This is my blog section. Here all new blog posts will be showed in reverse-chronological order. Just a fancy way to say newest-top.
At the left, you can view the categories, and on the right you can find the tags and Table of contents.
This is the multi-page printable view of this section. Click here to print.
This is my blog section. Here all new blog posts will be showed in reverse-chronological order. Just a fancy way to say newest-top.
At the left, you can view the categories, and on the right you can find the tags and Table of contents.
This category contains all Microsoft Azure Master Class pages..
In this module, we cover Azure: Infrastructure as Code (IaC) and DevOps. This module focuses more on development on Azure, with less emphasis on automation and IT management. While IaC and DevOps might seem less exciting at first, they are essential for modern cloud-based application development and operations, helping streamline deployments, ensure consistency, and integrate continuous delivery pipelines.
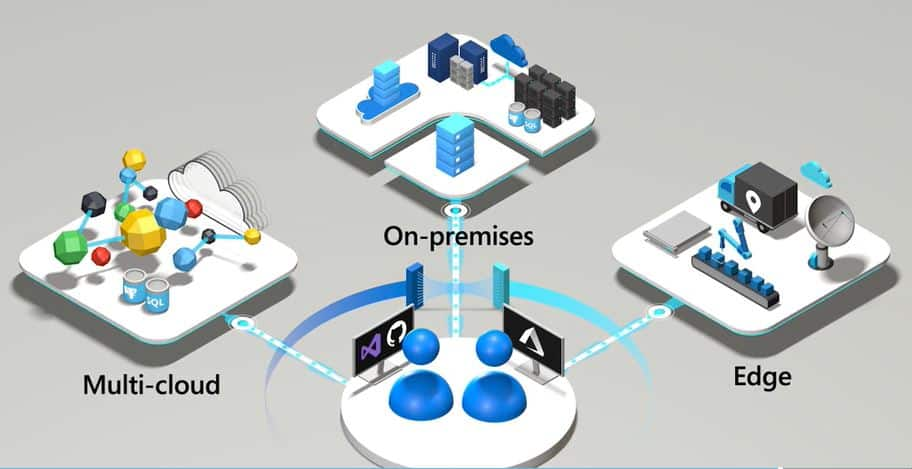
There are multiple environments to manage Azure and its resources:
Each of these environments offers different levels of flexibility and control, with the portal being more user-friendly for beginners, and PowerShell/CLI being preferred for automation and advanced scripting. We IT guys don’t want to eternally click around to do some basic tasks, don’t we?
The Azure Portal is the home of your Azure environment and is the most used tool to manage Azure. From the start, you always use it and in case of emergencies, it is the easiest, fastest and most reliable tool for some troubleshooting.
You visit the Azure Portal by going to: https://portal.azure.com
Azure Powershell is a Powershell module built on the Azure Resource Manager and can be used to manage and deploy resources into Azure. When deploying multiple instances, it fastly becomes a faster and less time consuming tool than the Azure Portal.
In practice i sometimes stumbled on some errors with Virtual Machines freezing in the Azure Portal and having to restart them with Powershell. It therefore gives you access to a deeper level of your Azure Environment.
You can access Azure Powershell by installing the Powershell module or by going to https://shell.azure.com
Azure CLI is the deepest level of managing Azure and is based on Bash. This enables Linux and Unix based developers to also benefit from Azure without having to learn a complete new set of commands.
You can access Azure CLI by installing the Azure CLI module or by going to https://shell.azure.com
Azure PowerShell and Azure CLI are both needed in Azure to manage all services. Some tasks can be performed in both shells, but they will be triggered by different commands.
Besides the way of triggering, there are a few other important differences between Azure PowerShell and Azure CLI:
It comes mostly to personal preference what you will use more often.
Automation can be summarized in two categories:
Declarative means that we proactively tell systems, “Meet this requirement,” for example, by specifying that they should contain at least certain versions, packages, dependencies, etc.
Examples of declarative automation are:
Imperative means that we perform an occasional “Do this” action on a system, such as installing a specific package, applying an update, or making a change using a script that we run one time.
Examples of imperative automation are:
Azure Resource Graph is a database designed to retrieve advanced information about resources. It allows you to efficiently fetch data from multiple subscriptions and resources. The data retrieval from Azure Resource Graph is done using the query language Kusto Query Language (KQL).
Azure Resource Graph is purely a central point for data retrieval, and it does not allow you to make changes to resources. Additionally, Azure Resource Graph is a service that does not require management and is included by default in Azure, similar to Azure Resource Manager (ARM), the Azure Portal, and other core services.
Azure Resource Graph also provides a tool for visual data retrieval, called Azure Resource Graph Explorer. This tool allows you to view and fetch live data using Kusto (KQL) and includes a query builder to write queries without needing extensive technical knowledge.
Check out the Resource Graph Explorer tool here: https://portal.azure.com/#view/HubsExtension/ArgQueryBlade
Under the hood, resource deployment in Azure is managed by the Azure Resource Manager (ARM) service using the JSON programming language. In almost every blade in the Azure Portal, you can access the JSON view or the option to export a template, where you can view and export the complete configuration of a resource in JSON. This allows you to quickly deploy identical configurations across multiple subscriptions.
Bicep is an alternative language for deploying Azure resources. It is a declarative language that communicates directly with Azure Resource Manager (ARM) but with much simpler syntax. When deploying resources, the administrator provides a Bicep template to ARM, which then translates the instructions into JSON and executes them.
Here’s an example to show the difference in syntax between Bicep and JSON when implementing the same resources:

If you haven’t already installed Visual Studio Code (VS Code), follow these steps:
To make it easier to work with Bicep, you can install the Bicep extension for VS Code. This way VS Code will know exactly what you are working on and can auto complete your scripts.
This extension provides syntax highlighting, IntelliSense, and support for deploying Bicep templates directly from VS Code.
To deploy directly to Azure from VS Code, you’ll need the Azure CLI. If you don’t already have it installed, you can install it by following the instructions here.
Once installed, log in to Azure using the following command in your terminal:
az loginExample Bicep template:
resource myStorageAccount 'Microsoft.Storage/storageAccounts@2021-04-01' = {
  name: 'mystorageaccount001'
  location: 'East US'
  sku: {
    name: 'Standard_LRS'
  }
  kind: 'StorageV2'
}
In this template:
To deploy the Bicep template directly from VS Code, you can use the Azure CLI integrated into the Terminal in VS Code.
az deployment group create --resource-group *YourResourceGroupName* --template-file storage-account.bicep*YourResourceGroupName* with the name of the Azure Resource Group you want to deploy to.This command will deploy the Bicep template defined in storage-account.bicep to your Azure resource group.
Once the deployment command is successfully executed, we can verify the deployment in the Azure Portal:
Alternatively, we can check the deployment using the Azure CLI:
az storage account show --name mystorageaccount001 --resource-group *YourResourceGroupName*If we need to make changes to your template (e.g., changing the SKU or location), simply edit the Bicep file and redeploy it using the same command:
az deployment group create --resource-group <YourResourceGroupName> --template-file storage-account.bicepAzure will handle the update automatically.
If you ever need to generate a traditional ARM template (JSON), we can compile the Bicep file to JSON using the following command in VS Code’s terminal:
bicep build storage-account.bicepThis will generate a storage-account.json file containing the equivalent ARM template in JSON format.
That’s it! You we have a workflow for writing Bicep templates in Visual Studio Code and deploying them directly to Azure using the Azure CLI. The Bicep extension in VS Code makes it easier to manage your Azure resources with a simplified syntax compared to traditional JSON-based ARM templates.
Terraform is an open-source infrastructure as code (IaC) tool created by HashiCorp. It allows users to define, provision, and manage cloud infrastructure using a declarative configuration language (HCL - HashiCorp Configuration Language).
With Terraform, you can manage infrastructure across multiple cloud providers (like Azure, AWS, Google Cloud, etc.) and services by writing simple code files. This eliminates the need for manual configuration, automating the setup, updating, and scaling of infrastructure in a consistent and repeatable manner. This has as an advantage that the formatting is the same across all cloud platforms.
If you haven’t already installed Visual Studio Code (VS Code), download and install it from the official website: https://code.visualstudio.com/.
To make it easier to work with Terraform in VS Code, you can install the Terraform extension. This extension provides syntax highlighting, IntelliSense, and other features to help you write Terraform code.
If you don’t already have Terraform installed, follow these steps to install it:
terraform --versionThis should return the installed version of Terraform.
You will also need the Azure CLI installed to interact with Azure. Follow the instructions to install the Azure CLI from the official documentation: https://docs.microsoft.com/en-us/cli/azure/install-azure-cli.
Once installed, log in to Azure by running:
az loginNow, let’s create a simple Terraform configuration that provisions an Azure Storage Account.
# Configure the Azure provider
provider "azurerm" {
  features {}
}

# Create a Resource Group
resource "azurerm_resource_group" "example" {
  name     = "example-resources"
  location = "East US"
}

# Create a Storage Account
resource "azurerm_storage_account" "example" {
  name                     = "examplestorageacc"
  resource_group_name       = azurerm_resource_group.example.name
  location                 = azurerm_resource_group.example.location
  account_tier               = "Standard"
  account_replication_type = "LRS"
}azurerm).example-resources in the East US region.examplestorageacc within the resource group.Before deploying your resources, you need to initialize Terraform. Initialization downloads the necessary provider plugins and sets up your working directory.
terraform initTerraform will download the required provider and prepare your environment for deployment.
Once the configuration is initialized, you can run a terraform plan to preview the actions Terraform will take based on your configuration. This is a safe way to ensure everything is correct before making changes.
Run the following command in the terminal:
terraform planThis will display a list of actions Terraform will take to provision the resources.
Once you’re happy with the plan, you can apply the configuration to deploy the resources to Azure.
terraform applyyes to confirm.Terraform will now deploy the resources defined in your main.tf file to Azure. Once the process is complete, you will see output confirming that the resources have been created.
Once the Terraform apply process completes, you can verify the deployment in the Azure Portal:
If you need to make changes (e.g., update the account tier of the storage account), simply edit the main.tf file, then run:
terraform planThis will show you the changes Terraform will make. If everything looks good, run:
terraform applyIf you no longer need the resources and want to clean them up, you can run the following command to destroy the resources created by Terraform:
terraform destroyTerraform will ask you to confirm, type yes to proceed, and it will remove the resources from Azure.
You have now set up a complete workflow to write Terraform configurations in Visual Studio Code, and deploy resources to Azbure using the Azure CLI. Terraform is a powerful tool that simplifies infrastructure management, and with VS Code’s Terraform extension, you have a streamlined and productive environment to develop and deploy infrastructure as code.
Git is an open-source version control system used to manage different versions of projects and take periodic snapshots. This allows you to, for example, start from a specific version during debugging and then make changes (or “break” the code) without losing the original state.
Additionally, Git enables merging code with other versions. Think of it as a form of collaboration similar to working in Word, where every minute represents a “save” action. With Git, you can return to any version from any minute, but applied to code instead of a document.
GitHub is a public or private repository service from Microsoft for storing code and collaborating with multiple DevOps engineers or programmers on a project involving code. It works by allowing developers to work locally on their machines, and then click “push changes,” which essentially acts as a save-to-server option.
GitHub can be used in combination with Git to get the best of both worlds, allowing developers to save changes via the command line while benefiting from version control and collaboration features provided by GitHub.
While this module is not my primary focus, it contains really cool stuff for automation purposes. When done properly it can save a ton of time but also helps secure and unifies your environments. Humans can make mistakes, but when having a correct template, the number of errors will drop significantly.
However, using those tools is not a must and there is no “wrong” way of how you perform tasks in Azure. Only one can be faster or slower than the other based on multiple factors.
Thank you for reading this module, and the rest of the master class. Unfoetunately, this is the last page.
To go back to the navigation page: https://justinverstijnen.nl/microsoft-azure-master-class-navigation/
You have reached the end of the page. You can navigate through other blog posts as well, share this post on X, LinkedIn and Reddit or return to the blog posts collection page. Thank you for visiting this post.
If you think something is wrong with this post or you want to know more, you can send me a message to one of my social profiles at: https://justinverstijnen.nl/about/
If you find this page and blog very useful and you want to leave a donation, you can use the button below to buy me a beer. Hosting and maintaining a website takes a lot of time and money. Thank you in advance and cheers :)
The terms and conditions apply to this post.
In this module, i want you to understand all the possibilities of Monitoring and some Security features of Microsoft Azure. We know that Security these days is a very hot topic and monitoring is not really unimportant either. Very valuable information for you, i hope :).
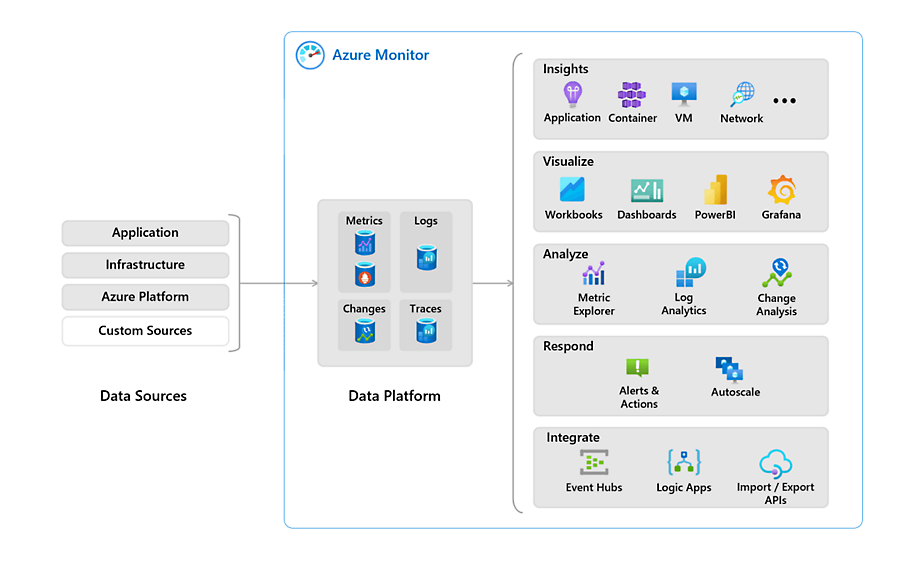
Azure Monitor is a service in Azure that enables monitoring. With it, you can monitor various resources and quickly identify potential issues during an outage. Azure Monitor supports almost all resources in Azure and can, for example, retrieve event logs and metrics from the guest operating system of virtual machines.
The Azure Monitor Agent is an agent that can run on Windows- and Linux-based VMs in Azure. These agents operate as a service to send information from the VM to Azure Log Analytics.
This information can include:
The agent is automatically installed as a VM extension when a Data Collection Rule is created and linked to the VM. This means customers do not need to install anything manually.
Previously, a manually installable agent was used for this purpose, which had several names:
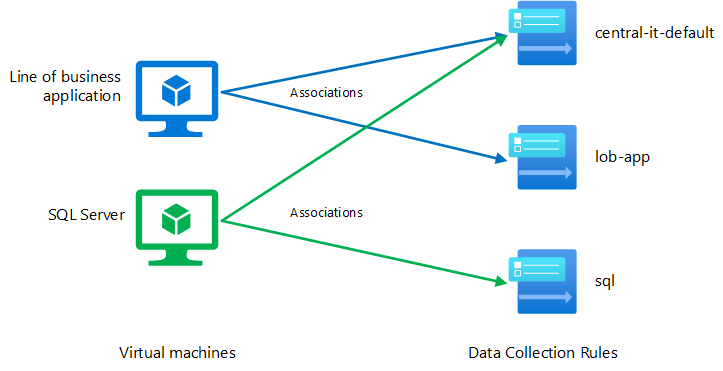
Data Collection Rules are centralized rules that allow you to collect the same data from one or multiple resources at once. When you add a VM to its first Data Collection Rule, the Azure Monitor Agent is automatically installed.
Previously, diagnostic settings had to be configured per resource. With Data Collection Rules, you can enable this for, for example, 100 VMs at once or even enforce it using Azure Policy.
In a Data Collection Rule, you define:
Azure Monitor allows you to create a custom dashboard with key information and shortcuts. Such a dashboard looks like this:
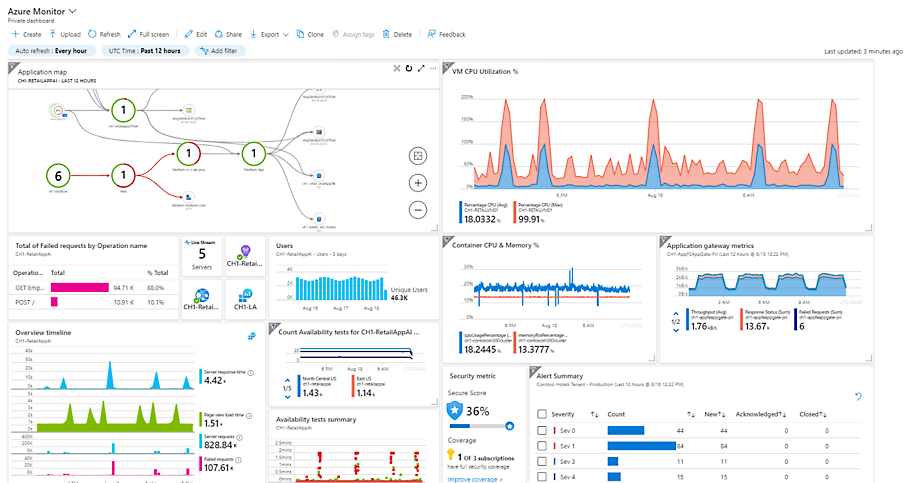
This dashboard gets information from various places, like Virtual Machine insights, Guest OS insights, Azure Resource Graph and Log Analytics workspaces.
In almost every resource in Azure, you can view resource-specific insights. This is information relevant to the selected resource and can be found under "Monitoring" and then “Insights”.
However, this information is predefined and cannot be customized. Additionally, it only covers a small portion of the entire application you want to monitor.
Azure Workbooks are flexible overviews in Azure. You can fully customize what you want to see for a specific service and even add tabs. This option is more advanced than an Azure Dashboard. The information displayed in an Azure Workbook comes mostly from a Log Analytics workspace, but it is possible to get information from Azure Resource Graph too.
An workbook can look like this:
The advantages of an Azure Workbook are that every button, every column and every type of conditional formatting is customizable. However, it can quickly become very complex and it requires a bit of knowledge of Kusto Query Language (KQL) to make it totally yours. I speak out of experience here.
What really helped me were the free Azure Workbook templates from Microsoft themselves. They have created a whole Github repository full of templates which you can import in your own environment and use some modules from. You can find them in the link below:
https://github.com/microsoft/Application-Insights-Workbooks/tree/master/Workbooks
I also did a guide to Azure Workbooks and how to create your own custom workbook a while ago: https://justinverstijnen.nl/create-custom-azure-workbooks-for-detailed-monitoring/
Log Analytics is an Azure service for centrally storing logs and metrics. It acts as a central database where you can link all resources of a solution or application. Azure Dashboards and Workbooks, in turn, retrieve their information from Log Analytics. By sending data to a Log Analytics workspace, you can retrieve it and build reports. Data from Log Analytics can be queried using the Kusto Query Language (KQL).
Log Analytics data is organized within a Workspace, which is the actual Log Analytics resource. Within this workspace, you can choose to store all information for a specific application, as data retention settings are defined at the workspace level.
It is very important to watch the data retention of the workspace. The more data you store, the more expensive it will get.
In Azure, you can send logs to Log Analytics from almost every resource under “Diagnostics Settings”:
And then “+ Add diagnostic setting”:
While Log Analytics is a great service of Azure, it can be very expensive for small environments. There are two alternatives to Log Analytics:
Log Analytics can be of services for some business and technical requirements:
Every came in the situation that something has changed but you don’t know what exactly, who did the change and when?
The Azure Activity logs solve this problem and can be displayed on every level in Azure. Here is an example of the Activity logs on Resource Group-level:
Let’s say we have an storage account named sa-jv-amc10 and suddenly, the application doesn’t have access to the storage account anymore, starting like 5 minutes ago. You can fire up the activity log to search for possible changes.
And there it is, like 5 minutes ago someone disabled public internet access to the storage account and this caused the outage.
It is possible to create specific alerts in Azure based on collected data. For example, you can trigger an alert when a virtual machine exceeds a certain load threshold or when there are multiple failed login attempts.
Alerts in Azure may seem complex, but they are designed to be scalable. They consist of the following components:
The available action types for Action Groups include:
An overview of how this works looks like this:
Some basic principles in Microsoft Azure are:
The Zero Trust model is also considered as a must-have security pillar today. You can read more about the zero trust model here: https://justinverstijnen.nl/the-zero-trust-model
Solutions that help facilitate Zero Trust in Microsoft Azure include:
Microsoft Defender for Cloud is a security service for Azure, AWS, Google Cloud, and Arc resources. It provides security recommendations in the Azure Portal, such as identifying open ports that should be closed, enabling backups, and more.
The main objectives of Defender for Cloud are:
Microsoft Defender for Cloud also provides a dashboard with Secure Score, which evaluates your entire environment. Not just Azure, but also AWS, Google Cloud, and Azure Arc (on-premises) resources.
Defender for Cloud is partially free (Basic tier), but it also offers a paid version with advanced features and resource-specific plans, such as protection for SQL servers, Storage accounts, Windows Server VMs and more.
In addition to its standard recommendations, Defender for Cloud allows you to apply global security standards to your Azure subscriptions. This provides additional recommendations to ensure compliance with industry standards, such as:
Azure/Microsoft Sentinel is an advanced Security Information & Event Management (SIEM) and Security Orchestrated Automation and Response (SOAR) solution. It provides a centralized platform for investigating security events. Sentinel integrates with many Microsoft services as well as third-party applications and solutions.

Azure Sentinel stores its data in Log Analytics and allows the creation of custom Workbooks for visualization. Additionally, it supports Playbooks, which enable automated responses to security incidents based on incoming data.
Playbooks are collections of procedures that are executed from Azure Sentinel in response to a specific alert or incident. These workflows are built on top of Azure Logic Apps, allowing automated actions to be triggered based on security events.
In addition to manually investigating security incidents, Microsoft Sentinel uses AI-driven learning to continuously improve its threat detection and response. If a specific alert is resolved multiple times using the same Playbook, Sentinel will recognize this pattern and automatically trigger the Playbook in future occurrences.
Managed Identities in Microsoft Azure are the next generation of service accounts. They represent a resource in Azure and can be assigned Entra ID roles. They are stored in Entra ID as well.
The main advantage is that they do not use passwords or secrets that need to be securely stored, reducing the risk of leaks. Additionally, each resource can be granted only the necessary permissions following the principle of least privilege.
Mostly you use a System-assigned MI when you must allow access to for example a storage account for one resource, but if you need to have multiple resources needing access to this storage account you use a User-asssigned MI. This to have one Managed Identity and minimize administrative effort.
Azure Key Vault is a resource in Microsoft Azure where you can store:
It offers the ability to rotate keys, ensuring they are periodically changed to enhance security.
Azure services can be linked to the Key Vault to specify that the secrets are stored there. This allows you to centrally manage the lifecycle of these resources and define how frequently keys should be rotated, ensuring better security control across your environment.
It is also possible to leverage Azure Policy for some specific enforcements and to ensure resources for example use encryption with the encryption key stored in Azure Key Vault.
With Monitoring and Security in Azure, there almost is no limit. Workbooks enables you to create really interactive overviews of the health of your environment/application and be alerted when anything is wrong. With security and auditing tools, Microsoft has everything to embrace the zero trust model and having the bar very low to start and use them today.
Thank you for reading this page.
To go back to the navigation page: https://justinverstijnen.nl/microsoft-azure-master-class-navigation/
You have reached the end of the page. You can navigate through other blog posts as well, share this post on X, LinkedIn and Reddit or return to the blog posts collection page. Thank you for visiting this post.
If you think something is wrong with this post or you want to know more, you can send me a message to one of my social profiles at: https://justinverstijnen.nl/about/
If you find this page and blog very useful and you want to leave a donation, you can use the button below to buy me a beer. Hosting and maintaining a website takes a lot of time and money. Thank you in advance and cheers :)
The terms and conditions apply to this post.
In this we will explore various possibilities of Databases and AI in Microsoft Azure.
Data in general can be stored in different ways for various purposes.
In Microsoft Azure, there are different ways to deploy a database where each type has it’s own charasteristics and requirements:
We will take a further look into each type of database and the features there.
These SQL solutions are all based on the Microsoft SQL protocol. This means they all have support to replace the installation based SQL server and talk with the same protocol. However, note that some applications may not support all of those options.
It is possible to build an SQL database within a virtual machine. This provides a high level of compatibility, but as a customer, you are responsible for all aspects from the operating system onwards, including security, availability, backups, disaster recovery, updates, and performance tuning. It is possible to install an extension for the virtual machine, which allows Azure to monitor, back up, patch, and manage the SQL Server within the VM.
This option has the most supported 3rd party solutions because it is not very different from an on-premises server with SQL installed.
In Microsoft Azure, you can create a serverless SQL Server, where Microsoft manages the host, and you, as the customer, only manage the database itself. This service can be deployed in four options:
After creating a Azure SQL server with an Database on it, you can connect with your applications to the database. Table level changes has to be done through a management computer with the SQL Management Tools installed.
This option has the least generic support with using 3rd party applications, but this has increased substantially.
With Azure SQL Managed Instance, Microsoft provides a managed virtual machine, but you do not need to manage the VM itself. Your only concern is the data within the database and its data flow. A managed instance also comes with a dedicated IP address in your virtual network.
You can manage the database on table-level with the Microsoft SQL Management Tools
Azure SQL Hyperscale is a Microsoft Azure service that provides an SQL Server with high performance and scalability, designed for demanding workloads requiring rapid scaling. This option is comparable with Azure SQL but at a higher cost and a better SLA.
Azure also offers options for open-source database software. These are the following solutions, but hosted and managed by Microsoft:
These are mostly for custom applications and Linux based solutions.
Azure Cosmos DB is a cloud-focused database solution designed for global distribution. It supports multiple regions with replication options that you can configure according to your needs. It also is a NoSQL database and supports multiple Database models which may not be supported on the other options.
Some charasteristics about Azure Cosmos DB:
All databases can be encrypted using either a Microsoft-managed key or a customer-managed key.
By default, Microsoft-managed keys provide encryption for databases without requiring user intervention. However, customer-managed keys (CMK) allow organizations to have full control over encryption, offering additional security and compliance benefits.
The primary use-case of customer managed keys is to let the customer have full control over the key lifecycle. This means you can adjust the encryption standard and rotation to your needs. Some companies require this or are bound within some regulations that require some of these features.
A summary of the advantages of Customer-managed keys
This level of control is particularly useful for finance, healthcare, and government sectors, where data privacy and regulatory compliance are critical.
Azure offers Azure Synapse as a data warehouse and analytics solution. It is a fully managed service that enables big data processing, data integration, and real-time analytics. Azure Synapse allows users to query and analyze large datasets using SQL, Spark, and built-in AI capabilities. It integrates seamlessly with Azure Data Lake, Power BI, and Azure Machine Learning for advanced analytics and visualization. The platform supports both on-demand and provisioned compute resources, optimizing performance and cost. With built-in security, role-based access control, and encryption, Azure Synapse ensures data privacy and compliance.
A cool practice example of Azure Synapse is as follows:
A global e-commerce company wants to analyze customer behavior, sales trends, and supply chain efficiency. Here comes Azure Synapse into play and can solve the following challenges:
The practical outcome is that all live data from the databases are ingested into human-readable dashboards with Power BI to analyze and find trends for the future.
In 2025, you must heard of the term Artificial Intelligence (AI) and Azure has not missed the boat.
AI stands for Artificial Intelligence, a term used to describe the ability of computers to make predictions, calculations, and assessments, mimicking human thought processes. Machine Learning is a subset of AI, where the system learns from input data to improve its performance over time.
Azure offers Artificial Intelligence services in multiple areas, including the following:
Anomaly Detection is a term in AI that can detect inconsistencies in data or find unusual patterns, which may indicate fraud or other causes.
Different actions can be performed on the “anomalies” that this service can detect, such as sending a notification or executing an action/script to resolve the issue.
Computer Vision is a part of AI that can perform visual processing. Microsoft, for example, has the Seeing AI app, which can inform blind or visually impaired people about things around them.
It can perform tasks like:
Natural Language Processing is the part of Azure AI that can understand and recognize spoken and written language. This can be used for the following applications:
A great example of an AI application combined with the Natural Language Processing feature is Starship Commander. This is a VR game set in a futuristic world. The game uses NLP to provide players with an interactive experience and to respond to in-game systems. Examples include:
Knowledge mining is a term used to describe the process of extracting information from large volumes of data and unstructured data to build a searchable knowledge base.
Azure offers a service called Azure Cognitive Search. This solution includes tools to build an index, which can be used for internal use or made searchable through a secure internet-facing server.
With this approach, Azure can process images, extract content, or retrieve information from documents. A great example of this concept is Microsoft 365 Copilot.
Microsoft has established several guidelines and recommendations for implementing and handling AI solutions to ensure the are ethically responsible:
Machine Learning is a term used to describe software that learns from the data it receives. It is considered the foundation of most AI solutions. To build an intelligent solution, Machine Learning is often the starting point, as it allows the system to be trained with data and make predictions or decisions.
Azure has a dedicated management tool for Machine Learning, available at https://ml.azure.com.
In Machine Learning Studio, you need to create a workspace. There are four types of compute resources available for your workspace:
In Azure, the possibilities are endless in terms of Databases and AI are almost limitless. I hope i gave a good understanding of all the services and features possible.
Thank you for reading this page.
To go back to the navigation page: https://justinverstijnen.nl/microsoft-azure-master-class-navigation/
You have reached the end of the page. You can navigate through other blog posts as well, share this post on X, LinkedIn and Reddit or return to the blog posts collection page. Thank you for visiting this post.
If you think something is wrong with this post or you want to know more, you can send me a message to one of my social profiles at: https://justinverstijnen.nl/about/
If you find this page and blog very useful and you want to leave a donation, you can use the button below to buy me a beer. Hosting and maintaining a website takes a lot of time and money. Thank you in advance and cheers :)
The terms and conditions apply to this post.
This module is about application services in Microsoft Azure. It mainly focuses on containers and containerized solutions but also explores other serverless solutions. These are solutions where, as a customer or consumer of Microsoft Azure, you do not need to manage a server.
We can categorize servers/VMs into two categories: Stateful and Stateless:
Stateful: Stateful servers are uniquely configured and have a specific role, for example:
Stateless: Stateless servers do not have a unique role and can be easily replicated, for example:
Containers represent a new generation of virtualization. With Hyper-V, Azure, and VMware, we virtualize hardware, but with Containers, we virtualize the operating system. The goal is to quickly and efficiently host scalable applications.
Some key features and benefits of using containers are:
Microsoft Azure offers the following container solutions:
The configuration of containers in blocks is structured as follows:
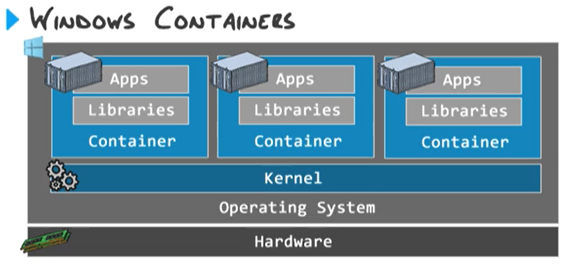
The main advantage of containers over virtual machines is that you don’t need to configure a separate operating system, network configuration, and instance settings for each deployment. All containers on the container host share the same kernel.
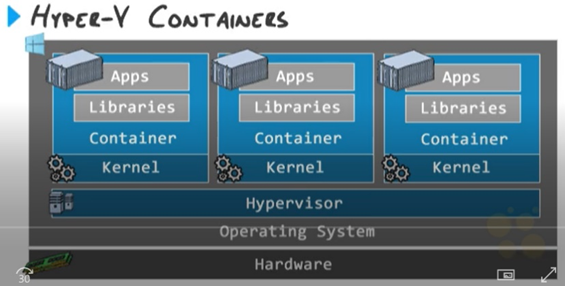
Instead of creating normal, software based containers it is also possible to create isolated containers. This also virtualizes the hardware. This is an option used often when on shared environments or data-protected environments:
Docker is a container runtime solution that allows you to create and manage containers. This container solution can be managed via PowerShell and does not have a GUI, as it is purely a tool designed for technical professionals.

Azure Container Registry is a Microsoft Azure service that allows you to store Docker images that you have built for later use. Before this service existed, this was a standalone server role that needed to be installed.
Azure Container Registry ensures that images are stored with the following benefits:
A completely different approach to maintaining containers is that containers are based on the container host they run on.
With virtual machines, each VM installs updates individually, and every update needs to be installed separately on each VM. Containers, however, work differently. Instead of updating each container separately, you update the container host and then rebuild all containers. This ensures that your application is hosted with the latest features and security updates across all containers immediately.
Azure Container Instances (ACI) is the simplest Azure solution for running containers as a Platform-as-a-Service (PaaS) offering. With ACI, customers are not responsible for the infrastructure or operating system— only the container and how their application runs on ACI.
Azure Container Instances support both Windows and Linux, with Linux offering the most features.
Azure Kubernetes Service (AKS) is a managed service in Microsoft Azure designed to manage multiple containers efficiently. Often, a service consists of multiple containers to enhance resilience and scalability, using load balancers to distribute traffic. AKS offers a much more advanced solution compared to Azure Container Instances (ACI).
Kubernetes is an orchestration tool for managing multiple containers. It handles:
Kubernetes has become the industry standard for container management. With Azure Kubernetes Service (AKS), you get all the benefits of Kubernetes as a fully managed PaaS solution in Microsoft Azure, reducing the complexity of setting up and maintaining a Kubernetes cluster manually.
AKS is available in two pricing tiers in Microsoft Azure:
| Free (AKS Free) | Standard (AKS Standard) |
| The Kubernetes control plane is free, meaning you don’t pay for the management and orchestration services. | Includes an SLA-backed Kubernetes control plane for higher availability and reliability. |
| You only pay for the underlying virtual machines (VMs), storage, and networking used by your worker nodes. | Advanced security features, including Azure Defender for Kubernetes and private cluster options. |
| No Service Level Agreement (SLA) is provided for the uptime of the control plane. | Enhanced scalability and performance options. |
| Ideal for production workloads requiring enterprise-grade support and uptime guarantees. | |
| Price: Free | Price: $0.10 per cluster per hour + Pay as you go pricing for other resources |
In Azure Kubernetes Service (AKS), users can manage their Kubernetes clusters through two primary methods:
The key points for using the tools are:
The control plane of Kubernetes is the brain behind managing Kubernetes. The control plane is divided into four services:
For more information, check out this website: https://kubernetes.io/docs/concepts/overview/components/
The above services are managed by Microsoft Azure in Azure Kubernetes Services.
Kubernetes will distribute a workload across Nodes. These are virtual machines where the Pods, containing the containers, will run. The Node is a standalone environment that runs Docker for the actual deployment and building of the containers.
In the Pods, all containers run that host an application or a part of the application.
Azure Container Apps are microservices that are deployed in containers. This means that a large application is divided into containers, allowing each component to be scaled independently while also minimizing the impact on the overall application.
Some key points of Azure Container Apps are:
Azure Spring Apps is a Spring Cloud service built on top of Azure Kubernetes Service (AKS), providing a fully managed microservices framework for deploying and scaling Spring Boot applications.
However, it is a premium enterprise service, making it relatively expensive, as it is designed for large-scale enterprise-grade applications requiring high availability, security, and scalability.
Microsoft Azure originally started with App Services as a Platform-as-a-Service (PaaS) offering, and it has since grown into one of the many services available in Azure. Azure App Services primarily focus on running web applications without requiring customers to manage the underlying server infrastructure.
In Azure App Services, you can run the following types of applications:
Azure App Services are sold through an App Service Plan, which defines the quotas, functionality, and pricing of one or more App Services.
The available App Service Plans summarized:
| App Service Plan | Scaling Options | Features | Pricing |
|---|---|---|---|
| Free (F1) | None | N/A | Free |
| Shared (D1) | None | Custom Domains | Low |
| Basic (B1; B2; B3) | Manual | Hybrid Connections, Custom Domains | Moderate |
| Standard (S1; S2; S3) | Auto-Scaling | Custom Domains, VNET integration, Custom Domains, SSL | Higher |
| Premium (P1V3; P2V3; P3V3) | Auto-Scaling | Custom Domains, VNET integration, Custom Domains, SSL | Premium |
| Isolated (I1; I2; I3 - ASE) | Auto-Scaling | Custom Domains, VNET integration, Custom Domains, SSL | Enterprise-Level |
As seen in the table above, for a production environment, it is highly recommended to choose at least the Standard Plan due to its advanced functionality.
Deployment slots in App Services are intended to create a test/acceptance environment within your App Service Plan. This allows you to roll out a new version of the application to this instance without impacting the production environment. It is also possible, using a “Virtual-IP,” to swap the IP address of the production application and the test/acceptance application to test the app in a real-world scenario.
Azure Functions are scripts in Azure that can be executed based on a trigger/event or according to a schedule (e.g., every 5/15 minutes, daily, etc.). These functions are serverless and utilize Microsoft Azure’s infrastructure resources.
In practice, Azure Functions can perform actions such as:
It is possible to run Azure Functions as part of an App Service Plan. However, the default option is based on consumption, meaning you only pay for the resources needed to run the function.
The scripting languages supported by Azure Functions are:
Azure Logic Apps are similar to Azure Functions, but instead of being based on code/scripts, they use a graphical interface. Like Azure Functions, they operate with triggers that execute an action.
Logic Apps function as a low-code/no-code solution, similar to Power Automate, which itself is based on Azure Logic Apps. Additionally, Logic Apps offer the ability to configure connectors with external applications and services.
Examples of what you can do with Logic Apps:
Azure Static Web Apps is a service for static, pre-defined web pages that are scalable but require minimal functionality. This is also the cheapest way to host a website in Microsoft Azure, with a paid option of €9 per month and a free option available for hobbyists.
This service does have limitations, as websites must be pre-defined. This means that the website cannot perform server-side calculations. Static Web Apps are therefore limited to the following technologies:
However, it is possible to perform server-side calculations using Azure Functions, which can be added as an extension to a Static Web App.
Azure Event Grid is a fully managed event routing service that enables event-driven architectures by delivering events from various Azure services services such as AKS, ACI, App Services, Blobs and custom sources to event handlers or subscribers. It uses a publish-subscribe model, ensuring reliable, scalable, and real-time event delivery.
Some use cases of Azure Event Grid are:
This chapter is very based on microservices and automation, this all with serverless applications. This minimizes attack surface and so increases security, availability and reliability of your services. For custom applications this works great.
However, some legacy systems and applications that require Windows Servers to run cannot be run on these serverless applications.
To go back to the navigation page: https://justinverstijnen.nl/microsoft-azure-master-class-navigation/
You have reached the end of the page. You can navigate through other blog posts as well, share this post on X, LinkedIn and Reddit or return to the blog posts collection page. Thank you for visiting this post.
If you think something is wrong with this post or you want to know more, you can send me a message to one of my social profiles at: https://justinverstijnen.nl/about/
If you find this page and blog very useful and you want to leave a donation, you can use the button below to buy me a beer. Hosting and maintaining a website takes a lot of time and money. Thank you in advance and cheers :)
The terms and conditions apply to this post.
This module explicitly covers virtual machines and virtual machines in combination with VMSS (Virtual Machine Scale Sets). Also we cover most of the VM family names, their breakdown, and advanced VM features.
Virtual Machines are one of the most commonly used services in Microsoft Azure. This is because a customizable virtual machine allows for nearly unlimited possibilities, and most software requires a real desktop environment for installation.
Technically, all virtual machines run on Microsoft’s hardware within Azure. A server that hosts one or more virtual machines is known as a Hypervisor. In on-premises environments, this could be Hyper-V, VMware, or VirtualBox.
With virtual machines, the system administrator or customer is responsible for everything within the VM. This makes it an IaaS (Infrastructure as a Service) solution. Microsoft ensures the VM runs properly from a technical standpoint, but the customer is responsible for everything from the VM’s operating system and beyond.
Azure can enable various extensions for virtual machines. These are small pieces of software installed as Windows Services within the VM to enhance integration with the Azure Backbone and the Azure Portal. When an extension is required for a specific function, Azure will automatically install it at the VM-bus level.
Below is a list of much used extensions which mosty will be installed automatically:
These extensions help optimize and automate VM management within Microsoft Azure.
Before choosing a VM size and family, we first want to do some research about the actual workload/tasks that the VM has to support. Compare this to driving a car, we have to buy tires that exactly fit the car and type of rims of your car and driving style.
In Azure, various virtual machine configurations are available to meet different requirements. The amount of resources a VM needs depends entirely on its workload. Below is a reference guide to help determine the appropriate resource allocation for different types of workloads:
These workloads require a high amount of memory (RAM):
For CPU-intensive workloads, it is crucial to choose the right number of vCPUs and the correct CPU generation.
Examples of CPU-dependent workloads:
Disk performance depends on capacity, IOPS/throughput, and latency. Workloads that require high disk performance include:
As you might have noticed, workloads are not limited to one type of resource but can rely on multiple types of resources. My advice from practice is to always allocate more than recommended specs and to use SSD based storage for real-world scenario’s.
Every application/software is different and always review the recommended specs of the software to comply.
In Azure, every type of virtual machine is classified into families and sizes. You have to select one of the available sizes that suit your needs. This is a difference when used to on-premises virtualization solutions like Hyper-V or VMware where you can exactly assign the resources you need. To exactly know which VM you must pick, it is good to know where to pick from.
The family of a virtual machine determines the type of use the virtual machine is intended for. There are millions of different workloads, each with many options. These families/editions are always indicated in CAPITAL letters.
The following virtual machine families/editions are available:
| Type | Ratio vCPU:RAM | Letters family | Purpose |
| General Purpose | 1:4 | B, D, DC, DS | Desktops/testing/web servers |
| Compute-optimized | 1:2 | F, FX | Data analytics/machine learning |
| Memory-optimized | 1:8 | E, M | (in memory) database servers |
| Storage-optimized | 1:8 | L | Big data storages and media rendering with high I/O requirements |
| Graphical-optimized | 1:4 | NC, ND, NV | 3D and AI/ML based applications |
| HPC-optimized | 1:4 | HB, HC, HX | Simulations and modeling |
The ratio of vCPU and RAM can be confusing, but it stands for; General purpose has 4 GBs of RAM for every vCPU and Memory-optimized has 8 GBs of RAM for every vCPU.
When a virtual machine family/edition has more than one letter (for example: DC), the second letter serves as a sub-family. This indicates that the virtual machine is designed for two purposes. The available second letters/sub-families stands for:
Each type of virtual machine in Azure is identified by a name, such as E8s_v5, D8_v2, F4s_v1. This name provides information about the configuration and composition of the virtual machine. Here are some more examples of names:
| VM size name |
| D4_v5 |
| E8s_v3 |
| EC8as_v5 |
| ND96amsr_A100_v4 |
This name derives from a convention that works like this:
| Family | # of vCPUs | Functions | Accelerator | Version |
So all features and details are included in the name of the VM, but if a machine does not have a certain feature, the part is not included. Lets break down some names:
| VM name | Family | # of vCPUs | Functions | Accelerator | Version |
| D4_v5 | D-series | 4 | N/A | N/A | 5 |
| E8s_v3 | E-series | 8 | Premium Storage | N/A | 3 |
| EC8as_v5 | E-series | 8 | Confidential Computing AMD Premium Storage | N/A | 5 |
| ND96amsr_A100_v4 | ND-series | 96 | AMD Memory upgrade Premium Storage RDMA capable | Nvidia A100 | 4 |
Virtual machines also have specific features, which are indicated in the VM name/size. If the feature is not mentioned, the virtual machine does not have that feature.
These features are always indicated in lowercase letters:
Certain types of virtual machines also include an accelerator, which is often a GPU. Azure has several different types of GPUs for different purposes:
The type of GPU is directly reflected in the virtual machine name, such as:
Each virtual machine edition has its own version number, which indicates the generation of physical hardware the virtual machine runs on. The best practice is to always select the highest version possible. Lower versions may be “throttled” to simulate lower speeds, and you’ll pay the same amount for a higher version number.
Versions available to this day are v1 to v6 in some families.
The biggest factor influencing performance is the CPU. The higher the version number, the faster and newer the CPU will be.
Azure is based on Hyper-V, where you also deal with Generation 1 and Generation 2 virtual machines. The differences are as follows:
Not all virtual machines support both generations. So, you should take this into account when designing your architecture. Also, because Windows 11 and up requires Secure Boot and TPM so Gen 2 is required for Windows 11.
A virtual machine on Azure is not a standalone resource; it is a collection of various resources that make the term “virtual machine” workable. It consists of:
On Azure, the basic support is available for:
Through the Azure Marketplace, it is possible to install a wide range of different operating systems, but it also offers ready-made solutions that are deployed with ARM templates. These ARM (Azure Resource Manager) templates help automate the deployment and configuration of complex environments, including both OS and application-level setups.
In Microsoft Azure, by default, your virtual machine is placed on a hypervisor. It is quite possible that virtual machines from completely different companies are running on the same hypervisor/physical server. By default, Azure does not allow these machines to connect with each other, as they are well isolated for security reasons.
However, there may be cases where a company, due to legal or regulatory requirements, cannot run virtual machines on the same server as another company. For such cases, Azure offers the following options:
Both options provide greater control and isolation for specific regulatory needs but come at a higher cost.
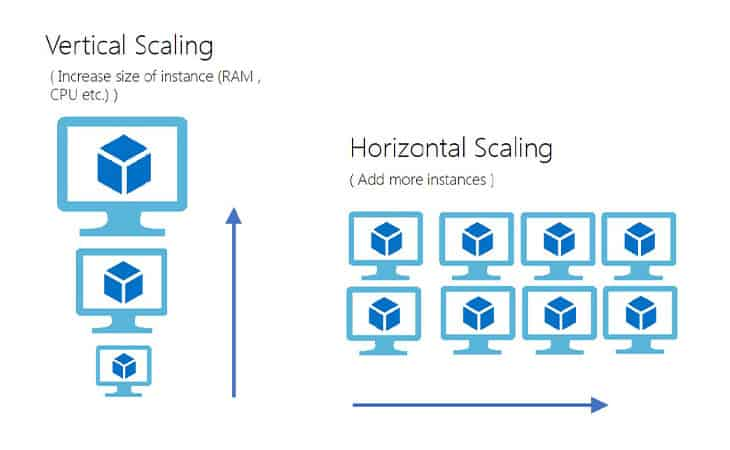
In Azure, you can create a Virtual Machine Scale Set. This means it is a set of identical virtual machines, all with 1 purpose like hosting a website on the web-tier. These sets of virtual machines can scale up or down according to the load of the machines. Scale Sets focusses primarily on achieving High Availability and saving costs.
The features of Virtual Machine Scale Sets are;
Let’s say, a webserver needs 100 clients to be overloaded and we have a set of 4 machines. When the number of client increases to 500, Azure can automatically roll out some machines for the extra load. When the clients goes down to 200, the extra machines are automatically deleted.
Virtual Machine Scale Sets are an example of “Horizontal Scaling” where more instances are added to complete the goal.
The configuration of VMSS can be done in the Azure Portal and starts with configuring a condition to scale up and down and defining the minimum, maximum and default amount of instances:
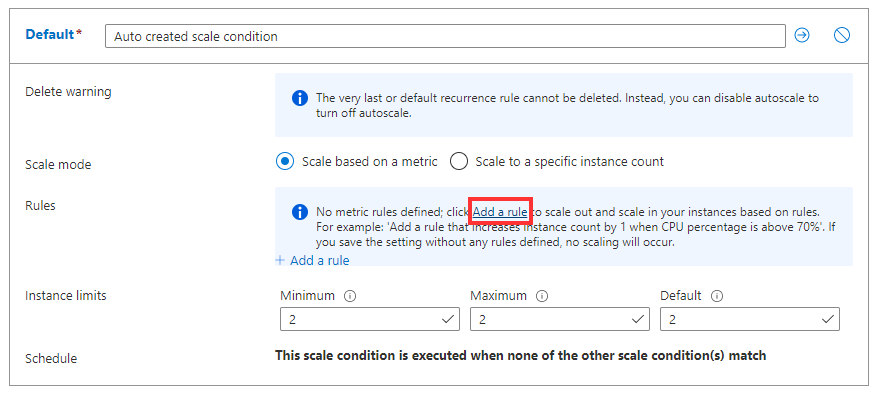
After the conditions are configured, we can define the rules where we plan when to scale up or down:
I am no expert in Scale Sets myself but i know the basic concept. If you want to learn more, refer to this guide: https://learn.microsoft.com/en-us/azure/virtual-machine-scale-sets/virtual-machine-scale-sets-autoscale-portal
What type of scenario’s can really profit from scale sets?
Microsoft automatically maintains virtual machines and hypervisors. It’s possible for Microsoft to put a VM into a “freeze” mode, where the virtual machine does not need to be turned off, but critical updates can still be applied, often without the customer noticing.
To protect your applications from these micro-outages, it’s recommended to place multiple virtual machines in an availability set. Here, you can define different update domains, ensuring that not all VMs are patched at the same time.
Azure Guest Patch Orchestration is an extension for the VM that automatically installs Windows updates on a schedule. This solution always works according to the “Availability-first” model, meaning it will not update all virtual machines in the same region simultaneously.
Azure Update Management Center is a solution within Azure that can update virtual machines directly from the Azure Portal. It allows for applying both Windows and Linux updates without logging into the VMs. Additionally, you can update a whole batch of Azure VMs and Azure ARC machines from a central system.
These solutions help manage updates while ensuring that applications and VMs on Azure stay up-to-date without risking downtime or performance issues.
To learn more about Azure Update Manager, check out my guide: https://justinverstijnen.nl/using-azure-update-manager-to-manage-updates-at-scale/
The Azure Compute Gallery is a service that allows you to create custom images for deployment. You can use this for Azure Virtual Desktop, virtual machines, and more.
You can create an image definition and associate multiple versions under it to ensure that you always keep an older version.
In the Azure Compute Gallery, you can also choose between LRS (Locally Redundant Storage) or ZRS (Zone-Redundant Storage) for data center redundancy.
In Azure, it is possible to use VMware as a service. In this setup, Azure provisions a VMware server for you on its own physical hardware. This server connects to Azure via ExpressRoute.
Normally, virtual machines in Azure run on Hyper-V, which is Microsoft’s own virtualization solution. However, with this service, you can create your own VMware host or even a cluster of hosts. Additionally, these VMware hosts can be connected to an on-premises vCenter server. This allows you to integrate your existing VMware environment with Azure’s infrastructure.
Azure Arc is a service that allows you to add servers outside of Azure as if they were part of Azure. This means you can integrate servers from AWS, Google Cloud, other public clouds, or on-premises servers to be managed in Azure.
Servers in other clouds are added to Azure Arc by generation a installation package in the Azure Portal and installing this package on the target server outside of Azure.
Additionally, Azure Arc enables you to leverage other Azure benefits on non-Azure servers, such as:
This allows you to have consistent management, monitoring, and security policies across your entire infrastructure, regardless of where it is hosted.
Virtual Machines are the most important feature of cloud computing in general. Virtual Machines enable you to build possibly 95% of all applications needed for an organization. It also gives great flexibility but not profit that much of the cloud as a whole. Remember, there is no such “cloud”. Its only others computer.
To go back to the navigation page: https://justinverstijnen.nl/microsoft-azure-master-class-navigation/
You have reached the end of the page. You can navigate through other blog posts as well, share this post on X, LinkedIn and Reddit or return to the blog posts collection page. Thank you for visiting this post.
If you think something is wrong with this post or you want to know more, you can send me a message to one of my social profiles at: https://justinverstijnen.nl/about/
If you find this page and blog very useful and you want to leave a donation, you can use the button below to buy me a beer. Hosting and maintaining a website takes a lot of time and money. Thank you in advance and cheers :)
The terms and conditions apply to this post.
In Module 6, we will explore all the possibilities of Azure regarding networking, VPNs, load balancing methods, proxies, and gateways. This chapter also covers most the topics and solutions included in the AZ-700 exam, the Azure Networking certification.
Check out the AZ-700 Azure Networking Certification at: https://learn.microsoft.com/en-us/credentials/certifications/azure-network-engineer-associate/?practice-assessment-type=certification
A network is described as a group of devices who communicate with each other. In Microsoft Azure, we have to create and design networks for our resources to communicatie with each other. We only use TCP/IP networking, which works with IP addresses, DHCP, routing etcetera.
To keep things basic at the beginning, we have 2 types of networks:
On a network, we have traffic. Just like you have roads and highways with cars and trucks driving to their destination. A network is litteraly the same. Each device (city) is connected through a cable/wifi (road) and sends TCP/IP packages (cars/trucks) their destination addresses.
A virtual network in Azure is a private network within the Azure cloud. Within this network, you can deploy various services and extend an existing physical network into the cloud.
This Azure service does not require physical switches or routers. When creating a virtual network, you specify an address space, which defines the range of IP addresses available for subnet creation. An example of an address space would be: 10.0.0.0/16. This is the default setting when creating a virtual network in Microsoft Azure.
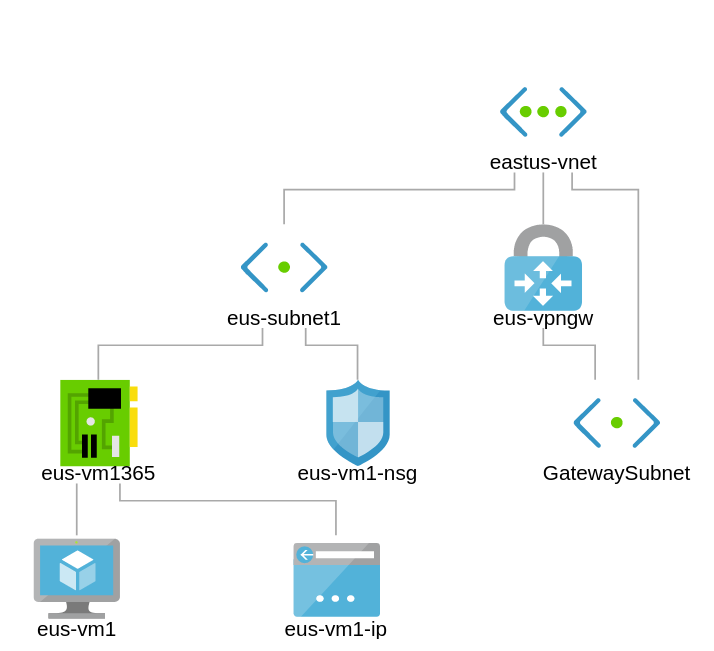
An example network in Microsoft Azure.
Azure Virtual Networks provide the following functionalities:
The most important features of virtual networks in Azure are:
x.x.x.0 → Network IDx.x.x.1 → Gateway servicex.x.x.2 → DNSx.x.x.3 → DNSx.x.x.255 → Broadcast addressBefore going ahead and building the network without thinking, we first want to design our network. We want to prevent some fundamental errors which can be a huge challenge later on.
fc00::/7fd00::/8 is the most commonly used part of this space.To keep things simple, we stick to IPv4 for this part.
Within an Azure Virtual Network, you can create subnets that use a smaller portion of the allocated IP address space. A subnet is defined as a part/segment of a broader network.
For example, if the Azure network uses the address space 172.16.0.0/16, it theoretically provides 65,535 available addresses. This space can be divided into segments, typically used to group specific services and apply security measures at the subnet level. Let’s share an example of a possible real-world scenario:
| Subnet name | Purpose subnet | Network space |
| GatewaySubnet | VPN connection to on premises | 172.16.0.0/27 (27 hosts) |
| Subnet-1 | Infrastructure | 172.16.1.0/24 (250 hosts) |
| Subnet-2 | Azure Virtual Desktop hosts | 172.16.2.0/24 (250 hosts) |
| Subnet-3 | Windows 365 hosts | 172.16.3.0/24 (250 hosts) |
| Subnet-4 | Database-servers | 172.16.4.0/24 (250 hosts) |
| Subnet-5 | Web-servers | 172.16.5.0/24 (250 hosts) |
| Subnet-6 | Management-servers | 172.16.6.0/24 (250 hosts) |
To learn more about basic subnetting, check out this page: https://www.freecodecamp.org/news/subnet-cheat-sheet-24-subnet-mask-30-26-27-29-and-other-ip-address-cidr-network-references/
Here an example of Microsoft which I found really usefull and well-architected:
In Azure we can configure the network interface cards of services like virtual machines and private endpoints. Here we can configure what IP address it has, which network it is connected to and what Network Security Group (more about that later) is assigned.
Note: Network configurations of virtual machines may never be done in the guest OS to prevent outage.
By default, Azure assigns IP addresses to virtual machines dynamically, but these addresses are reserved. In Azure, the term “Dynamic” actually means that the assigned IP address remains the same unless the resource is deleted or deallocated. It is also possible to configure a static IP address through the Azure Portal or via automation tools like PowerShell and Azure CLI. With a static IP address you can exactly define the address, and the portal will check if this is available prior to save the configuration.
All network interfaces in Azure support Accelerated Networking, which enhances network performance by bypassing the virtual switch on the hypervisor. This reduces latency, jitter, and CPU overhead, resulting in improved throughput and lower network latency. Compare this to SR-IOV when having great knowledge of Hyper-V or VMware.
How does this work?
In Microsoft Azure, we can connect multiple virtual networks to each other to enable connection between them by using one of the options below:
A virtual network is tied to a resource group or subscription. It is possible to connect it in two ways:
My advice is to to link multiple virtual networks together to build a hub-and-spoke network. This allows multiple spokes to be connected to each other and not having traffic to transition through multiple networks before reaching its destination.
In terms of costs, you only pay for inbound and outbound gigabits. Creating VNETs and Peerings is free. Additionally, the network plan must be well-structured, as there should be no overlapping IP addresses or ranges.
With VNET Peering, it is possible to connect to VNETs in other regions and subscriptions. When a connection is created in one direction, the other side will also be established.
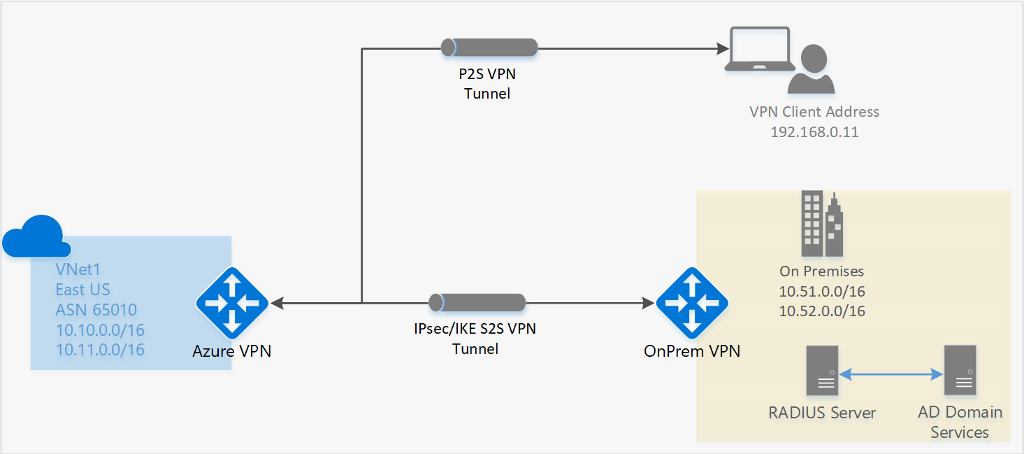
There are two ways to connect your entire Azure network to your on-premises, physical network:
A Site-to-Site VPN allows you to connect an on-premises network to a virtual network gateway in Azure via a router or firewall.
ExpressRoute is a private connection to an Azure datacenter. Microsoft establishes a dedicated connection based on MPLS, and you receive a router that connects to your Azure Virtual Network.
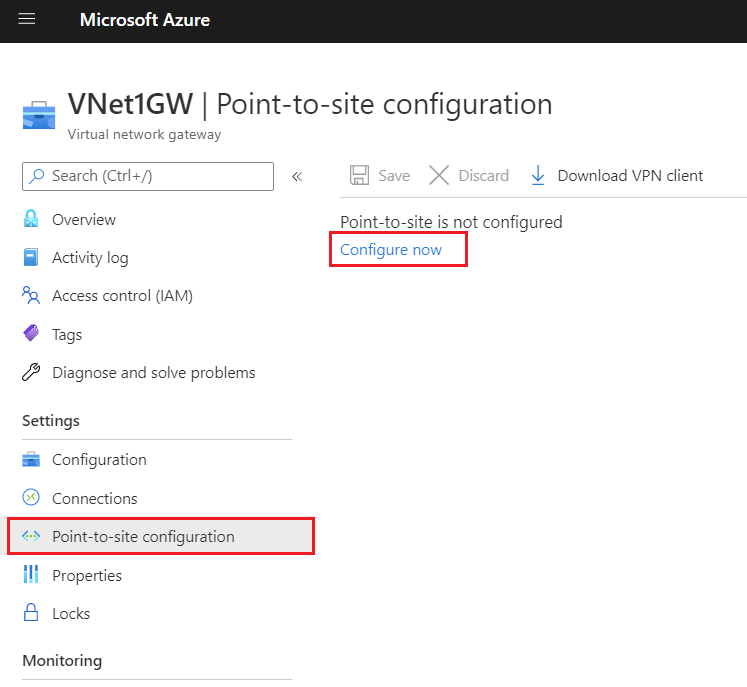
It is also possible to connect a single or multiple devices to a Virtual Network Gateway (VNG) in Microsoft Azure. This is often more cost-efficient than deploying a router and establishing a Site-to-Site (S2S) VPN connection.
VPN clients that support these protocols will work with VPN options in Microsoft Azure. For the best integration, Azure provides its own VPN client.
To configure a Point-to-Site VPN, navigate to “Settings” → “Point-to-site configuration” in the Virtual Network Gateway. From there, you can download a .zip file containing the required installation files and the correct VPN profile.
To keep the connection secure, authentication/login must be performed on the VPN connection. Azure Virtual Network Gateways (VNG) support the following authentication methods:
In Azure, there are two ways to secure a network:
Because we use Network Security Groups a lot, and Azure Firewall way less, we will cover that later and stick to Network Security Groups.
Network Security Groups can be created at two levels with the purpose of filtering incoming and outgoing network traffic. By default, all traffic within Azure virtual networks is allowed when it passes through the firewall of virtual servers. By applying Network Security Groups, traffic can be filtered. Here, inbound and outbound rules can be created to allow or block specific ports or protocols.
There are two options for applying NSGs:
If a resource does not have a Network Security Group or is not protected by Azure Firewall, all traffic is allowed by default, and the guest OS firewall (Windows Firewall or UFW for Linux) becomes the only point where security is enforced for incoming and outgoing traffic.
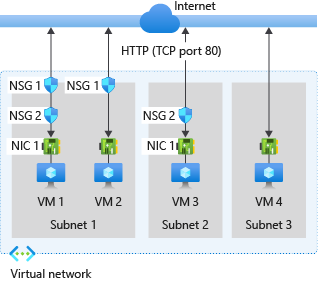
Network Security Groups (NSGs) can filter incoming traffic. This means traffic from the internet to the machine, such as RDP access, HTTP(s) access, or a specific application.
A virtual machine or endpoint can have two Network Security Groups applied: one at the subnet level and one at the network interface (NIC) level.
The following order of rules is applied:
Traffic must be allowed at all levels. If traffic is blocked at any point, it will be dropped, and so the connection will not work.
Network Security Groups (NSGs) can also filter outgoing traffic. This means traffic from the resource to the internet.
For outbound connections, the order of rule processing is reversed:
Traffic must be allowed at all levels. If traffic is blocked at any point, it will be dropped, and so the connection will not work.
Examples of using Network Security Groups (NSGs) can be:
Microsoft Azure Virtual Networks primarily operate at Layer 3 of the OSI model. The supported protocols in virtual networks are:
The following protocols are blocked by Microsoft in virtual networks:
The reason for these restrictions is that all networking capabilities in Azure are virtualized and based on Software Defined Networking (SDN). This means there are no physical wires connecting your resources.
Application Security Groups are definitions for a Network Security Group. This enables to have a third protection layer, because you can allow or disallow traffic based on a ASG member ship. Lets take a look at the image below:
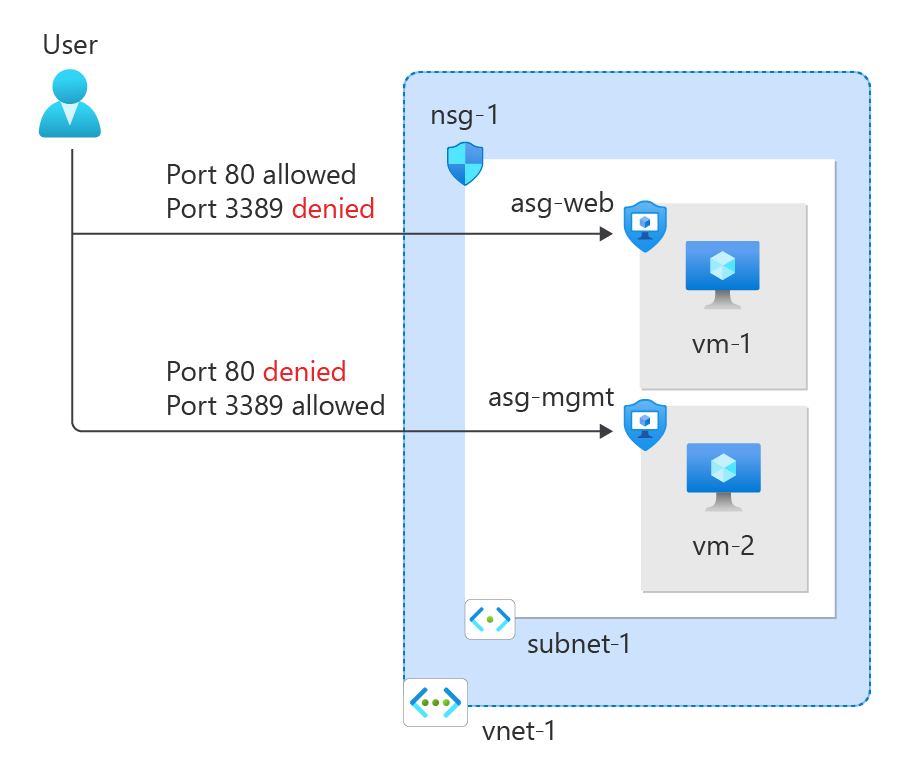
Here we have a single subnet. Normally all traffic in and out is allowed. But because we created a rule in the NSG of the VM specific NIC and added ASGs for web and mgmt, the user can only connect to the webservers for port 80 and port 3389 to mgmt servers. This enables that third layer of traffic filtering.
Typically, you use either an NSG per machine or an NSG for the entire subnet combined with ASGs. ASGs in this way eliminates the need of specifying every source in the NSG. Instead of that, you simply add a server to it.
Within Azure, you can also create route tables. These allow you to define custom rules on top of the virtual network or subnet to direct traffic. The routing table which contains all the user defined routes (UDR’s) has to be linked to one of the created subnets.
Every network uses routing to determine where specific traffic should be directed. In Azure, this works the same way within a virtual network. There are the following types of routing:
System routes are the default routes that Azure creates. These ensure that resources automatically have access to the internet and other resources/networks. The default routes created by Azure include:
In addition to the system routes automatically created by Azure, you can define your own custom routes. These take precedence over system routes and allow traffic to be routed according to specific needs.
Examples:
When determining how network traffic is routed, Azure follows this order:
In a route table, you can configure various static routes, specifying that a particular IP range should be reachable via a specific gateway when using multiple subnets or networks.
When creating routes, you need to know several values to ensure the route functions correctly:
After this step there are different Next Hop types, each with its own purpose:
| Next Hop Type | Purpose |
| Virtual Network Gateway | Route traffic to Virtual Network Gateway/VPN |
| Virtual Network | Route traffic to Virtual Network |
| Internet | Route traffic to the Internet |
| Virtual Appliance | Route traffic to specified IP Address/Firewall |
| None (Drop) | Drop traffic |
It is good to know that all routes can be viewed through a network interface that is connected to the network. Additionally, you can check whether a route is a system route or a user-defined route. You can find this in the Network Interface Card (NIC) of the virtual machine.
This can be helpful if a routing doesn’t work properly and you want to find out if this is by a User defined route.
It is possible to secure and monitor an Azure Virtual Network using Forced Tunneling. This ensures that all traffic is routed through an on-premises Site-to-Site VPN, where it can be monitored and secured before reaching the internet.
By default, Azure traffic communicates directly with the internet, as this results in fewer hops and higher speed.
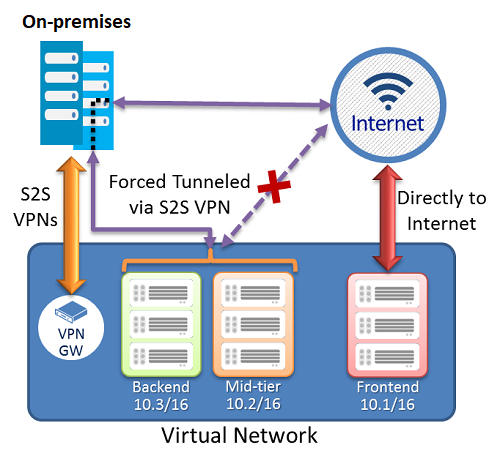
Now i don’t neccesarily recommend this option as it increases hops and lower the performance but when it is required for security and governance purposes it will do the trick.
In Azure, we have our resources that all use their own Endpoints to connect to. There are possibilities to further enhance and secure them.
We have the following types of endpoints:
The order of these are very important, because i ordered them most inclusive to most restrictive.
When you create resources like the resources below, you get an URL to connect to the resource. This is called an Public Endpoint, which is accessible to the whole internet by default. You may want to limit this.
Resources who use public endpoints:
In the configuration of the resource, its possible to still use the public endpoint for its simplicity but limit the access to specified IP addresses/ranges:
Service endpoints are extensions for virtual networks that enhance security by allowing traffic to specific Azure resources only from a designated virtual network. The following resources support both service endpoints and private endpoints:
However, service endpoints are not the most secure option for access control, as they remain routable via the internet and the resource retains its public DNS name. For the highest level of security, a Private Endpoint should be used.
A private link ensures that a resource is only accessible from the internal network and not from both the internet and the internal network. It assigns the resource an IP address within your virtual network, allowing for additional security and control.
This provides extra security and performance since the route to the resource is optimized for efficiency. It also allows you to place a load balancer between the client and the resource if needed.
To give a better understanding of how this works:
In this case, John Savill created a Private Endpoint on his Storage Account and so connected it to his private network. It does get a local IP address instead of being routed over the internet.
This increases:
Because i find both terms still really confusing till this day, i have created a table to describe the exact differences:
| Service Endpoint | Private Endpoint |
| Access through public IP | Access through private IP |
| Isolation from VNETs | Complete isolation |
| Public DNS | Private DNS |
| Better performance by limiting hops |
Azure DNS is a service in Azure that allows you to link a registered public domain name and create DNS records for it. Azure DNS is available in both a public and private variant for use within a virtual network. In the private variant, you can use any domain name.
This service is available in two service types:
The default IP address for all DNS/DHCP-related services in Azure is 168.63.129.16. You can use this IP address as secondary or tertiary DNS server.
Azure NAT Gateways are designed to provide one or more virtual networks within an Azure region (the same region as the VNET) with a single, static inbound/outbound IP address.
This allows you, for example, to enable an entire Azure Virtual Desktop host pool with 100 machines to communicate using the same external IP address.
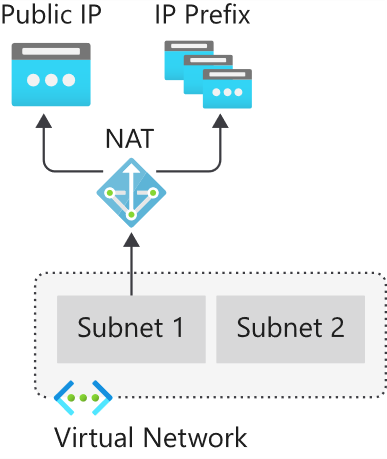
Use cases for Azure NAT Gateway are for example:
With Azure Virtual WAN, you can build a Hub-and-Spoke network in Microsoft Azure by configuring Azure as the “Hub” and the on-premises networks as “Spokes.”
This allows you to link all connections to Azure, such as VPN (S2S/P2S) and connections to other branches or other Azure virtual networks (VNETs) in different Azure Tenants/subscriptions. Microsoft utilizes its own backbone internet for this.
The topology looks as follows:
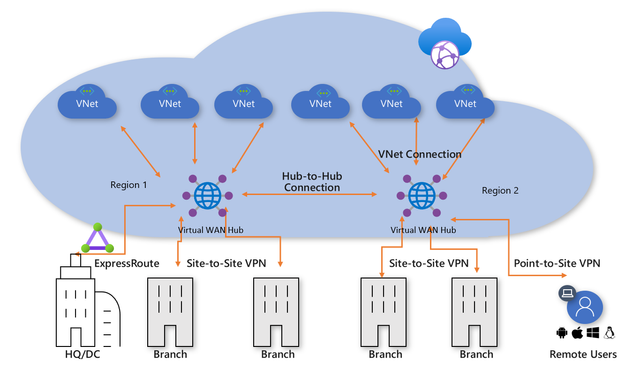
Azure Virtual WAN serves as the Hub for all externally connected services, such as:
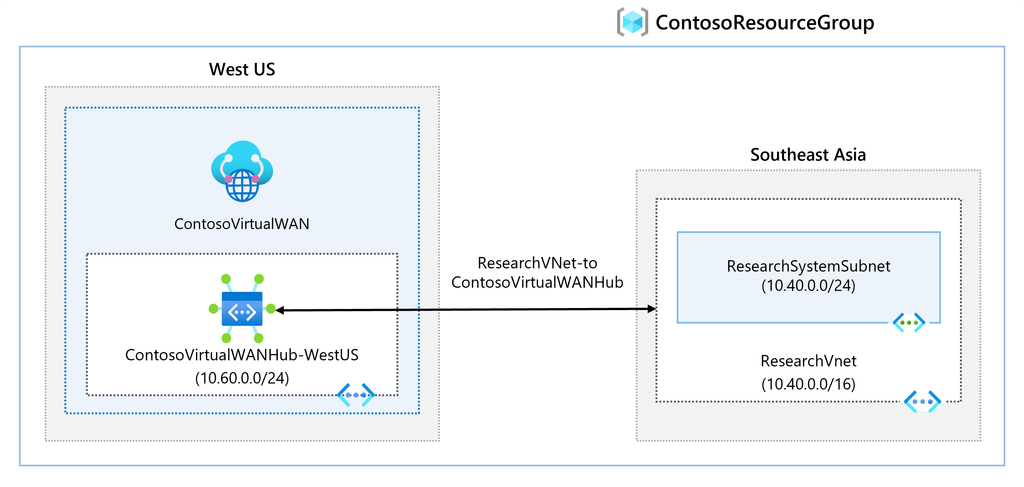
An Azure Virtual WAN consists of a base network that must be at least a /24 network or larger, to which all endpoints are connected. Additionally, it is possible to deploy a custom NVA (Network Virtual Appliance) or Firewall to secure traffic. The NVA must be deployed in the Virtual WAN Hub that you have created.
Overall, Azure Virtual WAN ensures that when a company has a network in Azure along with multiple branch offices, all locations are centrally connected to Azure. This architecture is a more efficient and scalable solution compared to manually connecting various virtual networks using different VPN gateways.
Azure Virtual WAN replaces VPN connections with Azure Virtual Network Gateways to Virtual WAN. It also supports more tunnels (2000 versus 30 in a virtual network gateway).
Azure ExpressRoute is another method to connect an existing physical network to an Azure network. It works by establishing a dedicated, private fiber-optic connection to Azure, which is not accessible from the public internet.
With this method, you achieve much higher speeds and lower latency compared to Site-to-Site VPN connections. However, ExpressRoute can be quite expensive.
For a current overview of ExpressRoute providers: https://learn.microsoft.com/nl-nl/azure/expressroute/expressroute-locations-providers?tabs=america%2Ca-c%2Ca-k#global-commercial-azure
For using Azure ExpressRoute, there are 4 methods of connecting your network with ExpressRoute to Azure:
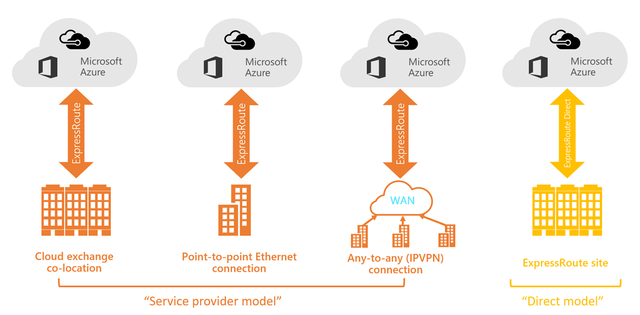
If you are located at the same site as a cloud exchange, you can request virtual overlapping connections to the Microsoft Cloud via the co-location provider’s Ethernet exchange. Co-location providers can offer Layer 2 overlapping connections or managed Layer 3 overlapping connections between your infrastructure in the co-location facility and the Microsoft Cloud.
You can connect your on-premises data centers/offices to the Microsoft Cloud through point-to-point Ethernet links. Point-to-point Ethernet providers can offer Layer 2 connections or managed Layer 3 connections between your location and the Microsoft Cloud.
You can integrate your WAN with the Microsoft Cloud. IPVPN providers (typically MPLS VPN) offer any-to-any connectivity between your branches and data centers. The Microsoft Cloud can also be connected to your WAN, making it appear as just another branch. WAN providers generally offer managed Layer 3 connectivity.
You can connect directly to Microsoft’s global network at a strategically located peering site worldwide. ExpressRoute Direct provides dual connectivity of 100 Gbps or 10 Gbps, supporting active/active connectivity at scale.
When having to load balance external traffic to for example webservers, database servers etc. Azure has some solutions to achieve this:
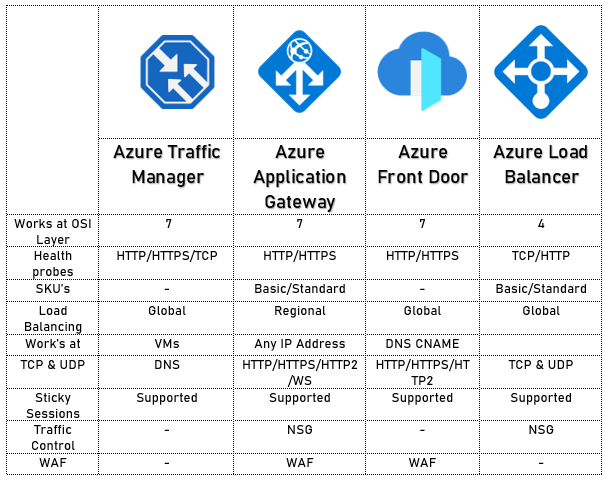
The solutions mentioned above each have their own use cases but work best with the following applications:
Azure Application Gateway is an HTTP/HTTPS load balancer with advanced functionality. Like other load balancing options in Azure, it is a serverless solution.
The features of Azure Application Gateway include:
Azure Application Gateway supports 2 load balancing methods:
On the frontend, Azure Application Gateway has a virtual WAN IP address that allows access to the web service. On the backend, you must determine how requests are routed to internal servers.
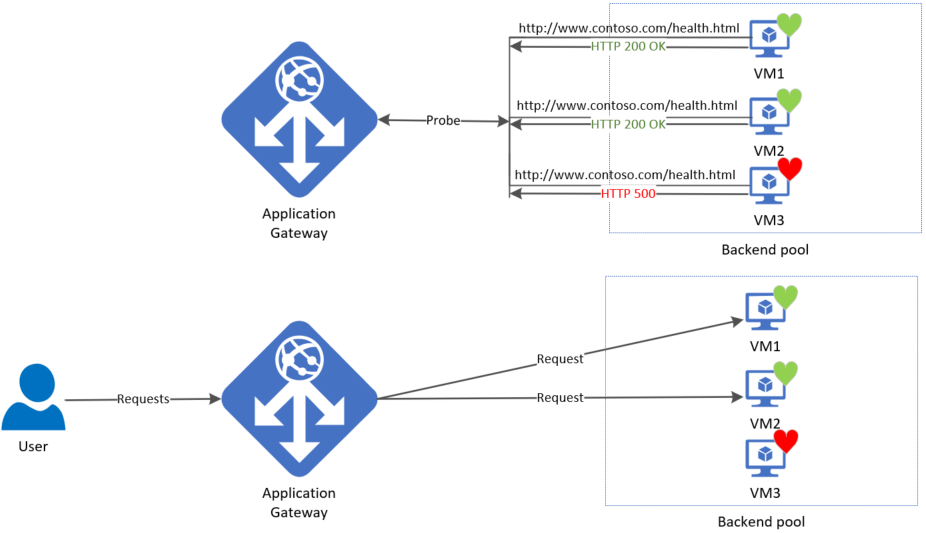
A load balancer also typically includes a health probe rule. This checks whether the backend web servers are functioning correctly by periodically opening an internal website. If a web server does not respond, the load balancer will immediately stop sending traffic to that server.
Azure Front Door is a Content Delivery Network (CDN) that runs on Azure. It is not a regional service and can be deployed across multiple regions. Essentially, it acts as a large index of all resources a company has and selects the appropriate backend resource for a client. In this sense, it also functions as a type of load balancer.
To learn more about Front Door, please review the image below:
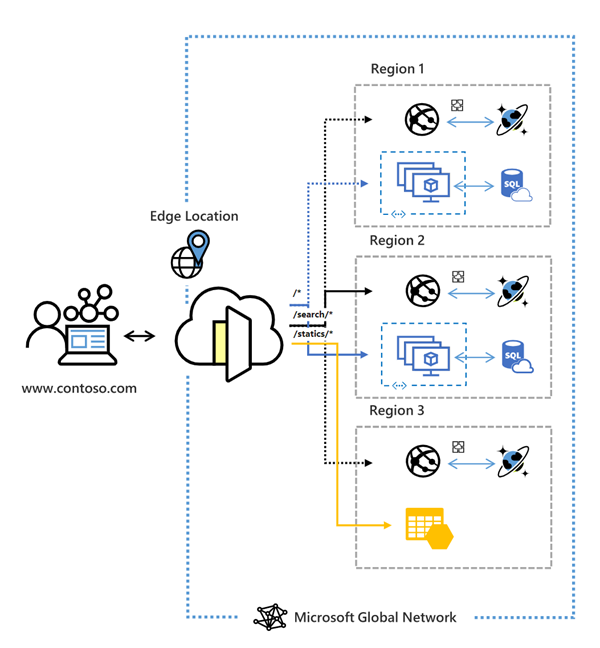
Azure Front Door has the following security features:
Bastion is a service in Microsoft Azure that allows you to manage all virtual machines within an Azure Virtual Network (VNET-level). It works similarly to RDP but runs directly in your browser using port 443 combined with a reverse-connect technique.
This service is primarily focused on security, just-in-time access and ease of access. With this solution, there is no need to open any ports on the virtual machine, making it a highly secure option. It also functions as a jump-server where you can give someone permission to the server for 30 minutes to complete their task and disallowing access after that time window.
The topology of Azure Bastion:
Azure Firewall is a serverless, managed security service in Microsoft Azure that provides network-level protection for your virtual networks. It operates as a stateful firewall, meaning it inspects both incoming and outgoing traffic.
Azure Firewall has support for:
While Azure Firewall does what it convinces you, most people (including myself) are not a big fan of the solution. It is great for some basic protection, but it is very expensive and configuring it can be a long road. Fortunately, we have some great alternatives:
In Microsoft Azure we can use custom firewalls such as Palo Alto, Fortinet, Opensense, or Sophos XG. These have a lot more functionality than the default Azure Firewall and are a lot better to configure. The only downside to them is that they have a seperate configure page and the settings cannot be configured in the Azure Portal.
To make our Firewall effective, we configure a routing table with next hop “Network Appliance” and define the IP address to route traffic through the custom firewall.
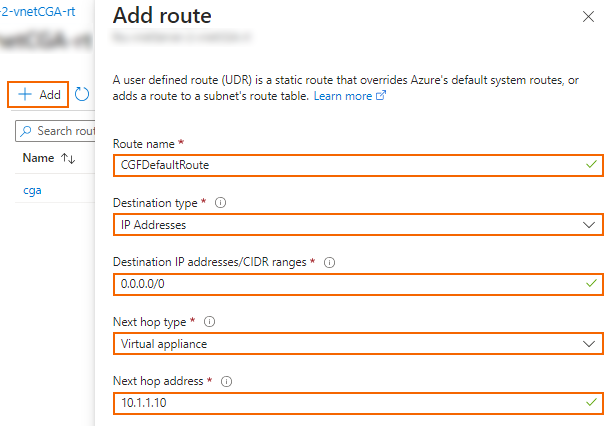
Networking is a critical part of administering and architecturing solutions in Microsoft Azure. It really is the backbone of all traffic between services, devices and maybe customers. So it is not strange that this is a really large topic.
Most of the knowledge is needed to architect and configure the solutions and most of the time, you sporadically add an IP address to a whitelist or make a minor change.
To go back to the navigation page: https://justinverstijnen.nl/microsoft-azure-master-class-navigation/
You have reached the end of the page. You can navigate through other blog posts as well, share this post on X, LinkedIn and Reddit or return to the blog posts collection page. Thank you for visiting this post.
If you think something is wrong with this post or you want to know more, you can send me a message to one of my social profiles at: https://justinverstijnen.nl/about/
If you find this page and blog very useful and you want to leave a donation, you can use the button below to buy me a beer. Hosting and maintaining a website takes a lot of time and money. Thank you in advance and cheers :)
The terms and conditions apply to this post.
This module focuses purely on the various storage services that Azure offers and provides. Additionally, we will explore the different options available to increase redundancy and apply greater resilience.
Storage fundamentally exists in three different types:
In this chapter, we will primarily focus on Unstructured data.
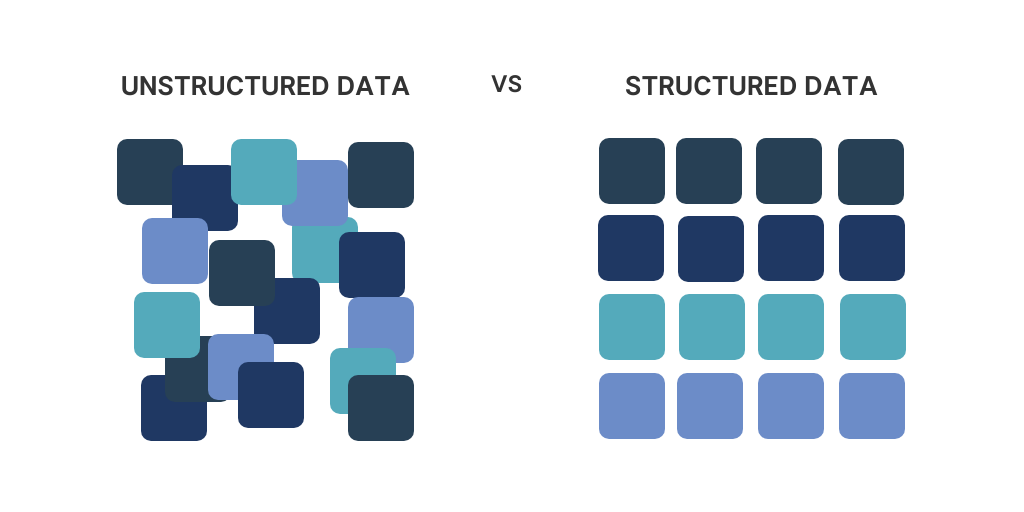
For most storage services, you need an Azure Storage Account. You can think of this as a file server—a top-level, logical container for all storage services and shares. It is possible to create multiple Storage Accounts within a subscription.
Standard/General Purpose V2: This option provides all storage services in one but uses HDD-based storage.
Premium: This option provides only one specific storage service but uses SSD-based storage. The account is optimized for the selected service.
Please note: The name of a Storage Account must be globally unique and comply to DNS naming requirements.
Access to Azure Storage Accounts can be managed in three different ways:
For each Azure Storage service, there are specific roles available to manage access effectively. These roles ensure that users and applications only have the necessary permissions for their tasks.
Azure Storage is a service provided by Azure for storing data in the cloud. Instead of merely simulating a traditional file server, it offers various storage services. These services include:
An important aspect of storage in Azure is that different SLAs exist for resiliency, interaction, and durability:
Azure offers several options to ensure high availability of data by making smart use of Microsoft’s data centers. When designing an architecture, it’s important to ensure that a service is available just enough for its purpose to optimize costs.
Azure is structured into different regions, and within these regions, there are multiple availability zones, which are groups of data centers.
Storage redundancy is divided into three main methods:
Note: Synchronizations between regions are asynchronous.
Aside from the options LRS, ZRS and GRS there is a 4th option available;
GZRS (Geo-Zone-Redundant Storage) stores three instances of the data across three availability zones within a region and an additional three instances in a paired region.
It is possible to enable read-access (RA), which allows the storage to be accessed via a secondary URL for failover purposes. This adds RA- to the redundancy type, resulting in RA-GRS or RA-GZRS.
Azure divides storage into different tiers/classes to ensure that customers do not pay more than necessary:
These tiers are designed for the customer to choose exactly the option needed. It is good to know that access to archive and cool data is more expensive than to Hot data.
Billing for Azure Storage is done in 2 different types:
Azure Storage will increase IOPS, throughput, and reduce latency when you allocate more storage space for Premium options or managed disks. See the image below:
The lower-tier Azure Storage options are always billed based on usage. This includes:
All Azure Storage options are encrypted with AES-256 by default for security reasons. This encryption is on platform-level and is the basic level which cannot be disabled.
Azure Storage offers the following networking options:
It is always recommended to enable the IP-based firewall and to block public access. Only use public access for testing and troubleshooting purposes.
Azure File Sync is a service within Azure Files that allows you to synchronize an on-premises SMB-based file share with an Azure Files share in Azure. This creates replication between these two file shares and is similar to the old DFS (Distributed File System) in Windows Server, but better and easier.
Azure File Sync can be used for two scenarios:
The topology of Azure File Sync is broadly structured as follows:
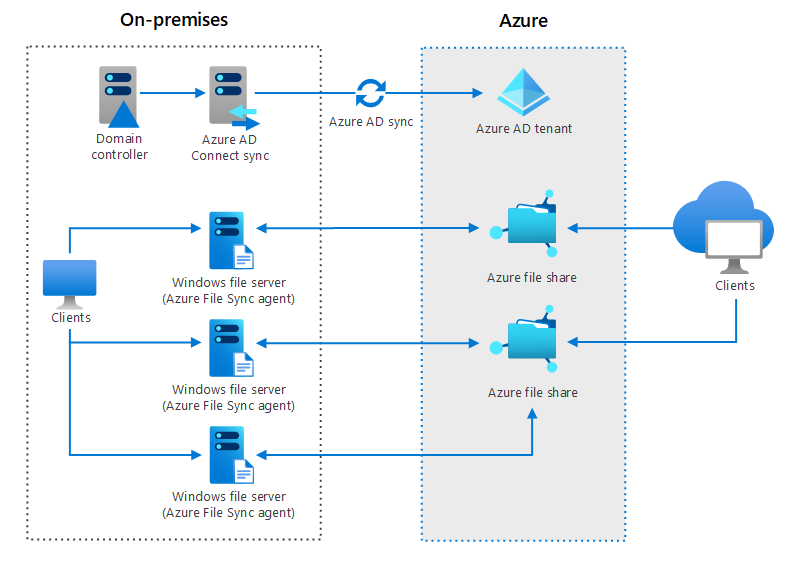
Azure provides the ability to create custom disks for use with virtual machines. It is possible to attach a single virtual disk to up to three virtual machines (MaxShares). If you pay for more capacity, this limit increases, like described earlier (Provisional based billing).
The different options:
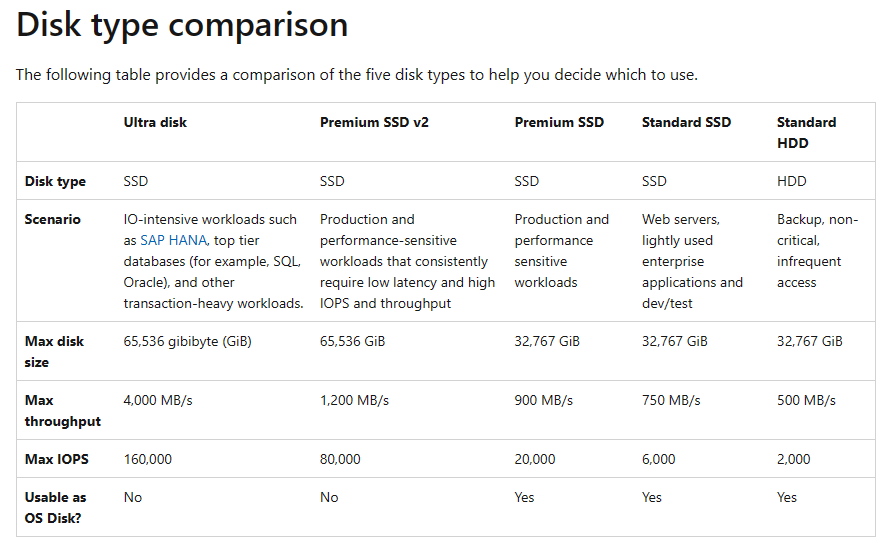
Source: https://learn.microsoft.com/nl-nl/azure/virtual-machines/disks-types#disk-type-comparison
Managed Disks are, like described, based on provisioning due to Operating System limitations. There has to be a fixed amount of storage available. You pay for a size and performance tier.
Goog to know, a Managed Disk can be resized but only increased. You cannot downgrade a Managed Disk from the portal. You have to create a new disk and migrate the data in this case.
Managed Disks are redundant with LRS and ZRS (Premium SSD only). These managed disks do not support GRS, as the disk is often used in conjunction with a virtual machine, making GRS unnecessary in this case.
With Azure Site Recovery, it is possible to create a copy of the VM along with the associated disk in another region. However, this process is asynchronous, and data loss may occur.
Virtual Machines rely on Managed Disks to store their data on. The disks where this data is stored, is stored on Azure Storage. VMs have a required OS disk, and can have some data disks. Also, you can have a temporary disk if you select this in the portal.
A virtual machine is placed on a host by Azure, and as a customer, you have no control over this placement. Azure uses an algorithm to do this automatically.
The storage for a virtual machine is by default always a managed disk, as this disk is accessible throughout the entire region within Azure.
Some VM generations include a “Temporary Disk” as the D: drive (or /dev/sdb1 for Linux). As the name suggests, this is temporary storage. After a machine is restarted or moved to another host/hypervisor, the data on this disk will be lost.
The purpose of this disk is to store the pagefile and cache. The performance of this disk is very high since it runs on the same host and uses the VM bus. This is why it is used for cache and pagefile (the Windows variant of Swap).
The different tools for working with Azure Storage are:
Azure offers a service for importing or exporting large amounts of data.
To go back to the navigation page: https://justinverstijnen.nl/microsoft-azure-master-class-navigation/
You have reached the end of the page. You can navigate through other blog posts as well, share this post on X, LinkedIn and Reddit or return to the blog posts collection page. Thank you for visiting this post.
If you think something is wrong with this post or you want to know more, you can send me a message to one of my social profiles at: https://justinverstijnen.nl/about/
If you find this page and blog very useful and you want to leave a donation, you can use the button below to buy me a beer. Hosting and maintaining a website takes a lot of time and money. Thank you in advance and cheers :)
The terms and conditions apply to this post.
This module is all about resiliency and redundancy in Microsoft Azure. Resiliency literally means flexibility. It refers to how resistant a solution is to certain issues and failures. We want to build our solutions redundant, because we don’t want outage in a system so a customer can’t do their work.
The different layers where you can and should apply resiliency and how you can improve the area are:
There are several ways to protect yourself against infrastructure problems, depending on the issue and the service.
People should have as little contact as possible with production environments. For any changes, ensure the presence of a test/acceptance environment. Human errors are easily made and can have a significant impact on a company or its users, depending on the nature of the mistake.
The best approach is to automate as much as possible and minimize human interaction. Also make use of seperated user/admin accounts and use priveleged access workstations.
It is important to define the Recovery Point Objective (RPO) for each service. This determines the maximum amount of data you can afford to lose based on real-life scenarios. A customer might often say, “I can’t afford to lose any data,” but achieving such a solution could cost hundreds of thousands or even millions.
An acceptable RPO is determined based on a cost-benefit analysis, such as: “If I lose one day of data, it will cost me €1,000, which is acceptable.” In this case, the backup solution can be configured to ensure that, in the event of an issue, no more than one day of data is lost.
The Recovery Time Objective (RTO) defines the amount of time required to initiate a specific recovery action, such as a disaster recovery to a secondary region.
The most important aspect is to thoroughly understand the application you are building in Azure. When you understand the application, you will more quickly identify improvements or detect issues. Additionally, it is crucial to know all the dependencies of the application. For example, Azure Virtual Desktop has dependencies such as Active Directory, FSLogix, and Storage.
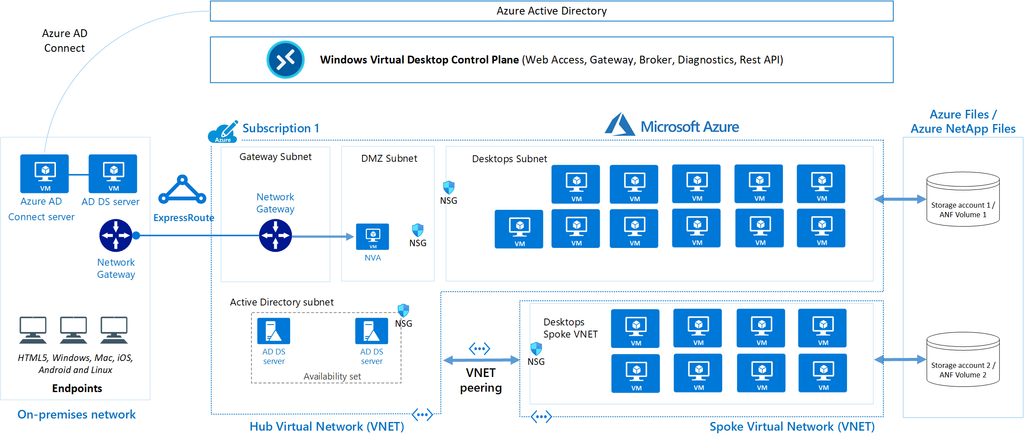
In solutions as these, documentation is key. Ensure your organization has a proper tool to write topologies like these down.
When designing and building an environment in Microsoft Azure, it is important to understand the requirements.
In Azure, most services come with a specific SLA (Service Level Agreement) that defines the annual uptime percentage. It is crucial to choose the right SLA in relation to the costs. For example, adding an additional “9” to achieve 99.999999% uptime might provide just a few extra minutes of availability but could cost an additional €50,000 annually.
To get a nice overview of the services available with all SLA options available, you can check this page: https://azurecharts.com/sla?m=adv
Azure Chaos Studio is a fault simulator in Azure that can perform actions such as:
In summary, Azure Chaos Studio enables you to test the resiliency of your application/solution and enhance its resilience.
To create actual resiliency for your application in Azure, the following functionalities can be used:
To achieve resiliency in your Azure application, these constructs must always be properly designed and configured. Simply adding a single virtual machine to an availability set, scale set, or availability zone does not automatically make it highly available.
A Fault Domain is a feature of Availability Sets and VM Scale Sets that ensures multiple virtual machines remain online in the event of a failure within a physical datacenter. However, true resiliency requires designing and configuring the application to handle such disruptions effectively, as fault domains are only one part of the broader resiliency strategy.
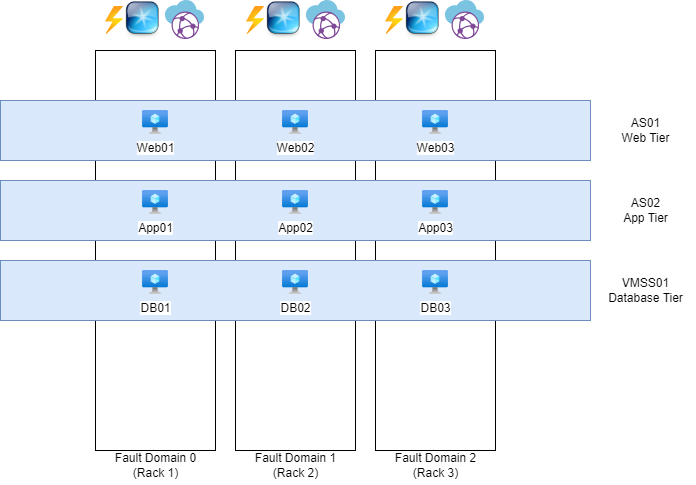
The white blocks represent physical server racks, each with its own power, network, and cooling systems. Each rack is considered a “Fault Domain,” meaning a domain or area where a failure could impact the entire domain/area.
The blue blocks represent Availability Sets (AS) and Virtual Machine Scale Sets (VMSS), which distribute multiple virtual machines with the same role across three fault domains. For instance, if one of the three server racks catches fire or loses power, the other two machines will remain online.
To maintain clarity and organization, ensure that each application has its own separate set. So you have implemented a good level of redundancy.
Availability Sets, Virtual Machine Scale Sets, and Fault Domains do not provide protection against failures at the datacenter level. You need Availability Zones for that.
Nearly every Microsoft Azure region has 3 Availability Zones. These are groups of datacenters with independent power, network, and cooling systems. This allows you to make solutions zone-redundant, protecting your application from failures at the datacenter level. However, this redundancy and resiliency must be specifically designed. This can be done by using a method like the method below:
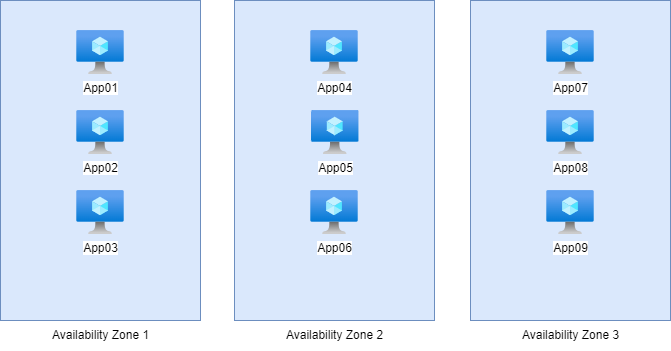
Here, we have 9 servers with the exact same role, distributed across the 3 Availability Zones in groups of 3. In this setup, if one of the three zones goes down, it will not impact the service. The remaining 6 servers in the other two zones will continue to handle the workload, ensuring uninterrupted service.
This type of design is a good example of zone-redundant architecture, providing resilience against datacenter-level failures while maintaining service availability.
The exact difference between these options, which appear very similar, lies in their uptime and redundancy:
Here’s a concise comparison of the options with their uptime and redundancy:
| Option | Uptime | Redundancy |
|---|---|---|
| Availability Set | 99.95% | Locally redundant |
| Availability Zone | 99.99% | Zone-redundant |
Azure does not guarantee that multiple virtual machines will be physically located close to each other to minimize latency. However, with a Proximity Placement Group (PPG), you can instruct Azure: “I want these machines to be as close to each other as possible.” Azure will then place the machines based on latency, ensuring they are located as close together as possible within the physical infrastructure.
This is particularly useful for applications where low latency between virtual machines is critical, such as high-performance computing (HPC) workloads or latency-sensitive databases.
You can configure this Proximity Placement Group on your Virtual Machines.
Azure offers two distinct services to configure backups for your resources:
1.Recovery Services Vault:
2.Backup Vault:
Key Difference:
Choose based on the scope and complexity of your backup requirements.
Backup and Resilience in Microsoft Azure is very important. This starts with knowing exactly what your solution does. Therefore you can apply high availability and backup to it.
To go back to the navigation page: https://justinverstijnen.nl/microsoft-azure-master-class-navigation/
You have reached the end of the page. You can navigate through other blog posts as well, share this post on X, LinkedIn and Reddit or return to the blog posts collection page. Thank you for visiting this post.
If you think something is wrong with this post or you want to know more, you can send me a message to one of my social profiles at: https://justinverstijnen.nl/about/
If you find this page and blog very useful and you want to leave a donation, you can use the button below to buy me a beer. Hosting and maintaining a website takes a lot of time and money. Thank you in advance and cheers :)
The terms and conditions apply to this post.
Governance in Azure refers to the enforcement of rules and the establishment of standards in solutions, naming conventions, technology, etc. This is achieved through the management and importance of Management Groups, Subscriptions, Resource Groups, Policies, RBAC, and Budgets.
In the cloud, Governance is crucial because processes and behaviors differ significantly from on-premises hardware. Additionally, certain services can be made publicly accessible, which requires an extra layer of security.
With Azure Policy, you can set up rules that different subscriptions, resources, or resource groups need to follow. Some examples include:
The main goals of Azure Policy are:
To better understand how Azure Policy works, here are its key components:
Definitions: A definition outlines what actions, configurations, or tasks are allowed or not. It can include multiple rules, so you can enforce or allow several things with one definition. Azure also offers many built-in definitions that you can use.
Initiatives: An initiative is a collection of definitions, so you can group policies together under a single initiative for things like company-wide policies or specific applications. Azure also has standard initiatives available, like checking if a subscription meets country regulations, NIST 800, or ISO 27001.
Assignments: These are the subscriptions that the policies apply to.
Exemptions: Exemptions are exceptions to a policy, like for a specific resource or type. You can also set an expiry date to make the exemption temporary. There are two types:
A Tag in Azure can be added to various types of resources to categorize them, making it easier to delegate or assign management to individuals or support teams. Tags can be added to resource groups, but the resources within these groups won’t automatically inherit the tags.
The main use of tags is to provide better organization, group resources, and are useful in scripts or other purposes. Tags consist of a name and a value, and they might look something like this for a resource group:
For example:
Here i have configured the tag on a resource group to show the outcome:
Write access to the resources is required to modify or add a tag. Additionally, a tag cannot contain special characters such as ?, <, >, ,, /, or ..
A maximum of 10,000 tags can be assigned per subscription.
Tags need to be added directly to objects; within the Tags section, you can only view the tags that have already been assigned.
Access to specific components in Microsoft Azure is managed using Access Control (IAM):
In Microsoft Azure, there are hundreds of different roles for each service, but the basic structure is as follows, ranked from the fewest to the most permissions:
The highest permissions are effective if multiple roles are assigned.
These roles define the scope of control users or groups have over resources in Azure, ensuring that access can be finely tuned based on the level of responsibility.
To learn more about Azure Roles and assignments, check out my easy Azure Roles guide: https://justinverstijnen.nl/introduction-to-microsoft-azure-roles-rbac-iam-the-easy-way/
At every level in Microsoft Azure, it’s possible to check the access permissions for a specific user or group. In the Access Control (IAM) blade of any level (such as subscription, resource group, or resource), you can click on the “Check Access” tab, and then on the “Check Access” button.
Azure will then display a clear overview of the roles assigned to the user and the associated permissions. This feature helps ensure that you can easily verify who has access to what resources and at what level of control.
In Azure, you can also create custom roles to allow or restrict specific actions with a role. This can be done in any window where you see Access Control (IAM).
A role in Azure is structured as follows:
Built-in and custom roles in Microsoft Azure can be assigned to:
With Azure RBAC, you ensure that a specific user only has access to the services/resources they need. In Azure, there are various predefined roles, and you can also create custom roles. These roles can then be applied at different levels.
In this diagram, several levels are illustrated:
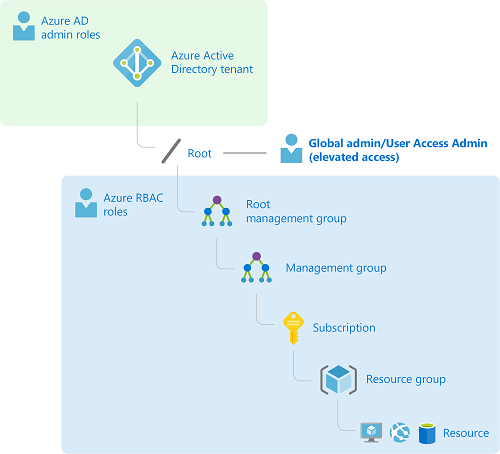
Each level serves to organize and control access within Azure, with permissions flowing from higher to lower levels to manage resources efficiently.
Please note, role assignments will always propagate to underlying levels. There is no “Block-inheritance” option. Therefore, determining the level at which roles are applied is very important.
Please take a look at the following image for a practice example:
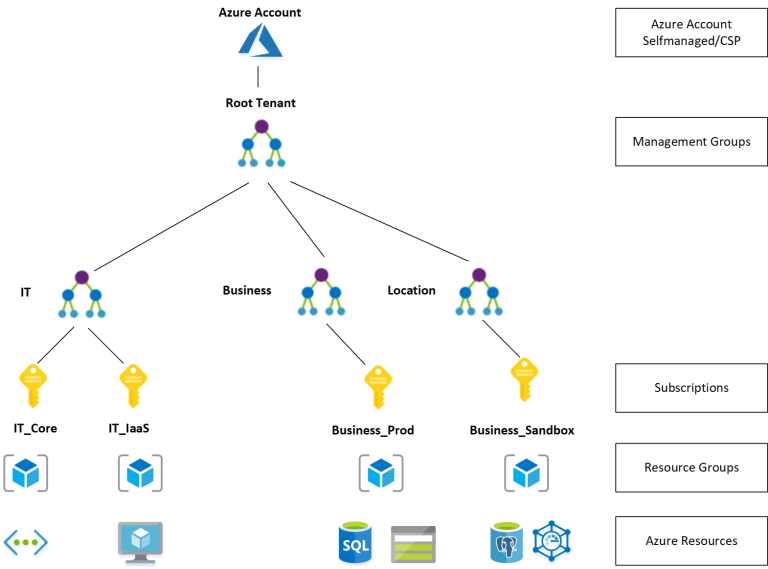
A relatively new feature of Microsoft Entra ID (formerly Azure AD) is attribute-based access. In the Microsoft Entra admin center, it is possible to create custom attributes and assign them to users. Permissions can then be applied based on these attributes.
In an Azure Subscription, it is possible to create a budget. This helps ensure that costs stay within certain limits and do not exceed them.
In Azure, you can apply locks to resource groups and resources. Locks are designed to provide extra protection against accidental deletion or modification of resource groups and resources. A lock always takes precedence over the permissions/roles of certain users or administrators. There are two types of locks:
These locks add an extra layer of security to help prevent unintended changes to critical resources.
Azure Resource Manager (ARM) is the management layer for your resources, providing an easy way to deploy resources in sets. Additionally, it allows the creation of templates to deploy a specific configuration across multiple environments. Deploying a solution via the Azure Marketplace is also a responsibility of ARM.
Azure Resource Manager ensures that all resources comply with defined Azure Policies and that security configurations set with RBAC function correctly on a technical level. ARM is a built-in service in Azure, not a standalone resource that requires management.
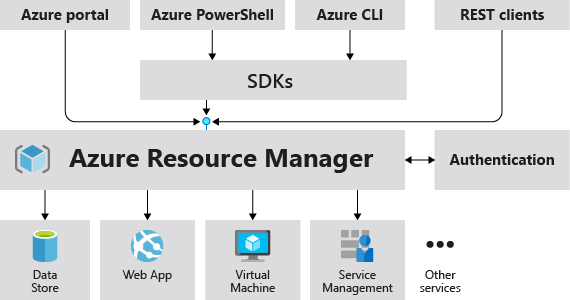
Azure Resource Providers are technical (REST) definitions at the Subscription level for the resources that are available. They are represented in the following format:
| Azure Service | Azure Resource Provider |
|---|---|
| Virtual Machines | Microsoft.Compute/virtualMachines |
| Availability Sets | Microsoft.Compute/availabilitySets |
These definitions are used, for instance, when creating custom roles to determine the scope of an action.
Before a resource provider can be used within your Azure subscription, it must be registered. The resource creation wizard will automatically prompt you to register a provider if necessary. This is “by design” to prevent unused resource providers from being exploited by malicious users.
In a given subscription, you can view an overview of which providers are registered and which are not.
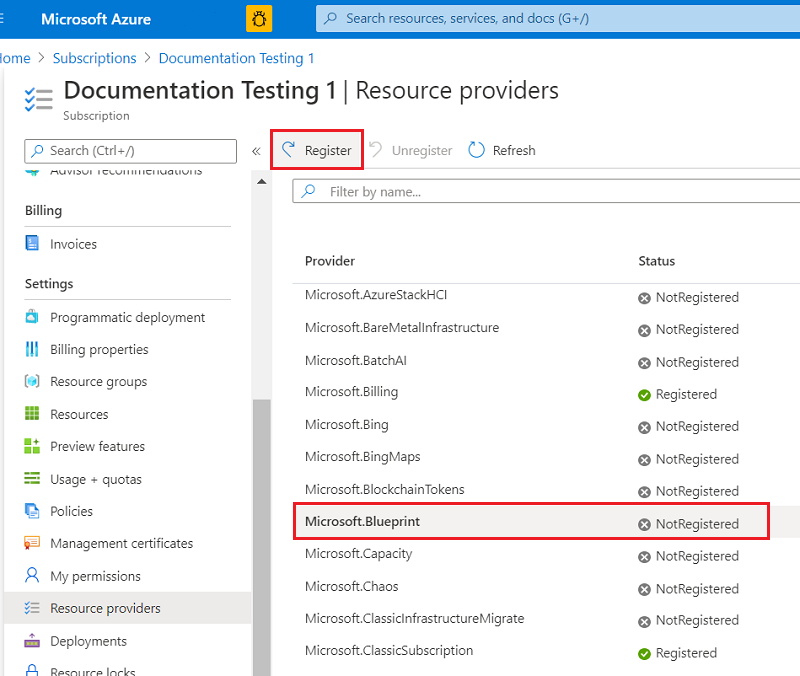
When using Microsoft Azure, there are multiple ways to save money:
Governance in Azure ensures that your cloud resources are used effectively and securely, aligned with organizational policies and compliance requirements. You can reach this outcomes by using the solutions defined on this page.
To go back to the navigation page: https://justinverstijnen.nl/microsoft-azure-master-class-navigation/
You have reached the end of the page. You can navigate through other blog posts as well, share this post on X, LinkedIn and Reddit or return to the blog posts collection page. Thank you for visiting this post.
If you think something is wrong with this post or you want to know more, you can send me a message to one of my social profiles at: https://justinverstijnen.nl/about/
If you find this page and blog very useful and you want to leave a donation, you can use the button below to buy me a beer. Hosting and maintaining a website takes a lot of time and money. Thank you in advance and cheers :)
The terms and conditions apply to this post.
This Azure Master Class (AMC) chapter is all about Identity in Microsoft Azure. This means we discuss the following:
For every service that a user accesses, it is necessary to have an identity. Access needs to be determined, and the service must know who the user is in order to open the correct environment.
Best practice is to always assign the least possible privileges. A person who performs 3 tasks does not need permissions for 200 tasks, but for the 3 tasks only. “Least privilege” is one of the 3 key principals of the Zero Trust model.
To store identities, you need an Identity Provider. In Azure, we have a built-in identity provider called Azure Active Directory. An Identity Provider itself is a database where all identities are stored, and it can securely release them through Single Sign-On applications.
An overview of what this process looks like:
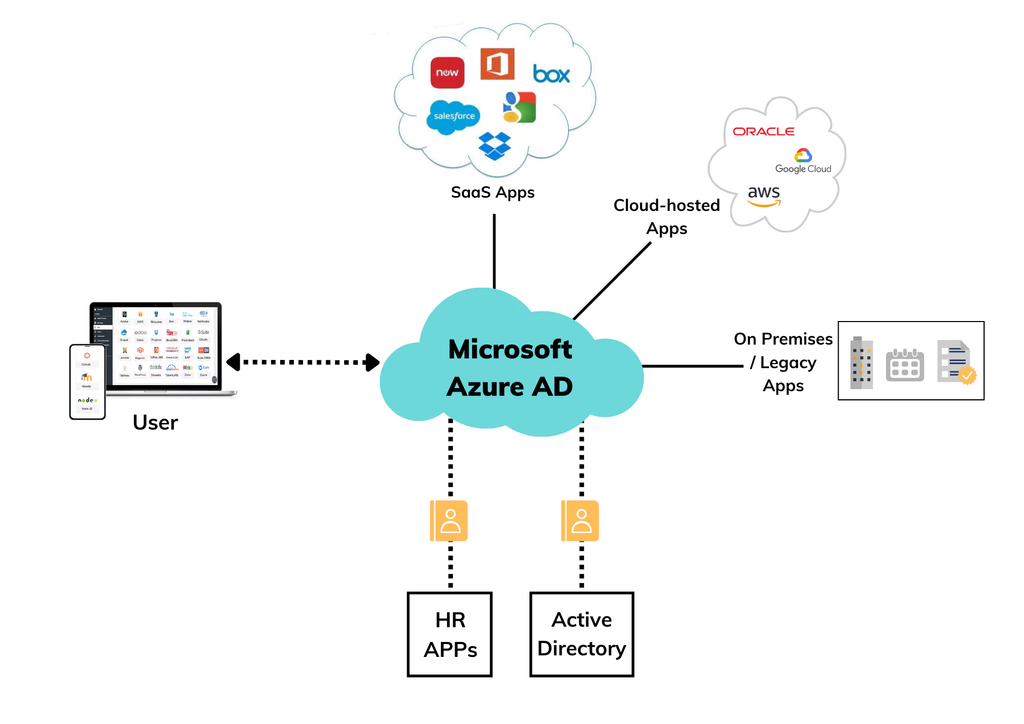
In this diagram, Azure Active Directory, our Identity Provider, is at the center. When an application is set up, a ’trust’ is established with the Identity Provider. This allows a user to log in to third-party applications through the Identity Provider using the same credentials, and they will be logged in automatically.
Another possibility is to use the Decentralized Identity model. In this model, the user owns all their application credentials and can decide for themselves which entities/applications they share their credentials with.
An overview of what this process looks like:
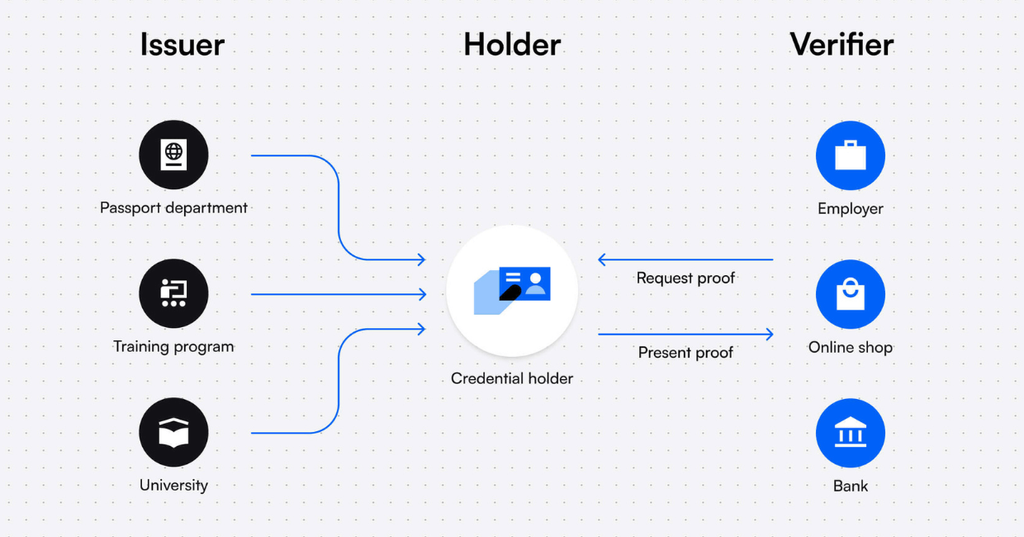
Microsoft Entra ID is the Identity Provider for all enterprise Microsoft Cloud services and 3rd-party applications:
This was previously known as Azure Active Directory which sounds similar to the traditional Active Directory Domain Services that you install on Windows Servers, but it differs significantly in terms of functionality and purpose. The name of it was changed in 2023 to make it less confusion.
However, it differs some from the old Active Directory Domain Services protocols:
| Active Directory Domain Services | Microsoft Entra ID | |
| Verification protocols | NTLM & Kerberos | Open ID, OAuth 2.0, SAML, WS-FED |
| Query protocols | LDAP | Powershell |
The Federation process means that an application trusts a federation server, allowing it to issue tokens for Single Sign-On.
It is possible to create multiple Azure ADs within a single .onmicrosoft tenant. For example, for a partner who works on the same tenant with a different domain name. This can be done in the Microsoft Azure marketplace.
Microsoft Entra ID consists of 4 different licenses:
Each SKU has its own functionality:
For the actual list of features, please visit: https://learn.microsoft.com/en-us/entra/identity/authentication/concept-mfa-licensing#available-versions-of-azure-ad-multi-factor-authentication
The Microsoft Secure Score is a score for the Azure AD tenant on a scale from 0 to 100%. By using various security features, this score will increase, indicating how secure your identities and organization are with the use of Azure AD.
A few tasks that improve the Secure Score of the Azure AD environment include:
Identity has become the primary factor to secure because, in the past 5 years, approximately 85% of cyberattacks have originated from leaked, harvested or stolen credentials.
There are multiple overviews of the Microsoft Secure Score. In the Security portal (https://security.microsoft.com) you have the best overview with the most information:
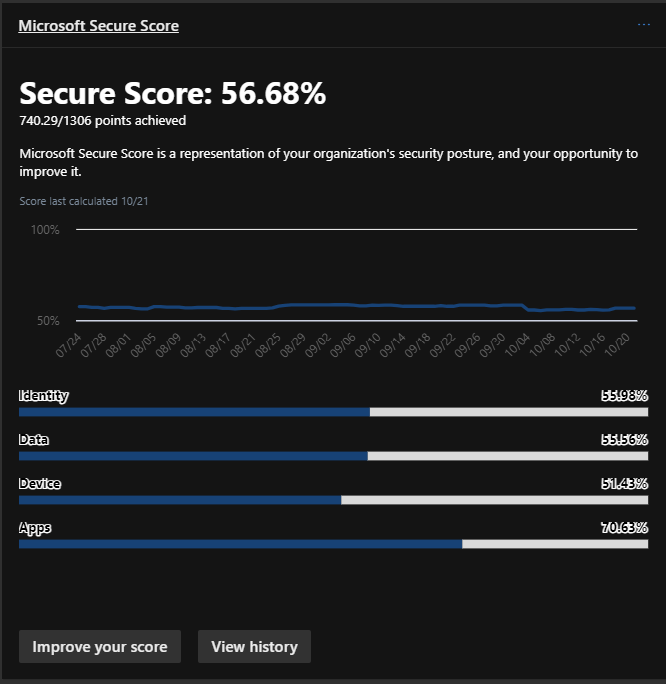
In the Microsoft Entra portal, only the “Identity” score is shown:
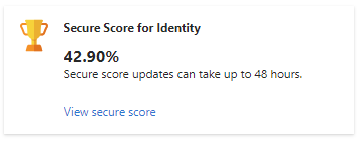
All types of identities stored in Microsoft Entra ID are:
Devices can be added to Microsoft Entra ID for various reasons:
Devices can be added to Microsoft Entra ID in multiple ways, for different purposes/reasons:
*Active Directory Domain Services and Entra ID Connect required
Synchronizing traditional Active Directory (AD DS) to Microsoft Entra ID offers the following benefits:
To synchronize AD DS with Microsoft Entra ID, there are two solutions available:
Microsoft Entra ID has several built-in roles, which are packages with predefined permissions. These can be assigned to users to grant them access to specific functions. It is possible to create a custom role using JSON, defining actions that a user can or cannot perform (Actions/NotActions).
To learn more about roles and custom roles, check out my guide where i go in depth of this subject: https://justinverstijnen.nl/introduction-to-microsoft-azure-roles-rbac-iam-the-easy-way/
Roles cannot be assigned to groups, except if you create a custom group. In this case, you can specify that Microsoft Entra ID roles can be applied:

Administrative units are similar to OUs (Organizational Units) in traditional AD DS, but they differ in a few aspects. They are logical groups used to add identities, with the purpose of applying additional security to control what users can and cannot manage. For example, an administrative unit for Executives can be created so that not all administrators can manage these identities.
Identities that can be added to administrative units are:
However, administrative units have some limitations/security constraints:
Privileged Identity Management (PIM) is a feature in Microsoft Entra ID to reinforce the “least privilege” concept. With PIM, you can assign roles to users or groups, but also for specific time periods. Does someone need to make a change between 12:00 PM and 12:30 PM but otherwise doesn’t need these permissions? Why should they always have those rights?
Privileged Identity Management is your central tool for assigning all permissions to users within your Microsoft Entra ID tenant and Azure subscriptions.
Privileged Identity Management works for Microsoft Entra ID roles and Azure Resource Manager roles, ensuring a systematic approach to resolving changes.
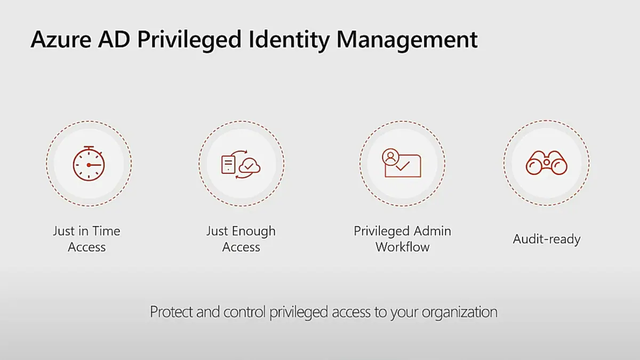
The four pillars of Entra ID Privileged Identity Management
There are 3 types of assignments:
Another option in Microsoft Entra ID is access reviews. This allows you to periodically review user assignments to groups and ensure that users who no longer need access are removed.
Access reviews can assist by notifying administrators about users, but also by sending an email to the users themselves, asking whether access is still needed. If they respond with “no” or fail to respond within a set number of days, the assignment is removed, and access is revoked. This enhances the level of security while also reducing the workload for administrators.
Multi-Factor Authentication prevents alot of password-based attacks. However, enabling MFA isn’t a clean security method. It can still be phished by attacks like Evilnginx: https://evilginx.com/
Additionally, the two recommended ways to enable MFA are Security defaults (free) or through Conditional Access (P1).
Microsoft Entra ID supports Multi-Factor Authentication. This means that, in addition to entering an email address and password, you also need to complete multiple factors.
During authentication (AuthN), it is verified whether you are truly who you say you are, and whether your identity is valid. Multi-Factor Authentication means that you can perform two or more of the following methods:
| Method | Level | Explanation |
| Password | Not secure | Passwords can be guessed, hacked, or stolen. With only a password, an account is not sufficiently protected in 2025. |
| PIN code | Not secure | A PIN code can also be guessed or stolen alongside a password. |
| Secret | Not secure | A secret, alongside a password, can also be guessed or stolen, regardless of its complexity or length. |
| SMS | Safer | SMS verification provides protection against credential theft but can be accessed when a phone is unlocked or stolen. Additionally, the code can be guessed (1 in 1,000,000). |
| Voice call | Safer | Phone call verification provides protection against credential theft but can always be answered when a phone is unlocked. Additionally, the code can be guessed (1 in 1,000,000). |
| Face recognition | Safer | Facial recognition is a good method; however, people who look alike could misuse it. |
| Biometric verification | Safer | Biometric verification significantly improves security but must be used alongside a password. |
| Authenticator app (OTP/notification) | Pretty safe, but not phising resistant | An authenticator app is still extra secure on the device and will ask for an additional check when approving access to the OTP. |
| Authenticator app passkey | Pretty safe | An authenticator app with the use of passkeys is very safe. It is like a software FIDO key and is very hard to phish (yet). |
| FIDO 2 key | Pretty safe | Use of a FIDO 2 key is the most secure option at this moment to use to authenticate. |
MFA should be deployed intelligently so that it doesn’t become an action that appears for every minor activity, to prevent MFA fatigue. In Conditional Access, for example, you can set how long a session can remain active, so that the user doesn’t have to perform any action during that time, using the same cookies. If an attacker logs in from elsewhere in the world, they will still receive the MFA prompt to complete.
The user cannot mindlessly click “Allow” but must also confirm the number displayed on the screen. While the user could guess the number, the chance of guessing correctly is 1 in 100, and the number changes with each request.
Before a user can use MFA, they must register for it. This means the initial configuration of the method and verifying the method. When registering for MFA, the registration for Self-Service Password Reset (SSPR) is also completed at the same time.
With Microsoft Entra ID security defaults, all users must register for MFA but don’t need to use it for every login (exception: administrators). When a system requires MFA from a user, the user must always register and use it immediately.
Self-Service Password Reset is a feature of Microsoft Entra ID that allows a user to change their password without the intervention of the IT department by performing a backup method, such as MFA, an alternate private email address, or a phone number.
You can find the portal to reset your password via the link below, or by pressing CTRL+ALT+DELETE on a Microsoft Entra ID-joined computer and then selecting “Change Password”. Otherwise, this is the link:
https://passwordreset.microsoftonline.com
Conditional Access is a feature of Microsoft Entra ID that allows users to access resources based on “if-then” rules.
This works in 3 steps:
Examples:
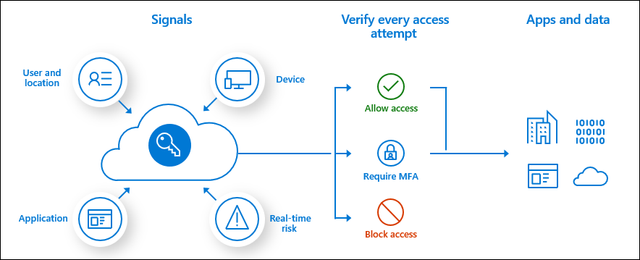
Because you can create many different policies for Conditional Access to secure access to your resources, these policies work slightly differently than you might expect. For example, with firewall rules, only the first policy that is triggered applies.
With Conditional Access, the effective policy for a user is determined by all the available policies, and they are combined. In addition, the following two rules are taken into account:
B2B and B2C can be seen as similar to how trusts used to work. This allows a user in an external Microsoft Entra ID tenant to access resources such as Teams channels or SharePoint sites in your own Microsoft Entra ID. The external user will be created as a guest in your Microsoft Entra ID, but the user from the external Microsoft Entra ID will use their own credentials and MFA. This provides high security and ease of use.
It is possible to block certain tenants (blacklist) or only allow certain tenants (whitelist) for use with guest users to prevent attacks or unwanted access. This can be configured in Microsoft Entra ID → External Identities → Cross-tenant access settings.
With B2C, it is entirely focused on customers. Customers can, for example, log in with Google or Facebook to an application published with Microsoft Entra ID. B2C does not work with guest users and is used purely for authentication. This must first be set up in Microsoft Entra ID → External Identities.
The traditional Active Directory with OUs and Group Policies is an outdated solution but is still needed for some applications/use cases (AVD/FSLogix). It is possible to get this as a service in Azure. A subscription to Azure is required for this.
With this solution, it is no longer necessary to set up and configure a separate VM as a Domain Controller. By default, this service is configured redundantly with 2 servers and a load balancer and costs about half (~90-100 euros per month, depending on the SKU and the number of objects) compared to a good server (~200 euros).
However, it has some limitations:
All in all, Microsoft Entra Domain Services is a good and quick solution with minimal administrative overhead for a company with a maximum of 30 employees and not too many different groups. For larger companies, I would definitely recommend 2 domain controllers and a self-hosted Active Directory.
The Identity part is a huge part of Microsoft Azure. At each level it’s good to know for the platform who is accessing it, what access policy must be enforced and what permissions the user has after completing the authentication process.
Because Identity has become the primary attack vector the last years, we have to defend ourselves to Identity-based attacks. This is because humans do the most with their identity and this is the most easy target for attackers.
Always keep the Zero Trust principals in mind when configuring identities:
To go back to the navigation page: https://justinverstijnen.nl/microsoft-azure-master-class-navigation/
You have reached the end of the page. You can navigate through other blog posts as well, share this post on X, LinkedIn and Reddit or return to the blog posts collection page. Thank you for visiting this post.
If you think something is wrong with this post or you want to know more, you can send me a message to one of my social profiles at: https://justinverstijnen.nl/about/
If you find this page and blog very useful and you want to leave a donation, you can use the button below to buy me a beer. Hosting and maintaining a website takes a lot of time and money. Thank you in advance and cheers :)
The terms and conditions apply to this post.
This chapter is about the term “Cloud” and the fundamentals of Microsoft Azure and Cloud Services in general.
The Cloud is a widely used term to say, “That runs elsewhere on the internet.” There are many different definitions, but the National Institute of Standards and Technology (NIST) in the United States has identified five characteristics that a service/solution must meet to call itself a cloud service:
Within cloud services, we have two different concepts of the Cloud: Public Cloud and Private Cloud:
Public Cloud: In the case of a Public Cloud, we refer to a cloud service such as Microsoft Azure, Google Cloud, or Amazon Web Services. With these services, servers are shared among different customers. Hence the term “Public Cloud.” However, data security is well-managed to ensure that sensitive business data doesn’t become publicly exposed, and various security options are available. In the case of the Public Cloud, you run your workload on servers in a data center owned by the Cloud Service Provider.
Private Cloud: With a Private Cloud/On-premises solution, a company hosts its own servers on its premises or in a rented data center. The customer is also responsible for resolving outages, designing the appropriate hardware configurations, managing the correct licenses, software, maintenance, and security.
Community Cloud: In a Community Cloud, a cloud provider makes part of the infrastructure available to, for example, government agencies and other non-profit organizations. These may be further isolated, and different pricing models apply, often with fixed pricing agreements.
When we talk about cloud or “As-a-service,” we mean that we are purchasing a specific service. In the past, you would often buy a server, a software package, or a certain license. In an as-a-service model, you pay monthly or annually for its use.
What is important to understand about different cloud services is that as a customer, even though you are using a service, you are still responsible for certain areas. See the matrix below; for example, with IaaS services, you are always responsible for the operating system, applications, and data.
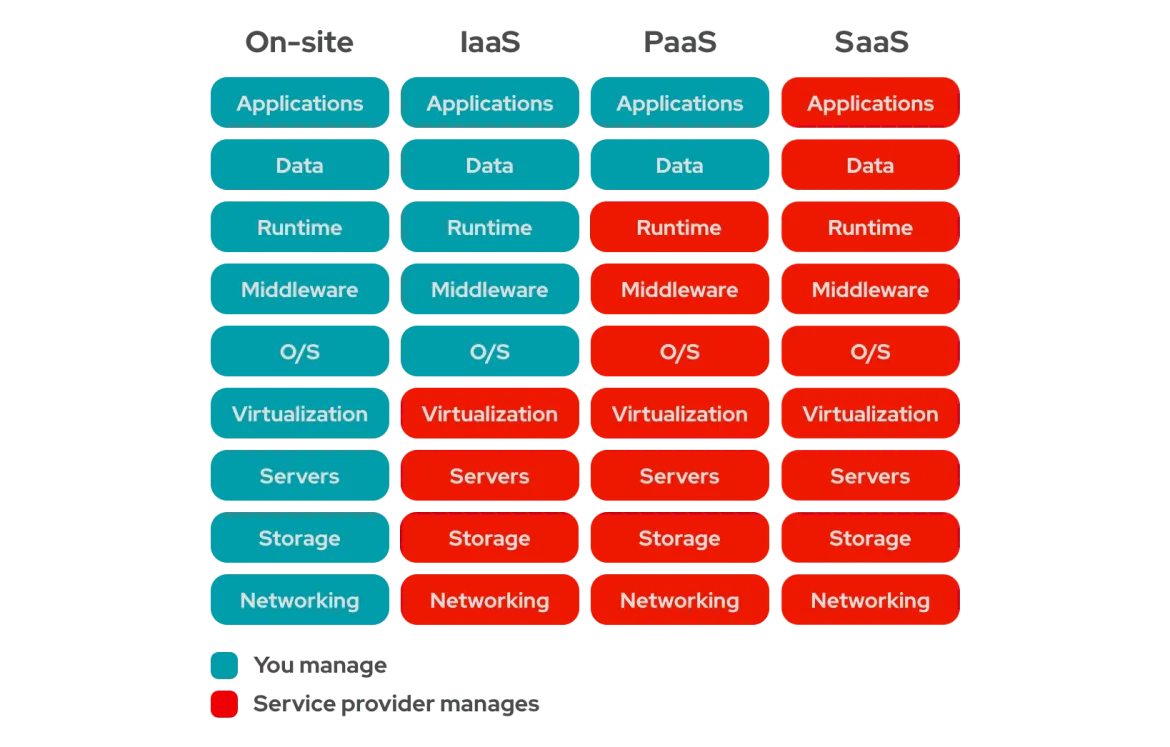
In general, there are three main types of cloud services:
Infrastructure-as-a-Service (IaaS): With IaaS, a company/customer is only responsible for the operating system layer and above. The infrastructure is provided as a service and is managed by the provider.
Platform-as-a-Service (PaaS): With PaaS, a company/customer is only responsible for the applications and data.
Software-as-a-Service (SaaS): With SaaS, a company/customer is only responsible for the configuration and permissions of the software. All underlying infrastructure and software are managed by the provider.
And we call self hosted servers:
There is no definitive answer to this question. Companies often have their own reasons for keeping certain servers on-site, such as sensitive data, outdated applications, or specific (hardware-related) integrations.
Different companies also have different priorities. One company may prefer a large hardware replacement cycle every 3 to 5 years with the high associated costs but lower operational expenses. Another company may prefer the opposite approach.
Good consultation with the customer and solid technical insight will help provide an answer to this question.
Other good scenarios for choosing the Public Cloud include:
This is because prices may initially seem quite high. However, when you take into account all the factors, such as those in the image below, you’ll see that the Cloud isn’t such a crazy option after all:
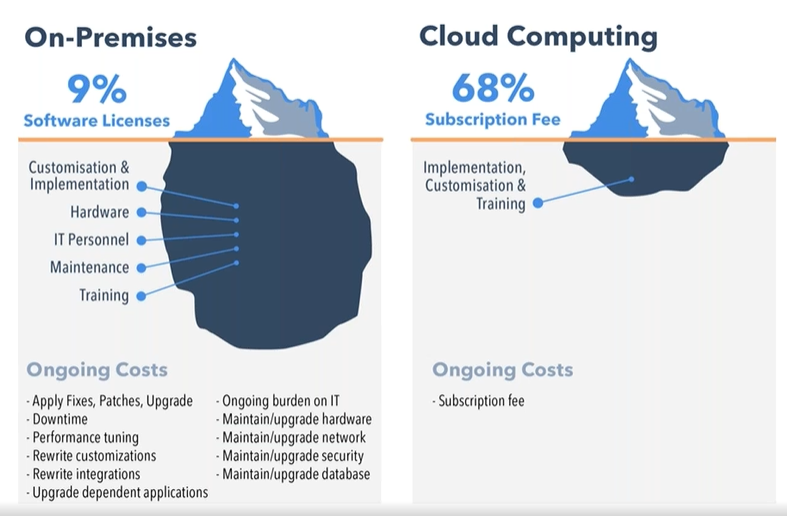
For on-premises (local) servers, for example, you incur the following costs that you don’t have in the cloud:
Microsoft Azure is an Infrastructure-as-a-Service (IaaS) cloud service designed to run compute and storage solutions.
It can serve as a replacement for physical servers and consists of dozens of different services, such as:
Most services in Microsoft Azure are “serverless.” This means you use a service without needing to manage or secure a server. Serverless solutions require the least maintenance, and Microsoft manages them for us and the customer.
Microsoft Azure works with the “Pay-as-you-go” model. This means you pay based on the usage of the cloud service and its resources. This makes the platform very flexible in terms of pricing.

Billing by Azure to a customer or reseller happens at the Subscription level, and payment methods are quite limited, usually to various types of credit cards.
To get an idea of what a specific service with your custom configuration costs, you can use the official Azure calculator, which can be found here: Pricing Calculator | Microsoft Azure.
Microsoft Azure has its own management portal. If an organization already has Microsoft 365, Microsoft Azure will already be set up, and you’ll only need a subscription and a payment method.
If an organization does not yet have Microsoft Azure, you can create an account and then set up a subscription.
The management portal is: Microsoft Azure. (https://portal.azure.com)
In Microsoft Azure, there are limits and quotas on what a specific organization can use. By default, the limits/quotas are quite low, but they can be increased. Microsoft wants to maintain control over which organizations can use large amounts of power and which cannot, while also dealing with the physical hardware that needs to be available for this. The purpose of quotas is to ensure the best experience for every Microsoft Azure customer.
Quotas can easily be increased via the Azure Portal → Quotas → Request quota increase. Here, you can submit a support request to increase a specific quota, and 9 out of 10 times, it will be increased within 5 minutes. If you submit a large request, it may take 2 to 3 business days.
Connecting many data centers and servers together requires a solid hierarchy and grouping. Additionally, it’s helpful to understand how the service is structured to identify any weaknesses in terms of resilience and redundancy.
Azure is structured as follows:
Microsoft Azure puts a lot of effort into ensuring the best availability for its customers and has the best options in place for this. However, there are differences in how Azure services are available or can be made available. This is important to consider when designing a solution architecture on Azure.
The table below shows which services can be categorized under the above concepts:
| Global | Regional | Zone-redundant | Zonal |
|---|---|---|---|
| Azure AD | Azure Virtual Networks | Azure Virtual Machines | Azure Virtual Machines |
| Azure Traffic Manager | Azure Functions | Azure Managed Disks | Azure SQL Database |
| Azure Front Door | Azure Key Vault | Azure Blob Storage | Azure VPN Gateway |
| Azure CDN | Azure Storage | Azure SQL Databases | |
| Azure Cosmos DB (with multi-master) | Azure Load Balancer | Azure Kubernetes Services | |
| Azure DevOps Services | Azure Service Bus | Azure Key Vault | |
| Azure Search | Azure Application Gateway | ||
| Azure Event Hub | Azure Load Balancer | ||
| Azure Firewall |
Microsoft Azure is a Infrastructure-as-a-service platform which is cloud based. It focusses primairly on replacing your infrastructure and hosting it in the cloud. This goes further than hosting a virtual machine or hosting a file storage.
{{< ads >}}
{{< article-footer >}}
Hey there! I have a new collection of blog posts here. A while ago (2023) I followed the Azure Master Class course of John Savill, and done some extra research into some of the components of Azure. I wrote those things down to learn from it and have some documentation. Firstly, this was for personal use but after founding this website and blog I decided to rework it and publish all the information because I think it can be very helpful.
The pages are very interesting (according to myself ;), but are not neccesarily to prepare you for a specific exam. It contains overal general knowledge of Azure, its components and some deep information about services. It is true that some information can really help you understand those concepts which can appear in your Azure exams journey.
1: Fundamentals of Cloud & Azure
7: Virtual Machines and Scale Sets
8: Application Services and Containers
11: Infrastructure as Code (IaC) and DevOps
The biggest source of all the information found in this Master Class are the Azure Master Class video’s of John Savill, which you can find here:
https://www.youtube.com/watch?v=BlSVX1WqTXk&list=PLlVtbbG169nGccbp8VSpAozu3w9xSQJoY
Some concepts are basically the explaination, some of them are added with some practical knowledge or other knowledge from the internet or added with AI. Check out the “AI Generated Content” tag on the pages to learn more about this.
Other information comes from or is confirmed using the official learn.microsoft.com page.
You have reached the end of the page. You can navigate through other blog posts as well, share this post on X, LinkedIn and Reddit or return to the blog posts collection page. Thank you for visiting this post.
If you think something is wrong with this post or you want to know more, you can send me a message to one of my social profiles at: https://justinverstijnen.nl/about/
If you find this page and blog very useful and you want to leave a donation, you can use the button below to buy me a beer. Hosting and maintaining a website takes a lot of time and money. Thank you in advance and cheers :)
The terms and conditions apply to this post.
All pages referring or tutorials for Azure Virtual Desktop.
Microsoft released that the Kerberos protocol will be hardened by an update coming in April to June 2026 to increase security. This was released by Microsoft here:
At first, they are not very specific about how to check what Kerberos encryption your environment uses and how to solve this before becoming a problem. I will do my best to explain this and show you how to solve it.
Microsoft already introduced Kerberos-related hardening changes in updates released since November 2022, which significantly reduced RC4 usage in many environments. However, administrators should still verify whether specific accounts, services or devices are explicitly or implicitly relying on RC4 before disabling it. In this guide, I will explain to you how to do this.
Kerberos is the authentication protocol used in Microsoft Active Directory Domain Services. This is being used to authenticate yourself to servers and different services within that domain, such as an Azure Files share.
Kerberos works with tickets and those tickets can be encrypted using different encryption types, where we have two important ones:
These tickets are being granted in step 3 of the diagram below:
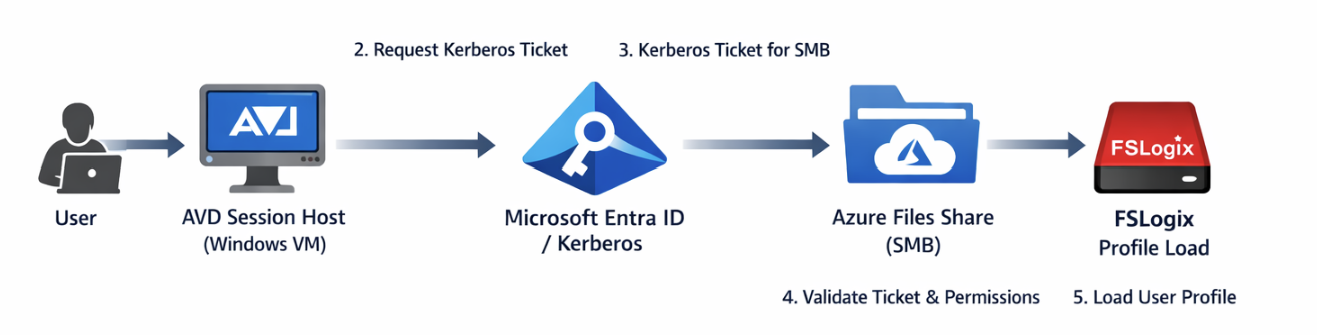
The resources impacted by this coming update and protocol deprecation are all sorts of domain-joined dependencies using Kerberos tickets, like AD DS-joined Azure Files shares.
However, this scope may not be limited to Azure Files or FSLogix only. Any resource that depends on Kerberos authentication can be affected if RC4 is still being used somewhere in the chain. This can include file servers, SMB shares, legacy service accounts, older joined devices, third-party appliances and applications that rely on Active Directory authentication. In many environments, the real risk is not the primary workload itself, but an older dependency that still expects RC4 without this being immediately visible.
We can check our current storage account configuration in Azure to check if we still use both protocols or only the newer AES-256 option by going to the storage account:
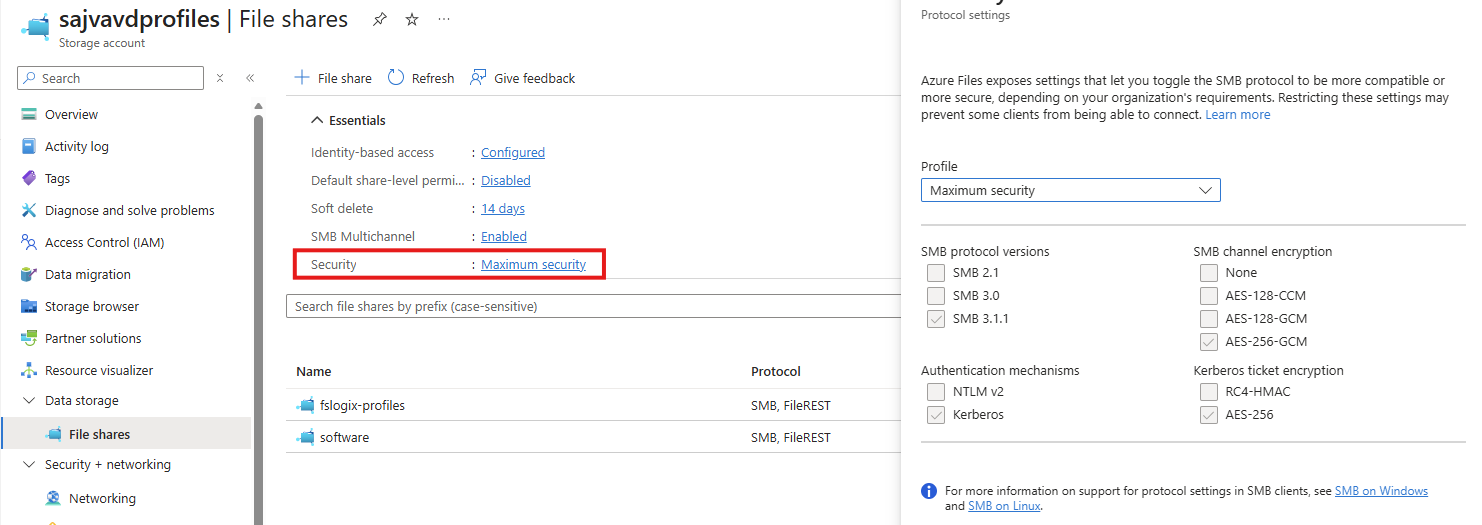
By clicking on the “Security” part, we get the overview of protocols being used by AD DS, Kerberos and SMB. This part goes about the part in the bottom right corner (Kerberos ticket encryption):
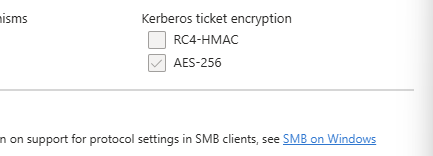
If you are already using the maximum security preset, you don’t have to change anything and you are good to go for the coming updates.
After the hardening updates coming to Windows PCs and Windows Server installations, the RC4-HMAC protocol will be phased out and not available to use, so we must take steps to disable this protocol without user disruption.
To check different server connections in your Active Directory for other resources, you can use this command. This will show the actual encryption method by Kerberos used to connect to a resource.
Replace “servername” with the actual file server you connect to.
klist get cifs/servernameFor example:
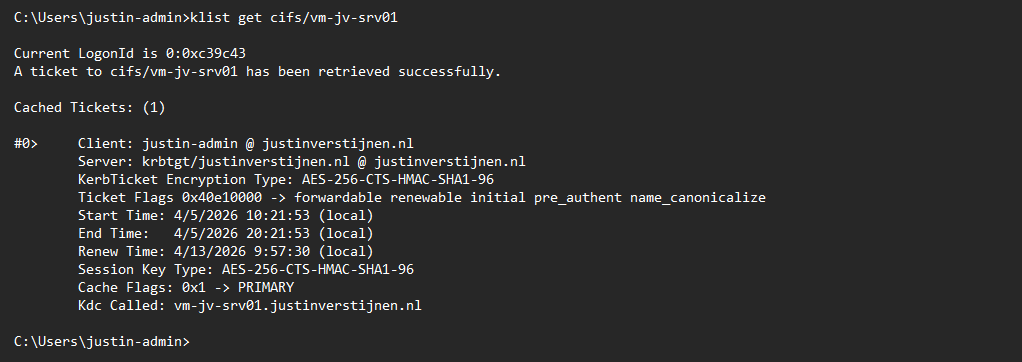
This returns the information about the current Kerberos ticket, and as you can see at the KerbTicket Encryption Type, AES-256 is being used, which is the newer protocol.
You can also retrieve all current tickets on your computer to check all tickets for their encryption protocol with this command:
klistIn our Active Directory, we can audit if RC4 encryption is being used. The best and easiest way is to open up the Event Logs on a domain controller in your environment and check for these event IDs:
You can also use this PowerShell one-liner to get all RC4 events in the last 30 days.
Get-WinEvent -FilterHashtable @{LogName='Security'; Id=4768,4769; StartTime=(Get-Date).AddDays(-30); EndTime=(Get-Date)} | Select-Object TimeCreated, Id, MachineName, Message | Format-Table -AutoSize -WrapIf there are any events available, you can trace what resource still uses this older encryption and what possibly can be impacted after the update. If no events show, then your environment is ready for this upcoming change.
My advice is to check this on all your domain controllers to make sure you have checked all types of RC4 requests.
As Microsoft already patched this in November 2022, we can disable the RC4-HMAC protocol in the Azure Portal. Most Windows versions supported today already are patched, disabling the RC4-HMAC by default but optional if scenarios still require this protocol.
In my environment, I am using a Windows 11-based AVD environment and have a Domain Controller with Windows Server 2022. I disabled the RC4-HMAC without any problems or user interruption.
Although, I highly recommend performing this change during off-business hours to prevent any user interruption.
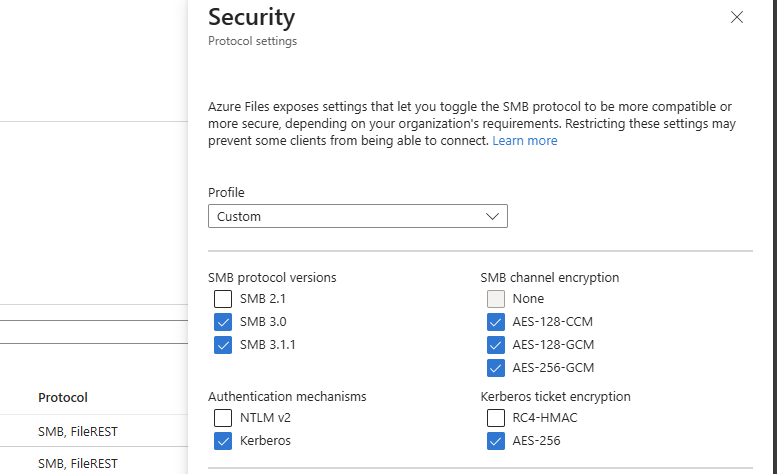
If the protocol is disabled and FSLogix still works, the change has been successfully done. We prepared our environment for the coming change and can now possibly troubleshoot any problems instead of a random Windows Update disabling this protocol and impacting your environment.
This blog post described the deprecation of the older RC4-HMAC protocol and what can possibly impact your environment. If using only modern operating systems, there is a great chance you don’t have to change anything. However, if older operating systems than Windows 11 are being used, this update can possibly impact your environment.
If your environment already uses AES-based Kerberos encryption for Azure Files, FSLogix and other SMB-dependent workloads, you are likely in a good position. If not, now is the right time to test, remediate and switch in a controlled way instead of finding out after the Windows updates are installed. We IT guys like controlled change of protocols where we actually know what could impact different workloads and give errors.
Thank you for visiting this page and I hope it was helpful.
These sources helped me by writing and research for this post;
You have reached the end of the page. You can navigate through other blog posts as well, share this post on X, LinkedIn and Reddit or return to the blog posts collection page. Thank you for visiting this post.
If you think something is wrong with this post or you want to know more, you can send me a message to one of my social profiles at: https://justinverstijnen.nl/about/
If you find this page and blog very useful and you want to leave a donation, you can use the button below to buy me a beer. Hosting and maintaining a website takes a lot of time and money. Thank you in advance and cheers :)
The terms and conditions apply to this post.
Microsoft announced RemoteAppV2 under some pretty enhancements on top of the older RemoteApp engine. This newer version has some improvements like:
I cannot really show this in pictures, but if you test V2 alongside V1, you definitely notice these small visual enhancements. However, a wanted feature called “drag-and-drop” is still not possible on V2.
Source: https://learn.microsoft.com/en-us/azure/virtual-desktop/remoteapp-enhancements
To enable RemoteAppV2, you need to set a registry key as long as the preview is running. Make sure you are compliant with the requirements as described on this page (client + hosts):
https://learn.microsoft.com/en-us/azure/virtual-desktop/remoteapp-enhancements#prerequisites
We can do this manually or through a Powershell script which you can deploy with Intune:
$registryPath = "HKLM:\Software\Policies\Microsoft\Windows NT\Terminal Services"

if (-not (Test-Path $registryPath)) {
    New-Item -Path $registryPath -Force | Out-Null
}

New-ItemProperty `
    -Path $registryPath `
    -Name "EnableRemoteAppV2" `
    -PropertyType DWord `
    -Value 1 `
    -Force | Out-Null
This should look like this:
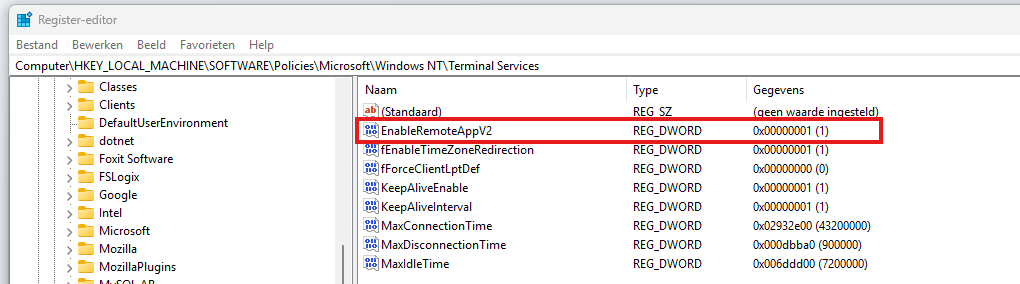
When enabled the registry key, the host must be restarted to make the changes effective. After that, when opening a Remote App, press the following shortcut:
Then right click the title bar and click Connection Information
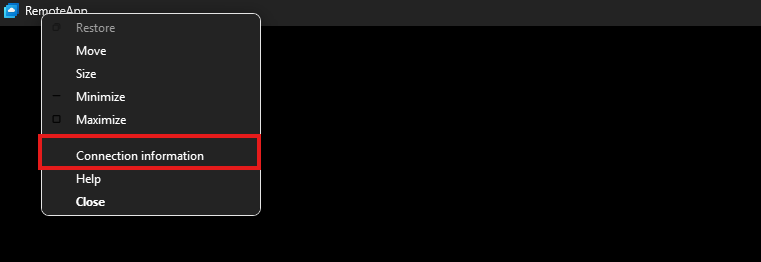
This gives you the RDP session information, just like with full desktops.
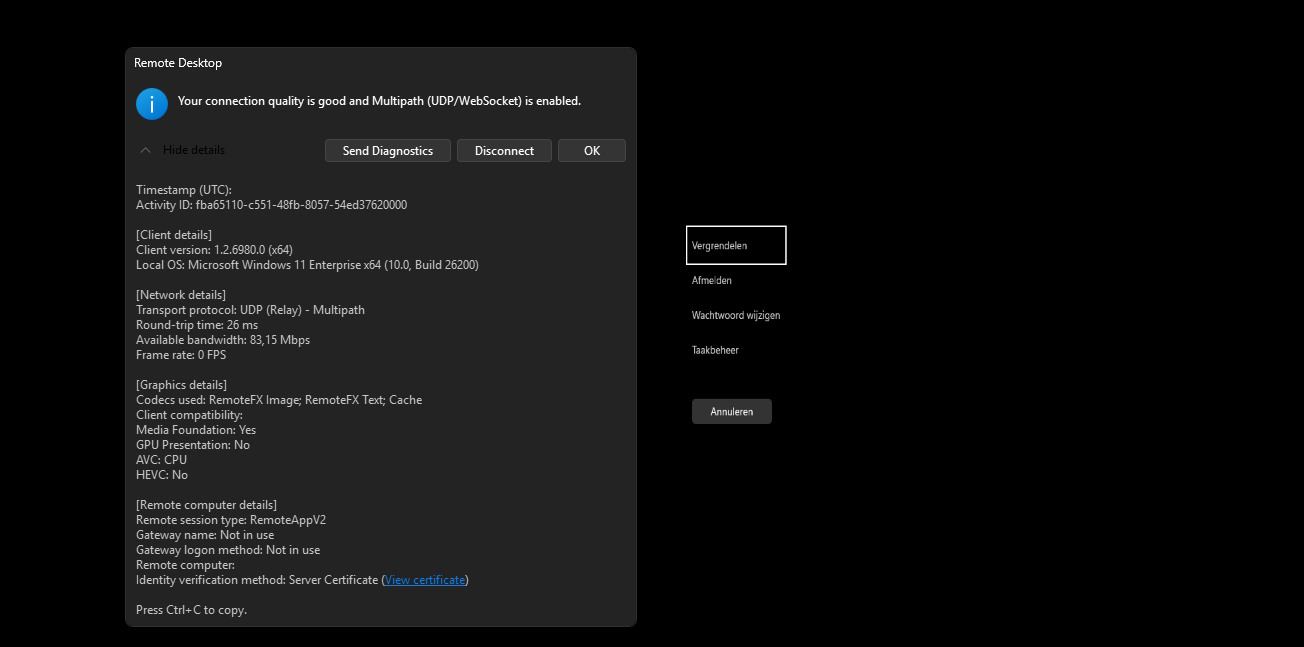
Under the Remote session type, you must see RemoteAppV2 now. Then the new enhancements are applied.
The one thing which pushes me away from using RemoteApp is the missing drag and drop functionality. This is something a lot of users want when working in certain applications. This V2 version also lacks this functionality.
I also couldn’t get it to work with the validation environment setting only. In my case, I had to create the registry key.
These sources helped me by writing and research for this post;
You have reached the end of the page. You can navigate through other blog posts as well, share this post on X, LinkedIn and Reddit or return to the blog posts collection page. Thank you for visiting this post.
If you think something is wrong with this post or you want to know more, you can send me a message to one of my social profiles at: https://justinverstijnen.nl/about/
If you find this page and blog very useful and you want to leave a donation, you can use the button below to buy me a beer. Hosting and maintaining a website takes a lot of time and money. Thank you in advance and cheers :)
The terms and conditions apply to this post.
When I first chose to use V6 or V7 machines with Azure Virtual Desktop, I ran into some boot controller errors about the boot controller not supporting SCSI images.
Because I really wanted to use higher version VMs, I went to research on how to solve this problem. I will describe the process from creating the initial imaging VM, to capture and installing new AVD hosts with our new image.
When using V6 and higher version Virtual Machines in Azure, the Boot Controller will also change from the older SCSI to NVMe. When using local VM storage, this could give a pretty disk performance increase but not really for Azure Virtual Desktop. We mostly use managed disks here so we don’t use that storage.
This change means that we have to also use a NVMe capable image storage, and this brings us to Azure Compute Gallery. With this Azure solution, we are able to do image versioning and has support for NVMe enabled VMs.
I used the managed images option in the past, as this was the most efficient option to deploy images very fast. However, NVMe controller VMs are not supported by those managed images and we can install up to V5 only.
| VM Version | Boot controller |
| v1-4 | SCSI |
| v5 | SCSI |
| v6 | NVMe |
| v7 | NVMe |
Because I wondered what the performance difference could be between similar v5 and v7 machines in Azure, I did two benchmark tests on both machines. Both using these software:
This gave pretty interesting results:
| Benchmark software | E4s_v5 | E4as_v7 |
| Geekbench 6 Single Core | 1530 | 2377 |
| Geekbench 6 Multi Core | 3197 | 5881 |
| Passmark CPU | 5950 | 9092 |
This result would indicate a theoretical CPU performance increase of around 55%.
Click here for benchmark results
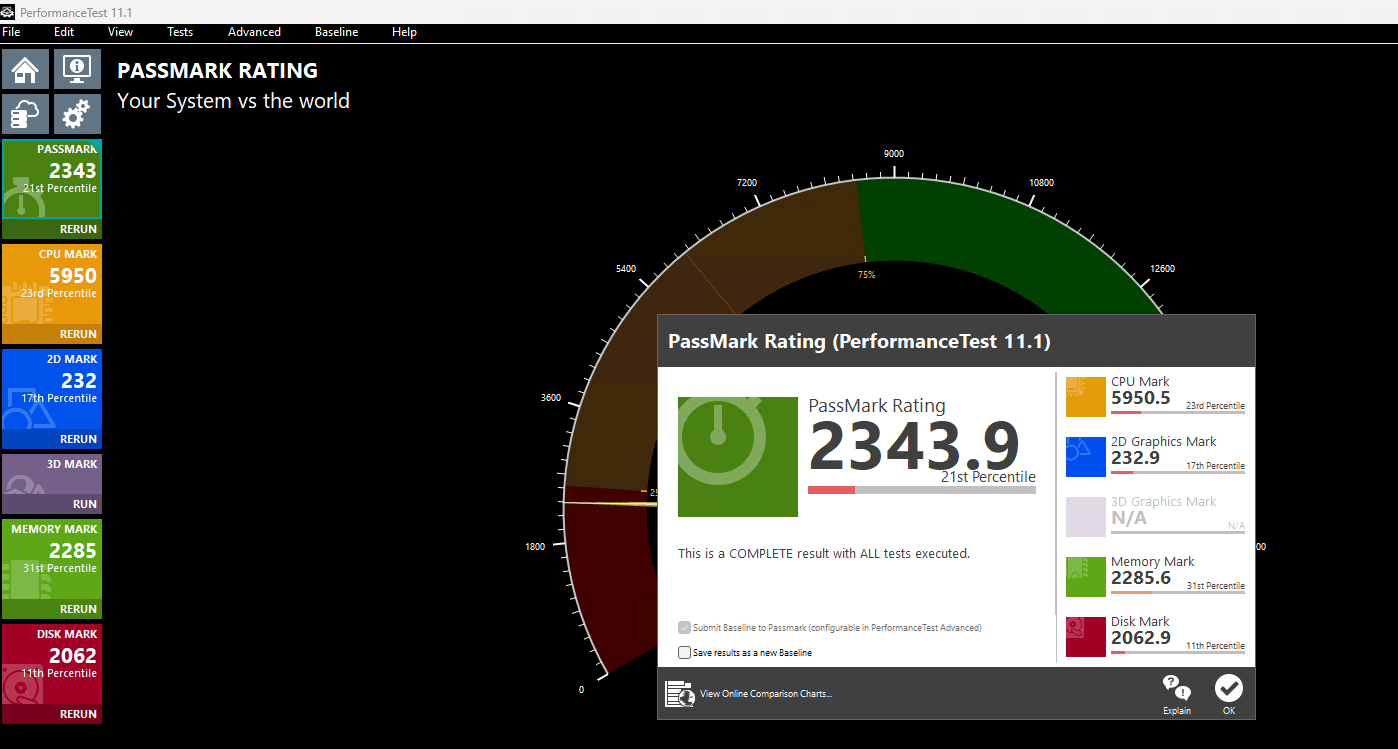
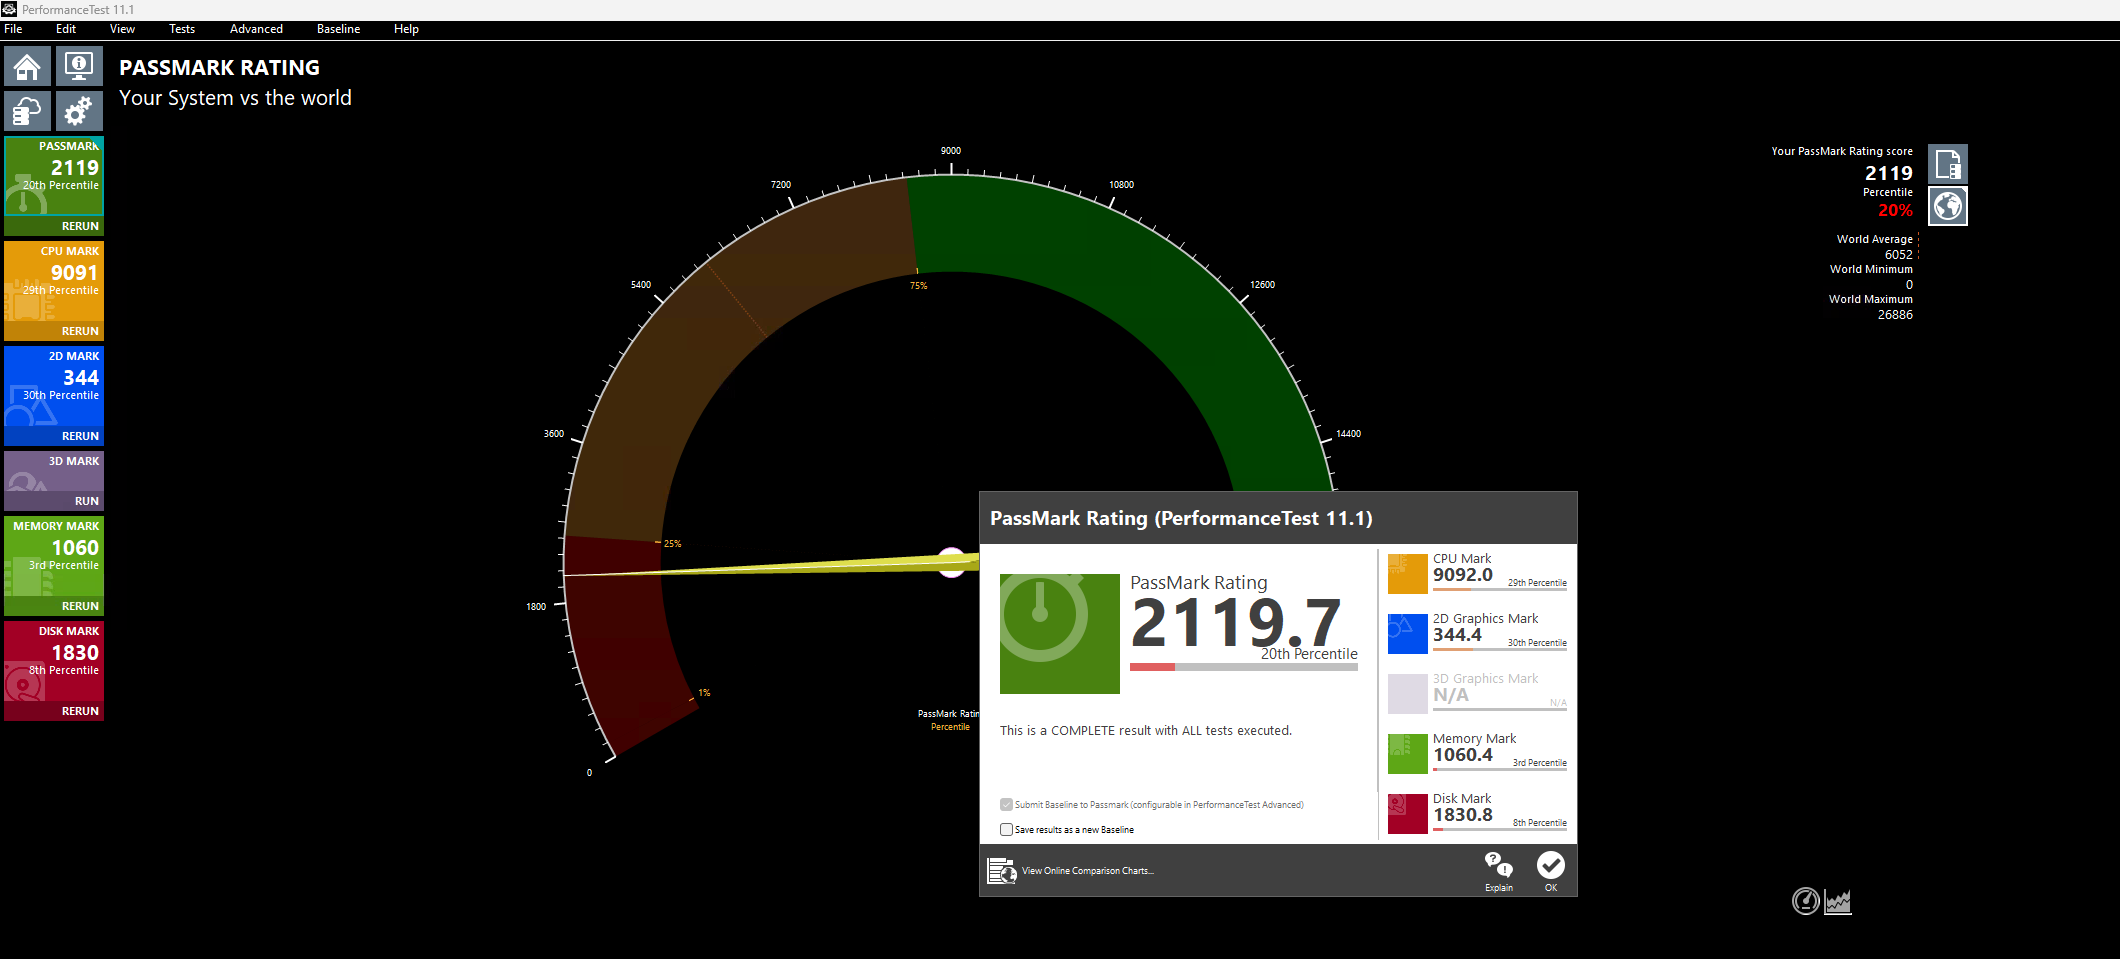
Let’s start by creating our imaging PC. This is a temporary VM which we will do all our configurations on before mass deployment. Think of:
In the Azure Portal (https://portal.azure.com), create a resource group if not already having one for this purpose.
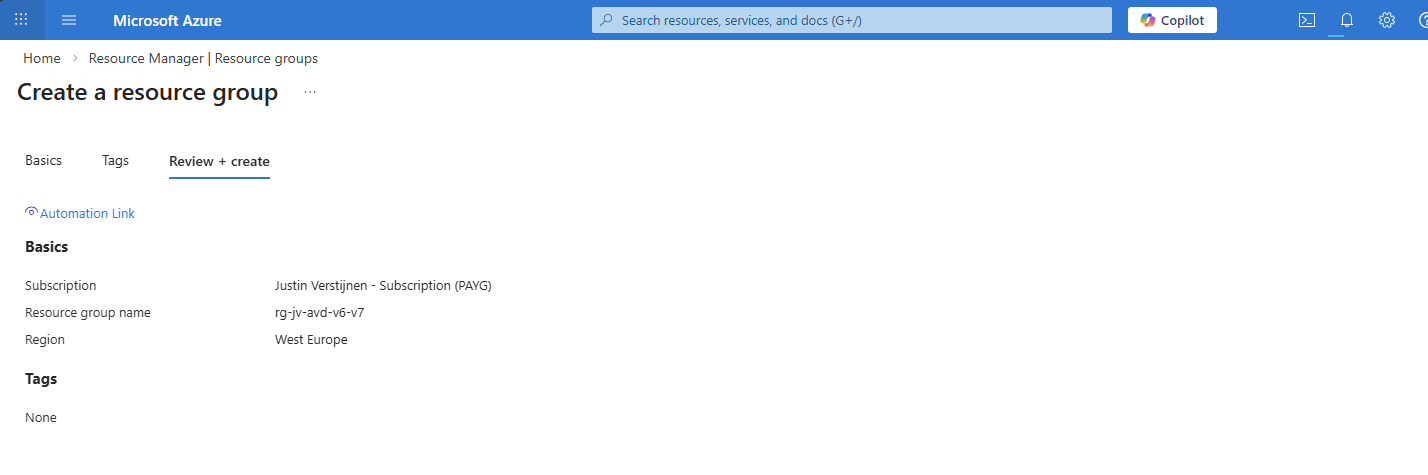
Now let’s go to “Virtual Machines” to create a temporary virtual machine. My advice is to always use the exact same size/specs as you will roll out in the future.

Create a new virtual machine using your settings. I chose the RDP top be opened so we can login to the virtual machine to install applications and such. Ensure you select the Multi-session marketplace image if you use a Pooled hostpool.
The option “Trusted launch virtual machines” is mandatory for these NVMe based VM sizes, so keep this option configured.
This VM creation process takes around 5 minutes.
Now we need to do our customizations. I would advise to do this in this order:
Connect to the virtual machine using RDP. You can use the Public IP assigned to the virtual machine to connect to:
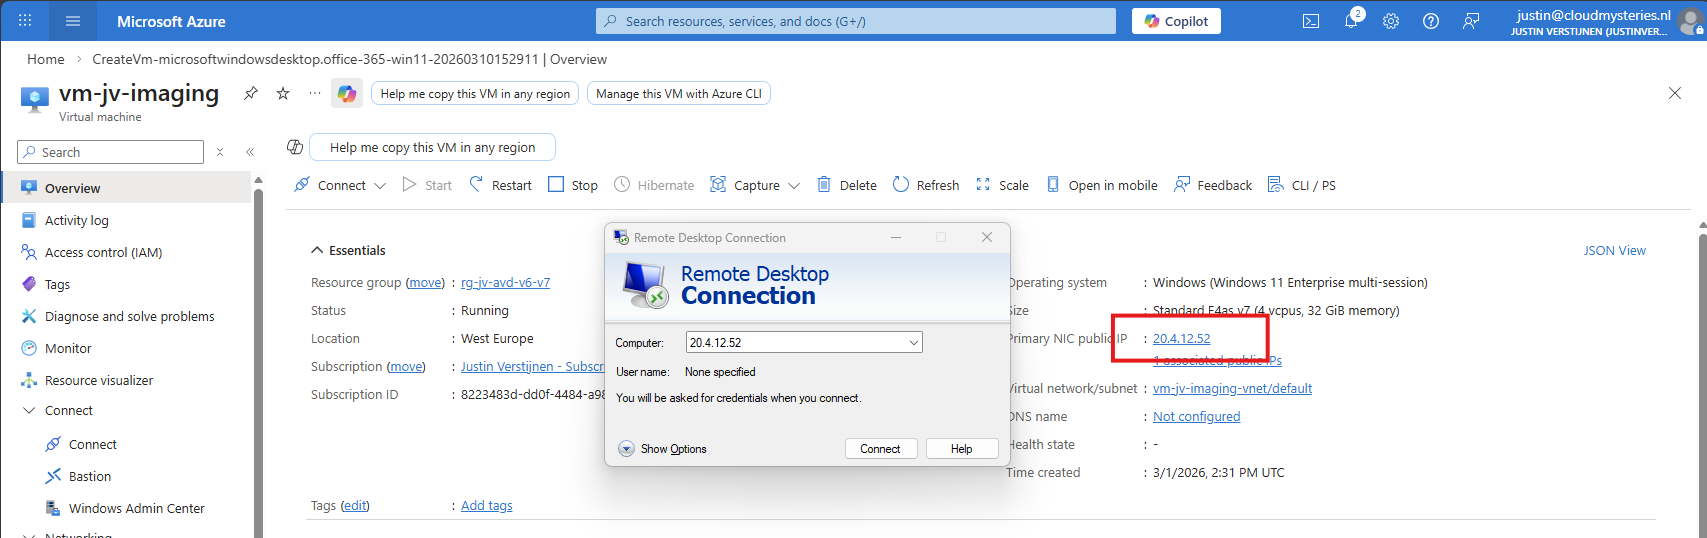
After logging in with the credentials you spefidied in the Azure VM wizard we are connected.
First I executed the Virtual Desktop Optimization tool:
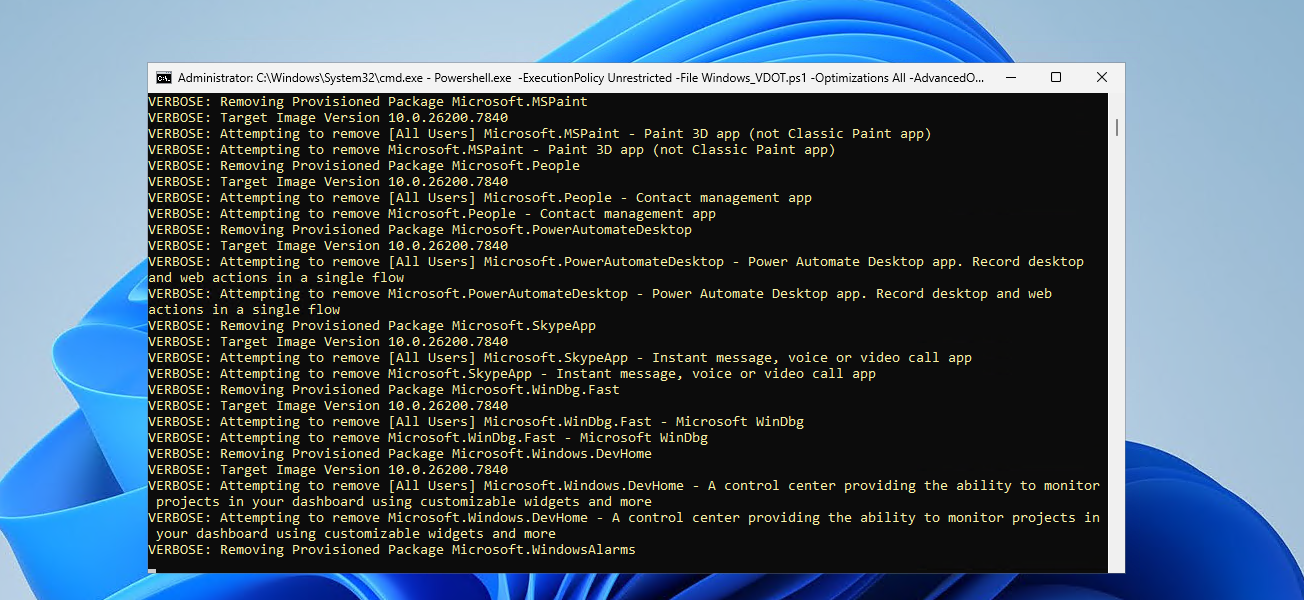
Then ran my script to change the language which you can find here: https://justinverstijnen.nl/set-correct-language-and-timezone-on-azure-vm/
And finally installed the latest updates and applications. I dont like preview updates in production environments so not installed the update awaiting.
Now that we have our machine ready, it’s time to execute an application called sysprep. This makes the installation ready for mass deployment, eliminating every driver, (S)ID and other specific information to this machine.
You can find this here:
Put this line into the “Run” window and the applications opens itself.
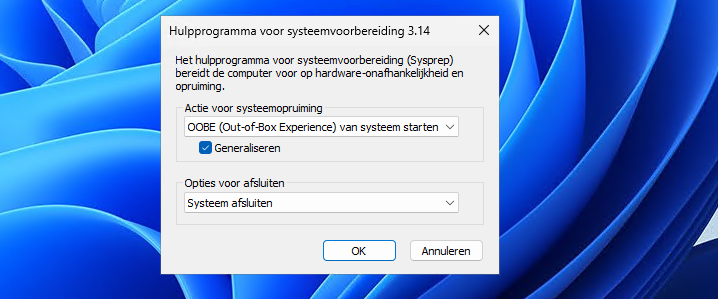
Select “Generalize” and choose the option to shutdown the machine after completing.
If getting an error that Bitlocker Drive Encryption is enabled, execute this command to disable it (you can re-enable it after deployment):
PowerShell
manage-bde -off C:
Wait for around 15 minutes to finish decryption, then try Sysprep again.
The machine will now clean itself up and then shutdown. This process can take up to 20 minutes, in the meanwhile you can advance with step 4.
Before we can capture the VM, we must first create a space for it. This is the Azure Compute Gallery, a managed image repository inside of your Azure environment.
Go to “Azure compute galleries” and create a new ACG.
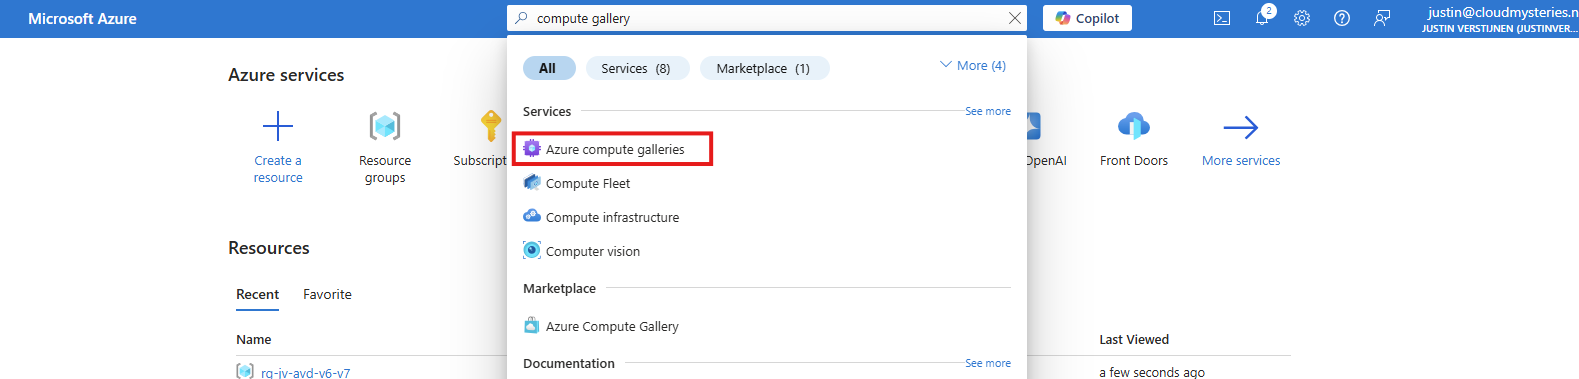
Give the ACG a name and place it in the right Subscription/Resouce Group.
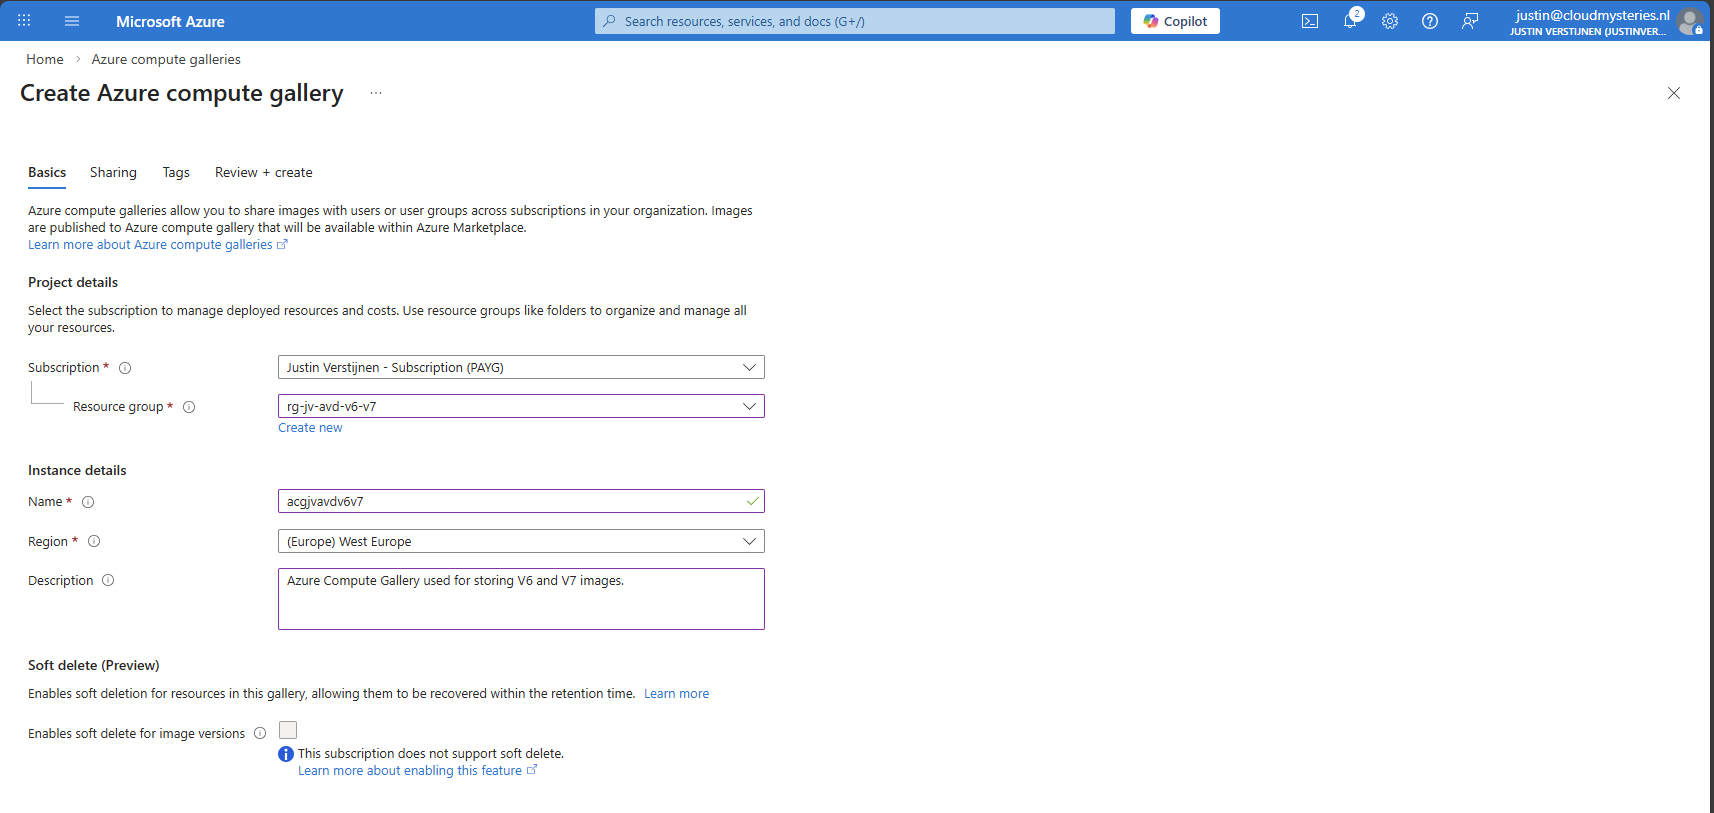
Then click “Next”.
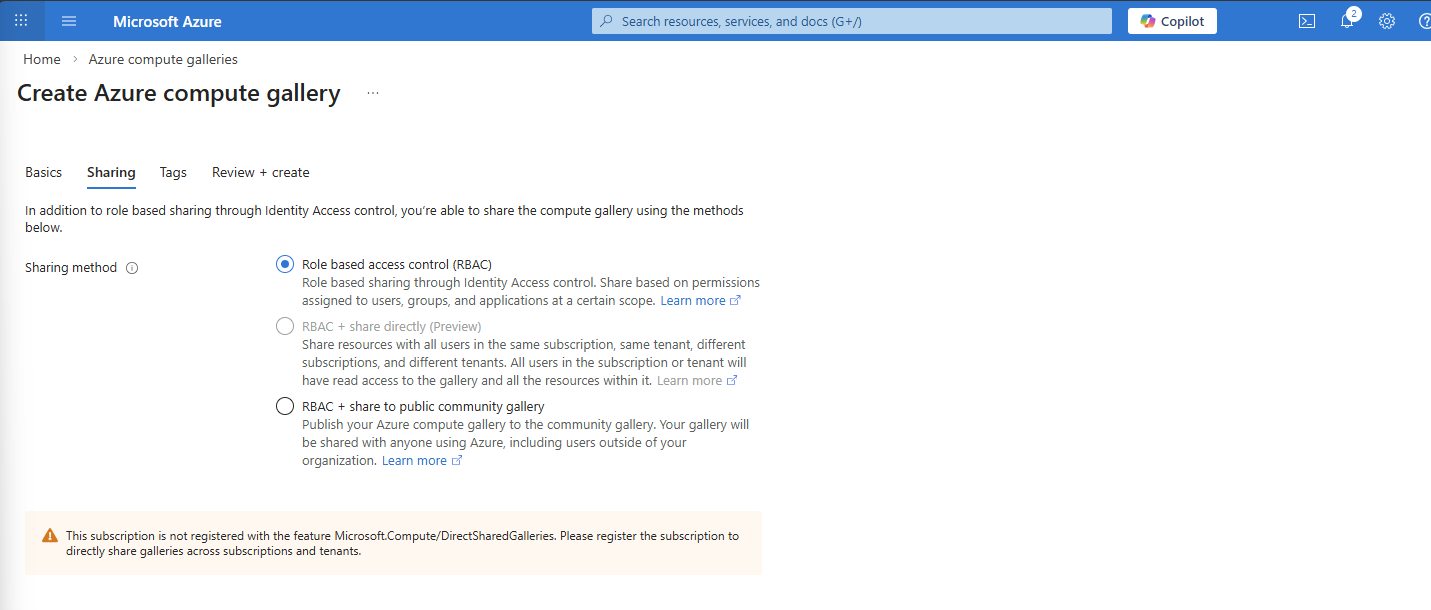
I use the default “RBAC” option at the “Sharing” tab as I dont want to publicy share this image. With the other options, you could share images acros other tenants if you want.
After finishing the wizard, create the Compute Gallery and wait for it to deploy which takes several seconds.
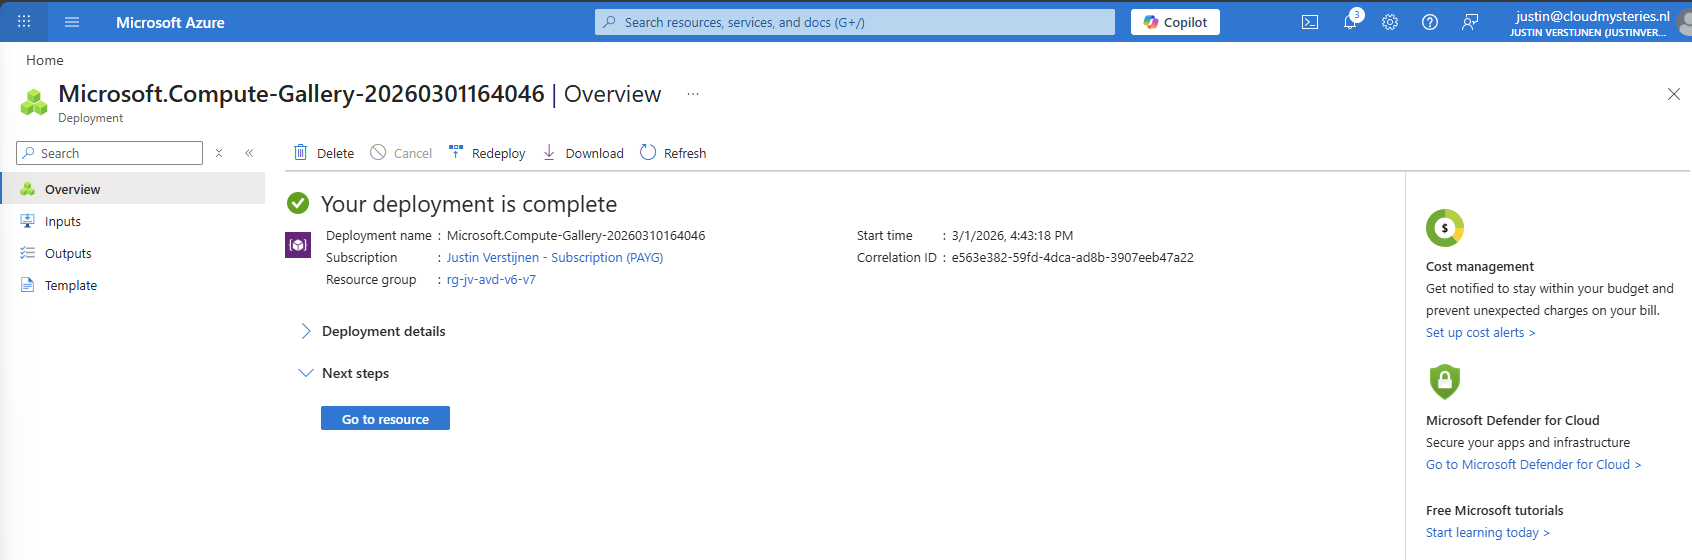
We can now finally capture our VM image and store it in the just created ACG. Go back to the virtual machine you have sysprepped.
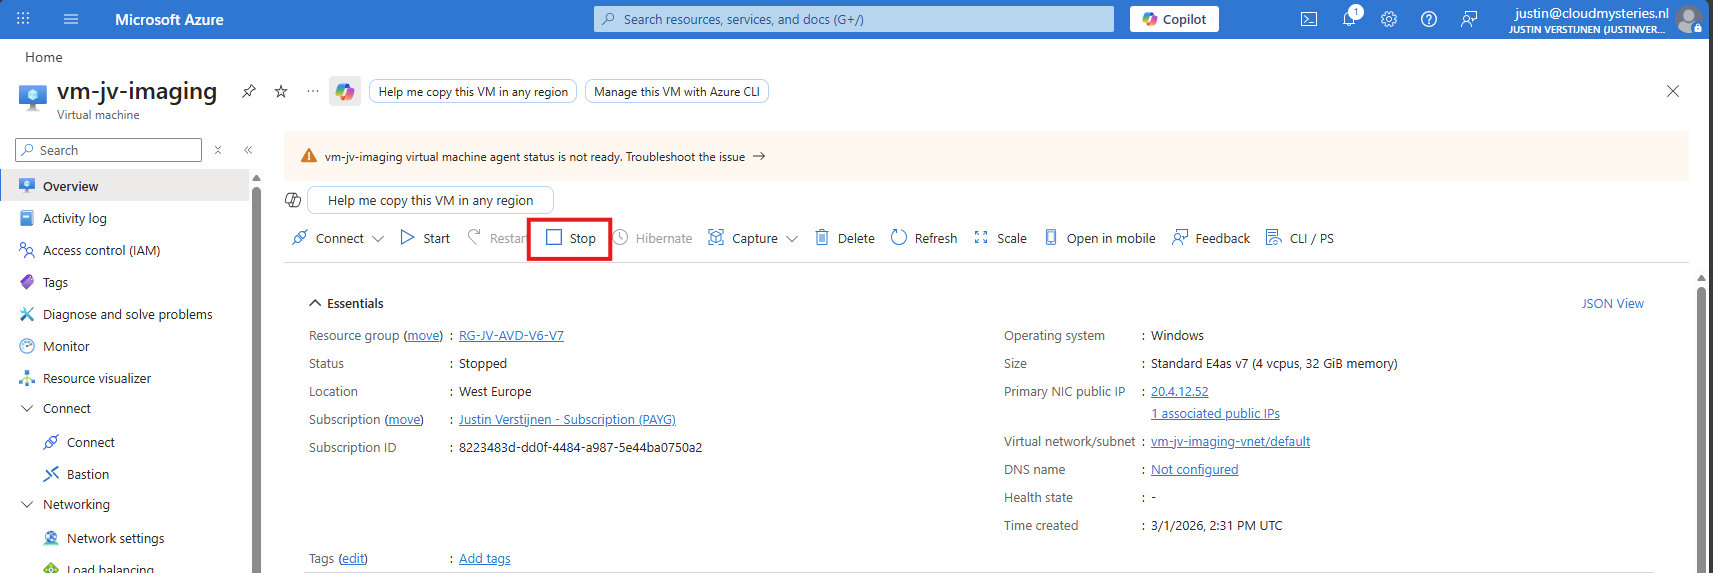
As it is “Stopped” but not “Deallocated”, we must first click “Stop” to deallocate the VM. This is because the OS itself gave the shutdown command but this does not really de-allocate the machine, and is still stand-by.
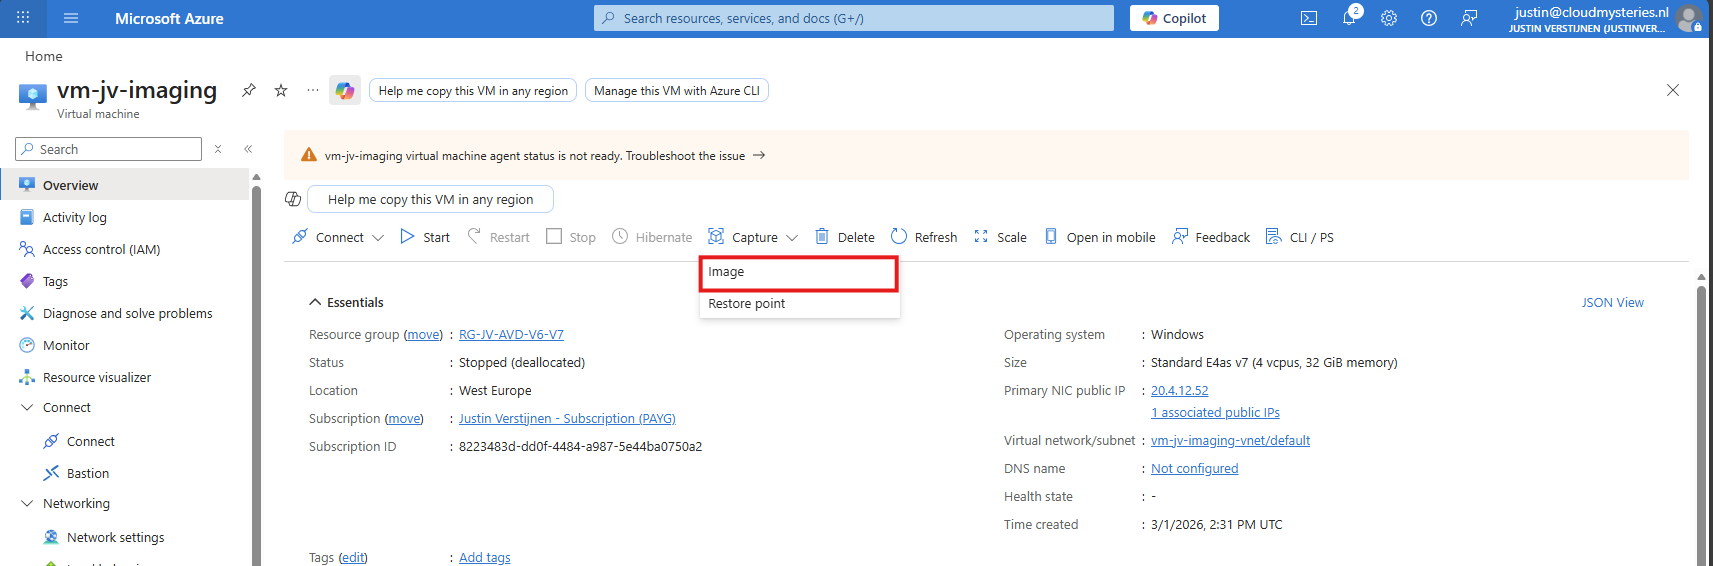
Now click “Capture” and select the “Image” option.
Now we get a wizard where we have to select our ACG and define our image:
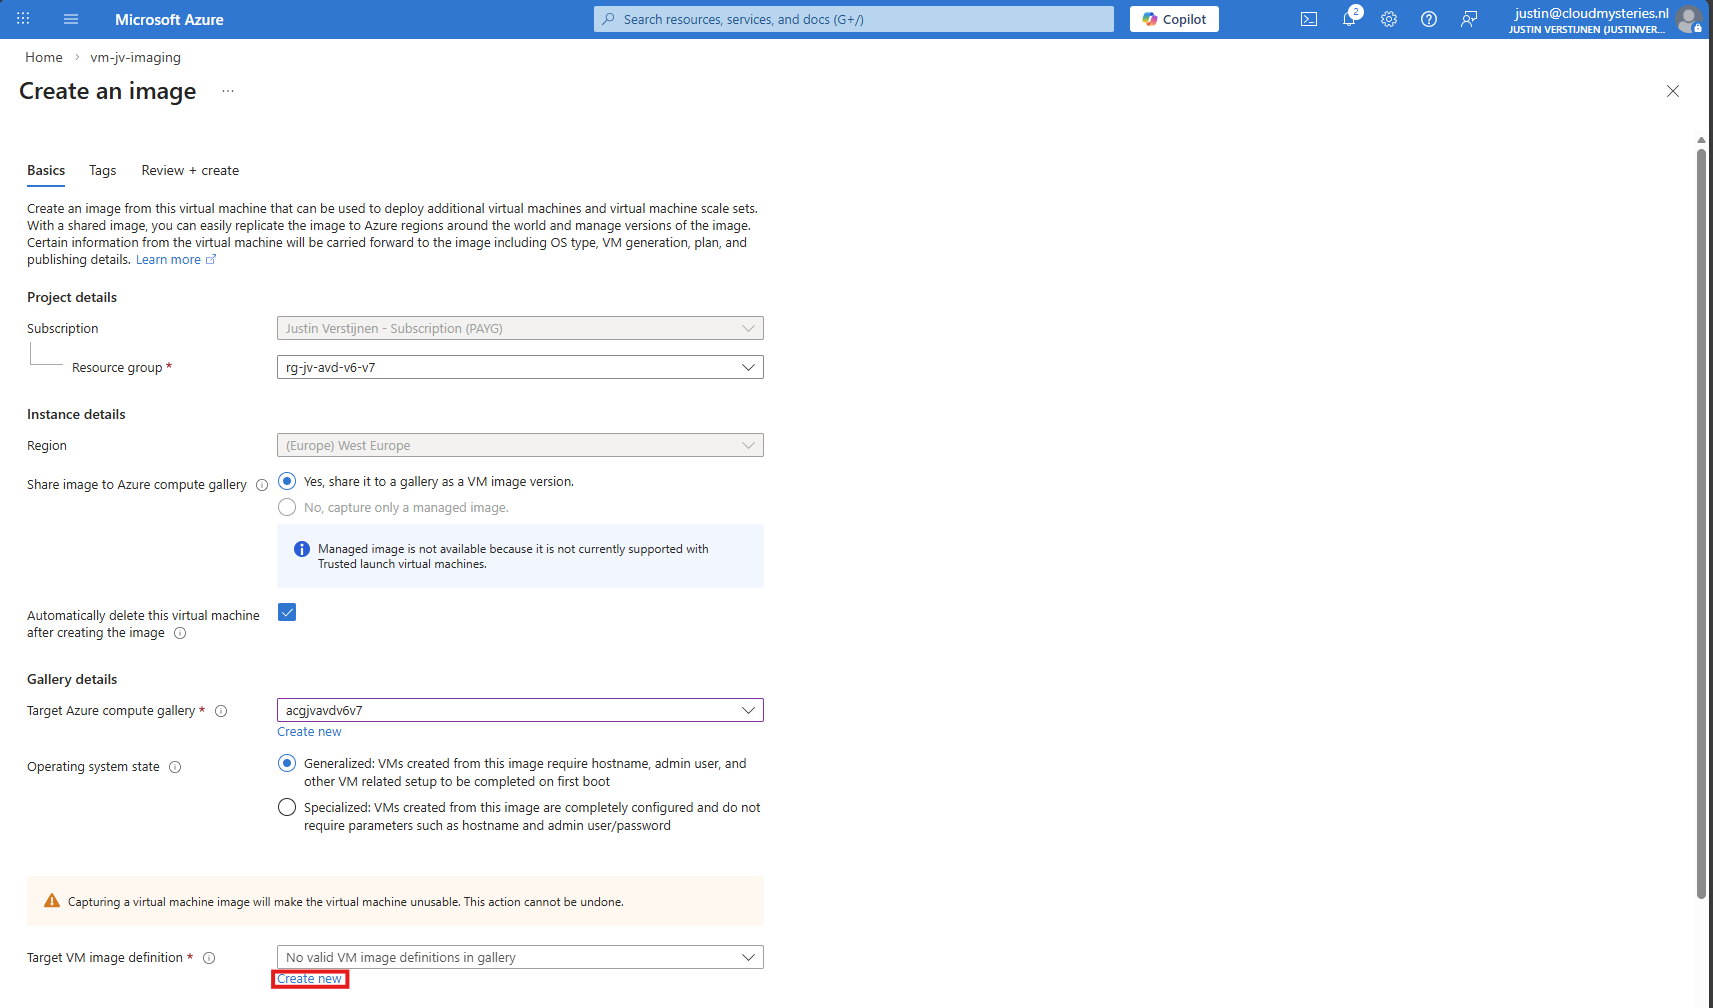
Click on “Create new” to create a new image definition:
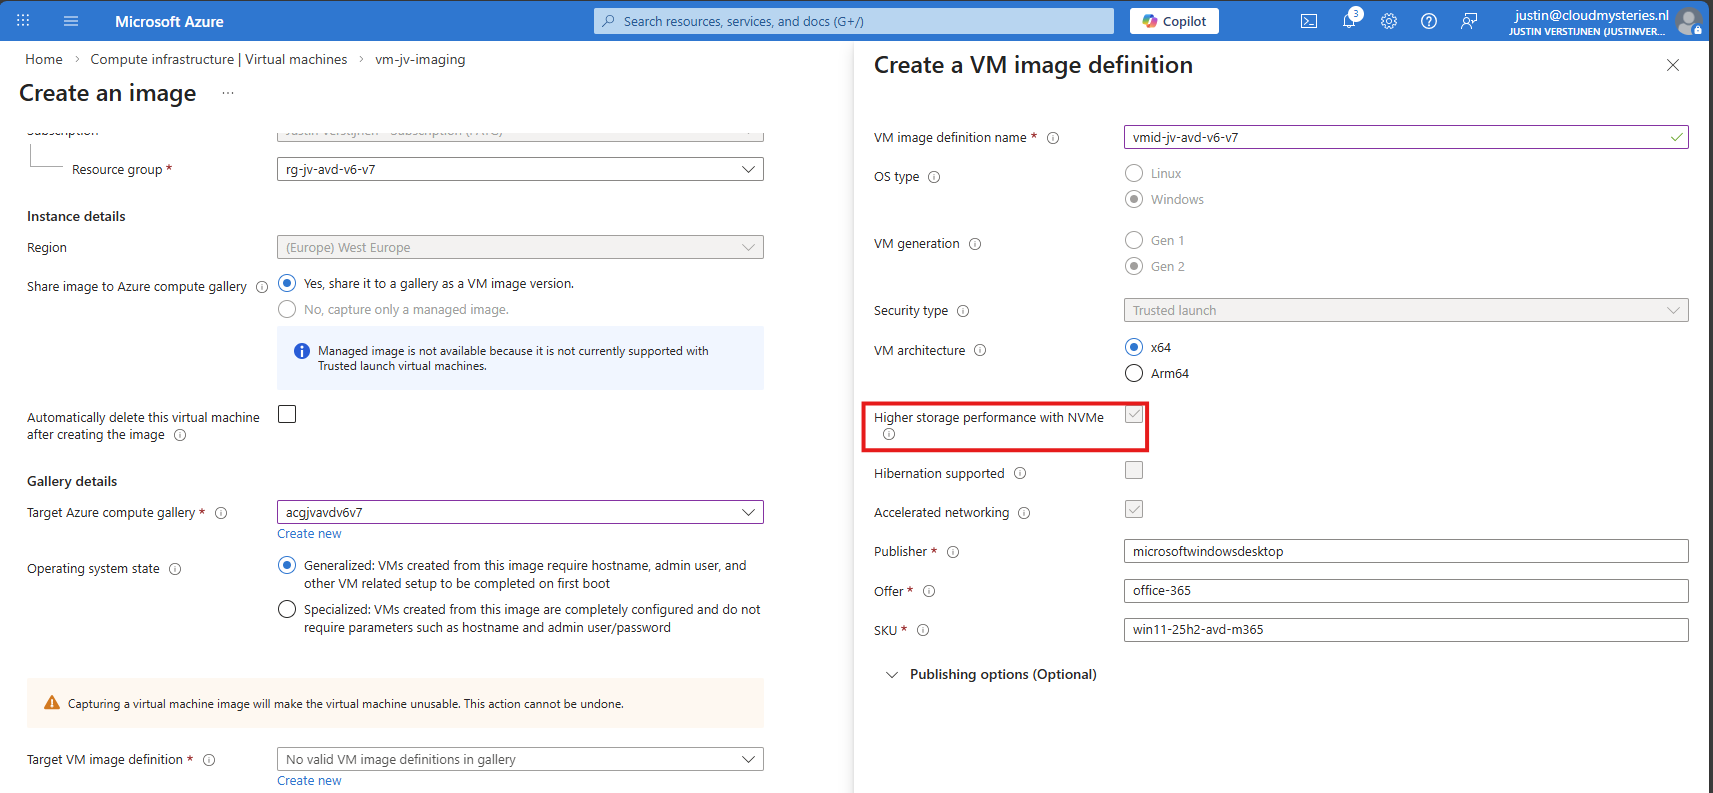
Give this a name and ensure that the check for “NVMe” is checked. Checking this mark enables NVMe support, while also still maintaining the SCSI support. Finish the versioning of the image and then advance through the wizard:
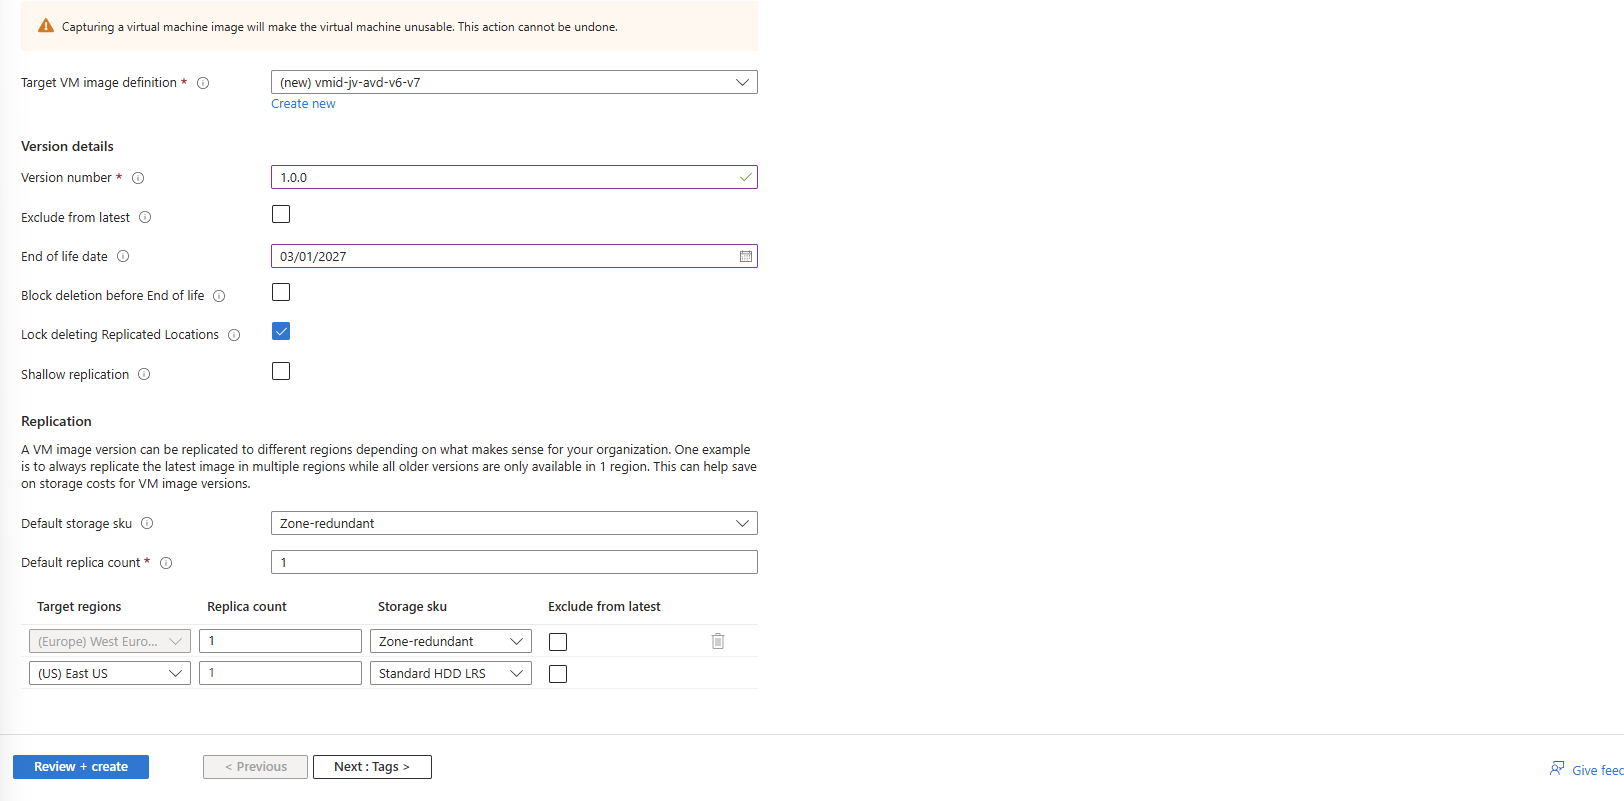
The image will then be created:
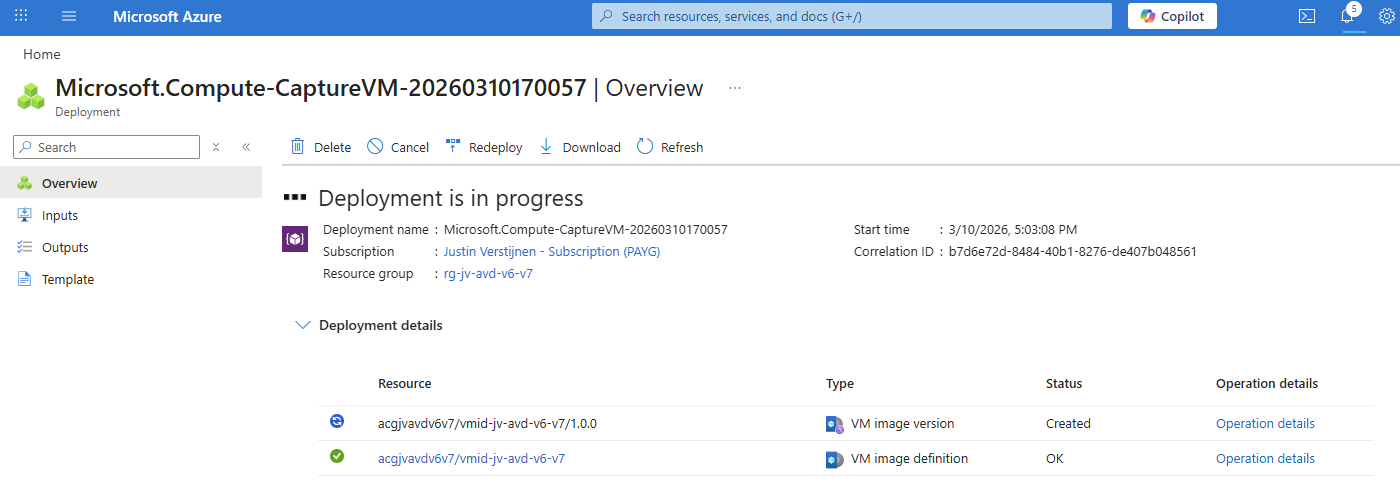
If you want, you can check the VM support of your image using this simple Azure PowerShell scipt:
$rg = "your resourcegroup"
$gallery = "your gallery"
$imageDef = "your image definition"

$def = Get-AzGalleryImageDefinition `
    -ResourceGroupName $rg `
    -GalleryName $gallery `
    -Name $imageDef

$def.Features | Format-Table Name, Value -AutoSize
This will result something like this:
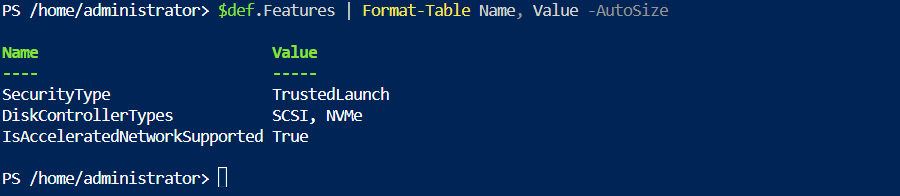
This states at the DiskControllerTypes that it supports both SCSI and NVMe for a broad support.
After the image has captured, I removed the imaging PC from my environment as you can do in the image capture wizard. I ended up having these 3 resources left:
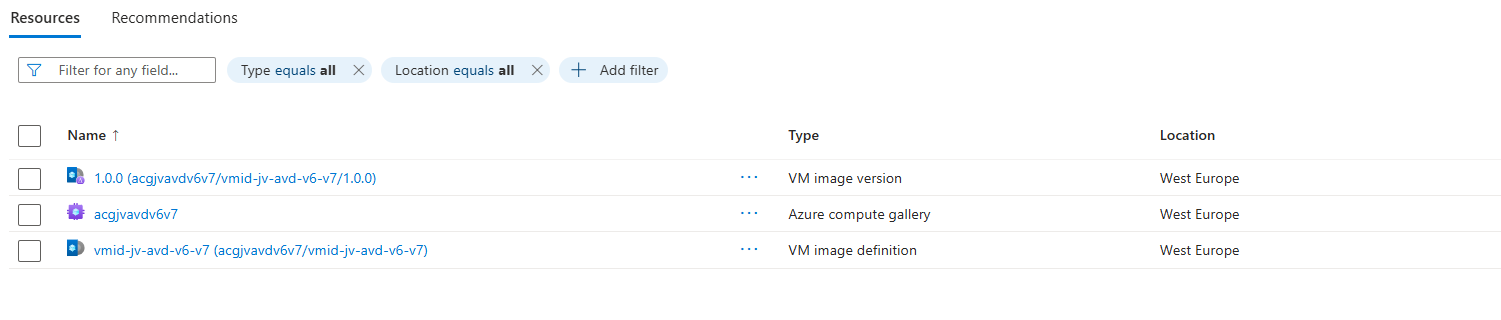
These resources should be kept, where the VM image version will get newer instances as you capture more images during the lifecycle.
We will now deploy a Azure Virtual Desktop hostpool with one VM in it, to test if we can select V7 machines at the wizard. Go to “host pools” and create a new hostpool if not done so already. Adding VMs to an existing hostpool is also possible.
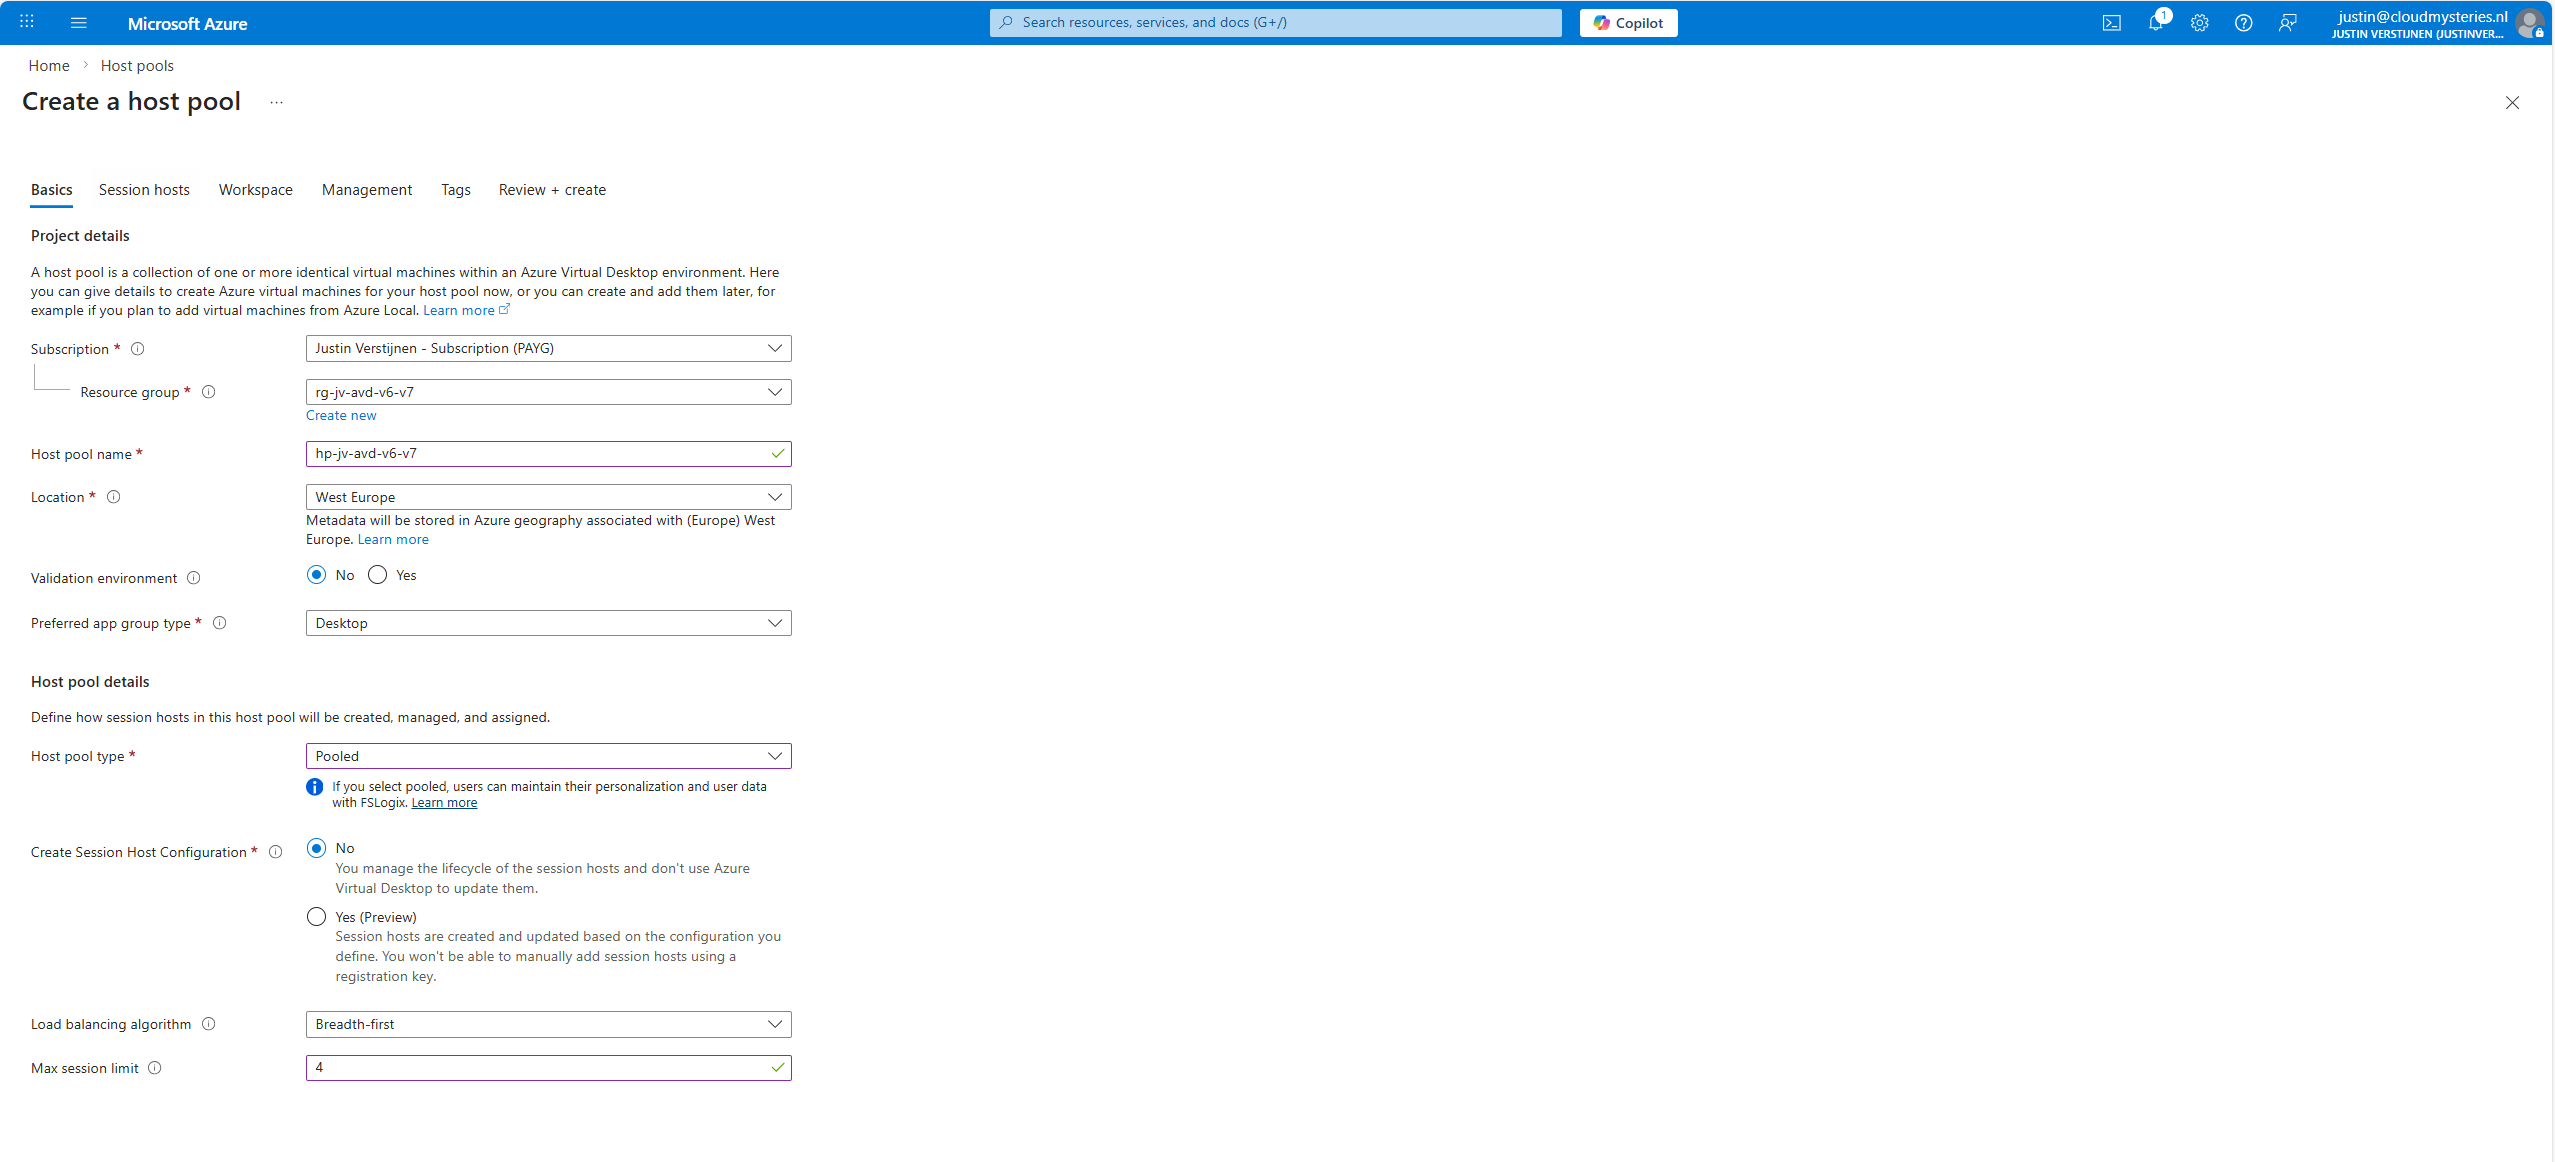
The next tab is more important, as we have to actually add the virtual machines there:
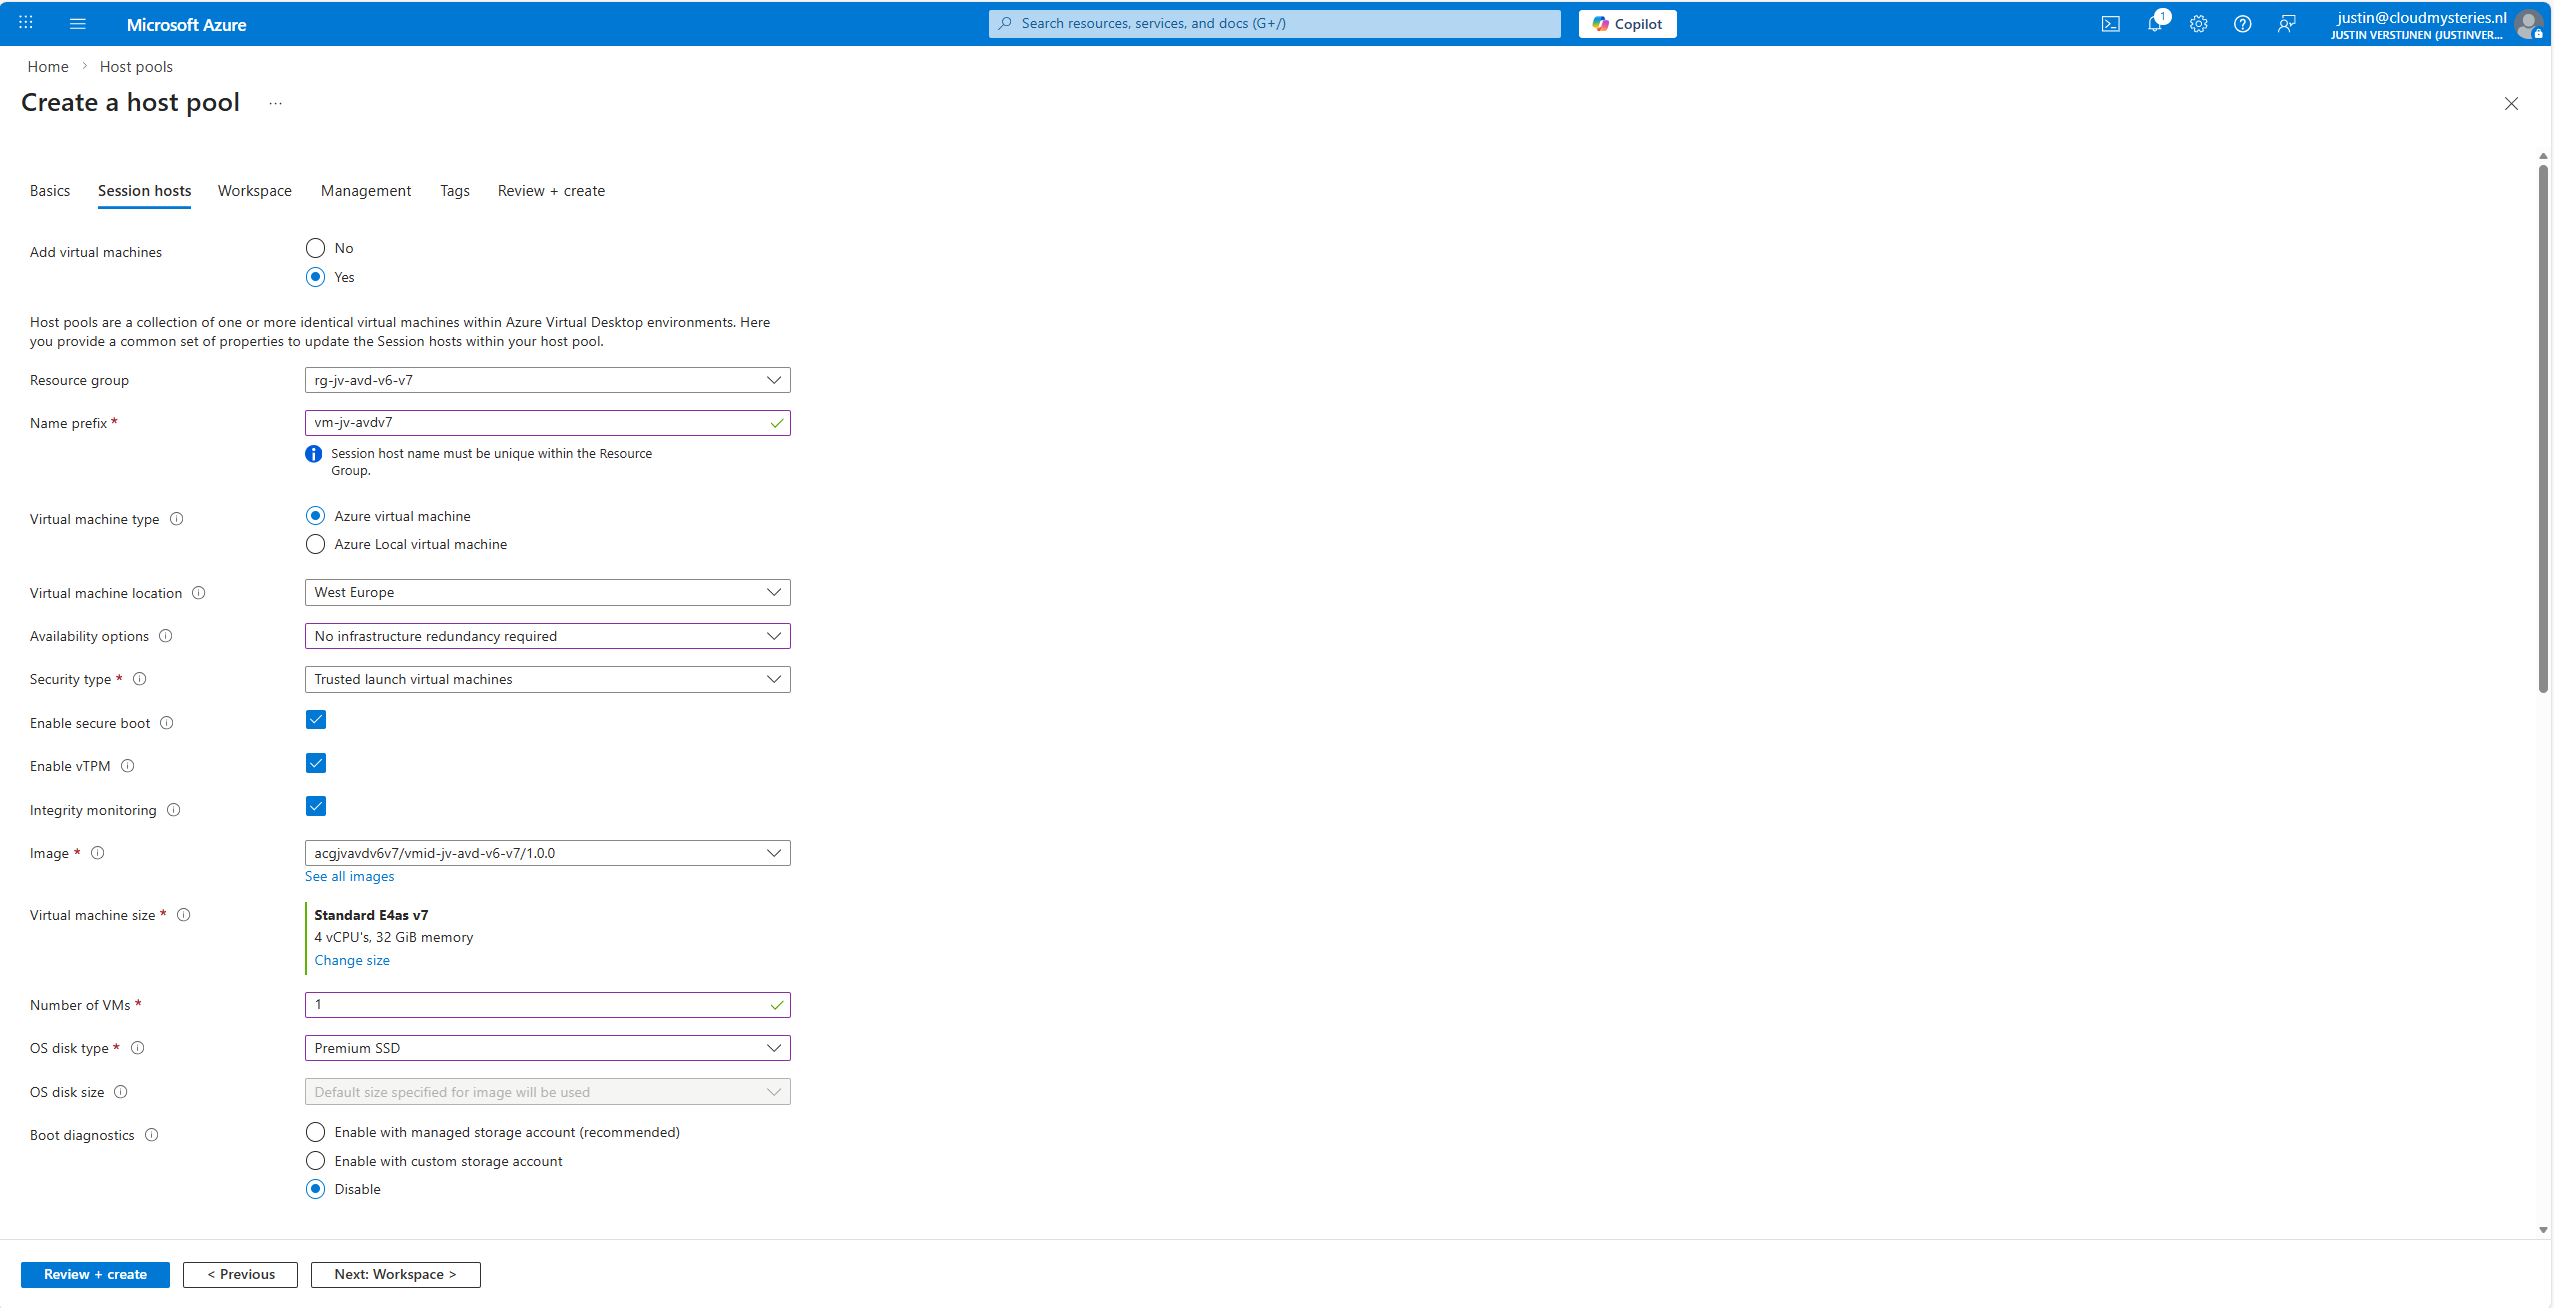
At the “Image” section, click on “see all images”, and then select your shared image definition. This will automatically pick the newest version from the list you saved there.
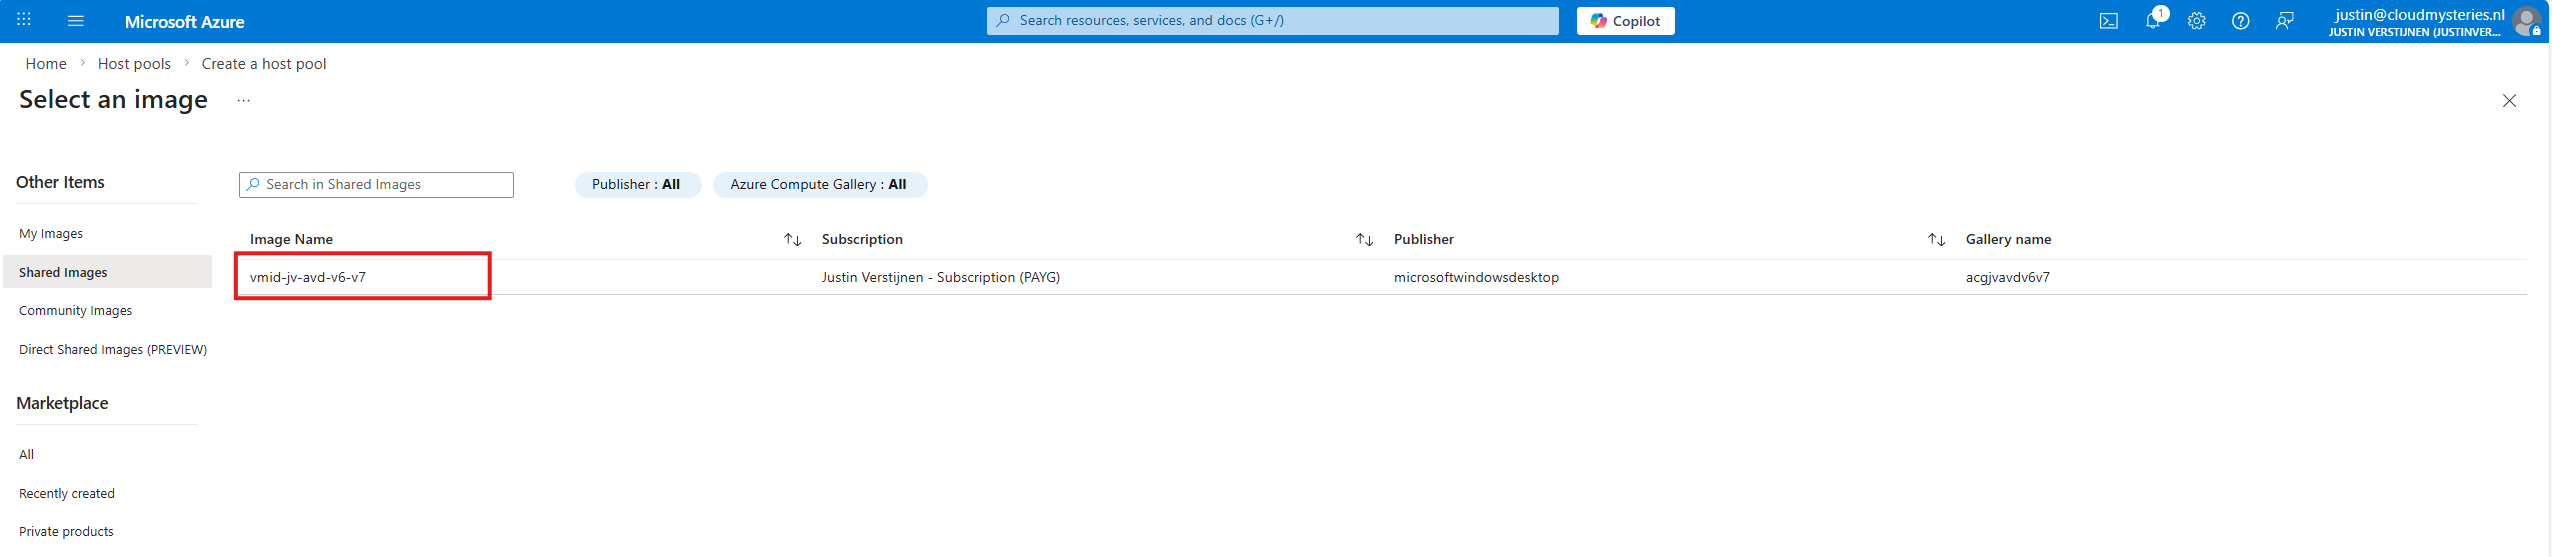
Now advance through the Azure Virtual Desktop hostpool wizard and finish.
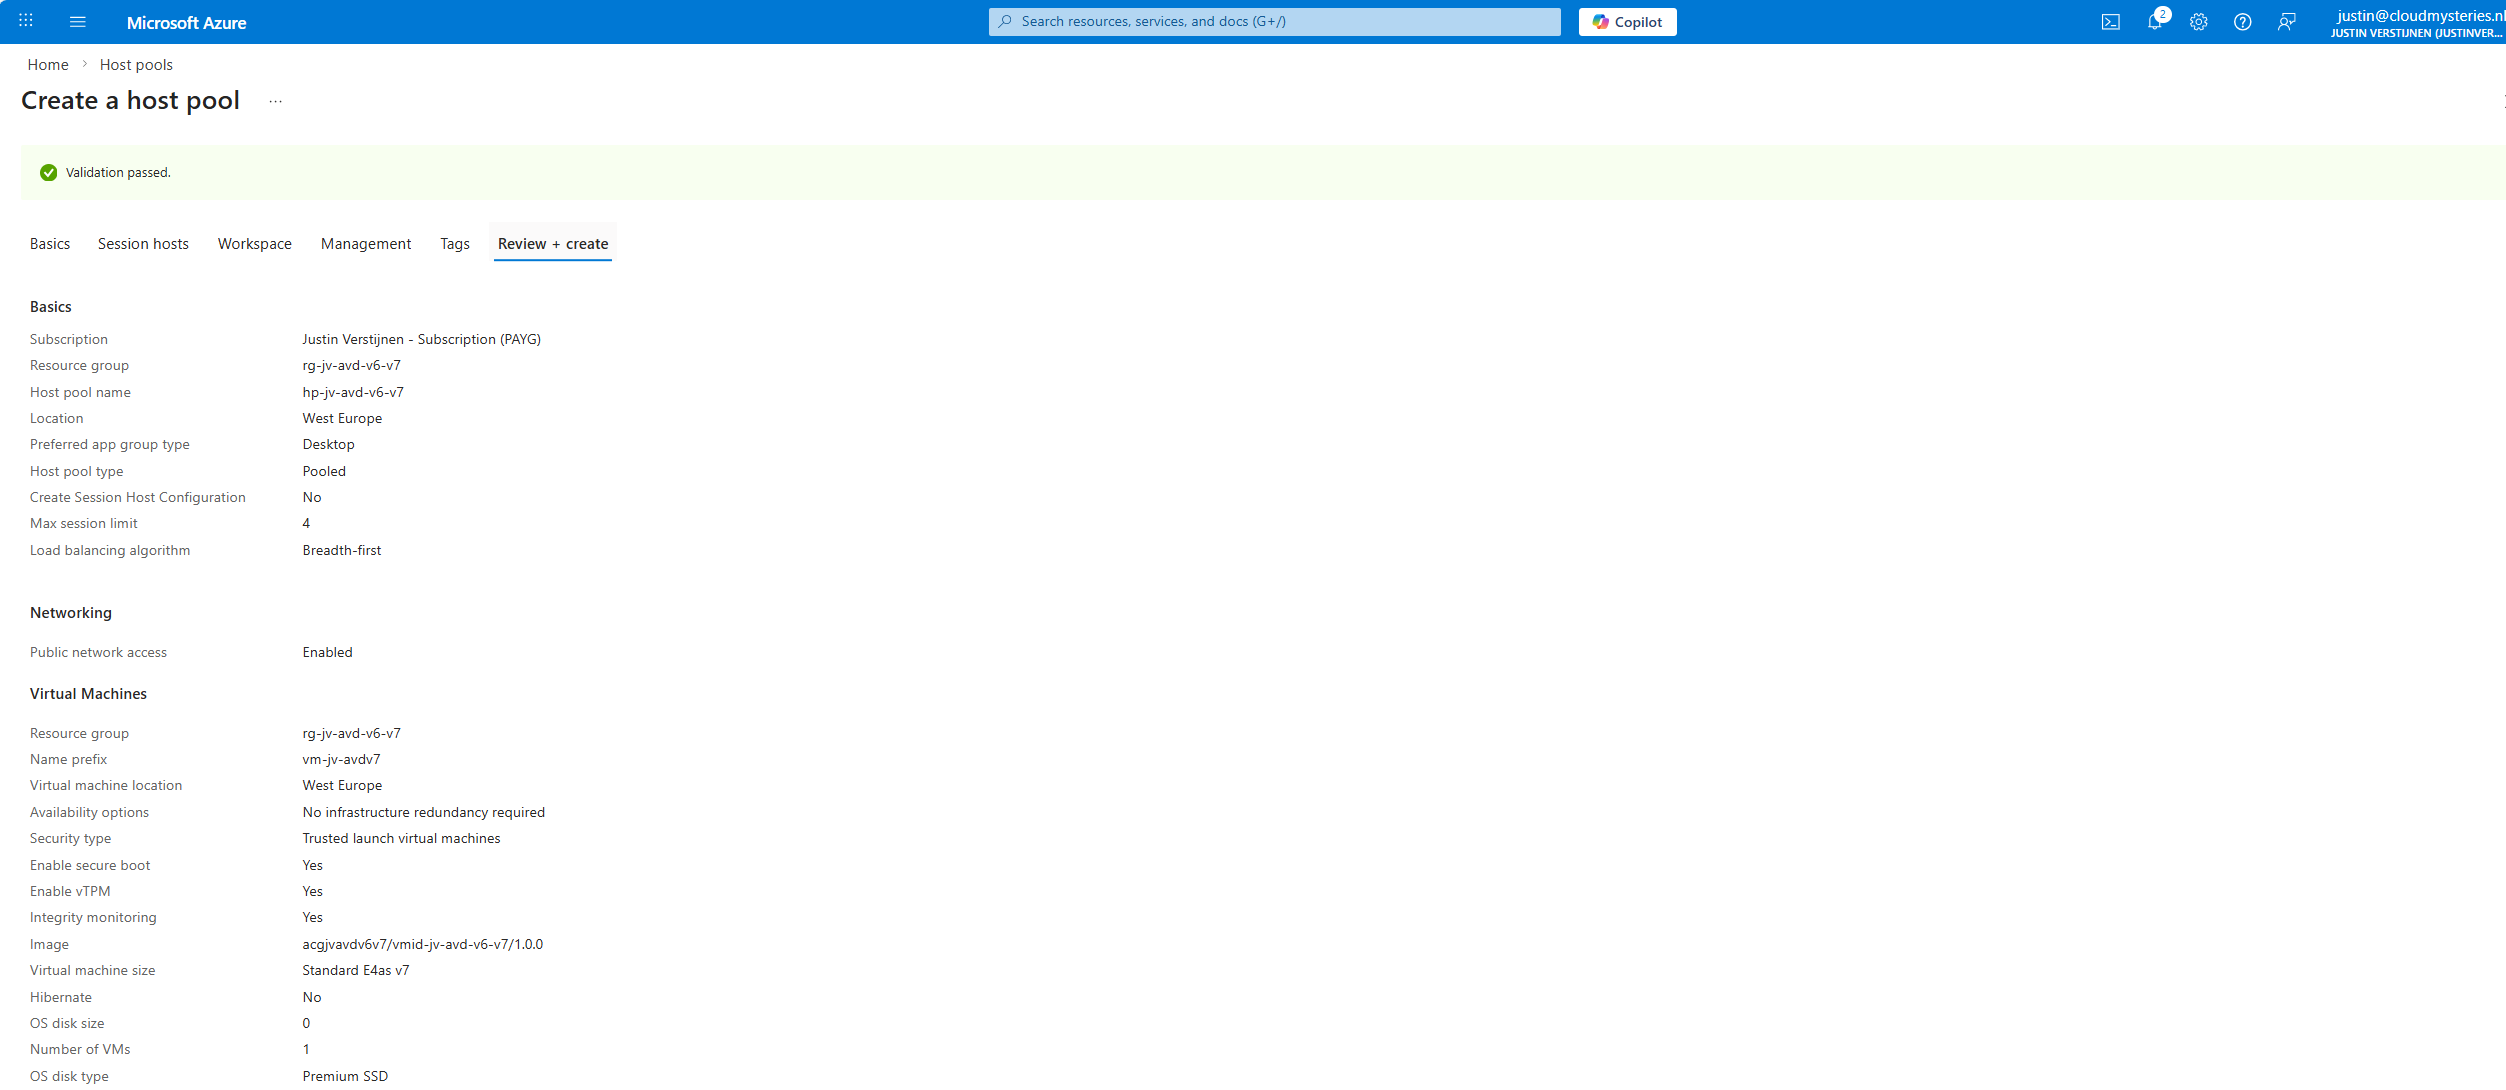
This will create a hostpool with the machines in it with the best specifications and highest security options available at this moment.
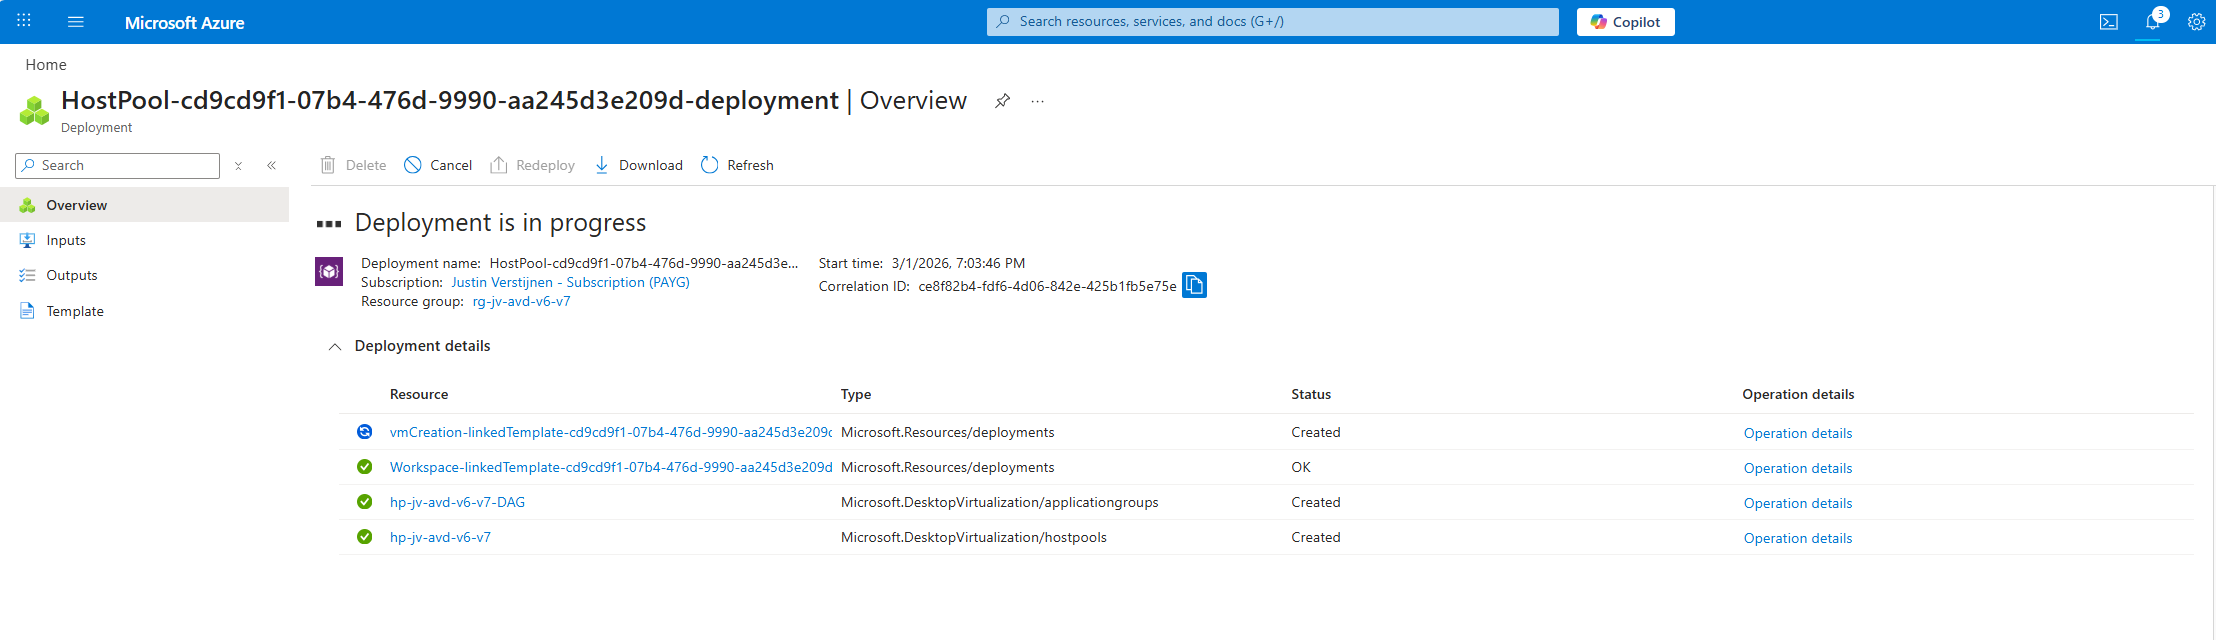
After the hostpool is deployed, we can check how this works now. The hostpool and machine are online:
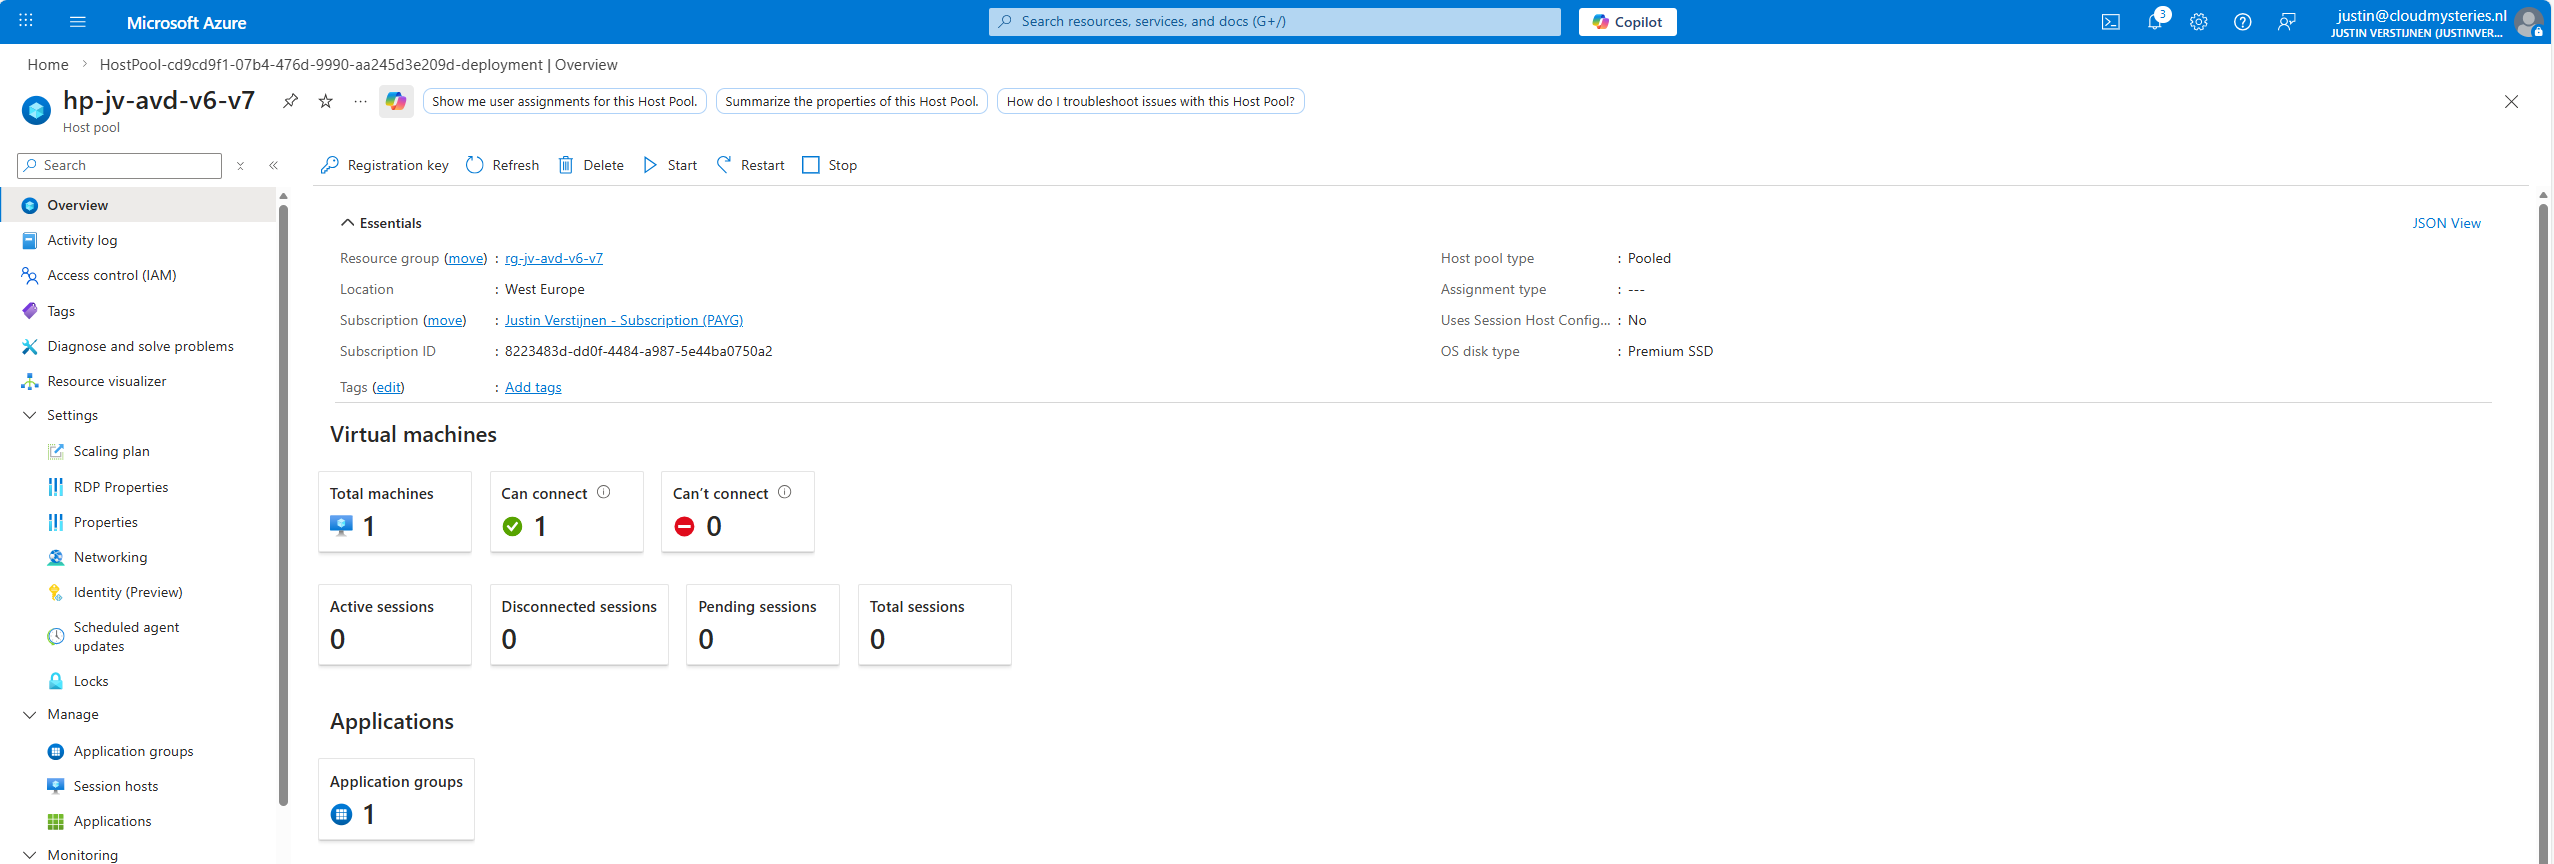
And looking into the VM itself, we can check if this is a newer generation of virtual machine:
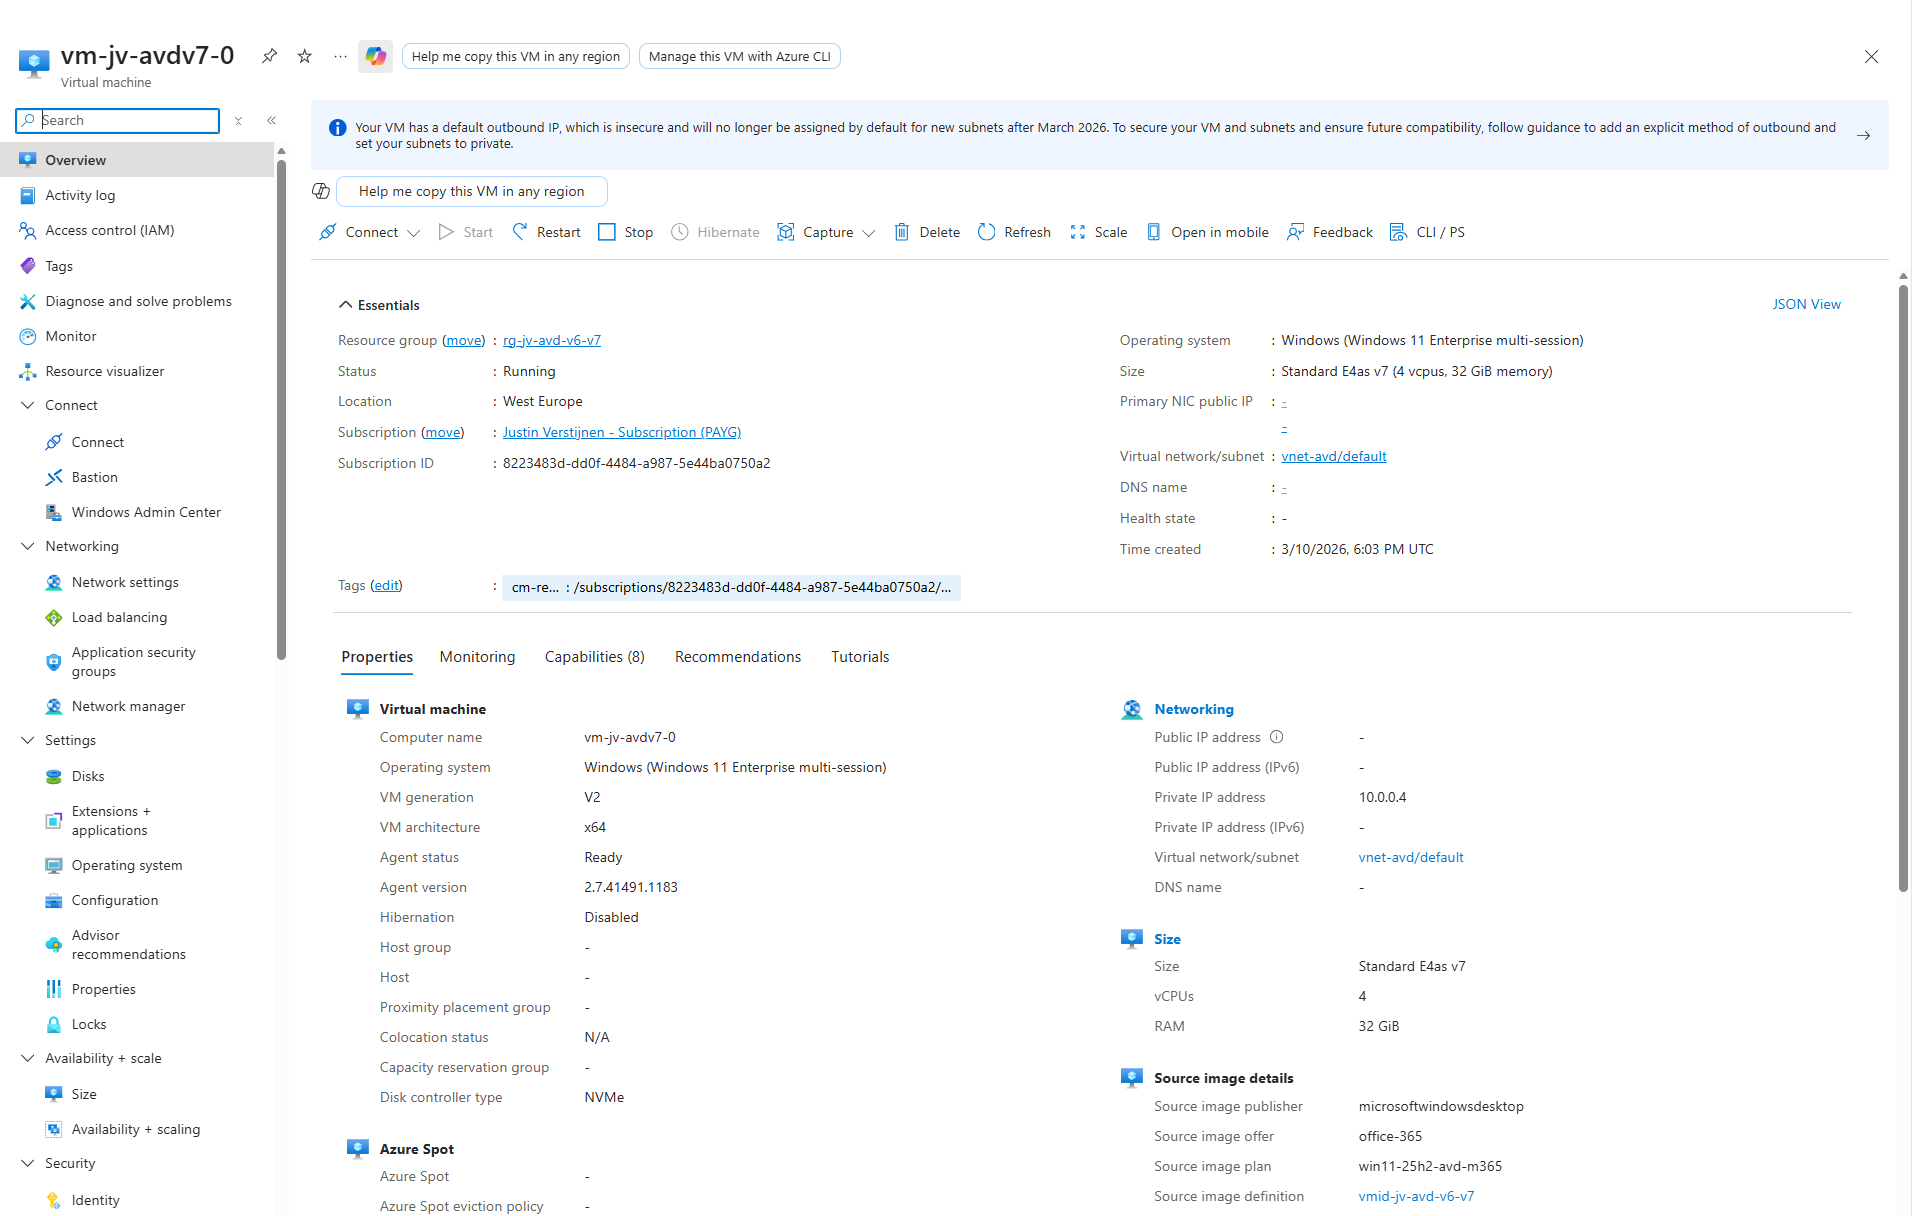
Now I have finished the configuration of the hostpool as described in my AVD implementation guide: https://justinverstijnen.nl/azure-virtual-desktop-fslogix-and-native-kerberos-authentication/#9-preparing-the-hostpool
If you want to use newer V6 or V7 AVD machines, you need to switch to an NVMe-compatible image workflow with Azure Compute Gallery. That is the supported way to build, version, and deploy modern AVD session hosts.
I hope I also informed you a bit on how these newer VMs work and why you cloud get the errors in the first place. Simply by still using a method Microsoft wants you to stop doing. I really think the Azure Compute Gallery is the better option right now, but takes a bit more configuration.
Thank you for reading this guide and I hope it was helpful.
These sources helped me by writing and research for this post;
You have reached the end of the page. You can navigate through other blog posts as well, share this post on X, LinkedIn and Reddit or return to the blog posts collection page. Thank you for visiting this post.
If you think something is wrong with this post or you want to know more, you can send me a message to one of my social profiles at: https://justinverstijnen.nl/about/
If you find this page and blog very useful and you want to leave a donation, you can use the button below to buy me a beer. Hosting and maintaining a website takes a lot of time and money. Thank you in advance and cheers :)
The terms and conditions apply to this post.
In this guide, I will show you how to delete the printers using a PowerShell script. This is compatible with Microsoft Intune and Group Policy and can be used on physical devices, Azure Virtual Desktop and Windows 365.
By default in Windows 11 with Microsoft 365 apps installed, we have two software printers installed. These are:
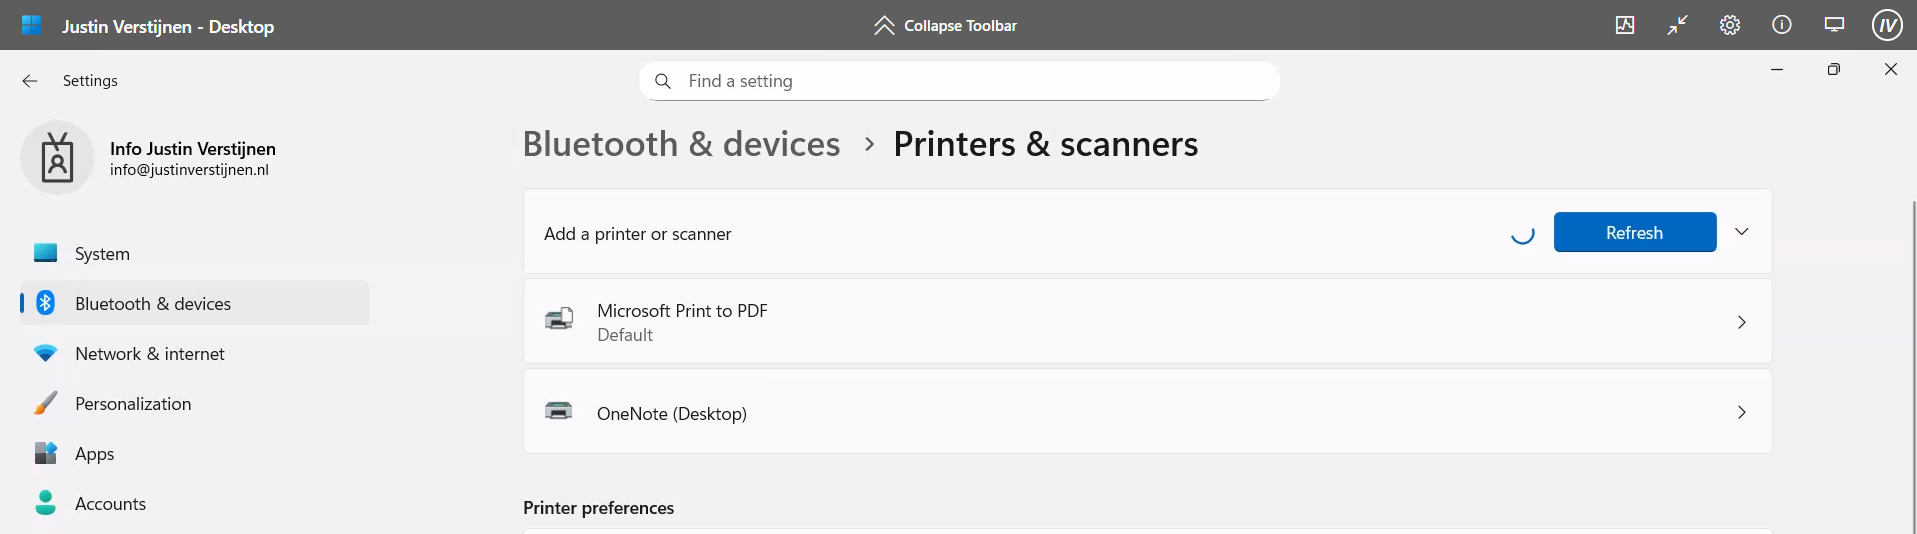
However, some users don’t use them and they will annoyingly be as default printer sometimes, which we want to avoid. Most software have built-in options to save to PDF, so this is a bit redundant. Our real printers will be further down which causes their own problems for end users.
The PowerShell script can be downloaded from my Github page:
On the Github page, click on “<> Code” and then on “Download ZIP”.
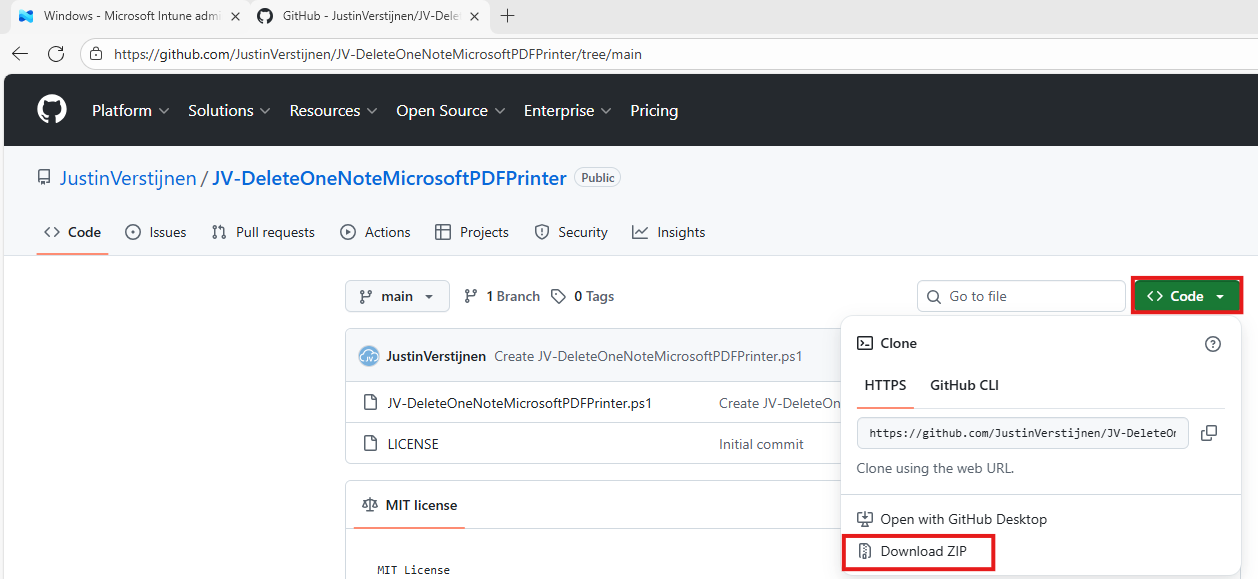
Unzip the file to get the PowerShell script:
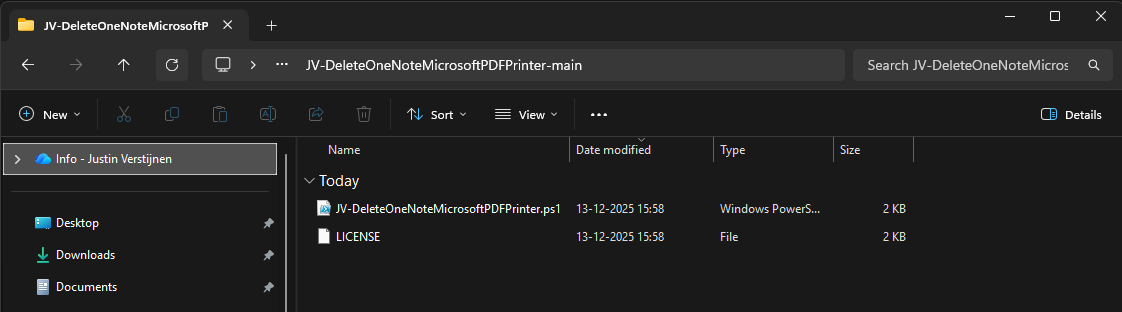
The script contains 2 steps, one step for deleting one of the two printers. The Onedrive printer is a very easy removal as this only needs removing and will never return till you reinstall Office. The Microsoft PDF printer needs removing a Windows Feature.
This however cannot be accomplished by native Intune/GPO settings so we have to do this by script. Therefore I have added two different options to deploy the script to choose which one to use. It can also be used on other management systems too but steps may be different.
To deploy this script, let’s go to the Microsoft Intune Admin Center: https://intune.microsoft.com
Navigate to Devices -> Windows -> Scripts and remediations and open the “Platform scripts” tab. Click on “+ Add” here to add a new script to your configuration.

Give your script a name and good description of the result of the script.
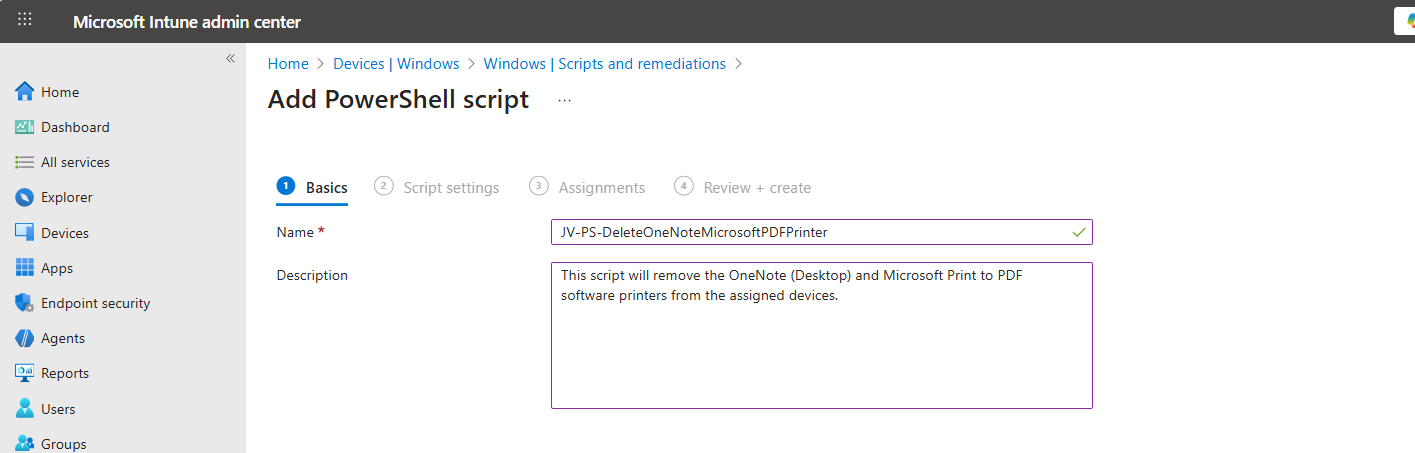
Then click “Next” to go to the “Script settings” tab.
Import the script you just downloaded from my Github page. Then set the script options as this:
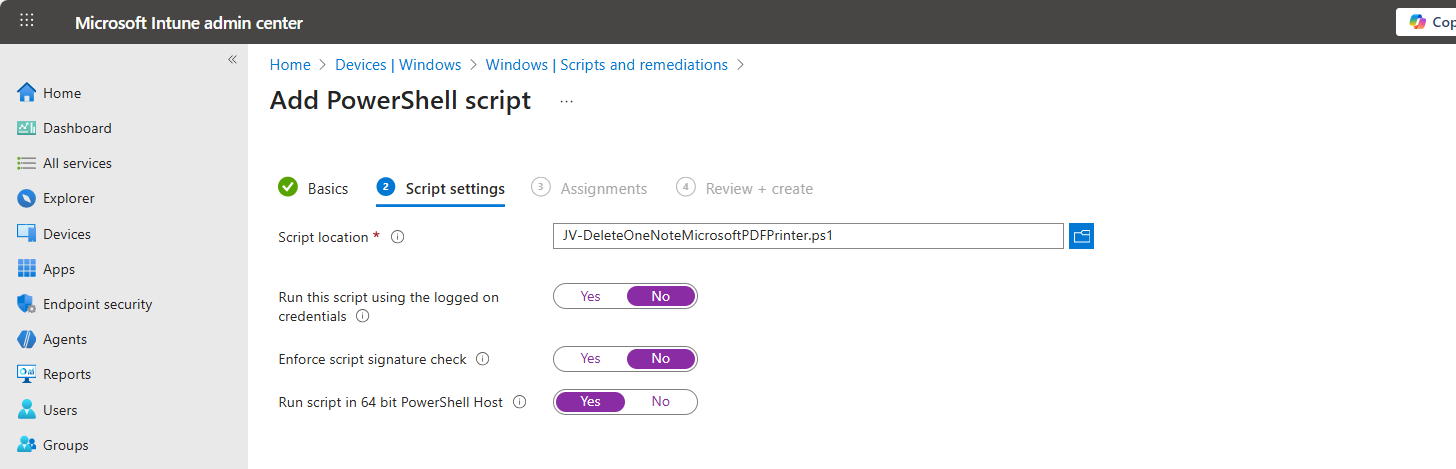
Then click “Next” and assign it to your devices. In my case, I selected “All devices”.
Click “Next” and then “Create” to deploy the script that will delete the printers upon execution.
If your environment is Active Directory based, then Group Policy might be a good option to deploy this script. We will place the script in the Active Directory SYSVOL folder, which is a directory-wide readable folder for all clients and users and will then create a task that starts when the workstation itself starts.
Login to your Domain-joined management server and go to File Explorer and go to your domains SYSVOL folder by typing in: \domain.com in the File Explorer bar:

Open the SYSVOL folder -> domain -> scripts. Paste the script in this folder:
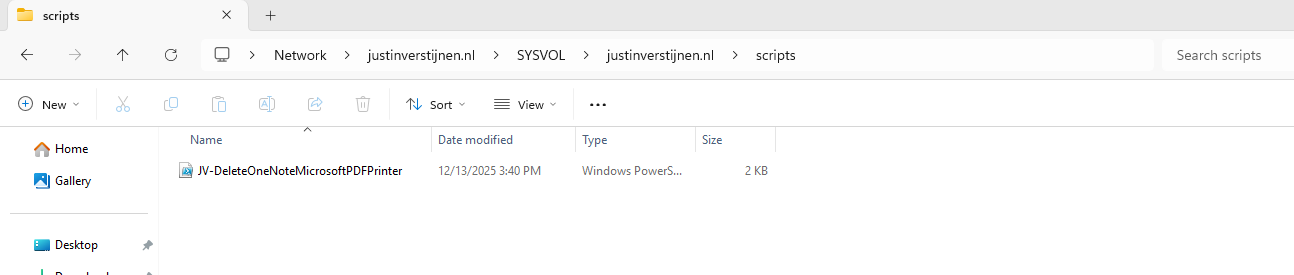
Then right-click the file and select “Copy as path” to set the full scipt path in your clipboard.
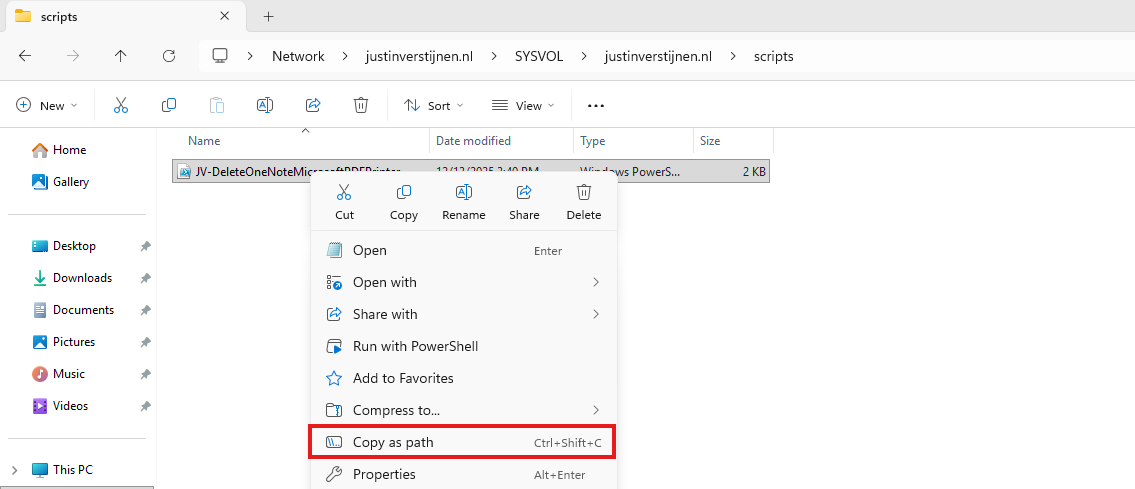
Open Group Policy Management on the server to create a new start-up script. Use an existing GPO or create a new one and navigate to:
Computer Configuration -> Policies -> Windows Settings -> Scripts -> Startup
Create a new script here and select the “PowerShell scripts” tab.
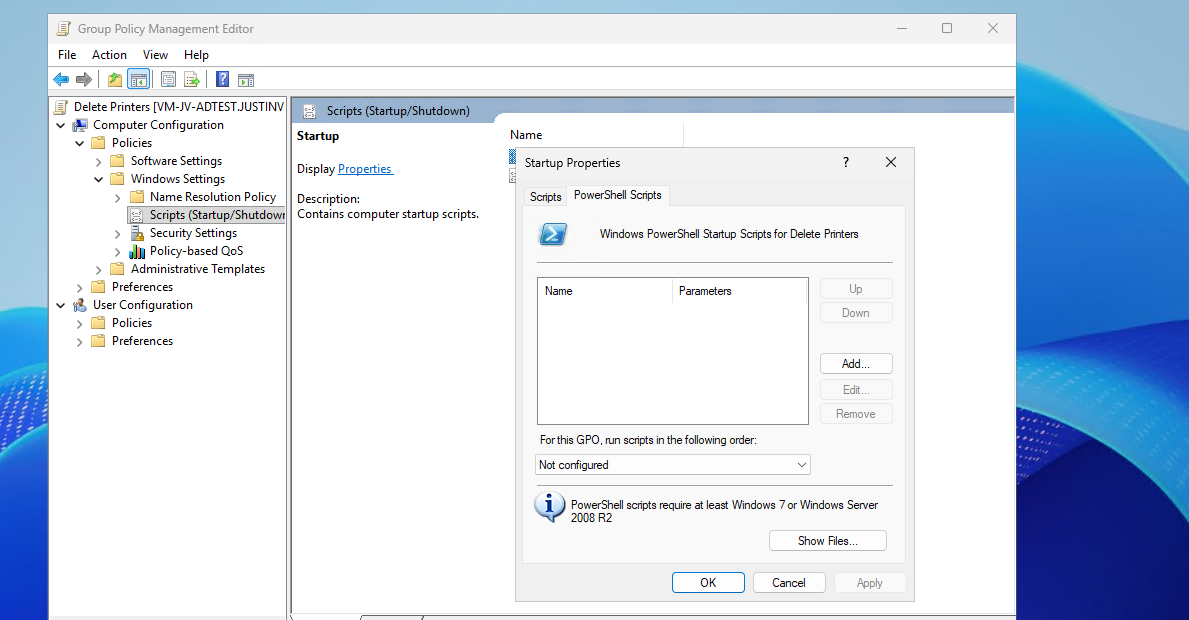
Add a new script here. Paste the copied path and remove the quotes.
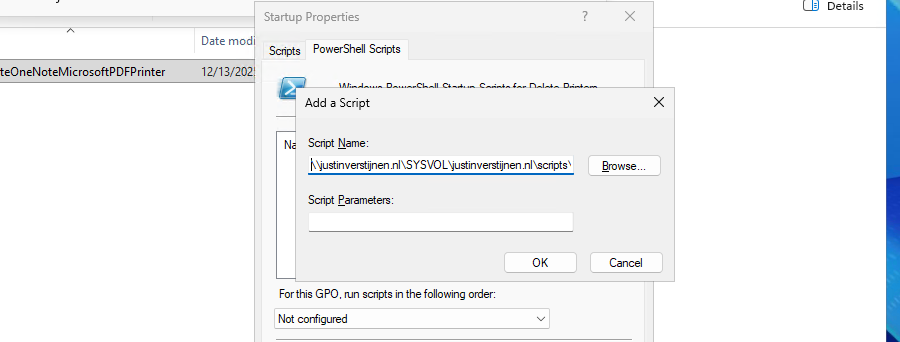
Then click “OK” to save the configuration. This will bring us to this window:
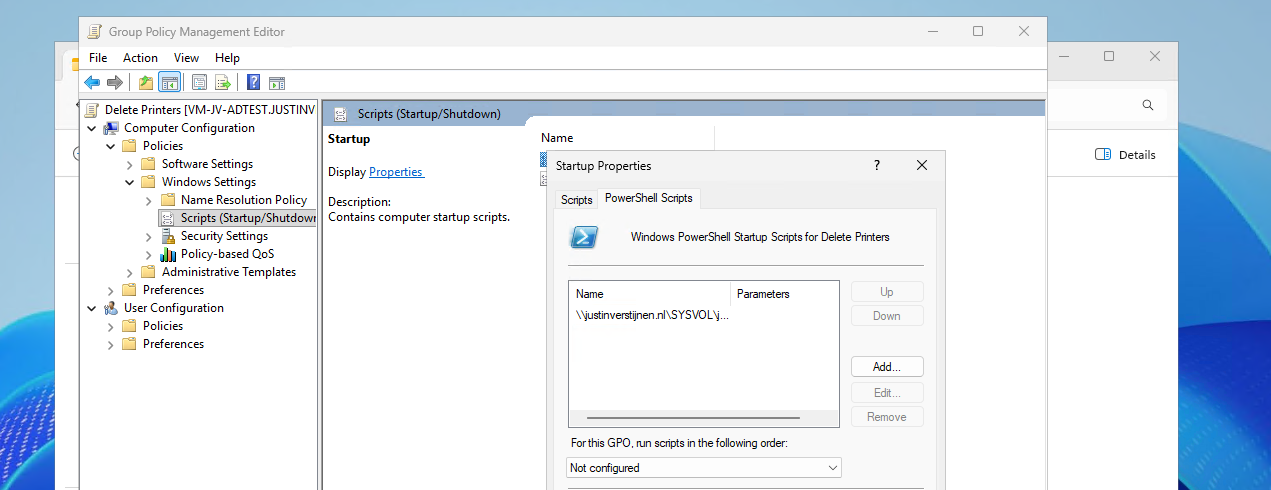
We have now made a start-up script which will run at every startup of the machine. If you place a updated script as the same name in the same directory, this new version will be executed.
After the script has been executed succesfully, which should be at the next logon, we will check the status in the Printers and Scanners section:
No software printers left bothering us and our end users anymore :)
Removing the default software printers may be strange but can help enhancing the printing for your end users. No software printer installed by default can take over being default printer anymore or even filling the list with printers. Almost every application has a option to save as PDF these days so this would be a little bit redundant.
Thank you for reading this guide and I hope it was helpful.
These sources helped me by writing and research for this post;
You have reached the end of the page. You can navigate through other blog posts as well, share this post on X, LinkedIn and Reddit or return to the blog posts collection page. Thank you for visiting this post.
If you think something is wrong with this post or you want to know more, you can send me a message to one of my social profiles at: https://justinverstijnen.nl/about/
If you find this page and blog very useful and you want to leave a donation, you can use the button below to buy me a beer. Hosting and maintaining a website takes a lot of time and money. Thank you in advance and cheers :)
The terms and conditions apply to this post.
On this page I will describe how I built an environment with a pooled Azure Virtual Desktop hostpool with FSLogix and using the Entra Kerberos option for authentication. This new authentication option eliminates the unsafe need of storing the storage key in hosts’ registry like we did in my earlier AVD full Entra blog.
In this guide I will dive into how I configured an simple environment where I placed every configuration action in separate steps to keep it simple and clear to follow and also will give some describing information about some concepts and settings.
I also added some optional steps for a better configuration and security than this guide already provides for a better user experience and more security.
The day has finally come; we can now build a Azure Virtual Desktop (AVD) hostpool in pooled configuration without having to host an Active Directory, and/or having to host an unsecured storage account by having to inject the Storage Access Key into the machines’ registry. This newer setup enhances performance and security on those points.
In this post we will build a simple Azure Virtual Desktop (AVD) setup with one hostpool, one session host and one storage account. We will use Microsoft Entra for authentication and Microsoft Intune for our session host configuration, maintenance and security.
This looks like this, where I added some session host to get a better understanding of the profile solution.
FSLogix is a piece of software that can attach a virtual disk from a network location and attach it to Windows at logon. This ensures users can work on any machine without losing their settings, applications and data.
In the past, FSLogix always needed an Active Directory or Entra Domain Services because of SMB and Kerberos authentication. We now finally got a solution where this is a thing of the past and go full cloud only.
For this to work we also get an Service Principal for your storage account, building a bridge between identity and storage account for Kerberos authentication for the SMB protocol.
Before we can configure the service, we will first start with creating a security group to give users permissions to the FSLogix storage. Every user who will use FSLogix will need at least Read/write (Contributor) permissions.
Go to the Entra Admin center (https://entra.microsoft.com) and go to “Groups”.
Create a new security group here:
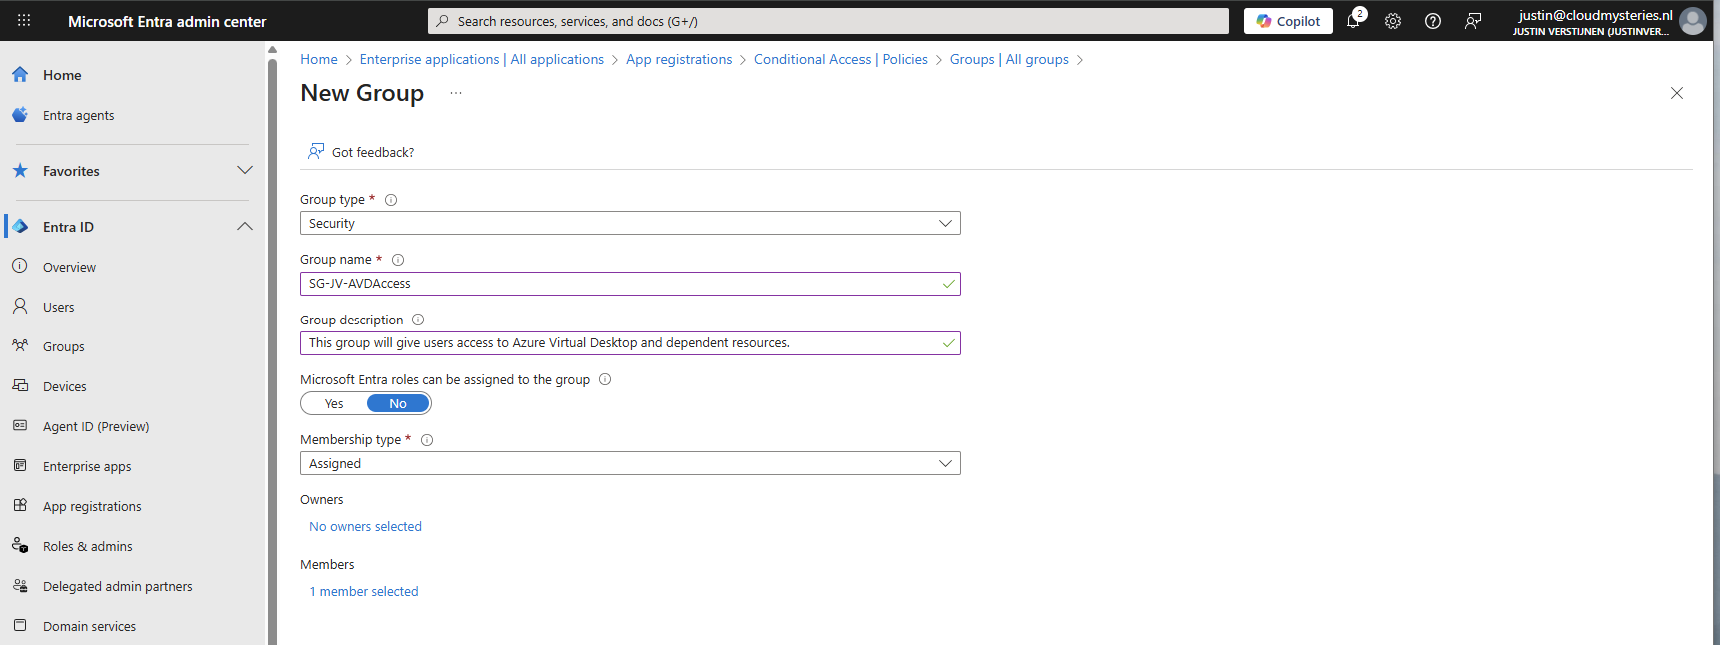
You can use a assigned group if you want to manage access, or you can use a dynamic group to automate this process. Then create the group, which in my case will be used for storage permissions and hostpool access.
If having a larger Intune environment, it is recommended to create a Azure Virtual Desktop device/session hosts group. This way you can apply computer settings to the hosts group in Intune.
You can create a group with your desired name and this can be an assigned or dynamic group. An examples of dynamic group rules can be this:
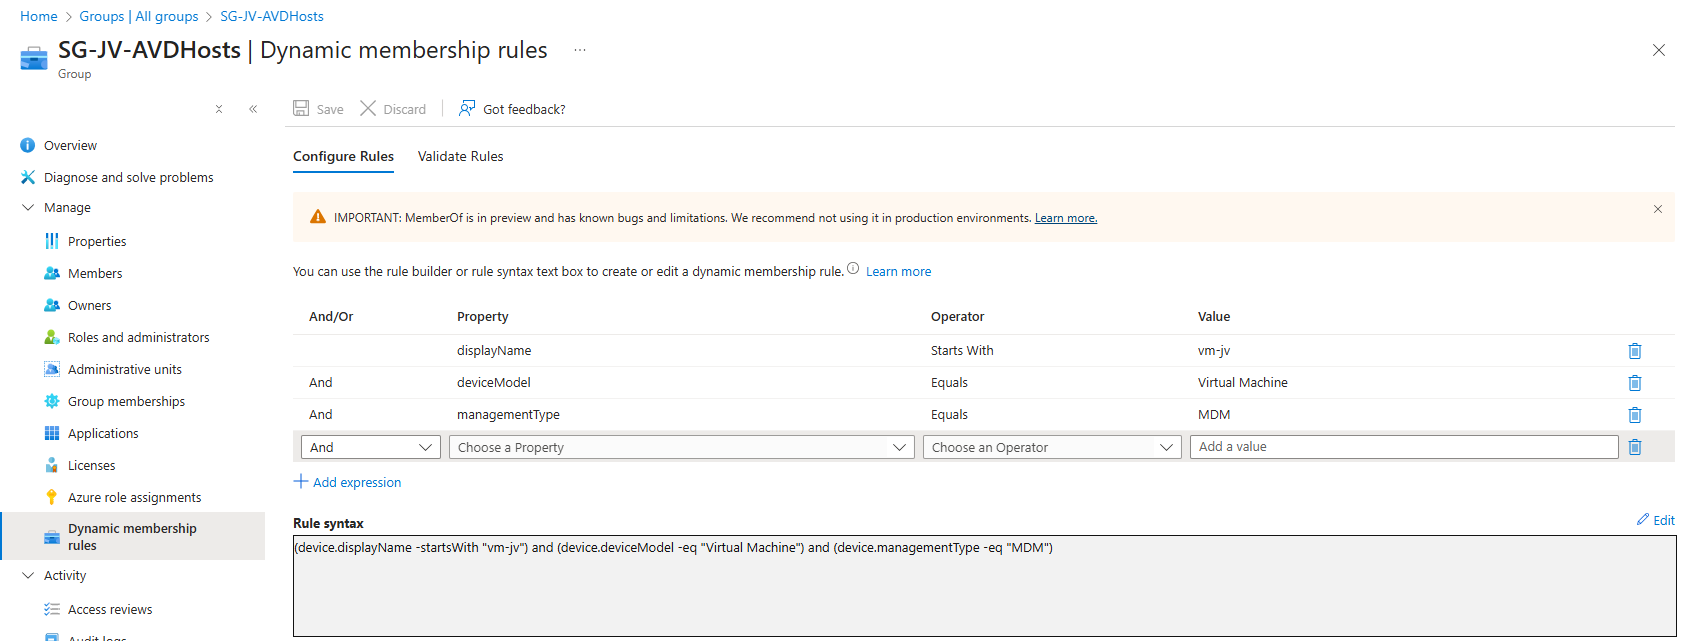
(device.displayName -startsWith "vm-jv") and (device.deviceModel -eq "Virtual Machine") and (device.managementType -eq "MDM")For AVD hosts, I really like dynamic groups, as you deploy more virtual machines, policies, scripts and such are all applied automatically.
After the group is created, we need to assign a role to the group. This role is:
We will use the role “Virtual Machine User Login” in this case for normal end users. Go to the resource group where your AVD hosts are and go to “Access control (IAM)”.
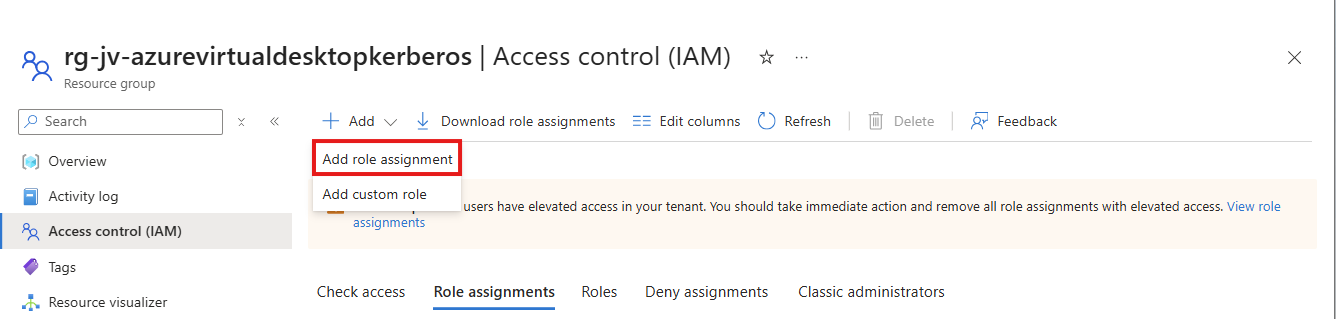
Click on “+ Add” and then “Add role assignment”.
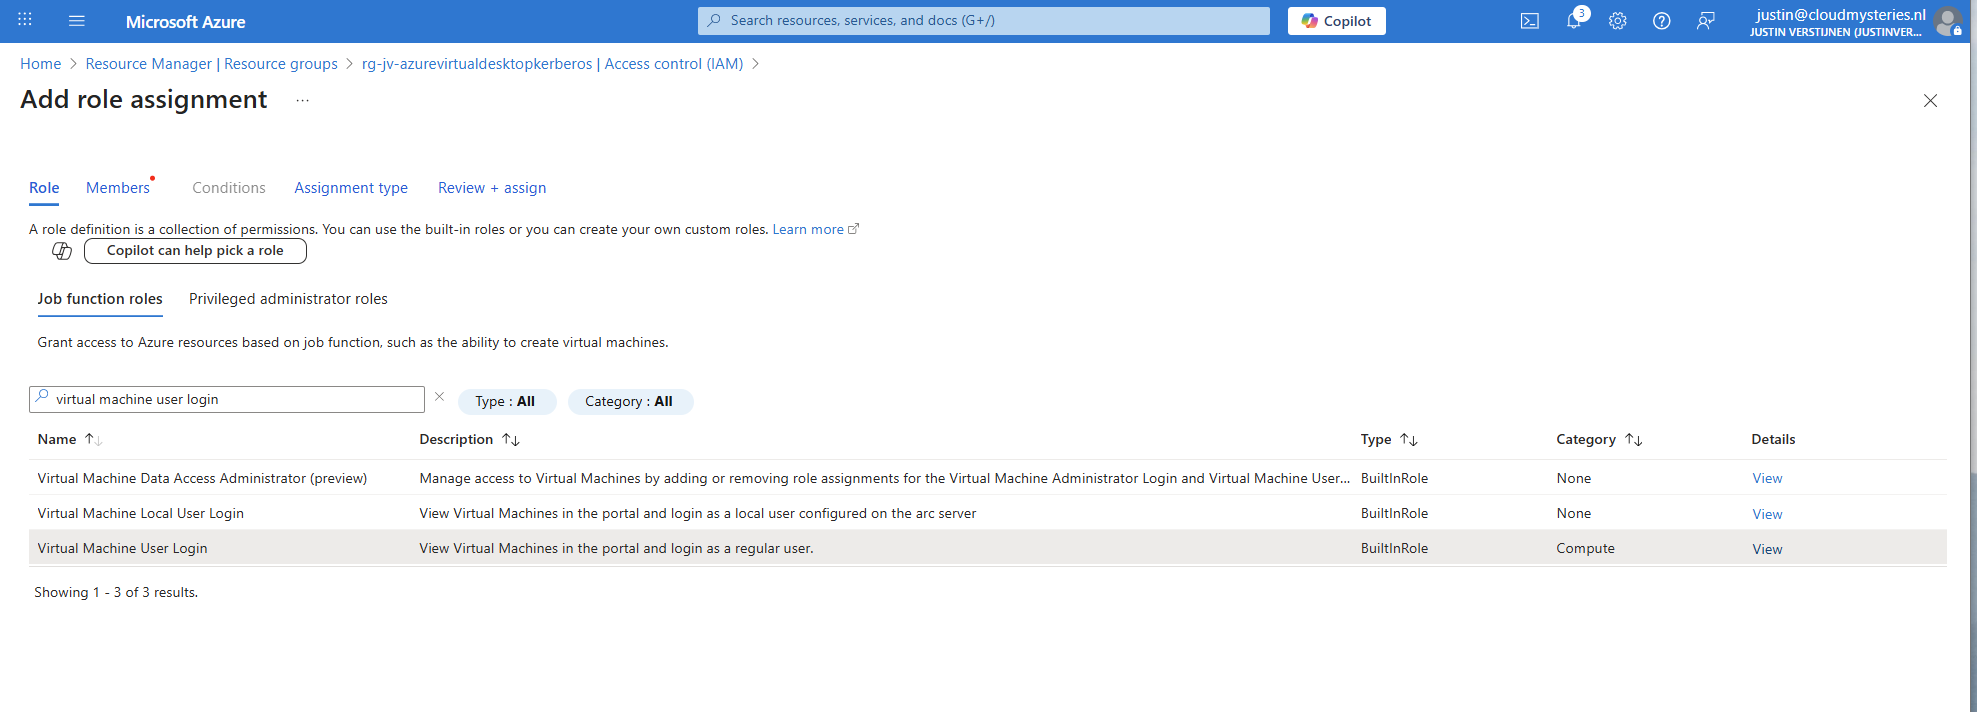
Select the role “Virtual Machine User Login” and click on “Next”. On the Members page, click on “+ Select members” and select the group with users you just created.
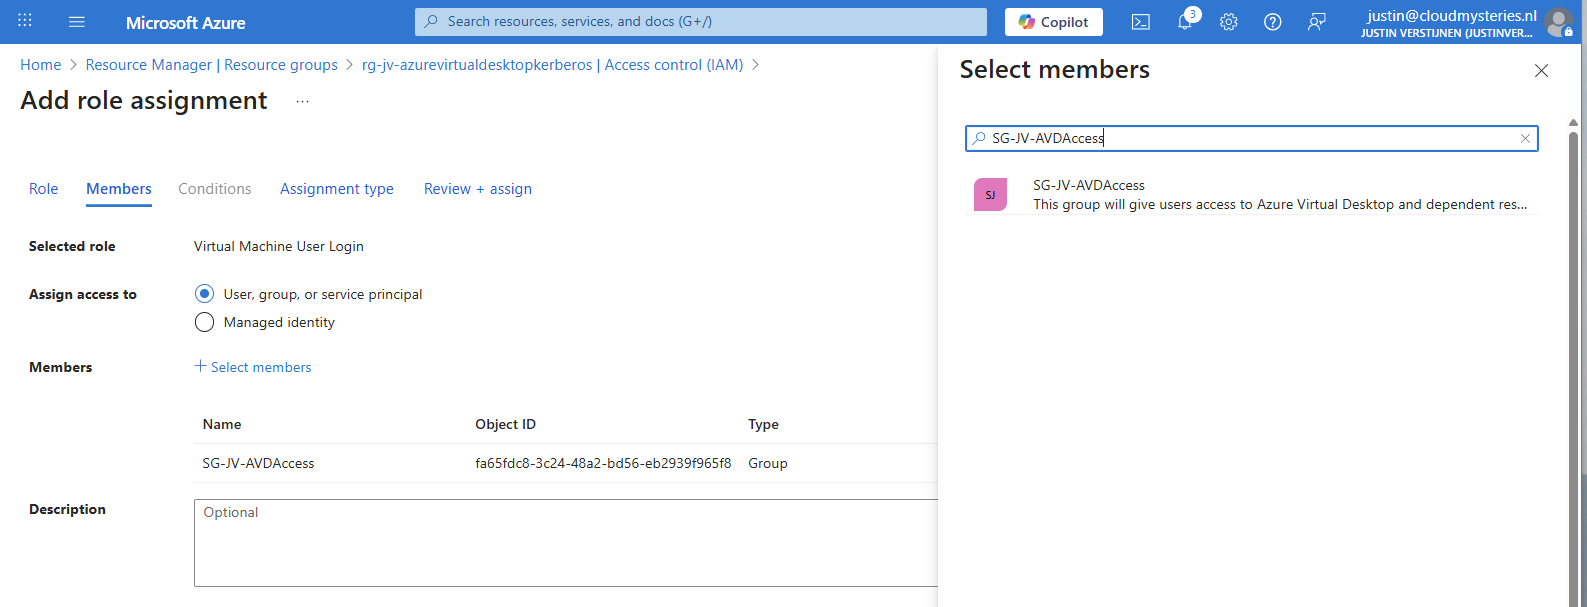
The role assignment is required because users will be loggin into a virtual machine. Azure requires the users to have the RBAC role for security.
You can do this on Resource, Resource Group and Subscription level, but mostly we will be placing similar hosts in the same resource group. My advice in such situation would be to use the resource group for the permissions.
Now we have to create a hostpool for Azure Virtual Desktop. This is a group of session hosts which will deliver a desktop to the end user.
In Microsoft Azure, search for “Azure Virtual Desktop”.

Then click on “Create a hostpool”.

Fill in the details of your hostpool like a name, the region you want to host it and the hostpool type. Assuming you are here for FSLogix, select the “Pooled” type.
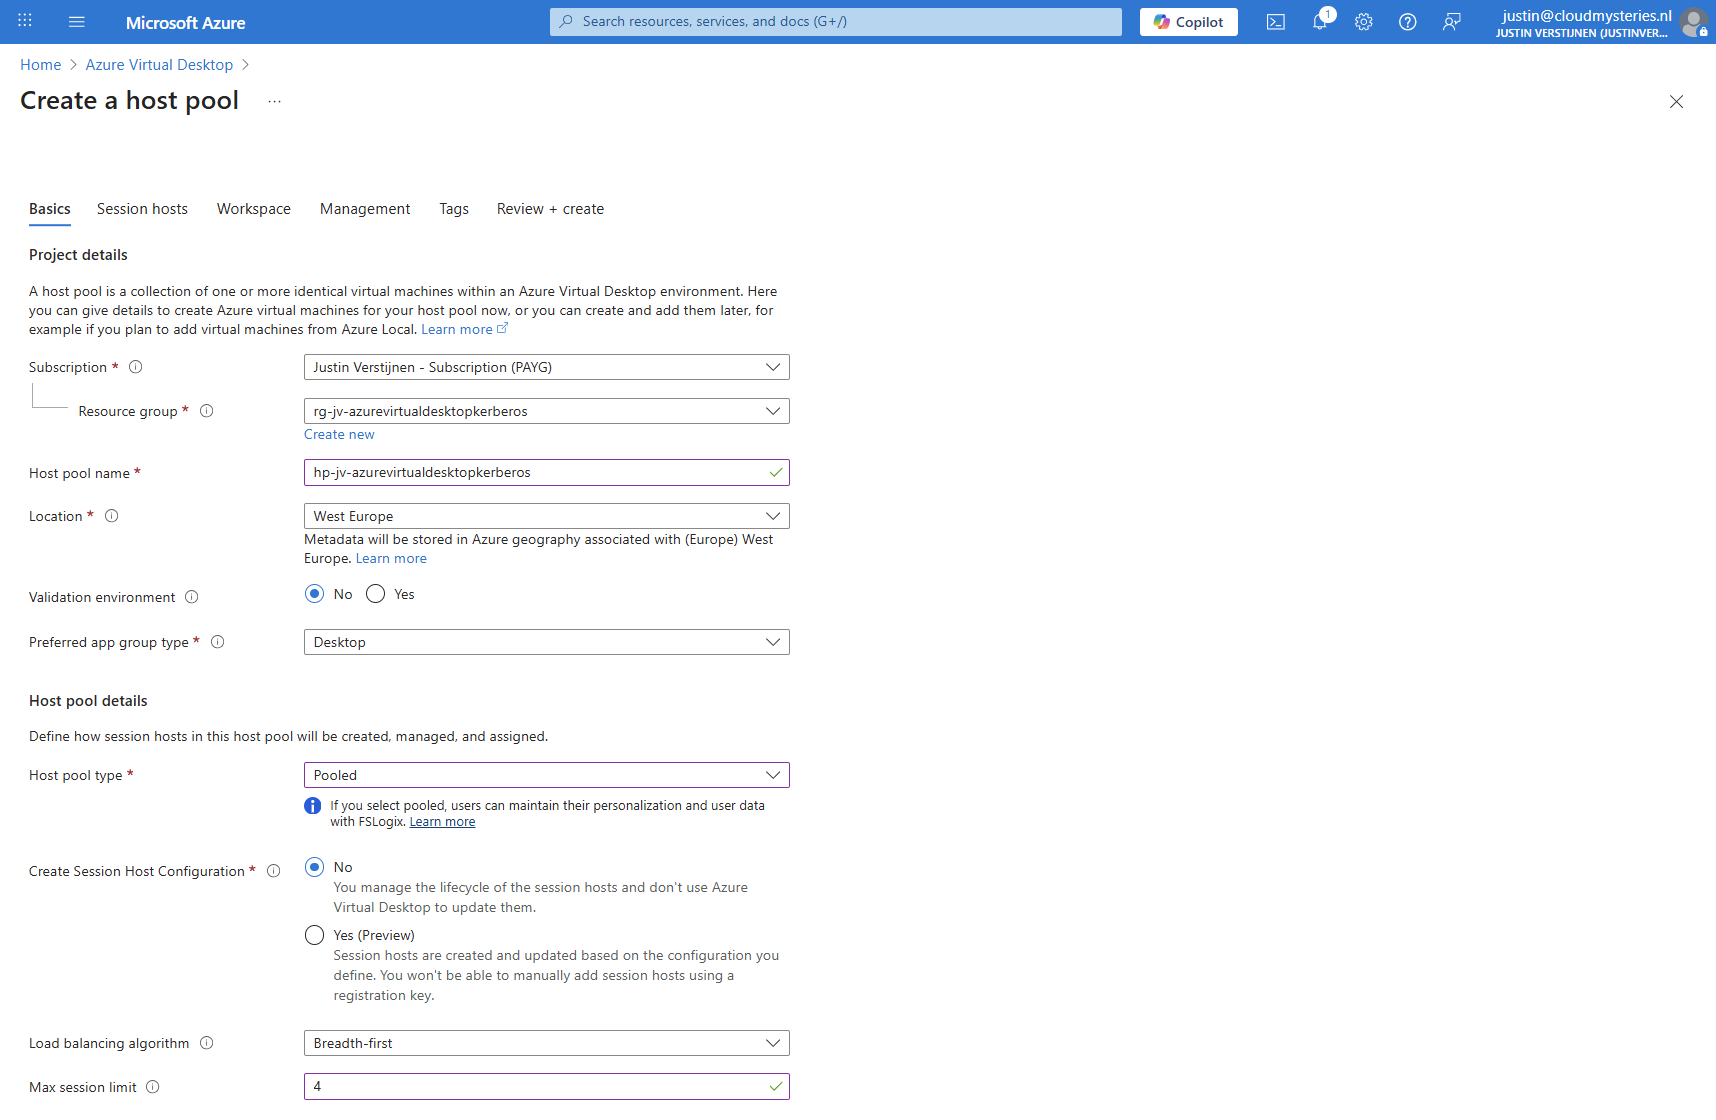
Then click “Next” to advance to the next configuration page. Here we must select if we want to deploy a virtual machine. In my case, I will do this.
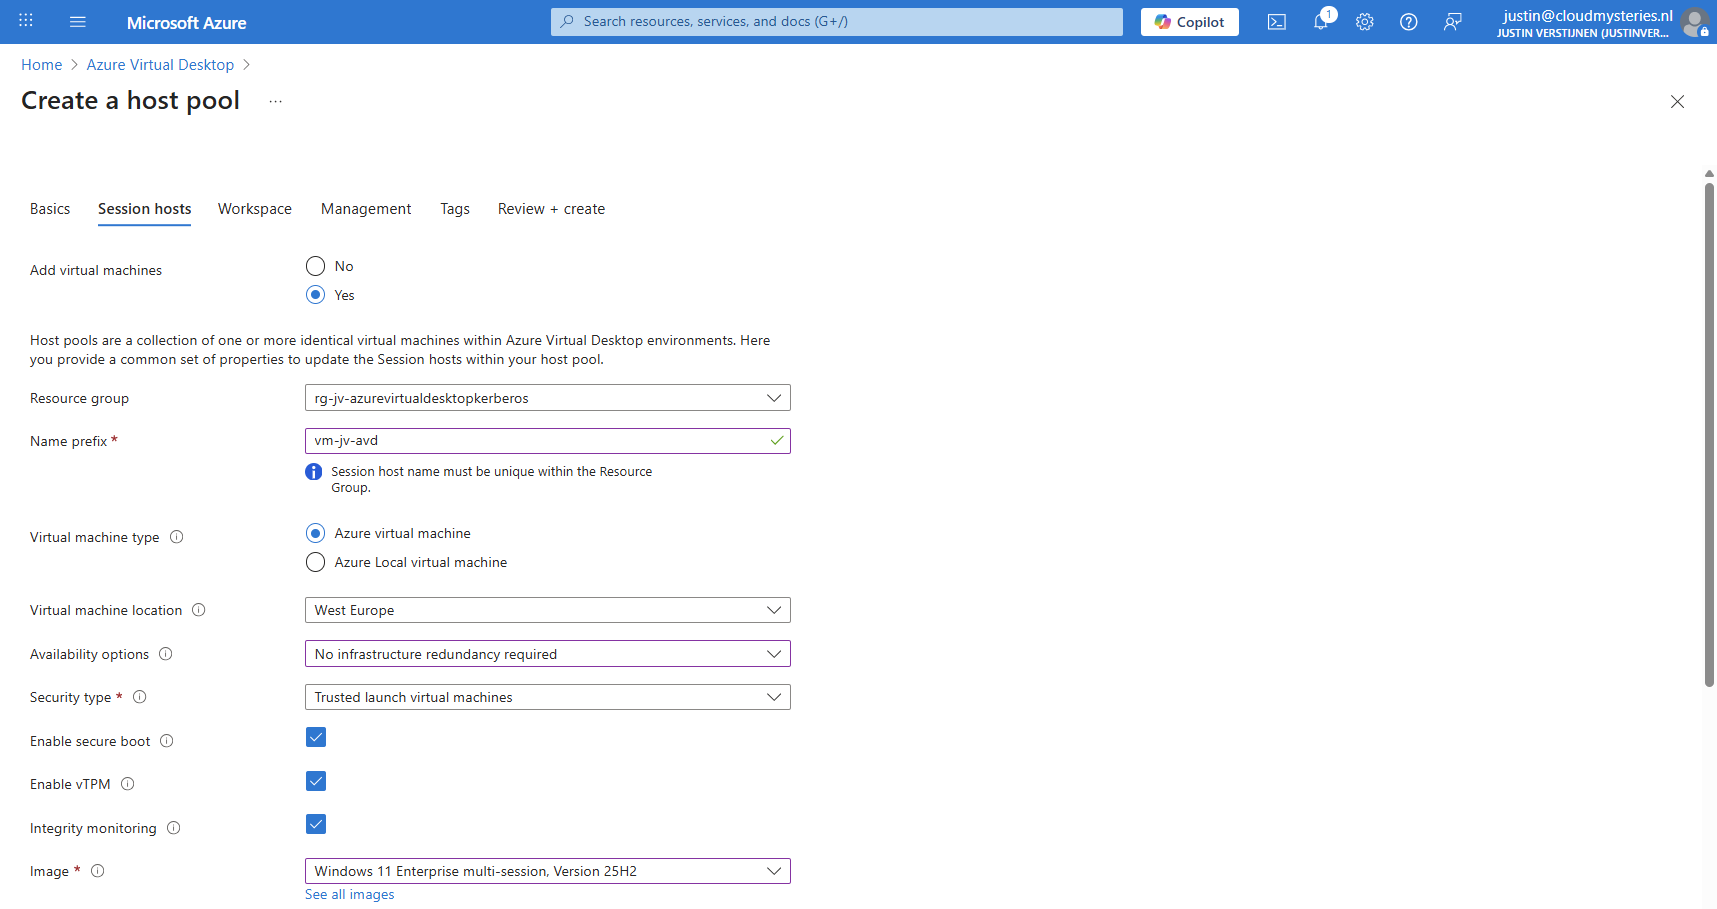
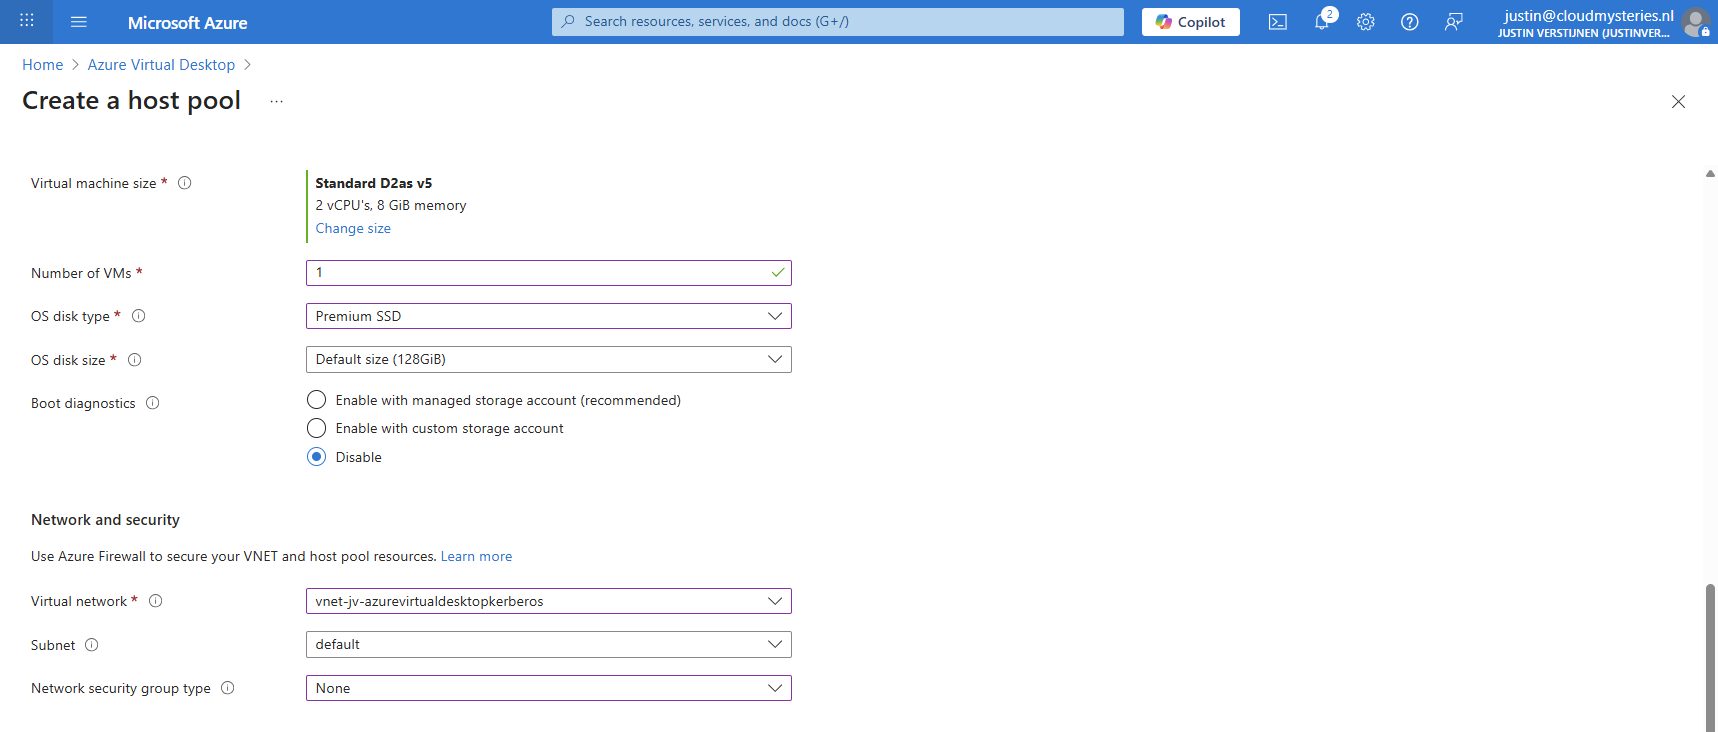
And at the end select the option “Microsoft Entra ID”.
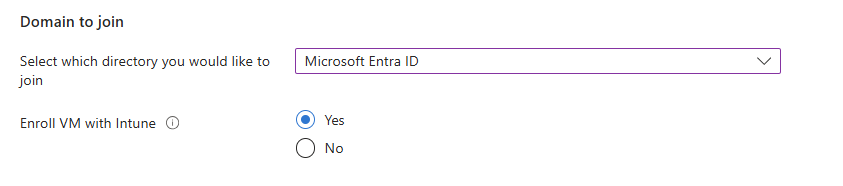
Create your local administrator account for initial or emergency access and then finish creating the hostpool.
After having the hostpool ready and the machine deploying, we have to create a storage account and fileshare for storing the FSLogix profiles. In the Azure Portal, go to Azure Files and create a new storage account:
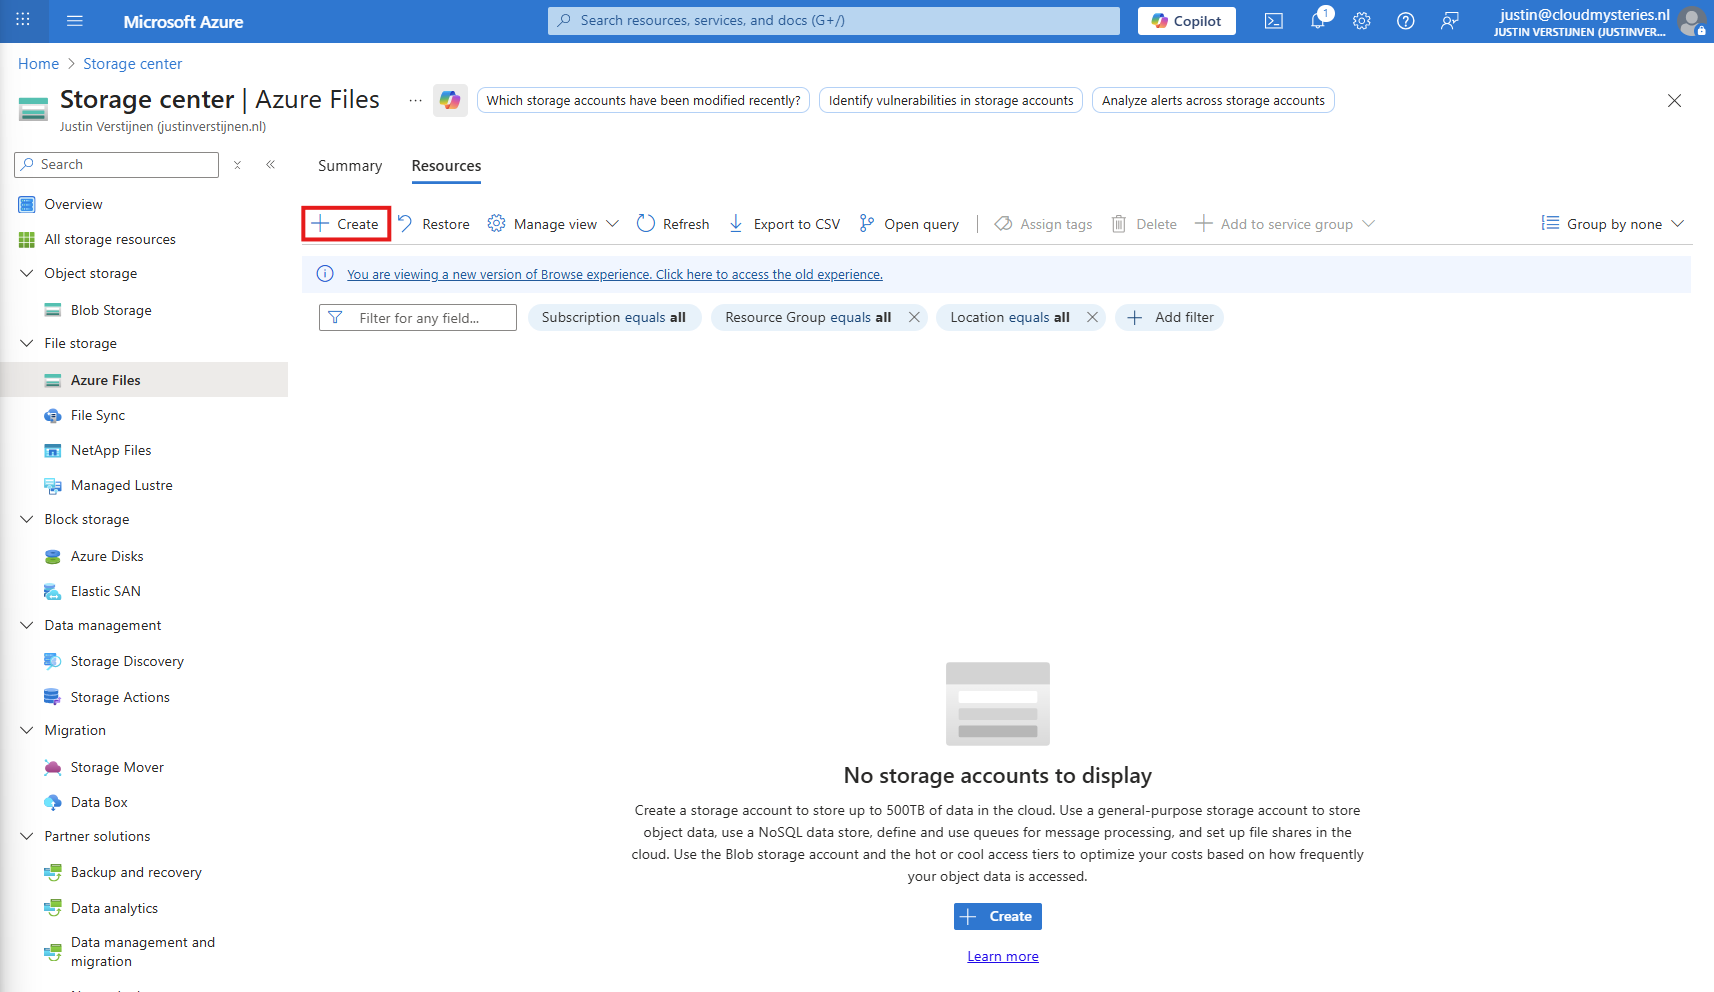
Then fill in the details of your storage account:
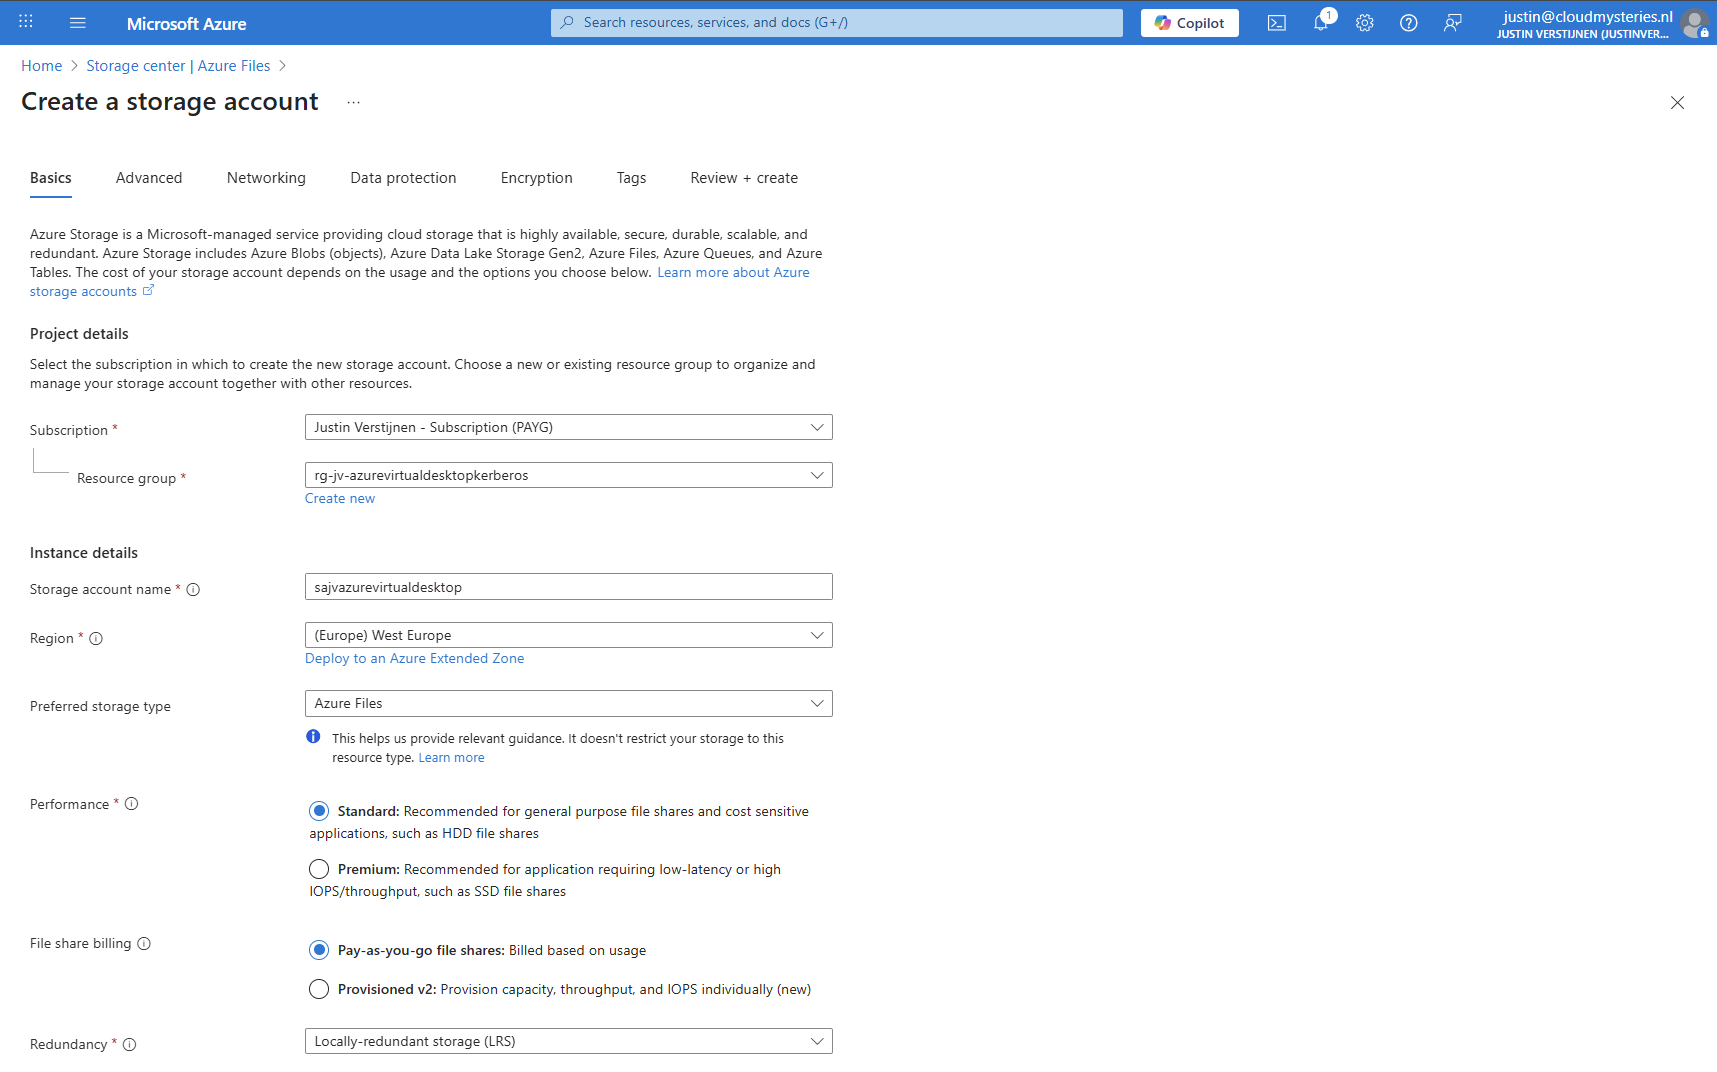
I chose the Azure Files type as we don’t need the other storages. We can skip to the end to create the storage account.
After creating the storage account, we must do some configurations. Go to the storage account and then to “Configuration”.
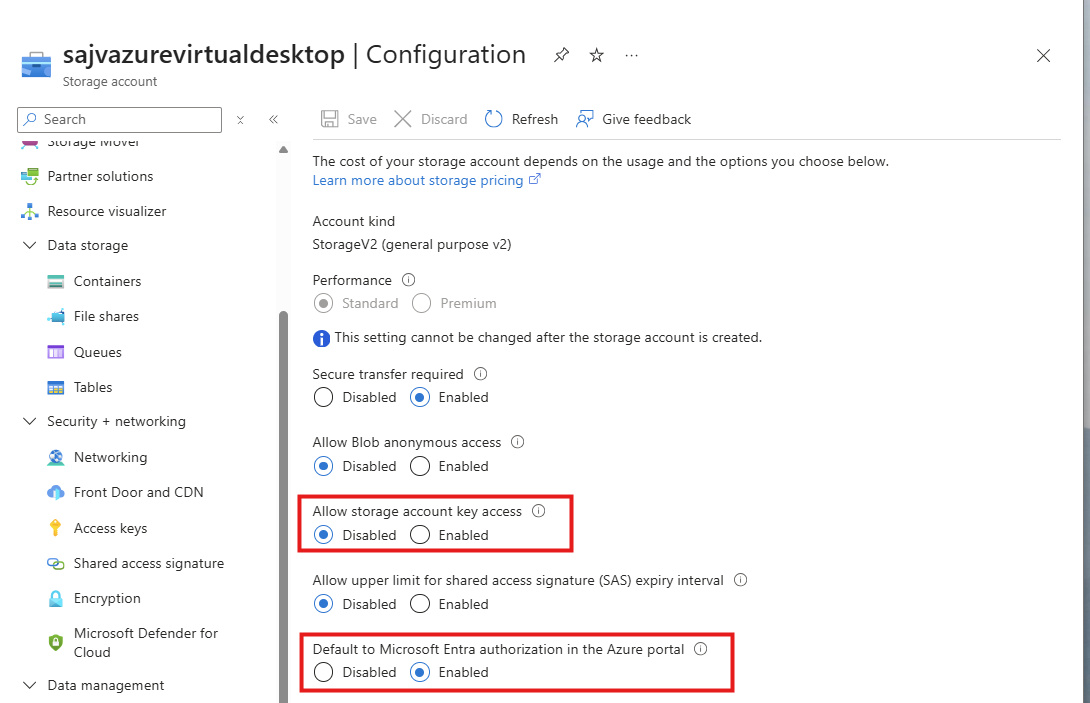
Set these two options to this setting:
Navigate in the Storage account to the blade “Networking”. We will limit the networks and IP addresses that can access the storage account which is by default the whole internet.
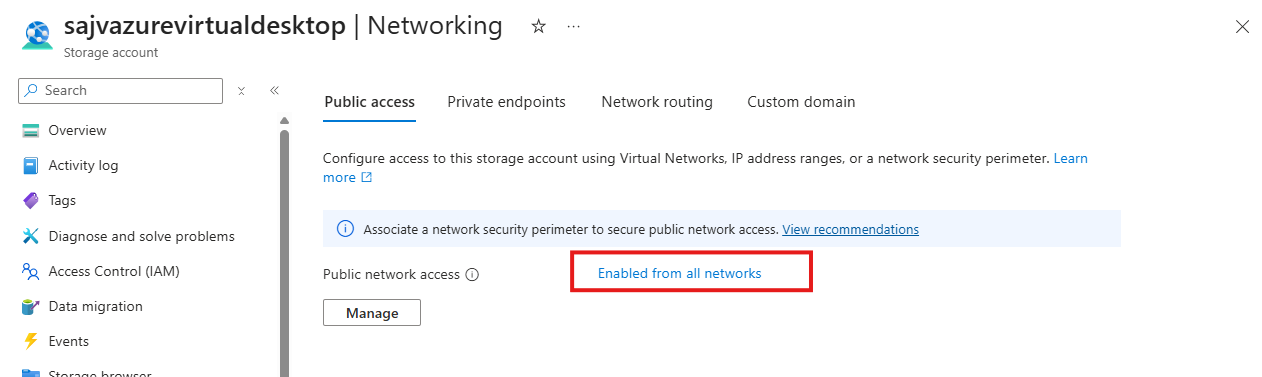
Click on “Enabled from all networks”.
Here select the “Enable from selected networks” option, and select your network containing your Azure Virtual Desktop hosts.
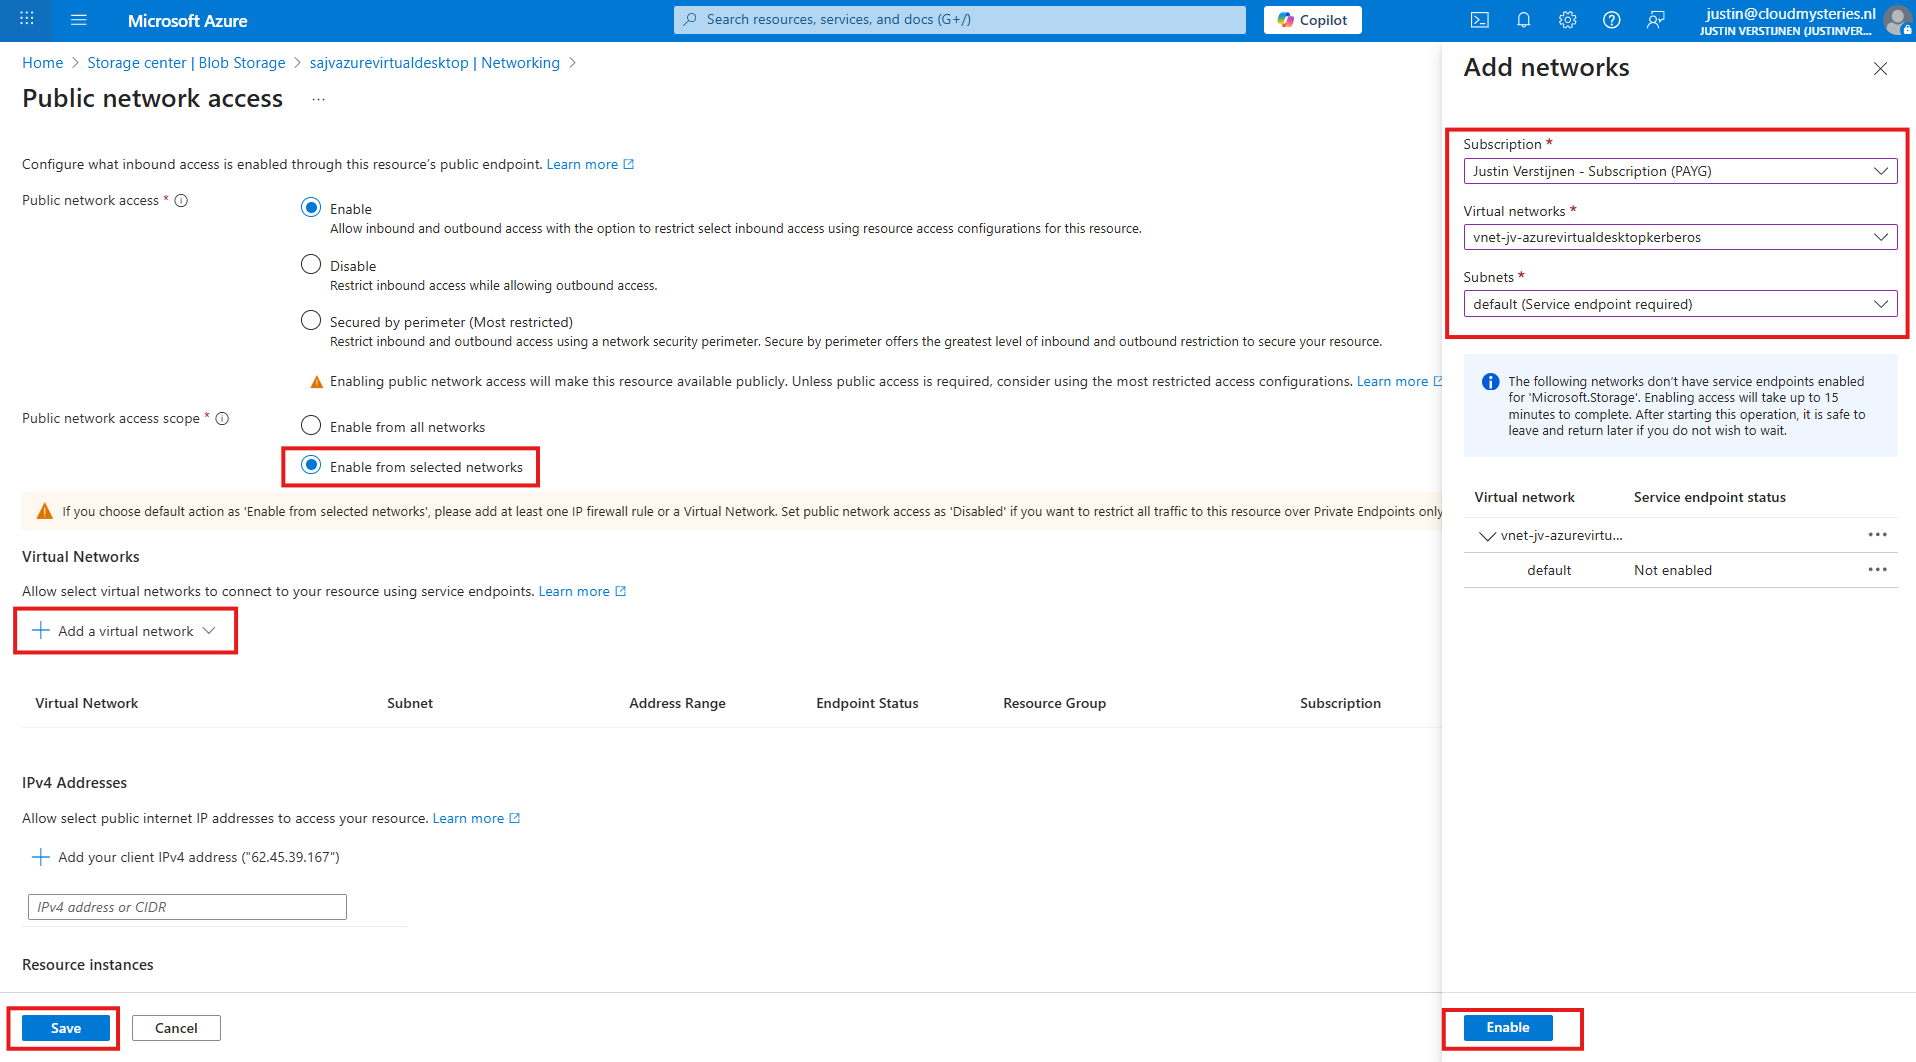
Click “Enable” to let Azure do some under the hood work (Creates a Service Endpoint for the AVD network to reach the Storage account).
Then click “Save” to limit access to your Storage Account only from your AVD hosts network.
Configuring this shifts the option to “Enabled from selected networks”.
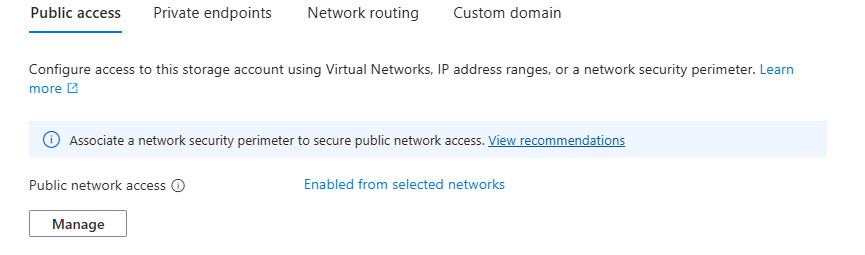
After creating, navigate to the storage account. We have to create a fileshare to place the FSLogix profiles.
Navigate to the storage account and create on “+ File share”.
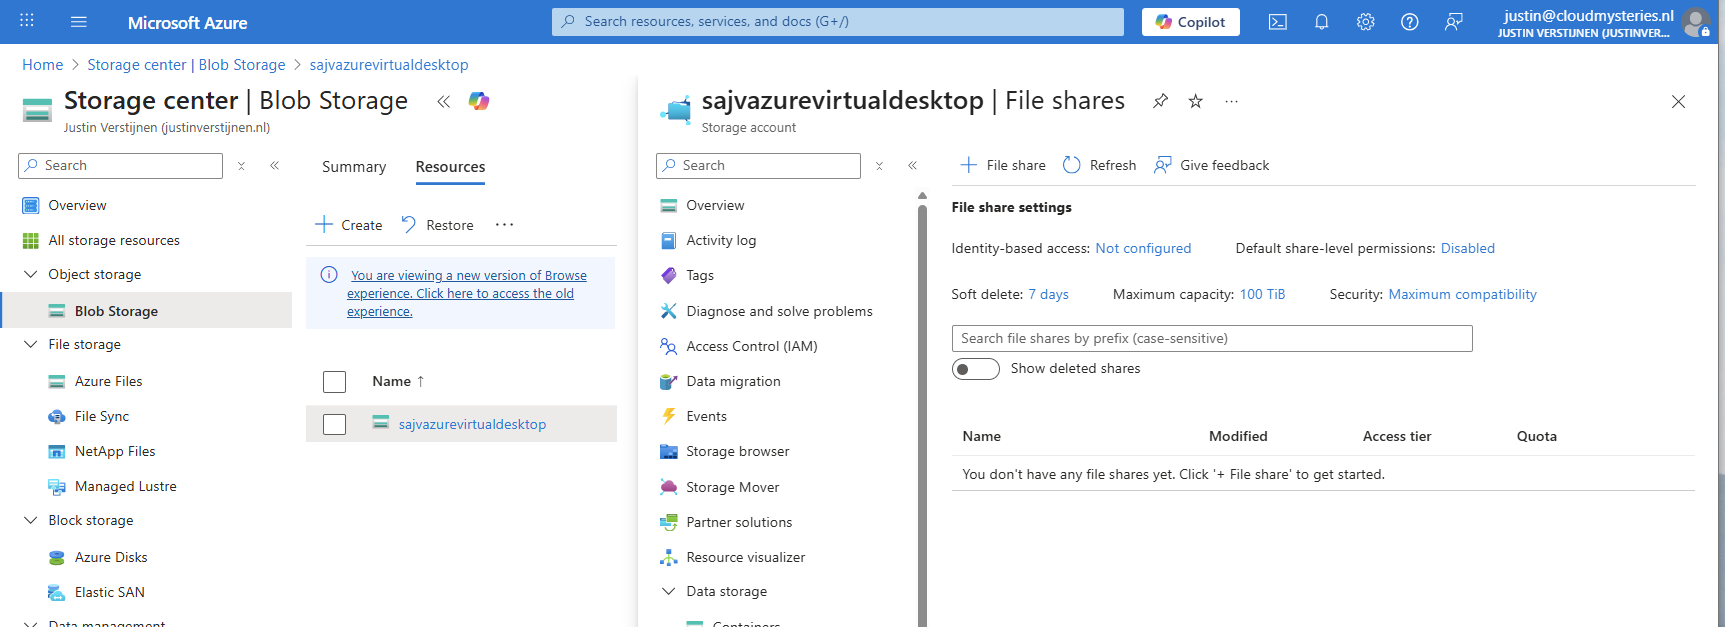
Give the file share a name and decide to use back-up or not. For production environments, this is highly recommended.
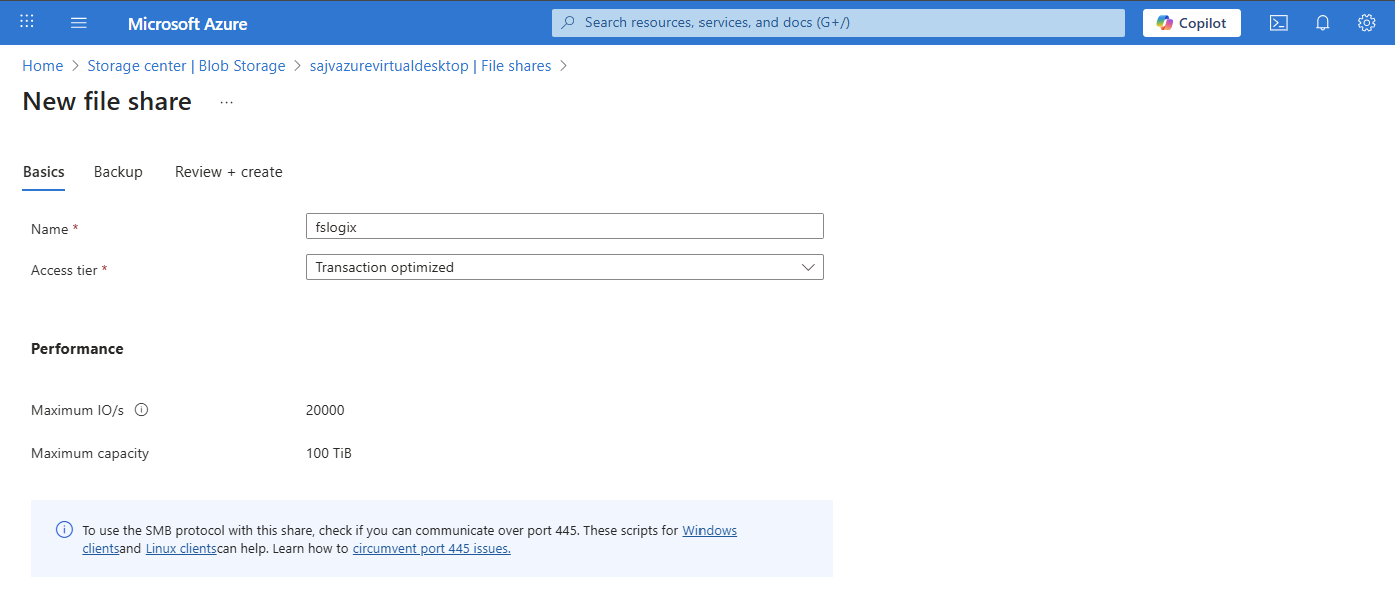
Finish the wizard to create the file share.
Now we have to configure the Microsoft Entra Authentication to authenticate against the file share. Go to the storage account, then “file shares” and then click on “Identity-based access”.
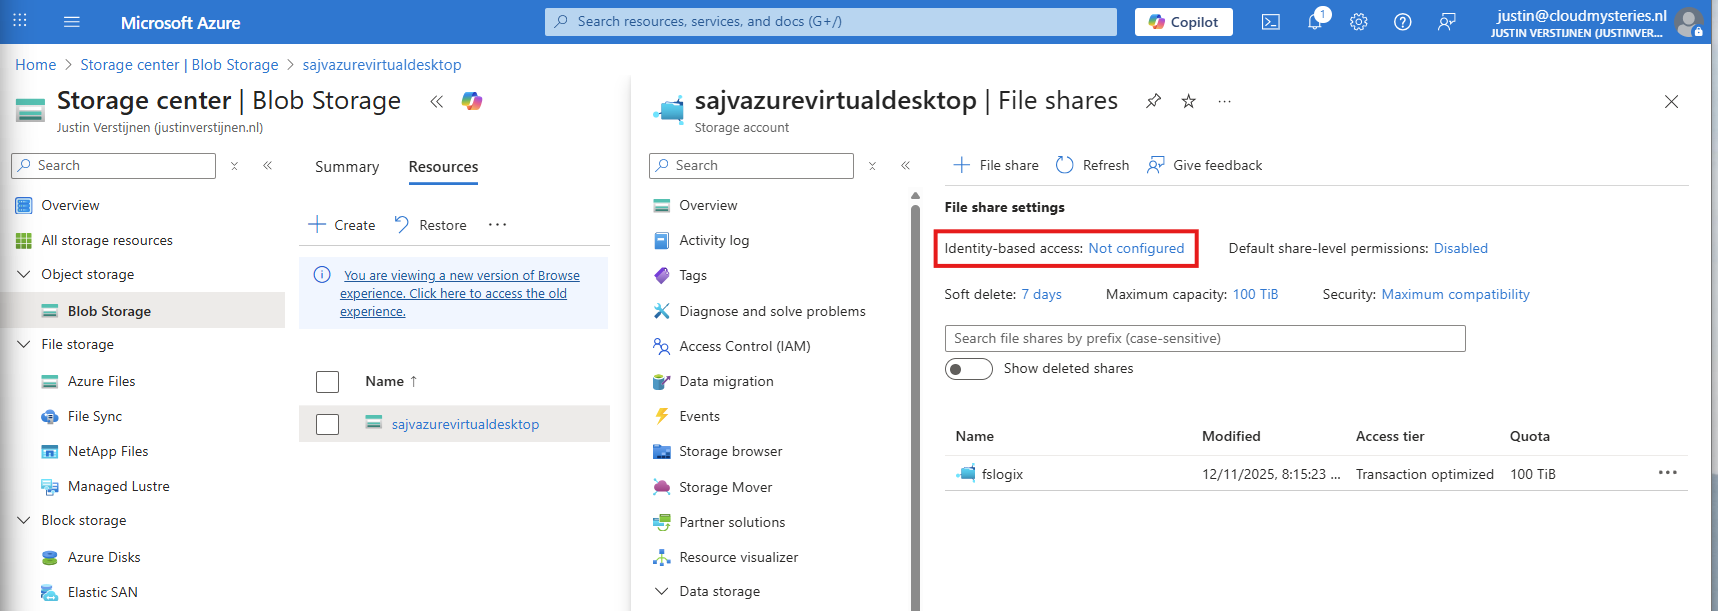
Select the option “Microsoft Entra Kerberos”.

Enable Microsoft Entra Kerberos on this window.
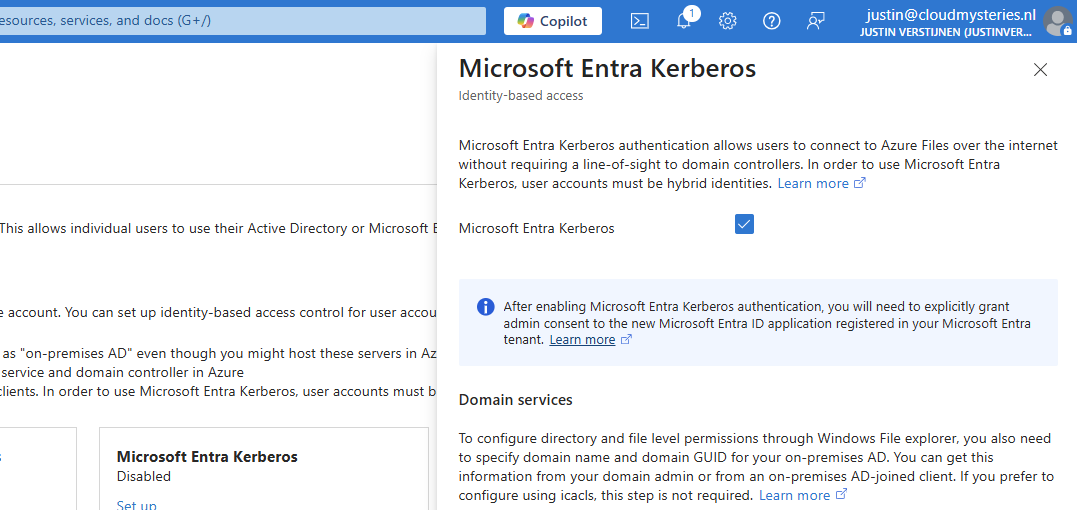
After enabling this option, save and wait for a few minutes.
Enabling this option will create a new App registration in your Entra ID.

Now that we have enabled the Entra Kerberos option, an App registration will be created. This will be used as Service Principal for gaining access to the file share. This will be a layer between the user logging into Azure Virtual Desktop and the file share.
Go to the Microsoft Entra portal: https://entra.microsoft.com
Head to “App registrations” and open it. We need to give it some permissions as administrator.
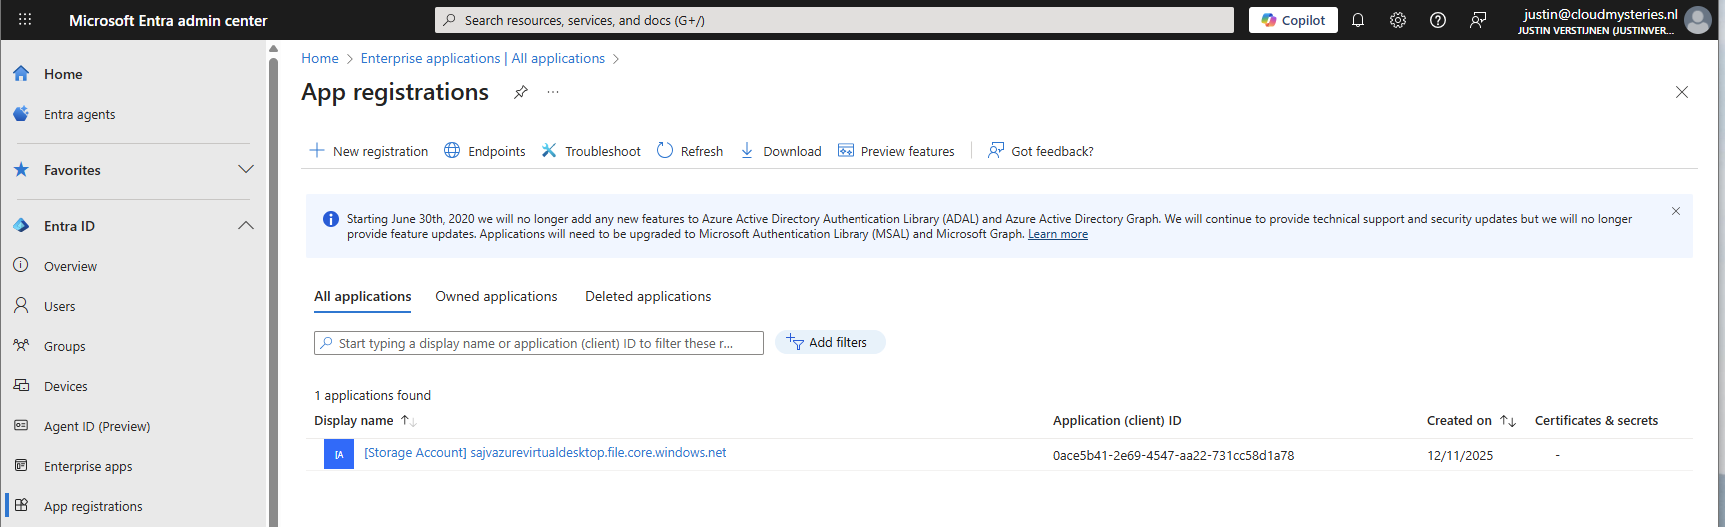
Then head to “API permissions”.
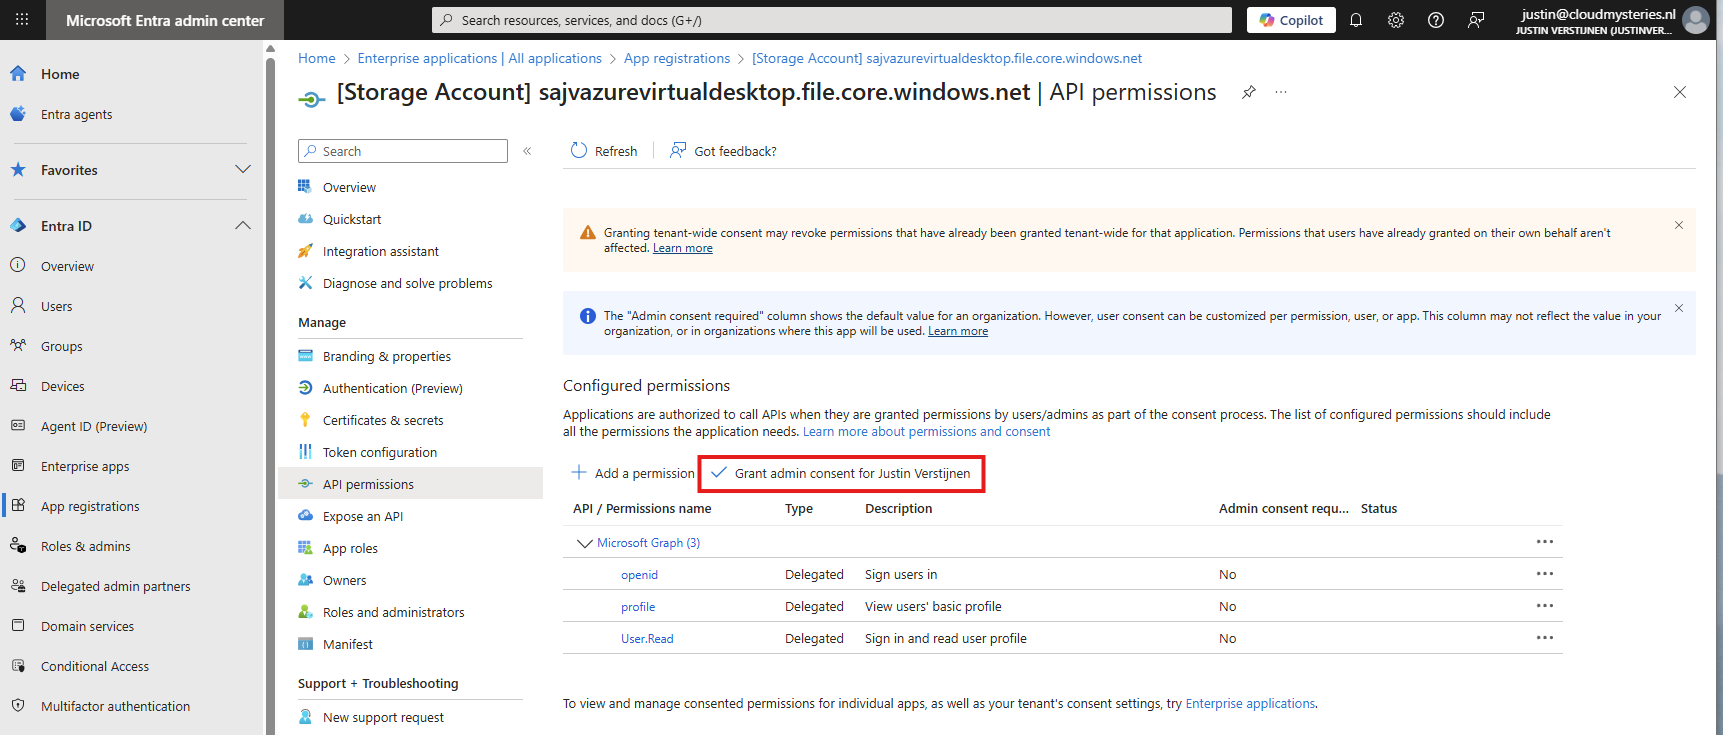
The required permissions are already filled in by Azure, but we need to grant admin consent as administrator. This means we tell Azure that it may read our users and can use it to sign in to the File share.

Click on “Yes” to accept the permissions.

Without granting access, the solution will not work. Even when it stated that admin consent is not required.
You also need to exclude the application from your Conditional Access policies. For every policy, add it as excluded resource:
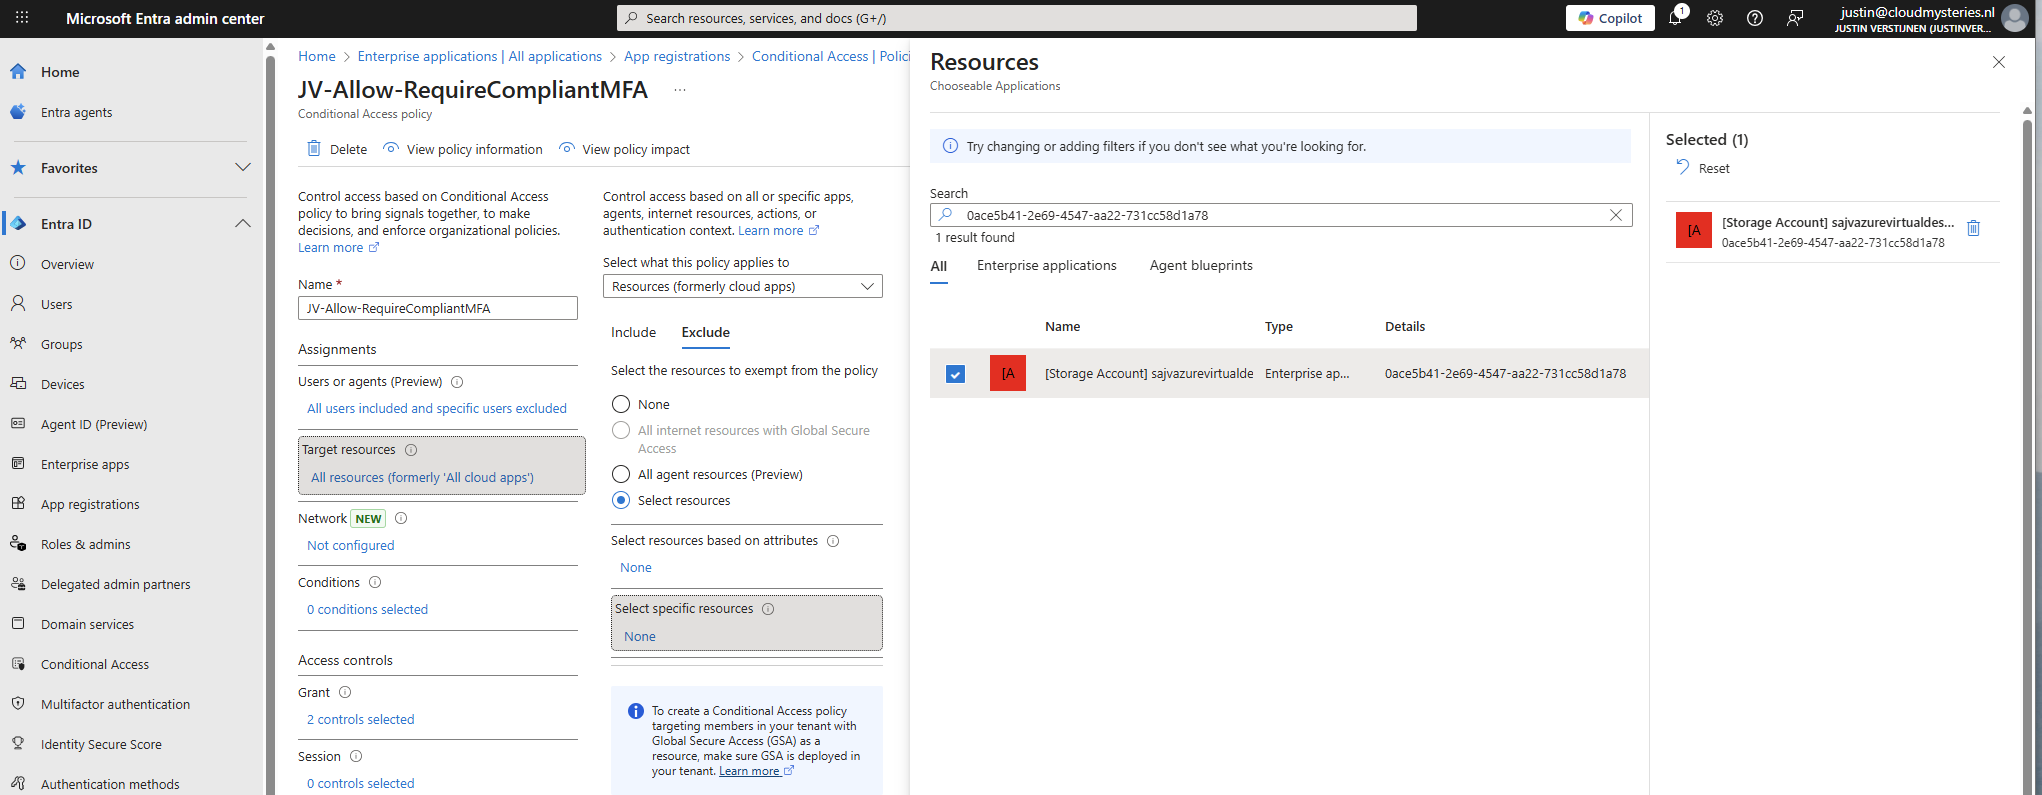
In my case, the name did not pop-up so I used the Application ID instead.
Add this to the excluded resource of every Conditional Access policy in your tenant to make sure this will not interrupt.
To give users and this solution access to the storage account, we need to configure the permissions on our storage account. We will give the created security group SMB Contributor permissions to read and write the profile disks.
Go to the Storage account, then to the file share and open the file share. For narrow security, we will give only permissions on the file share we just created some steps earlier.
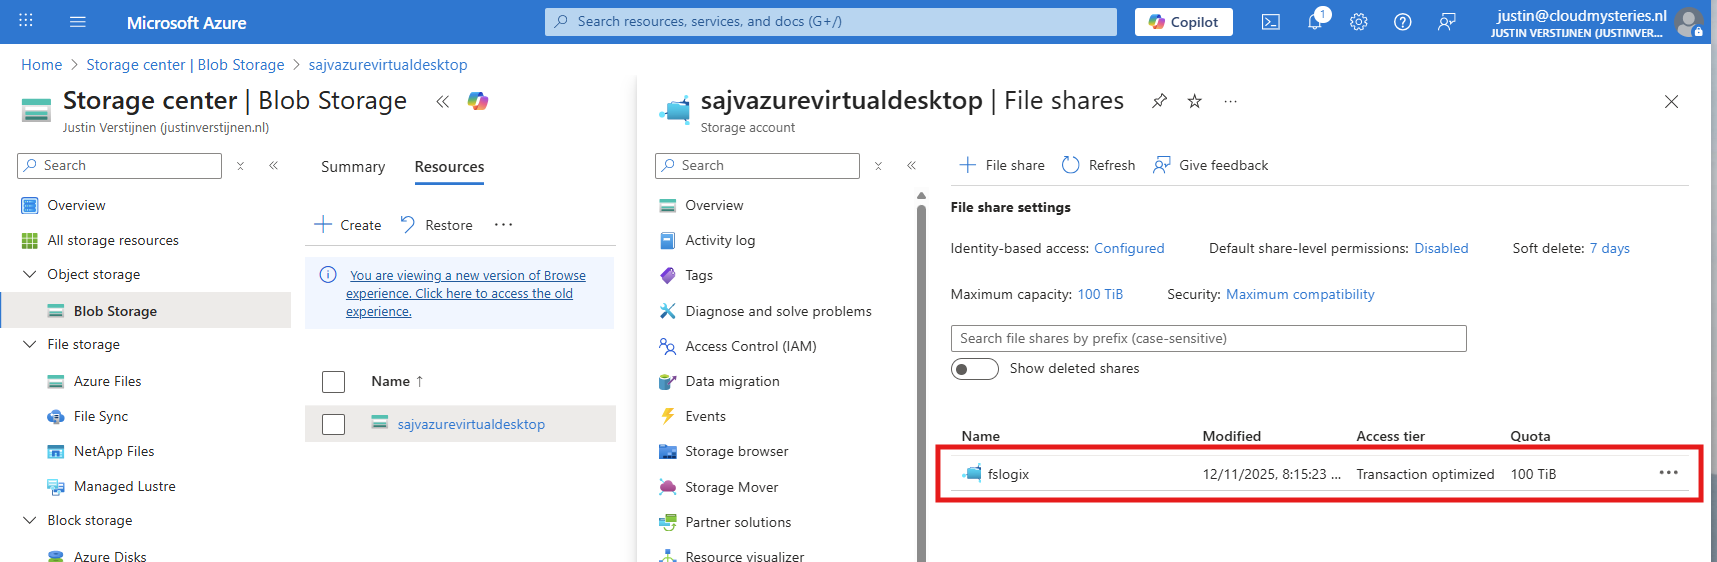
Open the file share and open the “Access Control (IAM)” blade and add a new role assignment.
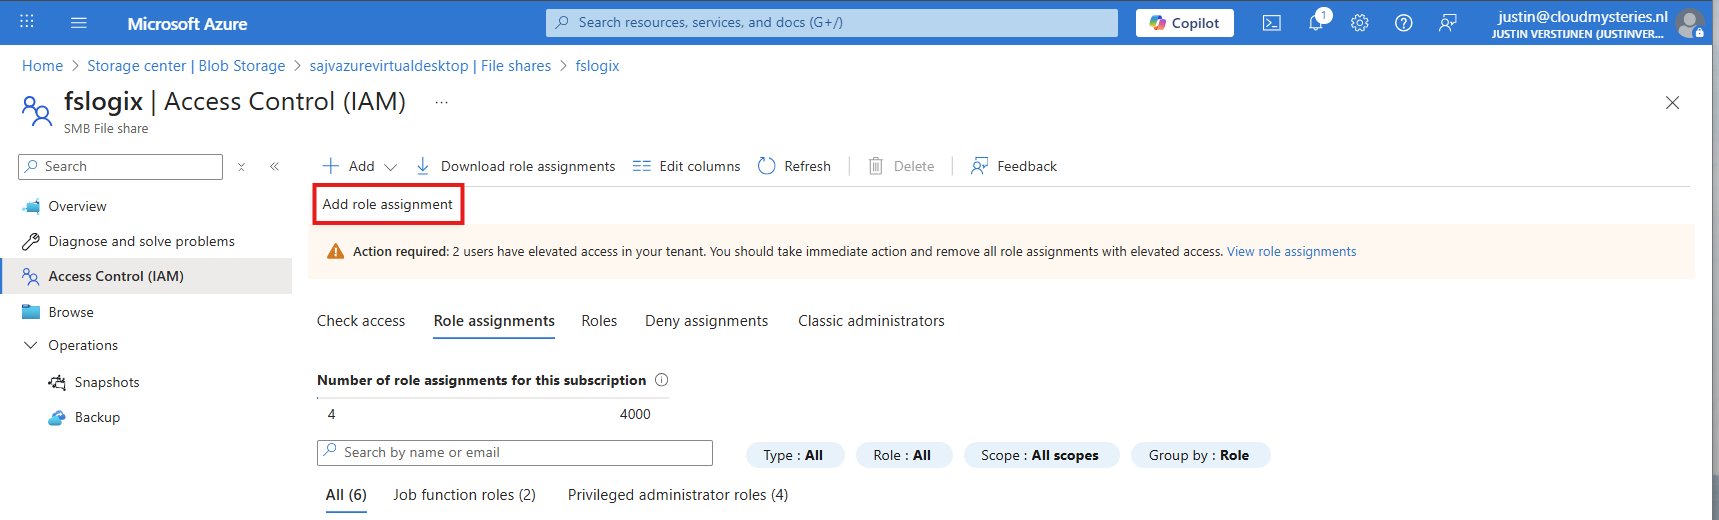
Now search for the role named:
This role gives read/write access to the file share, which is the SMB protocol. We will assign this role to our created security group.
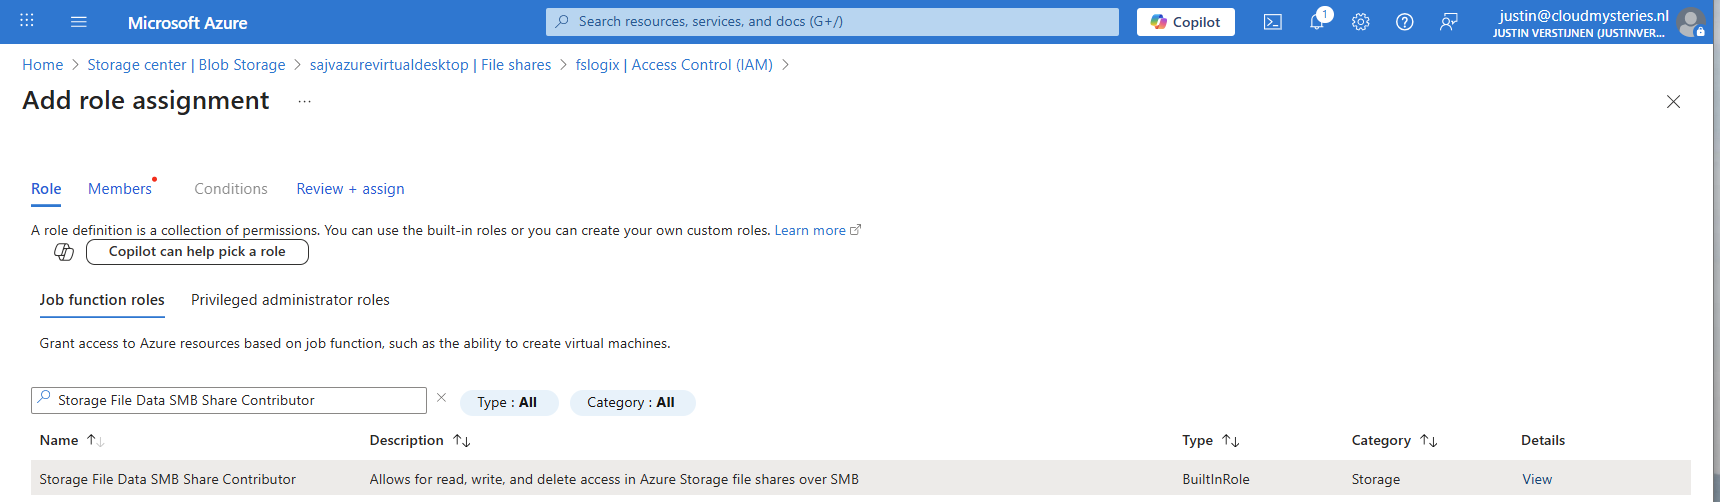
Click “Next” to get to the “Members” tab.
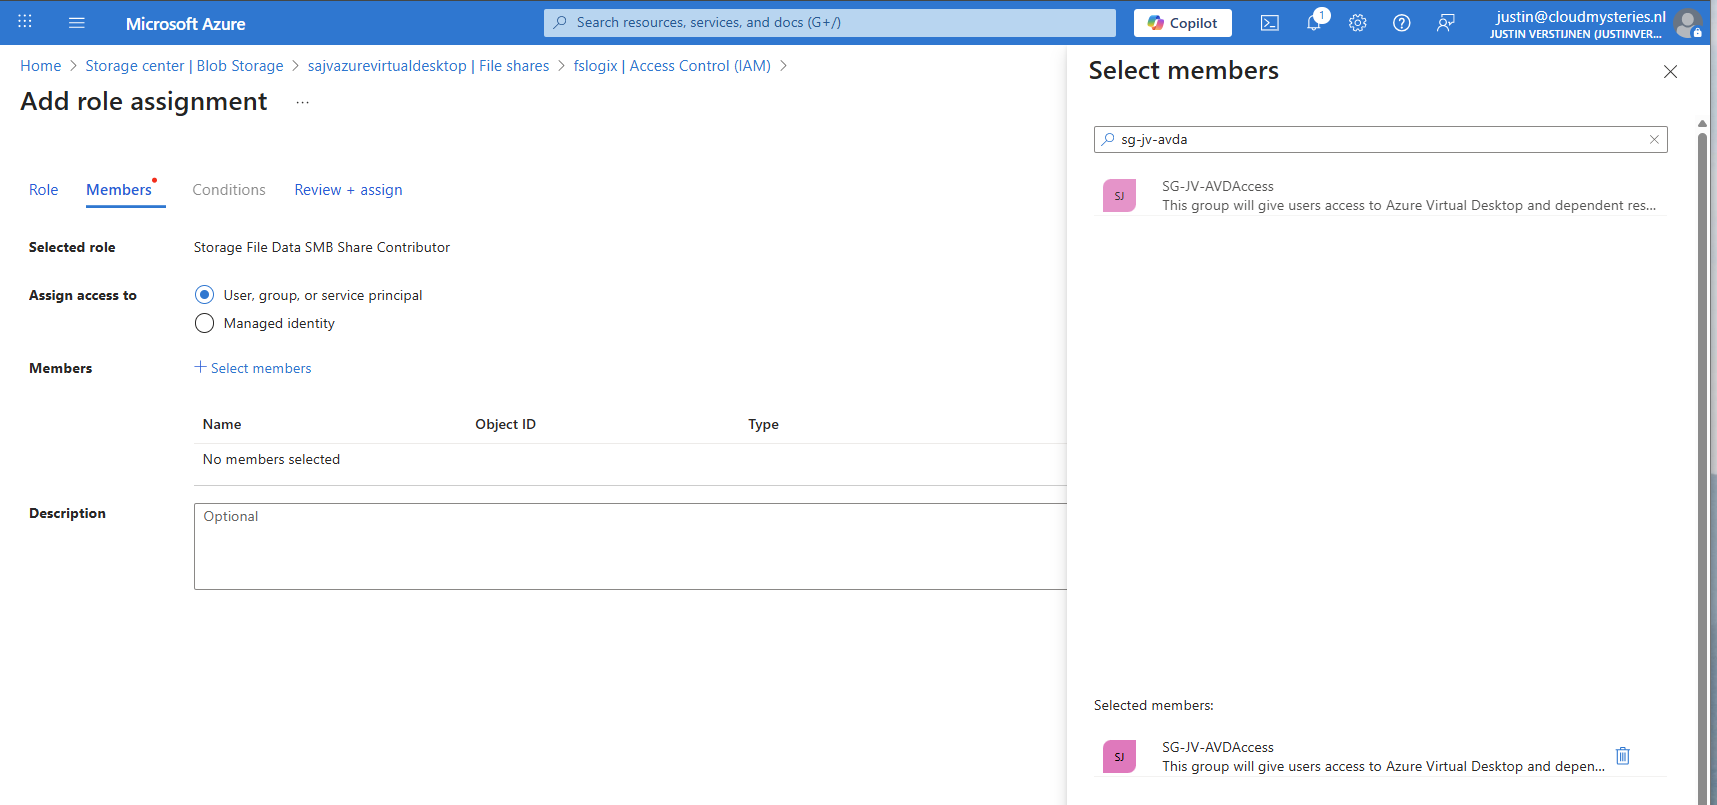
Search for your group and add it to the role. Then finish the wizard.
To view the profiles as administrator, we must give our accounts another role, this is to use Microsoft Entra authentication in the portal as we disabled the storage account key for security reasons.
Again, add a new role assignment:
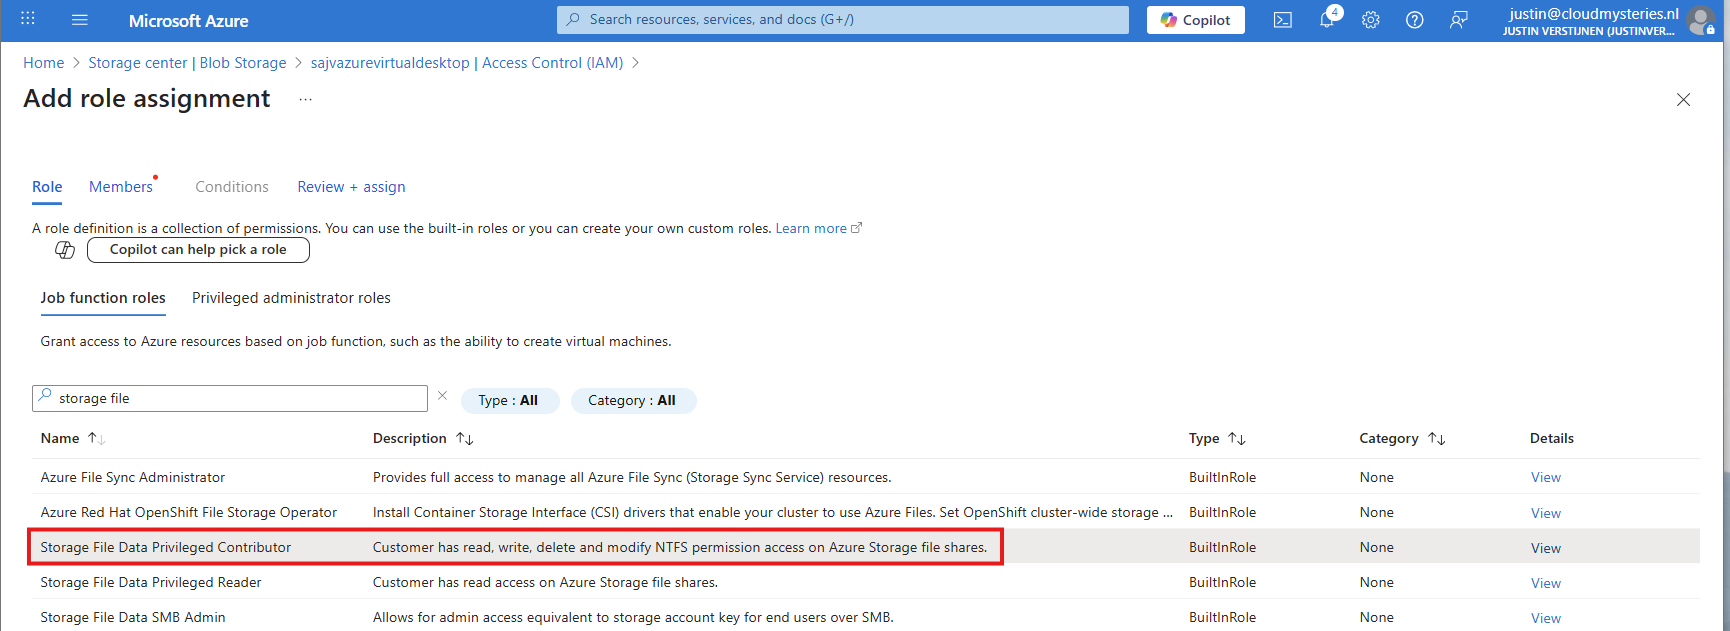
Search for the role: Storage File Data Privileged Contributor
Assign this to your administrator accounts:
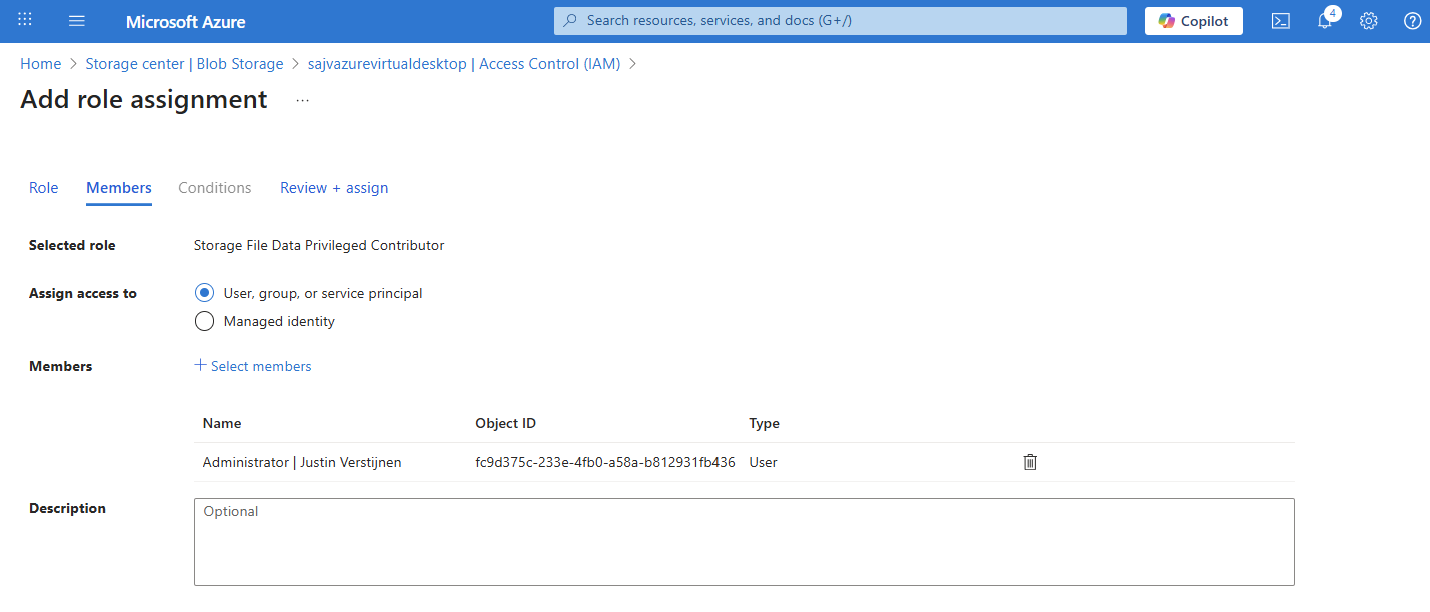
Finish the wizard to make the assignment active.
We must also do one final configuration to the storage account permissions, and that is to set default share-level permissions. Is is a requirement of this Microsoft Entra Kerberos thing.
Go back to the storage account, click on FIle shares and then click on “Default share-level permissions”
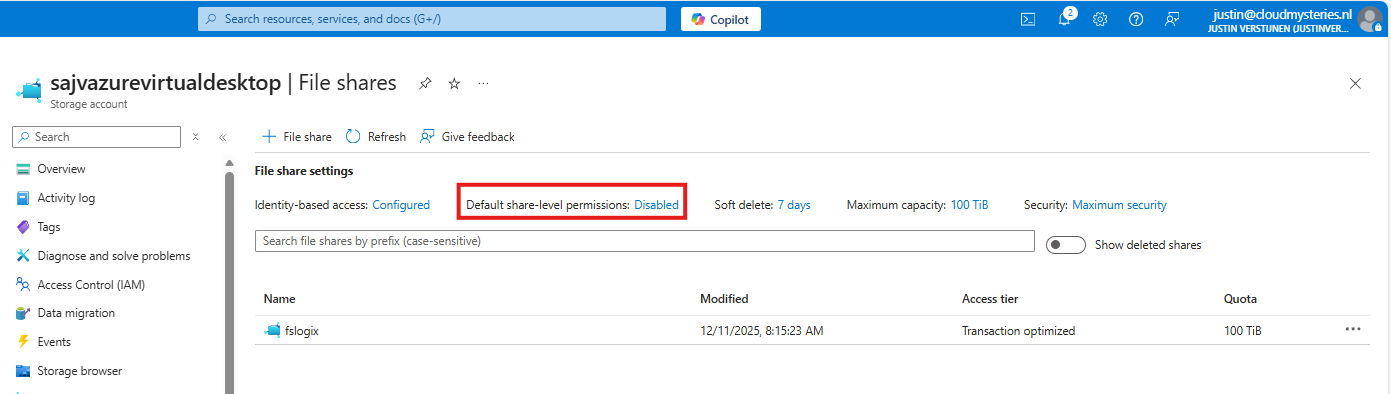
Set the share-level permissions to “Enable permissions for all authenticated users and groups”. Also select the “Storage File Data SMB Share Contributor” role, which includes read/write permissions.
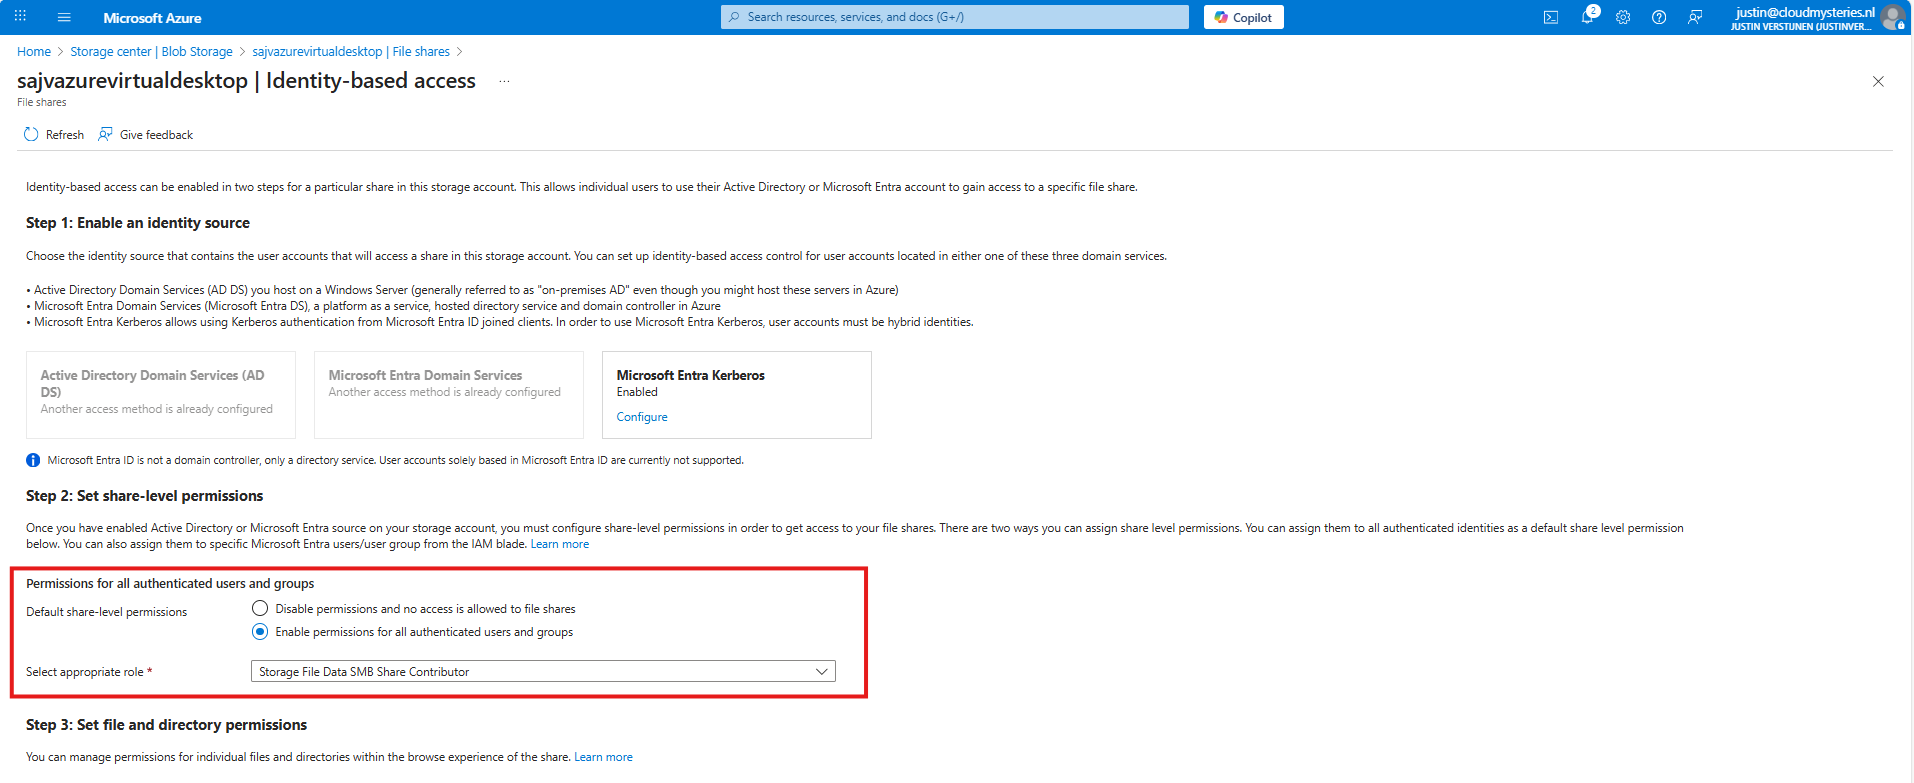
Save the configuration, and we will now dive into the session host configuration part.
Now we need to configure the following setting for our AVD hosts in Intune:
Go to the Intune Admin center (https://intune.microsoft.com). We need to create or change an existing configuration policy.
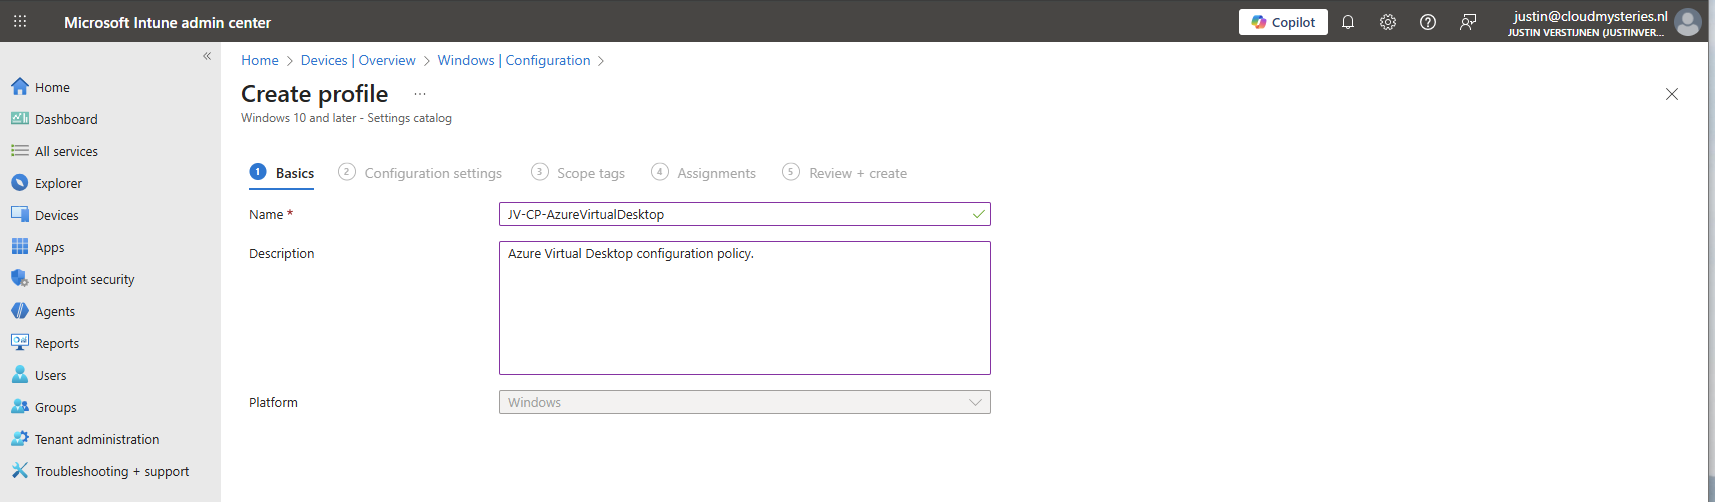
Search for “Kerberos” and search for the “Cloud Kerberos Ticket Retrieval” option and enable it.
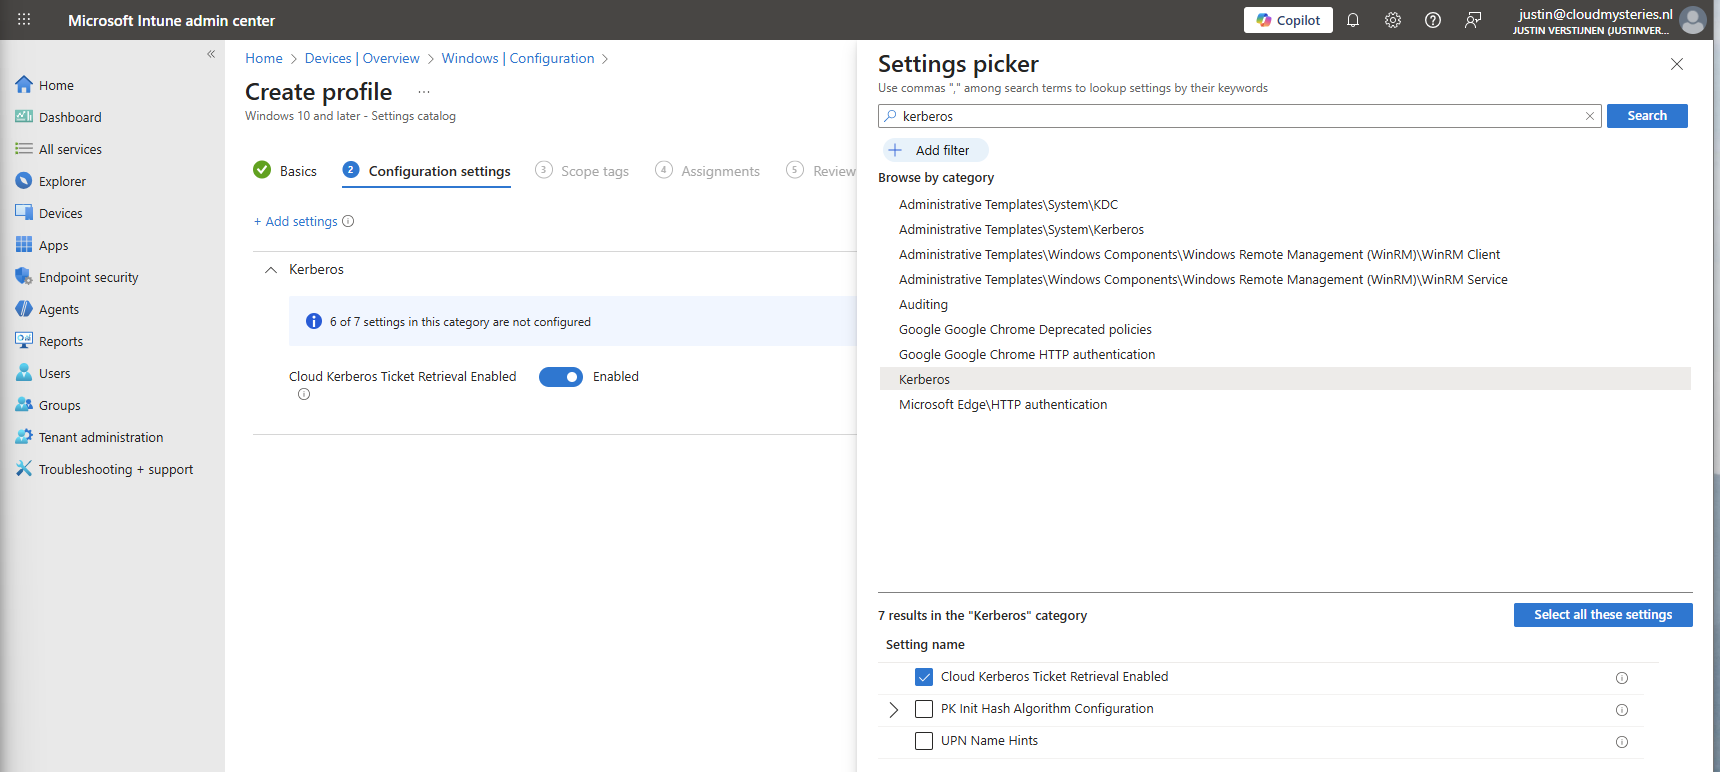
Then assign the configuration policy to your AVD hosts to apply this configuration.
We can now configure FSLogix in Intune. I do this by using configuration profiles from settings catalogs. These are easy to configure and can be imported and exported.
To configure this create a new configuration template from scratch for Windows 10 and higher and use the “Settings catalog”.
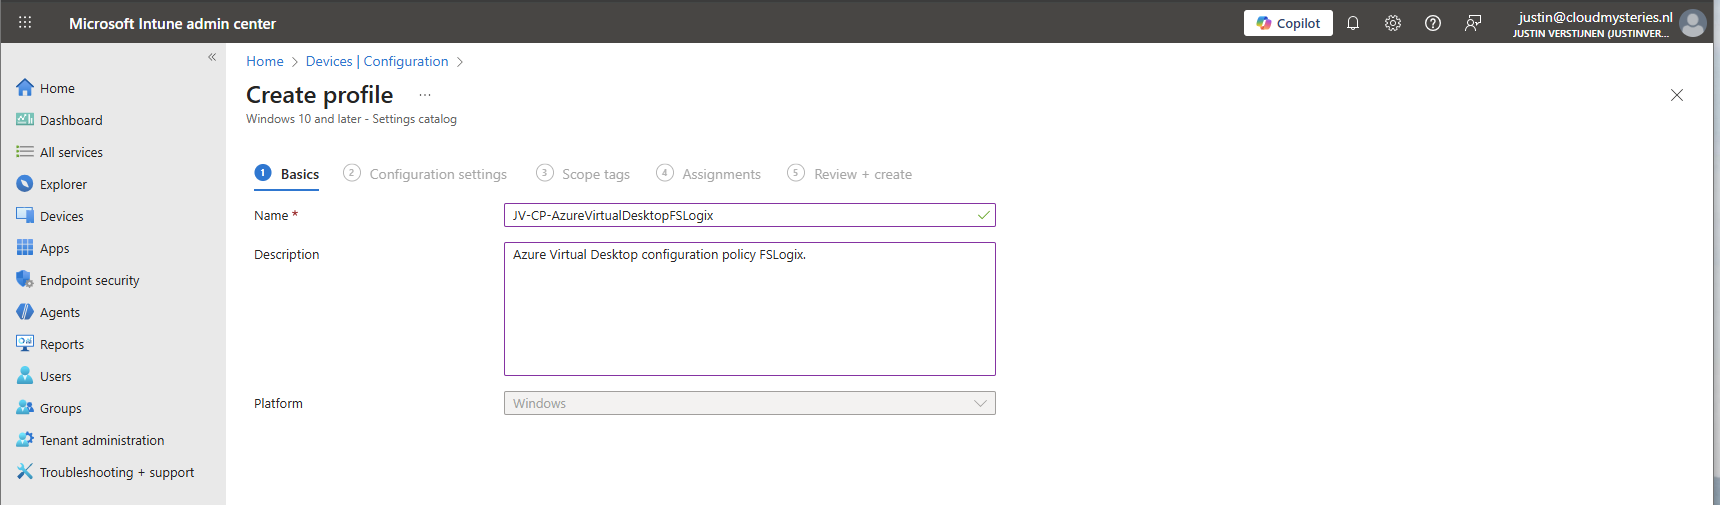
Give the profile a name and description and advance.
Click on “Add settings” and navigate to the FSLogix policy settings.
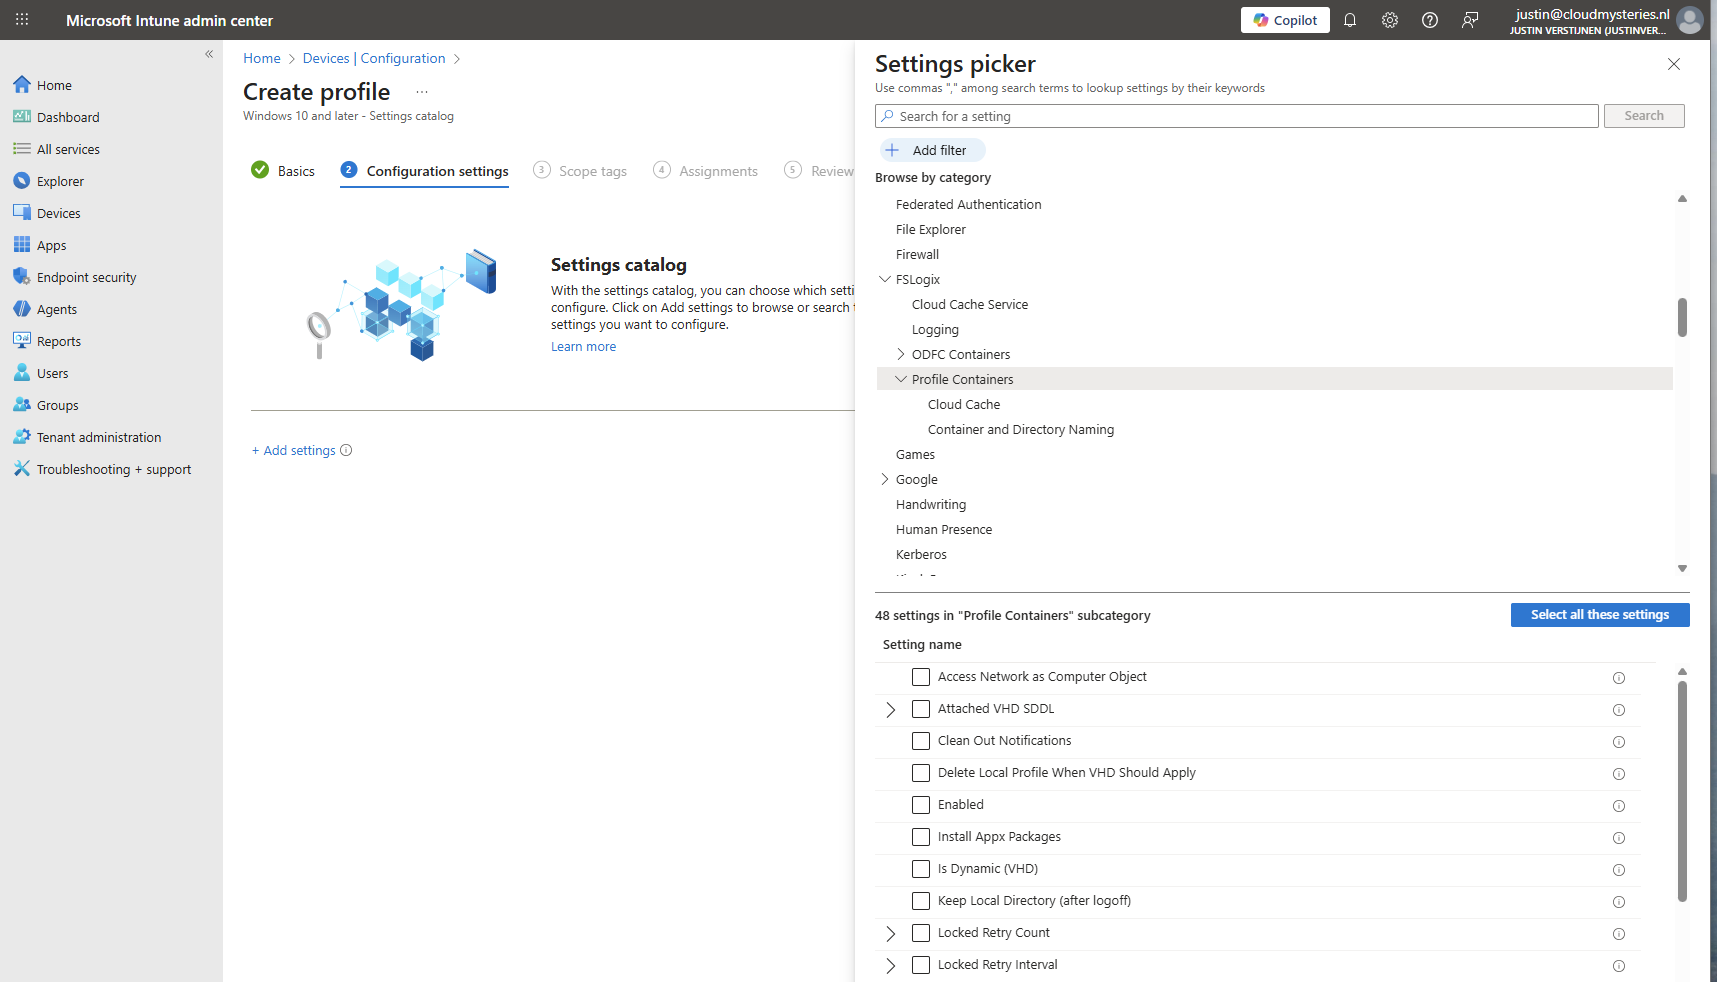
Under FSLogix -> Profile Containers, select the following settings, enable them and configure them:
| etting name | Value |
| Access Network as Computer Object | Disabled |
| Delete Local Profile When VHD Should Apply | Enabled |
| Enabled | Enabled |
| Is Dynamic (VHD) | Enabled |
| Keep Local Directory (after logoff) | Enabled |
| Prevent Login With Failure | Enabled |
| Roam Identity | Enabled |
| Roam Search | Disabled |
| VHD Locations | Your storage account and share in UNC. Mine is here: \sajvazurevirtualdesktop.file.core.windows.net\fslogix |
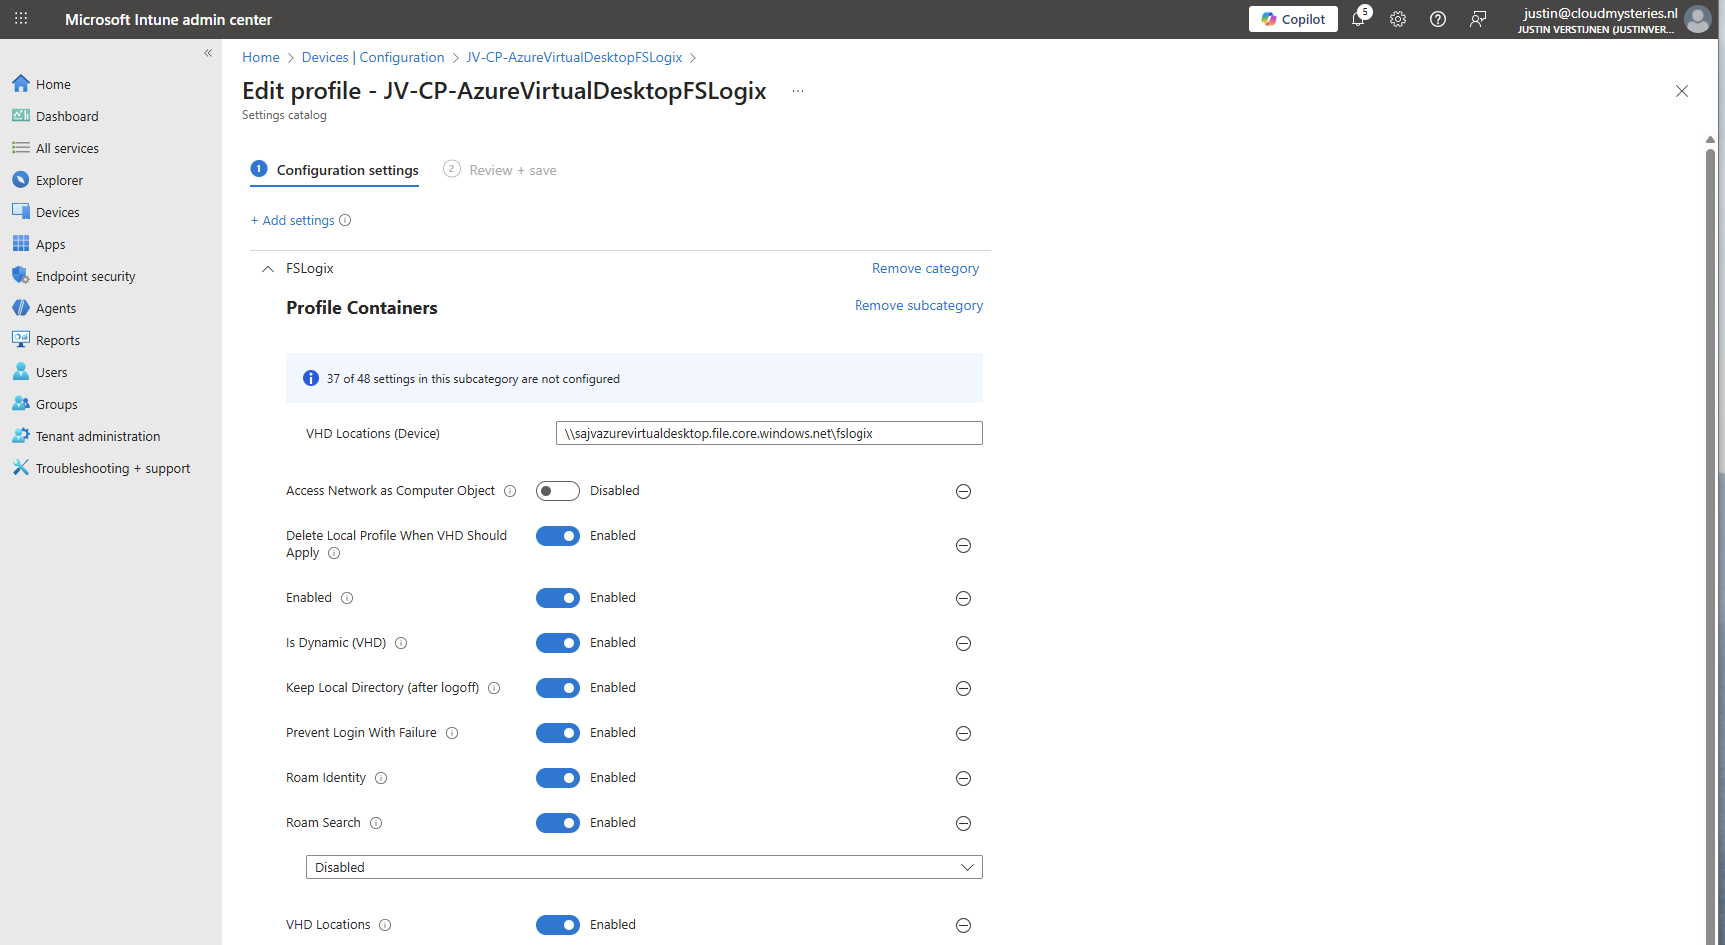
Make sure the option “Access Network as Computer Object” is Disabled, as this is a requirement for user authentication. Otherwise the solution will not work and sign in will result in a FSLogix “Error code: 0x000000035, Message: Impossibile to find network path” error.
Under FSLogix -> Profile Containers -> Container and Directory Naming, select the following settings, enable them and configure them:
| Setting name | Value |
| No Profile Containing Folder | Enable |
| VHD Name Match | %username% |
| VHD Name Pattern | %username% |
| Volume Type (VHD or VHDX) | VHDX |
You can change this configuration to fit your needs, this is purely how I configured FSLogix to keep the configuration as simple and effective as possible.
Save the policy and assign this to your AVD hosts.
We need to do some small final configurations, gaining access to the virtual desktops by giving the permissions.
Go to the hostpool and then to Application Groups.
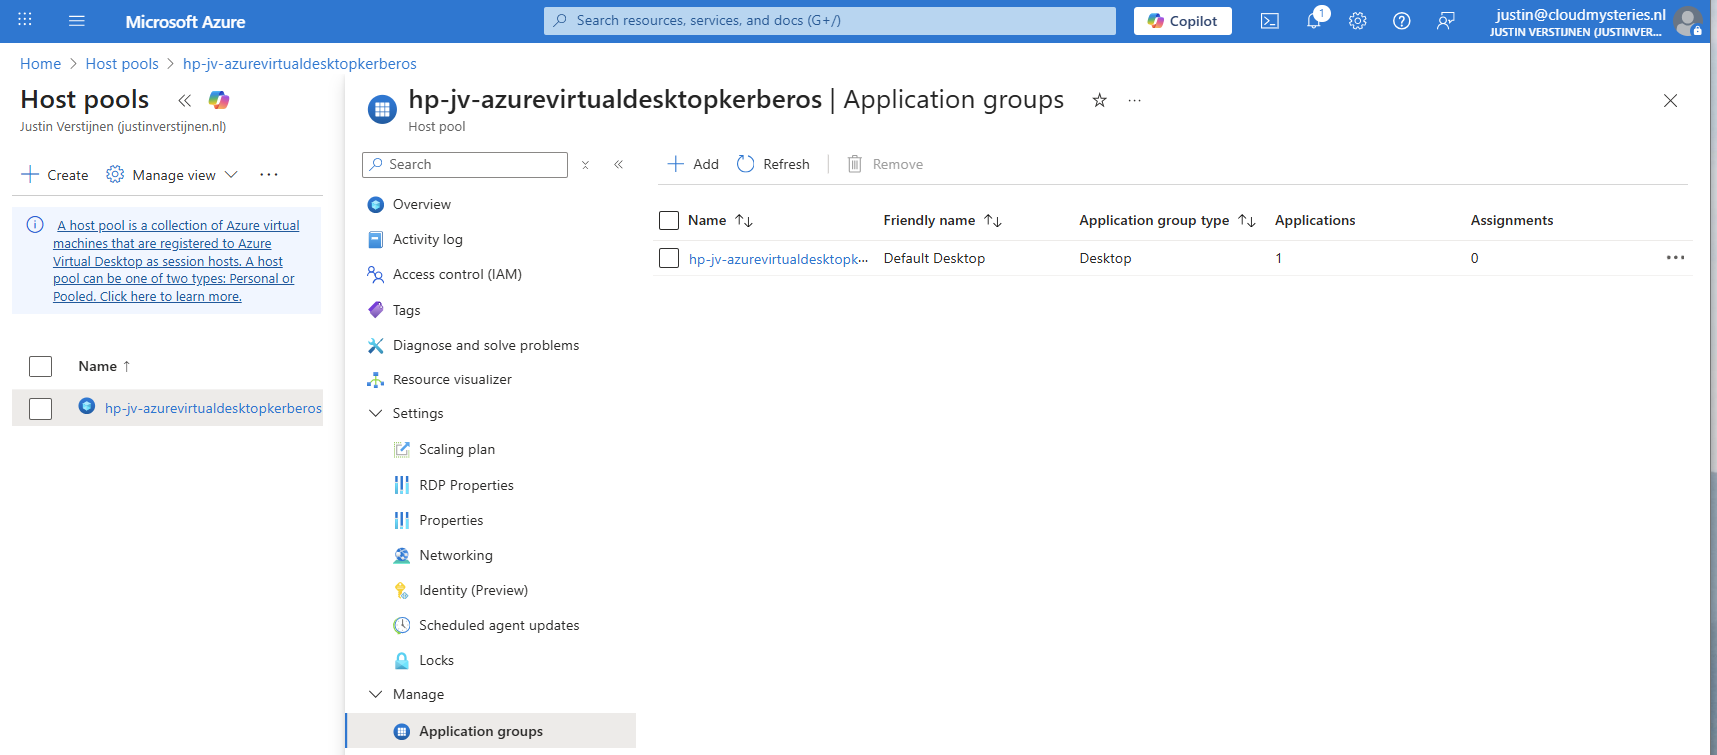
Then open the application group that contains the desktop. Then click on “Assignments”.
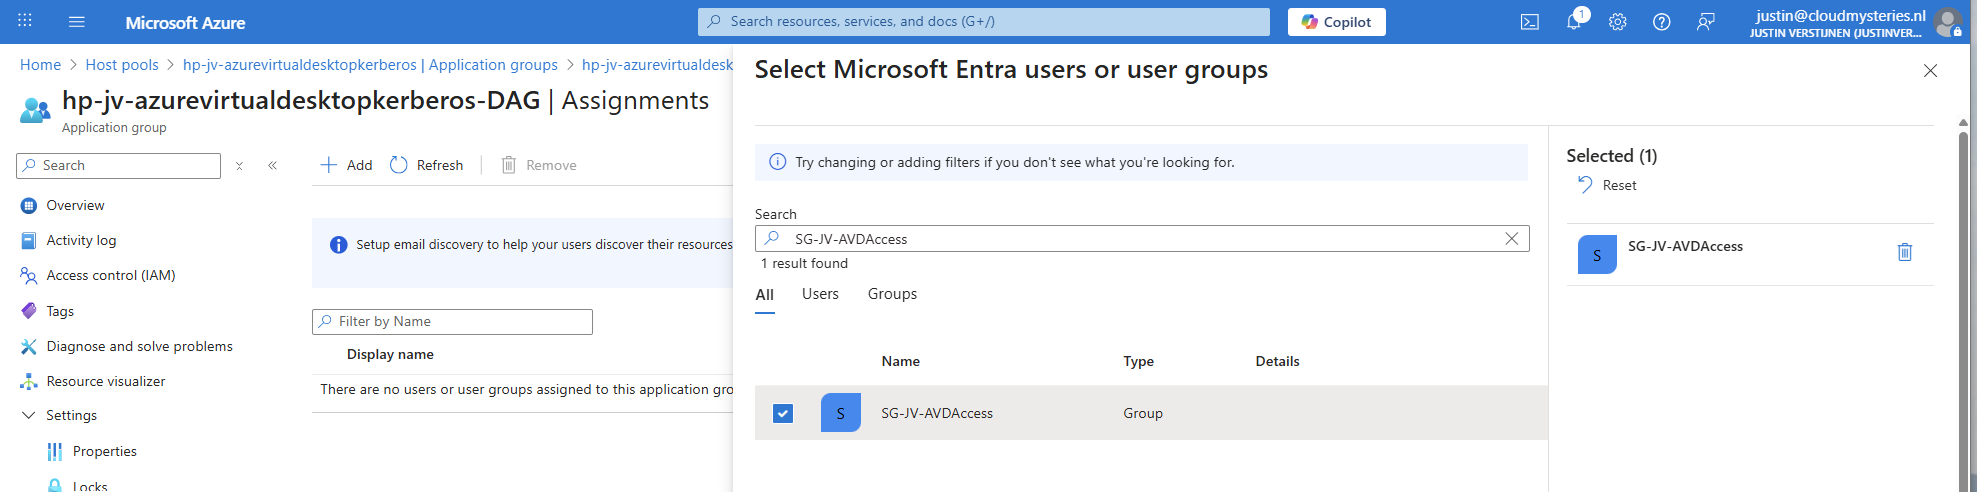
Select the group to give desktop access to the users. Then save the assignment.
After assigning the group we would have to do one last configuration, enabling Single Sign On on the hostpool. Go to your hostpool and open the RDP Properties
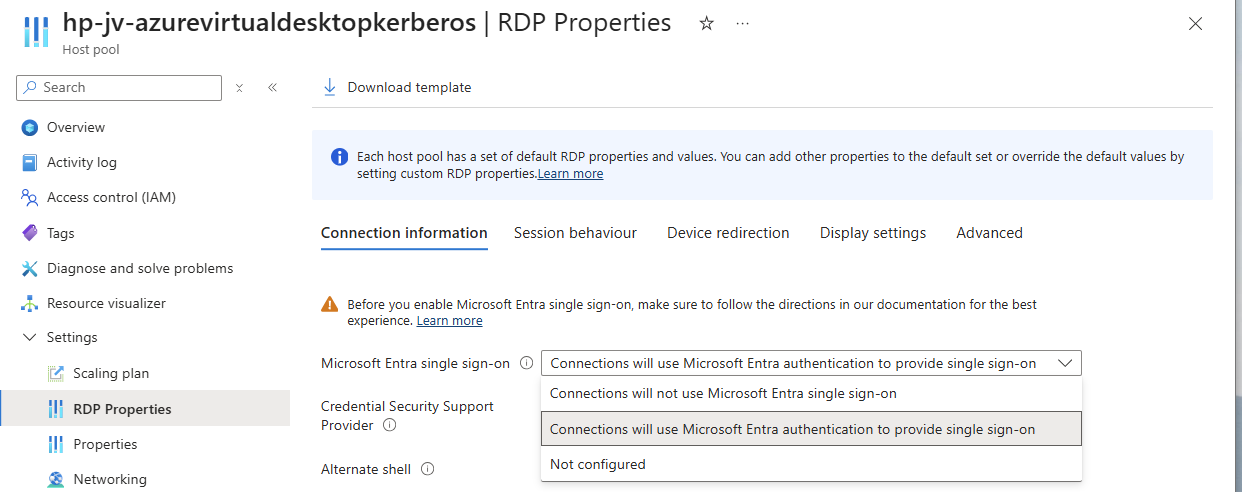
For a comprehensive guide about Azure Virtual Desktop and RDP Properties, visit: https://justinverstijnen.nl/azure-virtual-desktop-rdp-properties/
On the “Connection Information” tab, select the “Microsoft Entra single sign-on” option and set this to provide single sign-on. Then save the configuration.
At this point, my advanced RSP Properties configuration is:
drivestoredirect:s:;usbdevicestoredirect:s:;redirectclipboard:i:0;redirectprinters:i:0;audiomode:i:0;videoplaybackmode:i:1;devicestoredirect:s:*;redirectcomports:i:1;redirectsmartcards:i:1;enablecredsspsupport:i:1;redirectwebauthn:i:1;use multimon:i:1;enablerdsaadauth:i:1Now we have everything ready under the hood, we can finally connect to our hostpool. Download the Windows App or use the webclient and sign into your account:
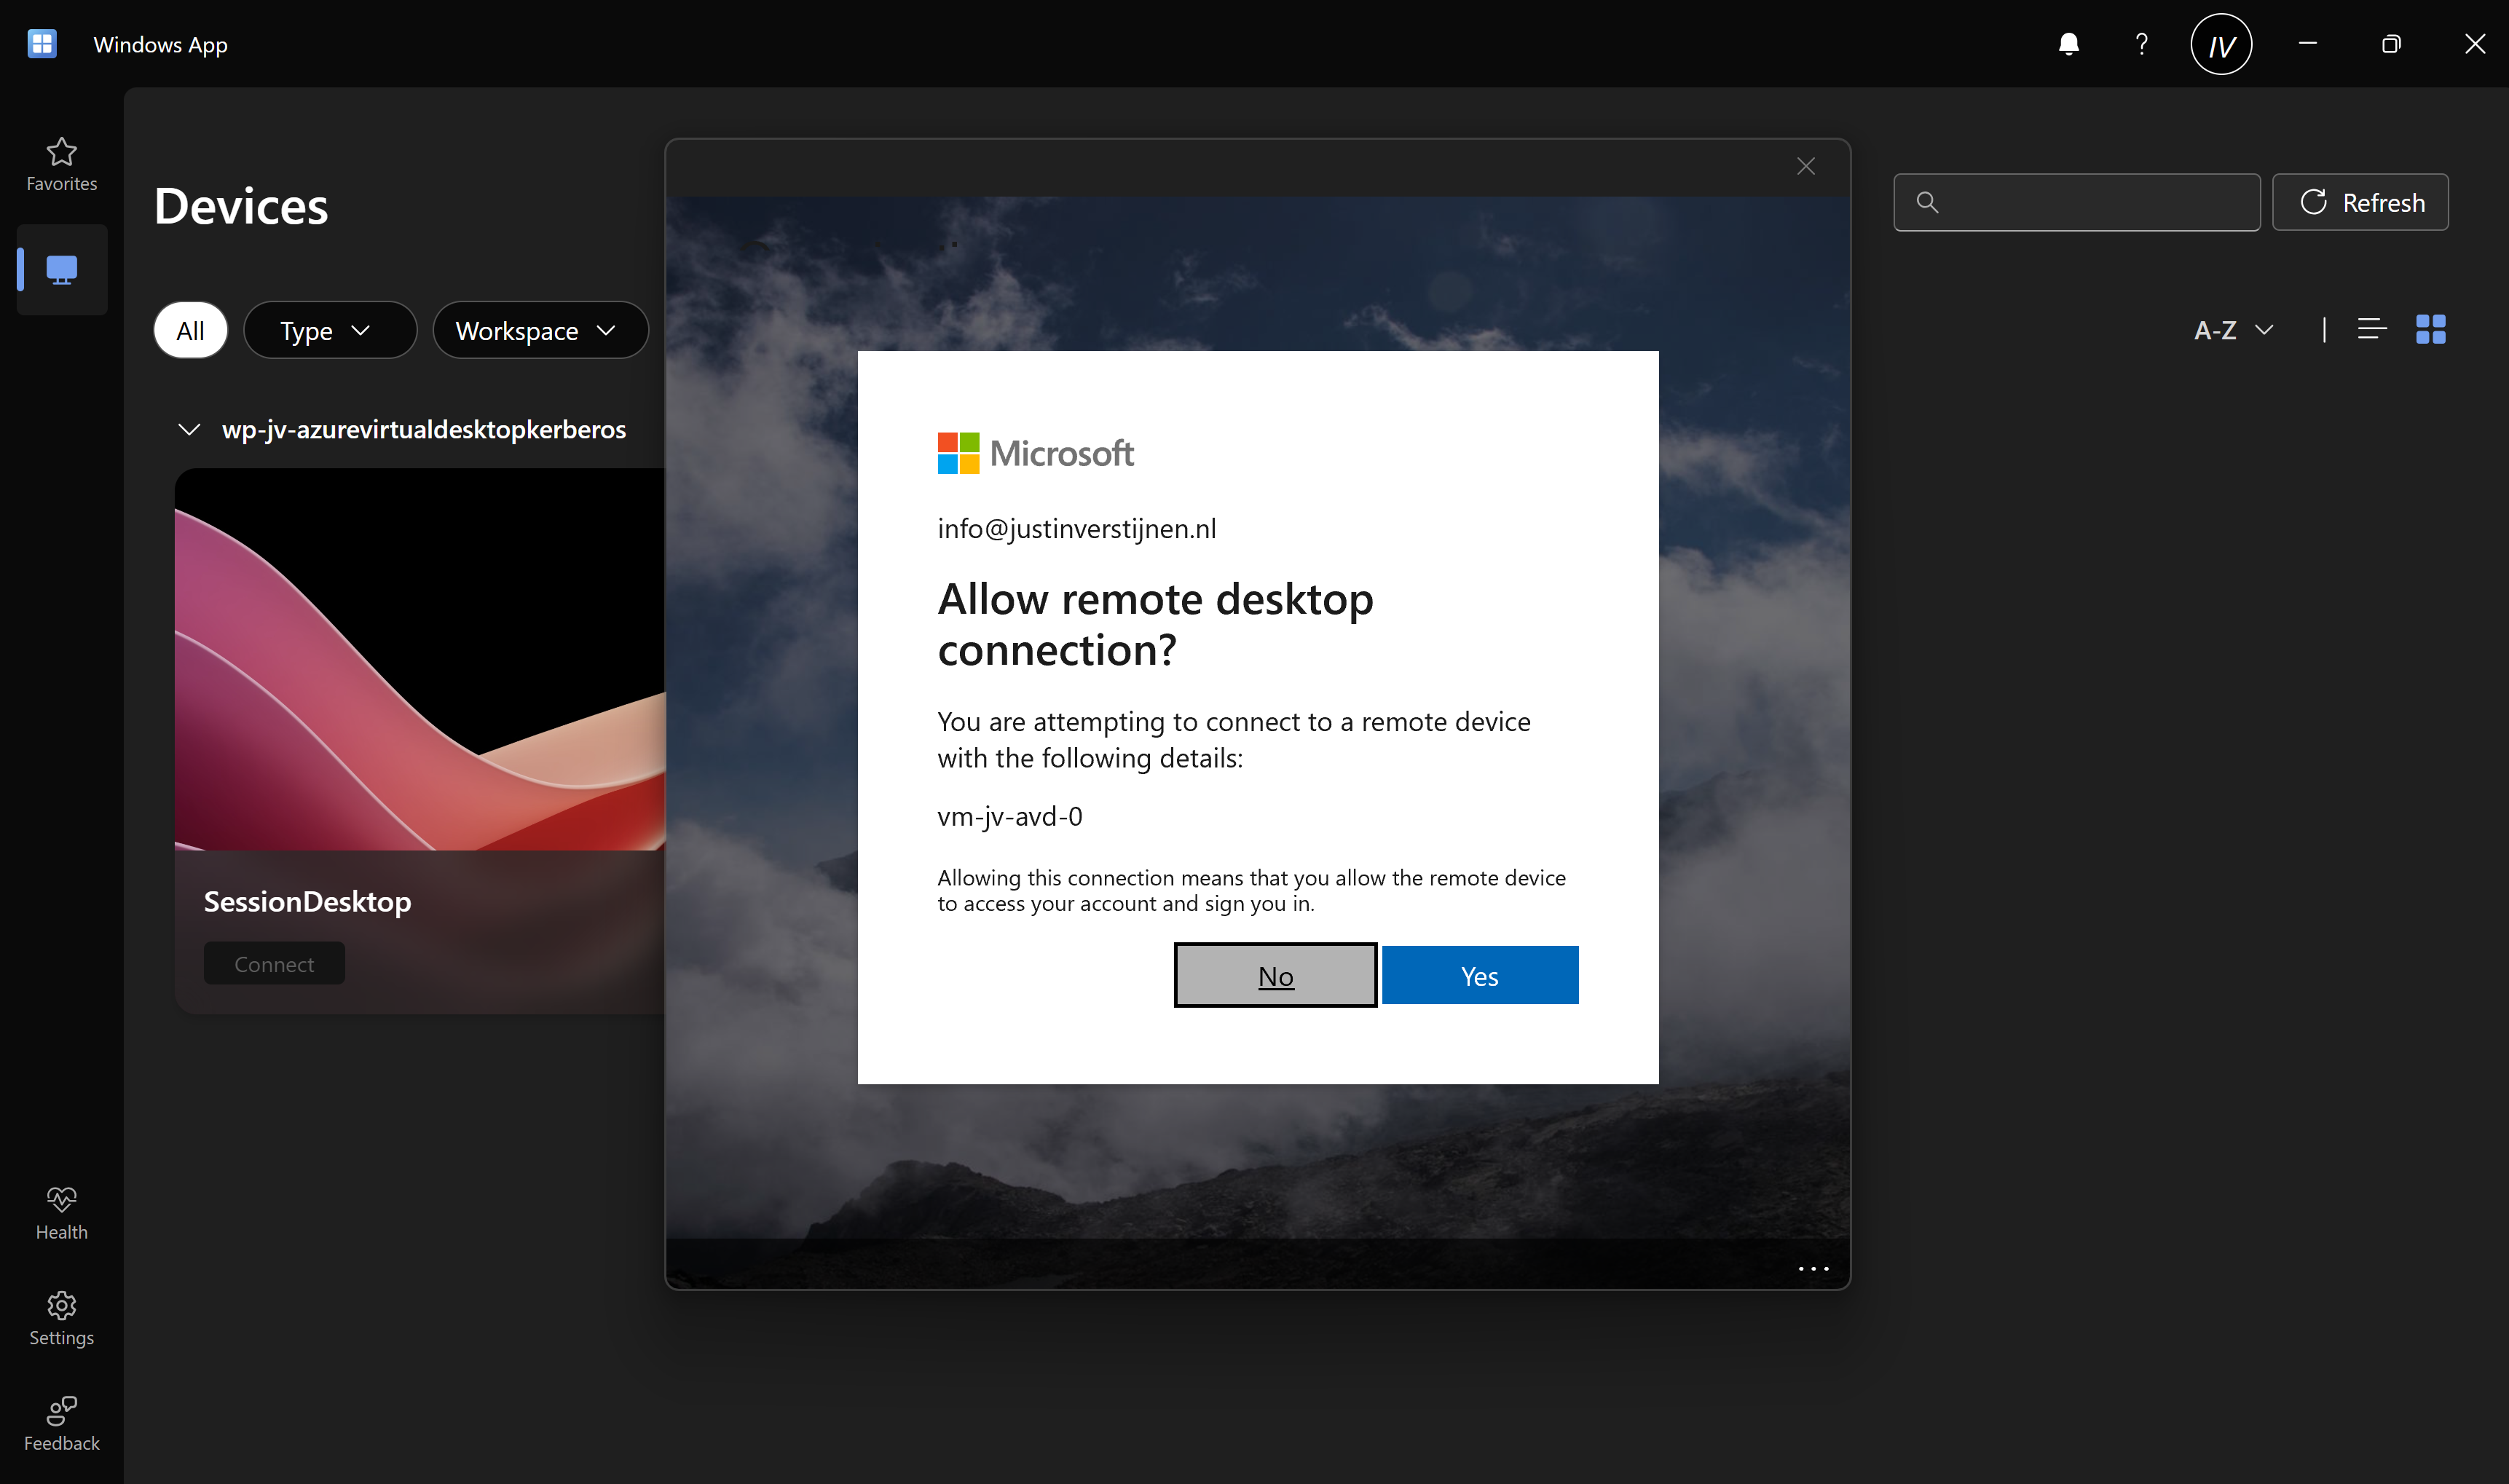
Also click on “Yes” on the Single sign-on prompt to allow the remote desktop connection.
Here we are on our freshly created desktop. After connecting the FSLogix profile will be automatically created on the storage account.
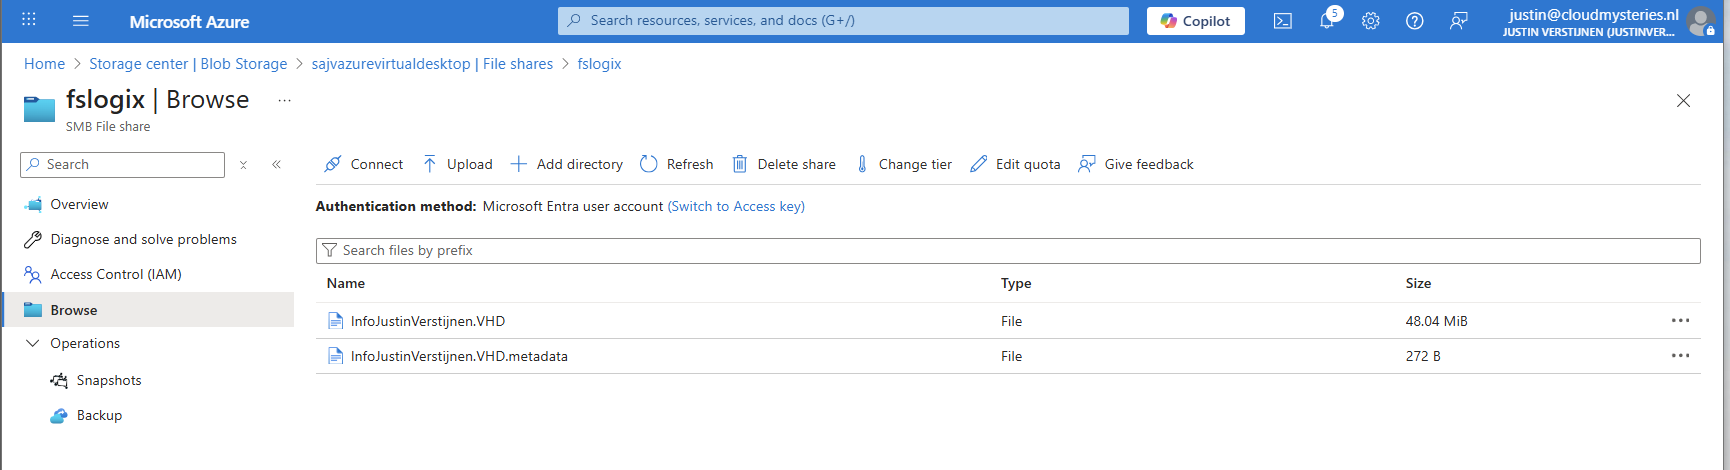
And this with only these resources:
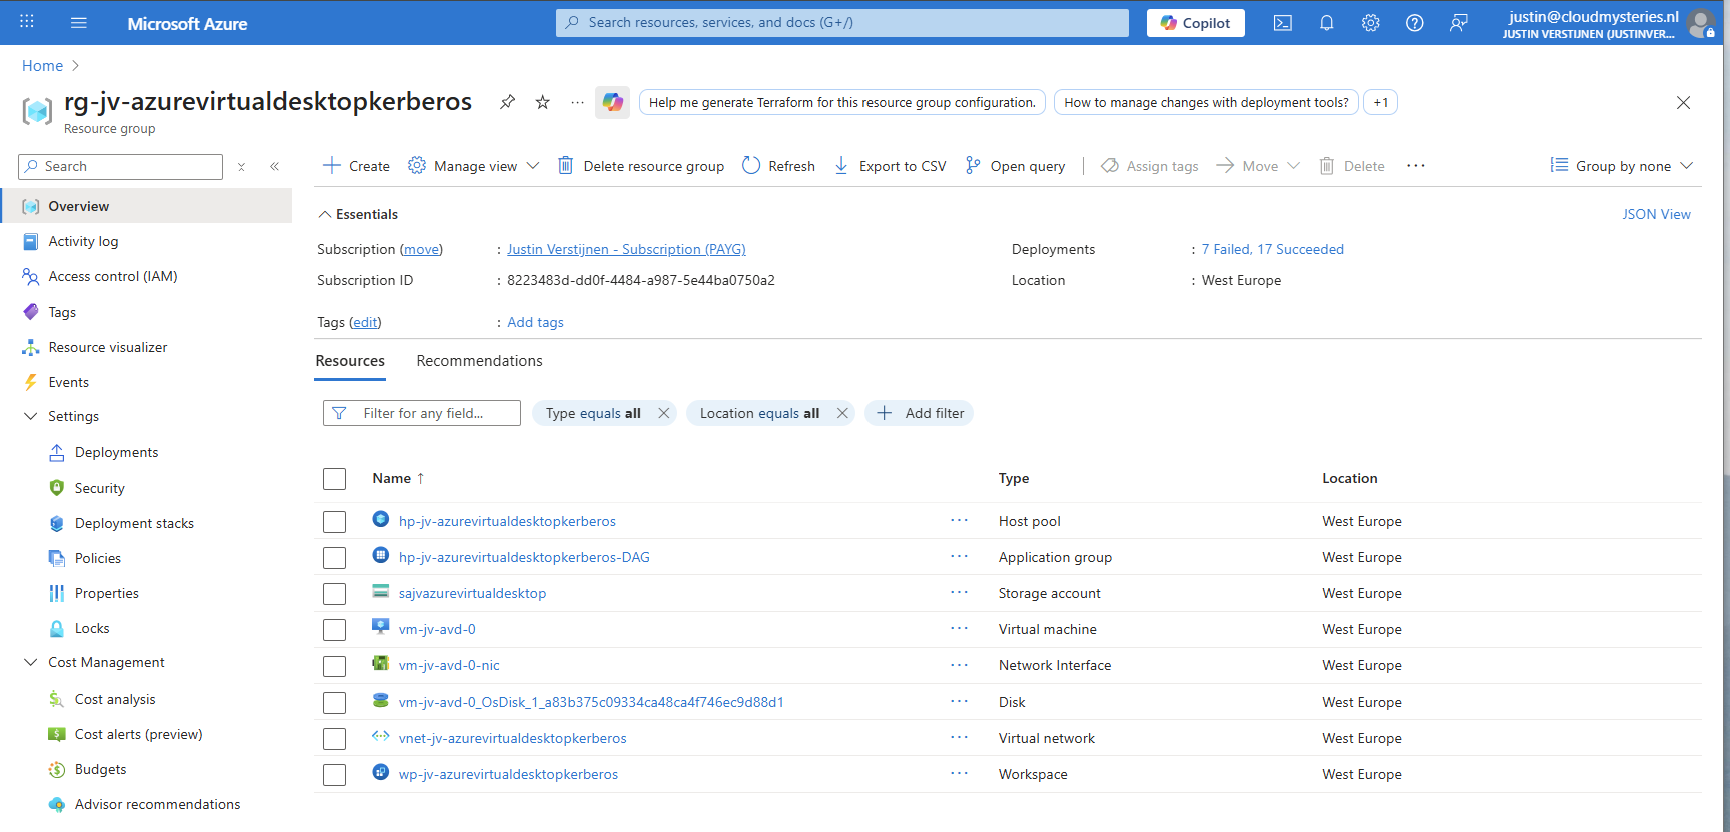
In the Windows app, you get a workspace to connect to your desktop. By default, these are filled in automatically but it is possible to change the names for a better user experience.
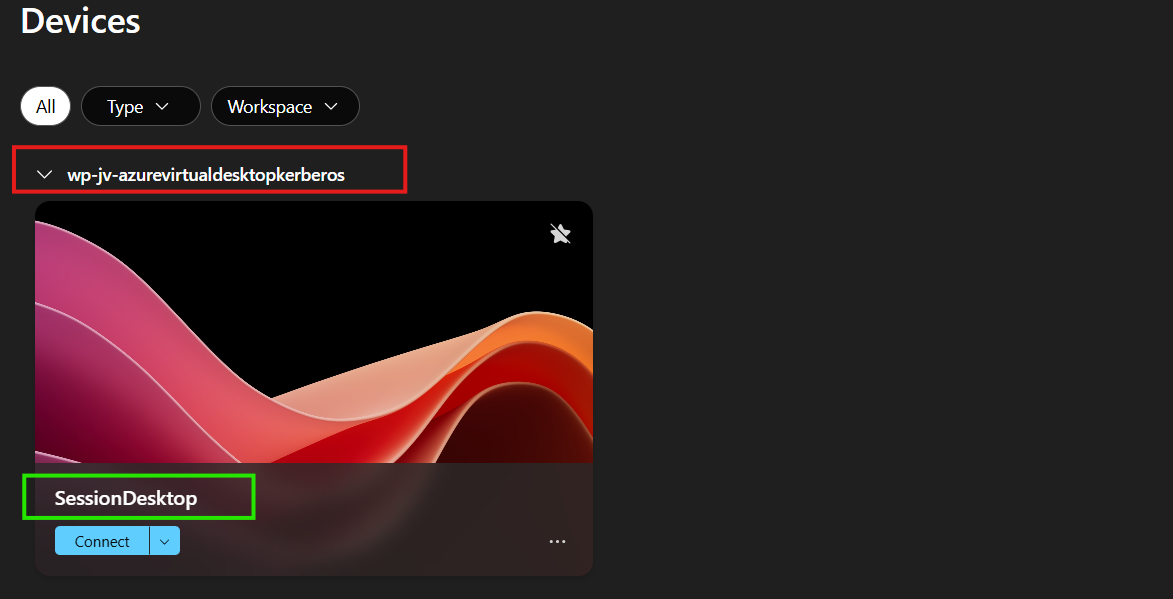
The red block can be changed in the Workspace -> Friendly name and the green block can be changed in the Application Group -> Application -> Session Desktop.
For the red block, go to your Workspace, then to Properties and change and save the friendly name:
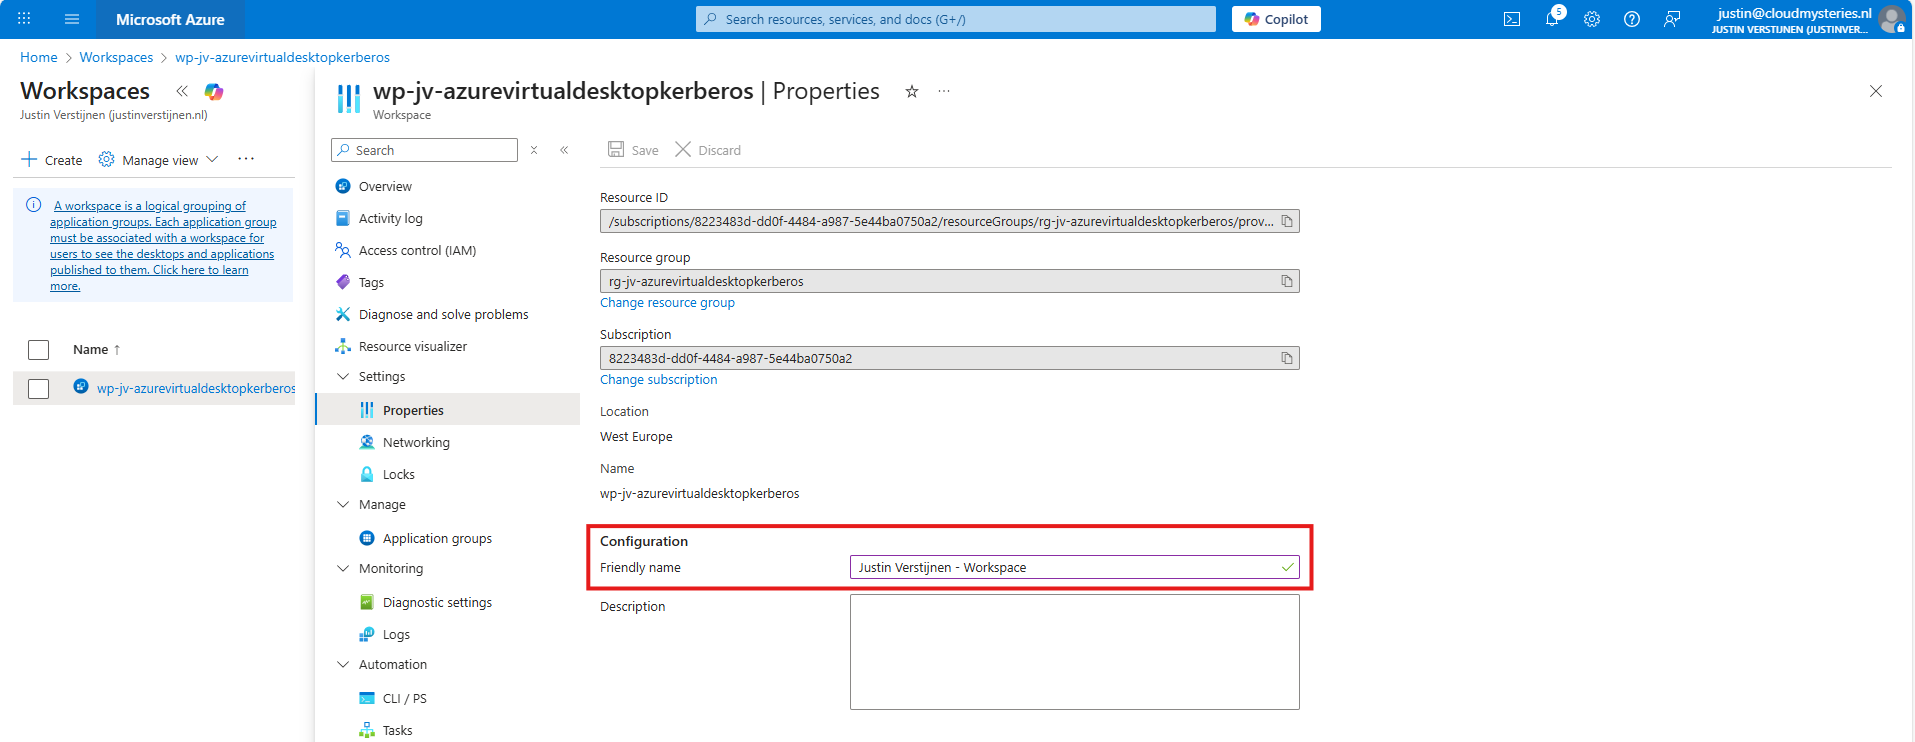
For the green block, go to your application groups, and then the Desktop Application Group (DAG) and select the SessionDesktop application. You can change and save the name here.
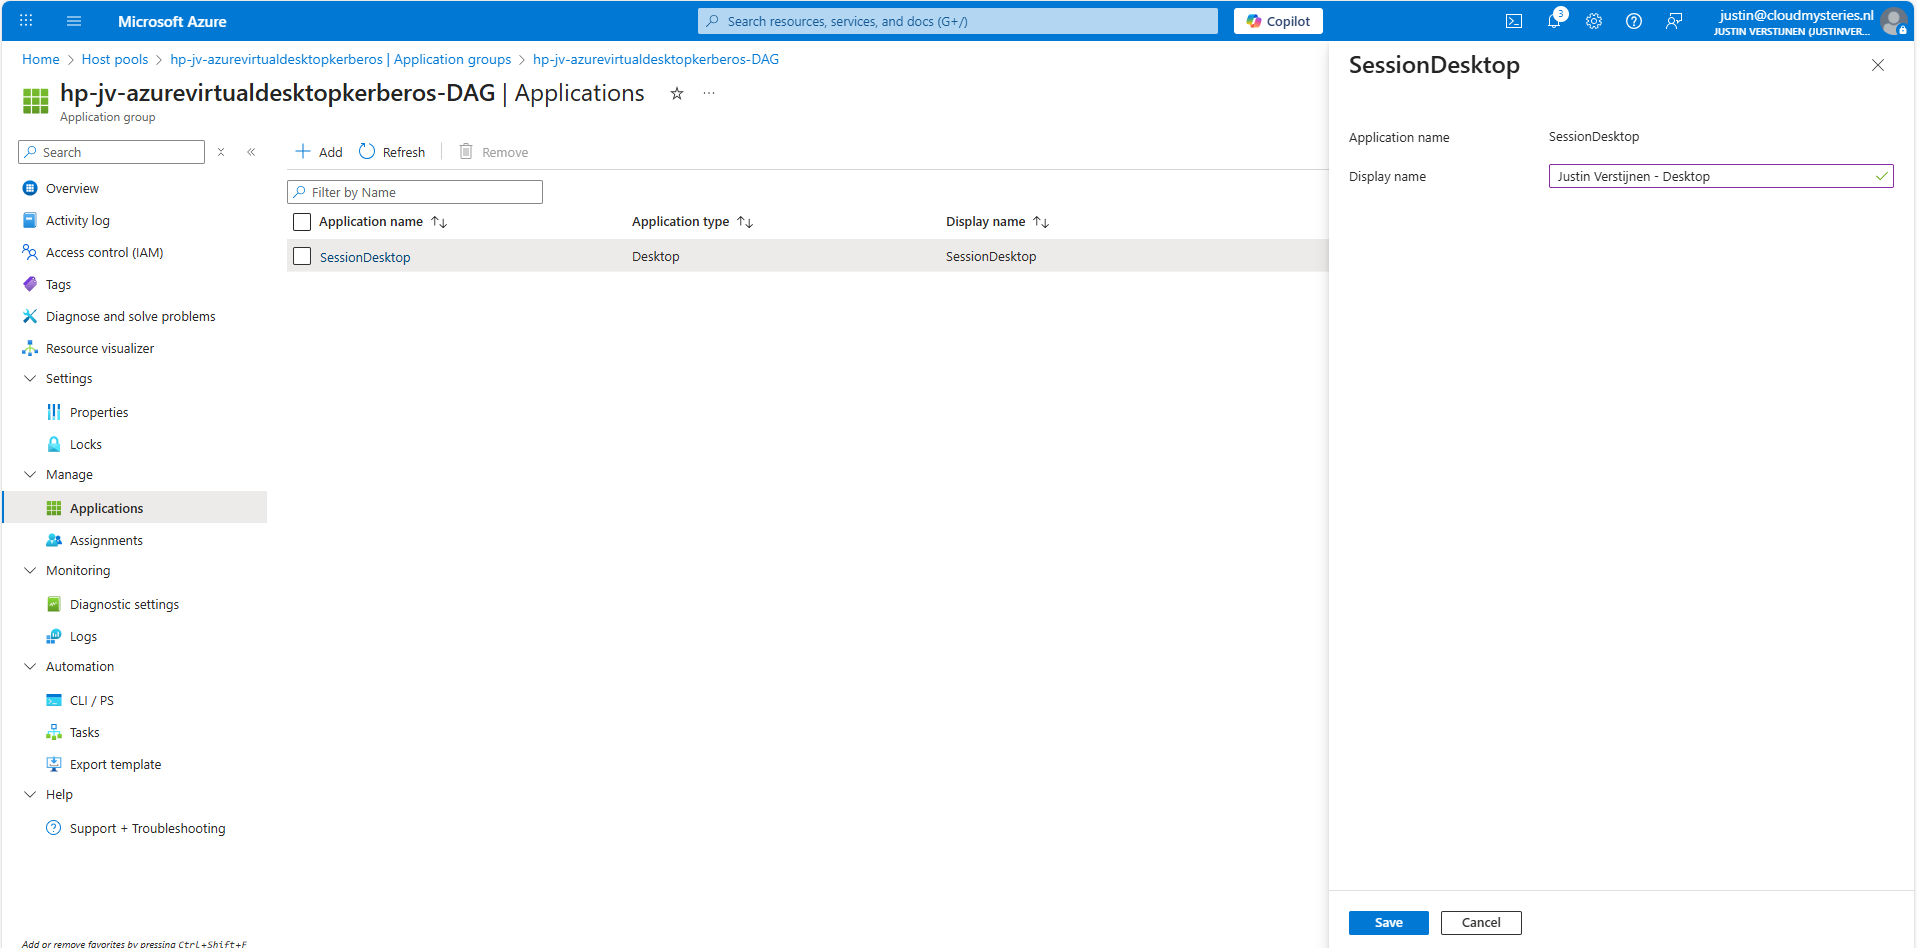
After refreshing the workspace, this looks a lot better to the end user:
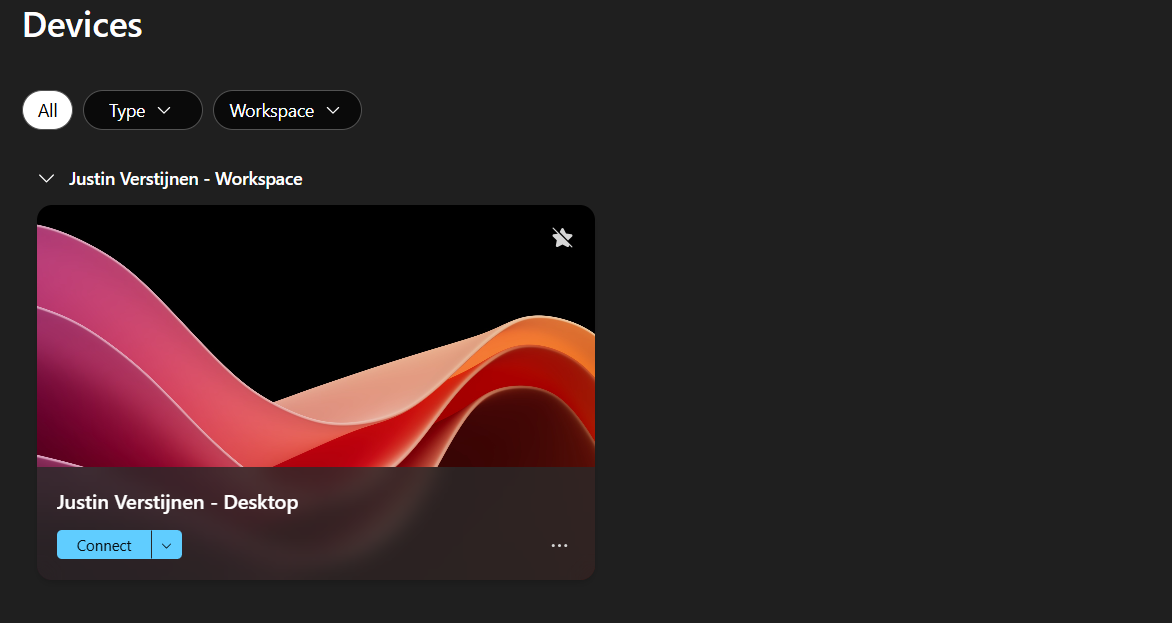
Building great solutions is having attention for the smallest details ;)
This step is optional, but recommended for higher security.
In another guide, I dived into the SMB encryption settings to use the Maximum security preset of Azure Files. You can find that guide here:
Guide for maximum SMB encryption
Using the Maximum security preset for Azure Files ensures only the best encryption and safest protocols are being used between Session host and File share. For example, this only allows Kerberos and disables the older, unsafe NTLM authentication protocol.
It is possible that this setup doesn’t work at your first try. I have added some steps to troubleshoot the solution and come to the cause of the error.
If you get an error like below picture, the profile failed to create or mount which can have various different causes based on the error.
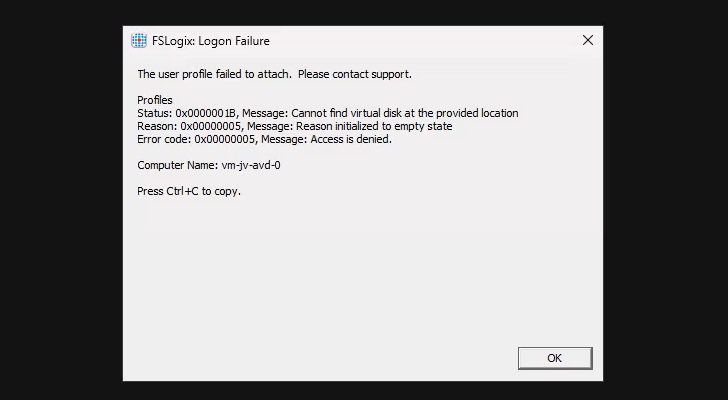
In this case, the error is “Access is denied”. This is true because I did this on purpose. Check the configuration of step 6.
When presented this type of errors, you are able to get to CMD by pressing CTRL+SHIFT+ESC and run a new task there, which is CMD.
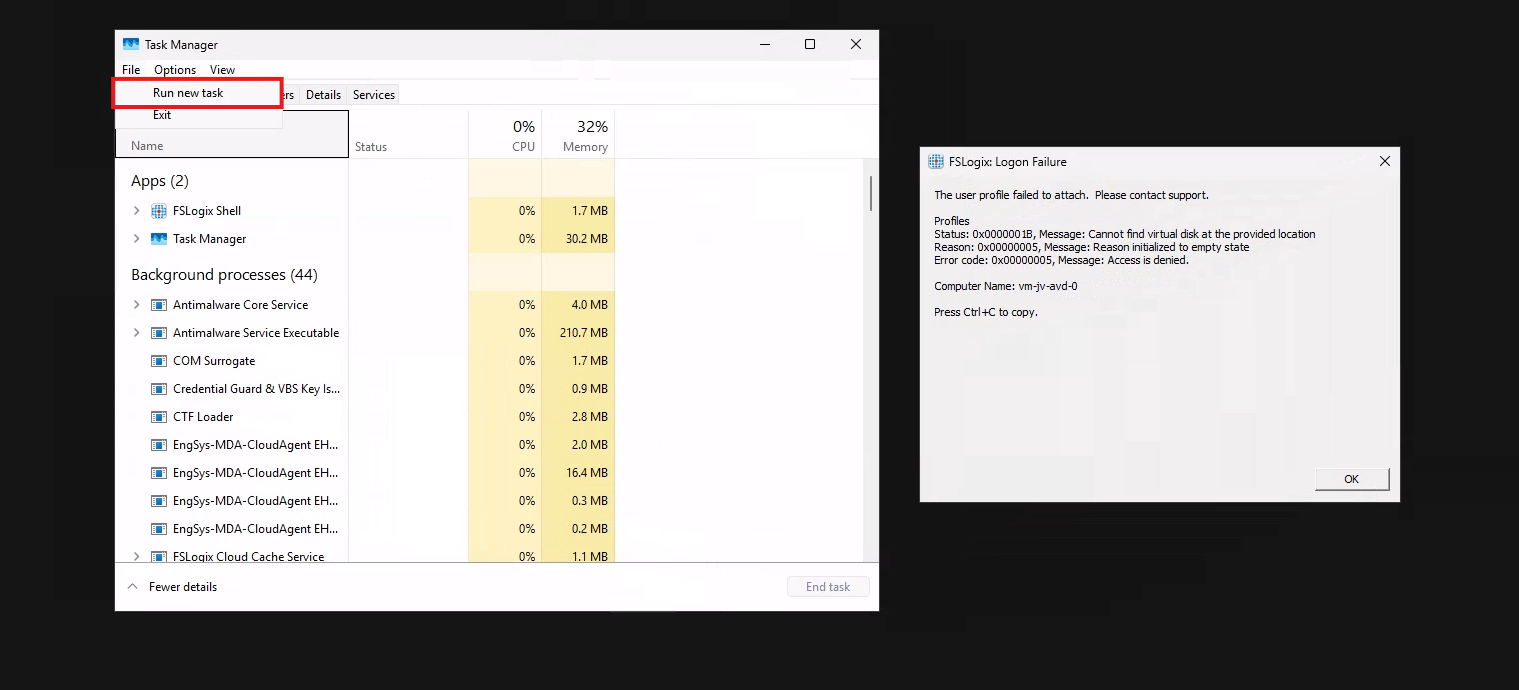
To check if you can navigate to the share, you can open explorer.exe here and navigate manually to the share to see if its working. If you get any authentication prompts or errors, this means that this is the reason FSLogix doesn’t work either.

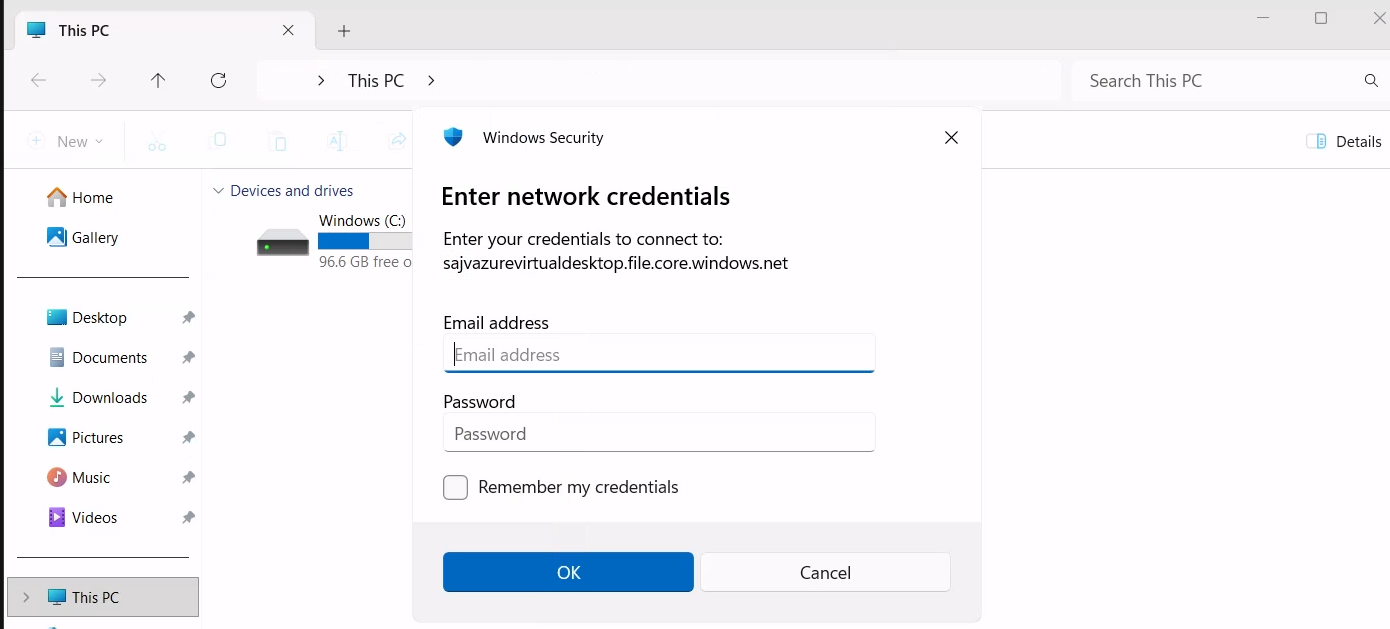
If not getting any FSLogix error and no profile is created in the storage account after logging in, check your FSLogix configuration from step 8 and the assignments in Intune.
It is also possible that you get an error that the network path cannot be found. This states that the kerberos connection is not working. You can use this command to check the configuration:
dsregcmd /statusThis returns an overview with the desktop configuration with Entra and Intune.
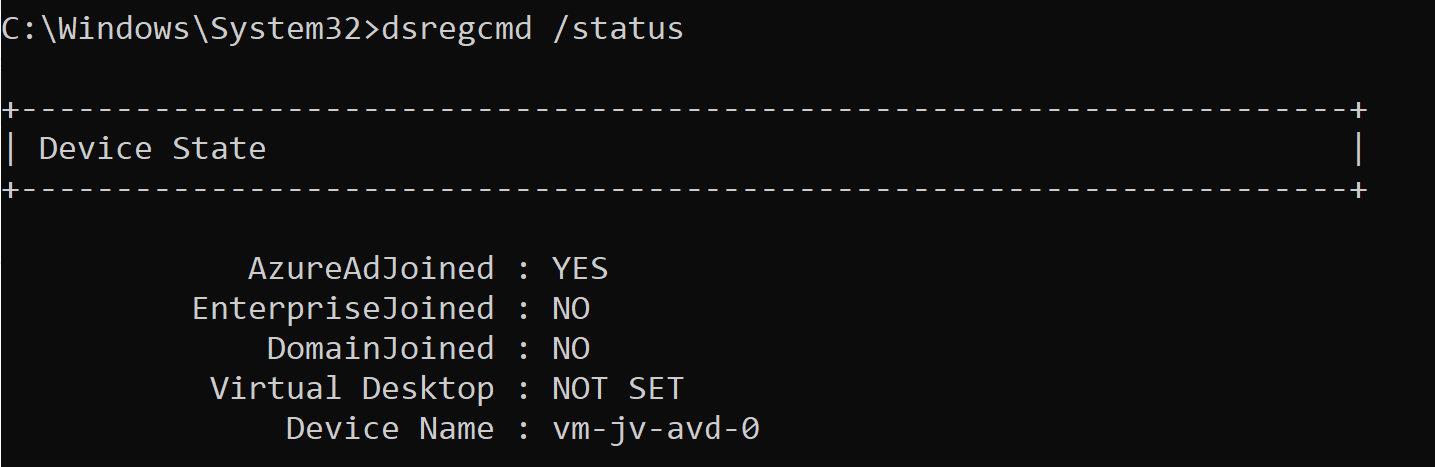
This overview shows that the Azure AD primary refresh token is active and that the Cloud TGT option is available. This must both be yes for the authentication to work.
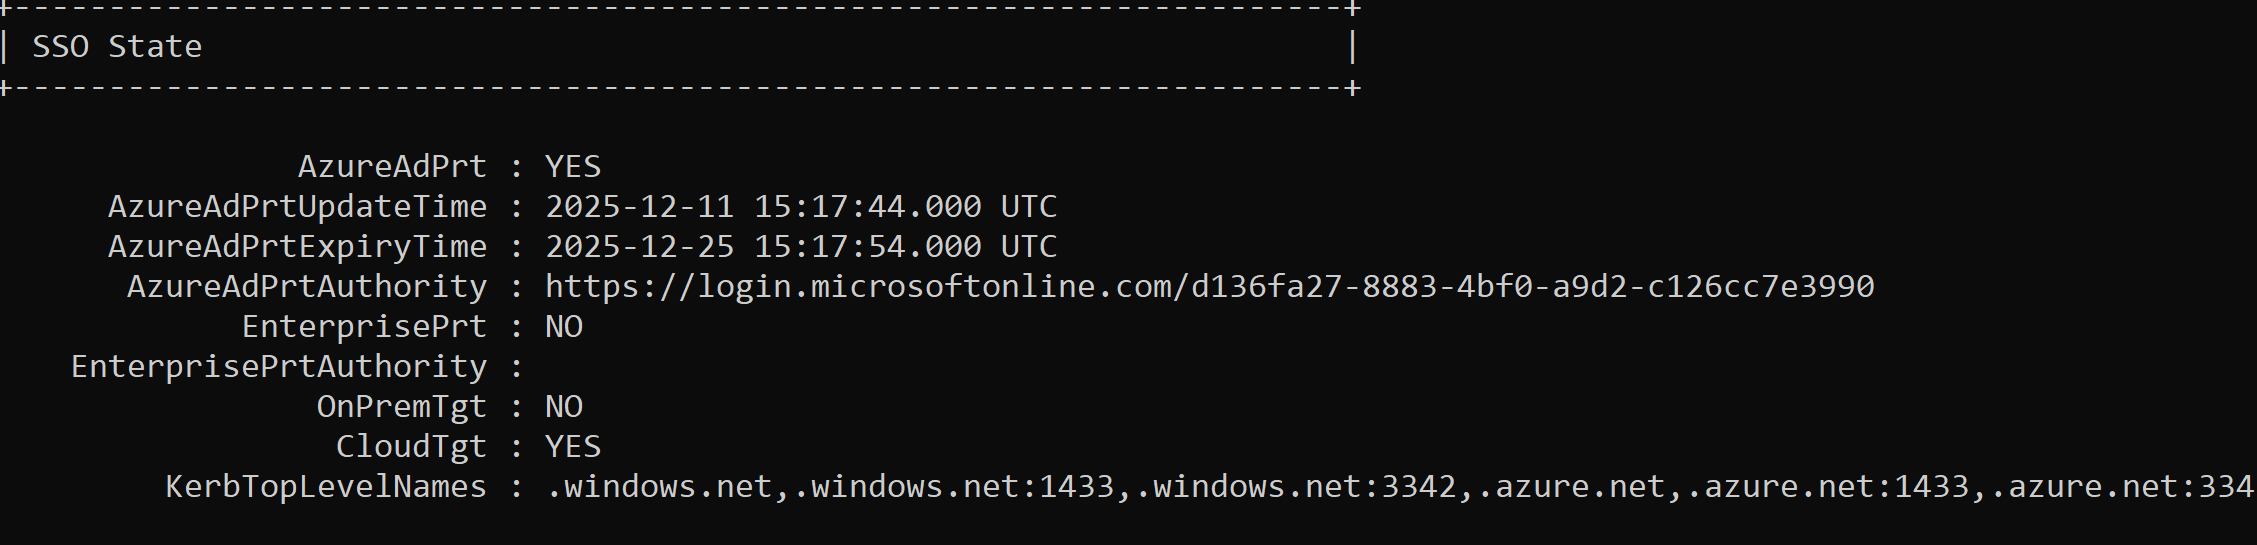
And to check if the Kerberos tickets is given, you can run this command:
klist get cifs/sajvazurevirtualdesktop.file.core.windows.netChange the name to your storage account name.
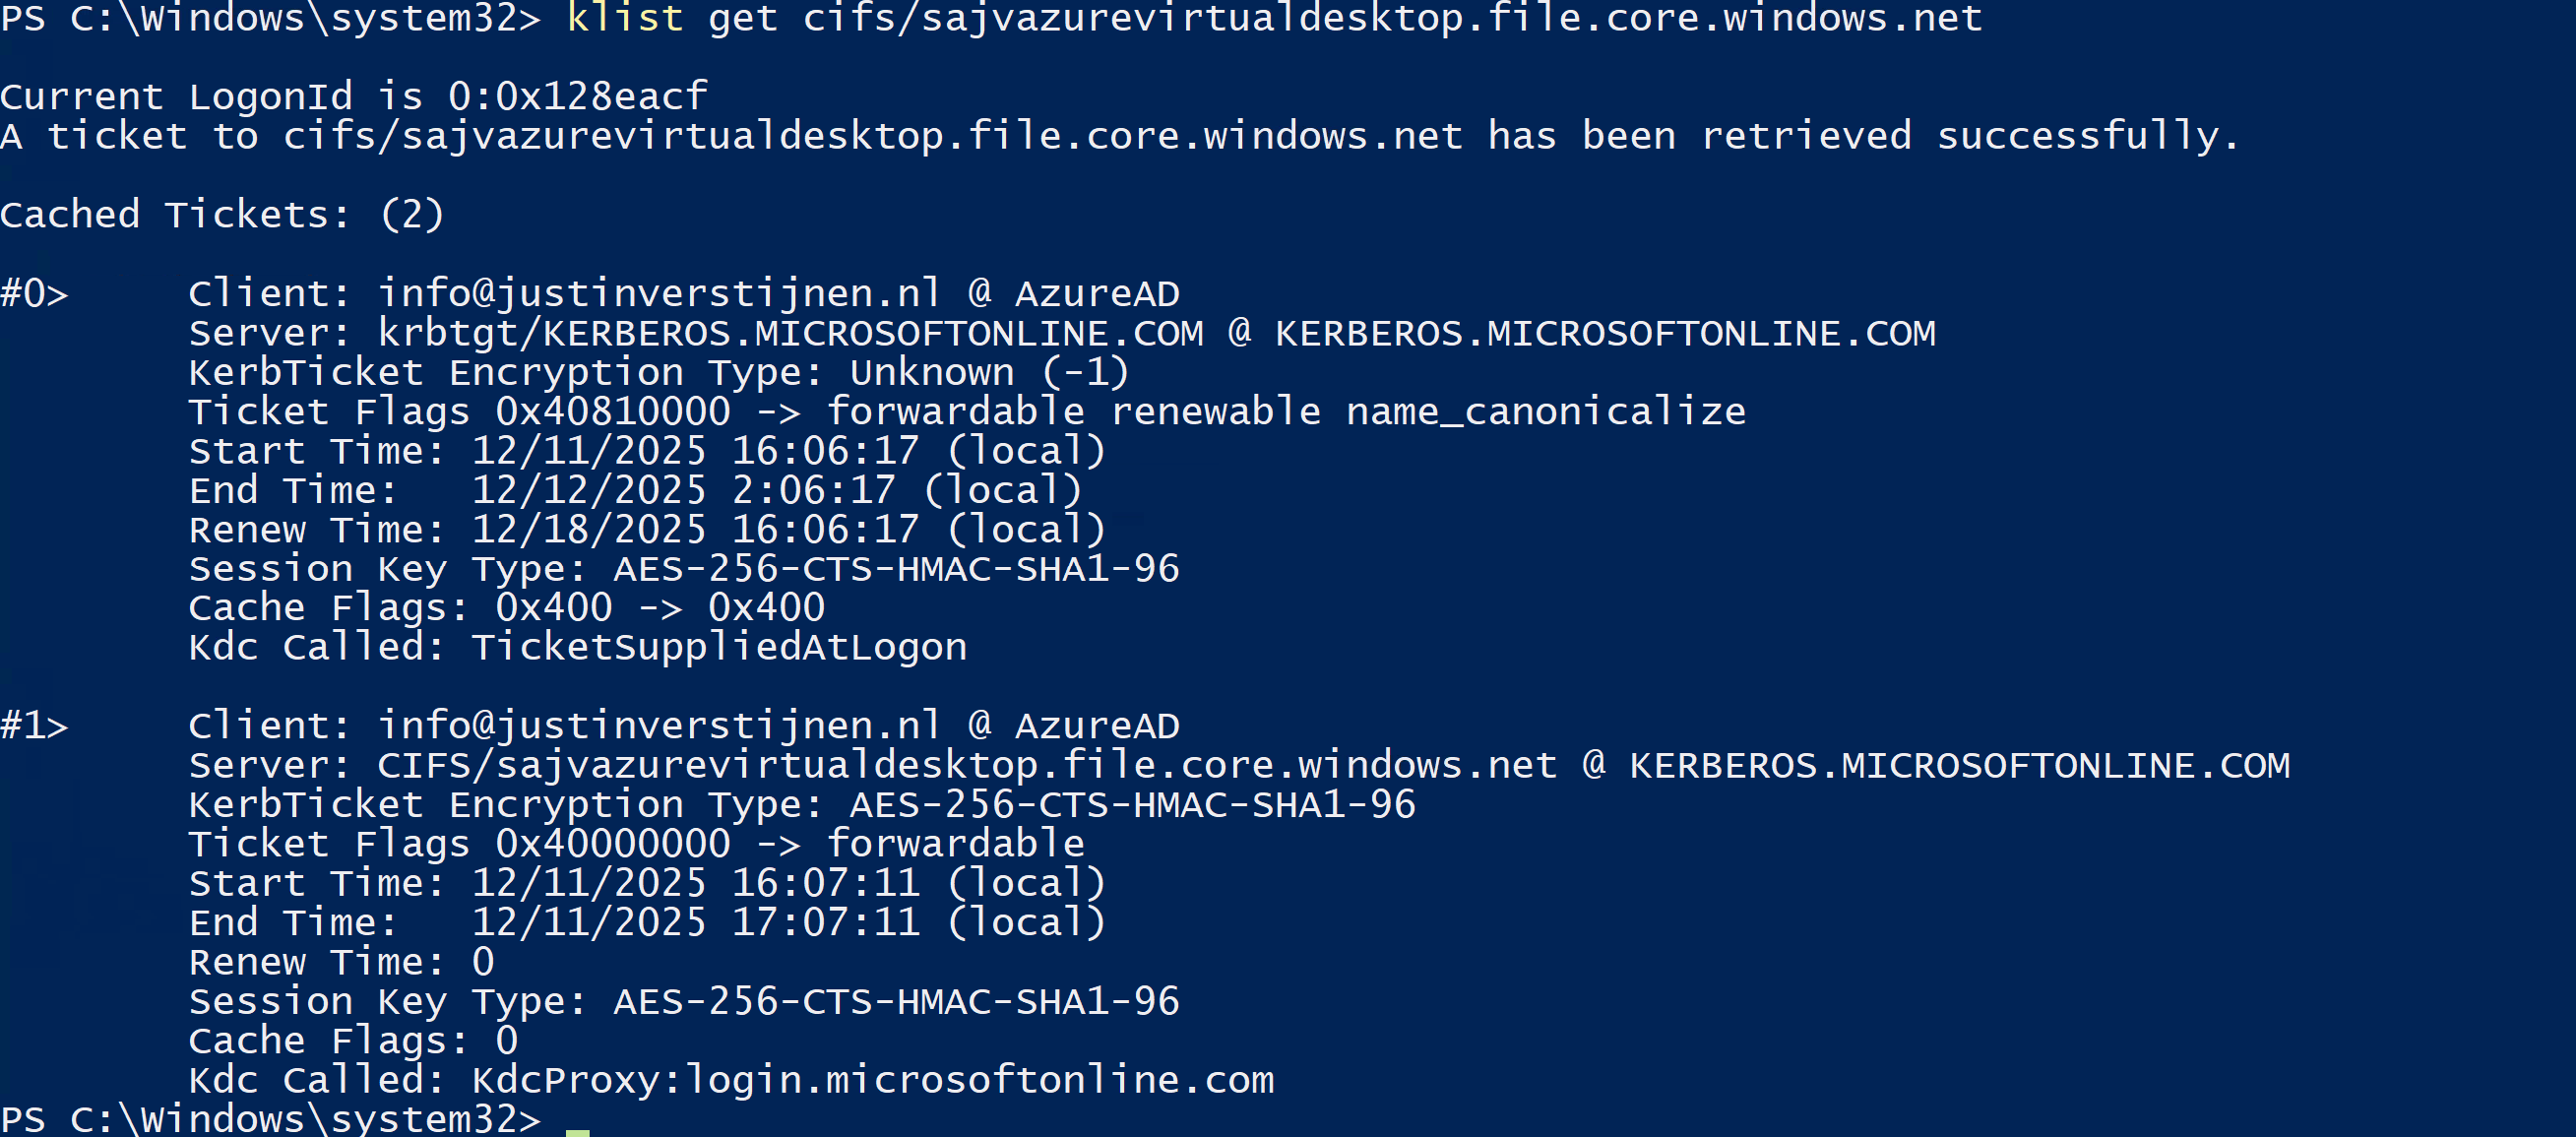
In my case, I get two tickets who are given to my user. If this shows nothing, there is anything wrong with your Kerberos configuration.
This new (in preview at the time of writing) Microsoft Entra Kerberos option is a great way to finally host an Azure VIrtual Desktop environment completely cloud only and without the need for extra servers for a traditional Active Directory. Hosting servers is a time consuming and less secure manner.
Going completely cloud only enhances the manageability of the environement keeps things simple to manage. It also makes your environment more secure which are things we like.
Thank you for reading this page and I hope it was helpful.
These sources helped me by writing and research for this post;
You have reached the end of the page. You can navigate through other blog posts as well, share this post on X, LinkedIn and Reddit or return to the blog posts collection page. Thank you for visiting this post.
If you think something is wrong with this post or you want to know more, you can send me a message to one of my social profiles at: https://justinverstijnen.nl/about/
If you find this page and blog very useful and you want to leave a donation, you can use the button below to buy me a beer. Hosting and maintaining a website takes a lot of time and money. Thank you in advance and cheers :)
The terms and conditions apply to this post.
When using Azure Files and Windows 11 as operating system for Azure Virtual Desktop, we can leverage the highest SMB encryption/security available at the moment, which is AES-256. While we can change this pretty easily, the connection to the storage account will not work anymore by default.
In this guide I will show how I got this to work in combination with the newest Kerberos Authentication.
We can also run the SMB security on the Maximum security preset in the Azure Portal and still run FSLogix without problems. In the Azure Portal, go to the storage account and set the security of the File share to “Maximum security”:
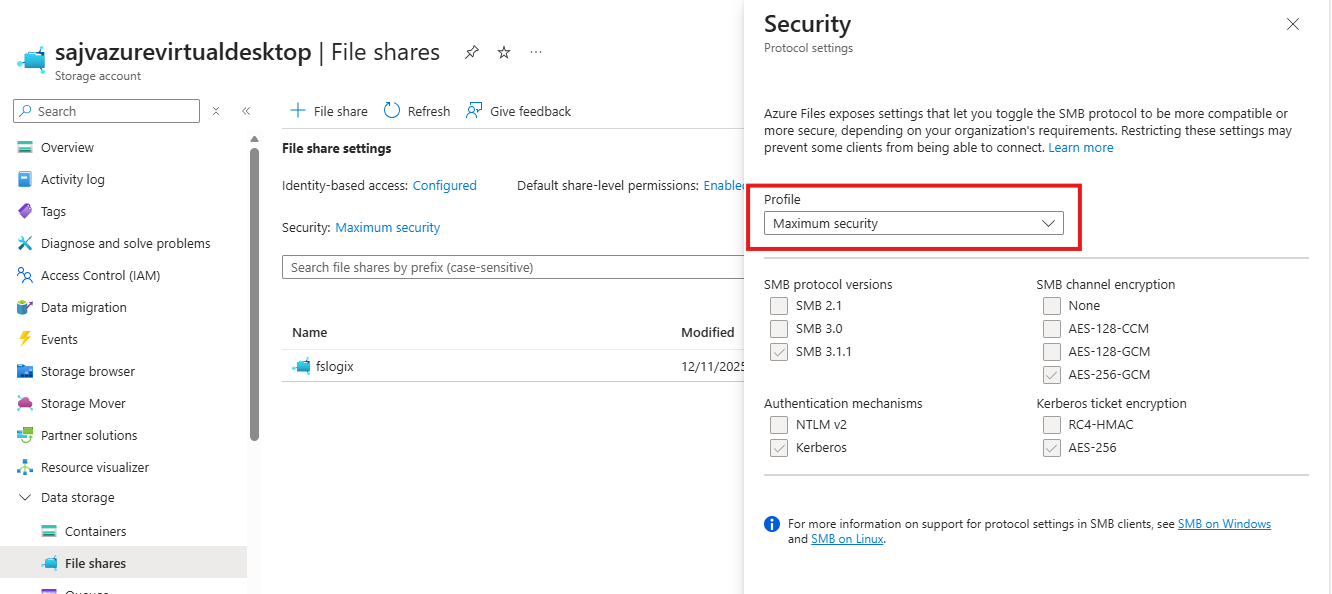
This will only allow the AES_256_GCM SMB Channel encryption, but Windows 11 defaults to the 128 version only. We now have to tell Windows to use the better secured 256 version instead, otherwise the storage account blocks your requests and logging in isn’t possible. I will do this through Intune, but you could do this with Group Policy in the same manner or with PowerShell.
Set-SmbClientConfiguration -EncryptionCiphers "AES_256_GCM" -Confirm:$falseGo to the Intune Admin center (https://intune.microsoft.com). We need to create or change an existing policy in Intune to configure these 2 settings. This policy must be assigned to the Azure Virtual Desktop hosts.
Search for these 2 settings and select the settings:
Both of these options are in different categories in Intune, altough they partly work with each other to facilitate SMB security.
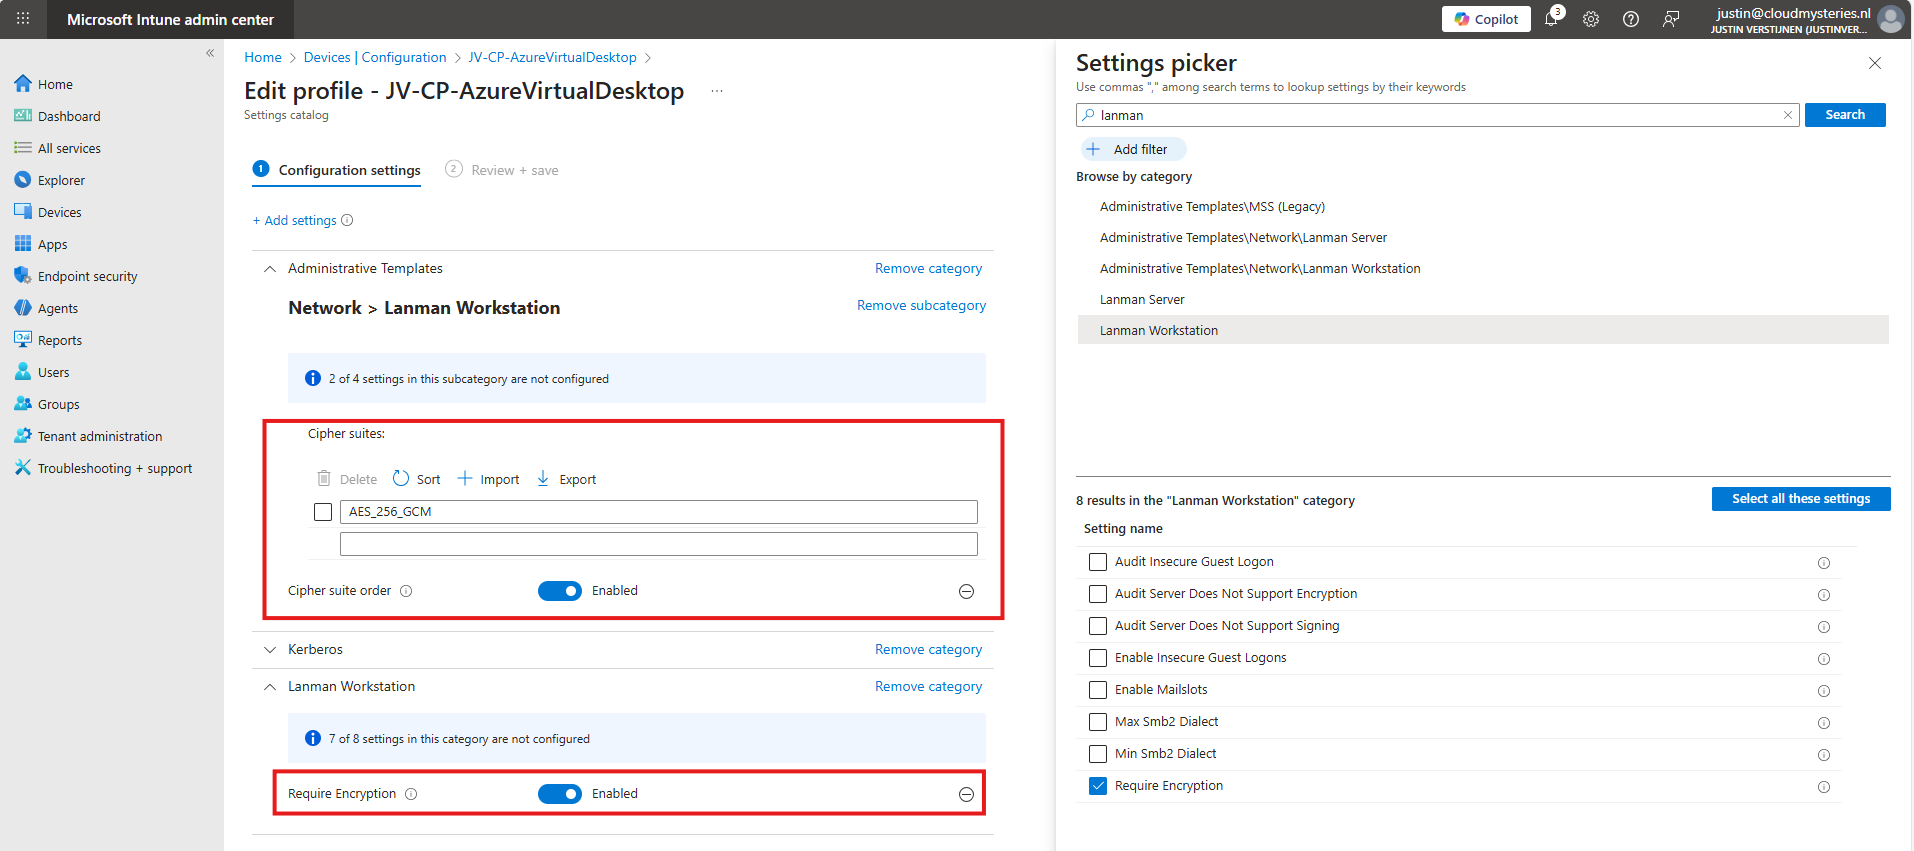
Set the Encryption to “Enabled” and paste this line into the Cipher Suites field:
AES_256_GCMIf you still want to use more ciphers as backup options, you can add every cipher to a new item in Intune, where the top Cipher is used first.
AES_256_GCM
AES_256_CCM
AES_128_GCM
AES_128_CCM
This is stated by the local group policy editor (gpedit.msc):
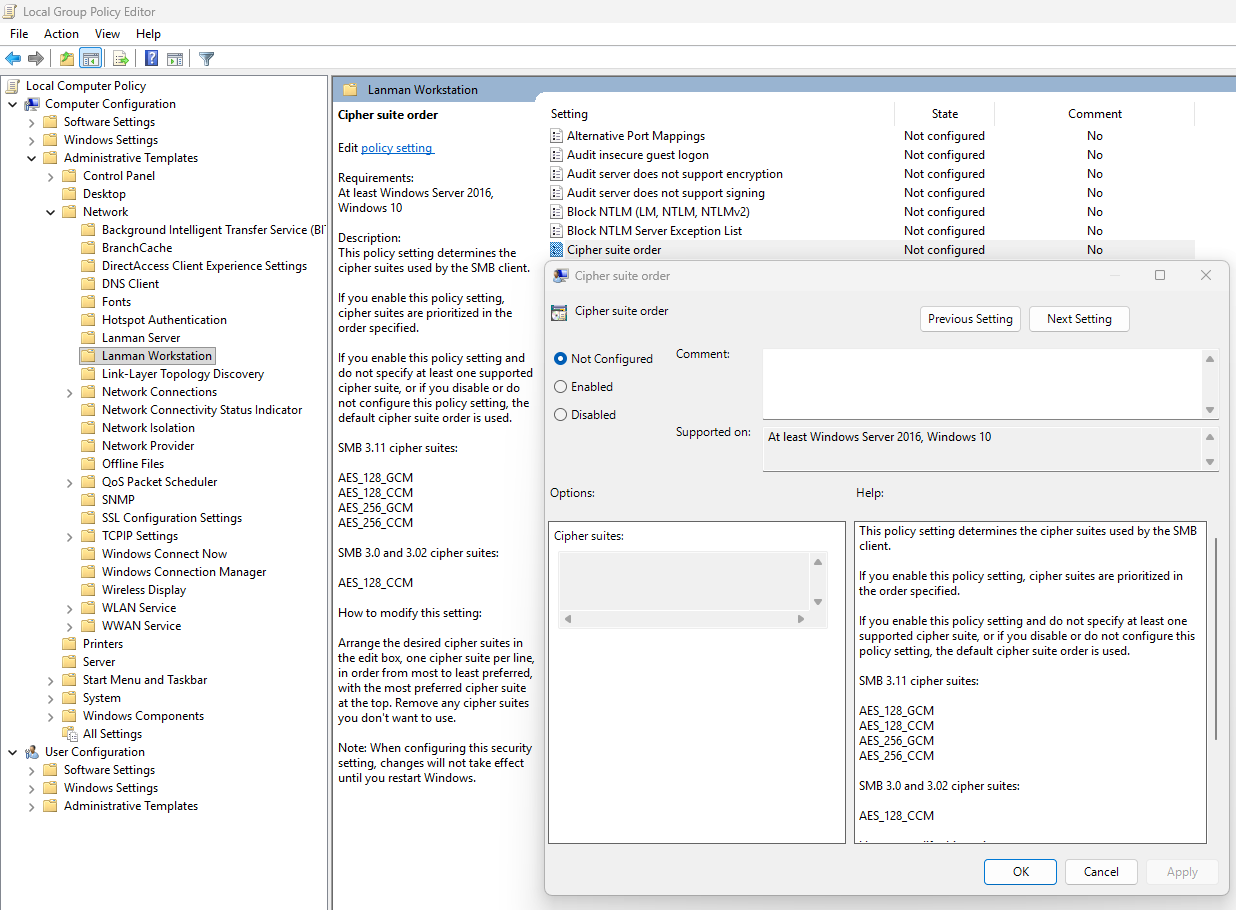
After finishing this configuration, save the policy and assign it to the group with your session hosts. Then reboot to make this new changes active.
Now that we have set the configuration, I have rebooted the Azure Virtual Desktop session host, and let the Intune settings apply. This was seconds after reboot. When logged into the hostpool the sign in was working again, using the highest SMB ecryption settings:
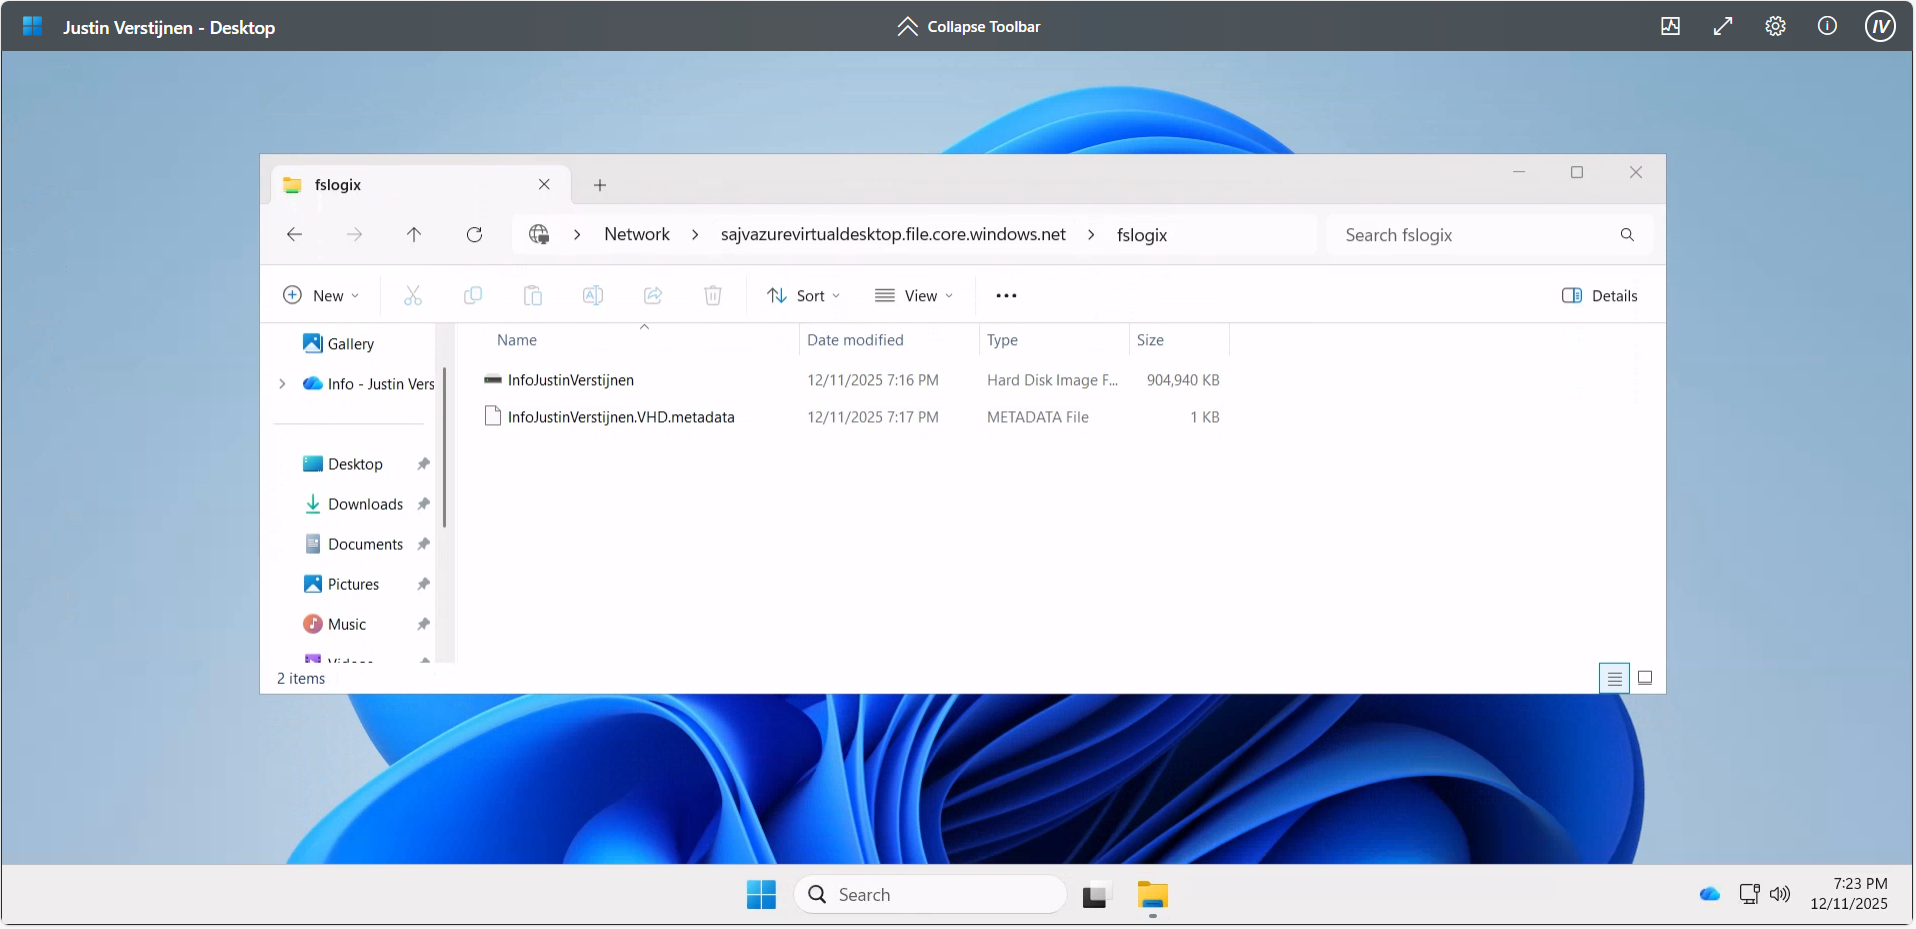
The Maximum security preset for Azure Files applies the most restrictive security configuration available to minimize the attack surface. It enforces:
This preset is intended for highly sensitive workloads with strict compliance and security requirements.
Thank you for reading this guide and I hope it was helpful.
These sources helped me by writing and research for this post;
You have reached the end of the page. You can navigate through other blog posts as well, share this post on X, LinkedIn and Reddit or return to the blog posts collection page. Thank you for visiting this post.
If you think something is wrong with this post or you want to know more, you can send me a message to one of my social profiles at: https://justinverstijnen.nl/about/
If you find this page and blog very useful and you want to leave a donation, you can use the button below to buy me a beer. Hosting and maintaining a website takes a lot of time and money. Thank you in advance and cheers :)
The terms and conditions apply to this post.
In this post, we will be looking at the most popular different RDP Properties we can use in Azure Virtual Desktop.
I will be talking about local PC’s and remote PC’s alot, where the remote PC is of course the Azure Virtual Desktop host and the local PC is the device you can physically touch.
RDP properties are specific settings to change your RDP experience. This can be to play sound on the remote or local PC, enable or disable printer redirection, enable or disable clipboard between computers and what to do if connection is lost.
In the previous years, this was also the case for normal RDP files or connections to Remote Desktop Services, but Azure Virtual Desktop brings this to a nice and centralized system which we can change to our and our users’ preference.
The 3 most popular RDP properties which I also used a lot in the past are these below.
redirectclipboard:i:0
This setting enables or disables if we are allowed to use the clipboard between the local PC and the remote PC. We can find this on the tab “Device redirection”:

The default option is “disabled”, so text and files are not transferable between computers. Enabling this means that users this can do, but we trade in some security. We can configure this in the Azure Portal GUI or by changing the setting on the “Advanced Settings” tab.
displayconnectionbar:i:0
We can hide the RDP connection bar by default for users. They can only bring it up with the shortcut “CTRL+ALT+HOME”. This makes the user experience a bit better as they don’t have that connection bar in place for the whole session. By default, this option is enabled, so 1.
There is no way to configure this in the GUI, only through the advanced settings. This also doesn’t have official AVD support but can confirm it works like expected.
drivestoredirect:s:dynamicdrives
Changing the drive redirection setting ensures that drives are only redirected when you want this. We can use the option “DynamicDrives” which only redirects drives that are connected after the RDP session is connected.
My full and most used configuration is here:
audioqualitymode:i:2;displayconnectionbar:i:0;drivestoredirect:s:dynamicdrives;usbdevicestoredirect:s:*;redirectclipboard:i:0;redirectprinters:i:1;audiomode:i:0;videoplaybackmode:i:1;devicestoredirect:s:*;redirectcomports:i:1;redirectsmartcards:i:1;enablecredsspsupport:i:1;redirectwebauthn:i:1;use multimon:i:1;enablerdsaadauth:i:0;autoreconnection enabled:i:1;audiocapturemode:i:1;camerastoredirect:s:*;screen mode id:i:2Mostly the default configuration, but I like the Connection bar hided by default.
We can find the RDP properties in the hostpool of your environment, and then on “RDP properties”:
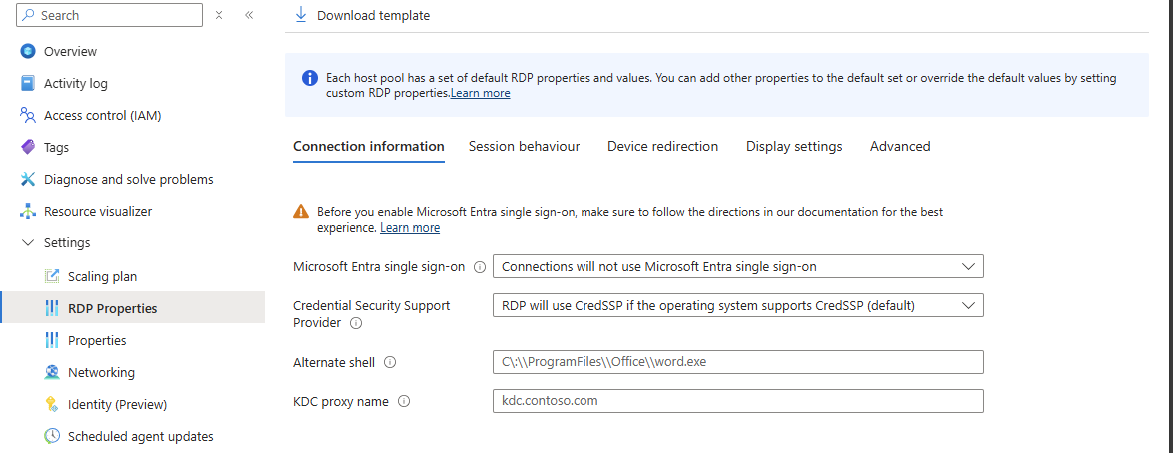
We can find the advanced options at the “Advanced” page:
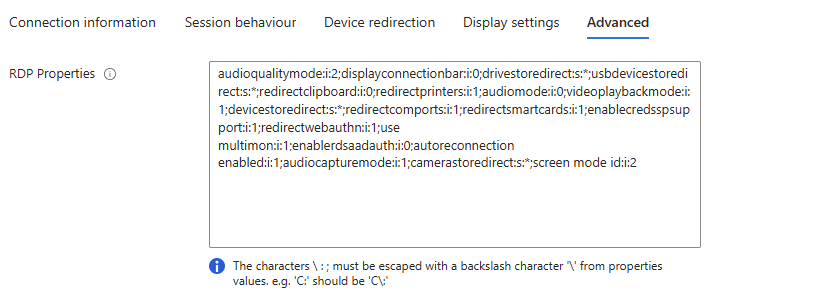
Here is a list with all RDP properties published, with the support for Azure Virtual Desktop and RDP files considered.
All RDP options are in the convention: option:type:value
You can search through the list with the search button, and support for AVD and seperate .RDP files is added.
RDP Settings Table
| Property | Type | Value (by default) | Support AVD | Support RDP | Description |
|---|---|---|---|---|---|
administrativesession | i | 0 | No | Yes | Connect to the administrative session (console) of the remote computer. 0 - Do not use the administrative session 1 - Connect to the administrative session |
allowdesktopcomposition | i | 0 | No | Yes | Determines whether desktop composition (needed for Aero) is permitted when you log on to the remote computer. 0 - Disable desktop composition in the remote session 1 - Desktop composition is permitted |
allowfontsmoothing | i | 0 | No | Yes | Determines whether font smoothing may be used in the remote session. 0 - Disable font smoothing in the remote session 1 - Font smoothing is permitted |
alternatefulladdress | s | No | Yes | Specifies an alternate name or IP address of the remote computer that you want to connect to. Will be overruled by RDP+. | |
alternateshell | s | No | Yes | Specifies a program to be started automatically when you connect to a remote computer. The value should be a valid path to an executable file. This setting only works when connecting to Windows Server instances. | |
audiocapturemode | i | 0 | No | Yes | Determines how sounds captured (recorded) on the local computer are handled when you are connected to the remote computer. 0 - Do not capture audio from the local computer 1 - Capture audio from the local computer and send to the remote computer |
audiomode | i | 0 | No | Yes | Determines how sounds on a remote computer are handled when you are connected to the remote computer. 0 - Play sounds on the local computer 1 - Play sounds on the remote computer 2 - Do not play sounds |
audioqualitymode | i | 0 | No | Yes | Determines the quality of the audio played in the remote session. 0 - Dynamically adjust audio quality based on available bandwidth 1 - Always use medium audio quality 2 - Always use uncompressed audio quality |
authenticationlevel | i | 2 | No | Yes | Determines what should happen when server authentication fails. 0 - If server authentication fails, connect without giving a warning 1 - If server authentication fails, do not connect 2 - If server authentication fails, show a warning and allow the user to connect or not 3 - Server authentication is not required This setting will be overruled by RDP+. |
autoreconnectmaxretries | i | 20 | No | Yes | Determines the maximum number of times the client computer will try to. |
autoreconnectionenabled | i | 1 | No | Yes | Determines whether the client computer will automatically try to reconnect to the remote computer if the connection is dropped. 0 - Do not attempt to reconnect 1 - Attempt to reconnect |
bandwidthautodetect | i | 1 | No | Yes | Enables the option for automatic detection of the network type. Used in conjunction with networkautodetect. Also see connection type. 0 - Do not enable the option for automatic network detection 1 - Enable the option for automatic network detection |
bitmapcachepersistenable | i | 1 | No | Yes | Determines whether bitmaps are cached on the local computer (disk-based cache). Bitmap caching can improve the performance of your remote session. 0 - Do not cache bitmaps 1 - Cache bitmaps |
bitmapcachesize | i | 1500 | No | Yes | Specifies the size in kilobytes of the memory-based bitmap cache. The maximum value is 32000. |
camerastoredirect | s | No | Yes | Determines which cameras to redirect. This setting uses a semicolon-delimited list of KSCATEGORY_VIDEO_CAMERA interfaces of cameras enabled for redirection.No | |
compression | i | 1 | No | Yes | Determines whether the connection should use bulk compression. 0 - Do not use bulk compression 1 - Use bulk compression |
connecttoconsole | i | 0 | No | Yes | Connect to the console session of the remote computer. 0 - Connect to a normal session 1 - Connect to the console screen |
connectiontype | i | 2 | No | Yes | Specifies pre-defined performance settings for the Remote Desktop session. 1 - Modem (56 Kbps) 2 - Low-speed broadband (256 Kbps - 2 Mbps) 3 - Satellite (2 Mbps - 16 Mbps with high latency) 4 - High-speed broadband (2 Mbps - 10 Mbps) 5 - WAN (10 Mbps or higher with high latency) 6 - LAN (10 Mbps or higher) 7 - Automatic bandwidth detection. Requires bandwidthautodetect. By itself, this setting does nothing. When selected in the RDC GUI, this option changes several performance related settings (themes, animation, font smoothing, etcetera). These separate settings always overrule the connection type setting. |
desktopsizeid | i | 0 | Yes | Yes | Specifies pre-defined dimensions of the Remote Desktop session. 0 - 640x480 1 - 800x600 2 - 1024x768 3 - 1280x1024 4 - 1600x1200 This setting is ignored when either /w and /h, or desktopwidth and desktopheight are already specified. |
desktopheight | i | 600 | Yes | Yes | The height (in pixels) of the Remote Desktop session. |
desktopwidth | i | 800 | Yes | Yes | The width (in pixels) of the Remote Desktop session. |
devicestoredirect | s | No | Yes | Determines which supported Plug and Play devices on the client computer will be redirected and available in the remote session. No value specified - Do not redirect any supported Plug and Play devices. * - Redirect all supported Plug and Play devices, including ones that are connected later. DynamicDevices - Redirect any supported Plug and Play devices that are connected later. The hardware ID for one or more Plug and Play devices - Redirect the specified supported Plug and Play device(s) | |
disablefullwindowdrag | i | 1 | No | Yes | Determines whether window content is displayed when you drag the window to a new location. 0 - Show the contents of the window while dragging 1 - Show an outline of the window while dragging |
disablemenuanims | i | 1 | No | Yes | Determines whether menus and windows can be displayed with animation effects in the remote session. 0 - Menu and window animation is permitted 1 - No menu and window animation |
disablethemes | i | 0 | No | Yes | Determines whether themes are permitted when you log on to the remote computer. 0 - Themes are permitted 1 - Disable theme in the remote session |
disablewallpaper | i | 1 | No | Yes | Determines whether the desktop background is displayed in the remote session. 0 - Display the wallpaper 1 - Do not show any wallpaper |
disableconnectionsharing | i | 0 | No | Yes | Determines whether a new Terminal Server session is started with every launch of a RemoteApp to the same computer and with the same credentials. 0 - No new session is started. The currently active session of the user is shared 1 - A new login session is started for the RemoteApp |
disableremoteappcapscheck | i | 0 | No | Yes | Specifies whether the Remote Desktop client should check the remote computer for RemoteApp capabilities. 0 - Check the remote computer for RemoteApp capabilities before logging in 1 - Do not check the remote computer for RemoteApp capabilities |
displayconnectionbar | i | 1 | No | Yes | Determines whether the connection bar appears when you are in full screen mode. Press CTRL+ALT+HOME to bring it back temporarily. 0 - Do not show the connection bar 1 - Show the connection bar Will be overruled by RDP+ when using the parameter. |
domain | s | No | Yes | Configures the domain of the user. | |
drivestoredirect | s | No | Yes | Determines which local disk drives on the client computer will be redirected and available in the remote session. No value specified - Do not redirect any drives. * - Redirect all disk drives, including drives that are connected later. DynamicDrives - Redirect any drives that are connected later. | |
enablecredsspsupport | i | 1 | No | Yes | Determines whether Remote Desktop will use CredSSP for authentication if it’s available. 0 - Do not use CredSSP, even if the operating system supports it 1 - Use CredSSP, if the operating system supports it |
enablesuperpan | i | 0 | No | Yes | Determines whether SuperPan is enabled or disabled. SuperPan allows the user to navigate a remote desktop in full-screen mode without scroll bars, when the dimensions of the remote desktop are larger than the dimensions of the current client window. The user can point to the window border, and the desktop view will scroll automatically in that direction. 0 - Do not use SuperPan. The remote session window is sized to the client window size. 1 - Enable SuperPan. The remote session window is sized to the dimensions specified through /w and /h, or through desktopwidth and desktopheight. |
encoderedirectedvideocapture | i | 1 | No | Yes | Enables or disables encoding of redirected video. 0 - Disable encoding of redirected video 1 - Enable encoding of redirected video |
fulladdress | s | No | Yes | Specifies the name or IP address (and optional port) of the remote computer that you want to connect to. | |
gatewaycredentialssource | i | 4 | No | Yes | Specifies the credentials that should be used to validate the connection with the RD Gateway. 0 - Ask for password (NTLM) 1 - Use smart card 4 - Allow user to select later |
gatewayhostname | s | No | Yes | Specifies the hostname of the RD Gateway. | |
gatewayprofileusagemethod | i | 0 | No | Yes | Determines the RD Gateway authentication method to be used. 0 - Use the default profile mode, as specified by the administrator 1 - Use explicit settings |
gatewayusagemethod | i | 4 | No | Yes | Specifies if and how to use a Gateway) server. 0 - Do not use an RD Gateway server 1 - Always use an RD Gateway, even for local connections 2 - Use the RD Gateway if a direct connection cannot be made to the remote computer (i.e. bypass for local addresses) 3 - Use the default RD Gateway settings |
keyboardhook | i | 2 | Yes | Yes | Determines how Windows key combinations are applied when you are connected to a remote computer. 0 - Windows key combinations are applied on the local computer 1 - Windows key combinations are applied on the remote computer 2 - Windows key combinations are applied in full-screen mode only |
negotiate security layer | i | 1 | No | Yes | Determines whether the level of security is negotiated. 0 - Security layer negotiation is not enabled and the session is started by using Secure Sockets Layer (SSL) 1 - Security layer negotiation is enabled and the session is started by using x.224 encryption |
networkautodetect | i | 1 | No | Yes | Determines whether to use auomatic network bandwidth detection or not. Requires the option bandwidthautodetect to be set and correlates with connection type 7. 0 - Use automatic network bandwitdh detection 1 - Do not use automatic network bandwitdh detection |
password51 | b | No | Yes | The user password in a binary hash value. | |
pinconnectionbar | i | 1 | No | Yes | Determines whether or not the connection bar should be pinned to the top of the remote session upon connection when in full screen mode. 0 - The connection bar should not be pinned to the top of the remote session 1 - The connection bar should be pinned to the top of the remote session |
promptforcredentials | i | 0 | No | Yes | Determines whether Remote Desktop Connection will prompt for credentials when connecting to a remote computer for which the credentials have been previously saved. 0 - Remote Desktop will use the saved credentials and will not prompt for credentials. 1 - Remote Desktop will prompt for credentials. This setting is ignored by RDP+. |
promptforcredentialsonclient | i | 0 | No | Yes | Determines whether Remote Desktop Connection will prompt for credentials when connecting to a server that does not support server authentication. 0 - Remote Desktop will not prompt for credentials 1 - Remote Desktop will prompt for credentials |
promptcredentialonce | i | 1 | No | Yes | When connecting through an RD Gateway, determines whether RDC should use the same credentials for both the RD Gateway and the remote computer. 0 - Remote Desktop will not use the same credentials 1 - Remote Desktop will use the same credentials for both the RD gateway and the remote computer |
publicmode | i | 0 | No | Yes | Determines whether Remote Desktop Connection will be started in public mode. 0 - Remote Desktop will not start in public mode 1 - Remote Desktop will start in public mode and will not save any user data (credentials, bitmap cache, MRU) on the local machine |
redirectclipboard | i | 1 | Yes | Yes | Determines whether the clipboard on the client computer will be redirected and available in the remote session and vice versa. 0 - Do not redirect the clipboard 1 - Redirect the clipboard |
redirectcomports | i | 0 | Yes | Yes | Determines whether the COM (serial) ports on the client computer will be redirected and available in the remote session. 0 - The COM ports on the local computer are not available in the remote session 1 - The COM ports on the local computer are available in the remote session |
redirectdirectx | i | 1 | No | Yes | Determines whether DirectX will be enabled for the remote session. 0 - Do not enable DirectX rendering 1 - Enable DirectX rendering in the remote session |
redirectedvideocaptureencodingquality | i | 0 | No | Yes | Controls the quality of encoded video. 0 - High compression video. Quality may suffer when there’s a lot of motion 1 - Medium compression 2 - Low compression video with high picture quality |
redirectlocation | i | 0 | No | Yes | Determines whether the location of the local device will be redirected and available in the remote session. 0 - The remote session uses the location of the remote computer 1 - The remote session uses the location of the local device |
redirectposdevices | i | 0 | No | Yes | Determines whether Microsoft Point of Service (POS) for .NET devices connected to the client computer will be redirected and available in the remote session. 0 - The POS devices from the local computer are not available in the remote session 1 - The POS devices from the local computer are available in the remote session |
redirectprinters | i | 1 | Yes | Yes | Determines whether printers configured on the client computer will be redirected and available in the remote session. 0 - The printers on the local computer are not available in the remote session 1 - The printers on the local computer are available in the remote session |
redirectsmartcards | i | 1 | Yes | Yes | Determines whether smart card devices on the client computer will be redirected and available in the remote session. 0 - The smart card device on the local computer is not available in the remote session 1 - The smart card device on the local computer is available in the remote session |
redirectwebauthn | i | 1 | Yes | Yes | Determines whether WebAuthn requests on the remote computer will be redirected to the local computer allowing the use of local authenticators (such as Windows Hello for Business and security key). 0 - WebAuthn requests from the remote session aren’t sent to the local computer for authentication and must be completed in the remote session 1 - WebAuthn requests from the remote session are sent to the local computer for authentication |
remoteapplicationicon | s | No | Yes | the file name of an icon file to be displayed in the while starting the RemoteApp. By default RDC will show the standard Note: Only .ico files are supported.No | |
remoteapplicationmode | i | 0 | No | Yes | Determines whether a RemoteApp shoud be launched when connecting 0 - Use a normal session and do not start a RemoteApp 1 - Connect and launch a RemoteApp |
remoteapplicationname | s | No | Yes | the name of the RemoteApp in the Remote Desktop interface while starting the RemoteApp. | |
remoteapplicationprogram | s | No | Yes | Specifies the alias or executable name of the RemoteApp. | |
screenmodeid | i | 2 | Yes | Yes | Determines whether the remote session window appears full screen when you connect to the remote computer. 1 - The remote session will appear in a window 2 - The remote session will appear full screen |
selectedmonitors | s | Yes | Yes | Specifies which local displays to use for the remote session. The selected displays must be contiguous. Requires use multimon to be set to 1. Comma separated list of machine-specific display IDs. You can retrieve IDs by calling mstsc.exe /l. The first ID listed will be set as the primary display in the session. Defaults to all displays. | |
serverport | i | 3389 | No | Yes | Defines an alternate default port for the Remote Desktop connection. Will be overruled by any port number appended to the server name. |
sessionbpp | i | 32 | No | Yes | Determines the color depth (in bits) on the remote computer when you connect. 8 - 256 colors (8 bit) 15 - High color (15 bit) 16 - High color (16 bit) 24 - True color (24 bit) 32 - Highest quality (32 bit) |
shellworkingdirectory | s | No | Yes | The working directory on the remote computer to be used if an alternate shell is specified. | |
signature | s | No | Yes | The encoded signature when using .rdp file signing. | |
signscope | s | No | Yes | Comma-delimited list of .rdp file settings for which the signature is generated when using .rdp file signing. | |
smartsizing | i | 0 | Yes | Yes | Determines whether the client computer should scale the content on the remote computer to fit the window size of the client computer when the window is resized. 0 - The client window display will not be scaled when resized 1 - The client window display will automatically be scaled when resized |
spanmonitors | i | 0 | No | Yes | Determines whether the remote session window will be spanned across multiple monitors when you connect to the remote computer. 0 - Monitor spanning is not enabled 1 - Monitor spanning is enabled |
superpanaccelerationfactor | i | 1 | No | Yes | Specifies the number of pixels that the screen view scrolls in a given direction for every pixel of mouse movement by the client when in SuperPan mode. |
usbdevicestoredirect | s | Yes | Yes | which supported RemoteFX USB devices on the client computer will be redirected and available in the remote session when you connect to a remote session that supports RemoteFX USB redirection. No value specified - Do not redirect any supported RemoteFX USB devices * - Redirect all supported RemoteFX USB devices for redirection that are not | |
usemultimon | i | 0 | Yes | Yes | Determines whether the session should use true multiple monitor support when connecting to the remote computer. 0 - Do not enable multiple monitor support 1 - Enable multiple monitor support |
username | s | No | Yes | the name of the user account that will be used to log on to the remote computer. | |
videoplaybackmode | i | 1 | No | Yes | Determines whether RDC will use RDP efficient multimedia streaming for video playback. 0 - Do not use RDP efficient multimedia streaming for video playback 1 - Use RDP efficient multimedia streaming for video playback when possible |
winposstr | s | 0,3,0,0,800,600 | No | Yes | Specifies the position and dimensions of the session window on the client computer. |
workspaceid | s | No | Yes | This setting defines the RemoteApp and Desktop ID associated with the RDP file that contains this setting. |
This page contains a lot of different RDP settings which we can still use today. Some of the RDP settings are categorized by Microsoft as not supported but will do their work in Azure Virtual Desktop too, for example the option to hide the connection bar by default.
These sources helped me by writing and research for this post;
Thank you for reading this post and I hope it was helpful!
You have reached the end of the page. You can navigate through other blog posts as well, share this post on X, LinkedIn and Reddit or return to the blog posts collection page. Thank you for visiting this post.
If you think something is wrong with this post or you want to know more, you can send me a message to one of my social profiles at: https://justinverstijnen.nl/about/
If you find this page and blog very useful and you want to leave a donation, you can use the button below to buy me a beer. Hosting and maintaining a website takes a lot of time and money. Thank you in advance and cheers :)
The terms and conditions apply to this post.
Azure Compute Gallery is a great service in Azure to store, capture and maintain your VM images. This can be helpful when deploying multiple similar VMs. Use cases of this can be VM Scale Sets, webservers , containers or Azure Virtual Desktop session hosts.
In this blog post, I will tell more about Azure Compute Gallery, how to use it when imaging VMs and how it can help you storing and maintaining images for your VMs.
Azure Compute Gallery (ACG) is a service in Azure that helps you storing, categorizing and maintaining images of your virtual machines. This can be really helpful when needing to deploy similar virtual machines, which we do for Virtual Machine Scale Sets but also for Azure Virtual Desktop. Those are 2 services where similar images needs to be deployed. You can also build “specialized” images for different use cases where similarity is not a requirement, like Active Directory Domain Controllers or SQL/Application servers.
The features of Azure Compute Gallery:
Azure Compute Gallery itself is a sort specialized storage account for storing images only. In the gallery, you have a VM definition, which is a group of images for a specific use case and under the definitions, we put the images itself. All of this looks like this:
This is an example of a use-case of Azure Compute Gallery, where we store images for Azure Virtual Desktop VMs and for our Webservers, which we re-image every month in this case.
Azure Compute Gallery has some advantages over the “older” and more basic Managed Images which you may use. Let’s dive into the key differences:
| Feature | Azure Compute Gallery | Managed Images |
| Creating and storing generalized and specialized images | ✅ | ✅ |
| Region availability | ✅ | ❌ |
| Versioning | ✅ | ❌ |
| Trusted Launch VMs (TPM/Secure Boot) | ✅ | ❌ |
The costs of Azure Compute Gallery is based on:
In my exploratory example, I had a compute gallery active for around 24 hours on Premium SSD storage with one replica, and the costs of this were 2 cents:

This was a VM image with almost nothing installed, but let it increase to 15 cents per 24 hours (5 euro per month) and it still is 100% worth the money.
Let’s dive into the Azure Portal, and navigate to “Azure Compute Gallery” to create a new gallery:
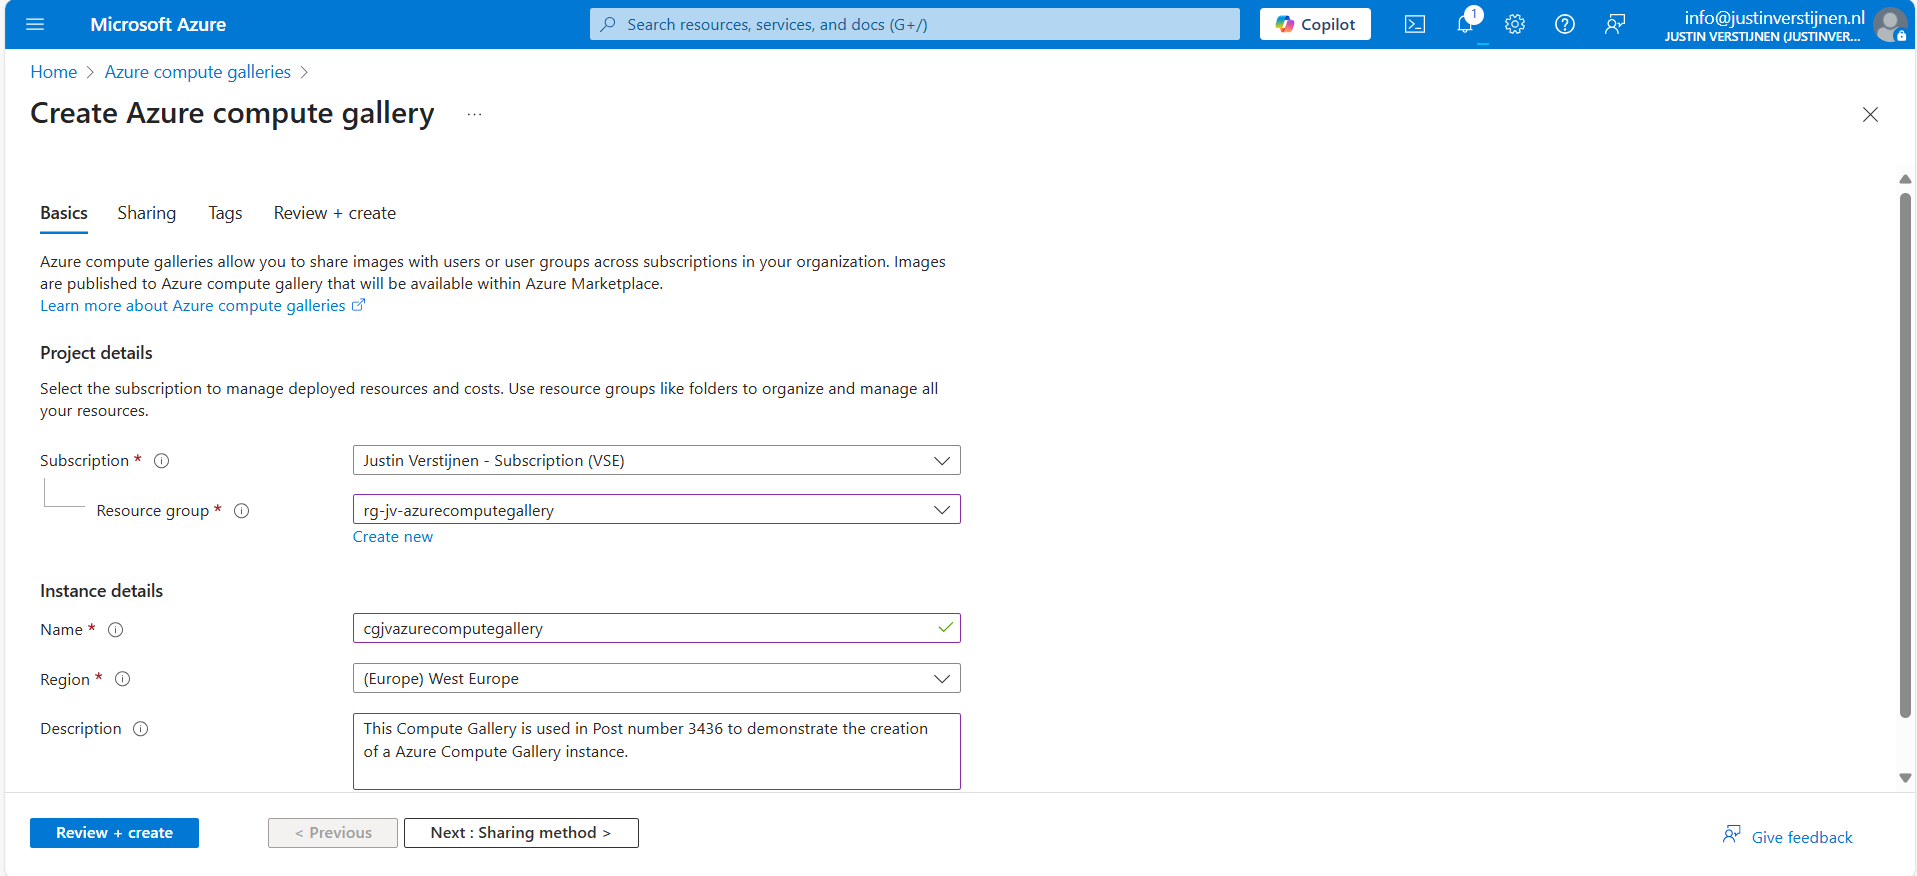
Give the gallery a name, place it in a resource group and give it a clear description. Then go to “Sharing method”.
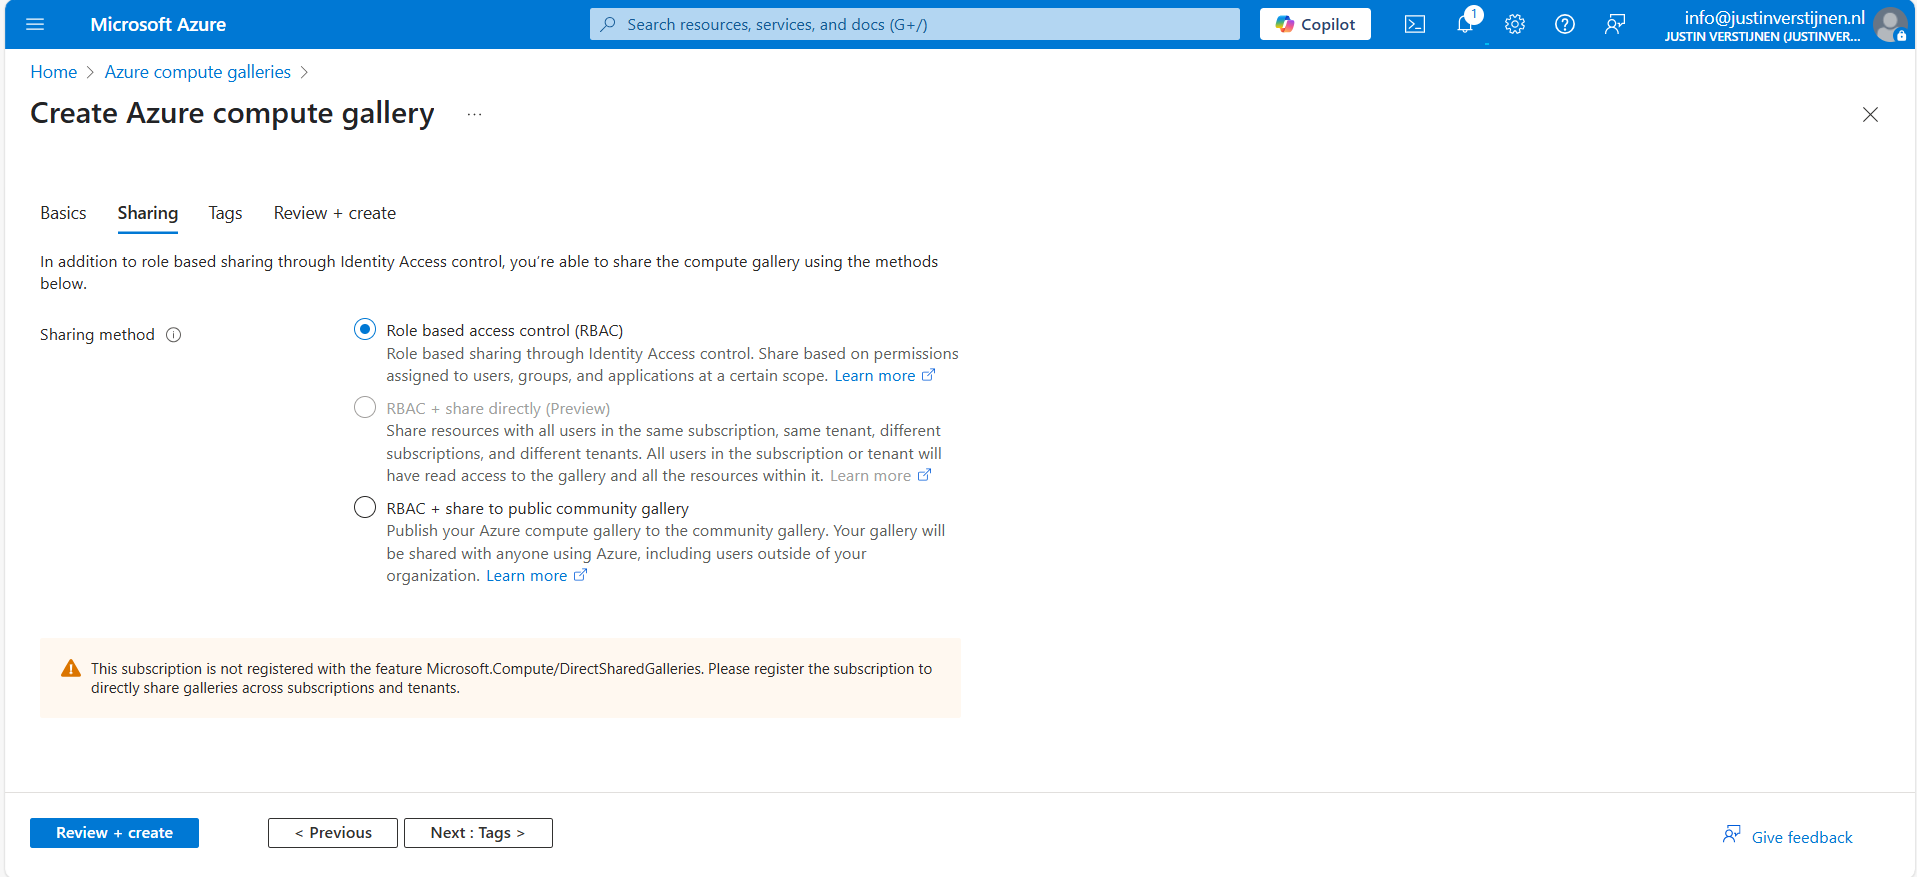
Here we have 3 options, where we will cover only 2:
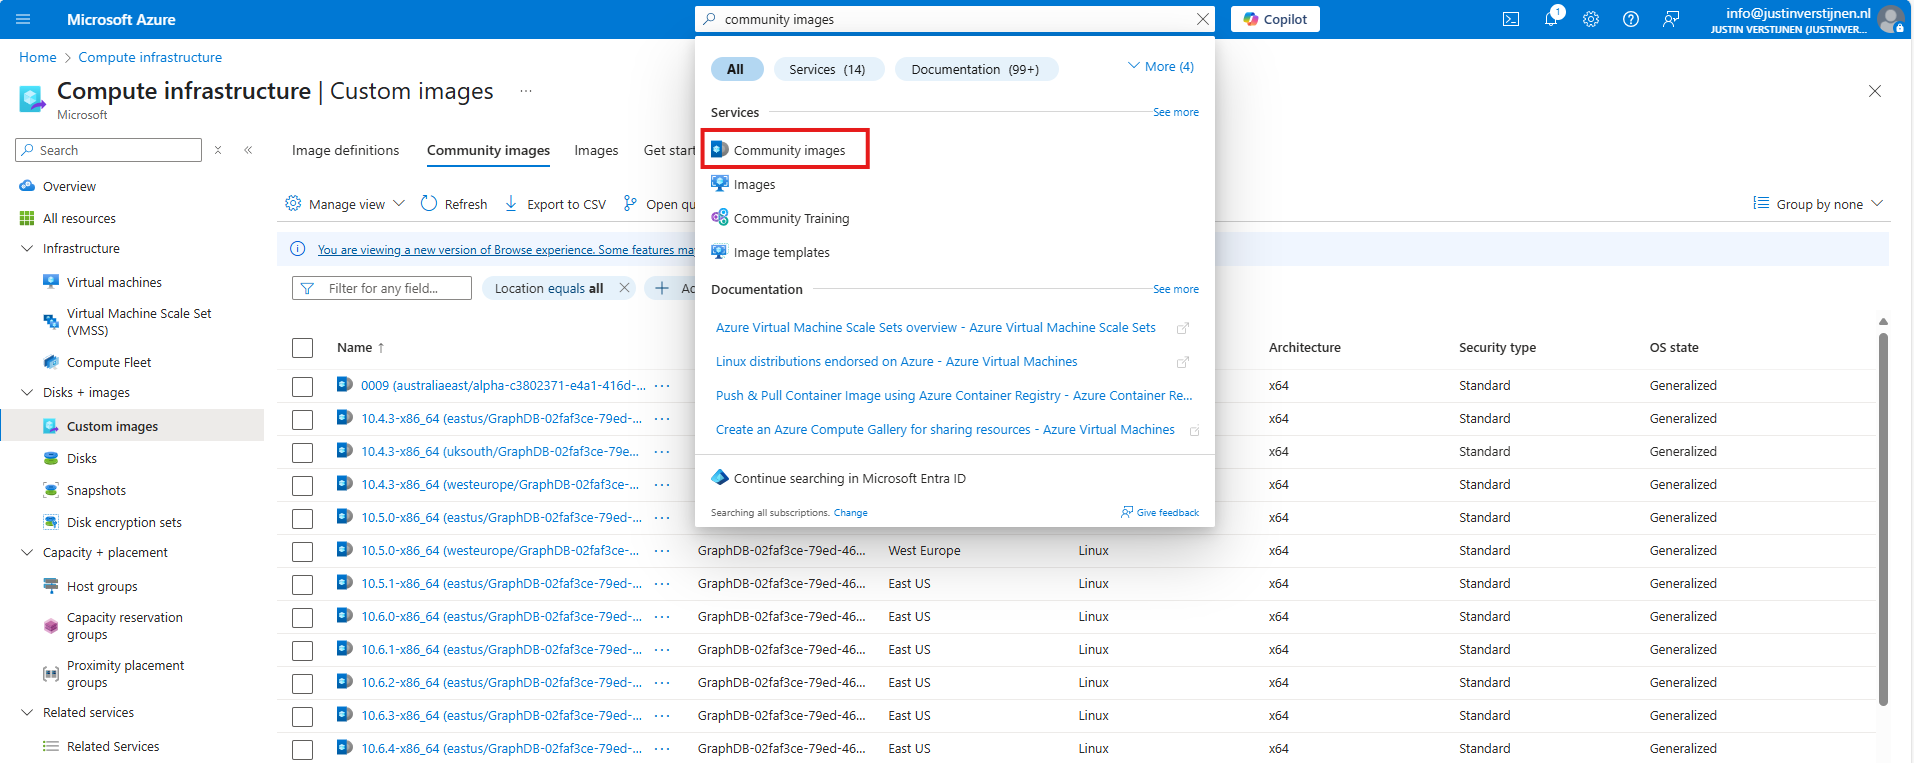
After you made your choice, proceed to the last page of the wizard and create the gallery.
VM image definitions can be created manually like this step, but also through a image you capture. Most of the information will be filled in automatically when choosing the second option.
I will showcase both of the options.
After creating the gallery itself, the place to store the images, we can now manually create a VM image definition. The category of images that we can store.
Click on “+ Add” and then “VM image definition”:
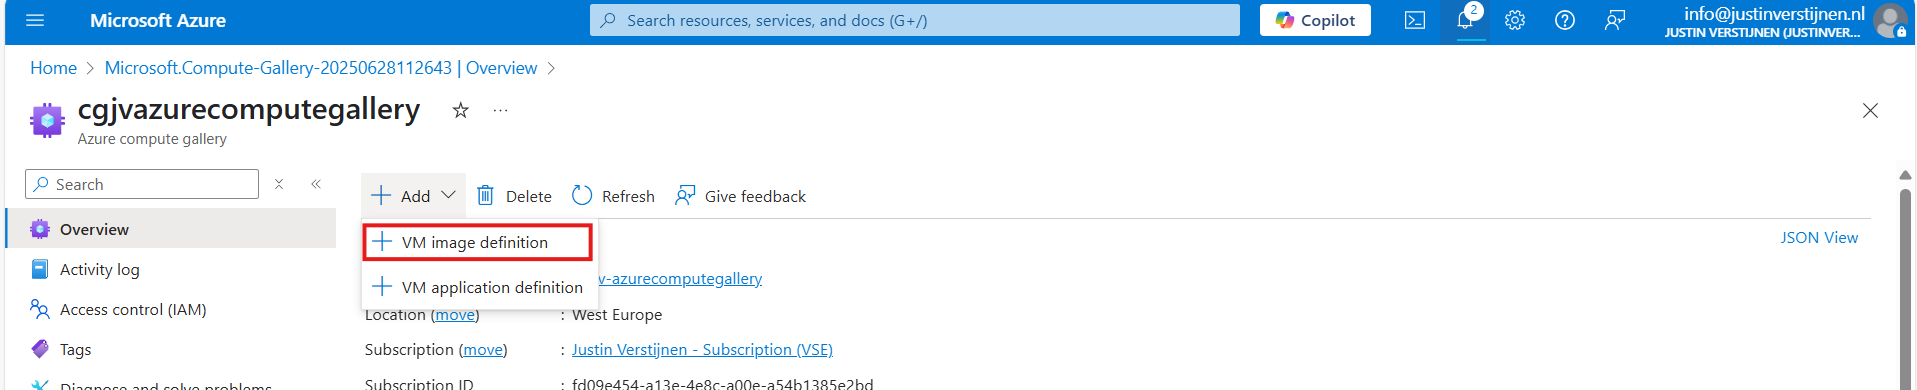
Here we need to define which type of VMs we will be storing into our gallery:
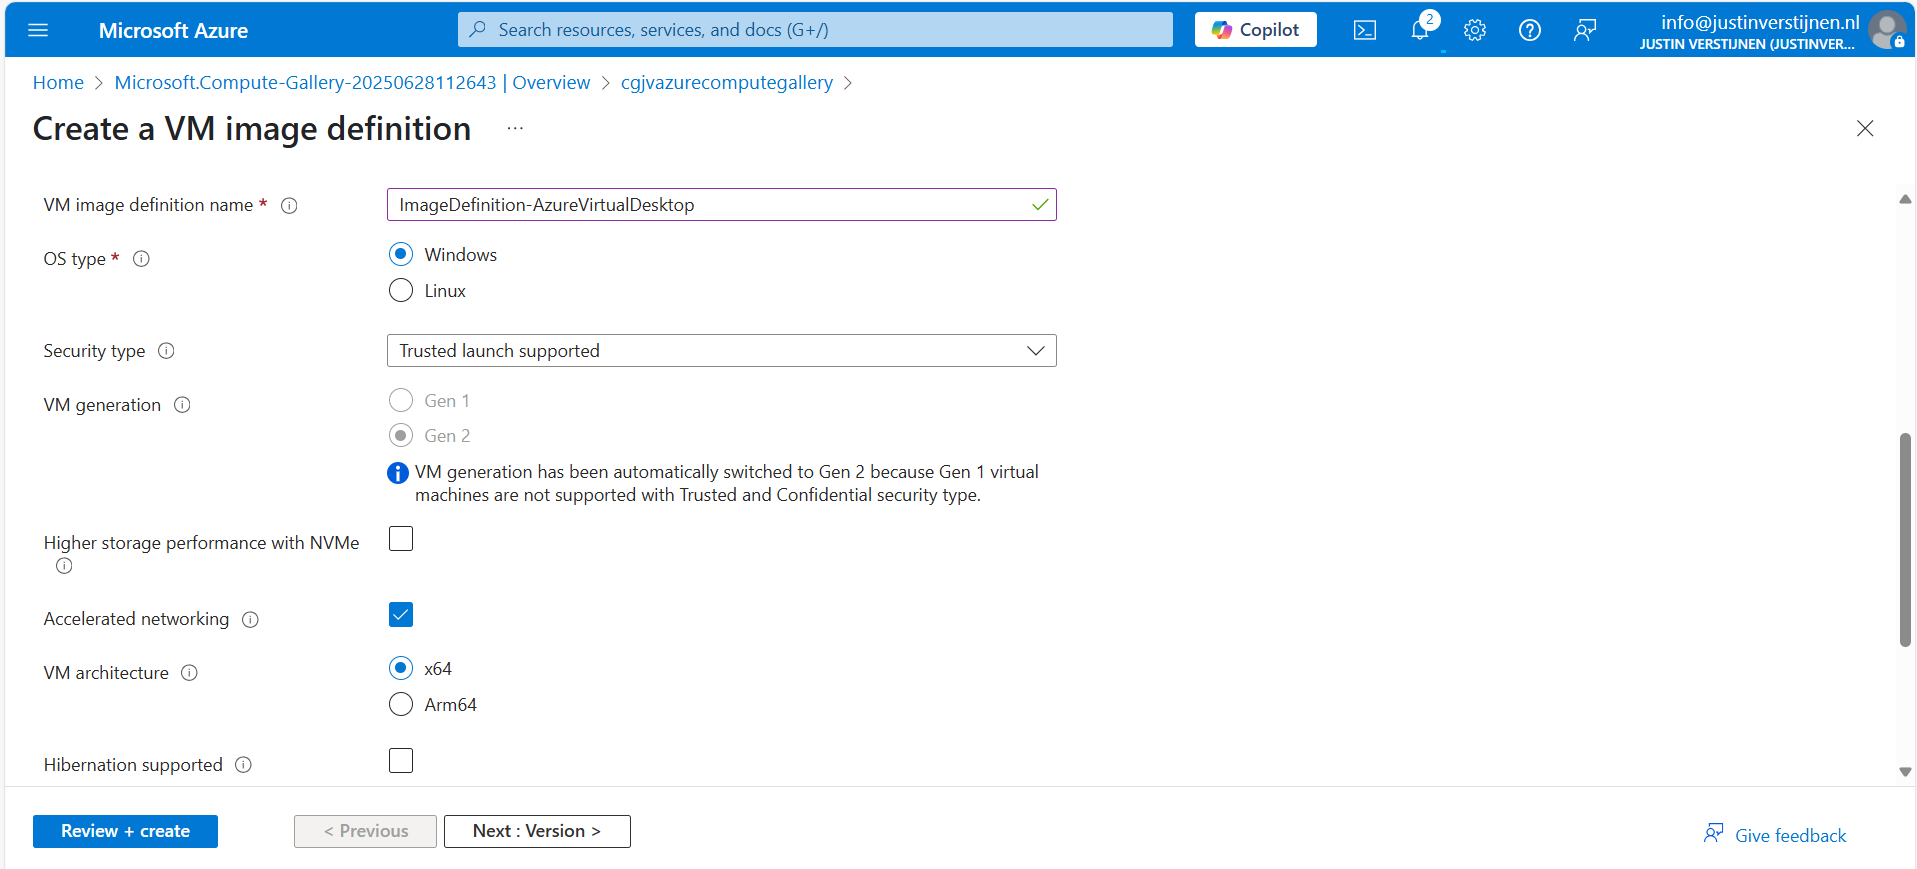
Here I named it “ImageDefinition-AzureVirtualDesktop”, the left side of the topology I showed earlier.
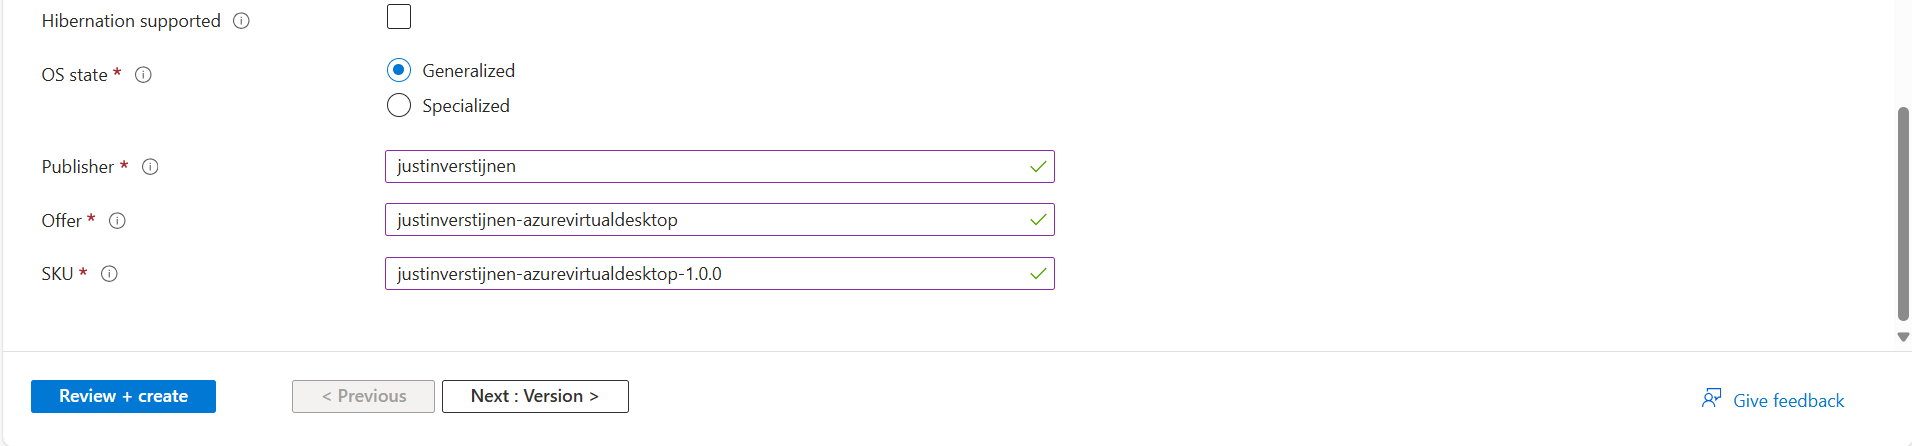
The last part can be named as you wish. This is meant for having more information for the image available for documentation purposes. Then go to the next page.
Here you can define the versioning, region and end date of using the image version. A EOL (End-of-Life) for your image.
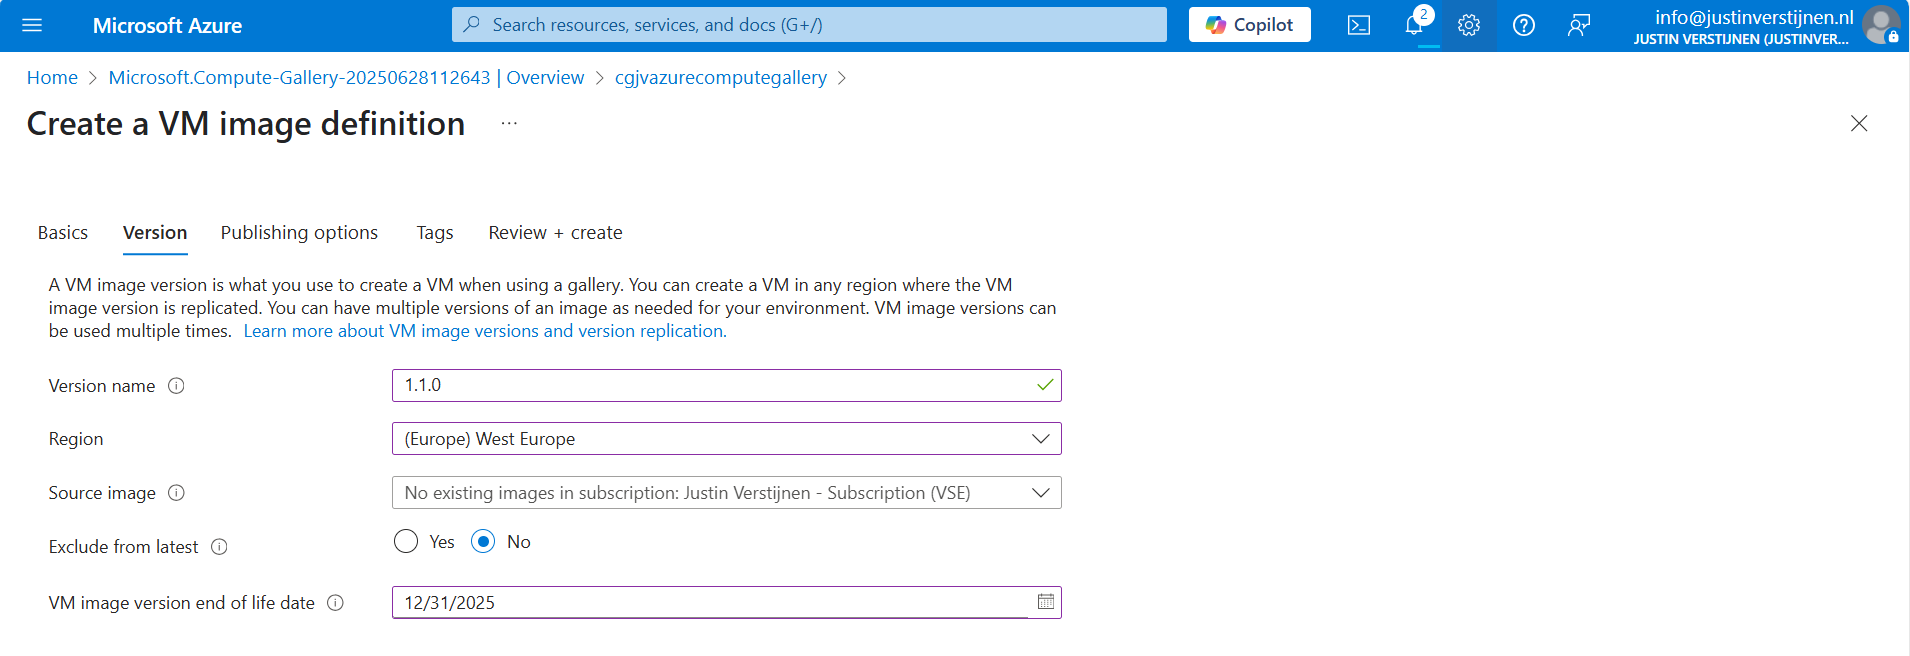
We can also select a managed image here, which makes migrating from Managed Images to Azure Compute Gallery really easy. After filling in the details go to the next page.
On the “Publishing options” page we can define more information for publishing and documentation including guidelines for VM sizes:
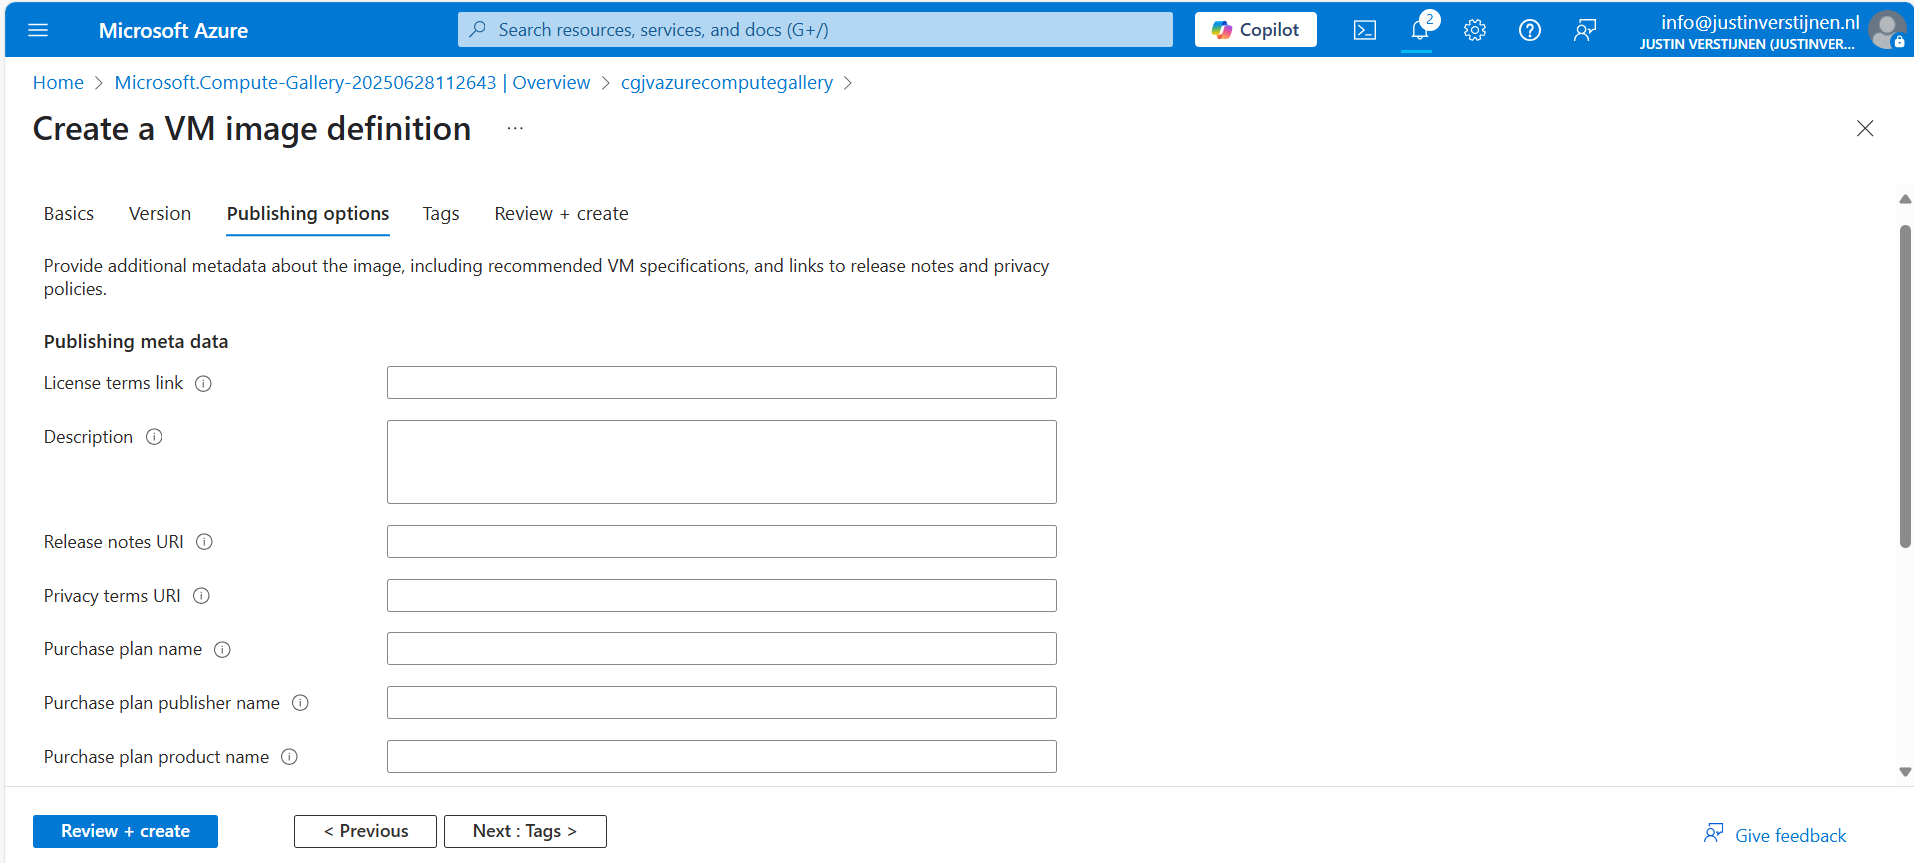
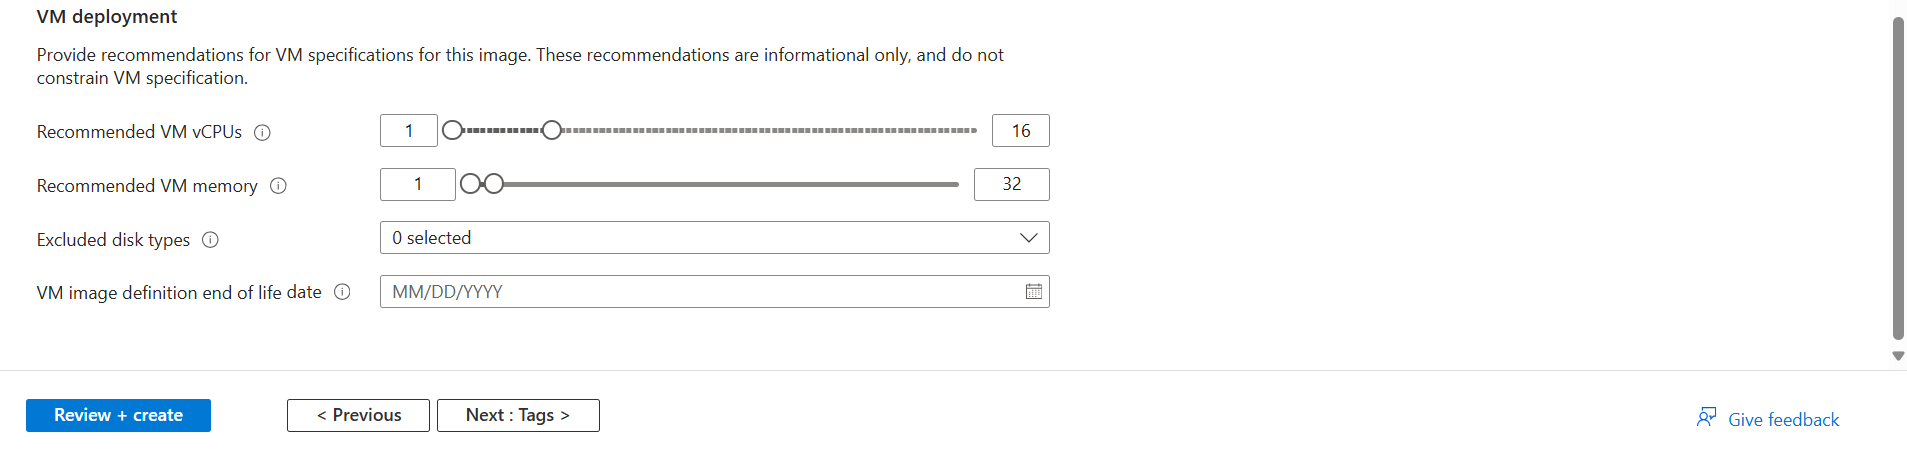
After defining everything, we can advance to the last page of the wizard and create the definition.
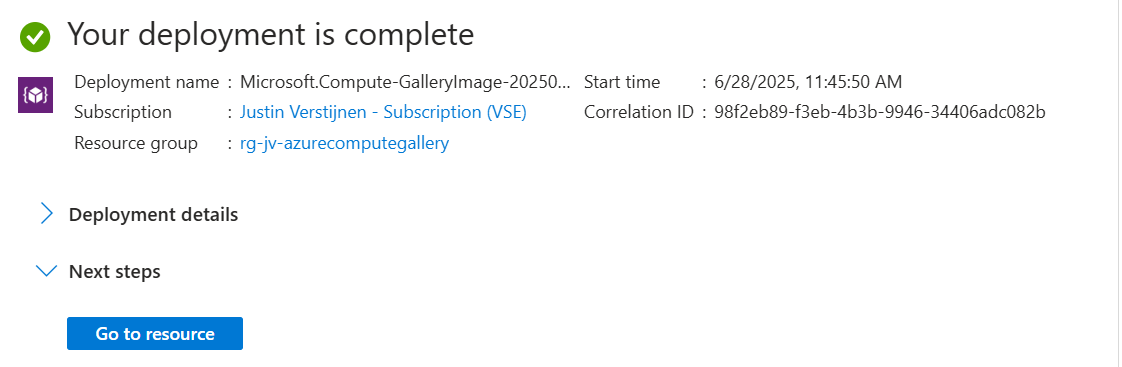
For demonstrating how to capture a virtual machine into the gallery/definition, I already created a ready virtual machine with Windows Server 2025. Let’s perform some pre-capturing tasks in the VM:
Sysprep is a application which is shipped with Windows which cleanes a Windows installation from specific ID’s, drivers and such and makes the installation ready for mass deployment. You must only use this for temporary machines you want to images, as this is a semi-destructive action for Windows. A generalized VM in Azure cannot be booted, so caution is needed.
After finishing those pre-capturing tasks, clean up the VM by cleaning the installation files etc. Then run the application Sysprep which can be found here: C:\Windows\System32\Sysprep
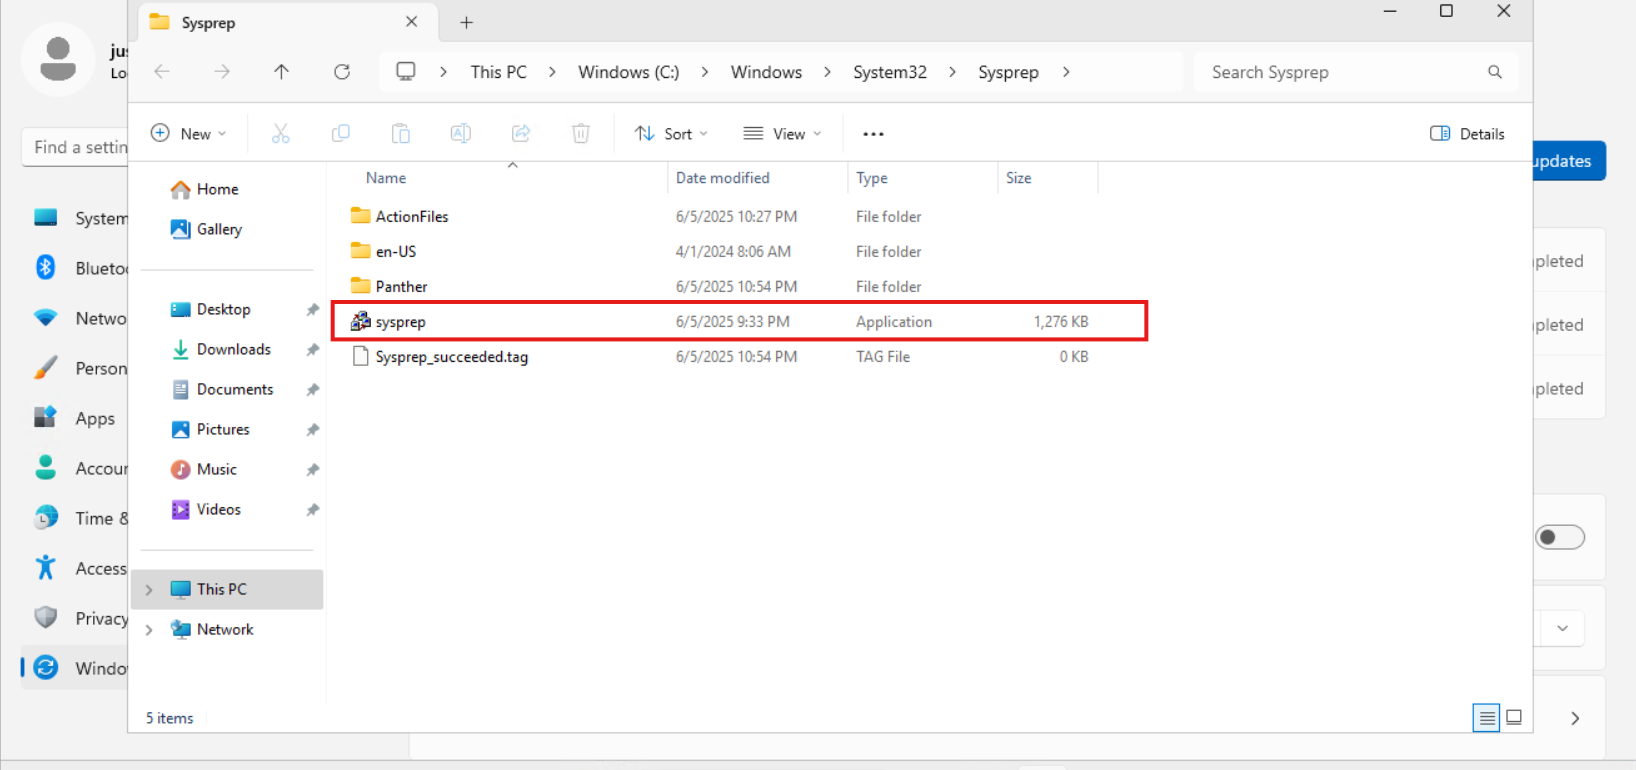
Open the application and select “Generalize” and the as Shutdown option: “Shutdown”.
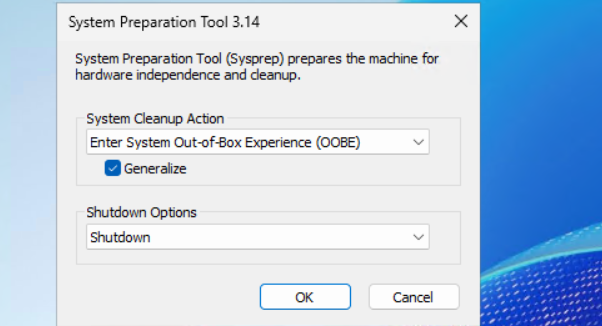
Click “OK” and wait till the virtual machine performs the shutdown action.

If you get an error during this stage that states Bitlocker is activated, you need to disable it temporarily. At deployment of the image, this will be re-activated.
PowerShell
Disable-BitLocker -MountPoint "C:"
After the virtual machine is sysprepped/generalized succesfully, we can go to the virtual machine in the Azure Portal to capture it and store it in our newly created Compute gallery.
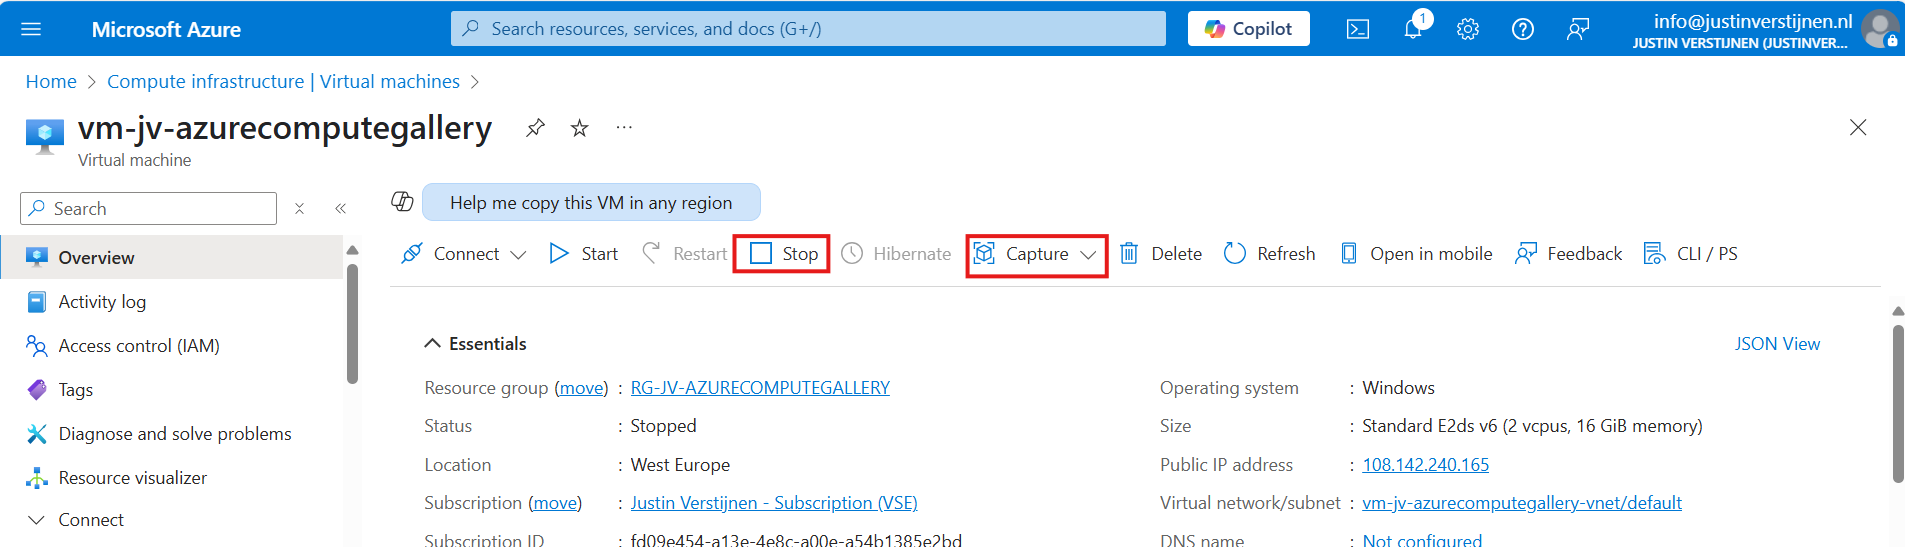
First clikc on “Stop” to actually deallocate the virtual machine. Then click on “Capture” and select “Image”.
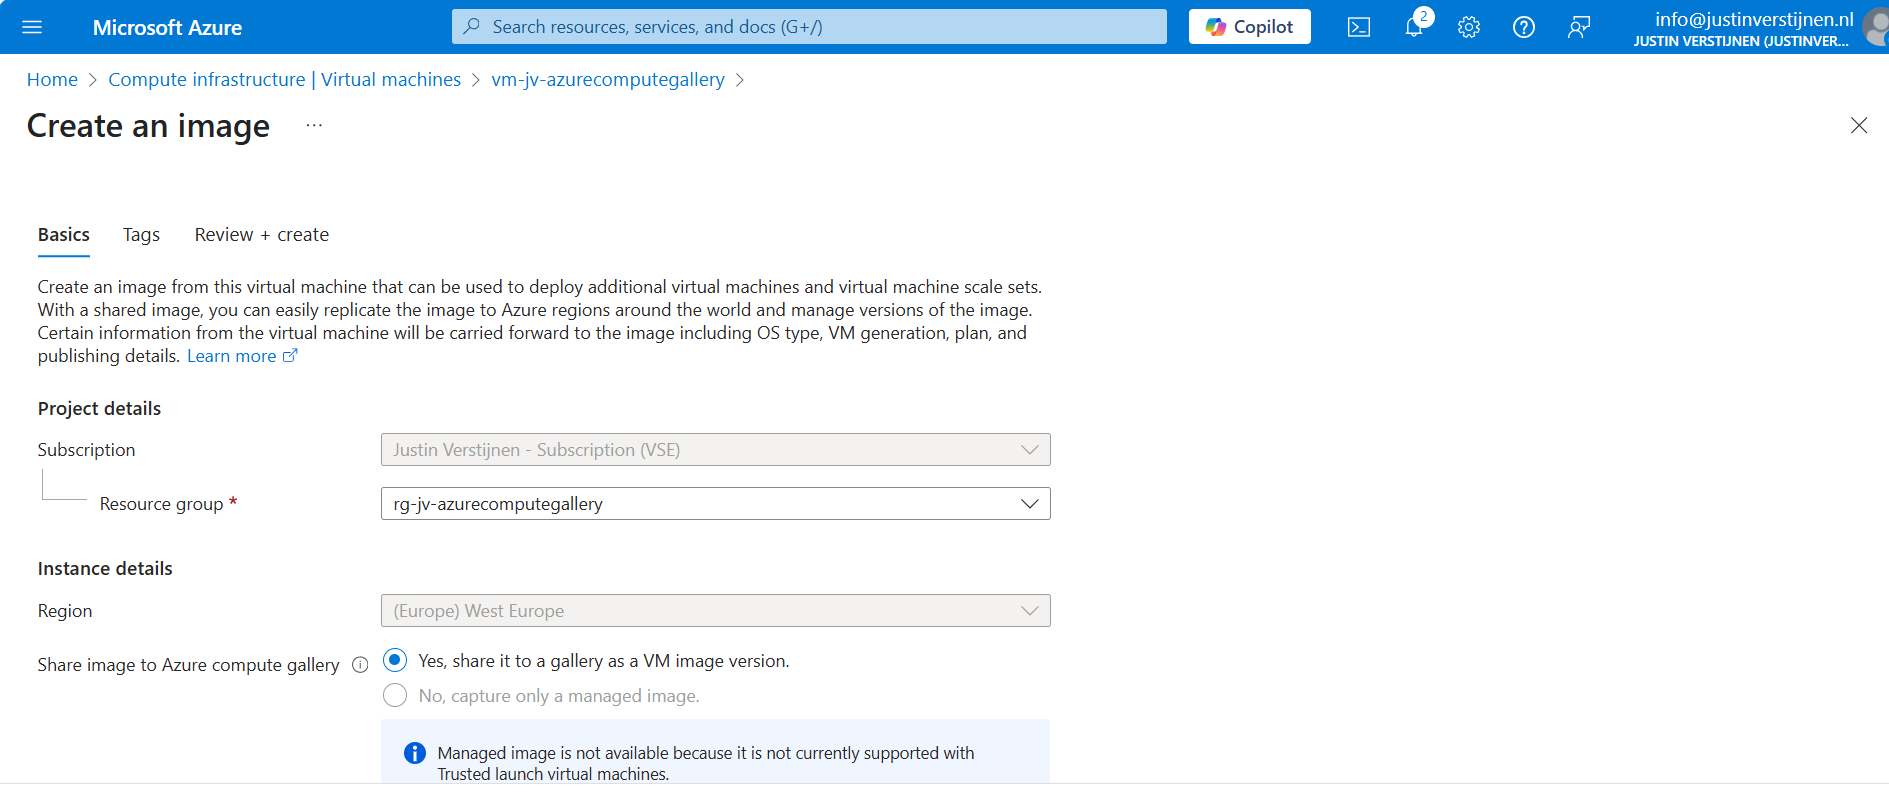
Select the option “Yes, share it to a gallery as a VM image version” if not already selected. Then scroll down and select your compute gallery as storage.
Scroll down on the first page to “Target VM image definition”. We can create a VM image definition here based on the image we give Azure:
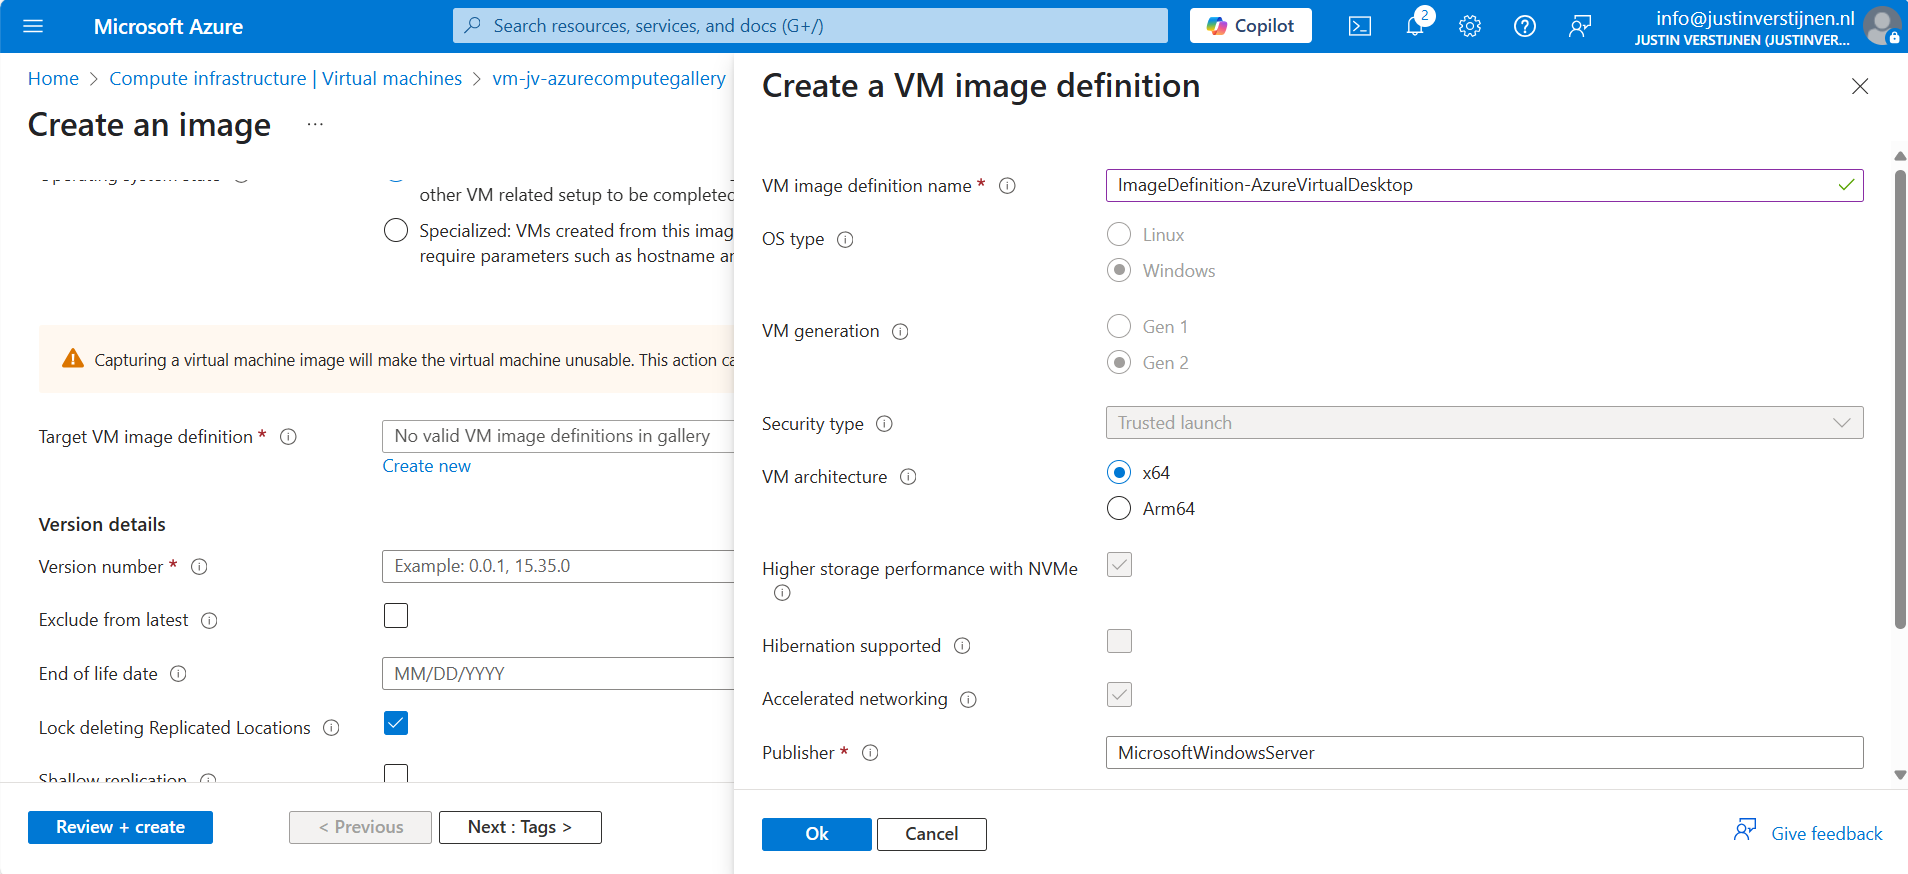
We don’t have to fill in that much. A name for the image is enough.
After that, click on “Add” and fill in the version numer and End of life date:
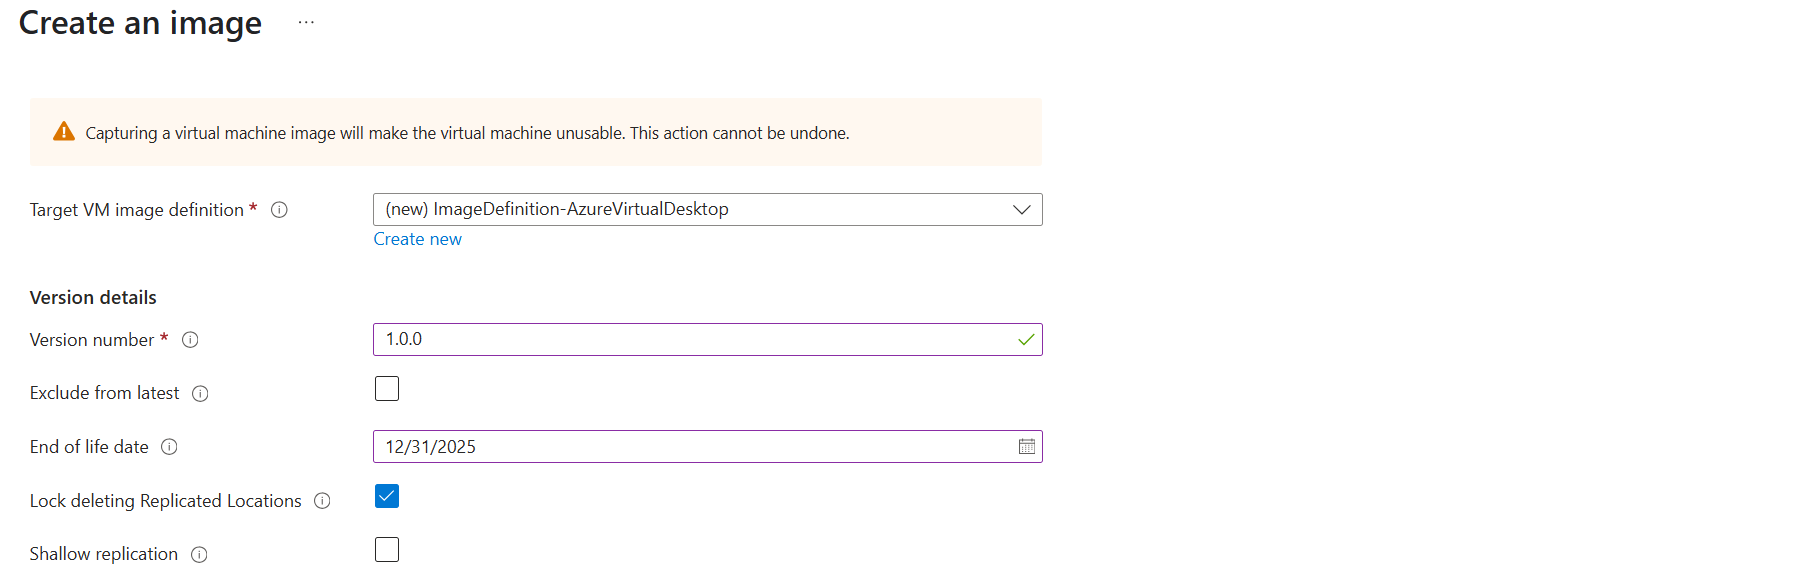
Then scroll down to the redundancy options. You can define here what type of replication you want and what type of storage:
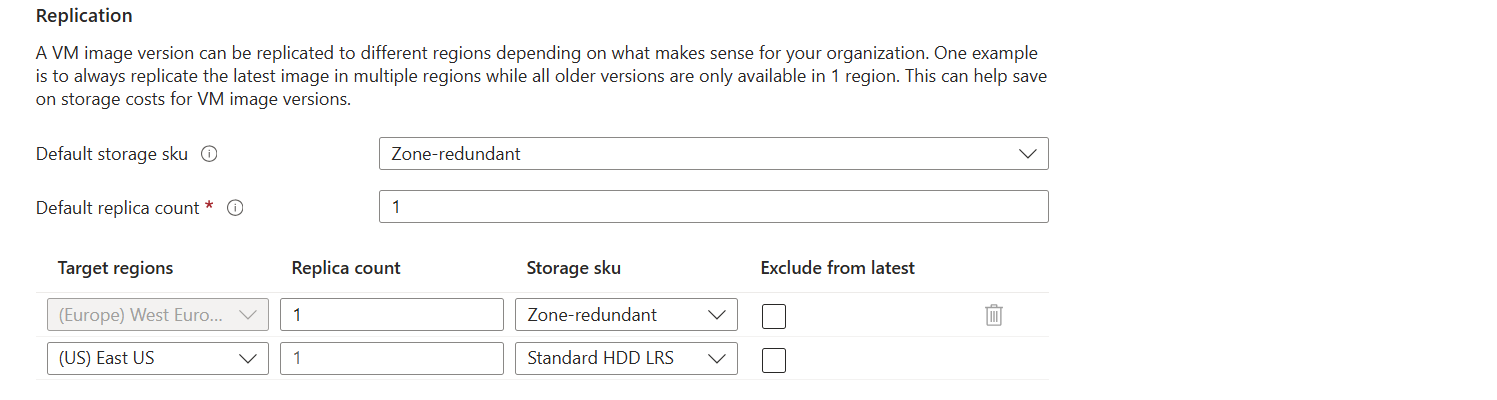
I changed the options to make it more available:
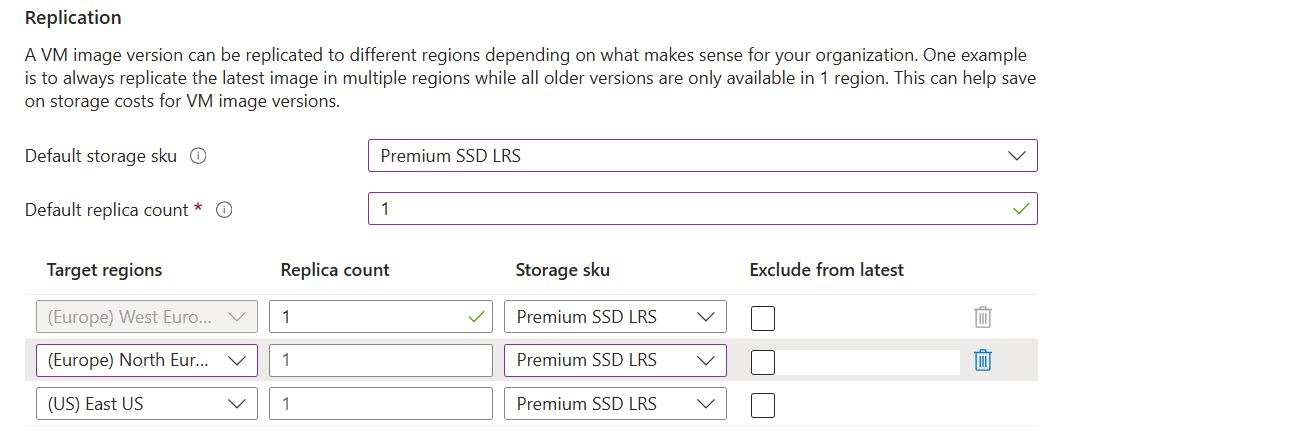
Only the latest versions will be available in the regions you choose here. Older versions are only available in the primary region (The region you can’t change).
After that finish the wizard, and the virtual machine will now be imaged and stored in Azure Compute Gallery.
Azure Compute Gallery is a great way to stora and maintain images in a fairly easy way. At first it can be overwhelming but after this post, I am sure you know the basics of it, how to use it and how it works.
If you already know the process with Managed Images, the only thing changed is the location of where you store the images. I think Azure Compute Gallery is the better option because of centralizing storage of images instead of random in your resource group and having support for trusted launch.
These sources helped me by writing and research for this post;
Thank you for reading and I hope it was helpful.
You have reached the end of the page. You can navigate through other blog posts as well, share this post on X, LinkedIn and Reddit or return to the blog posts collection page. Thank you for visiting this post.
If you think something is wrong with this post or you want to know more, you can send me a message to one of my social profiles at: https://justinverstijnen.nl/about/
If you find this page and blog very useful and you want to leave a donation, you can use the button below to buy me a beer. Hosting and maintaining a website takes a lot of time and money. Thank you in advance and cheers :)
The terms and conditions apply to this post.
When deploying Microsoft Office apps to (pooled) Virtual Desktops, we mostly need to do some optimizations to the installation. We want to optimize performance on pooled and virtual machines, or maybe we want to enable shared computer activation because multiple users need the apps.
In this guide I will show you how to customize the installation of Office apps, primarily for Virtual Desktops, but can be used on any Windows machine.
The Office Configuration Tool (config.office.com) is a customization tool for your Office installation. We can some custom settings and define which settings we want, how the programs must behave and include and exclude software we don’t need.
Some great options of using this tool are:
To use the Office Configuration tool, use the following link:
Then start by creating a new configuration:
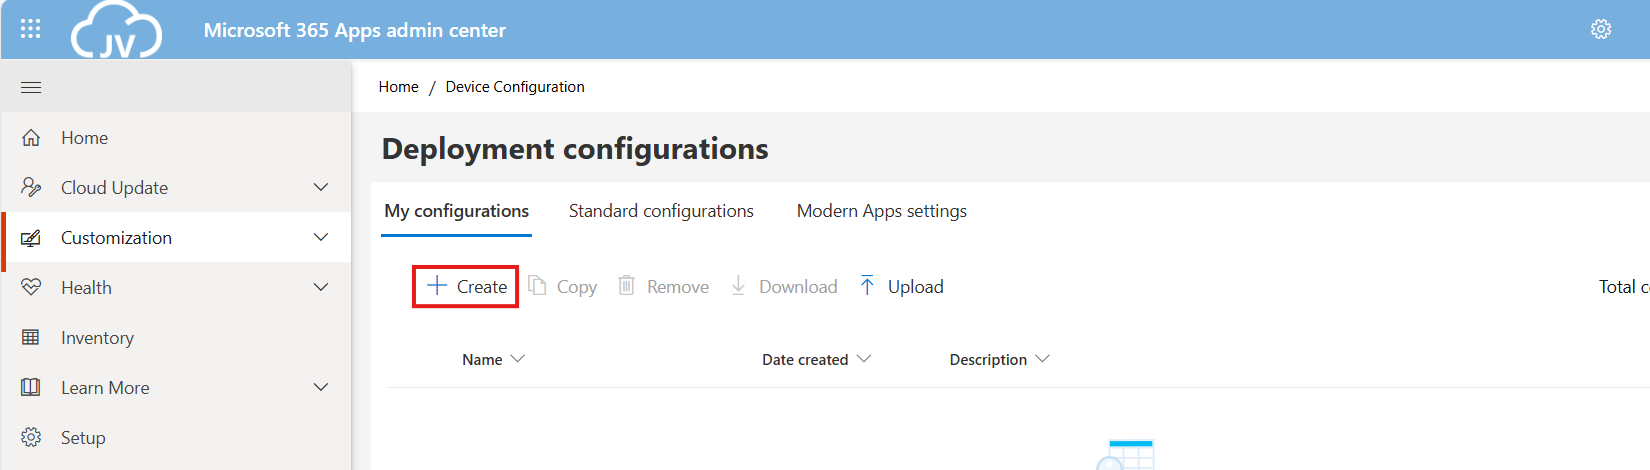
The wizard starts with asking whether to use 32-bit (x86) or 64-bit (x64). Choose the version you’ll need, while keeping in ming x64 is always the preferred option:
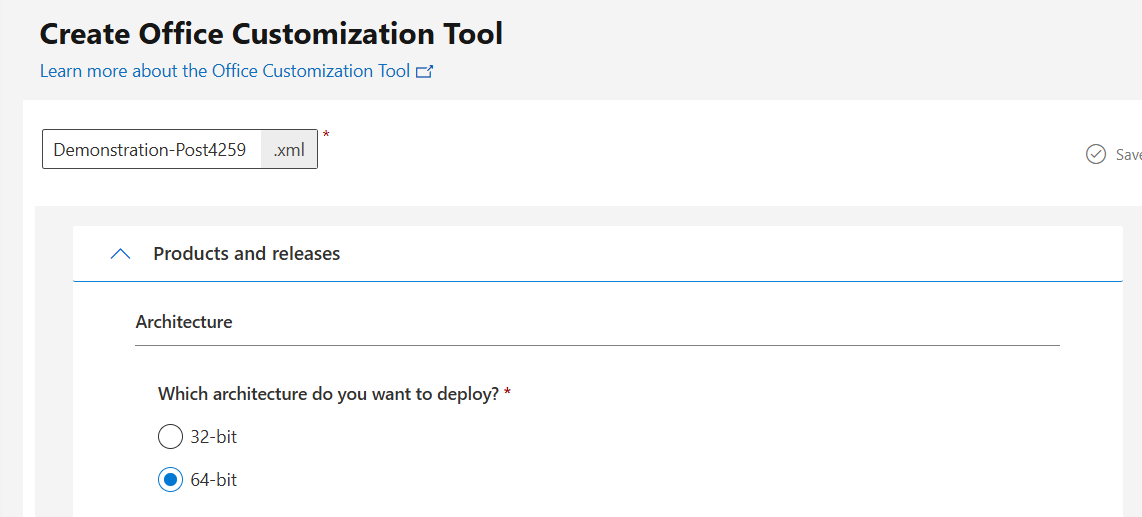
Then advance below.
If you need additional products or a different version like LTSC or Volume Licensing, you can select this now:
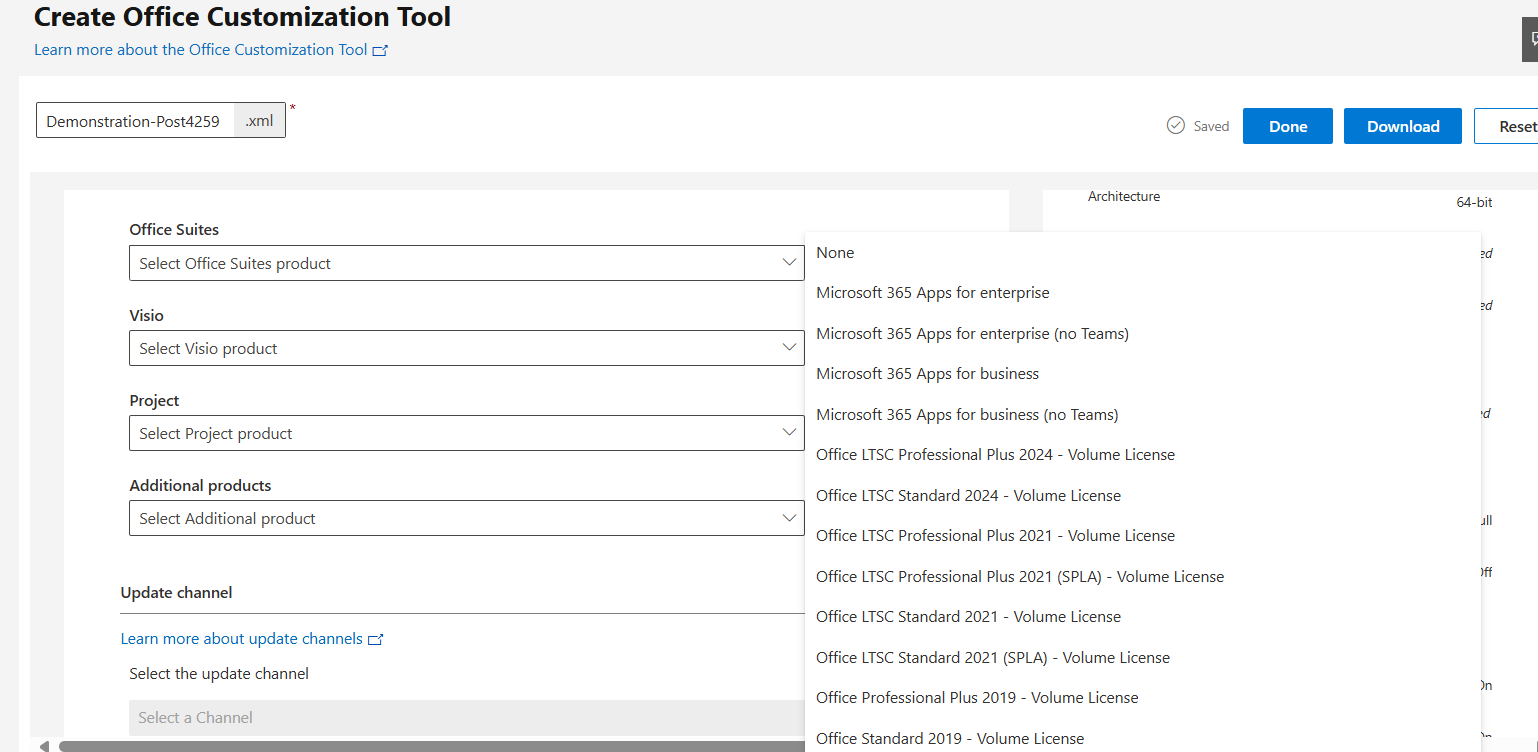
You can also select to include Visio, Project.
You can now select what update channel to use:
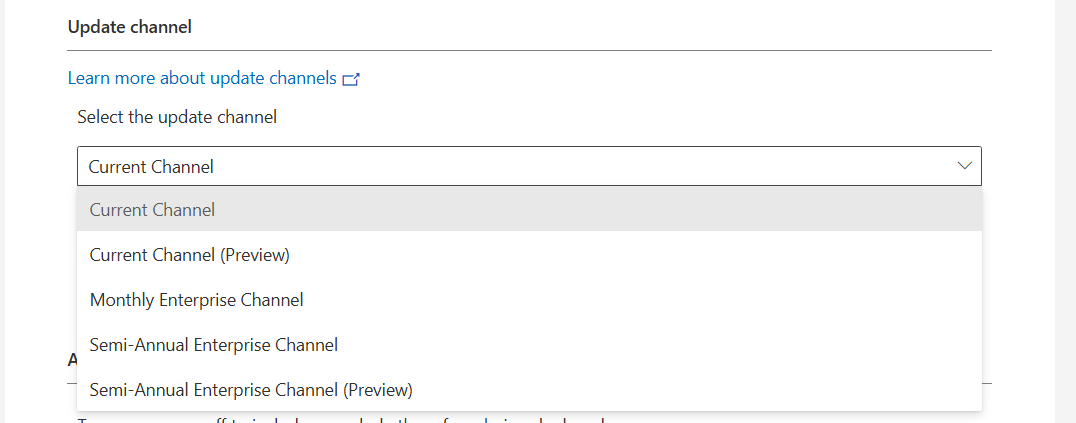
These channels define how much your apps are updated. I advice to use the monthly enterprise channel or the semi annual enterprise channel, so you’ll get updates once a month or twice a year. We don’t want to update too much and we also don’t want preview versions in our production environments.
In smaller organizations, I had more success with the monthly channel so new features like Copilot or such are not delayed for at least 6 months.
Now we can customize the set of applications that are being installed:
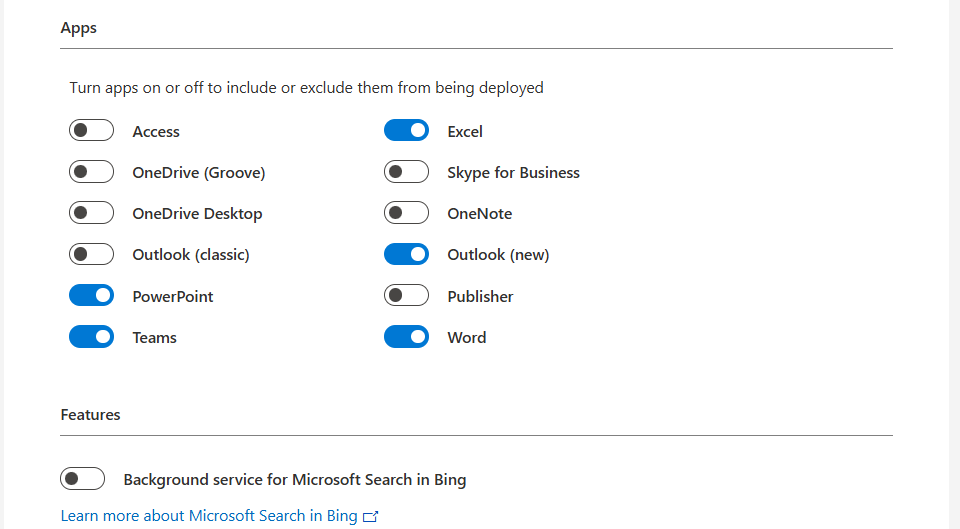
Here we can disable apps our users don’t need like the old Outlook or Access/Publisher. Not installing those applications saves some on storage and compute power. Also we can disable the Microsoft Bing Background service. No further clarification needed.
I prefer to install Onedrive manually myself to install it machine-wide. You do this by downloading Onedrive and then executing it with this command:
OneDriveSetup.exe /allusersWhen you have users from multiple countries in your Virtual Desktops, we can install multiple language packs for users. These are used for display and language corrections.
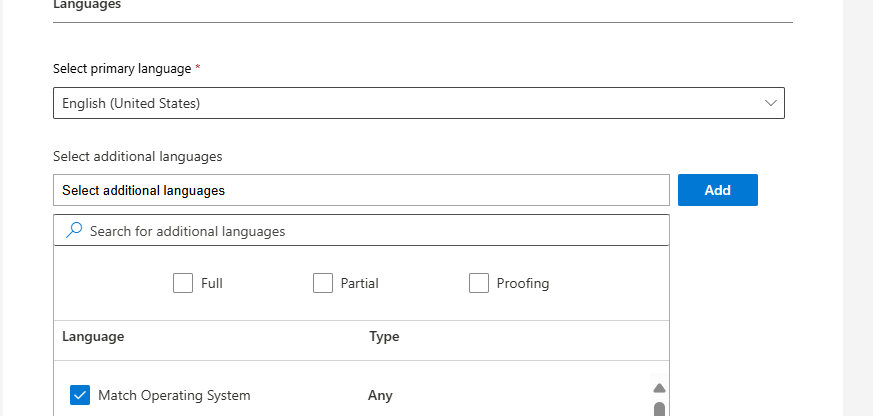
You can also choose to match the users’ Windows language.
At this step you could host the Office installation files yourself on a local server, which can save on bandwidth if you install the applications 25 times a day. For installations happening once or twice a month, I recommend using the default options:
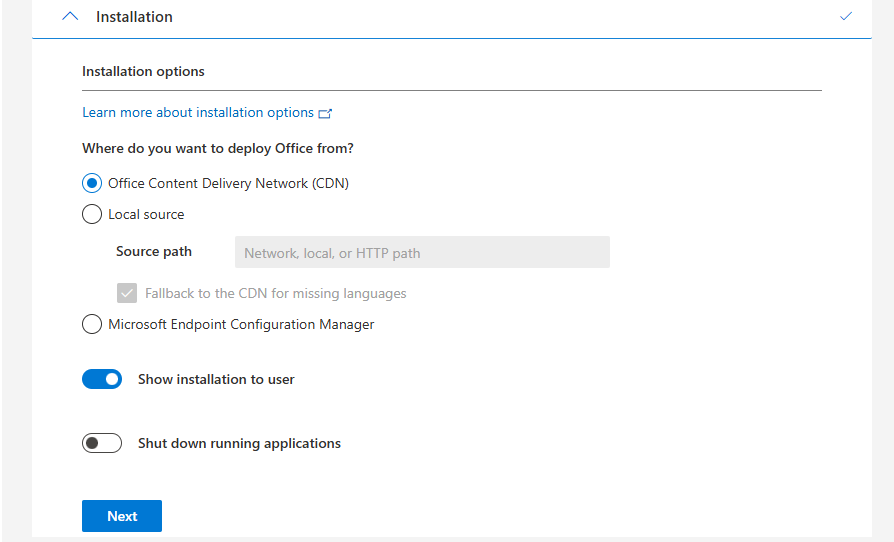
Now we have the option to automatically accept the EULA for all users. This saves one click for every user who opens the Microsoft Office apps:
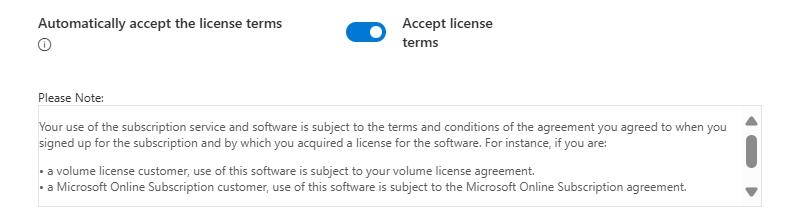
Now we have the option to enable Shared Computer Activation, which is required for using on machines where multiple users are working simultaneously.
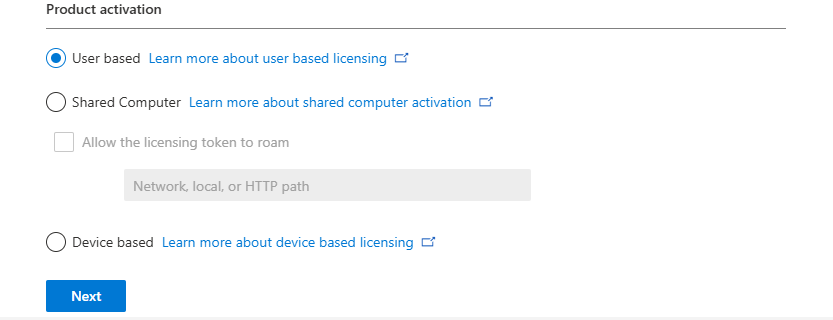
If using Azure Virtual Desktop or Remote Desktop Services as pooled, choose Shared Computer, otherwise use User based or Device based if having an Enterprise Agreement and the proper licenses.
At this step we can set a company name to print in every Office document:
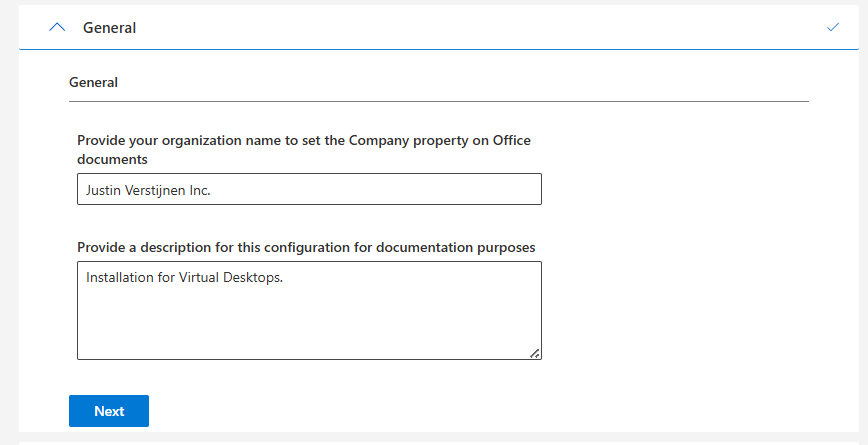
Now we have finished the normal wizard and we have the chance to set some advanced options/registry keys.
We could disable hardware acceleration on Virtual Desktops, as we mostly don’t have a GPU on board. DirectX software rendering will then be used as default to make the software faster.
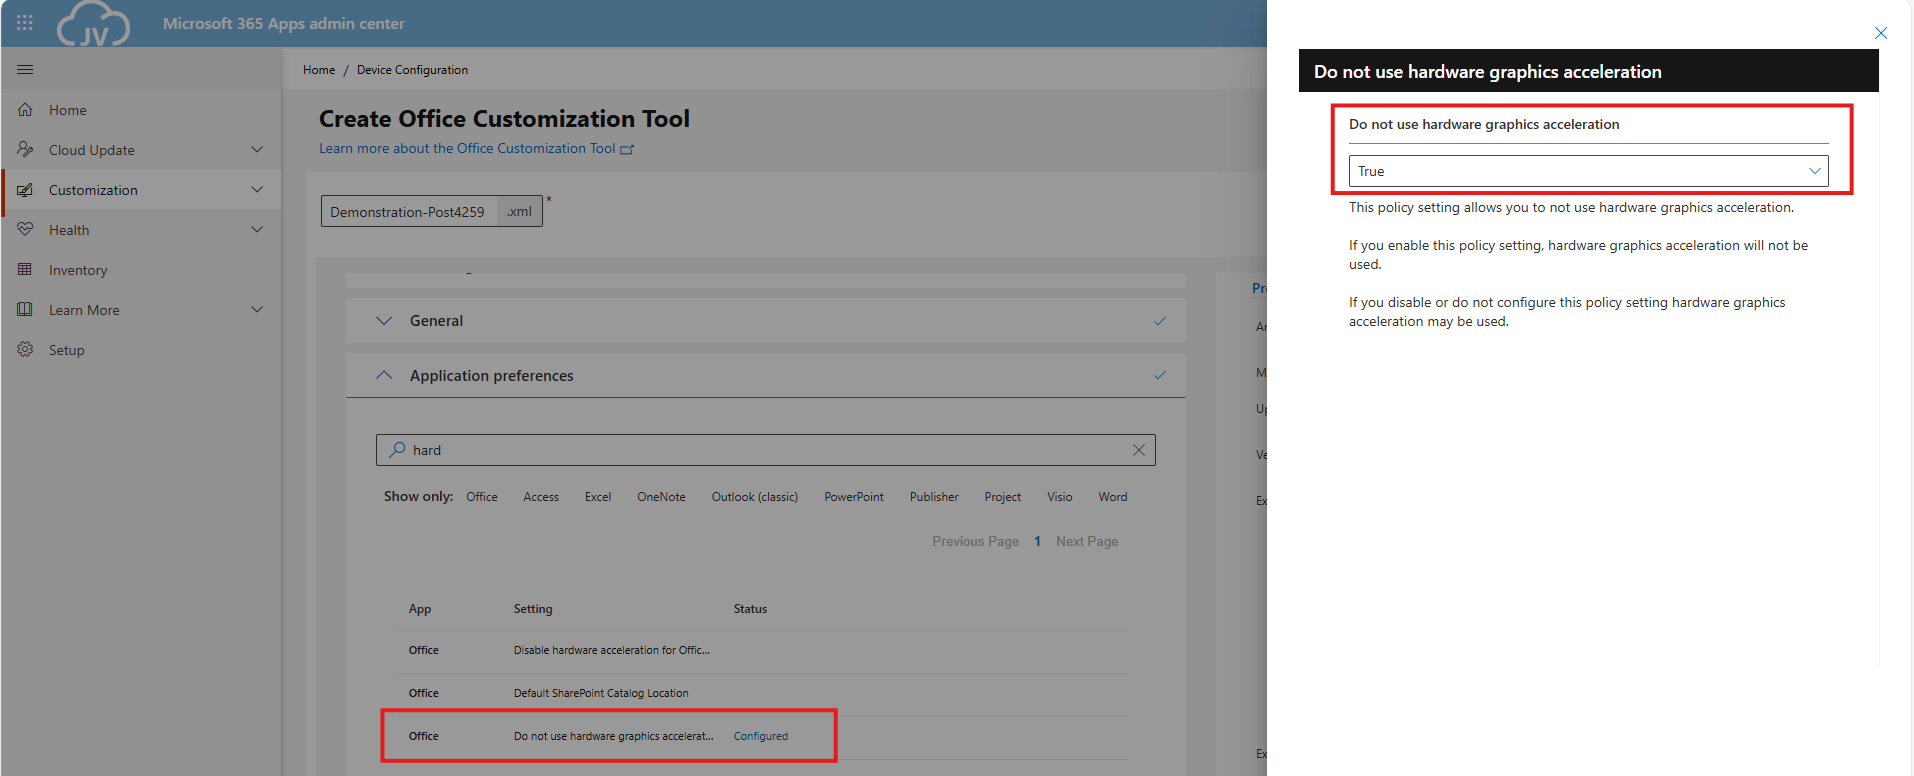
We could also disable the animations to save some on compute power:
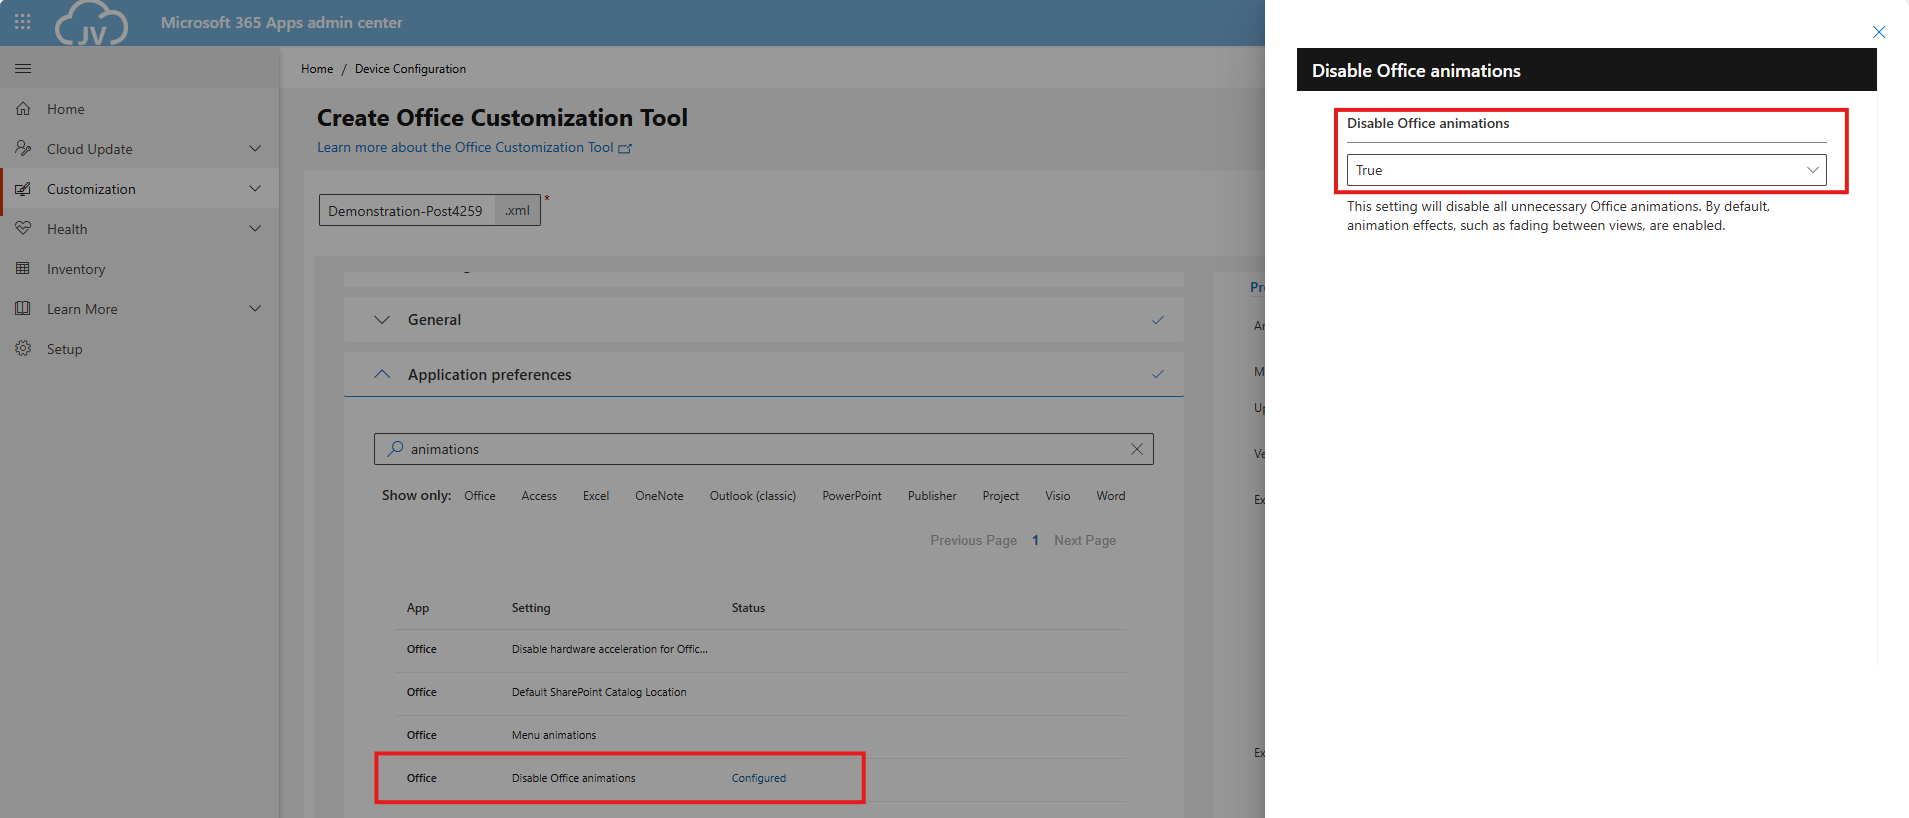
And we can also set some security options, like disable macros for files downloaded from the internet:
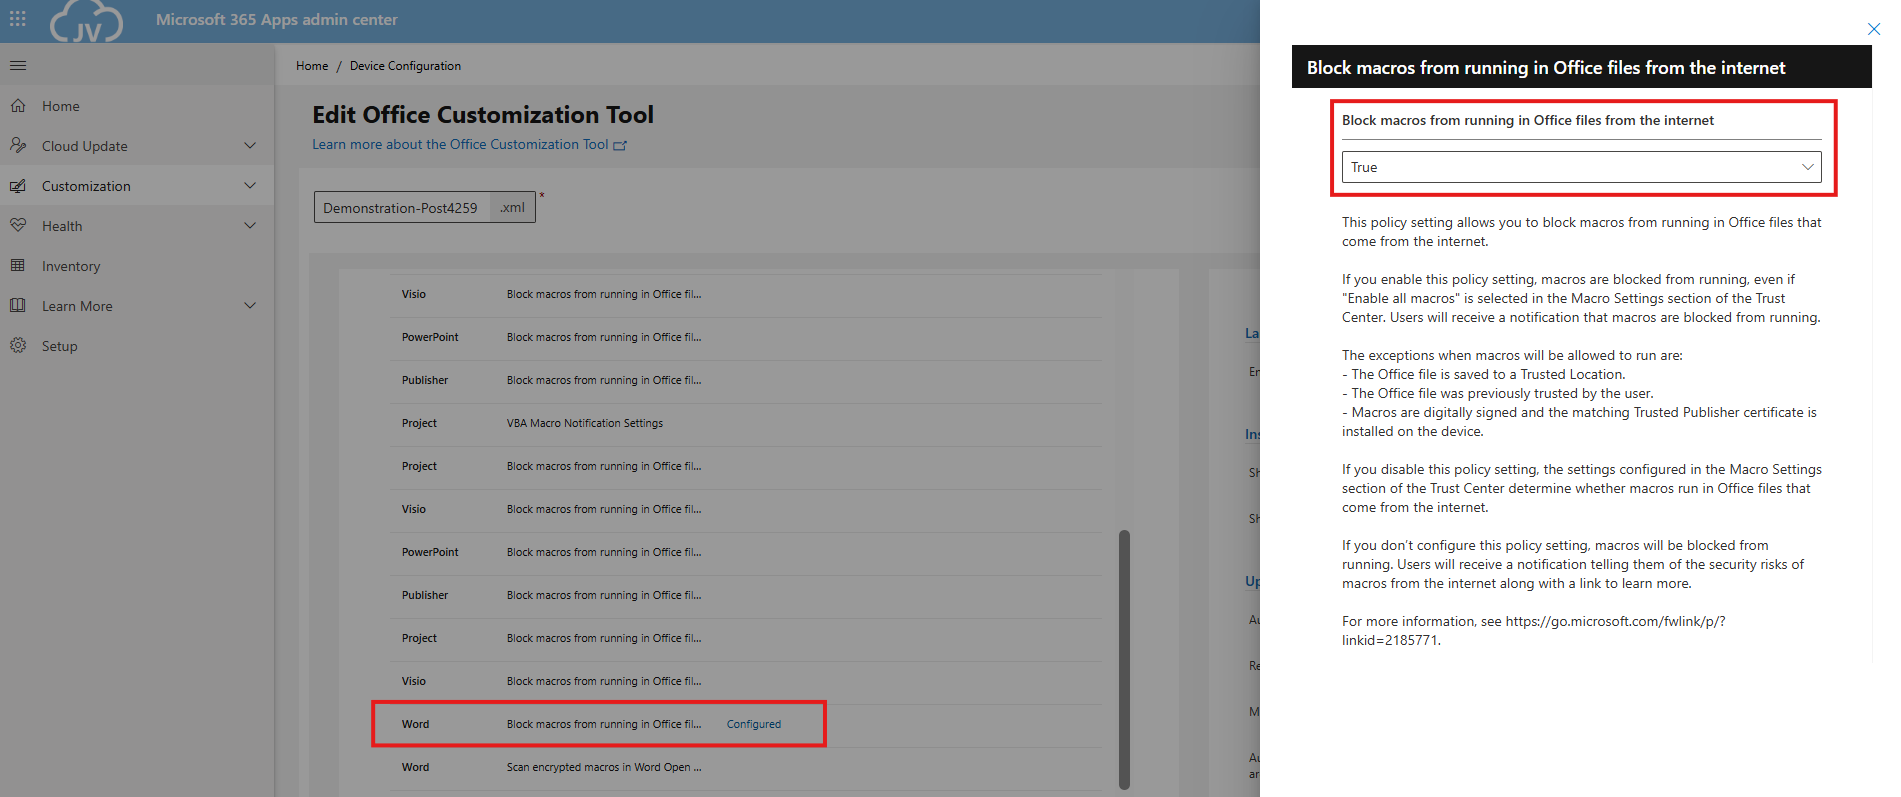
We can set the Office XML or OpenDocument setting in this configuration, as this will be asked for every new user. I am talking about this window:
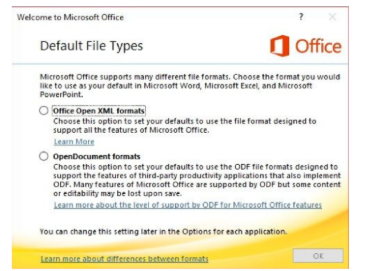
We can set this in our configured office by saving the configuration and then downloading it:

Click OK and your XML file with all customizations will be downloaded:
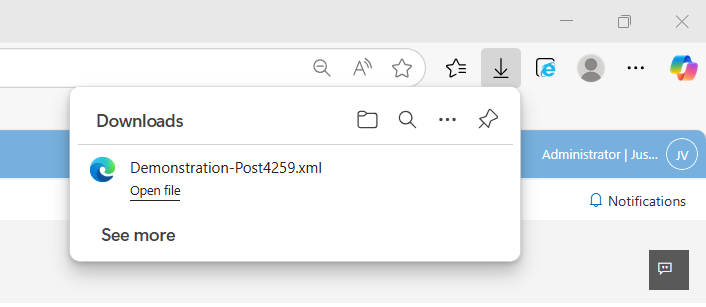
Now we can install Office with our customizations. We first need to download the Office Deployment Toolkit (ODT) from https://aka.ms/odt
After you downloaded the Office Deployment Toolkit, we end up having 2 files:
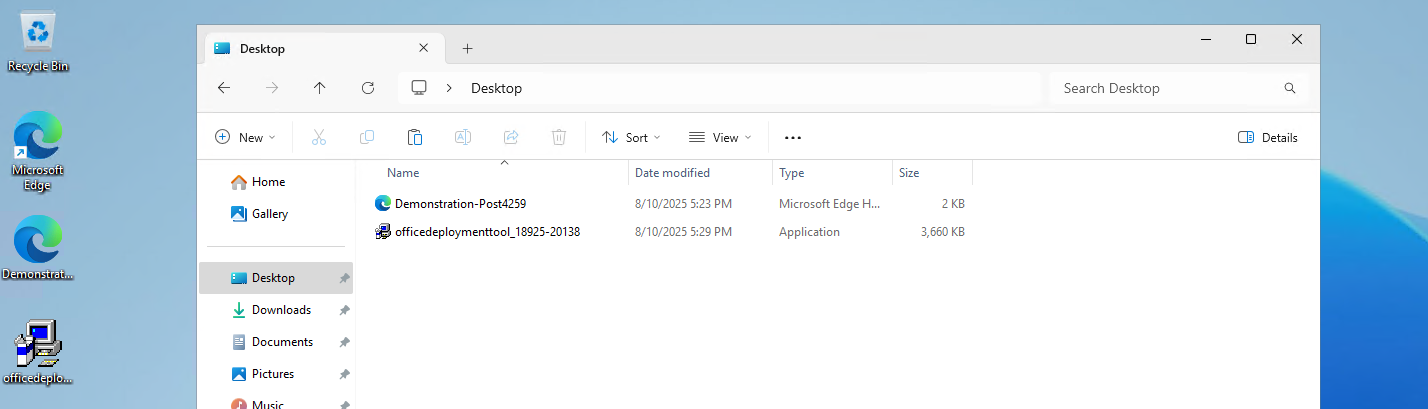
Now run the Office Deployment Toolkit and extract the files in the same folder:
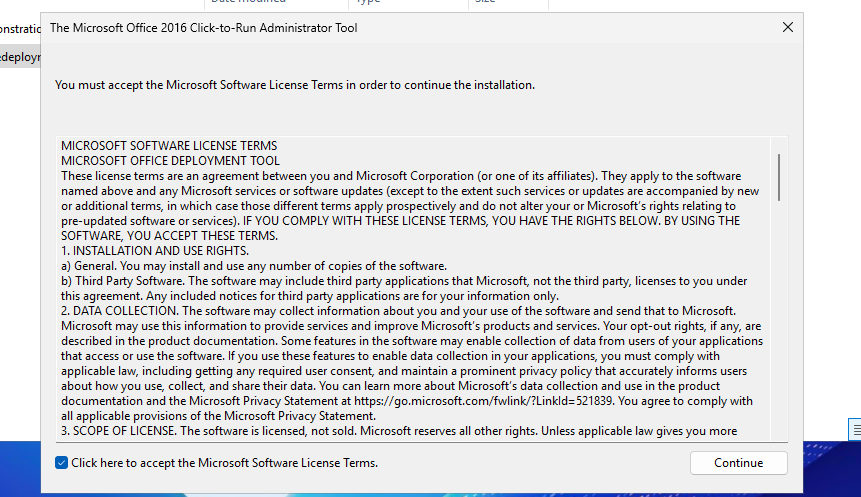
Select the folder containing your customized XML file:

Now we have around 4 files, with the official Office setup now extracted and comes with a default configuration:
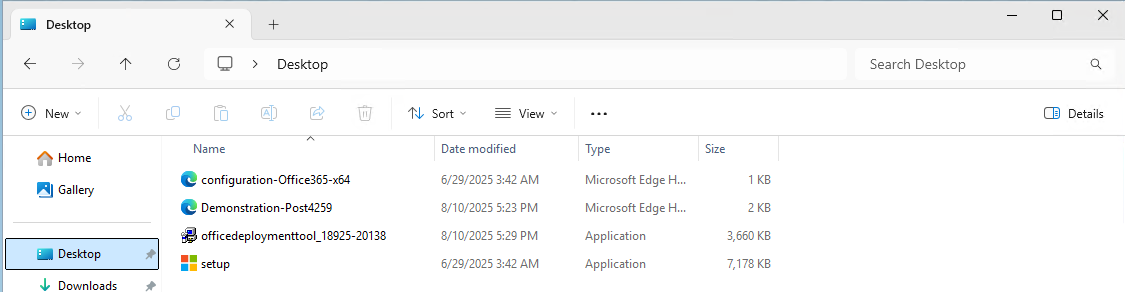
We will now execute the setup using our customized file. Don’t click on setup yet.
Click on the address bar of the File Explorer, type"cmd" and hit Enter.
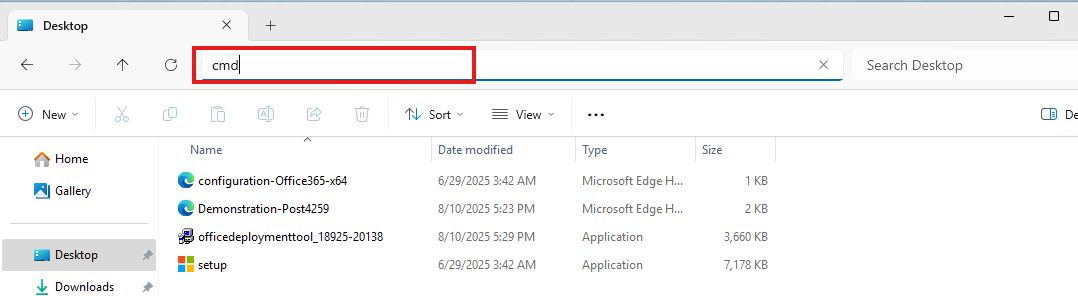
This opens CMD directly in this folder:
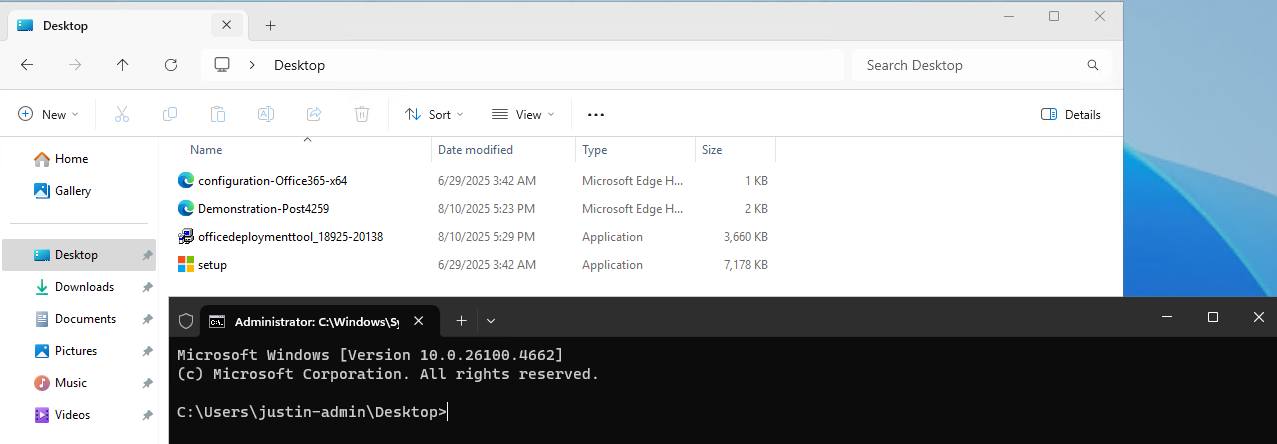
Now execute this command:
setup.exe /configure *yourcustomizedfile*.xmlAt the filename, you can use TAB to auto-complete the name. Makes it easier :)
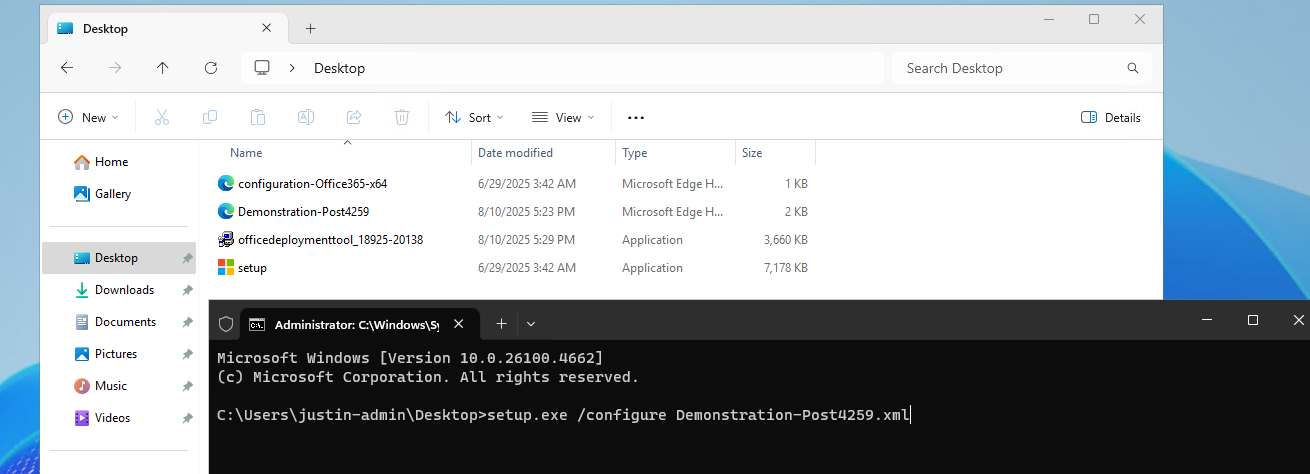
Now the setup will run and install Office applications according to your custom settings:
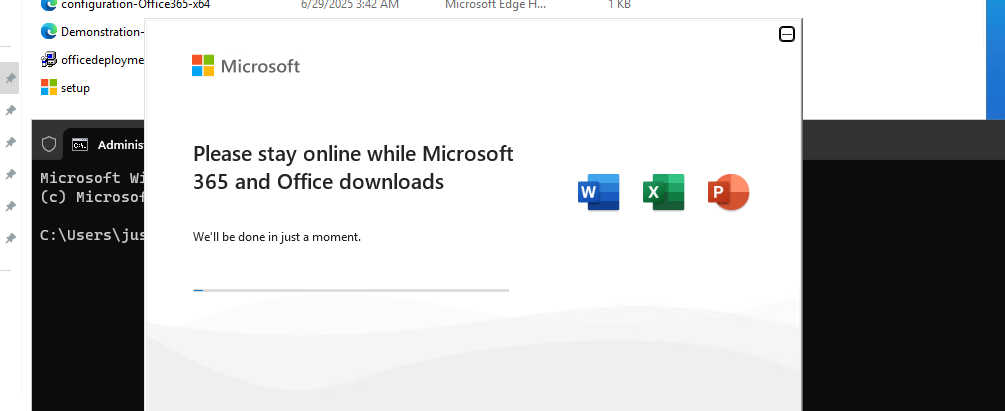
Now the installation of Office is done and I will click through the applications to check the outcome of what we have configured:
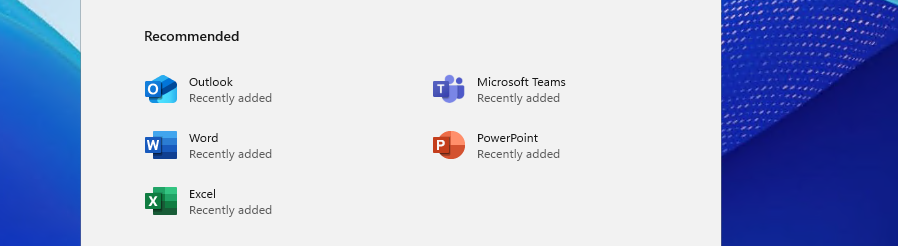

As we have Shared Computer Activation enabled, my user account needs a Microsoft 365 Business Premium or higher license to use the apps. I don’t have this at the moment so this is by design.
Learn more about the licensing requirements of Shared COmputer Activation here:
The Office Deployment Toolkit is your go-to customization toolkit for installing Office apps on Virtual Desktops. On Virtual Desktops, especially pooled/shared desktops it’s very critical that applications are as optimized as possible. Every optimization does save a few bits of compute power which will be profit for end users. And if one thing is true, nothing is as irritating as a slow computer.
Thank you for reading this guide and I hope it was helpful.
These sources helped me by writing and research for this post;
You have reached the end of the page. You can navigate through other blog posts as well, share this post on X, LinkedIn and Reddit or return to the blog posts collection page. Thank you for visiting this post.
If you think something is wrong with this post or you want to know more, you can send me a message to one of my social profiles at: https://justinverstijnen.nl/about/
If you find this page and blog very useful and you want to leave a donation, you can use the button below to buy me a beer. Hosting and maintaining a website takes a lot of time and money. Thank you in advance and cheers :)
The terms and conditions apply to this post.
Joining a storage account to Active Directory can be a hard part of configuring Azure Virtual Desktop or other components to work. We must join the storage account so we can do our Kerberos authentication against the storage account.
In this guide I will write down the most easiest way with the least effort of performing this action.
We must first prepare our server. This must be a domain-joined server, but preferably not a domain controller. Use a management server instead when possible. We must execute
The server must have the following software installed:
You can install the Azure PowerShell module by executing this command:
Install-Module -Name Az -Repository PSGallery -Scope CurrentUser -ForceYou can install the Azure Storage PowerShell module by executing this command:
Install-Module -Name Az.Storage -Repository PSGallery -Scope CurrentUser -ForceNow the server is prepared for installing the AZFilesHybrid Powershell module.
We must now install the AzFilesHybrid PowerShell module. We can download the files from the Github repository of Microsoft: https://github.com/Azure-Samples/azure-files-samples/releases

Download the ZIP file and extract this on a location on your Active Directory management server.
Now open the PowerShell ISE application on your server as administrator.
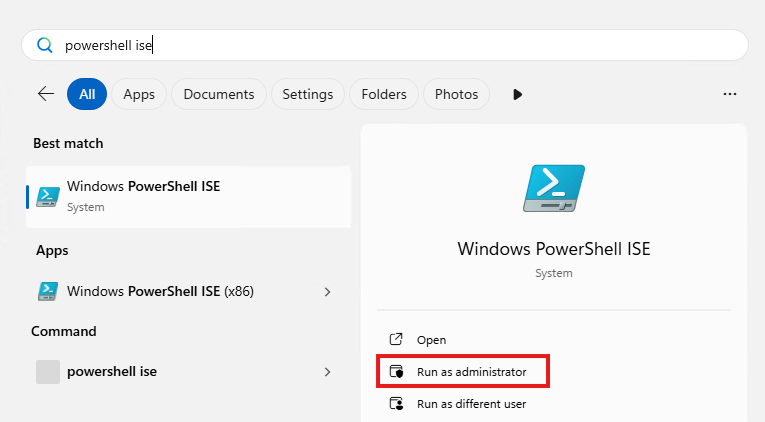
Then give consent to User Account Control to open the program.
Navigate to the folder where your files are stored, right-click the folder and click on “Copy as path”:
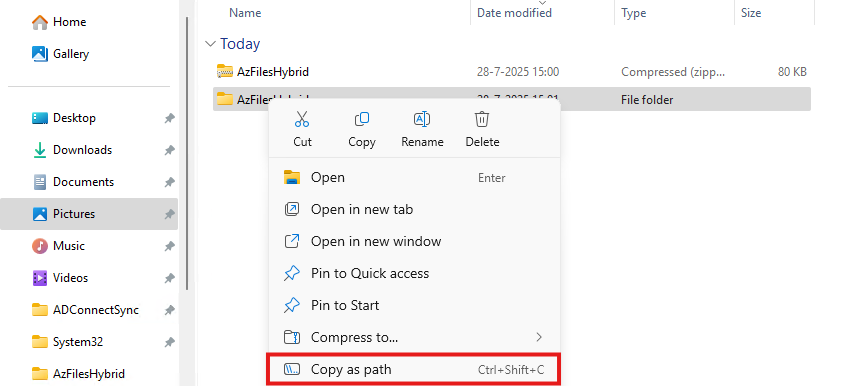
Now go back to PowerShell ISE and type “cd” followed by a space and paste your script path.
cd "C:\Users\justin-admin\Downloads\AzFilesHybrid"This will directly navigate PowerShell to the module folder itself so we can execute each command.
Now copy the whole script block of the Microsoft Webpage or the altered and updated script block below and paste this into PowerShell ISE. We have to change the values before running this script. Change the values on line 9, 10, 11, 12 and 14.
Set-ExecutionPolicy -ExecutionPolicy Unrestricted -Scope Process

.\CopyToPSPath.ps1

Import-Module -Name AzFilesHybrid

Connect-AzAccount -DeviceCode

$SubscriptionId =     "<your-subscription-id-here>"
$ResourceGroupName =  "<resource-group-name-here>"
$StorageAccountName = "<storage-account-name-here>"
$SamAccountName =     "<sam-account-name-here>"
$DomainAccountType =  "ComputerAccount"
$OuDistinguishedName = "<ou-distinguishedname-here>"

Select-AzSubscription -SubscriptionId $SubscriptionId

Join-AzStorageAccount `
        -ResourceGroupName $ResourceGroupName `
        -StorageAccountName $StorageAccountName `
        -SamAccountName $SamAccountName `
        -DomainAccountType $DomainAccountType `
        -OrganizationalUnitDistinguishedName $OuDistinguishedName

Debug-AzStorageAccountAuth -StorageAccountName $StorageAccountName -ResourceGroupName $ResourceGroupName -VerboseAfter running this script with the right information, you will be prompted with a device login. Go to the link in a browser, login with a Entra ID Administrator account and fill in the code.

Now the storage account will be visible in your Active Directory.
After step 3, we will see the outcome of the script in the Azure Portal. The identity-based access is now configured.

Click on the Security button:

Set this to “Maximum security” and save the options.
Ensure that the user(s) or groups you want to give access to the share have the role assignment “Storage File Data SMB Share Contributor”. This will give read/write NTFS access to the storage account. Now wait for around 10 minutes to let the permissions propagate.
Now test the access from File Explorer:
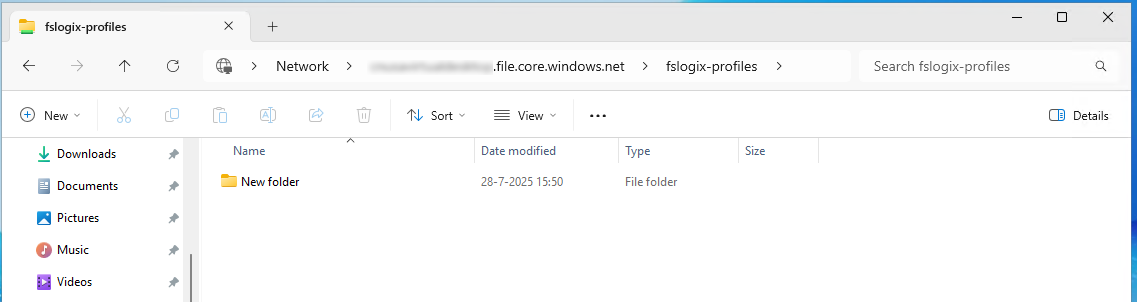
This works and we can create a folder, so have also write access.
This process we have to do sometimes when building an environment but most of the times, something doesn’t work, or we don’t have the modules ready, or the permissions were not right. Therefore I have decided to write this post to make this process as easy as possible while minimizing problems.
Thank you for reading this post and I hope it was helpful.
These sources helped me by writing and research for this post;
You have reached the end of the page. You can navigate through other blog posts as well, share this post on X, LinkedIn and Reddit or return to the blog posts collection page. Thank you for visiting this post.
If you think something is wrong with this post or you want to know more, you can send me a message to one of my social profiles at: https://justinverstijnen.nl/about/
If you find this page and blog very useful and you want to leave a donation, you can use the button below to buy me a beer. Hosting and maintaining a website takes a lot of time and money. Thank you in advance and cheers :)
The terms and conditions apply to this post.
Today I have a Logic App for you to clean up orphaned FSLogix profiles with Logic Apps. As you know, storage in Azure costs money and we want to store as minimum as possible. But in most companies, old and orphaned FSLogix profiles will be forgotten to clean up so we have automate this.
In this guide I will show you how you can clean up FSLogix profiles from Azure Files by looking up the last modified date, and deleting the files after they exceeded the number of days.
I will give you a step-by-step guide to build this Logic App yourself.
Make sure you have backups ofenabled on your storage account so when a file is deleted but you need it for some reason after some time, you can restore it from a monthly or yearly backup.
Also: Recover Services storage is much cheaper than live Storage Account storage, keep this in mind when implementing this sort of Logic Apps.
For the fast pass, you can download the Logic App JSON code here:
Then you can use the code to configure it completely and only change the connections.
The logic app looks like this:
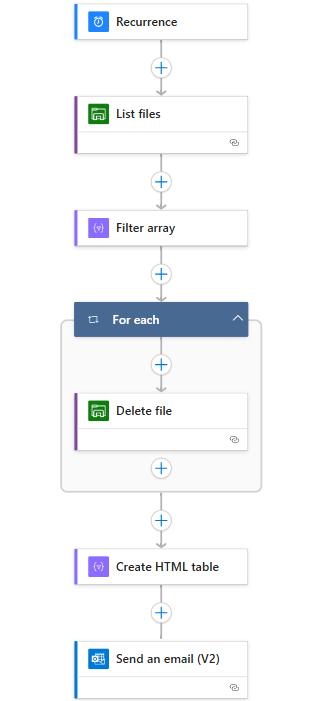
Recurrence: This is the trigger for the Logic App, and determines when it should run.
List Files: This connects to the storage account (using Storage Access Key) and folder and gets all file data.
Filter Array: Here the filtering on the last modified time/date takes place.
For Each -> Delete file: For each file that is longer than your stated last change date in the “Filter Array” step, deletes the file.
Create HTML template: Formats each file into a HTML template prior for sending via email.
Send an email: Sends an email of all the profiles which were deleted by the script for monitoring purposes.
This is a relatively simple 6-step logic app where the last 2 are optional. If you don’t want to receive email, it would be 4 steps and done after the for each -> Delete file step.
The Logic App monitors this date in the Azure Portal:
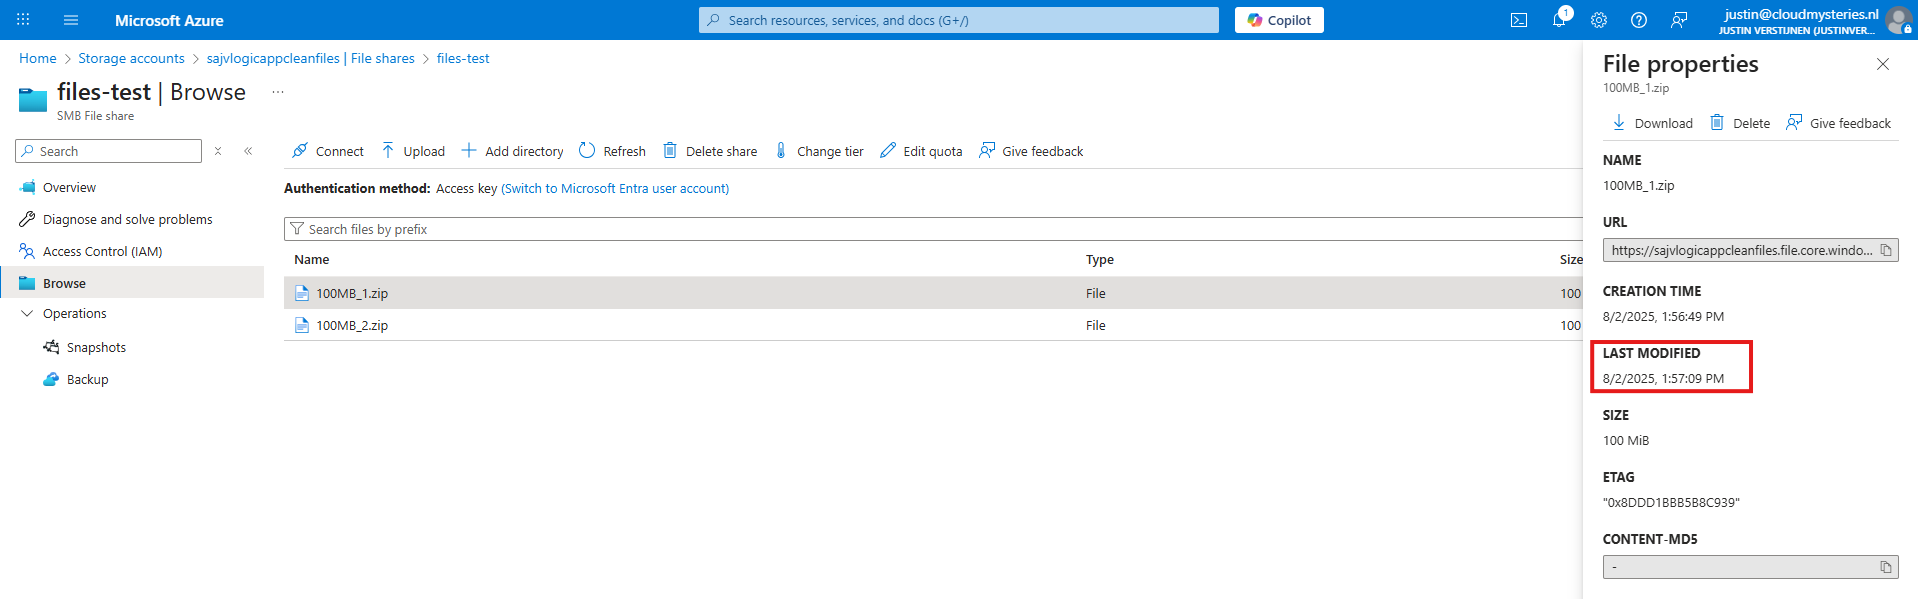
Not the NTFS last modified date which you will find in Windows:
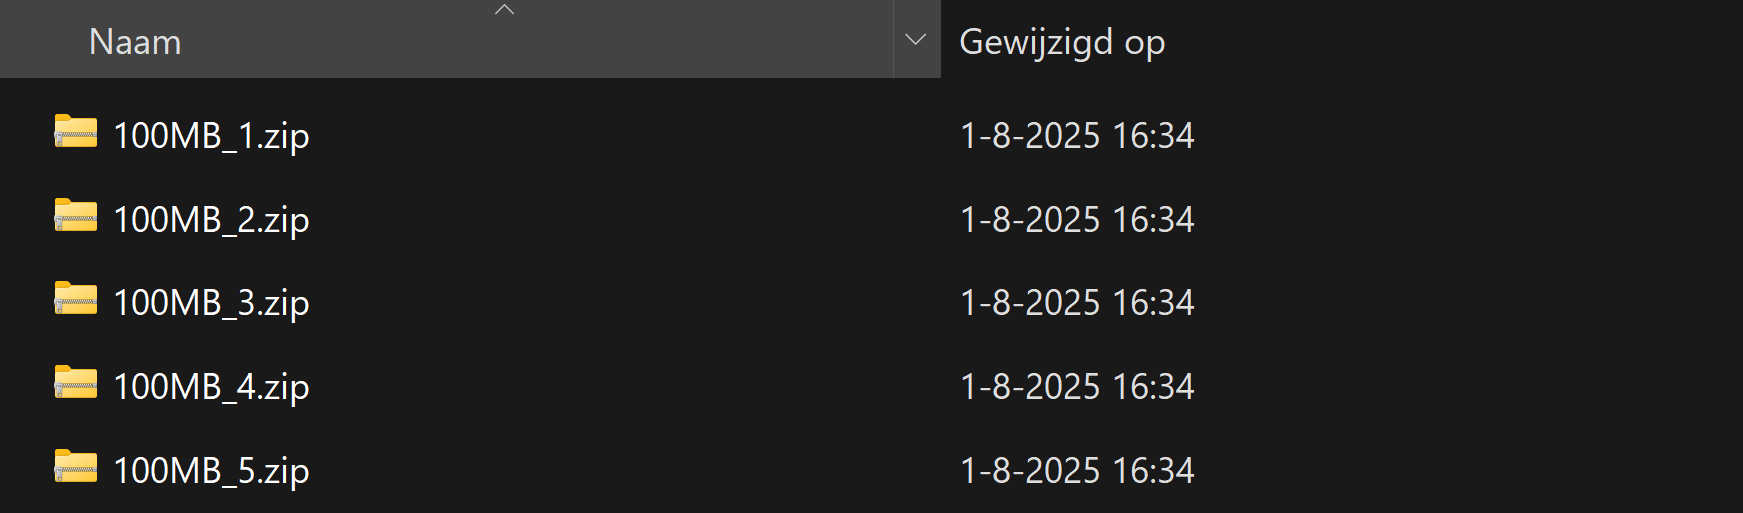
Now we will configure this Logic App step-by step to configure it like I have done.
Start by creating a new Logic App in the Azure Portal. Choose the “Multi-tenant” option for the most cost-effective plan:
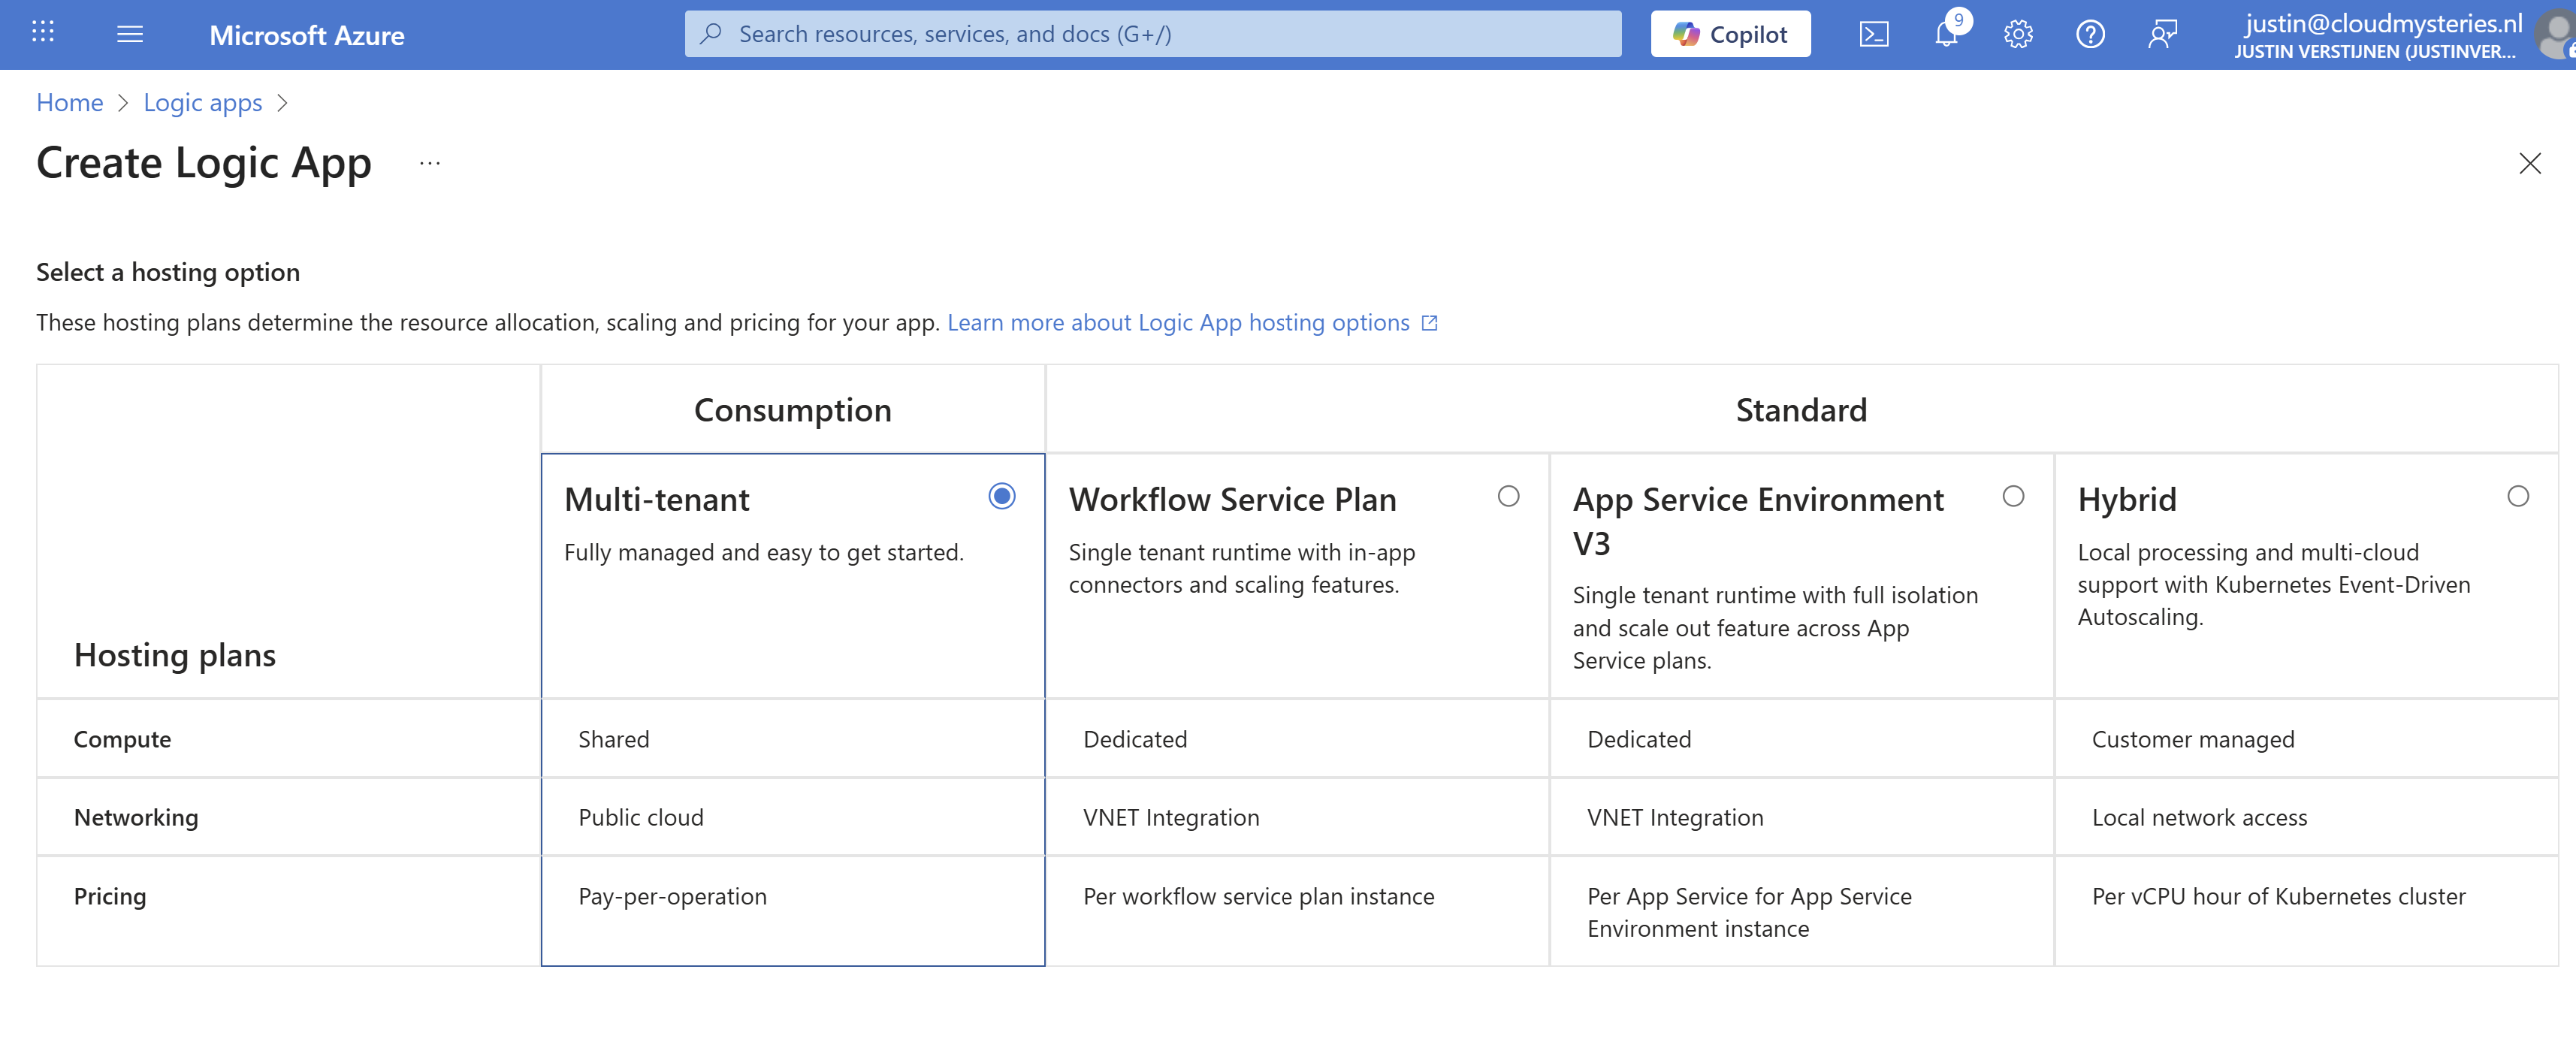
Advance.
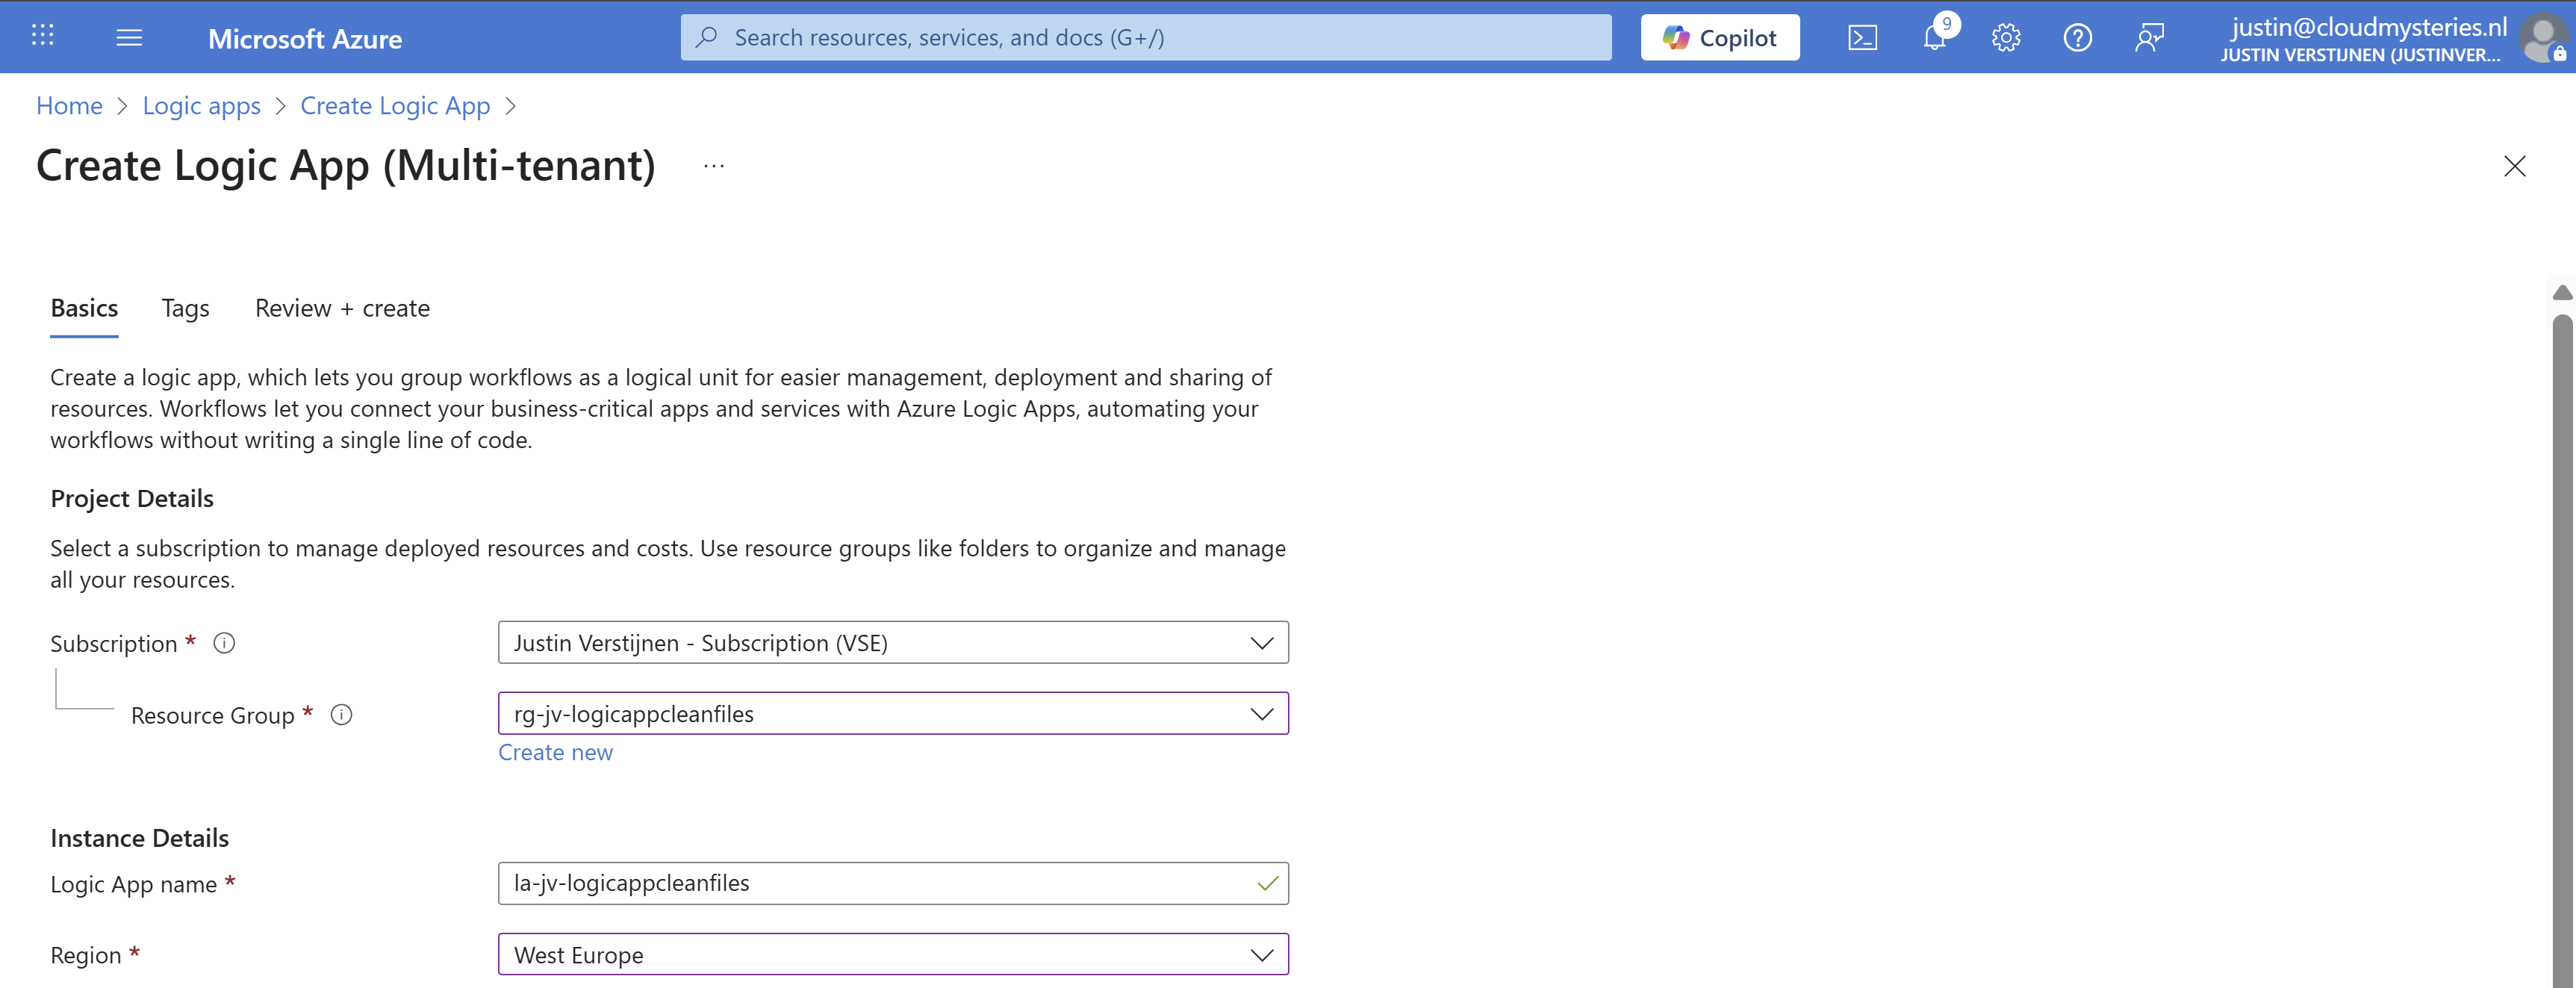
Select the right resource group, give it a name and select the right region. Then advance to the last page and create the Logic App.
Now that we have the Logic App, we must now configure the trigger. This states when the Logic App will run.
Open the Logic App designer, and click the “Add a trigger” button.
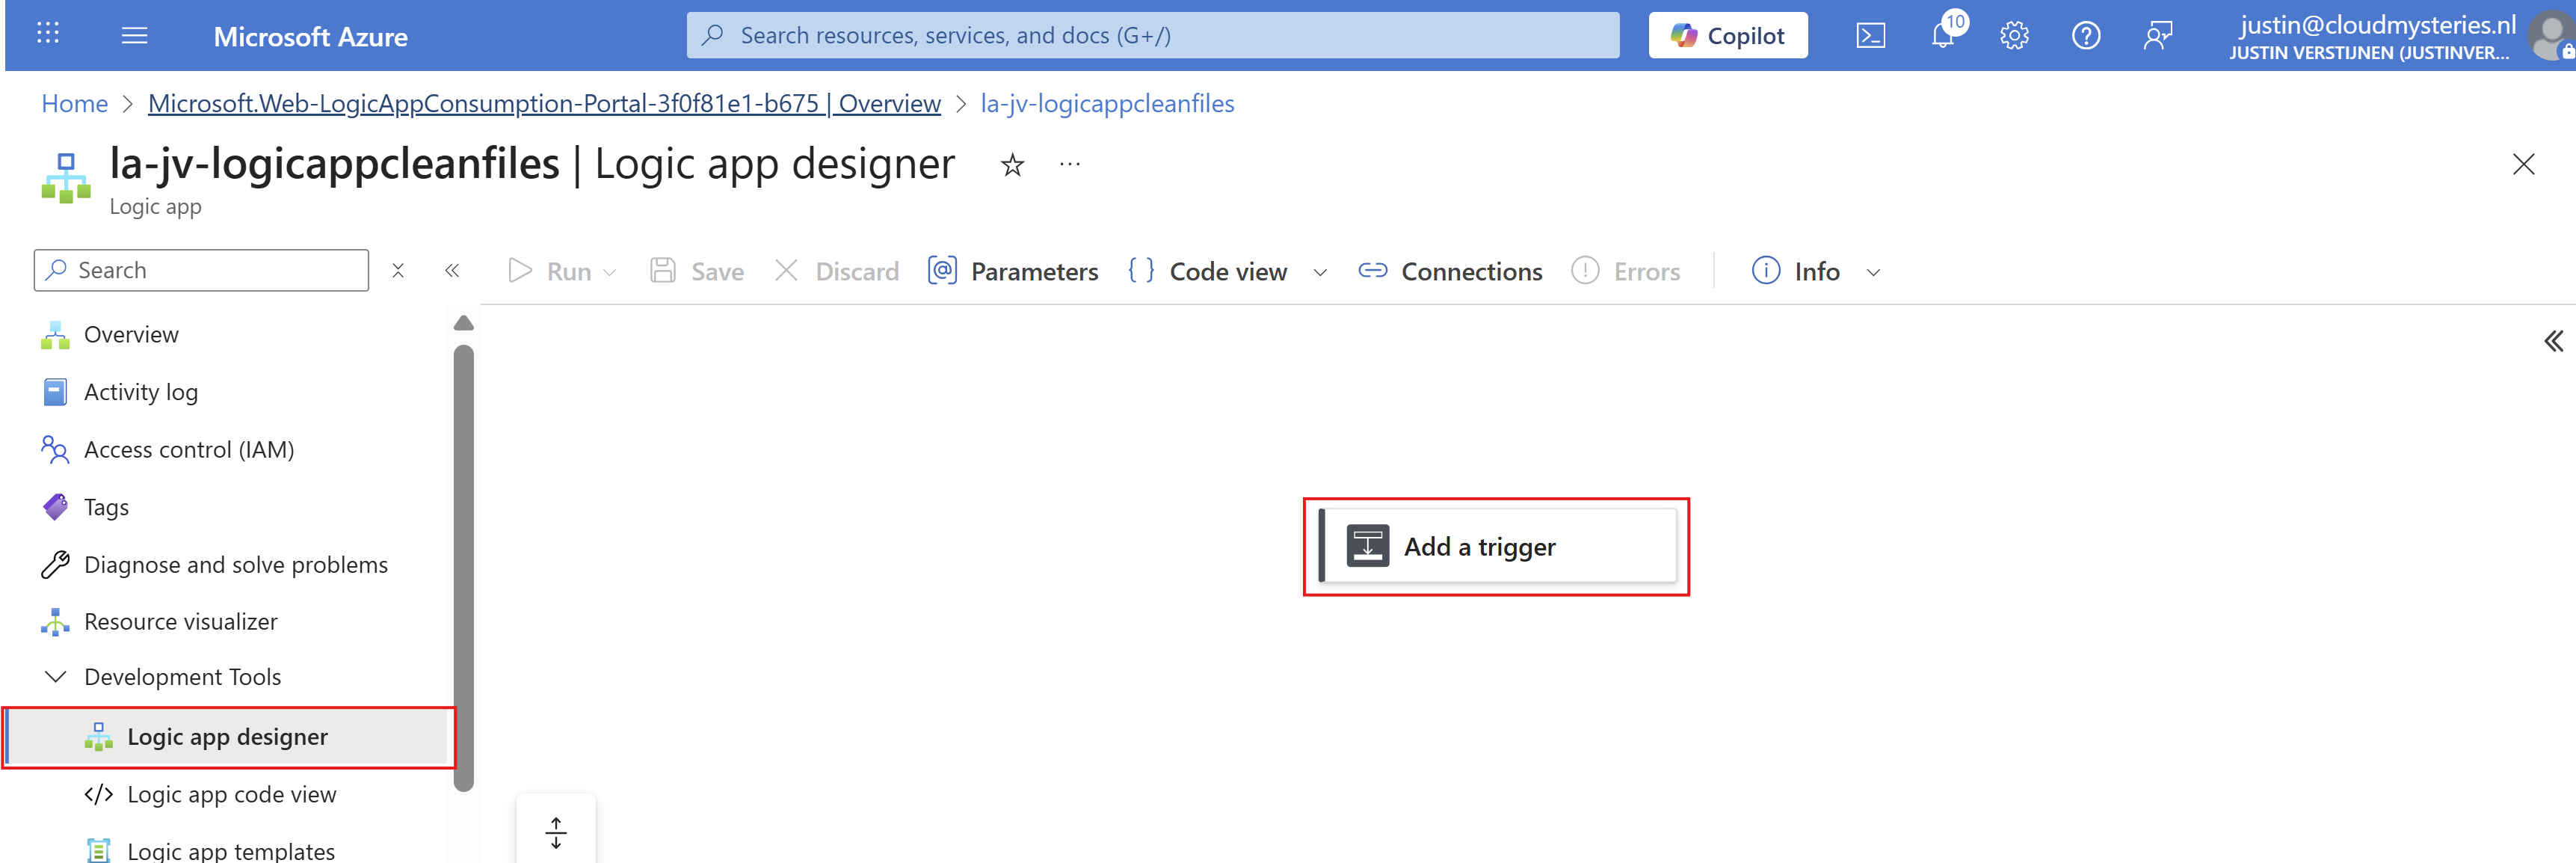
Search for “Recurrence” and select it.
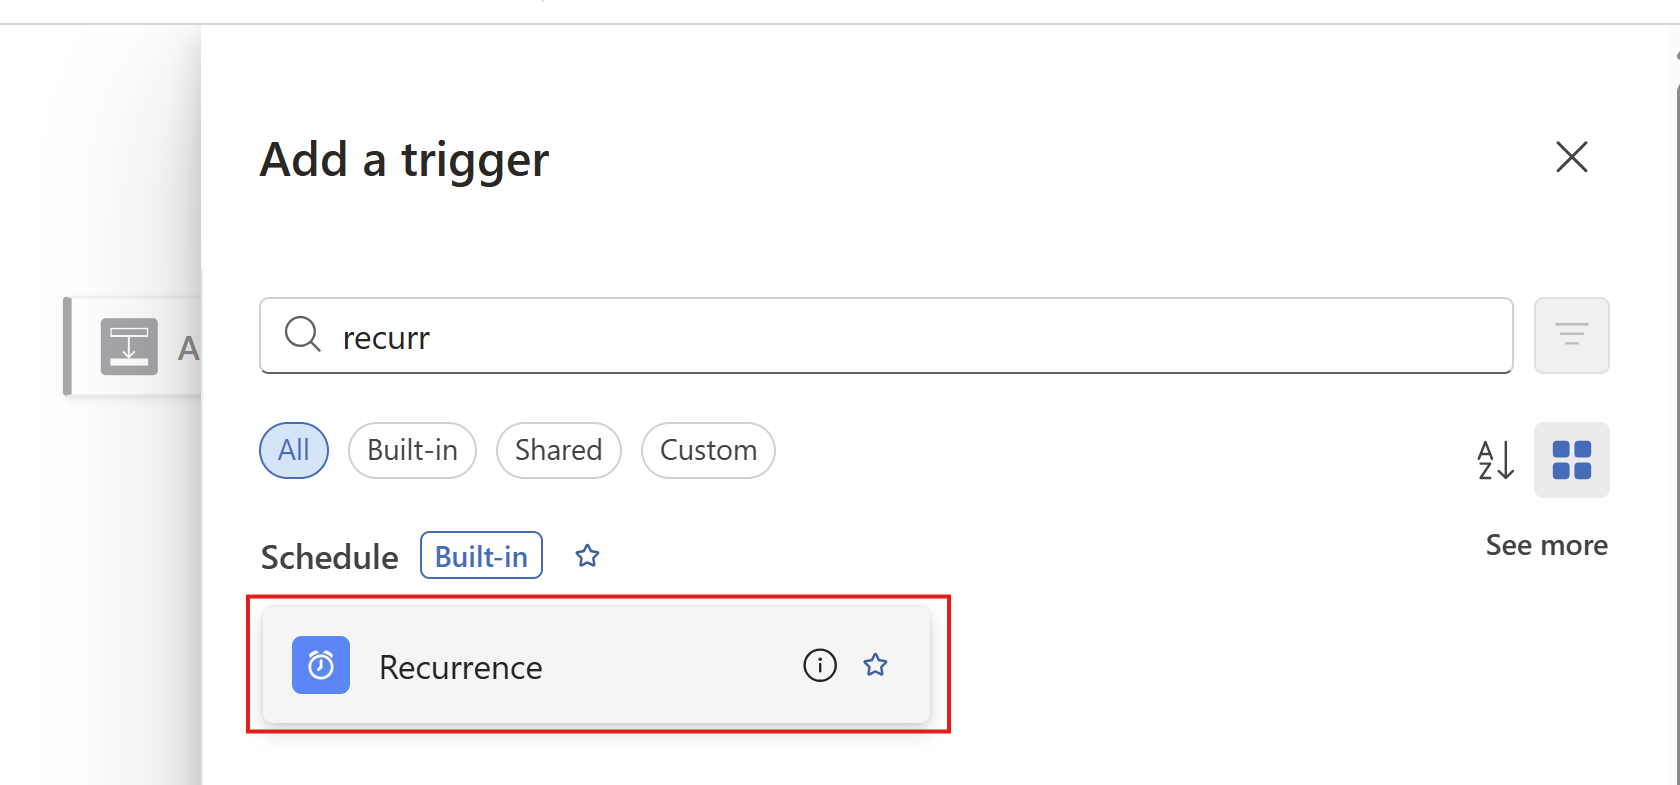
Then configure when the Logic App must run. In my example, I configured it to run every day on 00:00.
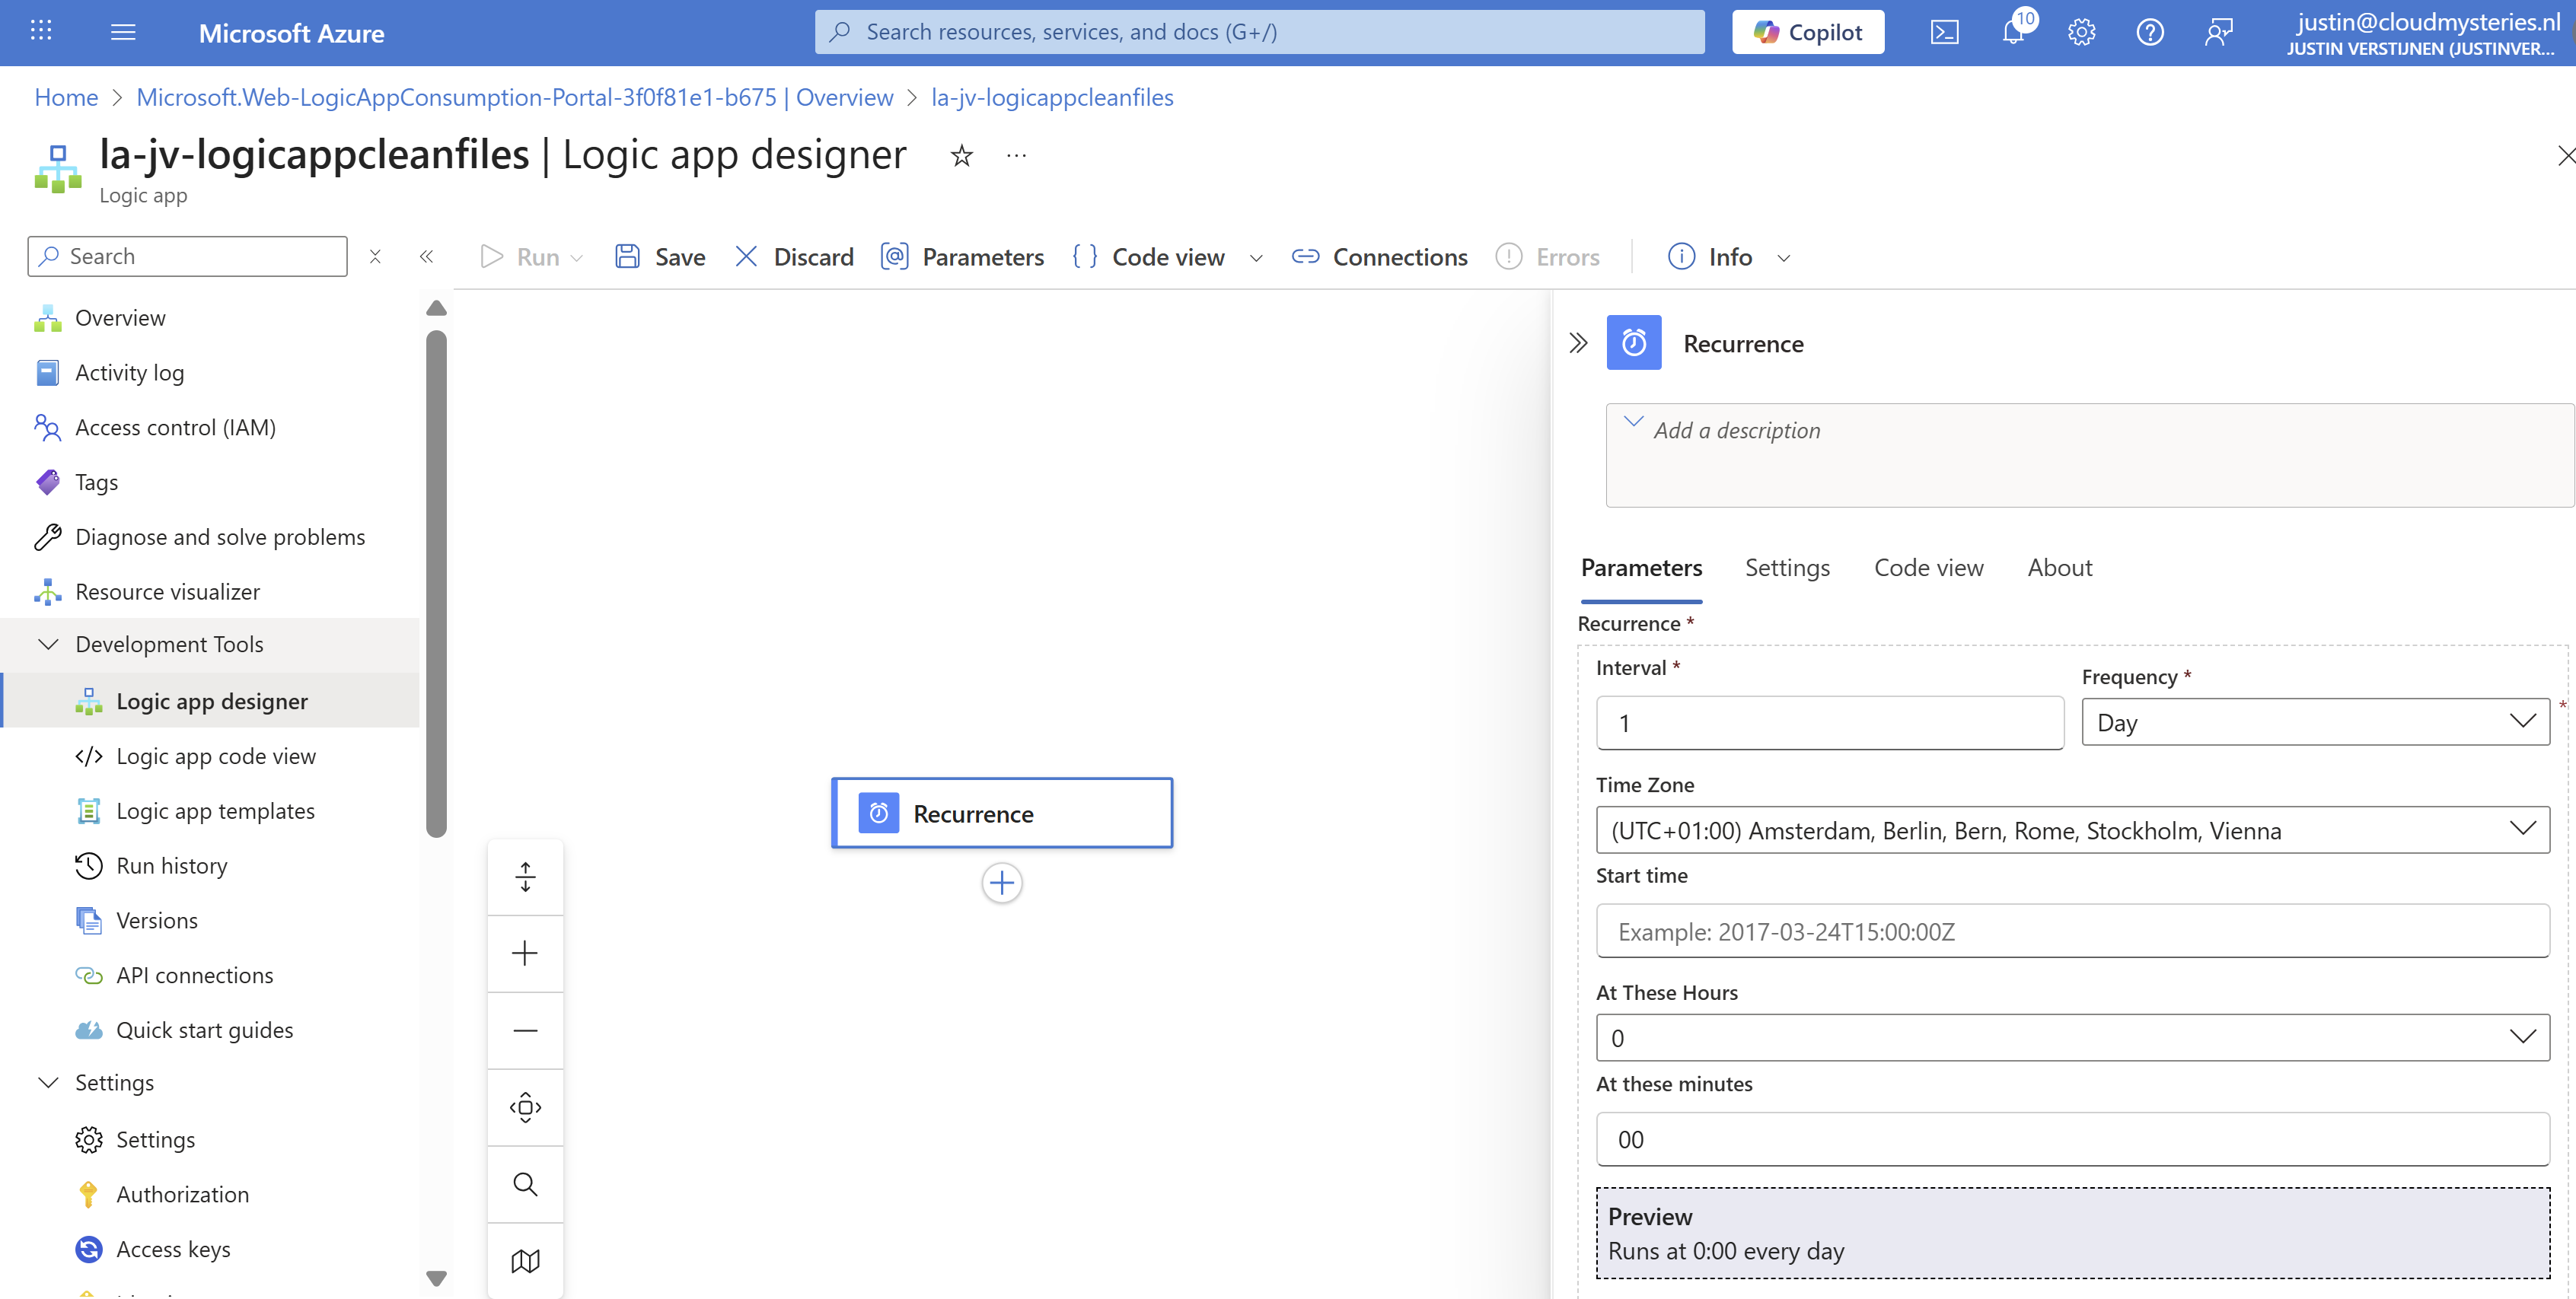
Then save the Logic App.
Now we have to configure the step to connect the Logic App to the Azure Files share and configure the list action.
Add a step under “Recurrence” by clicking the “+” button:
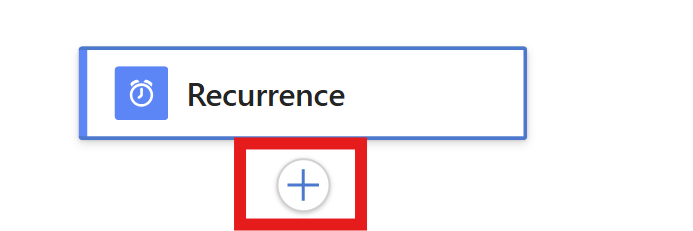
And then click “Add an action”. Then search for “List Files” of the Azure File Storage connector. Make sure to choose the right one:

Click the “List Files” button to add the connector and configure it. We now must configure 3 fields:
This must look like this:
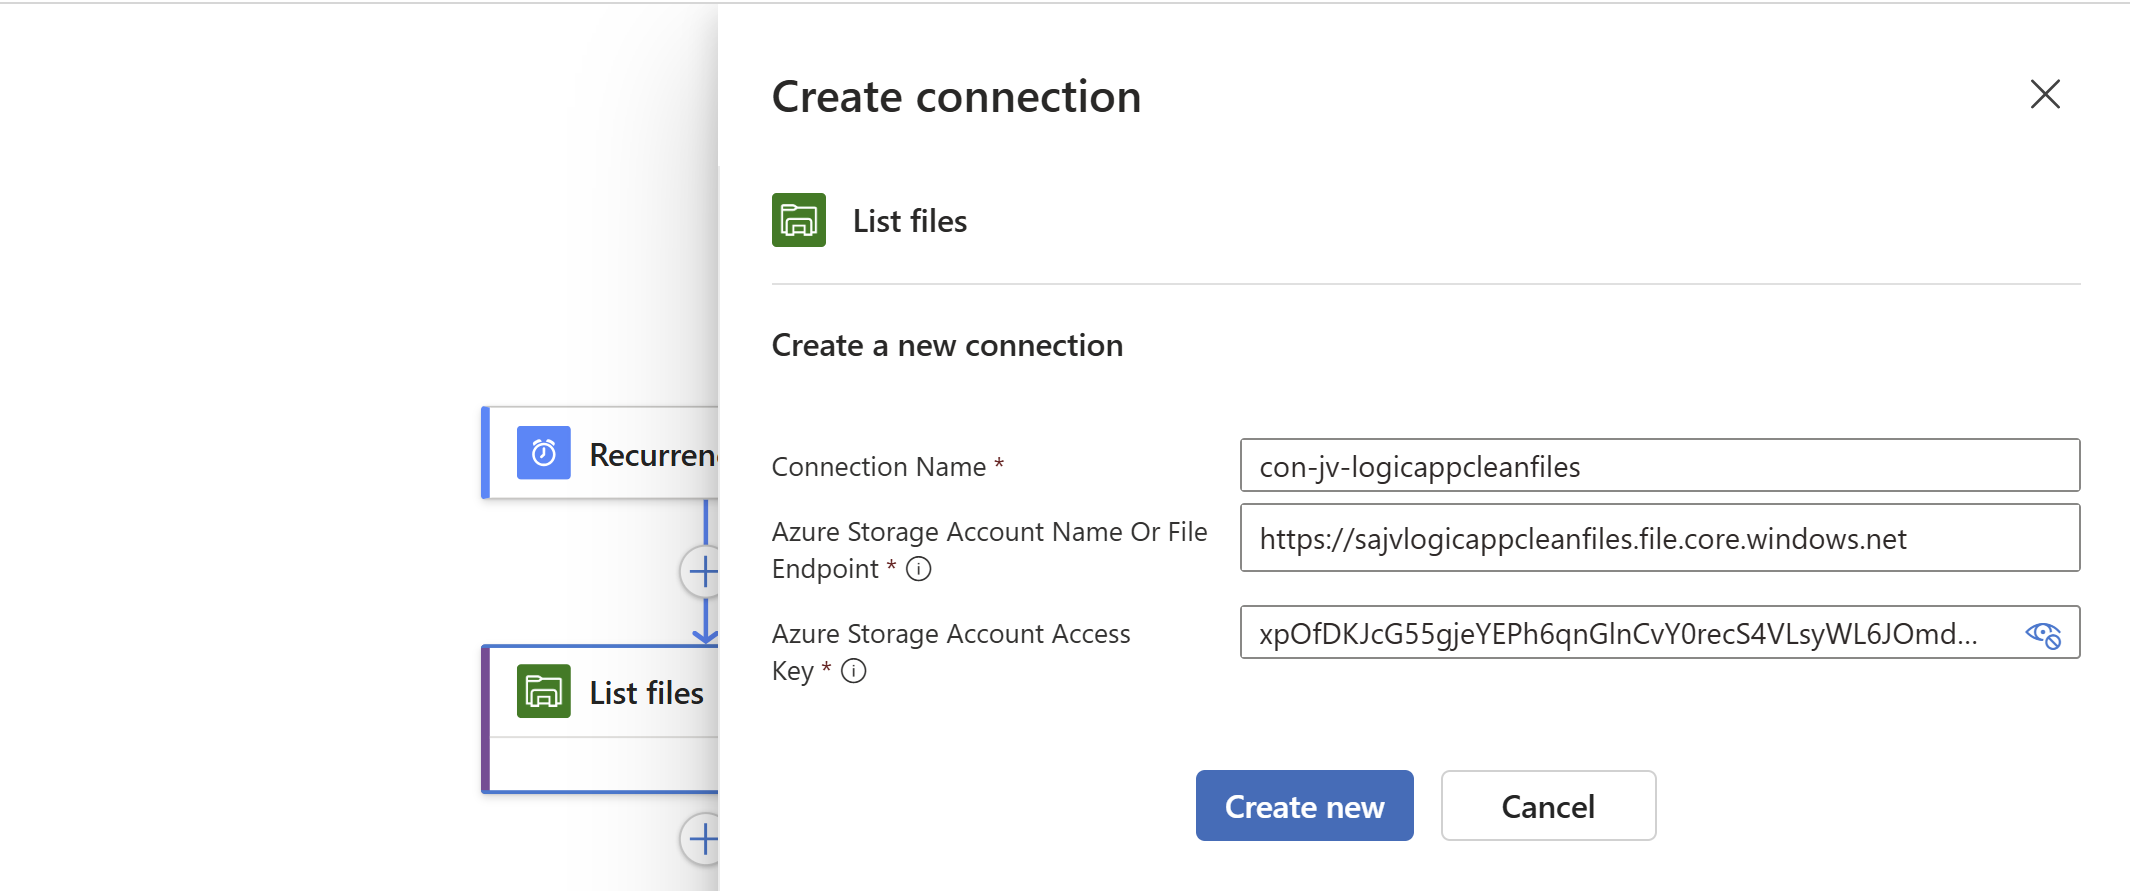
Click on “Create new” to create the connection. Because we now have access to the storage account we can select the right folder on the share:
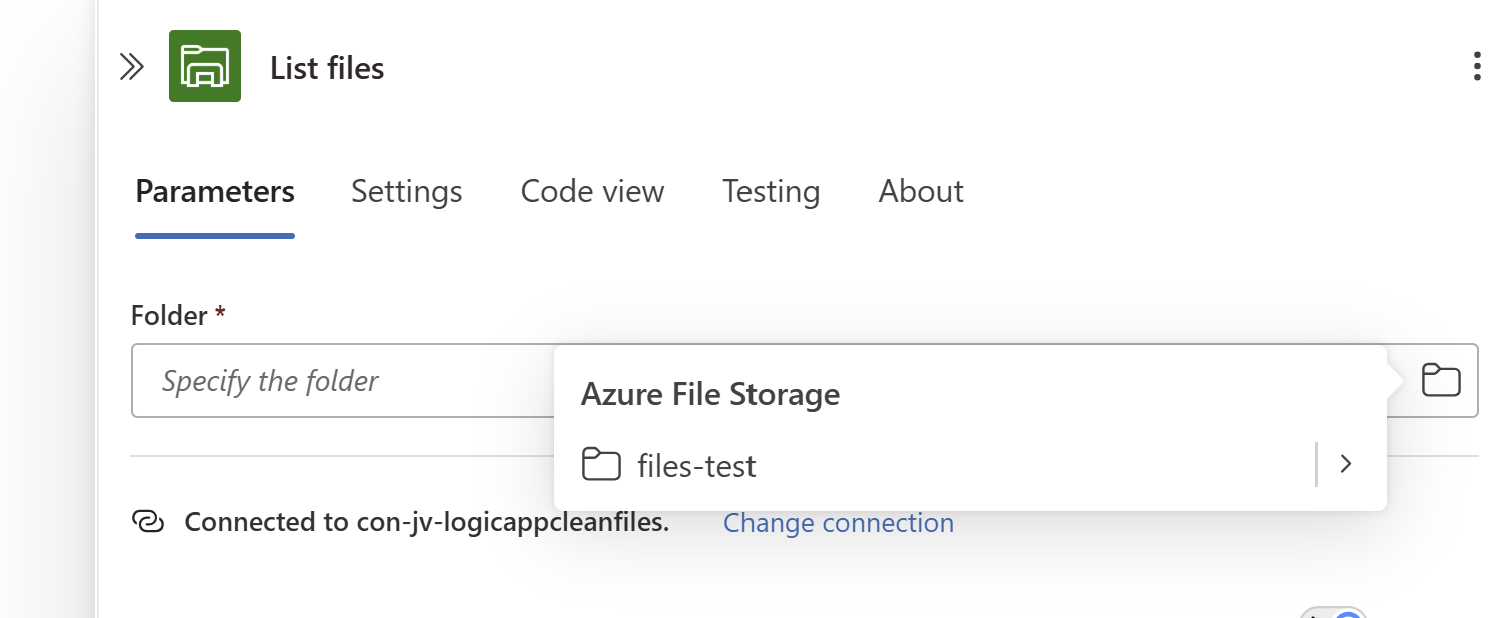
Save the Logic App.
We have to add another step under the “List Files” step, called a “Filter Array”. This checks all files from the previous step and filters only the files that are older than your rule.
Add a “Filter Array” step from the “Data operations” connector:
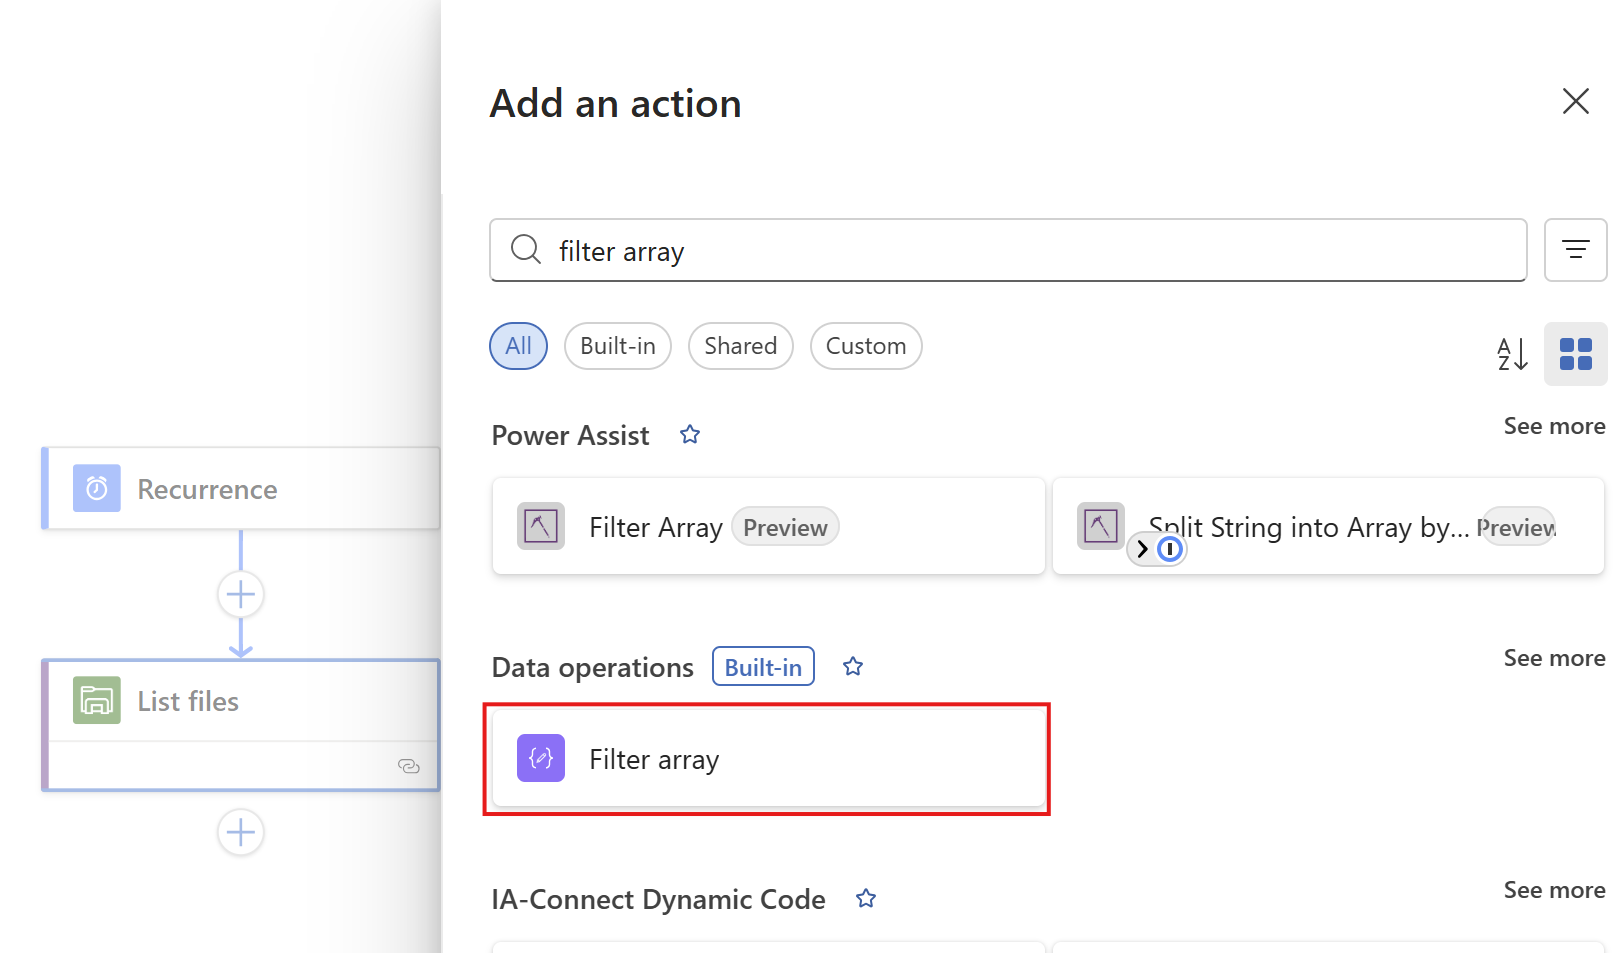
At the “From” field, click on the thunder button to add a dynamic content

And pick the “value” content of the “List Files” step.
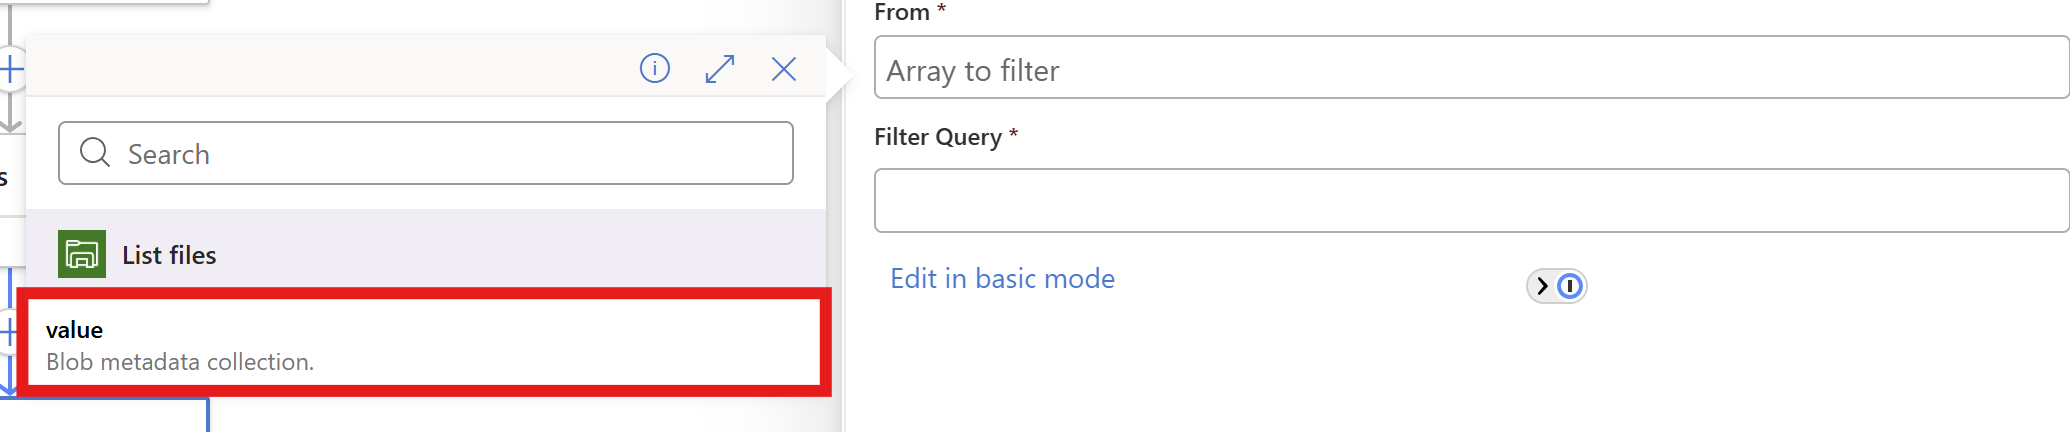
In the “Filter query” field, make sure you are in the advanced mode through the button below and paste this line:
@lessOrEquals(item()?['LastModified'], addDays(utcNow(), -180))You can change the retention by changing the 180 number. This is the amount of days.
You could also use minutes for testing purposes which I do in my demonstration:
@lessOrEquals(item()?['LastModified'], addMinutes(utcNow(), -30))This will only keep files mofidied within 30 minutes from execution. It’s up to you what you use. You can always change this and ensure you have good backups.
After pasting, it will automatically format the field:

Save the Logic App.
Now we have to add the step that deletes the files. Add the “Delete file” action from the Azure File Storage connector.
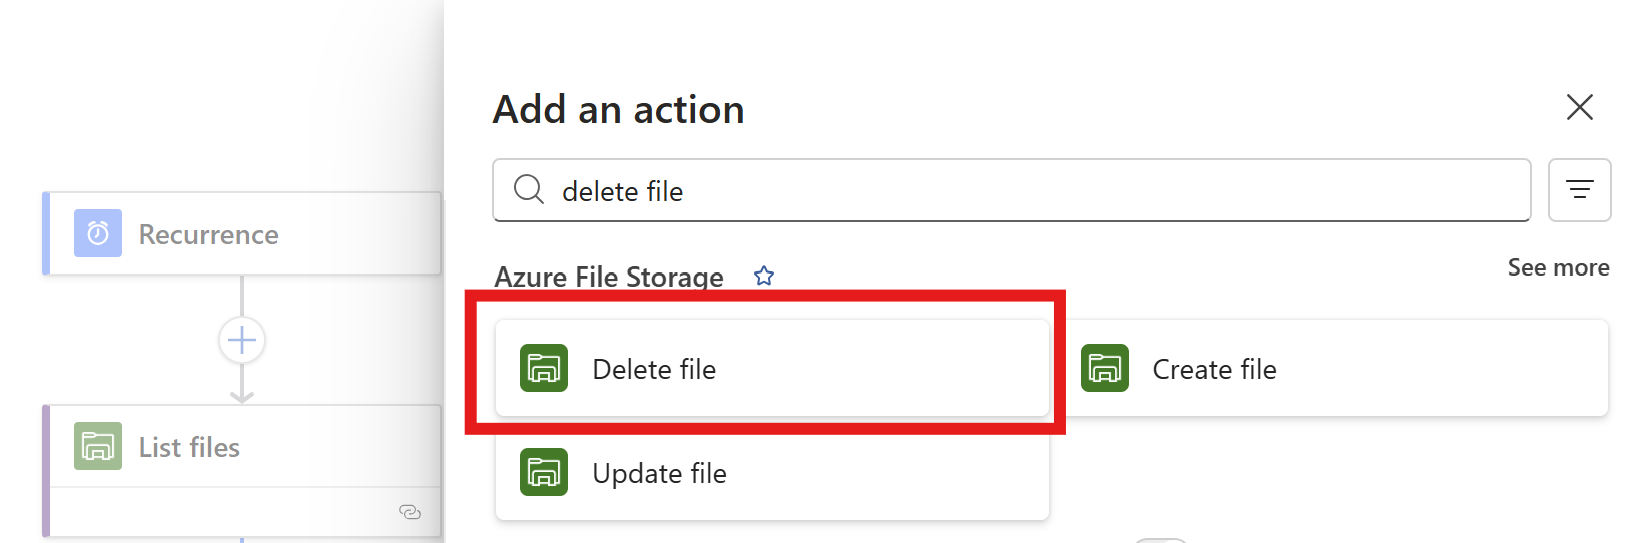
Click the “Delete files” option.
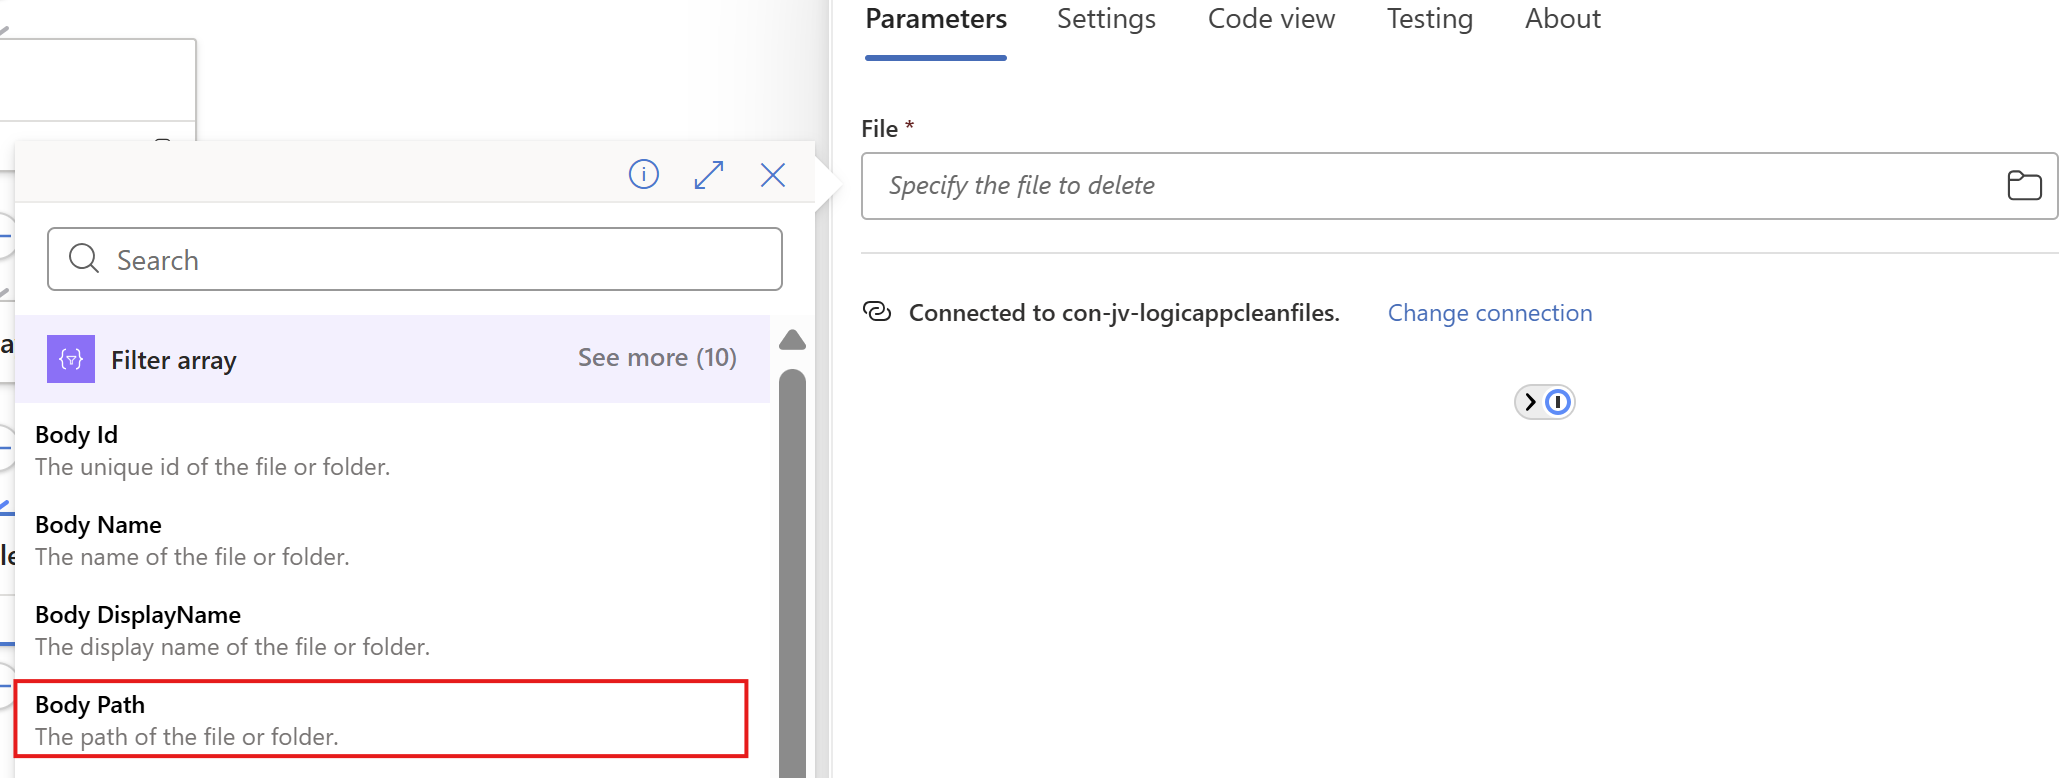
Now on the “File” field, again click on the thunder icon to add dynamic content and add the “Body Path” option of the “Filter Array” step.
Make sure you select the Filter Array step, as other steps might delete ALL files.
This automatically transforms the “Delete files” step into a loop where it performs the action for all filtered files in the “Filter Array” step.
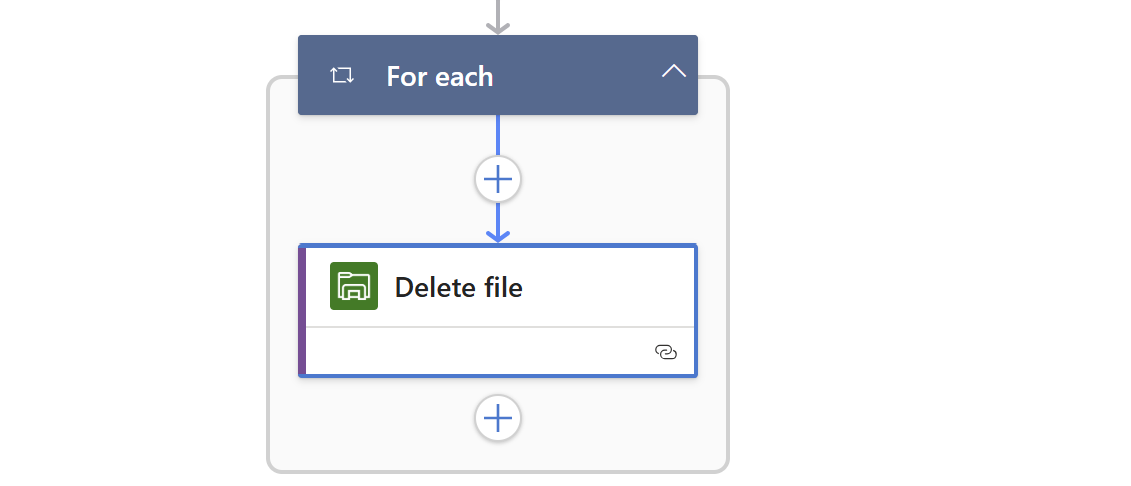
Save the Logic App.
We can now, if you want to receive reports of the files being deleted, add another step to transform the list of files deleted into a table. This is a preparation step for sending it through email.
Add a step called “Create HTML table” from the Data operations connector.
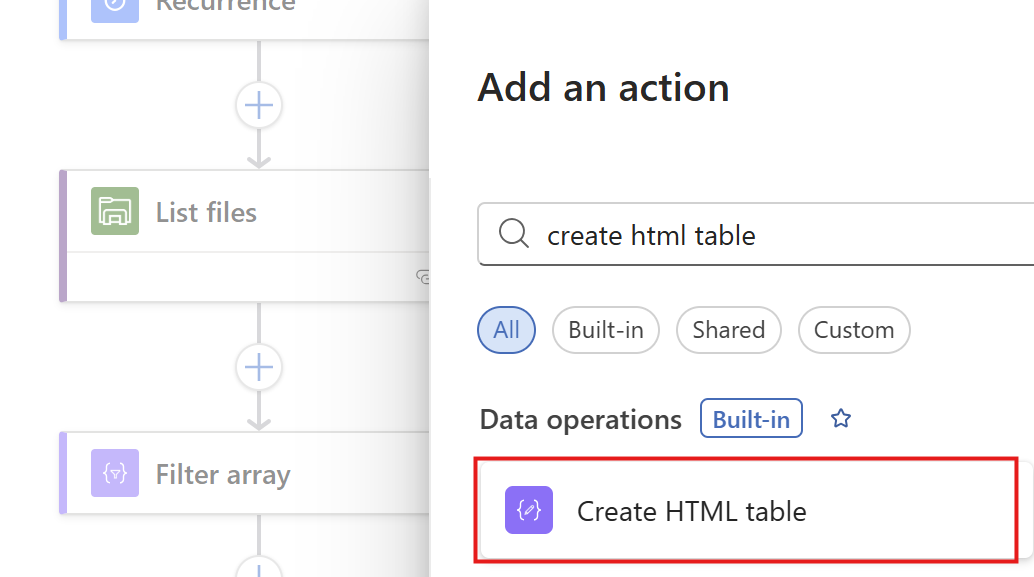
Then we have to format our table:
On the “From” field, again click the thunder icon to select dynamic content:
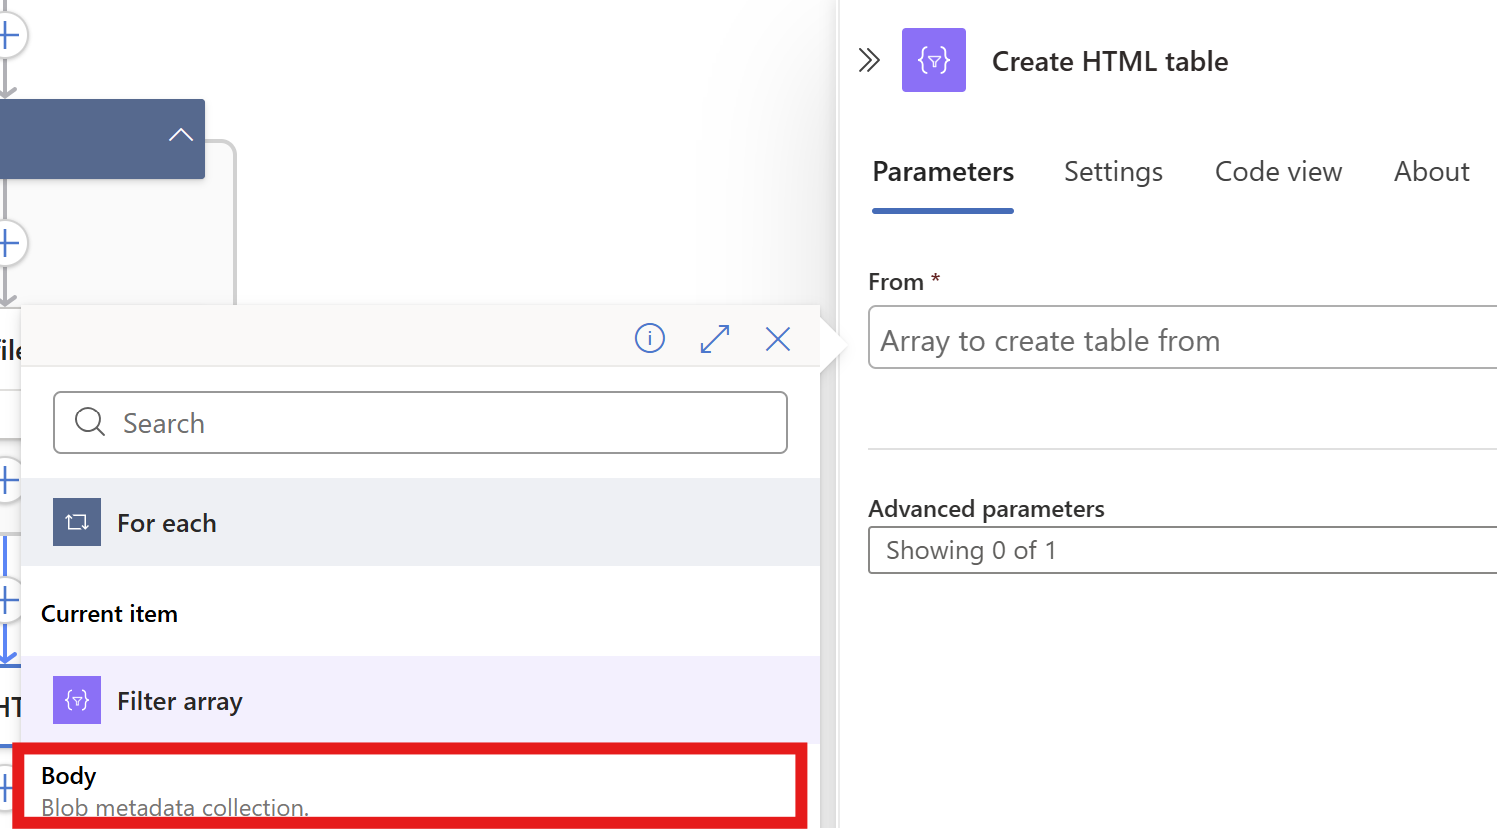
From the “Filter Array” step, select the Body content. Then on the “Advanced Parameters” drop down menu, select “Columns”. And after that on the “Columns” drop down menu, select “Custom”:
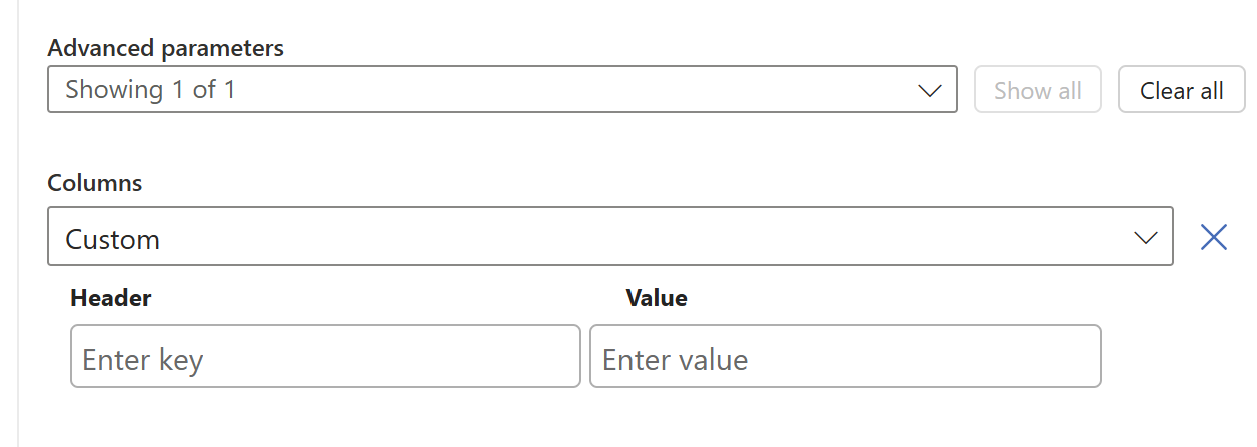
We now have to add 2 columns and configure in the information the Logic App needs to fill in.
Paste these 2 lines in the “Header” fiels:
And in the “Value” field, click the thunder icon for dynamic content and select the “Body Name” and “Body Last Modified” information from the “Filter Array” step.
This must look like this in the end:
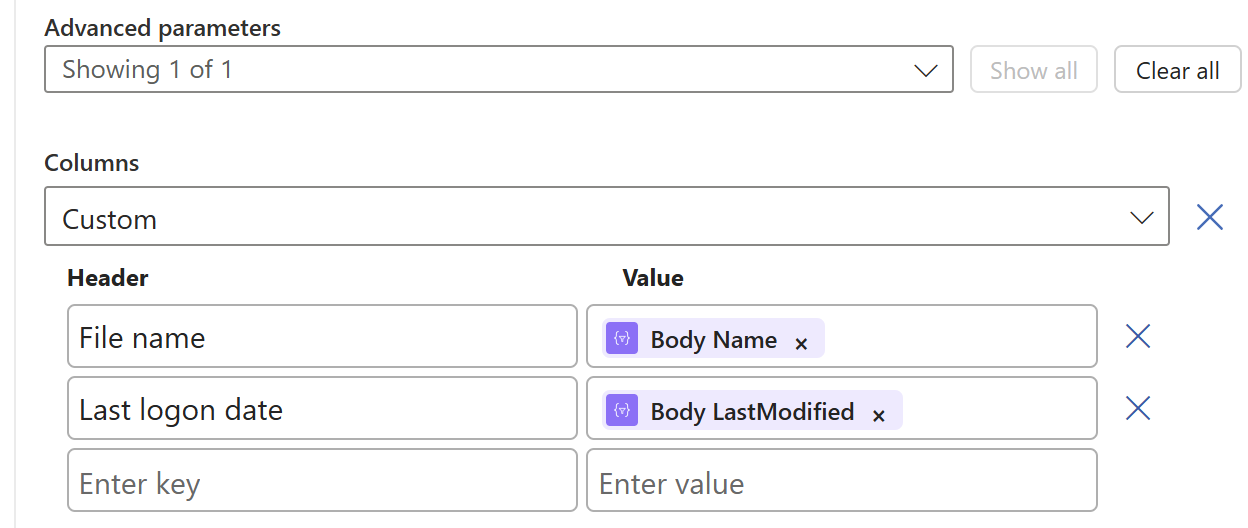
Now save the Logic app and we need to do one final step.
Now we have to send all the information from previous steps by email. We have to add an action called ‘Send an Email":
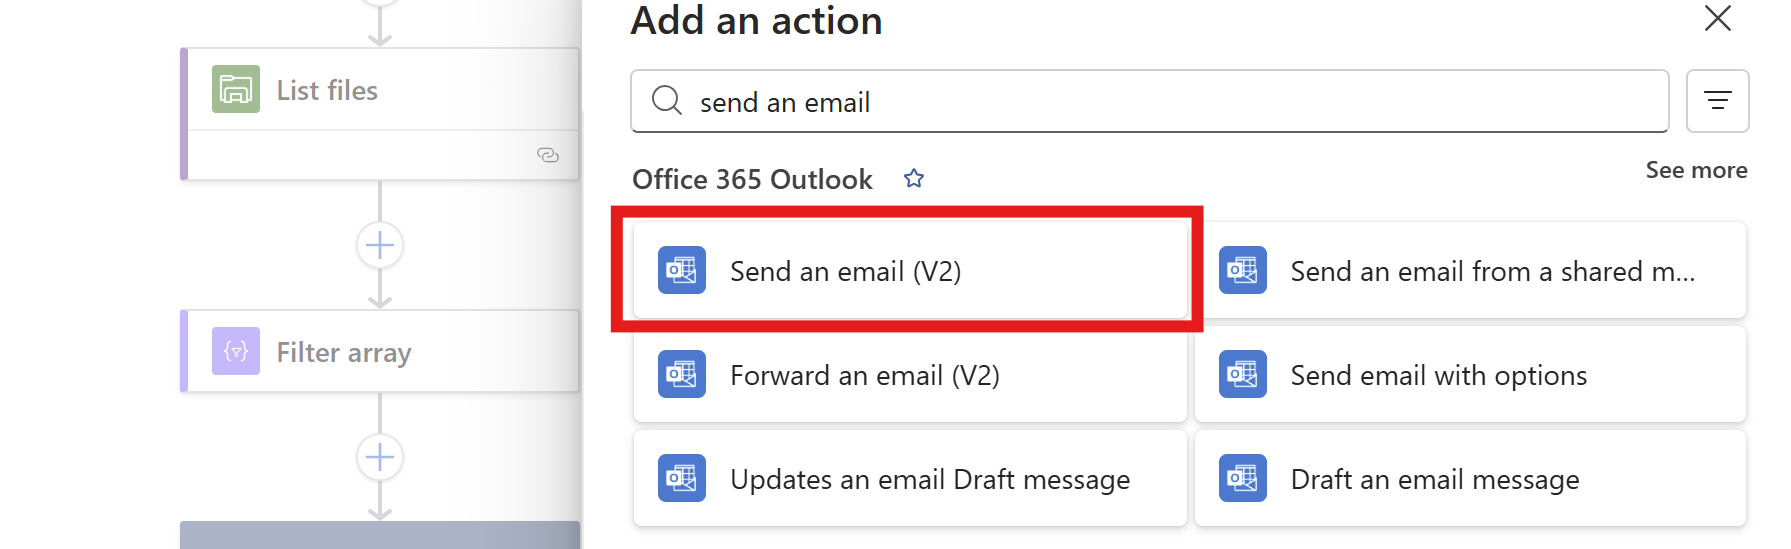
Make sure to use the “Office 365 Outlook” connector and not the Outlook.com connector. Also pick the newest version available in case of multiple versions.
Now create a connection to a mailbox, this means logging into it.
Then configure the address to send emails to, the subject and the text. I have did this:
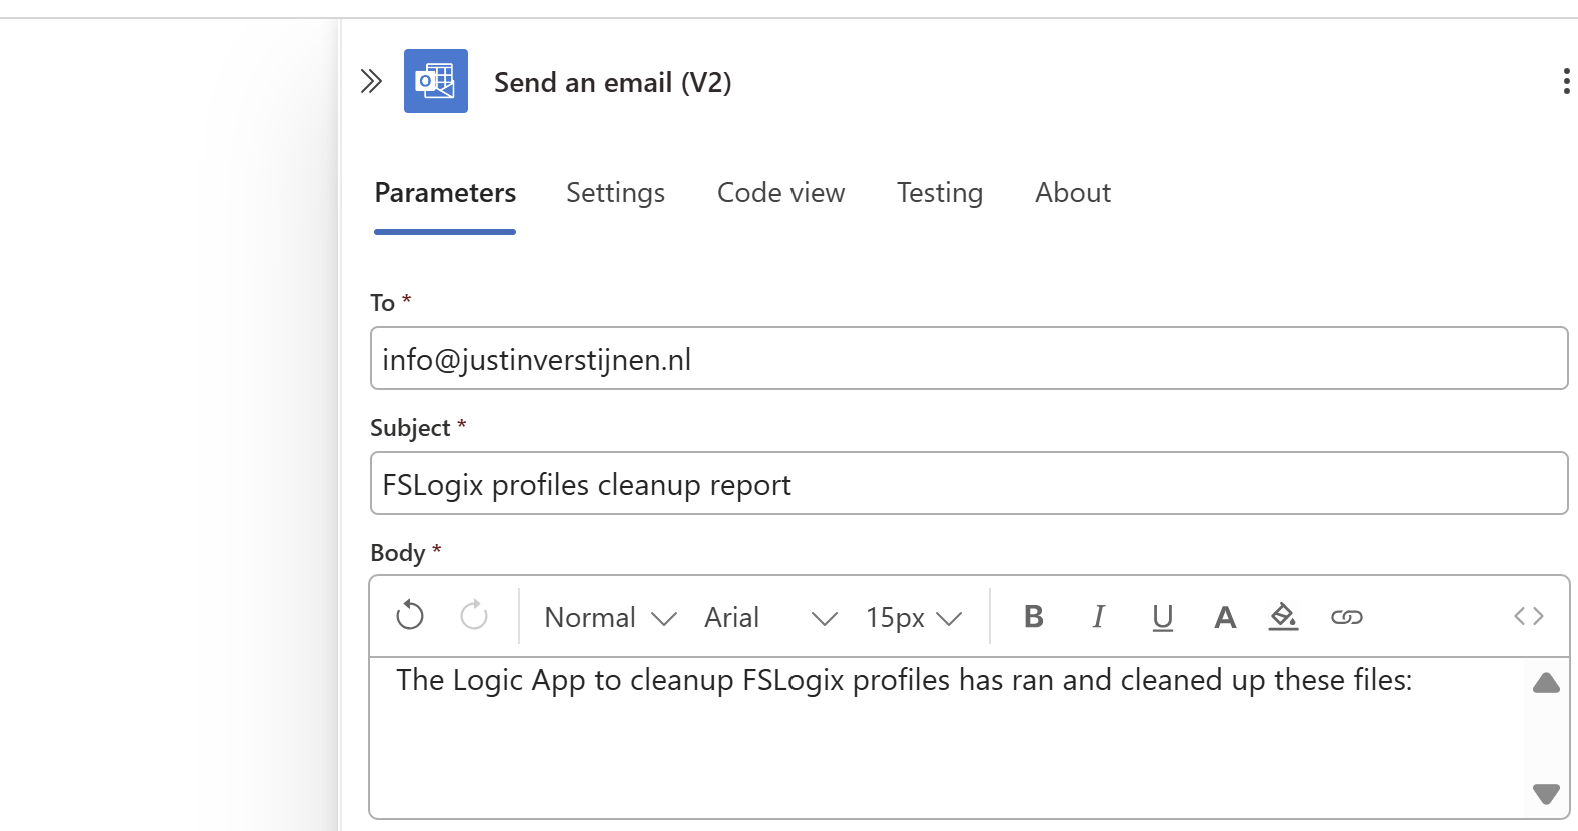
Then under the line in the “Body” field, paste a new dynamic content by clicking the thunder icon:

And select the “Output” option from the “Create HTML table” step which is basically the formatted table.

Now the Output dynamic content should be under your email text, and that will be where the table is pasted.
Now we have configured our Logic App and we want to test this. For the testing purpose, I have changed the rule in the “Filter Array” step to this:
@lessOrEquals(item()?['LastModified'], addMinutes(utcNow(), -30))This states that only files modified in the last 30 minutes will be kept, and longer than 30 minutes will be deleted. This is based on the Azure Files “Last Modified” time/date.

On the file share I have connected, there are 5 files present that acts as dummy files:
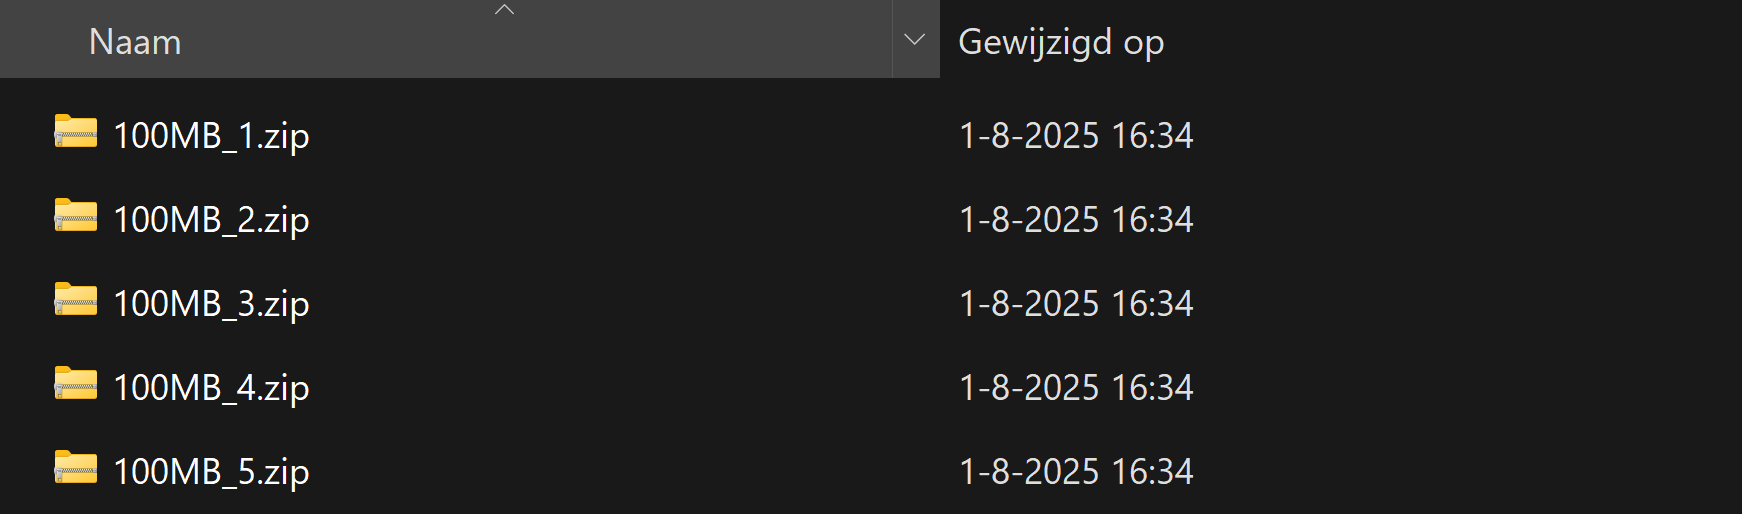
In the portal they have a different last modified date:
It’s now 2:39 PM on the same day, that will mean executing it now would:
I ran the logic app using the manual “Run” button:

It ran successfully:

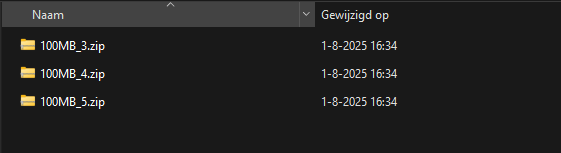
The files 1 and 2 are gone as they were not modified within 30 minutes of execution.
And I have a nice little report in my email inbox what files are exactly deleted:
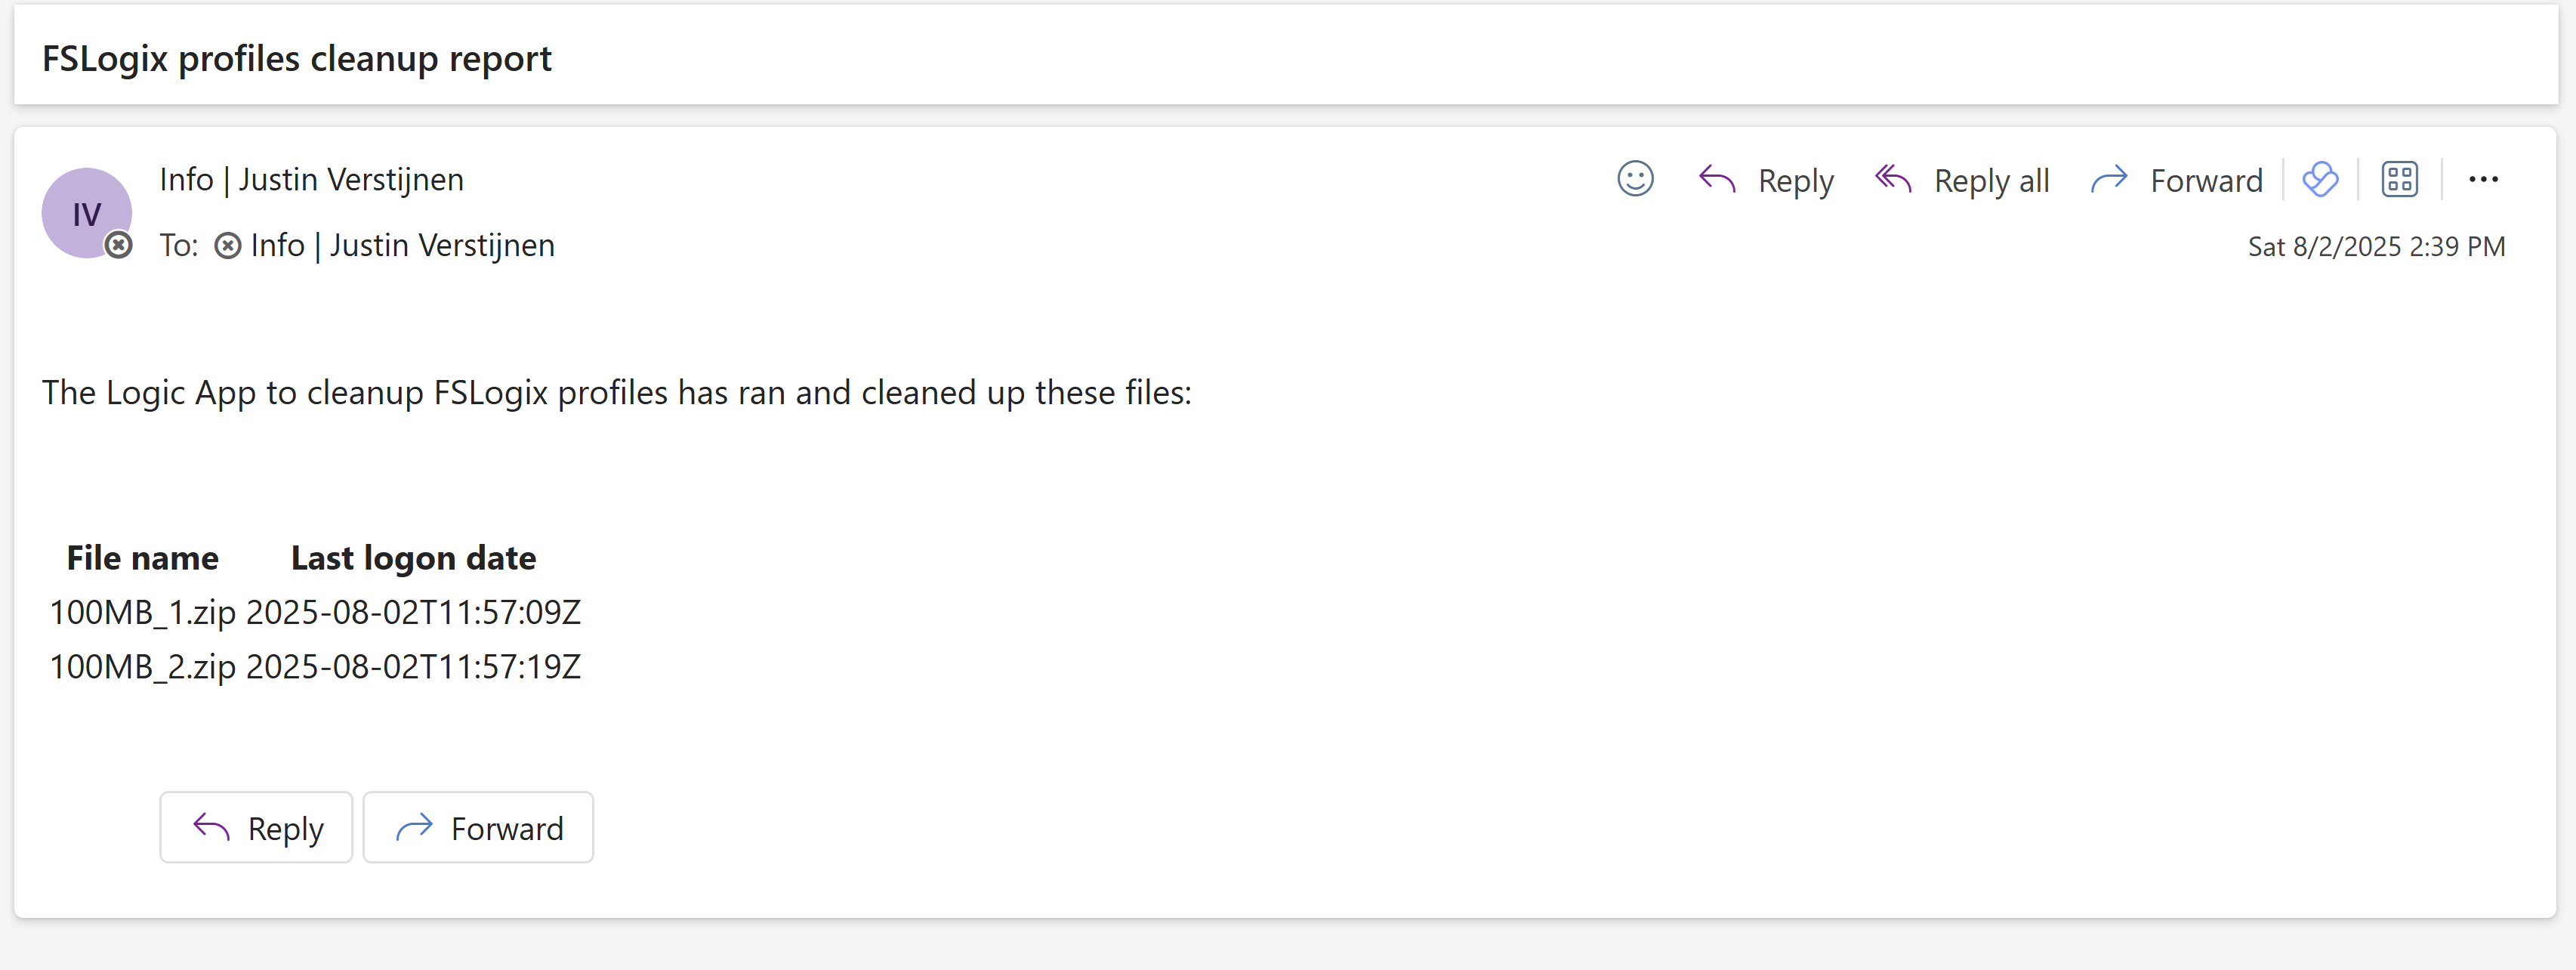
The last logon date is presented in UTC/Zulu timezone, but for my guide we have to add 2 hours.
This solution is really great for a Azure-native solution for cleaning Azure Virtual Desktop profiles. This is especially great when not having access to servers who can run this via SMB protocol.
The only downside in my opinion is that we cannot connect to the storage account using a Managed Identity or Storage Access Signature (SAS token), but that we must use the Storage Access key. We now connect with a method that has all rights and can’t be monitored. In most cased we would want to disable the Storage Access Key to have access.
Thank you for reading this guide and I hope it was helpful.
These sources helped me by writing and research for this post;
You have reached the end of the page. You can navigate through other blog posts as well, share this post on X, LinkedIn and Reddit or return to the blog posts collection page. Thank you for visiting this post.
If you think something is wrong with this post or you want to know more, you can send me a message to one of my social profiles at: https://justinverstijnen.nl/about/
If you find this page and blog very useful and you want to leave a donation, you can use the button below to buy me a beer. Hosting and maintaining a website takes a lot of time and money. Thank you in advance and cheers :)
The terms and conditions apply to this post.
In this blog post I will explain and demonstrate the pro’s and features of using FSLogix App Masking for Azure Virtual Desktop. This is a feature of FSLogix where we can hide certain applications and other components from our users while still having to maintain a single golden image.
In this guide I will give some extra explaination about this feature, how it works, how to implement it in a production environment and how to create those rules based on the logged on user. I hope to give a “one-post-fits-all” experience.
FSLogix App Masking is an extra feature of the FSLogix solution. FSLogix itself is a profile container solution which is widely used in virtual desktop environments where users can login on any computer and the profile is fetched of a shared location. This eliminates local profiles and a universal experience on any host.
Using FSLogix App Masking enables you to hide applications from a system. This can come in very handy when using Azure Virtual Desktop for multiple departments in your company. We must install certain applications, but we don’t want to expose too much applications.
To give a visual perspective of what we can do with FSLogix App Masking:
In this picture, we have a table that gives an example with 3 applications that we installed on our golden image:
In my environment, I created 3 departments/user groups and we will use those groups to adjust the app masking rules.
We have a Front Office department that only needs basic web browsing, we have a department Sales that also need Firefox for some shitty application they use that does not work properly in Chrome and we have a finance department that we only want to use Firefox and Adobe Reader for some PDF reading.
Let’s find out how to create the rules.
Now we must configure rules to hide the applications. App Masking is designed as hiding applications, not particularly showing them. We must create rules to hide the applications if the requirements are not met. We do this based on a application.
Assuming you already have the FSLogix Rule Editor installed, Let’s follow these steps:
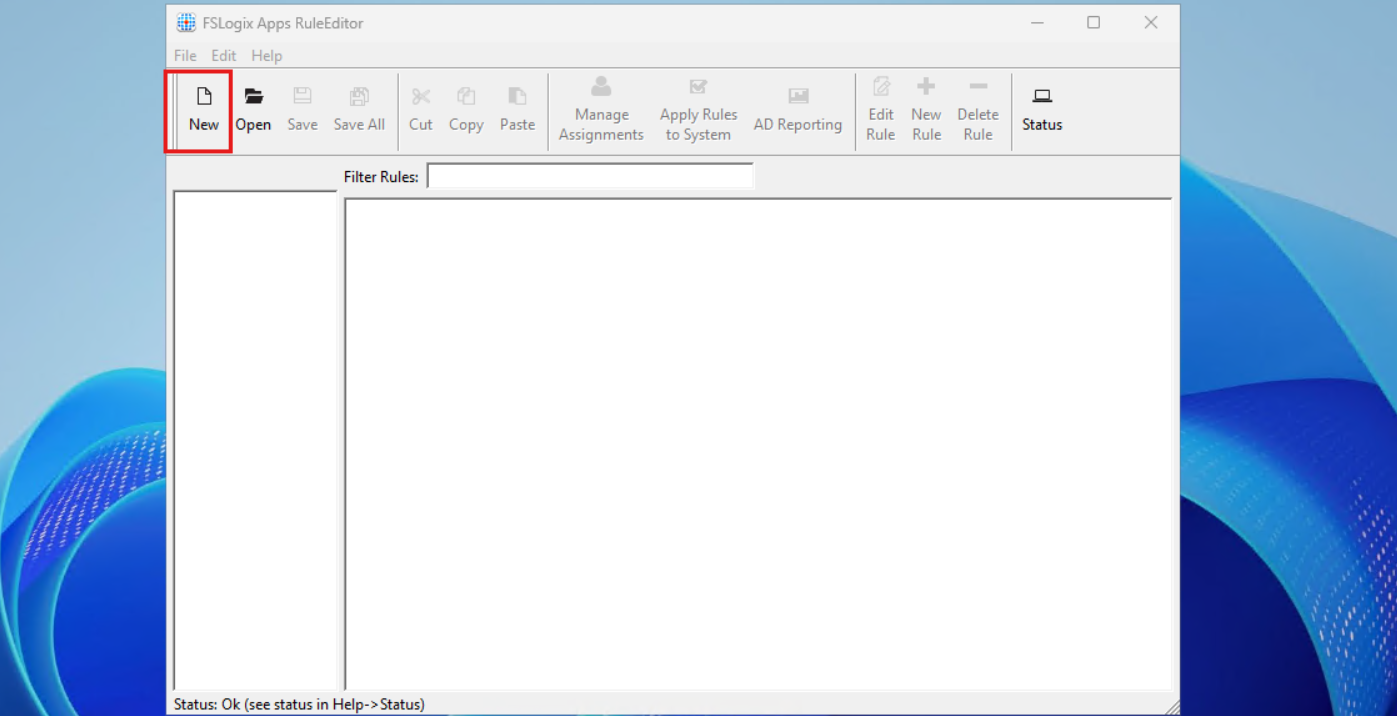
As this is a completely new instance, we must create a new rule by clicking the “New” button. Choose a place to save the rule and give it a name. I start with hiding Google Chrome according to the table.
After saving your rule, we get the following window:
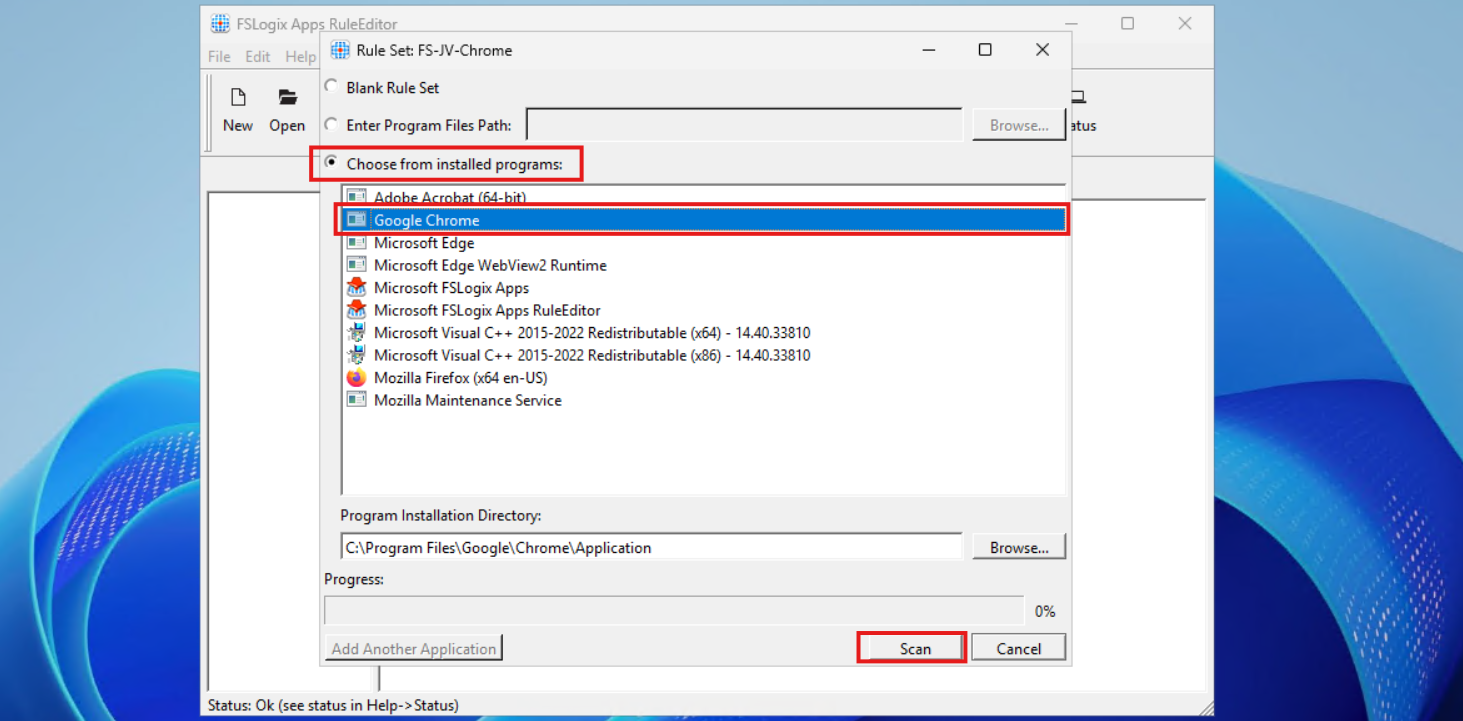
Select the option “Choose from installed programs”, then select Google Chrome and then click on Scan. Now something very interesting happens, the program scans for the whole application and comes up with all information, from installation directory to shortcuts and registry keys:
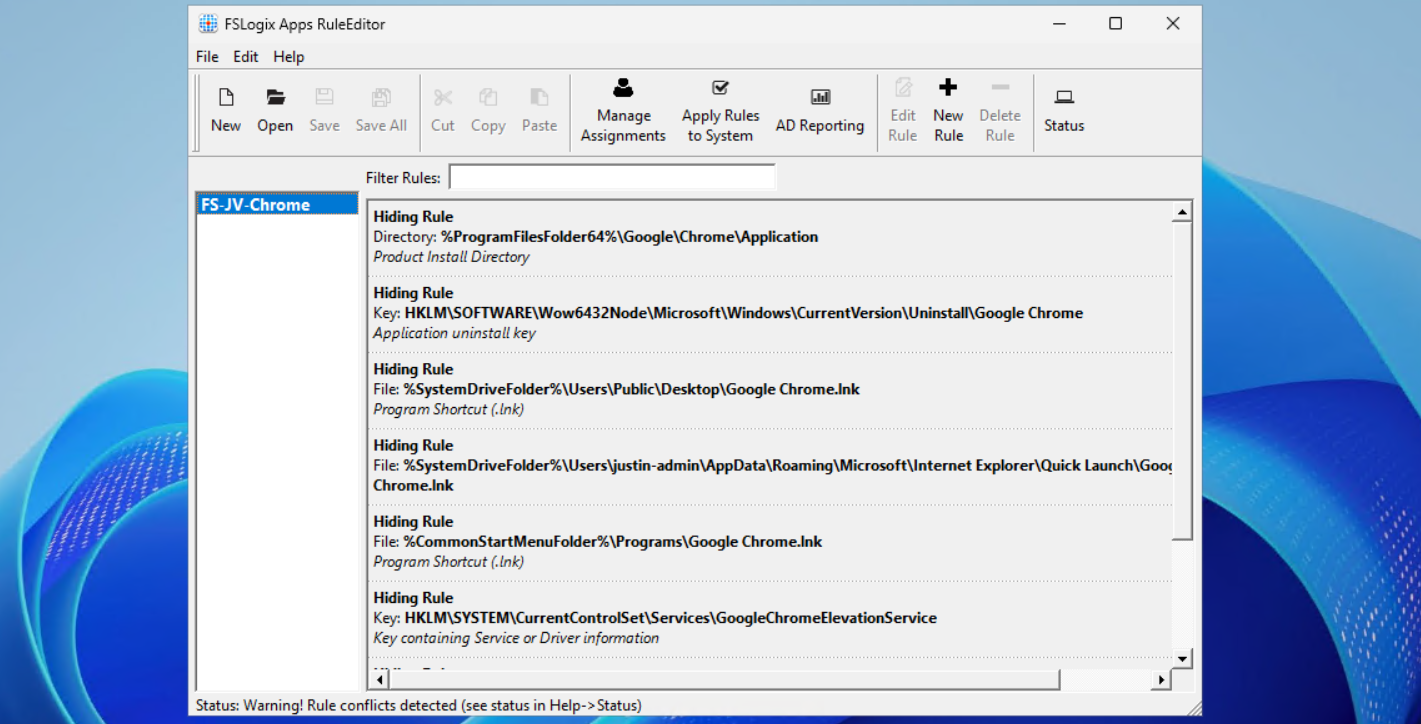
This means we use a very robust way of hiding everything for a user, even for non-authorized users like a hacker.
Now repeat those steps for the other applications, by creating a rule for every application like I did:
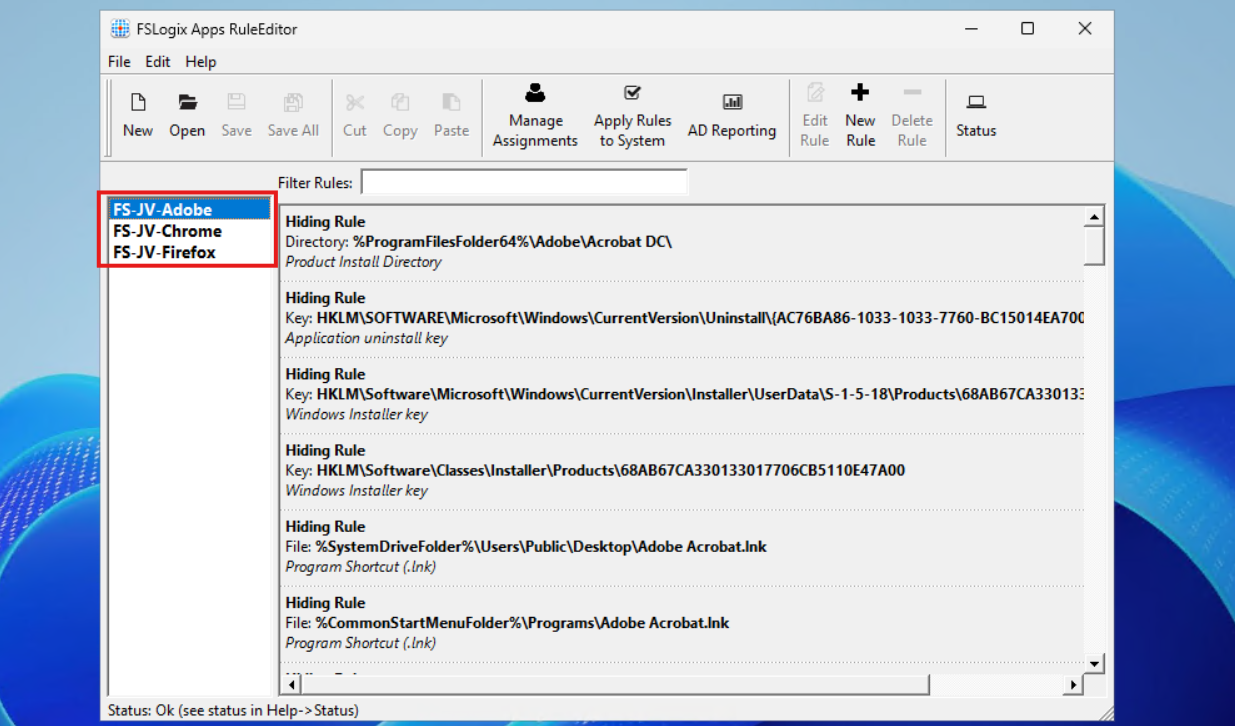
In the next step we will apply the security to those rules to make them effective.
Now that we have the rules themselves in place, we now must decide when users are able to use the applications. We use a “hide by default” strategy here, so user not in the right group = hide application. This is the most straight forward way of using those rules.
When still in the FSLogix Rule Editor application, select the first rule (in my case Chrome) and click on “Manage Assignments”.
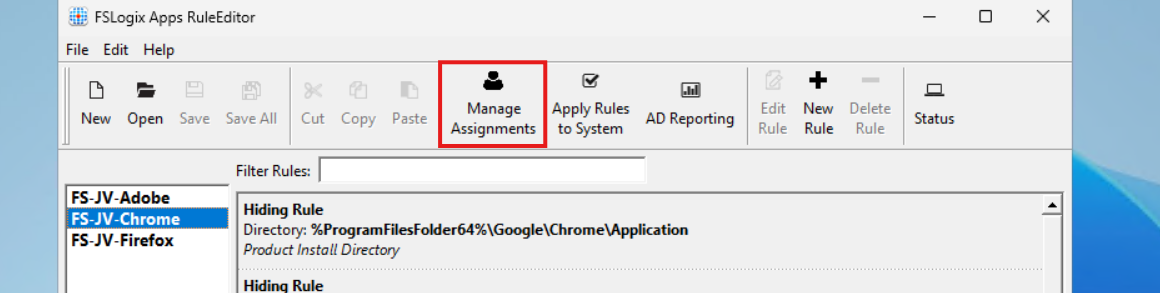
In this window we must do several steps:
Let’s do this step by step:
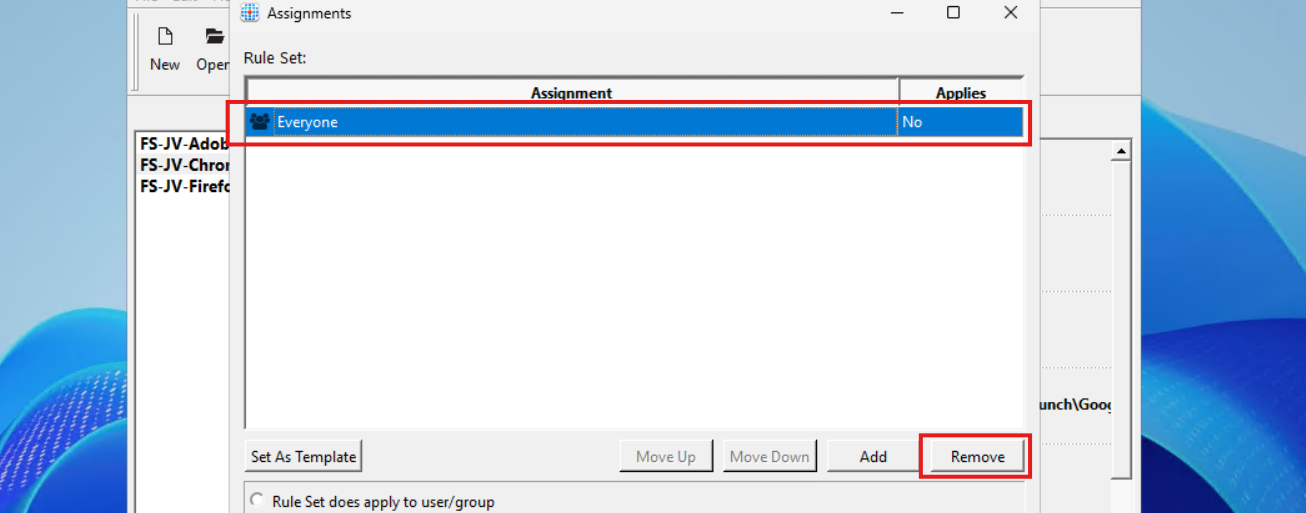
Select “Everyone” and click on remove.
Then click on “Add” and select “Group”.
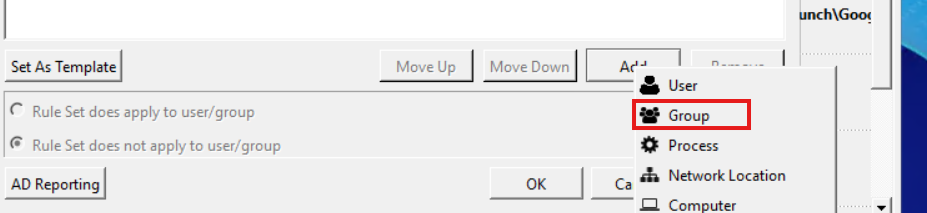
Then search for the group that must get access to the Google Chrome applicastion. In my example, these are the “Front Office” and “Sales” groups. Click the “User” icon to search the Active Directory.
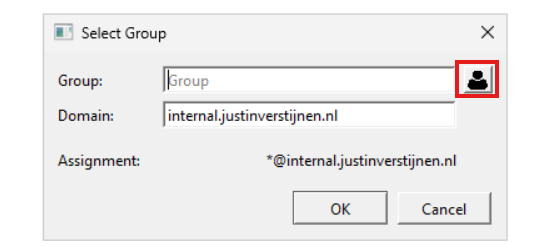
Then type in a part of your security group name and click on “OK”:
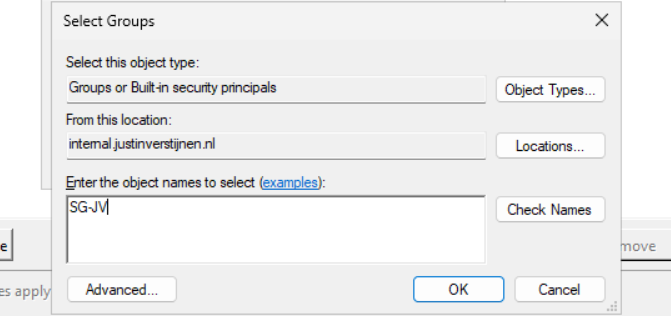
Add all your security groups in this way will they are all on the FSLogix Assignments page:
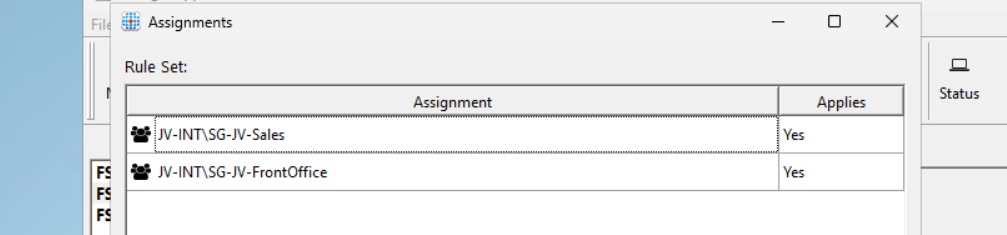
Now we must configure that the hiding rules does NOT apply to these groups. We do this by selecting both groups and then click “Rule Set does not apply to user/group”.
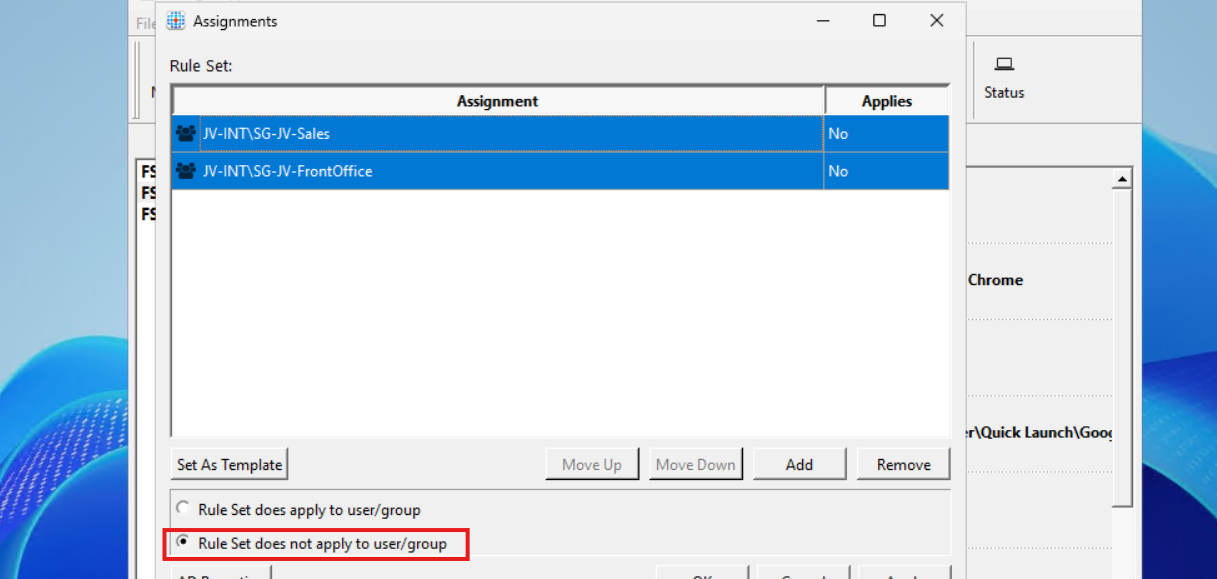
Then click “Apply” and then “OK”.
Repeat those steps for Firefox and Adobe Reader while keeping in mind to select the right security groups.
We can test the hiding rules directly and easily on the configuration machine, which is really cool. In the FSLogix Apps Rule Editor, click on the “Apply Rules to system” button:
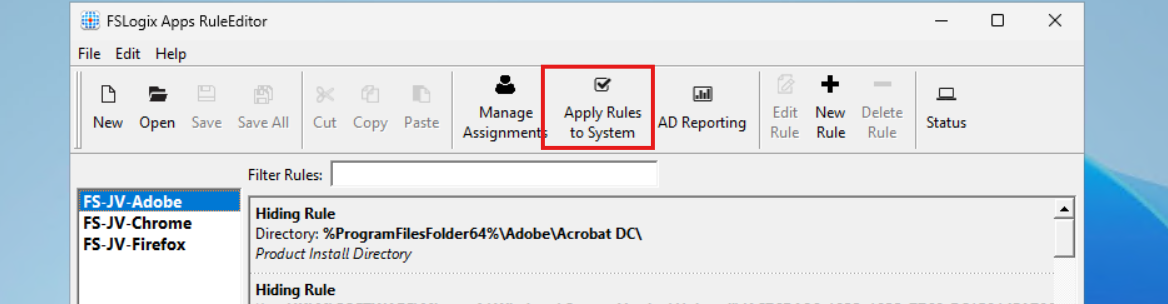
I will show you what happens if we activate all 3 rules on the testing machine. We don’t test the group assignments with this function. This function only tests if the hiding rules work.
You see that the applications disappear immediately. We are left with Microsoft Edge as only usable application on the machine. The button is a temporary testing button, clicking again gives the applications back.
Now an example where I show you what happens to the application folder and the registry key for uninstalling the application:
We now must deploy the rules to the workstations where our end users work on. We have 2 files per hiding rule:
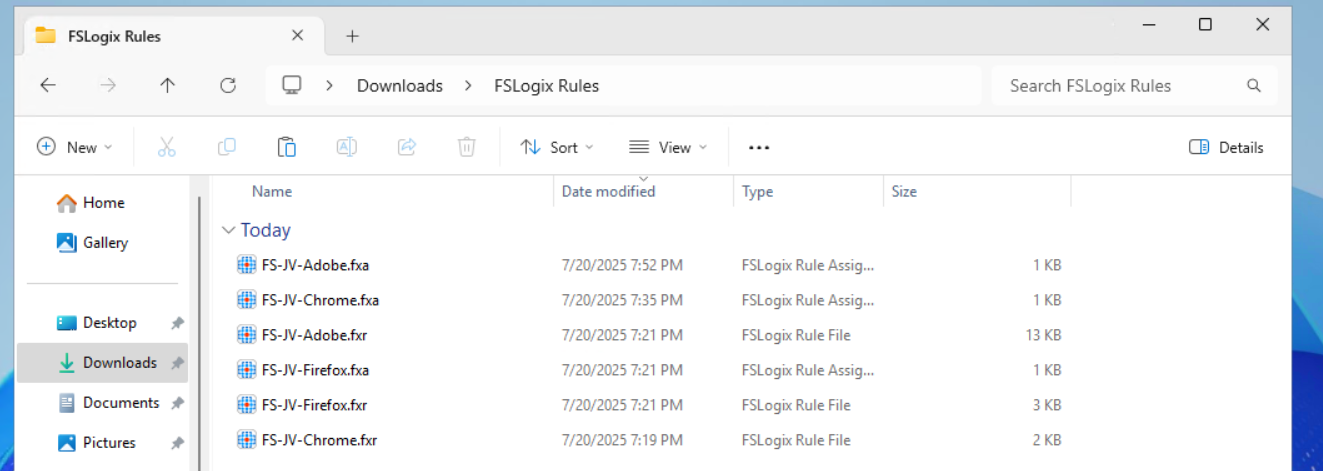
The best way is to host those files on a fileshare on or an Azure Storage account, and deploy them with Group Policy Files.
The files must go into this folder on the session hosts:
If you place the rules there, they will become active immediately.
We will now create a fileshare on our server and place the hiding rules there. We share this to the network so the session host in our Azure Virtual Desktop hostpool can pick the rules from there. Placing them centrally and deploying them from there to the session hosts is highly recommended as we might have to change stuff over time. We don’t want to manually edit those rules on every host.
I created a folder in C:\ named Shares, then created a folder “Systems Management” and then “FSLogix Rules”. The location doesn’t matter, it must be shared and authenticated users must have read access.
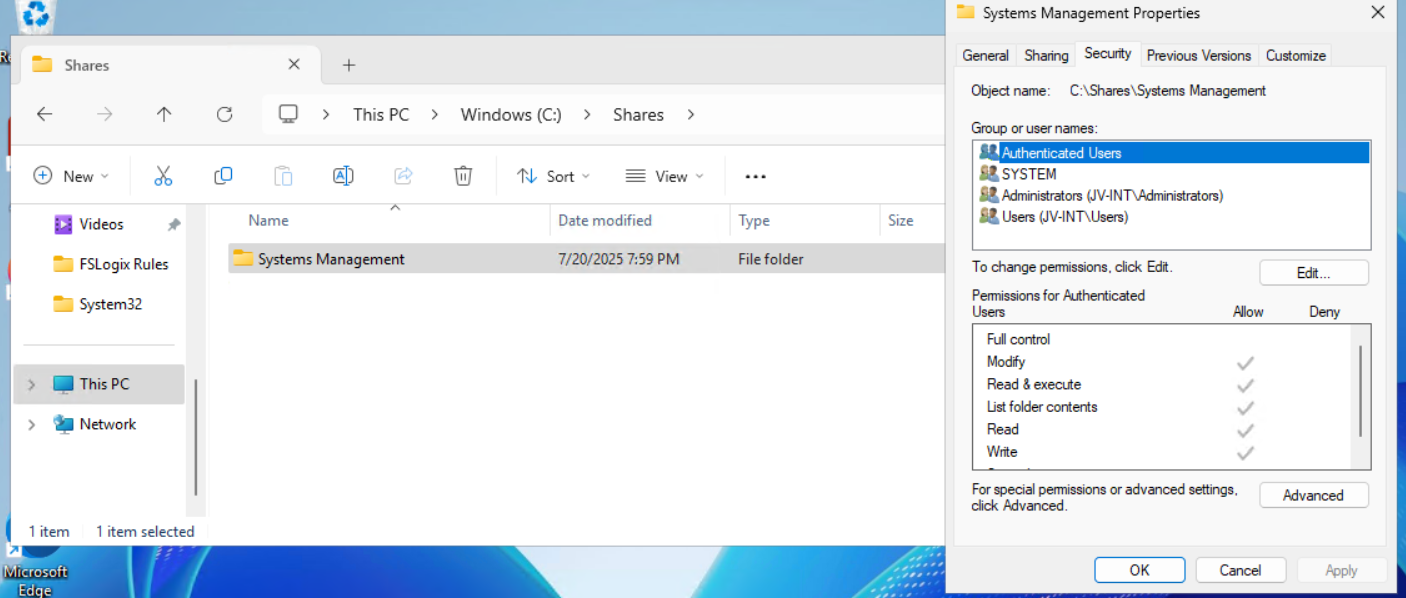
Then I shared the folder “Systems Management”, set Full Control to everyone on the SMB permissions and then gave “Authenticated Users” read access on the NTFS permissions.
Then I placed the files on the shared folder to make them accessible for the Azure Virtual Desktop hosts.
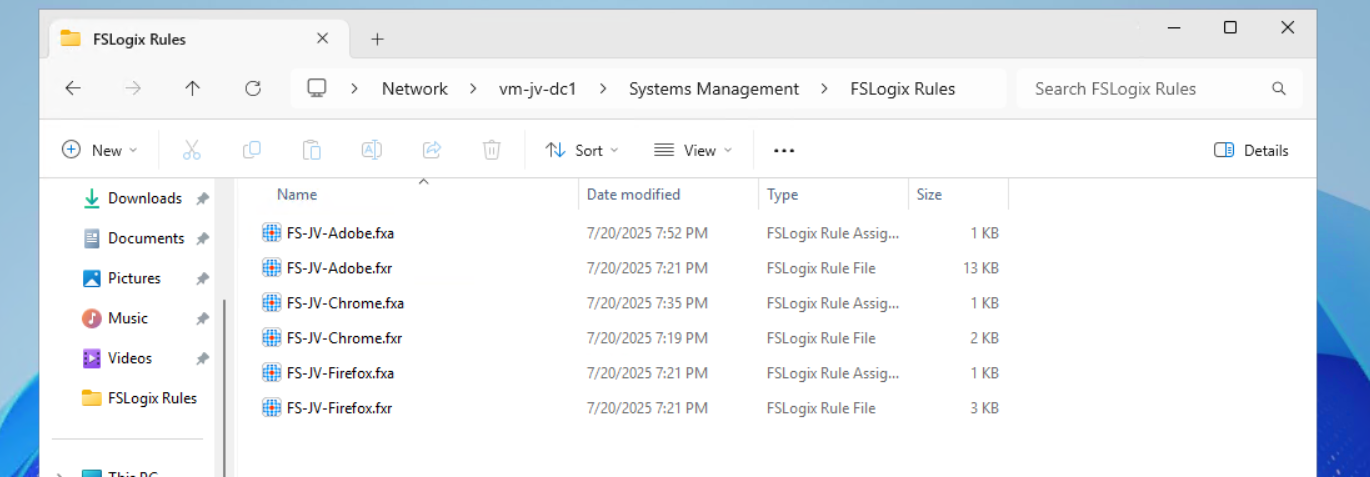
Let’s create the rule deployment Group Policy.
Now we can open the Group Policy Management console (gpmc.msc) on our management server. We can create a new GPO for this purpose. I do this on the OU Azure Virtual Desktop, thats where my hosts reside.

Give it a good and describing name:

Then edit the Group Policy by right clicking and then click “Edit”. Navigate to:
Create a new file here:
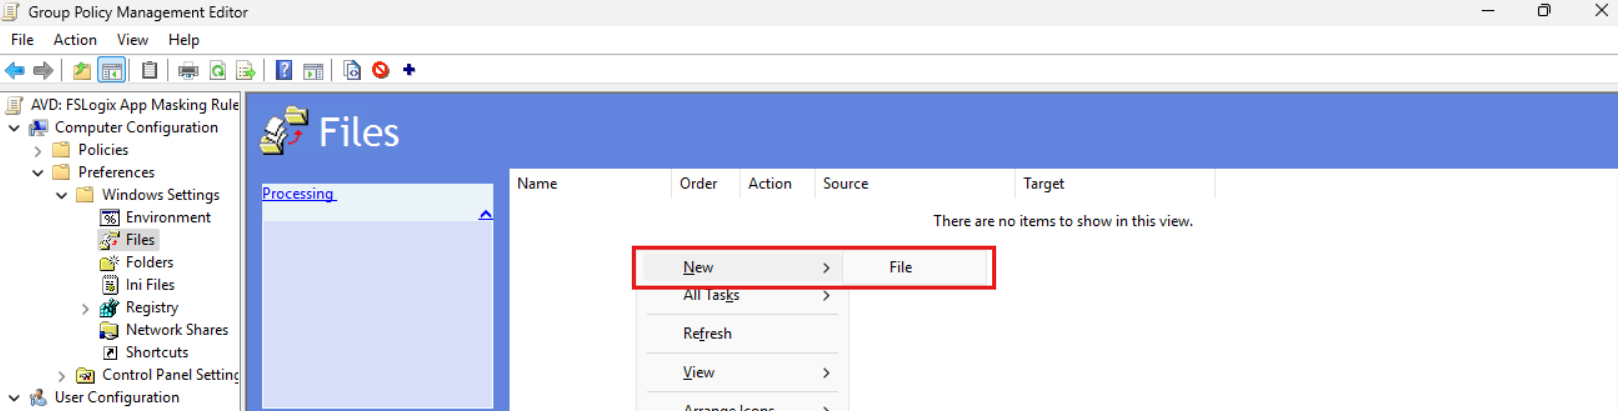
Now we must do this 6 times as we have 6 files. We have to tell Windows where to fetch the file and where the destination must be on the local machine/session host.
We now must configure the sources and destinations in this format:
| Source | Destination |
| \server\share\file.fxa | C:\Program Files\FSLogix\Apps\Rules\file.fxa |
So in my case this must be:
| Source | Destination |
| \vm-jv-dc1\Systems Management\FSLogix Rules\FS-JV-Adobe.fxa | C:\Program Files\FSLogix\Apps\Rules\FS-JV-Adobe.fxa |
| \vm-jv-dc1\Systems Management\FSLogix Rules\FS-JV-Adobe.fxr | C:\Program Files\FSLogix\Apps\Rules\FS-JV-Adobe.fxr |
| \vm-jv-dc1\Systems Management\FSLogix Rules\FS-JV-Chrome.fxa | C:\Program Files\FSLogix\Apps\Rules\FS-JV-Chrome.fxa |
| \vm-jv-dc1\Systems Management\FSLogix Rules\FS-JV-Chrome.fxr | C:\Program Files\FSLogix\Apps\Rules\FS-JV-Chrome.fxr |
| \vm-jv-dc1\Systems Management\FSLogix Rules\FS-JV-Firefox.fxa | C:\Program Files\FSLogix\Apps\Rules\FS-JV-Firefox.fxa |
| \vm-jv-dc1\Systems Management\FSLogix Rules\FS-JV-Firefox.fxr | C:\Program Files\FSLogix\Apps\Rules\FS-JV-Firefox.fxr |
Now paste in the source and destination paths both including the file name as I did for all 6 files. It should look like this:

We are done and the files will be deployed the first time Group Policy is updated.
Now I will do a manual Group Policy Update to force the files coming on my session host. Normally, this happens automatically every 90 to 120 minutes.
gpupdate /forceI made my account member of the Finance group that must be showing Adobe Reader and Firefox only. Let’s find out what happens:
After refreshing the Group Policies, everything we have prepared in this guide falls into place. The group policy ensures the files are placed in the correct location, the files contains the rules that we have configured earlier and FSLogix processes them live so we can see immediately what happens on the session hosts.
Google Chrome is hided, but Firefox and Adobe Reader are still available to me as temporary worker of the Finance department.
In the official FSLogix package, the FSLogix rule editor tool is included as separate installation. You can find it here: https://aka.ms/fslogix-latest
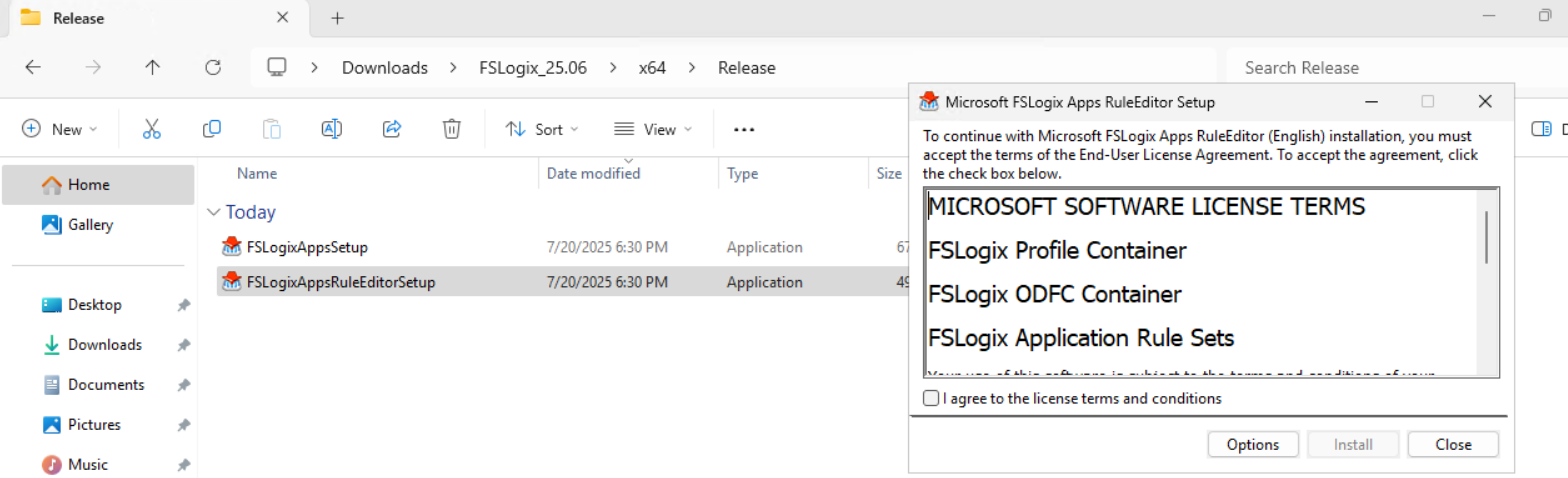
You need to install this on a testing machine which contains the same applications as your session host. In my work, we deploy session hosts first to a testing environment before deploying into production. I do the rule configuration there and installed the tool on the first testing session host.
After installing, the tool is available on your machine:
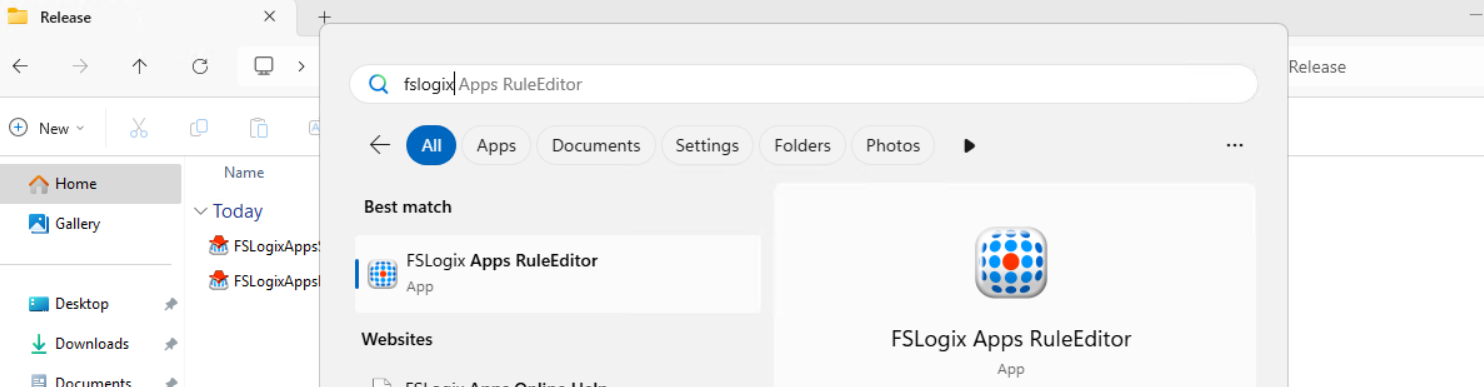
FSLogix App Masking is a great tool for an extra “cherry on the pie” (as we call this in Dutch haha) image and application management. It enables us creating one golden image and use this throughout the whole company. It also helps securing sensitive info, unpermitted application access and therefore possible better performance as users cannot open the applications.
I hope I give you a good understanding of how the FSLogix App Masking solution works and how we can design and configure the right rules without too much effort.
Thank you for reading this guide and I hope I helped you out.
These sources helped me by writing and research for this post;
You have reached the end of the page. You can navigate through other blog posts as well, share this post on X, LinkedIn and Reddit or return to the blog posts collection page. Thank you for visiting this post.
If you think something is wrong with this post or you want to know more, you can send me a message to one of my social profiles at: https://justinverstijnen.nl/about/
If you find this page and blog very useful and you want to leave a donation, you can use the button below to buy me a beer. Hosting and maintaining a website takes a lot of time and money. Thank you in advance and cheers :)
The terms and conditions apply to this post.
In Azure, you have the option to create Ephemeral OS disks for your machine. This sounds really cool but what is it actually, what pro’s and cons are coming with them, what is the pricing and how do we use them? I will do my best to explain everything in this guide.
Ephemeral OS Disks are disks in Azure where the data is stored directly on the hypervisor itself, rather than having a managed disk which could be resided at the very other end of a datacenter. Every cable and step between the disk and the virtual machine creates latency which will result in your machine being slower.
Now this looks really how it normally should look.
Now, let’s take a look at how normal, Managed disks work:
Topologies are simplified for more understanding.
As you can see, they could be stored anywhere in a datacenter or region. It could even be another datacenter. We can’t see this in the portal. We only see that a VM and disk are in a specific region and availability zone, but we don’t have further control.
Configuring Ephemeral OS Disks so mean much less latency and much more performance. Let’s dive into the pro’s and cons before being overjoyed.
Now let’s outline the pro’s and cons of Ephemeral OS Disks before jumping into the Azure Portal and configuring them:
| Pro | Con | Difference with managed disk |
| Very high disk performance and great user experience | Only support for VM sizes with local storage (includes non-capital “d” in size: D8dv4, E4ds_v6 | Managed disks support all VM sizes |
| No disk costs | Deallocation of VM not possible, VMs must be on 24/7 | Deallocation possible, saving money when VMs are shutdown and deallocated |
| Data storage is non-persistent, this means when a VM is redeployed or moved to another host, you data will be gone | Managed disks are persistent across a complete region | |
| No datacenter redundancy, VMs stay in the same datacenter for its lifetime | Datacenter redundancy and region redundancy possible with ZRS and GRS | |
| Resizing of disk not possible | Resizing possible (only increase) | |
| Backup, imaging or changing disk after deployment not possible | Backup, imaging and changing disks possible |
As you can see, this is exactly why I warned you for the cons, because these cons make it unusable for most workloads. However, there is at least one use-case where I can think of where the pros weigh up to the cons: Azure Virtual Desktop.
According to the Azure Portal, you have the following performance difference when using Ephemeral OS disks and Managed disks for the same VM size:
When using a E4ds_v6 VM size (and 128GB size disk);
| Disk type | IOPS | Throughput (Mbps) | |
| Ephemeral OS disk | 18000 | 238 | |
| Managed OS disk | 500 | 100 |
To deploy a new virtual machine with a Ephemeral OS disk, follow these steps:
Login to the Azure Portal, and deploy a new virtual machine:
Now we have to select a size, which mus contain a non-capital “d”. This stands for having local NVME storage on the hypervisor which makes it bloody fast. In my case, I selected the vm size: “E4ds_v6”
Now the wizard looks like this:
Proceed by creating your local account and advance to the tab “Disks”.
Here we have to scroll down to the “Advanced” section, expand it and here we have the hided options for having Ephemeral OS disks:
Select the “NVME placement” option and let the option “Use managed disks” checked. This is for additional data disks you link to the virtual machine. The Ephemeral OS disk option requires you to enable it.
Finish the rest of the wizard by selecting your needed options.
Now that the virtual machine is deployed, we can log into it with Remote Desktop Protocol:

In my test period of about 15 minutes, the VM feels really snappy and fast.
To further test the speed of the VM storage, I used a tool called Crystal Disk Mark. This is a generic tool which tests the disk speed of any Windows instance (physical or virtual).
To have a great overview of the speeds, I have created a bar diagram to further display the test results of the different tests, each separated by read and write results:
My conclusion from the test results is that Ephemeral OS disks does provide more speed when doing specific actions, like in the random 4KB tests, where it delivers 3 to 10 times te performance of managed disks. This is where you actually profit from the huge increase in Input Output operations Per Second (IOPS)
The sequential 1MB speeds are quite similar to the normal managed disks, in the read cases even slower. I think this has to do with traffic or bottlenecking. As my research goes, disk speed increases when the size of the VM increases, but I could not go for like D64 VMs due of quota limits.
Both of the test were conducted between 20 minutes of each other.
Here is the raw data of the tests. Left is Ephemeral and right is Managed disk results.
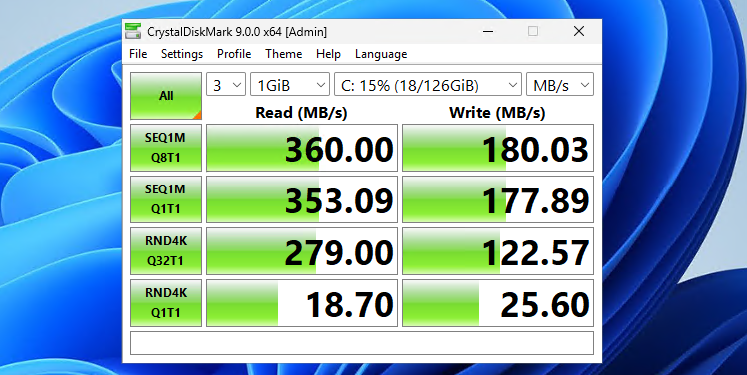
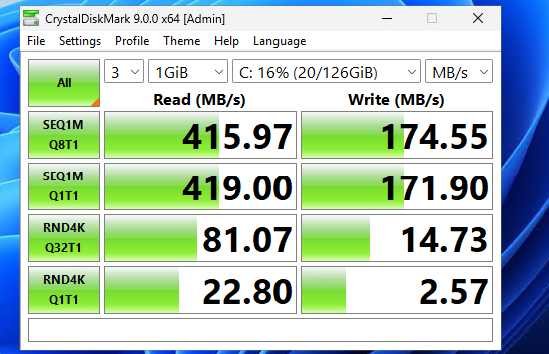
Ephemeral OS Disks ensure the VM is powered by great disk performance. Storage will not longer be a bottleneck when using the VM but it will be mostly CPU. However, it comes at the cost of not being able to perform some basic tasks like shutting down and deallocating the machine. Restarting is possible and these machines have an extra option, called “Reimage”, where they can be built again from a disk/image.

If using VMs with Ephemeral OS disks, use it for cases where data loss is no issue om the OS disk. All other data like data disks, data on storage account for FSLogix or outside of the VM is unharmed.
Thank you for reading this guide and I hope it was helpful.
You have reached the end of the page. You can navigate through other blog posts as well, share this post on X, LinkedIn and Reddit or return to the blog posts collection page. Thank you for visiting this post.
If you think something is wrong with this post or you want to know more, you can send me a message to one of my social profiles at: https://justinverstijnen.nl/about/
If you find this page and blog very useful and you want to leave a donation, you can use the button below to buy me a beer. Hosting and maintaining a website takes a lot of time and money. Thank you in advance and cheers :)
The terms and conditions apply to this post.
RDP Multipath is a new protocol for Azure Virtual Desktop and ensures the user always has a good and stable connection. It improves the connection by connecting via the best path and reduces random disconnections between session hosts and users.
Let’s take a look what RDP Multipath adds to your connections:
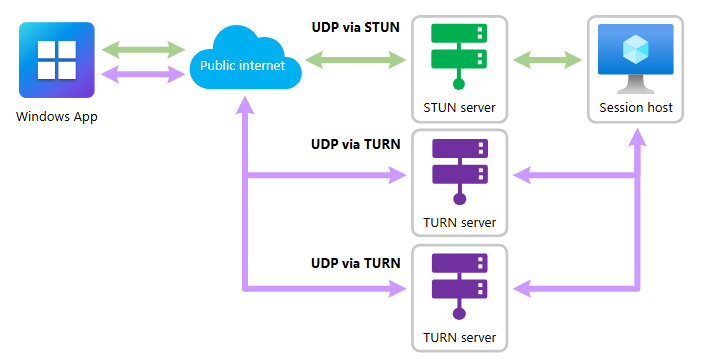
Green: The normal paths of connecting with RDP/Shortpath Purple: The paths added by RDP Multipath
This adds extra ways of connecting session hosts to the end device, selects the most reliable one and therefore adds stability and decreases latency.
RDP Multipath now has to be configured manually, but the expectation is that it will be added to new AVD/Multi Session images shortly, just ad RDP Shortpath did at the time.
The RDP Multipath function is exclusively for Azure Virtual Desktop and Windows 365 and requires you to use at least one of the supported clients and versions:
RDP Multipath can be configured by adding a registry key to your sessionhosts. This can be done through Group Policy by following these steps:
Open Group Policy Management (gpmc.msc) on your Active Directory Management server and create a new Group Policy that targets all AVD machines or use an existing GPO.
Go to: Computer Configuration \ Preferences \ Windows Settings \ Registry
Create a new registry item:
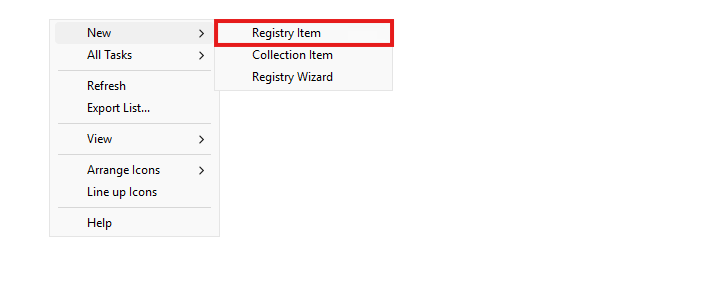
Choose the hive “HKEY_LOCAL_MACHINE” and in the Key Path, fill in:
Then, fill in the following value in the Value field:
Then select “REG_DWORD” as value type and type in “100” in the value data field. Let the “Base” option be on “Decimal”.
The correct configuration must look like this:
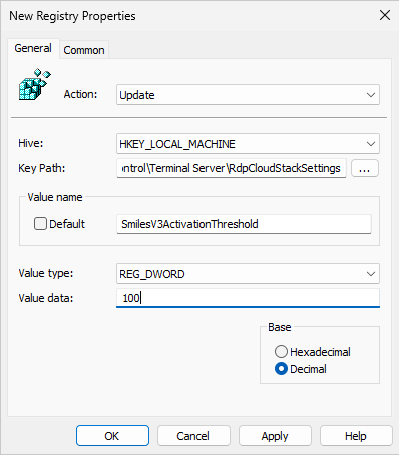
Now save this key, close the Group Policy Management console, reboot or GPupdate your session host and let’s test this configuration!
You can configure RDP Multipath through registry editor on all session hosts.
Then go to:
Create a new key here, named “RdpCloudStackSettings”
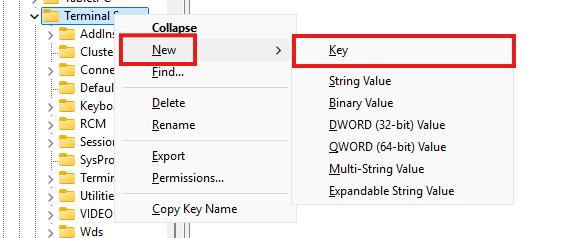
Then create a new DWORD value:
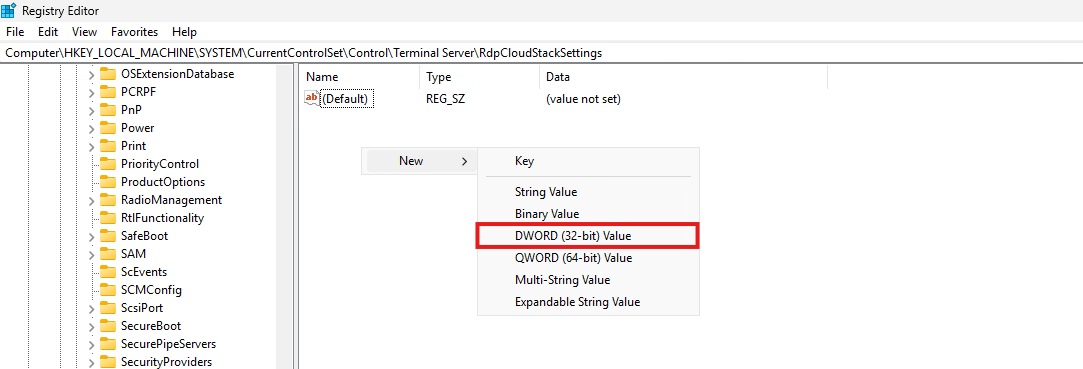
Name it “SmilesV3ActivationThreshold” and give it a value of 100 and set the Base to “Decimal”:
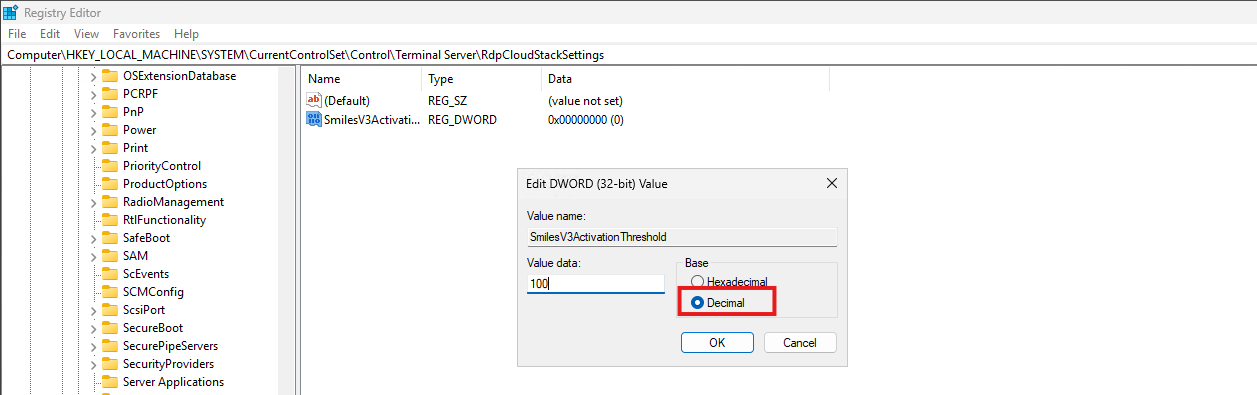
Save the key and close registry editor.
Now a new session to the machine must be made to make RDP Multipath active.
RDP Multipath can also be configured by running my PowerShell script. This can be run manually or by deploying via Intune. The script can be downloaded from my GitHub page:
Open Microsoft Intune, go to Windows, then go to “Scripts and Remediations” amd then “Platform Scripts”.
Click on “+ Add” to add a new script:
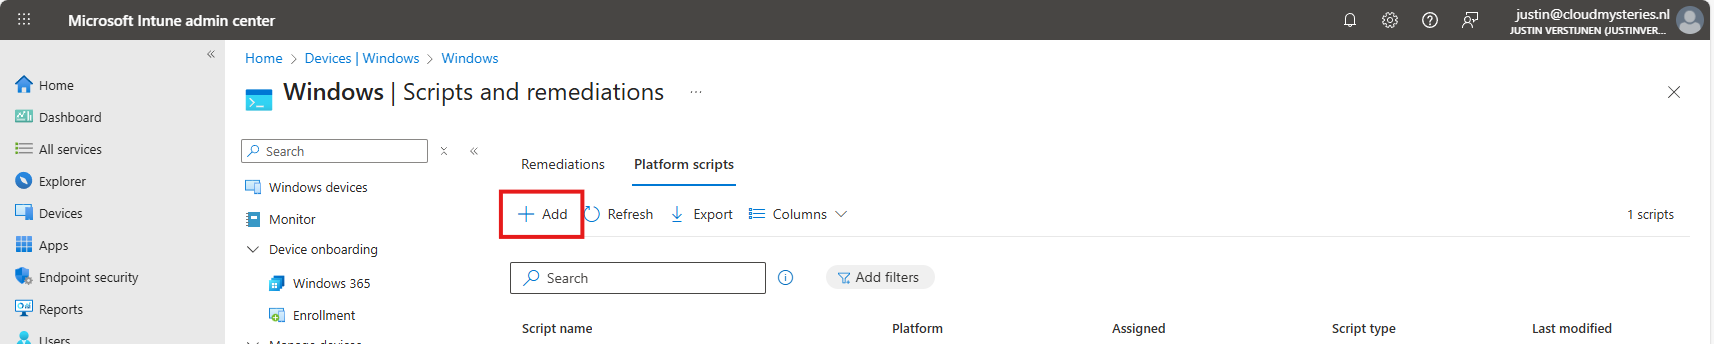
Give the script a name and description and click on “Next”.

Upload my script and then select the following options:
Select the script and change the options shown in the image and as follows:
Click next and assign the script to a group that contains your session hosts. Then save the script.
After this action, the script will be runned after synchronizing on your running sessionhosts, and then will be active. There is no reboot needed, only a new connection to the session host to make it work.
After you configured RDP Multipath, you should see this in your connection window:
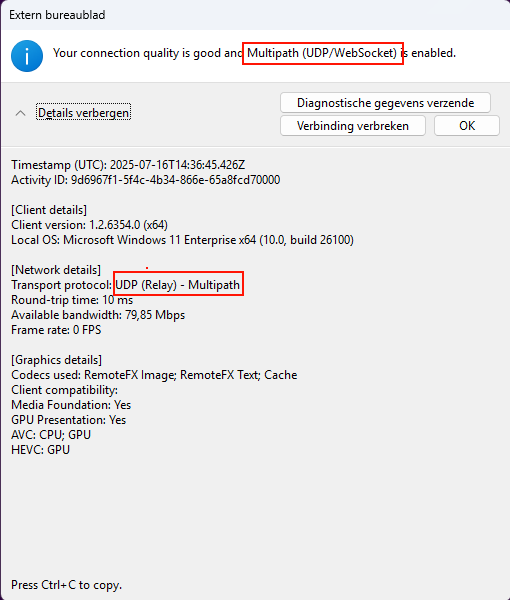
If Multipath is mentioned here, it means that the connection uses Multipath to connect to your session host. Please note that this may take up to 50 seconds prior to connectiong before this is visible. Your connection is first routed through the gateway and then switches to Shortpath or Multipath based on your settings.
Configuring RDP Multipath will enhance the user experience. With some minor network outages, the connection will be more stable. Also, it will help by always choosing the most efficient path to the end users’ computer.
Thank you for reading this guide and I hope it was helpful.
These sources helped me by writing and research for this post;
You have reached the end of the page. You can navigate through other blog posts as well, share this post on X, LinkedIn and Reddit or return to the blog posts collection page. Thank you for visiting this post.
If you think something is wrong with this post or you want to know more, you can send me a message to one of my social profiles at: https://justinverstijnen.nl/about/
If you find this page and blog very useful and you want to leave a donation, you can use the button below to buy me a beer. Hosting and maintaining a website takes a lot of time and money. Thank you in advance and cheers :)
The terms and conditions apply to this post.
This deployment option is superseded by the more easy and secure Entra Kerberos option, check out the updated deployment guide here: https://justinverstijnen.nl/azure-virtual-desktop-fslogix-and-native-kerberos-authentication/
Since the beginning of Azure Virtual Desktop, it is mandatory to run it with an Active Directory. This because when using pooled session hosts, there has to be some sort of NTFS permission for FSLogix to reach the users’ profile disks. This permission is done using NTFS with Kerberos authentication. Something Azure AD doesn’t support.
But what if I tell you this is technically possible to do now? We can use Azure Virtual Desktop in a complete cloud-only setup, where we use Azure for our session hosts, a storage account for the storage of the disks, Intune for our centralized configurations and Azure AD/Entra ID for our authentication! All of this without Active Directory, Entra Domain Services of any sort of Entra Connect Sync. Let’s follow this guide to find out.
In traditional environments we built or used an existing Active Directory and we joined the Azure storage account to it with Powershell. This makes Kerberos authentication possible to the fileshare of the storage account and for NTFS as well:
This means we have to host an Active Directory domain ourselves, and mean we have to patch and maintain those servers as well. Also, in bigger environments we are not done with only one server because of availability reasons.
A good point to remember is that this all works in one flow. The user is authenticated in Active Directory and then authorized with that credential/ticket for the NTFS permissions. Basically how Kerberos works.
In the cloud only setup there are 2 seperate authentication flows. The user will first be authenticated to Entra ID. When the user is authenticated there will be checked if it has the required Azure roles to login into a Entra joined machine.
After that is completed, there will be another authentication flow from the session host to the storage account to verify if the storage access key the session host knows is correct. The session host has the FSLogix setting enabled to access the network as computer account.
As you might think, there are indeed some security risks with this setup;
However, we want to learn something so we are still going to configure this cloud only setup. But take great care when bringing this into production.
My environment looks like this before the guide. I already have created the needed resources to perform the tasks:
So I created the hostpool, a network, the workspace and a demo VM to test this configuration with.
The hostpool must be an Entra ID joined hostpool, which you can configure at the creation wizard of the hostpool:
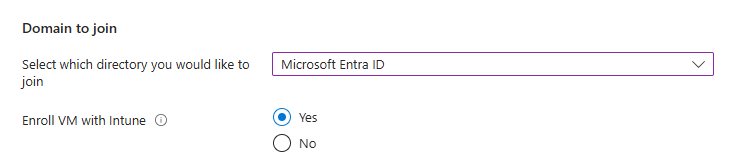
I also highly recommend using the “Enroll VM with Intune” option so we can manage the session hosts with Intune, as we don’t have Group Policies in this cloud only setup.
The cloud only setup need different role assignments and we will create a test user and assign him one of these roles:
In addition, our test user must have access to the Desktop application group in the Azure Virtual Desktop hostpool.
In this case, we are going to create our test user and assign him the default, non administrative role:
Now that the user is created, go to the Azure Portal, and then to the resource group where your session hosts lives:
Click on “+ Add” and then on “add role assignment”:
Then click on “Next” and under “User, group or service principal” select your user or user group:
Click on “Review + assign” to assign the role to your users.
This is an great example of why we place our resources in different resource groups. These users can login into every virtual machine in this resource group. By placing only the correct virtual machines in this resource group, the access is limited.
Now we navigate to our Hostpool to give our user access to the desktops.
Go to “Application Groups”, and then to our Hostpool DAG:
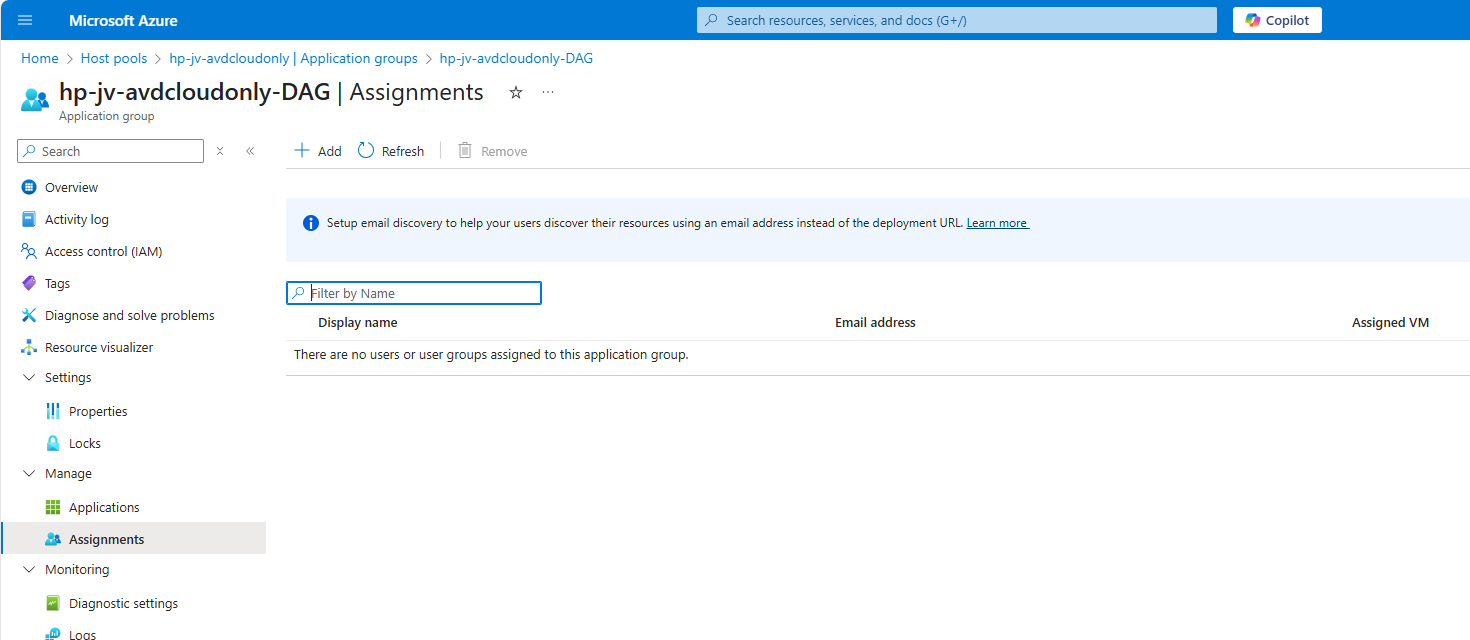
Click on “+ Add” to add our user or user group here:
Select your user or group here and save. The user/group is now allowed to logon to the hostpool and get the workspace in the Windows App.
Using dynamic groups require a Microsoft Entra Premium P1 tenant. If you don’t have this license, you can use an assigned group instead.
Before we can configure the session hosts in Microsoft Intune, we need to have a group for all our session hosts. I really like the use of dynamic group for this sort of configurations, because the settings will be automatically done. Otherwise we configure a new session host in about 3 months later and forget about the group assignment.
Go to Microsoft Entra and then to groups:
Create a new “Dynamic Device” security group and add the following query:
(device.displayName -startsWith "jv-vm-avd") and (device.deviceModel -eq "Virtual Machine") and (device.managementType -eq "MDM")This ensures no other device comes into the group by accident or by a wrong name. Only Virtual Machines starting with this name and managed by Intune will join the group.
This looks like this:
Validate your rule by testing these rules on the “Validate Rules” tab:
Now we are 100% sure our session host will join the group automatically but a Windows 11 laptop for example not.
We can now configure FSLogix in Intune. I do this by using configuration profiles from settings catalogs. These are easy to configure and can be imported and exported. Therefore I added a download link for you:
Download FSLogix configuration template
If you choose to download the FSLogix configuration template, you need to change the VHD location to your own storage account and share name.
To configure this manually create a new configuration template from scratch for Windows 10 and higher and use the “Settings catalog”
Give the profile a name and description and advance.
Click on “Add settings” and navigate to the FSLogix policy settings.
Under FSLogix -> Profile Containers, select the following settings, enable them and configure them:
| Setting name | Value |
| Access Network as Computer Object | Enabled |
| Delete Local Profile When VHD Should Apply | Enabled |
| Enabled | Enabled |
| Is Dynamic (VHD) | Enabled |
| Keep Local Directory (after logoff) | Enabled |
| Prevent Login With Failure | Enabled |
| Roam Identity | Enabled |
| Roam Search | Disabled |
| VHD Locations | Your storage account and share in UNC. Mine is here: \sajvavdcloudonly.file.core.windows.net\fslogix-profiles |
Under FSLogix -> Profile Containers -> Container and Directory Naming, select the following settings, enable them and configure them:
| Setting name | Value |
| No Profile Containing Folder | Enable |
| VHD Name Match | %username% |
| VHD Name Pattern | %username% |
| Volume Type (VHD or VHDX) | VHDX |
You can defer from this configuration to fit your needs, this is purely how I configured FSLogix.
After configuring the settings, advance to the “Assignments” tab:
Select your group here as “Included group” and save.
We now have to create a Powershell script to connect the session hosts to our storage account and share. This is to automate this task and for each session host in the future you add that it works right out of the box.
In this script, there is an credential created to access the storage account, an registery key to enable the credential in the profile and an additional registery key if you use Windows 11 22H2 to make it work.
# PARAMETERS
# Change these 3 settings to your own settings

# Storage account FQDN
$fileServer = "yourstorageaccounthere.file.core.windows.net"

# Share name
$profilesharename = "yoursharehere"

# Storage access key 1 or 2
$storageaccesskey = "yourkeyhere"

# END PARAMETERS

# Don't change anything under this line ---------------------------------

# Formatting user input to script
$profileShare="\\$($fileServer)\$profilesharename"
$fileServerShort = $fileServer.Split('.')[0]
$user="localhost\$fileServerShort"

# Insert credentials in profile
New-Item -Path "HKLM:\Software\Policies\Microsoft" -Name "AzureADAccount" -ErrorAction Ignore
New-ItemProperty -Path "HKLM:\Software\Policies\Microsoft\AzureADAccount" -Name "LoadCredKeyFromProfile" -Value 1 -force

# Create the credentials for the storage account
cmdkey.exe /add:$fileServer /user:$($user) /pass:$($storageaccesskey)
New-ItemProperty -Path "HKLM:\SYSTEM\CurrentControlSet\Control\Lsa" -Name "LsaCfgFlags" -Value 0 -force
Change the information on line 5, 8 and 11 and save the script as .ps1 file or download it here:
Download Cloud Only Powershell script
You can find the information for line 5 and 11 in the Azure Portal by going to your Storage Account, and then “Access Keys”:
For line 8, you can go to Data Storage -> File Shares:

If you don’t have a fileshare yet, this is the time to create one.
Paste this information in the script and save the script. It should look like this:
Go to Intune and navigate to the “Scripts and Remediations” and then to the tab “Platform scripts”. Then add a new script:
Give the script a name and description and advance.
Select the script and change the options shown in the image and as follows:
Advance to the “Assignments” tab:
Select your session hosts dynamic group and save the script:
Now we are done with all of the setups and we can test our configuration. The session host must be restarted and fully synced before we can login. We can check the status in Intune under our Configuration Profile and Powershell Script.
Configuration Profile:
PowerShell script: (This took about 30 minutes to sync into the Intune portal)
Now that we know for sure everything is fully synchronized and performed, let’s download the new Windows App to connect to our hostpool.
After connecting we can see the session host indeed uses FSLogix to mount the profile to Windows:
Also we can find a new file in the FSLogix folder on the Azure Storage Account:
We have now successfully configured the Cloud only setup for Azure Virtual Desktop.
We can test navigating to the Azure Storage account from the session host, we will get this error:
This is because we try it through the context of the user which doesn’t have access. So users cannot navigate to the fileshare of FSLogix because only our session host has access as system.
This means that you can only navigate to the fileshare on the PC when having local administrator permissions on the session host. This because a local administrator can traverse the SYSTEM account and navigate to the fileshare. However, local administrator permissions is something you don’t give to end users, so in this case it’s safe.
I tried several things to find the storage access key on the machine in registry and cmdkey commands but no success. It is secured enough but it is still a security concern.
I have some security recommendations for session hosts, not only for this cloud only setup but in general:
While this cloud only setup is very great, there are also some security risks that come with it. I really like to use as much serverless options as possible but for production environments, I still would recommend to use an Active Directory or take a look at personal desktop options. Also, Windows 365 might still be a great option if you want to eliminate Active Directory but still use modern desktops.
Please use the Powershell script very carefully, this contains the credentials to full controll access to the storage account. Upload to Intune and delete from your computer or save it and remove the key.
I hope this guide was very helpful and thank you for reading!
These sources helped me by writing and research for this post;
You have reached the end of the page. You can navigate through other blog posts as well, share this post on X, LinkedIn and Reddit or return to the blog posts collection page. Thank you for visiting this post.
If you think something is wrong with this post or you want to know more, you can send me a message to one of my social profiles at: https://justinverstijnen.nl/about/
If you find this page and blog very useful and you want to leave a donation, you can use the button below to buy me a beer. Hosting and maintaining a website takes a lot of time and money. Thank you in advance and cheers :)
The terms and conditions apply to this post.
Sometimes, we need to check some basic connectivity from end user devices to a service like Azure Virtual Desktop. Most networks have a custom firewall equipped where we must allow certain traffic to flow to the internet.
Previously there was a tool from Microsoft available, the Azure Virtual Desktop experience estimator, but they have discontinued that. This tested the Round Trip Time (RTT) to a specific Azure region and is a calculation of what the end user will get.
I created a script to test the connectivity, if it is allowed through Firewall and also test the RTT to the Azure Virtual Desktop service. The script then gives the following output:

I have the script on my Github page which can be downloaded here:
Download TestRTTAVDConnectivity script
The Round Trip Time is the time in milliseconds of an TCP packet from its source to it’s destination and from destination back to the source. It is like ping, but added with the time back like described in the image below:
This is an great mechanism to test connectivity in some critical applications where continious traffic to both the source and destination is critical. These applications can be Remote Desktop but also in VoIP.
RTT and Remote Desktop experience:
The script tests the connection to the required endpoints of Azure Virtual Desktop on the required ports. Azure Virtual Desktop heavily relies on port 443, and is the only port needed to open.
The script takes around 10 seconds to perform all those actions and to print those. If one or all of them are “Failed”, then you know that something has to be changed in your Firewall configurations. If all of them succeeds then everything is alright, and the only factor can be a eventually low RTT.
This script is really useful to test connectivity to Azure Virtual Desktop. It can be used in multiple scenario’s, like initial setup, testing and troubleshooting.
Thank you for reading this guide and I hope it was useful.
These sources helped me by writing and research for this post;
You have reached the end of the page. You can navigate through other blog posts as well, share this post on X, LinkedIn and Reddit or return to the blog posts collection page. Thank you for visiting this post.
If you think something is wrong with this post or you want to know more, you can send me a message to one of my social profiles at: https://justinverstijnen.nl/about/
If you find this page and blog very useful and you want to leave a donation, you can use the button below to buy me a beer. Hosting and maintaining a website takes a lot of time and money. Thank you in advance and cheers :)
The terms and conditions apply to this post.
When using Windows 11 Multi Session images on Azure for Azure Virtual Desktop, Microsoft has disabled some features and changed the behaviour to optimize it for using with multiple users. One of the things that has been “lazy loading” is Windows Search. The first time after logging in it will be much slower than normal. The 2nd, 3rd and 4th time, it will be much faster.
In this video you will see that it takes around 5 seconds till I can begin searching for applications and Windows didnt respond to the first click. This is on a empty session host, so in practice this is much slower.
We can solve this issue by running a simple script on startup that opens the start menu, types in some dummy text and then closes. In my experience, the end user actually likes this because waiting on Windows Search the first time on crowded session hosts can take up to 3 times longer than my “empty host” example. I call it “a stupid fix for a stupid problem”.
I have a simple script that does this here:
Download script from GitHub
Because it is a user-context script that runs on user sign in, I advice you to install this script using Group Policy or Microsoft Intune. I will show you how to do it with Group Policy. You can also store the script in your session host and run it with Task Scheduler.
Demonstration is done through the Local Group Policy editor, but it will work for both domain/non-domain group policy.
Place the script on a local or network location and open Group Policy Management, and then create a new GPO.
Go to User Configuration -> Windows Settings -> Scripts (Logon/Logoff)
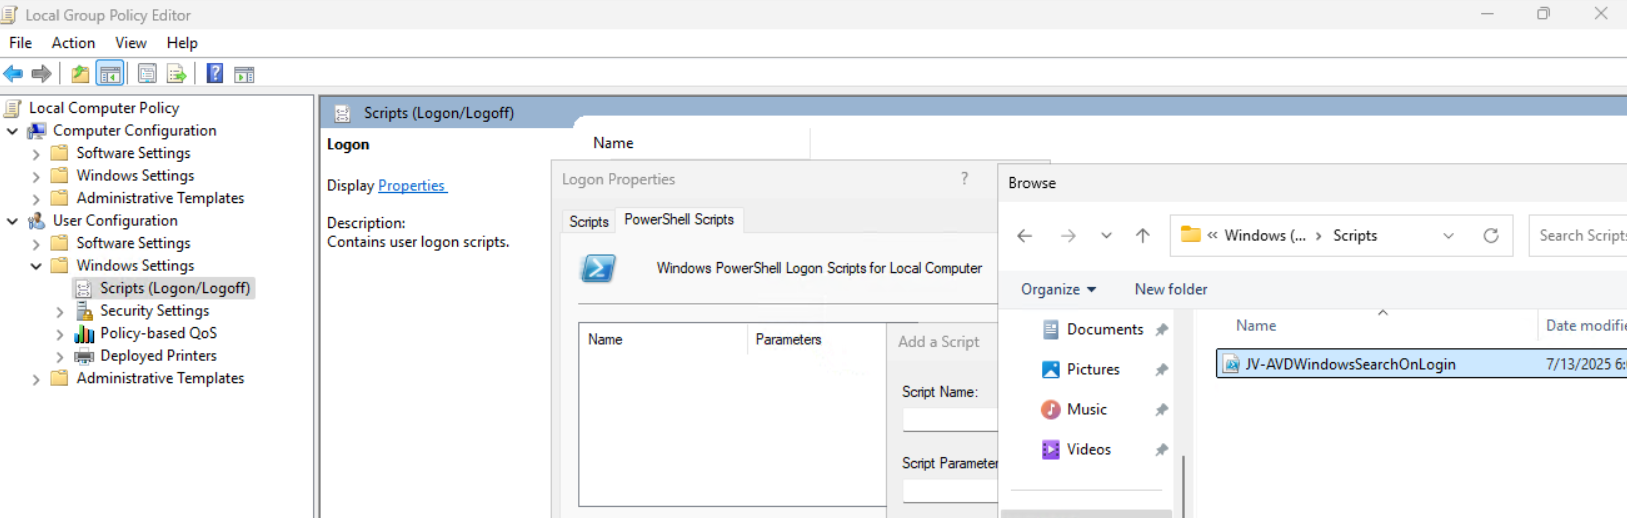
Then open the tab “Powershell Scripts” and select the downloaded script from my Github page.
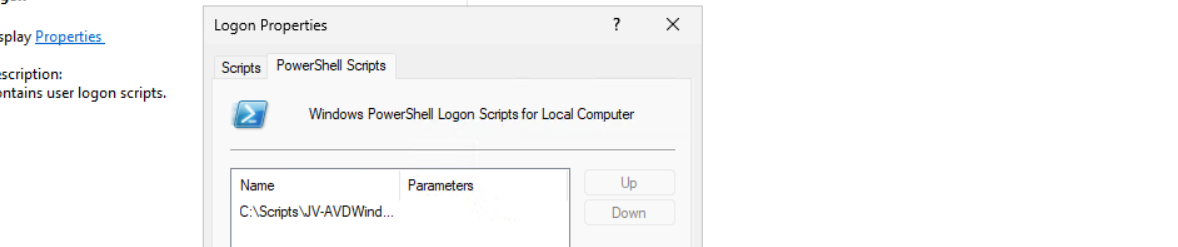
Save the GPO and the script will run on startup.
Assuming you use FSLogix for the roaming profiles on non-persistent session hosts, I have the following optimizations for Windows Search here:
We don’t neccesarily need to roam our search index and history to other machines. This just disables it and our compute power completely goes to serve the end user with a faster desktop experience.
And we have some GPO settings for Windows Search here. I advice you to add this to your system optimizations:
Computer Configuration > Administrative Templates > Windows Components > Search
Set the settings to this for the best performance:

* Negative policy setting, enabled means disabling the option
Save the group policy and test it out.
The script might seem stupid but it’s the only way it works. I did a lot of research because some end users were waiting around 10 seconds before searching was actually possible. This is very time wasting and annoying for the end user.
For better optimization, I included some Group Policy settings for Windows and FSLogix to increase the performance there and get the most out of Azure Virtual Desktop.
Thank you for reading this post and I hope this was helpful.
These sources helped me by writing and research for this post;
You have reached the end of the page. You can navigate through other blog posts as well, share this post on X, LinkedIn and Reddit or return to the blog posts collection page. Thank you for visiting this post.
If you think something is wrong with this post or you want to know more, you can send me a message to one of my social profiles at: https://justinverstijnen.nl/about/
If you find this page and blog very useful and you want to leave a donation, you can use the button below to buy me a beer. Hosting and maintaining a website takes a lot of time and money. Thank you in advance and cheers :)
The terms and conditions apply to this post.
Sometimes we want to know why a Azure Virtual Desktop logon took longer than expected. Several actions happen at Windows logon, like FSLogix profile mounting, Group Policy processing and preparing the desktop. I found a script online that helps us monitor the sign-ins and logons and basically tells us why it took 2 minutes and what parts took a specific amount of seconds.
The script is not made by myself, the source of the script is: https://www.controlup.com/script-library-posts/analyze-logon-duration/
I have a demo environment where we can test this script. There we will run the script.
The script must be run at the machine where a user has just finished the login process. The user must be still logged on at the time you run it because it needs information from the event log and the session id.
I have just logged in into my demo environment with my testuser. We must specify the user as: “DOMAIN\user”:
Get-LogonDurationAnalysis @params
cmdlet  at command pipeline position 1
Supply values for the following parameters:
DomainUser: JV\test.user
Then hit enter and the script will get all information from the event logs. It can generate some warnings about software not recognized, which is by design because they are actually not installed.
WARNING: Unable to find network providers start event
WARNING: Could not find Path-based Import events for source VMware DEM
WARNING: Could not find Async Actions events for source VMware DEM
WARNING: Could not find AppX File Associations events for source Shell
WARNING: Unable to find Pre-Shell (Userinit) start event
WARNING: Could not find ODFC Container events for source FSLogix
WARNING: No AppX Package load times were found. AppX Package load times are only present for a users first logon and may not show for subsequent logons.After about 15 seconds, we get the results from the script with readable information. I will give an explanation about each section of the output and the information it tells us.
Here we have some basic information like the total time, the username, the FSLogix profile mounting, the possible Loopback processing mode and the total time of all login phases at the bottom.
This is a nice overview of the total sign in time and where this time is spent. In my case, I did not use FSLogix because of 1 session host.
At this section there are some tasks that happens in the background. In this case, the client refreshed some Group Policy scripts.
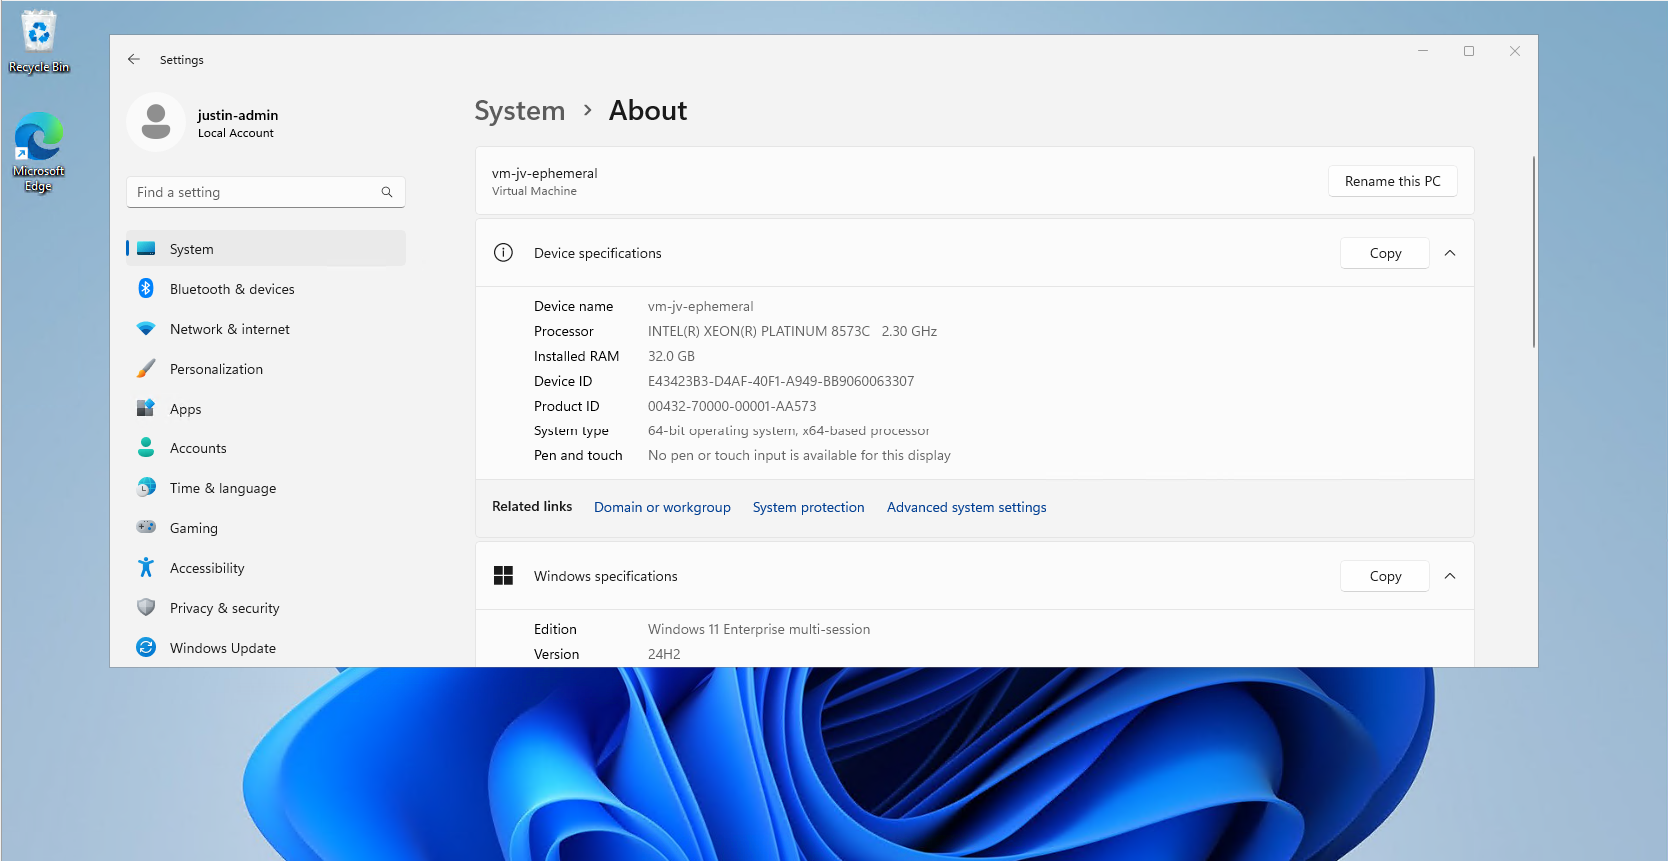
Here the script assessed the scheduled tasks on the machine that ran on the login of the user. Some tasks can take much time to perform, but in this case it was really fast.
At this section the group policies are assessed. This takes more time the more settings and different policies you have.
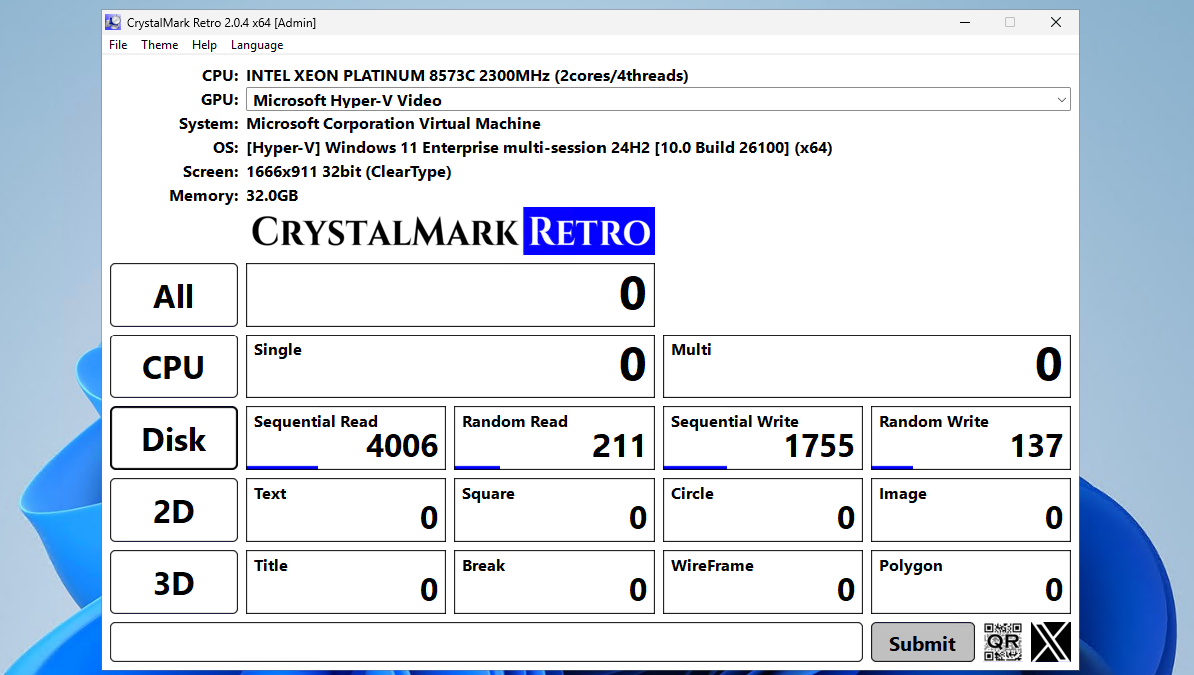
After that the script summarizes the processing time on the client for the Group Policy Client Side Extensions (CSE). This means, the machine get its settings and the CSE interprets this into machine actions.
You can get the script from this site or by downloading it here:
This script can be very handy when testing, monitoring and troubleshooting logon performance of Azure Virtual Desktop. It shows exactly how much time it takes and what part took the most time. I can recommend everybody to use it when needed.
Thank you for reading this guide and I hope it was helpful.
You have reached the end of the page. You can navigate through other blog posts as well, share this post on X, LinkedIn and Reddit or return to the blog posts collection page. Thank you for visiting this post.
If you think something is wrong with this post or you want to know more, you can send me a message to one of my social profiles at: https://justinverstijnen.nl/about/
If you find this page and blog very useful and you want to leave a donation, you can use the button below to buy me a beer. Hosting and maintaining a website takes a lot of time and money. Thank you in advance and cheers :)
The terms and conditions apply to this post.
Choosing the right performance tier of Azure Storage Accounts can be very complex. How much size and performance do we need? How many users will login to Azure Virtual Desktop and how many profile size do we want to assign them?
In this blog post I will explain everything about hosting your FSLogix profiles on Azure Virtual Desktop and the storage account performance including pricing. AFter that we will do some real world performance testing and a conclusion.
Before looking into the details, we first want to decide which billing type we want to use for our Storage Account. There are two billing types for storage accounts:
You select this billing type at the storage account wizard. After creating the storage account, you can’t change the type. If you want to use premium storage account, then “provisioned” is required.
As you can see in this animation. For standard (HDD based) you can choose both, and for premium (SSD based) we have to provision storage.
When you want to be billed based on how many storage you provision/reserve, you can choose “provisioned”. This also means that we don’t pay for the transactions and egress costs as we pay a full package for the storage and can use it as much as we want.
We have two types of “provisioned” billing, V1 and V2:

The big difference between those two values is that in V1, you are stuck with Microsoft’s chosen performance based on how much you provision and with V2, you can change those values independently, as shown in the pictures below:
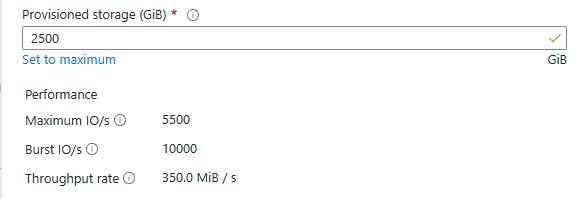
Provisioned v1
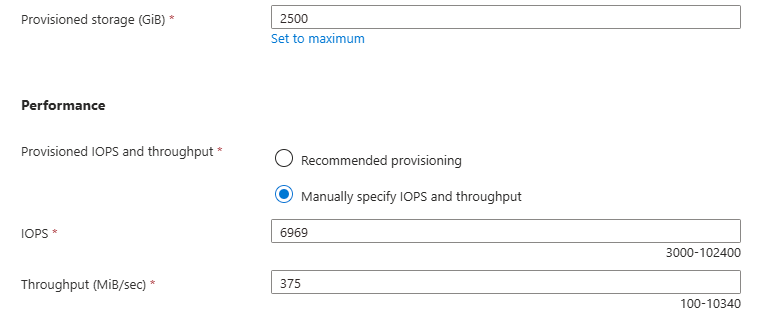
Provisioned v2
This way you can get more performance, with a little increase of credits instead of having to provision way more than you use.
Pay-as-you-go is the more linear manner of paying your storage account. Here you pay exactly what you use, and get a fixed performance but we have to pay additionally for transactions and egress of the data.
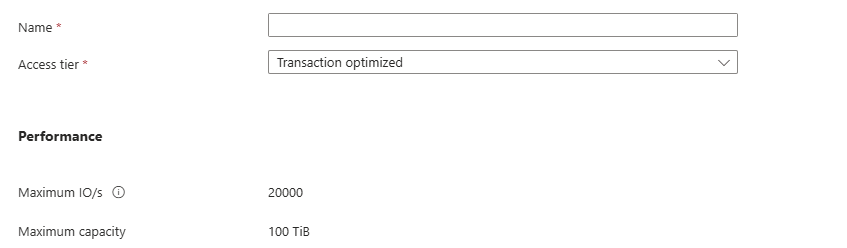
Because this billing option aligns tohow you use the storage, we can define for what purpose we use the storage account. This changes the prices of transactions, storage at rest and egress data. We have 3 categories/tiers:
All three tiers use the same underlying hardware and give you the same performance.
For Azure Virtual Desktop operating in standard performance and pay-as-you-go billing, Transaction optimized or Hot tiers are recommended. Let’s find out why:
| Tier | Storage $/GB | IOPS Cost | Egress Cost | Use Cases |
|---|---|---|---|---|
| Transaction Optimized | Medium | Lowest | Normal | High metadata activity |
| Hot | Higher | Moderate | Lower | Frequent access |
| Cool | Lowest | Highest | Higher | Rare access, archival |
Per this table, we would pay the most if we place frequent accessed files on a “Cool” tier, as you pay the most for IOPS. Therefore, for FSLogix profiles it the best to use “Hot” tier as we pay the most for storage and we try to limit that as much as possible by deleting unneeded profiles and limiting the profile size with FSLogix settings.
Use the Azure Calculator for a real world calculation based on your needs.
Now we have those terms to indicate the performance, but what do they mean exactly?
We can compare IOPS and throughput to a car, where the IOPS are the rotations per minute (RPM) of the engine and the throughput is the actual speed of the car.
Let’s say, we need a storage account. We want to know for 3 scenario’s which of the options would give us specific performance and also the costs of this configuration. We want the highest performance for the lowest price, or we want a upgrade for a little increase.
I want to go through all of the options to see the actual performance and pricing of 3 AVD profiles scenarios where we state we use 3 hypothetical sizes:
I first selected “Provisioned” with premium storage with default IOPS/throughput combination. For the three scenarios I get by default: (click image to enlarge)
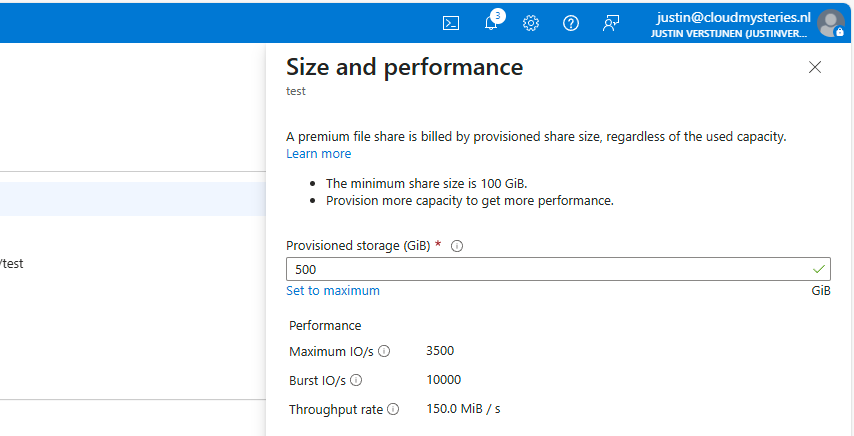
500GB
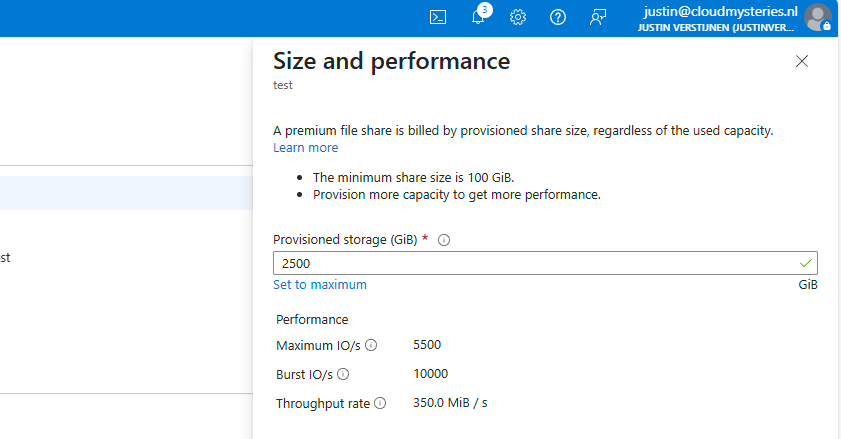
2500GB
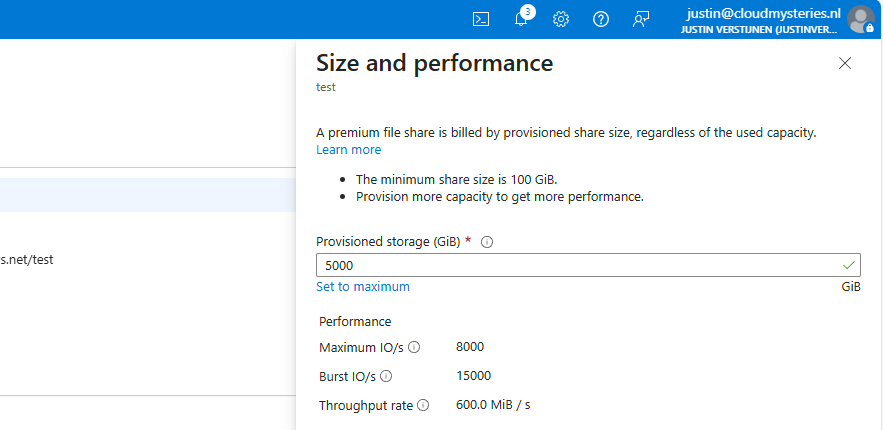
5000GB
I put those numbers in the calculator, and this will cost as stated below (without extra options):
| IOPS | Burst IOPS | Throughput (MB/s) | Costs per month | Latency (in ms) | |
| (Premium) 500GB | 3500 | 10000 | 150 | $ 96 | 1-5 |
| (Premium) 2500GB | 5500 | 10000 | 350 | $ 480 | 1-5 |
| (Premium) 5000GB | 8000 | 15000 | 600 | $ 960 | 1-5 |
You see, this is pretty much linear in terms of pricing. 96 dollars for every 500GB. Now let’s check the standard provisioned options:
| IOPS | Burst IOPS | Throughput (MB/s) | Costs per month | Latency (in ms) | |
| (Standard) 500GB | 1100 | Not available | 70 | $ 68 | 10-30 |
| (Standard) 2500GB | 1500 | Not available | 110 | $ 111 | 10-30 |
| (Standard) 5000GB | 2000 | Not available | 160 | $ 165 | 10-30 |
This shows pretty clear as the storage size increases, we could trade in performance for monthly costs. However, FSLogix profiles are heavily dependent on latency which increases by alot when using standard tier.
Because the difference of 1-5 and 10-30 ms latency, Premium would be a lot faster with loading and writing changes to the profile. And we have the possibility of bursting for temporary extra speed.
To further clarify what those numbers mean in terms of performance, I have a practice test;
In this test we will place a 10GB (10.240 MB) file from a workstation to the Azure Storage to count the time and the average throughput (speed in MB per second).

Now let’s take a look at the results:
Left: Premium Right: Standard
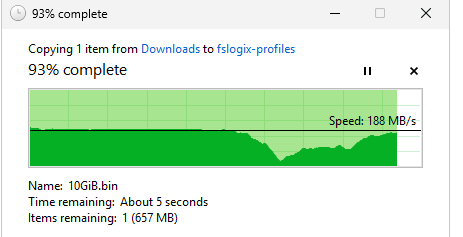
Time: 01:14:93 (75 seconds) Average speed: 136,5 MB/s Max speed: 203MB/s
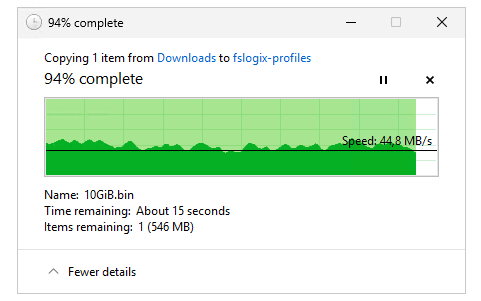
Time: 03:03:41 (183 seconds) Average speed: 55,9 MB/s Max Speed: 71,8 MB/s
The premium fileshare has finished this task 244% faster than the standard fileshare.
I also tested the profile mounting speed but they were around even. I have tested this with this script: https://justinverstijnen.nl/monitor-azure-virtual-deskop-logon-performance/
I couldn’t find a good way to test the performance when logged in and using the profile, but some tasks were clearly slower on the “standard” fileshare, like placing files on the desktop and documents folder.
Because FSLogix profiles heavily rely on low latency due to constant profile changes, we must have as low latency as possible which we also get with premium fileshares. I cannot state other than we must have Premium fileshares in production, at least for Azure Virtual Desktop and FSLogix disks.
This guide further clarifies the difference in costs and practice of Premium vs Standard Azure Storage Accounts for Azure Virtual Desktop. Due to the throughput and latency differences, for FSLogix profiles I would highly recommend using premium fileshares.
I hope this guide was very helpful and thank you for reading.
These sources helped me by writing and research for this post;
You have reached the end of the page. You can navigate through other blog posts as well, share this post on X, LinkedIn and Reddit or return to the blog posts collection page. Thank you for visiting this post.
If you think something is wrong with this post or you want to know more, you can send me a message to one of my social profiles at: https://justinverstijnen.nl/about/
If you find this page and blog very useful and you want to leave a donation, you can use the button below to buy me a beer. Hosting and maintaining a website takes a lot of time and money. Thank you in advance and cheers :)
The terms and conditions apply to this post.
This issue has been solved in the newest release of FSLogix 25.04: https://learn.microsoft.com/en-us/fslogix/overview-release-notes
Please use this newer version instead of version 25.02. This fixes the bug in this article without any change in policies and settings.
When testing the new FSLogix 25.02 version, I came across a very annoying problem/bug in this new version.
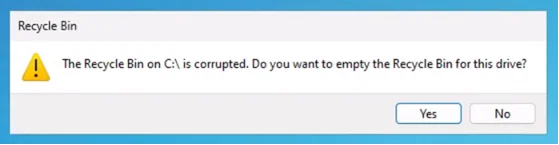
“The Recycle Bin on C:\ is corrupted. Do you want to empty the Recycle Bin for this drive?”
I tried everything to delete the folder of the Recycle bin on the C:\ drive but nothing worked. Only warnings about insufficient permissions and such, which is good but not in our case. This warning appears everytime you log in to the hostpool and every 2 minutes when working in the session. Something you definitely want to fix.
To solve the bug, you have to disable the Recycle Bin roaming in the FSLogix configuration. You can do this by going to your FSLogix Group Policy and open it to edit the settings. Make sure you already updated the FSLogix policies to this new version to match the agent and policy version. I also addedd a fix for using the Windows registry.
Go to the following path:
Computer Configuration -> Policies -> Administrative Templates -> FSLogix
Here you can find the option “Roam Recycle Bin”, which is enabled by default -> even when in a “Not Configured” state. Disable this option and click on “OK”.
After this change, reboot your session host(s) to update the FSLogix configuration and after rebooting log in again and check if this solved your problem. Otherwise, advance to the second option.
When using Registery keys to administer your environment, you can create the following registery key that does the same as the Group Policy option:
HKEY_LOCAL_MACHINE\SOFTWARE\FSLogix\Apps\RoamRecycleBinThis must be a default DWORD;
After this change, reboot your session host(s) to update the FSLogix configuration and after rebooting log in again and check if this solved your problem. Otherwise, advance to the second option.
If disabling the recycle bin did not fix your problem, we have to do an extra step to fix it. In my case, the warning still appeared after disabling the recycle bin. FSLogix changed something in the profile which makes the recycle bin corrupt.
We have 2 options to “fix” the profile:
After logging in with a new or restored profile, the problem is solved.
This problem can be very annoying, especially when not wanting to disable the recycle bin. This version seems to change something in the profile which breaks usage of the the recycle bin. I did not manage to solve it with a profile that had this problem.
In existing and sensitive environments, my advice is to keep using the last FSLogix 2210 hotfix 4 version. As far as I know, this version is completely bug-free and does not have this problem.
After some more research, I came across a page of Microsoft about a lot of features deprecated in this version of FSLogix. Be aware of those changes before they might impact your environment: https://learn.microsoft.com/en-us/fslogix/troubleshooting-feature-deprecation
If I helped you with this guide to fix this bug, it was my pleasure and thank you for reading it.
You have reached the end of the page. You can navigate through other blog posts as well, share this post on X, LinkedIn and Reddit or return to the blog posts collection page. Thank you for visiting this post.
If you think something is wrong with this post or you want to know more, you can send me a message to one of my social profiles at: https://justinverstijnen.nl/about/
If you find this page and blog very useful and you want to leave a donation, you can use the button below to buy me a beer. Hosting and maintaining a website takes a lot of time and money. Thank you in advance and cheers :)
The terms and conditions apply to this post.
If you have the Office Apps installed with OneNote included, sometimes the OneNote printer will be installed as default:

This can be very annoying for our end users and ourselves as we want real printers to be the default printer. Today I will show you how to delete this printer for current and new session hosts permanently.
The issue is that OneNote automatically creates a printer queue in Windows at installation for users to send information to OneNote. This will be something they use sometimes, but a physical printer will be used much more often. The most annoying part is that the software printer for OneNote will be marked as default printer every day which is annoying for the end users.
Advance through this page to see how I solved this problem many times, as our users don’t use the OneNote printer. Why keeping something as we don’t use it.
My solution to fix this problem is to create a delete-printer rule with Group Policy Printers. These are very great as they will remove the printer now, but also if we roll out new session hosts in a few months. This will be a permanent fix until we delete the GPO.
Create a new Group Policy Object at yourt Active Directory Management server:
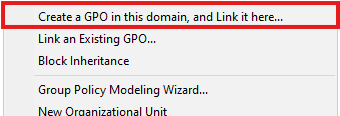
Choose “Create a GPO in this domain and Link it here…” or use your existing printers-GPO if applicable. The GPO must target users using the Azure Virtual Desktop environment.
Navigate to User Configuration -> Preferences -> Control Panel Settings -> Printers
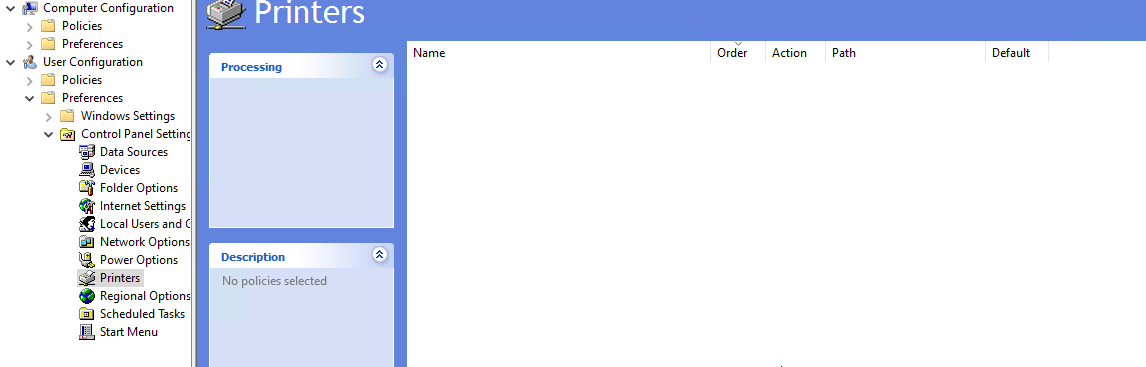
Right-click on the empty space and select New -> Local Printer
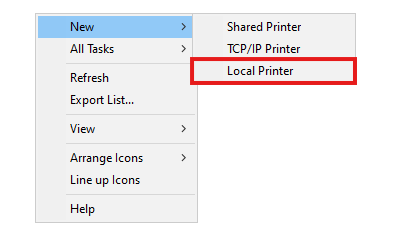
The select “Delete” as action and type in exactly the name of the printer to be deleted, in this case:
OneNote (Desktop)Just like below:
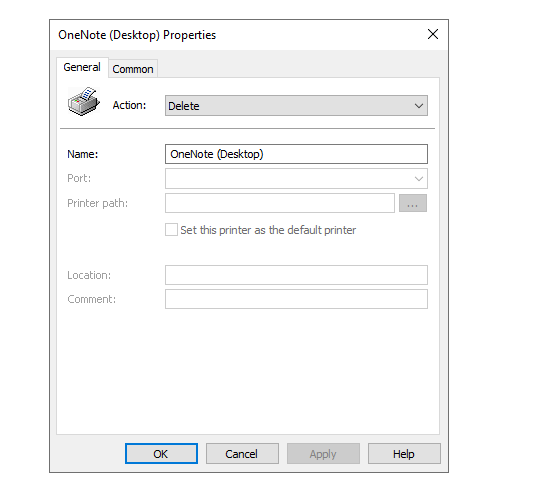
Click OK and check the settings for the last time:
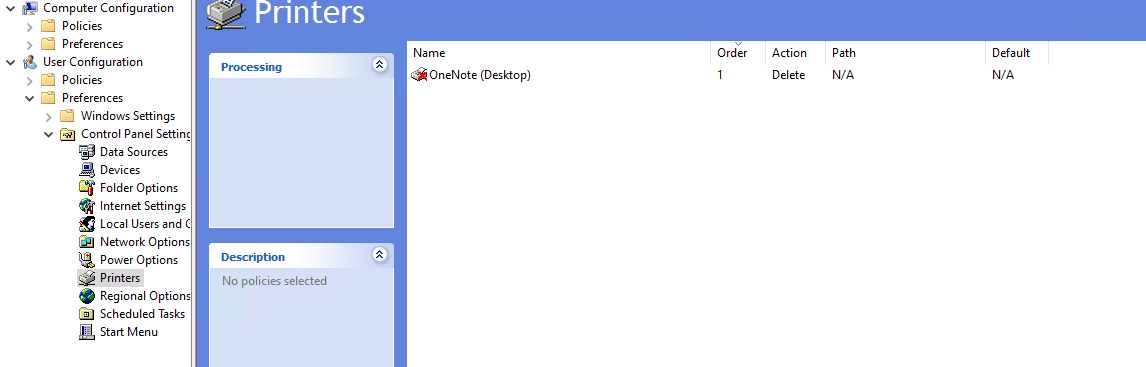
Now we are done and at the next login or Group Policy refresh interval, the OneNote printer will be completely deleted from the users’ printers list.
This is a very strange thing to happen but a relatively easy solution. I also tried deleting the printer through registery keys but this was very hard without success. Then I though of a better and easier solution as most deployments still need Active Directory.
Thank you for reading this guide and I hope it was helpful.
These sources helped me by writing and research for this post;
You have reached the end of the page. You can navigate through other blog posts as well, share this post on X, LinkedIn and Reddit or return to the blog posts collection page. Thank you for visiting this post.
If you think something is wrong with this post or you want to know more, you can send me a message to one of my social profiles at: https://justinverstijnen.nl/about/
If you find this page and blog very useful and you want to leave a donation, you can use the button below to buy me a beer. Hosting and maintaining a website takes a lot of time and money. Thank you in advance and cheers :)
The terms and conditions apply to this post.
When using Azure Virtual Desktop (AVD) or Windows (W365), we sometimes use the mobile apps for Android, MacOS or iOS. But those apps rely on filling in a Feed Discovery URL instead of simply a Email address and a password.
Did you know we can automate this process? I will explain how to do this!
Fast path for URL: https://rdweb.wvd.microsoft.com/api/arm/feeddiscovery
When downloading the apps for your mobile devices, we get this window after installing:
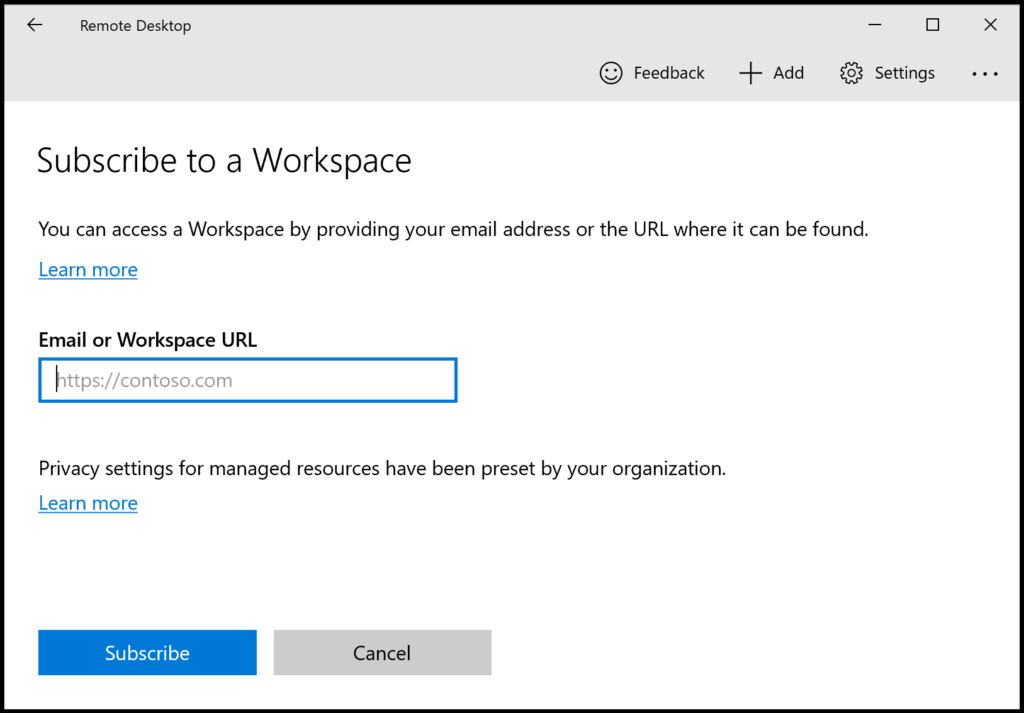
After filling in our emailadress that has access to a Azure Virtual Desktop hostpool or Windows 365 machine, we still get this error:
Now the client wants a URL, but we don’t want to fill in this URL for every device we configure. We can automate this through DNS.
To configure your automatic Feed Discovery, we must create this DNS record:
| Record type | Host | Value |
| TXT | _msradc | https://rdweb.wvd.microsoft.com/api/arm/feeddiscovery |
Small note, we must configure this record for every domain which is used for one of the 2 remote desktop solutions. If your company uses e.g.:
We must configure this 3 times.
Let’s login to our DNS hosting for the domain, and create the record:

Then save your configuration and wait for a few minutes.
Now that our DNS record is in place, we can test this by again, typing our email address into the application:
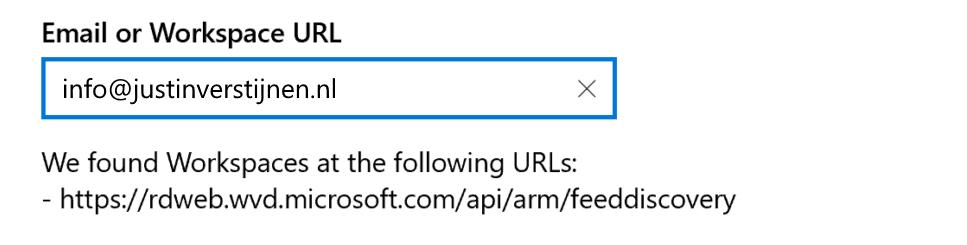
Now the application automatically finds the domain and imports the feed discovery URL into the application. This minor change solves a lot of headache.
Creating this DNS record saves a lot of problems and headache for users and administrators of Azure Virtual Desktop and/or Windows 365. I hope I explained clearly how to configure this record and described the problem.
These sources helped me by writing and research for this post;
Thank you for visiting this website!
You have reached the end of the page. You can navigate through other blog posts as well, share this post on X, LinkedIn and Reddit or return to the blog posts collection page. Thank you for visiting this post.
If you think something is wrong with this post or you want to know more, you can send me a message to one of my social profiles at: https://justinverstijnen.nl/about/
If you find this page and blog very useful and you want to leave a donation, you can use the button below to buy me a beer. Hosting and maintaining a website takes a lot of time and money. Thank you in advance and cheers :)
The terms and conditions apply to this post.
By default, Microsoft Store applications are not supported when using FSLogix. The root cause is that Windows stores some metadata that is not roamed in the profile folder and cleared at every new logon. You will encounter this behaviour in every environment where you use FSLogix.
Now a long time I told our end users that there unfortunately is no solution possible to download apps and make them persistent across Azure Virtual Desktop sessions but someday I found a workaround to this problem. I will explain this at this page.
So the problem with Microsoft Store applications on any FSLogix based system is that the application can be installed like expected and they will work. After signing out of the session and logging in again, the applications will be gone. Under water, the applications are still installed on the computer, only Windows doesn’t know to show them to the user.
The fun fact is, the application data is stored in the user profile. You can test this by for example download the application WhatsApp and login to your WhatsApp account. Log off the machine and sign in again. Download the application and you will be logged into WhatsApp automatically.
So, the application manifest of Windows which contains what applications are available to the user cleans up after logging out, but the data is persistent.
Now that we know more about the underlying problem, we can come to a solution to it. My solution is relatively simple; a log-on script that uses winget and installs all the needed packages at sign in of the user. This also has some advantages because we of IT are in control what people and install or not. We can completely disable the Microsoft Store and only use this “allowed” packages.
For installing this Microsoft Store applications, we use Winget. This is a built-in (from 24H2) package manager for Windows which can download and install these applications.
We can for example install the WhatsApp Microsoft Store application with Winget with the following command:
winget install 9NKSQGP7F2NH --silent --accept-package-agreements --accept-source-agreementsFor installing applications, we have to define the Id of the package, which is 9NKSQGP7F2NH for WhatsApp. You can lookup these Id’s by using your own command prompt and run the following command:
winget search *string*Where *string* is of course the application you want to search for. Let’s say, we want to lookup WhatsApp:
winget search whatsapp

Agree: Y

Name                            Id                            Version         Match         Source
---------------------------------------------------------------------------------------------------
WhatsApp                        9NKSQGP7F2NH                  Unknown                       msstore
WhatsApp Beta                   9NBDXK71NK08                  Unknown                       msstore
Altus                           AmanHarwara.Altus             5.5.2           Tag: whatsapp winget
Beeper                          Beeper.Beeper                 3.110.1         Tag: whatsapp winget
Wondershare MobileTrans         Wondershare.MobileTrans       4.5.40          Tag: whatsapp winget
ttth                            yafp.ttth                     1.8.0           Tag: whatsapp winget
WhatsappTray                    D4koon.WhatsappTray           1.9.0.0                       winget
Here you can find the ID where we can install WhatsApp with. We need this in the next step.
Now the solution itself consists of creating a logon script and running this on login.
First, put the script in .bat or .cmd format on a readable shared network location, like a server or on the SYSVOL folder of the domain.
Then create a Group Policy with an start-up script that targets this script and launches it on startup of the PC. You can do that here:
User Configuration -> Policies -> Windows Settings -> Scripts (Logon)
Add your network added script there. Then head over to your AVD application.
After succesfully logging in to Azure Virtual Desktop (relogin required after changing policy), our applications will be available and installed in the background. After around 30 seconds you can find the applications in the start menu.
Fun fact is that the data is stored in the profile, so after installing the app it can be used directly and with the data from an earlier login.
Now this guide shows how I solved the problem of users not able to use apps on Azure Virtual Desktop without re-installing them every session.
In my opinion, I think its the best way to handle the applications. If the application has an option to install through a .exe or .msi file, that will work much better. I use this only for some applications that can be downloaded exclusively from the Windows Store.
These sources helped me by writing and research for this post;
You have reached the end of the page. You can navigate through other blog posts as well, share this post on X, LinkedIn and Reddit or return to the blog posts collection page. Thank you for visiting this post.
If you think something is wrong with this post or you want to know more, you can send me a message to one of my social profiles at: https://justinverstijnen.nl/about/
If you find this page and blog very useful and you want to leave a donation, you can use the button below to buy me a beer. Hosting and maintaining a website takes a lot of time and money. Thank you in advance and cheers :)
The terms and conditions apply to this post.
When using Windows 11 on Azure Virtual Desktop (AVD) - without the right optimization - the experience can be a little laggy, stuttery and slow. Especially when you came from Windows 10 with the same settings. You definitely want to optimize some settings.
After that we will look into the official Virtual Desktop Optimization Toolkit (VDOT).
Assuming you run your Azure Virtual Desktop environment by using the good old Active Directory (AD DS), you can manage the hosts with Group Policy.
To help you optimizing the experience on Windows 11, I have a predefined group policy available with lots of settings to help optimizing your Windows 11 session hosts. This group policy follows the official Microsoft best practices, alongside with some of my own optimizations which has been proven good in production.
This group policy does the following:
You can install this group policy by following the steps below;
If you have to change your Powershell Execution Policy, use Set-ExecutionPolicy Unrestricted -Scope Process and then run your script. This bypasses the execution policy for only the duration of that Powershell window.
After succesfully running the script, the GPO will be available in the Group Policy Management console;
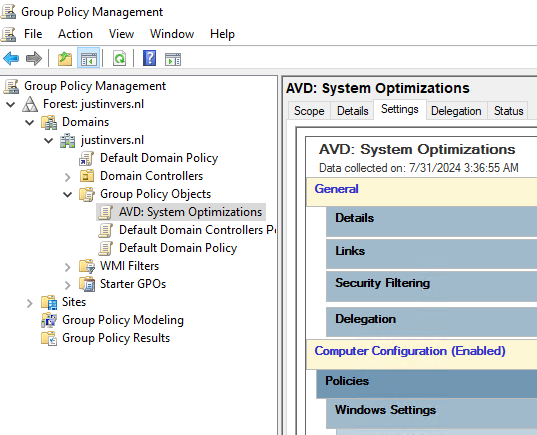
You are free to link the GPO to each OU you want but make sure it will not directly impact users or your service.
Managing AVD session hosts isn’t only enabling settings and hoping that it will reach its goal. It is building, maintaining and securing your system with every step. To help you building your AVD environment like a professional, i have some tips for you:
You can download the package from my Github (includes Import script).
Next to my template of performance GPO’s we can use the Virtual Desktop Optimization Tool (VDOT) to optimize our Windows images for multi-session hosts. When using Windows as multi session, we want to get the most performance without overshooting the resources which will result in high operational costs.
This tool does some deep optimizations for user accounts, processes and threads the background applications use. Let’s say that we have 12 users on one VM, some processes are running 12 times.
Download the tool and follow the instructions from this page:
Download Virtual Desktop Optimization Tool
When creating images, it is preferred to run the tool first, and then install the rest of your applications and changes.
This group policy is a great wat to optimize your Windows 11 session hosts in Azure Virtual Desktop (AVD) and Windows 365. This does disable some stuff that really uses some computing and graphical power which you don’t want in performance-bound situation like remote desktop. Those can feel laggy and slow really fast for an end user.
I hope I helped you optimizing your Windows 11 session hosts and thank you for reading and using my Group Policy template.
You have reached the end of the page. You can navigate through other blog posts as well, share this post on X, LinkedIn and Reddit or return to the blog posts collection page. Thank you for visiting this post.
If you think something is wrong with this post or you want to know more, you can send me a message to one of my social profiles at: https://justinverstijnen.nl/about/
If you find this page and blog very useful and you want to leave a donation, you can use the button below to buy me a beer. Hosting and maintaining a website takes a lot of time and money. Thank you in advance and cheers :)
The terms and conditions apply to this post.
All pages referring or tutorials for GitHub.
With GitHub Pages, we can host some free websites for personal use. This is really great as we mostly already use GitHub to store our code and assets for websites. In this guide, I will explain some of the advantages of GitHub Pages, and how to get started by using the service.
Let’s dive into it!
youraccount.github.ioGitHub Pages allows you to host a static website directly from a GitHub repository. This can be done without managing a server, infrastructure, or hosting provider. The only thing you do is create a repository, upload a website, and optionally connect it to a domain name of your choice. We can compare this to Azure Static Web Apps if you are familiar with that.
GitHub Pages supports static websites, which means it can only do frontend code like:
You cannot host complex websites with PHP, APIs, Node.js, or Python, or other complex code. For that, I would advise using Azure or your own hosting service.
To start hosting a website on GitHub, we need to create a repository. This is a space where we place all code used for a certain solution, like frontend code and assets. This will be clear in a few minutes.
Open GitHub at https://github.com/ and log in to your account.
Now in the top-right corner, click on the “+” and create a new repository.
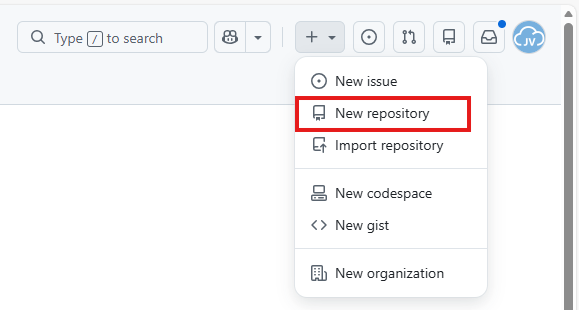
Now give the repository a name and description.
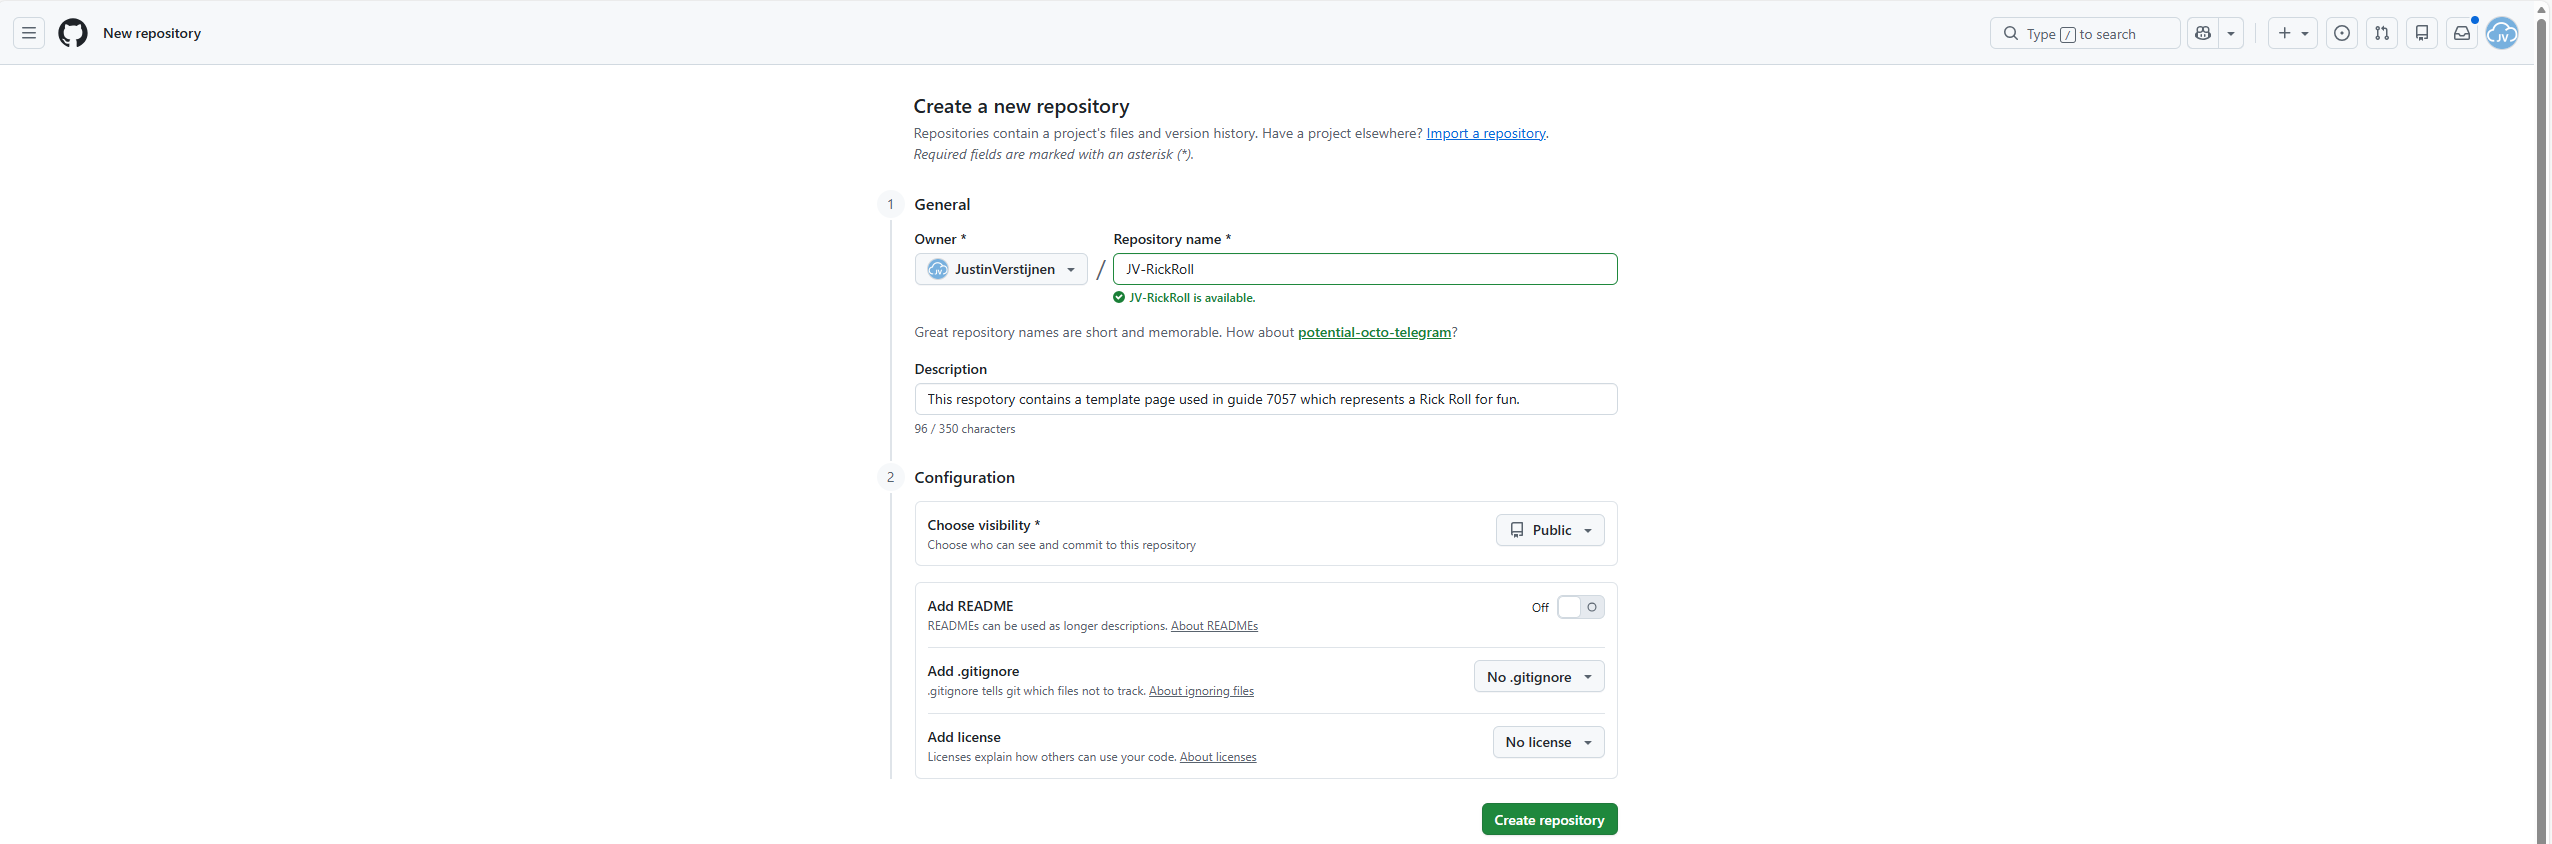
Now the creation of the repository is finished.
I will create a template site with a Rick Roll meme on it, to make the guide a little bit fun. This is a very simple website with a GIF and sound which you can download and also use. You can also choose to run your own website code of course.
Now finish the repository creation wizard. Then click on uploading some files.
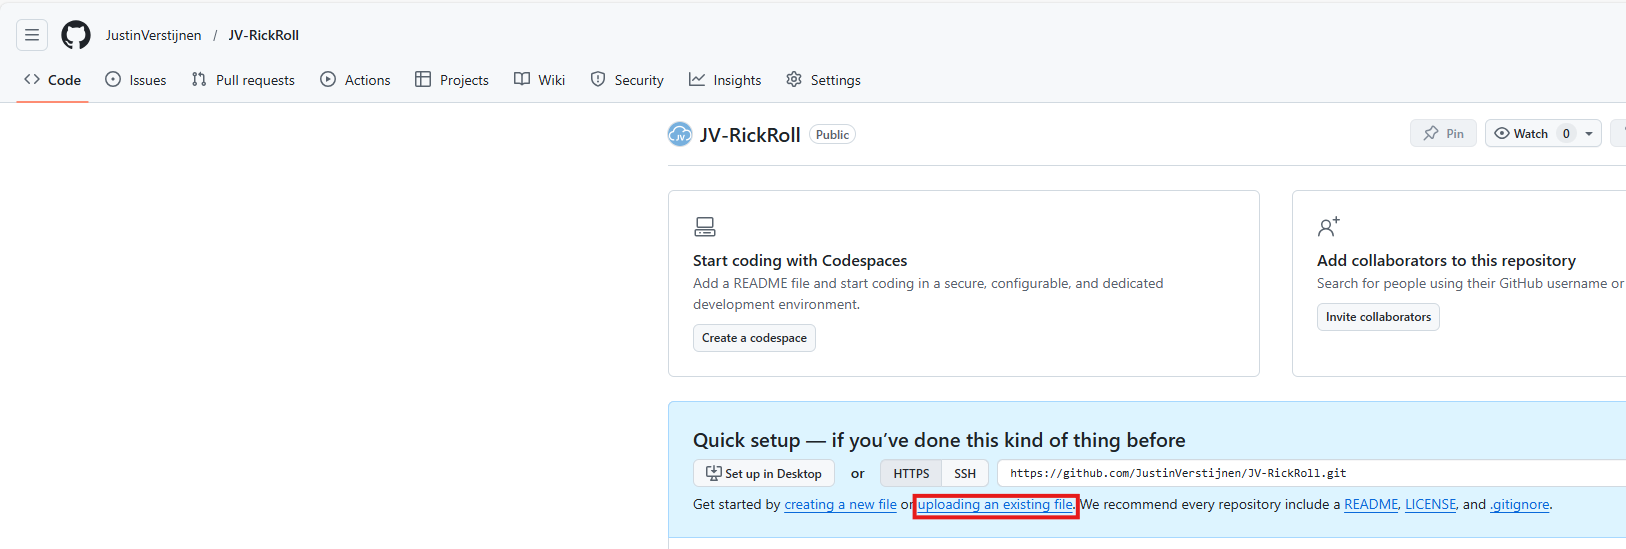
Download the files from my example repository:
Download template site from my GitHub
Click “Code” and then click “Download ZIP”.
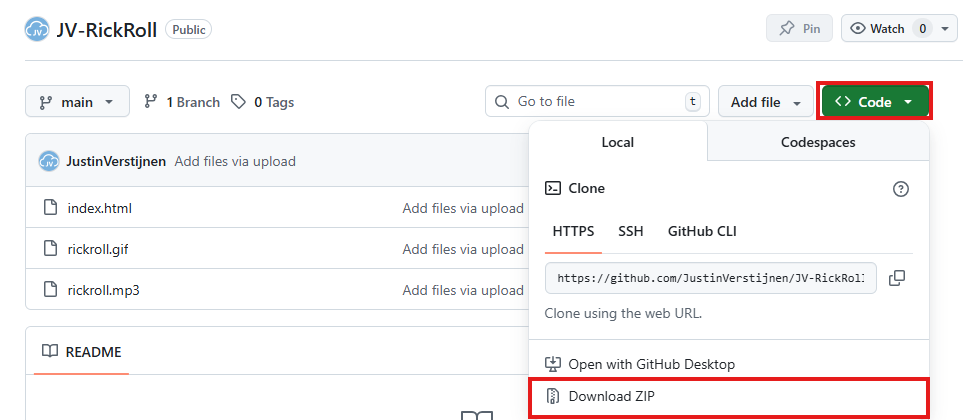
Then upload these files into your own repository.
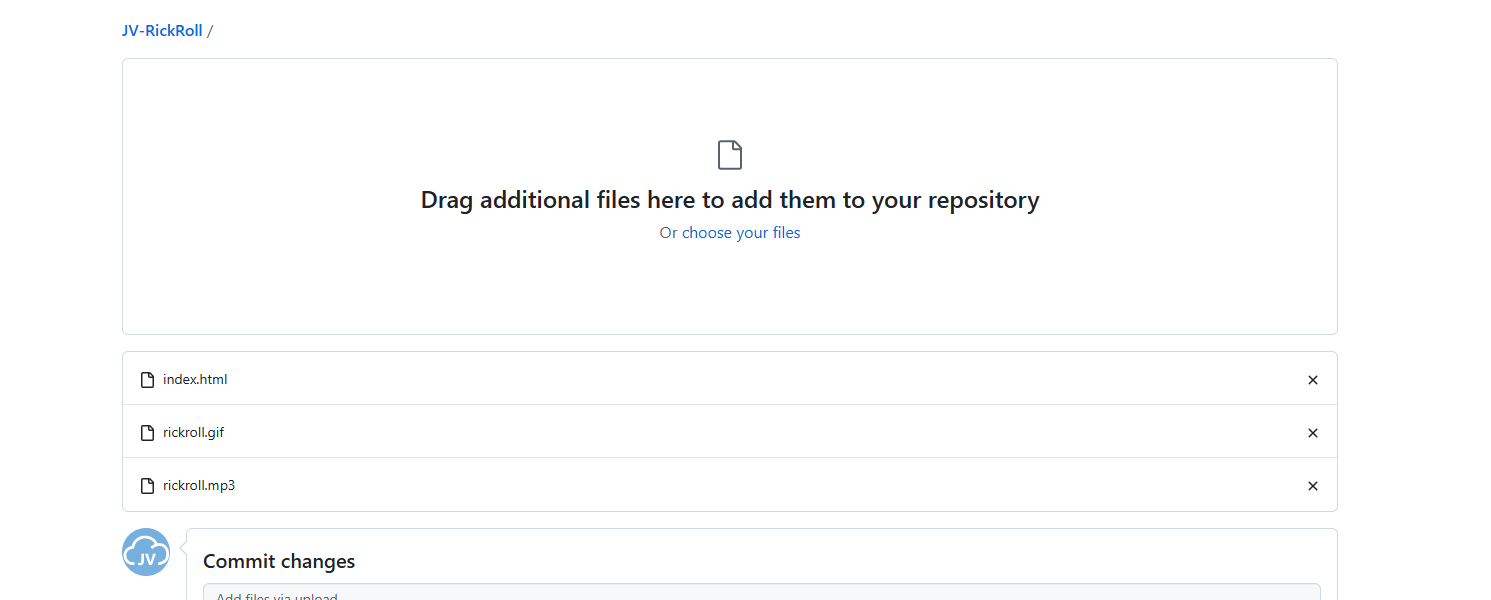
Your repository should have those three files in the root/main branch now:
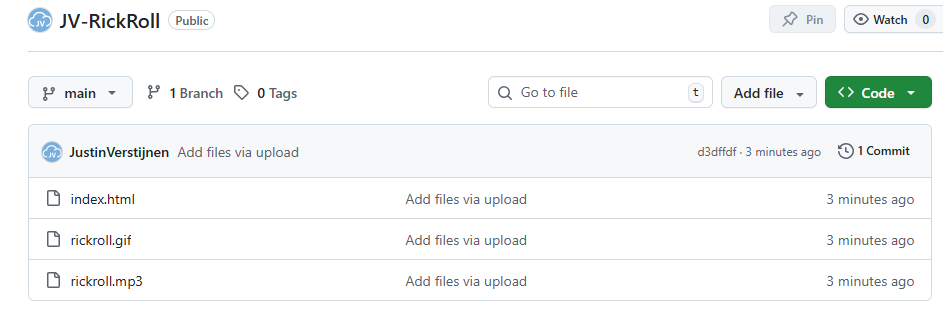
Now we have prepared our repository to host a website, so we can enable the GitHub Pages service. In the repository, go to “Settings”:
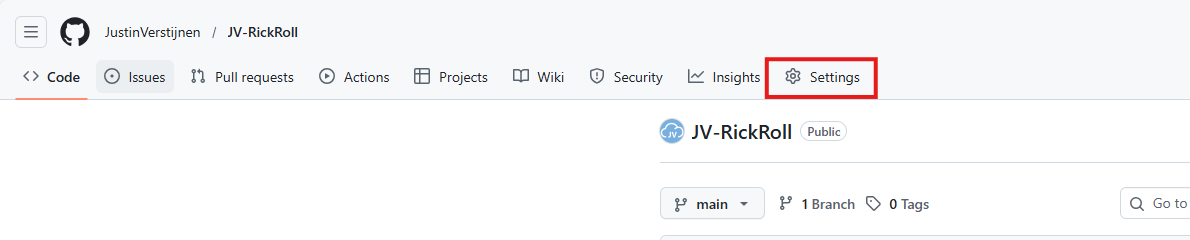
Then go to “Pages”.
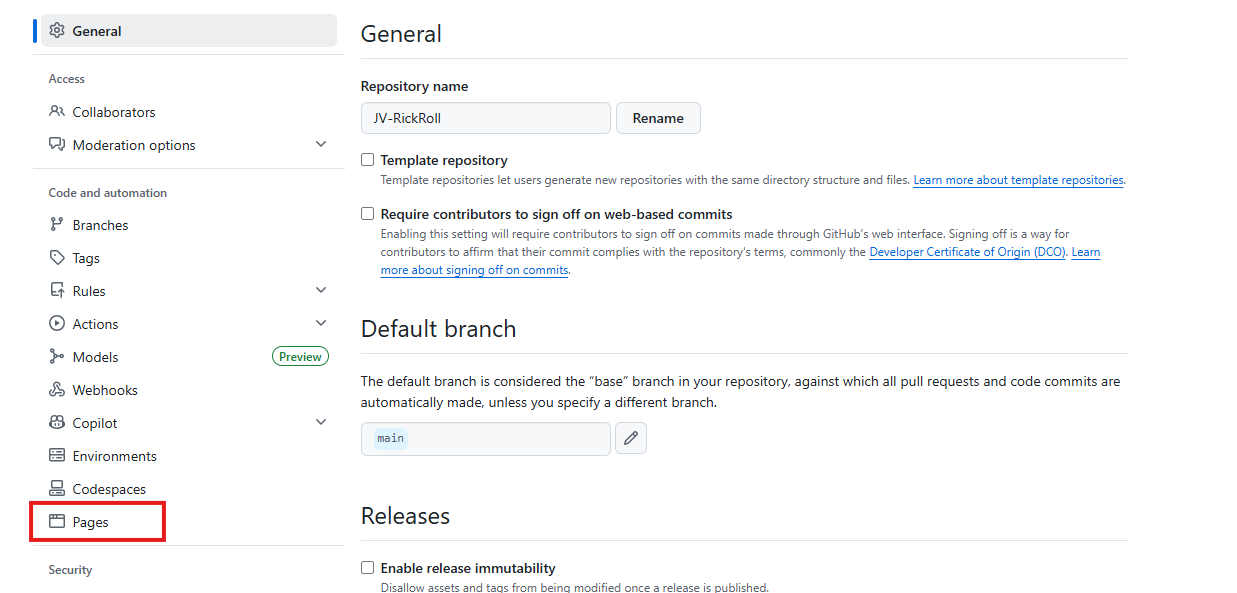
We can now build the website by selecting the branch main and finishing by clicking “Save”.
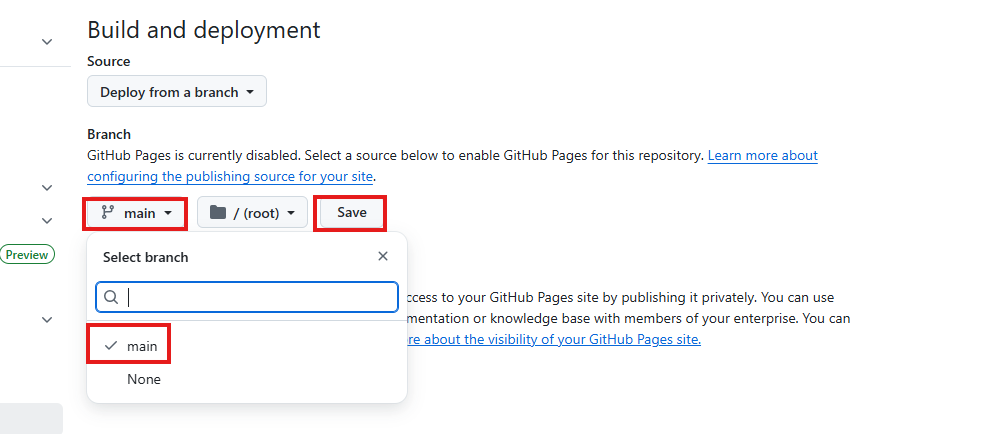
After waiting a few minutes, the website will be up and running with a github.io link. In the meantime, you can continue with Step 4.
In the meantime, the page will be built, and we can link a custom domain to our repository. You can choose to use the default github.io domain, but a custom domain is more scalable and more professional.
On the same blade where you ended Step 3, fill in your custom domain. This can be a normal domain or subdomain. In my case, I will use a subdomain.
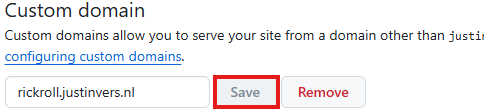
Now we have to do a simple DNS change in our domain, linking this name to your GitHub so the whole world knows where to find your page. Head to the DNS hosting provider of your domain and create a CNAME record.
In my case, I created this CNAME record:
| Type record | Name | Destination |
|---|---|---|
| CNAME | rickroll | justinverstijnen.github.io. |
Make sure to end the destination with a trailing dot .. This is required because it is an external domain in the context of your own domain.

The TTL does not really matter. I stuck to the best practice of 60 minutes / 1 hour.
Save your DNS settings and wait for a few minutes. Heading back to GitHub, you will see this in the meantime:
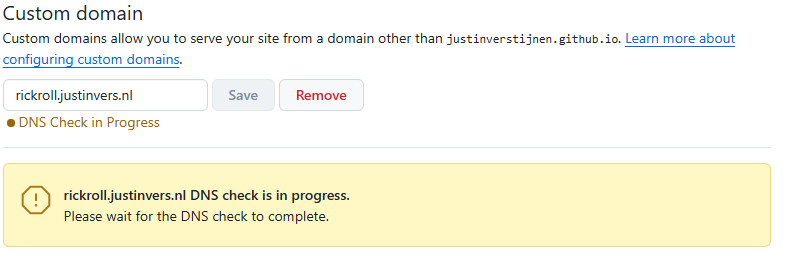
Keep this page open. Then after waiting some minutes, and possibly getting yourself a coffee, you will see a notification that the website is up and running and live:
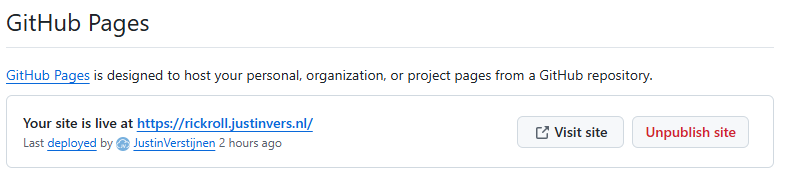
After the custom domain is successfully validated and configured, we need to enable HTTPS for a secure transfer of data to our site. Otherwise users can get this error when visiting the website:
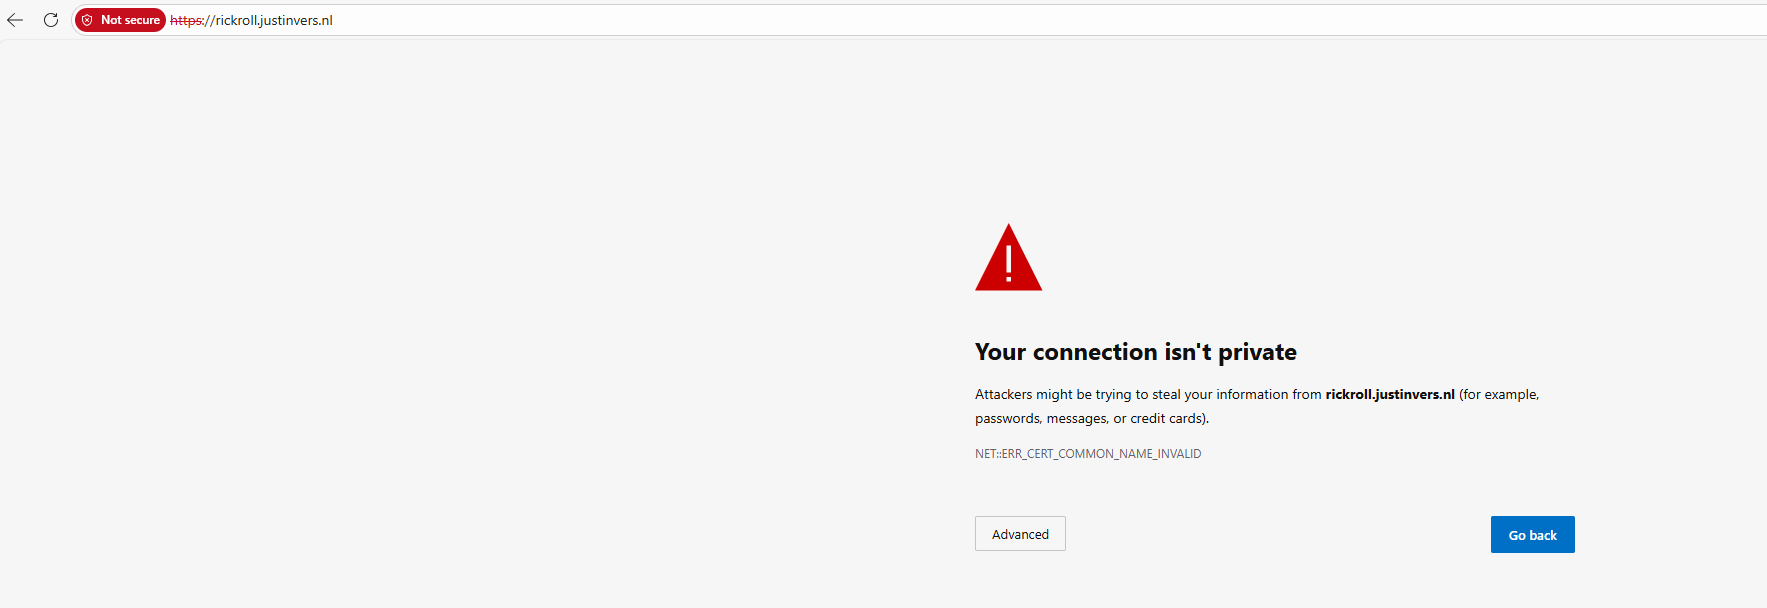
In the GitHub Pages blade, we have to wait for GitHub linking a certificate to your new website. I have seen cases where this takes a few minutes but also up to a few hours.

After this is done, we can check this checkmark on the GitHub Pages blade:
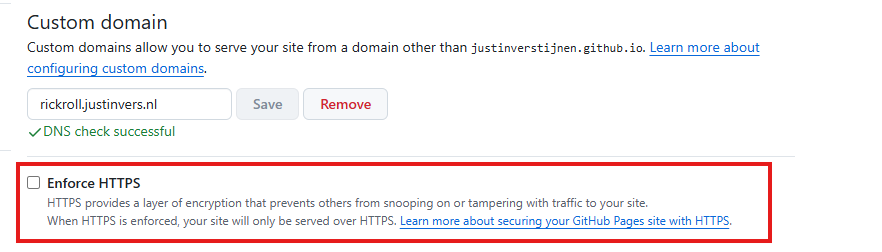

Now the site is fully up and running and secured. Yes, even if we are hosting a meme.
After waiting for all the preparations to complete, we can finally test our page on the internet. Go to your custom domain in your favorite browser and test if everything works:
It looks like we are ready and done :).
GitHub Pages provides a simple and reliable way to host static websites for free. It integrates directly with Git, requires no server maintenance, and supports custom domains with HTTPS.
You can easily host documentation, portfolios, memes, and lightweight projects, and it offers a practical hosting solution without added complexity. If backend functionality is required, you will need to combine it with an external service or choose an alternative hosting platform, like Microsoft Azure or AWS.
Thank you for visiting my website and I hope it was helpful.
These sources helped me with writing and research for this post:
You have reached the end of the page. You can navigate through other blog posts as well, share this post on X, LinkedIn and Reddit or return to the blog posts collection page. Thank you for visiting this post.
If you think something is wrong with this post or you want to know more, you can send me a message to one of my social profiles at: https://justinverstijnen.nl/about/
If you find this page and blog very useful and you want to leave a donation, you can use the button below to buy me a beer. Hosting and maintaining a website takes a lot of time and money. Thank you in advance and cheers :)
The terms and conditions apply to this post.
All pages referring or tutorials for Intune.
In some cases we want to automatically start the Windows App for connections to AVD and Windows 365 at startup. We can achieve this through different ways which I will describe in this post.
We can achieve this with Intune using a PowerShell script. As Intune doesn’t support login/startup scripts, we have to create a Platform script that creates a Scheduled Task in Windows for us. This is a great way, as this is visible at the client side and can be disabled pretty easily.
To create this task/script, go to the Intune Admin center: https://intune.microsoft.com
Go to Devices -> Windows -> Scripts and remediations, then open the tab “Platform scripts”.
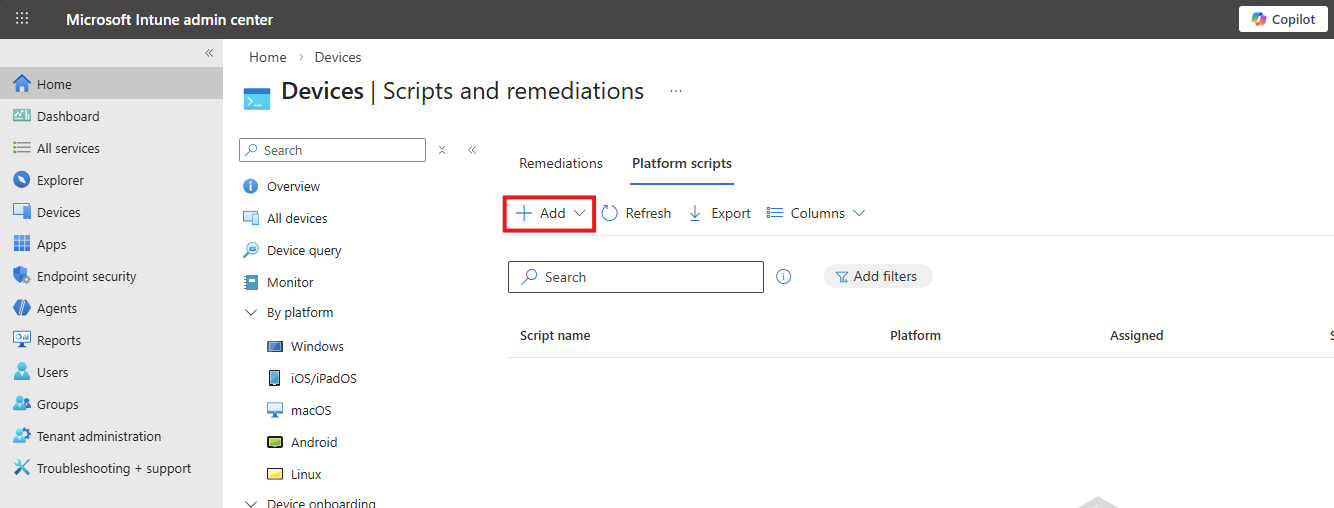
Click on “+ Add” and select “Windows 10 and later” to create a new script.
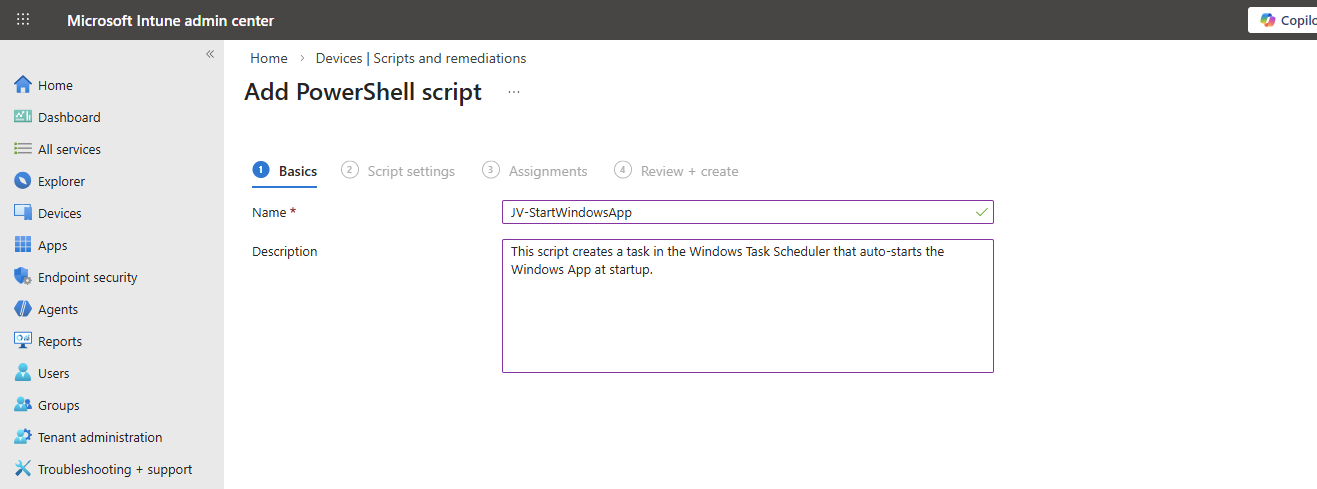
Click “Next”.
Then download my script here that does the magic for you:
Or create a new file in Windows and paste the contents below into a file save it to a .ps1 file.
$TaskName = "JV-StartWindowsApp"

$Action = New-ScheduledTaskAction `
    -Execute "explorer.exe" `
    -Argument "shell:AppsFolder\MicrosoftCorporationII.Windows365_8wekyb3d8bbwe!Windows365"

$Trigger = New-ScheduledTaskTrigger -AtLogOn

$Principal = New-ScheduledTaskPrincipal `
    -GroupId "BUILTIN\Users" `
    -RunLevel Limited

Register-ScheduledTask `
    -TaskName $TaskName `
    -Action $Action `
    -Trigger $Trigger `
    -Principal $Principal `
    -Force
Upload the script to Intune and set the following options:

Then click “Next”.
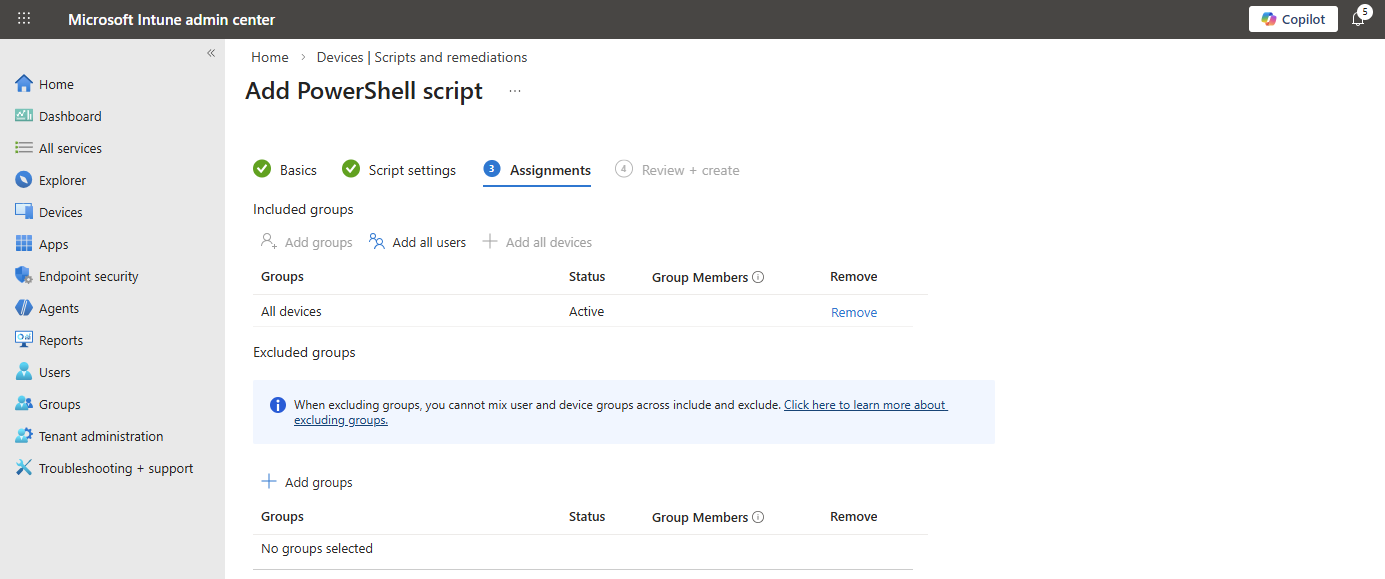
Assign the script to the group containing your devices where you want to autostart the Windows App. Then save the script.
After the script was applied which can take up to 30 minutes, and after restarting the computer, the Windows App will automatically start after the user logs in, automating this process and elaminating the start-up wait time:
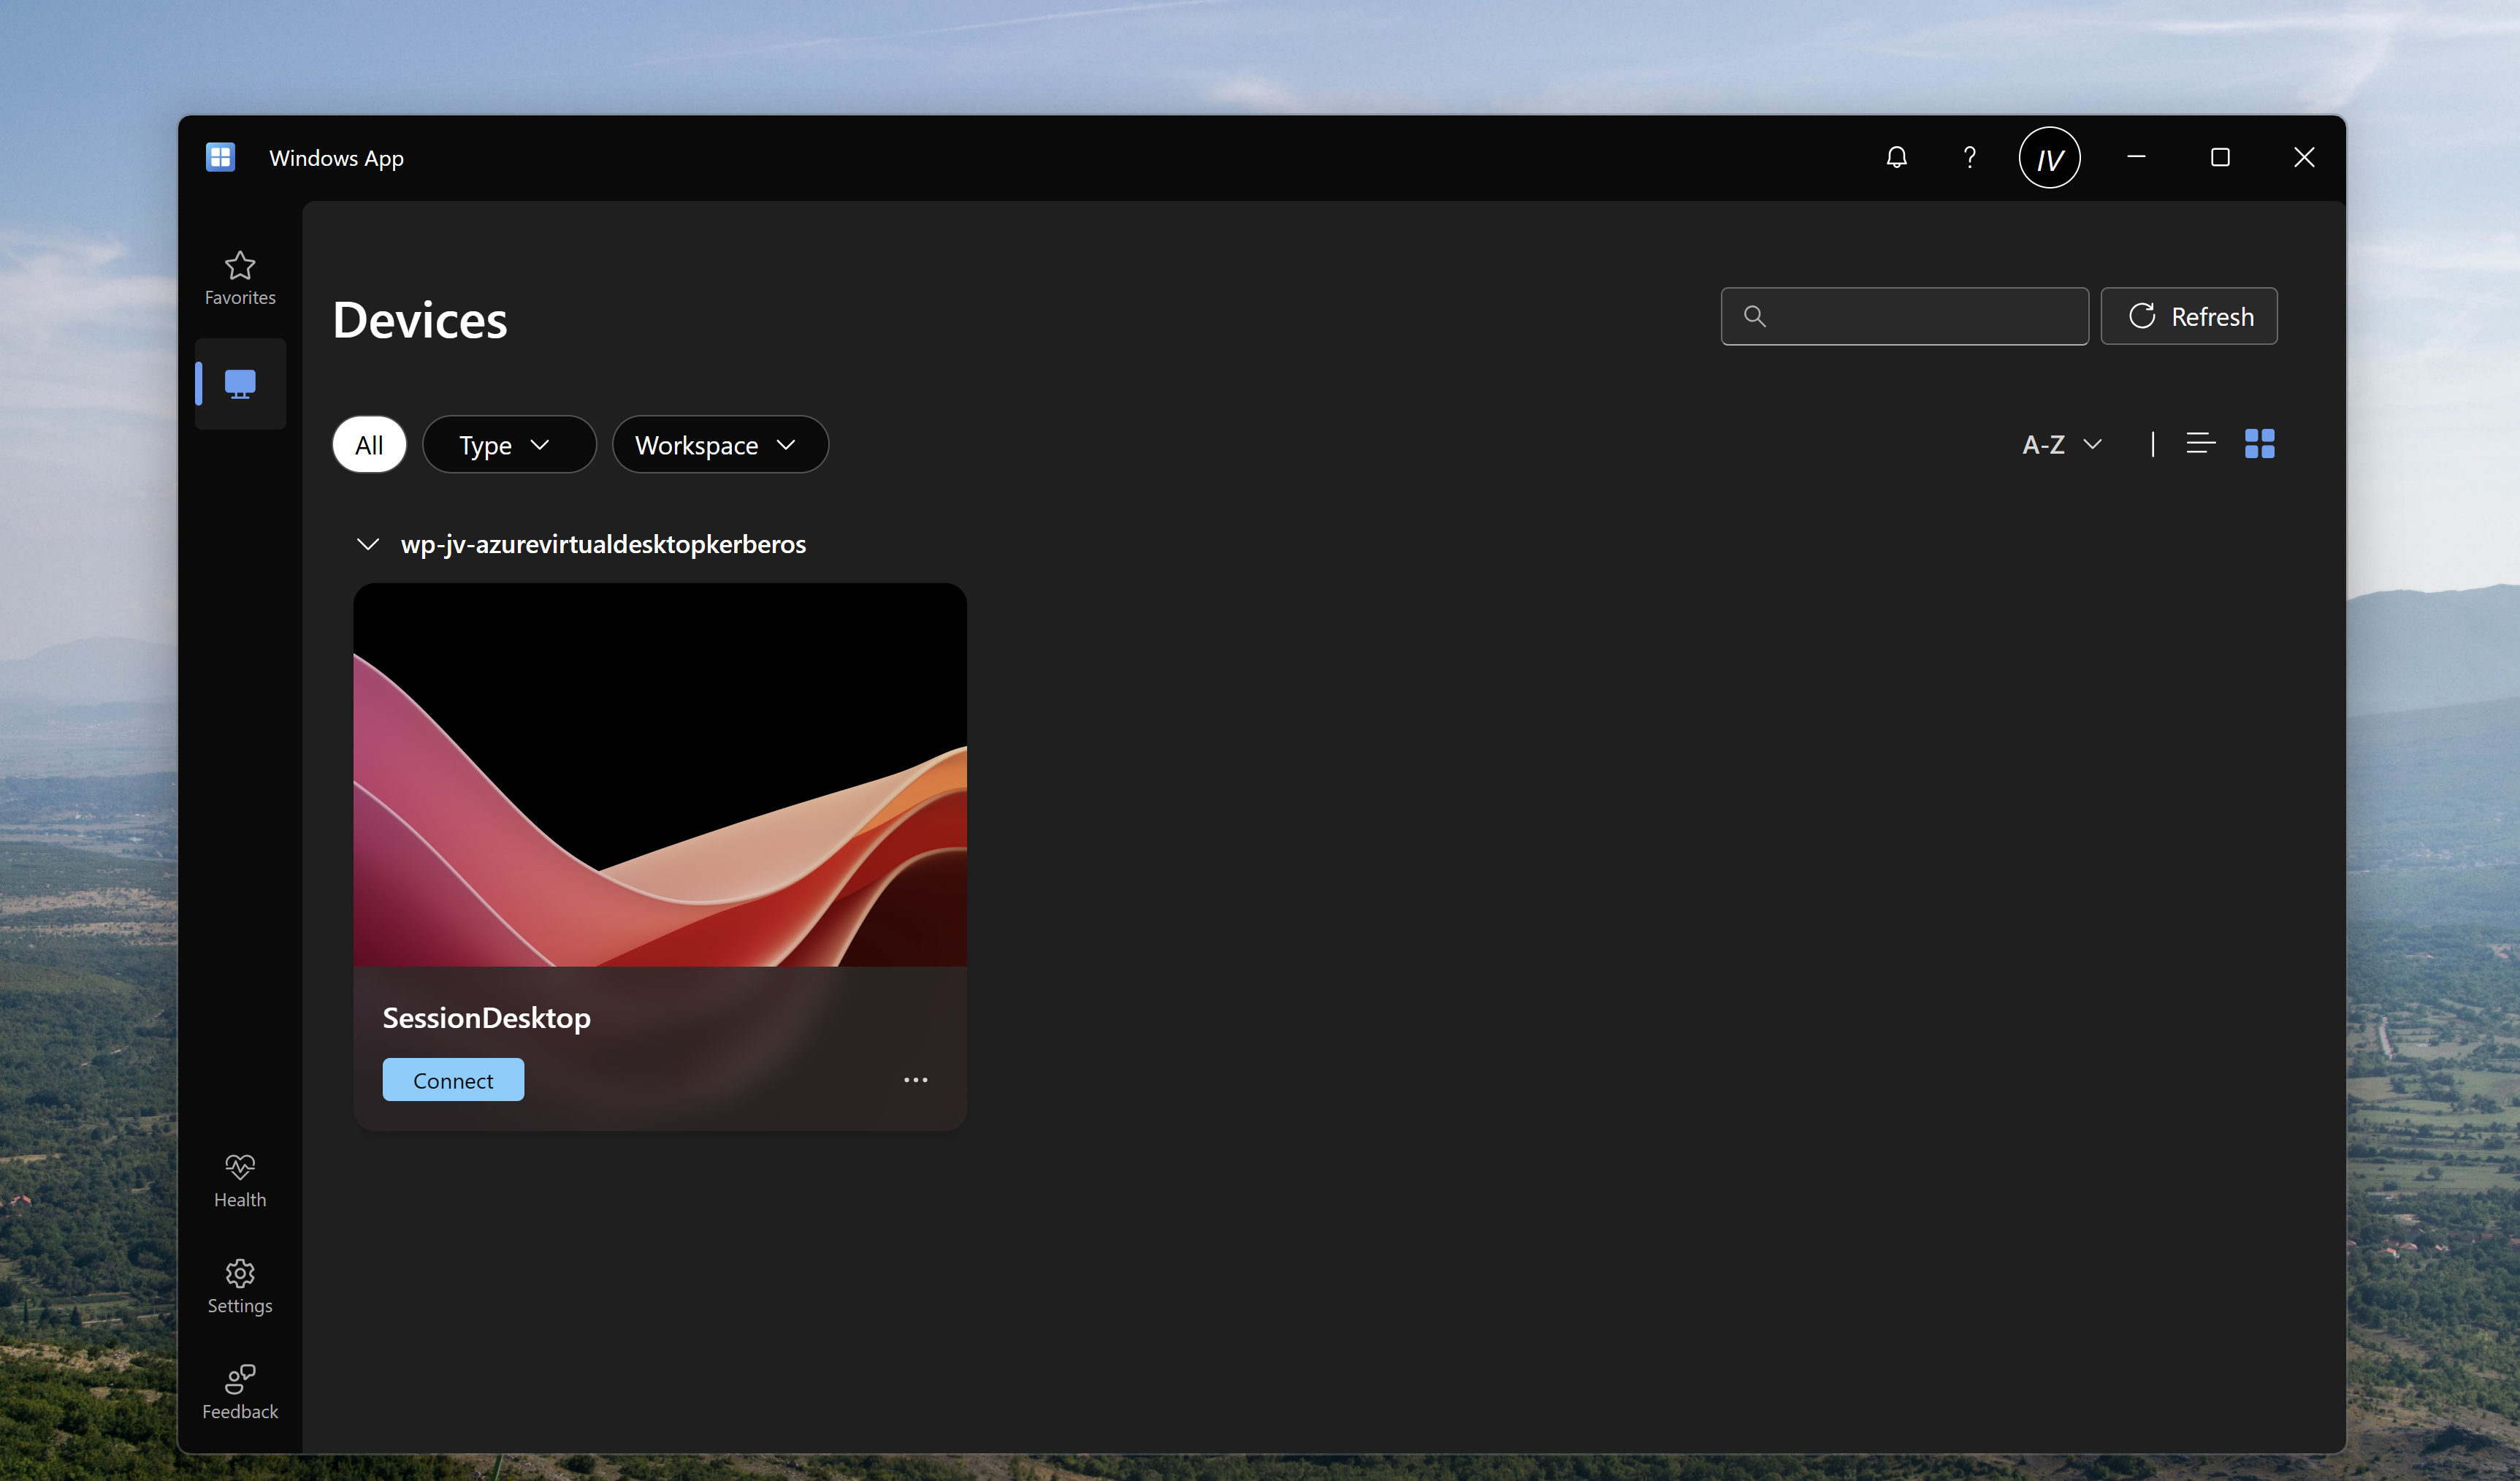
Automatically startint the Windows App can help end users to automate a bit of their daily work. They don’t have to open it after turning on their PC and can sign-in directly to their cloud device.
Thank you for visiting my website and I hope it was helpful.
These sources helped me by writing and research for this post;
You have reached the end of the page. You can navigate through other blog posts as well, share this post on X, LinkedIn and Reddit or return to the blog posts collection page. Thank you for visiting this post.
If you think something is wrong with this post or you want to know more, you can send me a message to one of my social profiles at: https://justinverstijnen.nl/about/
If you find this page and blog very useful and you want to leave a donation, you can use the button below to buy me a beer. Hosting and maintaining a website takes a lot of time and money. Thank you in advance and cheers :)
The terms and conditions apply to this post.
When deploying Google Chrome with Microsoft Intune, users still have to manually login with their credentials into Microsoft Online websites. Microsoft Edge has built-in Single Sign On (SSO) for users who already logged in with their Microsoft account to their computer.
However, there is a Chrome extension published by Microsoft themselves which allows users to also have this Single Sign On experience into Google Chrome.
On this page I will show how this extension works, what the advantages are and how we can deploy this with Microsoft Intune. I will share both a Configuration Policy and a PowerShell script option where you may choose which one to use.
The Microsoft SSO extension for Google Chrome uses the same token/session you already have when you have your device Entra ID joined. It will send that to every Microsoft Online webpage to show you are already authenticated and have a valid token. This makes the user experience a lot better as they don’t have to authenticate first before starting to use the web applications.
The extension can be manually downloaded from here: https://chromewebstore.google.com/detail/microsoft-single-sign-on/ppnbnpeolgkicgegkbkbjmhlideopiji?pli=1
I have both the Configuration Profile and PowerShell script for you to download and implement easily on my Github page. You can download them there:
Download Configuration Profile and Script
To deploy the extension with Intune, login to the Microsoft Intune Admin Center: https://intune.microsoft.com
From there, navigate to Devices -> Windows -> Configuration and create a new policy.
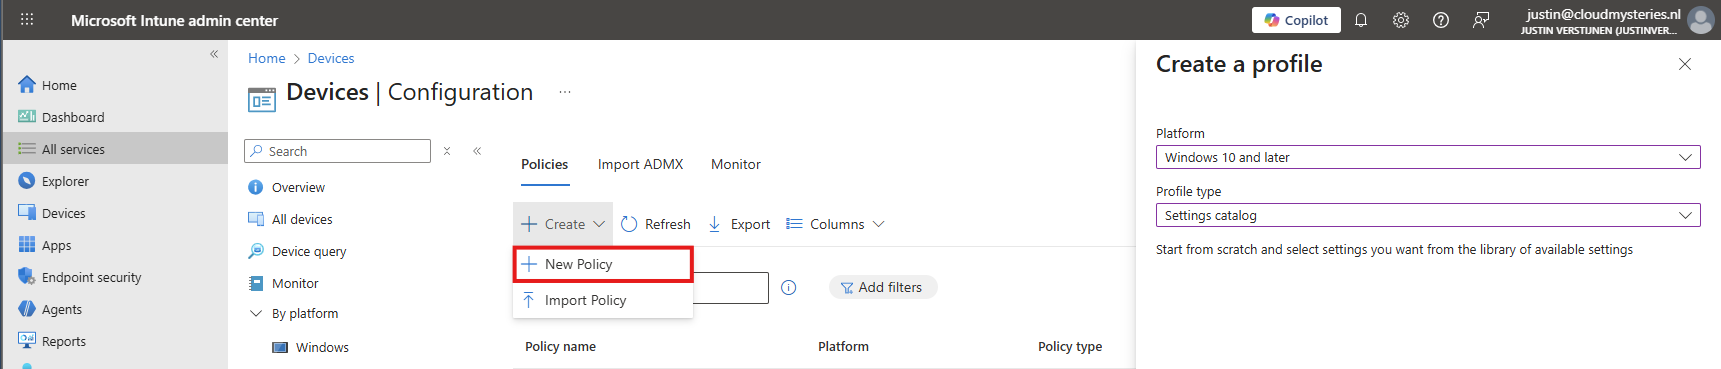
Select Windows 10 and later for “Platform” and use the “Settings catalog” profile type. Then click on “Create”.
Now define a name and description for this new policy, defining what this actually does.
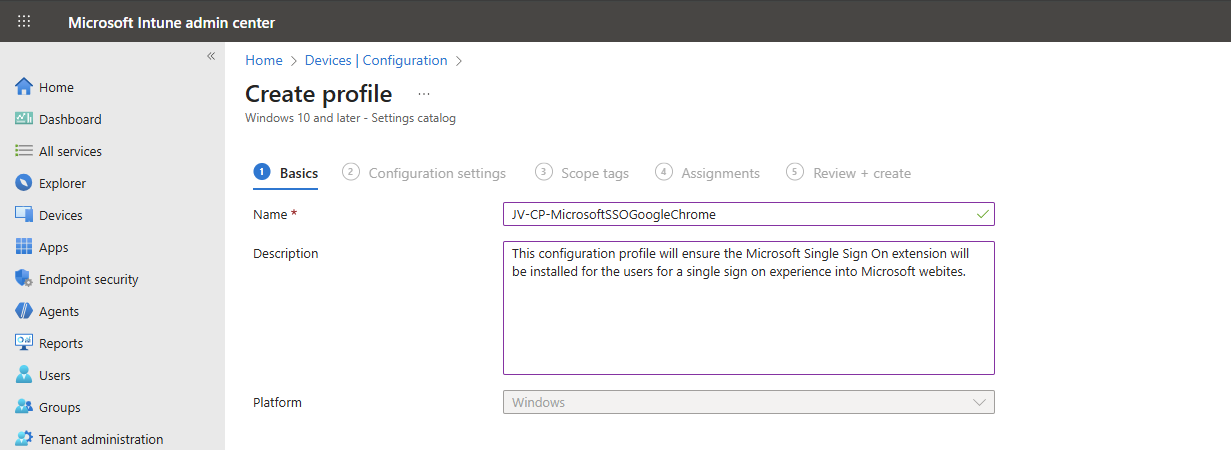
Then click on “Next”.
Now click on “+ Add settings”, search for Google. Click it open to go down to “Google Chrome” and then “Extensions”.
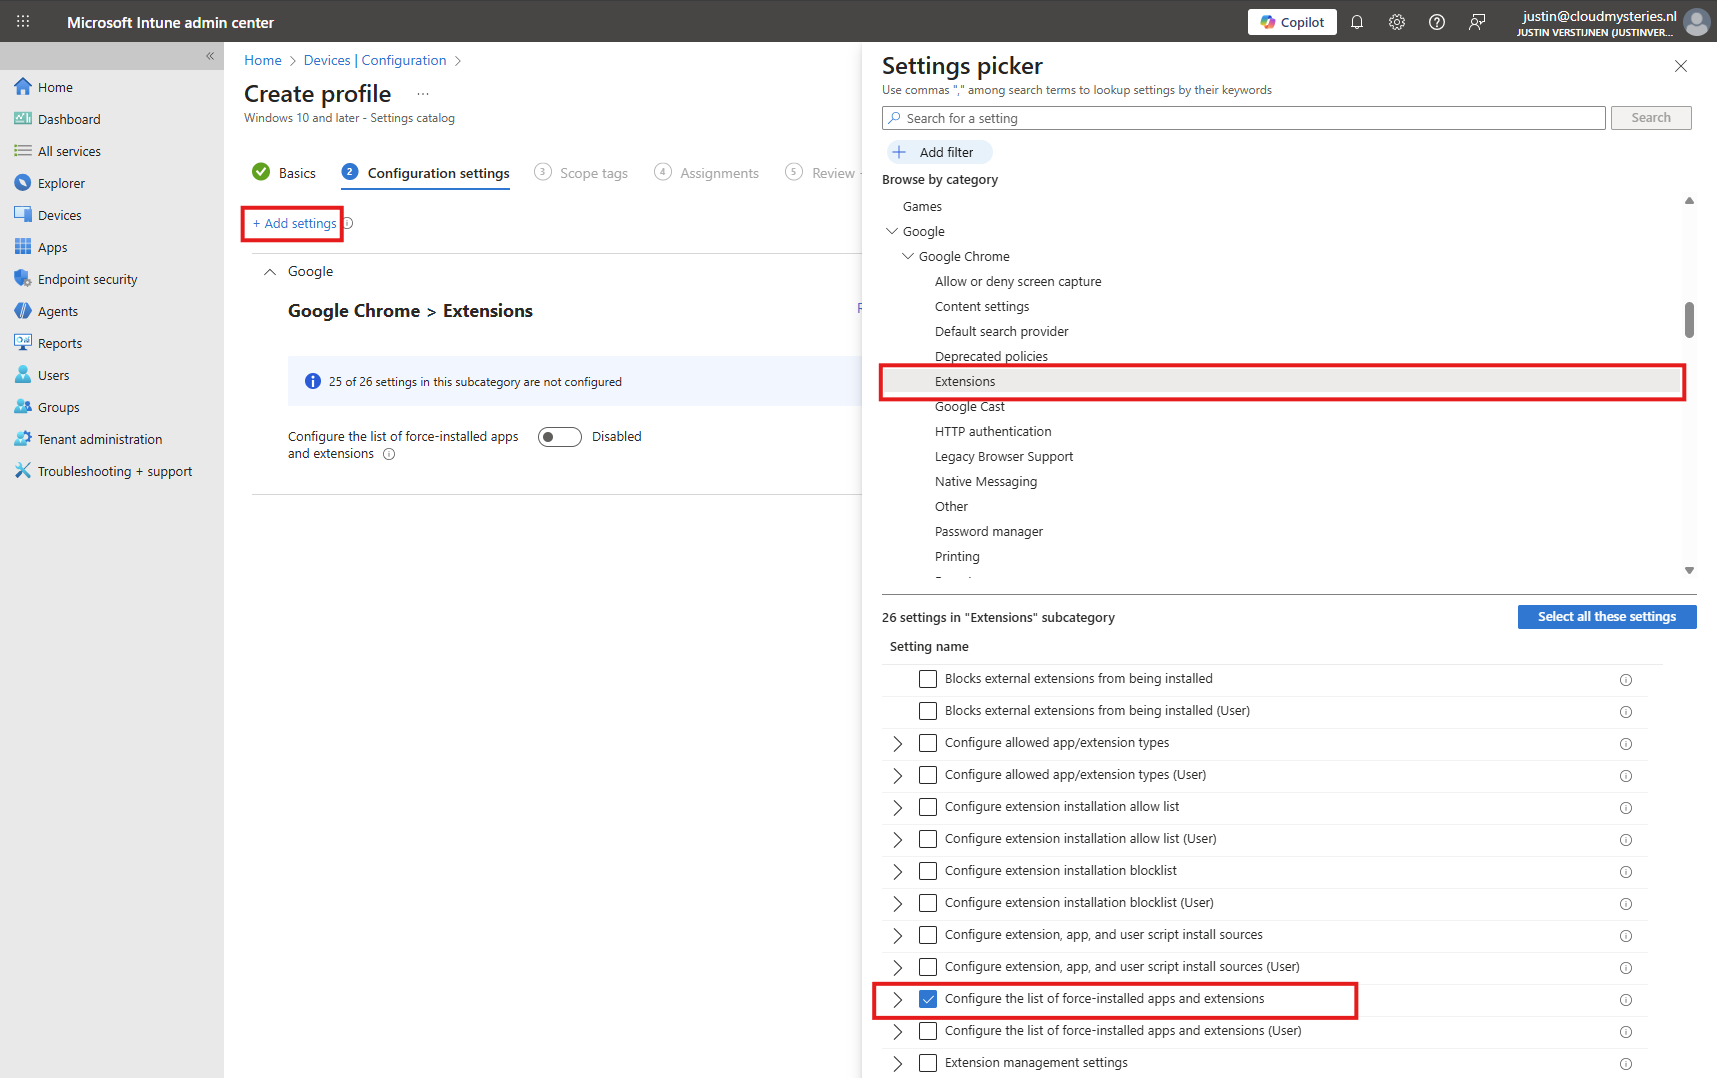
Select the option “Configure the list of force-installed apps and extensions”.
The same option exists with (User) attached, using that option means a user is able to delete the extension.
Now we can configure that option by setting the switch to “Enabled”.
We have to paste the Extension IDs here. You can find this in the Chrome Web Store in the URL (the part after the last /):
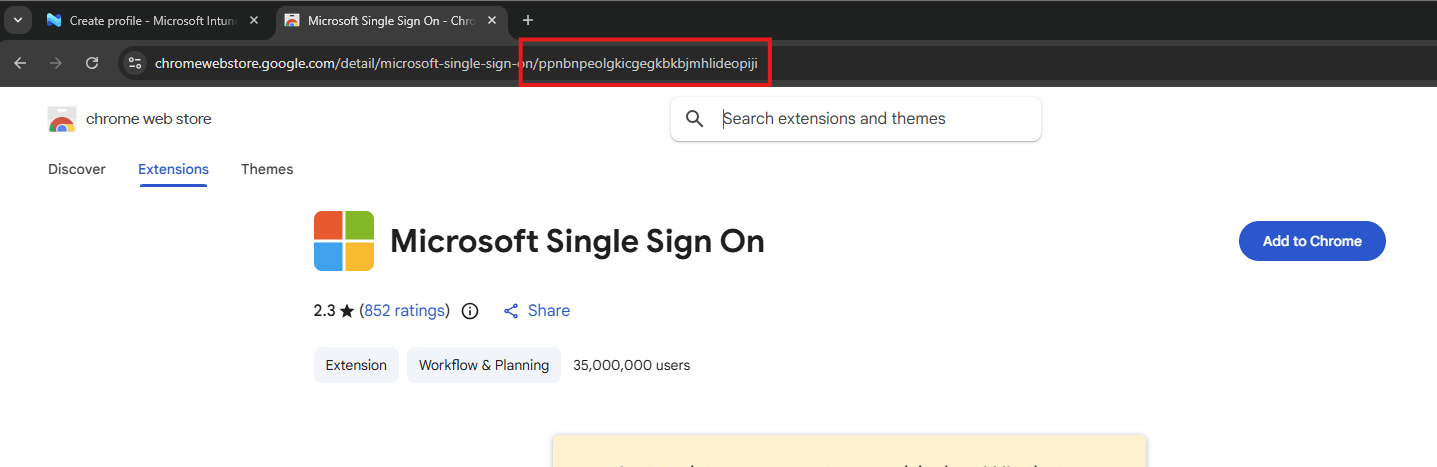
So we paste this value in the field, but you can add any extension, like ad blockers, password managers or others.
ppnbnpeolgkicgegkbkbjmhlideopiji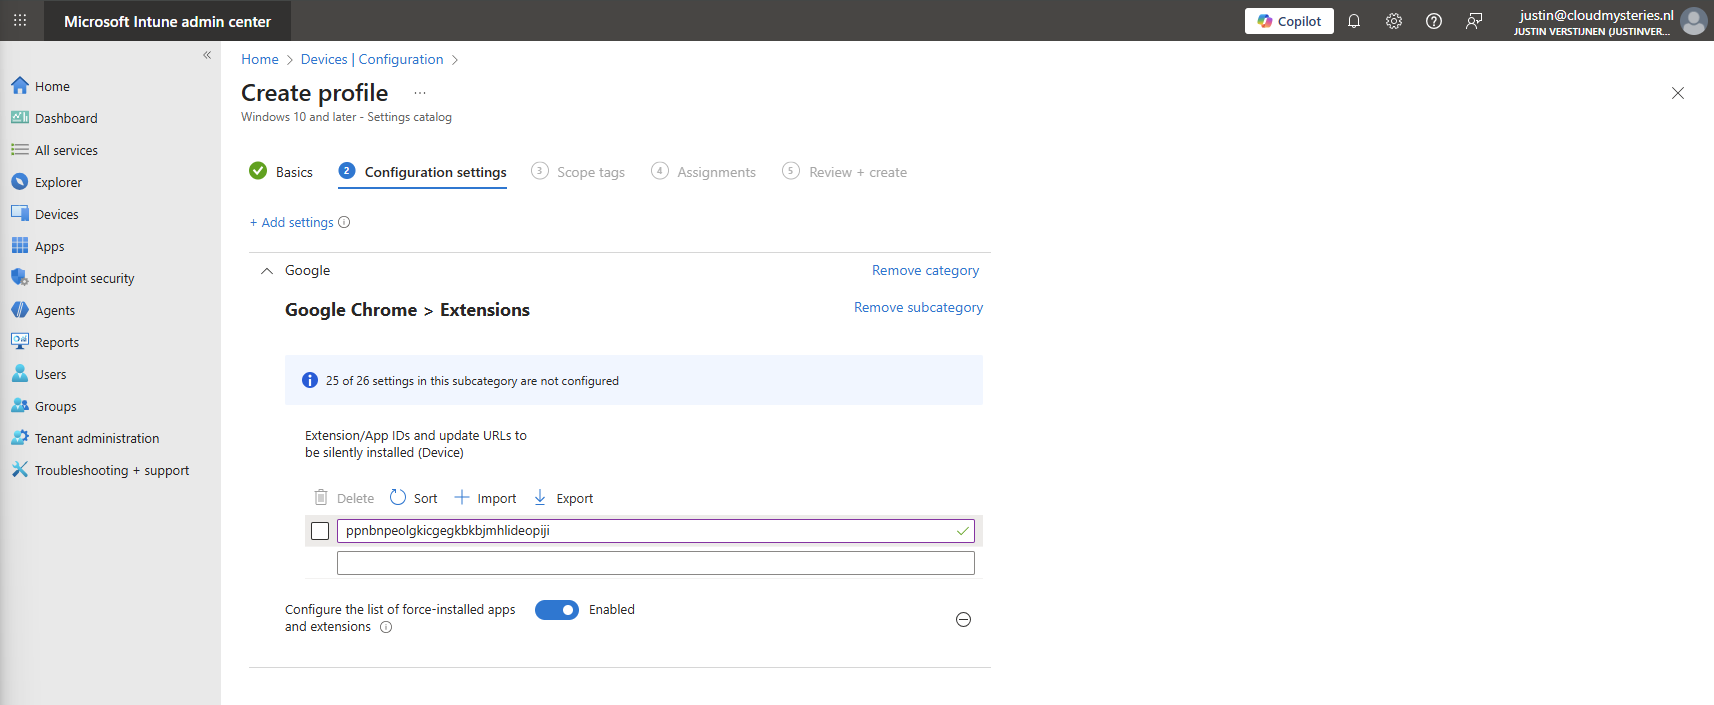
Click on “Next” twice. We can now assign this new policy to our devices. I picked the All Devices option here as I want this extension to be installed on all Windows devices.
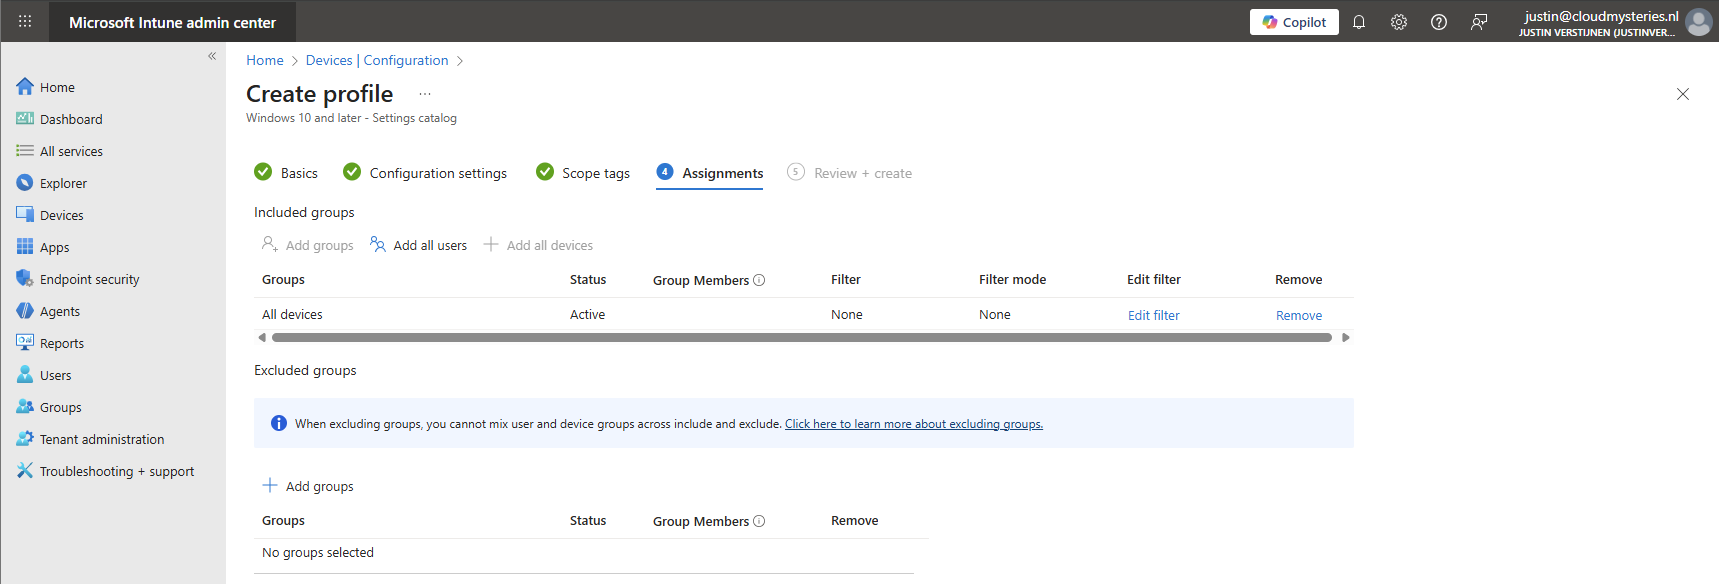
Create the policy by finishing the wizard. Let’s check the results here.
We can also deploy the extension through a PowerShell script. This is recommended if using other MDM solutions than Microsoft Intune. However, we can also deploy it in Intune as script by going to the Microsoft Intune Admin Center: https://intune.microsoft.com
From there, go to Devices -> Windows ->Scripts and remediations and then the tab “Platform scripts”. These are scripts that are automatically run once.
Create a new script for Windows 10 and later here.

Give it a name and description of the script:
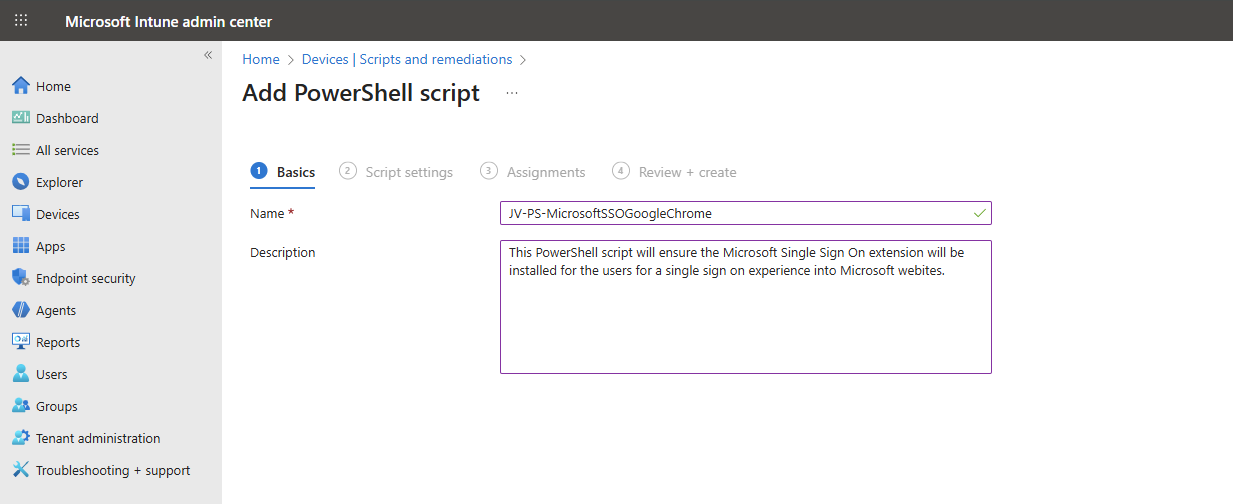
Click “Next” to open the script settings. To download my script, go to https://github.com/JustinVerstijnen/JV-CP-MicrosoftSSOGoogleChrome and download the .ps1 file.
Here import the script you just downloaded from my Github page.
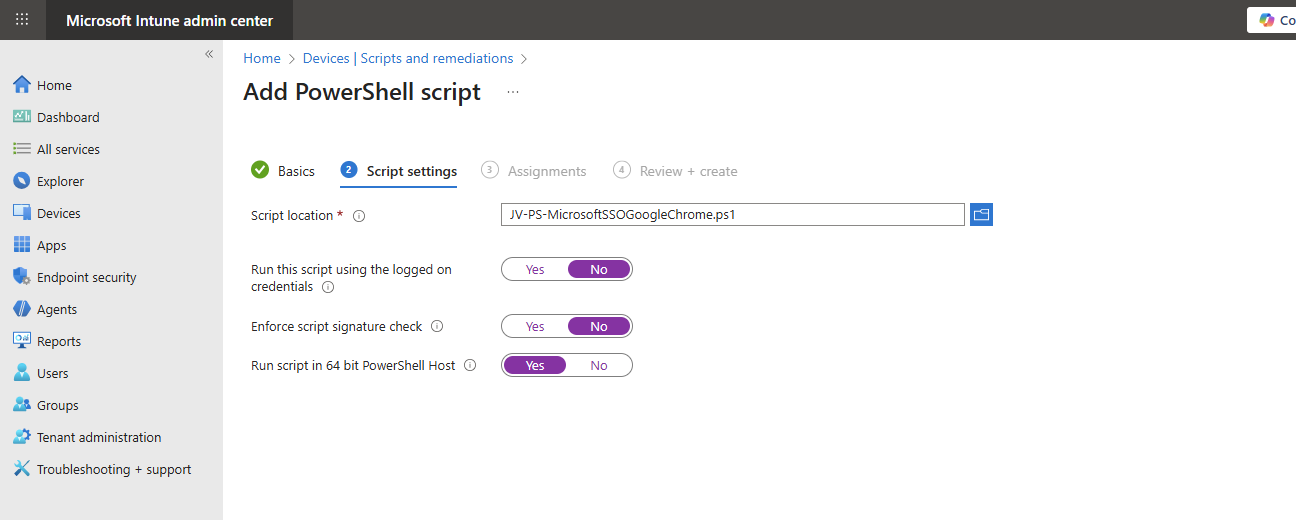
Then set the script options as this:
The script targets the whole machine by creating a registry key in the HKEY_LOCAL_MACHINE hive.
Then click “Next” and assign it to your devices. In my case, I selected “All devices”.
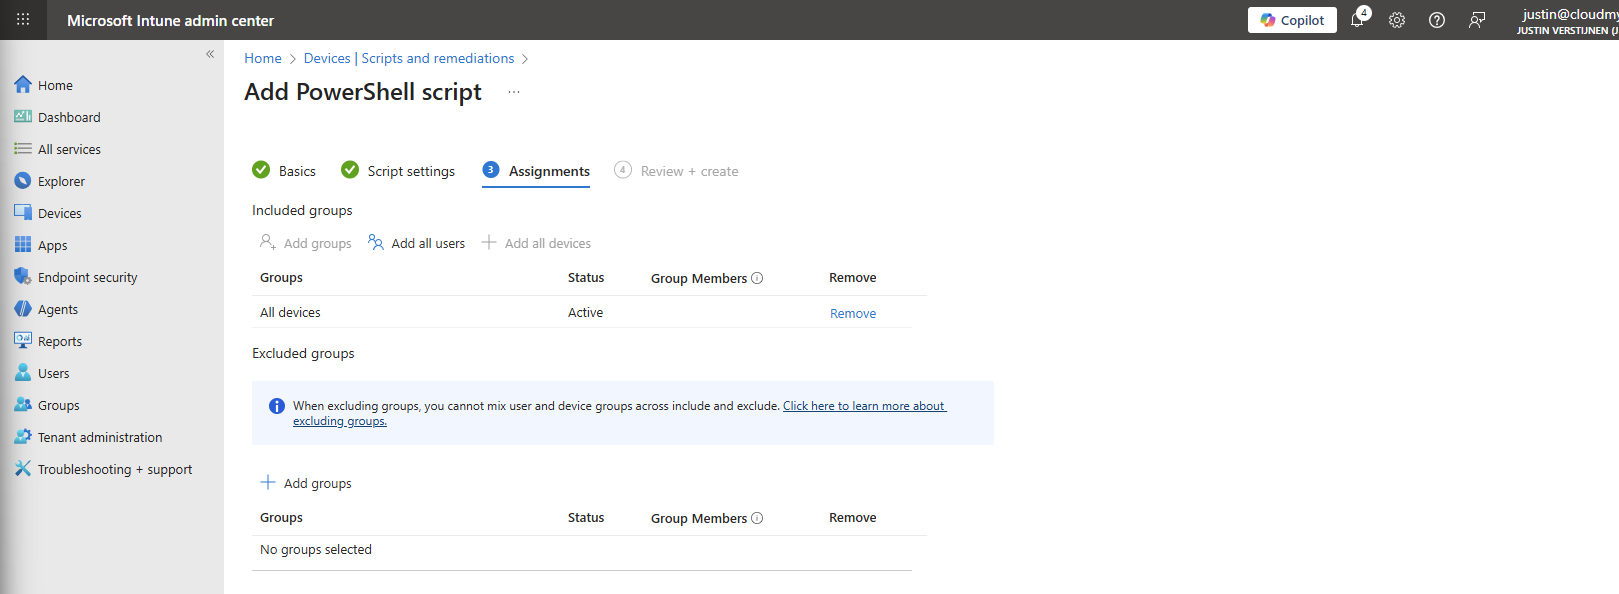
Click “Next” and then “Create” to deploy the script that will install the extension.
After assigning the configuration profile or PowerShell script to the machine, this will automatically be installed silently. After the processing is done, the extension will be available on the client machine:
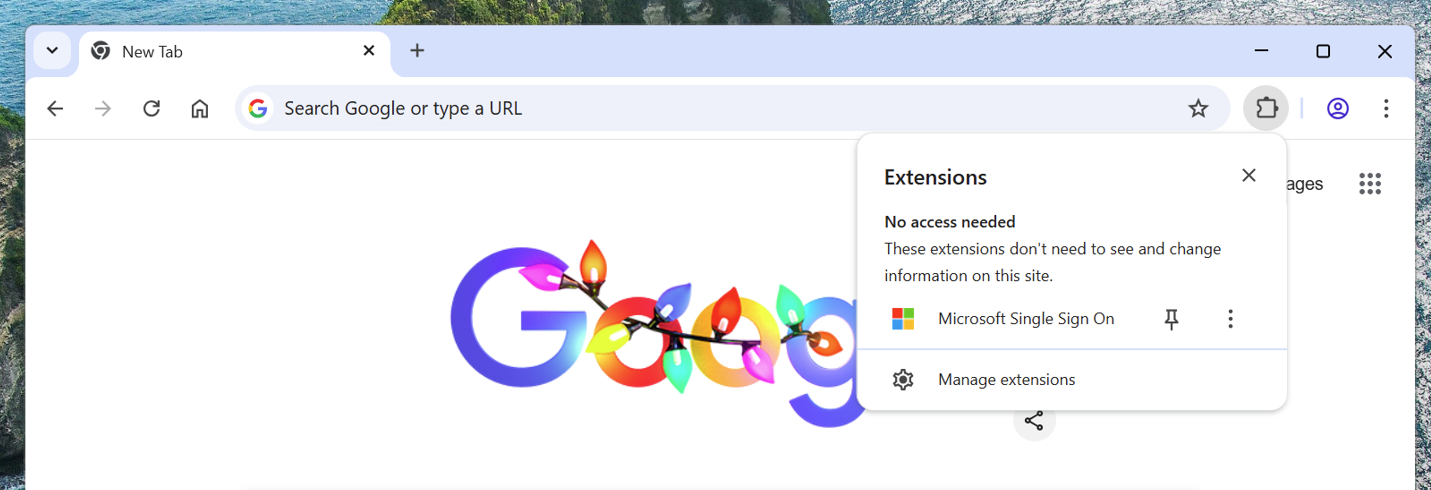
This doesn’t have to do much. We don’t need to configure it either, its only a pass of the token to certain Microsoft websites.
When going to the extensions, you see that it also cannot be deleted by the user:
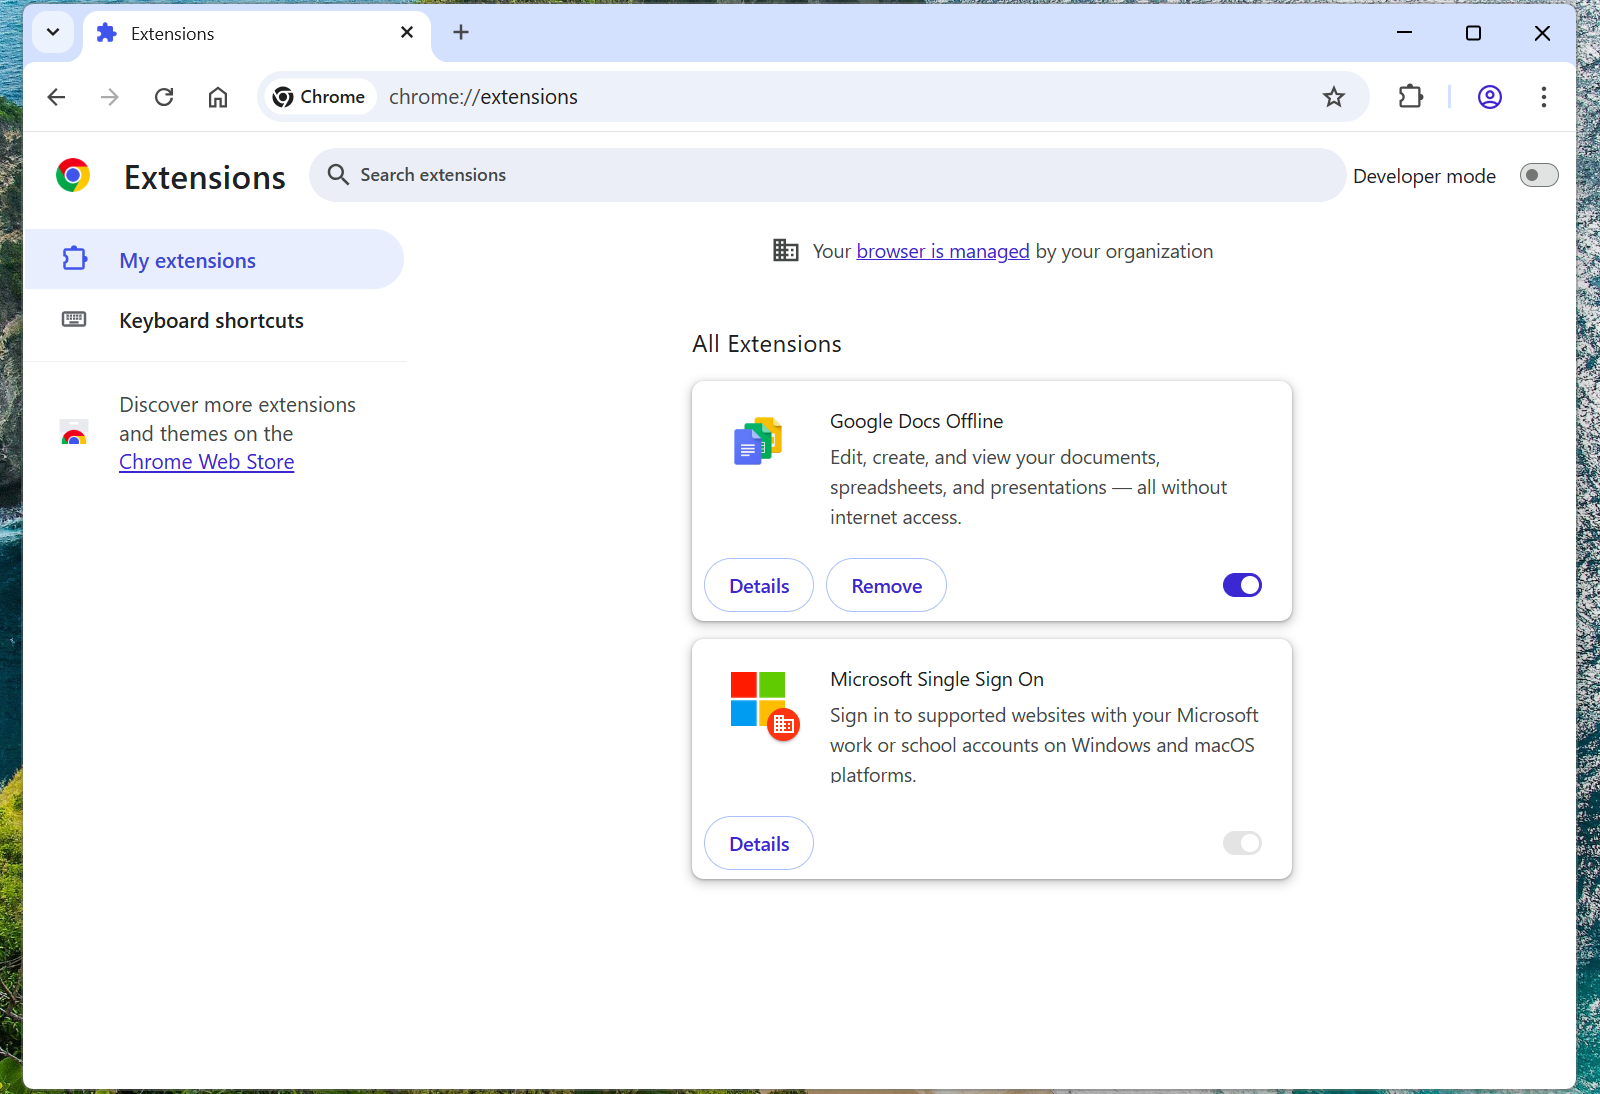
The Google Chrome Microsoft SSO extension is a great way to enhance the user experience for end users. They now can login to Microsoft websites using their already received token and don’t need to get a new one by having to login again and doing MFA. We want to keep our systems secure, but too many authentication requests is annoying for the user.
Also the guide can be used to deploy other extensions for Google Chrome and Edge.
Thank you for reading this guide and I hope it was helpful.
These sources helped me by writing and research for this post;
You have reached the end of the page. You can navigate through other blog posts as well, share this post on X, LinkedIn and Reddit or return to the blog posts collection page. Thank you for visiting this post.
If you think something is wrong with this post or you want to know more, you can send me a message to one of my social profiles at: https://justinverstijnen.nl/about/
If you find this page and blog very useful and you want to leave a donation, you can use the button below to buy me a beer. Hosting and maintaining a website takes a lot of time and money. Thank you in advance and cheers :)
The terms and conditions apply to this post.
Today a short guide on how to disable Windows Taskbar widgets through Intune. I mean this part of the Windows 11 taskbar:

The easiest way to disable these widgets is through a Settings Catalog policy. Open up Microsoft Intune admin center and create a new policy through the Settings Catalog.
Search for “widget” and these options are available:
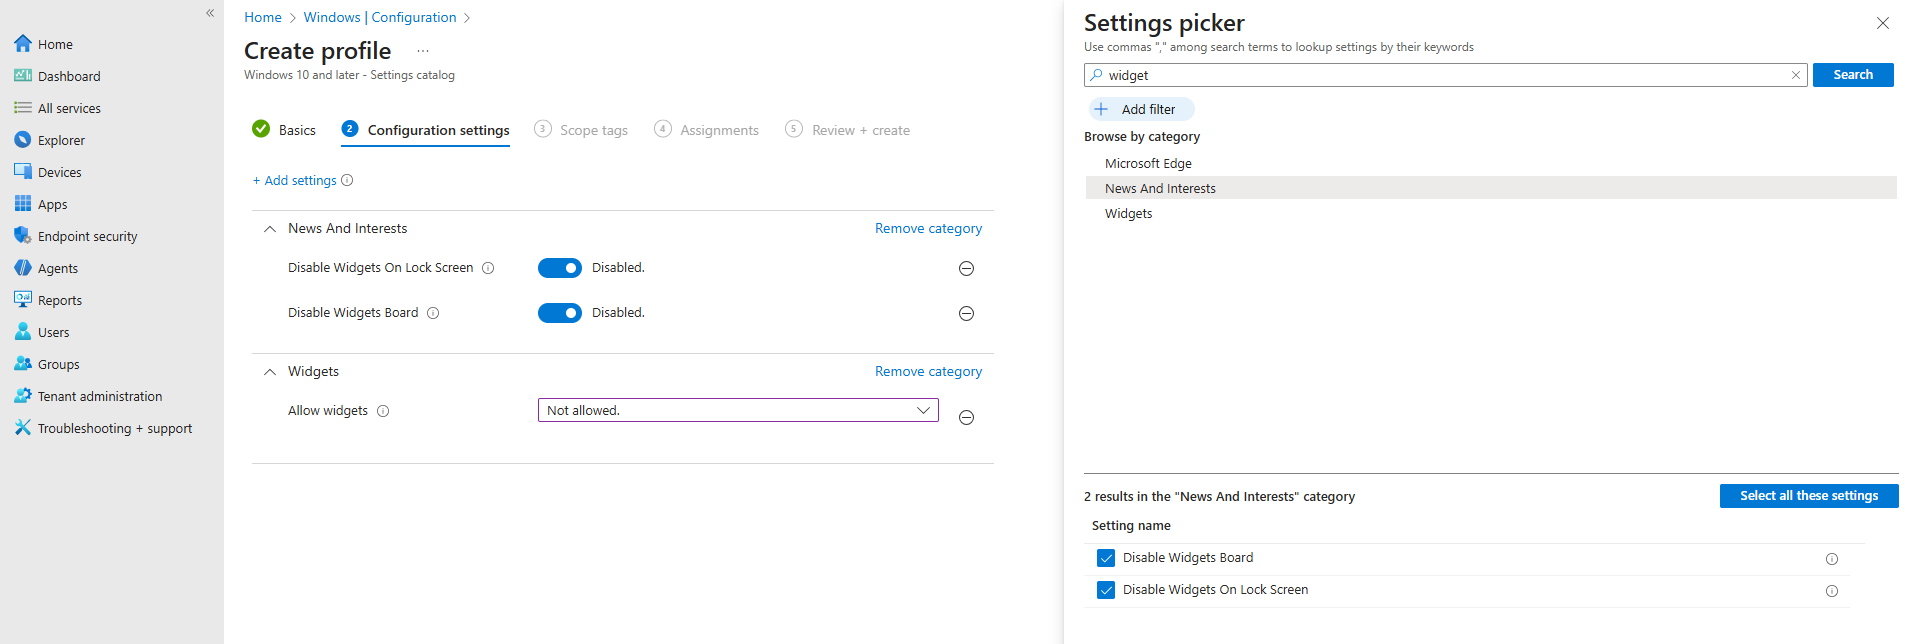
In my case, I have set all three options to disabled/Not allowed.
After you have assigned this to the device, all Widgets options are gone and the user experience will be a bit better. The endpoint must restart to apply the changes.
You can achieve the settings also through PowerShell which does some registry changes. You can use this simple script:
$JVRegPath = "HKLM:\SOFTWARE\Policies\Microsoft\Dsh"

# Checking/creating path
If (!(Test-Path $JVRegPath)) {
    New-Item -Path $JVRegPath -Force | Out-Null
}

# 1. Disable Widgets Board
Set-ItemProperty -Path $JVRegPath -Name "AllowNewsAndInterests" -Type DWord -Value 0

# 2. Disable Widgets on Lock Screen
Set-ItemProperty -Path $JVRegPath -Name "AllowWidgetsOnLockscreen" -Type DWord -Value 0

# 3. Disable Widgets on Taskbar
Set-ItemProperty -Path $JVRegPath -Name "AllowWidgets" -Type DWord -Value 0
This sets 3 registry keys to the desired setting. In this case disabling widgets on the taskbar and lockscreen.
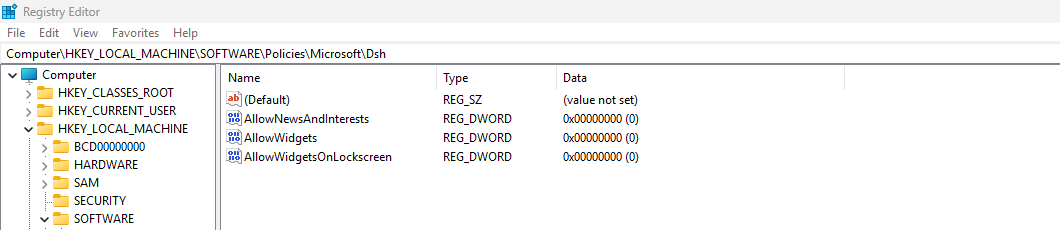
After these keys are set, the computer must reboot to apply the changes.
This short page explains 2 methods of disabling Widgets from the Windows Taskbar. This is something almost nobody uses and everyone dislikes.
Disabling this speeds up the device and enhances user experience.
Thank you for reading this guide and I hope it was helpful.
These sources helped me by writing and research for this post;
You have reached the end of the page. You can navigate through other blog posts as well, share this post on X, LinkedIn and Reddit or return to the blog posts collection page. Thank you for visiting this post.
If you think something is wrong with this post or you want to know more, you can send me a message to one of my social profiles at: https://justinverstijnen.nl/about/
If you find this page and blog very useful and you want to leave a donation, you can use the button below to buy me a beer. Hosting and maintaining a website takes a lot of time and money. Thank you in advance and cheers :)
The terms and conditions apply to this post.
Microsoft just released a new feature, Windows Backup for Organizations, which is a revolution on top of the older Enterprise State Roaming.
Windows Backup for Organizations will help you and your users by saving different components of your Windows installation to make a the proces of a new installation or computer much easier. Especially when used with Windows Autopilot, this is a great addition to the whole Windows/Intune ecosystem.
In this guide I will dive into how it works, what is backed up and excluded and how to configure and use it.
Windows Backup for Organizations is a feature where Windows creates a backup of your Windows settings and Windows Store applications every 8 days. This will be saved to your Microsoft business account. If ever having to re-install your device or to use a new device, you can easily restore your old configuration. This is a revolution on top of the older Enterprise State Roaming feature, who did around 20% of this.
Let’s compare what is included in this new Windows Backup for Organizations feature versus Enterprise State Roaming
| Item | Windows Backup for Organizations | Enterprise State Roaming |
| Windows Settings | ✅ | ✅ |
| Windows Personalization | ✅ | ❌ |
| Windows Store apps and data | ✅ | ❌ |
| Windows Desktop applications (Win32) | ❌ | ❌ |
To configure this new and great setting, go to Microsoft Intune and create a new configuration policy for Windows devices:
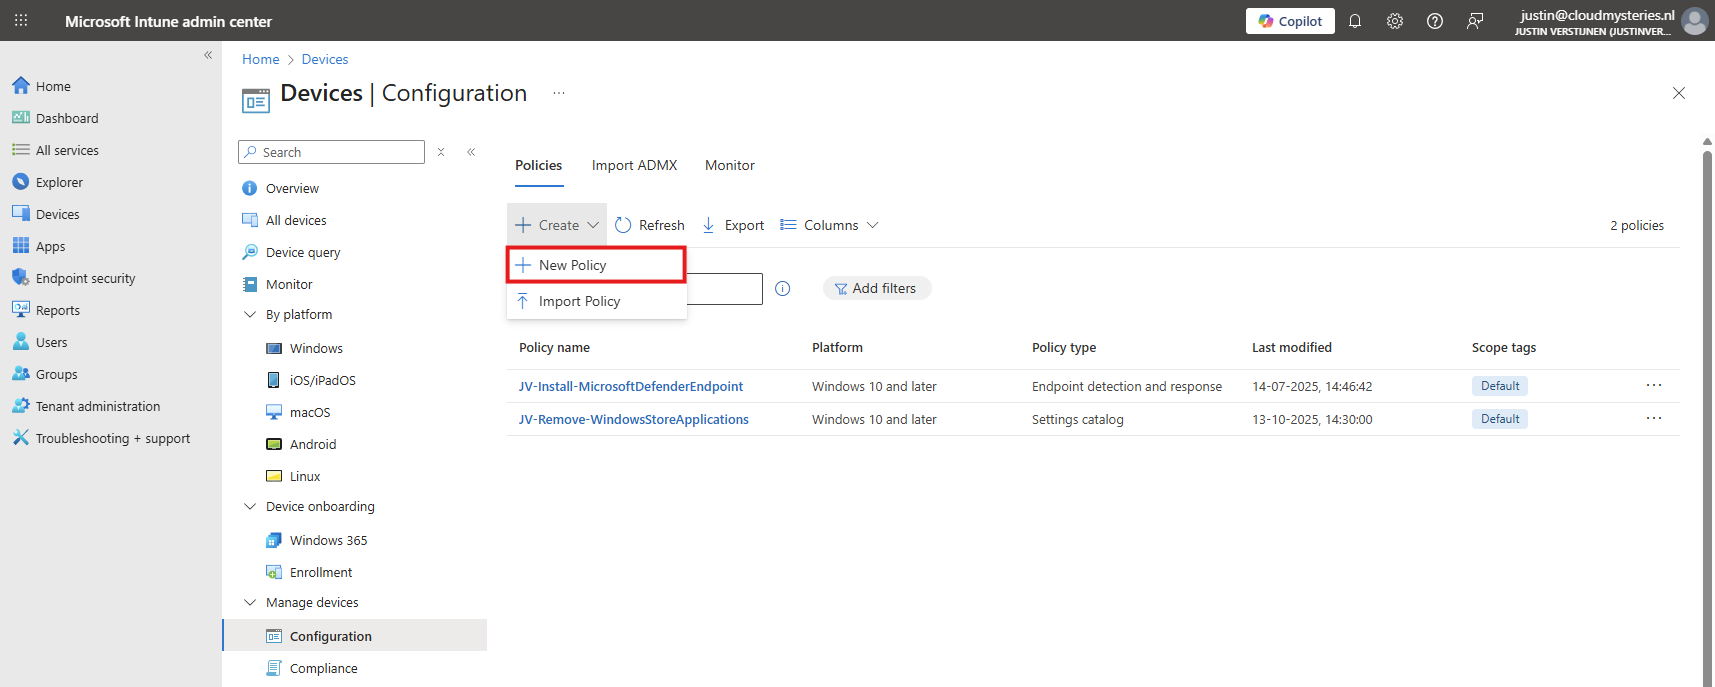
Then select Windows 10 and later, and the profile type “Settings catalog”.
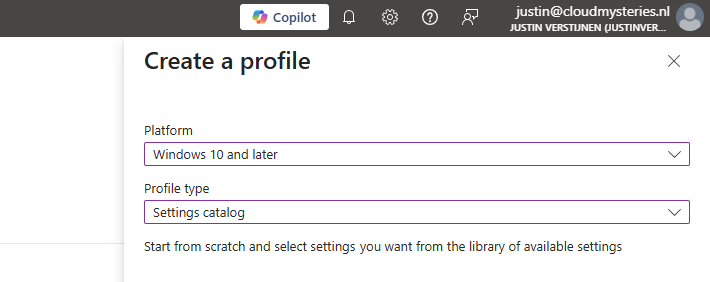
Then click on create. Give the policy a name and a good description for your own documentation.
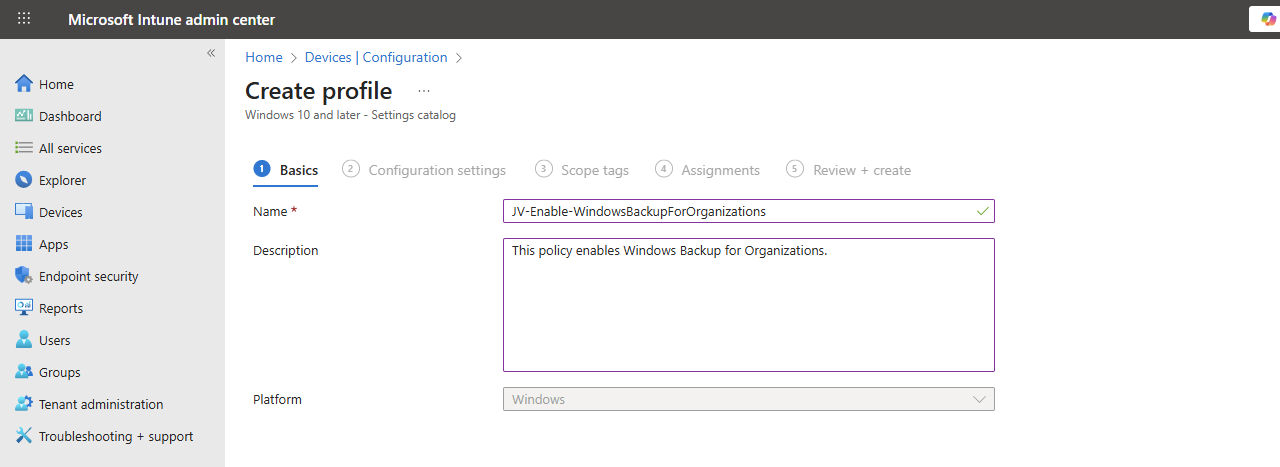
Click Next.
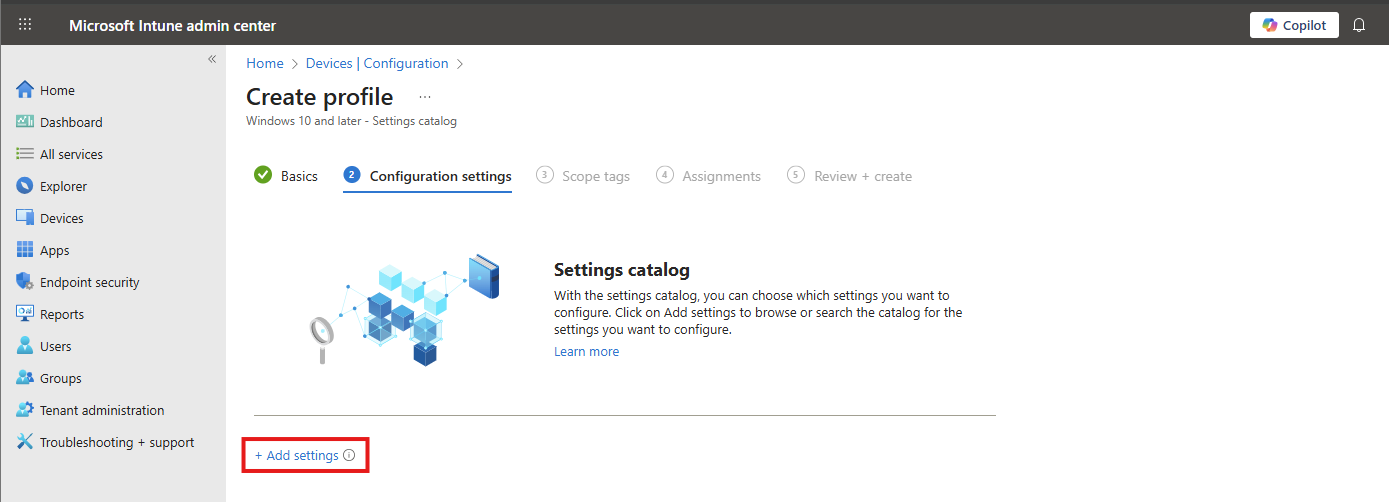
On the “Configuration settings” tab, click on “+ Add settings”. Navigate to this setting:
Administrative Templates -> Windows Components -> Sync your settings
Then lookup the setting-name: “Enable Windows Backup” and select it.
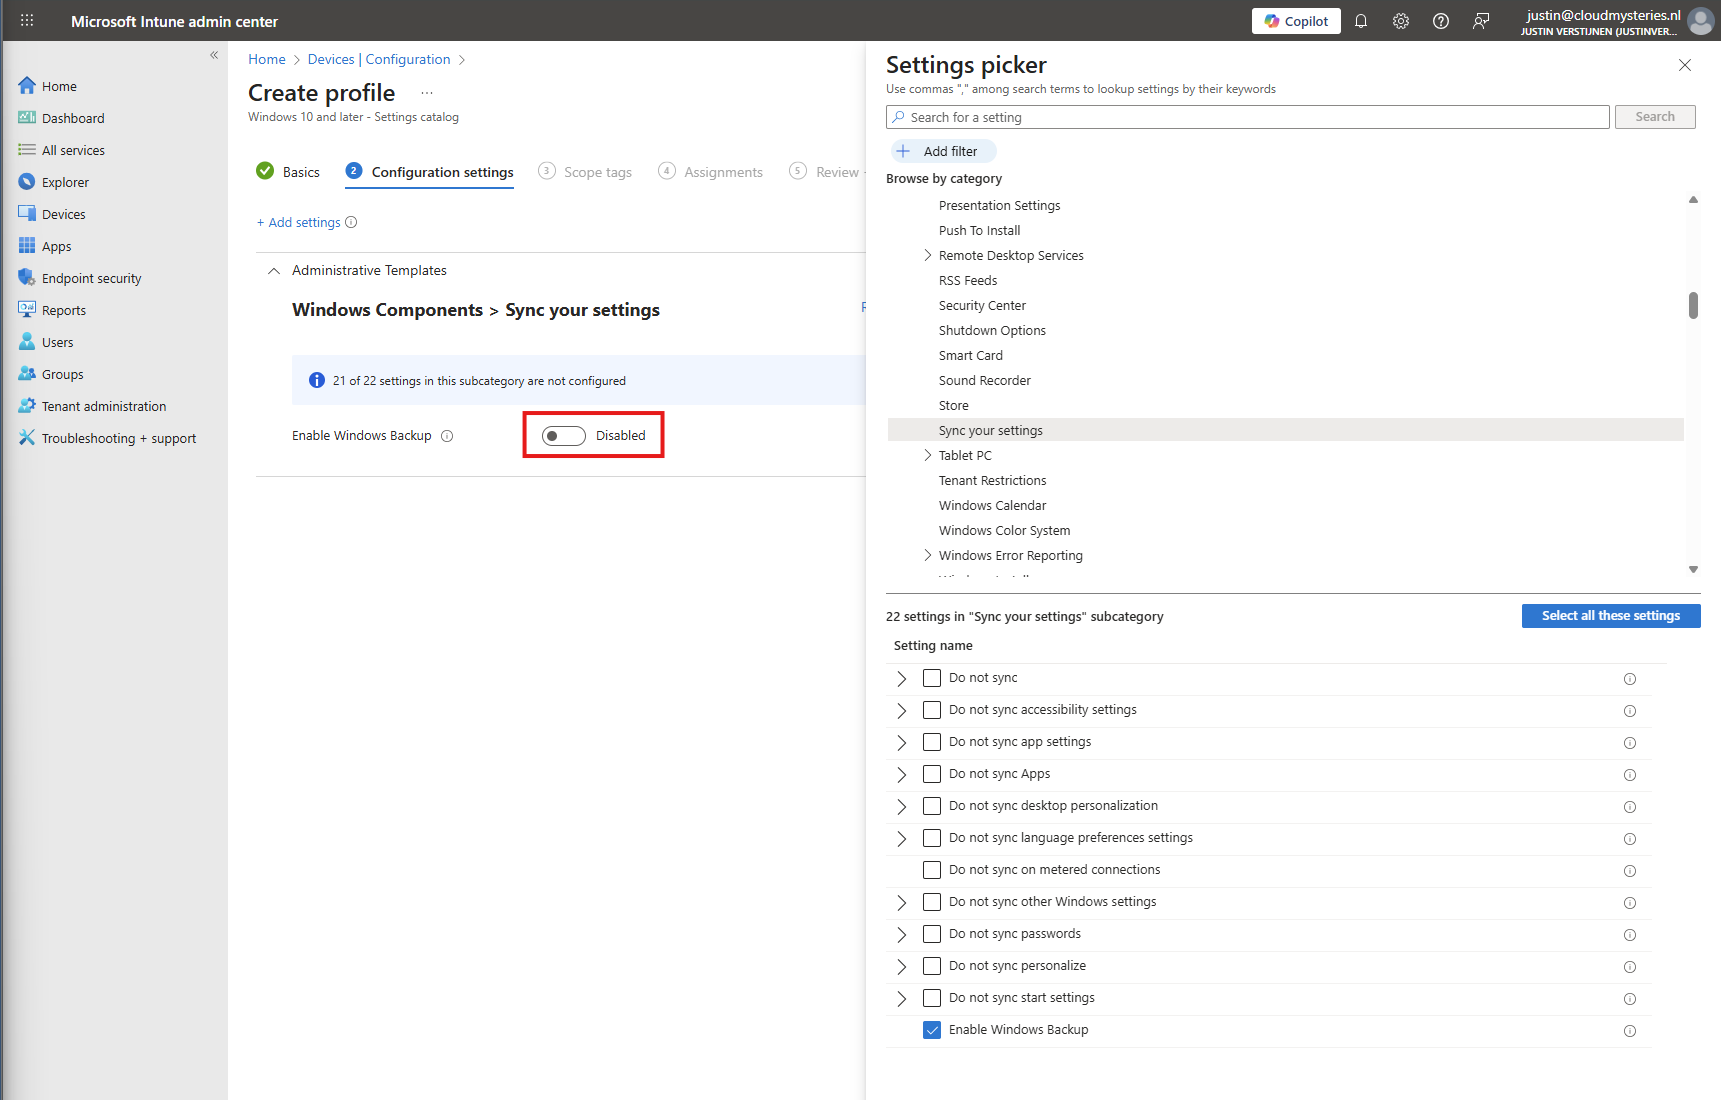
You can now enable the setting which will enable it on your device.
Then click “Next”, assign the policy to your devices.
After enabling the the devices to make their back-up, we also need to configure that Windows shows automatically the older backups at the initial start (OOBE).
Head to Windows Devices -> Enrollment -> Windows Backup and Restore (preview)
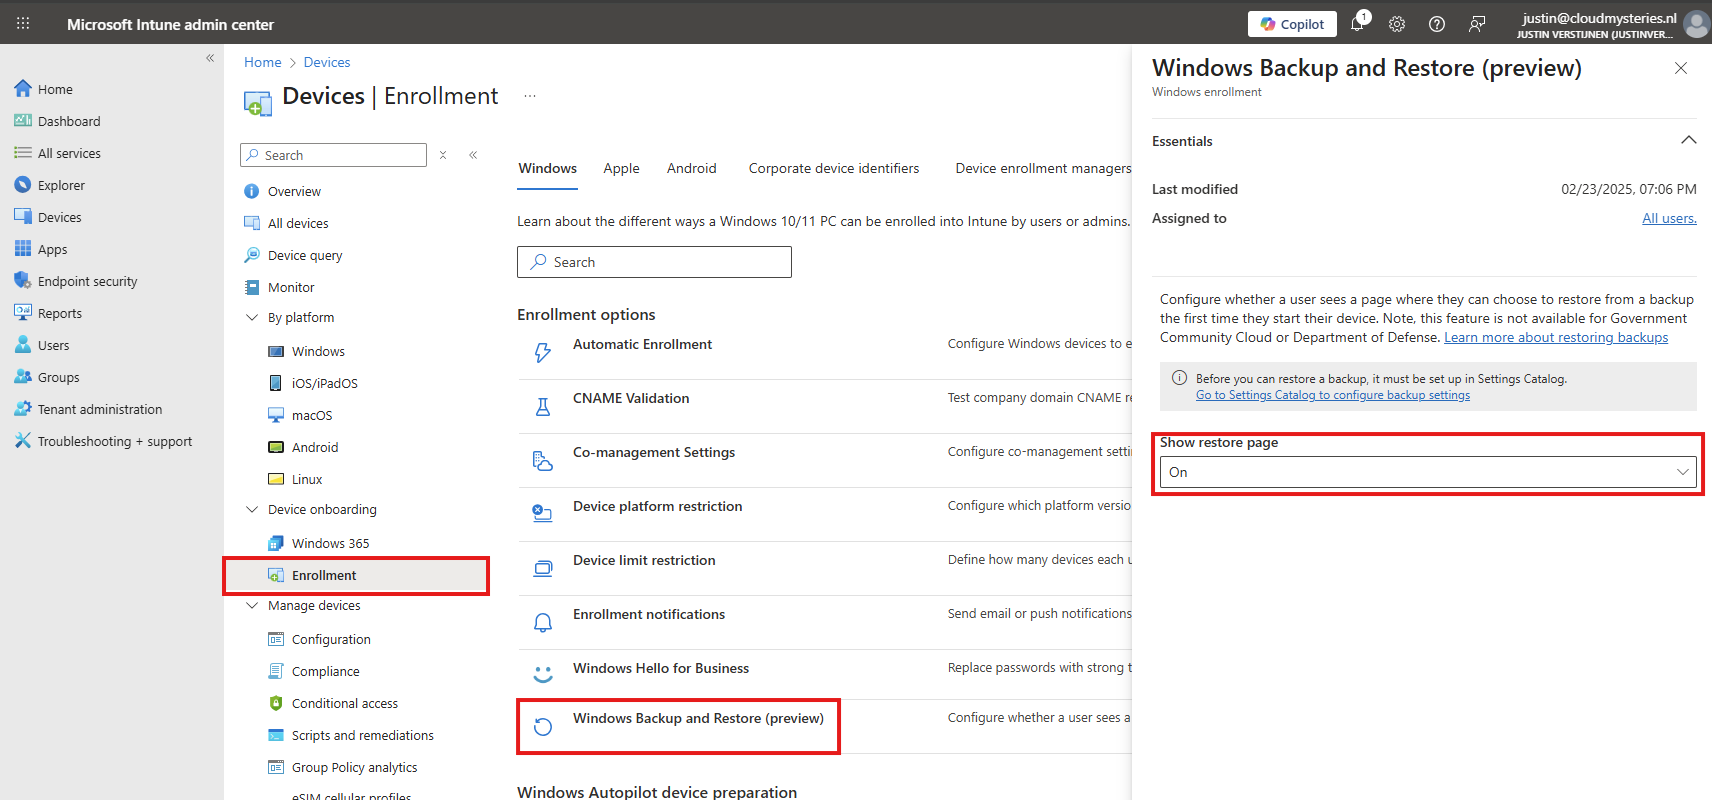
Select “On” to show the restore page. This will prompt the user (when an active backup is made) to restore their old configuration ath the Windows Out of the Box experience screen (OOBE)
Save the configuration to make this active.
Users can also manually configure this new Backup in the Windows Settings:
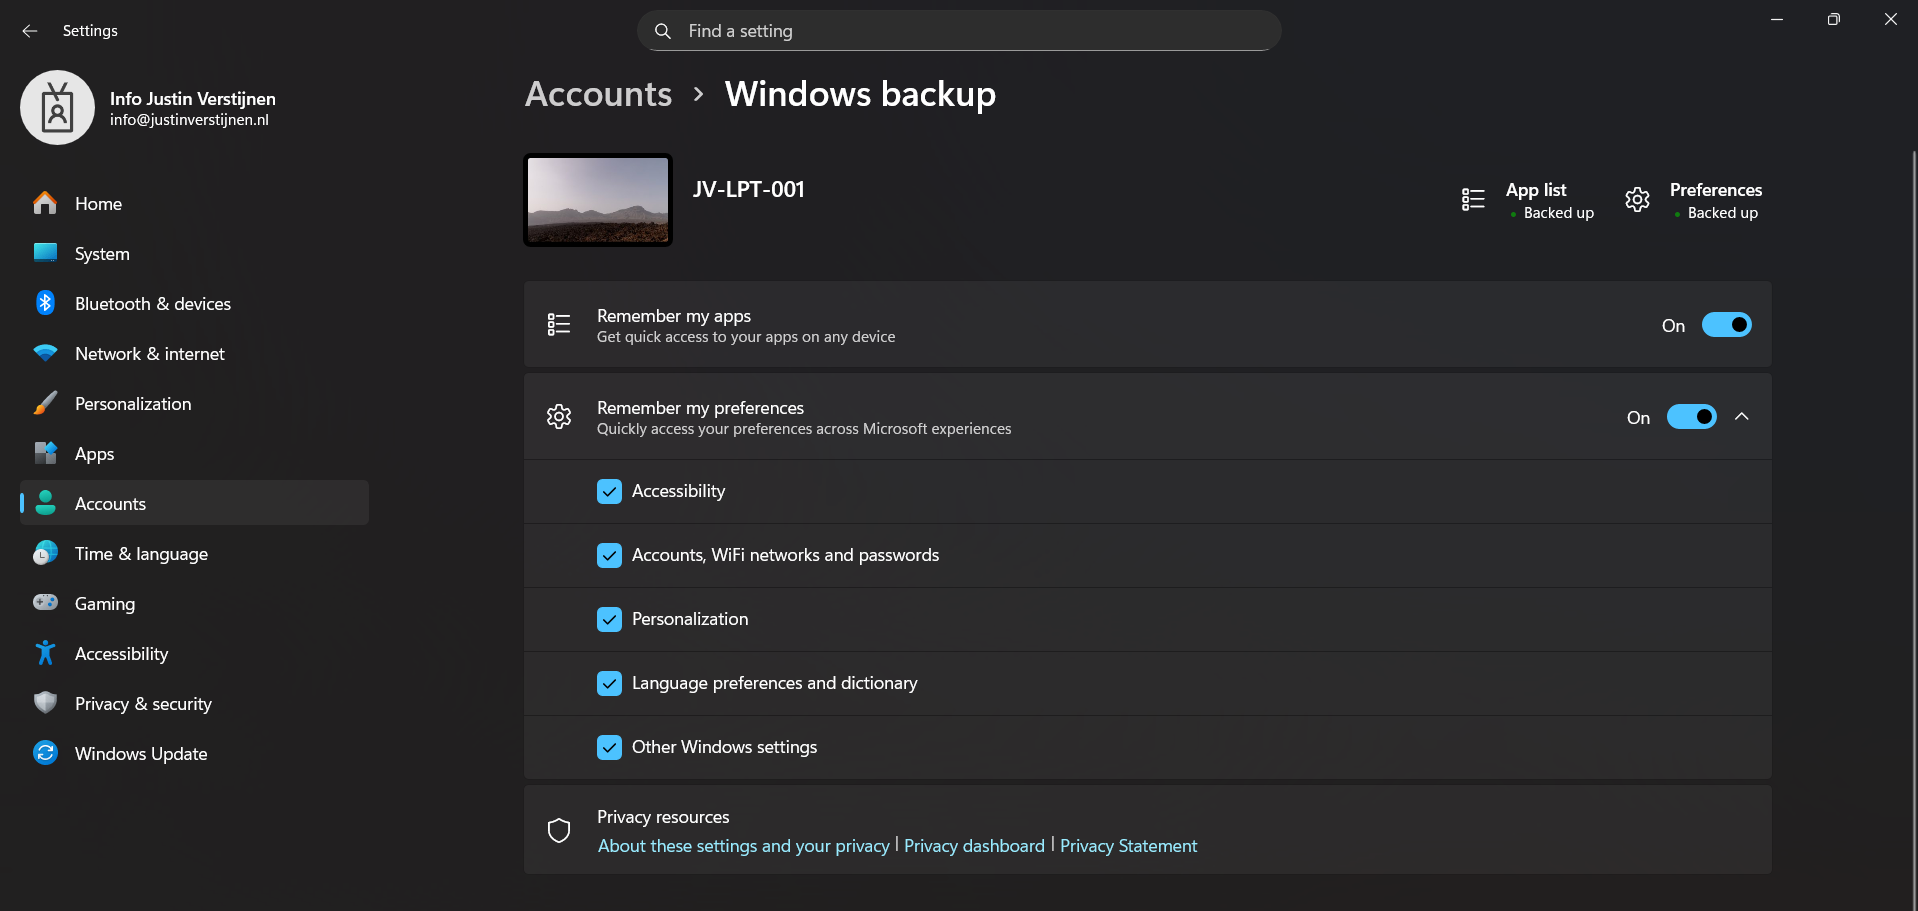
This is the overview after I have configured it in Intune and synced to my device. It automatically enabled the feature and should be ready to restore in case I’ll do a reinstall of my computer.
To restore the back-up made by Windows Backup for Organizations, let’s install a second laptop (JV-LPT-002) with the latest Windows updates (25H2).
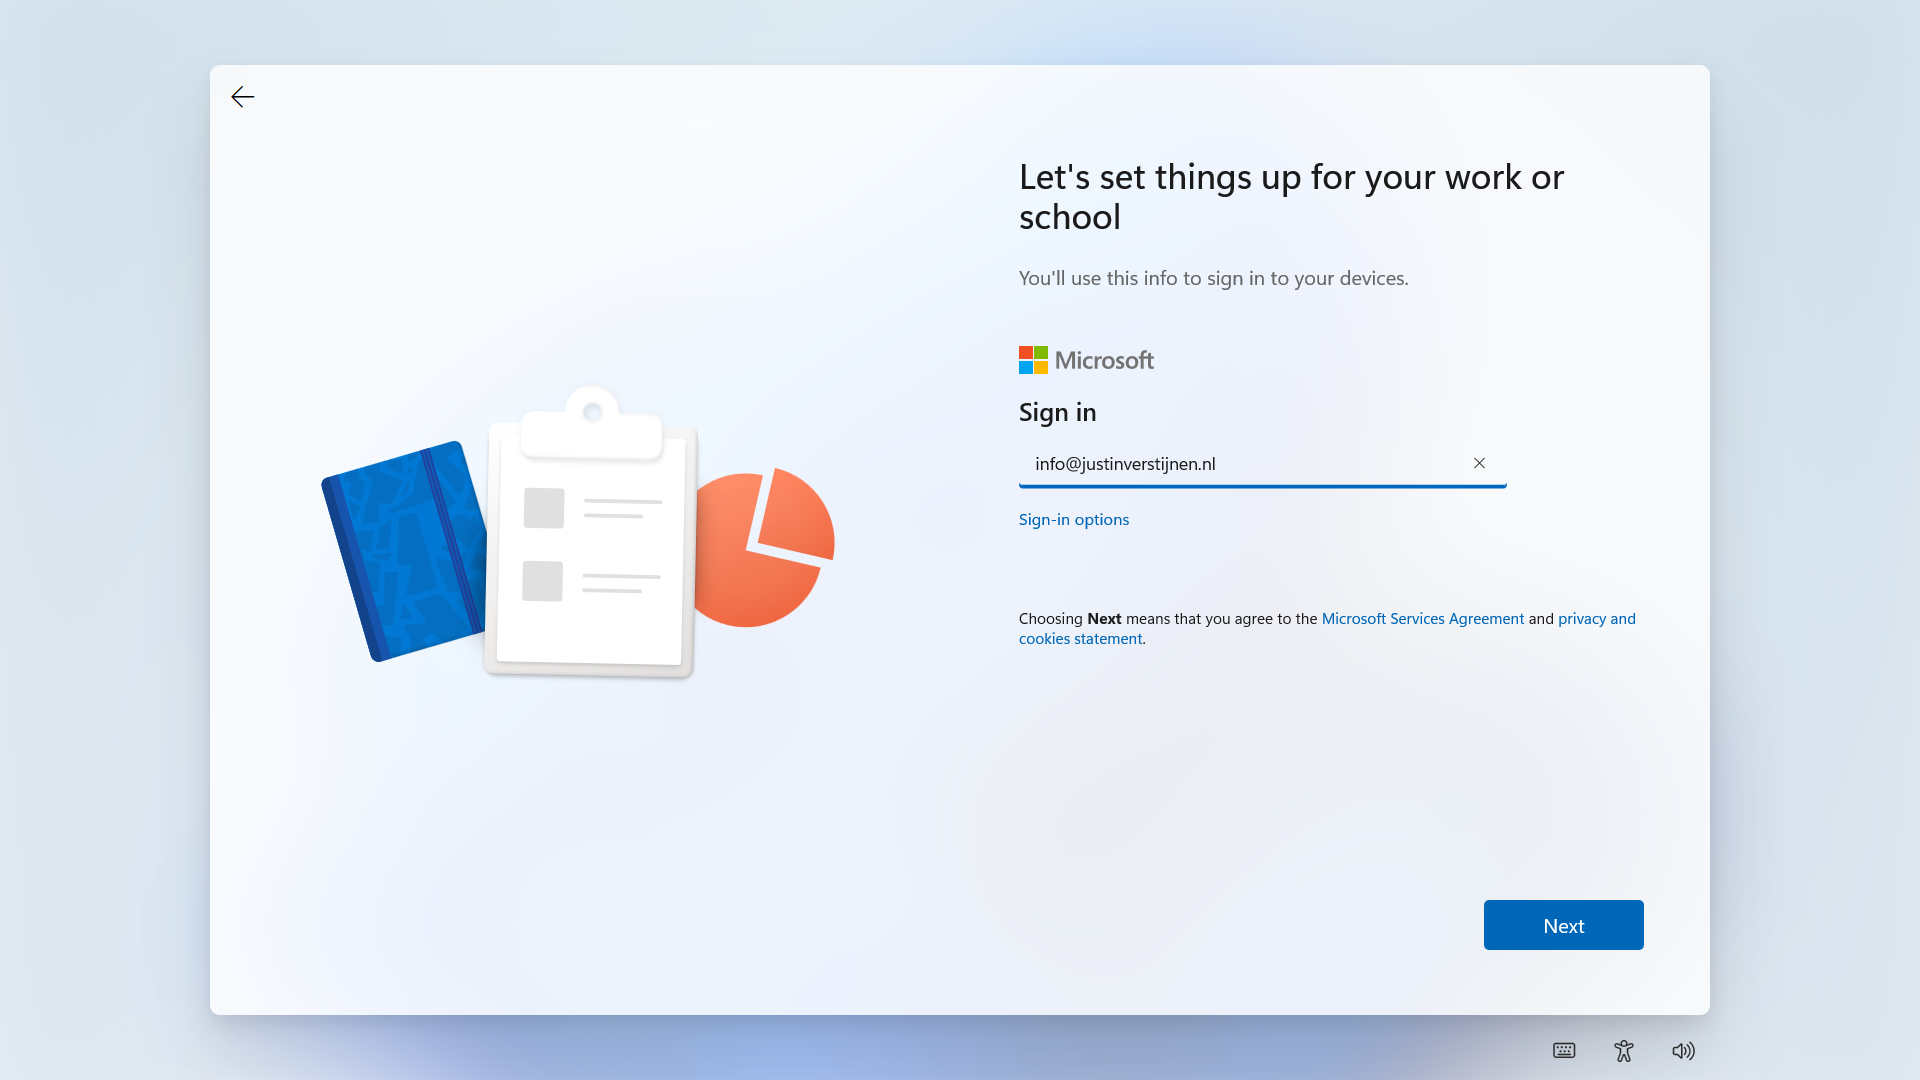
Now I will login to Windows with the same account as I logged in to the first laptop (JV-LPT-001).
After succeeding the MFA challenge, Windows will process the changes and will get the additional information from our tenant.
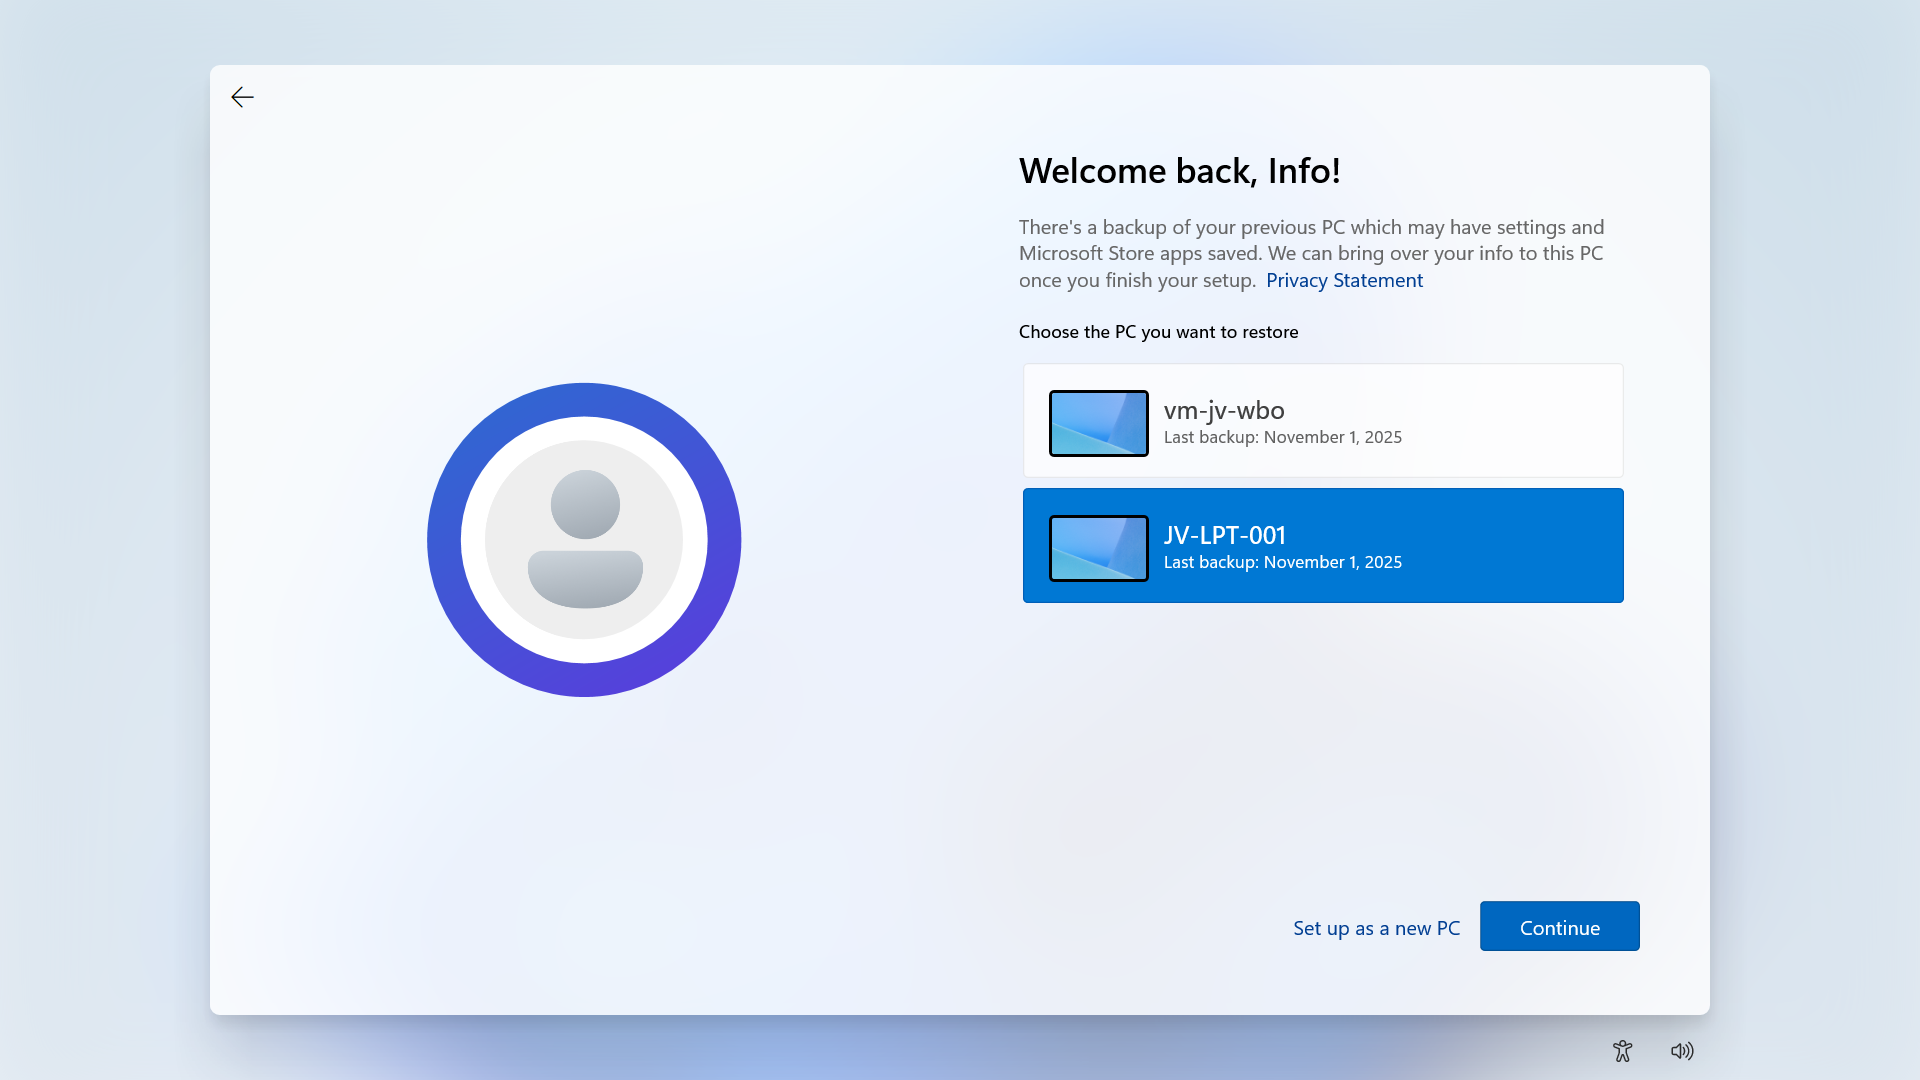
Then Windows will present you the options to restore a previously made backup. To get a better picture, I have made a second backup on a VM.
Now I will select the backup from the first laptop and click “Continue”.
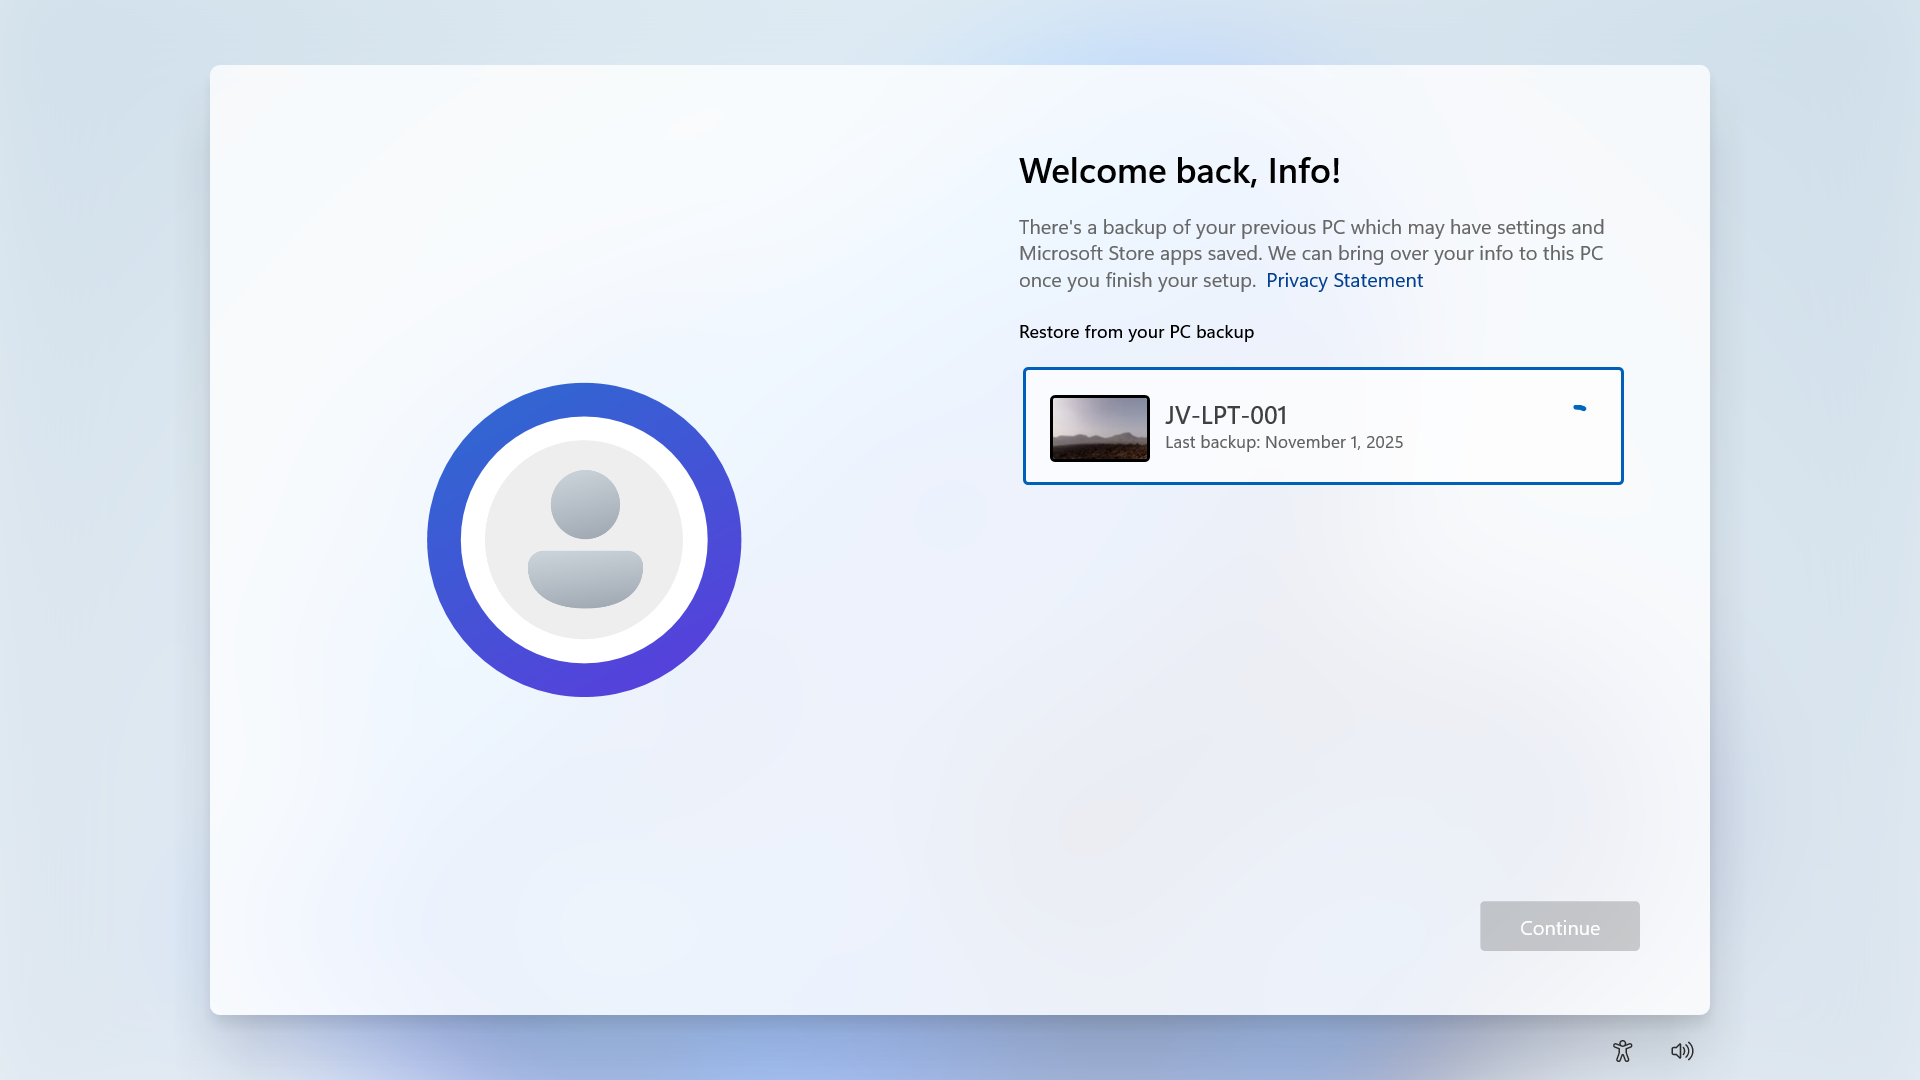
Now the backup will be restored.
After the backup has been restored, this was the state on the laptop without any manual change. It synced the dark mode I configured, the installed Windows Store apps, the Windows taskbar to the left and my nice holiday picture. All without any manual action after restoring.
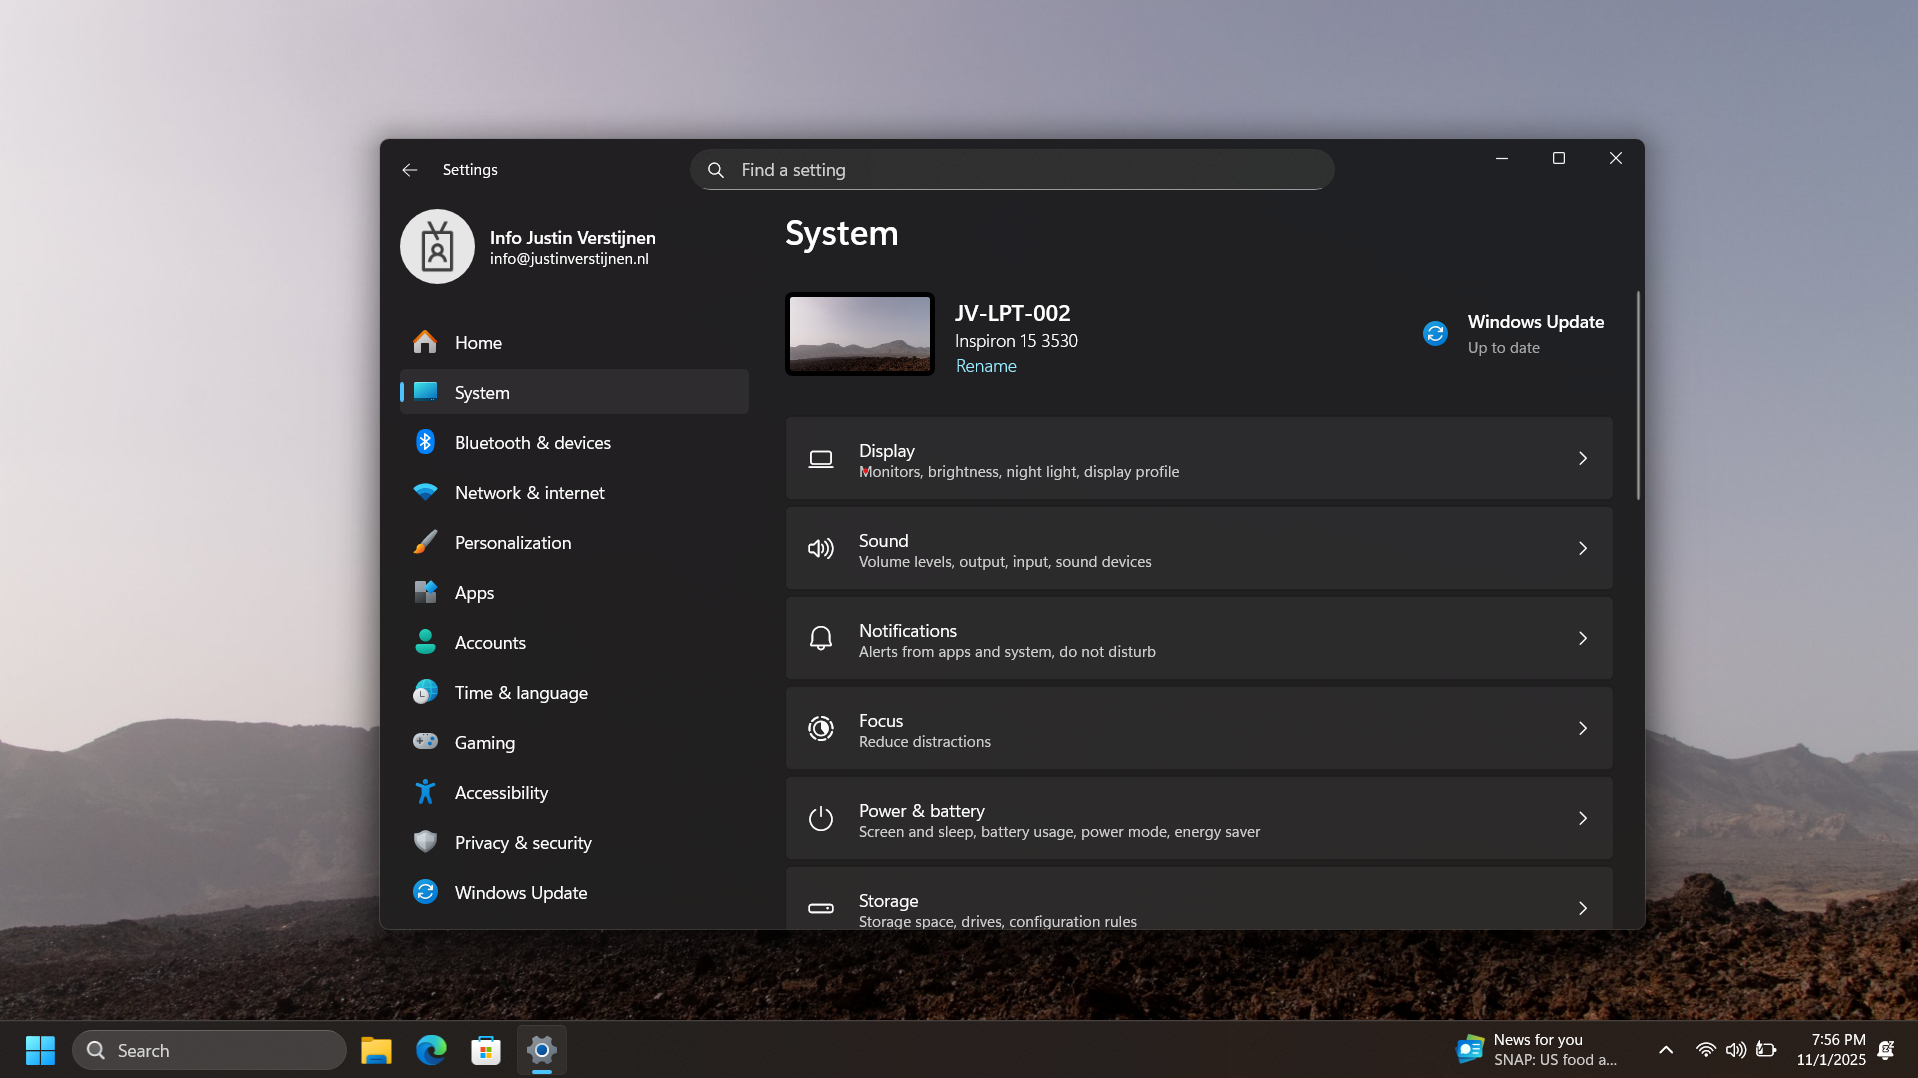
As you can see, installing an new computer is alot easier with this new feature. We can easily restore an this configuration and minimizes the configuration we need to do for our new computer or installation.
The Windows Out of the Box experience screen is the first you’ll see when going to a fresh Windows installation. We can take screenshots here but with a little difficult.
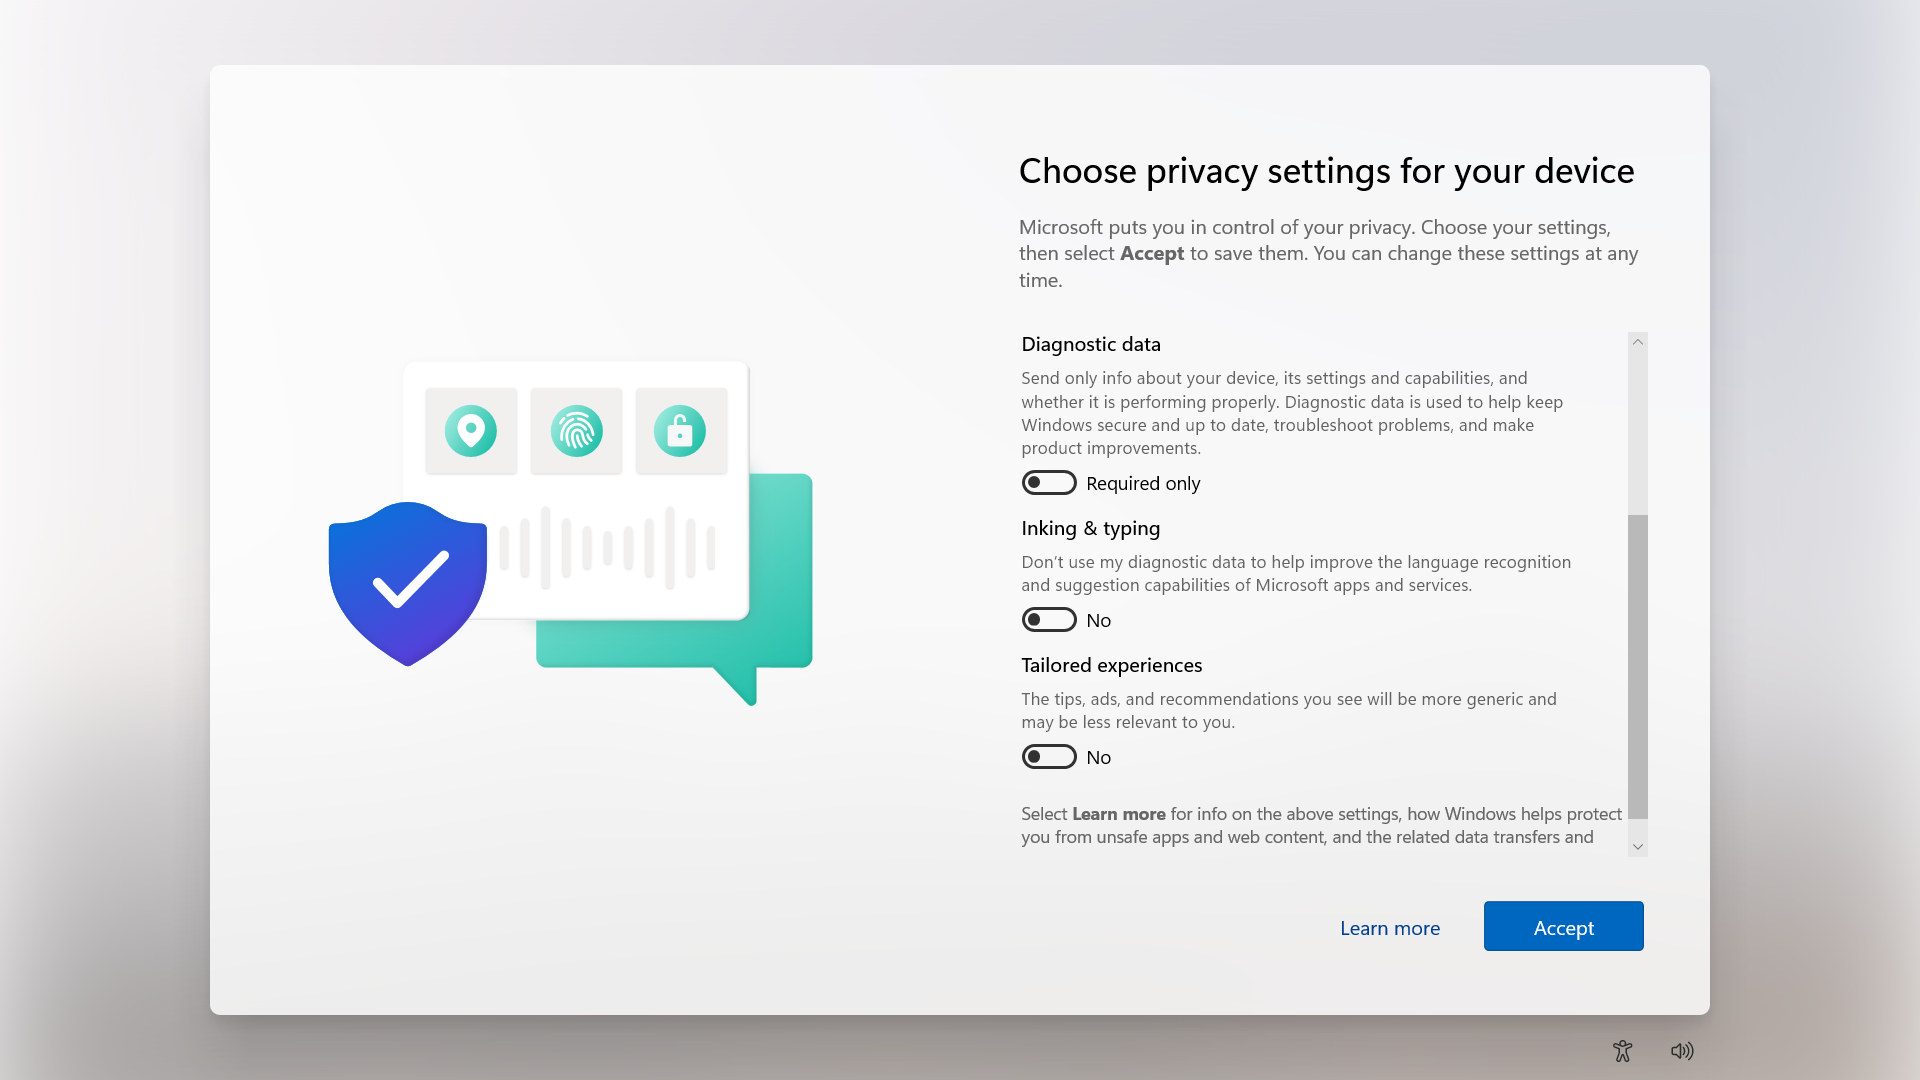
You can do this by pressing Shift + F10 or Shift + Fn + F10. A cmd window will the open.
Type in PowerShell, and the use this command to take a screenshot:
Add-Type -AssemblyName System.Windows.Forms; Add-Type -AssemblyName System.Drawing; $width = 1920; $height = 1080; $bmp = New-Object Drawing.Bitmap($width, $height); $graphics = [Drawing.Graphics]::FromImage($bmp); $graphics.CopyFromScreen(0,0,0,0,$bmp.Size); $bmp.Save("C:\OOBE.png")Screenshots will be saved to C:\ to be backed-up after the OOBE flow.
Windows Backup for Organizations is a great feature, especially for end users to keep their personal Windows Settings saved into their account. This in combination with OneDrive will make reinstalls pretty easy as we only have to install applications. The rest will be handled by Microsoft in this way.
These sources helped me by writing and research for this post;
You have reached the end of the page. You can navigate through other blog posts as well, share this post on X, LinkedIn and Reddit or return to the blog posts collection page. Thank you for visiting this post.
If you think something is wrong with this post or you want to know more, you can send me a message to one of my social profiles at: https://justinverstijnen.nl/about/
If you find this page and blog very useful and you want to leave a donation, you can use the button below to buy me a beer. Hosting and maintaining a website takes a lot of time and money. Thank you in advance and cheers :)
The terms and conditions apply to this post.
Since the latest Windows 25H2 update, we have a great new feature. We can now remove pre-installed Windows Store Applications which we don’t want to ship with our devices. This helps us alot with both Windows 365 and Azure Virtual Desktop Personal deployments as with normal Intune-joined devices. The only downside is that Pooled Azure Virtual Desktop Deployments are not supported.
In this guide I will dive into this new setting and explain how to configure this and why this is a great update. The step-by-step guide shows how I have configured a policy that removes most of the non-productive apps from my PC.
In Intune we can now select which default shipped apps must be removed from Windows clients. Before, this was a complete package we had to use or remove with custom scripts, but now we can select the apps to remove (and deselect to keep).
Keep in mind, we have the following requirements for this new feature:
Also worth mentioning, removing an application needs a manual reinstall, which is easy to do.
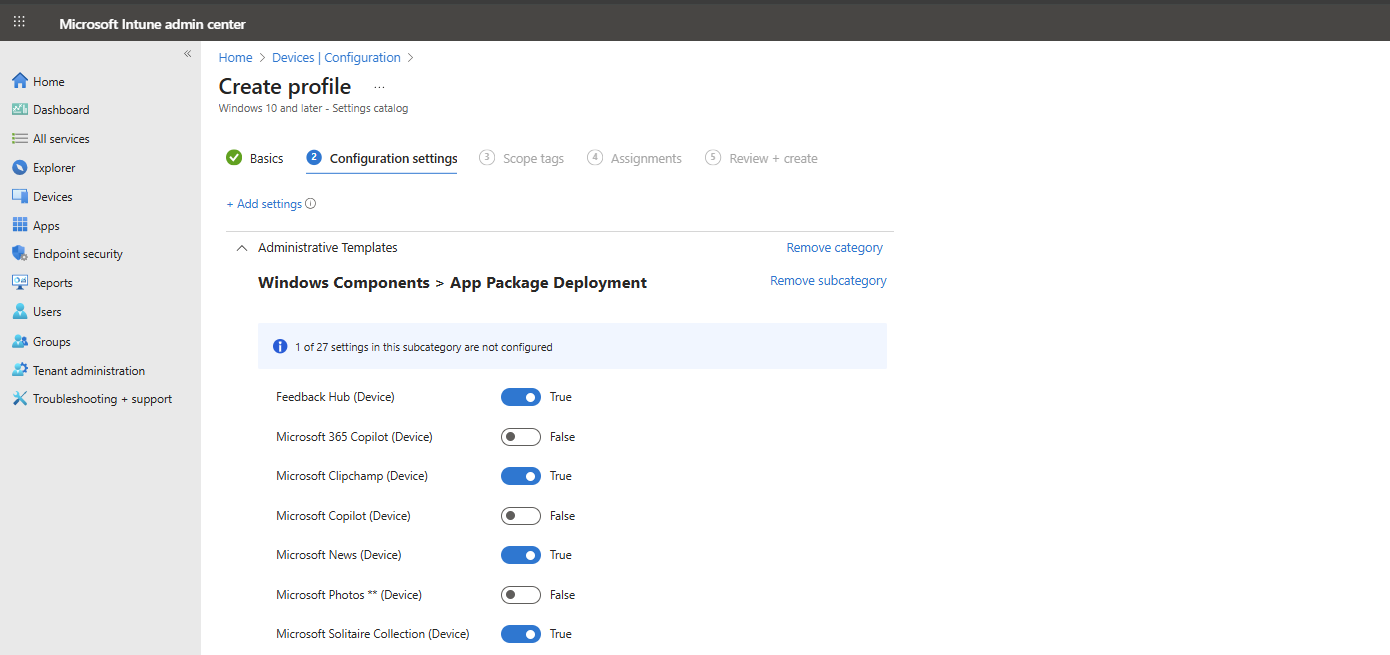
We can configure the removal of these apps with a configuration profile in Microsoft Intune. I will create this from A to Z in this guide to fully explain how this works:
Open up Microsoft Intune Admin center (intune.microsoft.com).
Then go to your Devices, and then Windows.
Then click on “Configuration” to view all the Windows-based Configuration Profiles. Here we can create a new profile for this setting. Click on “+ Create” and then “New Policy”.
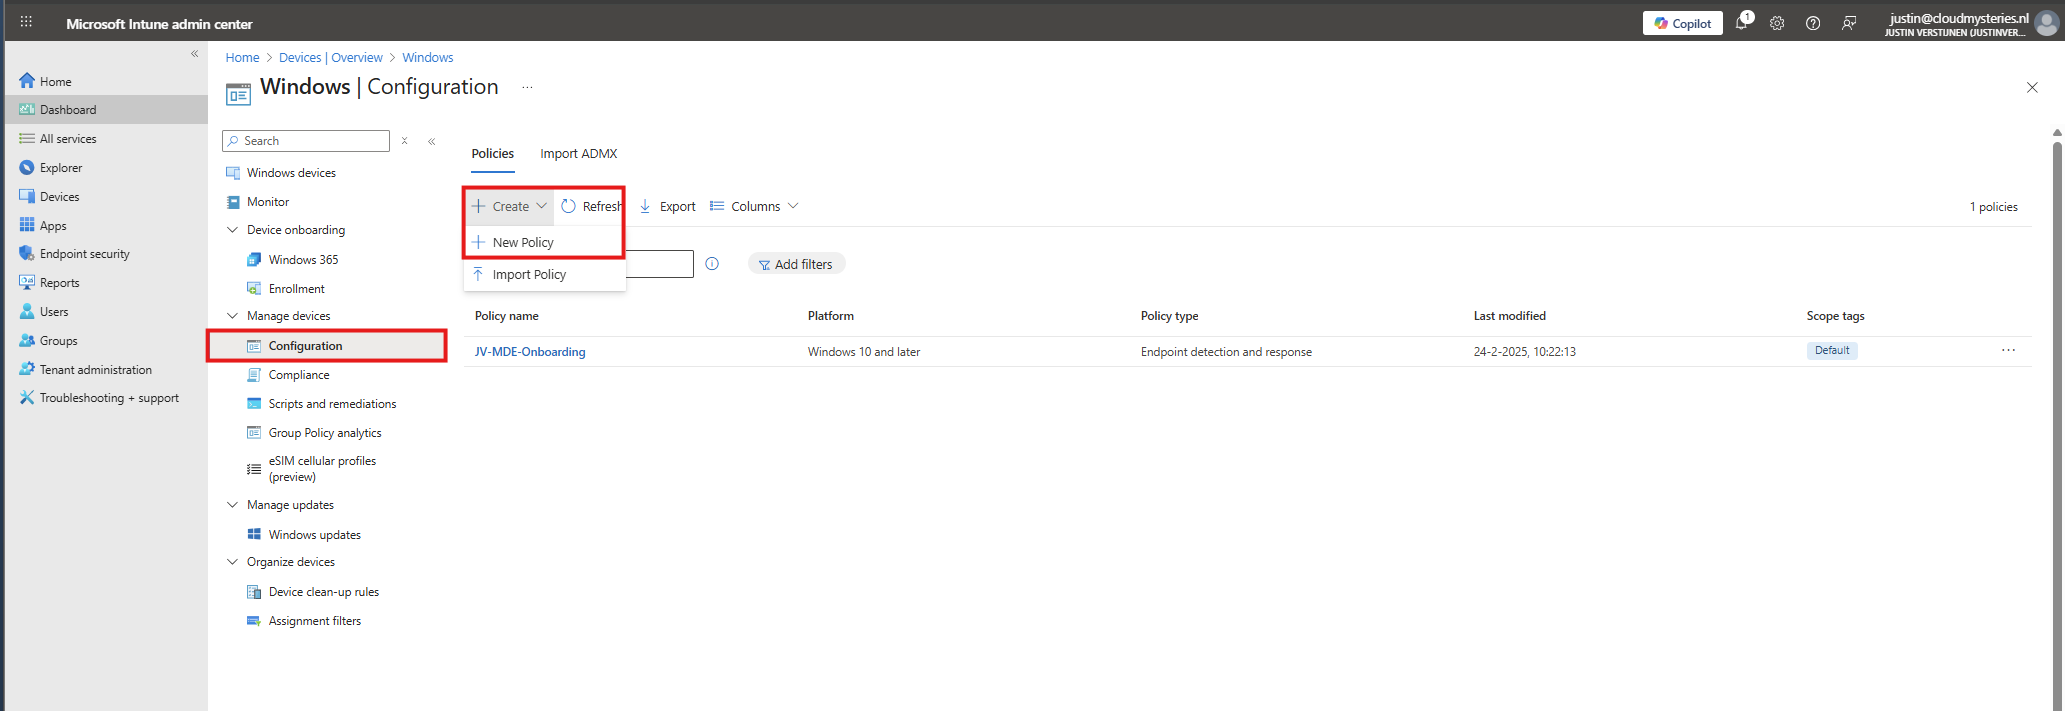
Select for Platform the “Windows 10 and later option”, and for Profile Type “Settings catalog”.
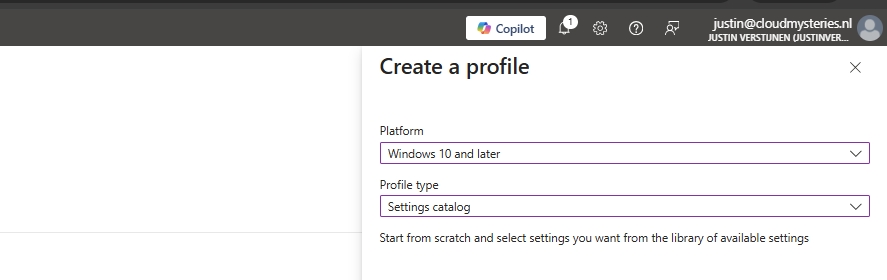
Then give the policy a recognizable name and description.

Then click “Next”. On the “Configuration settings” page, click on the “+ Add settings” button:
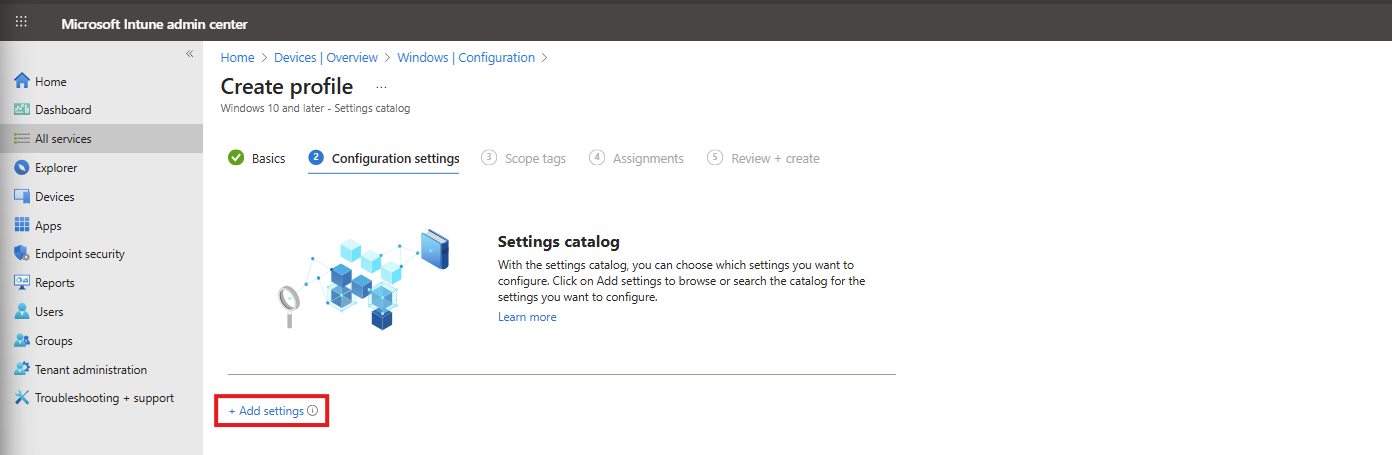
Then search for the setting in this location:
Administrative Templates -> Windows Components -> App Package Deployment
Then select the “Remove Default Microsoft Store packages from the system” option.
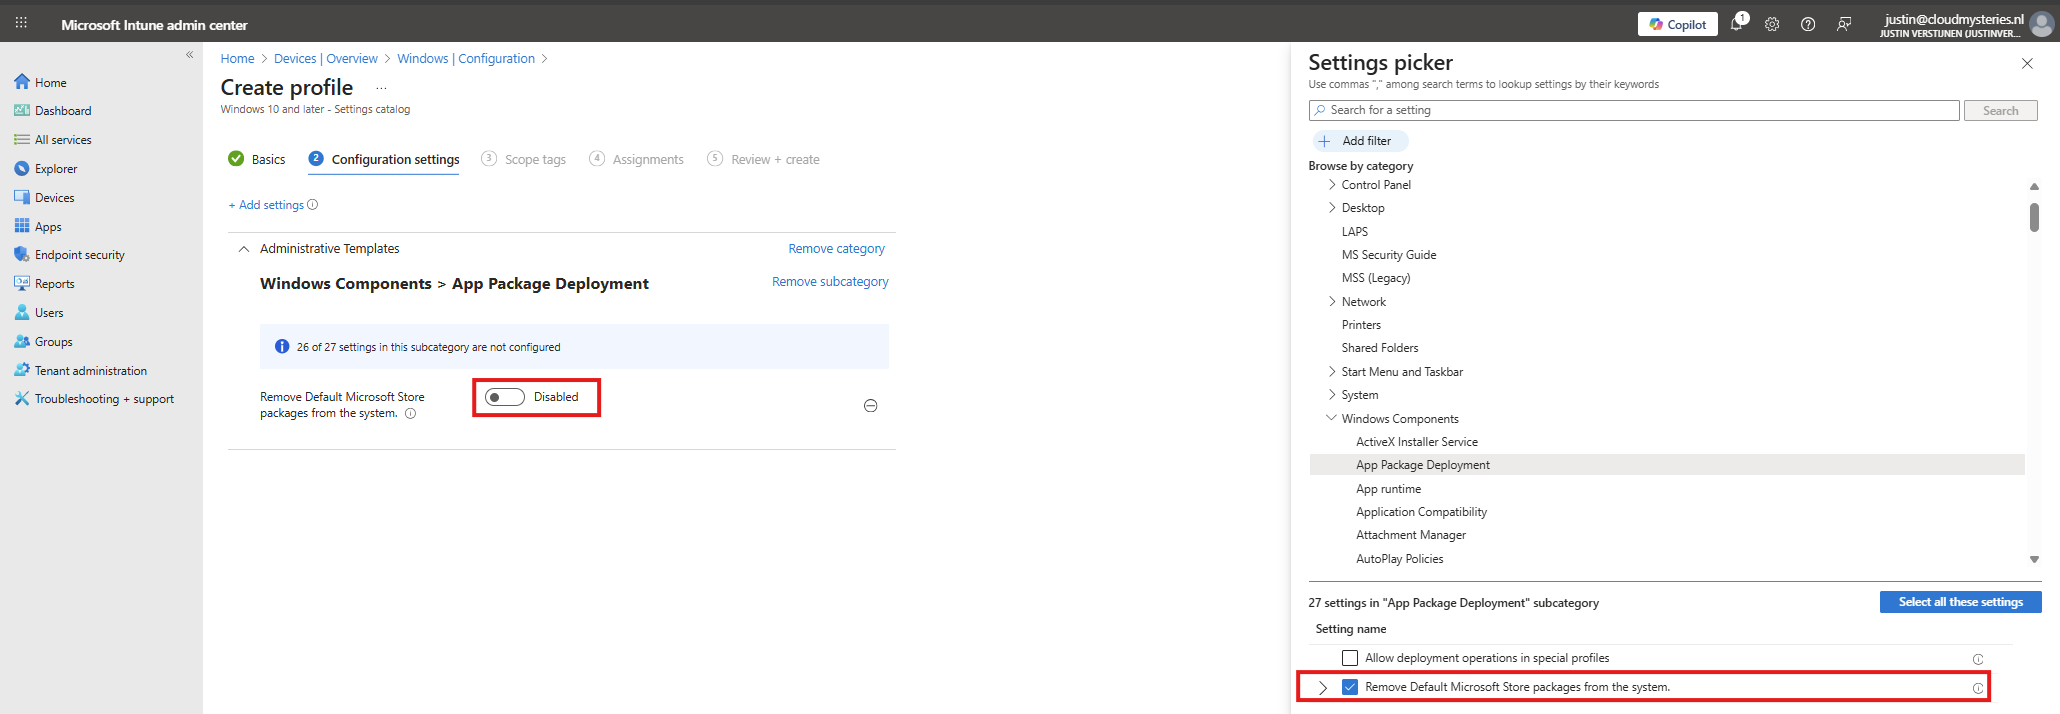
At the left side, flick the switch to “Enabled” and now we can select all apps to remove from Windows client devices.
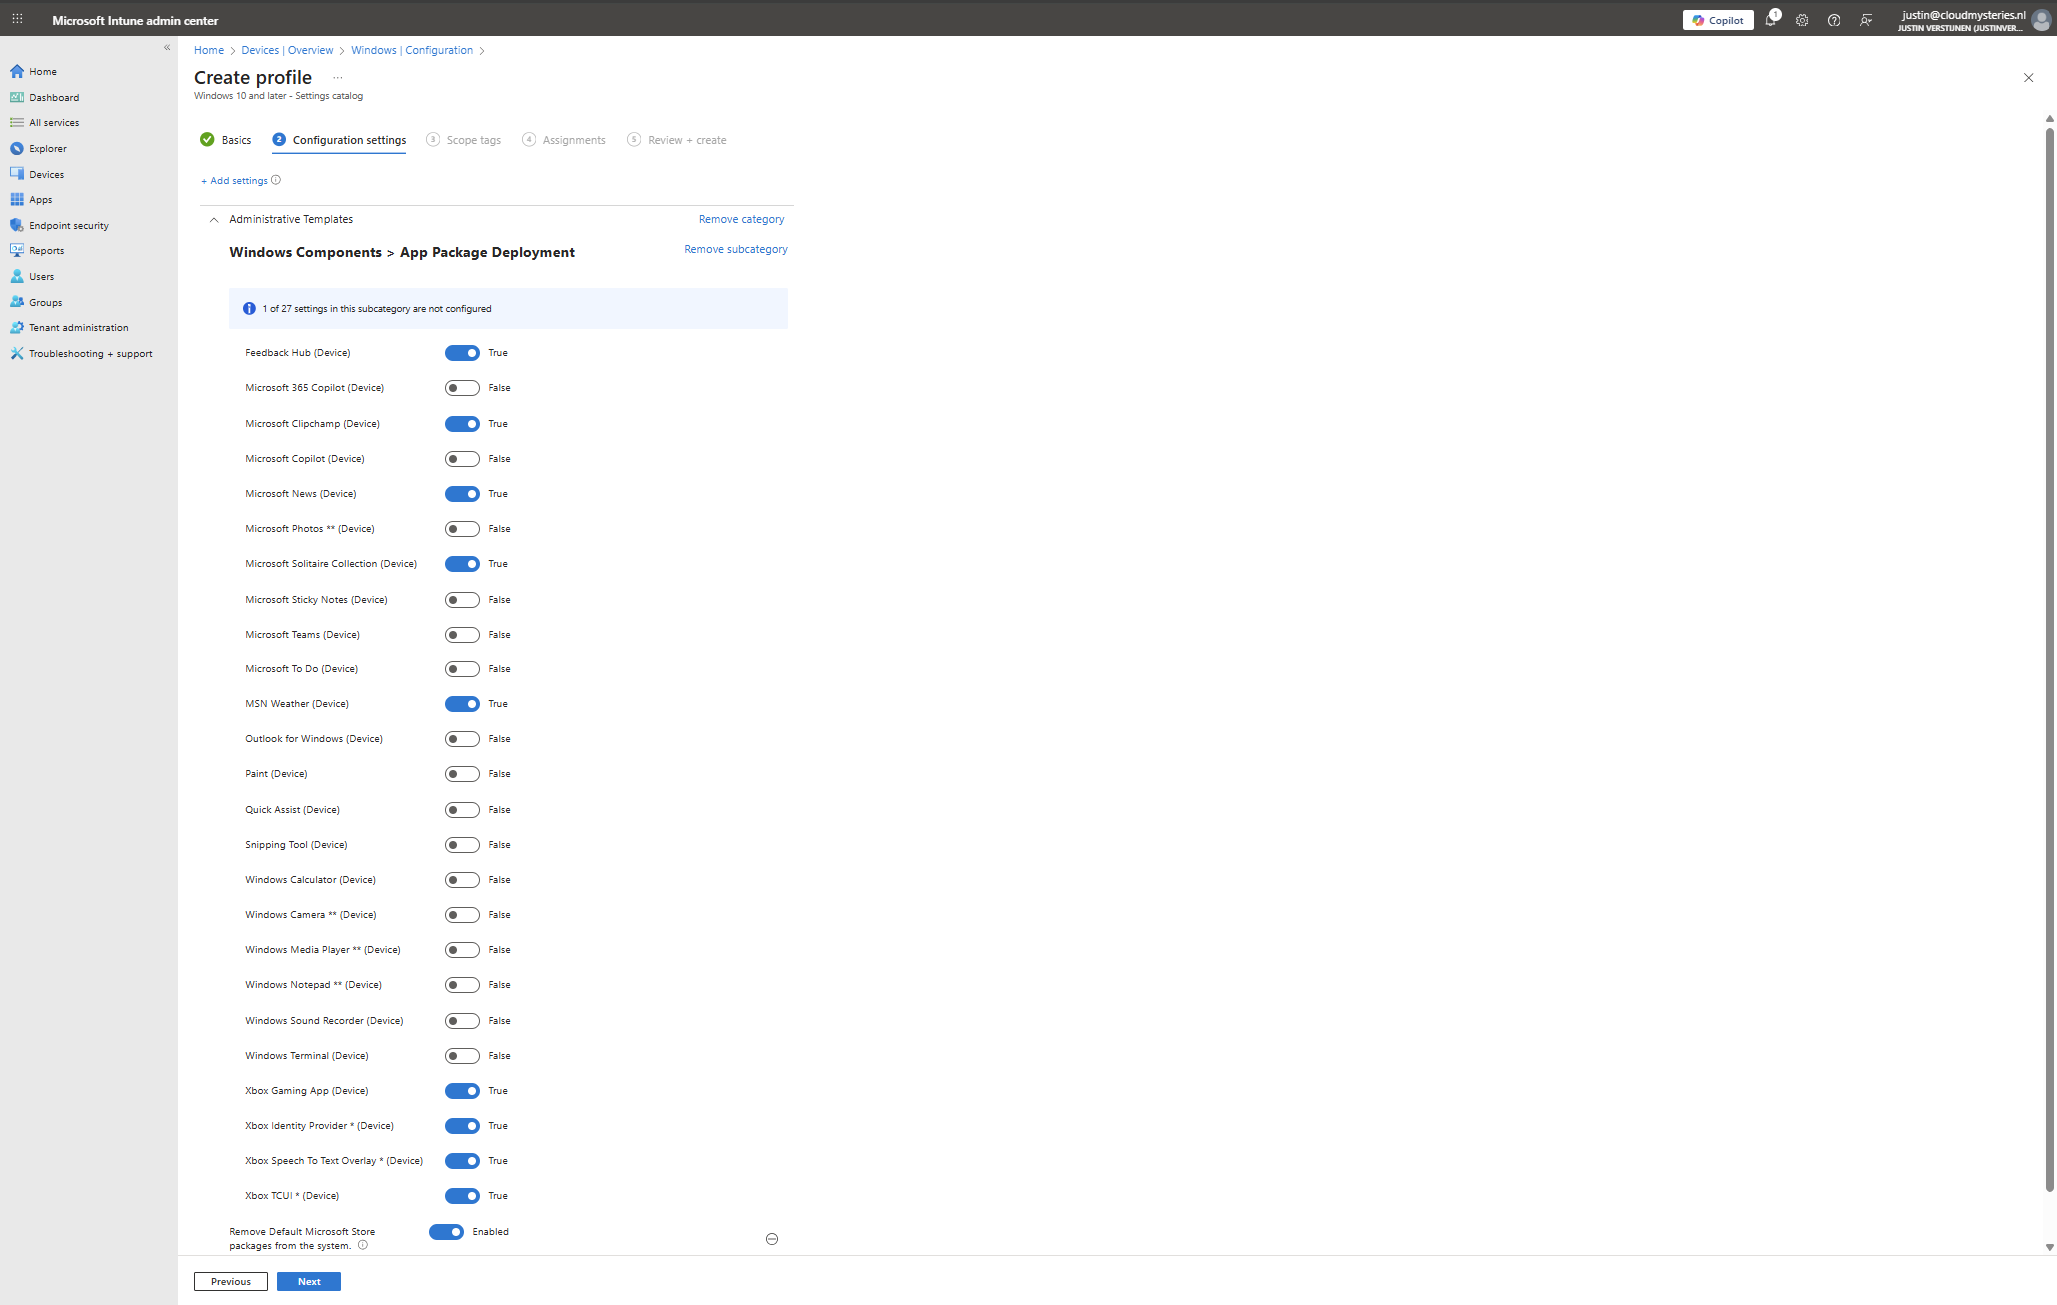
In this configuration, I want to leave all helpful tools installed, but want to remove non-business related applications like Xbox , Solitaire collection and Clipchamp.
You can make your own selection of course. After your apps to remove are selected, click “Next”. Then click “Next” again to assign the configuration profile to your devices. In my case, I select “All devices” but you can also use a manual or Dynamic group.
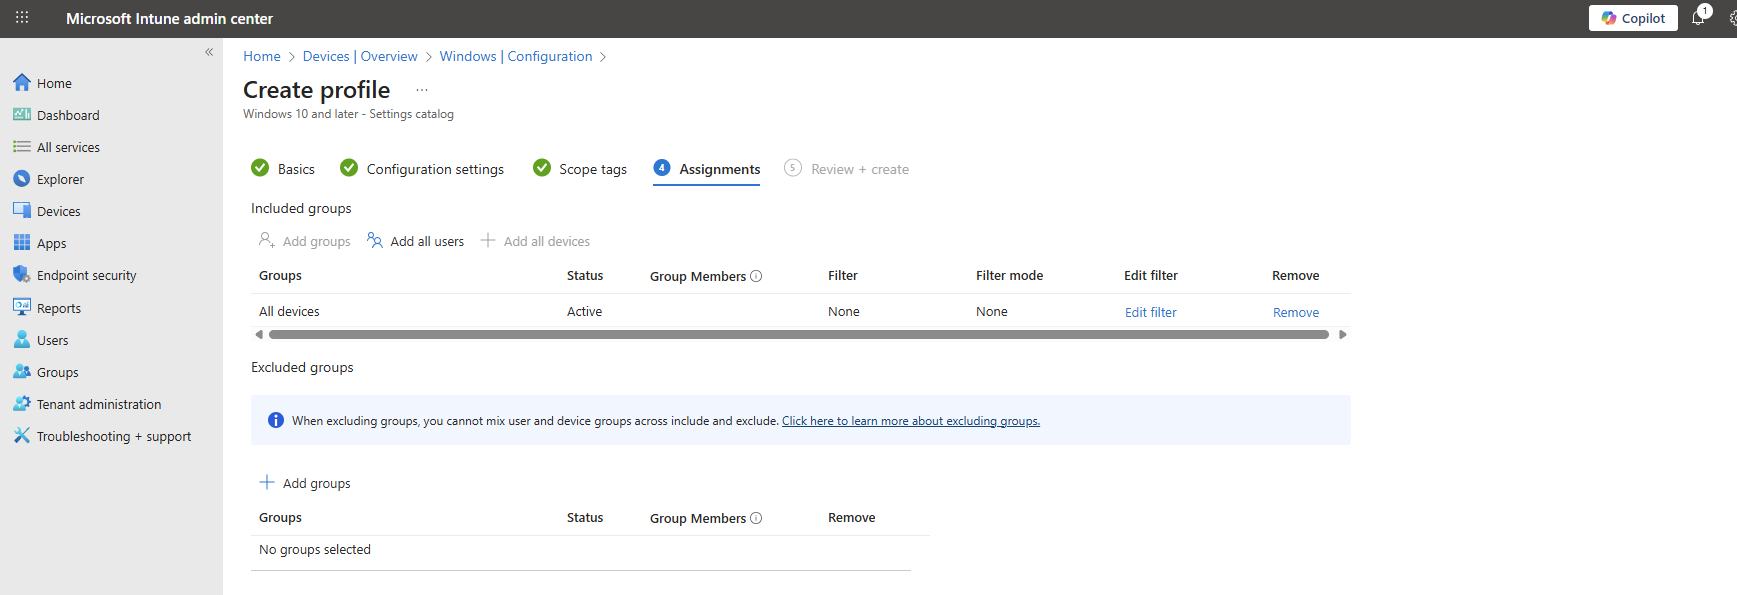
Now the policy is assigned and the actions will be applied the next time your device synchronizes with Microsoft Intune.
In you don’t have Enterprise or Education licenses for Windows, I can highly recommend using this debloat script: https://github.com/Raphire/Win11Debloat
This script will help you in the Windows Experience by removing the selected apps, and helps with Windows Explorer settings.
This new feature is one of the greater updates to the Windows 11 operating system. Deleting applications you don’t need frees up some disk space and compute resources. Also, end-uders are not presented apps they should not use which makes the overall device experience alot better.
I hope I have made this clear to use and thank you for reading my post.
These sources helped me by writing and research for this post;
You have reached the end of the page. You can navigate through other blog posts as well, share this post on X, LinkedIn and Reddit or return to the blog posts collection page. Thank you for visiting this post.
If you think something is wrong with this post or you want to know more, you can send me a message to one of my social profiles at: https://justinverstijnen.nl/about/
If you find this page and blog very useful and you want to leave a donation, you can use the button below to buy me a beer. Hosting and maintaining a website takes a lot of time and money. Thank you in advance and cheers :)
The terms and conditions apply to this post.
Universal Print is a Microsoft cloud solution which can replace your Windows based printservices. It can be used to deploy printers to endpoints, even to non-Windows devices in a cloud-only way.
Universal Printing is a cloud based service of Microsoft for installing, managing and deploying printers to end users in a modern way. This service eliminates the need for having to manage your own print servers and enables us to deploy printers in a nice and easy way. This is mostly HTTPS-based.
You can use Universal Print with printers in 2 ways:
To be clear of the costs of Universal Print:
These sources helped me by writing and research for this post;
You have reached the end of the page. You can navigate through other blog posts as well, share this post on X, LinkedIn and Reddit or return to the blog posts collection page. Thank you for visiting this post.
If you think something is wrong with this post or you want to know more, you can send me a message to one of my social profiles at: https://justinverstijnen.nl/about/
If you find this page and blog very useful and you want to leave a donation, you can use the button below to buy me a beer. Hosting and maintaining a website takes a lot of time and money. Thank you in advance and cheers :)
The terms and conditions apply to this post.
All pages referring or tutorials for Microsoft 365.
Microsoft 365 Backup ensures that your data, accounts and email is safe and backed up into a separate storage space. A good and reliable back-up solution is crucial for any cloud service, even when having versioning and recycle bin options. Data in SharePoint or OneDrive stays data in one central place and any minor error is made within seconds.
In this guide, I will explain how Microsoft 365 Backup works and how you can start using it.
Microsoft 365 Backup is an integrated solution of Microsoft to backup Microsoft 365 items. This applies to these items:
Microsoft 365 Backup can be used to extend the retention period of certain data. By default, spaces like SharePoint sites have a retention of 93 days if you count the recycle bin and versioning. But this is not really a backup, only some techniques to quicky restore a single file or folder. This doesn’t include things like permissions, which Microsoft 365 Backup does.
If having any site-wide problems, data loss or change in permissions, you will be doomed.
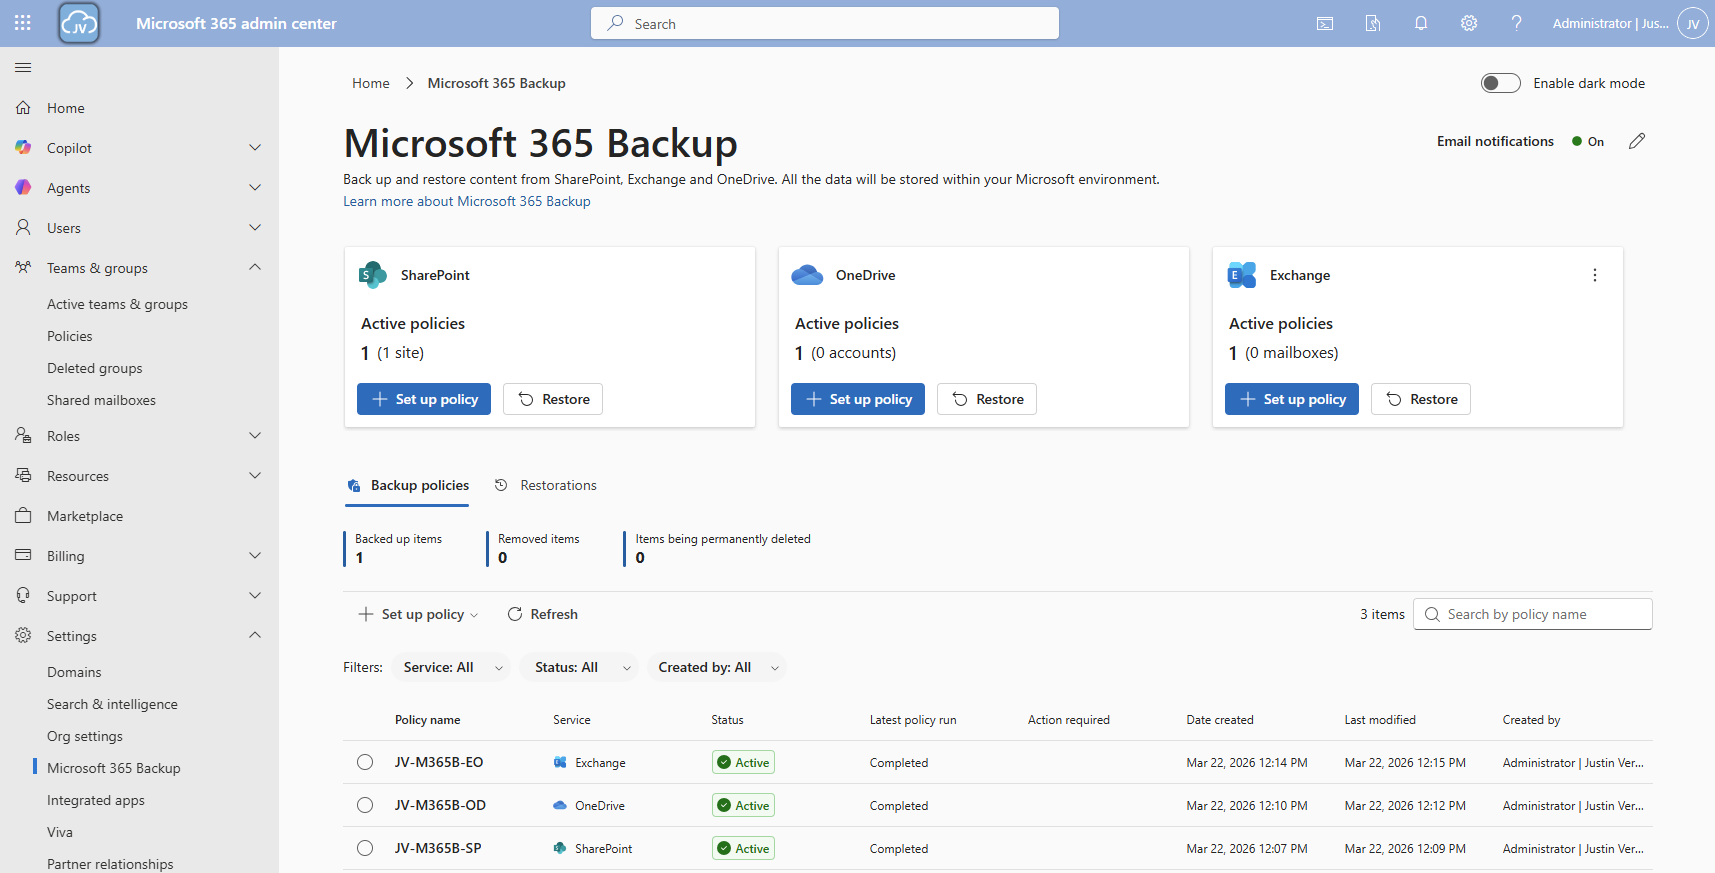
Microsoft 365 Backup has the following details:
The pricing of Microsoft 365 Backup is $0,15 per month per stored gigabyte. This means every gigabyte that is protected is being billed. This is billed using the payment method of Azure and will be on that invoice. You could also create a separate subscription to receive a separate invoice.
For example:
You will pay 5 x 25 x $0,15 per month which is $18,75 per month. The duplicate data that is being saved is not billed, as deduplication techiques are being used: Incremental backups.
An example of forecasted costs for an environment with backups enabled can be (with low and heavy users):
| Type | SharePoint size | Onedrive size | Mailboxes size | Total costs/month* |
| 5 users (low) | 25GB | 32,5GB | 32,5GB | $ 13,50 ($2,70/user) |
| 5 users (heavy) | 100GB | 125GB | 125GB | $ 52,50 ($10,50/user) |
| 25 users (low) | 100GB | 125GB | 125GB | $ 52,50 ($2,10/user) |
| 25 users (heavy) | 500GB | 625GB | 625GB | $ 262,50 ($10,50/user) |
| 250 users (low) | 500GB | 625GB | 625GB | $ 262,50 ($1,05/user) |
| 250 users (heavy) | 5000GB | 6.250GB | 6.250GB | $ 2.625,- ($10,50/user) |
*$ 0,15 per GB/month
As you can see, it totally depends on how many data is backed up, and selecting only crucial sites/users is crucial. You have to create a cost estimate based on the items you need the extra retention for. Maybe for most of the users, like frontline workers or people with only an email address and some OneDrive, the recycle bin and versioning options with 93 days of retention is more than enough.
You can find currect usage easily through the Microsoft 365 Admin center (https://admin.cloud.microsoft) and then to “Reports” and then “Usage”:
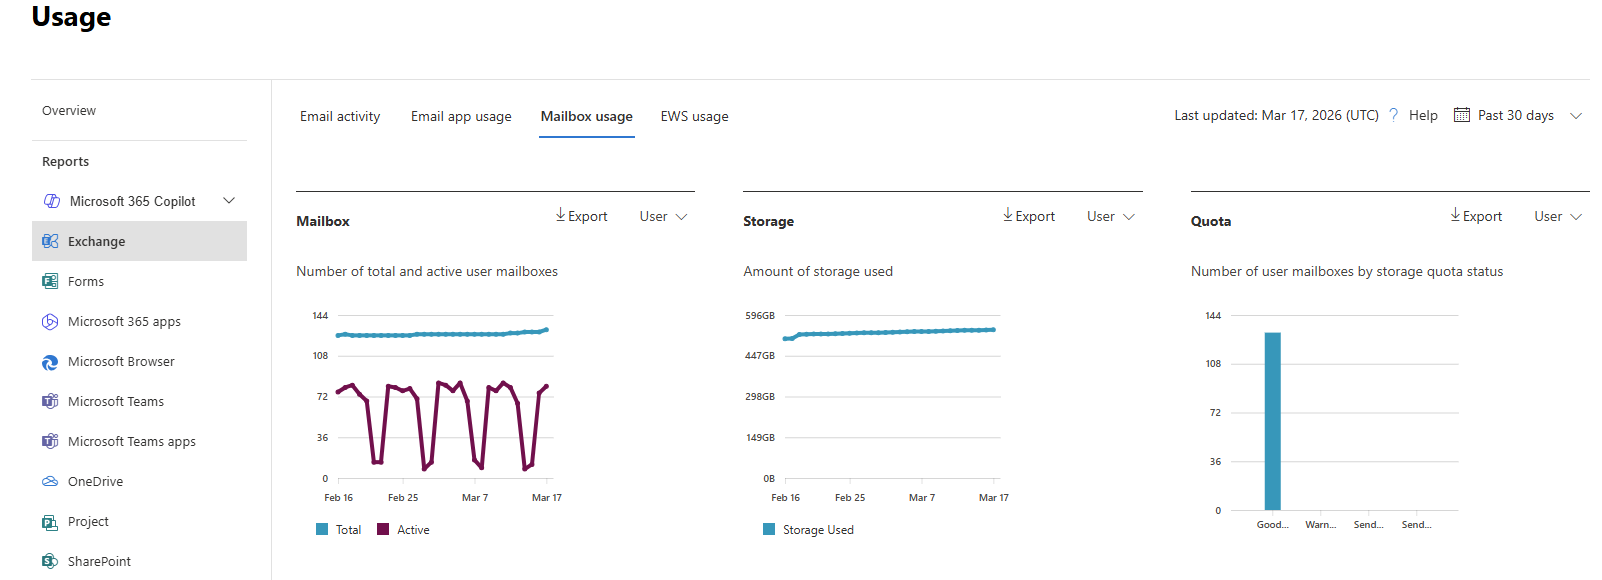
Tip: Calculate your actual data usage with this PowerShell scripts of Microsoft: https://learn.microsoft.com/en-us/microsoft-365/backup/backup-pricing?view=o365-worldwide#finding-the-sizes-of-stored-data
To be more prepared, let’s review the permissions/roles you need to configure and restore with Microsoft 365 Backup.
If you want to use the file level restore options, you need to have these roles assigned, even with Global Administrator permissions already assigned, keep this in mind:
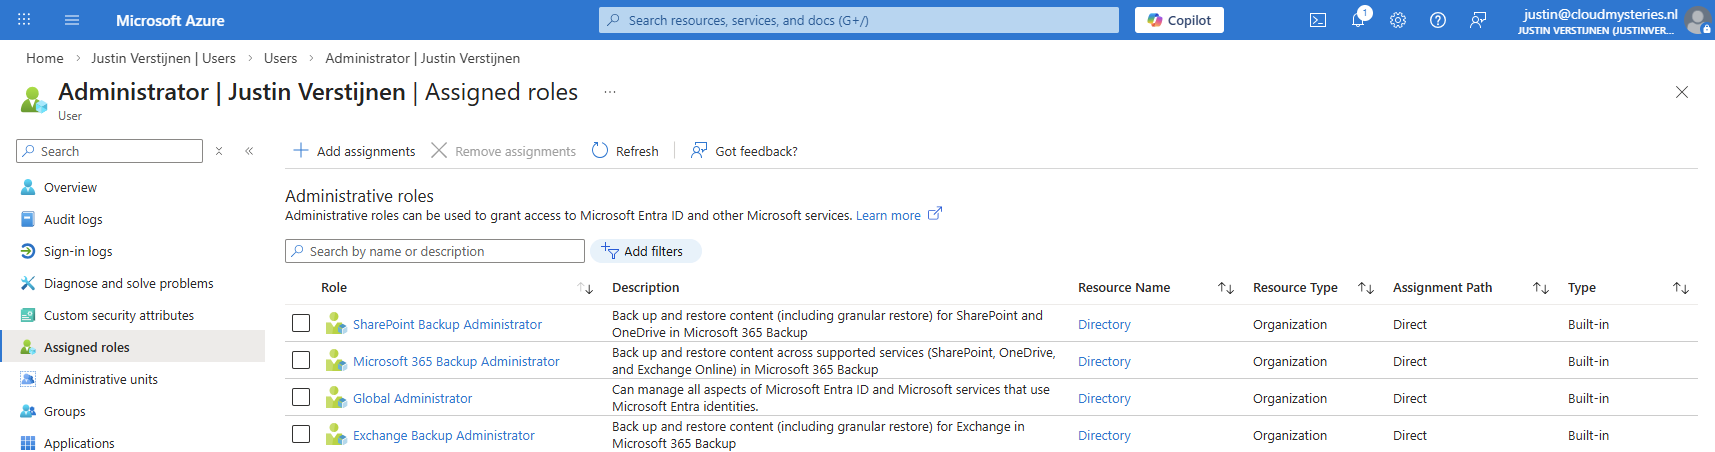
First we will creeate a separate resource group for our Microsoft 365 Backup policy. Go to the Azure Portal (https://portal.azure.com).
Then create a new resource group in your subscription:
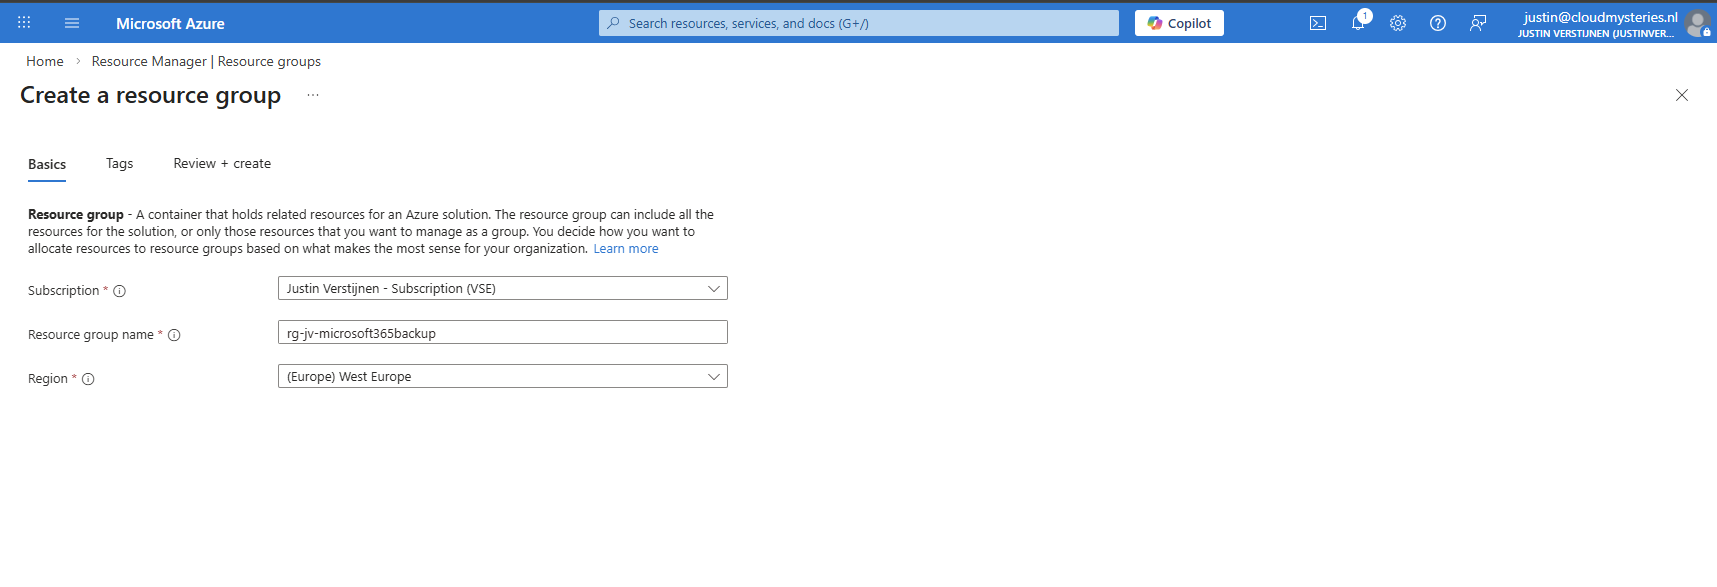
After creating the resource group, it will be ready to deploy resources into.
Now we can start by preparing Microsoft 365 Backup in your tenant. Go to the Microsoft 365 Admin center (or directly to: https://admin.cloud.microsoft/?#/Settings/enhancedRestore)
Then go to Settings -> Microsoft 365 Backup
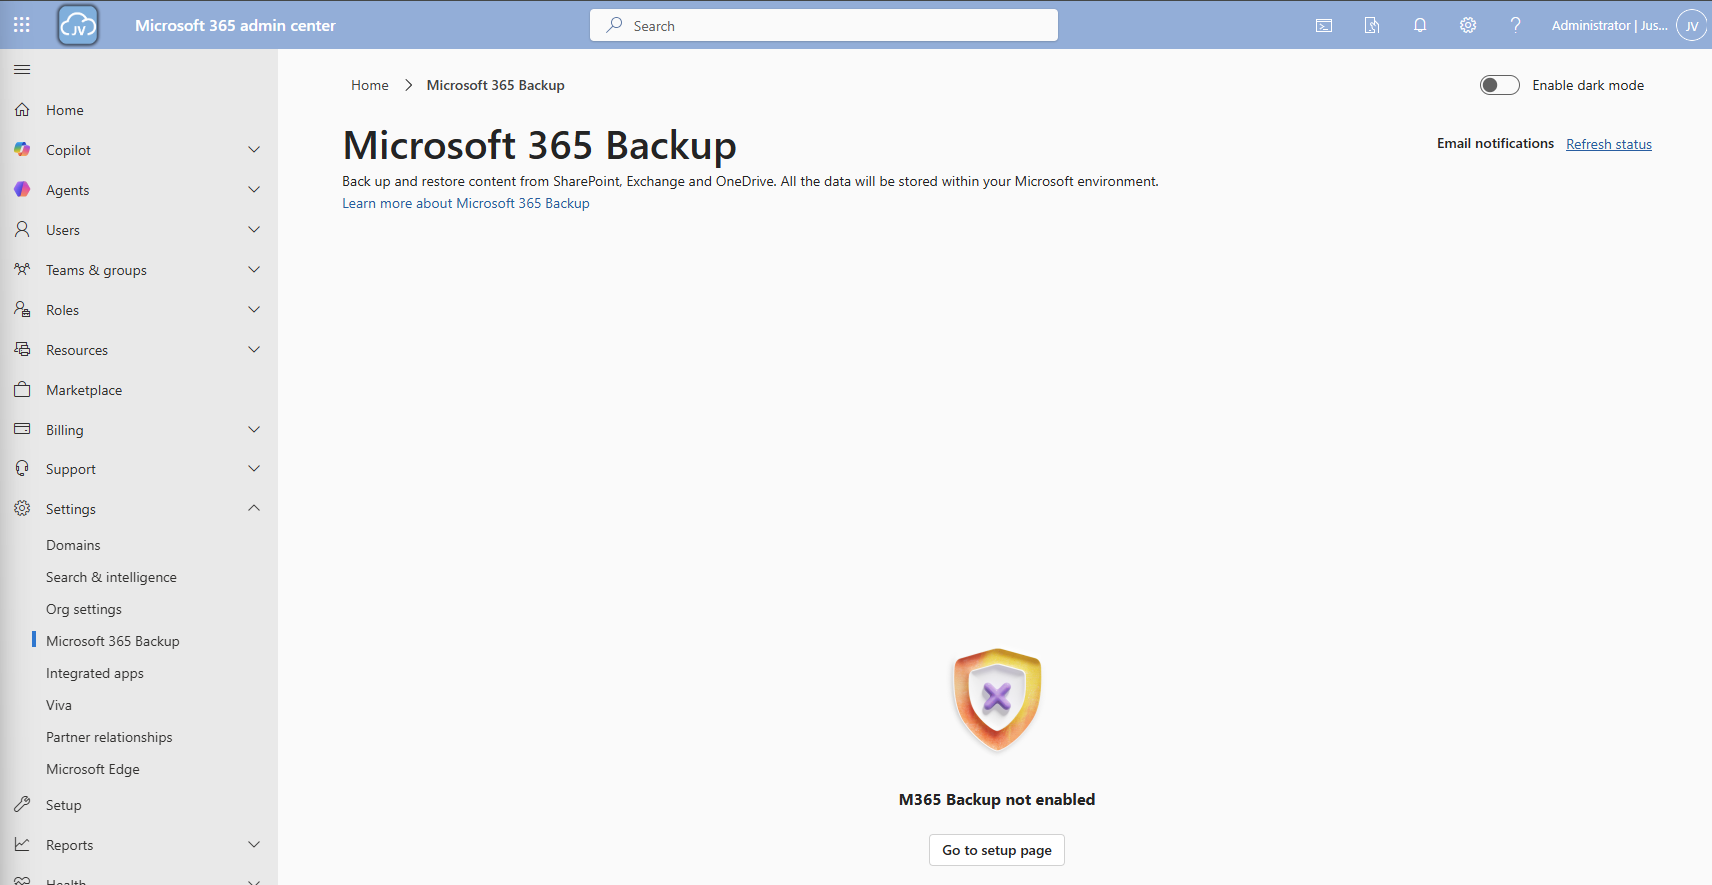
Then click on the “Go to setup page” button and you will be redirected to the billing options.
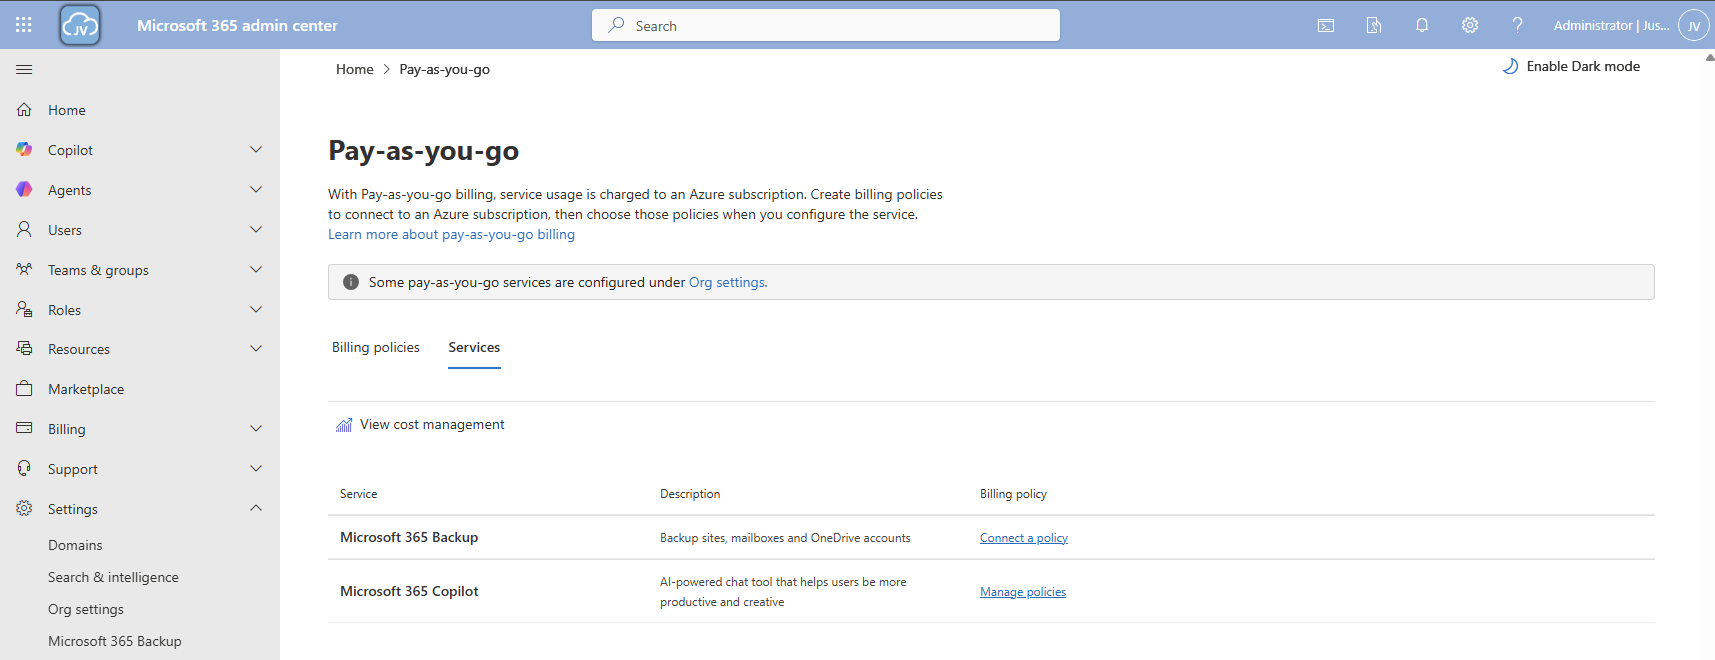
Click on the “Services” tab here and there we have Microsoft 365 Backup. To actually use Microsoft 365 Backup, we need to create a billing policy.
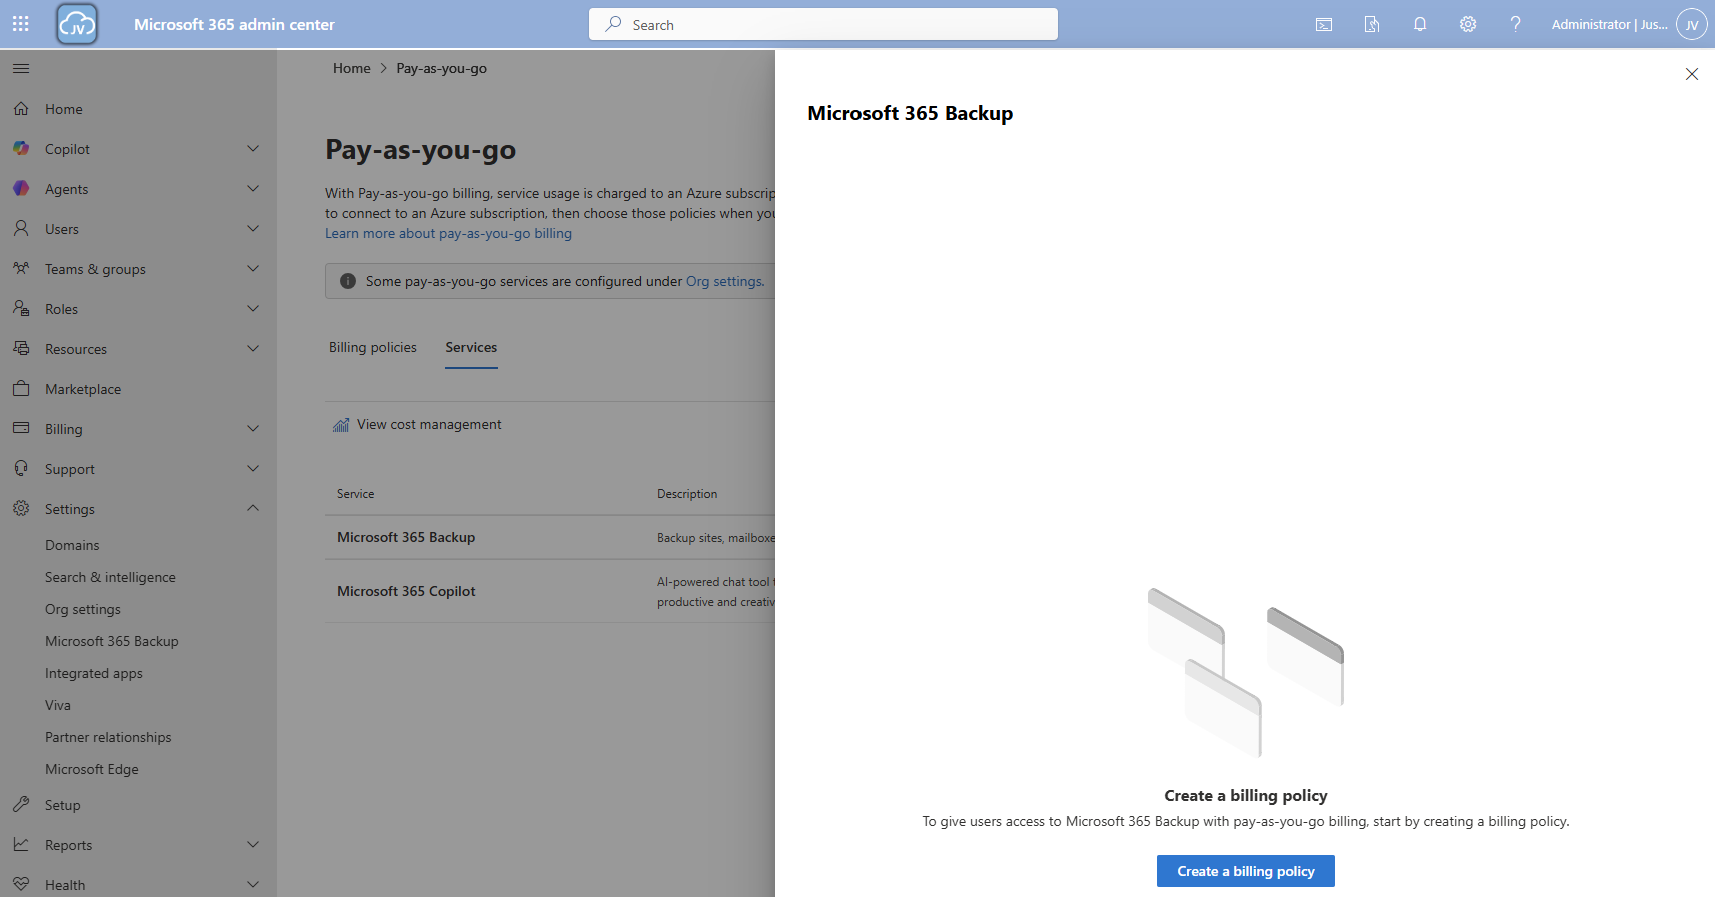
Click the “create a billing policy” button to create one.
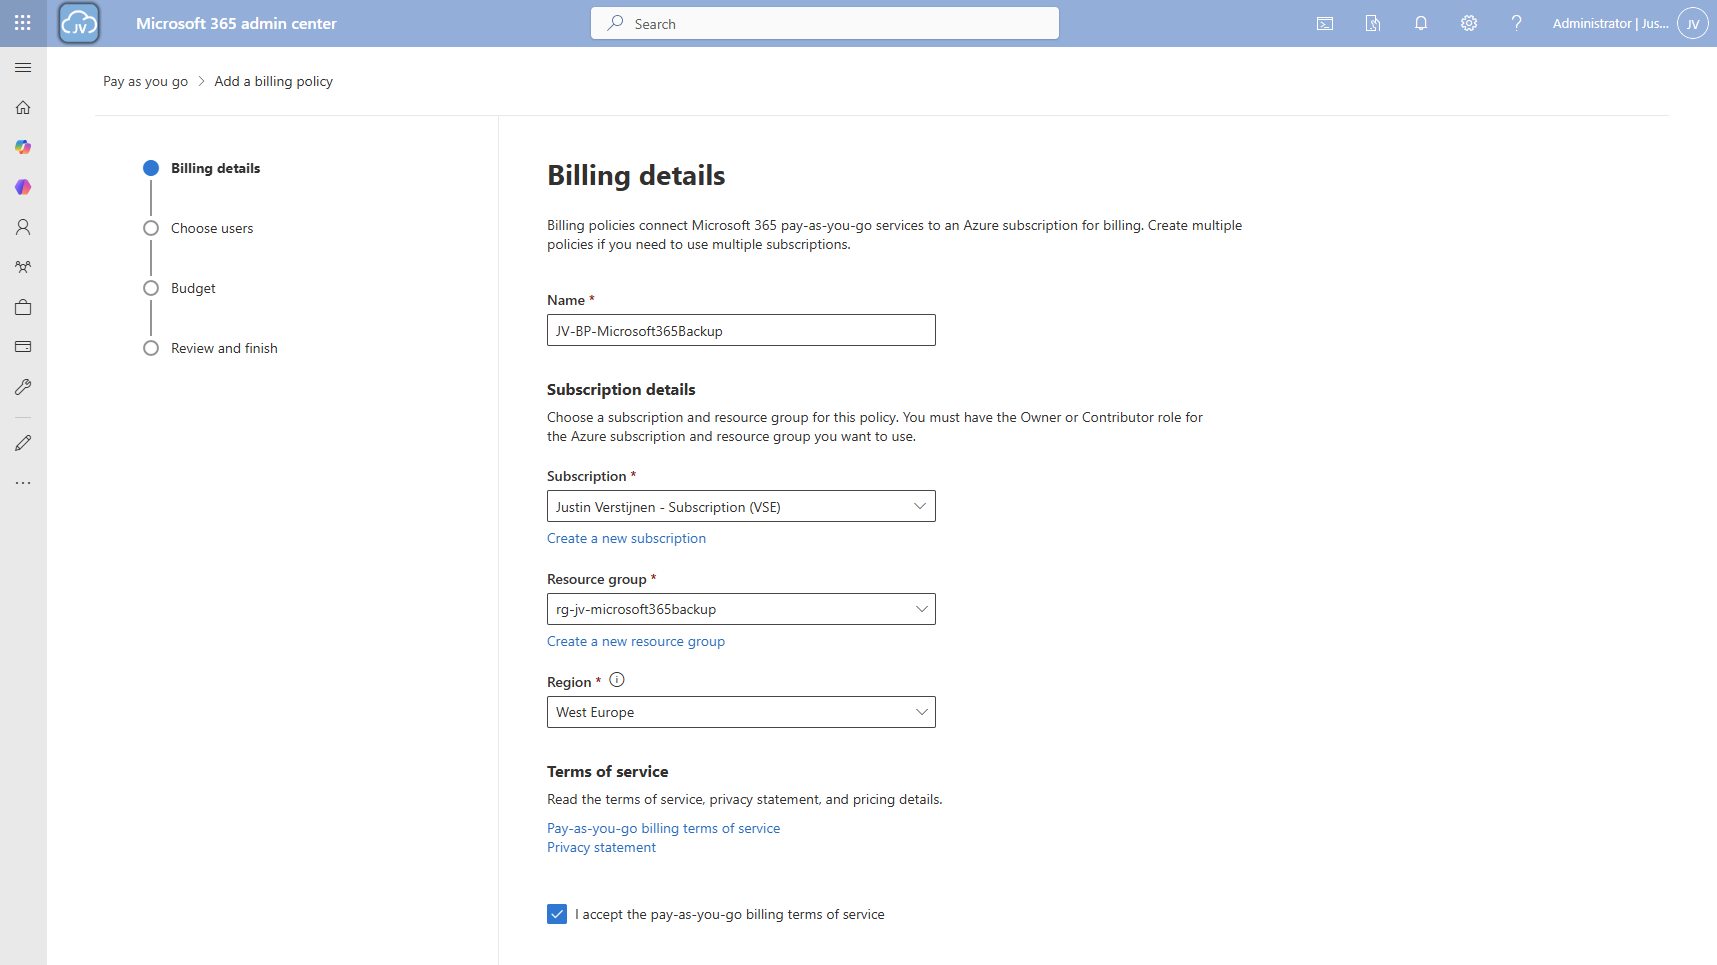
Fill in the details, and select your Azure subscription and just created resource group. The region can be any region of choice. Preferrably the closest one to you or what you need in terms of regulatory compliance.
Click “Next”.
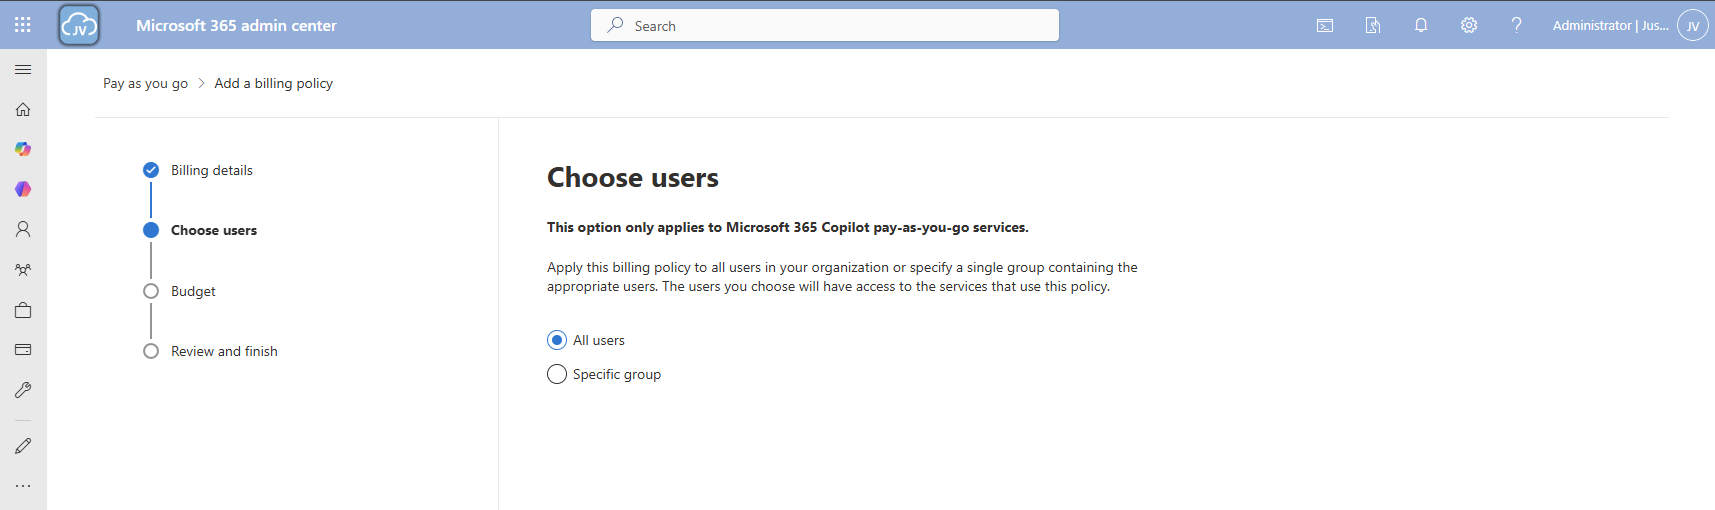
On the “Choose users” page choose one of the two options. I chose “All users”. Then click “Next”.
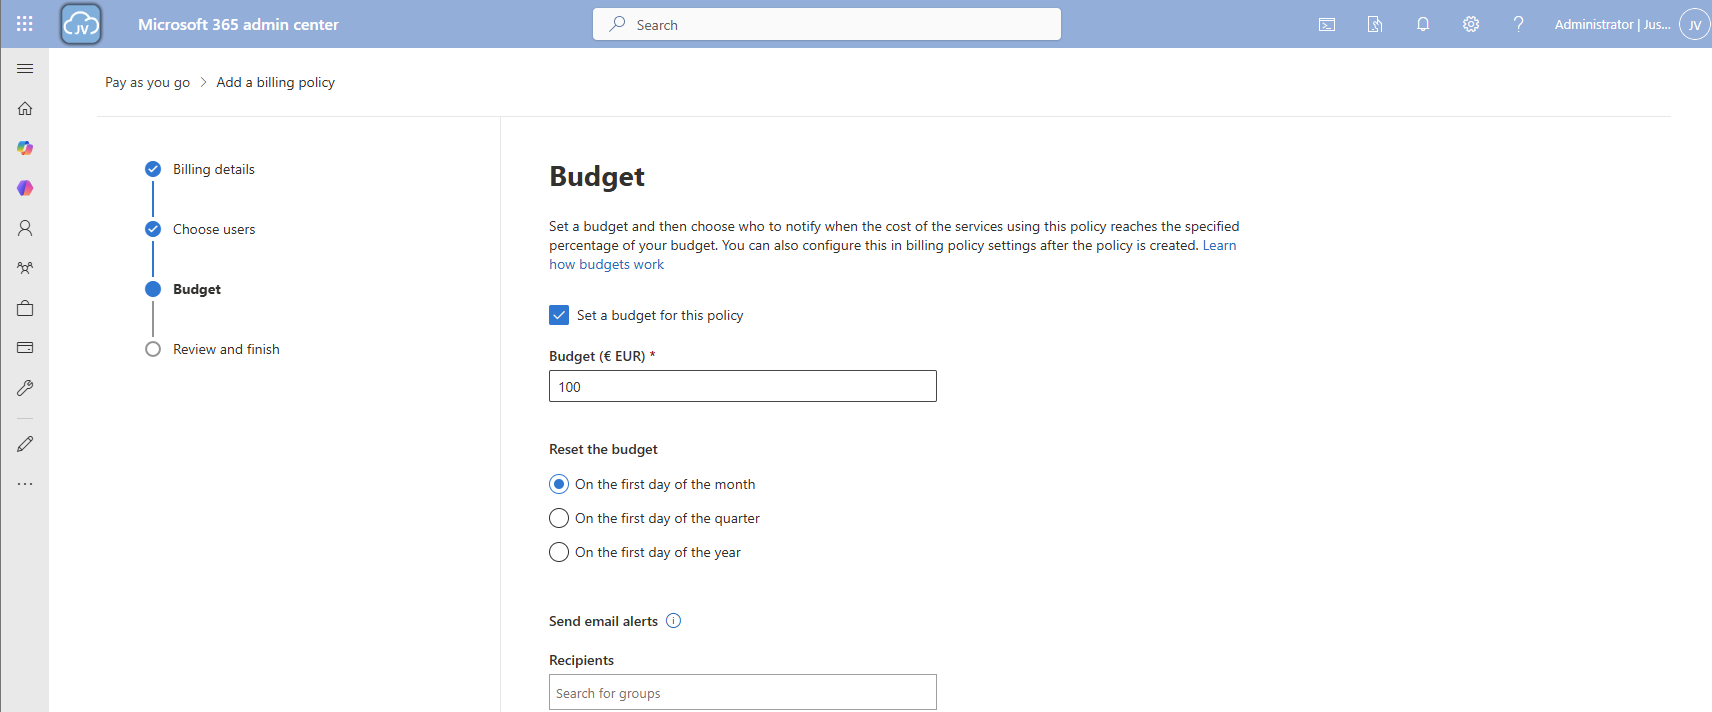
On the “Budget” page, you can set a budget, or maximum amount of money you want to spend on this solution.
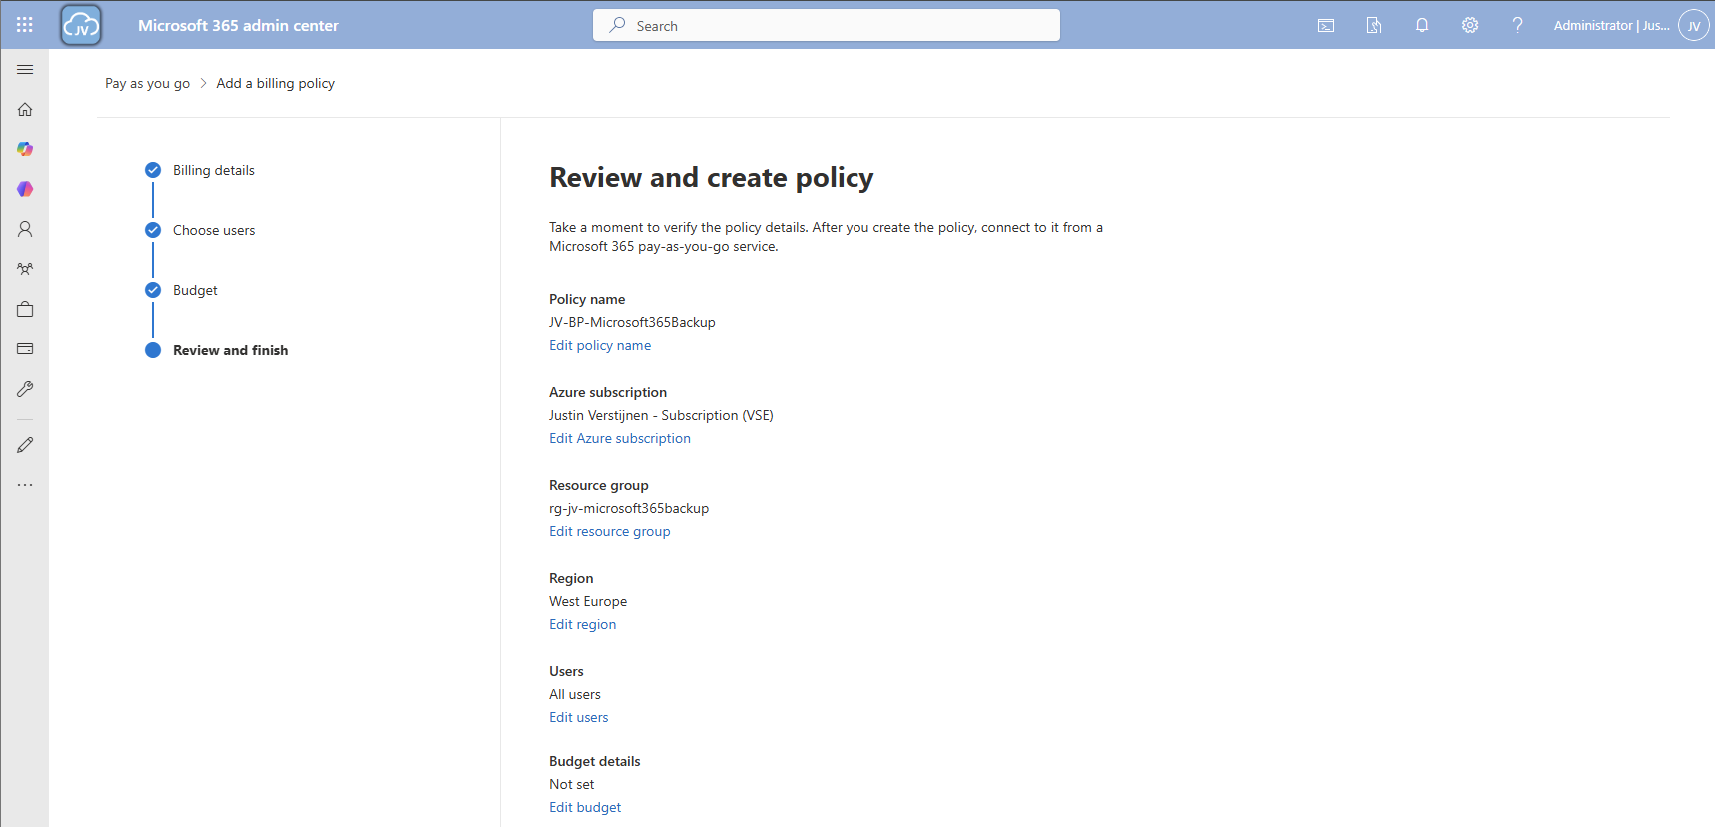
Finish the policy and we are ready to go.
Now that we have our billing policy in place, we can now connect the Microsoft 365 Backup service to this policy. On the “Billing policies page, click “Services” and then “Microsoft 365 Backup”.
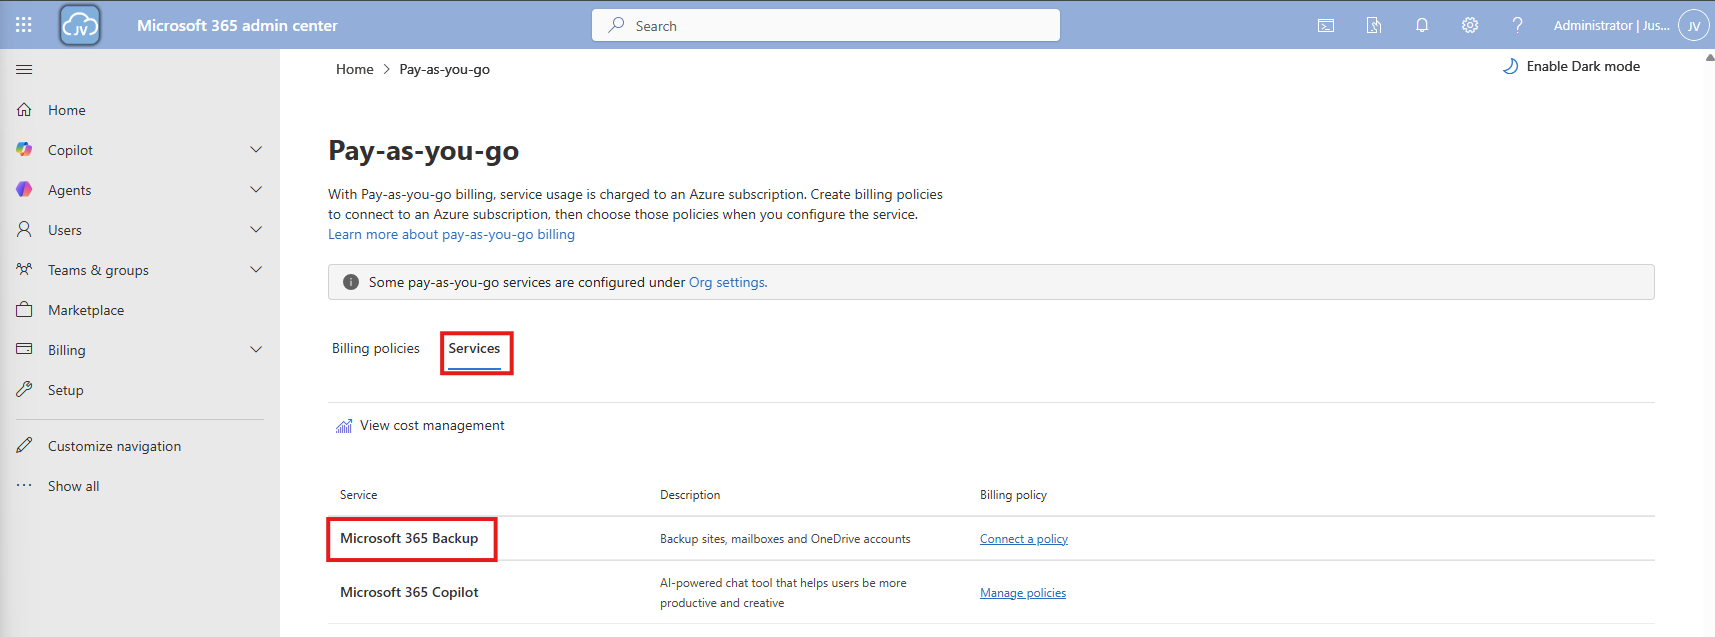
A blade will now come from the right. Select the “Billing policies” tab there and enable the switch to connect the service to your created billing policy.
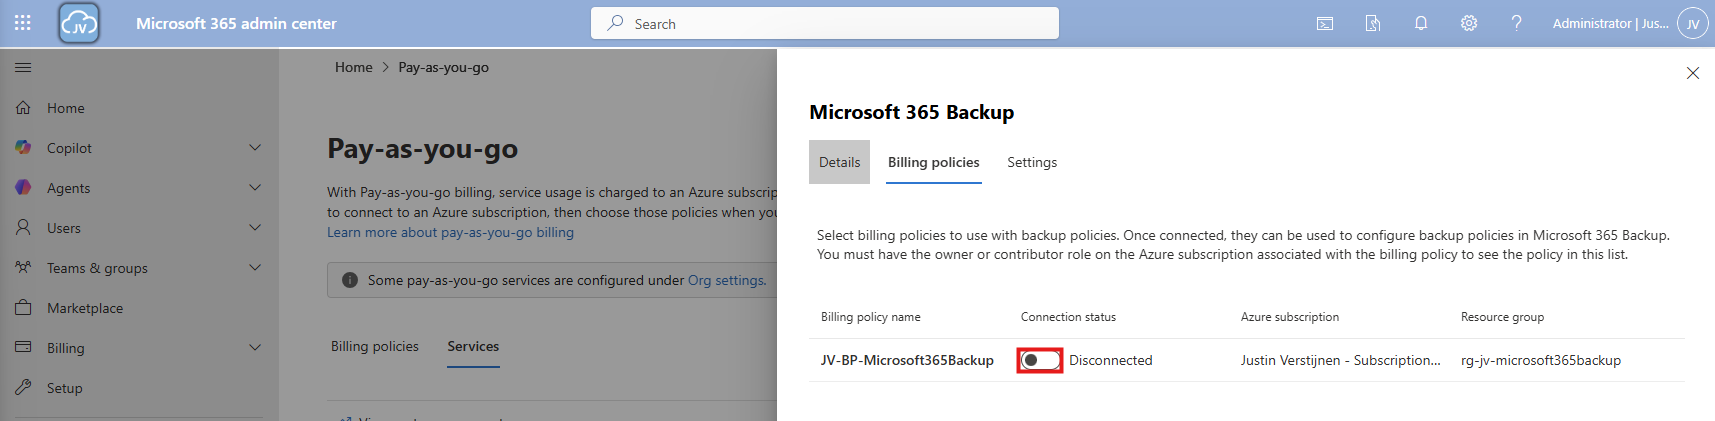
After enabling this and saving, the service is now linked to your billing policy.

And as we can see in Azure, a policy is now deployed to our resource group:
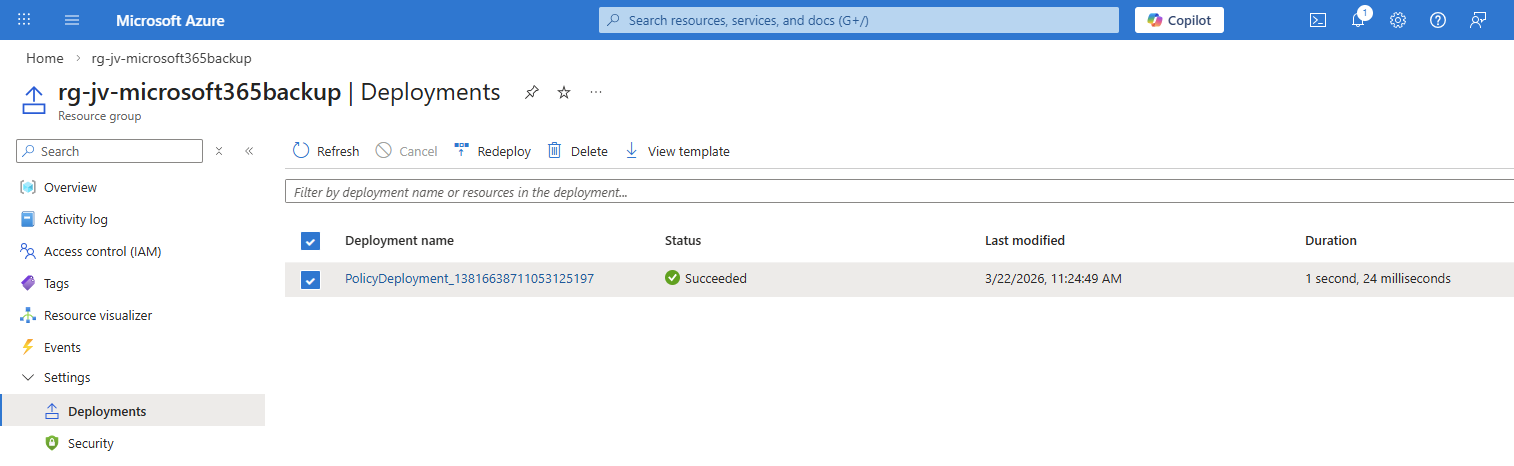
Now that we have connected the service to our Azure subscription, we actually enabled the service but without any configuration. By going again to the Microsoft 365 Backup blade, we will be shown this:
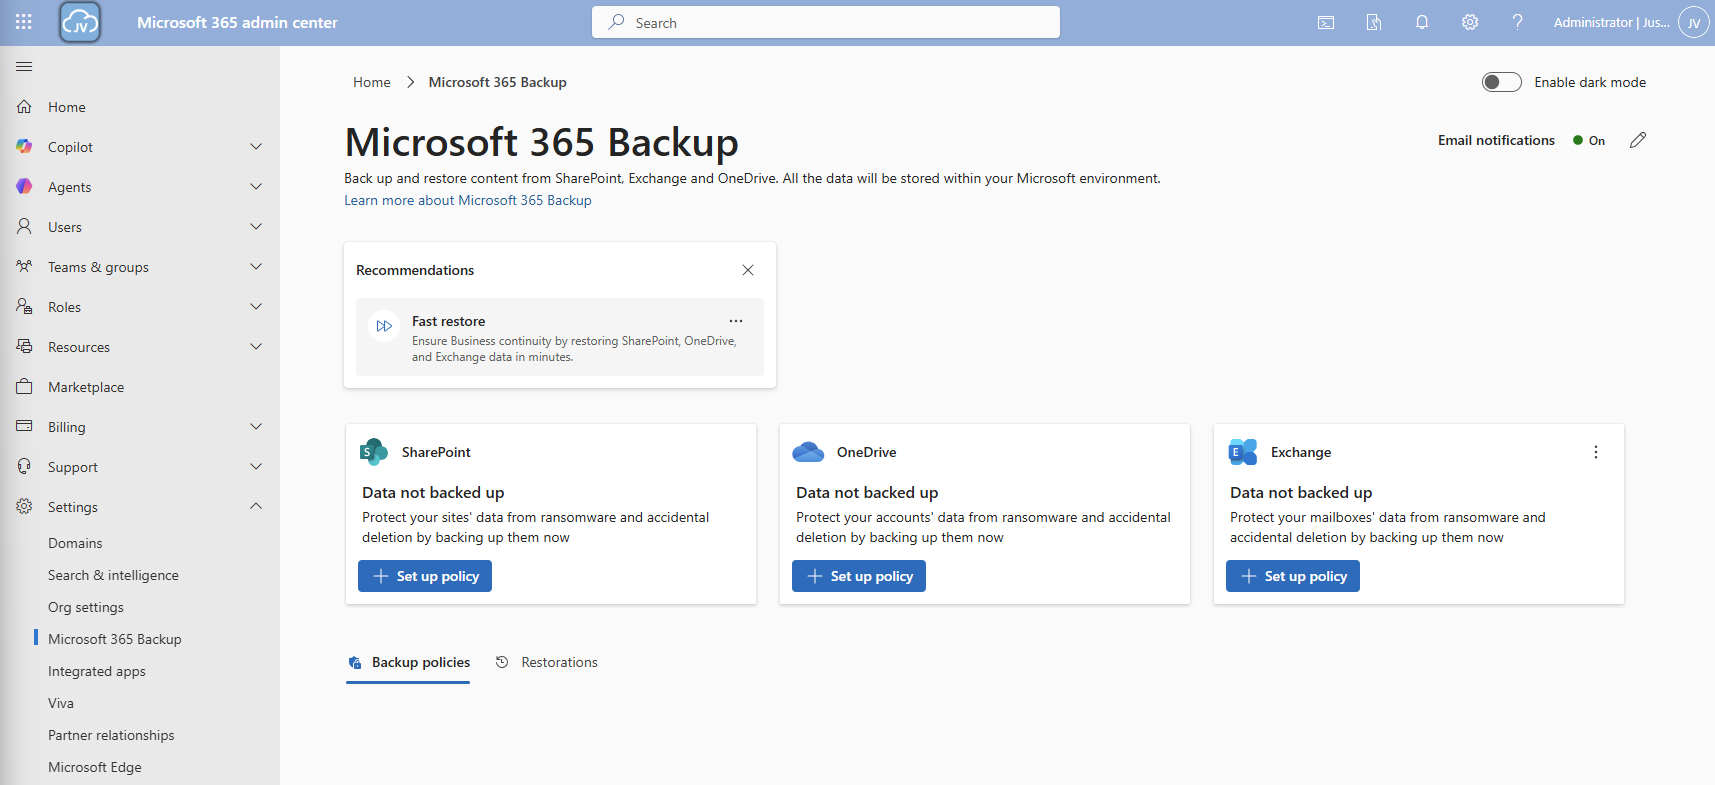
We will first configure a policy for SharePoint. Click on “+ Set up policy”. After that, click Next on the SharePoint backup policy page.

You can use the “filters” option, but you always need to add new sites manually. This is not a dynamic option. Therefore, the “Individual” option is more easy.
Here we can select how we want to select our SharePoint sites. I will use the “Individual” option here. Then select the sites you want to backup.
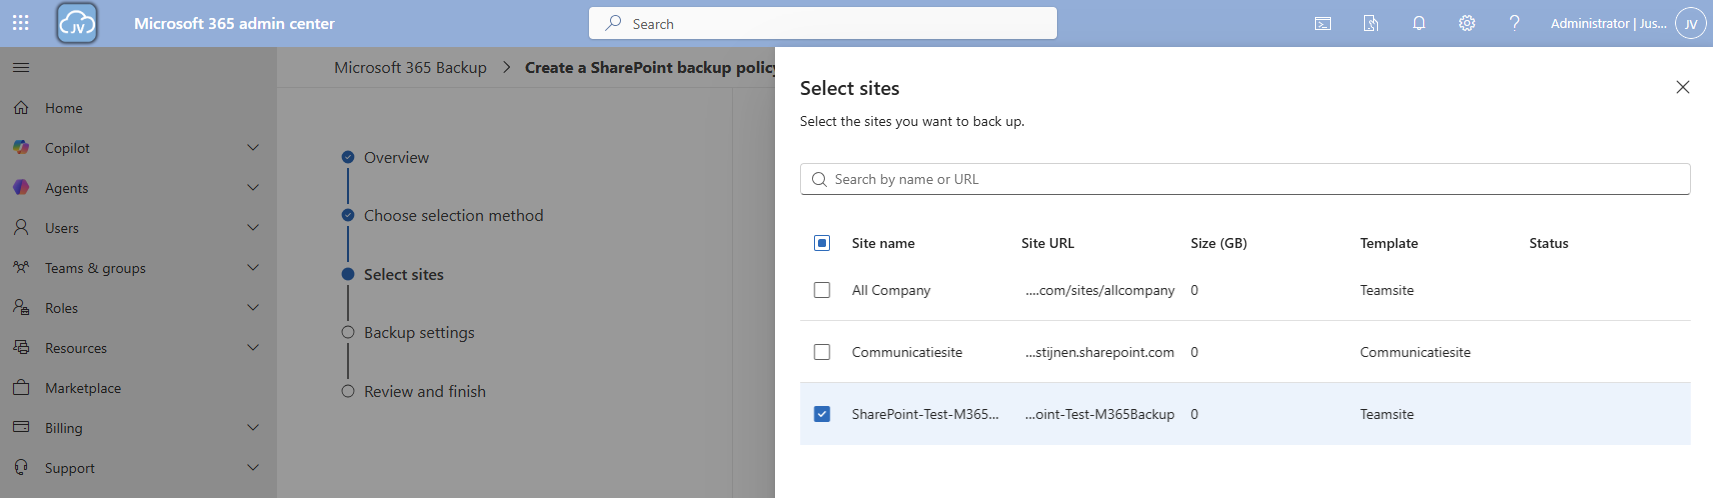
Then proceed to the “Backup settings” and give your policy a name.
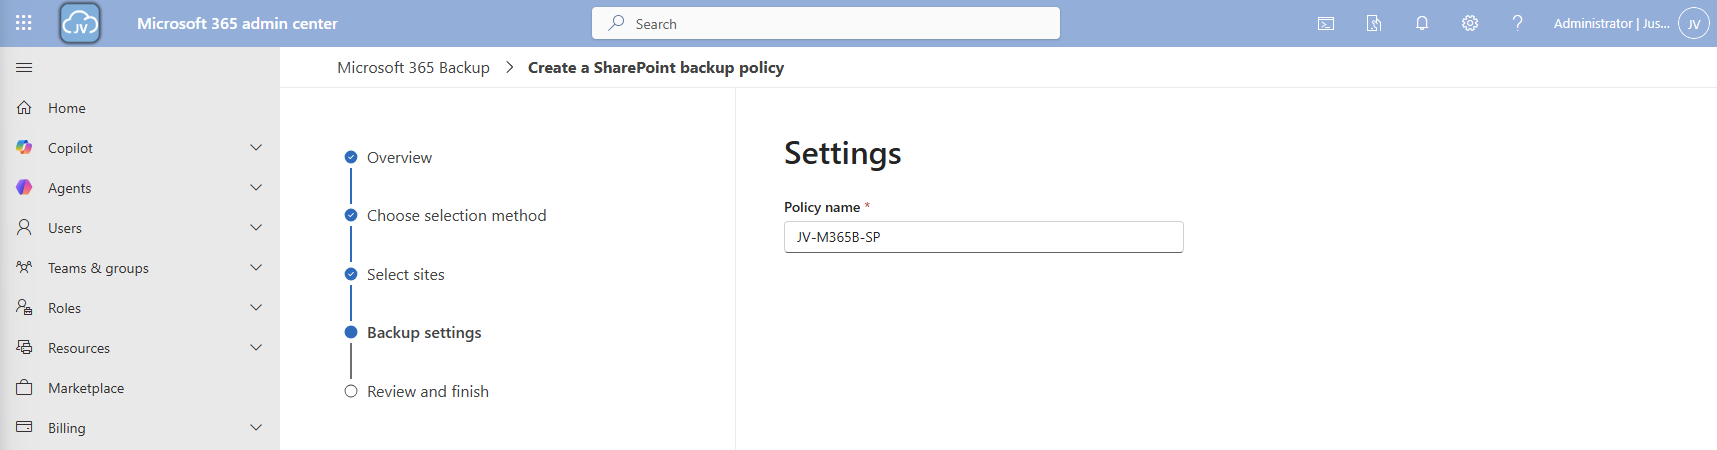
Then finish the wizard. The policy will directly start backing up your data:

Now we can configure the backup for OneDrive accounts. Click on the “+ Set up policy” button under “OneDrive”. Proceed to the wizard.
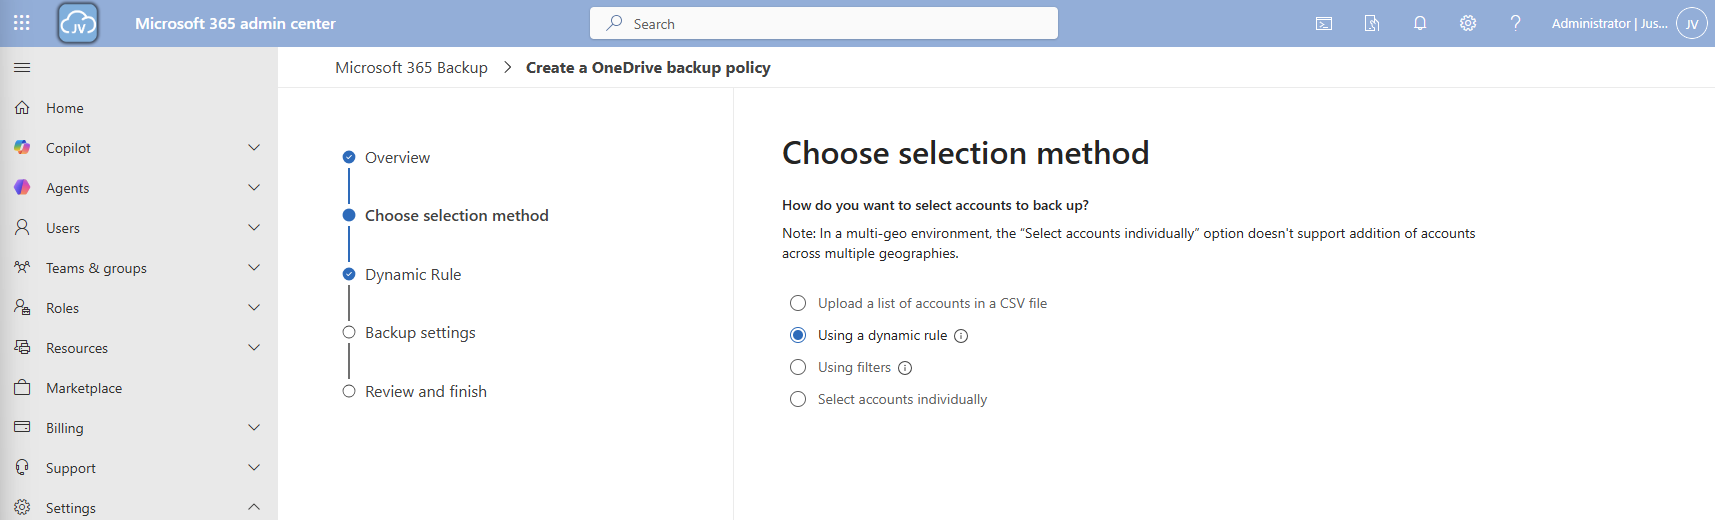
At the “Choose selection method” select the “Dynamic rule” option, as we want to automatically backup new accounts instead of changing the scope every time.
We can select two types here:

In my case, I created a dynamic security group containing all users. Then click “Next”.

Give the policy a name and finish the wizard.
Now we have 2 policies in place:

Now we can configure the backup for Exchange accounts. Click on the “+ Set up policy” button under “Exchange”. Proceed to the wizard.
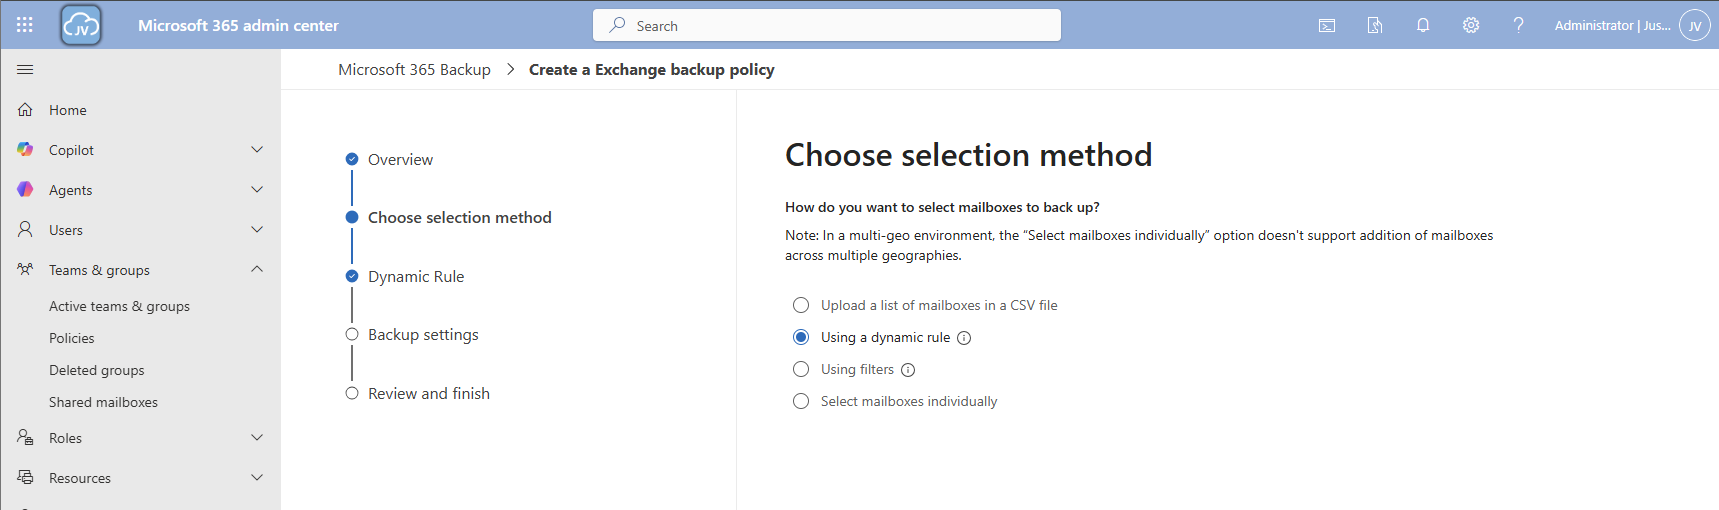
I once again use the dynamic rule option, to actually backup newly created accounts.
Here we can select two types of user sources similar to the OneDrive accounts:
In my case, I created a dynamic security group containing all users. Then click “Next”.
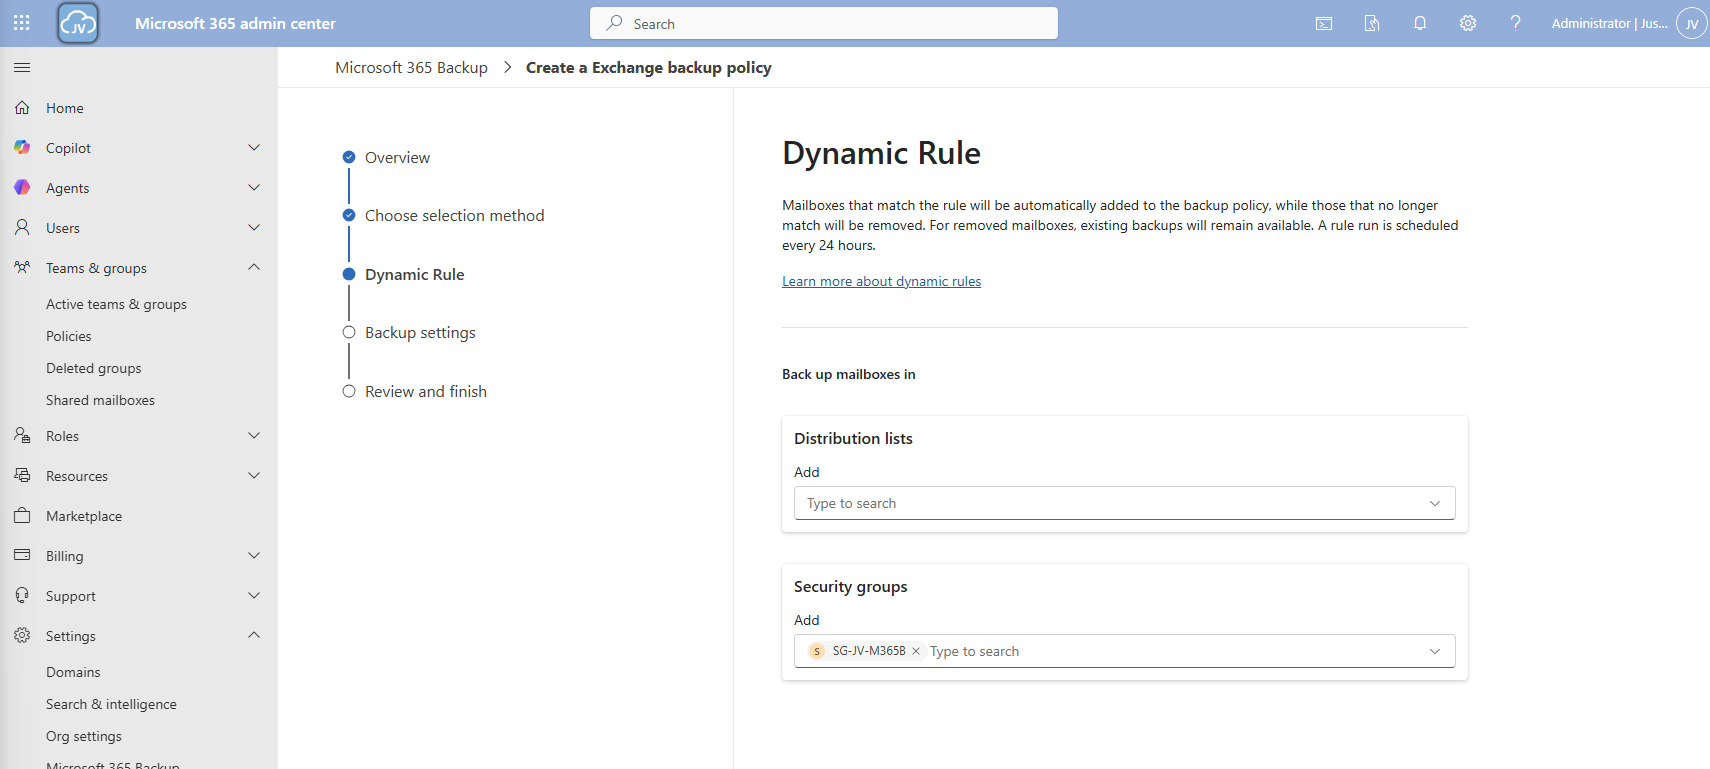
Click “Next”.
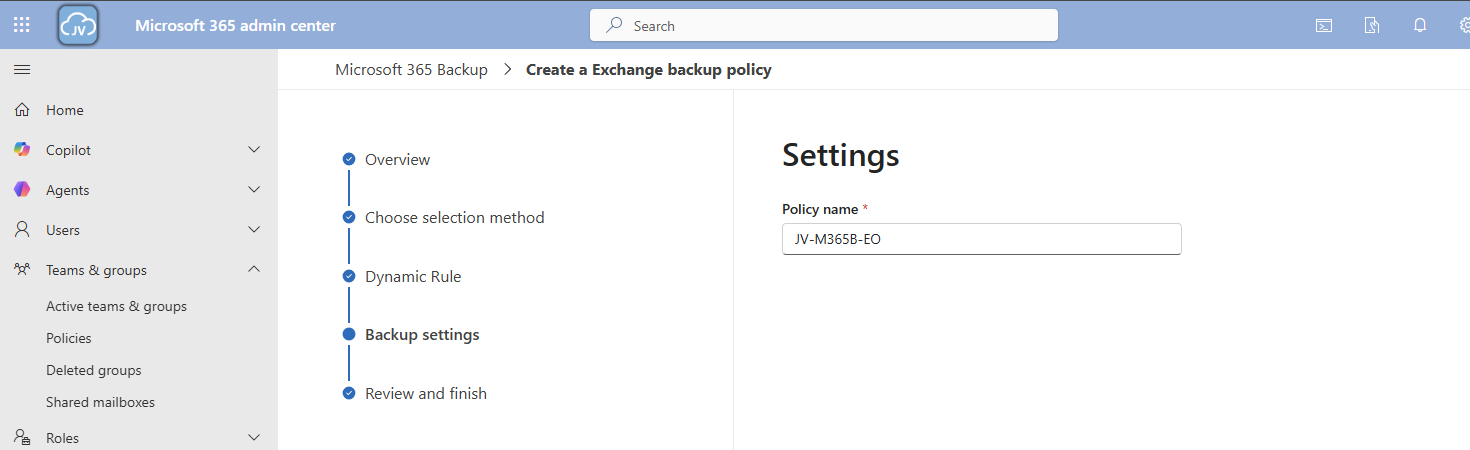
Give the policy a name and finish the wizard.
Now we have 3 policies in place:
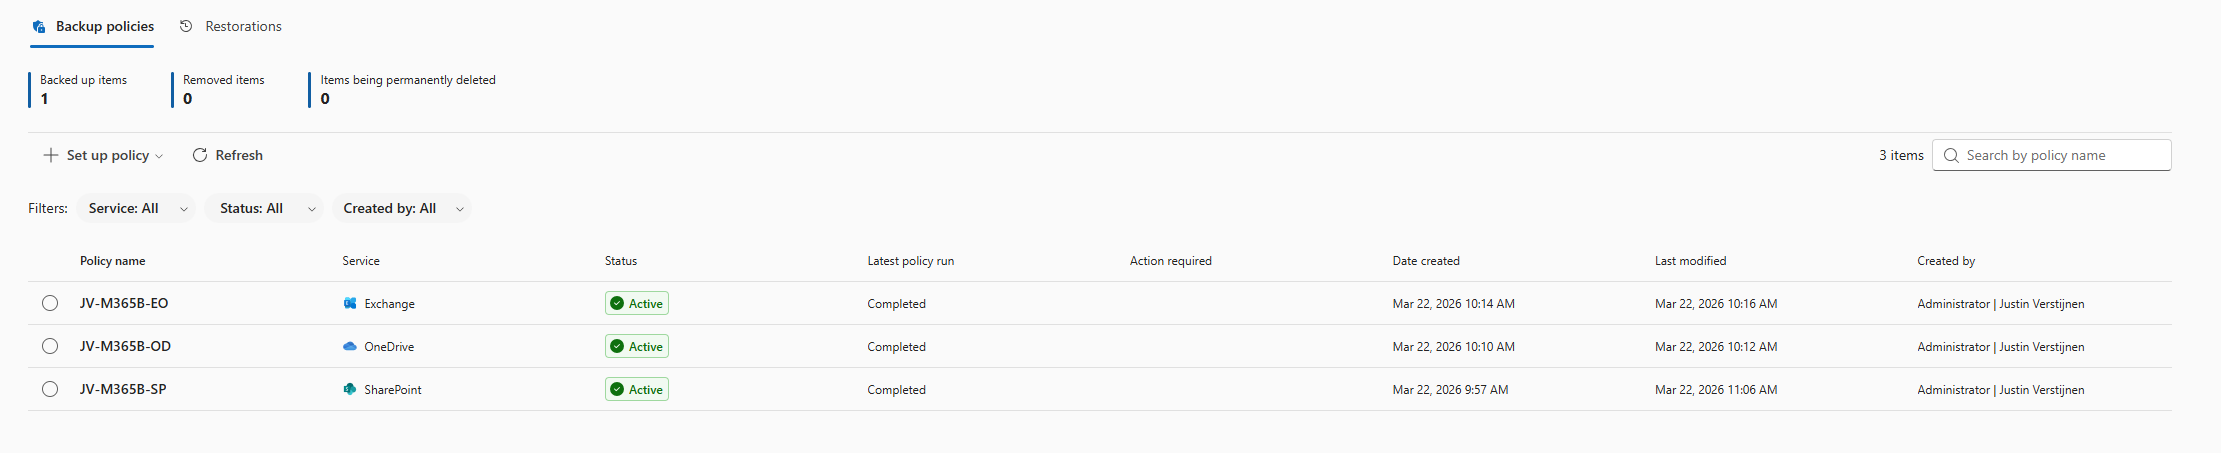
To actually test the backup method, we will place a file on the SharePoint site and restore the site. I placed a .zip file of around 200MB on the site I just selected and wait for Microsoft 365 Backup to backup the site:
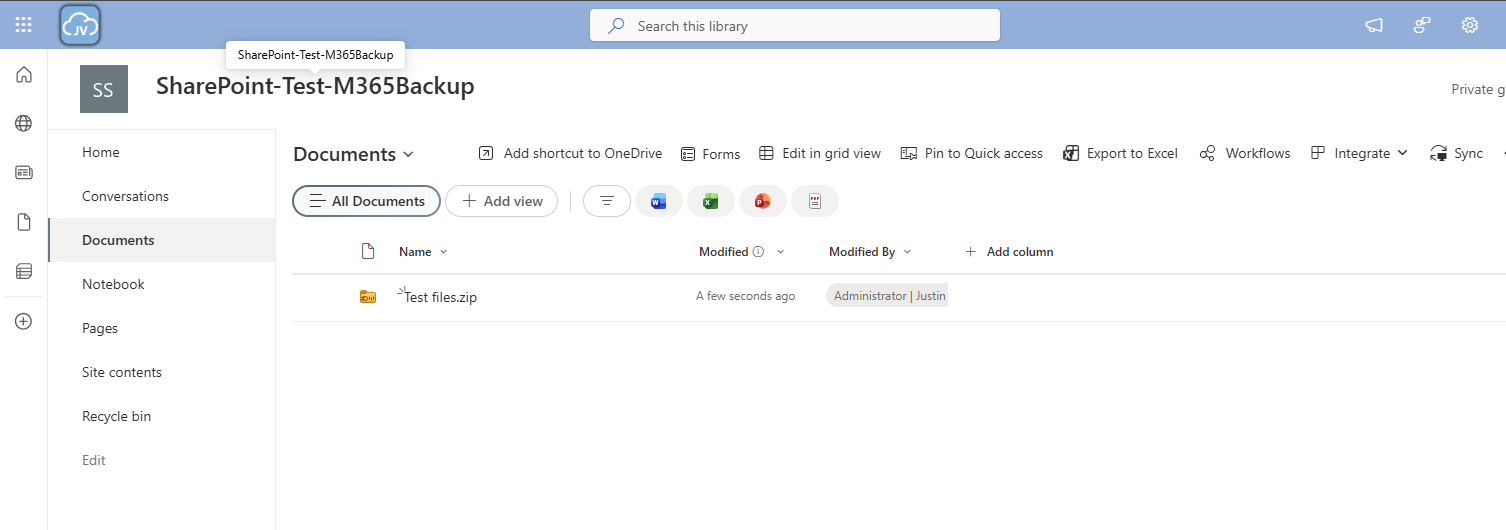
After around 10 minutes, this starts backing up:

And waiting for a few minutes will ensure the task has been completed:

Now we will delete the file from the SharePoint site:
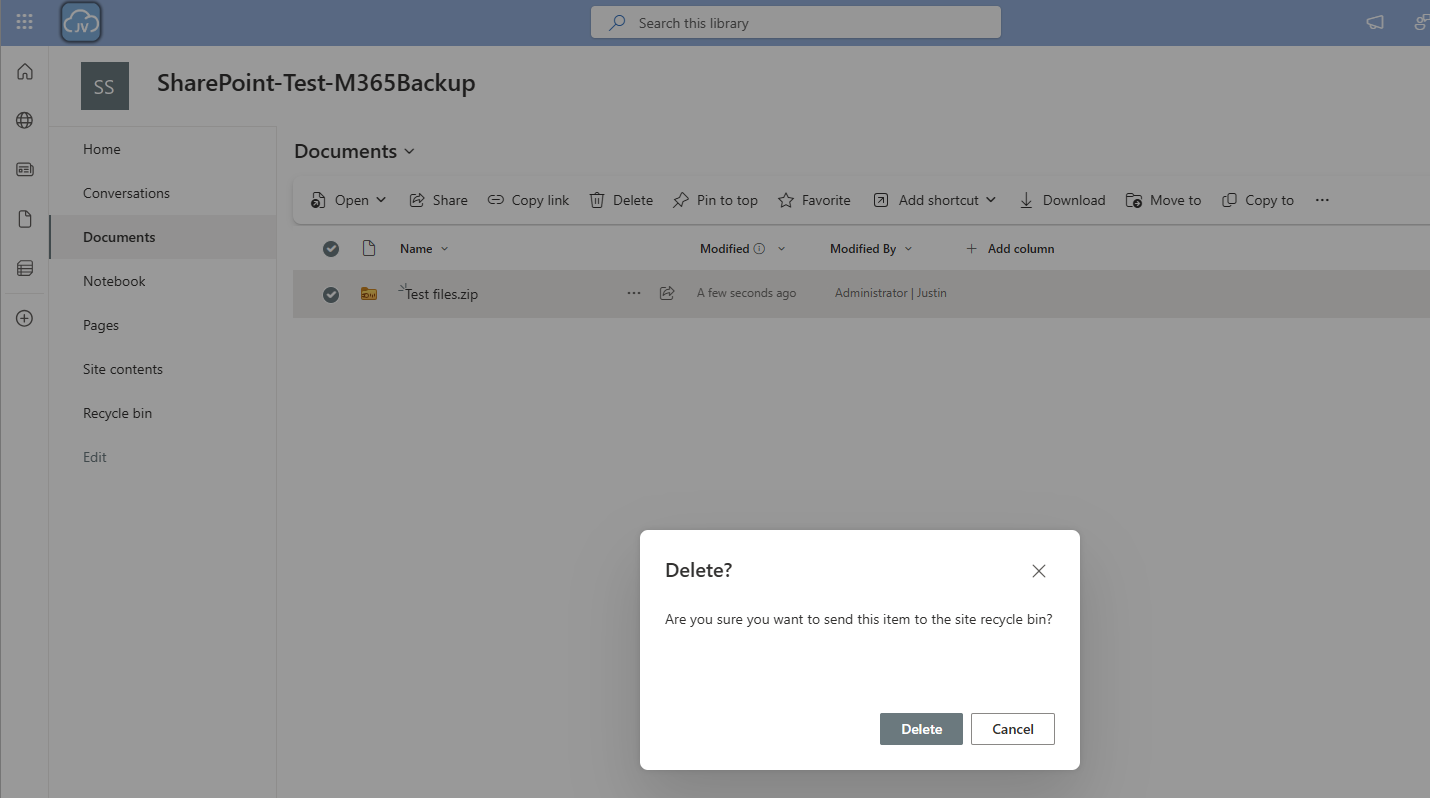
And let’s head back to Microsoft 365 Backup to actually restore the file. Under “SharePoint” I clicked on “Restore”
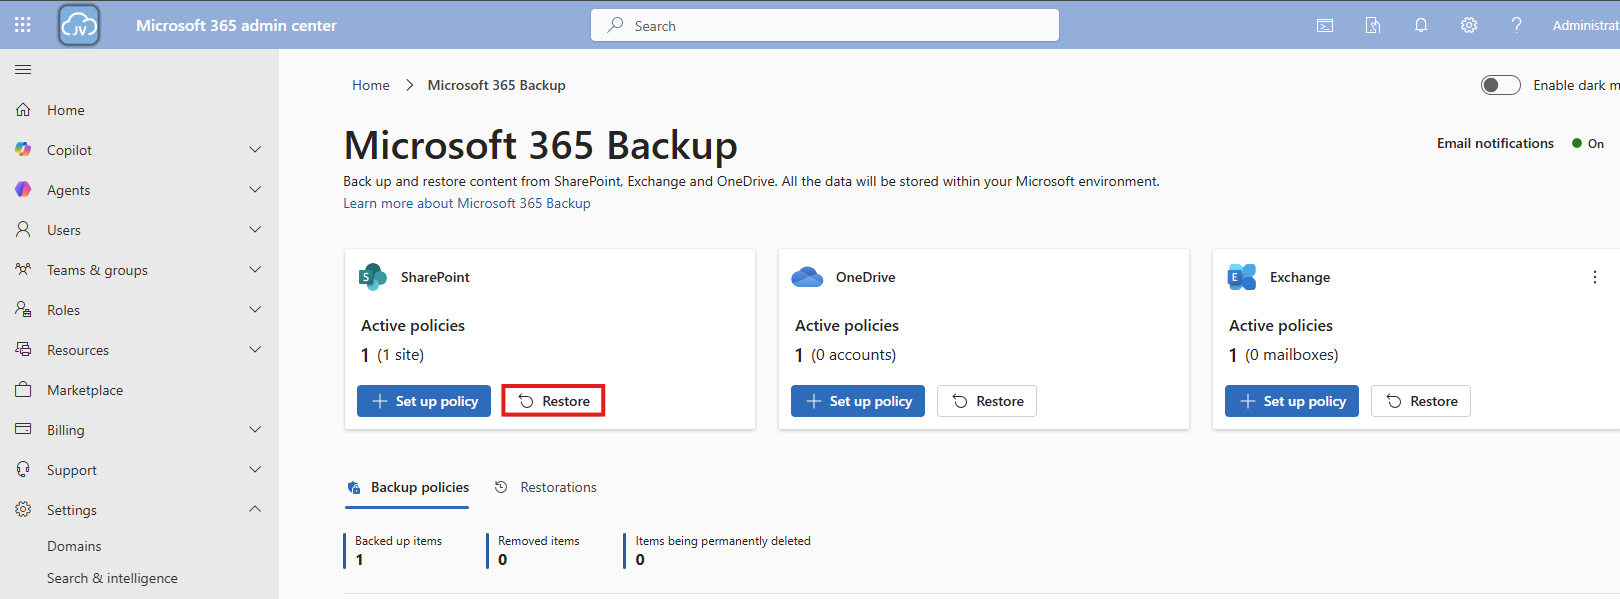
Follow the wizard by selecting your site where you want to recover files
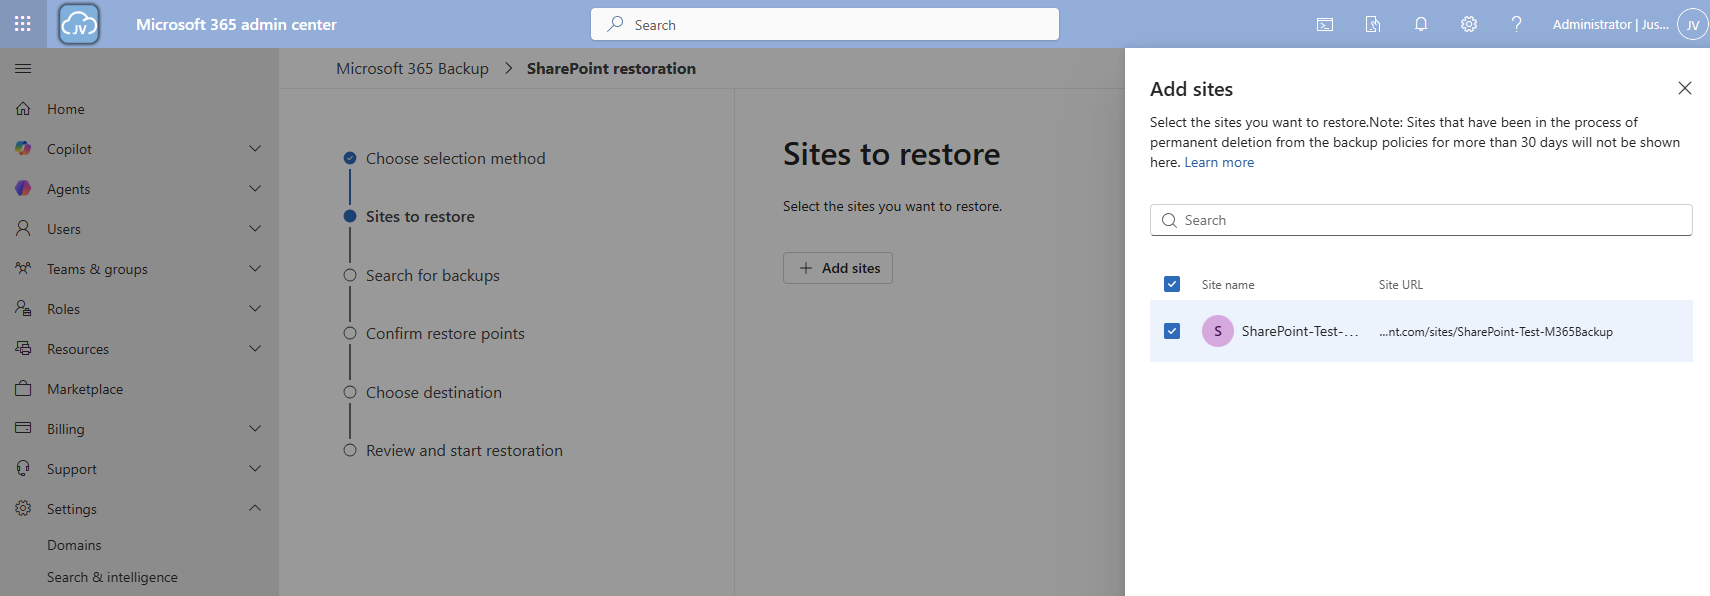
Select your desired restore point, which will be obviously before any error or problem occurred. In my case, I deleted the file after 10:30 AM.
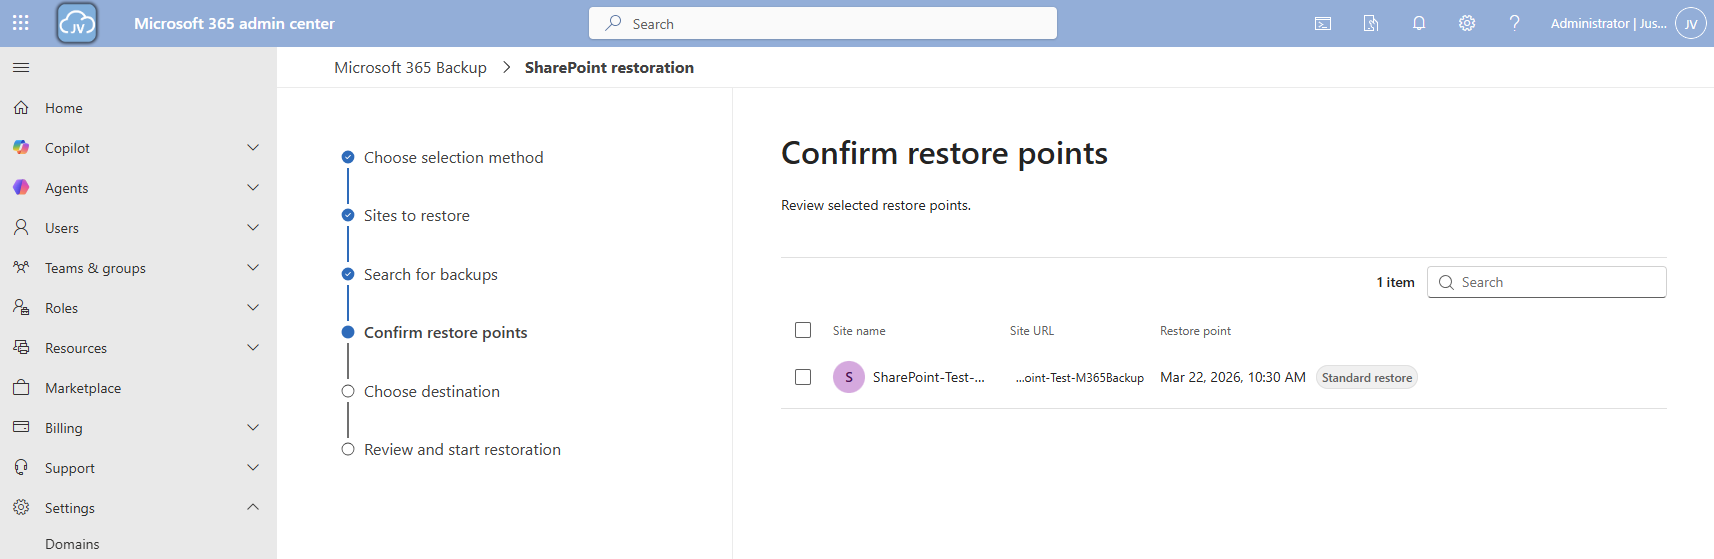
I selected this restore point and clicked “Next”.
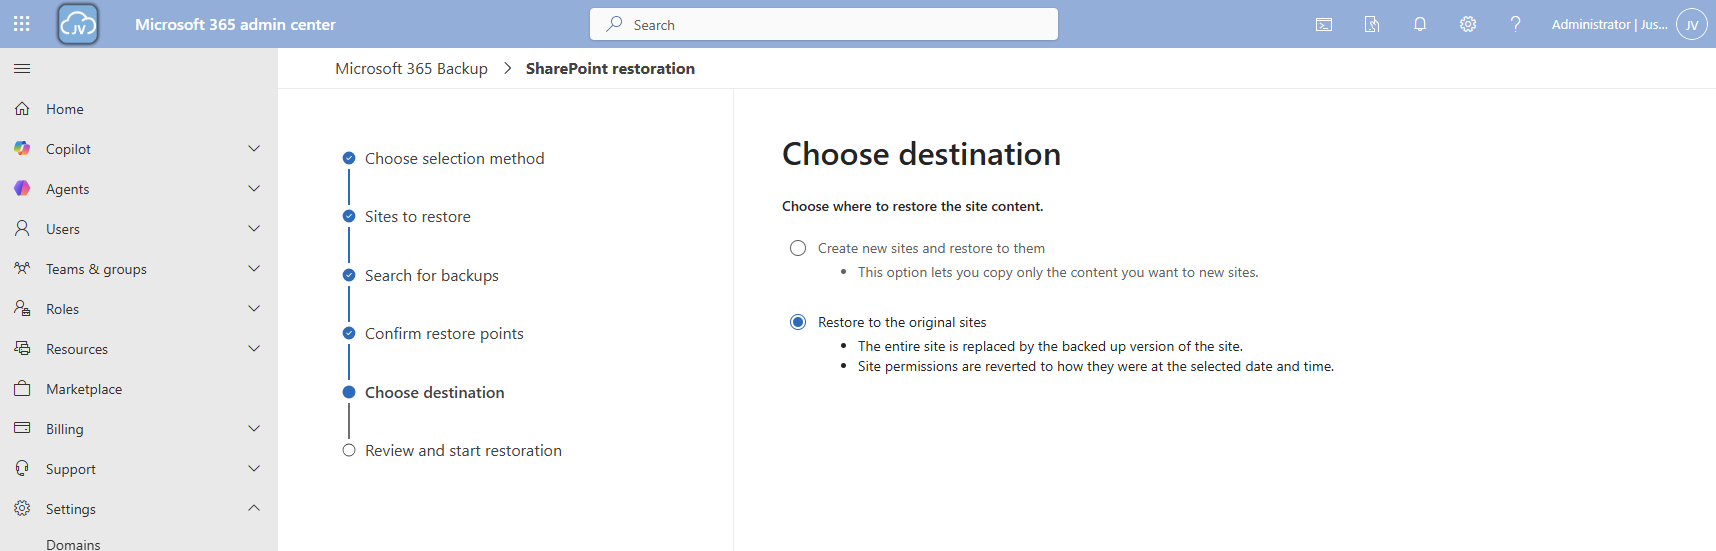
Now you can select to create a new copy SharePoint site with all the filed in it or to just restore it to the current site.
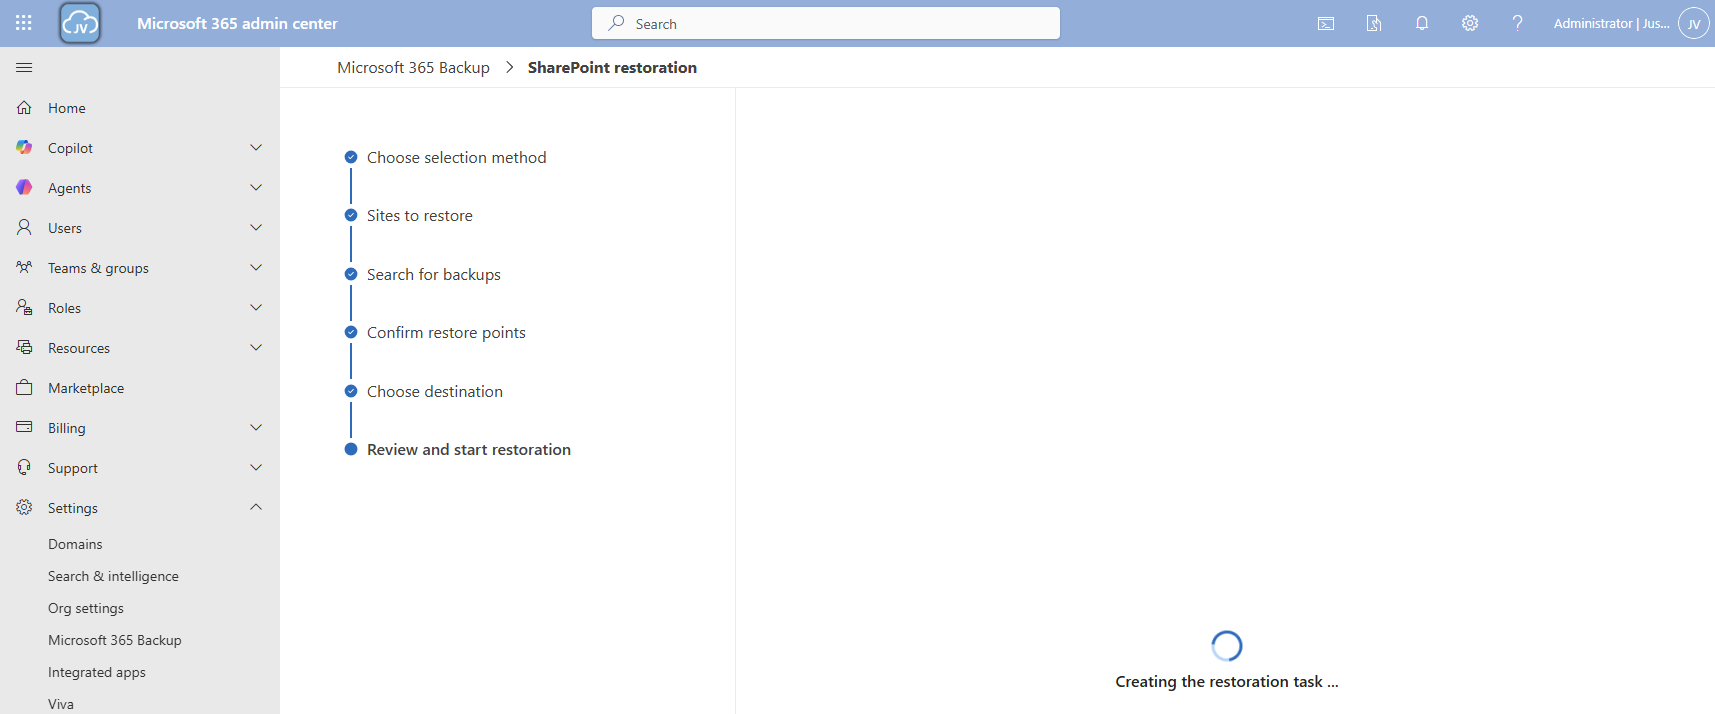
Now the restore action will be executed. In my case this took a while. Actually, around 3 hours:

And as you can see, the file is back:
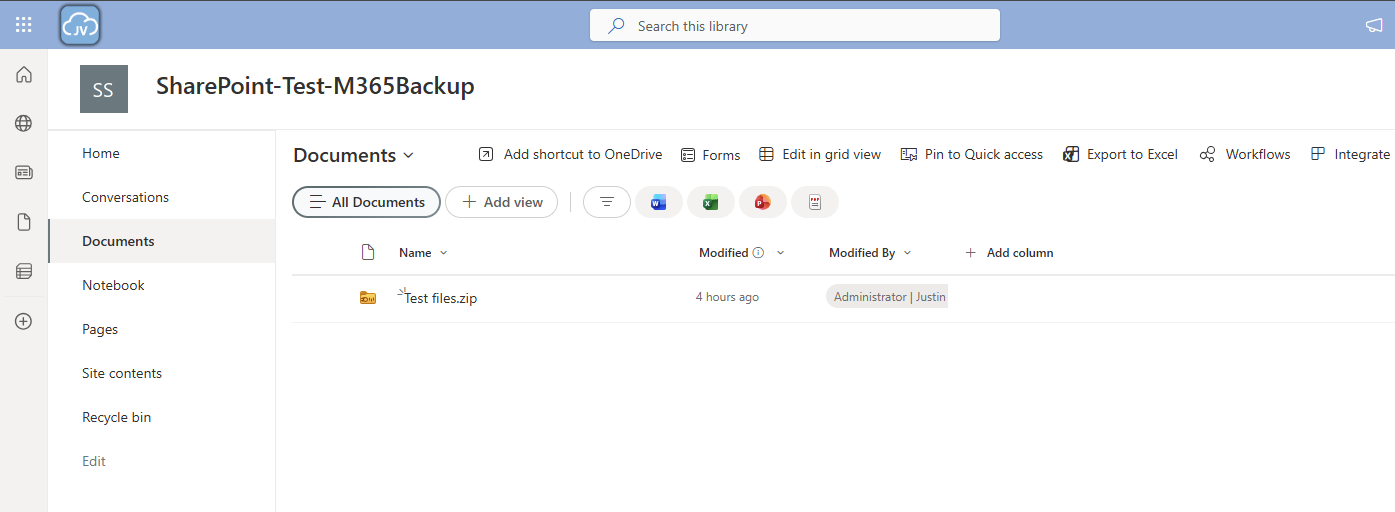
Because we want also be able to restore a single file, let’s try to restore one single file in a OneDrive folder either.
Once again the reminder that your account needs these permissions to perform single-file restore actions for OneDrive:
In the Microsoft 365 Backup pane, under “Onedrive” click on “Restore”:
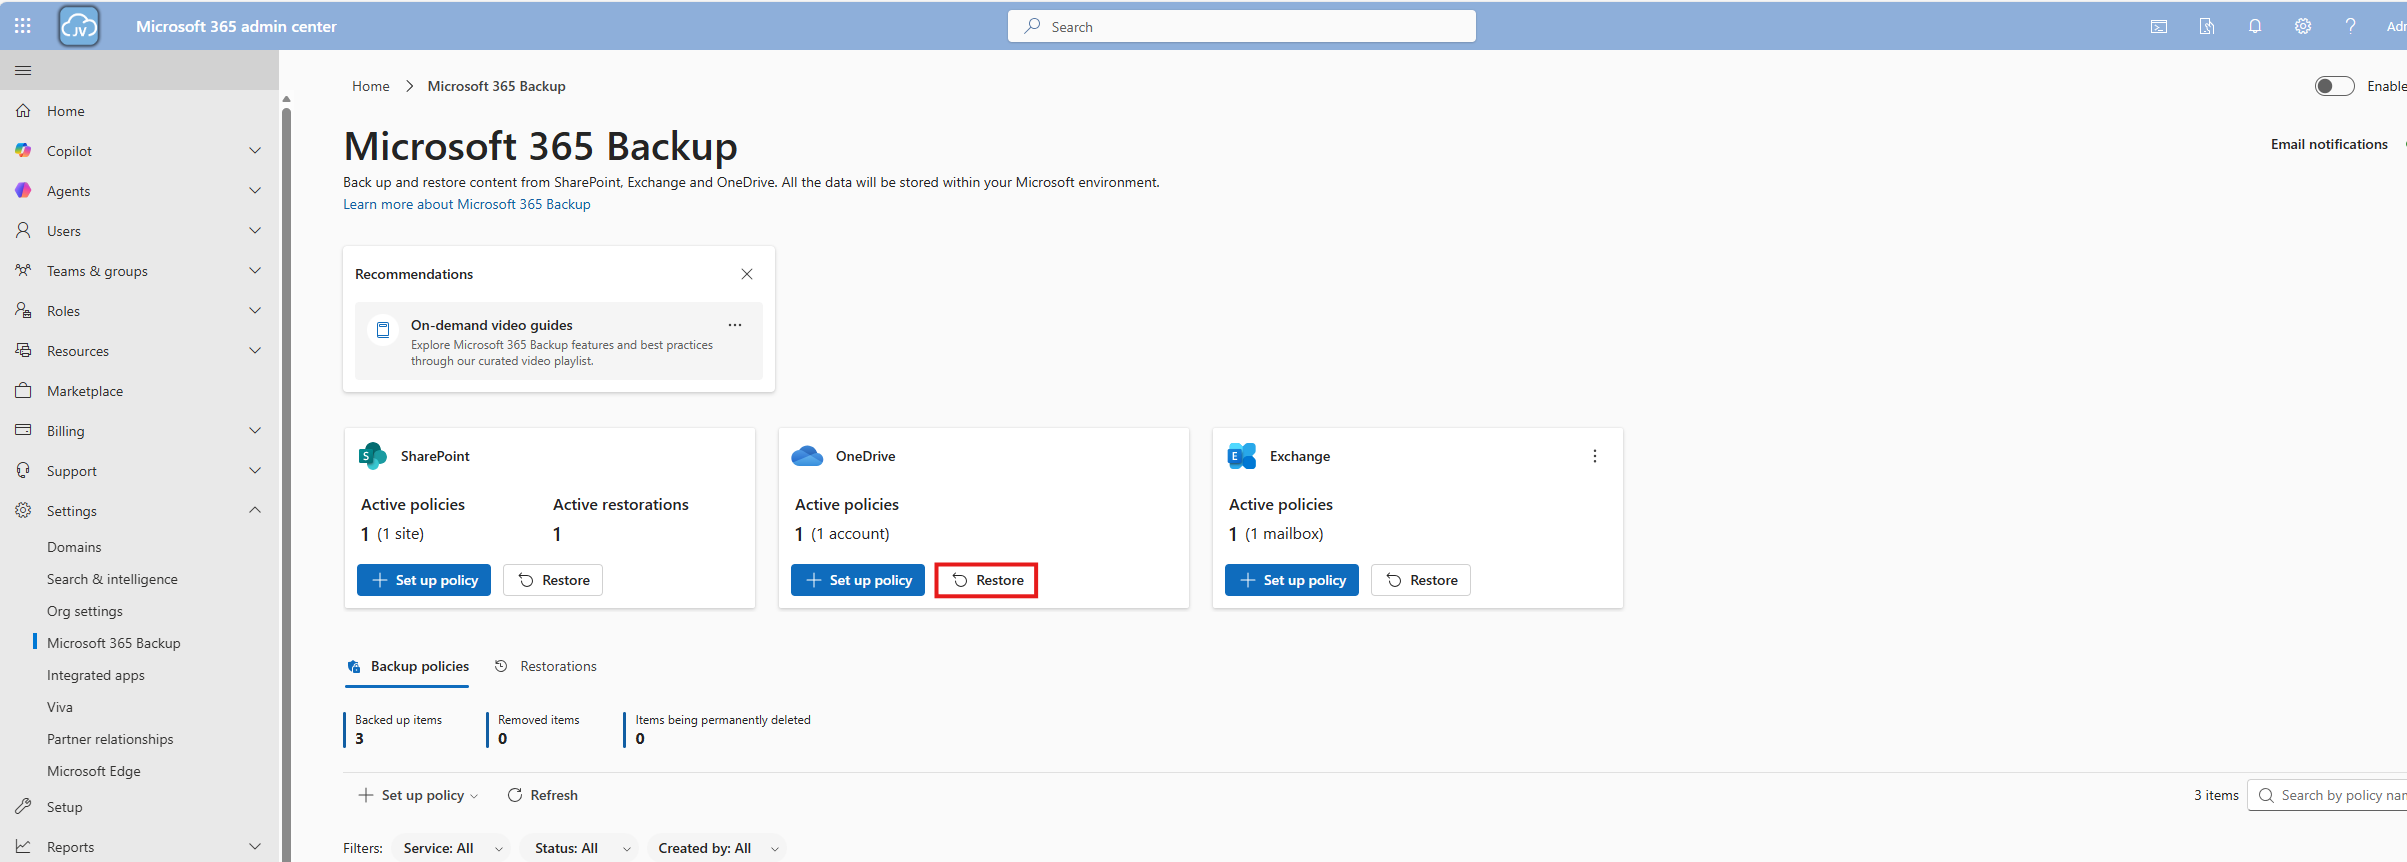
Use the “Restore specific files or folders” option.
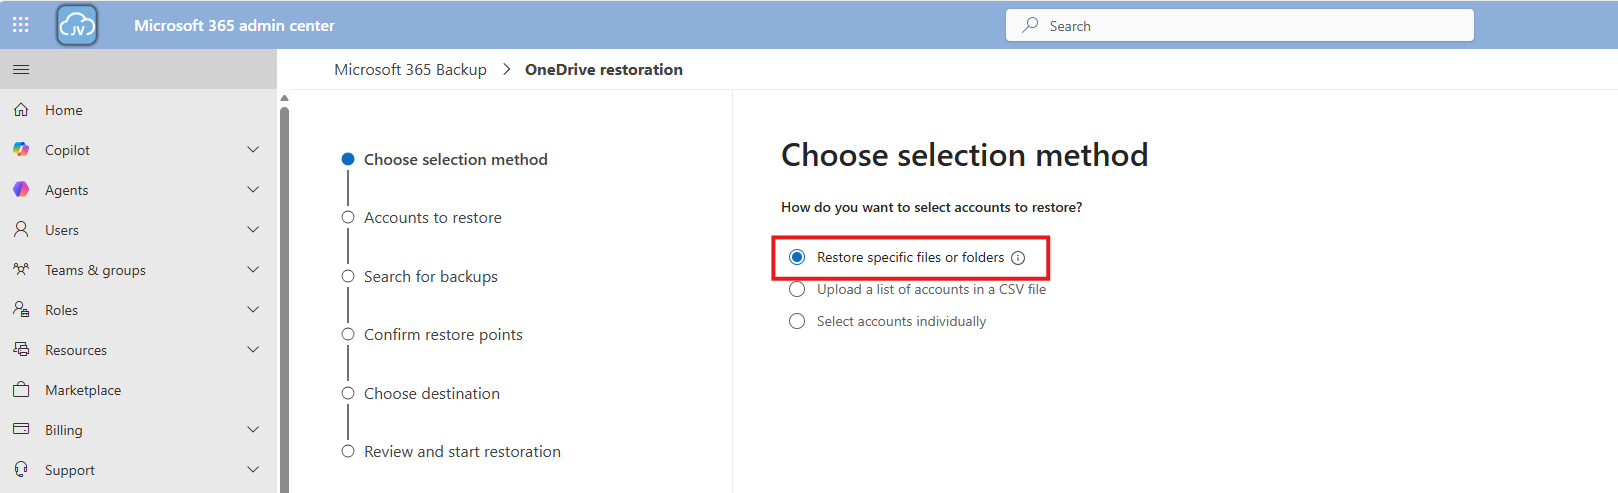
Then navigate to the account, desired restore point and file/folder. This would be pretty straight forward.
For the demonstration, I will delete the top folder (called Post 1462 - SPF-DKIM-DMARC), containing some files of an earlier blog post (around 40MB):
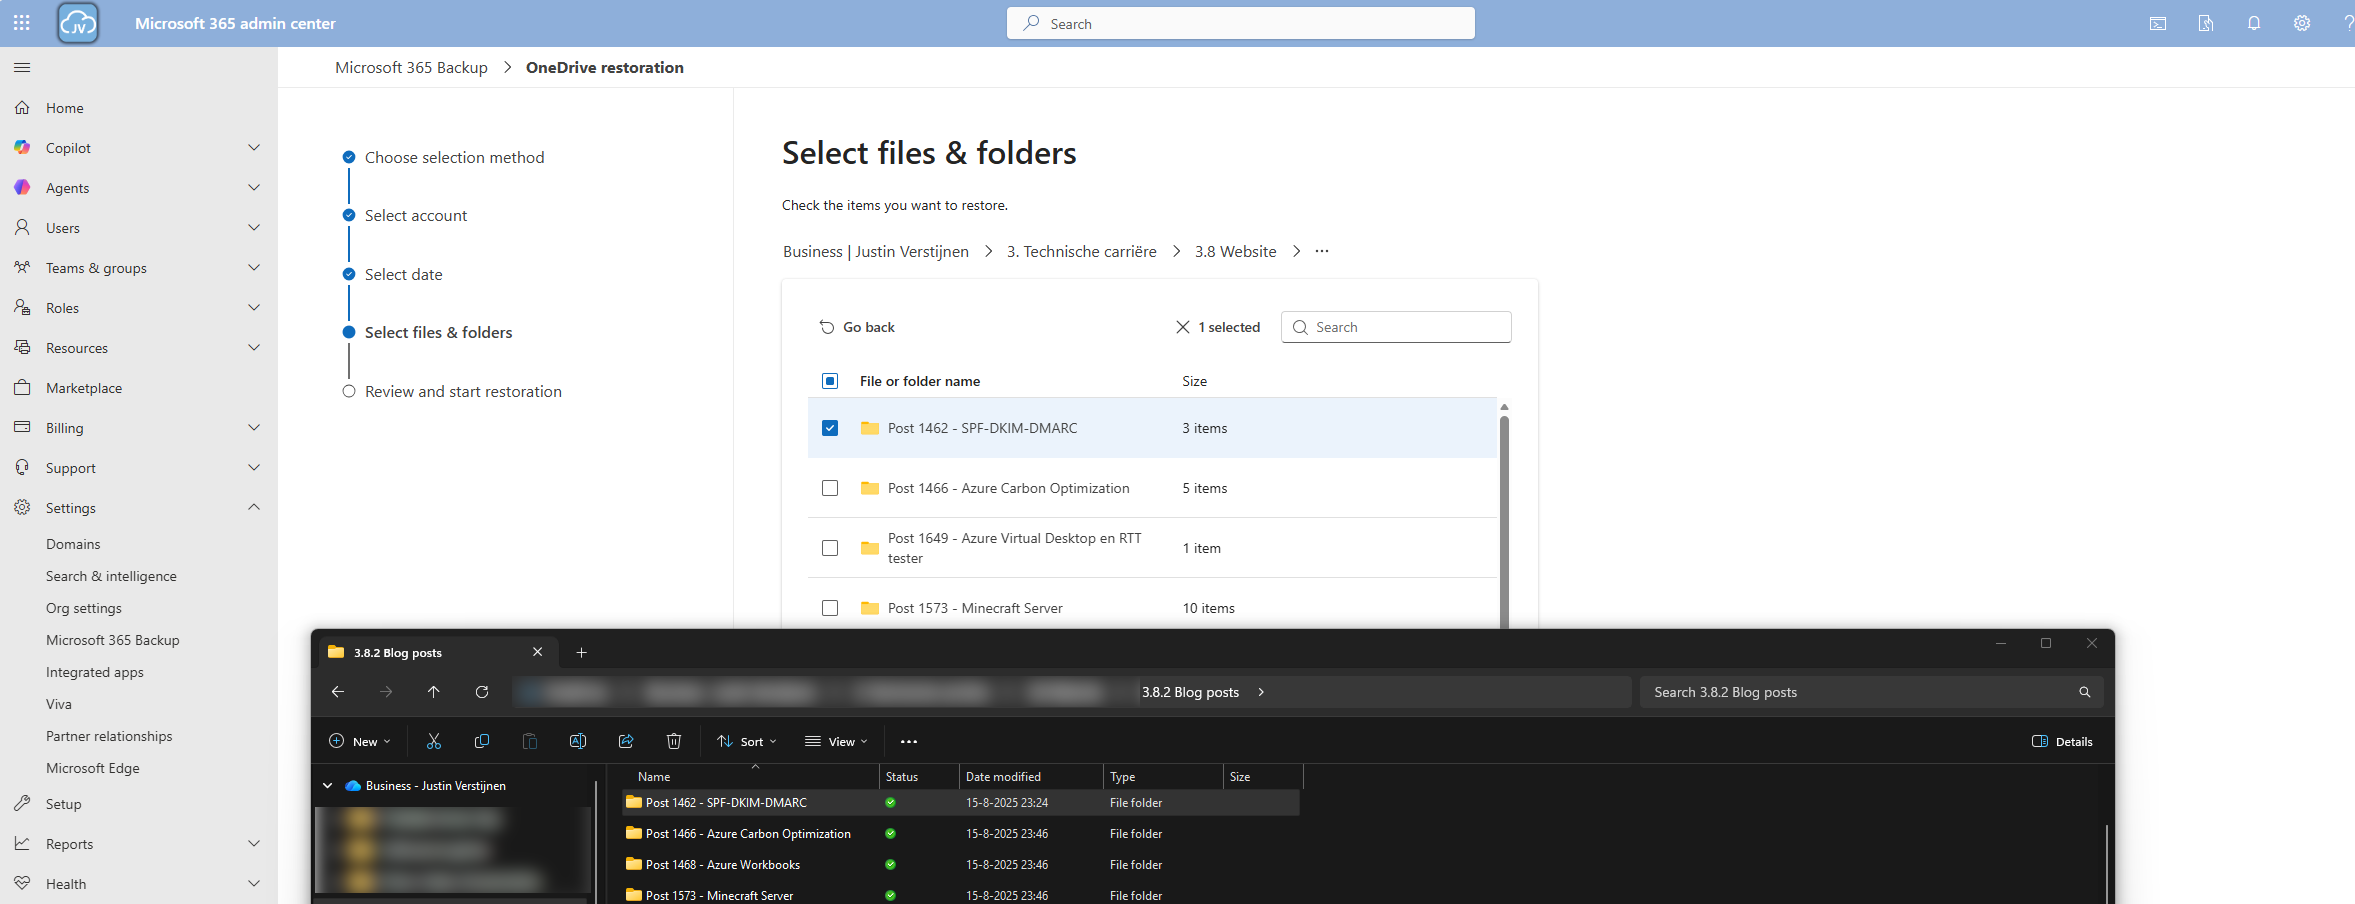
Thats gone.

Now let’s resume the restore action in the Microsoft 365 Backup portal.
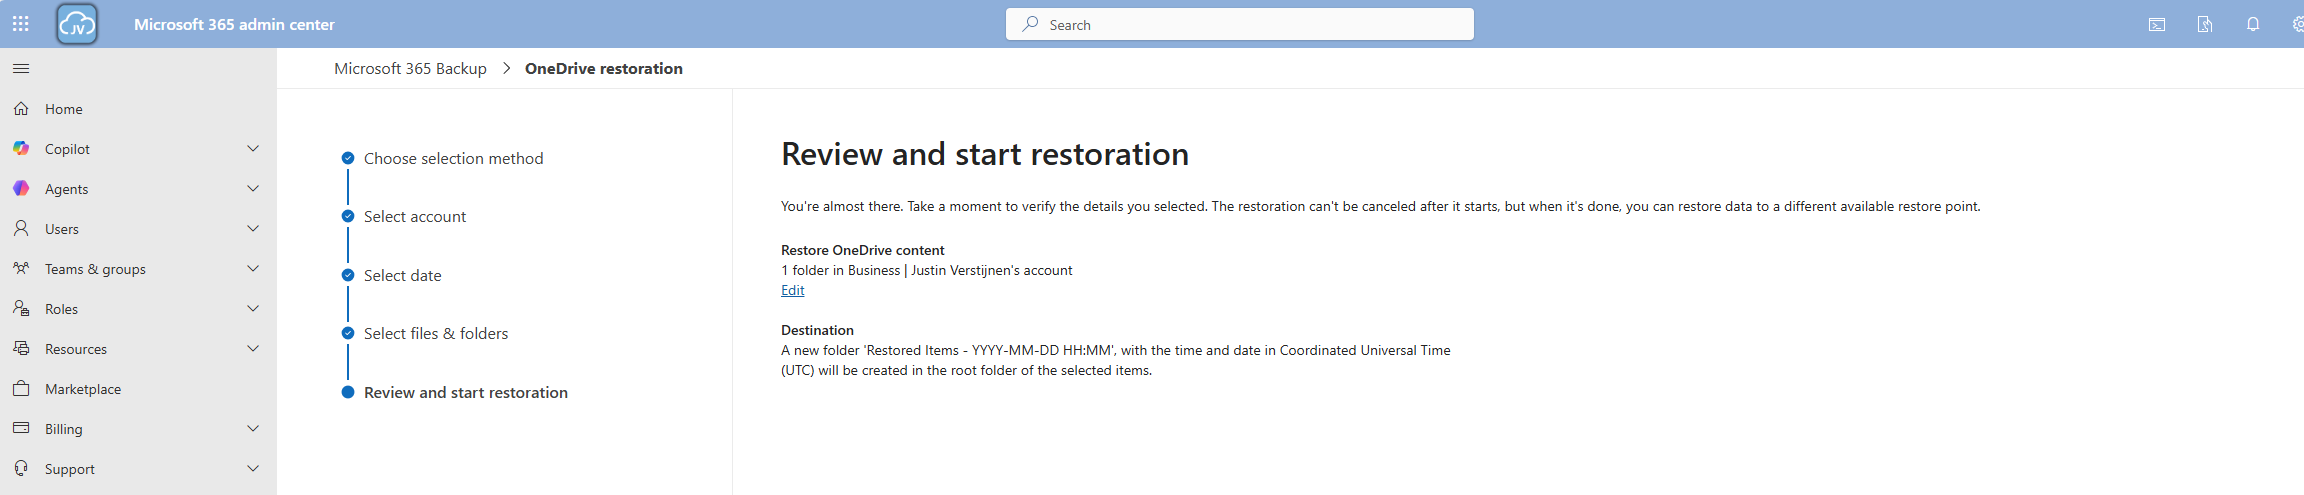
And the portal will inform us the restoration task has been started.
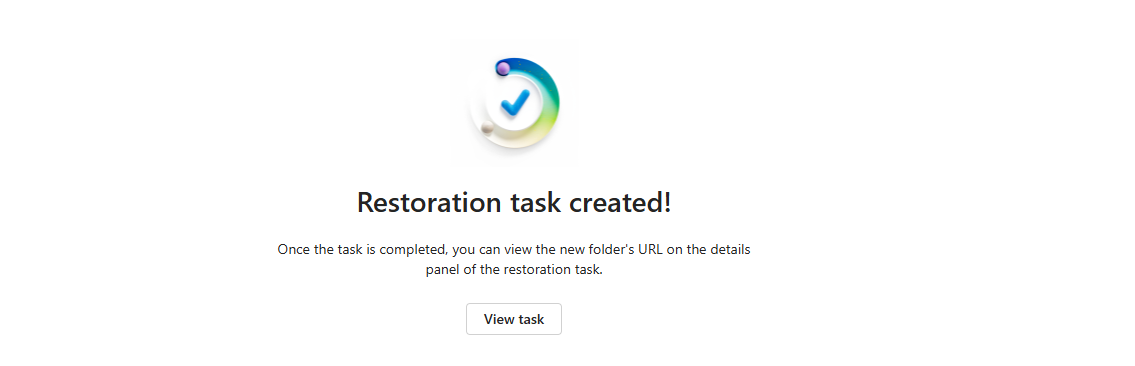
Now we can review the status of the restore action under the tab “Restorations”.
After a minute, the service has placed our files in a new folder in the root of the OneDrive folder, allowing us to manually place back the files. This is by design to prevent data loss.

And the folder contains our selected folder:

As I researched this solution, I wanted to know the upsides and downsides of this solution. As no solution is perfect, you have to align with what you want and need for your workloads. I came with the following downsides of Microsoft 365 Backup:
Microsoft 365 Backup is a great solution for organizations and people that need more restore options than the default recycle bin (93 days) and versioning. It greatly integrates with your Microsoft 365 environment and is easy to setup, using your current Azure subscription as billing method.
I honestly see this as a last resort, when actions are too destructive to rely on the built in recycle bin options where you want to restore a complete account/mailbox/site. If within 93 days of deletion, the recycle bin would be a much faster option. But its a great feature to extend the retention from 93 days to 365 days for organizations who need this.
Thank you for visiting this page and I hope it was helpful.
These sources helped me by writing and research for this post;
You have reached the end of the page. You can navigate through other blog posts as well, share this post on X, LinkedIn and Reddit or return to the blog posts collection page. Thank you for visiting this post.
If you think something is wrong with this post or you want to know more, you can send me a message to one of my social profiles at: https://justinverstijnen.nl/about/
If you find this page and blog very useful and you want to leave a donation, you can use the button below to buy me a beer. Hosting and maintaining a website takes a lot of time and money. Thank you in advance and cheers :)
The terms and conditions apply to this post.
MTA-STS is a standard for ensuring TLS is always used for email transmission. This increases security and data protection because emails cannot be read by a Man in the Middle. It works like this for inbound and outbound email to ensure security is applied to all of the messages processed by your emailing solution and domains.
In this guide I will explain how it works. Because it is a domain specific configuration, it can work with any service and is not bound to for example Exchange Online. In this guide we use Azure to host our MTA-STS policy. I present you 2 different options for you to choose, and of course only one is needed. You can also choose to use another solution, its it supports HTTPS and hosting a single TXT file, it should work.
MTA-STS overlaps with the newer SMTP DANE option, and they both help securing your email flow but each in its own manner. Some differences:
| MTA-STS | SMTP DANE | |
| Requires DNSSEC at DNS hosting | No | Yes |
| Requires hosting a TXT file | Yes | No |
| Secures inbound and outbound | Yes | Yes |
| Fallback option if DANE is not supported | Yes | No |
The conclusion is;
My advice is to configure both when possible, because not every email service does support SMTP DANE and MTA-STS is much more broadly supported. This will be used then as fallback. If the sender does not support MTA-STS, email will not be delivered and the sender gets an error message.
MTA-STS (Mail Transfer Agent Strict Transport Security) is a standard that improves email security by always using SMTP TLS encryption and validating certificates during email transmission. It’s designed to prevent man-in-the-middle (MitM) attacks, ensuring email servers cannot be tricked into falling back to insecure delivery. This increases security and protects your data.
MTA-STS works very similar to how HSTS works for webservers.
MTA-STS consists of the following components:
Like described in the previous section, we must configure 2 things for MTA-STS to work:
For the policy we can use Azure Static Web Apps or Azure Functions to publish the policy, but you can use any webhosting/HTTP service of choice. The steps will be different of course.
We log into our DNS hosting environment and we have to create a TXT record there. This must look like this:
_mta-sts.yourdomain.com. 3600 IN TXT v=STSv1; id=20250101000000Z;The first part must contain your domain instead of yourdomain.com and the last part after the ID contains the timestamp of the record being published.
Tip: you can use my (Microsoft 365) DNS Record Generator tool for customizing your MTA-STS record: https://tools.justinverstijnen.nl/365recordsgenerator
I have logged in into the DNS hosting and added my TXT record there. My record looks like this:
_mta-sts.justinverstijnen.nl. 3600 IN TXT v=STSv1; id=20250511000000Z;After filling the form, it looks like this:

The domain is automatically added by the DNS protocol and from v=STSv1 to the 0’s and the Z; is the value part.
Now we must configure the policy for MTA-STS. We start by creating the TXT file and defining our policy. The TXT file must contain the information below:
version: STSv1
mode: enforce
mx: justinverstijnen-nl.r-v1.mx.microsoft
max_age: 1209600Save this information to a TXT file named “mta-sts.txt” and now we must publish this on a webserver, so when a visitor goes to https://mta-sts.yourdomain.com/.well-known/mta-sts.txt, they will see this TXT file.
My first option is the most simple way to host your TXT file for your MTA-STS policy. We will do this with Azure Static Web Apps in coorperation with GitHub. This sounds complex but is very easy.
Before we dive into Azure, we will start by creating a reposiroty on Github. This is a space where all files of your application resides. In this case, this will only be the TXT file.
Create an account on Github or login to proceed.
Create a new repository:
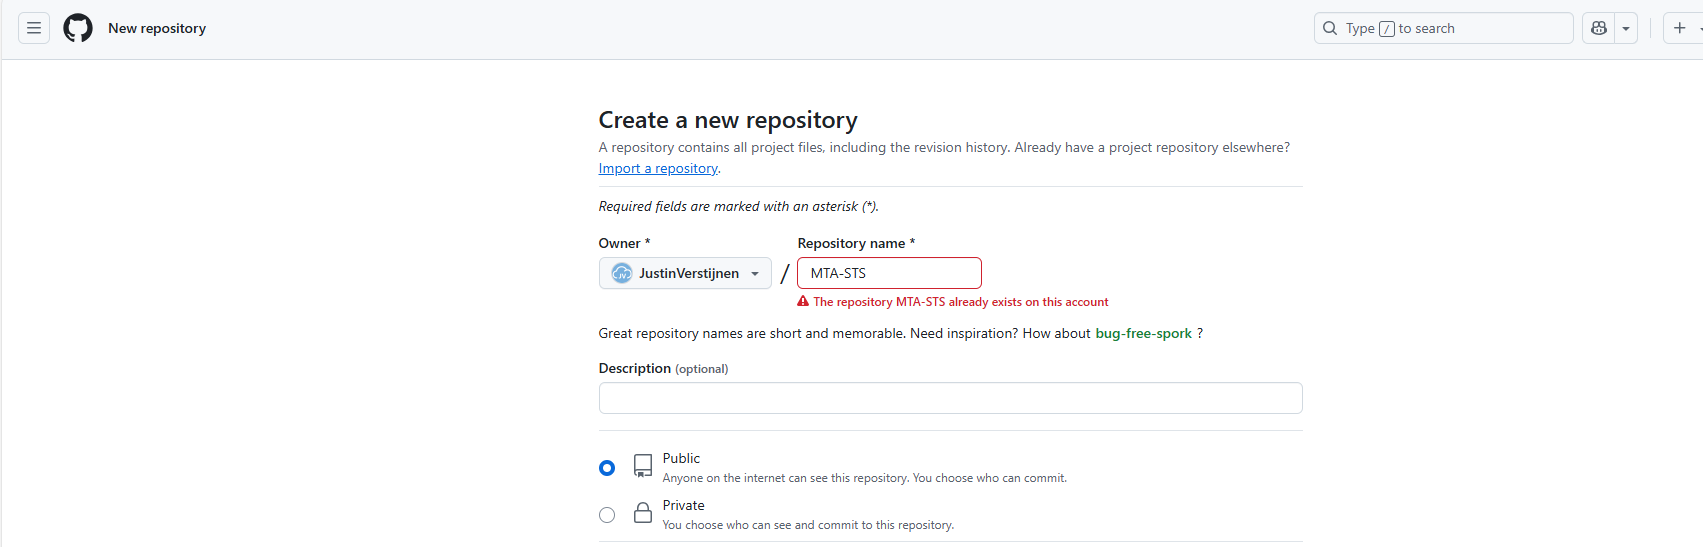
Give it a name and description and decide if you want the repository to be public. Note that the TXT will be public in any case.
Create the repository.
I have my repository public, and you can check out that to have an example of the correct configuration. We must download the index.html file from here: https://github.com/JustinVerstijnen/MTA-STS
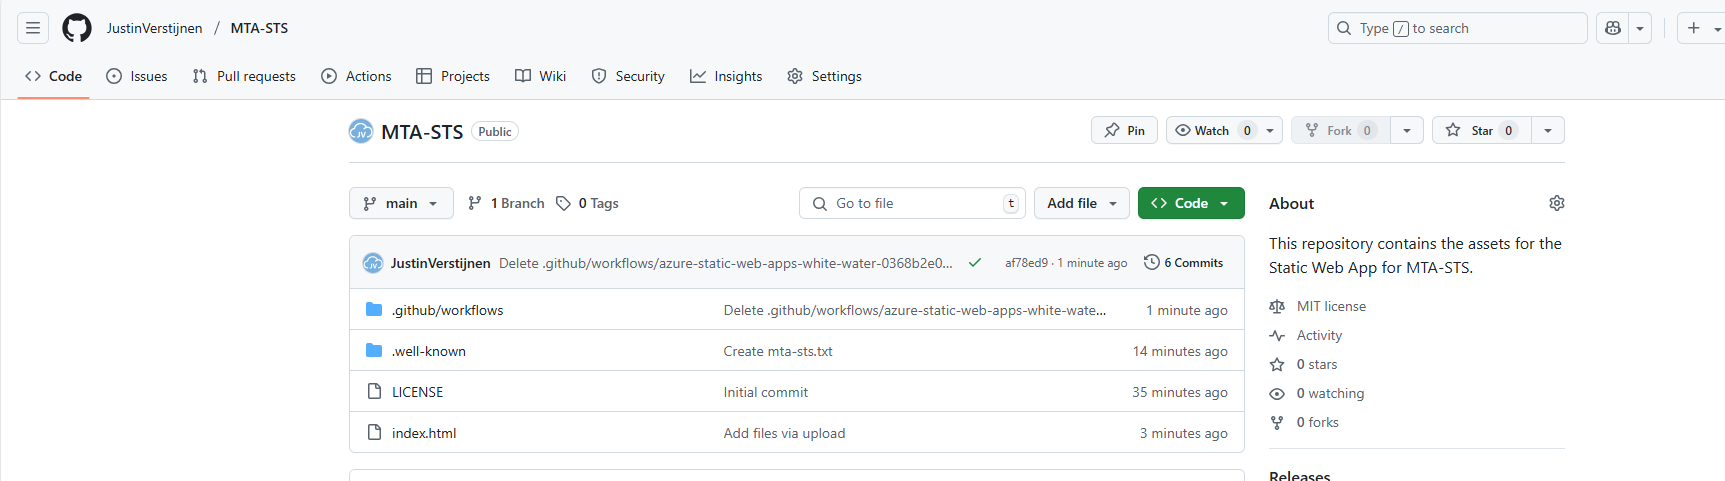
Click on the index.html file and download this. You can also copy the content and create the file with this content in your own repository.
Now go back to your own, newly created repository on Github.
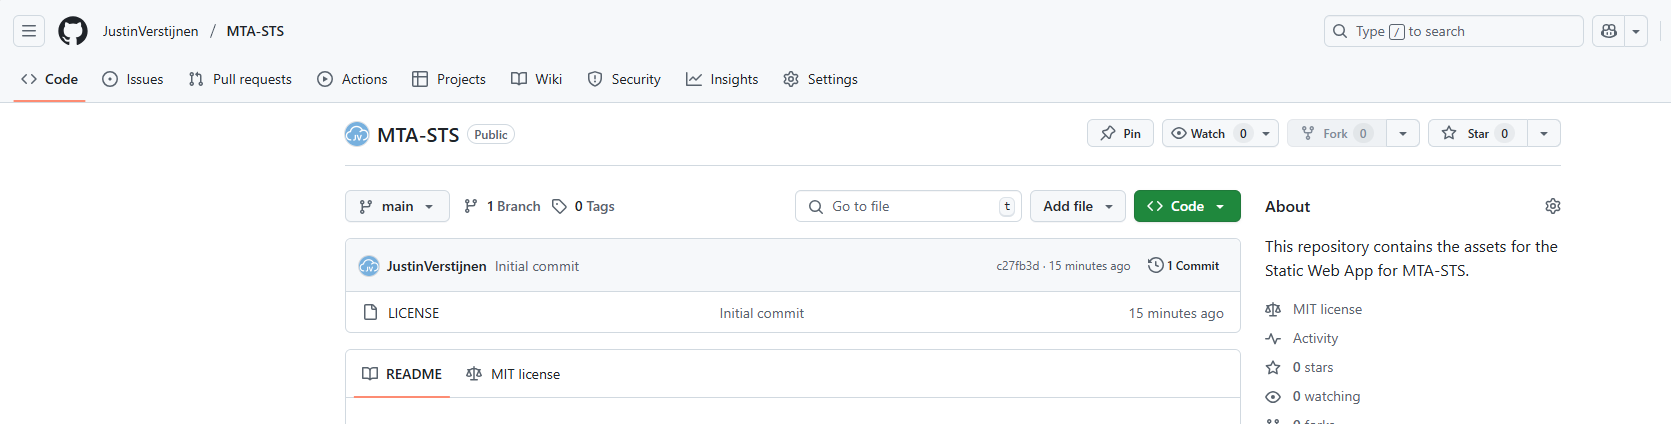
Click on the “Add file” button and then on “Create a new file”.
Now we must create the folder and the TXT file. First type in: “.well-known”, then press “/” and then enter “mta-sts.txt”. This creates the folder and then the file.
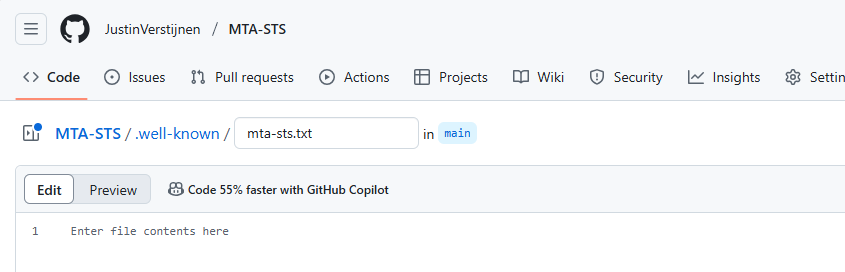
Now we can paste in the information of our defined policy:
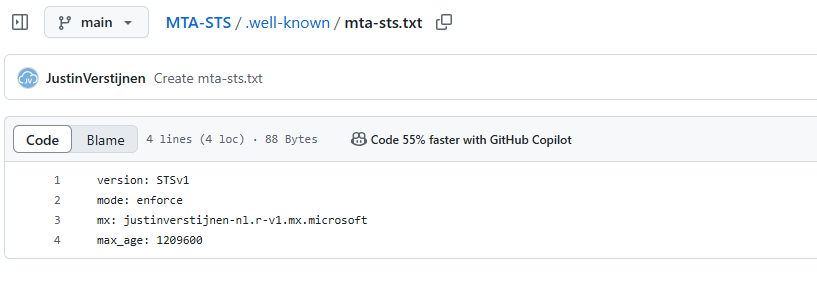
Now commit the changes, which is basically saving the file.
Now because a Static Web App requires you to have a Index.html at all time (because it is a website), we need to upload the prepared Index.html from my repository you downloaded earlier.
Click on “Add file” and then on “Upload files”. Then click on “Select your files” and select the downloaded Index.html file.
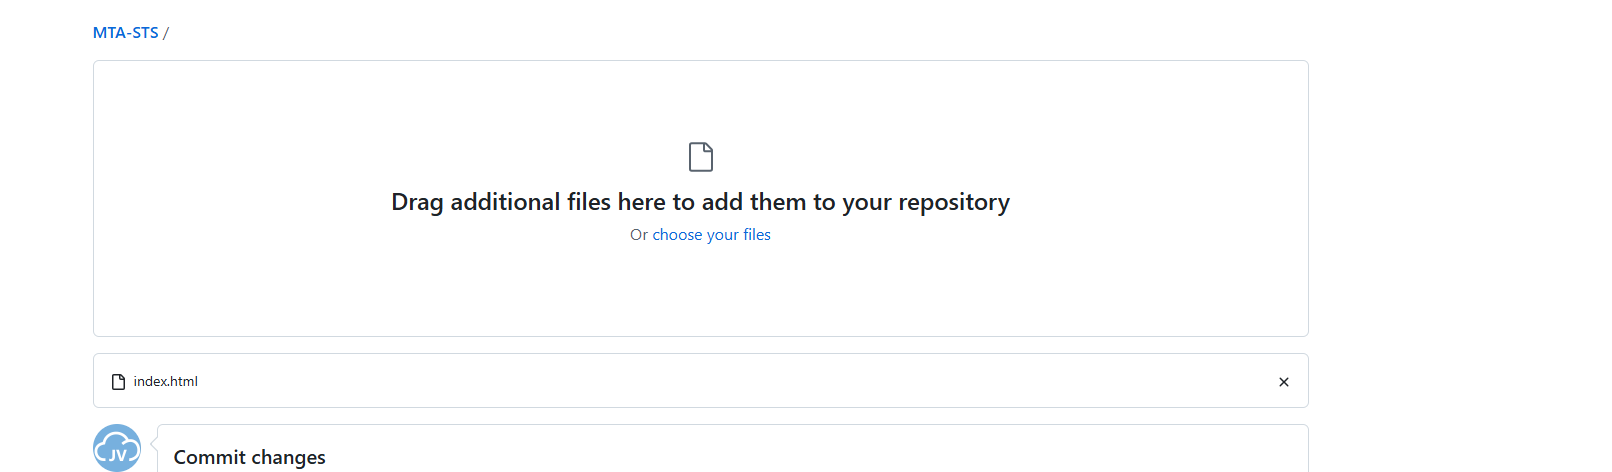
Commit the change. After committing the change, click on the Index.html file. We must make some changes to this file to change it to your own website:
Change the URLs on line 5 and 7 to your own domain. the mta-sts part on the beginning must stay intact and the part from .well-known too.
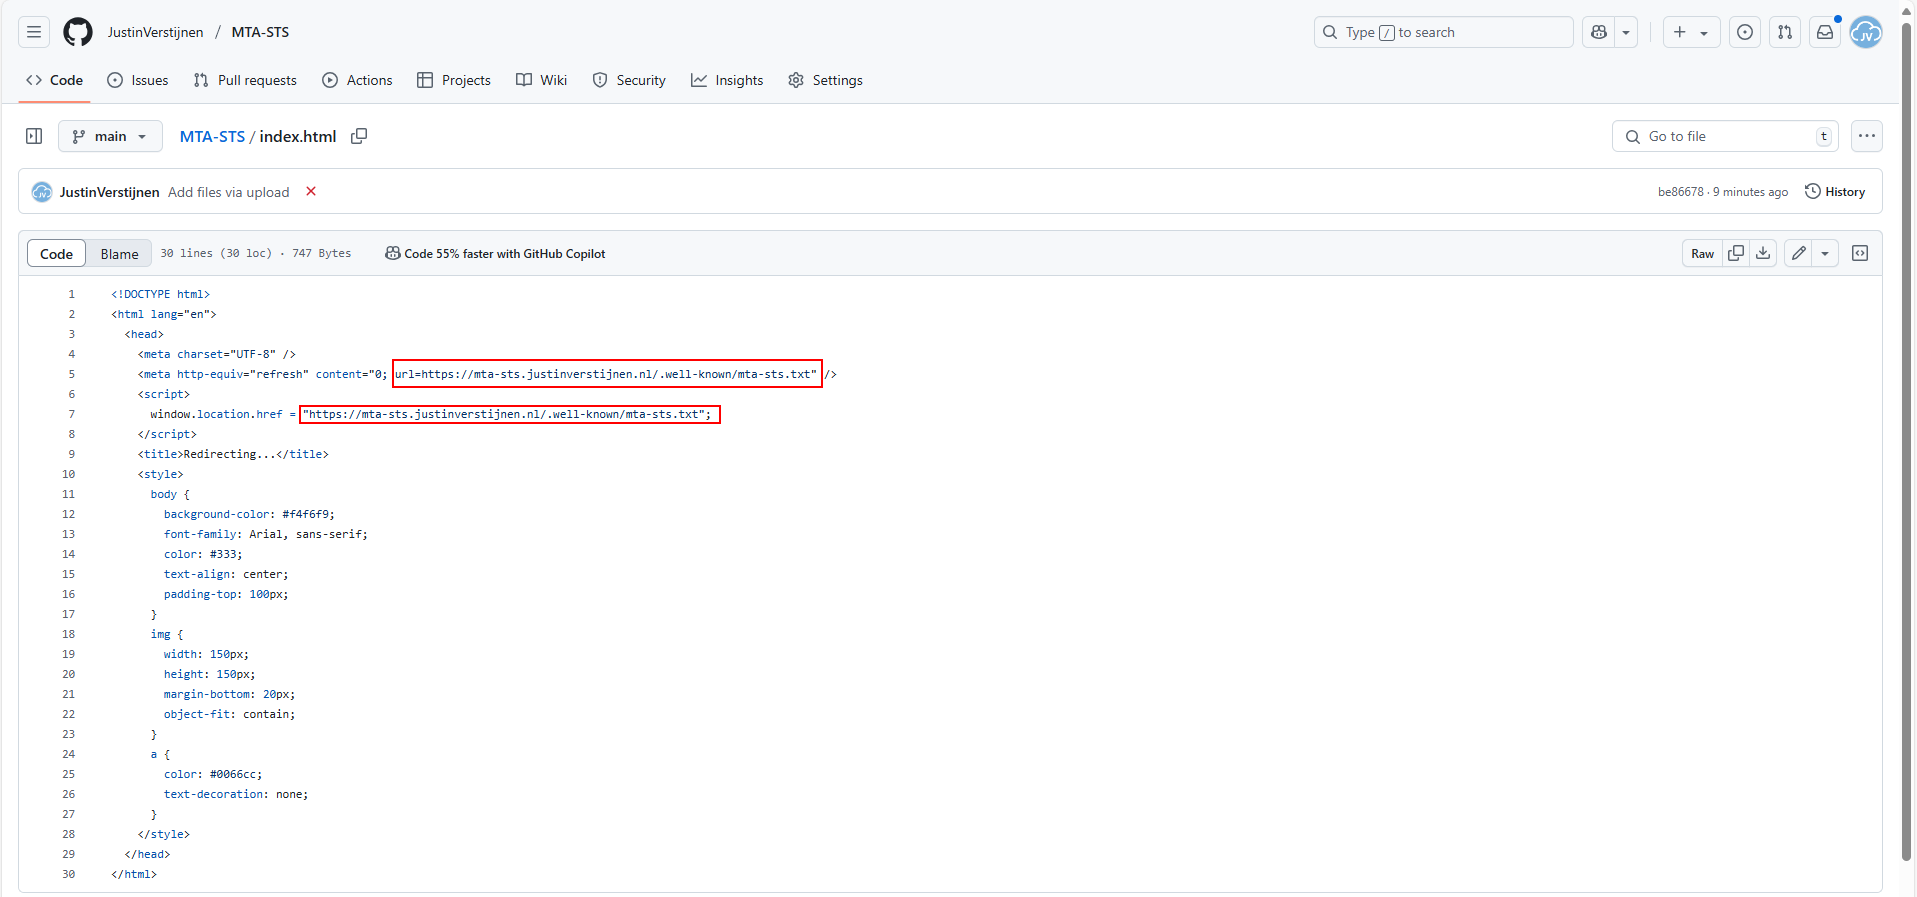
As you can see, its a simple HTML file that redirects every visitor directly to the correct file in the .well-known folder. This is purely for Azure which always must have a index.html but it makes your life a bit easier too.
Proceed to the next steps in Azure.
Now we must create the Azure Static Web App in Azure to host this file. Search for “Static Web Apps” in the Azure Portal and create a new app:
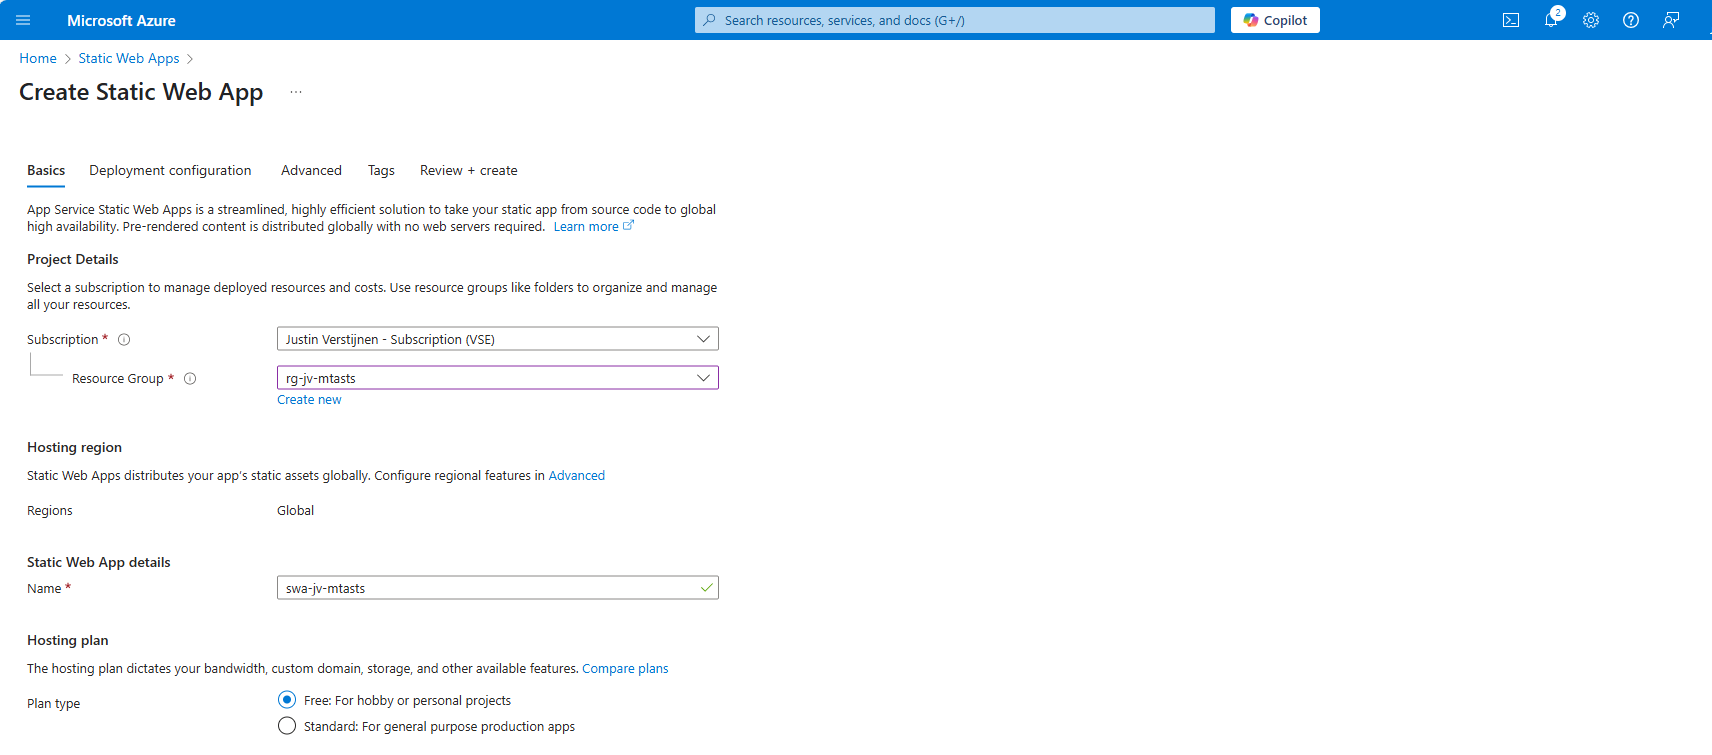
Place it in the desired resource group, give it a name (cannot be changed) and select a plan. You can use a free plan for this. The only limit is the custom domains you can link, which is 2 custom domain names per app.
Then scroll down on the page till you see the Deployment type:
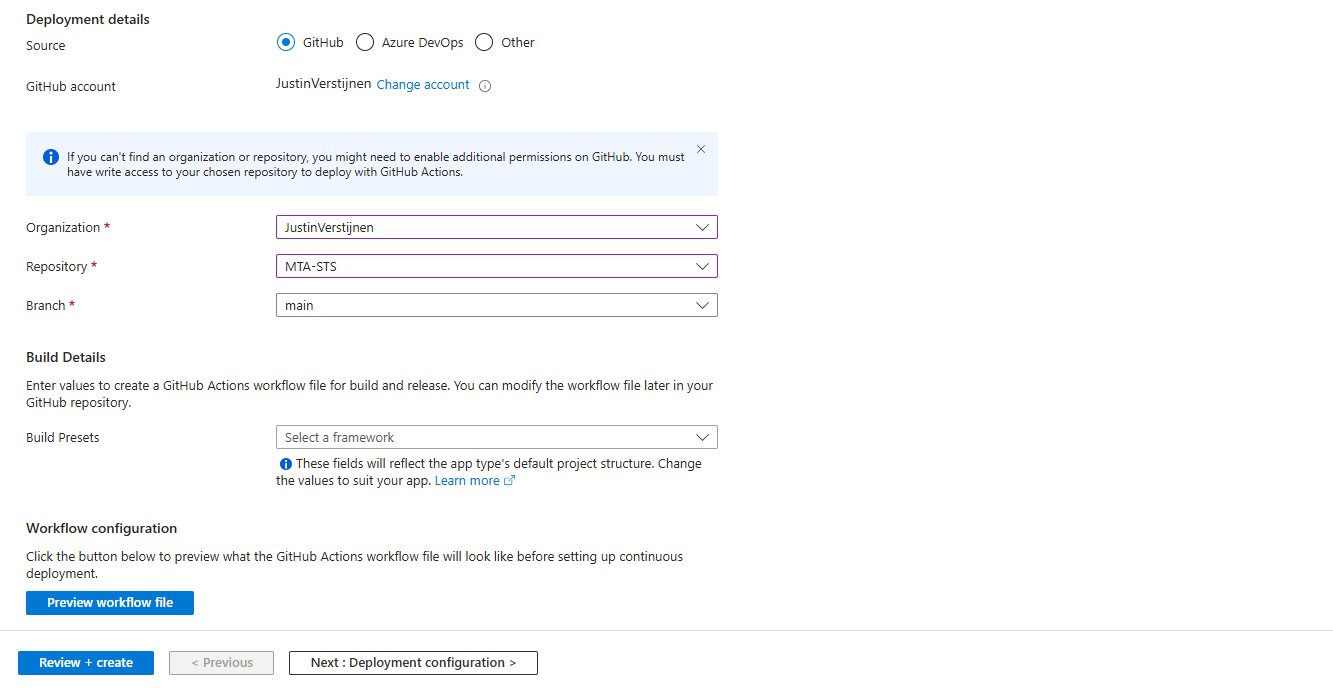
Link your Github account to Azure so Azure can get the information from your repository and put it in the Static Web App. Select your Repository after linking and complete the wizard. There is no need to change anything else in this wizard to make it work.
After completing the wizard, the app will be created and then your repository files will be placed onto the Static Web App Host. This process completes in about 3 minutes.
After around 3 minutes, your website is uploaded into Azure and it will show:

If you now click on “visit your site”, it will redirect you to the file. However, we didn’t link our custom domain yet, so it will not show our policy yet. The redirection will work fine.
Now we can link our custom domain to our created Azure Static Web App in the Azure portal. Go to “Custom domains” in the settings of the Static Web App and click on “+ Add”.
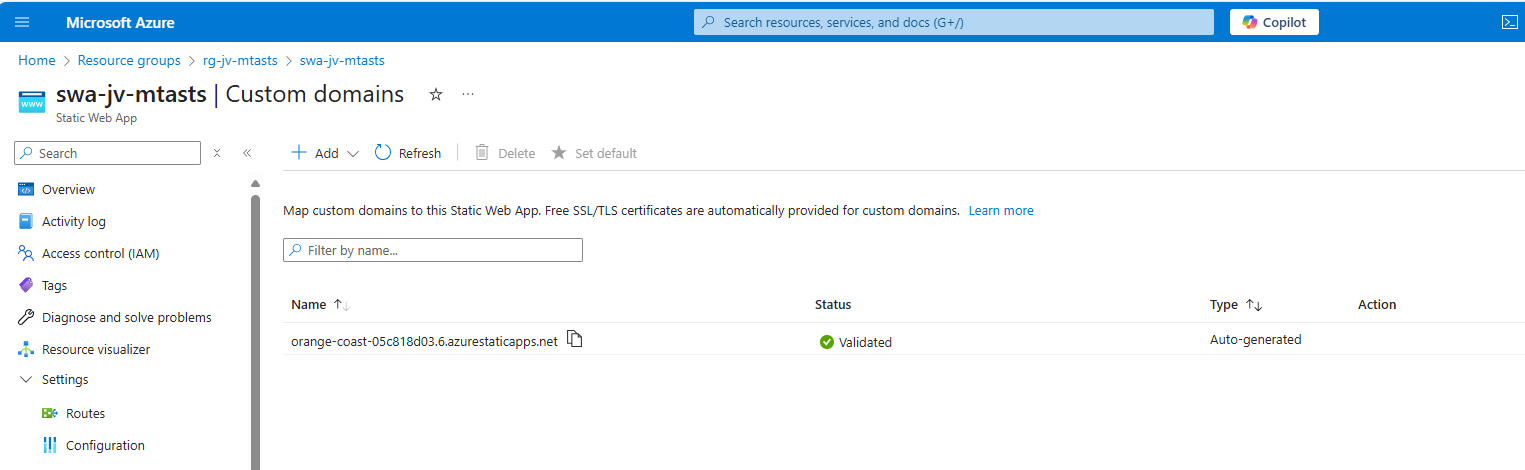
Select the option “Custom domain on other DNS”, the middle option.
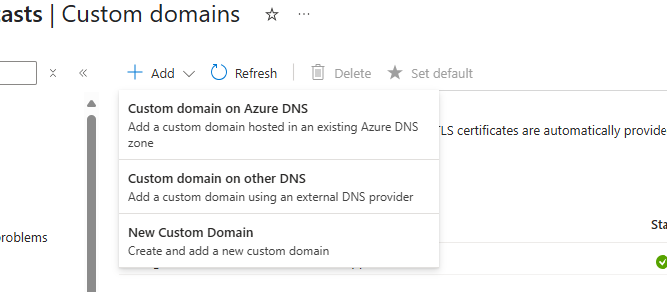
Now fill in mta-sts.yourdomain.com, for my environment this will be:
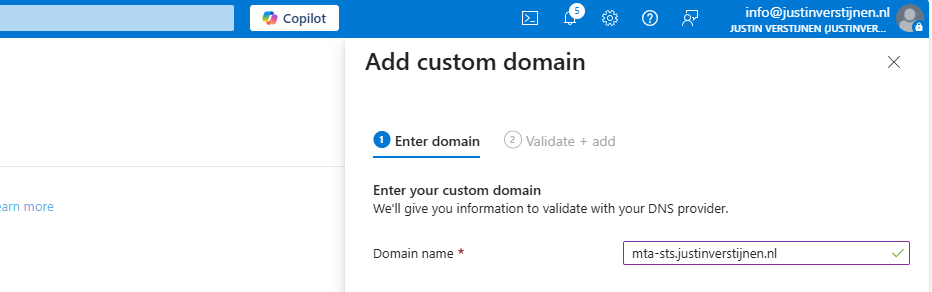
Click on “Next”. Now we have to validate that we are the owner of the domain. I recommend the default CNAME option, as this is a validation and alias/redirection in one record.
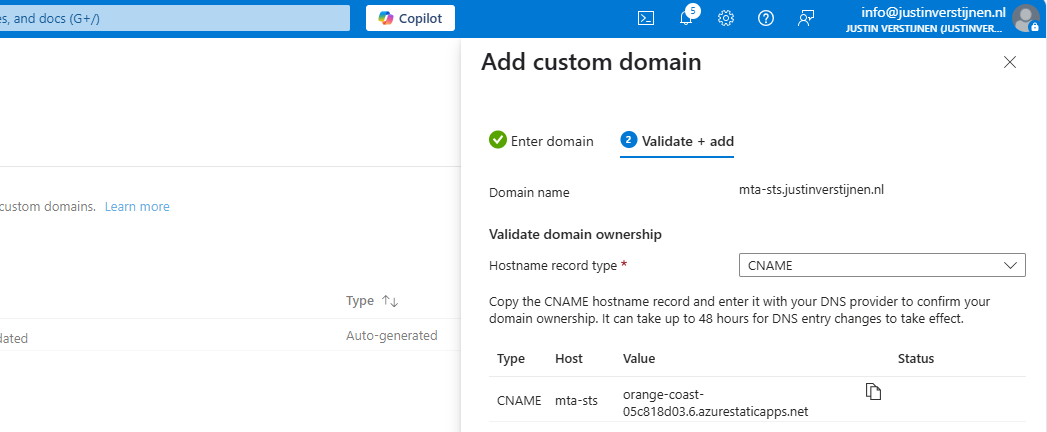
Copy the Value of the CNAME record which is the project-name of the Static Web App and we now have to create a DNS record for our domain.
Go to your DNS hosting service and login. Then go to your DNS records overview.
Create a new CNAME record with the name “mta-sts” and paste the value you copied from the Azure Portal. Add a dot “.” to the value of the record because it is a external domain. In my case, the value is:
orange-coast-05c818d03.6.azurestaticapps.net.Save the DNS record and go back to Azure, and click “Add” to validate the record. This process will be done automatically and ready after 5 minutes most of the time.

Now we can test our site in the Azure Portal by again using the “Visit your site” button:
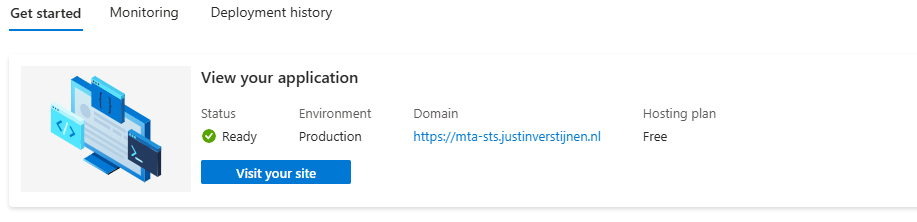
Now the website will show your MTA-STS policy:
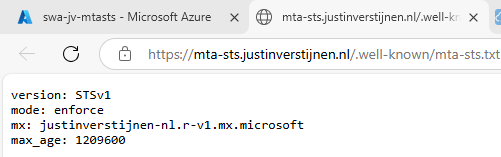
We are now succesfully hosting our MTA-STS policy on a Azure Static Web App instance. We also using a mandatory index.html to redirect to the correct sub-location. If your repository doesn’t have a index.html file in the root, the upload to Azure action will fail.
You can skip option 2 and proceed to “Testing the MTA-STS configuration”
My second option is to host the TXT file with an Azure Function. This is a bit more complicated than option 1, but I will guide you through.
In this guide I will use an Azure Function to publish the MTA-STS policy to the internet.
Let’s go to the Azure Portal and create a new Function App:
Here you can select:
Create the app by finishing the wizard.
After creating the app, we must do a change to the host.json file in the Azure Function. Paste the code below on the first part of the json file:
{
  "version": "2.0",
  "extensions": {
  "http": {
    "routePrefix": ""
  }
},
It should look like this:
Save the file, and now it is prepared to host a MTA-STS policy for us.
Create a new Function in the function app:
Select the HTTP trigger, give it a name and select the “Anonymous” authorization level.
Now we can paste some code into the function. We have to wrap this into a .NET website:
#r "Newtonsoft.Json"

using System.Net;
using Microsoft.AspNetCore.Mvc;
using Microsoft.Extensions.Primitives;
using Newtonsoft.Json;

public static async Task<IActionResult> Run(HttpRequest req, ILogger log)
{
    log.LogInformation("C# HTTP trigger function processed a request.");

    string responseMessage = "version: STSv1\nmode: enforce\nmx: justinverstijnen-nl.r-v1.mx.microsoft.\nmax_age: 1209600";

    return new OkObjectResult(responseMessage);
}
On line 12 there is the policy where you need to paste your settings in. Paste the final code into the Azure Portal and save/publish the function.
Now go to the “Integration” tab:
Click in the “Trigger” section on “HTTP(req)”.
Here we can define how the HTTP trigger is and the file/path of the MTA-STS policy:
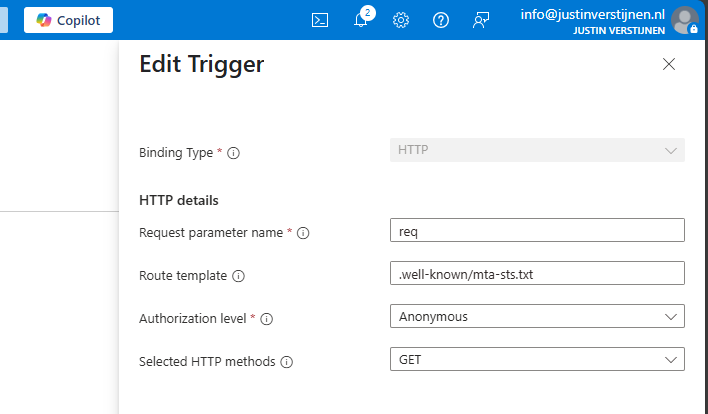
Change the values as below:
We are have bound the URL WEBSITE/.well-known/mta-sts.txt to our function and that kicks off our code which contains the policy. Very creative solution for this use case.
We can now test if this works by forming the URL with the function app and the added route:
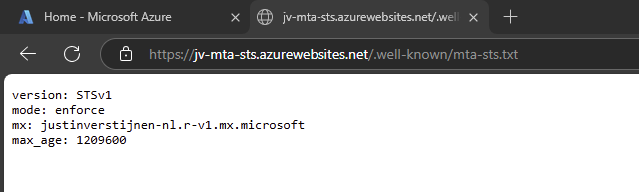
It works not by going to the Function App URL but we now need to add our custom domain.
Now we need to link our domain to the function app. Go to “Custom domains” and add your custom domain:
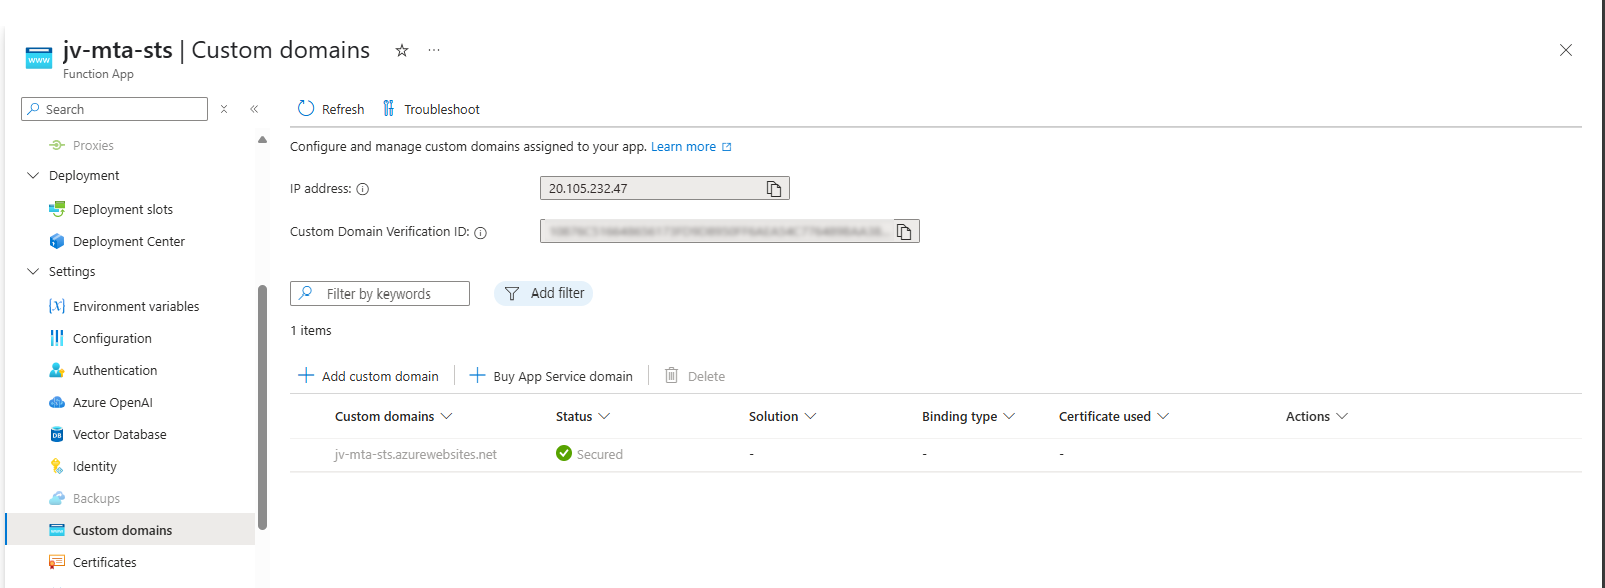
Choose “All other domain services” at the Domain provider part.
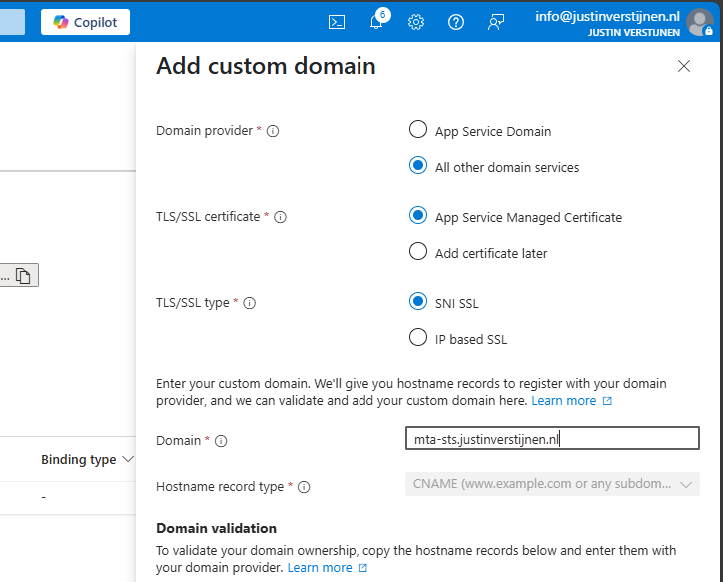
Fill in your custom domain, this must start with mta-sts because of the hard URL requirement for MTA-STS to work.
We now get 2 validation records, these must be created at your DNS hosting provider.
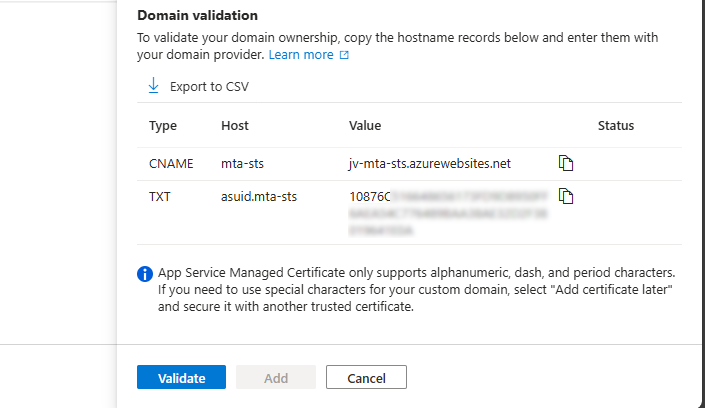
Here I created them:


Now hit “Validate” and let Azure check the records. This can take up to 1 hour before Azure knows your records due to DNS propagation processes. In my case, this worked after 3 minutes.
Now we can check if the full URL works like expected: https://mta-sts.justinverstijnen.nl/.well-known/mta-sts.txt
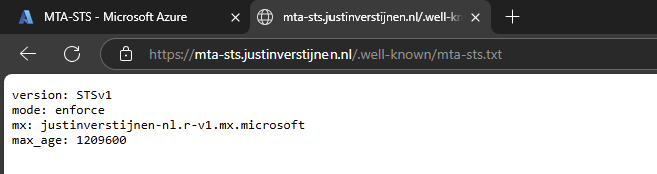
As you can see, our policy is succesfully published.
From here, you can test with all sorts of hosting the policy, like the 2 options I described and your custom hosting.
You can test your current MTA-STS configuration with my DNS MEGAtool:
This tests our configuration of MTA-STS and tells us exactly what is wrong in case of an error:

The tool checks MTA-STS for both the TXT record value and the website. In my case, everything is green so good to go and this means you did the configuration correctly.
After configuring everything, it can take up to 60 minutes before everything shows green, please have a little patience.
MTA-STS is a great way to enhance our email security and protect them from being stolen or read in transit. It also offers a great way of protection when DNSSEC/SMTP DANE is no option in your domain.
Thank you for reading this guide and I hope it was helpful.
You have reached the end of the page. You can navigate through other blog posts as well, share this post on X, LinkedIn and Reddit or return to the blog posts collection page. Thank you for visiting this post.
If you think something is wrong with this post or you want to know more, you can send me a message to one of my social profiles at: https://justinverstijnen.nl/about/
If you find this page and blog very useful and you want to leave a donation, you can use the button below to buy me a beer. Hosting and maintaining a website takes a lot of time and money. Thank you in advance and cheers :)
The terms and conditions apply to this post.
One day I came across an option in Microsoft 365 to disable the users’ self service trials. You must have seen it happening in your tenants, users with free licenses for Power Automate, Teams or Power BI. I will show you how to disable those and only let administrators buy and assign new licenses.
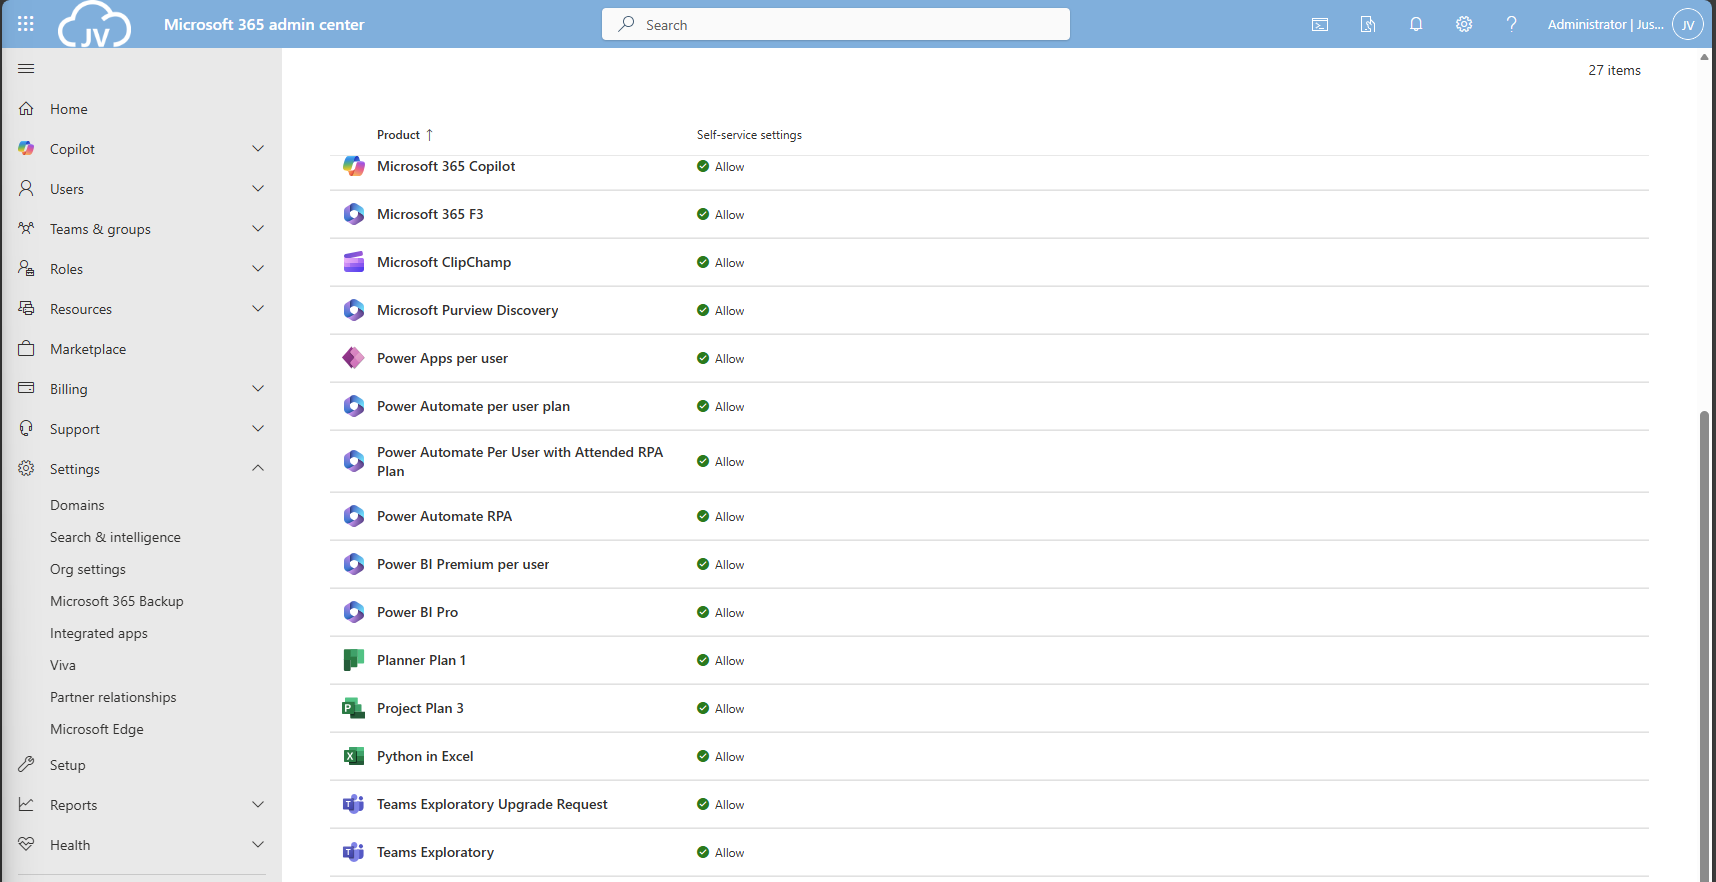
You can disable self service trial licenses if you want to avoid users to use un-accepted apps. This could result in shadow-it happening in your environment.
Let’s say, your company uses Zoom to call with each other, and users are starting to use Microsoft Teams. Teams then is an application not accepted by your organization and users then should not be able to use it. If you give them the possibility, they will. This all of course assuming you don’t have paid licenses for Microsoft Teams.
To disable those purchases from happening in the GUI, open up Microsoft 365 admin center.
Then go to “Settings”, “Org settings” and then “Self-service trials and purchases”.

Here you get a list of all the possible products you could disable individually. Unfortunately, for disabling everything, you must do this manually for all (at the moment 27) items. The good thing is, PowerShell can actually do this for us.
Click on your license to be disabled, and click on “Do not allow”. Then save the setting to apply it to your users.
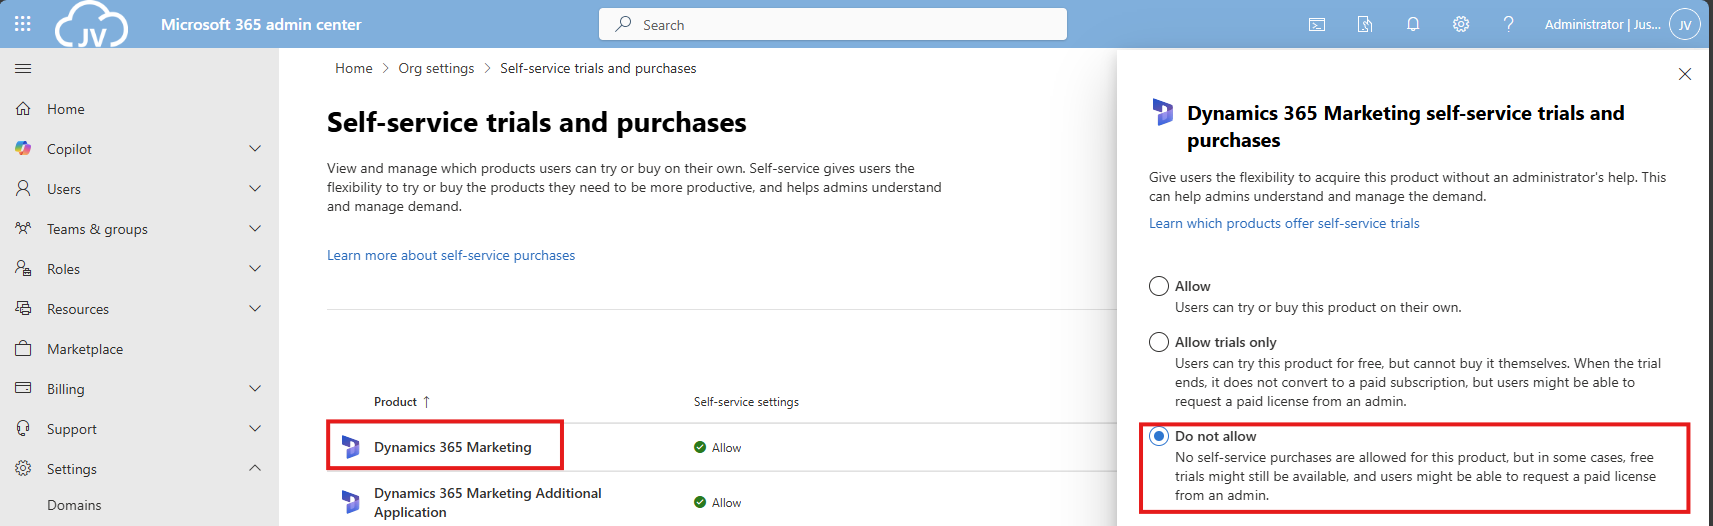
There is a PowerShell module available that contains multiple options for billing and commerce options. This is the MSCommerce module, and can be installed using ths command:
Install-Module -Name MSCommerceAfter this module is installed, run this commando to login into your environment:
Connect-MSCommerceThen login to your environment, complete the MFA challenge and you should be logged in.
Run this command to get all the trial license options:
Get-MSCommerceProductPolicies -PolicyId AllowSelfServicePurchaseThis will return the list of all possible trial licenses, just like you got in the GUI.
To disable all trial licenses at once, run this:
Get-MSCommerceProductPolicies -PolicyId AllowSelfServicePurchase |
    ForEach-Object {
        Update-MSCommerceProductPolicy -PolicyId AllowSelfServicePurchase `
                                       -ProductId $_.ProductId `
                                       -Enabled $false
    }
PowerShell will now initiate a loop that sets the status of every license to “Disabled”:
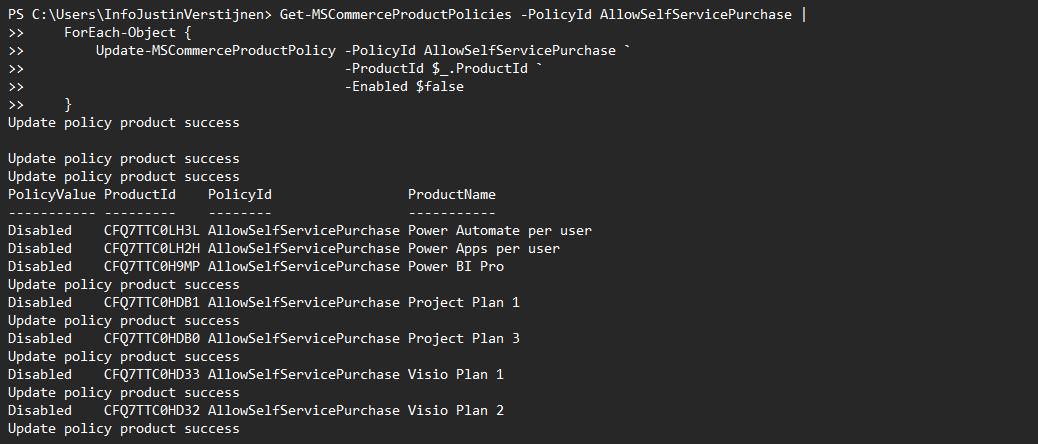
After the simple script has run succesfully, all trial license options should be disabled in the Microsoft 365 Portal:
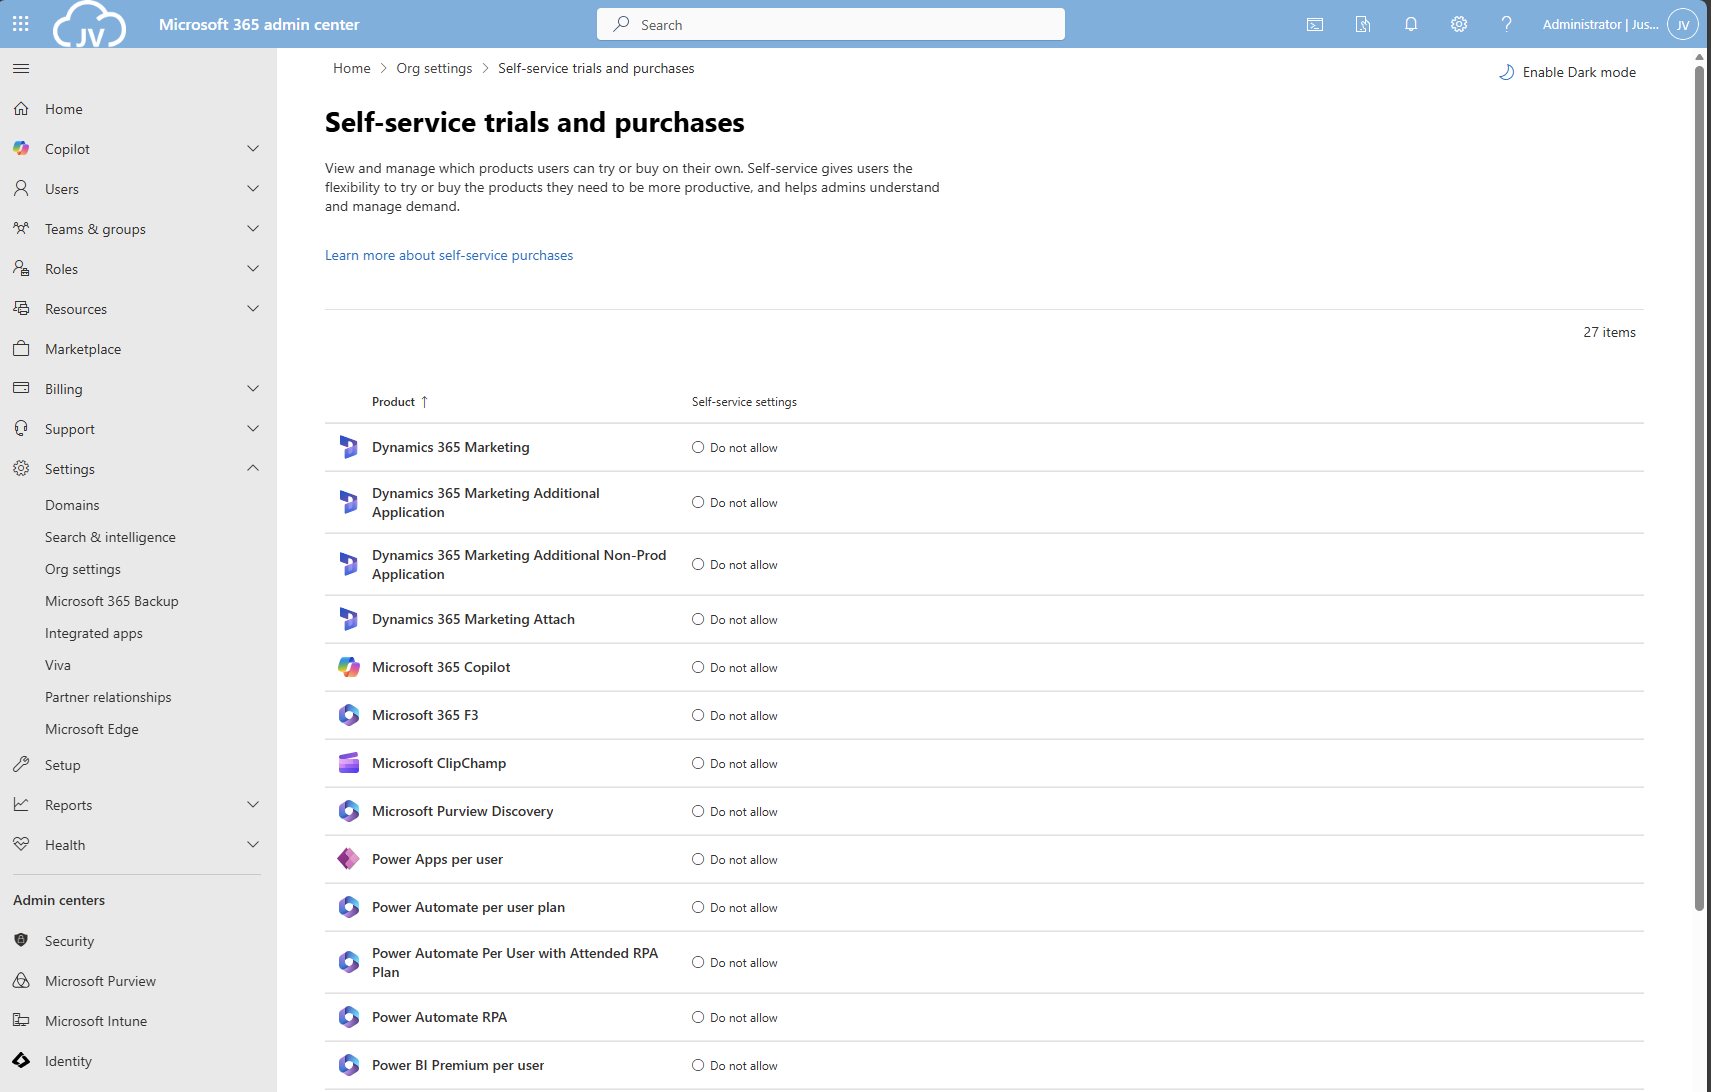
And thank you once again PowerShell for saving a ton of clicks :)
Disabling the trial licenses is generally a good idea to avoid users from using services you don’t generally accept. You can technically still get trial licenses but an administrator has to approve them now by changing the status of the license.
Most of the time it’s better to use a paid license as trial, because you would have access to all features.
Thank you for reading this guide and I hope it was helpful.
These sources helped me by writing and research for this post;
You have reached the end of the page. You can navigate through other blog posts as well, share this post on X, LinkedIn and Reddit or return to the blog posts collection page. Thank you for visiting this post.
If you think something is wrong with this post or you want to know more, you can send me a message to one of my social profiles at: https://justinverstijnen.nl/about/
If you find this page and blog very useful and you want to leave a donation, you can use the button below to buy me a beer. Hosting and maintaining a website takes a lot of time and money. Thank you in advance and cheers :)
The terms and conditions apply to this post.
When it comes to basic email security, we have 3 techniques that can enhance our email security and delivery by some basic initial configuration. Those are called SPF, DKIM and DMARC. This means, configure and mostly never touch again.
Microsoft announced that starting from May 5, 2025: SPF, DKIM and DMARC will become mandatory for inbound email delivery. Not configuring all three can result in your emails not being delivered correctly.
These 3 techniques are:
When using Microsoft 365 as your messaging service, I also highly recommend to configure SMTP DANE. A detailed guide of configuring this can be found here: https://justinverstijnen.nl/configure-dnssec-and-smtp-dane-with-exchange-online-microsoft-365/
In this guide, we will cover those 3 techniques, how they work, how they can help you and your company to reduce email delivery problems and how we can configure those in Microsoft 365. By configuring SPF, DKIM and DMARC right you help creating a more safe internet. Not only for your own company but also for other companies.
You will recognise this in your work. You send an email to a party or expecting an incoming email, but it appears in your junk folder. Or you send a advertisement email to your customers but most of the customers will not receive this properly and the mail will appear in the junk folder which will not be checked that regularly. This can result in some huge income loss.
This will happen because the receiving party checks reputation of the sending party. Based on that reputation there will be a decision on the receiving email service which can place the email in the normal folder or in the junk folder.
In the last 3 years, almost every emailing service (Hotmail/Exchange Online/Gmail/Yahoo) has forced to have SPF configured. If not configured properly, all received email will be placed in the junk folder. In addition to this, also configuring DKIM can further reduce the odds of an email received in the junk folder.
Configuring these 3 techniques helps with:
Tip: Use my DNS MEGAtool to verify if your domain or other domains already use these techniques: https://tools.justinverstijnen.nl/dnsmegatool
Every domain on the internet can have multiple MX records. This record tells a sender on which server the email message must be delivered. A MX record for 365 can look like this:
0 justinverstijnen-nl.mail.protection.outlook.comAfter configuring DNSSEC and SMTP DANE from this guide, your MX record looks like this:
0 justinverstijnen-nl.r-v1.mx.microsoftMX records have a priority number in front of them, this tells the priority of the servers. Messages will be delivered first at the number closest to “0” which represents a higer priority. After this server doesnt accept the message or a outage is ongoing, other servers will be tried to deliver the message.
Sender Policy Framework (SPF) is an email authentication method designed to prevent email spoofing. It allows domain owners to specify which mail servers are permitted to send emails on behalf of their domain. Receiving mail servers use SPF records of the sending party to verify if an incoming email comes from an authorized source.
It works by publishing a DNS record as a sending party that states when an email from the sending domain can be trusted. The receiving party then can lookup the sending party if the email is send through a trusted service. This DNS record is an TXT-type record and looks like this:
v=spf1 mx ip4:123.123.123.123 include:spf.protection.outlook.com -allIn this record you state all the emailing services, emailserver as IP address or add “mx” to always trust mails sent from your primary MX record-service.
In a SPF record, you always have a ~all, ?all or -all at the end of the record. This is the policy of what the SPF record will do:
| SPF Policy | Description | Effect |
| ?all | No action taken | All emails are delivered normally. |
| ~all | Softfail | All email is still being sent and delivered, but in the Junk folder |
| -all | Hardfail | Email sent from your domain but not by trusted service in SPF means a very high spam score and most of the time rejecting the email. |
My advice is to always use the Hardfail (-all) and ensuring your emailsystems are always trusted by SPF. This means almost nobody could misuse your domain to send unauthorized email. Of course, this excludes security breaches into accounts.
The advantages of configuring SPF records are:
DKIM (Domain Keys Identified Mail) is an email authentication method that allows senders to digitally sign their emails using cryptographic signatures. This helps receiving partys verify that an email was sent from an authorized source and that it was not altered during transit.
Exactly like in SPF, the sending party publishes a DNS record with an public key for the receiving party. Every email then will be signed with an private key so an receiver can match those keys and check if the message is altered on it’s way. The last what we want is an virus of other threat injected into an email and getting that in our inbox.
DKIM records must be configured for every sending domain, and every service that sends email from the domain. Basically, it’s a TXT record (or CNAME) that can look like this:
v=DKIM1; p=4ea8f9af900800ac9d10d6d2a1d36e24643aeba2This record is stating that it uses DKIM version 1 (no new version available) and has a public key. In this example case, it is “justinverstijnen.nl” in SHA1.
When using Microsoft 365, DKIM consists of 2 DNS records which has to be added to the DNS records of your domain. After adding those records, we still need to activate DKIM for every domain. I will show this in depth further in this guide.
DMARC is an email verification and reporting protocol that helps domain owners prevent email spoofing, phishing, and unauthorized use of their domains for sending emails by attackers. It takes advantage of the SPF and DKIM checks to ensure that only legitimate emails are delivered while unauthorized emails are rejected or flagged.
DMARC uses the SPF and DKIM checks as a sort of top layer to determine if a sender is spoofing a domain. If the SPF check or DKIM check fails, we can decice what to do then by configuring one of the 3 available DMARC policies to decide what to do:
| DMARC Policy | Description | Effect |
| p=none | No action taken, just collect reports. | All emails are delivered normally. |
| p=quarantine | Suspicious emails are sent to spam. | Reduces phishing but still delivers spoofed emails to end users Junk box. |
| p=reject | Strict enforcement – email sent without SPF or DKIM check are blocked. | Maximum protection against spoofing and phishing. |
So DMARC isn’t really a protocol that states what email inbound on your emailing service should be blocked. It tells other servers on the internet when they receive an email from your domain, what they should do. You then can choose to receive reports from other emailing services what
DMARC is configured per domain, just as all other techniques and helps reducing the amount of SPAM emails that can be sent from your domains. My advice is to configure a reject policy on all domains you own, even when not using for any email. If every domain on the world configures a reject policy, spoofing will be decreased by at least 95%.
DMARC must be configured by configuring a TXT record on your public DNS. An example of a very strict DMARC record looks like this:
_dmarc v=DMARC1; p=reject;To have a step-by-step guide to configure this into your DNS, please go down to: Configuring DMARC step-by-step
In production domains, I highly recommend only using the “reject” policy. Each email that does not pass through SPF and DKIM must not be delivered in a normal manner to employees as they will click on anything without proper training.
We can get 2 types of reports from DMARC which can be used for monitoring malicious activity or to get an better understanding about rejected email-messages:
You can configure this by adding the options to the DMARC record:
Of course replace with your own email adresses and add the options to the DMARC record, my record will look like this:
v=DMARC1; p=reject; rua=mailto:reports@justinverstijnen.nl; ruf=mailto:reports@justinverstijnen.nl;To configure SPF for your domain with Microsoft 365, follow these steps:
Log in to your DNS-hosting service where you can create and change DNS records.
Now check if there is already an existing SPF record, otherwise create a new one. This is always the same for each domain:
| Type | Name | Value |
| TXT-record | @ | v=spf1 include:spf.protection.outlook.com -all |
When using more than only Microsoft 365 for emailing from your domain, ensure that you don’t overwrite the record but add those services into the record. Also, the maximum number of DNS lookups in your SPF record is 10.
This configuration must done for all your domains.
To configure DKIM for your domain in Microsoft 365, go to the Security center or to this direct link: https://security.microsoft.com/dkimv2
Then, under “Email & Collaboration” go to “Policies & Rules”.
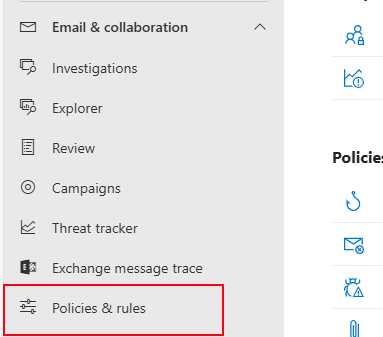
Click on “Threat policies”.
Then on “Email authentication settings”.
Here you will find all your domains added to Microsoft 365 and the status of DKIM. In my case, I already configured all domains to do DKIM signing.
If you have a domain that has DKIM disabled, you can click on the domain-name. This opens an fly-in window:
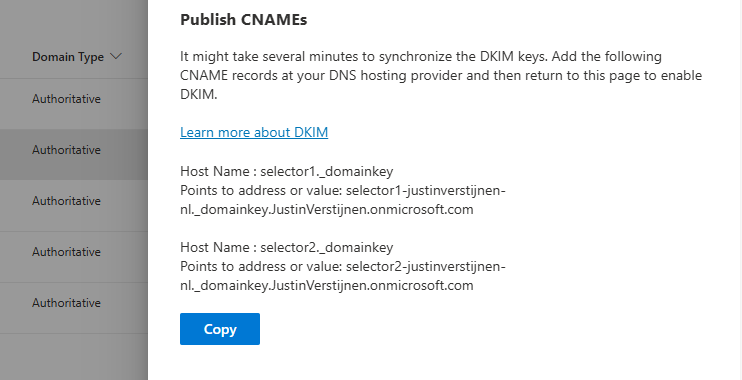
The window tells us how to configure the records in our DNS service. In my case i have to configure 2 CNAME type DNS records. Microsoft 365 always use this 2 CNAME-configuration.
Log in to your DNS-hosting service where you can create and change DNS records.
Create those 2 records in your DNS hosting service. In my case this configured:
| Type | Name | Value | TTL |
| CNAME-record | selector1._domainkey | selector1-justinverstijnen-nl._domainkey.JustinVerstijnen.onmicrosoft.com | Provider default |
| CNAME-record | selector2._domainkey | selector2-justinverstijnen-nl._domainkey.JustinVerstijnen.onmicrosoft.com | Provider default |
For reference;

Some DNS hosting providers requires you to end external domain-record values with a dot “.”
Save the DNS records, and check in Microsoft 365 if DKIM can be enabled. This may be not directly but should work after 15 minutes.
This configuration must done for all your domains.
Configuring DMARC is done through DNS records. This guide can be used to configure DMARC for most emailing services.
My record looks like this:
v=DMARC1; p=reject;We have to create or change an existing record to make this DMARC policy effective. The full record can look like this:
| Type | Name | Value | TTL |
| TXT-record | _dmarc | v=DMARC1; p=reject; | Provider default |
My configured record for reference:

This configuration must done for all your domains.
When implementing the reject policy in real world domains, double check all systems who send email from your domain, as this change can disrupt deliverability when not configured correctly.
Ensure all systems are defined in SPF and use DKIM.
It’s also possible to configure DMARC on your Microsoft Online Email Routing Address (MOERA) domain, which is more widely known as your .onmicrosoft.com domain. I highly recommend doing this as this is practically also a domain that looks like your brand.
To configure this, go to Microsoft 365 Admin Center and head to the domains section:

Open your domain and then open the “DNS records” tab. Create a new record here:
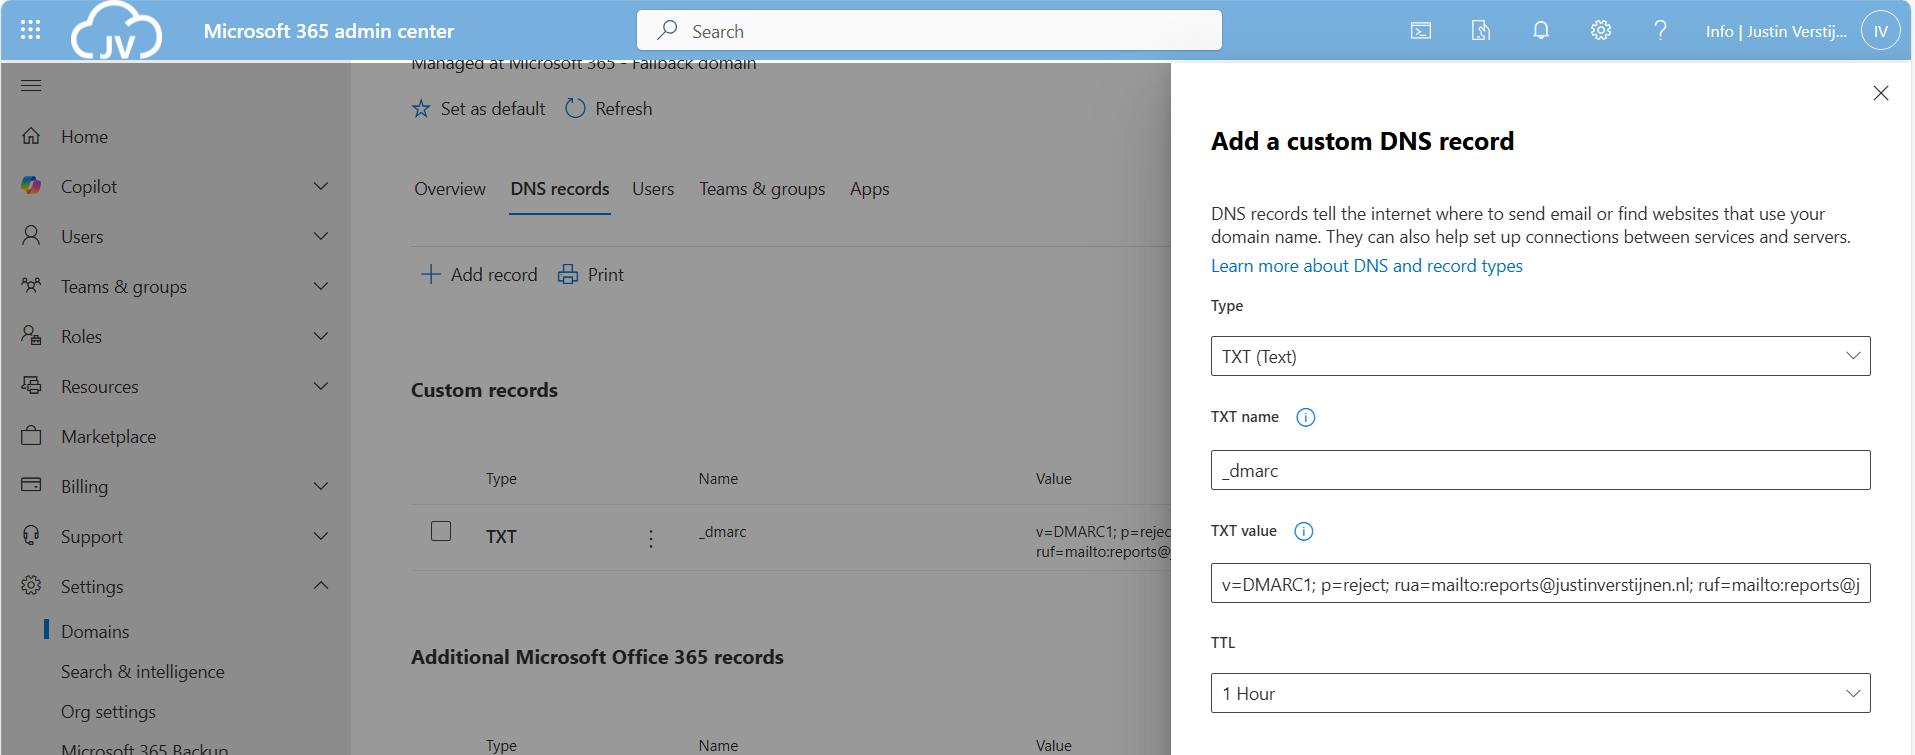
Use the following parameters:
Then save your configuration.
Configuring SPF, DKIM and DMARC nowadays must to be a standard task when adding a new domain to your email sending service like Microsoft 365. Without them, almost all of your sent email will be delivered to “Junk” or even rejected. In larger companies, this can directly result in income loss which we definitely want to avoid.
For short, these 3 techniques do:
My advice is to always have those 3 techniques configured, and when using Microsoft 365 I again highly recommend to configure SMTP DANE also. This can be configured using this guide: https://justinverstijnen.nl/configure-dnssec-and-smtp-dane-with-exchange-online-microsoft-365/
Thank you for reading this page and I hope I helped you.
You have reached the end of the page. You can navigate through other blog posts as well, share this post on X, LinkedIn and Reddit or return to the blog posts collection page. Thank you for visiting this post.
If you think something is wrong with this post or you want to know more, you can send me a message to one of my social profiles at: https://justinverstijnen.nl/about/
If you find this page and blog very useful and you want to leave a donation, you can use the button below to buy me a beer. Hosting and maintaining a website takes a lot of time and money. Thank you in advance and cheers :)
The terms and conditions apply to this post.
Microsoft has published a new command to completely disable the unsafe DirectSend protocol in your Microsoft 365 environment. In this guide I will explain what DirectSend is, why you should disable this and how we can achieve this.
DirectSend (Microsoft 365) lets devices or applications (like printers, scanners, or internal apps) send email directly to users inside your organization without authentication. Instead of using authentication, it uses your MX record directly with port 25.
Some details about DirectSend:
We can see it like a internal relay, possible to send email to all users in your tenant, which is actively used to distribute malicious activity. This consists of sending mailware or credential harvesting, bypassing different security controls active on normal email.
Lets take a look into DirectSend en why this is a security risk, and a protocol which we must have disabled:
Let’s get into the part of disabling DirectSend for Exchange Online. First, ensure you have the Exchange Online Management PowerShell module installed.
Let’s connect to your Microsoft 365 environment using the command below:
Connect-ExchangeOnlineLogin to your account with Global Administrator permissions.
Then execute this command to disable DirectSend tenant-wide:
Set-OrganizationConfig -RejectDirectSend $trueTo re-enable DirectSend, just change the $true boolean to $false.
If you want to check the status before or after the set command, you can use this command:
Get-OrganizationConfig | Select -Expand RejectDirectSendThats all. :)
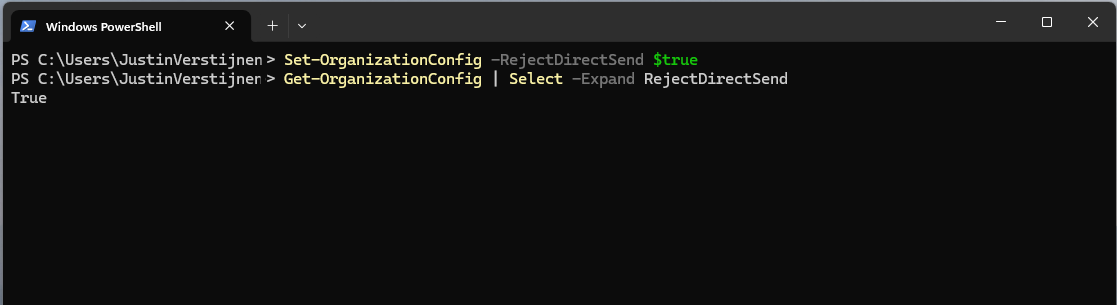
If an email is now sent using DirectSend, the following error will occur:
550 5.7.68 TenantInboundAttribution; Direct Send not allowed for this organization from unauthorized sources
Exactly what we wanted to achieve.
Disabling DirectSend on your Microsoft 365 tenant enhances your email security for a bit, and helps your users being secure. If you are planning on disabling DirectSend, I recommend doing this outside of business hours, giving you time to fix possible email disruptions.
We cannot disable DirectSend on specific users first, this is because its an tenant-wide setting. Because we have no authentication, this would theoretically impossible.
Thank you for reading this guide and I hope it was helpful.
These sources helped me by writing and research for this post;
You have reached the end of the page. You can navigate through other blog posts as well, share this post on X, LinkedIn and Reddit or return to the blog posts collection page. Thank you for visiting this post.
If you think something is wrong with this post or you want to know more, you can send me a message to one of my social profiles at: https://justinverstijnen.nl/about/
If you find this page and blog very useful and you want to leave a donation, you can use the button below to buy me a beer. Hosting and maintaining a website takes a lot of time and money. Thank you in advance and cheers :)
The terms and conditions apply to this post.
Sometimes, we add a new domain to Microsoft 365 and we want to have a domain alias for multiple or every user.
To configure a alias for every user, we need to login into Exchange Online Powershell:
Connect-ExchangeOnlineIf you don’t have the module already installed on your computer, run the following command on an elevated window:
Install-Module ExchangeOnlineManagementSource: https://www.powershellgallery.com/packages/ExchangeOnlineManagement/3.7.2
After succesfully logged in, run the following command:
$users=Get-Mailbox | Where-Object{$_.PrimarySMTPAddress -match "justinverstijnen.nl"}Here our current domain is “justinverstijnen.nl” but let’s say that we want to add “justinverstijnen.com”. Run the following command to do this:
foreach($user in $users){Set-Mailbox $user.PrimarySmtpAddress -EmailAddresses @{add="$($user.Alias)@justinverstijnen.com"}}Now we have added the alias to every user. To check if everything is configured correctly, run the following command:
$users | ft PrimarySmtpAddress, EmailAddresses
You have reached the end of the page. You can navigate through other blog posts as well, share this post on X, LinkedIn and Reddit or return to the blog posts collection page. Thank you for visiting this post.
If you think something is wrong with this post or you want to know more, you can send me a message to one of my social profiles at: https://justinverstijnen.nl/about/
If you find this page and blog very useful and you want to leave a donation, you can use the button below to buy me a beer. Hosting and maintaining a website takes a lot of time and money. Thank you in advance and cheers :)
The terms and conditions apply to this post.
Recently, Microsoft announced the general availability of 2 new security protocol when using Microsoft 365 and the service Exchange Online in particular. SMTP DANE and DNSSEC. What are these protocols, what is the added value and how can they help you secure your organization? Lets find out.
DNSSEC is a feature where a client can validate the DNS records received by a DNS server to ensure a record is originated from the DNS server and not manipulated by a Man in the Middle attack.
DNSSEC is developed to prevent attacks like in the topology below:
Here a attacker injects a fake DNS record and sends the user to a different IP-address, not the actual IP-address of the real website but a fake, mostly spoofed website. This way, a user sees for example https://portal.azure.com in his address bar but is actually on a malicious webserver. This makes the user far more vulnerable to credential harvesting or phising attacks.
With DNSSEC, the client receives the malicious and fake DNS entry, validates it at the authorative DNS server for the domain and sees its fake. The user will be presented a error message and we have prevented just another breach.
SMTP DANE is an addition to DNSSEC which actually brings the extra security measures to sending email messages. It helps by performing 3 steps:
SMTP DANE and DKIM sounded the same security to me when i first read about it. However, both are needed to secure your outbound email traffic, but they help in another way:
When starting out, your DNS hosting must support and enabled DNSSEC on your domain. Without this, those protocols don’t work. You can check out your domain and DNSSEC status with my DNS MEGAtool:
My domain is DNSSEC capable and a DS record is published from the registrar to the DNS hosting and is ready to go to the next phase:
You can find this on the last row of the table in the DNS MEGAtool. If the status is red or an error is in the value field, the configuration of your domain is not correct.
The only way to enable those features at this moment are to configure those on Exchange Online Powershell. The good part is, it is not that hard. Let me show you.
First, login into Exchange Online Powershell:
Connect-ExchangeOnlineLogin with your credentials, and we are ready.
We have to enable DNSSEC to each of our domains managed in Microsoft 365. In my environment, i have only one domain. Run the following command to enable DNSSEC:
Enable-DnssecForVerifiedDomain -DomainName "justinverstijnen.nl"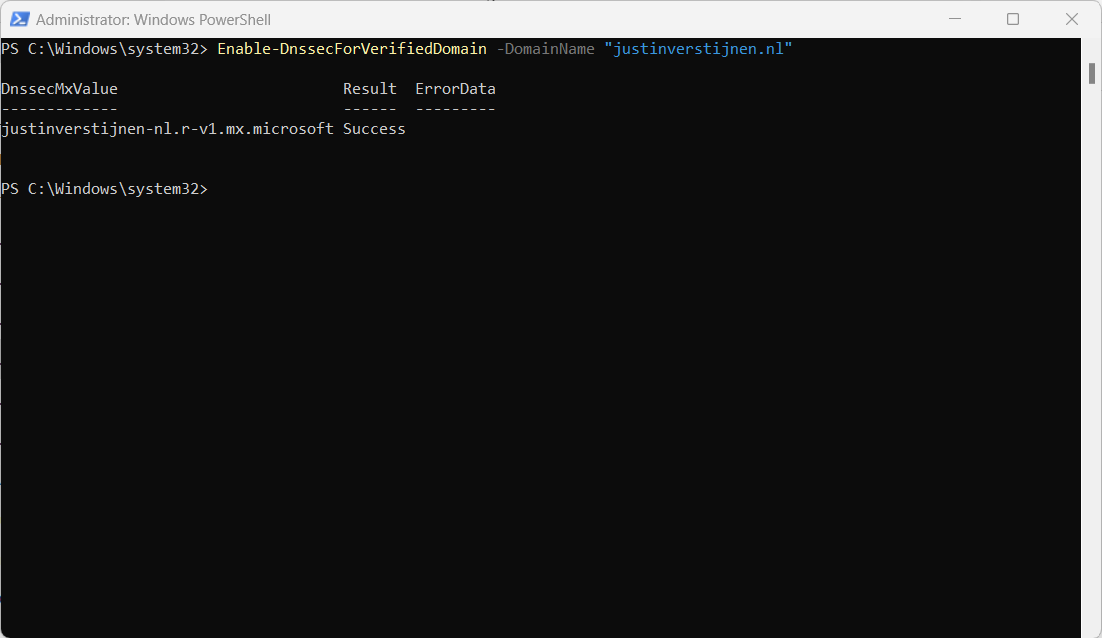
The output of the command gives us a new, DNSSEC enabled MX-record.
DnssecMxValue                         Result  ErrorData
-------------                         ------  ---------
justinverstijnen-nl.r-v1.mx.microsoft Success
We have to change the value of the MX-record in the DNS hosting of your domain and it has to be the new primary MX-record (the one with the highest priority -> lowest number). I added it to the list of DNS records with a priority of 5, and switched the records outside of business hours to minimize service disruption.
Here an example of my configuration before switching to the new DNSSEC enabled MX record as primary.

When you change your MX record it can take up to 72 hours before the whole world knows your new MX record.
We can test our new MX record and the working of our change with the following tool: https://testconnectivity.microsoft.com/tests/O365InboundSmtp/input
Fill in your emailaddress and log into the service:
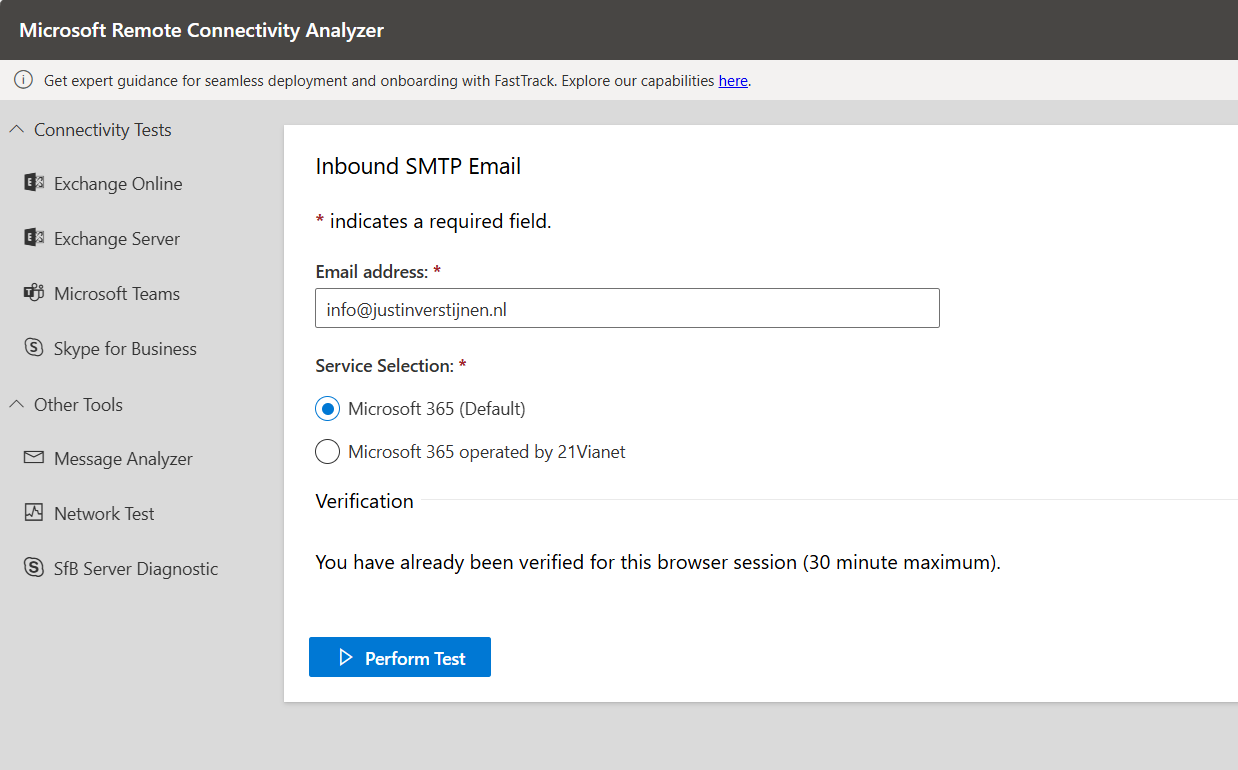
After that you get an test report:

I did this test before flipping the MX records. You can test this anytime.
After the MX records are fine, we can test our DNSSEC. The DNSSEC enabled MX record has to be primary at this point.
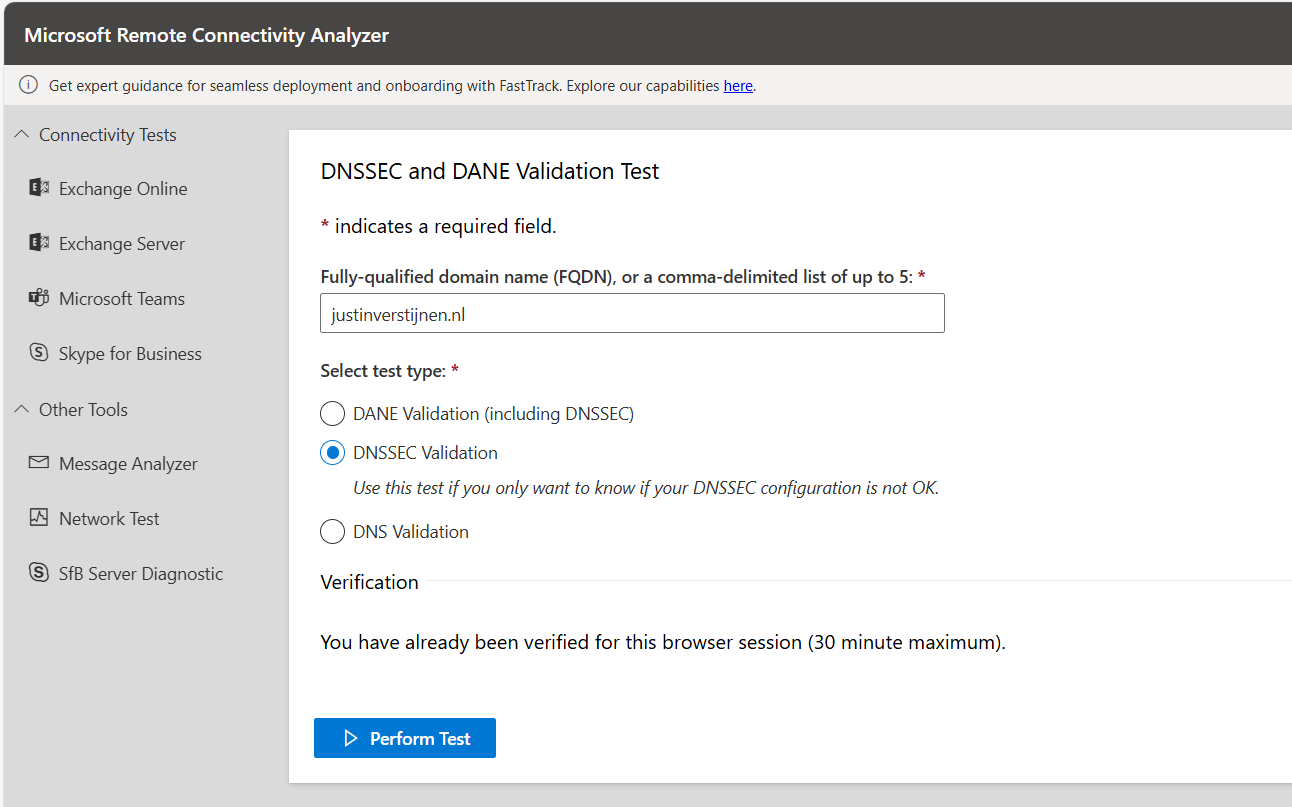
After the test is completed you get the results and possible warnings and errors:
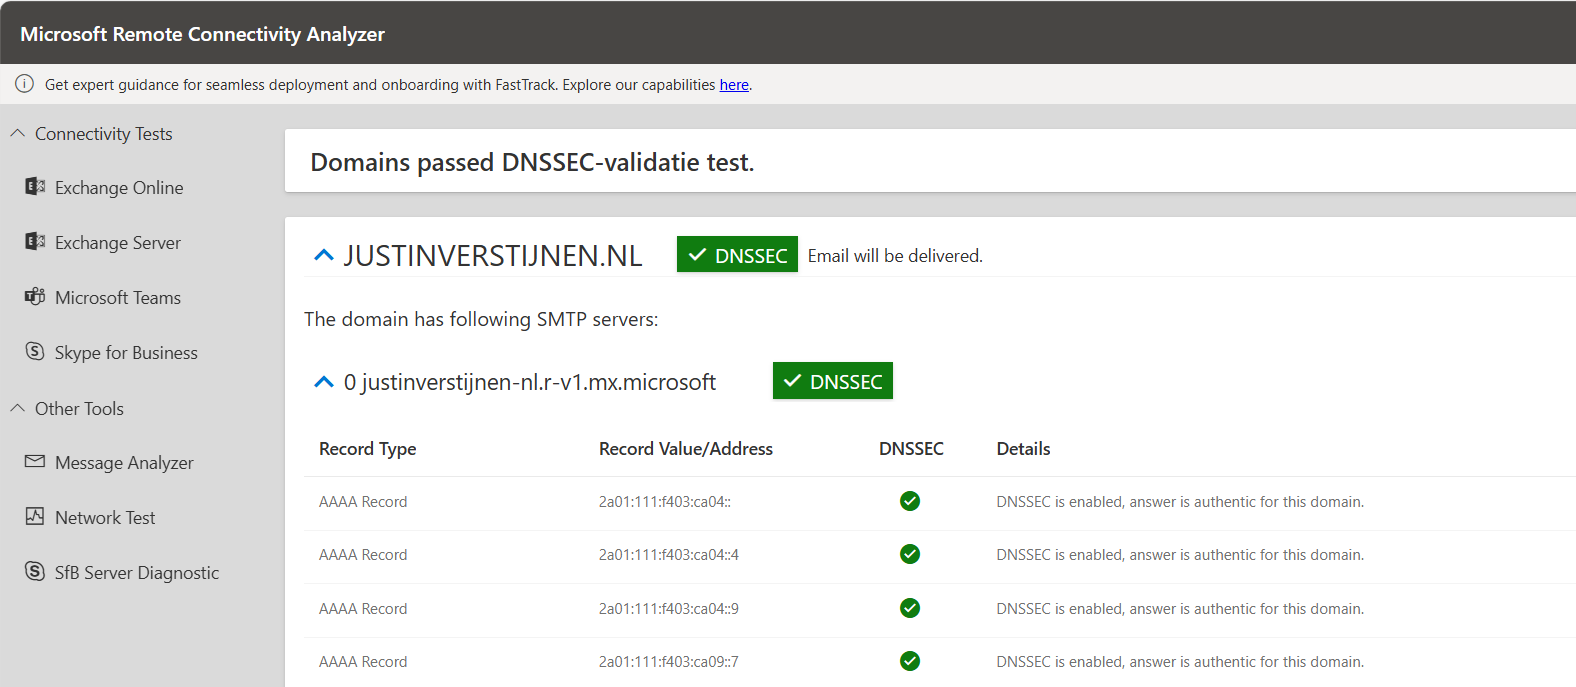
After we configured DNSSEC, we can enable SMTP DANE in the same Exchange Online Powershell window by using the following command:
Enable-SmtpDaneInbound -DomainName "justinverstijnen.nl"
This is only a command to enable the option, here is no additional DNS change needed.
After enabling the SMTP DANE option, you will have to wait some time to fully enable and make it work on the internet. It can take up to an hour, but in my case it took around 10 minutes.
You can test the outcome by using this tool: https://testconnectivity.microsoft.com/tests/O365DaneValidation/input
Fill in your domain, and select the “DANE-validation” including DNSSEC to test both of your implemented mechanisms:
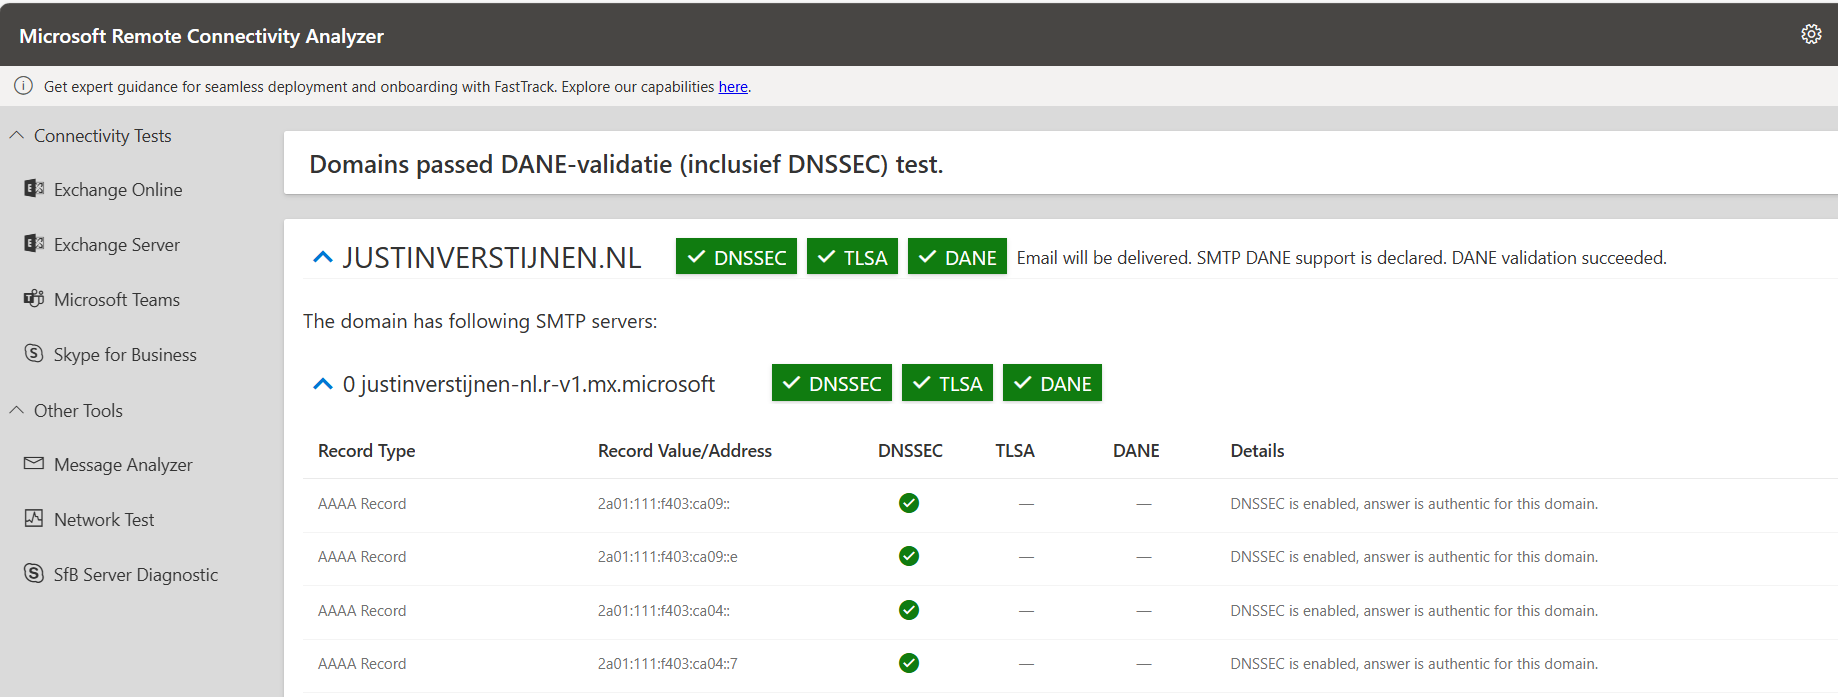
After this guide you are using DNSSEC and SMTP DANE on your Exchange Online environment. This improves your security posture at that point. My advice is to enable this options when possible. When DNSSEC is not an option, I highly recommend to configure this: https://justinverstijnen.nl/what-is-mta-sts-and-how-to-protect-your-email-flow/
Thank you for reading this post and I hope I helped you out securing your email flow and data in transfer.
You have reached the end of the page. You can navigate through other blog posts as well, share this post on X, LinkedIn and Reddit or return to the blog posts collection page. Thank you for visiting this post.
If you think something is wrong with this post or you want to know more, you can send me a message to one of my social profiles at: https://justinverstijnen.nl/about/
If you find this page and blog very useful and you want to leave a donation, you can use the button below to buy me a beer. Hosting and maintaining a website takes a lot of time and money. Thank you in advance and cheers :)
The terms and conditions apply to this post.
Microsoft will sometimes “pause” tenants to reduce infrastructure costs. You will then get an error which contains “tenant dehydrated”. What this means and how to solve it, I will explain in this post.
Microsoft sometimes will dehydrate Microsoft 365 tenants where things will not often change to the tenant. This closes some parts of the tenant for changing, even if you have Global Administrator permissions.
The cause of this is for Microsoft to save on infrastructure cost. They will set the tenant in this sort of “sleep mode” where everything works properly but some configuration changes cannot be done. You can get this error with all sorts of changes:
Fortunately, we can undo this with some Powershell commands, which I will show you:
Start by logging into Exchange Online PowerShell. If you don’t have this installed, click here for instructions.
Connect-ExchangeOnlineThen fill in your credentials and finish MFA.
When logged in, we can check the tenant dehydration status with this command:
Get-OrganizationConfig | ft Identity,IsDehydratedThis will show something like this:
Get-OrganizationConfig | ft Identity,IsDehydrated

Identity                               IsDehydrated
--------                               ------------
justinverstijnen.onmicrosoft.com       True
This outputs the status “True”, which means we cannot change some settings in our tenant and is in a sleep mode.
The following command disables this mode and makes us able to change things again (when still logged in to Exchange Online Powershell):
Enable-OrganizationCustomizationThis command takes a few seconds to process, and after this commando we can check the ststua again:
Get-OrganizationConfig | ft Identity,IsDehydrated

Identity                               IsDehydrated
--------                               ------------
justinverstijnen.onmicrosoft.com FalseSometimes, this error will occur what is very unfortunate but it’s not a really complex fix. We have to agree with Microsoft. They host millions of tenants which will almost never get any changes so putting them in this sleep mode is completely acceptable.
Thank you for reading this guide and I hope I helped you out fixing this problem.
You have reached the end of the page. You can navigate through other blog posts as well, share this post on X, LinkedIn and Reddit or return to the blog posts collection page. Thank you for visiting this post.
If you think something is wrong with this post or you want to know more, you can send me a message to one of my social profiles at: https://justinverstijnen.nl/about/
If you find this page and blog very useful and you want to leave a donation, you can use the button below to buy me a beer. Hosting and maintaining a website takes a lot of time and money. Thank you in advance and cheers :)
The terms and conditions apply to this post.
Sometimes a company wants to receive all email, even when addresses don’t really exist in Exchange. Now we call this a Catch all mailbox, where all inbound email is being catched that is not pointed to a known recipient. Think of a sort of *@domain.com.
In this guide I will explain how to configure this in Exchange Online and how to maintain this by limiting our administrative effort. I also created a full customizable PowerShell script for this task which you can find here:
The solution described in this guide works with 3 components:
We create a standalone mailbox that is the catch all mailbox, this is the mailbox where everything will be stored. This must have a license for mailflow rules to work. This can also be a free shared mailbox to give multiple users permissions.
Then we create a Dynamic Distribution list which contains all of our users and is automatically refreshed when new users are created. We don’t want the rule of the Catch all superseding our users and all of our email redirected to the catch all mailbox with users not receiving anything.
After the group is created, this will be used as a exception in our created Mailflow rule which states: “Mail to address, member of distribution list, deliver to user. Not member of the list? Deliver to Catch all mailbox.” To have a more clear understanding, I created a diagram of the process:
Note that internal messages will not be hit by this rule, as there is no point of catching internal messages, but you can change this in your rule to suit your needs.
Now we have to create a mailbox in Microsoft 365. Login to https://admin.microsoft.com
Go to Users and create a new user, and make it clear that this is the Catch-All user:
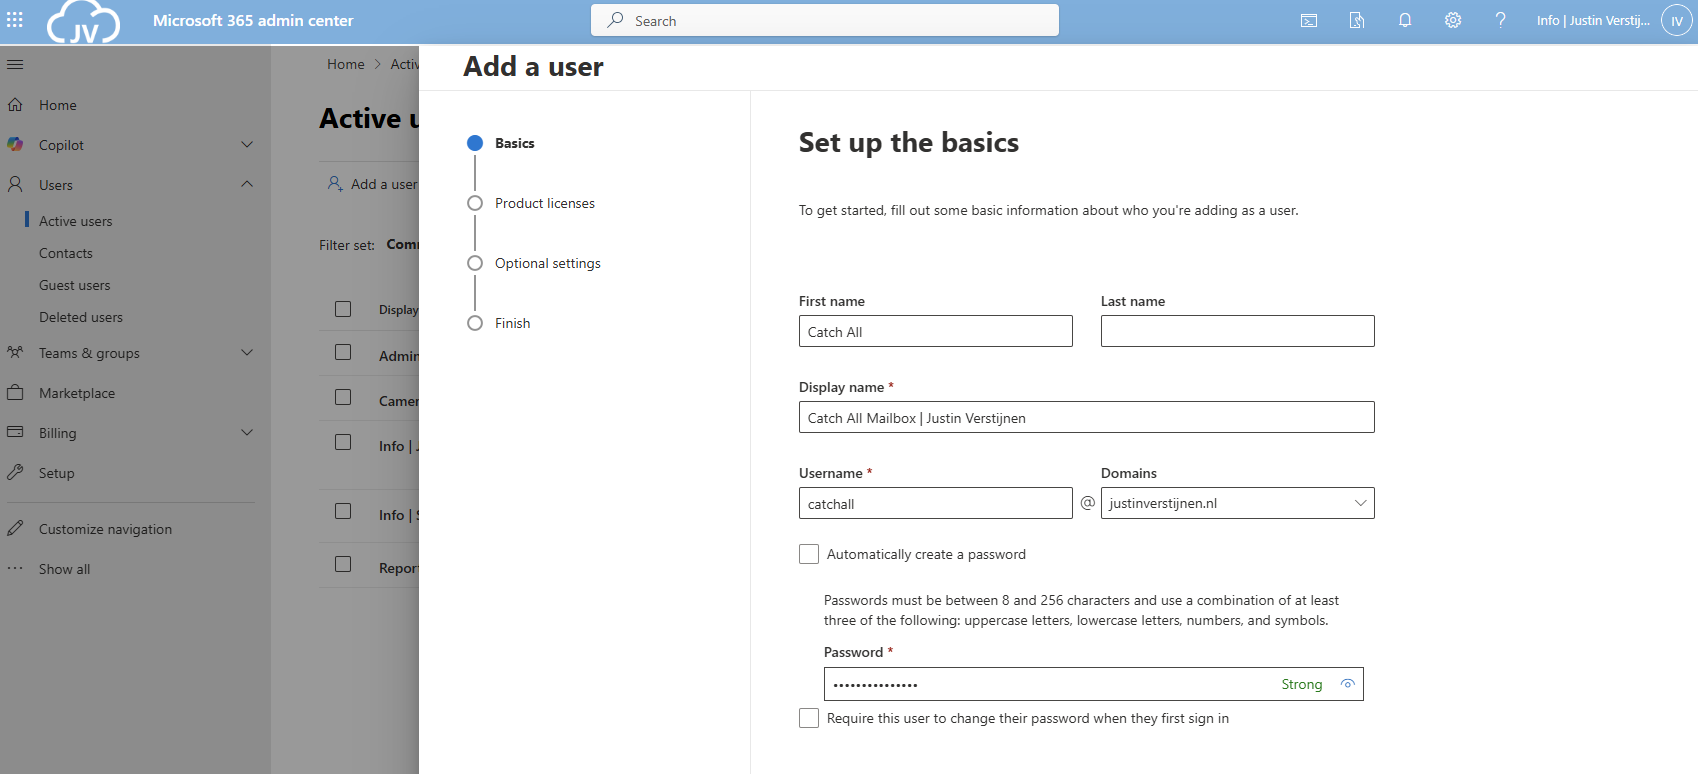
Advance to the next tab and assign at least a Exchange Online P1 license and finish creating the user.
You can also create the mailbox with Exchange PowerShell with this simple script:
$catchalladdress = "catchall@domain.com"
$displayName = "New User"
$password = ConvertTo-SecureString -String "Password01" -AsPlainText -Force

# Create mailbox itself
New-Mailbox -UserPrincipalName $catchalladdress `
            -DisplayName $displayName `
            -Password $password `
            -FirstName "New" `
            -LastName "User"
Fill in the parameters on line 1, 2 and 3 and execute the script in Exchange Online Powershell. Make sure to first login to your tenant.
If you want to go with the free non-license option, then we can create a shared mailbox instead:
Now we have to create the Dynamic Distribution Group. Go to Exchange Admin Center (as this option only exists there). https://admin.exchange.microsoft.com
In my guide, I create one group for excluding only. You can also create a group for all@domain.com for a internal mailing list with all employees.
Go to “Recipients” and then “Groups”. Then open the tab “Dynamic distribution list”
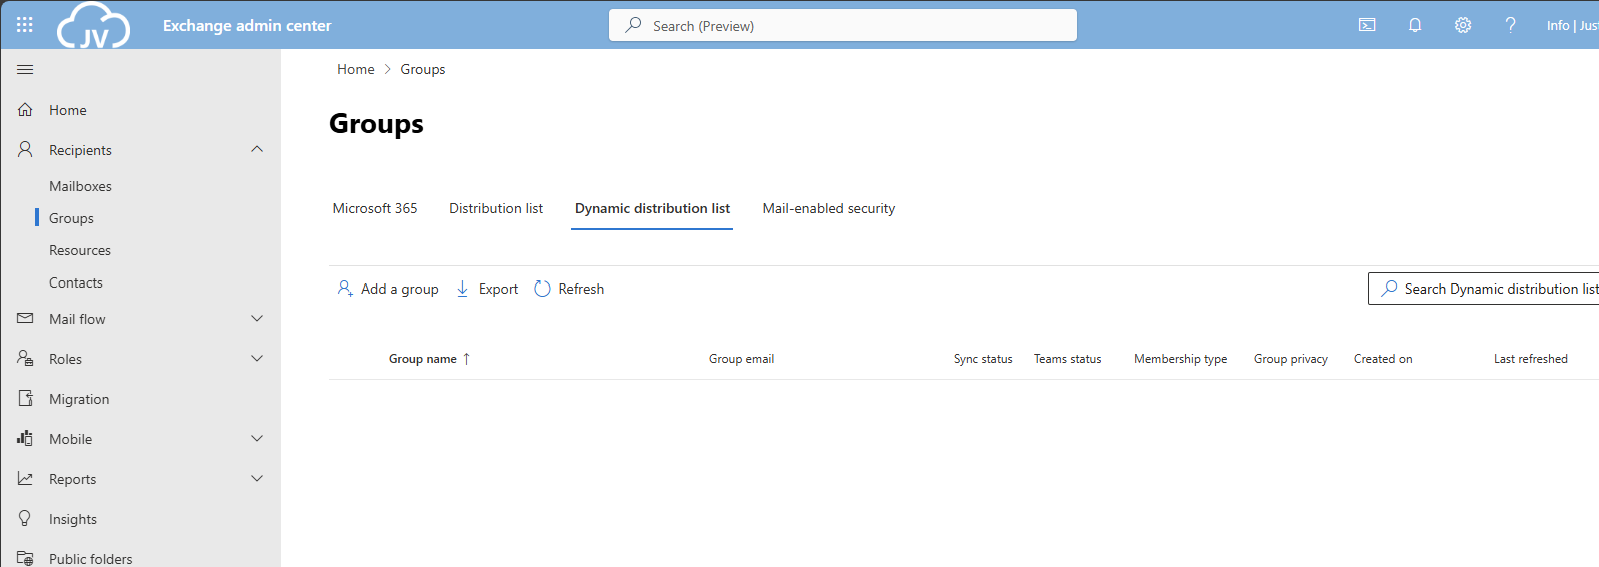
Click on “Add a group” to create a new group.
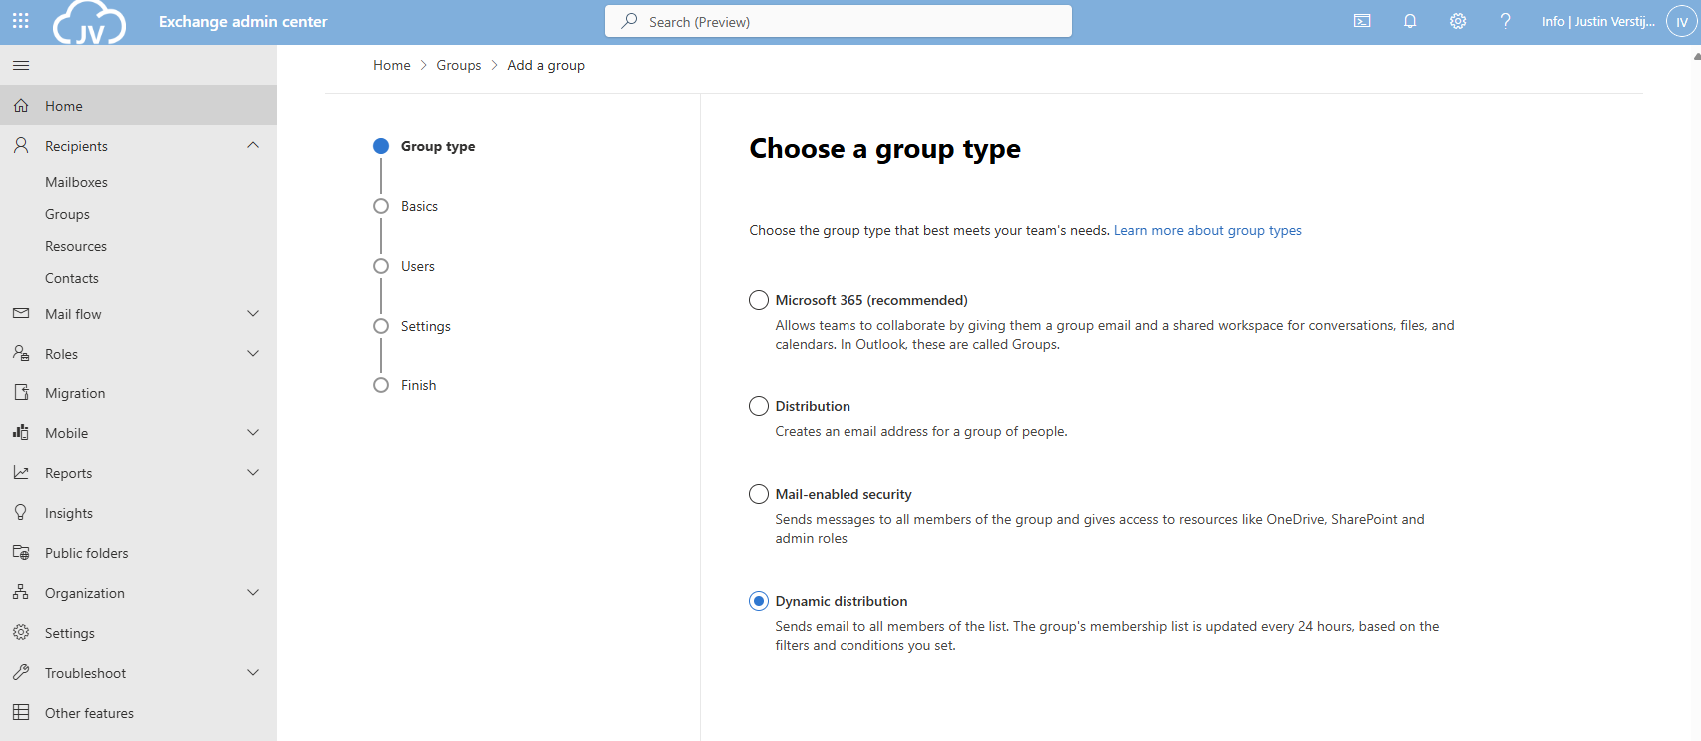
Select the option “Dynamic distribution” and click on “Next”.
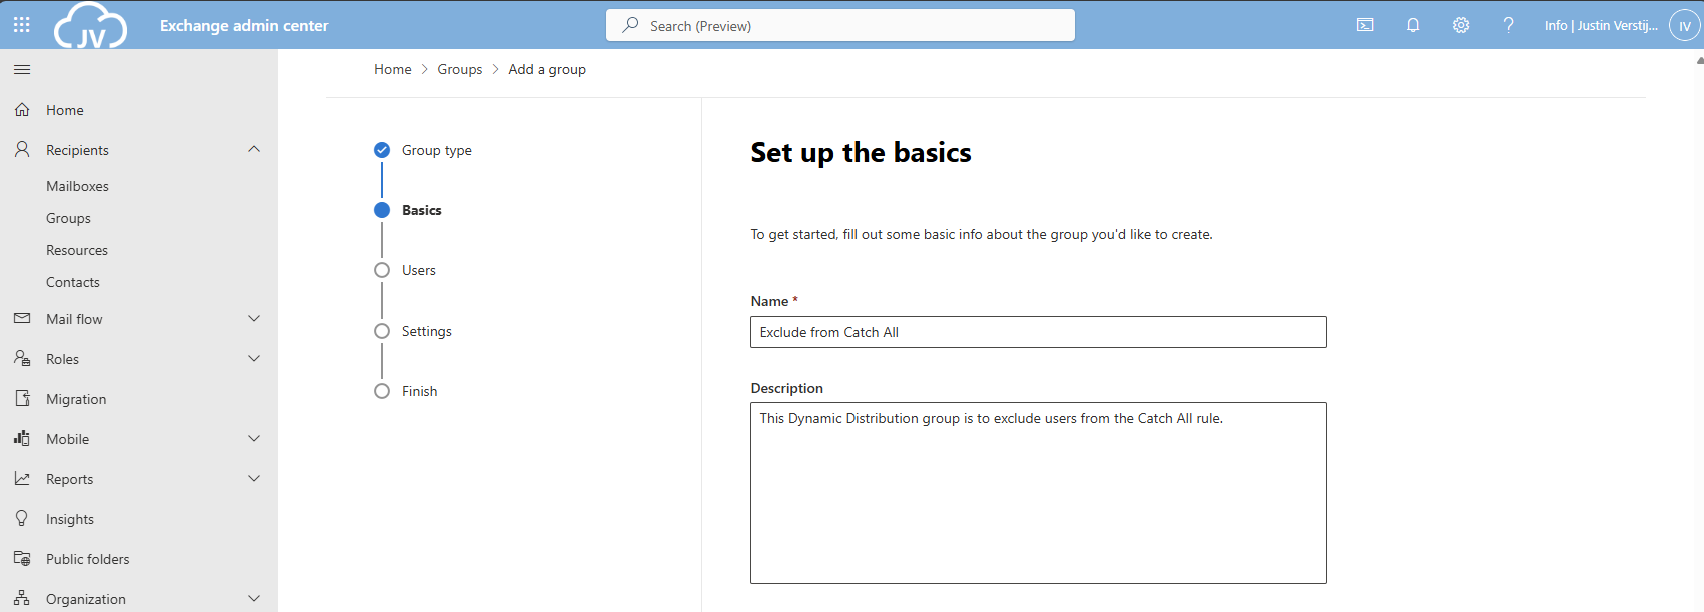
Fill in a good name and description for the Dynamic distribution group.
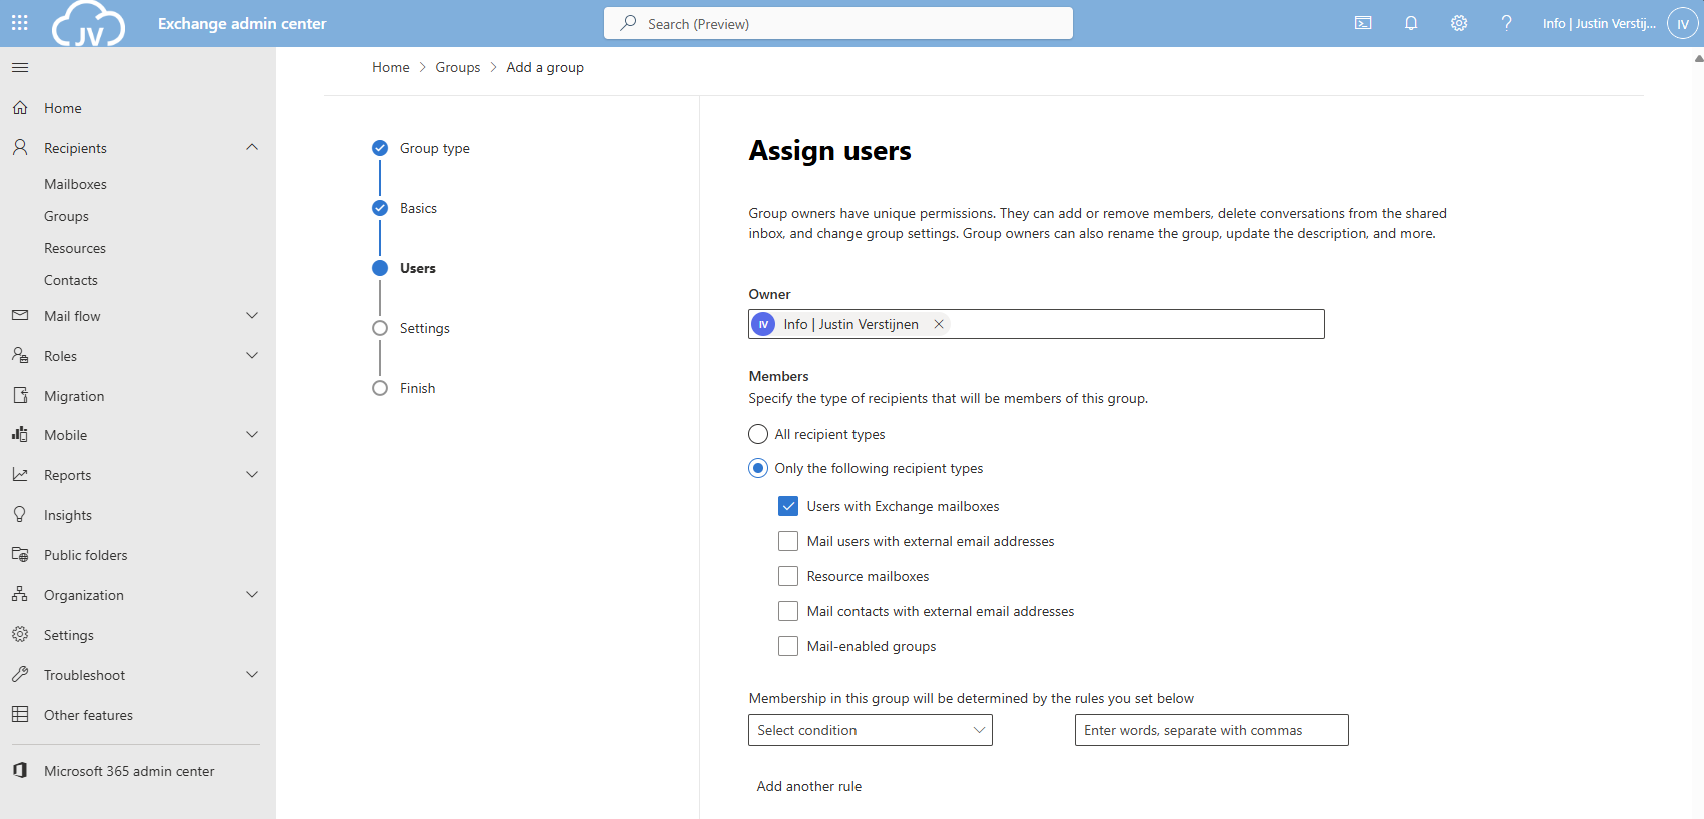
Now for the owner select your admin account(s) and for the members define which types of addresses you want to include. In my case, I only selected Users with Exchange mailboxes. Then click on “Next”.
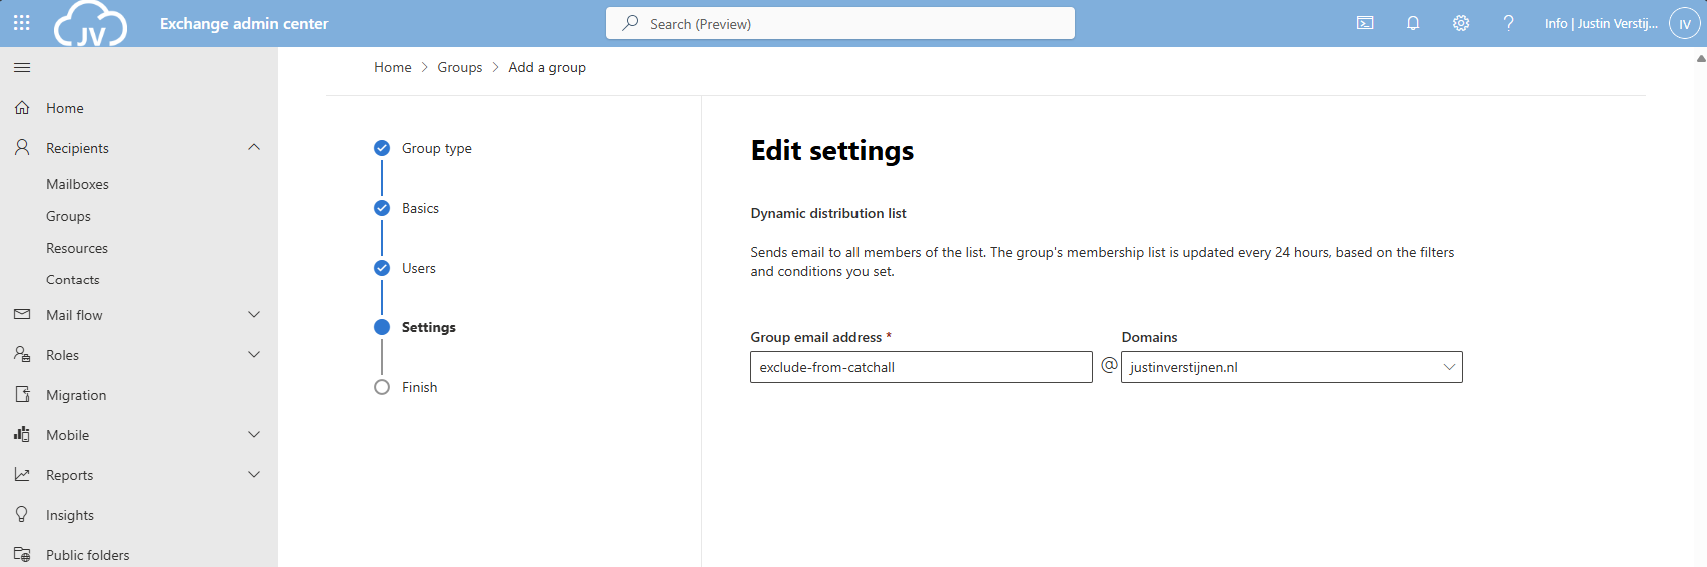
Now define the email address name of the Dynamic Distribution group.
Finish the wizard to create the group.
You can also create this Dynamic Distribution Group with PowerShell by using this simple script;
$distributiongroup = "Exclude from Catch All"
$aliasdistributiongroup = "exclude-from-catchall"

New-DynamicDistributionGroup -Name '$distributiongroup' -Alias '$aliasdistributiongroup' -OrganizationalUnit $null -IncludedRecipients 'MailboxUsers'Now we have to create the Mailflow rule in Exchange Admin Center. Go to “Mail flow” and then to “Rules”.
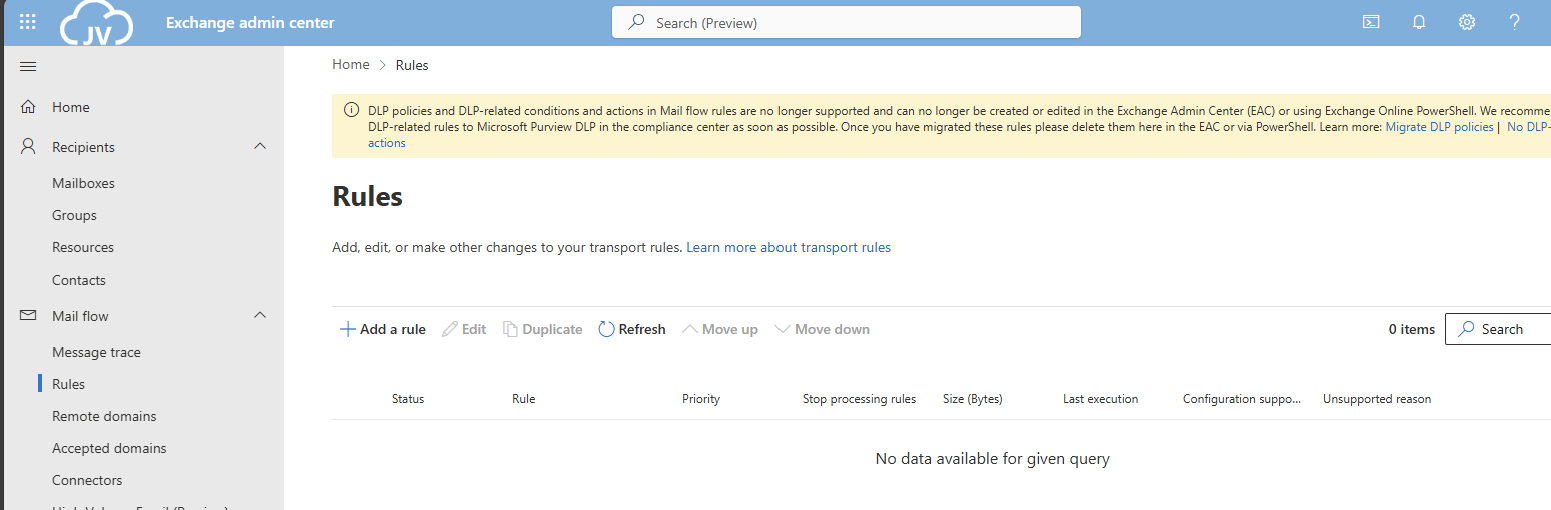
Click on “+ Add a rule” and then on “Create a new rule” to create a new rule from scratch.
Now we have to define the rule by hand:
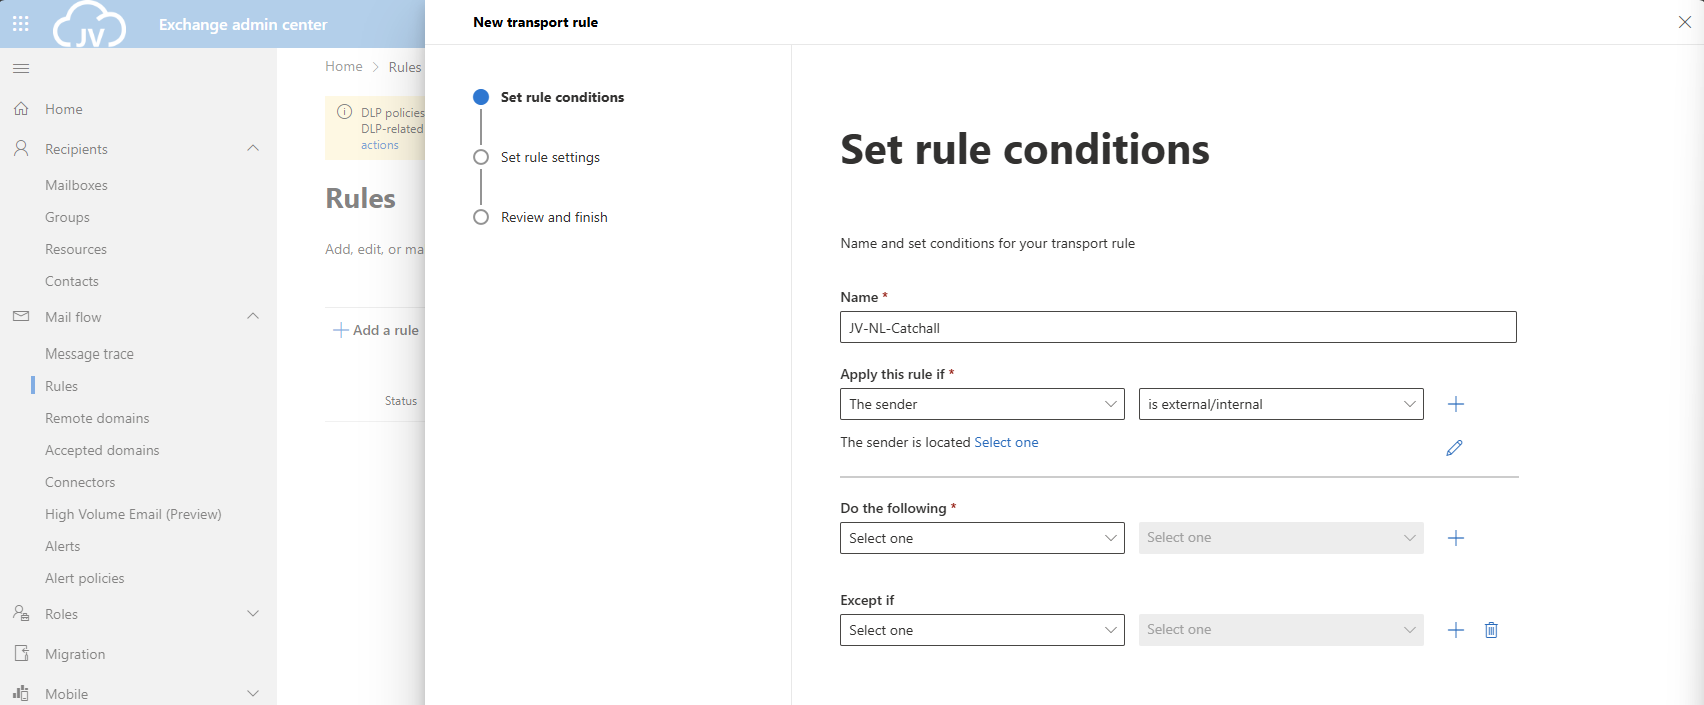
Give the rule a clear name. I called the rule “JV-NL-Catchall” which contains the domain abbreviation and the TLD of the domain. Then specified that its a Catchall rule.
The rule must look like this:
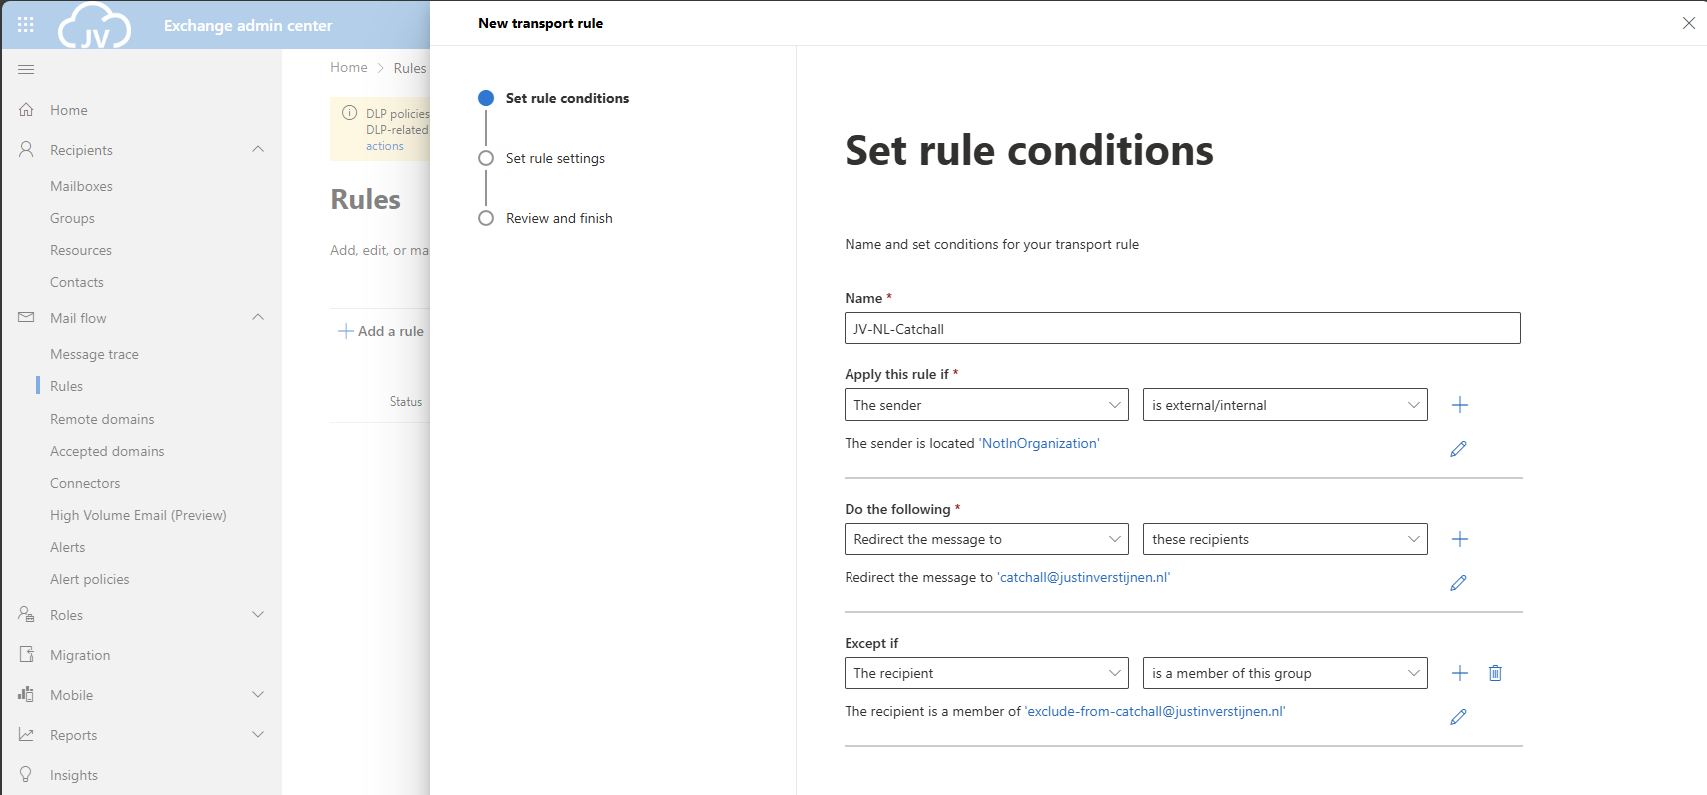
Click on “Next”.
Now for the rule settings, select “Stop processing more rules” to ensure this rule is hit.
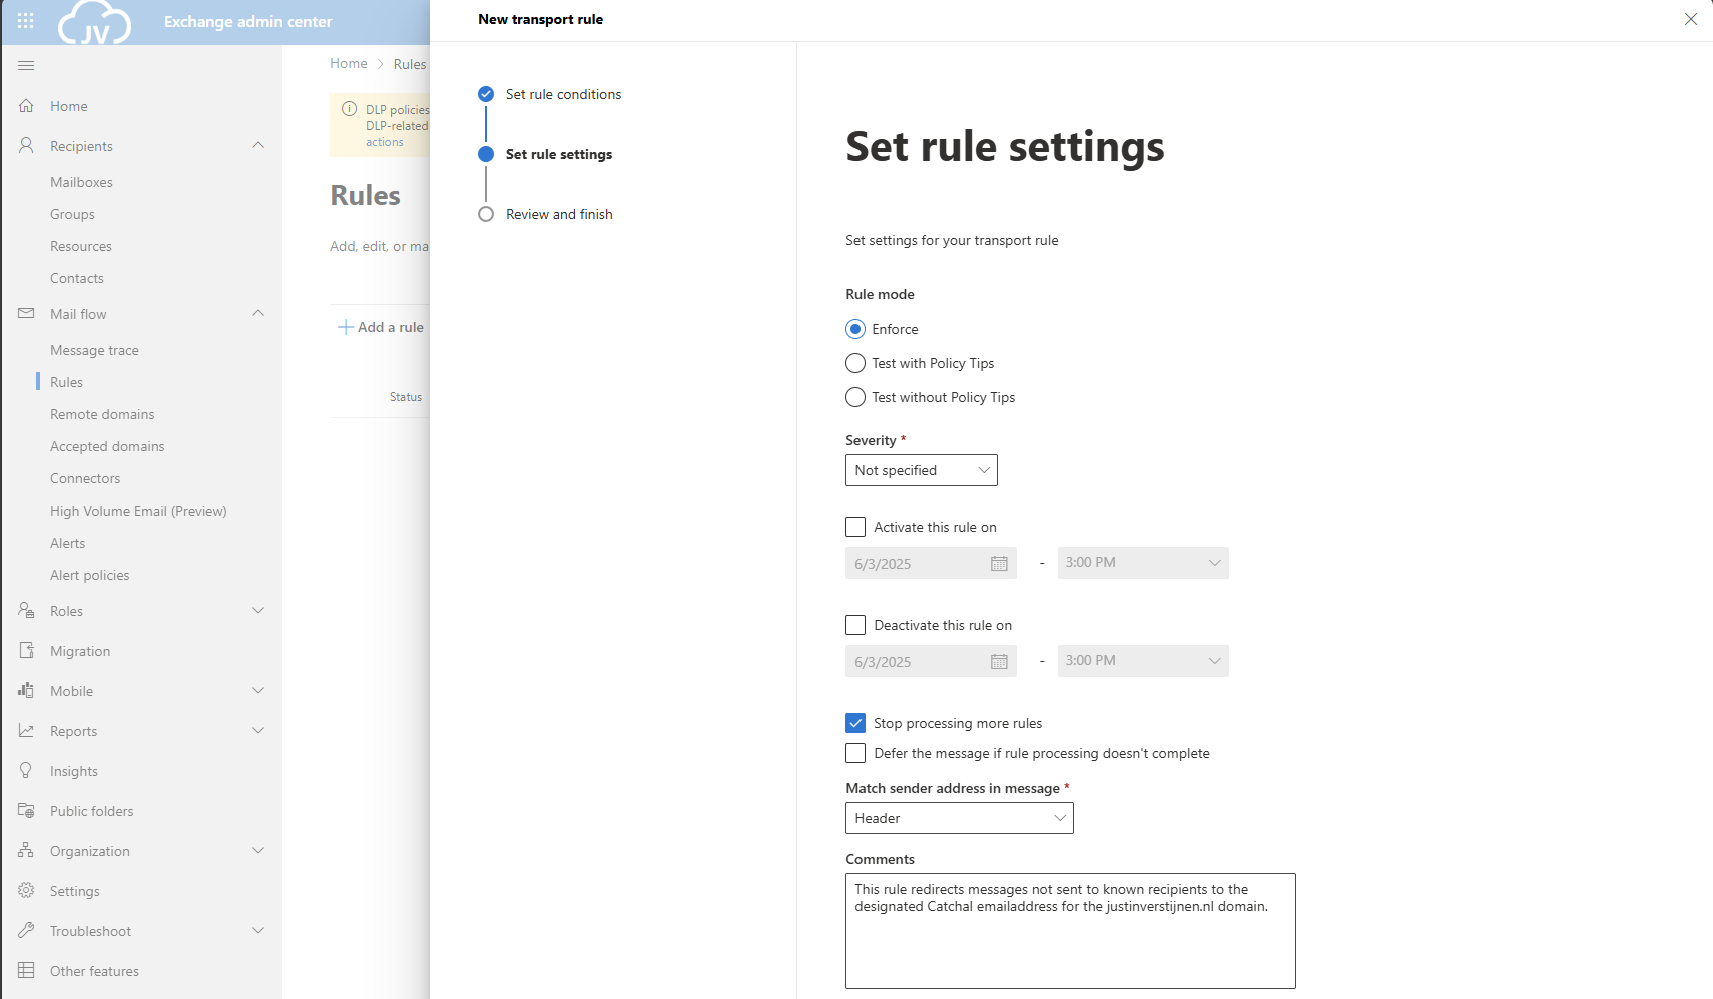
Then give the rule a good description/comment and save the rule.
After creating the rule, we can activate the rule if not already done. Click on the “Disabled” part of the rule and click on the switch to enable the rule.
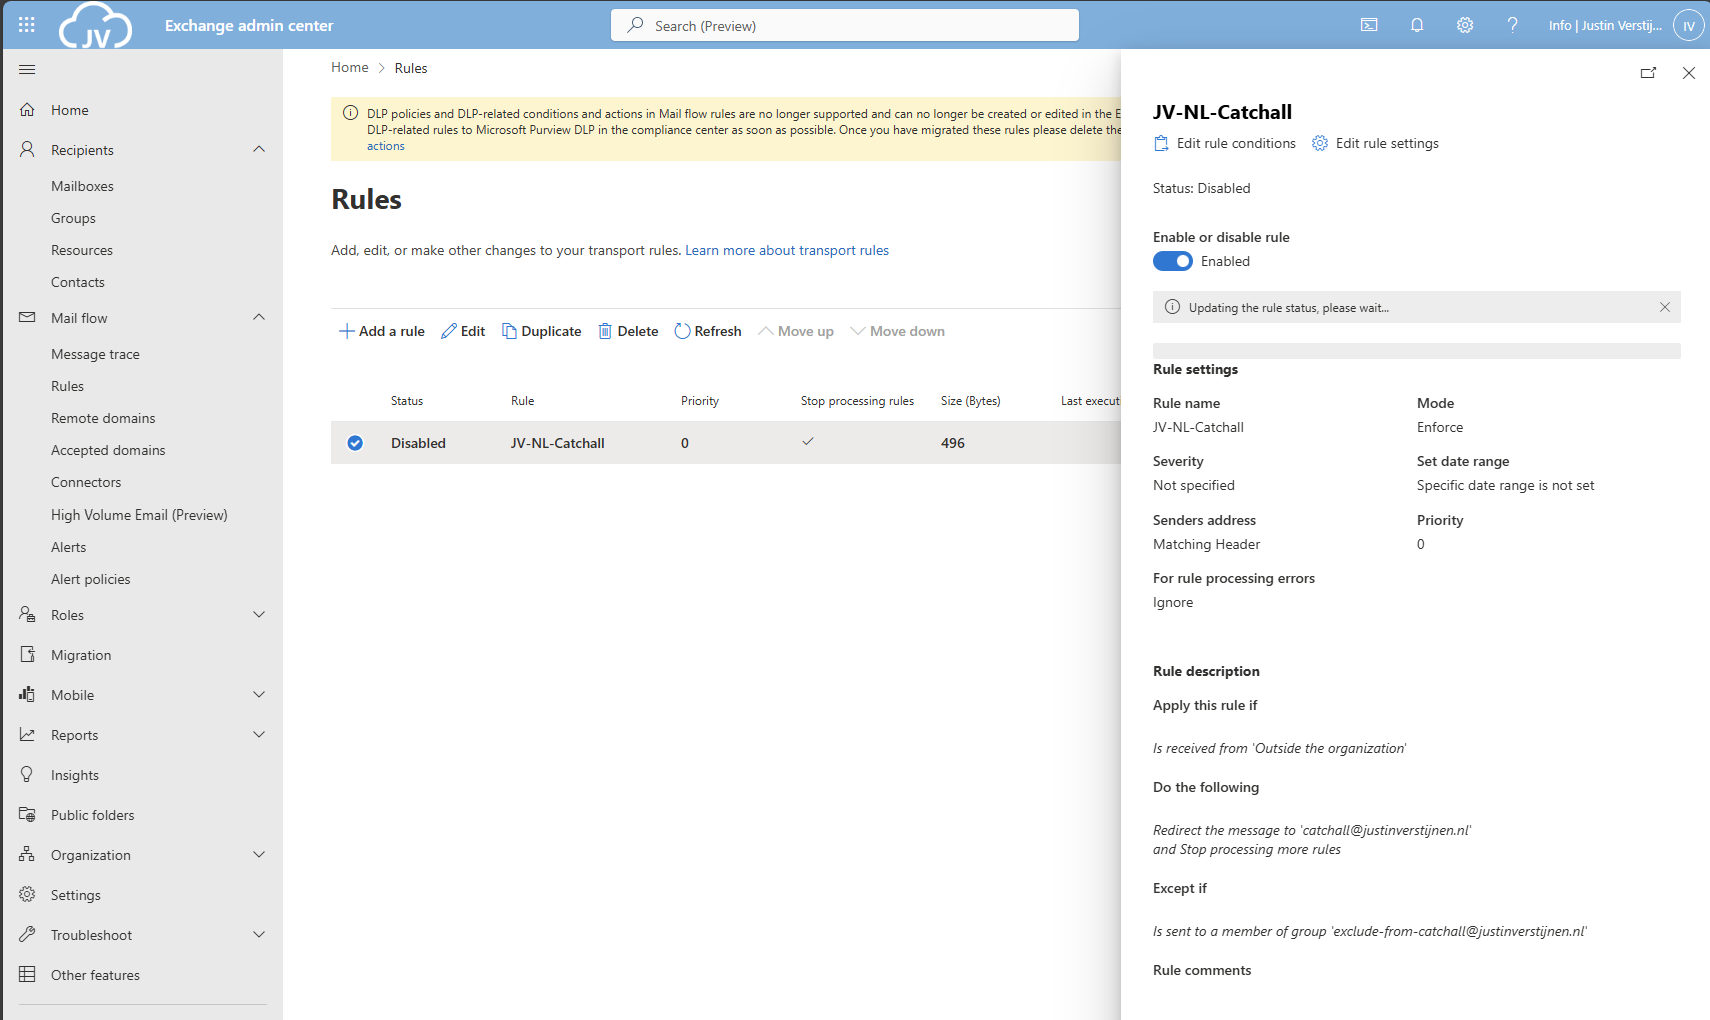
As you can see, my rule is enabled.
With this PowerShell script you can create the Mailflow rule with Powershell.
$catchalladdress = "catchall@domain.com"
$distributiongroup = "Exclude from Catch All"
$aliasdistributiongroup = "exclude-from-catchall"
$catchallalias = (Get-EXOMailbox -Identity $catchalladdress).Alias
$flowruletitle = "JV-NL-Catchall"
$flowruledesc = "Your rule description"

# Create the rule itself with given parameters
New-TransportRule -FromScope 'NotInOrganization' -RedirectMessageTo '$doelalias' -ExceptIfSentToMemberOf $distributiongroup -Name 'AllMailboxes' -StopRuleProcessing:$false -Mode 'Enforce' -Comments $flowruledesc -RuleErrorAction 'Ignore' -SenderAddressLocation 'Header'
Make sure to change all parameters. I have added the parameters from earlier tasks above, you can exclude them if already specified in your command window. The command is built on the settings shown in the GUI part.
For Exchange be able to redirect messages to a email addresses that doesn’t really exist, we must enable “Internal Relay” for every domain that must do a Catch all configuration.
You can enable this in Exchange Admin Center, by going to “Mail flow” and then to “Accepted domains”:
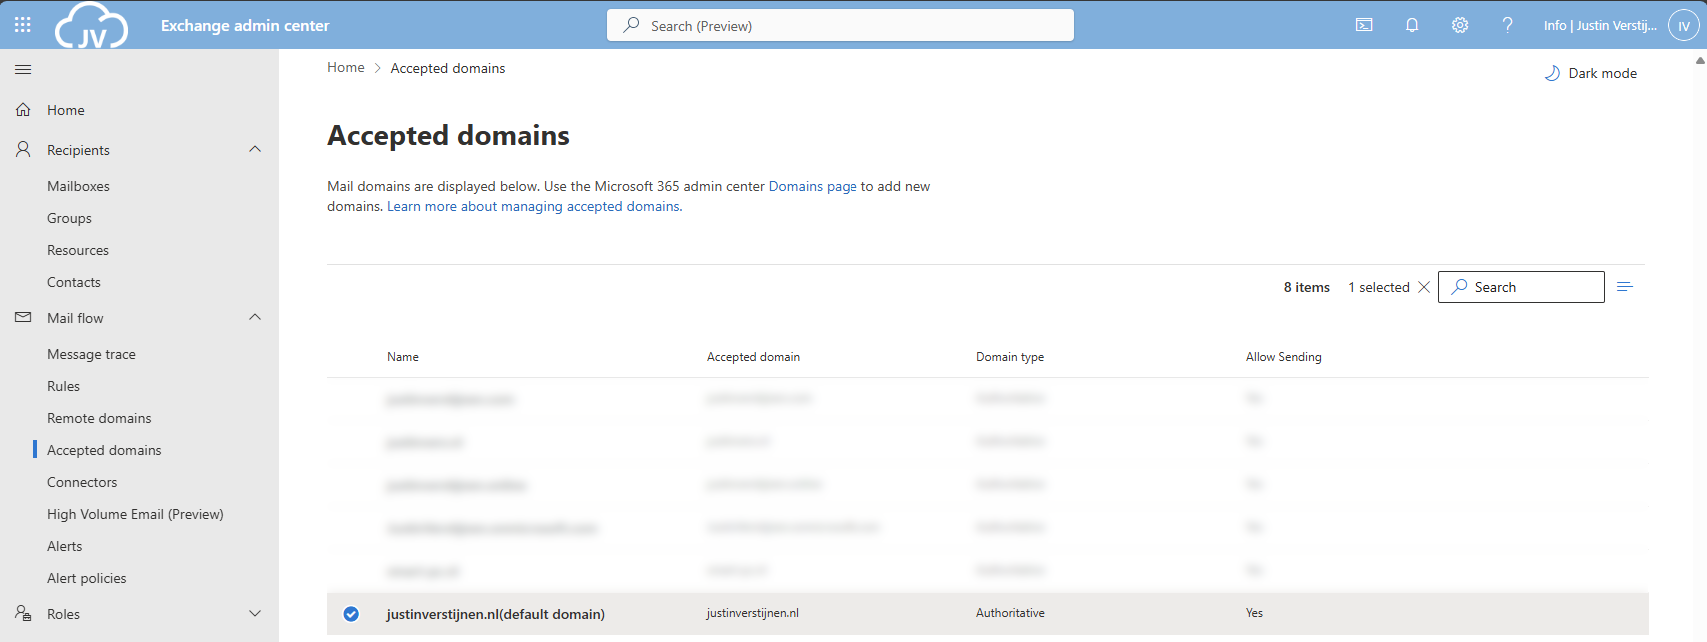
Select your domain and click on it. A window will be opened to the right:
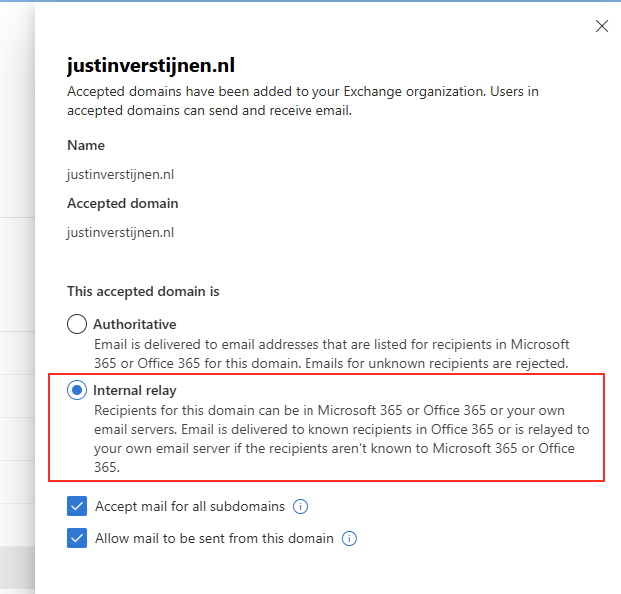
Select the option “Internal Relay” and save the configuration.
This simple Powershell script will set the relay option of the domain to internal.
$catchalldomain = "Your domainname"

# Set the relay of Internal
Set-AcceptedDomain -Identity $catchalldomain -DomainType InternalRelayWe will now test the configuration. Let’s test from an emailaddress outside of your Microsoft 365 tenant (such as Gmail or Hotmail/Outlook.com)
I have sent a message from Hotmail to no-reply@justinverstijnen.nl which is a non-existent emailaddress in my tenant. This message should be delivered to my Catch All mailbox.
And it did!
Now you should test normal email flow too, and ensure not all email is sent to your catch all mailbox. If this works, then the solution is working 100%.
To minimize errors for your configuration, I created a PowerShell script to automate this setup. You can view and download the script here:
This solution is a great way for having a catch all mailbox in your Microsoft 365 environment. I also added a PowerShell script for performing this task correctly, because one simple mistake can disrupt the complete mailflow.
Thank you for following this guide and I hope it was helpful.
You have reached the end of the page. You can navigate through other blog posts as well, share this post on X, LinkedIn and Reddit or return to the blog posts collection page. Thank you for visiting this post.
If you think something is wrong with this post or you want to know more, you can send me a message to one of my social profiles at: https://justinverstijnen.nl/about/
If you find this page and blog very useful and you want to leave a donation, you can use the button below to buy me a beer. Hosting and maintaining a website takes a lot of time and money. Thank you in advance and cheers :)
The terms and conditions apply to this post.
When using Microsoft 365 and using multiple custom domains, sometimes you are unable to create a shared mailbox that uses the same alias as an existing mailbox.
In this guide I will explain this problem and show how to still get the job done.
Let’s say, we have a Microsoft 365 tenant with 3 domains;
When you already have a mailbox called “info@domain1.com” you are unable to create a “info@domain2.com” in the portal. The cause of this problem is that every mailbox has a underlying “alias” and that this alias is the same when created in the portal. I have tried this in the Microsoft 365 admin center, Exchange Online admin center and Powershell. I get the following error:
Write-ErrorMessage: ExB10BE9|Microsoft.Exchange.Management.Tasks.WLCDManagedMemberExistsException|The proxy address "SMTP:info@domain1.com" is already being used by the proxy addresses or LegacyExchangeDN. Please choose another proxy address.The cause of the problem is that even if you select another domain in the shared mailbox creation wizard, it wants to create a underlying UPN in your default domain.
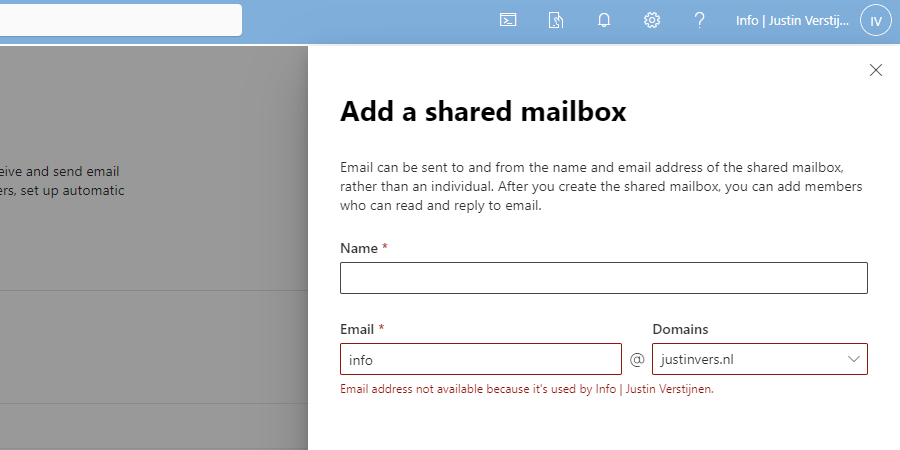
We get an error stating: Email address not available because it’s used by XXX, which is actually true.
Luckily I found out that the solution is very easy and that is to create the new mailbox using the Exchange Online Powershell module. I will explain how this works.
For my tutorial, i stick to the example given above, where i described 3 domains, domain1, domain2 and domain3.
First, ensure that you have installed the Exchange Online Powershell module by running the following command in an elevated Windows Powershell window:
Install-Module ExchangeOnlineManagementAfter around 30 seconds, you are ready to login into Exchange Online by using th efollowing command:
Connect-ExchangeOnlineLog in into your account which has sufficient permissions to manage mailboxes.
After logging in, you have to run the following command:
New-Mailbox -Shared -Name "NAME" -DisplayName "DISPLAYNAME" -PrimarySMTPAddress "info@domain.com" -Alias "info_domainname"Here, we create a new shared mailbox:
You can create all mailboxes like this, and we have to tell Exchange Online exactly how to create the mailbox. After creating the mailbox, it looks like this in Exchange Admin center;
So creating multiple shared mailboxes with the same alias is not possible in the admin portals which is very stupid. It looks like a way Microsoft wants you to still use their Powershell modules.
I hope Microsoft publishes a new solution for this where we can create those mailboxes in the admin portals and not having to create them using Powershell.
You have reached the end of the page. You can navigate through other blog posts as well, share this post on X, LinkedIn and Reddit or return to the blog posts collection page. Thank you for visiting this post.
If you think something is wrong with this post or you want to know more, you can send me a message to one of my social profiles at: https://justinverstijnen.nl/about/
If you find this page and blog very useful and you want to leave a donation, you can use the button below to buy me a beer. Hosting and maintaining a website takes a lot of time and money. Thank you in advance and cheers :)
The terms and conditions apply to this post.
When still managing on-premises environments, but shifting your focus to the cloud you sometimes need to do a migration. This page helps you to migrate to SharePoint or Onedrive according to your needs.
At the moment, SharePoint is a better option to store your files because it has the following benefits over a traditional SMB share:
Microsoft has a tool available which is free and which can migrate your local data to SharePoint. The targets you can specify are:
Download the tool here: https://learn.microsoft.com/en-us/sharepointmigration/how-to-use-the-sharepoint-migration-tool
When using in a production environment, my advice is to use the “General Availability” option, this version is proven to work like expected.
Install the SharePoint Migration tool on a computer with access to the source fileshare, or on the fileserver itself. How closer to the source, how faster the migration will perform. Also, please check the system requirements: https://learn.microsoft.com/en-us/sharepointmigration/spmt-prerequisites
When the tool is installed, you will get on the landing page:
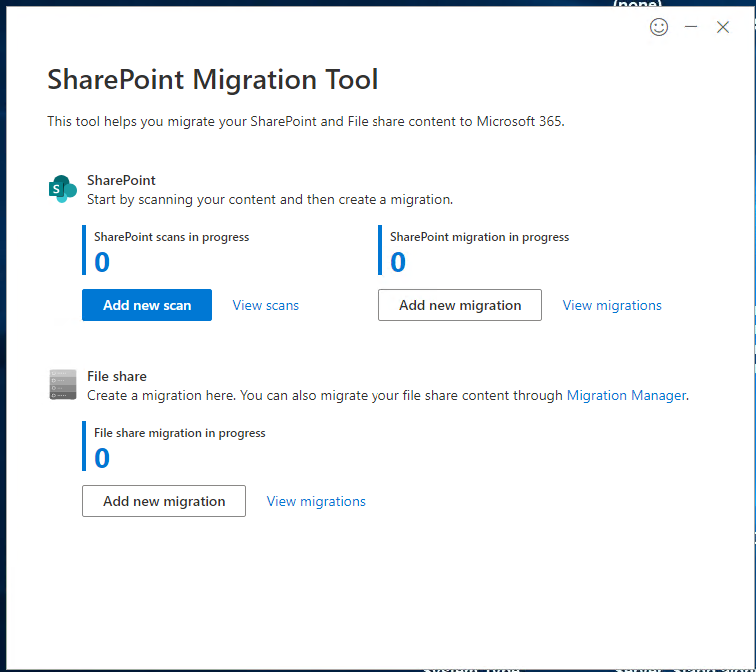
Here you can configure the fileshare (source) and then the destination in SharePoint.
After configuring the task, the tool will take over the hard work and migrates your data to your SharePoint site:

The SharePoint Migration Tool is a great tool to automate your SharePoint migration and phase out local network folders. It supports resyncing to first do a bulk migration, and later syncing the changes.
Thank you for reading this post and I hope it was helpful.
You have reached the end of the page. You can navigate through other blog posts as well, share this post on X, LinkedIn and Reddit or return to the blog posts collection page. Thank you for visiting this post.
If you think something is wrong with this post or you want to know more, you can send me a message to one of my social profiles at: https://justinverstijnen.nl/about/
If you find this page and blog very useful and you want to leave a donation, you can use the button below to buy me a beer. Hosting and maintaining a website takes a lot of time and money. Thank you in advance and cheers :)
The terms and conditions apply to this post.
Sometimes you want to have a distribution group with all your known mailboxes in it. For example an employees@justinverstijnen.nl or all@justinverstijnen.nl address to send a mail company wide. A normal distribution group is possible, but requires a lot of manual maintenance, like adding and removing users.
To apply a little more automation you can use the Dynamic Distribution Group feature of Exchange Online. This is a feature like the Dynamic groups feature of Microsoft Entra which automatically adds new user mailboxes after they are created to make sure every new employee is added automatically.
To create a dynamic distribution group, go to the Exchange Online Admin center (admin.exchange.microsoft.com)
When you create a group, select the option “Dynamic distribution” and fill in the details.
At the step “Users” you have to select “Users with Exchange mailboxes” to only include users, no shared mailboxes, external/guest users or resource mailboxes.
Define an email address and finish the wizard.
To define which users are allowed to email to the group, you can configure delivery management which acts as a whitelist for the dynamic distribution group. Only the users defined may send to the group.
After creating the mailbox, go to Groups and then Dynamic distribution list and select the group.
Go to the tab “Settings” and click “edit delivery management”.
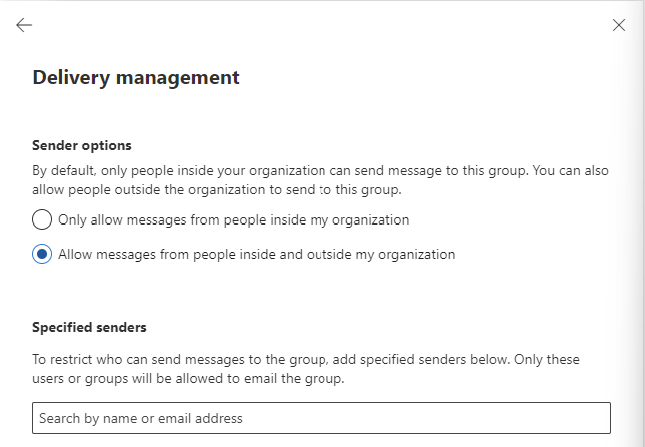
Here you can define the users who may send and a general advice to restrict mailing only from the same orgainzation.
It is possible to exclude mailboxes from the dynamic distribution group, but it is not possible in the Admin center. This is possible with Powershell.
My way to do it is to use the attribute field CustomAttribute1 and put “exclude_from_employees” in it without the quotes. In the filter of the dynamic distribution group we select all user mailboxes but not when they have the attribute “exclude_from_employees”.
To configure the attribute filter, we login into Exchange Online Powershell:
Connect-ExchangeOnlineTo configure the filter itself, we run the following script:
$employees = "Name of distributiongroup"
Set-DynamicDistributionGroup -Identity $employees -RecipientFilter "(Recip
ientTypeDetails -eq 'UserMailbox') -and (CustomAttribute1 -ne 'exclude_from_employees')"
After running these commands succesfully you can add the attribute from the Exchange Online admin center in a mailbox. To add this attribute, open a mailbox;
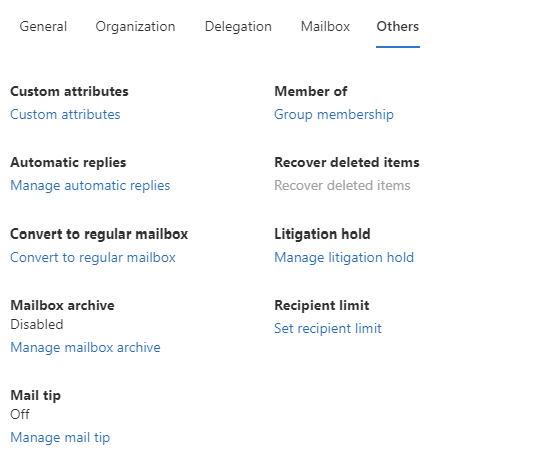
Go to “Custom Attributes” and add the attribute like shown below;

When a mailbox had this attribute in field 1, it will be excluded from the dynamic distribution group.
To check all recipients of the distribution group, you can run the following command when logged in into Exchange Online Powershell:
$employees = Get-DynamicDistributionGroup -Identity *EMAILADDRESS*
Get-Recipient -RecipientPreviewFilter ($employees.RecipientFilter)
Just change the Email Address to your own created dynamic distribution group and all recipients will show. Now you have the list of all email addresses the system considers as “members”.
To check which mailboxes does not receive email from the dynamic distribution group, you can run the following;
Get-Mailbox | where {$_.CustomAttribute1 -eq "exclude_from_employees"}This command will return all users with the created attribute and who does not receive the email.
Dynamic Distribution Groups are an excellent way to minimize administrative effort while maintaining some internal addresses for users to send mail to. It is really good as a “all-employees” distribution group where you never have to add or remove users from when employees come and leave. The more automation, the better.
I hope this guide was helpful and thank you for reading!
You have reached the end of the page. You can navigate through other blog posts as well, share this post on X, LinkedIn and Reddit or return to the blog posts collection page. Thank you for visiting this post.
If you think something is wrong with this post or you want to know more, you can send me a message to one of my social profiles at: https://justinverstijnen.nl/about/
If you find this page and blog very useful and you want to leave a donation, you can use the button below to buy me a beer. Hosting and maintaining a website takes a lot of time and money. Thank you in advance and cheers :)
The terms and conditions apply to this post.
All pages referring or tutorials for Microsoft Azure.
In this post, I will explain how I redirect my domains and subdomains to websites and parts of my website. If you ever visited my tools page at https://justinverstijnen.nl/tools, you will see I have shortcuts to my tools themselves, although they are not directly linked to the instances.
In this post I will explain how this is done, how to setup Azure Front Door to do this and how to create your own redirects from the Azure Portal.
For this solution, you need the following stuff:
I will explain how I have made the shortcuts to my tools at https://justinverstijnen.nl/tools, as this is something what Azure Front Door can do for you.
In short, Azure Front Door is a load balancer/CDN application with a lot of load balancing options to distribute load onto your backend. In this guide we will use a simple part, only redirecting traffic using 301 rules, but if interested, its a very nice application.
This effectively results in this (check the URL being changed automatically):
Now that we know what happens under the hood, let’s configure this cool stuff.
At first we must configure our Azure Front Door instance as this will be our hub and configuration plane for 301 redirects and managing our load distribution.
Open up the Azure Portal and go to “Azure Front Door”. Create a new instance there.
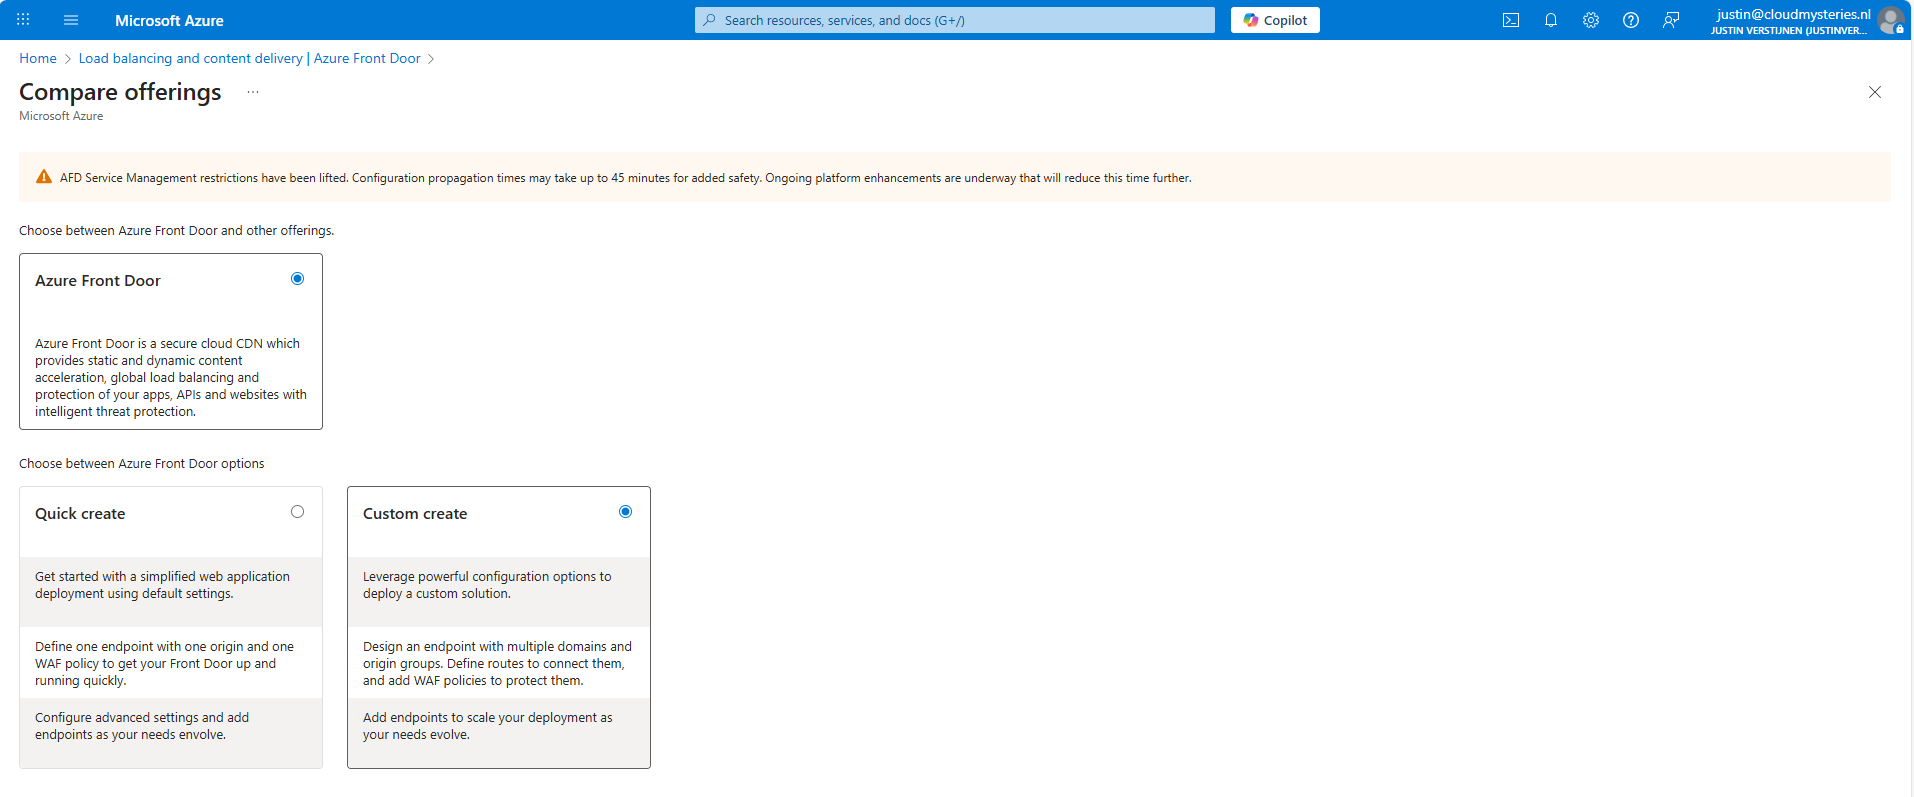
As the note describes, every change will take up to 45 minutes to be effective. This was also the case when I was configuring it, so we must have a little patience but it will be worth it.
I selected the “Custom create” option here, as we need a minimal instance.
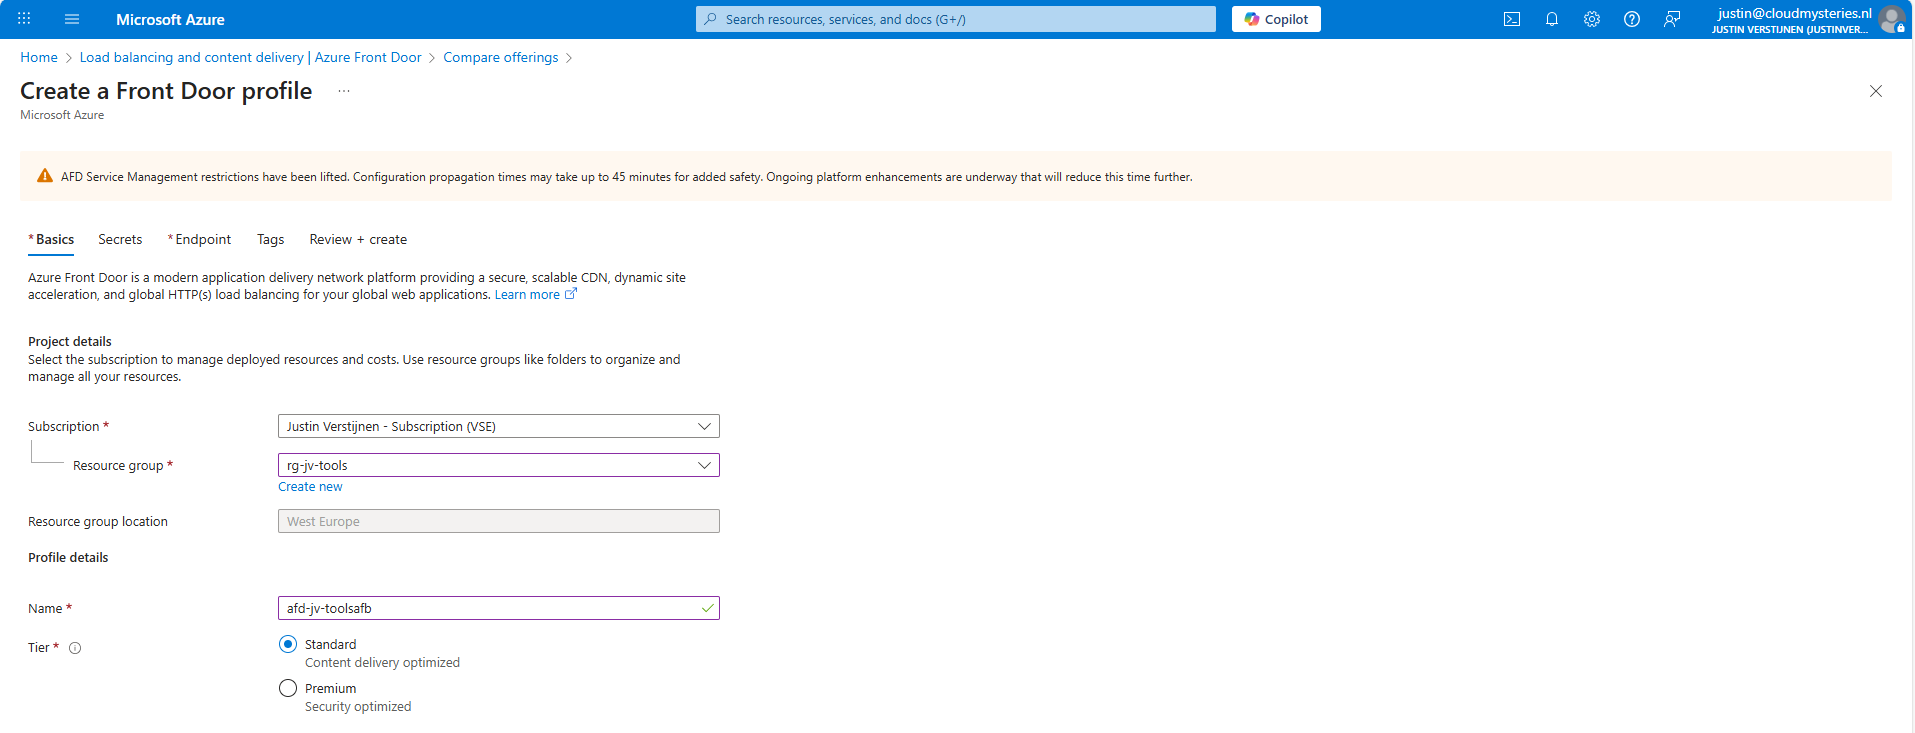
At the first page, fill in your details and select a Tier. I will use the Standard tier. The costs will be around:
Go to the “Endpoint” tab.

Give your Endpoint a name. This is the name you will redirect your hostname (CNAME) records to.
After creating the Endpoint, we must create a route.

Click “+ Add a route” to create a new route.
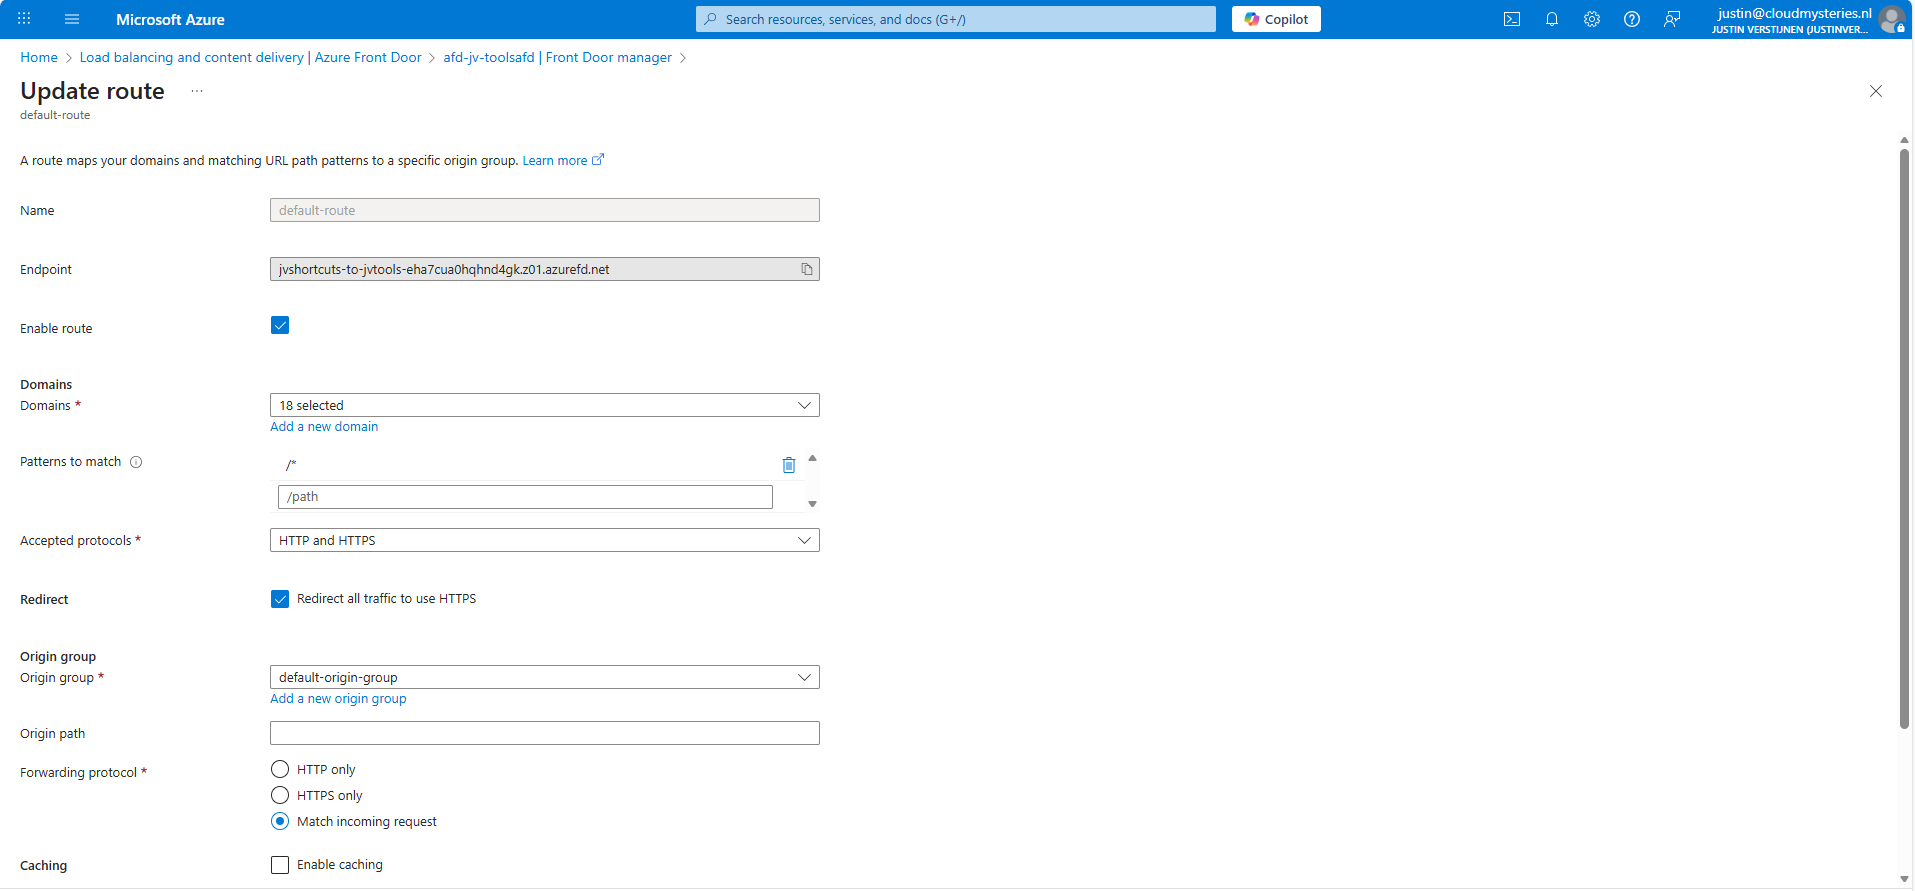
Give the route a name and fill in the following fields:
Then create a new origin group. This doesn’t do anything in our case but must be created.
After creating the origin group, finish the wizard to create the Azure Front Door instance, and we will be ready to go.
After the Azure Front Door instance has finished deploying, we can create a Rule set. This can be found in the Azure Portal under your instance:
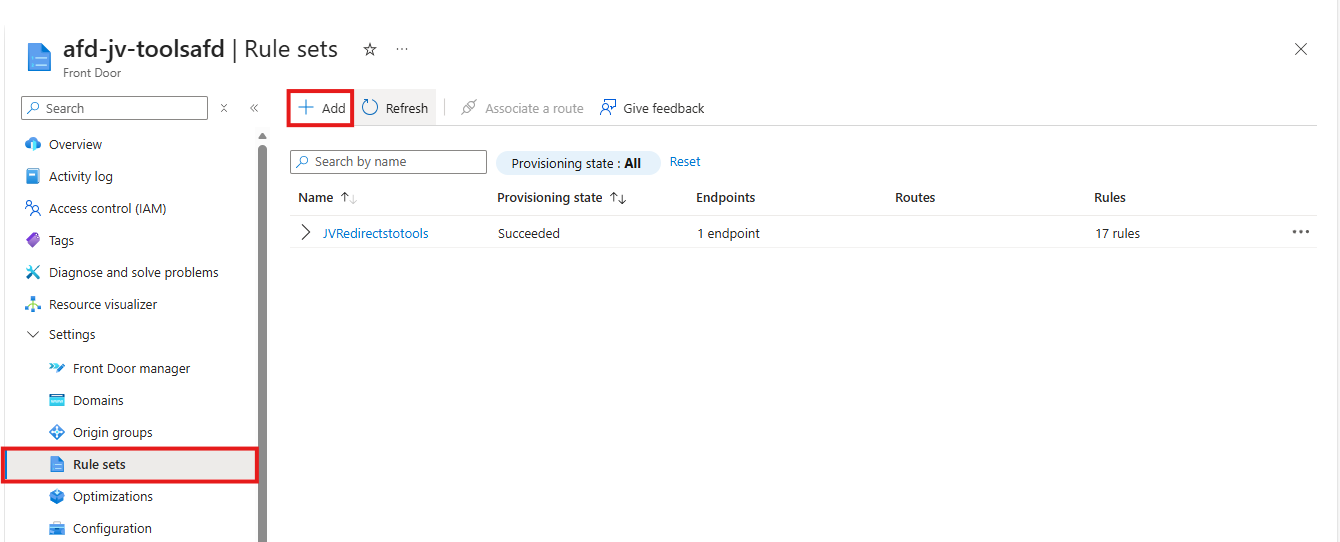
Create a new rule set here by clicking “+ Add”. Give the set a name after that.
The rule set is exactly what it is called, a set of rules your load balancing solution will follow. We will create the redirection rules here by basically saying:
Basically a if-then (do that) strategy. Let’s create such rule step by step.
Click the “+ Add rule” button. A new block will appear.

Now click the “Add a condition” button to add a trigger, which will be “Request header”
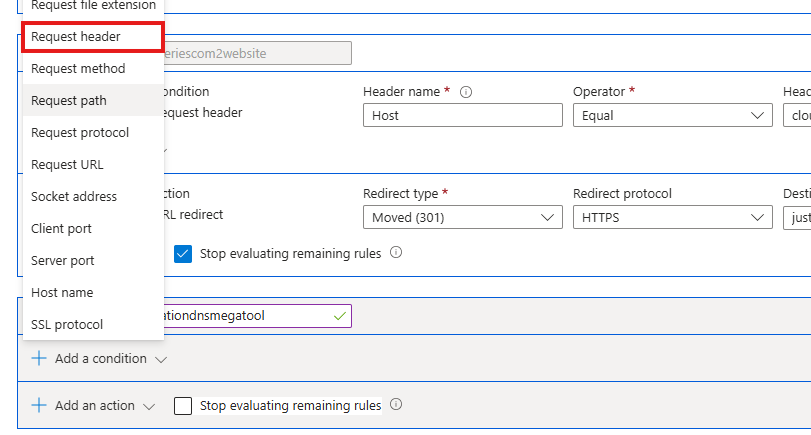
Fill in the fields as following:
It will look like this:

The click the “+ Add an action” button to decide on what to do when a client requests your URL:

Select the “URL redirect” option and fill in the fields:
Then enable the “Stop evaluating remaining rules” option to stop processing after this rule has applied.
The full rule looks like this:

Now we can update the rule/rule set and do the rest of the configurations.
How we have configured that we want domain A to link to domain B, but Azure requires us to validate the ownership of domain A before able to set redirections.
In the Azure Front Door instance, go to “Domains” and “+ Add” a domain here.
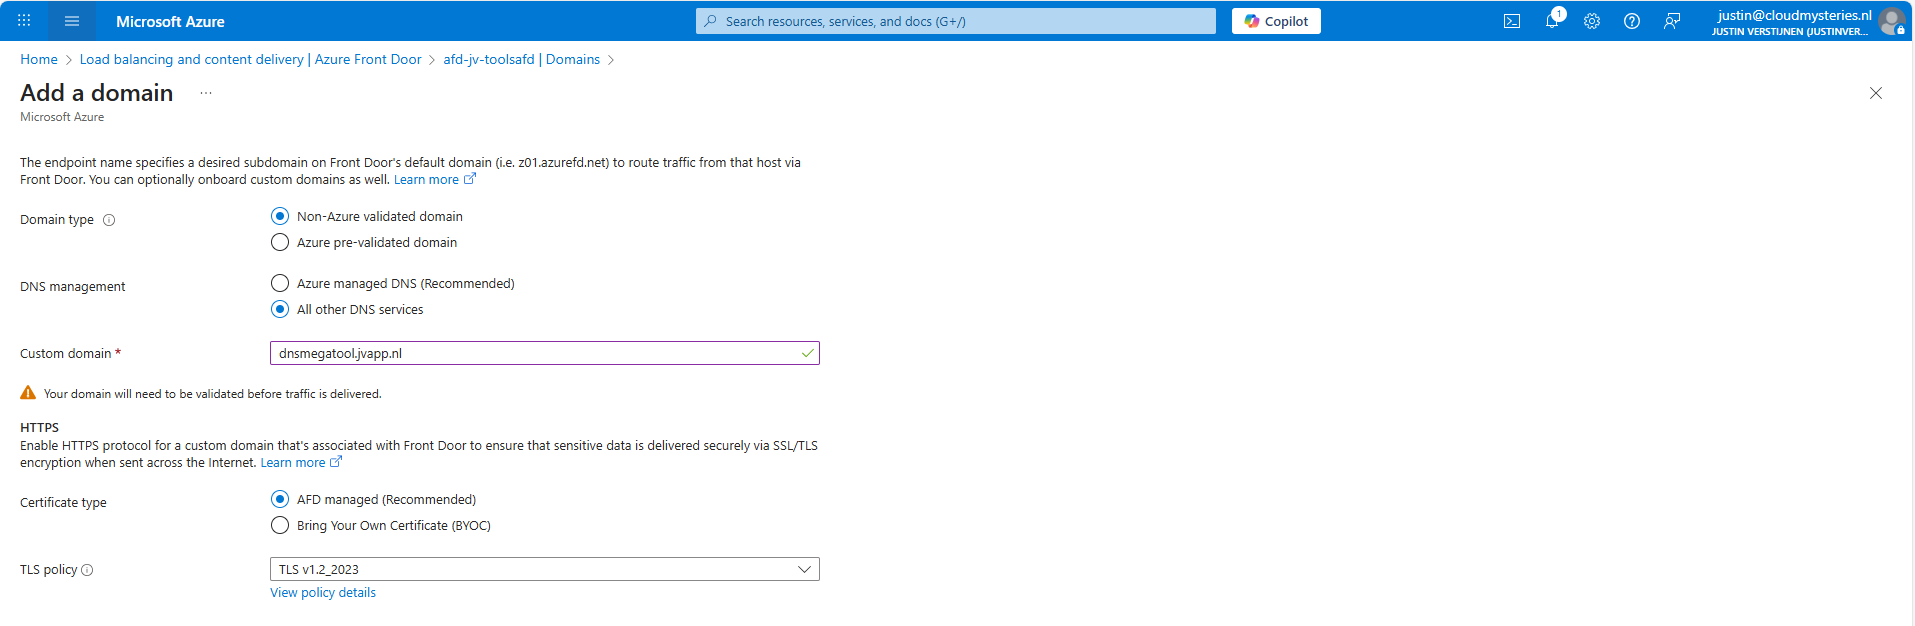
Fill in your desired domain name and click on “Add”. We now have to do a validation step on your domain by creating a TXT record.
Wait for a minute or so for the portal to complete the domain add action, and go to the “Domain validation section”:

Click on the Pending state to unveil the steps and information for the validation:
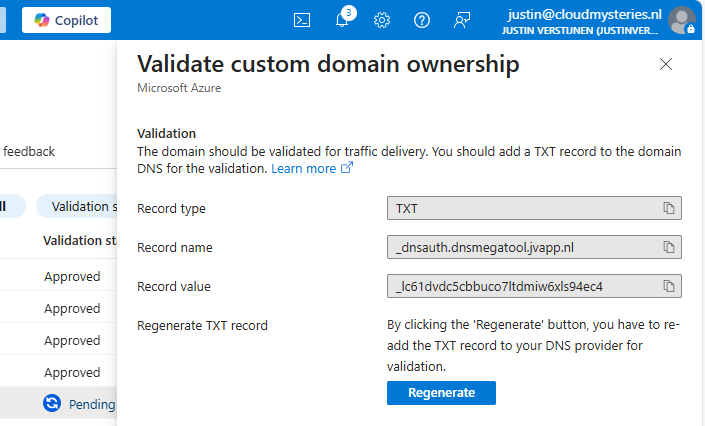
In this case, we must create a TXT record at our DNS hosting with this information:
Let’s do this:

Save the record, and wait for a few minutes. The Azure Portal will automatically validate your domain. This can take up to 24 hours.
In the meanwhile, now we have all our systems open, we can also create the CNAME record which will route our domain to Azure Front Door. In Azure Front Door collect your full Endpoint hostname, which is on the Overview page:
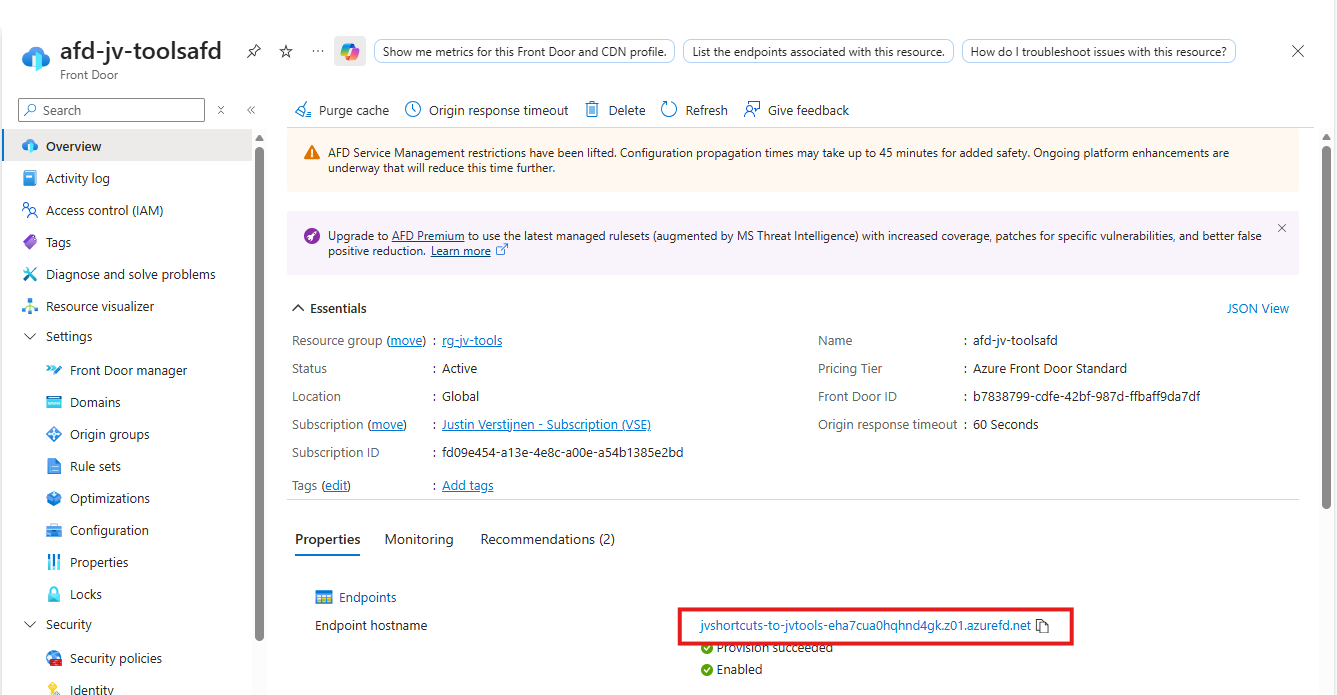
Copy that value and head back to your DNS hosting.
Create a new CNAME record with this information:
Make sure to end the value with a trailing dot (.), as this is a hostname externally to your DNS zone.

Save the DNS configuration, and your complete setup will now work in around 45 to 60 minutes.
This domain configuration has to be done for every domain and subdomain Azure Front Door must redirect. This is by design due to domain security.
Azure Front Door is a great solution for managing redirects for your webservers and tools in a central dashboard. Its a serverless solution so no patching or maintenance is needed. Only the configuration has to be done.
Azure Front Door does also manage your SSL certificates used in the redirections which is really nice.
Thank you for visiting this guide and I hope it wass helpful.
These sources helped me by writing and research for this post;
You have reached the end of the page. You can navigate through other blog posts as well, share this post on X, LinkedIn and Reddit or return to the blog posts collection page. Thank you for visiting this post.
If you think something is wrong with this post or you want to know more, you can send me a message to one of my social profiles at: https://justinverstijnen.nl/about/
If you find this page and blog very useful and you want to leave a donation, you can use the button below to buy me a beer. Hosting and maintaining a website takes a lot of time and money. Thank you in advance and cheers :)
The terms and conditions apply to this post.
Azure Bastion is a great tool in Azure to ensure your virtual machines are accessible in a fast, safe and easy way. This is cool if you want to embrace Zero Trust into your servers management layer and so a secure way to access your servers in Azure.
In this guide I will explain more about Azure Bastion and I hope I can give you a good overview of the service, its features, pricing and some practice information.
Azure Bastion is a serverless instance you deploy in your Azure virtual network. It resides there waiting for users to connect with it. It acts like a Jump-server, a secured server from where an administrative user connects to another server.
The process of it looks like this:
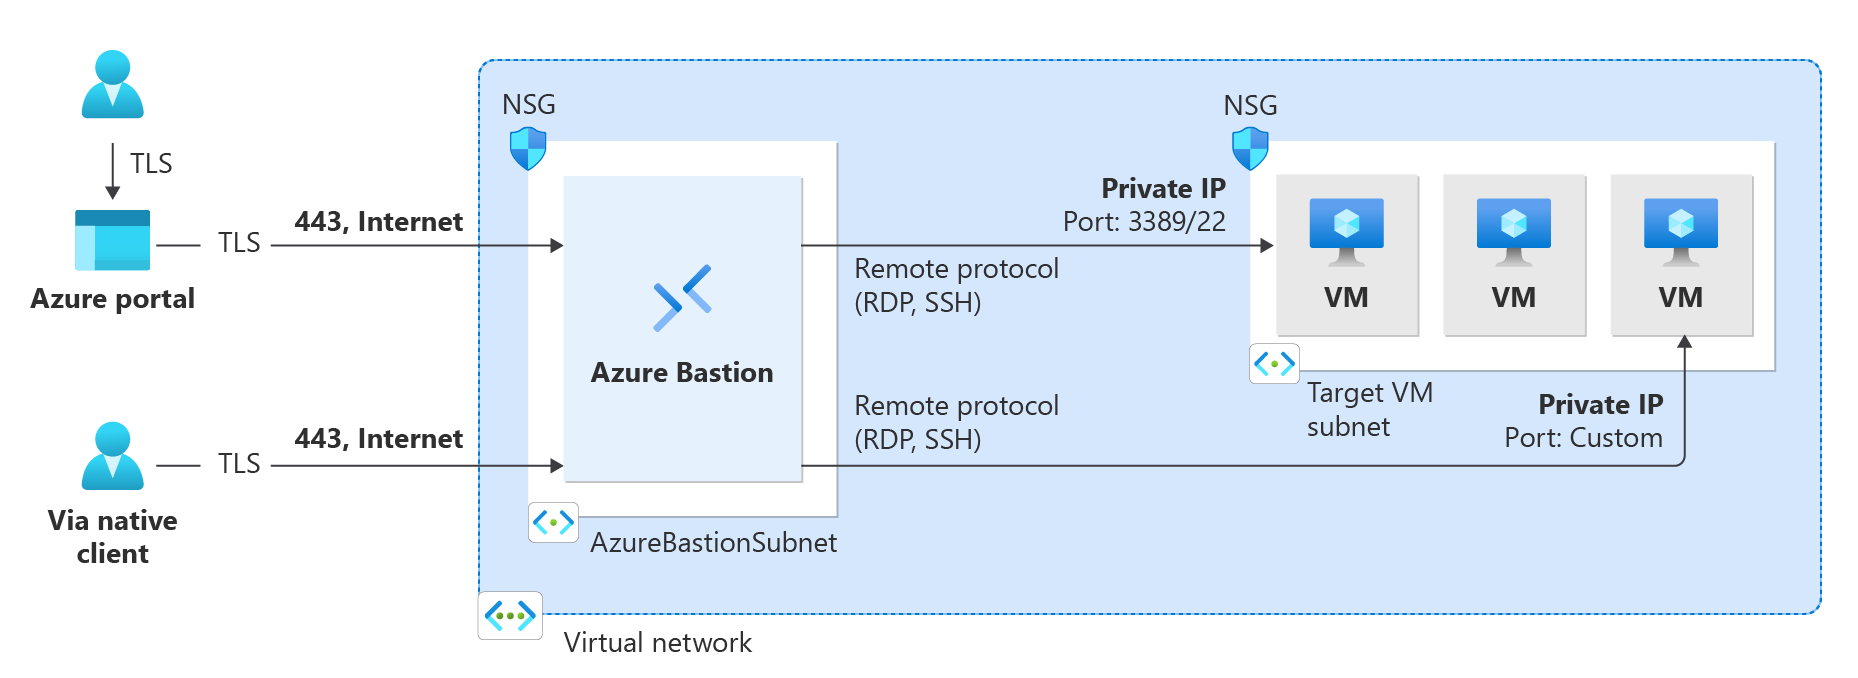
A user can choose to connect from the Azure Portal to Azure Bastion and from there to the destination server or use a native client, which can be:
Think of it as a layer between user and the server where we can apply extra security, monitoring and governance.
Azure Bastion is an instance which you deploy in a virtual network in Azure. You can choose to place an instance per virtual network or when using peered networks, you can place it in your hub network. Bastion supports connecting over VNET peerings, so you will save some money if you only place instances in one VNET.
Azure Bastion has a lot of features today. Some years ago, it only was a method to connect to a server in the Azure Portal, but it is much more than that. I will highlight some key functionality of the service here:
| Feature | Basic | Standard | Premium |
| Connecting to Windows VMs | ✅ | ✅ | ✅ |
| Connecting to Linux VMs | ✅ | ✅ | ✅ |
| Concurrent connections | ✅ | ✅ | ✅ |
| Custom inbound port | ❌ | ✅ | ✅ |
| Shareable link | ❌ | ✅ | ✅ |
| Disable copy/paste | ❌ | ✅ | ✅ |
| Session recording | ❌ | ❌ | ✅ |
Now that we know more about the service and it’s features, let’s take a look at the pricing before configuring the service.
Azure Bastion Instances are available in different tiers, as with most of the Azure services. The normal price is calculated based on the amounth of hours, but in my table I will pick 730 hours which is a full month. We want exactly know how much it cost, don’t we?
The fixed pricing is by default for 2 instances:
| SKU | Hourly price | Monthly price (730 hours) |
| Basic | $ 0,19 | $ 138,70 |
| Standard | $ 0,29 | $ 211,70 |
| Premium | $ 0,45 | $ 328,50 |
The cost is based on the time of existence in the Azure Subscription. We don’t pay for any data rates at all. The above prices are exactly what you will pay.
For the Standard and Premium SKUs of Azure Bastion, it is possible to get more than 2 instances which are a discounted price. These instances are half the prices of the base prices above and will cost you:
| SKU | Hourly price | Monthly price (730 hours) |
| Standard | $ 0,14 | $ 102,20 |
| Premium | $ 0,22 | $ 160,60 |
We can deploy Azure Bastion through the Azure Portal. Search for “Bastions” and you will find it:

Before we can deploy Azure Bastion to a network, we must create a subnet for this managed service. This can be done in the virtual network. Then go to “subnets”:
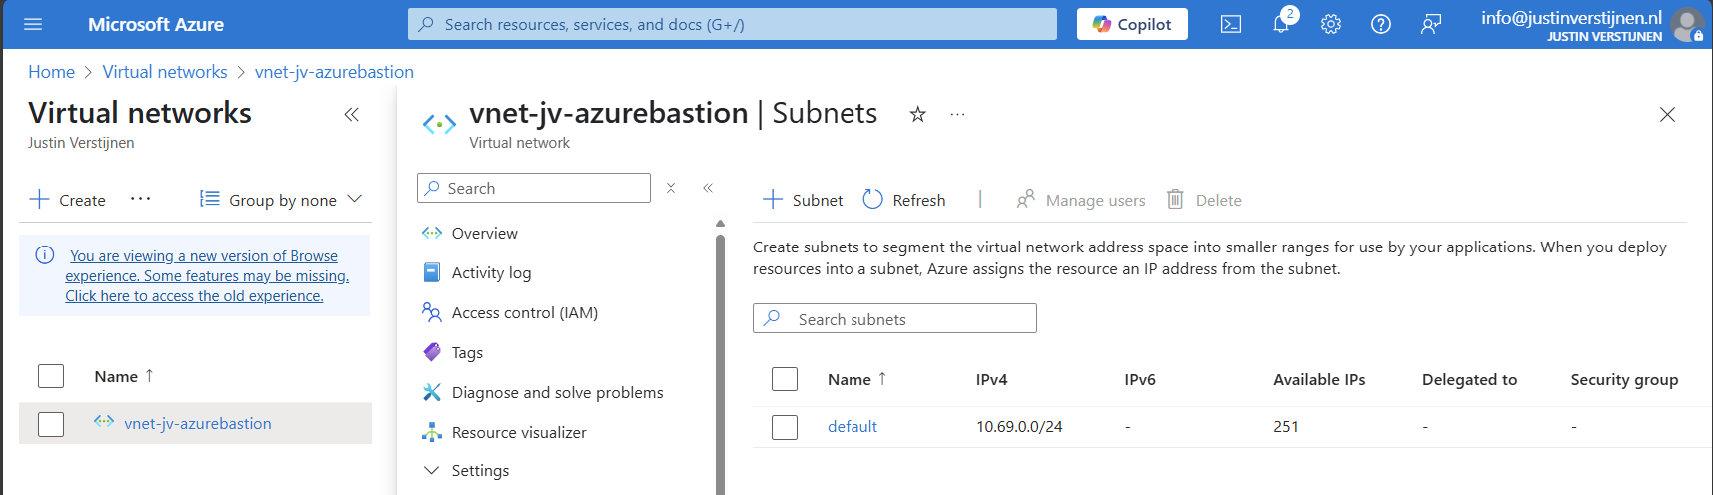
Click on “+ Subnet” to create a new subnet:
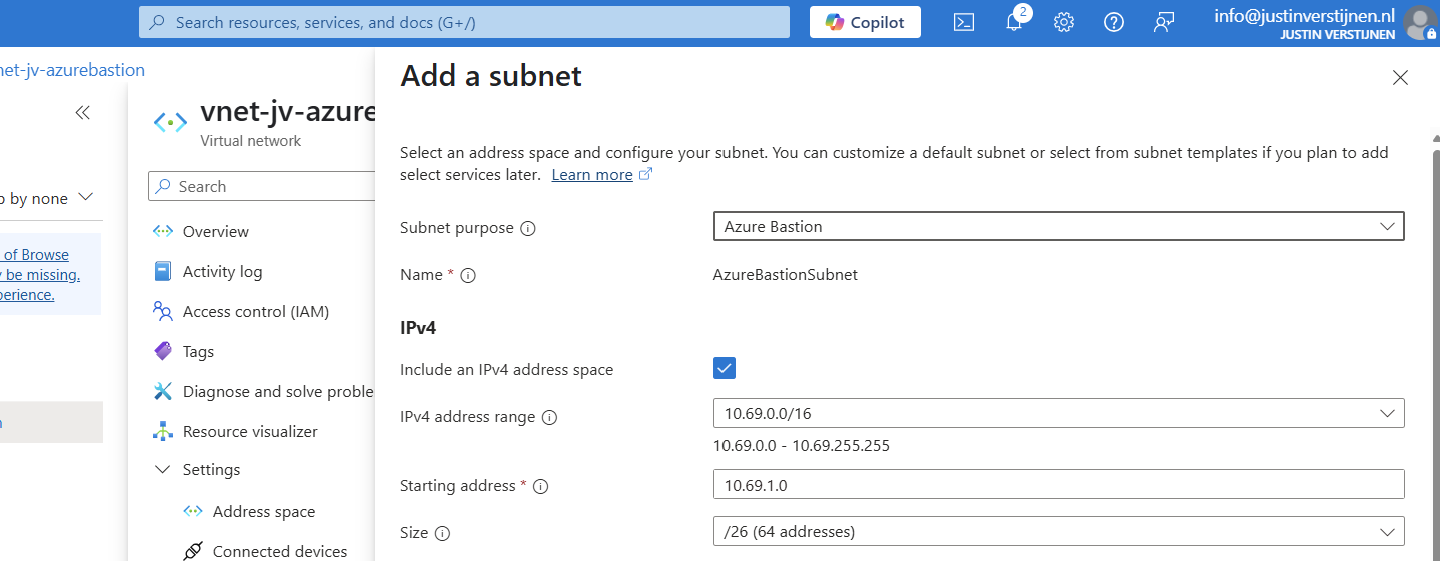
Select “Azure Bastion” at the subnet purpose field, this is a template for the network.
Click on “Add” to finish the creation of this subnet.
Now go back to “Bastions” and we can create a new instance:
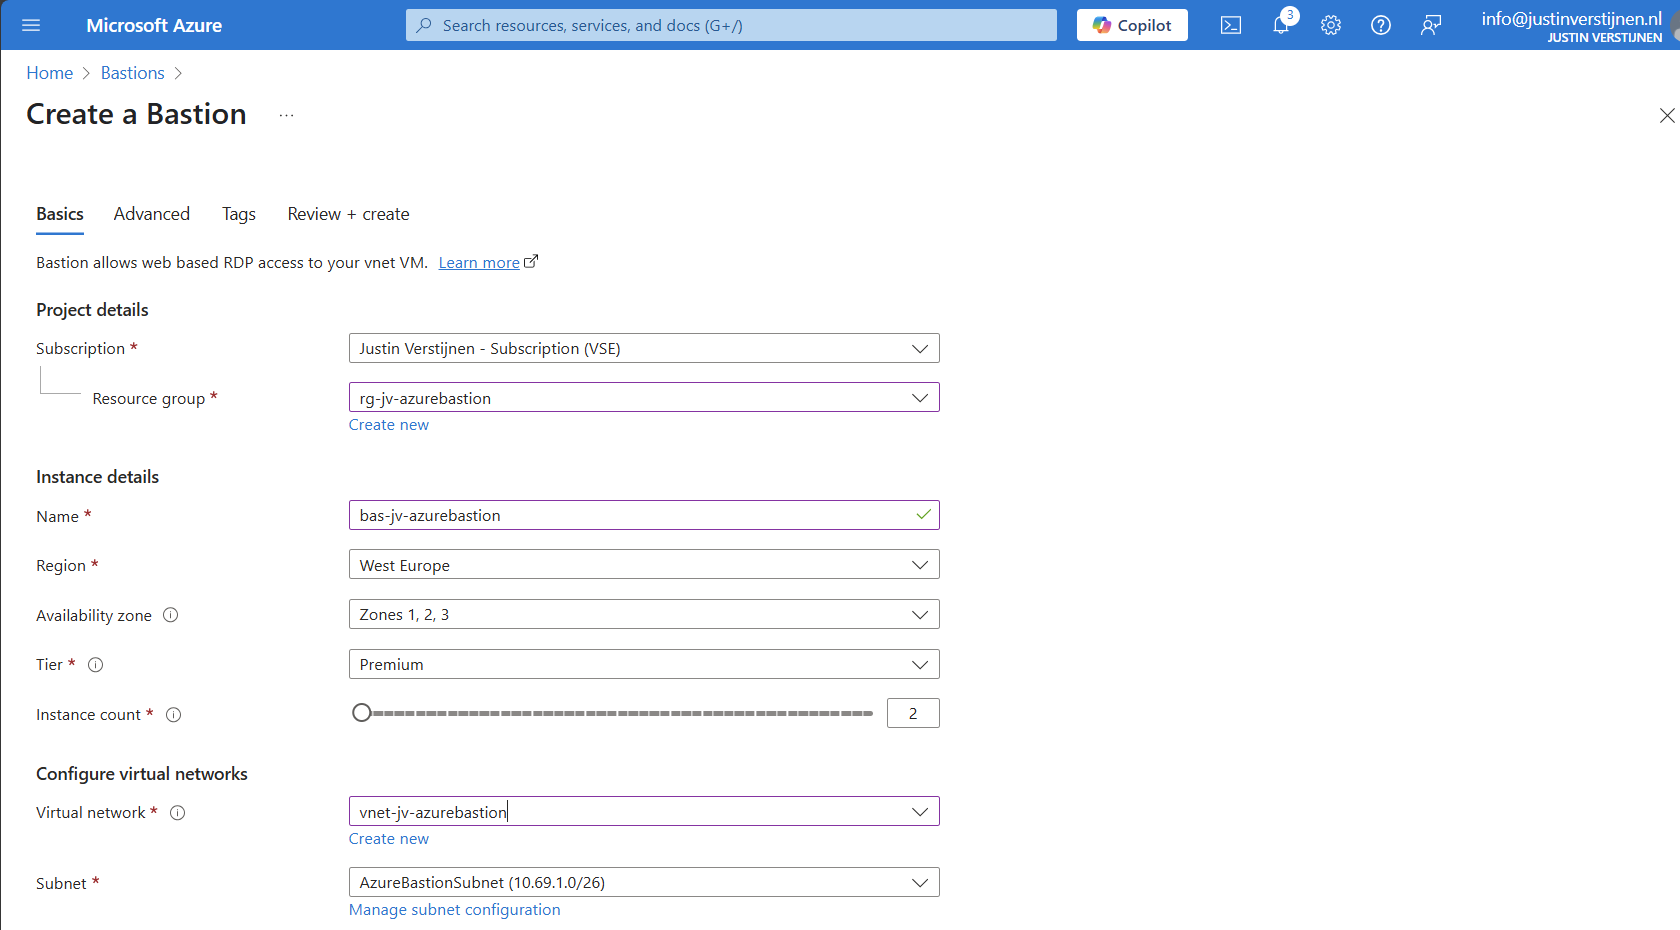
Fill in your details and select your Tier (SKU). Then choose the network to place the Bastion instance in. The virtual network and the basion instance must be in the same region.
Then create a public IP which the Azure Bastion service uses to form the bridge between internet and your virtual machines.
Now we advance to the tab “Advanced” where we can enable some Premium features:
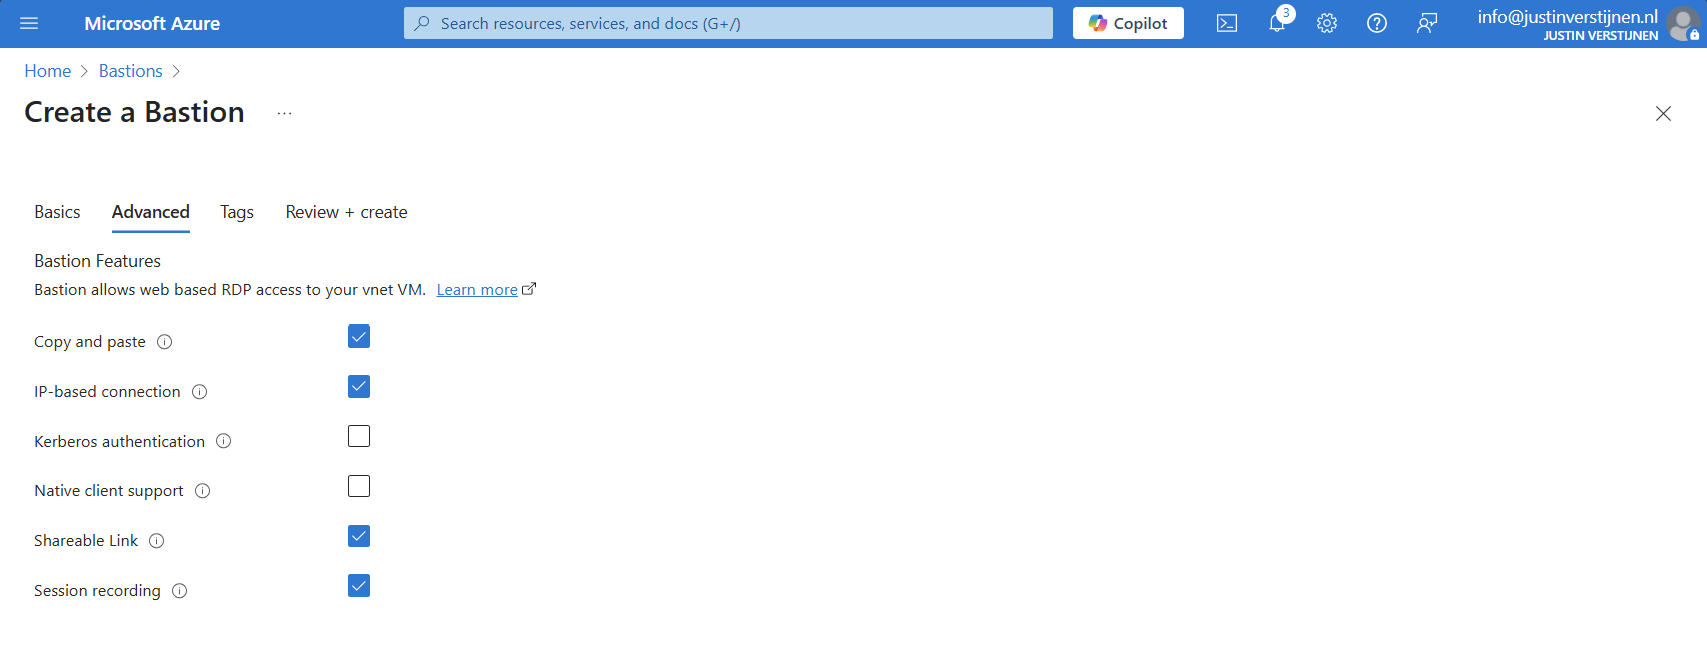
I selected these options for showcasing them in this post.
Now we can deploy the Bastion instance. This will take around 15 minutes.
You can also deploy Azure Bastion when creating a virtual network:

However, this option has less control over naming structure and placement. Something we don’t always want :)
We can now use Azure Bastion by going to the instance itself or going to the VM you want to connect with.
Via instance:
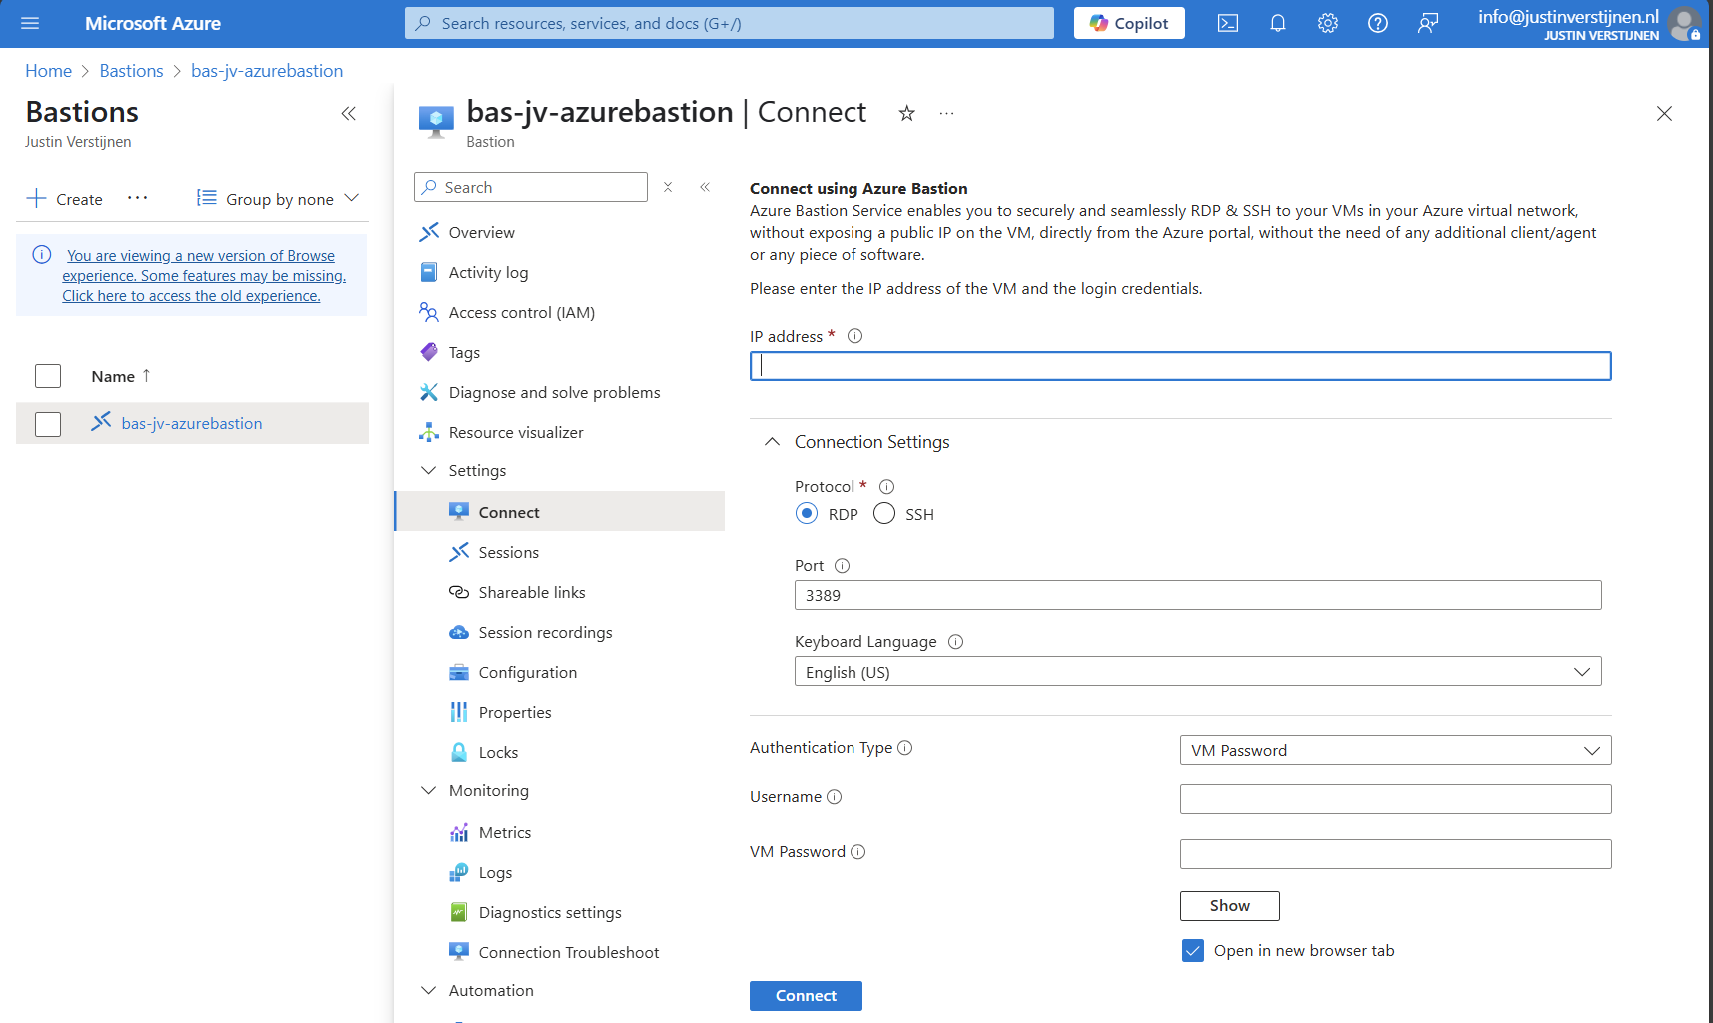
Via virtual machine:
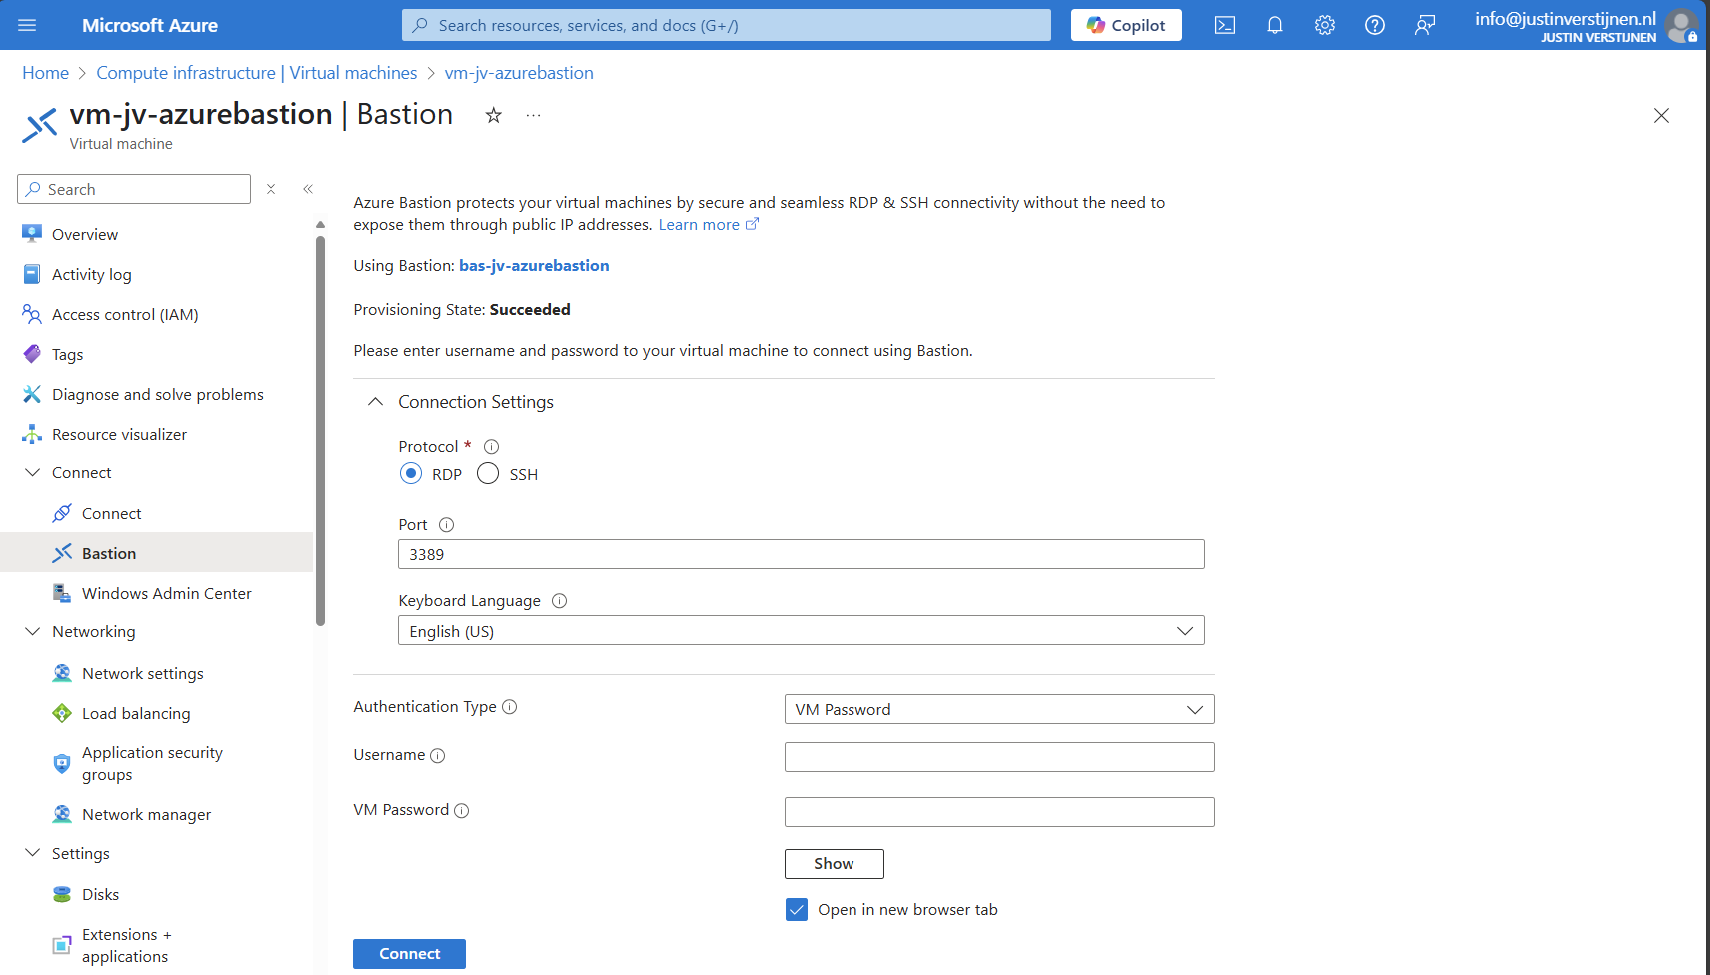
We can now connect to a virtual machine. In this case I will use a Windows VM:

Fill in the details like the internal IP address and the username/password. Then click on “Connect”.
Now we are connected through the browser, without needing to open any ports or to install any applications:
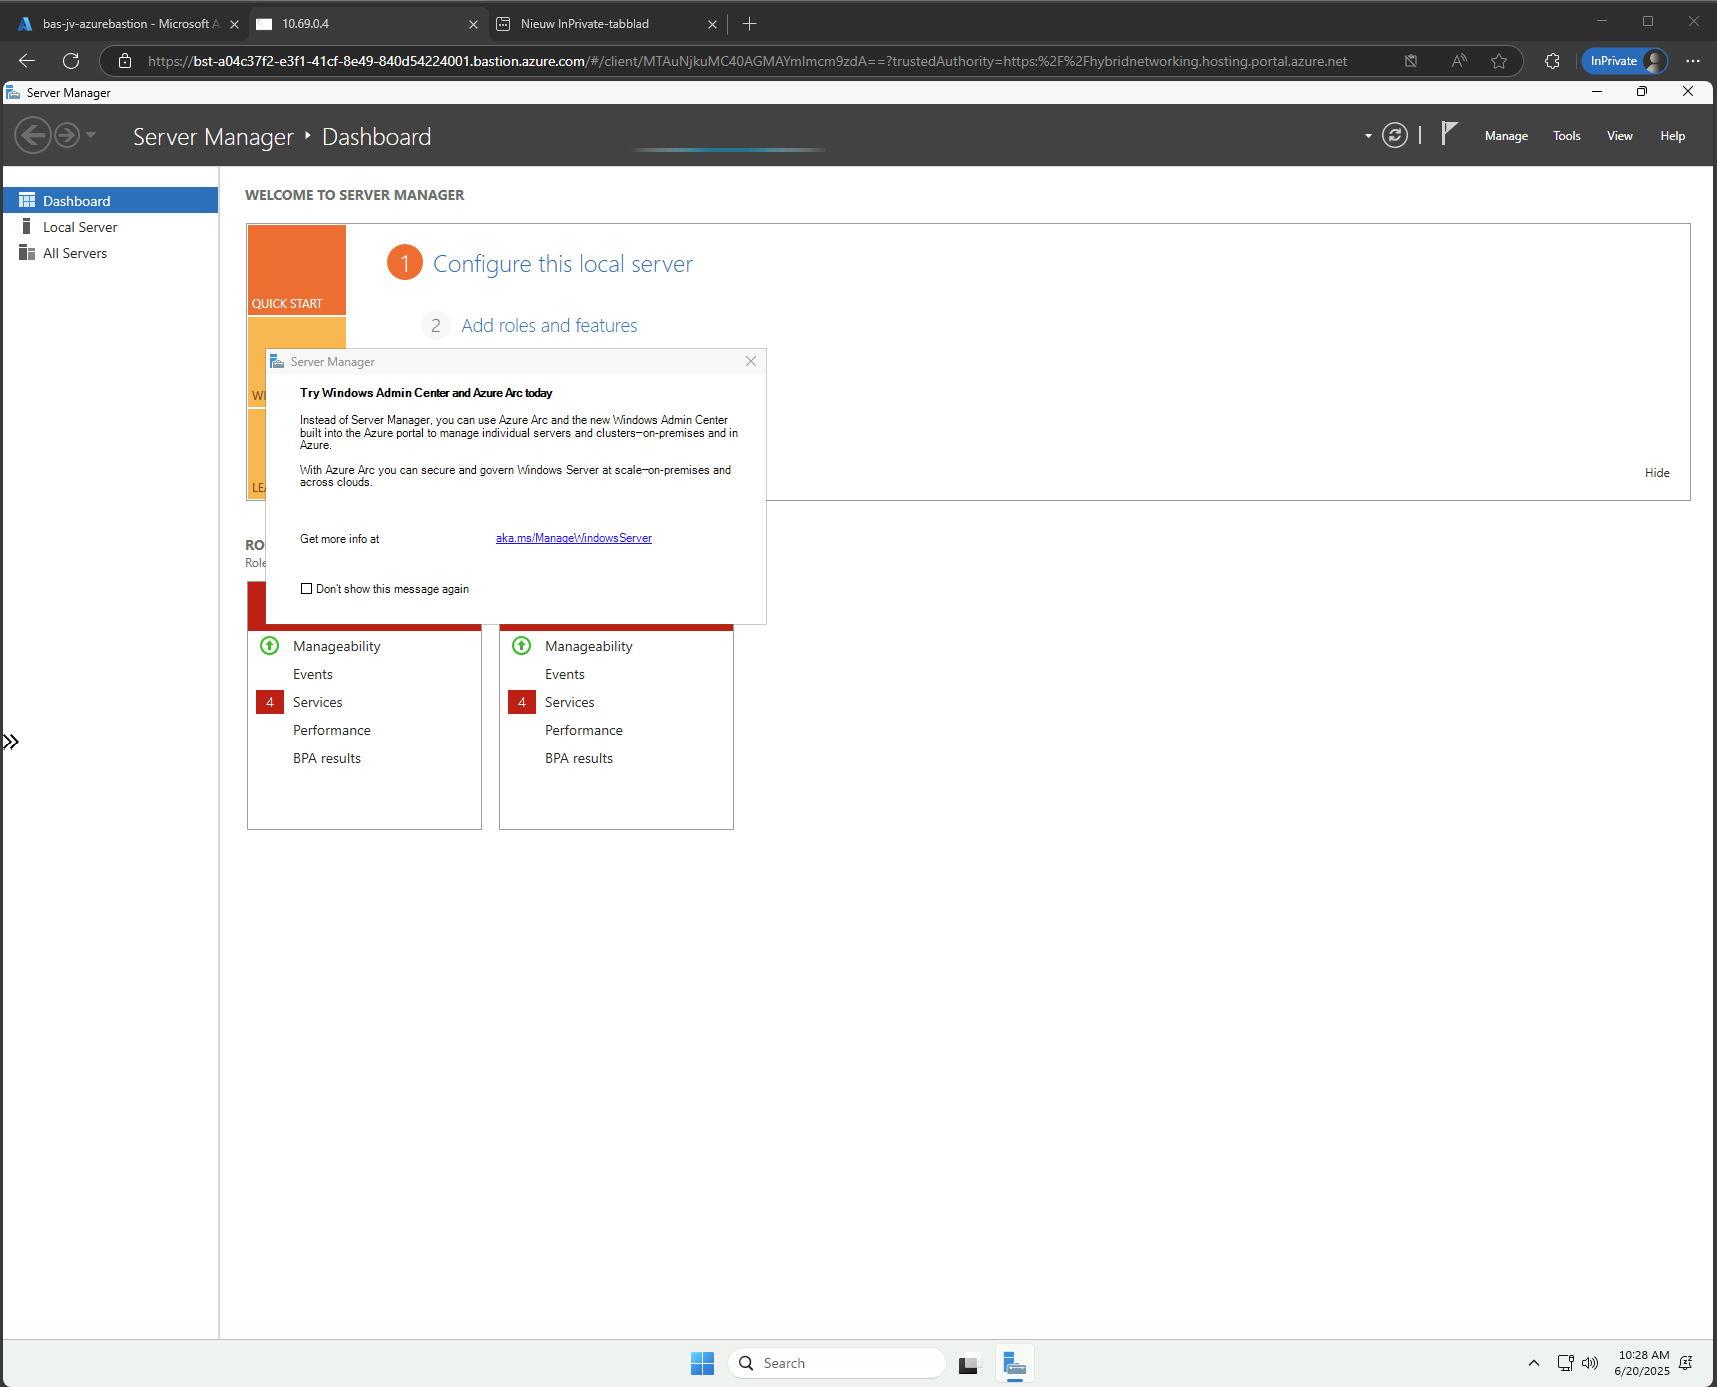
In Azure Bastion, it’s possible to have shareable links. With these links you can connect to the virtual machine directly from a URL, even without logging into the Azure Portal.
This may decrease the security, so be aware of how you store these links.
In the Azure Bastion instance, open the menu “Shareable links”:
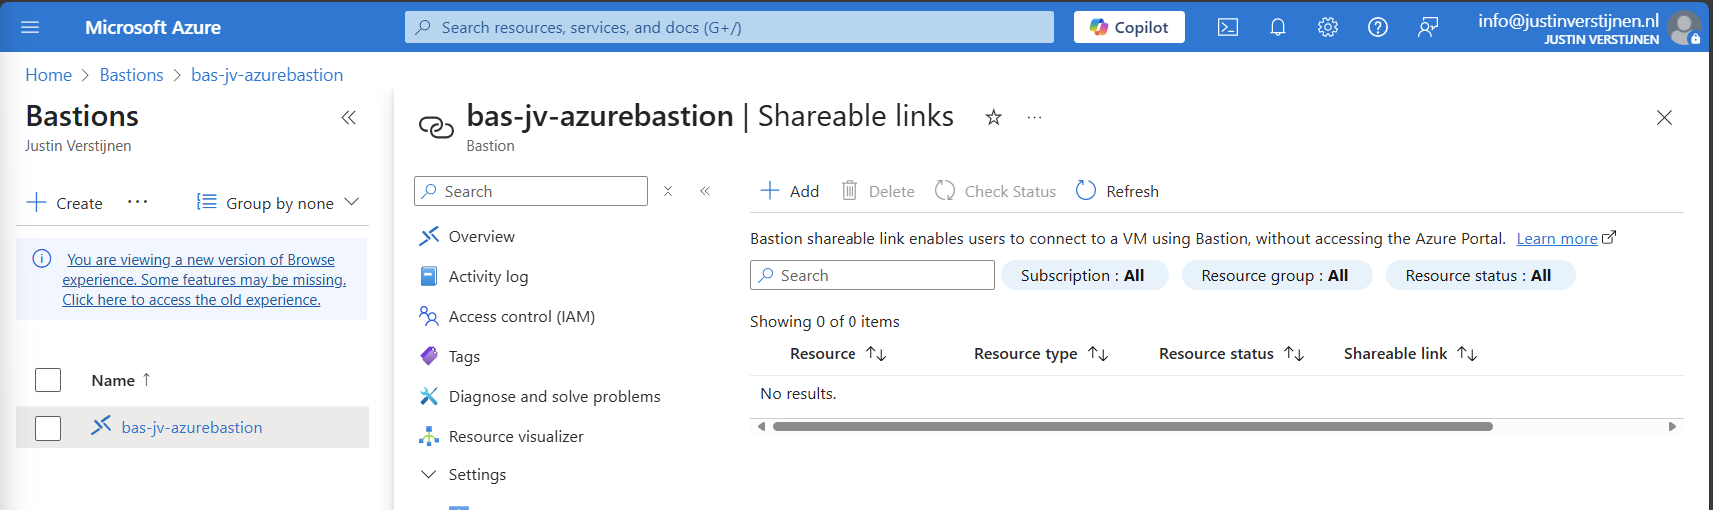
Click on “+ Add”
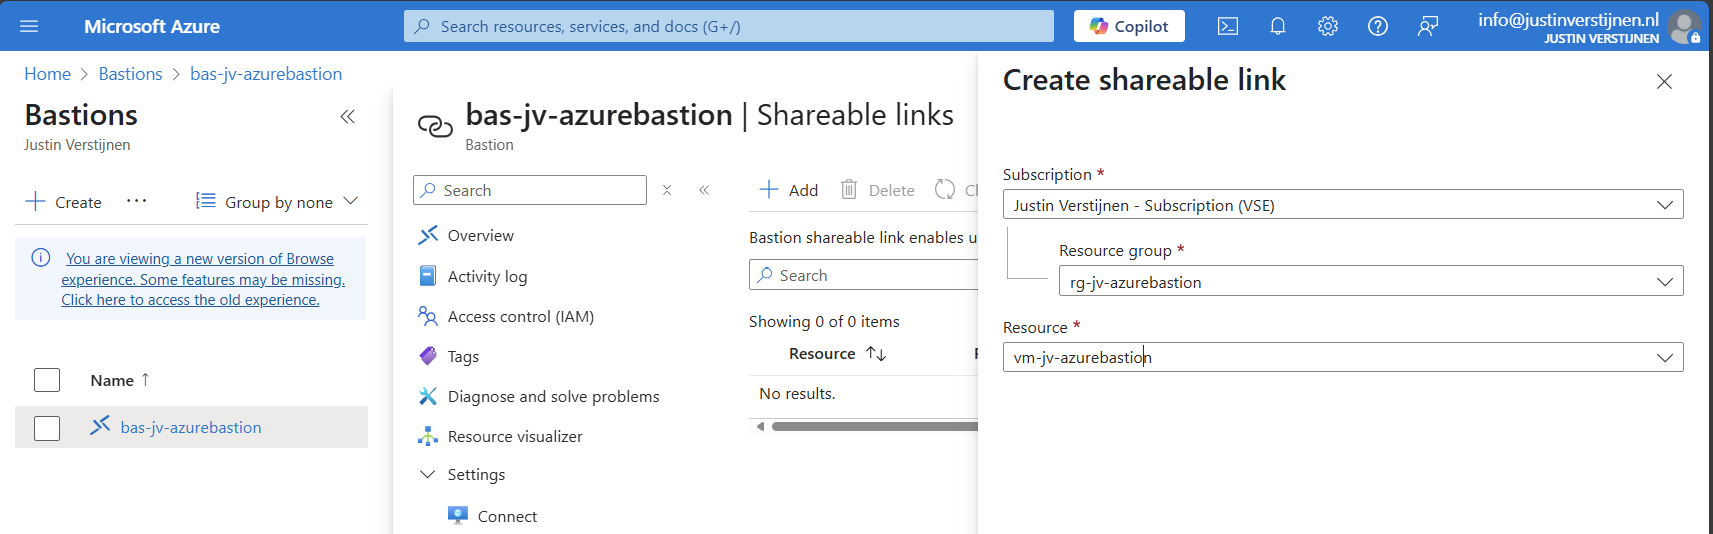
Select the resource group and then the virtual machine you want to share. Click on “Create”.
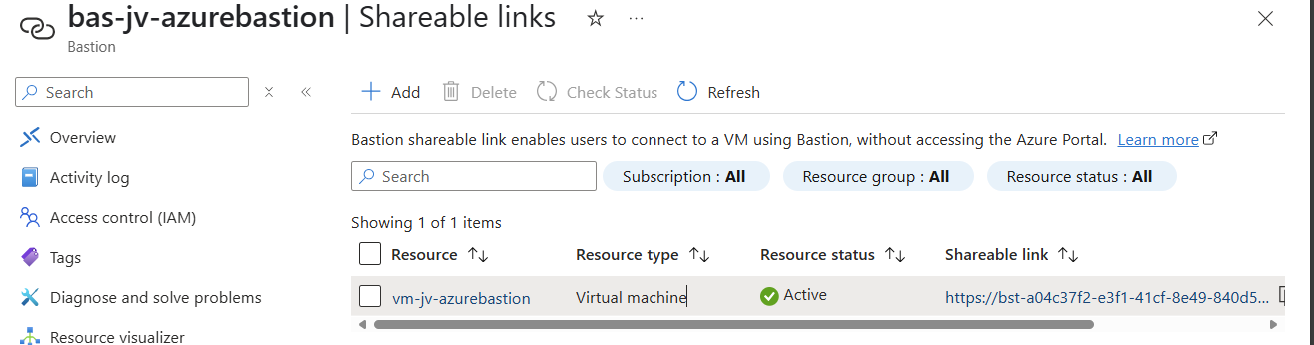
We can now connect to the machine using the shareable link. This looks like this:
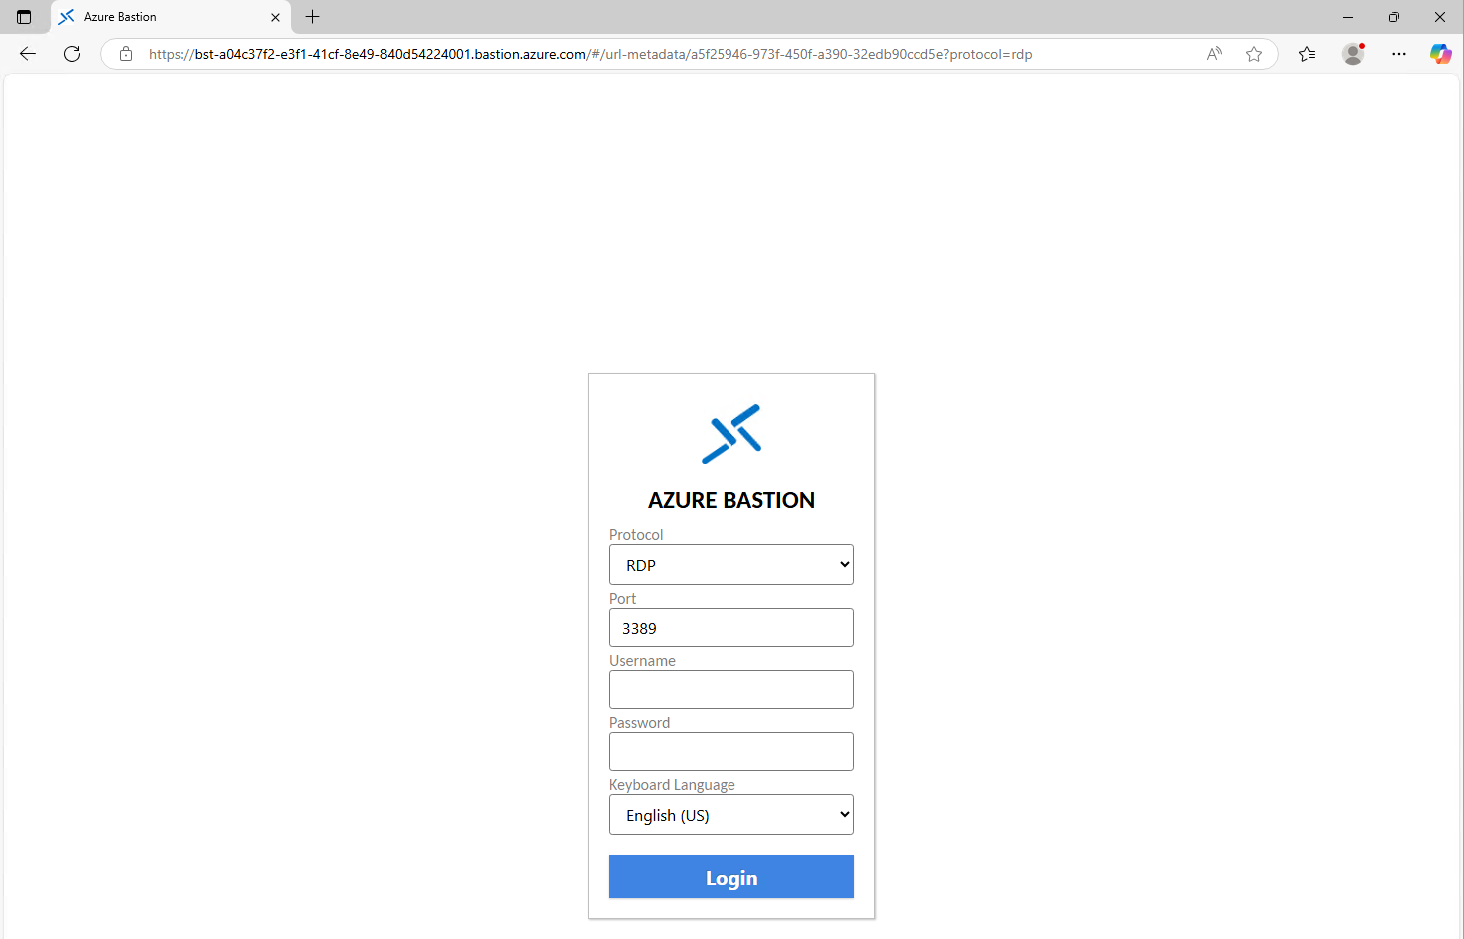
Of course you still need to have the credentials and the connection information, but this is less secure than accessing servers via the Azure Portal only. This will expose a login page to the internet, and with the right URL, its a matter of time for a hacker to breach your system.
We also have the option to disable copy/paste functionality in the sessions. This improves the security while decreasing the user experience for the administrators.
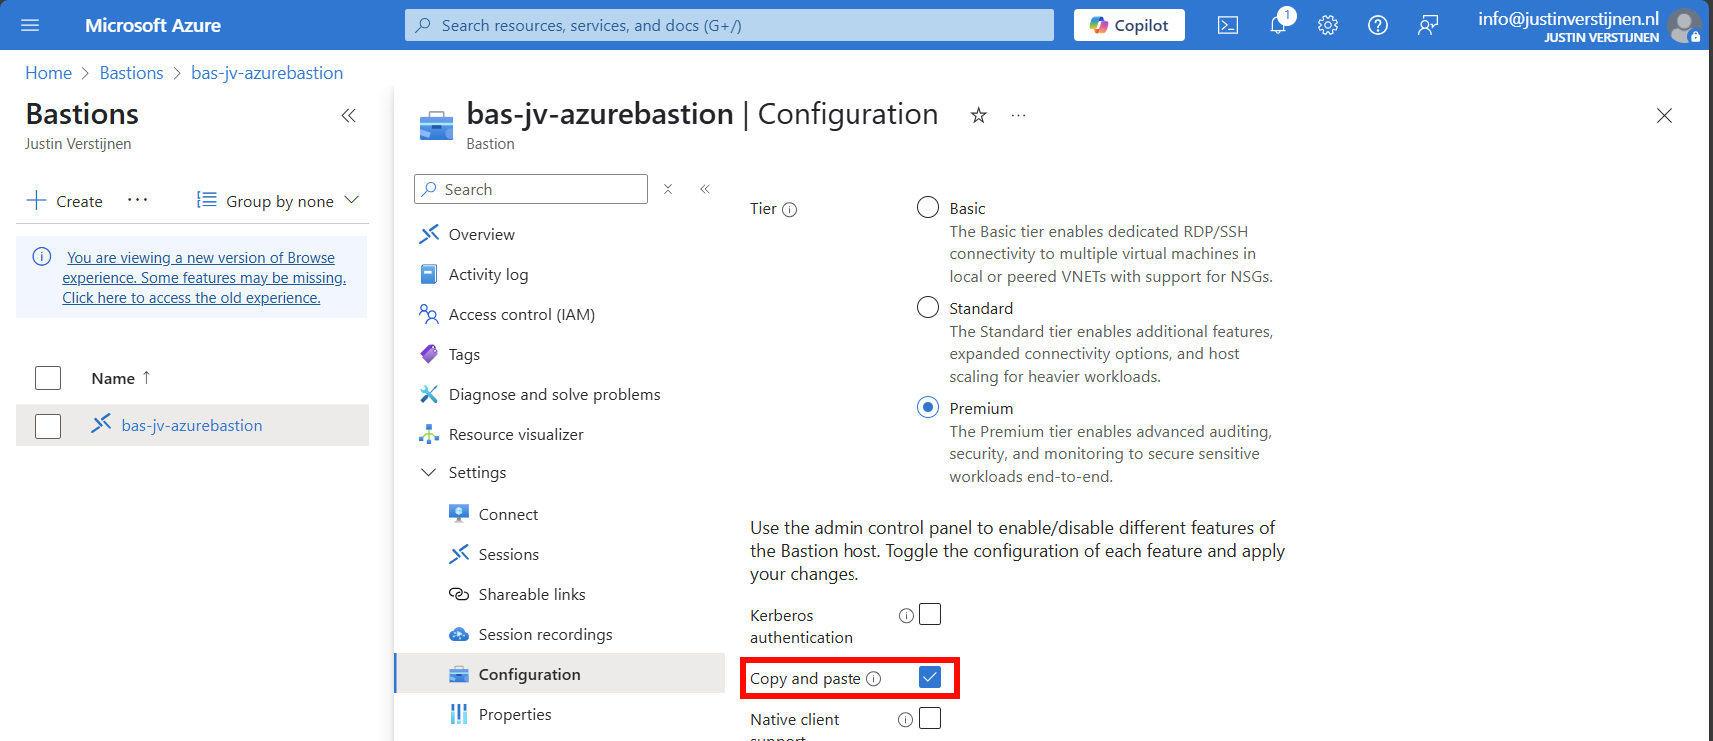
You can disable this by deselecting this option above.
When you want to configure session recording, we have to create a storage account in Azure for the recordings to be saved. This must be configured in these steps, where I will guide you through:
Let’s follow these steps:
Go to “Storage accounts” and create a new storage account:
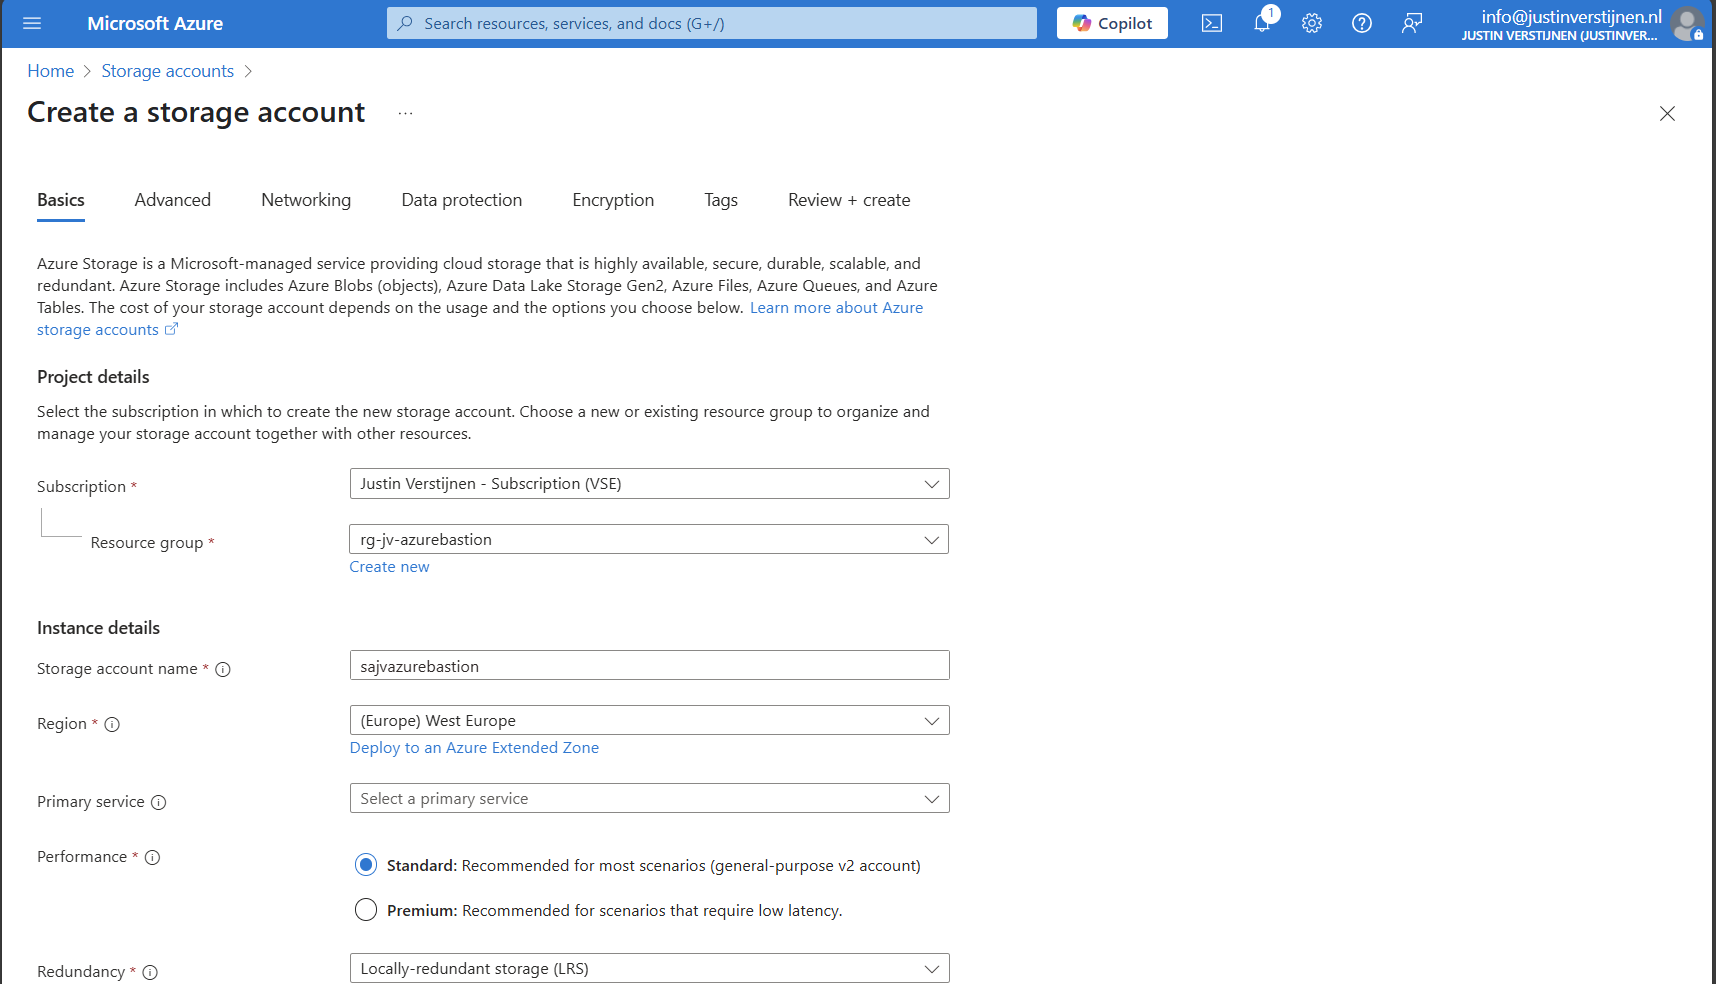
Fill in the details on the first page and skip to the deployment as we don’t need to change other settings.
We need to create a container on the storage account. A sort of folder/share when talking in Windows language. Go to the storage account.
We need to configure CORS resource sharing. This is a fancy way of permitting that the Blob container may be used by an endpoint. In our case, the endpoint is the bastion instance.
In the storage account, open the section “Resource sharing (CORS)”
Here fill in the following:
| Allowed Origins | Allowed methods | Allowed headers | Exposed headers | Max age |
| Bastion DNS name* | GET | * | * | 86400 |
*in my case: https://bst-a04c37f2-e3f1-41cf-8e49-840d54224001.bastion.azure.com
The Bation DNS name can be found on the homepage of the Azure Bastion instance:
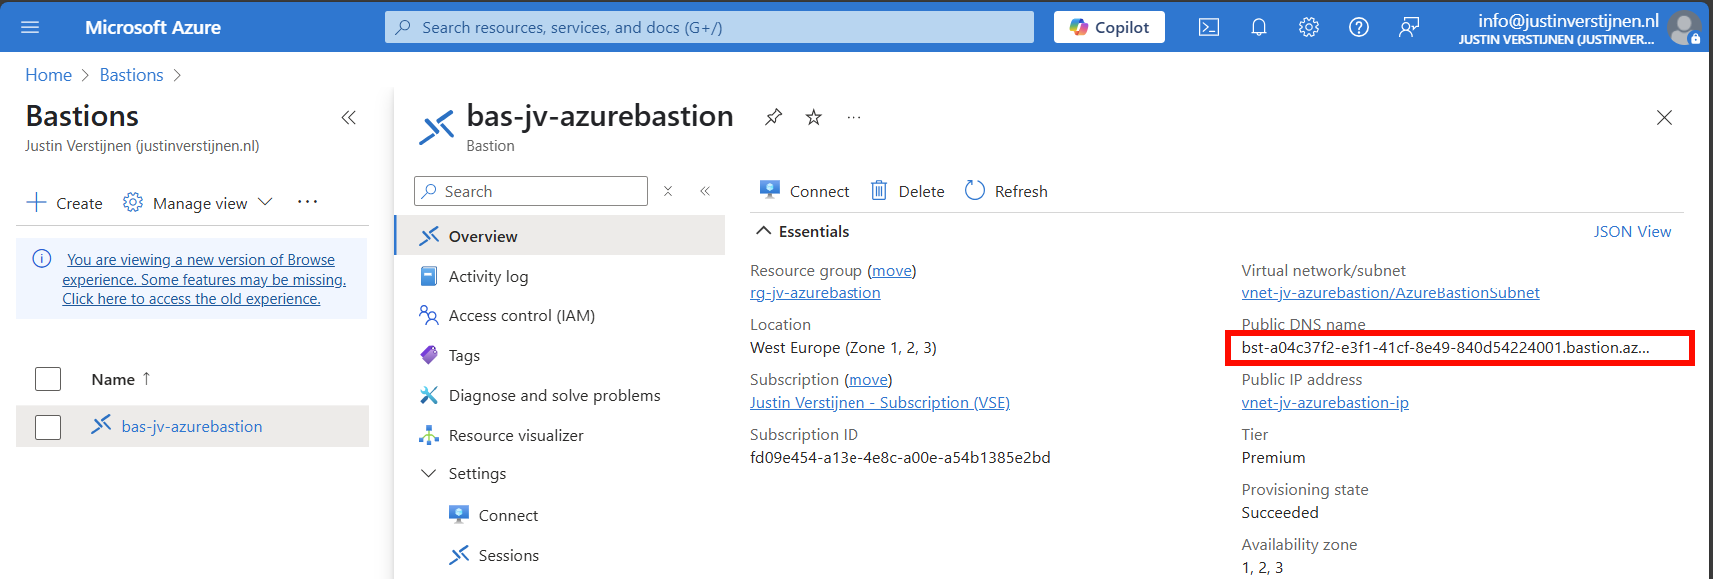
Ensure the CORS settings look like this:
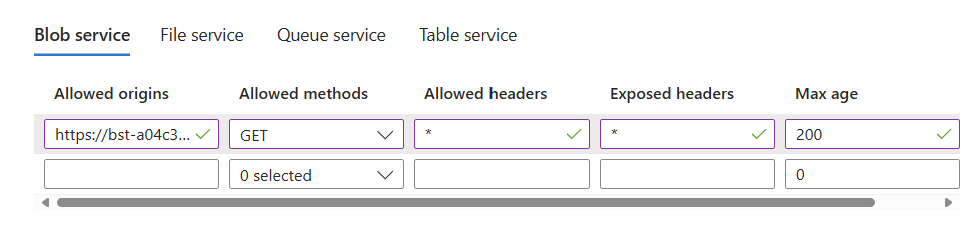
Click on “Save” and we are done with CORS.
Go to the storage account again and create a new container here:
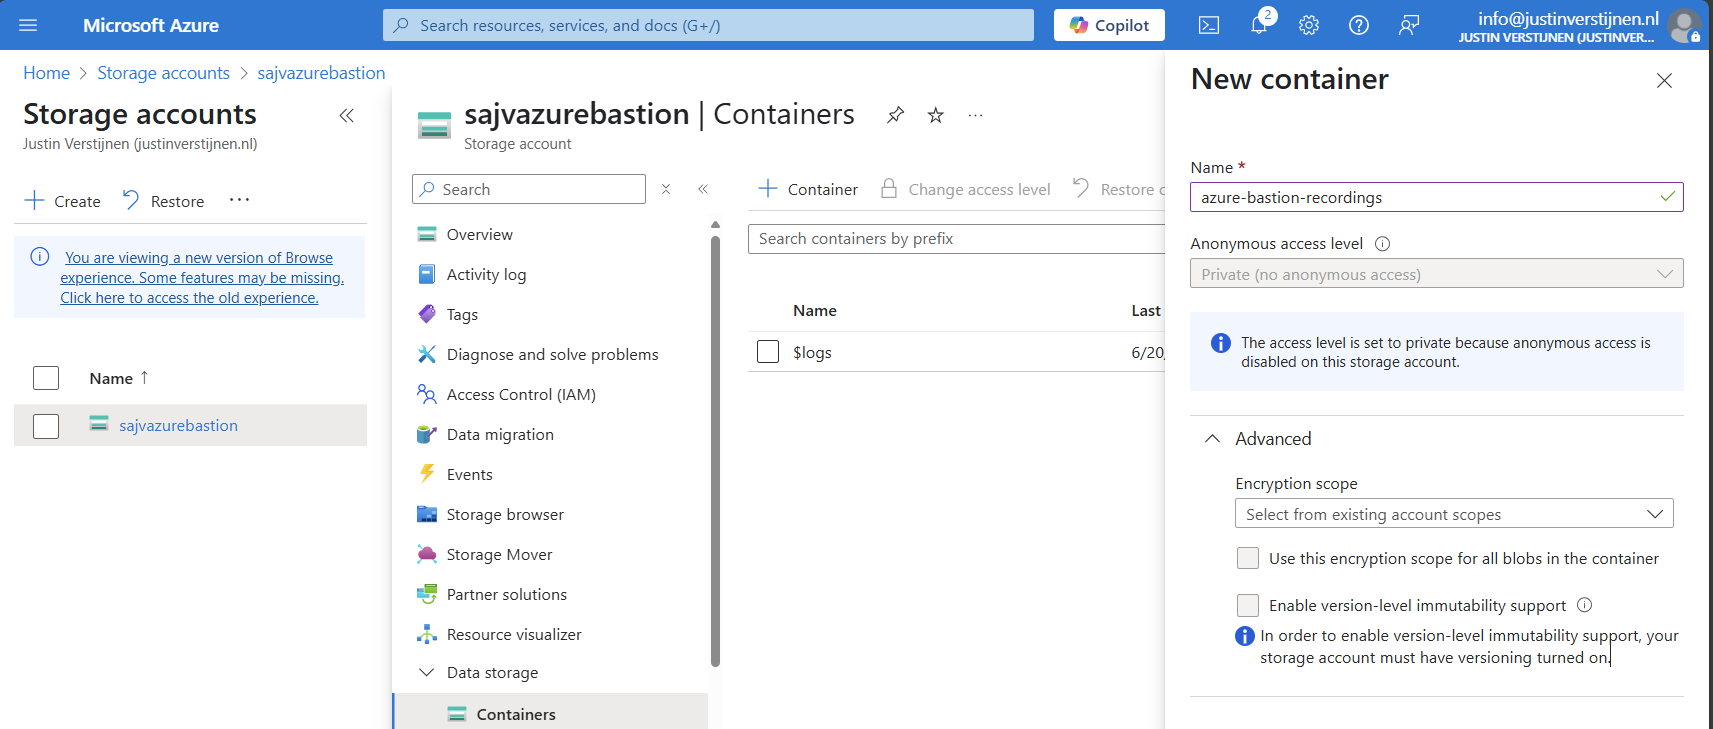
Create the container and open it.
We need to create a Shared Access Signature for the Azure Bastion instance to access our newly created storage account and container.
A Shared Access Signature (SAS) is a granular token which permits limited access to a storage account. A limited token with limited permissions at suit your needs, while using least-privilege.
To learn more about SAS tokens: click here
When you have opened the container, open “Shared access tokens”:
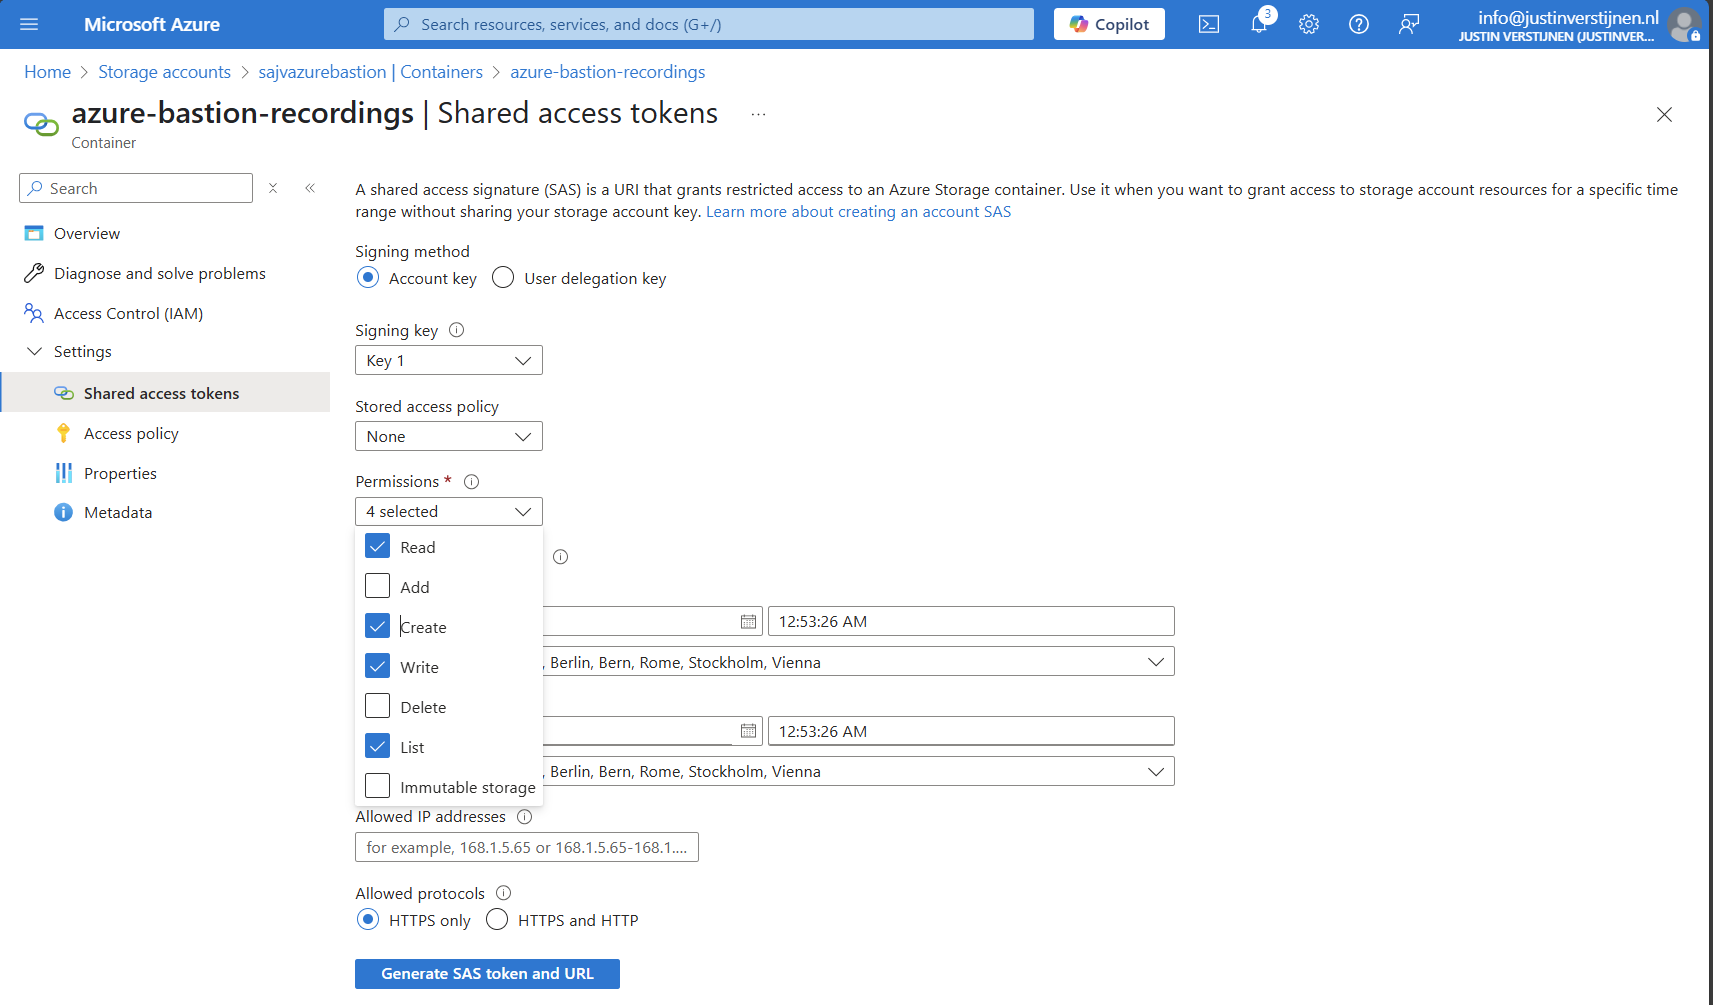
Then click on “Generate SAS token and URL” to generate a URL:

Copy the Blob SAS URL, as we need this in the next step.
We need to paste this URL into Azure Bastion, as the instance can save the recordings there. Head to the Azure Bastion instance:
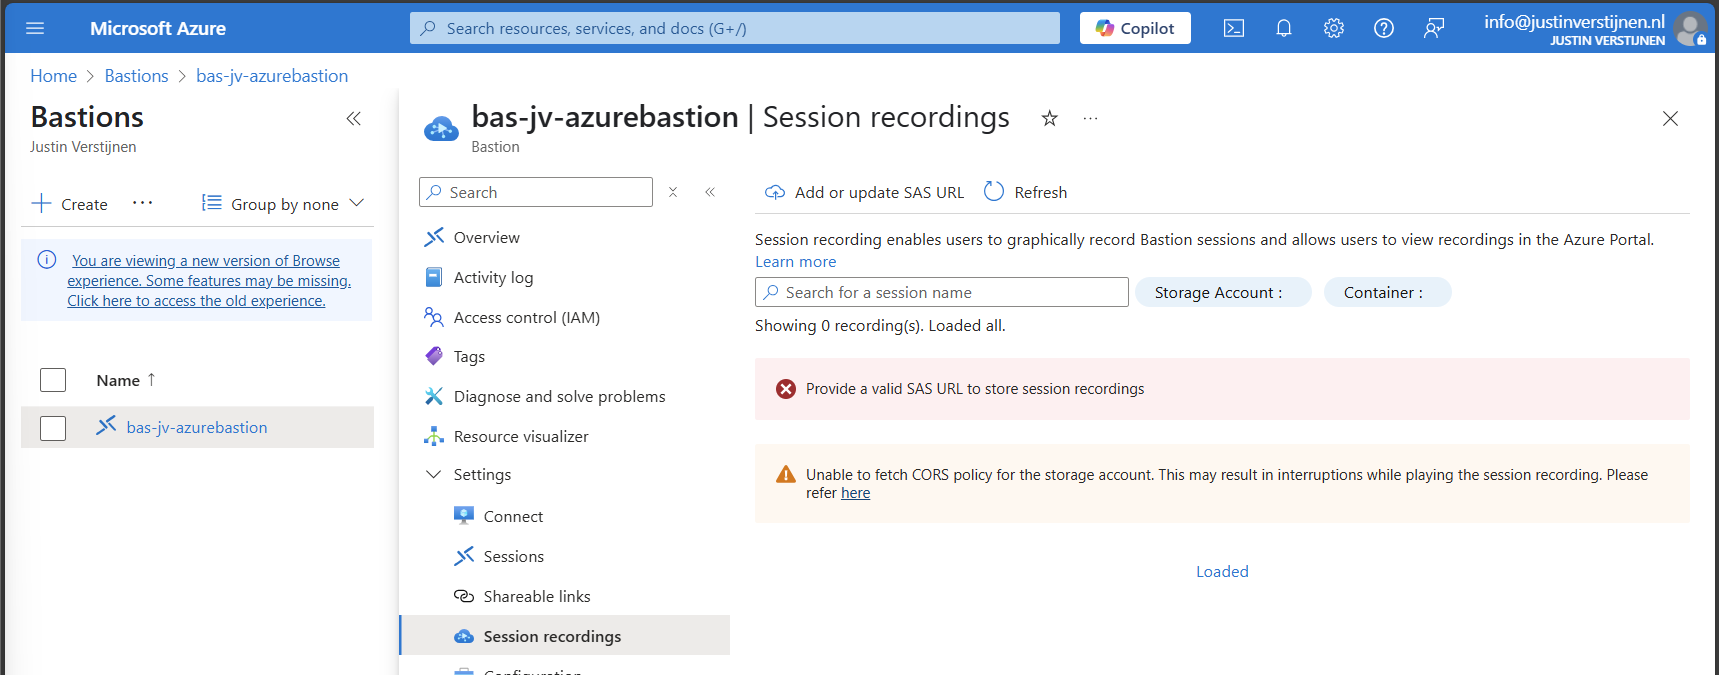
Then open the option “Session recordings” and click on “Add or update SAS URL”.
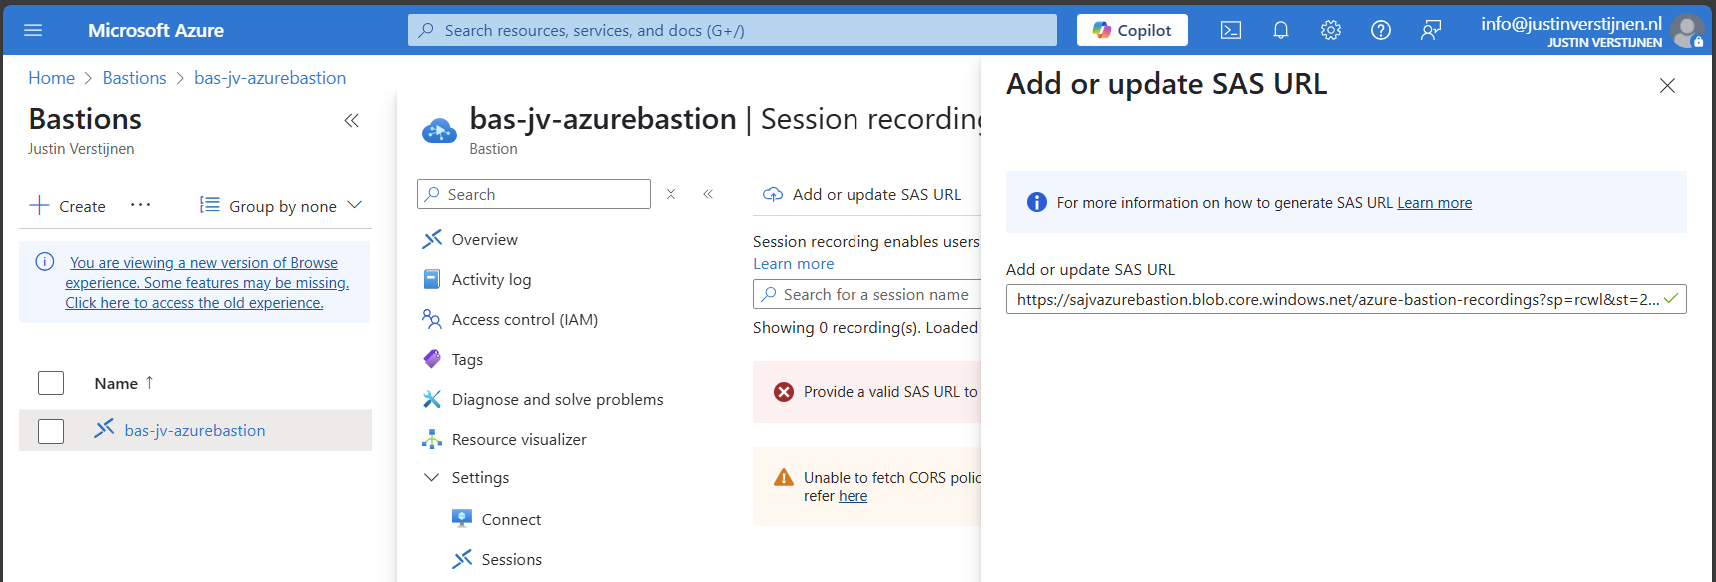
Paste the URL here and click on “Upload”.
Now the service is succesfully configured!

Now let’s connect again to a VM now by going to the instance:
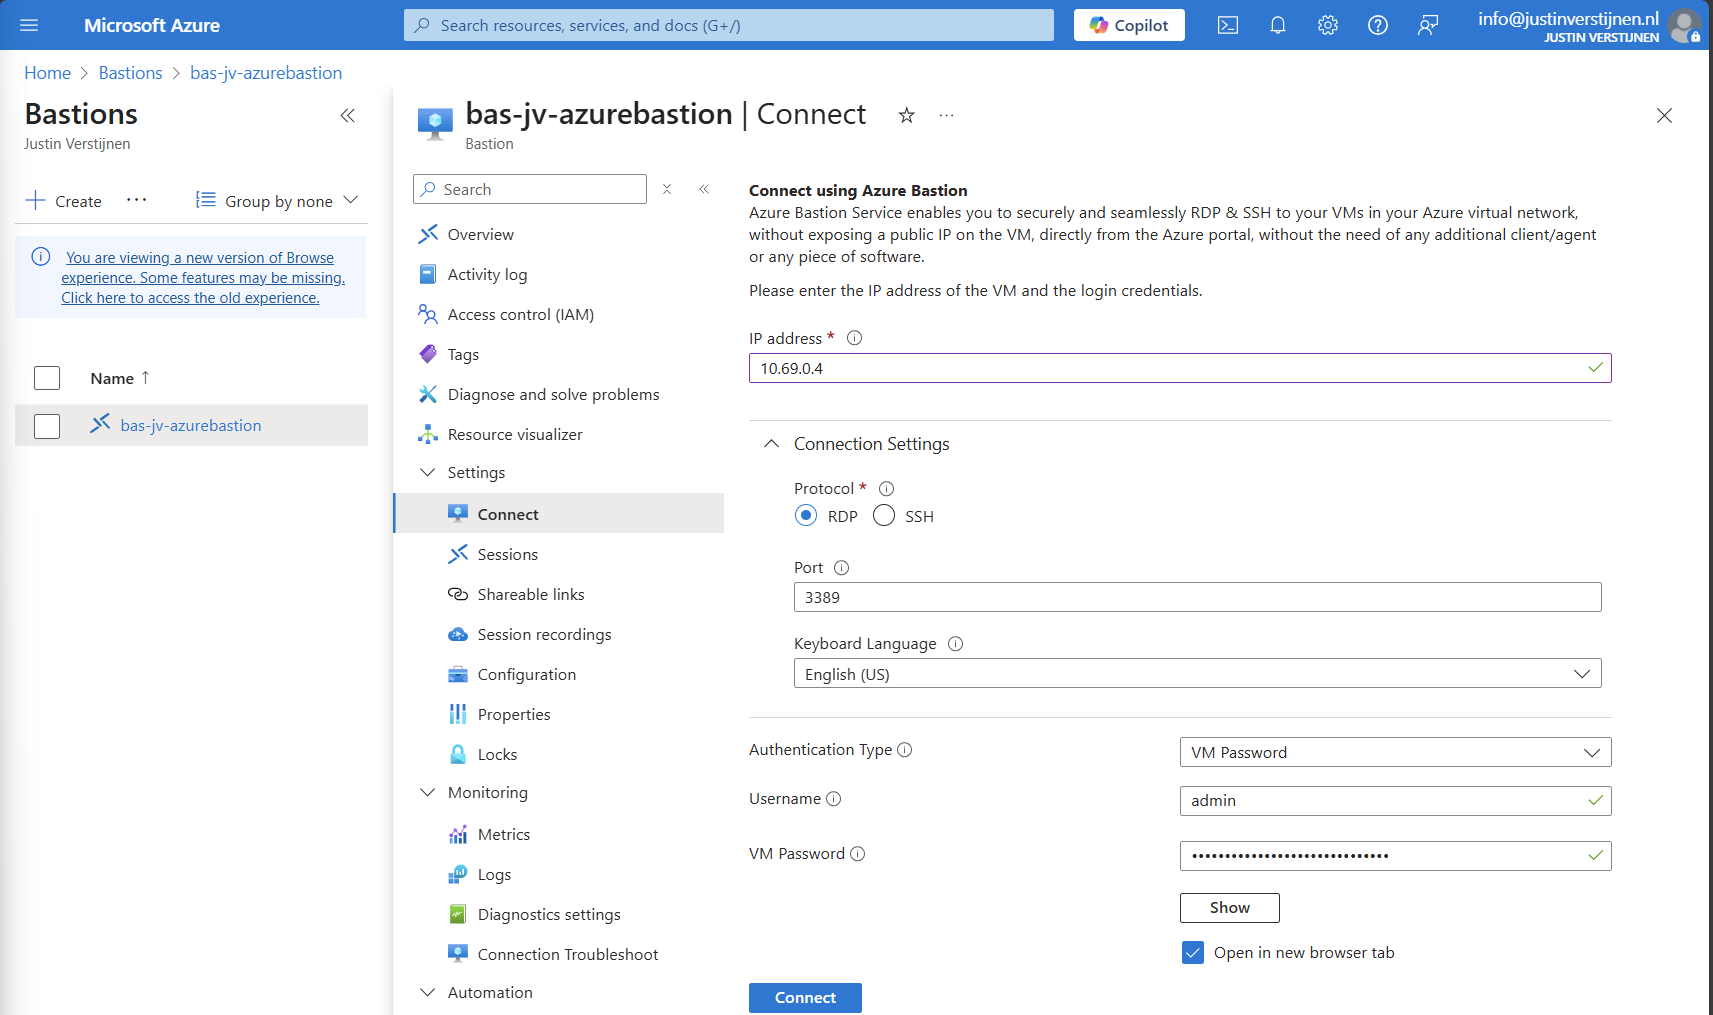
Now fill in the credentials of the machine to connect with it.

We are once again connected, and this session will be recorded. You can find these recordings in the Session recordings section in the Azure portal. These will be saved after a session is closed.
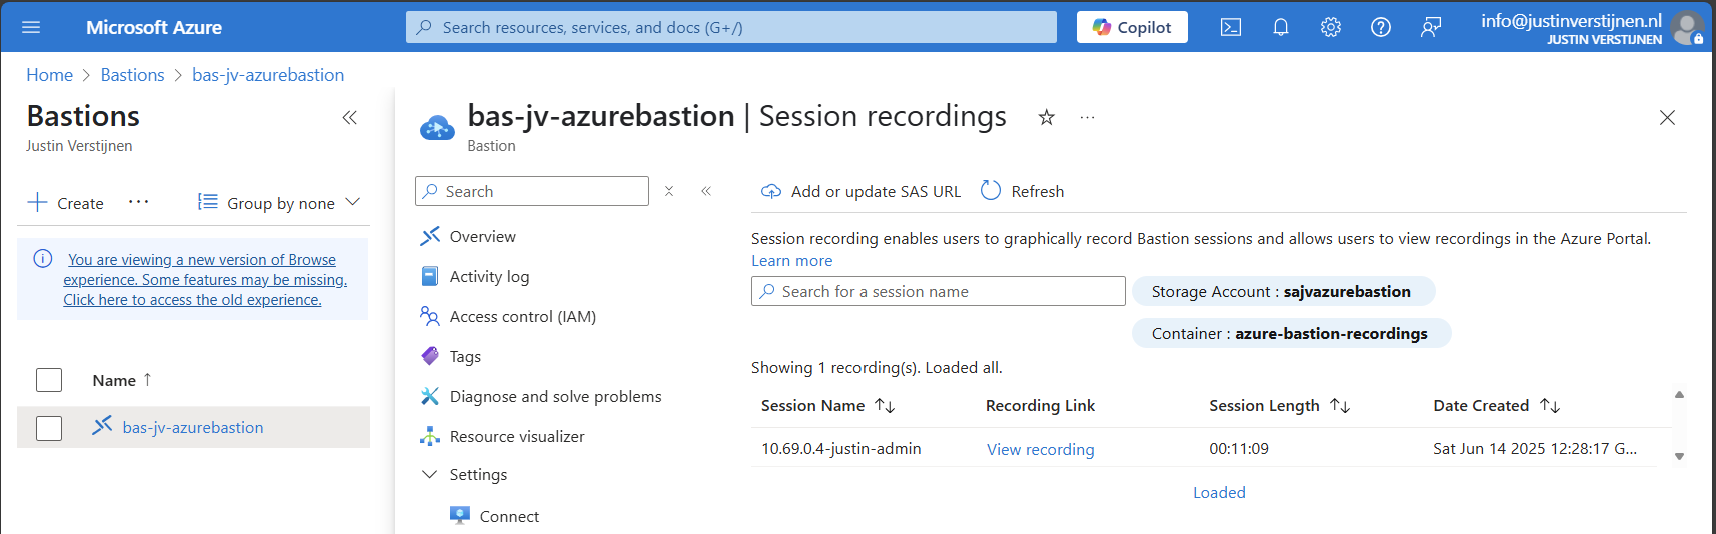
The recording looks like this, watch me installing the ISS role for demonstration of this function. This is a recording that Azure Bastion has made.
Azure Bastion is a great tool for managing your servers in the cloud without opening sensitive TCP/IP ports to the internet. It also can be really useful as Jump server.
In my opinion it is relatively expensive, especially for smaller environments because for the price of a basic instance we can configure a great Windows MGMT server where we have all our tools installed.
For bigger environments where security is a number one priority and money a much lower priority, this is a must-use tool and I really recommend it.
Thank you for reading this post and I hope it was helpful.
You have reached the end of the page. You can navigate through other blog posts as well, share this post on X, LinkedIn and Reddit or return to the blog posts collection page. Thank you for visiting this post.
If you think something is wrong with this post or you want to know more, you can send me a message to one of my social profiles at: https://justinverstijnen.nl/about/
If you find this page and blog very useful and you want to leave a donation, you can use the button below to buy me a beer. Hosting and maintaining a website takes a lot of time and money. Thank you in advance and cheers :)
The terms and conditions apply to this post.
In Azure we can configure private DNS zones for local domains. We can use this to resolve our resources in our virtual network by name instead of IP addresses, which can be helpful creating failover and redundancy. These could all help to achieve a higher availability for your end users. Especially because Private DNS Zones are free and globally redundant.
I thought of myself; “Will this also work for Active Directory?”. In that case, DNS would still resolve if suddenly our domain controllers are offline and users are working in a solution like Azure Virtual Desktop.
In this guide I will describe how I got this to work. Honestly, the setup with real DNS servers is better, but it’s worth giving this setup a chance.
The configuration in this blog post is a virtual network with one server and one client. In the virtual network, we will deploy a Azure Private DNS instance and that instance will do everything DNS in our network.
This looks like this:
Assuming you have everything already in plave, we will now deploy our Azure Private DNS zone. Open the Azure Portal and search for “Private DNS zones”.
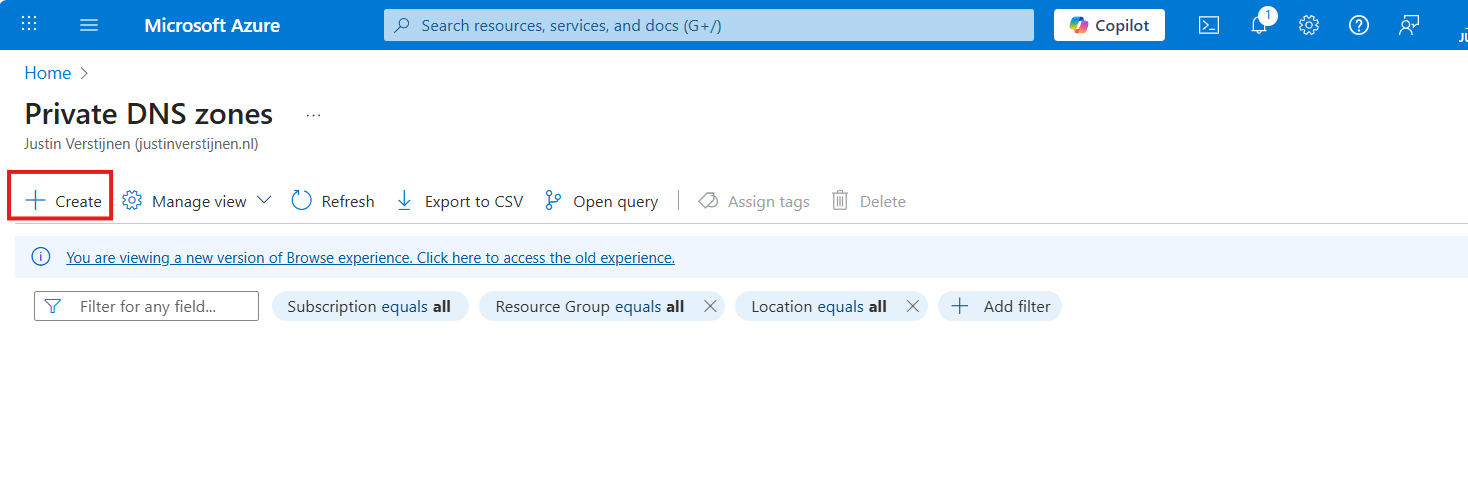
Create a new DNS zone here.
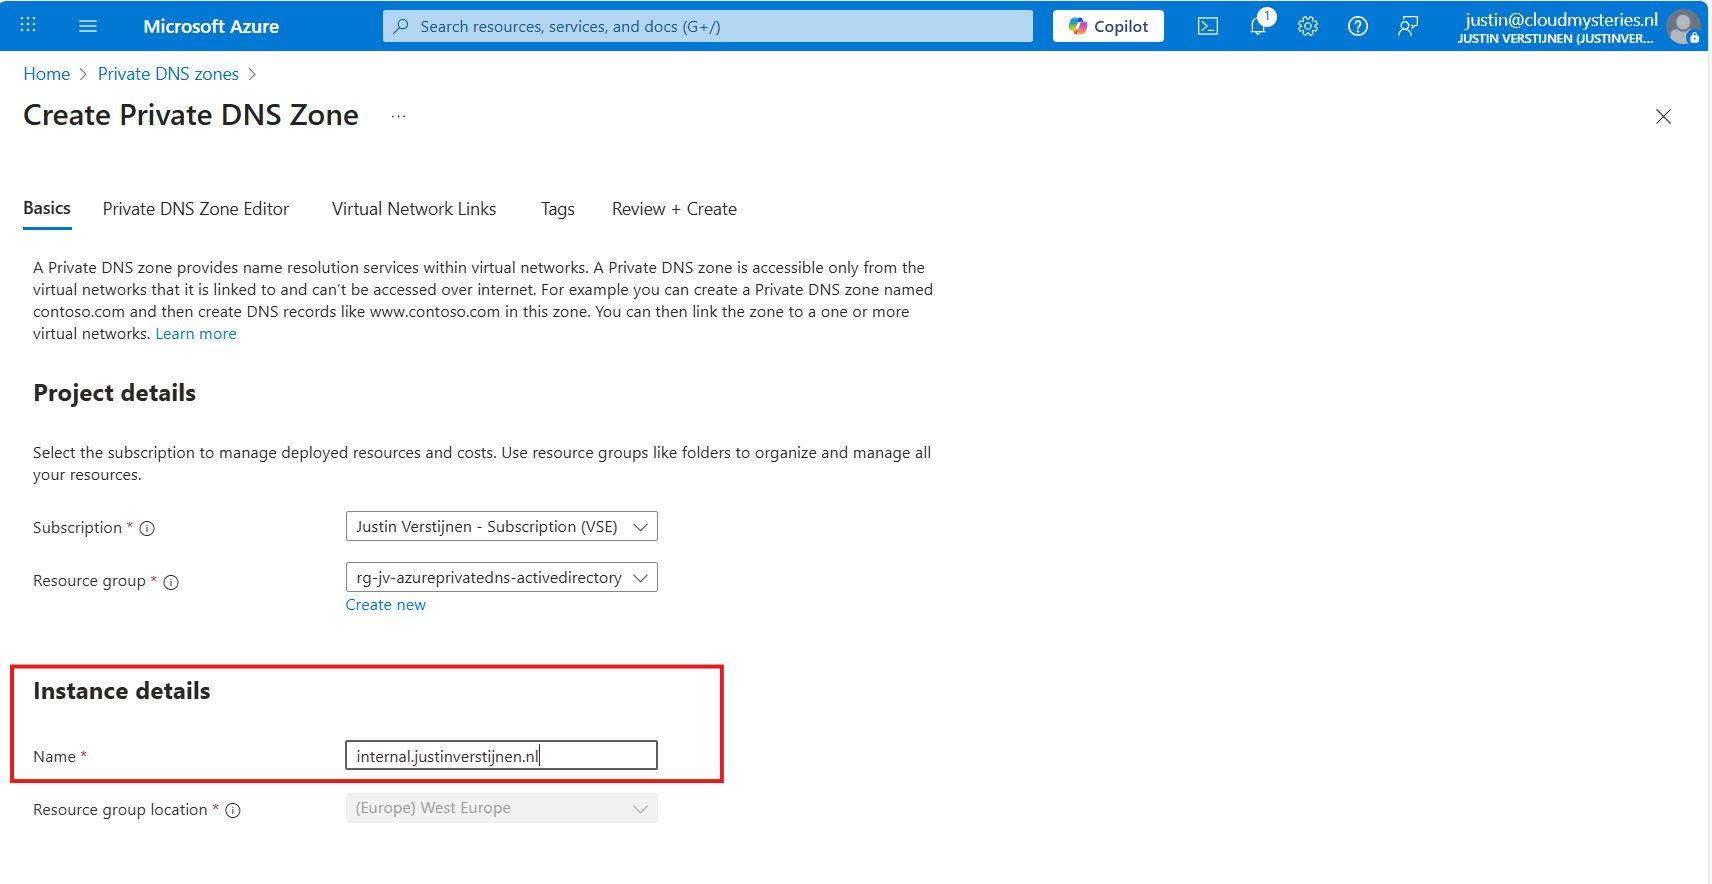
Place it in the right resource group and name the domain your desired domain name. If you actually want to link your Active Directory, this must be the same as your Active Directory domain name.
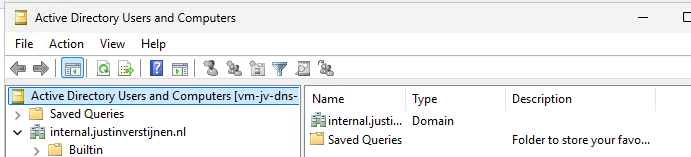
In my case, I will name it internal.justinverstijnen.nl
Advance to the tab “Virtual Network Links”, and we have to link our virtual network with Active Directory here:
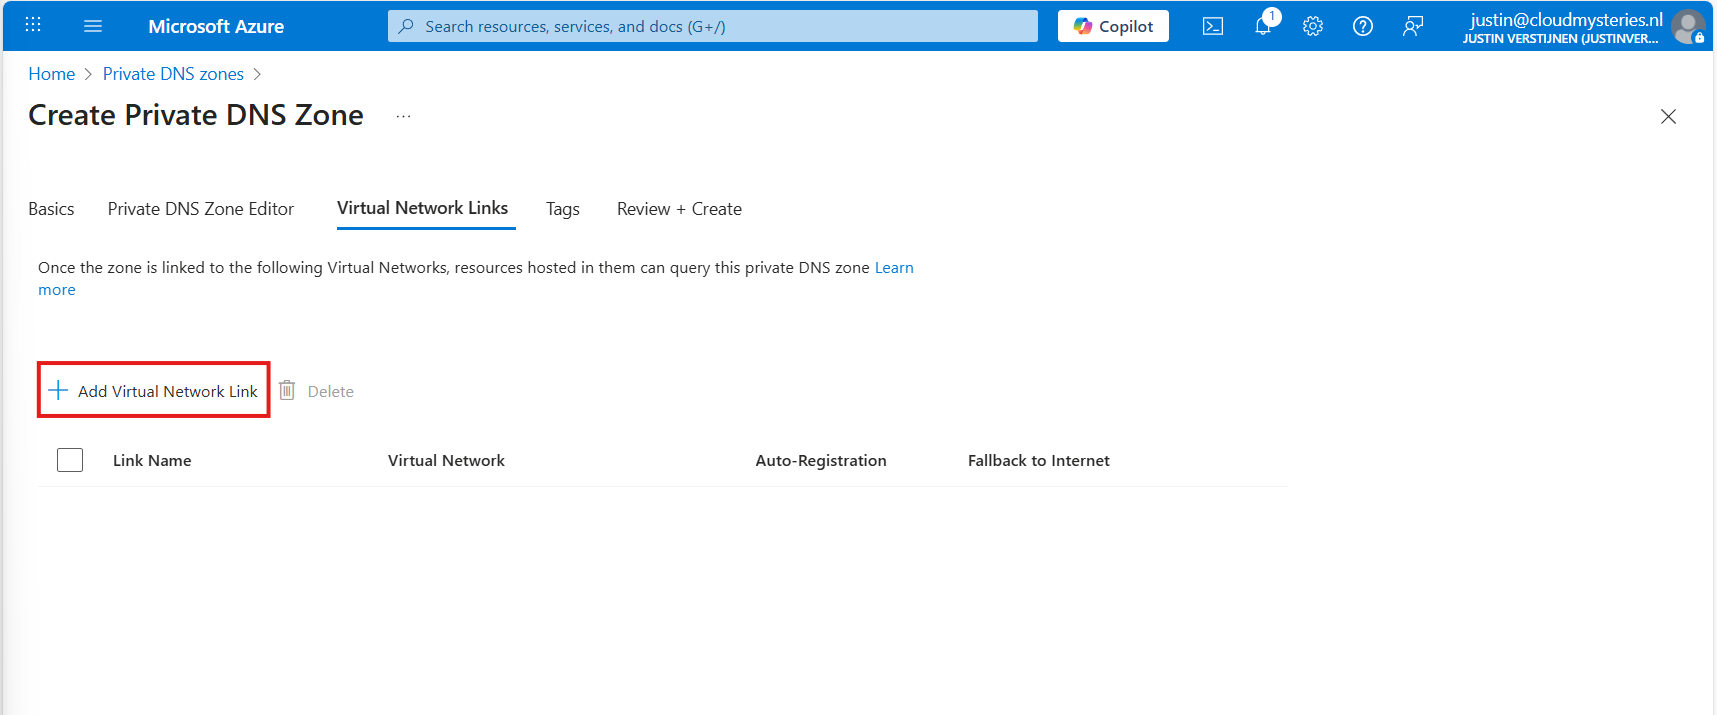
Give the link a name and select the right virtual network.

You can enable “Auto registration” here, this means every VM in the network will be automatically registered to this DNS zone. In my case, I enabled it. This saves us from having to create records by hand later on.

Advance to the “Review + create” tab and create the DNS zone.
For Active Directory to work, we need to create a set of DNS records. Active Directory relies heavily on DNS, not only for A records but also for SRV and NS records. I used priority and weight 100 for all SRV records.
| Recordname | Type | Target | Poort | Protocol |
|---|---|---|---|---|
| _ldap._tcp.dc._msdcs.internal.justinverstijnen.nl | SRV | vm-jv-dns-1.internal.justinverstijnen.nl | 389 | TCP |
| _ldap._tcp.internal.justinverstijnen.nl | SRV | vm-jv-dns-1.internal.justinverstijnen.nl | 389 | TCP |
| _kerberos._tcp.dc._msdcs.internal.justinverstijnen.nl | SRV | vm-jv-dns-1.internal.justinverstijnen.nl | 88 | TCP |
| _kerberos._udp.dc._msdcs.internal.justinverstijnen.nl | SRV | vm-jv-dns-1.internal.justinverstijnen.nl | 88 | UDP |
| _kpasswd._udp.internal.justinverstijnen.nl | SRV | vm-jv-dns-1.internal.justinverstijnen.nl | 464 | UDP |
| _ldap._tcp.pdc._msdcs.internal.justinverstijnen.nl | SRV | vm-jv-dns-1.internal.justinverstijnen.nl | 389 | TCP |
| vm-jv-dns-1.internal.justinverstijnen.nl | A | 10.0.0.4 | - | - |
| @ | A | 10.0.0.4 | - | - |
After creating those records in Private DNS, the list looks like this:

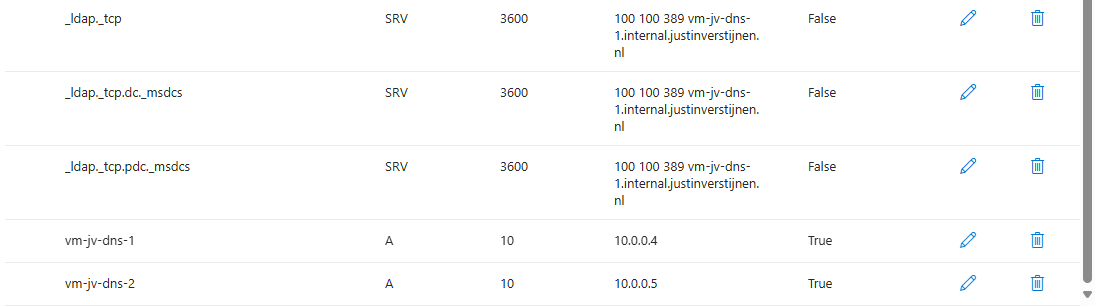
Now I headed over to my second machine, did some connectivity tests and tried to join the machine to the domain which instantly works:
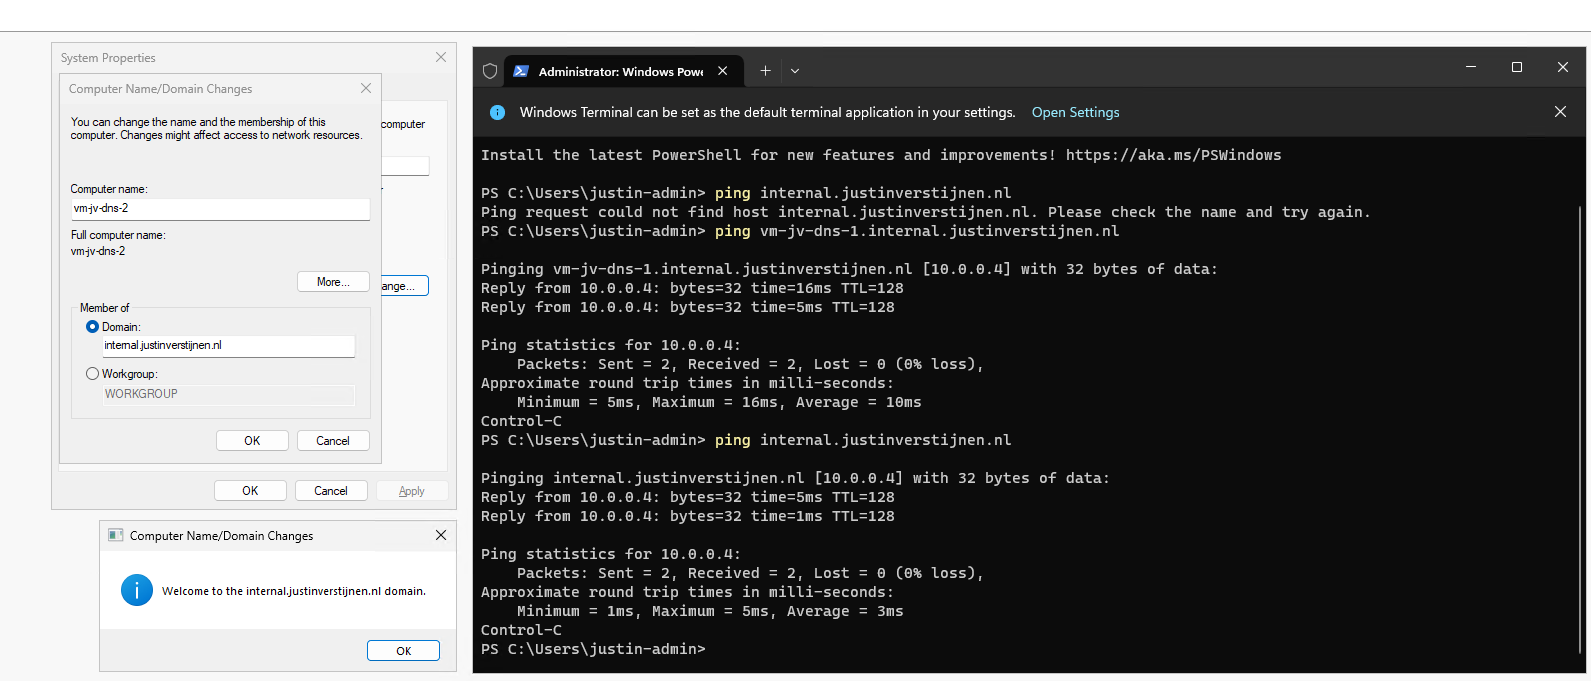
After restarting, no errors occured at this just domain joined machine and I was even able to fetch some Active Directory related services.
To 100% ensure that this works, I will install the Administration tools for Active Directory on the second server:

And I can create everything just like it is supposed. Really cool :)
This option may work flawlessly, I still don’t recommend it in any production environment. The extra redundancy is cool but it comes with extra administrative overhead. Every domain controller or DNS server for the domain must be added manually into the DNS zone.
The better option is to still use the Active Directory built-in DNS or Entra Domain Services and ensure this has the highest uptime possible by using availability zones.
These sources helped me by writing and research for this post;
You have reached the end of the page. You can navigate through other blog posts as well, share this post on X, LinkedIn and Reddit or return to the blog posts collection page. Thank you for visiting this post.
If you think something is wrong with this post or you want to know more, you can send me a message to one of my social profiles at: https://justinverstijnen.nl/about/
If you find this page and blog very useful and you want to leave a donation, you can use the button below to buy me a beer. Hosting and maintaining a website takes a lot of time and money. Thank you in advance and cheers :)
The terms and conditions apply to this post.
In the past few weeks, I have been busy on scaling up my tools and the backend hosting of the tools. For the last year, I used multiple Static Web Apps on Azure for this, but this took a lot of time administering and creating them. I thought about a better and more scalable manner of hosting tools, minimizing the amount of hosts needed, uniforming URLs and shortcodes with Azure Front Door (guide coming up) andlinking multiple GitHub repositories into one for central management.
In this guide, I will describe how I now host multiple Github applications/tools into one single Static Web App environment in Azure. This mostly captures the simple, single task, tools which can be found on my website:
Because I started with a single tool, then built another and another and another one, I needed a sort of scalable way of doing this. Each tool means doing the following stuff:
In this guide, I will describe the steps I have taken to accomplish what I’ve built now. A single Static Web App instance with all my tools running.
To prepare for this setup, we need to have our GitHub repository topology right. I already had all my tools in place. Then I have built my repositories to be as the following diagram:
In every repository I have placed a new YML GitHub Action file, stating that the content of the repository must be mirrored to another repository, instead of pushing it to Azure. All of the repos at the top have this Action in place an they all mirror to the repository at the bottom: “swa-jv-tools” which is my collective repository. This is the only repository connected to Azure.
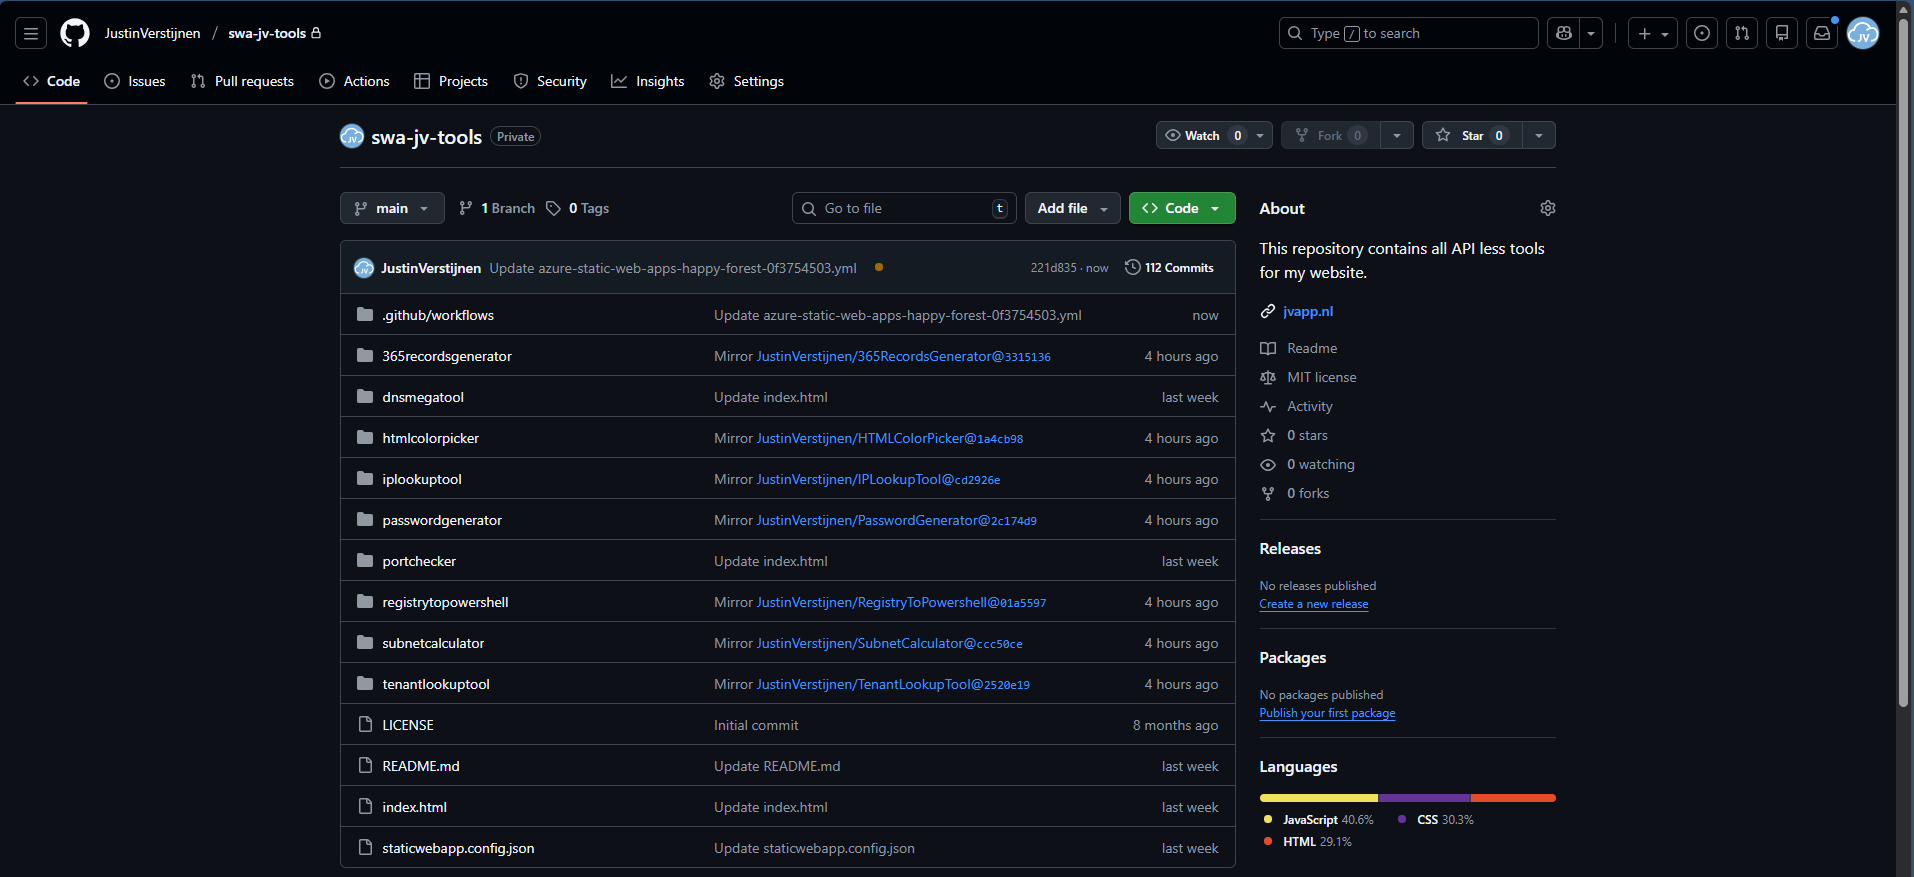
GitHub Actions are automated scripts that can run every time a repository is updated or on schedule. It basically has a trigger, and then does an action. This can be mirroring the repository to another or to upload the complete repository to a Static Web App instance on Microsoft Azure.
GitHub Actions are stored in your Repository under the .Github folder and then Workflows:
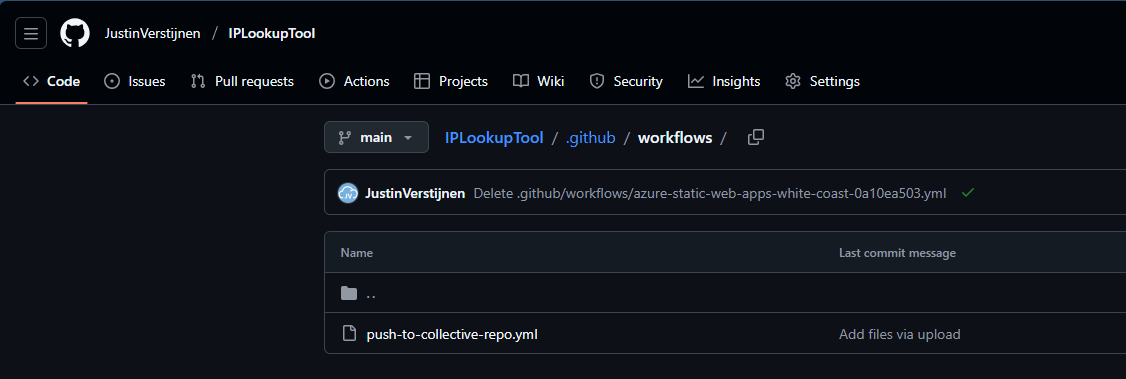
In this guide, I will show you how to create your first GitHub Action.
To configure one Repository to act as a collective repository, we must first prepare our collective repository. The other repos must have access to write to their destination, which we will do with a Personal Access Token (PAT).

In Github, go to your Settings, and then scroll down to “Developer settings”.

Then on the left, select “Personal access tokens” and then “Fine-grained tokens”.
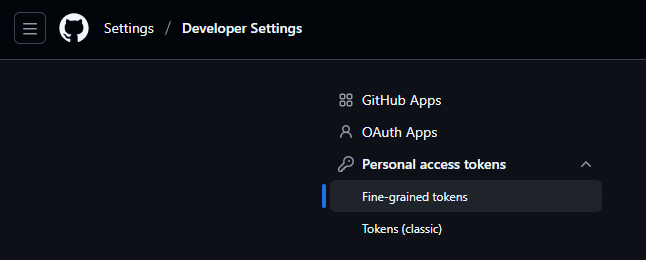
Click on the “Generate new token” button here to create a new token.
Fill in the details and select the Expiration date as you want.
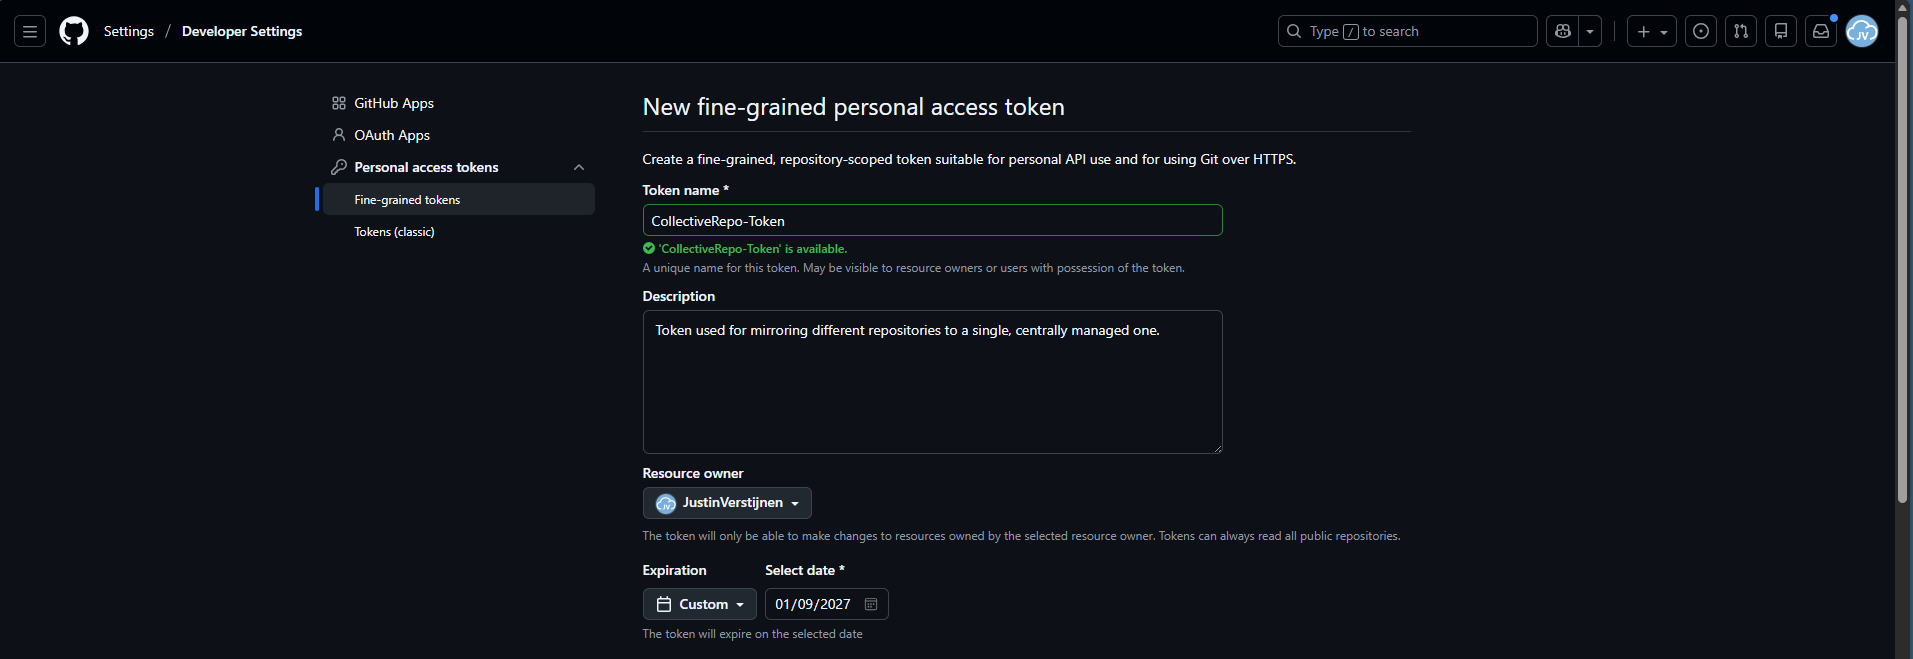
Then scroll down to “Repository access” and select “Only selected repositories”. We will create a token that only writes to a certain repository. We will select our destination repository only.

Under permissions, add the Actions permission and set the access scope to “Read and write”.
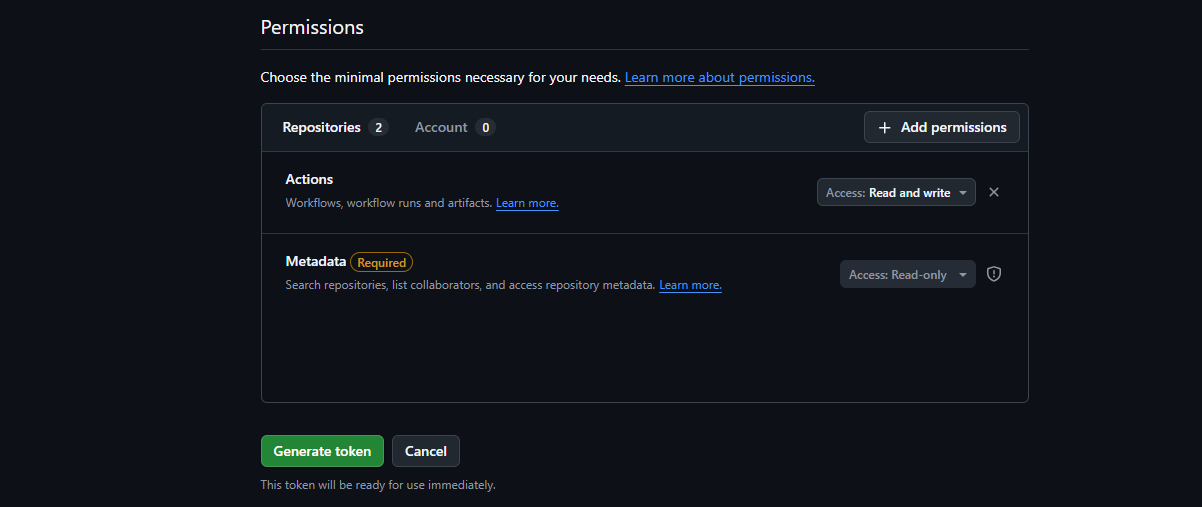
Then create your token and save this in sa safe place (like a password manager).
Now that we have our secret/PAT created with permissions on the destination, we will have to give our source repos access by setting this secret.
For every source repository, perform these actions:
In your source repo, go to “Settings” and then “Secrets and variables” and click “Actions”.
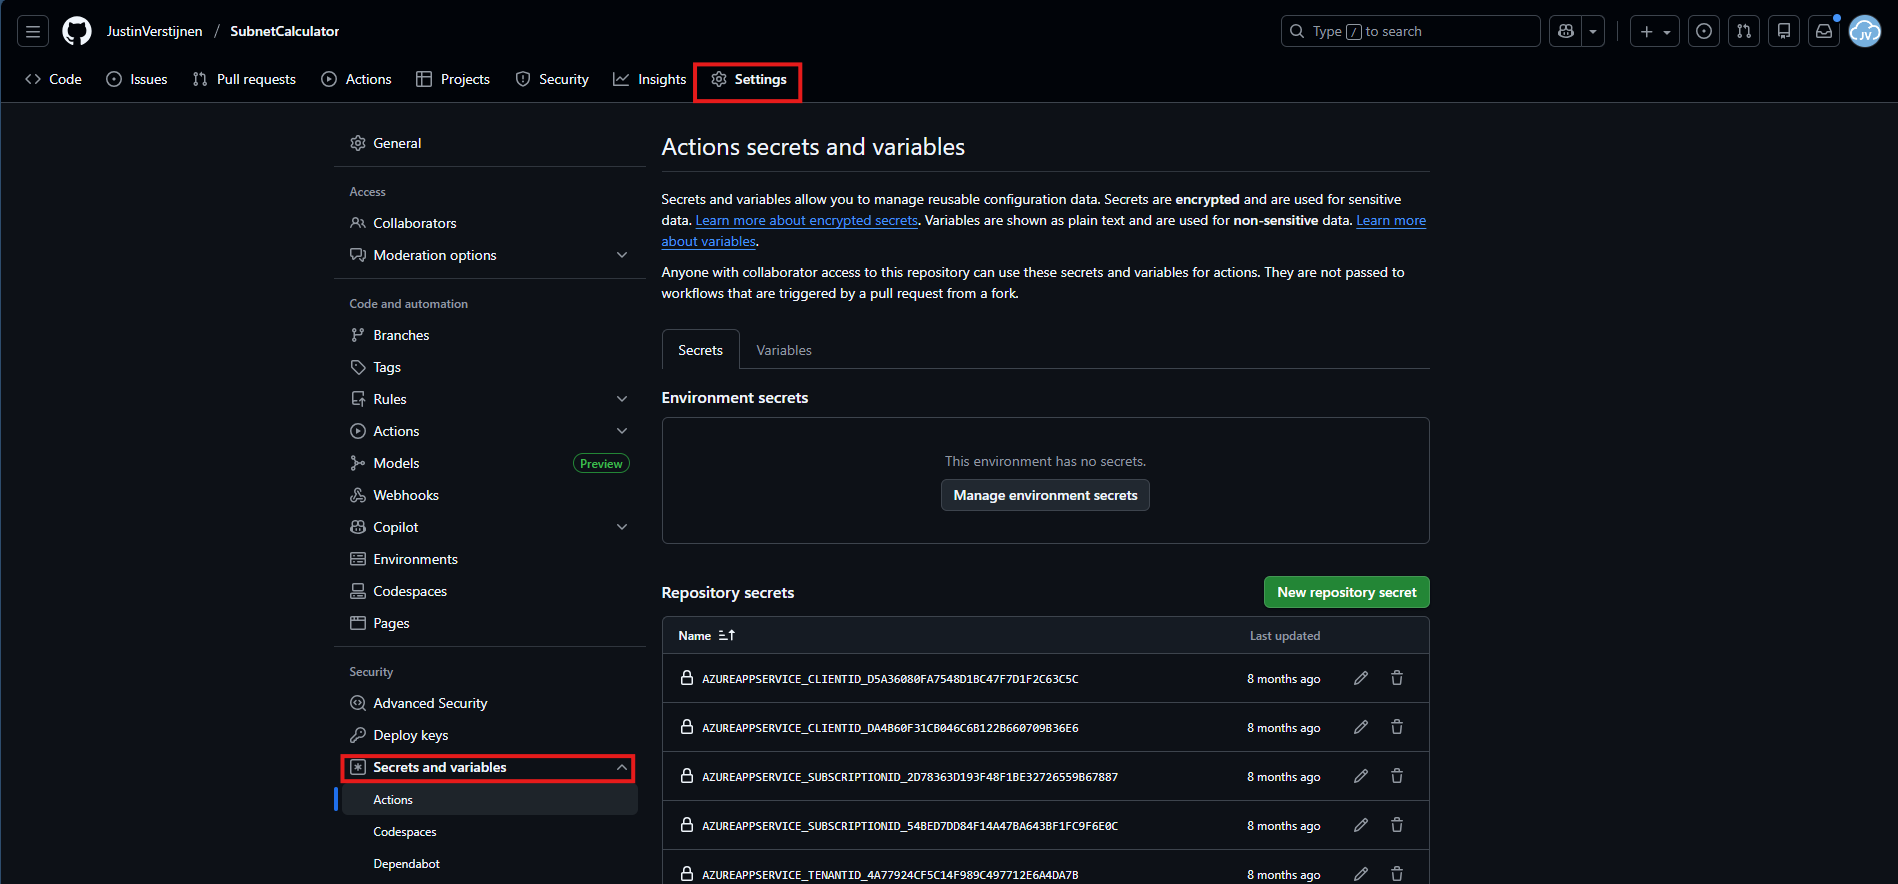
Create a new Repository secret here. I have named all secrets: “COLLECTIVE_TOOLS_REPO” but you can use your own name. It must be set later on in the Github Action in Step 3.
Paste the secret value you have copied during Step 1 and click “Add secret”.
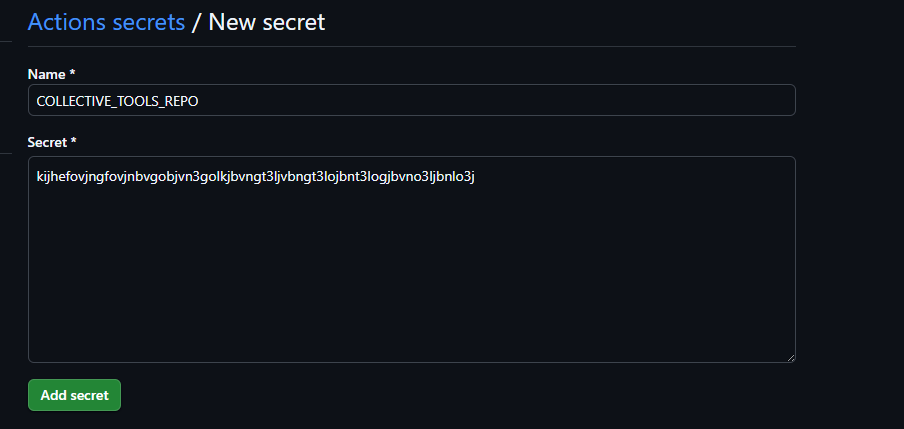
After this is done, go to Step 3.
Now the Secret has been added to the repository, we can insert the GitHub Actions file into the repo. Go to the Code tab and create a new file:
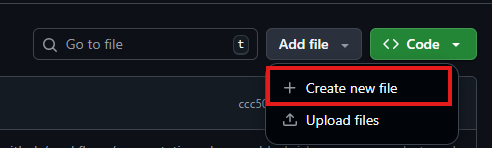
Type in:
Github automatically will put you in the subfolders while typing.
There paste the whole content of this code block:
name: Mirror repo A into subdirectory of repo B

on:
  push:
    branches:
      - main
  workflow_dispatch: {}

permissions:
  contents: read

jobs:
  mirror:
    runs-on: ubuntu-latest

    steps:
      - name: Checkout source repo (repo A)
        uses: actions/checkout@v4
        with:
          fetch-depth: 0

      - name: Checkout target repo (repo B)
        uses: actions/checkout@v4
        with:
          repository: JustinVerstijnen/swa-jv-toolspage
          token: ${{ secrets.COLLECTIVE_TOOLS_REPO }}
          path: target
          ref: main
          fetch-depth: 0

      - name: Sync repo A into subfolder in repo B (lowercase name)
        shell: bash
        run: |
          set -euo pipefail

          # Get name for organization in target repo
          REPO_NAME="${GITHUB_REPOSITORY##*/}"

          # Set lowercase
          REPO_NAME_LOWER="${REPO_NAME,,}"

          TARGET_DIR="target/${REPO_NAME_LOWER}"

          mkdir -p "$TARGET_DIR"

          rsync -a --delete \
            --exclude ".git/" \
            --exclude "target/" \
            --exclude ".github/" \
            ./ "$TARGET_DIR/"

      - name: Commit & push changes to repo B
        shell: bash
        run: |
          set -euo pipefail
          cd target

          if git status --porcelain | grep -q .; then
            git config user.name  "github-actions[bot]"
            git config user.email "github-actions[bot]@users.noreply.github.com"

            git add -A
            git commit -m "Mirror ${GITHUB_REPOSITORY}@${GITHUB_SHA}"
            git push origin HEAD:main
          else
            echo "No changes to push."
          fi
On line 25 and 26, paste the name of your own User/Repository and Secret name. These are just the values I used.
Save the file by commiting and the Action will run for the first time.
On the “Actions” tab, you can check the status:

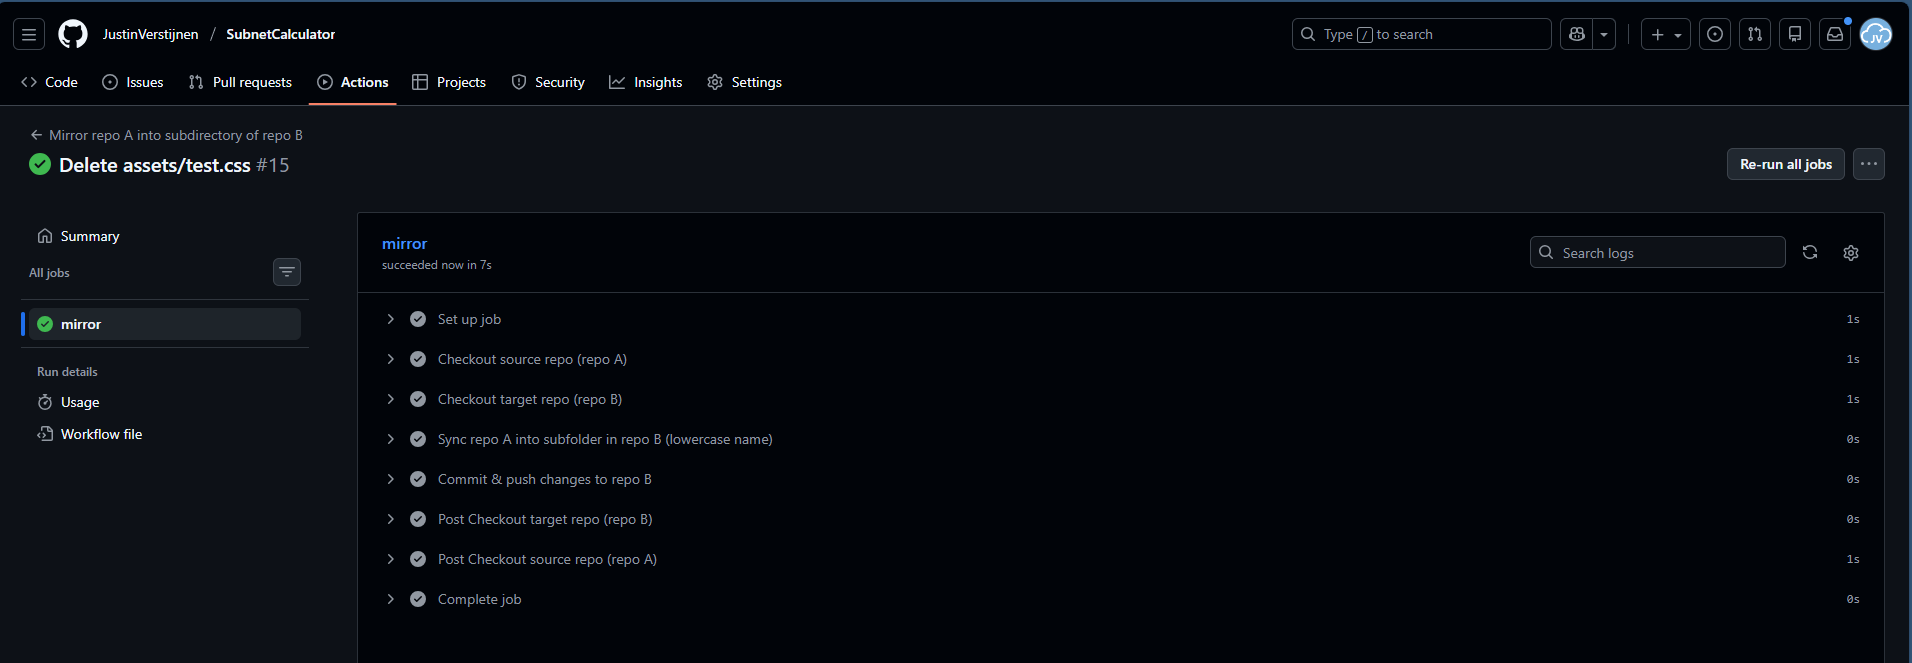
I created a file and deleted it to trigger the action.
You will now see that the folder is mirrored to the collective repository:

Now we have to head over to Microsoft Azure, to create a Static Web App:
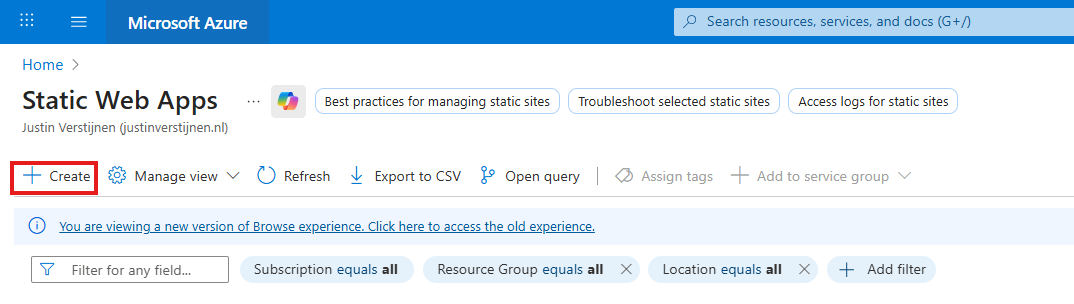
Place it in a resource group of your likings and give it a name:
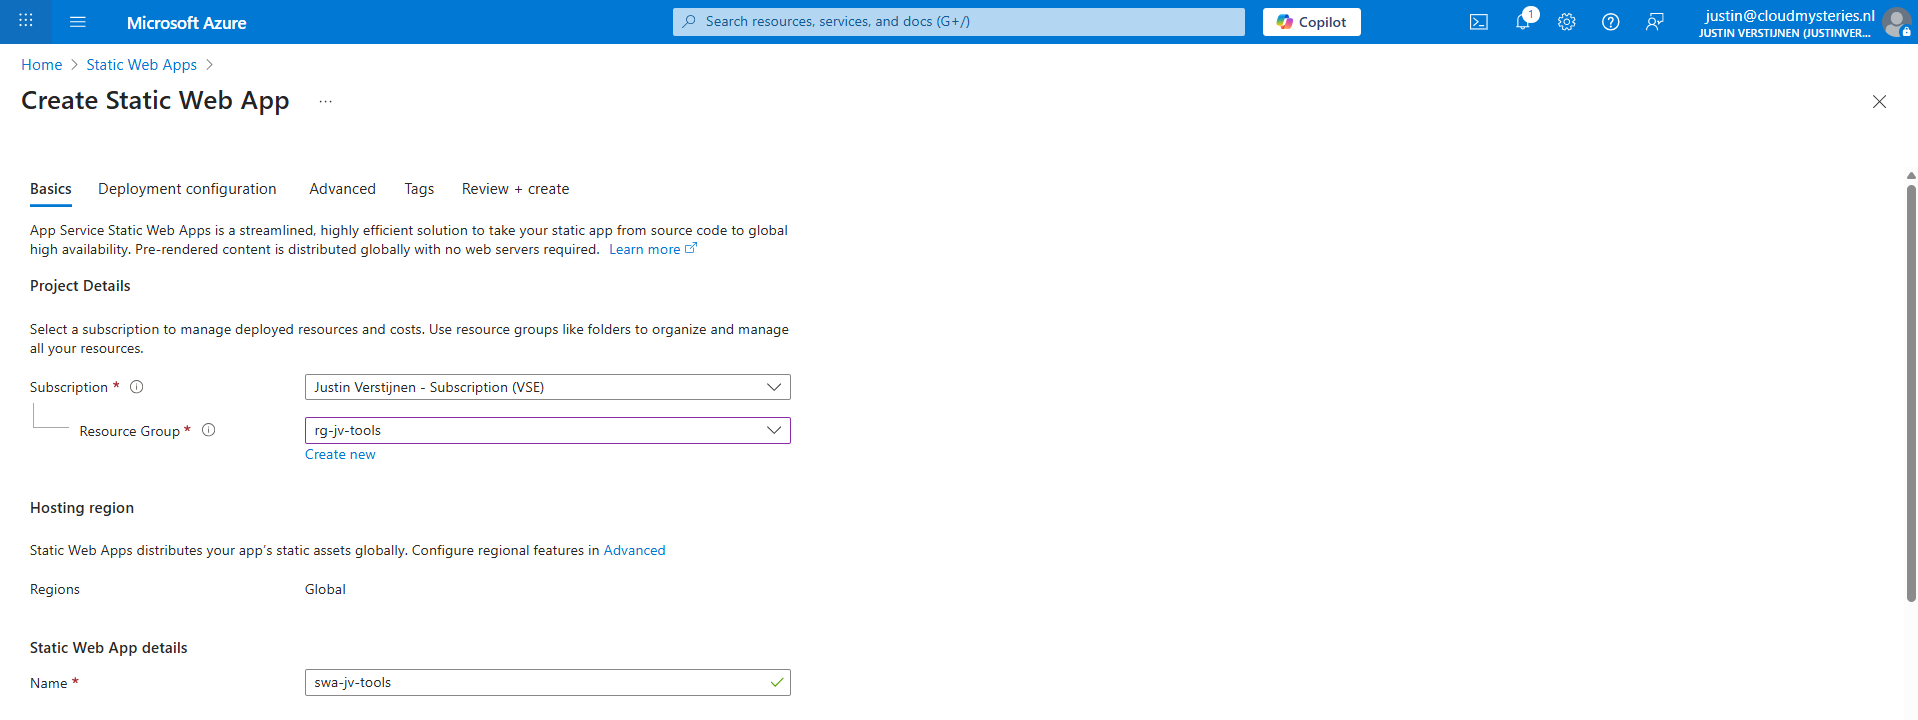
Scroll down to “Deployment details” and here we have to make a connection between GitHub and Azure which is basically logging in and giving permissions.
Then select the right GitHub repository from the list:
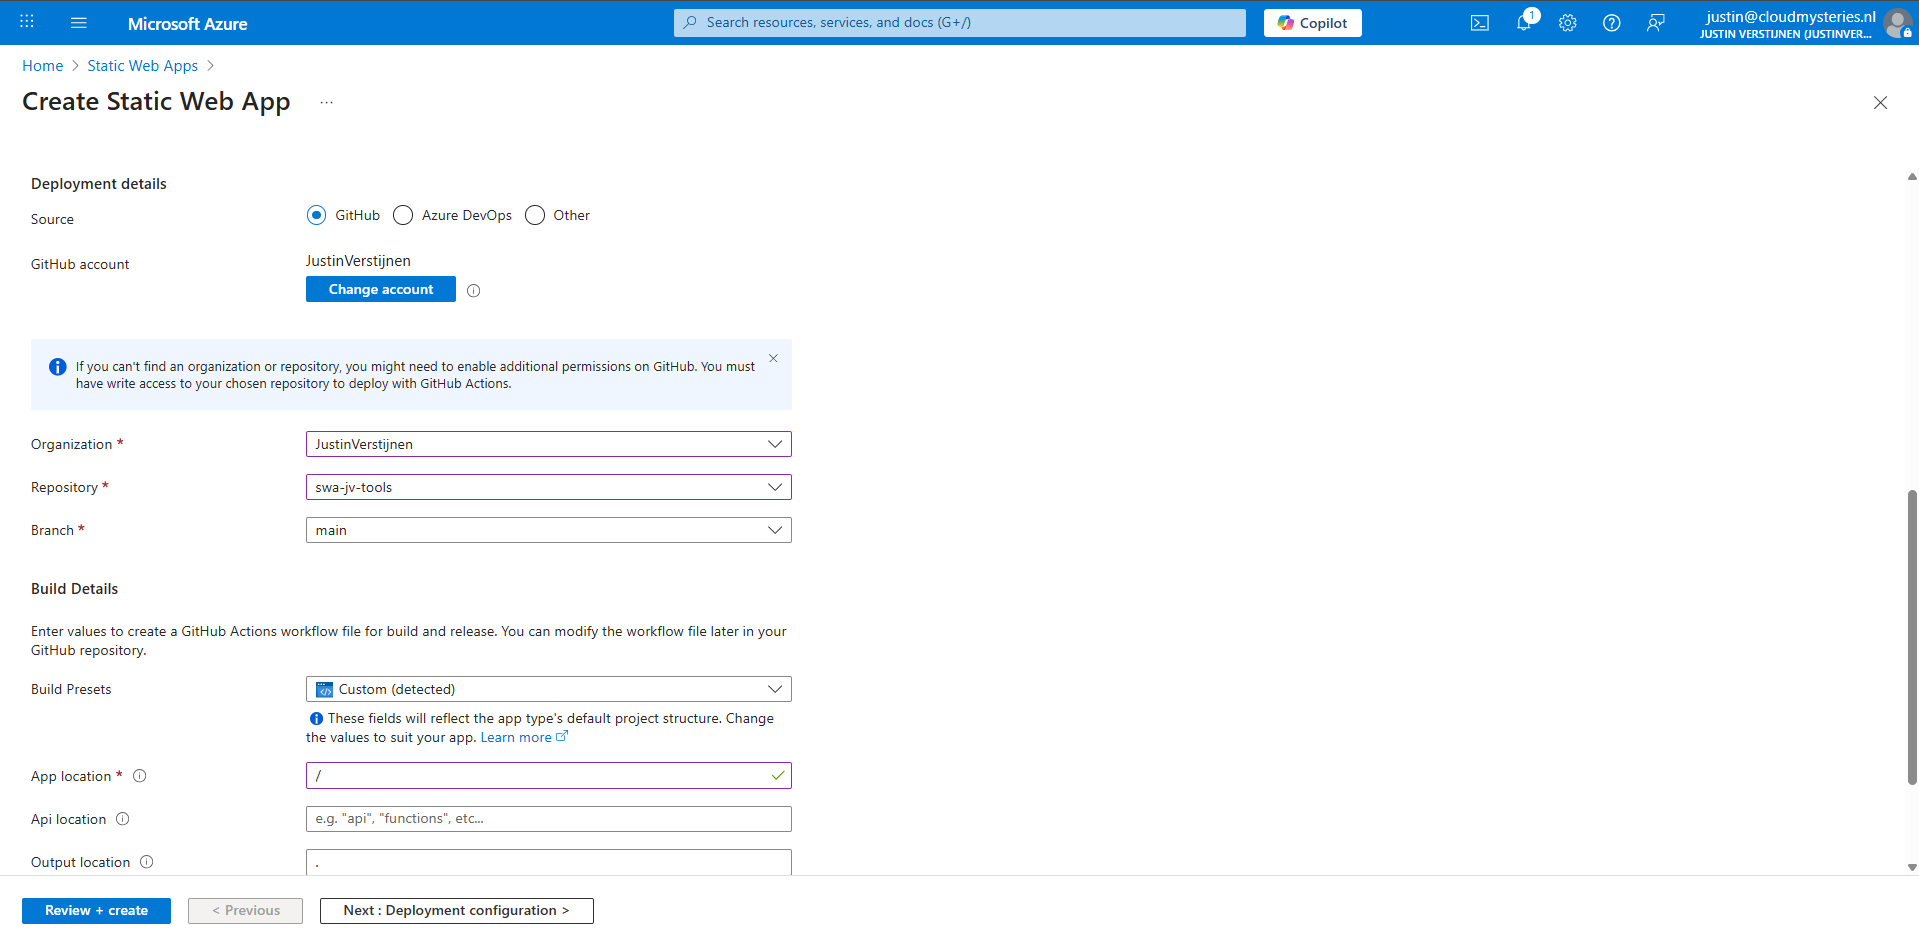
Then in the “Build details” section, I have set “/” as app location, telling Azure that all the required files start in the root of the repository.
Click “Review + create” to create the static web app and that will automatically create a new GitHub action that uploads everything from the repository into the new created Static Web App.

An optional step but highly recommended is to add a custom domain name to the Static Web App. So your users can access your great stuff with a nice and whitelabeled URL instead of e.g. happy-bush-0a245ae03.6.azurestaticapps.net.
In the Static Web App go to “Custom Domains”.
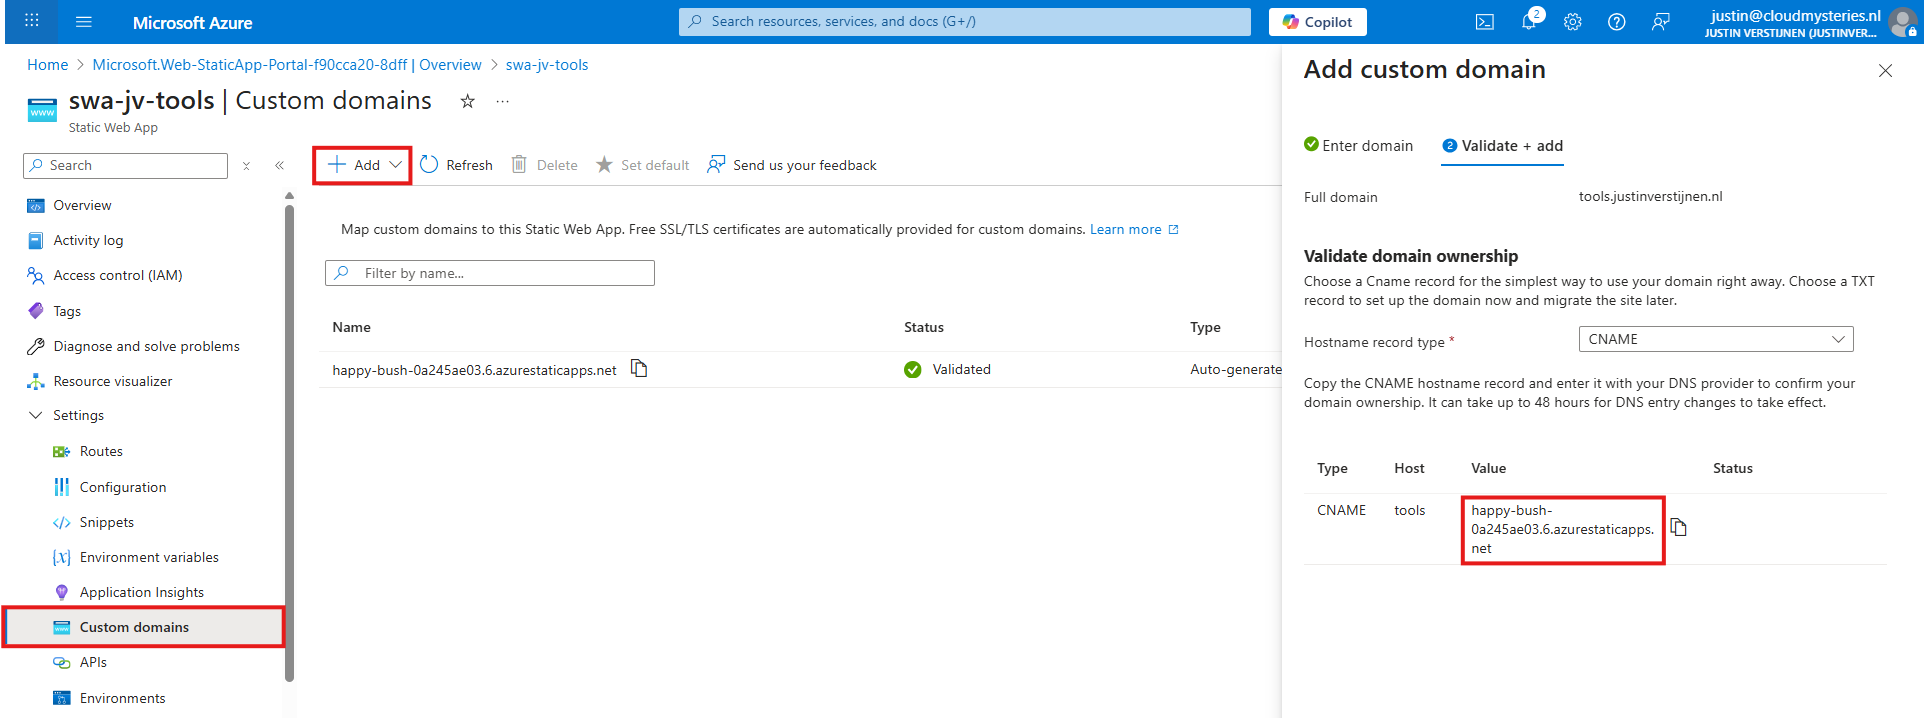
Click on “+ Add” to add a new custom domain you own, and copy the CNAME record. Then head to your DNS hosting company and create this CNAME record to send all traffic to the Static Web App:

Do not forget to add a trailing dot “.” at the end as this is an external hostname.
Then in Azure we can finish the domain verification and the link will now be active.

After this step, wait for around 15 minutes for Azure to process everything. It also takes a few minutes before Azure has added a SSL certificate to visit your web application without problems.
This new setup helps me utilizing Github and Azure Static Web Apps way better in a more scalable way. If I want to add different tools, I have to do less steps to accomplish this, while maintaining overview and a clean Azure environment.
Thank you for reading this post and I hope it was helpful.
These sources helped me by writing and research for this post;
You have reached the end of the page. You can navigate through other blog posts as well, share this post on X, LinkedIn and Reddit or return to the blog posts collection page. Thank you for visiting this post.
If you think something is wrong with this post or you want to know more, you can send me a message to one of my social profiles at: https://justinverstijnen.nl/about/
If you find this page and blog very useful and you want to leave a donation, you can use the button below to buy me a beer. Hosting and maintaining a website takes a lot of time and money. Thank you in advance and cheers :)
The terms and conditions apply to this post.
In Azure we can deploy ARM templates (+ script afterwards) to deploy resources on a big scale. This is like an easier version Terraform and Bicep, but without the great need to test every change and to learn a whole new language and convention. Also with less features indeed.
In this post I will show some examples of deploying with ARM templates and also will show you how to deploy a PowerShell script to run directly after the deployment of an virtual machine. This further helps automating your tasks.
ARM stands for Azure Resource Manager and is the underlying API for everything you deploy, change and manage in the Azure Portal, Azure PowerShell and Azure CLI. A basic understanding of ARM is in this picture:

I will not go very deep into Azure Resource Manager, as you can better read this in the Microsoft site: https://learn.microsoft.com/en-us/azure/azure-resource-manager/management/overview
Now ARM allows us to create our own templates for deploying resources by defining a resource first, and then by clicking this link on the last page, just before deployment:
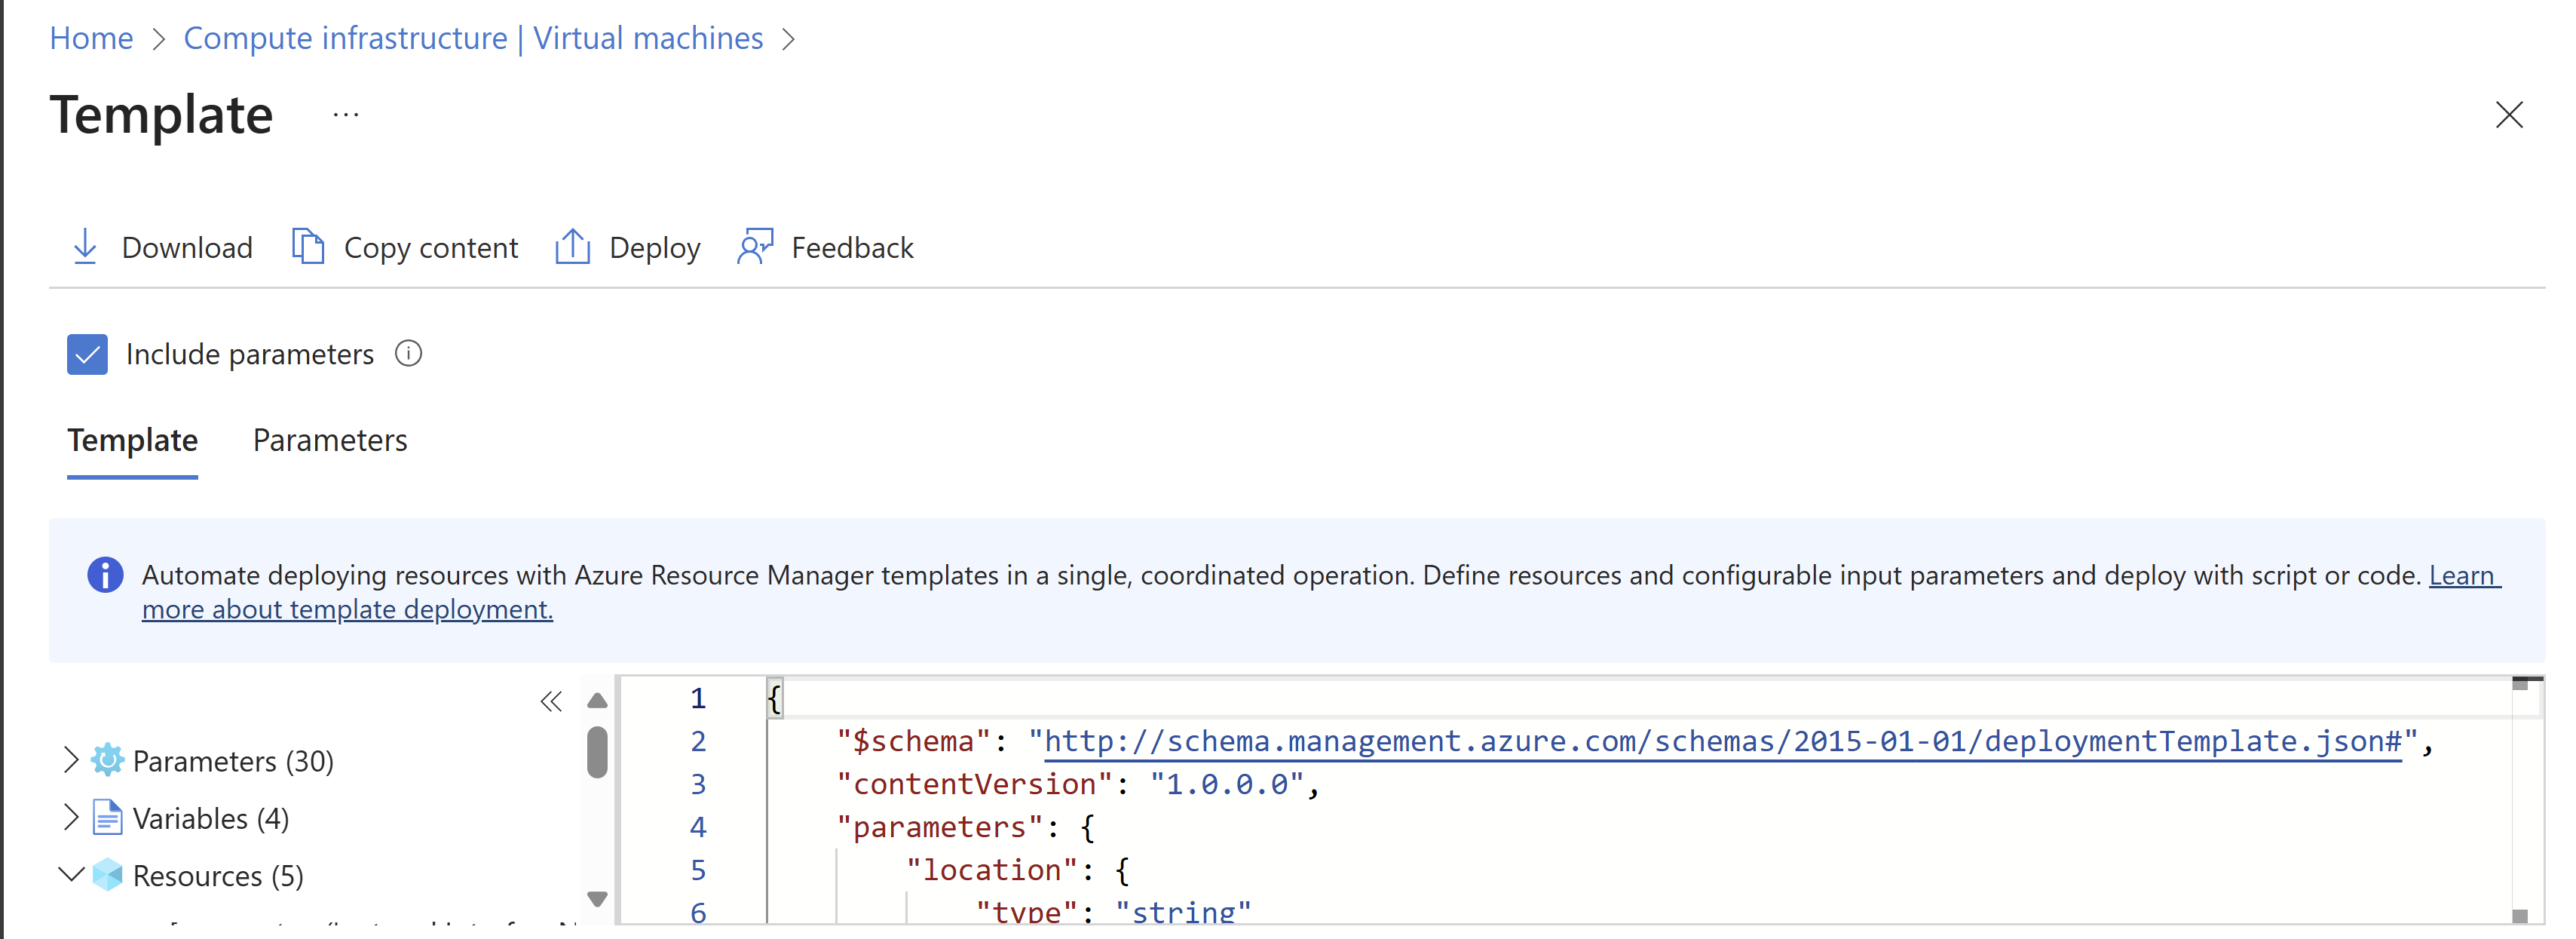
Then click “Download”.
This downloads a ZIP file with 2 files:
These files can be changed easily to create duplicates and to deploy 5 similar VMs while minimizing effort and ensuring consistent VMs.
After creating your ARM template by defining the wizard and downloading the files, you can change the parameters.json file to change specific settings. This contains the naming of the resources, the region, your administrator and such:
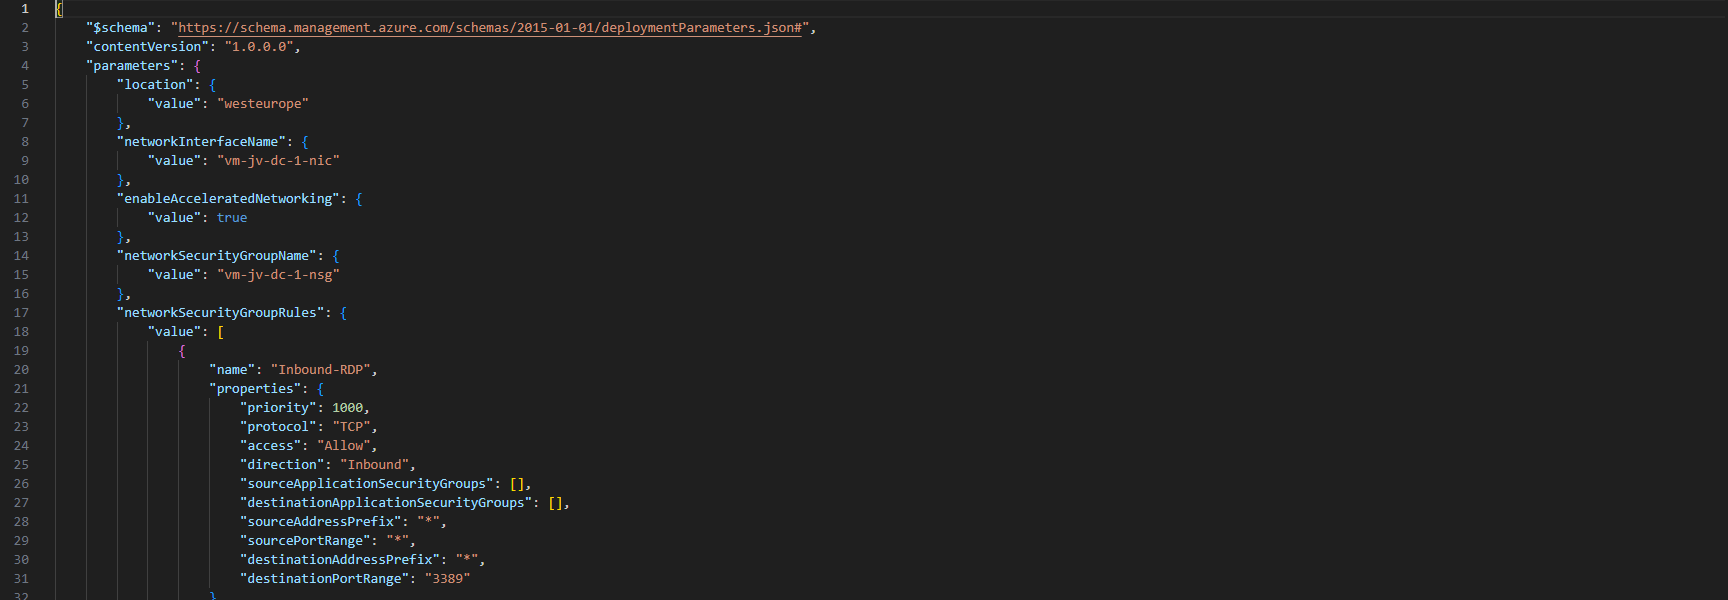
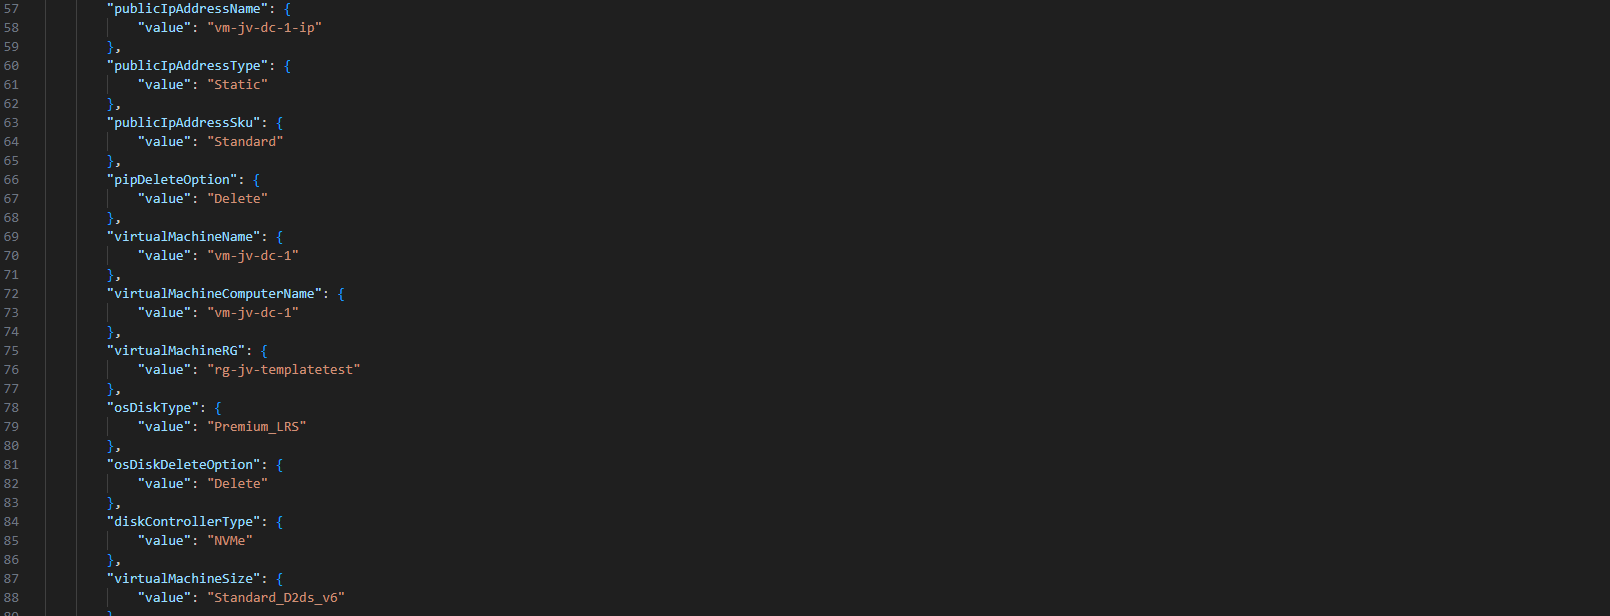
Ensure no templates contain the same names as that will instantly result in an error.
After you have changed your template and adjusted it to your needs, you can deploy it in the Azure Portal.
Open up the Azure Portal, and search for “Deploy a custom template”, and open that option.

Now you get on this page. Click on “Build your own template in the editor”:

You will get on this editor page now. Click on “Load file” to load our template.json file.
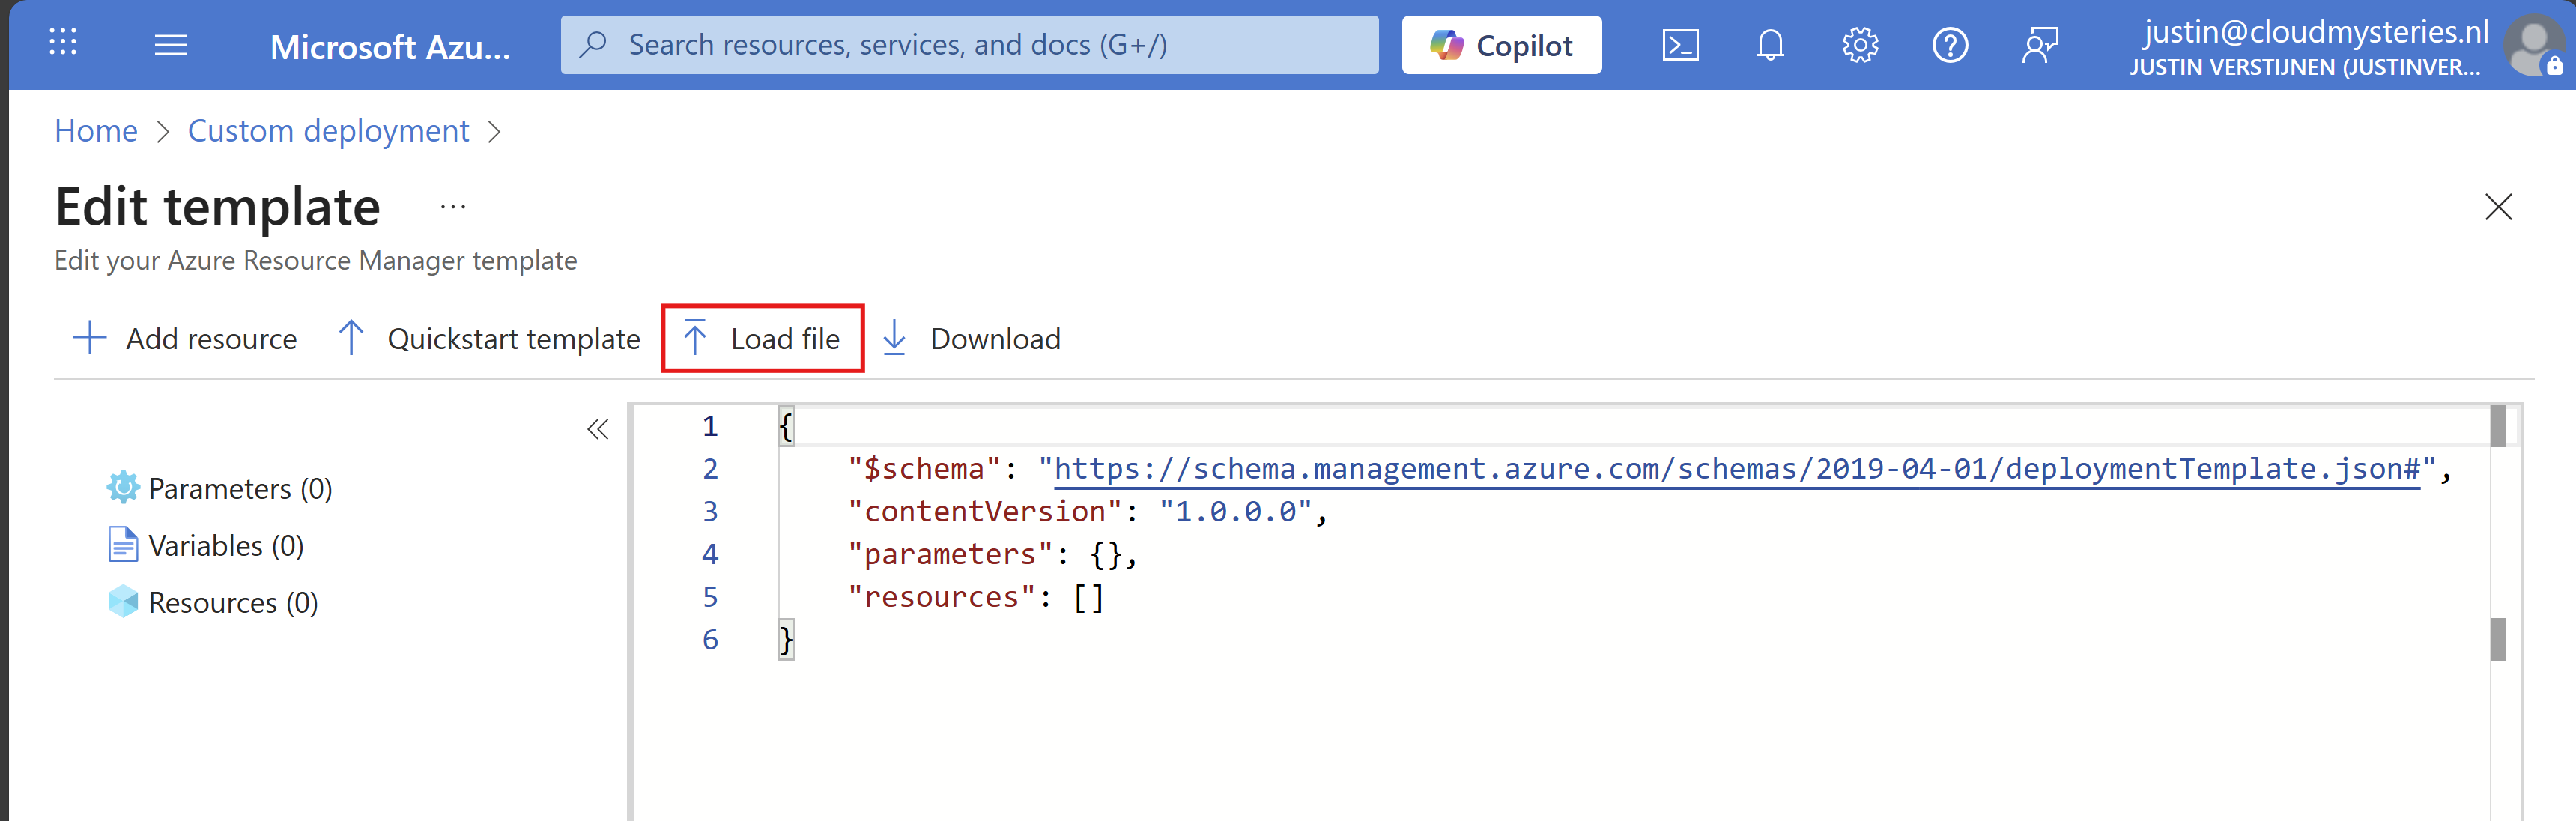
Now select the template.json file from your created and downloaded template.

It will now insert the template into the editor, and you can see on the left side what resource types are defined in the template:

Click on “Save”. Now we have to import the parameters file, otherwise all fields will be empty.
Click on “Edit parameters”, and we have to also upload the parameters.json file.
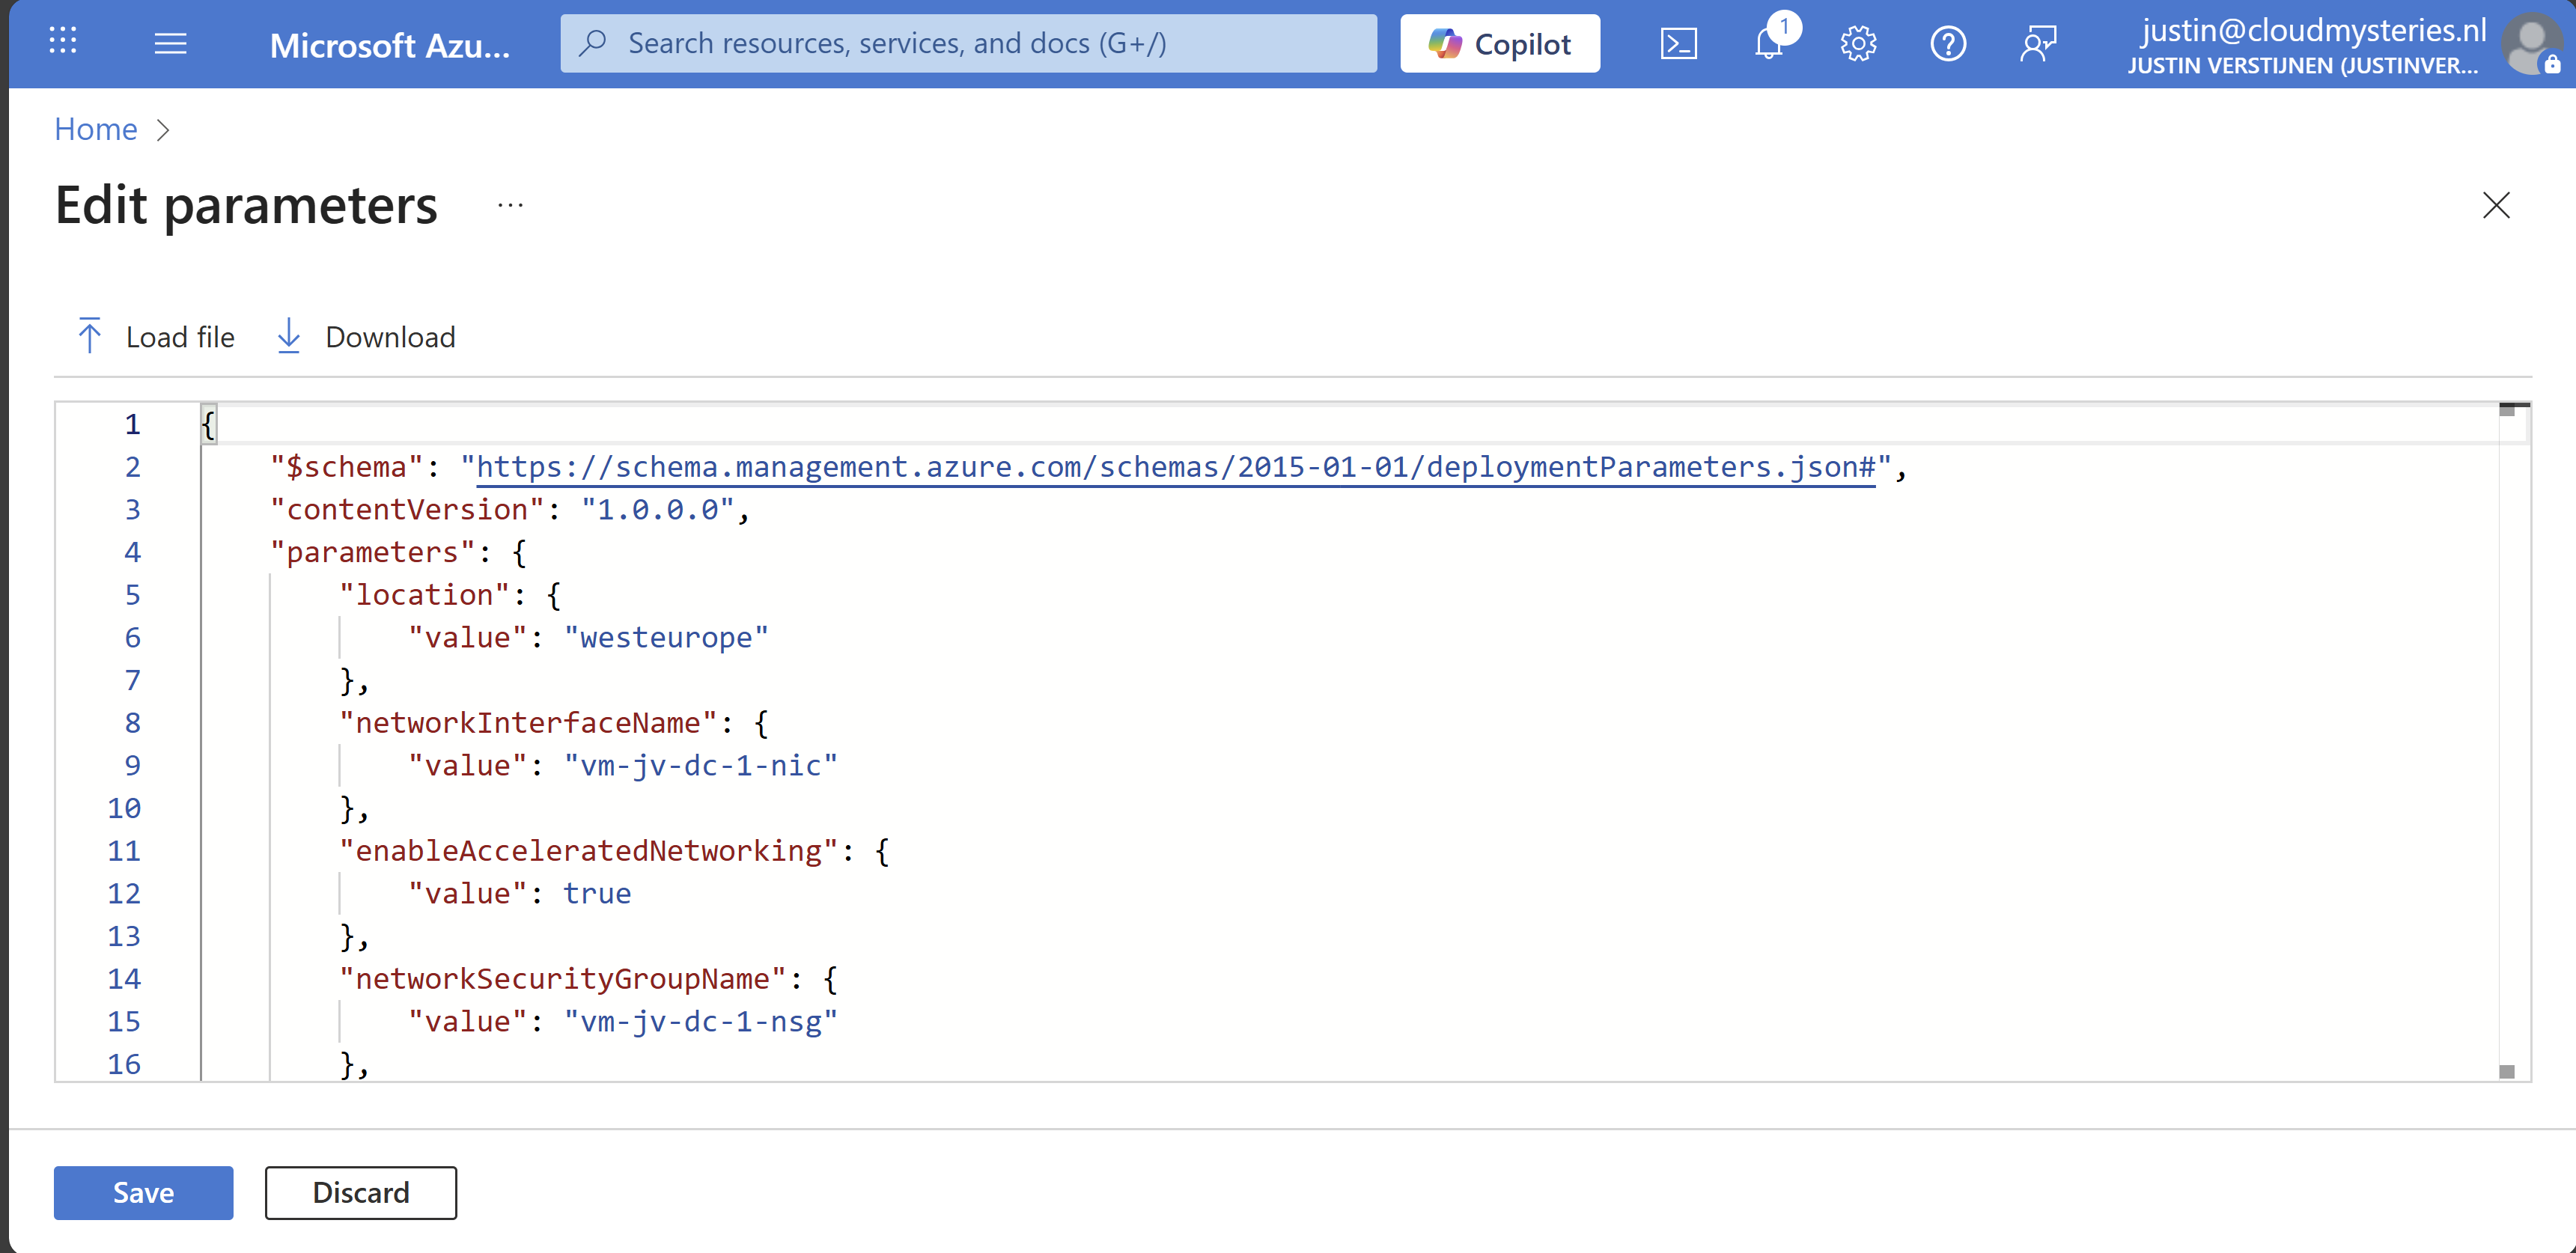
Click on “Save” and our template will be filled in for 85%. We only have to set the important information:
Select your resource group to deploy all the resources in.
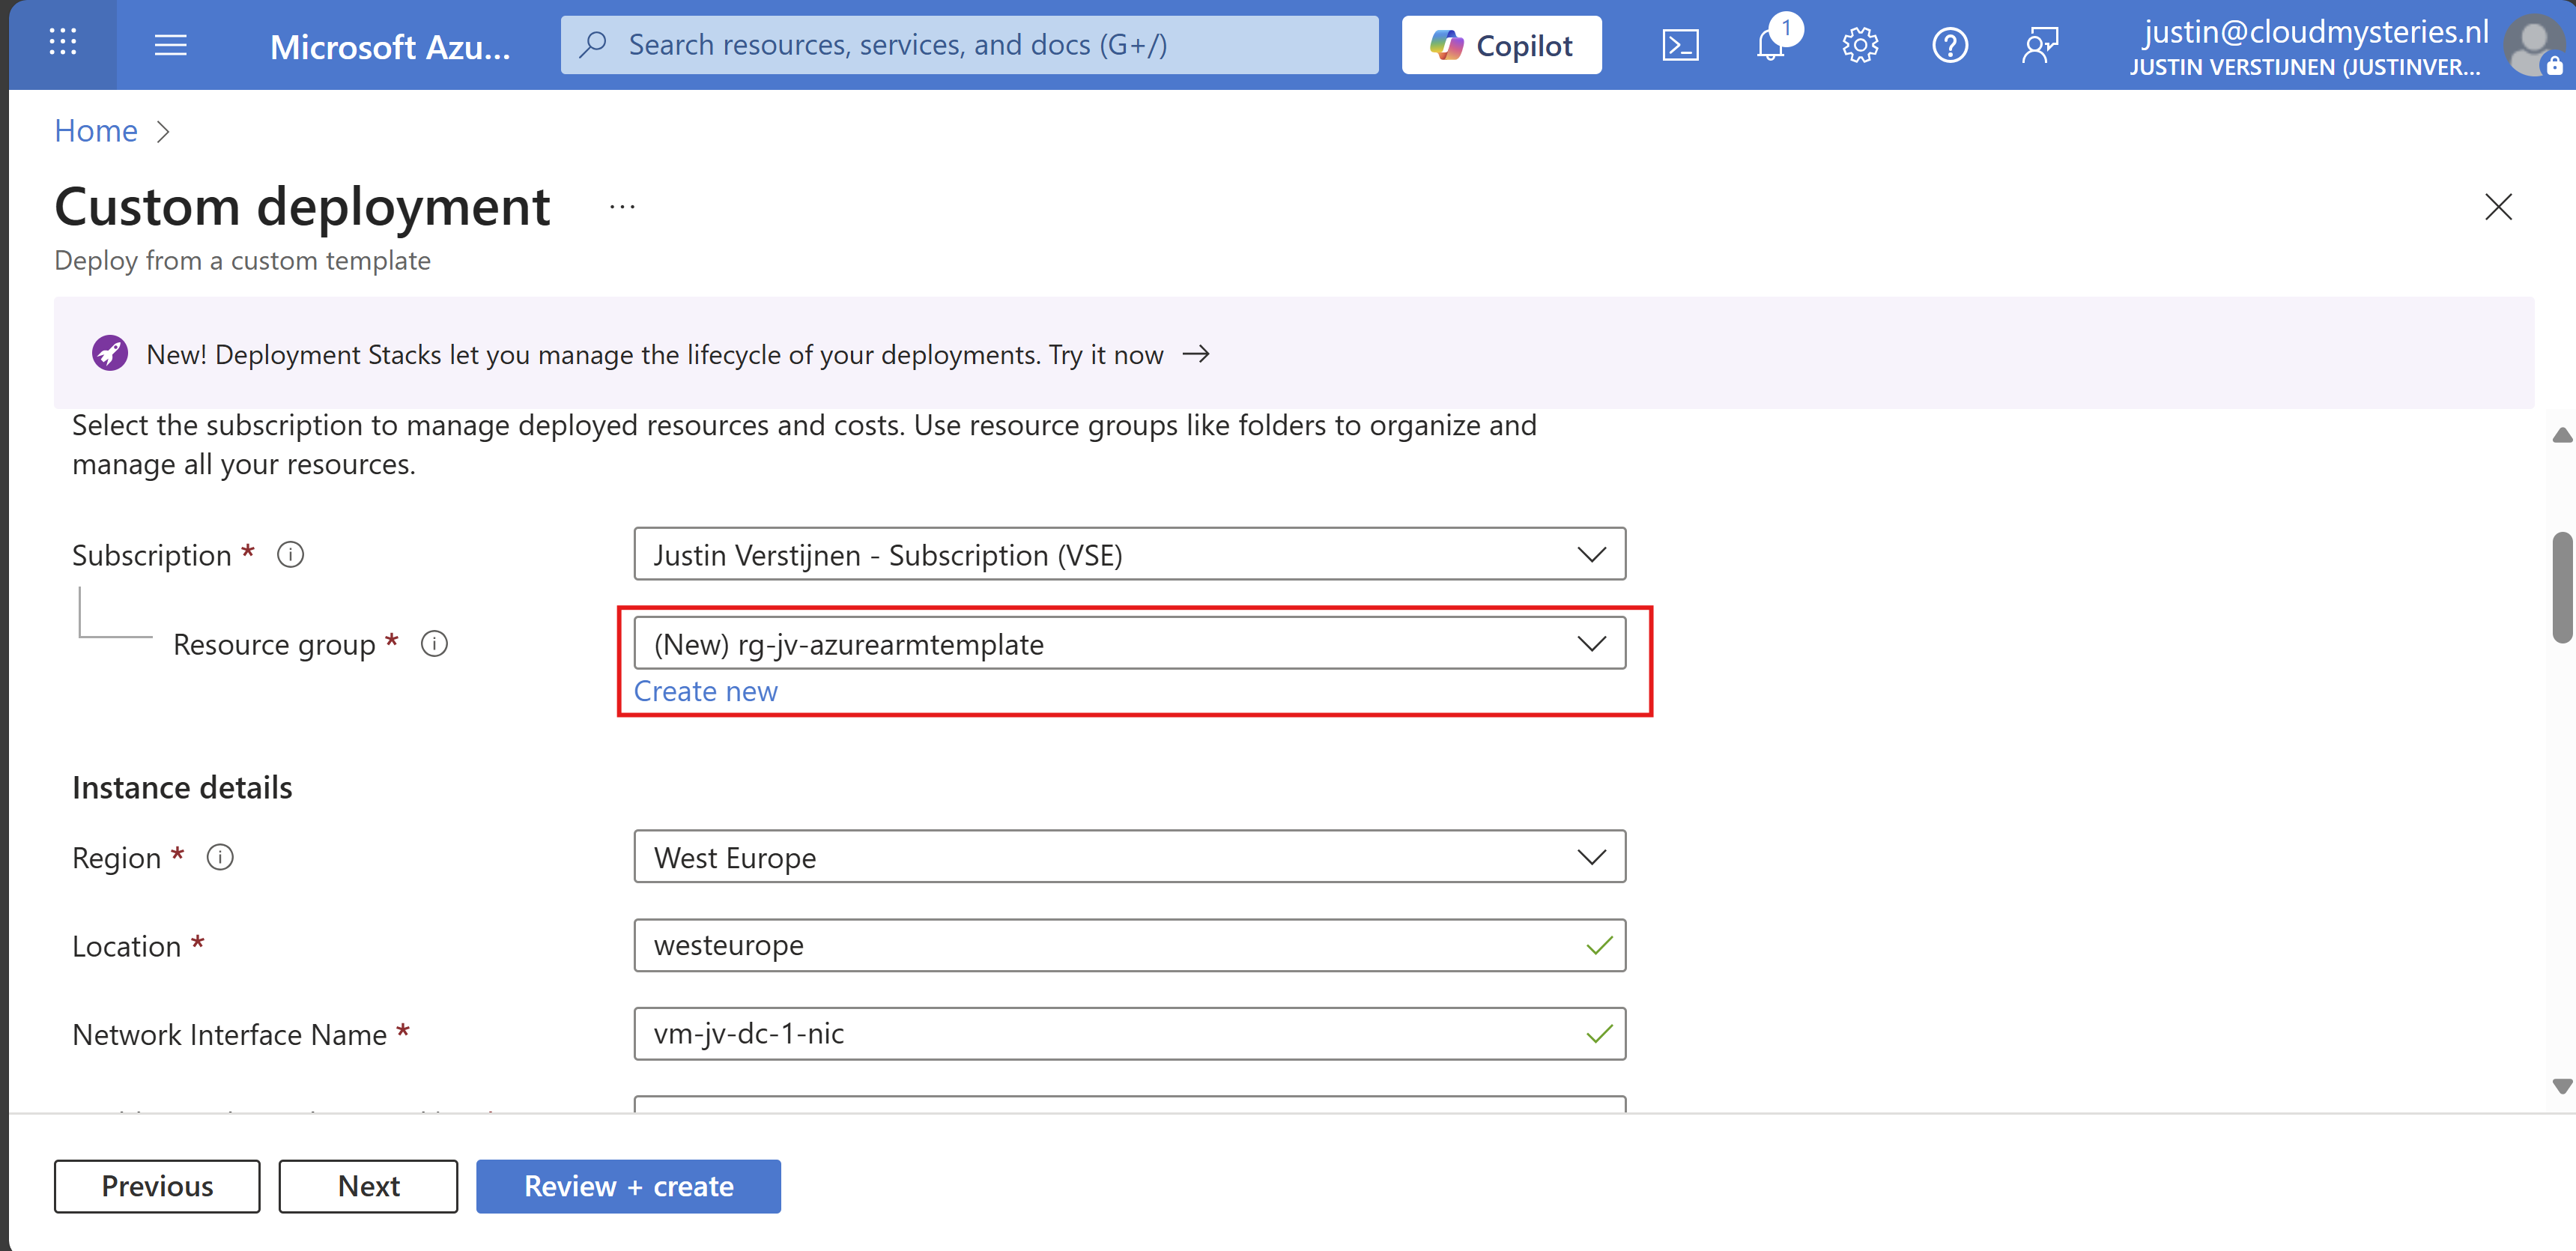
Then fill in your administrator password:
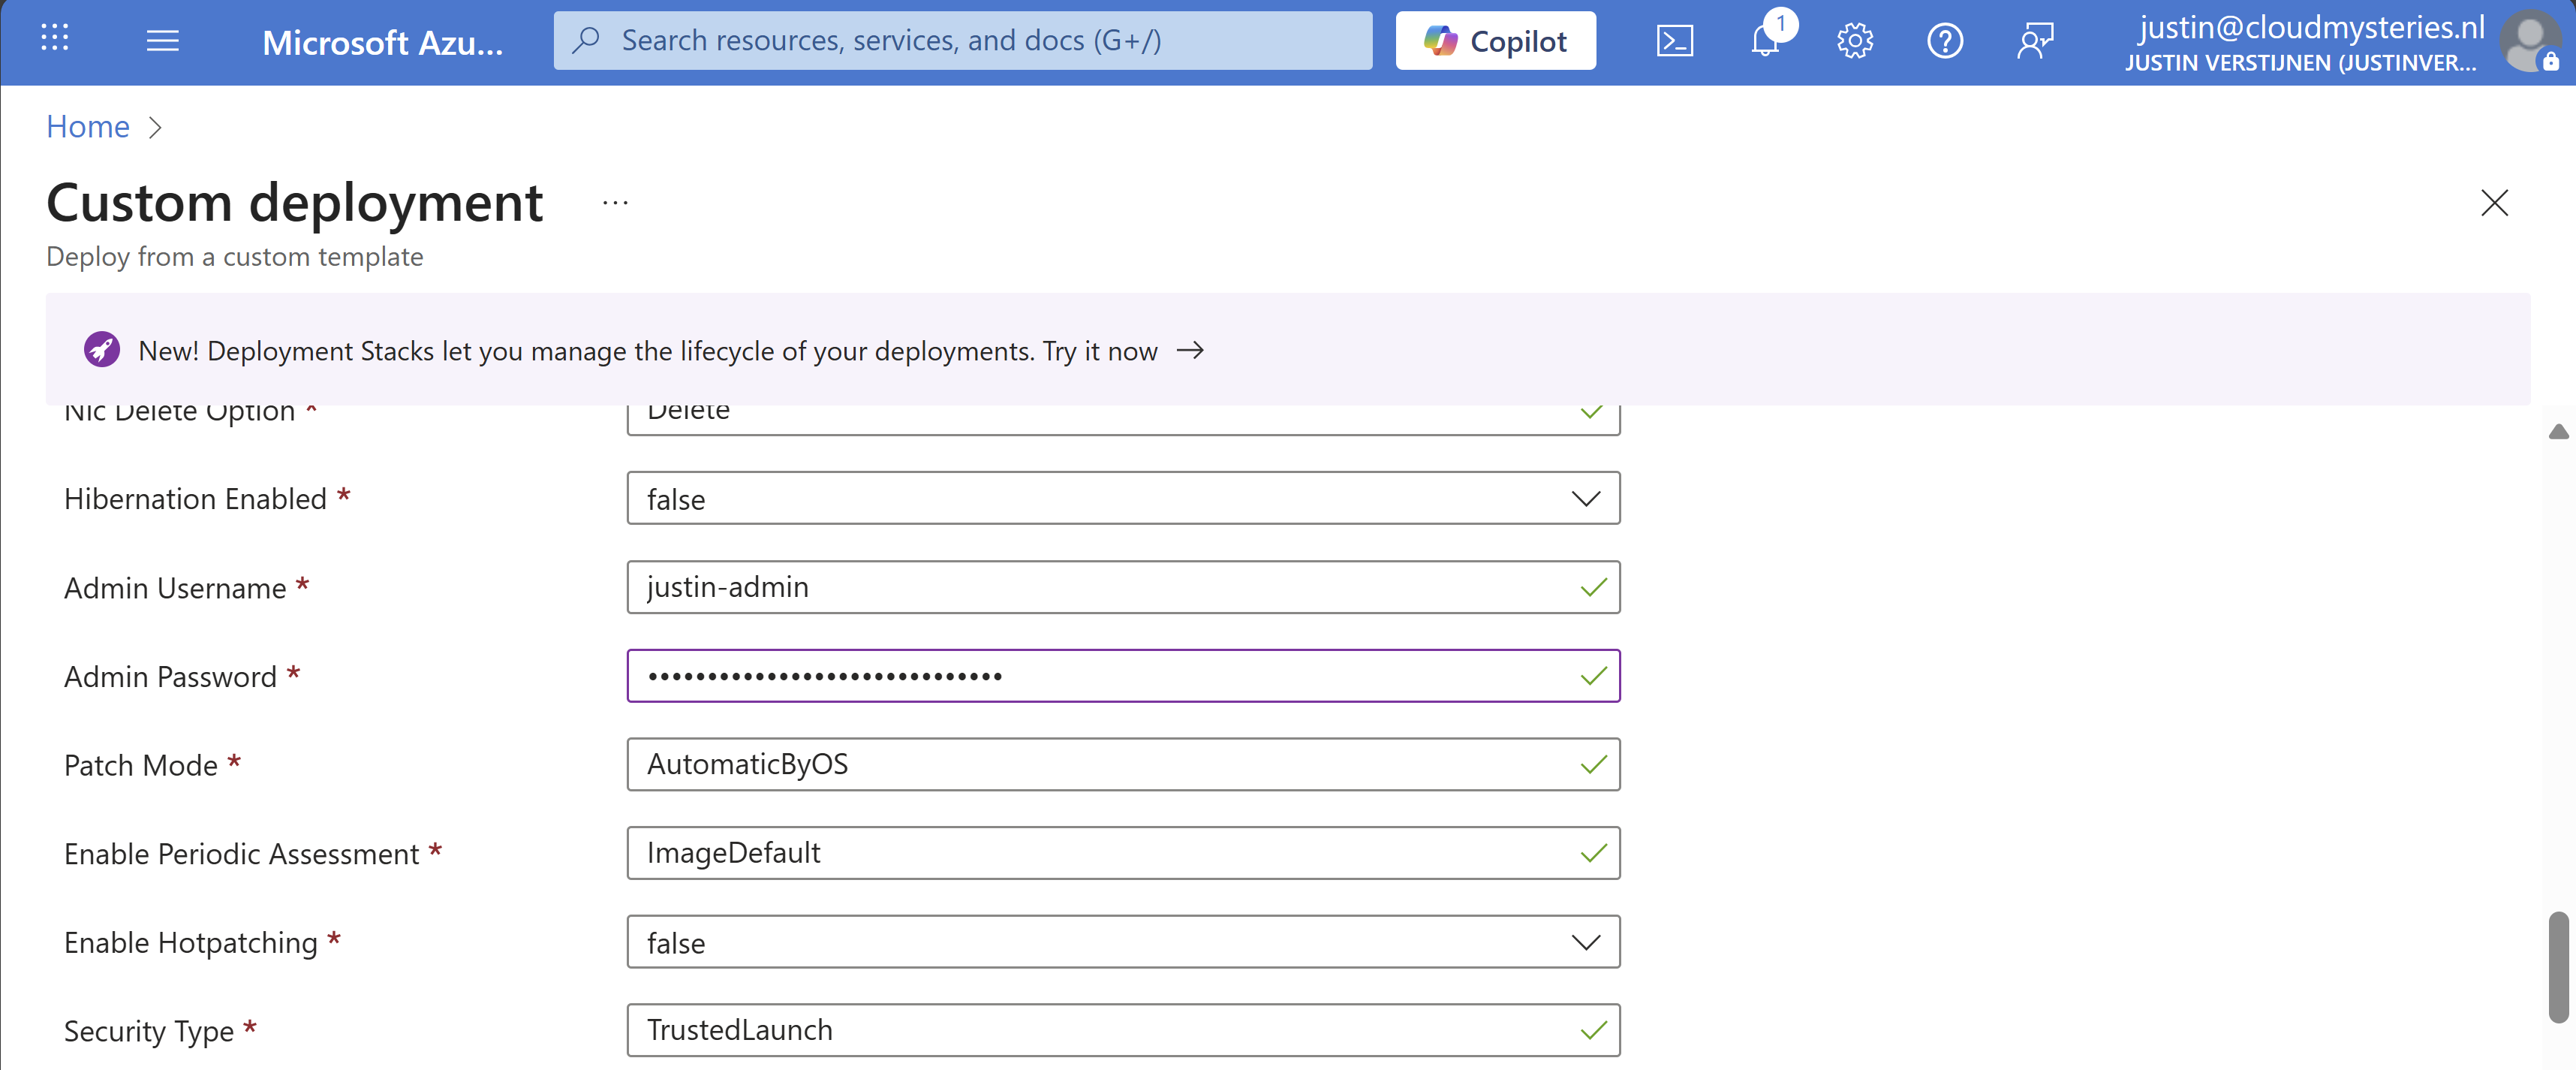
Review all of the settings and then advance to the deployment.
Now everything in your template will be deployed into Azure:
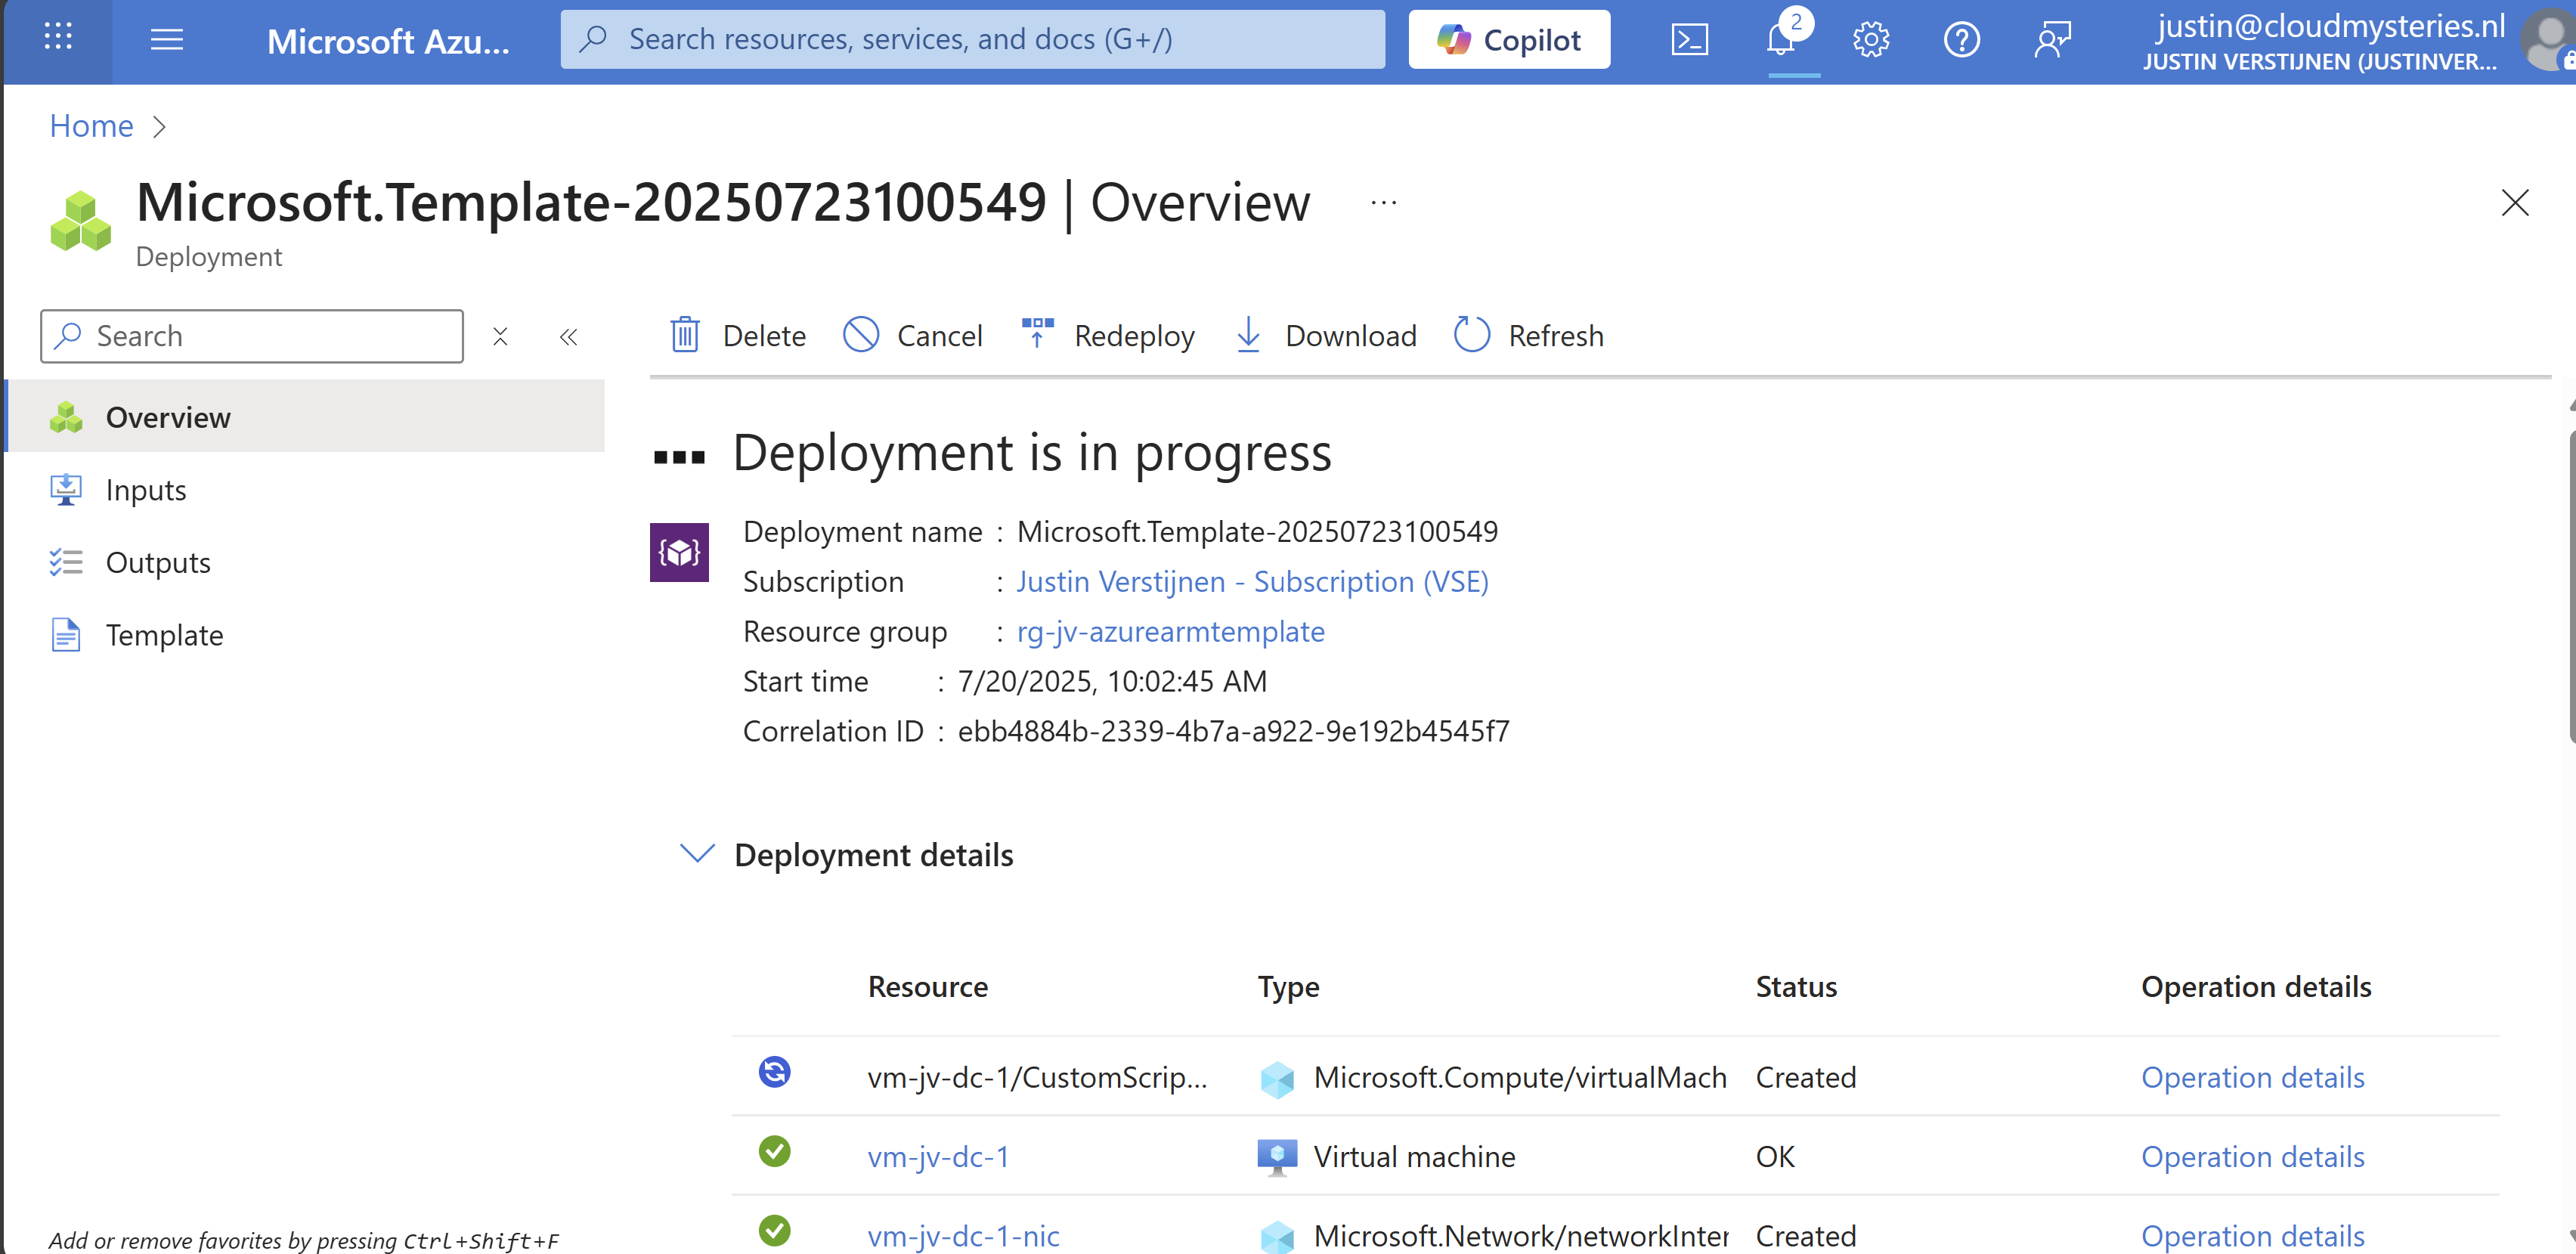
As you can see, you can repeat these steps if you need multiple similar virtual machines as we only need to load the files and change 2 settings. This saves a lot of time of everything in the normal VM wizard and this decreases human errors.
We can also add a PowerShell script to an ARM template to directly run after deploying. Azure does this with an Custom Script Extenstion that will be automatically installed after deploying the VM. After installing the extension, the script will be running in the VM to change certain things.
I use a template to deploy an VM with Active Directory everytime I need an Active Directory to test certain things. So I have a modified version of my Windows Server initial installation script which also installs the Active Directory role and promotes the VM to my internal domain. This saves a lot of time configuring this by hand every time:

We can add this Custom Script Extension block to our ARM template.json file:
{
  "type": "Microsoft.Compute/virtualMachines/extensions",
  "name": "[concat(parameters('virtualMachineName'), '/CustomScriptExtension')]",
  "apiVersion": "2021-03-01",
  "location": "[parameters('location')]",
  "dependsOn": [
    "[resourceId('Microsoft.Compute/virtualMachines', parameters('virtualMachineName'))]"
  ],
  "properties": {
    "publisher": "Microsoft.Compute",
    "type": "CustomScriptExtension",
    "typeHandlerVersion": "1.10",
    "autoUpgradeMinorVersion": true,
    "settings": {
      "fileUris": [
        "url to script"
      ]
    },
    "protectedSettings": {
      "commandToExecute": "powershell -ExecutionPolicy Unrestricted -Command ./script.ps1"
    }
  }
}
Then change the 2 parameters in the file to point it to your own script:


This block must be placed after the virtual machine, as the virtual machine must be running before we can run a script on it.

Search for the “Outputs” block and on the second line just above it, place a comma and hit Enter and on the new line paste the Custom Script Extension block. Watch this video as example where I show you how to do this:
After changing the template.json file, save it and then follow the custom template deployment step again of this guide to deploy the custom template which includes the PowerShell script. You will see it appear in the deployment after the virtual machine is deployed:
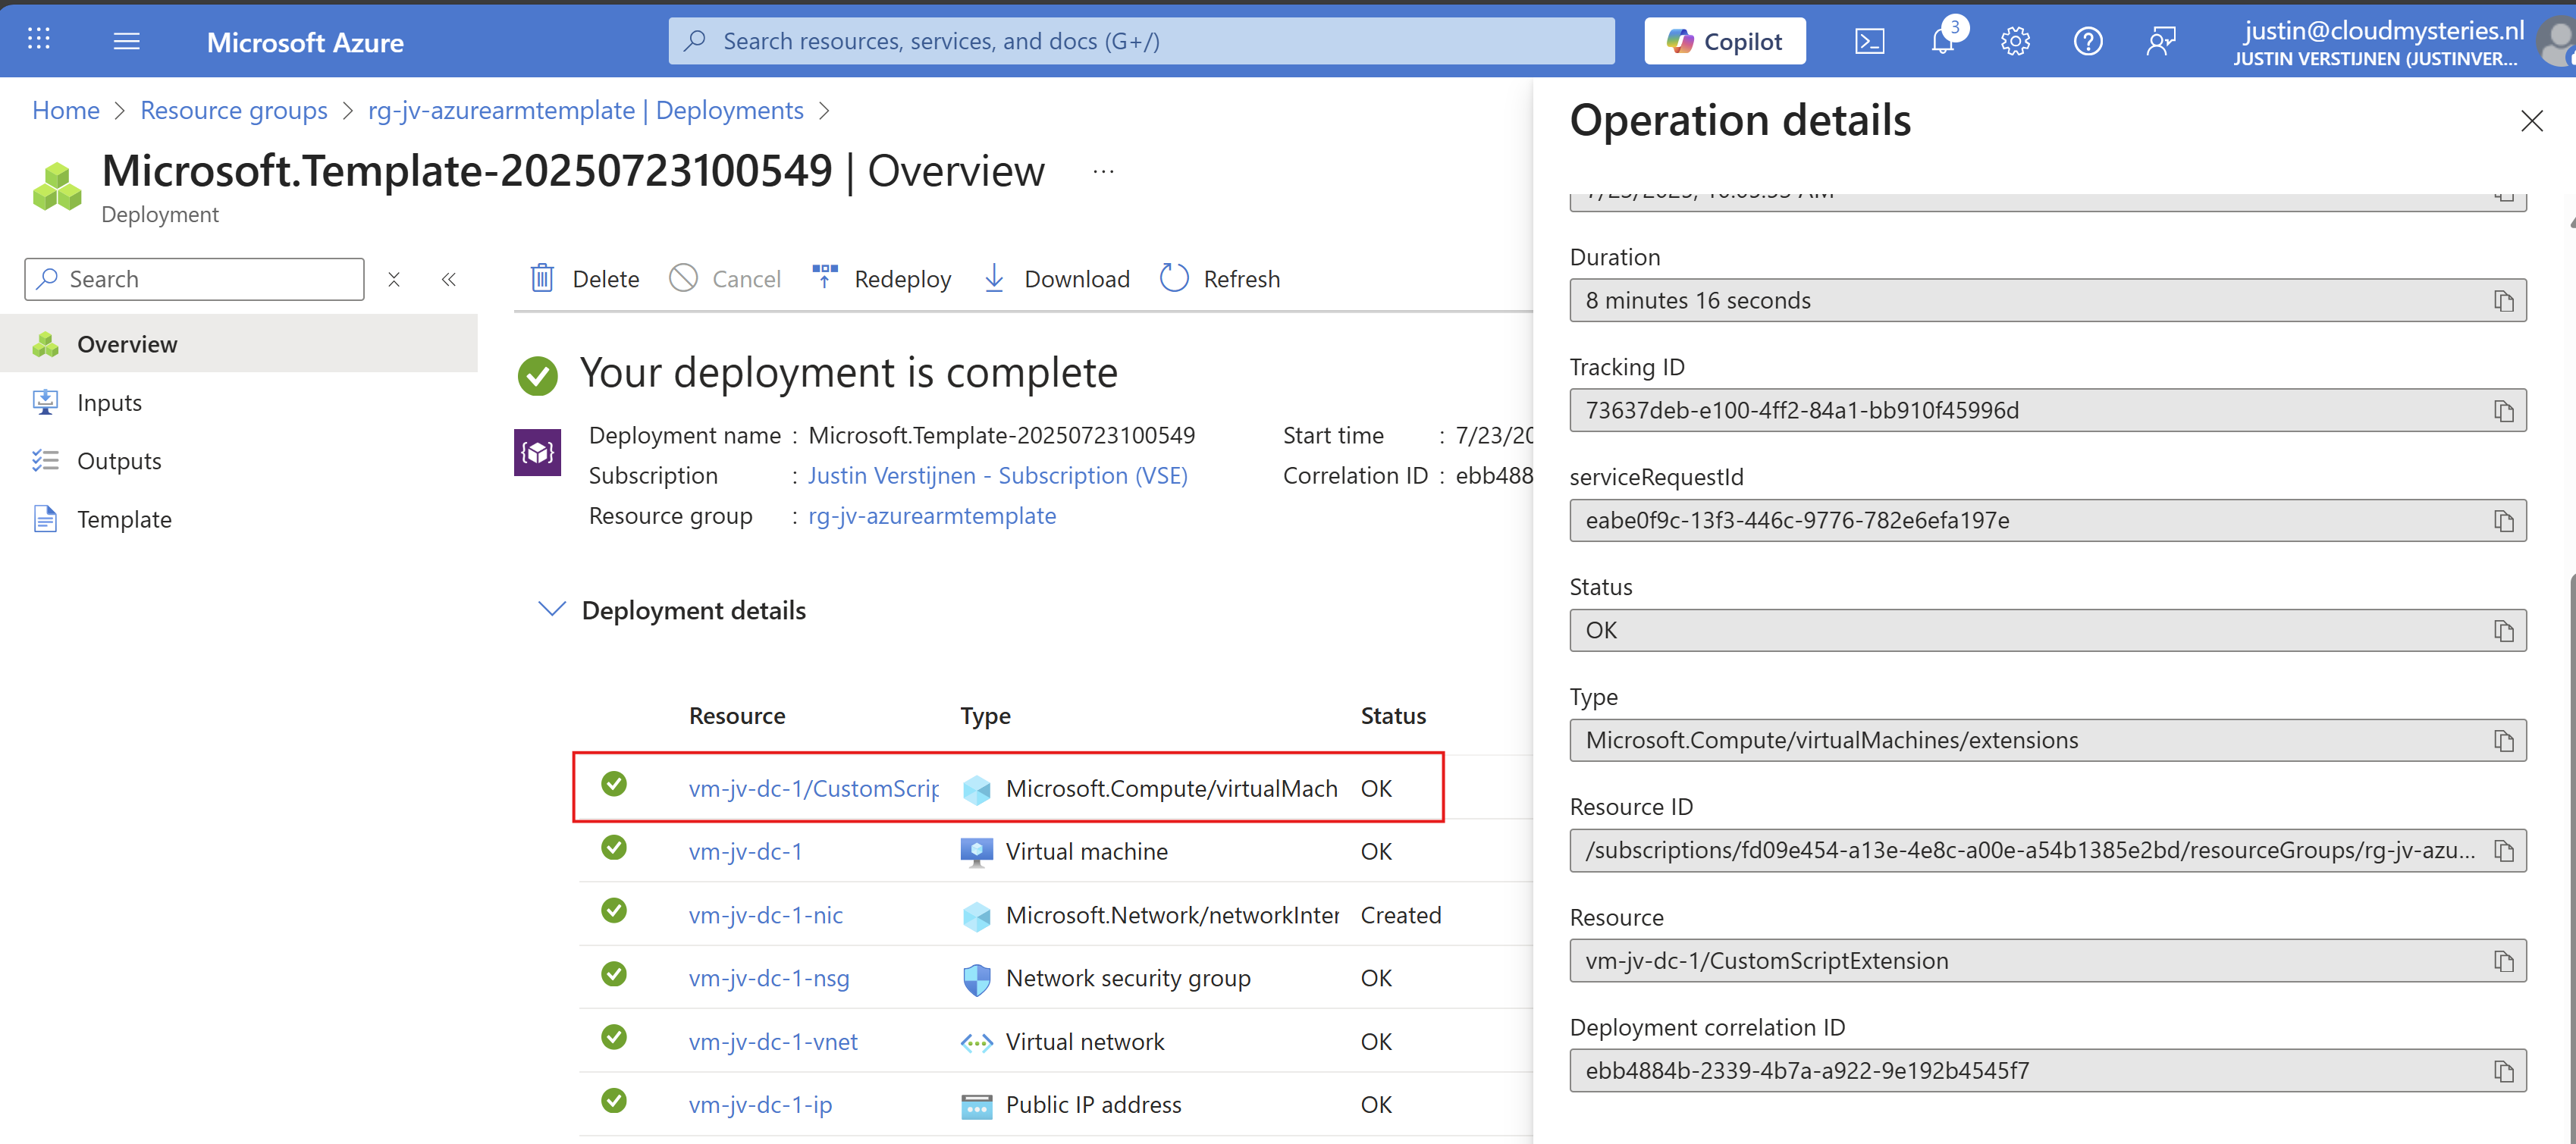
After the VM is deployed, I will login and check if the script has run:

The domain has been succesfully installed with management tools and such. This is really cool and saves a lot of time.
ARM templates are an great way to deploy multiple instances of resources and with extra customization like running a PowerShell script afterwards. This is really helpful if you deploy machines for every blog post like I do to always have the same, empty configuration available in a few minutes. The whole proces now takes like 8 minutes but when configuring by hand, this will take up to 45 minutes.
ARM is a great step between deploying resources completely by hand and IaC solutions like Terraform and Bicep.
Thank you for visiting this webpage and I hope this was helpful.
These sources helped me by writing and research for this post;
You have reached the end of the page. You can navigate through other blog posts as well, share this post on X, LinkedIn and Reddit or return to the blog posts collection page. Thank you for visiting this post.
If you think something is wrong with this post or you want to know more, you can send me a message to one of my social profiles at: https://justinverstijnen.nl/about/
If you find this page and blog very useful and you want to leave a donation, you can use the button below to buy me a beer. Hosting and maintaining a website takes a lot of time and money. Thank you in advance and cheers :)
The terms and conditions apply to this post.
In Azure, we can configure Boot diagnostics to view the status of a virtual machine and connect to its serial console. However, this must be configured manually. The good part is that we can automate this process with Azure Policy. In this post I will explain step-by-step how to configure this and how to start using this in your own environment.
In short, Azure Policy is a compliance/governance tool in Azure with capabilities for automatically pushing your resources to be compliant with your stated policy. This means if we configure Azure Policy to automatically configure boot diagnostics and save the information to a storage account, this will be automatically done for all existing and new virtual machines.
The boot diagnostics in Azure enables you to monitor the state of the virtual machine in the portal. By default, this will be enabled with a Microsoft managed storage account but we don’t have control over the storage account.
With using our custom storage account for saving the boot diagnostics, these options are available. We can control where our data is saved, which lifecycle management policies are active for retention of the data and we can use GRS storage for robust, datacenter-redundancy.
For saving the information in our custom storage account, we must tell the machines where to store it and we can automate this process with Azure Policy.
The solution we’re gonna configure in this guide consists of the following components in order:
Assuming you want to use your own storage account for saving Boot diagnostics, we start with creating our own storage account for this purpose. If you want to use an existing managed storage account, you can skip this step.
Open the Azure Portal and search for “Storage Accounts”, click on it and create a new storage account. Then choose a globally unique name with lowercase characters only between 3 and 24 characters.
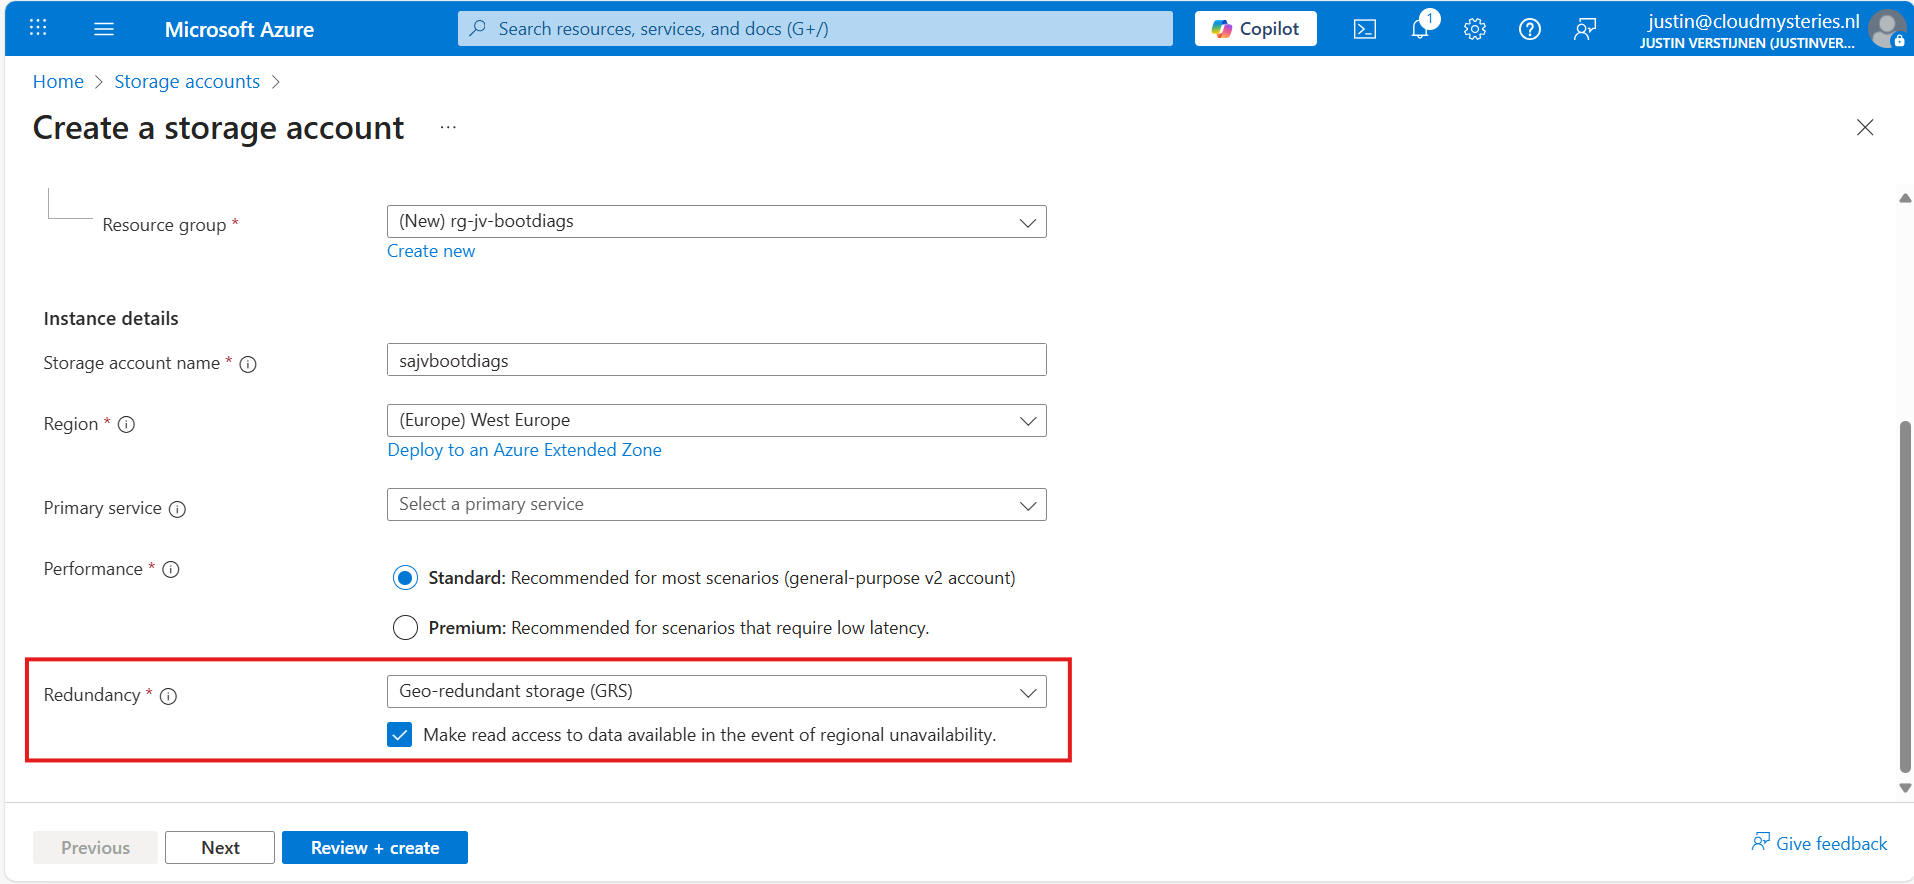
Make sure you select the correct level of redundancy at the bottom as we want to defend ourselves against datacenter failures. Also, don’t select a primary service as we need this storage account for multiple purposes.
At the “Advanced” tab, select “Hot” as storage tier, as we might ingest new information continueosly. We also leave the “storage account key access” enabled as this is required for the Azure Portal to access the data.
Advance to the “Networking” tab. Here we have the option to only enable public access for our own networks. This is highly recommended:
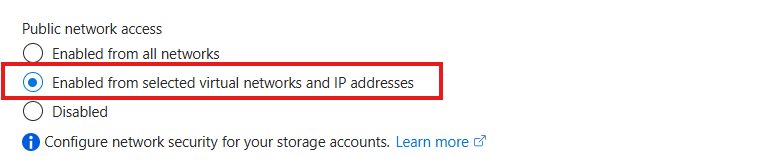
This way we expose the storage account access but only for our services that needs it. This defends our storage account from attackers outside of our environment.
For you actually able to see the data in the Azure Portal, you need to add the WAN IP address of your location/management server:
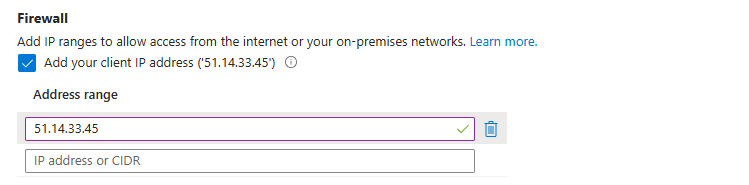
You can do that simply by checking the “Client IP address”. If you skip this step, you will get an error that the boot diagnostics cannot be found later on.
At the “Encryption” tab we can configure the encryption, if your company policies states this. For the simplicity of this guide, I leave everything on “default”.
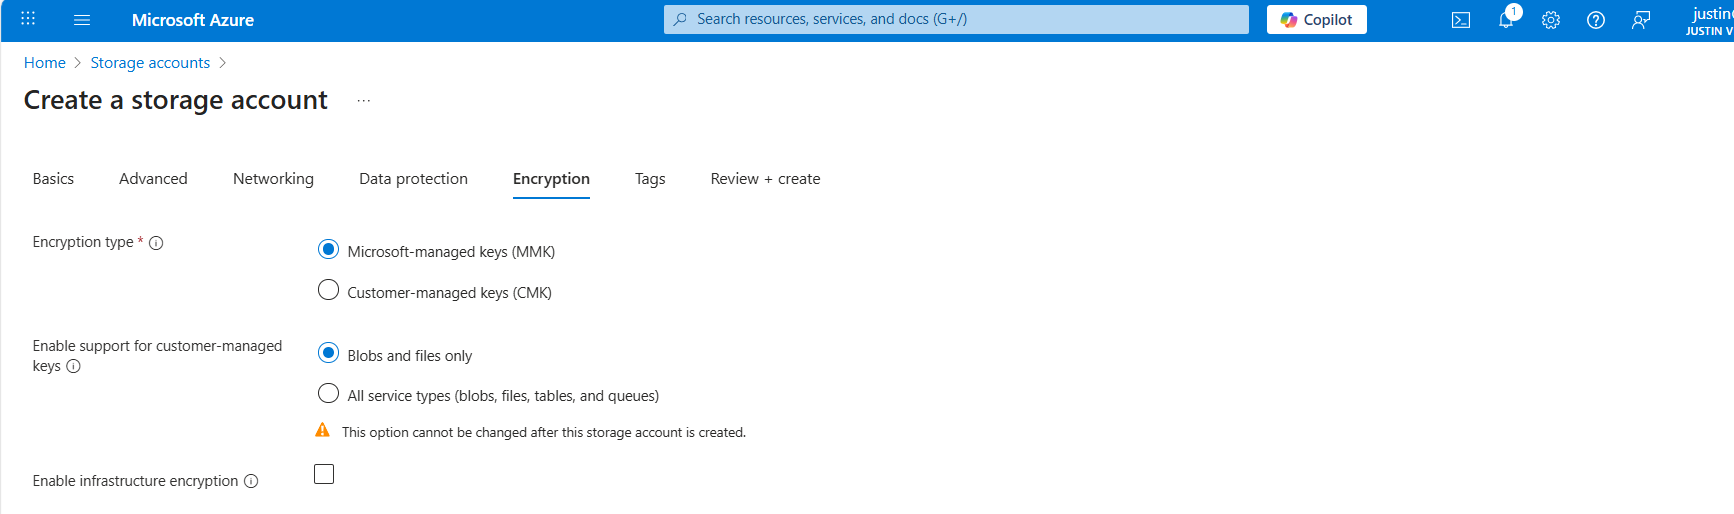
Create the storage account.
We can now create our Azure Policy that alters the virtual machine settings to save the diagnostics into the custom storage account. The policy overrides every other setting, like disabled or enabled with managed storage account. It 100% ensures all VMs in the scope will save their data in our custom storage account.
Open the Azure Portal and go to “Policy”. We will land on the Policy compliancy dashboard:
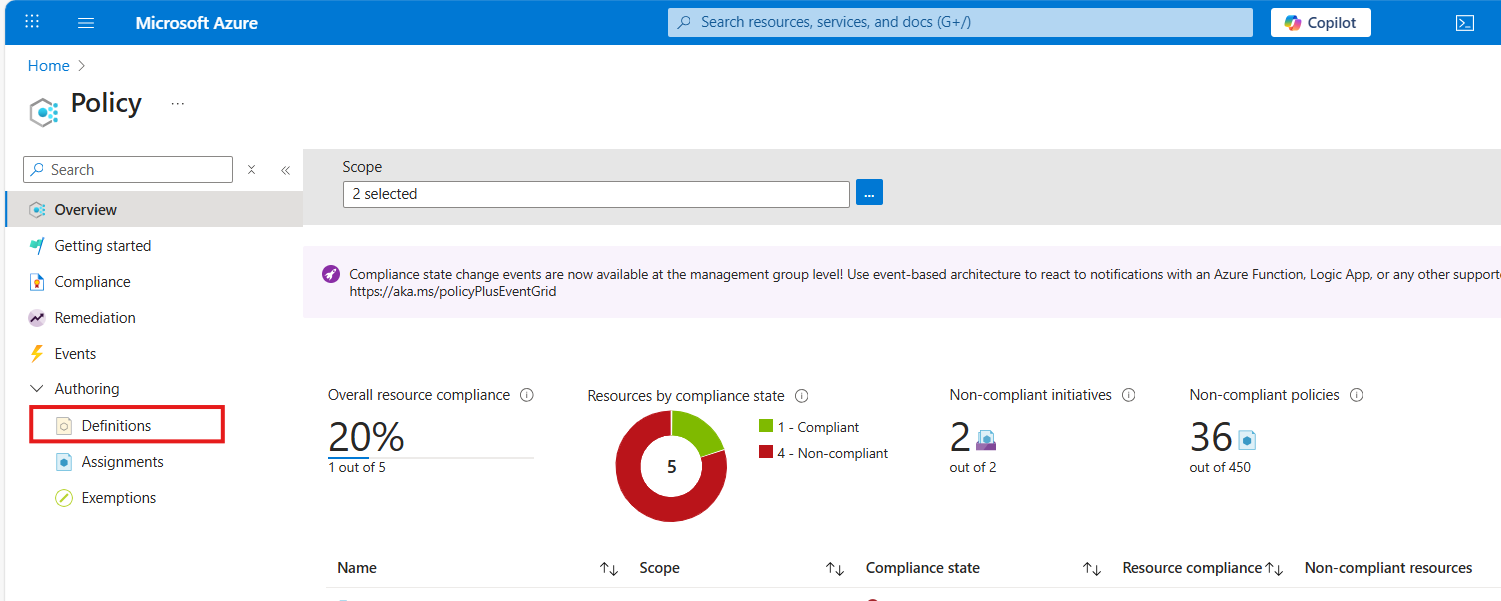
Click on “Definitions” as we are going to define a new policy. Then click on “+ Policy Definition” to create a new:
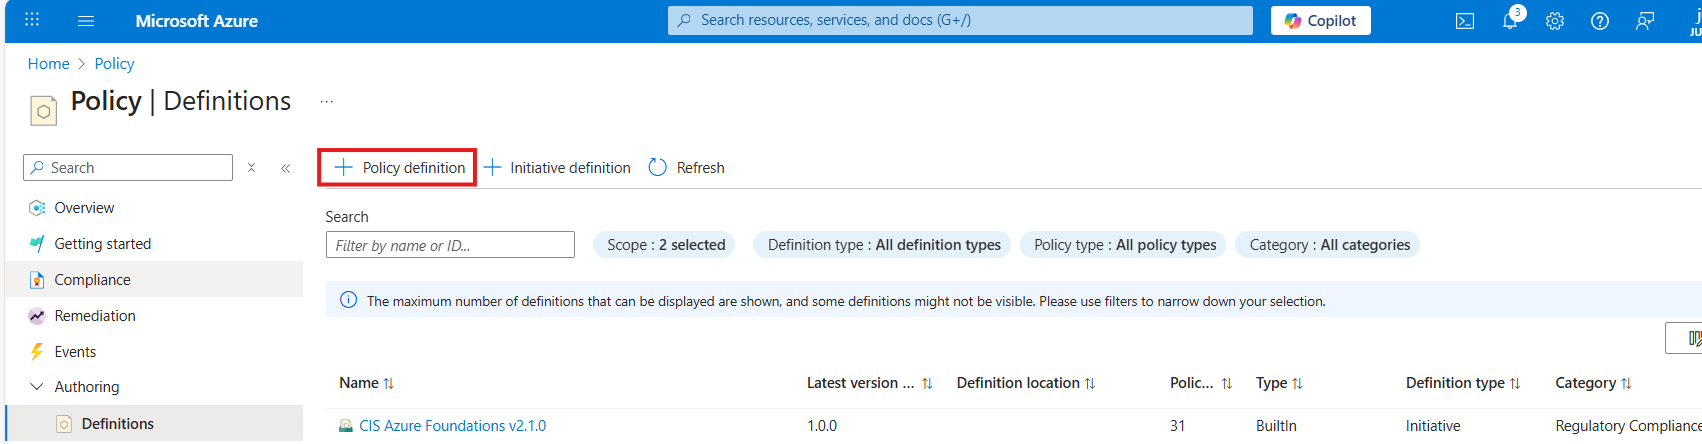
At the “definition location”, select your subscription where you want this configuration to be active. You can also select the tenant root management group, so this is enabled on all subscriptions. Caution with this of course.
Warning: Policies assigned to the Tenant Management Group cannot be assigned remediation tasks. Select one or more subscriptions instead.
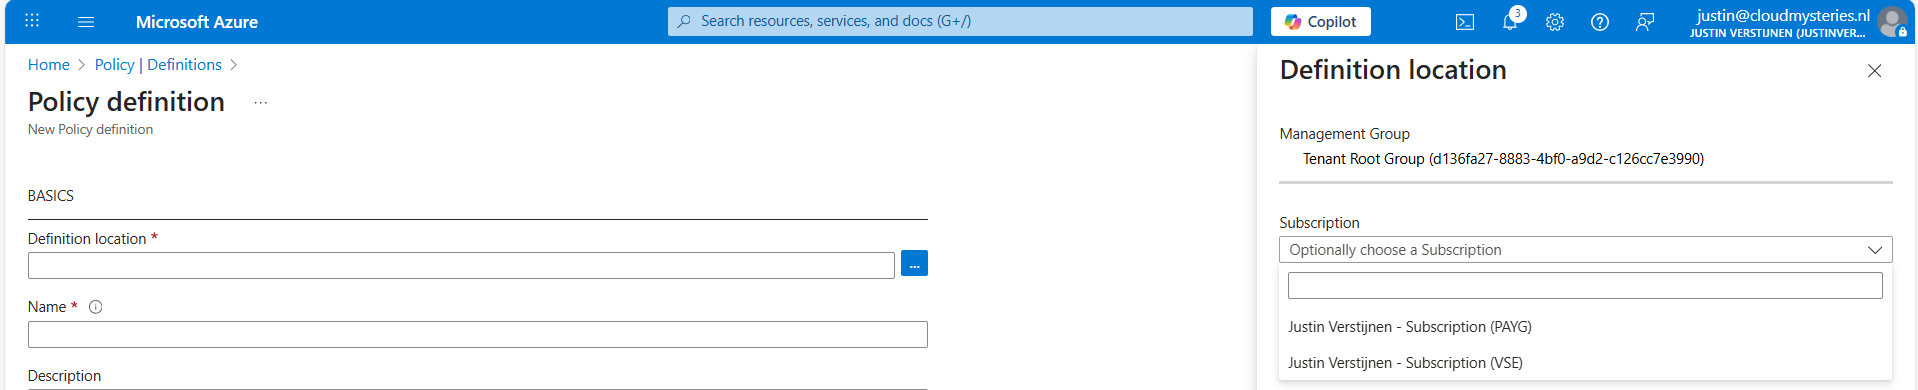
Then give the policy a good name and description.
At the “Category” section we can assign the policy to a category. This changes nothing to the effect of the policy but is only for your own categorization and overview. You can also create custom categories if using multiple policies:

At the policy rule, we have to paste a custom rule in JSON format which I have here:
{
  "mode": "All",
  "parameters": {
    "customStorageUrl": {
      "type": "String",
      "metadata": {
        "displayName": "Custom Storage",
        "description": "The custom Storage account used to write boot diagnostics to."
      },
      "defaultValue": "https://*your storage account name*.blob.core.windows.net"
    }
  },
  "policyRule": {
    "if": {
      "allOf": [
        {
          "field": "type",
          "equals": "Microsoft.Compute/virtualMachines"
        },
        {
          "field": "Microsoft.Compute/virtualMachines/diagnosticsProfile.bootDiagnostics.storageUri",
          "notContains": "[parameters('customStorageUrl')]"
        },
        {
          "not": {
            "field": "Microsoft.Compute/virtualMachines/diagnosticsProfile.bootDiagnostics.storageUri",
            "equals": ""
          }
        }
      ]
    },
    "then": {
      "effect": "modify",
      "details": {
        "roleDefinitionIds": [
          "/providers/Microsoft.Authorization/roleDefinitions/9980e02c-c2be-4d73-94e8-173b1dc7cf3c"
        ],
        "conflictEffect": "audit",
        "operations": [
          {
            "operation": "addOrReplace",
            "field": "Microsoft.Compute/virtualMachines/diagnosticsProfile.bootDiagnostics.storageUri",
            "value": "[parameters('customStorageUrl')]"
          },
          {
            "operation": "addOrReplace",
            "field": "Microsoft.Compute/virtualMachines/diagnosticsProfile.bootDiagnostics.enabled",
            "value": true
          }
        ]
      }
    }
  }
}
Copy and paste the code into the “Policy Rule” field. Then make sure to change the storage account URI to your custom or managed storage account. You can find this in the Endpoints section of your storage account:
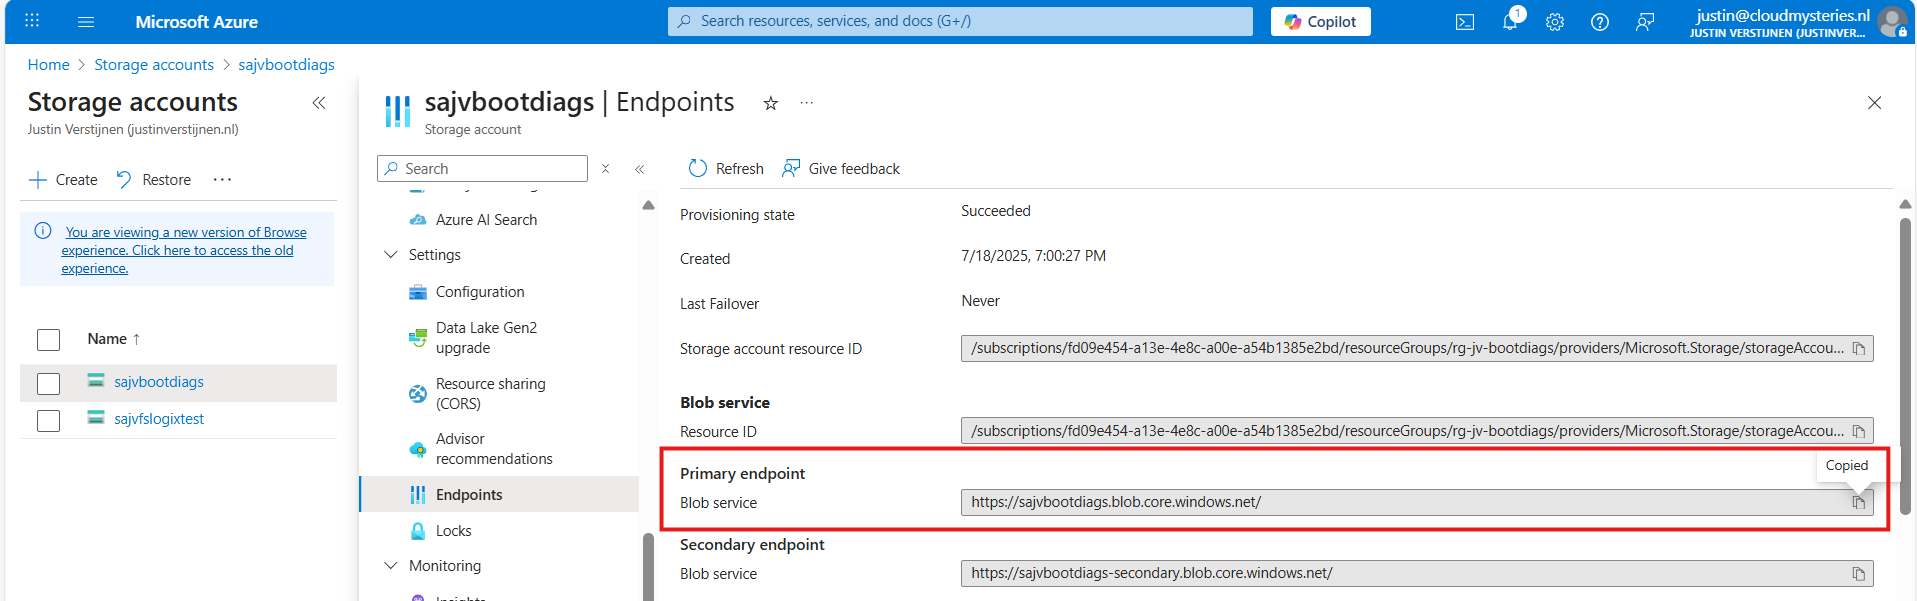
Paste that URL into the JSON definition at line 10, and if desired, change the displayname and description on line 7 and 8.
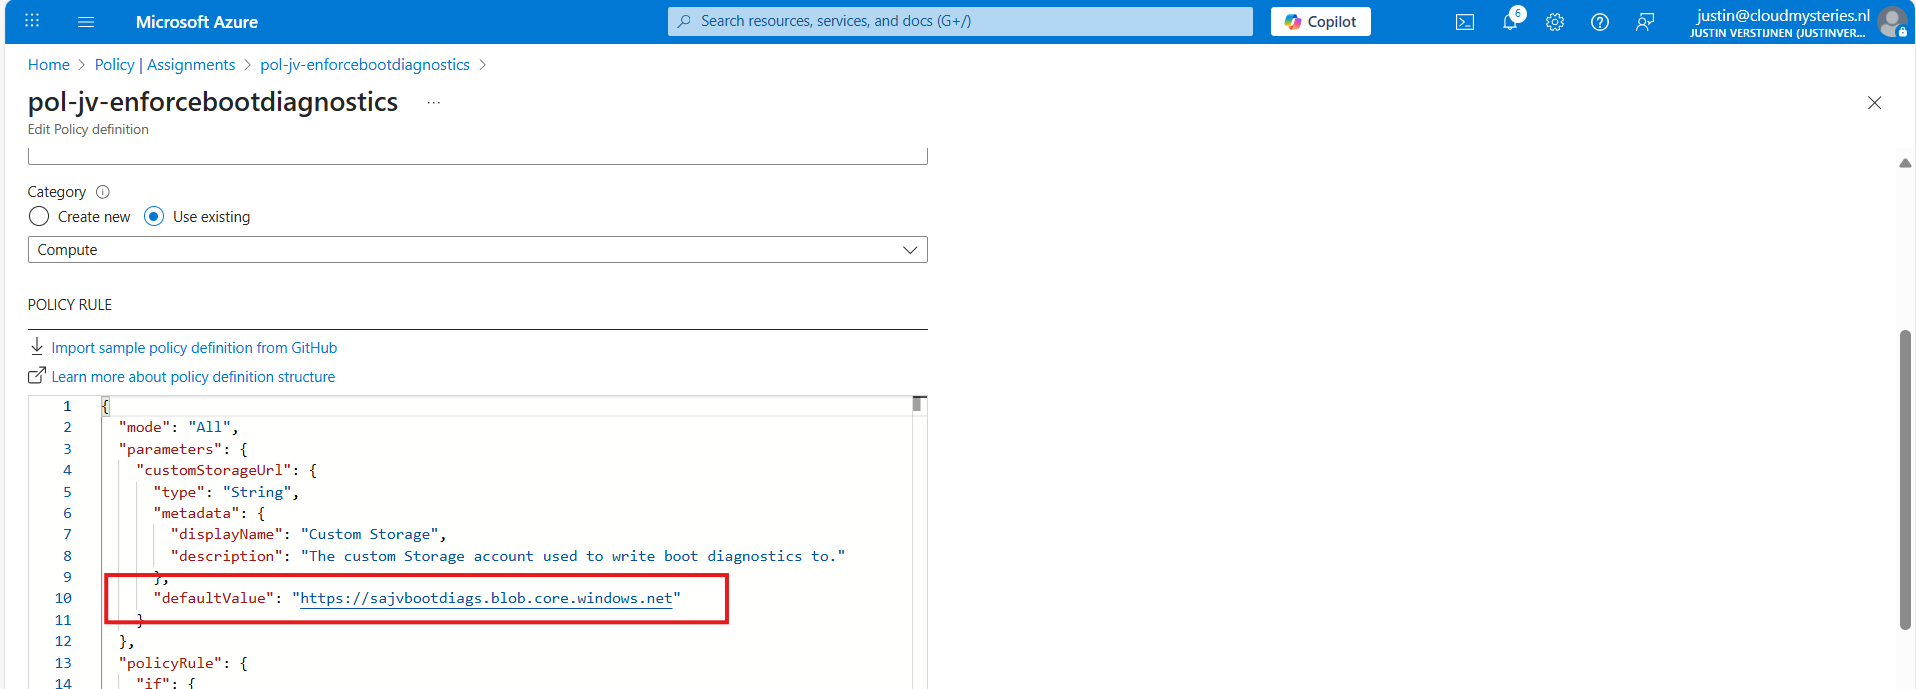
Leave the “Role definitions” field to the default setting and click on “Save”.
Now we have defined our policy, we can assign it to the scope where it must be active. After saving the policy you will get to the correct menu:
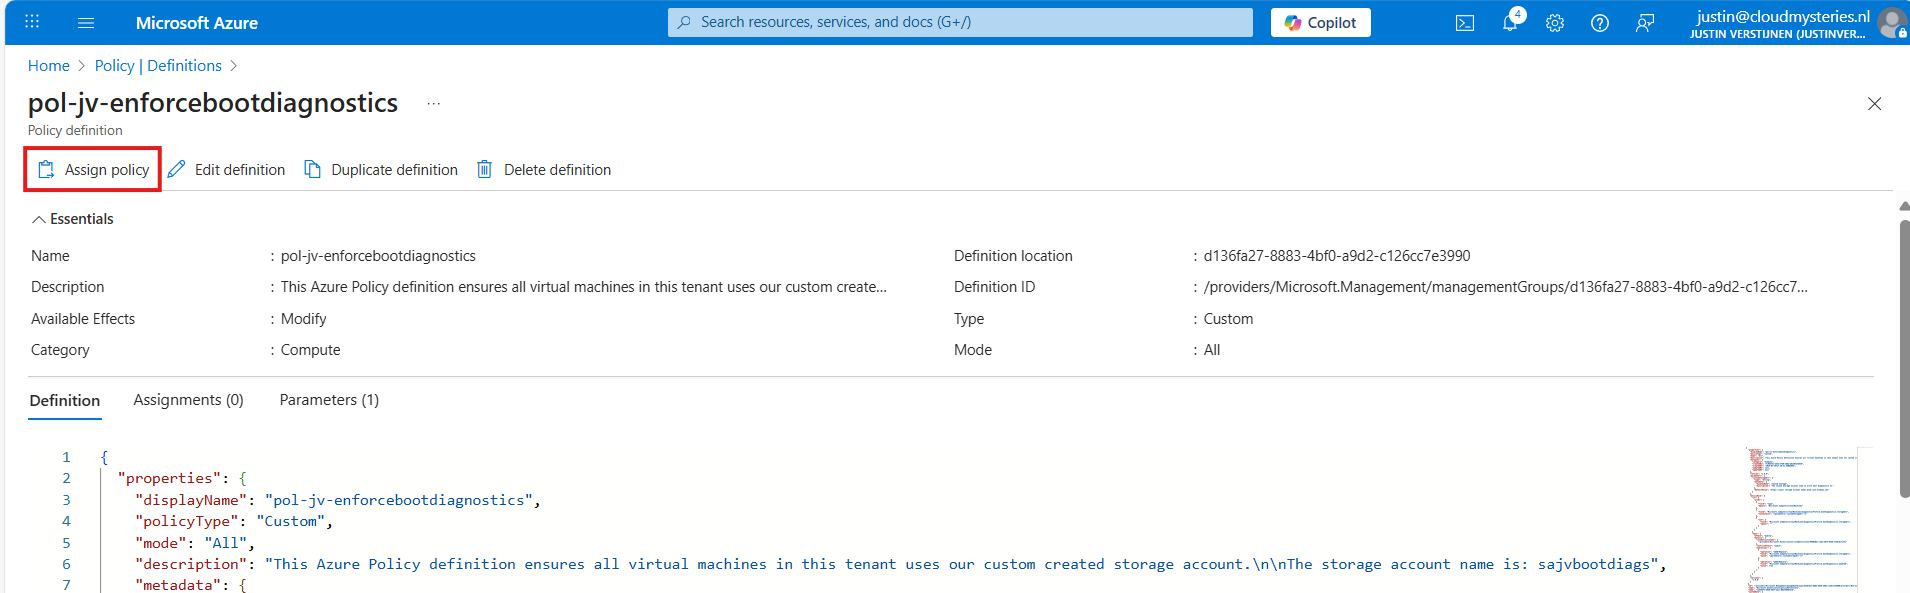
Otherwise, you can go to “Policy”, then to “Definitions” just like in step 3 and lookup your just created definition.
On the Assign policy page, we can once again define our scope. We can now set “Exclusions” to apply to all, but some according to your configurations. You can also select one or multiple specific resources to exclude from your Policy.
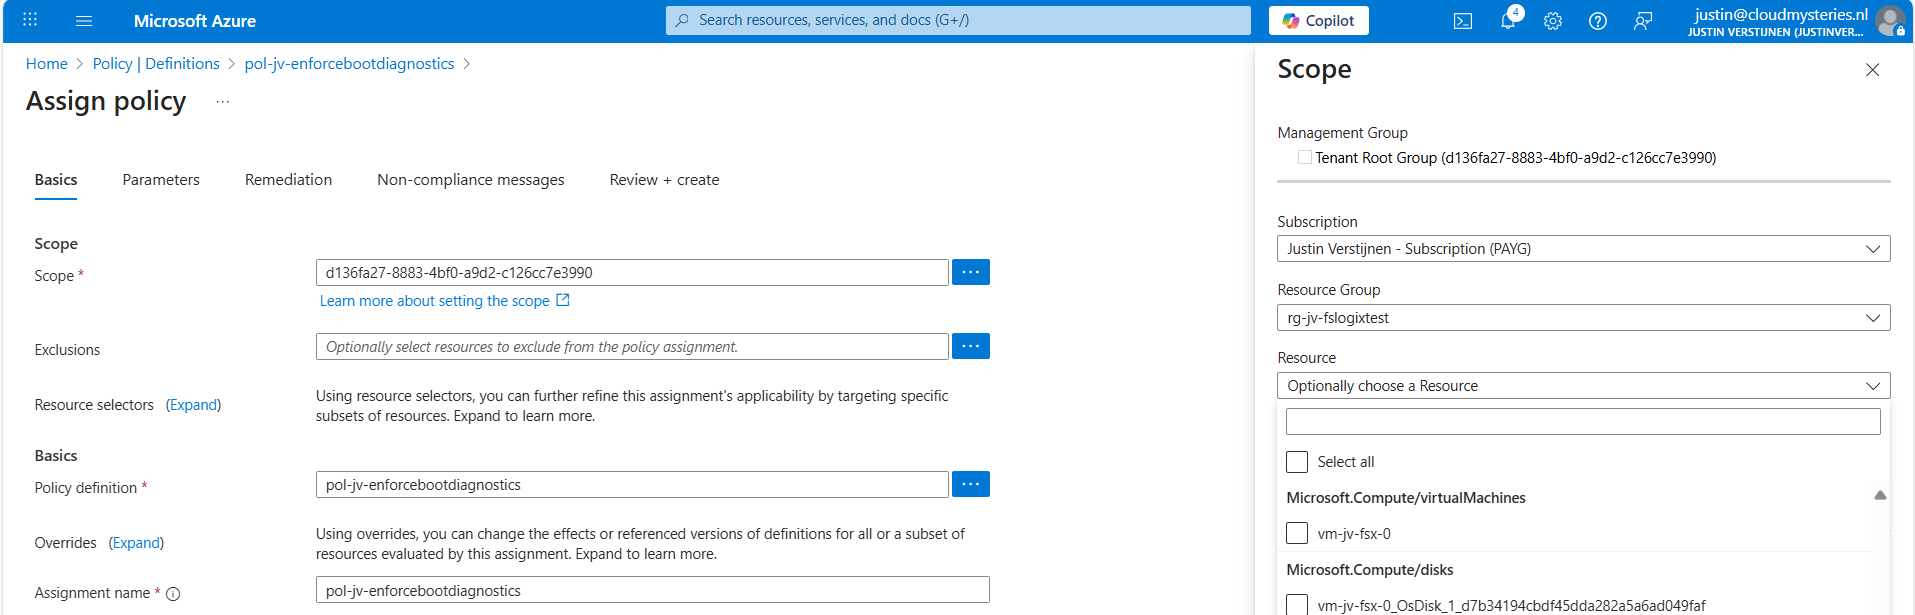
Leave the rest of the page as default and advance to the “Remediation” tab:
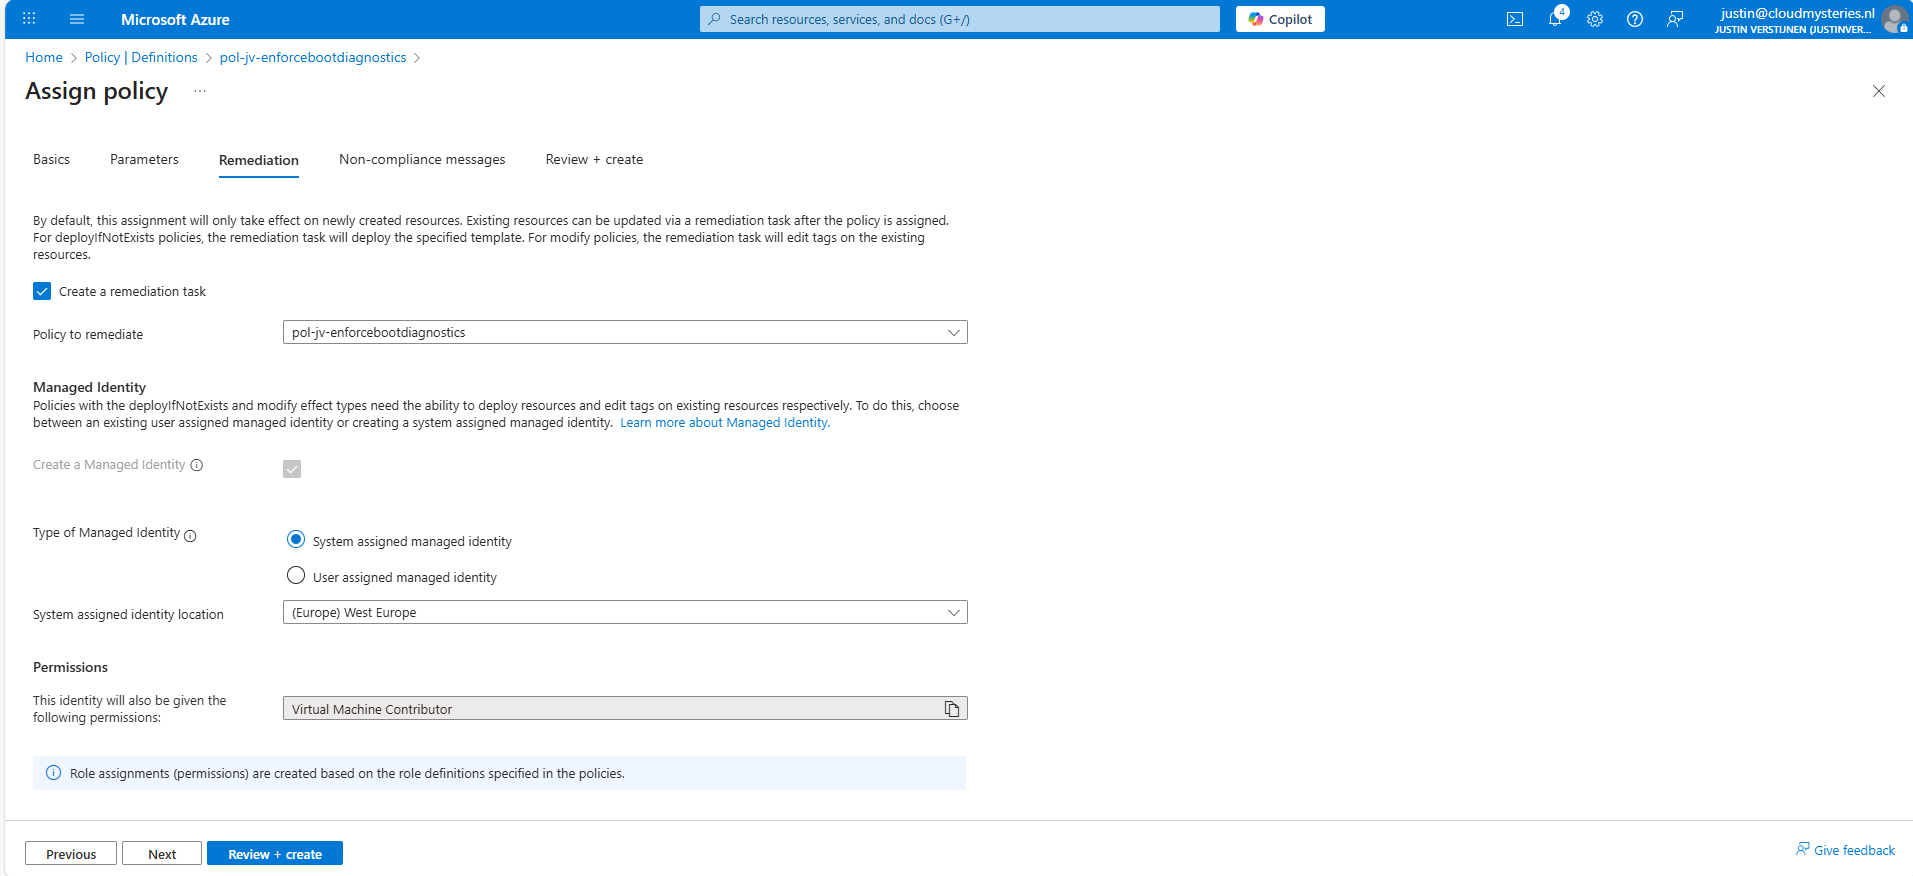
Enable “Create a remediation task” and select your policy if not already there.
Then we must create a system or user assigned managed identity because changing the boot diagnostics needs permissions. We can use the default system assiged here and that automatically selects the role with the least privileges.
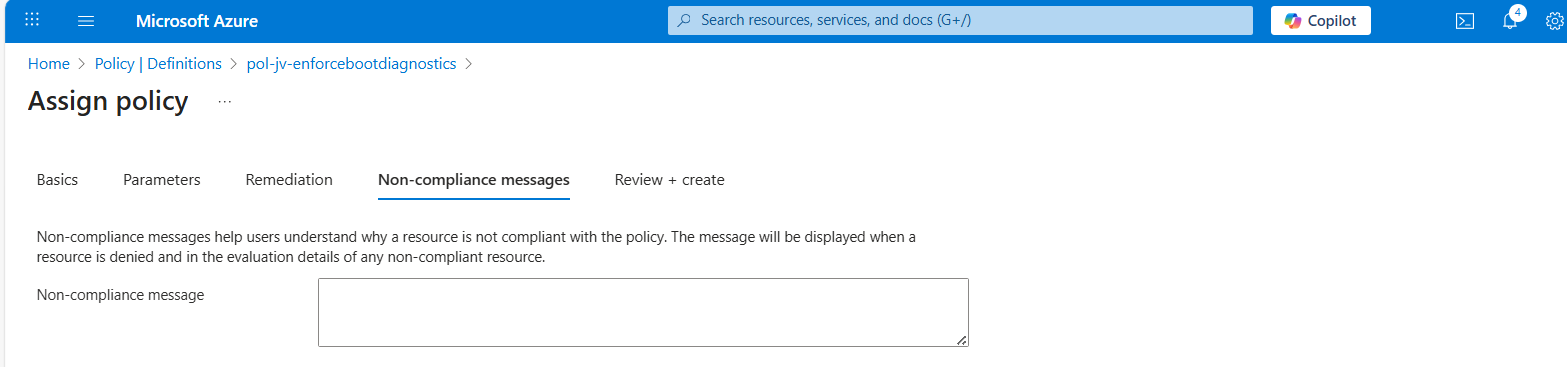
You could forbid the creation of non-compliant virtual machines and leave a custom message, like our documentation is here -> here. This then would show up when creating a virtual machine that is not configured to send boot diagnostics to our custom storage account.
Advance to the “Review + create” tab and finish the assignment of the policy.
Now that we finished the configuration of our Azure Policy, we can now test the configuration. We have to wait for around 30 minutes when assigning the policy to become active. When the policy is active, the processing of Azure policies are much faster.
In my environment I have a test machine called vm-jv-fsx-0 with boot diagnostics disabled:
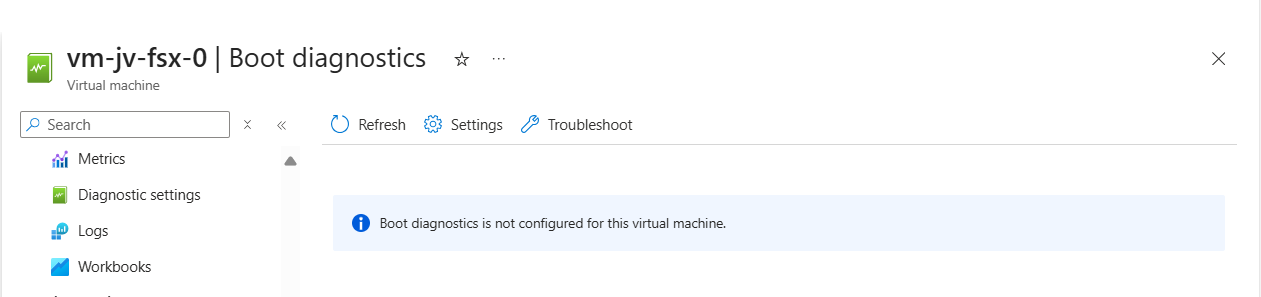
This is just after assigning the policy, so a little patience is needed. We can check the status of the policy evaluation at the policy assignment and then “Remediation”:
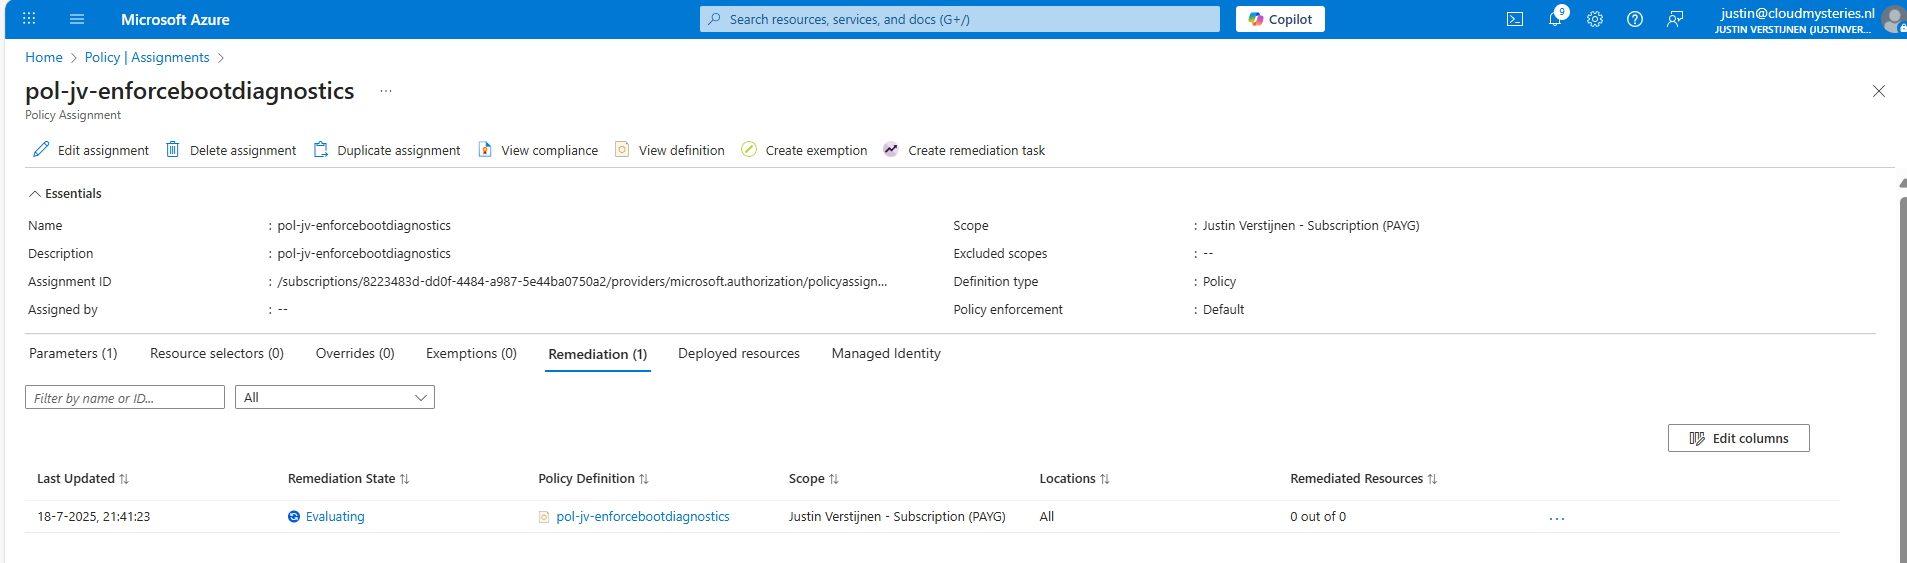
After 30 minutes or something, this will automatically be configured:
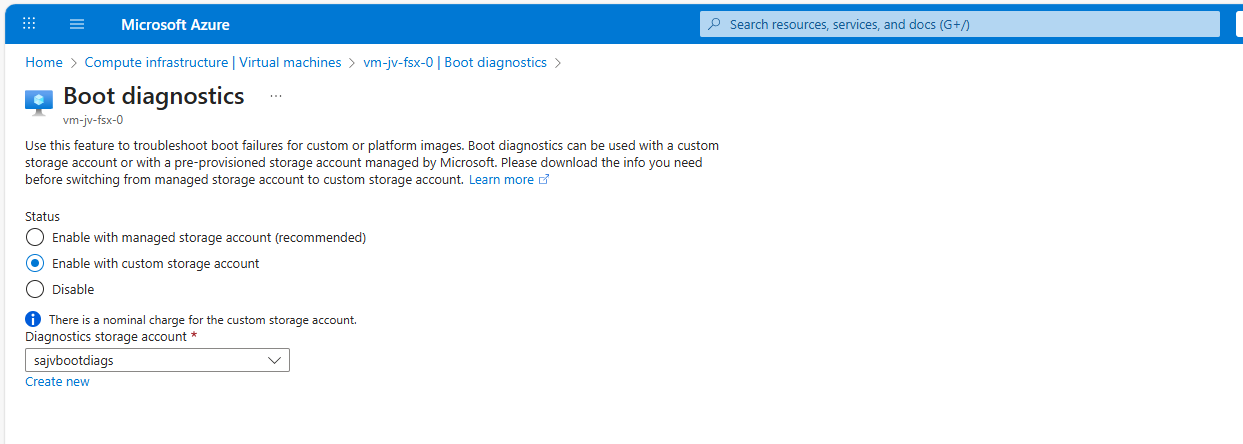
This took about 20 minutes in my case. Now we have access to the boot configuration:
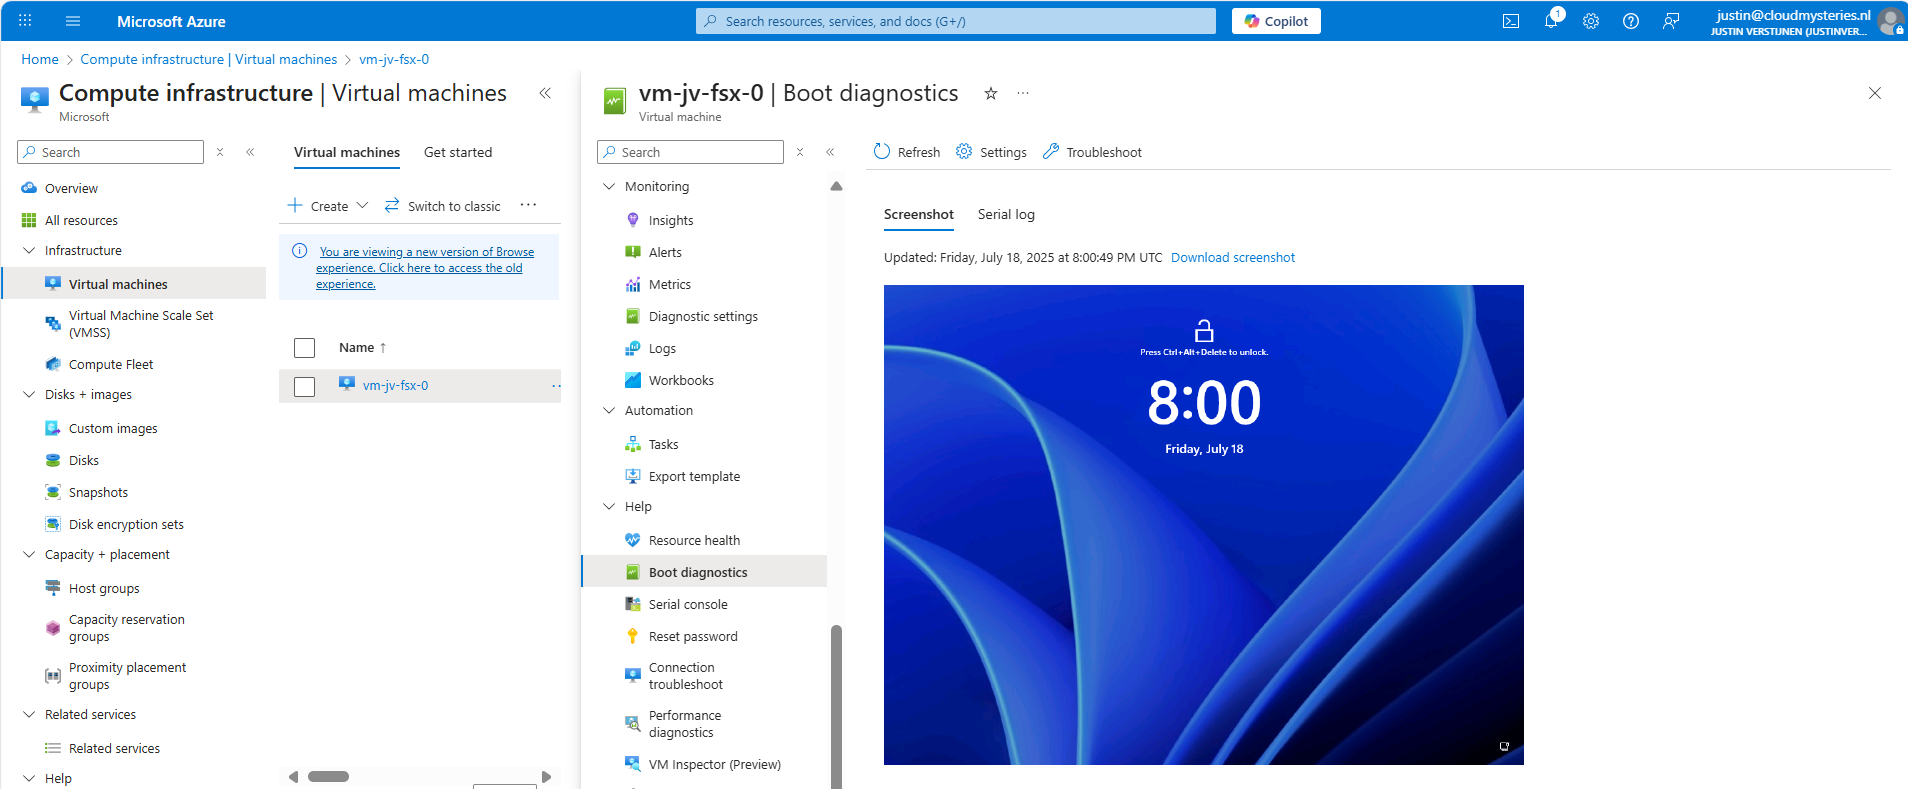
You can monitor the compliance of the policy by going to “Policy” and search for your assignment:
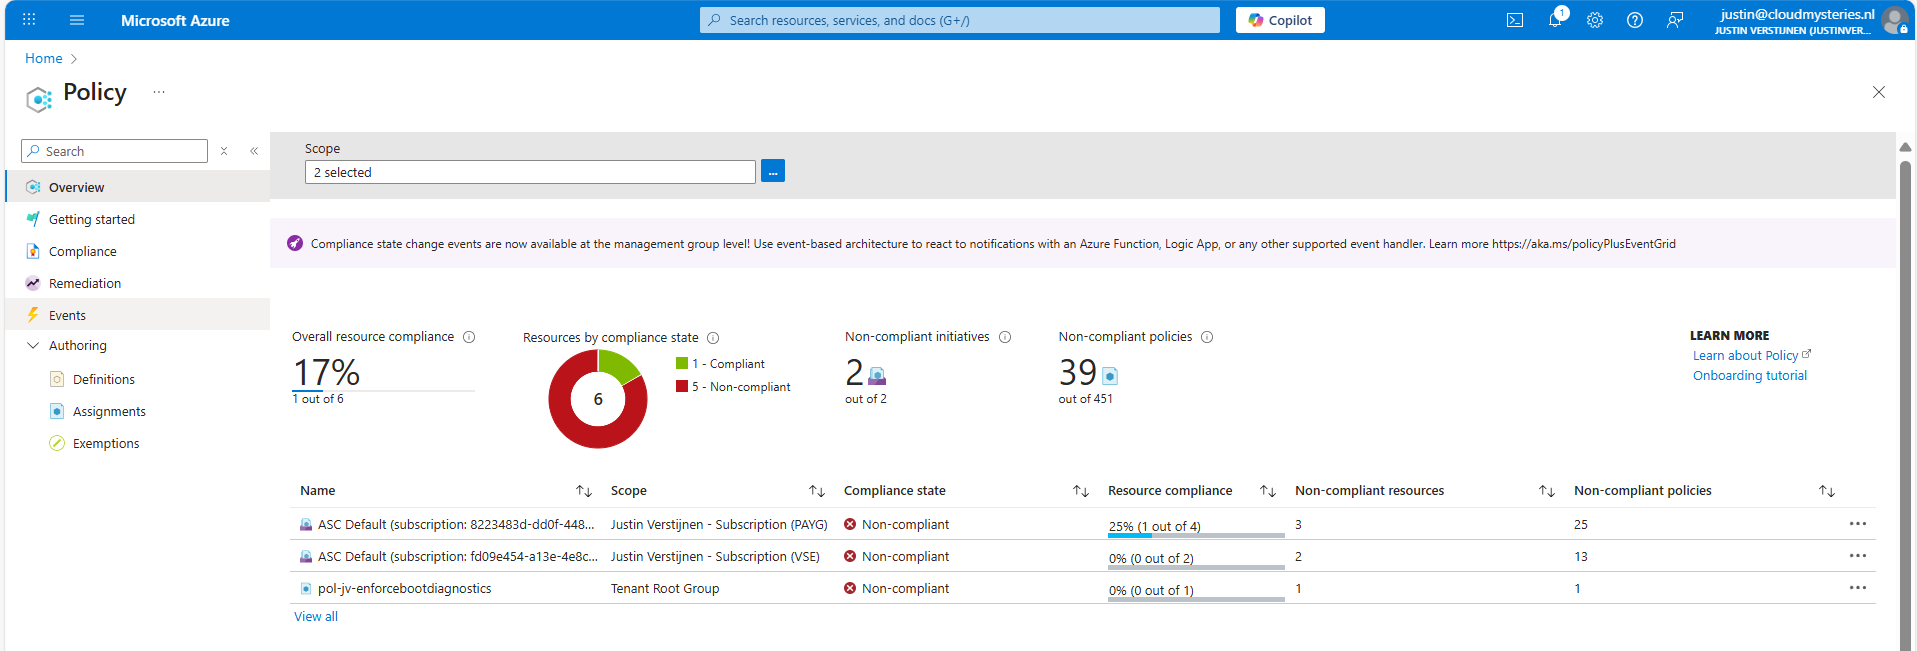
You will see the configuration of the definition, and you can click on “Deployed resources” to monitor the status and deployment.
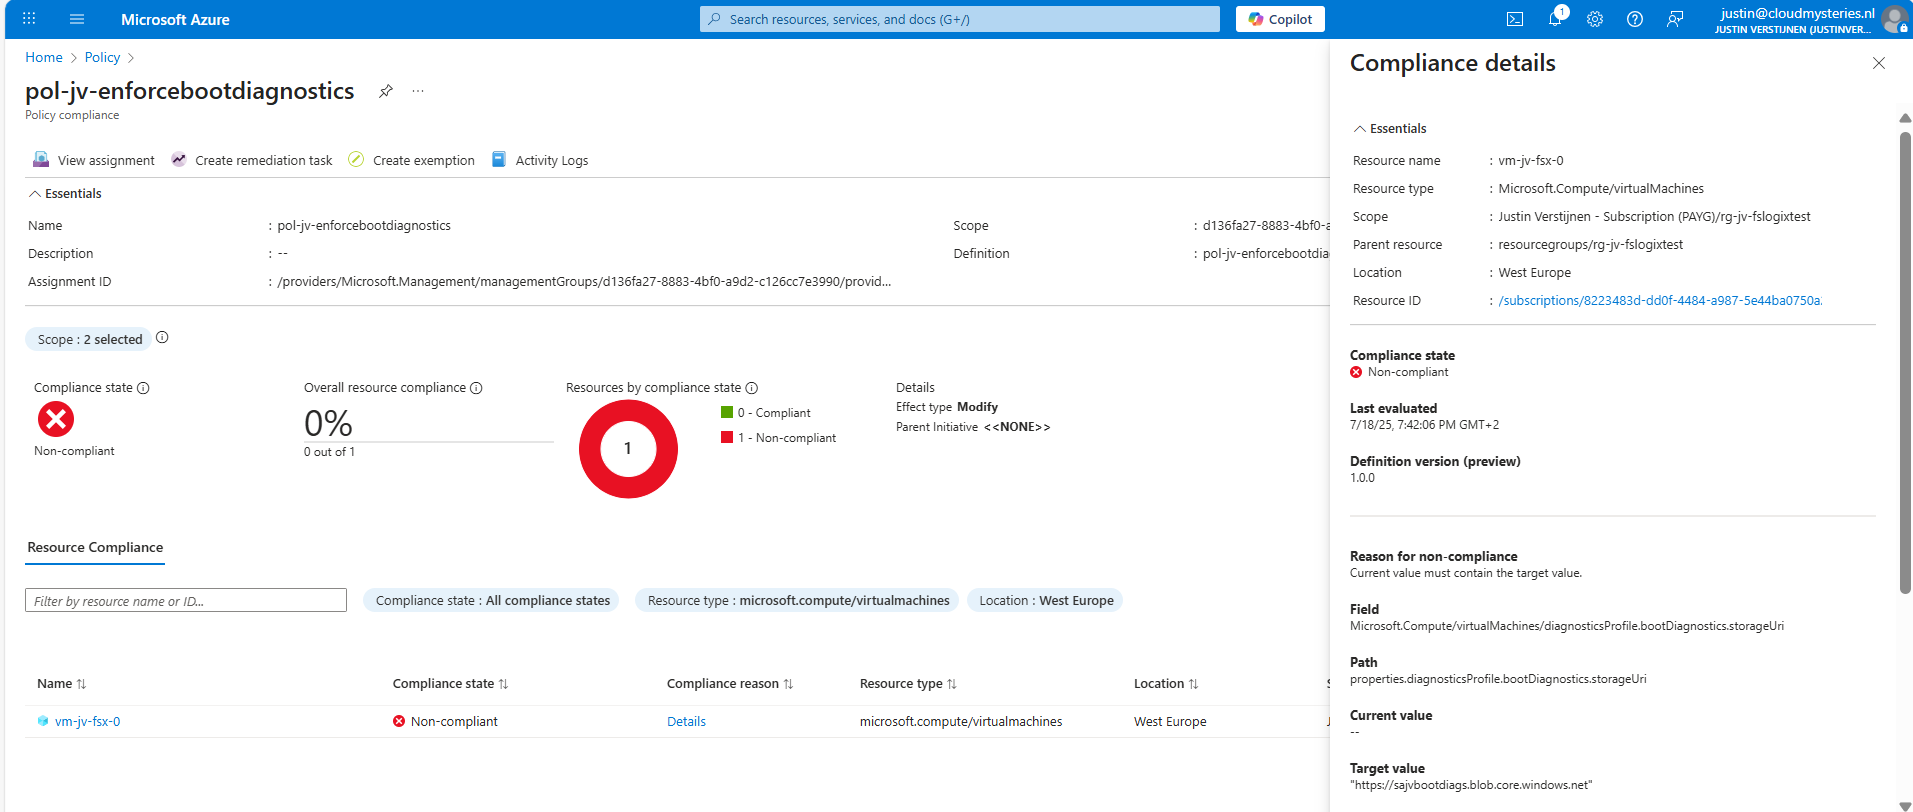
It will exactly show why the virtual machine is not compliant and what to do to make it compliant. If you have multiple resources, they will all show up.
Azure Policy is a great way to automate, monitor and ensure your Azure Resources remain compliant with your policies by remediating them automatically. This is only one possibility of using Policy but for many more options.
I hope I helped you with this guide and thank you for visiting my website.
These sources helped me by writing and research for this post;
You have reached the end of the page. You can navigate through other blog posts as well, share this post on X, LinkedIn and Reddit or return to the blog posts collection page. Thank you for visiting this post.
If you think something is wrong with this post or you want to know more, you can send me a message to one of my social profiles at: https://justinverstijnen.nl/about/
If you find this page and blog very useful and you want to leave a donation, you can use the button below to buy me a beer. Hosting and maintaining a website takes a lot of time and money. Thank you in advance and cheers :)
The terms and conditions apply to this post.
Wordpress. Its maybe the best and easiest way to maintain a website. This can be run on any server. In Azure, we also have great and serverless possibilities to run Wordpress. In this guide I will show you how to do this, how to enhance the experience and what steps are needed to build the solution. I will also tell more about the theoretical stuff to get a better understanding of what we are doing.
For the people who may not know what Wordpress is; Wordpress is a tool to create and manage websites, without needing to have knowledge of code. It is a so-called content management system (CMS) and has thousands of themes and plugins to play with. This website you see now is also running on Wordpress.
When we look at the Azure Marketplace, we have a lot of different Wordpress options available:
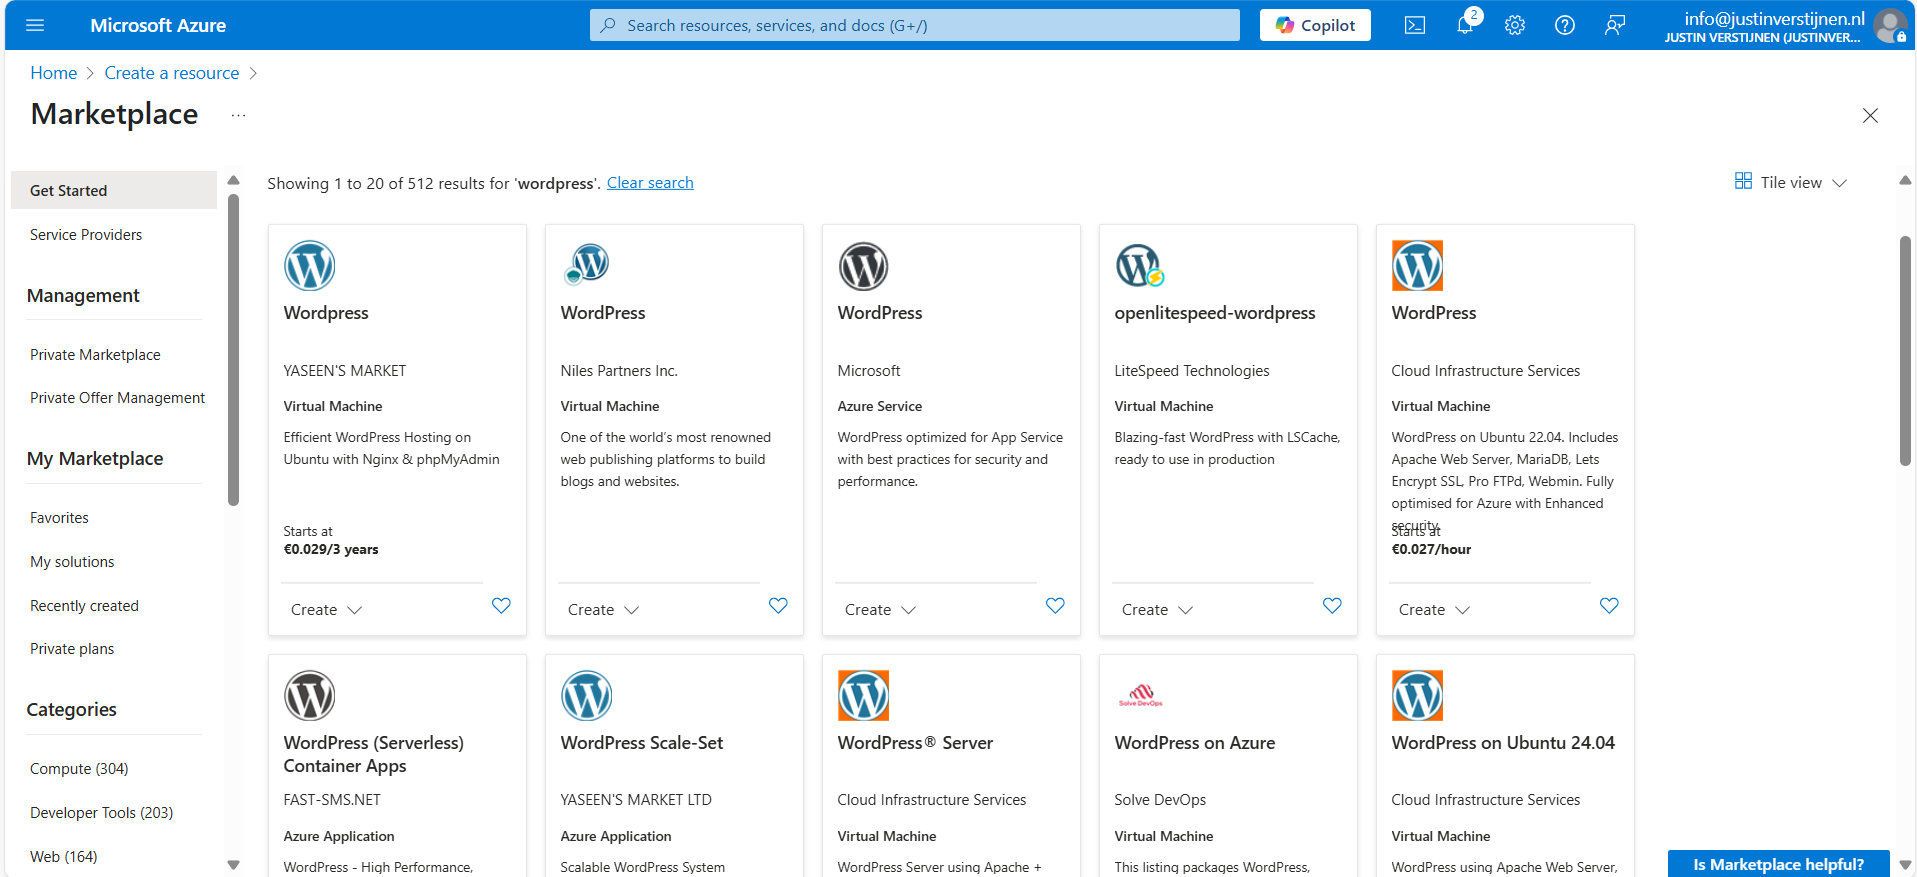
Now I want to highlight some different options, where some of these offerings will overlap or have the same features and architecture which is bold in the Azure Marketplace:
In this guide, we will go for the official Microsoft option, as this has the most support and we are Azure-minded.
We have the following plans and prices when running on Linux:
| Plan | Price per month | Specifications | Options and use |
| Free | 0$ | App: F1, 60 CPU minutes a day Database: B1ms | Not for production use, only for hobby projects. No custom domain and SSL support |
| Basic | ~ 25$ (consumption based) | App: B1 (1c 1,75RAM) Database: B1s (1c 1RAM) No autoscaling and CDN | Simple websites with same performance as free tier, but with custom domain and SSL support |
| Standard | ~ 85$ per instance (consumption based) | App: P1v2 (1c 3,5RAM) Database: B2s (2c 4RAM) | Simple websites who also need multiple instances for testing purposes. Also double the performance of the Basic plan. No autoscaling included. |
| Premium | ~ 125$ per instance (consumption based) | App: P1v3 (2c 8RAM) Database: D2ds_V4 (2c 16RAM) | Production websites with high traffic and option for autoscaling |
For the Standard and Premium offerings there is also an option to reserve your instance for a year for a 40% discount.
The Wordpress solution of Microsoft looks like this:
We start with Azure Front Door as load balancer and CDN, then we have our App service instances (1 to 3), they communicate with the private databases and thats it. The app service instances has their own delegated subnet (appsubnet) and the database instances have their own delegated subnet (dbsubnet).
This architecture is very flexible, scalable and focusses on high availability and security. It is indeed more complex than one virtual machine, but it’s better too.
Backups of the whole Wordpress solution is included with the monthly price. Every hour Azure will take a backup from the App Service instance and storage account, starting from the time of creation:
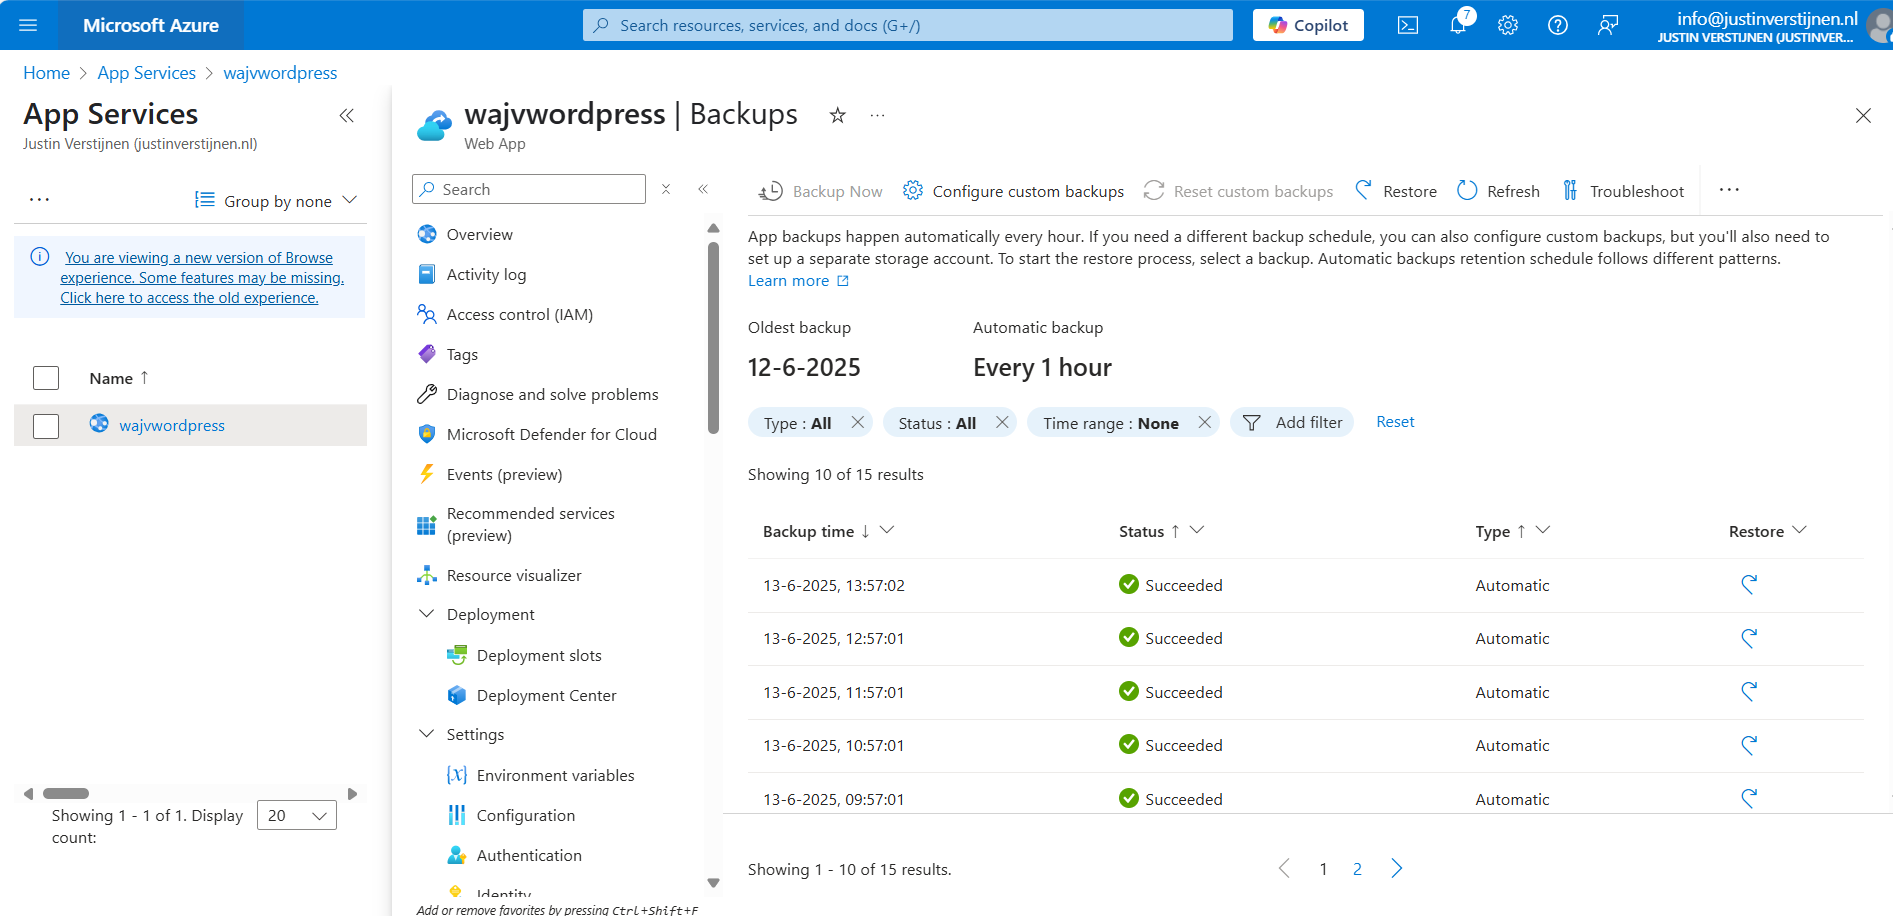
I think this is really cool and a great pro that this will not take an additional 10 dollars per month.
We have to prepare our Azure environment for Wordpress. We begin by creating a resource group to throw in all the dependent resources of this Wordpress solution.
Login to Microsoft Azure (https://portal.azure.com) and create a new resource group:
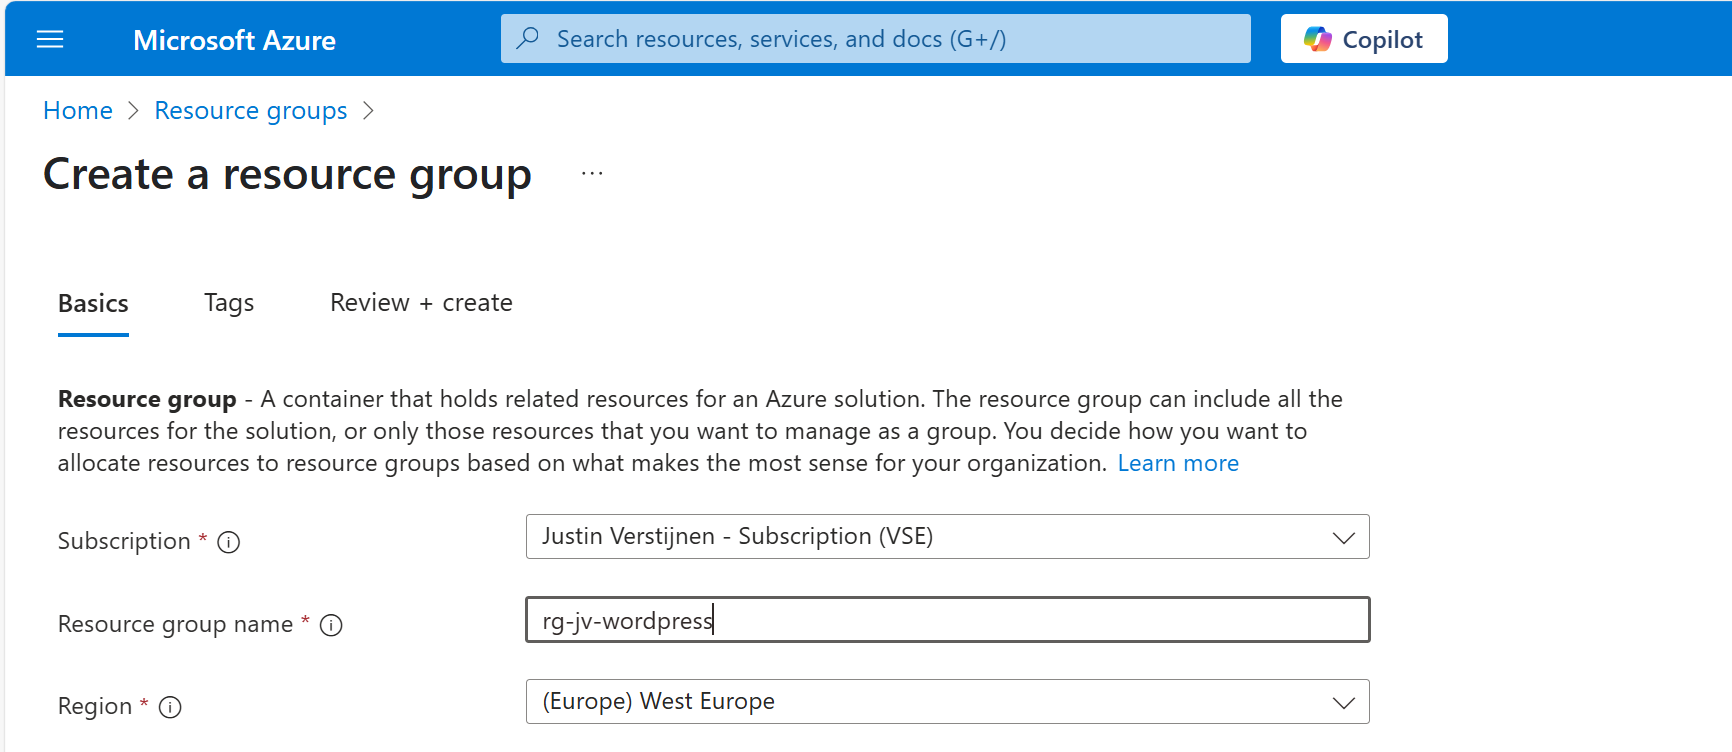
Finish the wizard. Now the resource group is created and we can advance to deploy the Wordpress solution.
We can go to the Azure Marketplace now to search for the Wordpress solution published by Microsoft:
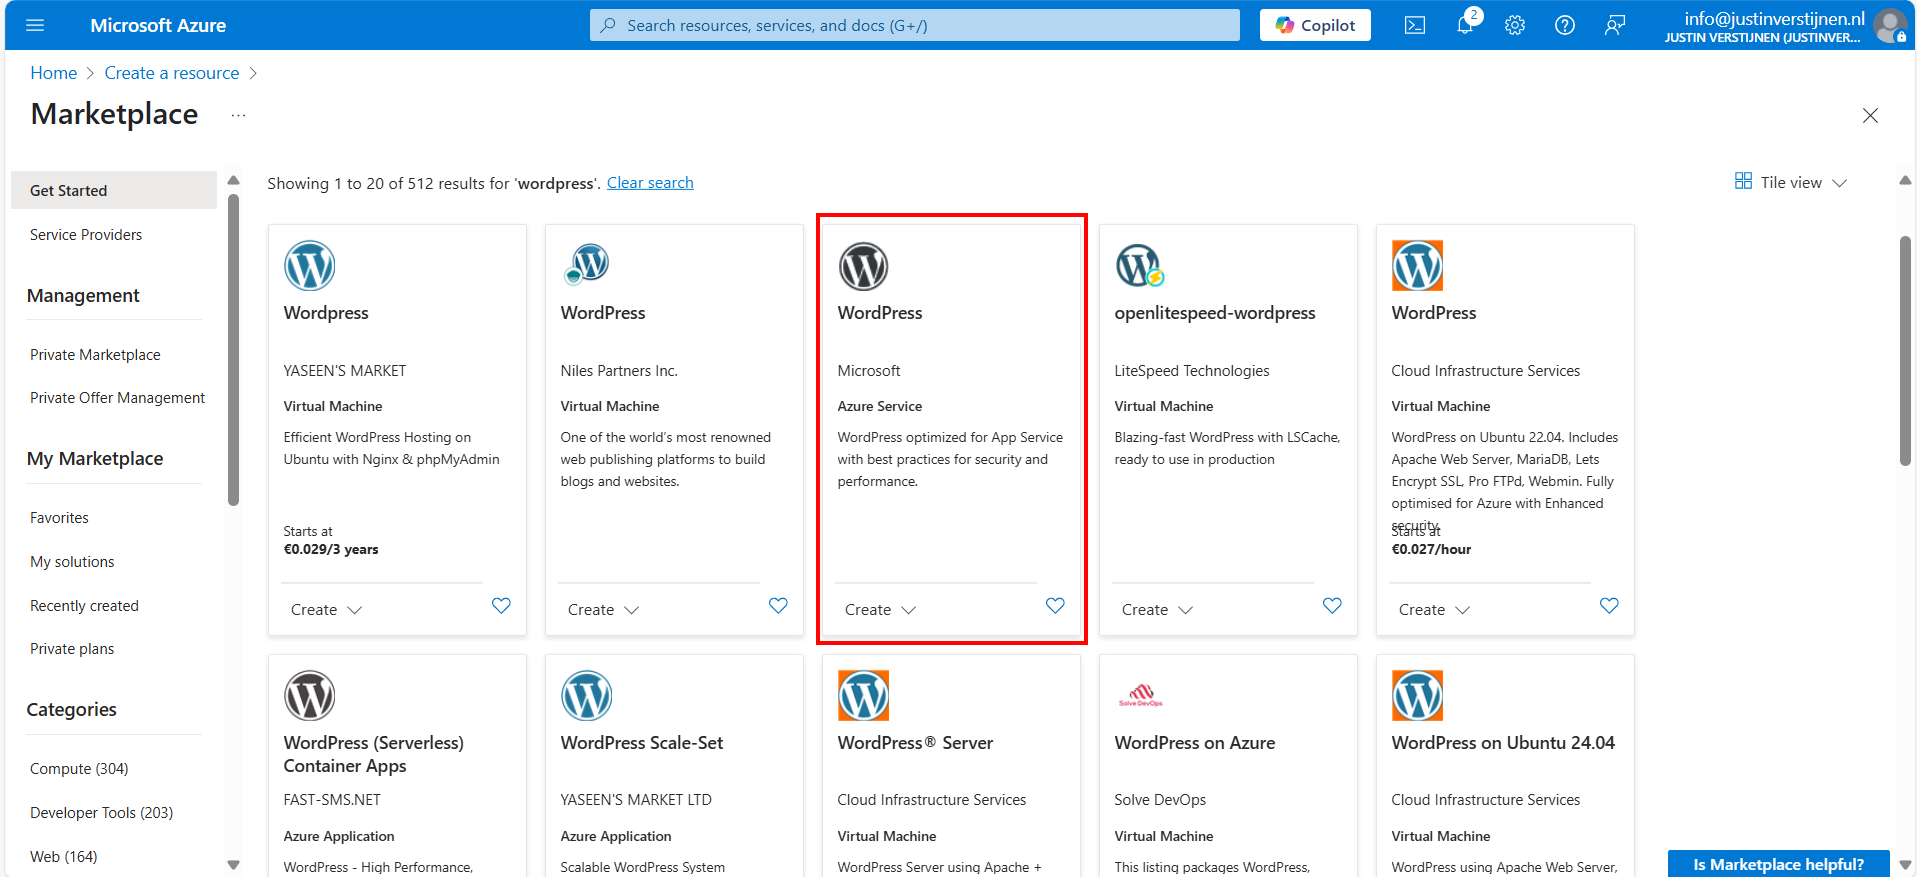
In this guide, we will use the Microsoft offering. You are free to choose other options, but some steps will not align with this guide.
Now after selecting the option, we have 4 different plans which we can choose. This mostly depends on how big you want your environment to be:
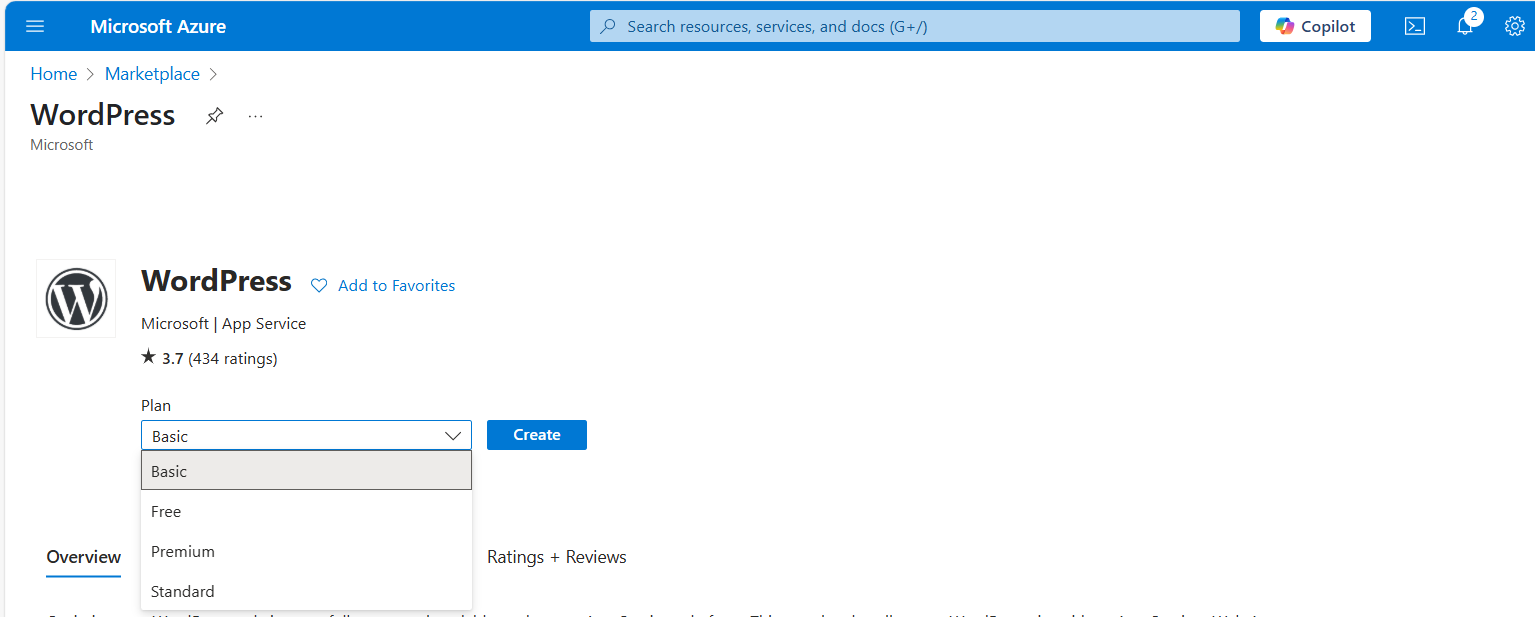
For this guide, we will choose the Basic as we want to actually host on a custom domain name. Select the free plan and continue.
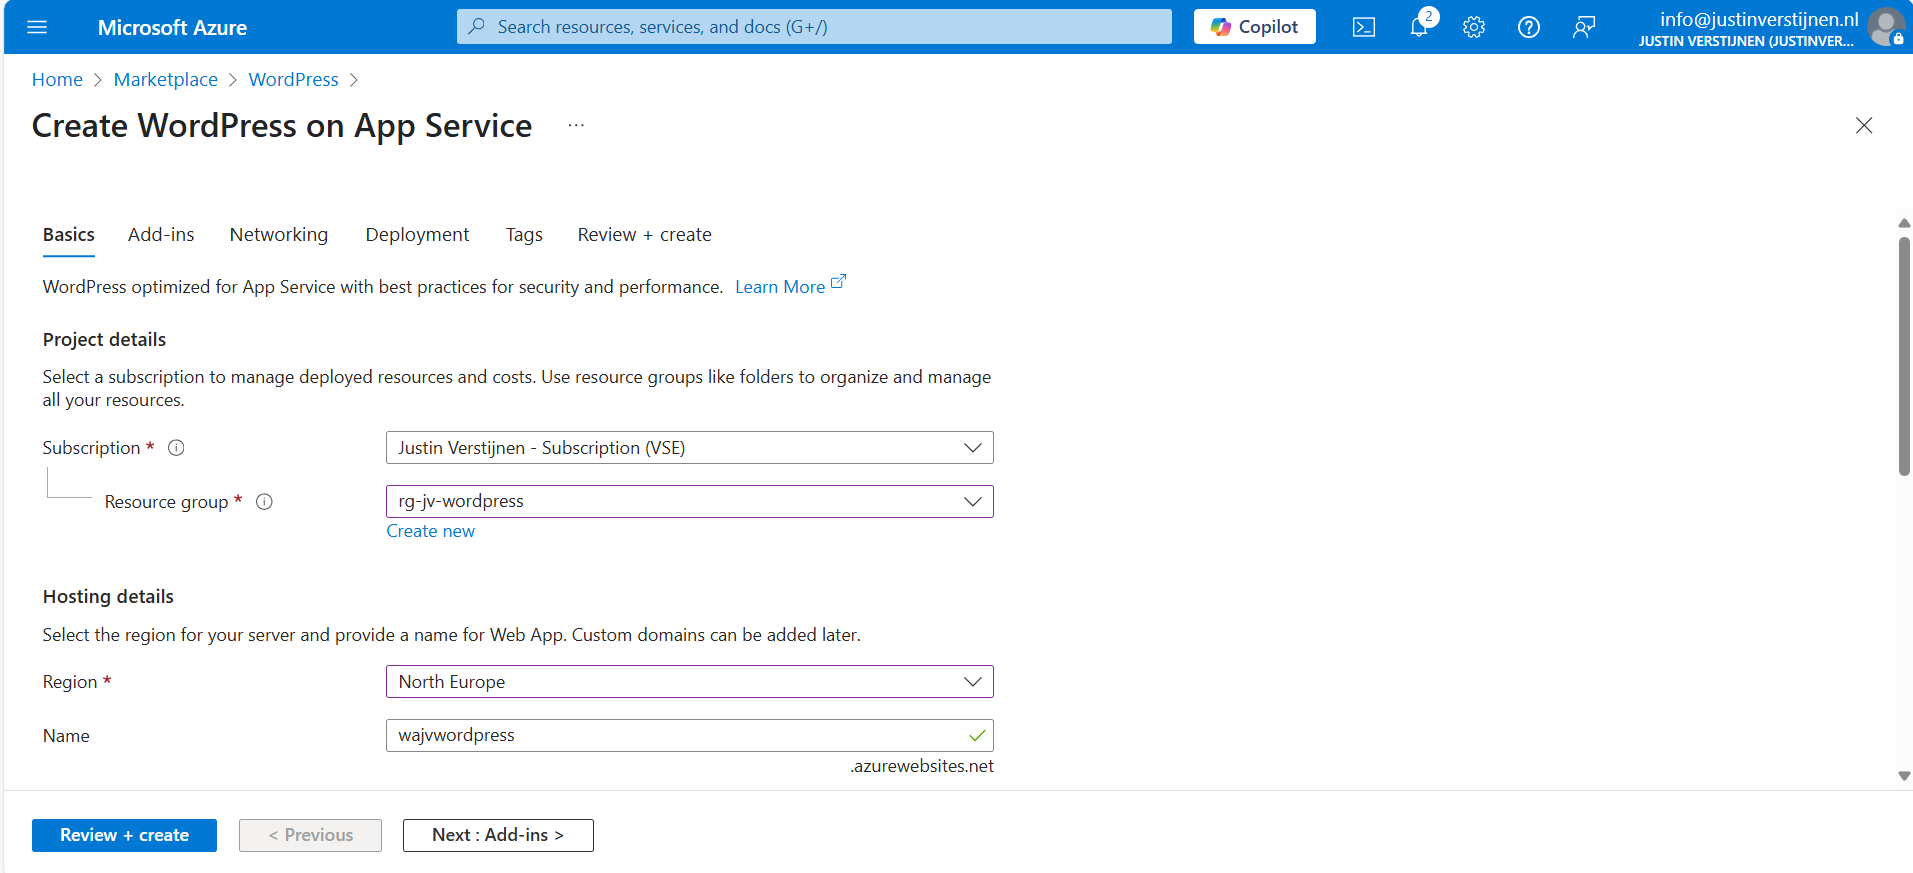
Choose your resource group and choose a resource name for the Web app. This is a URL so may contain only small letters and numbers and hyphens (not ending on hyphen).
Scroll down and choose the “Basic” hosting plan. This is for the Azure App Service that is being created under the hood.
Then fill in the Wordpress Setup menu, this is the admin account for Wordpress that will be created. Fill in your email address, username and use a good password. You can also generate one with my password generator tool: https://password.jvapp.nl/
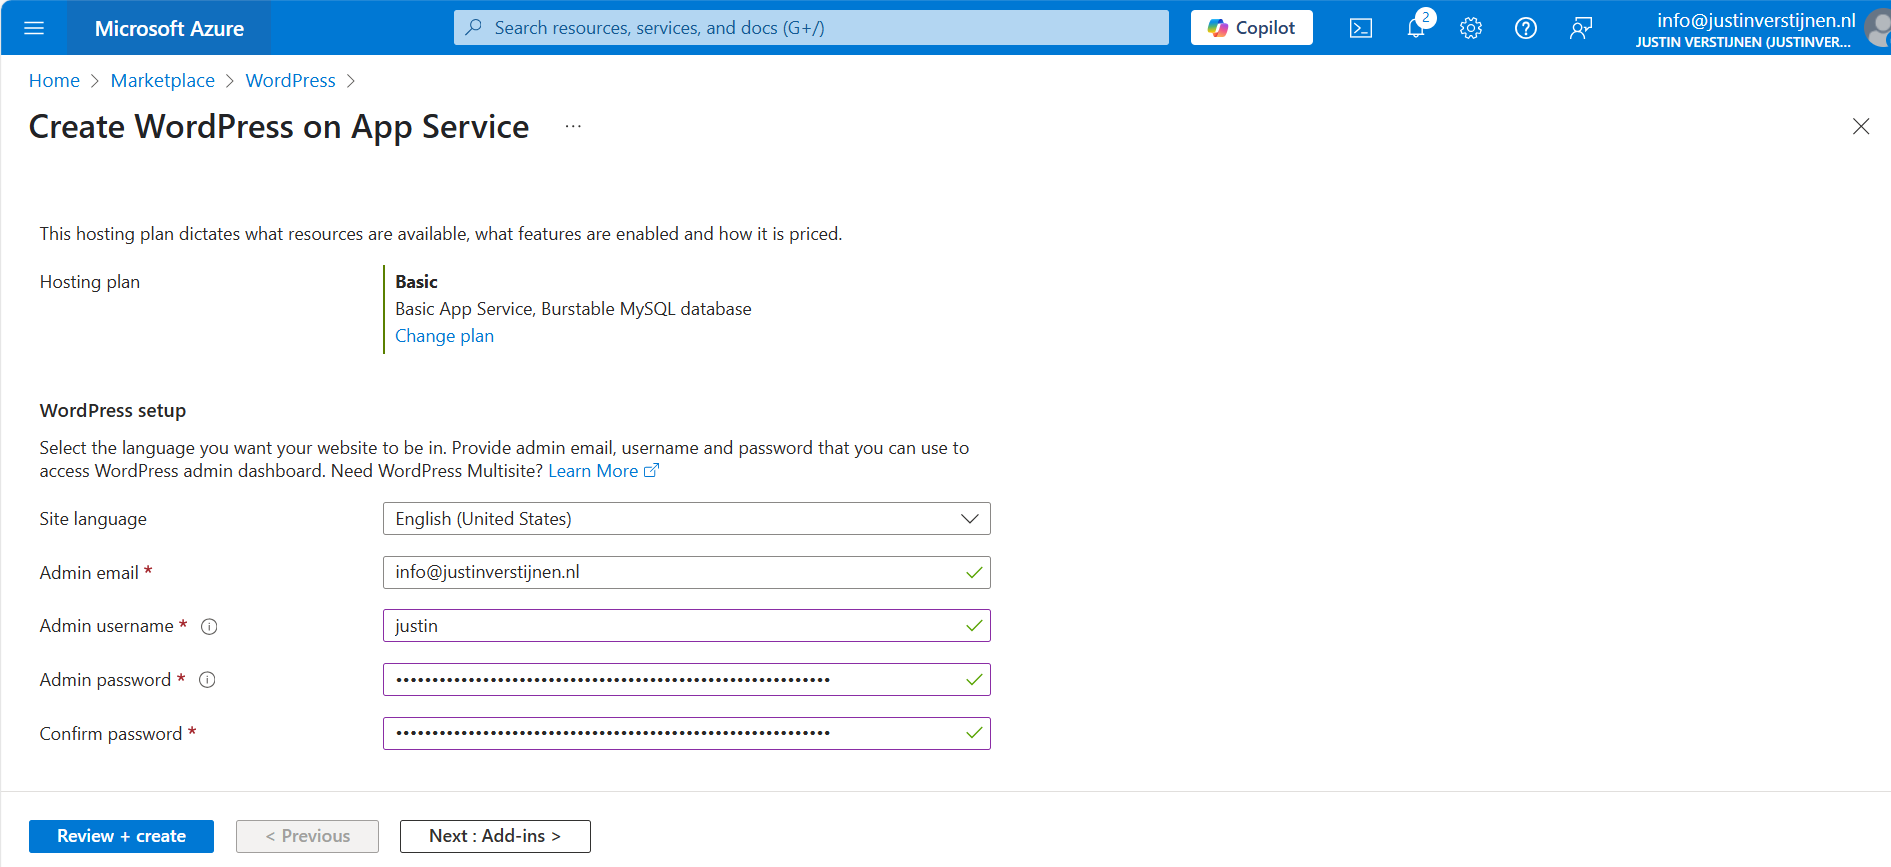
Click on “Next: Add ins >”
On the Add-ins page, i have all options as default but enabled the Azure Blob Storage. This is where the media files are stored like images, documents and stuff.

This automatically creates an storage account. Then go to the “Networking” tab.
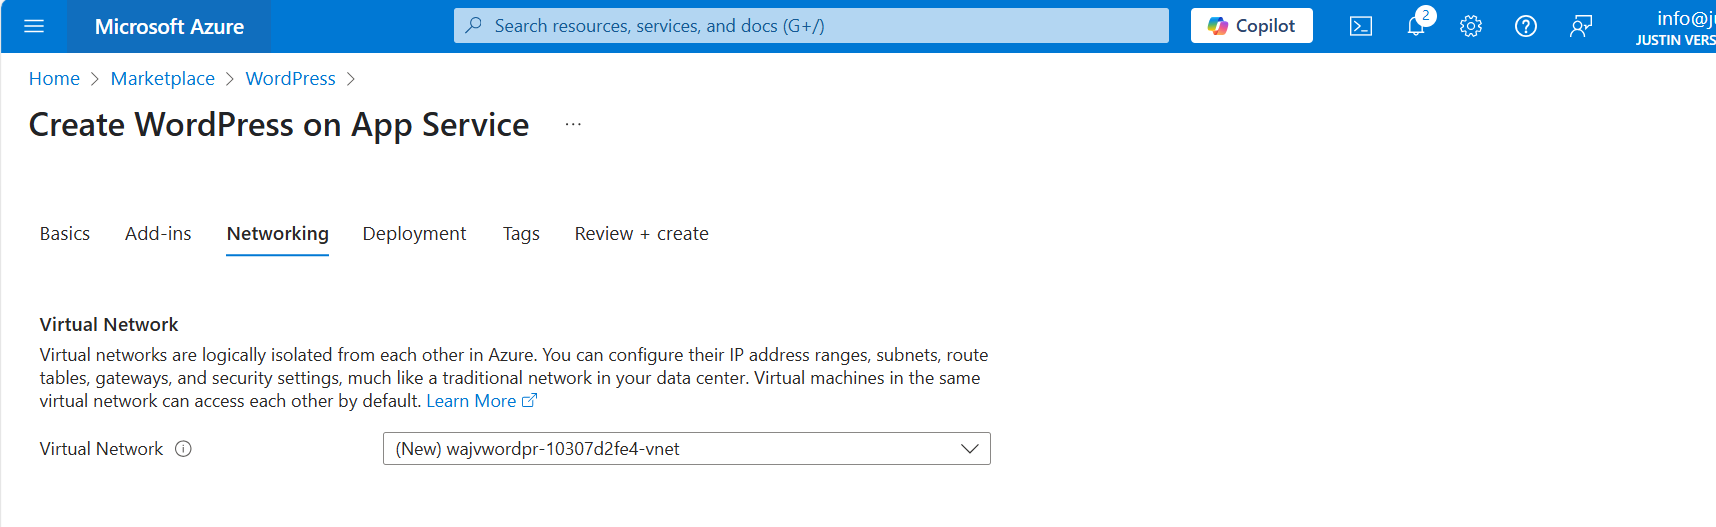
On the networking tab, we have to select a virtual network. This is because the database is hosted on a private, non public accessible network. When using a existing Azure network, select your own network. In my case, I stick to the automatic generated network.
When using your own network, you have to create 2 subnets:
Click on “Next”. And finish the wizard. For the basic plan, there are no additional options available.
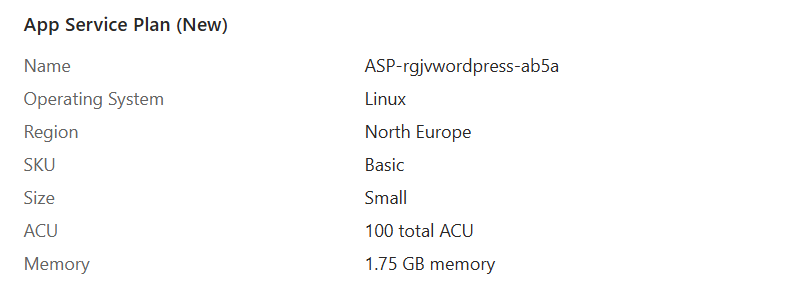
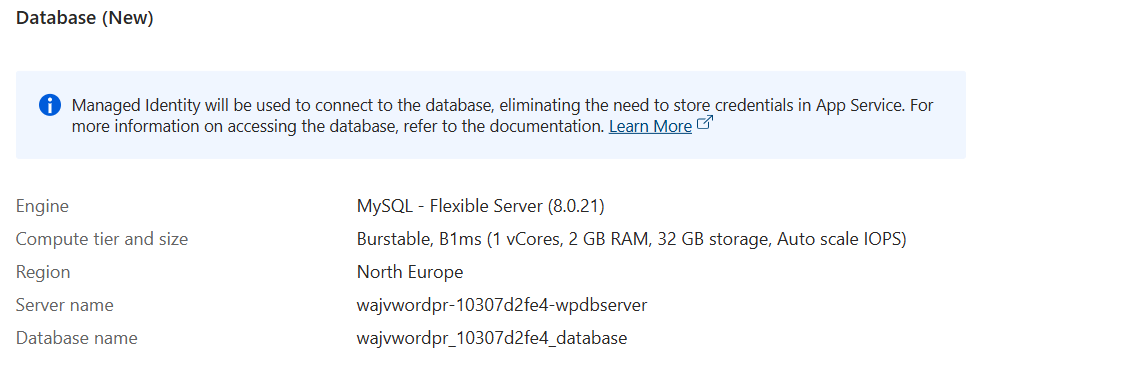
You will see at the review page that both the App service instance and the Database are being created.
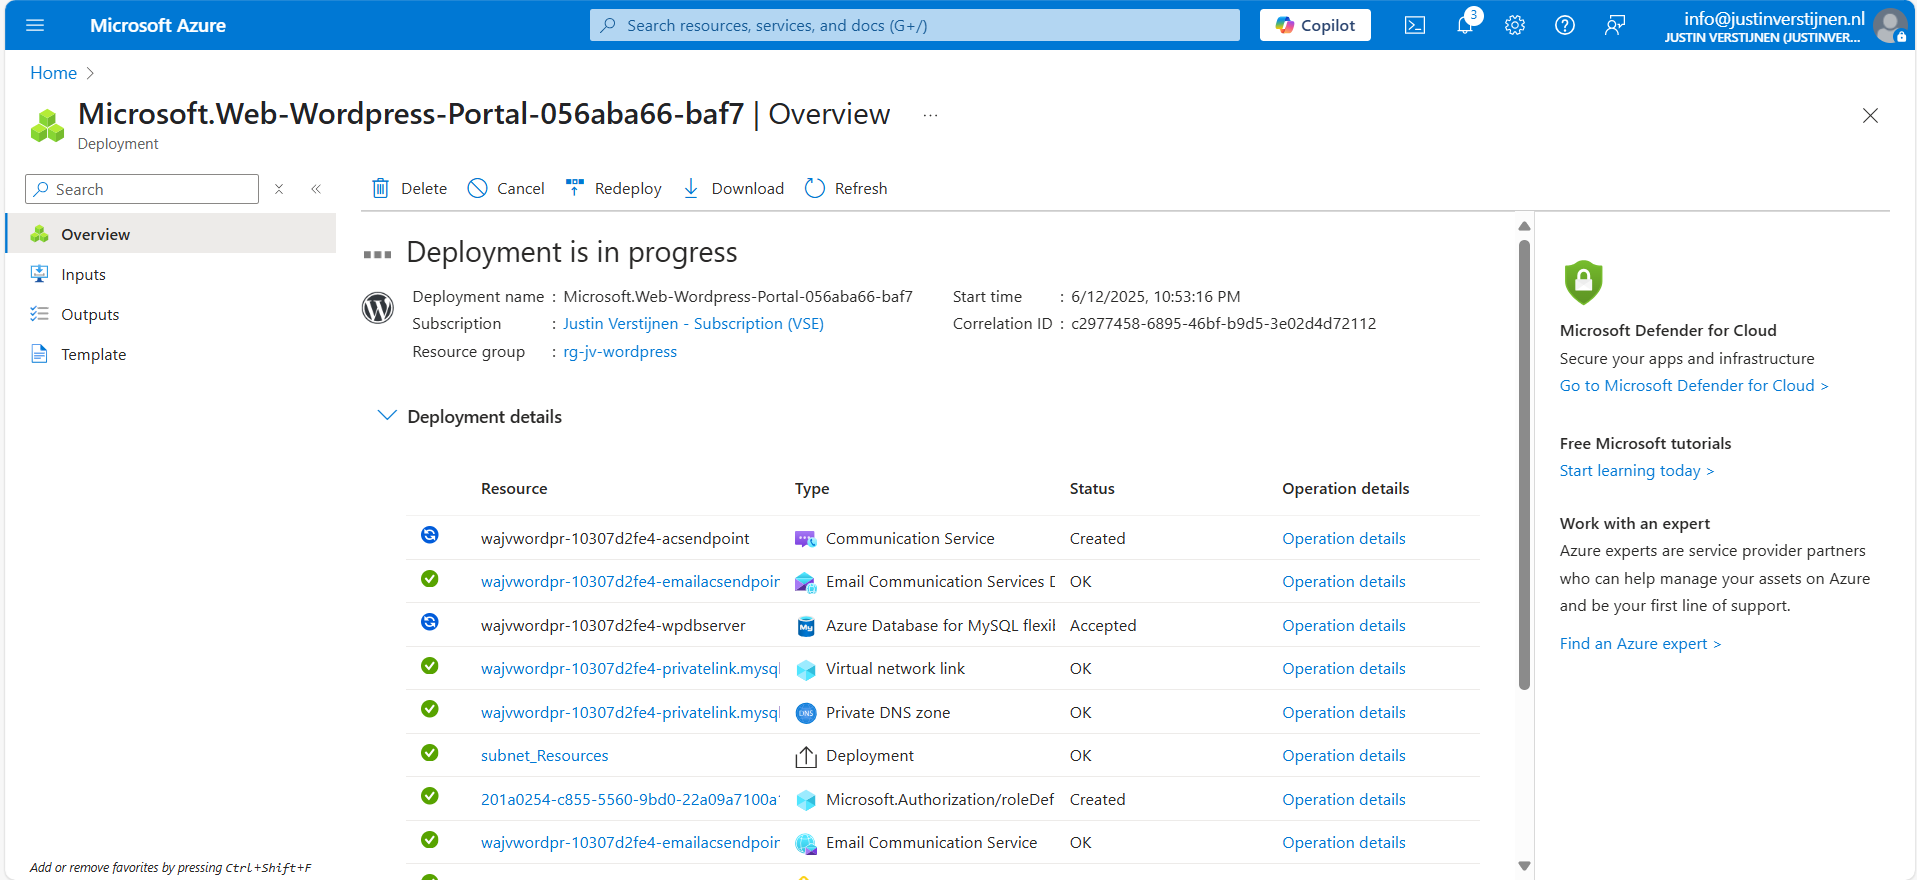
Now the deployment is in progress and you can see that a whole lot of resources are being created to make the Wordpress solution work. The nice thing about the Marketplace offerings is that they are pre-configured, and we only have to set some variables and settings like we did in Step 2.
The deployment took around 15 minutes in my case.
Now we are not going very deep into Wordpress itself, as this guide will only describe the process of building Wordpress on Azure. I have some post-installation recommendations for you to do which we will follow now.
Now that the solution is deployed, we can go to the App Service in Azure by typing it in the bar:

There you can find the freshly created App Service. Let’s open it.

Here you can find the Web App instance the wizard created and the URL of Azure with it. My URL is:
We will configure our custom domain in step 4.
We can navigate to this URL to get the template website Wordpress created for us:
We want to configure our website. This can be done by adding “/wp-admin” to our URL:
Now we will get the Administrator login of Wordpress:

Now we can login to Wordpress with the credentials of Step 1: Wordpress setup
After logging in, we are presented the Dashboard of Wordpress:
As with every piece of software, my advice is to update directly to the latest version available. Click on the update icon in the left top corner:
Now in my environment, there are 3 types of updates available:
Update everything by simply selecting all and clicking on the “Update” buttons:

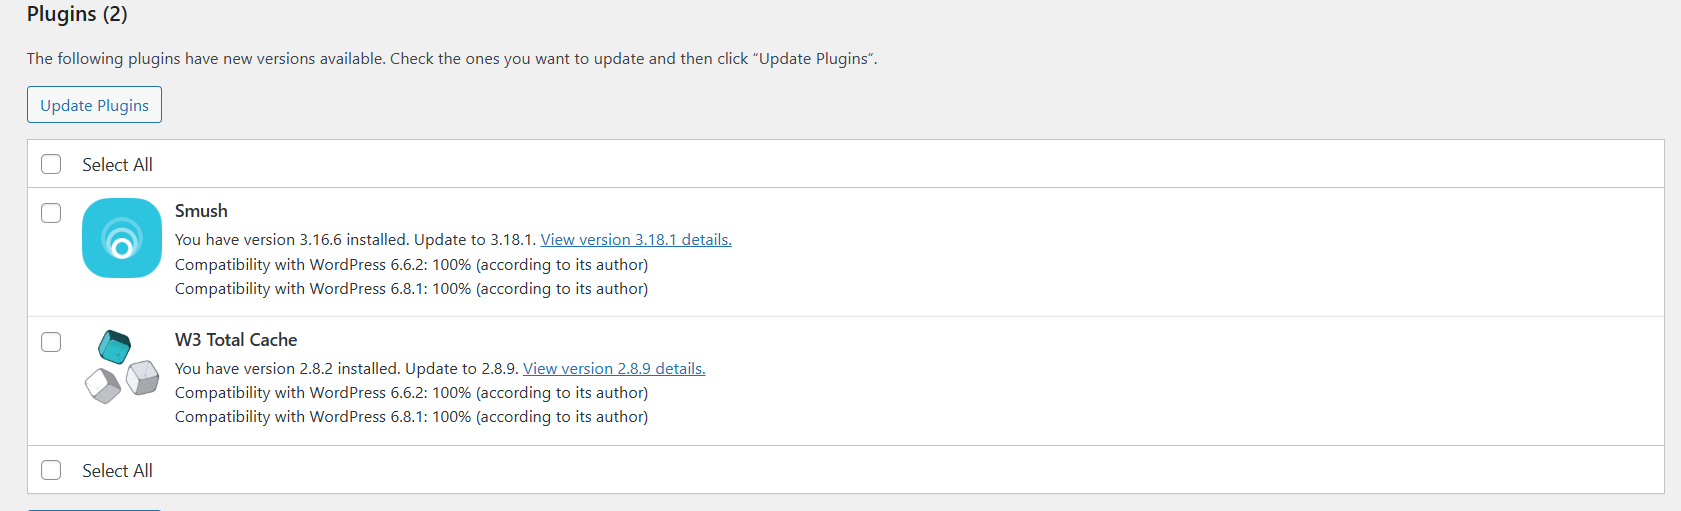
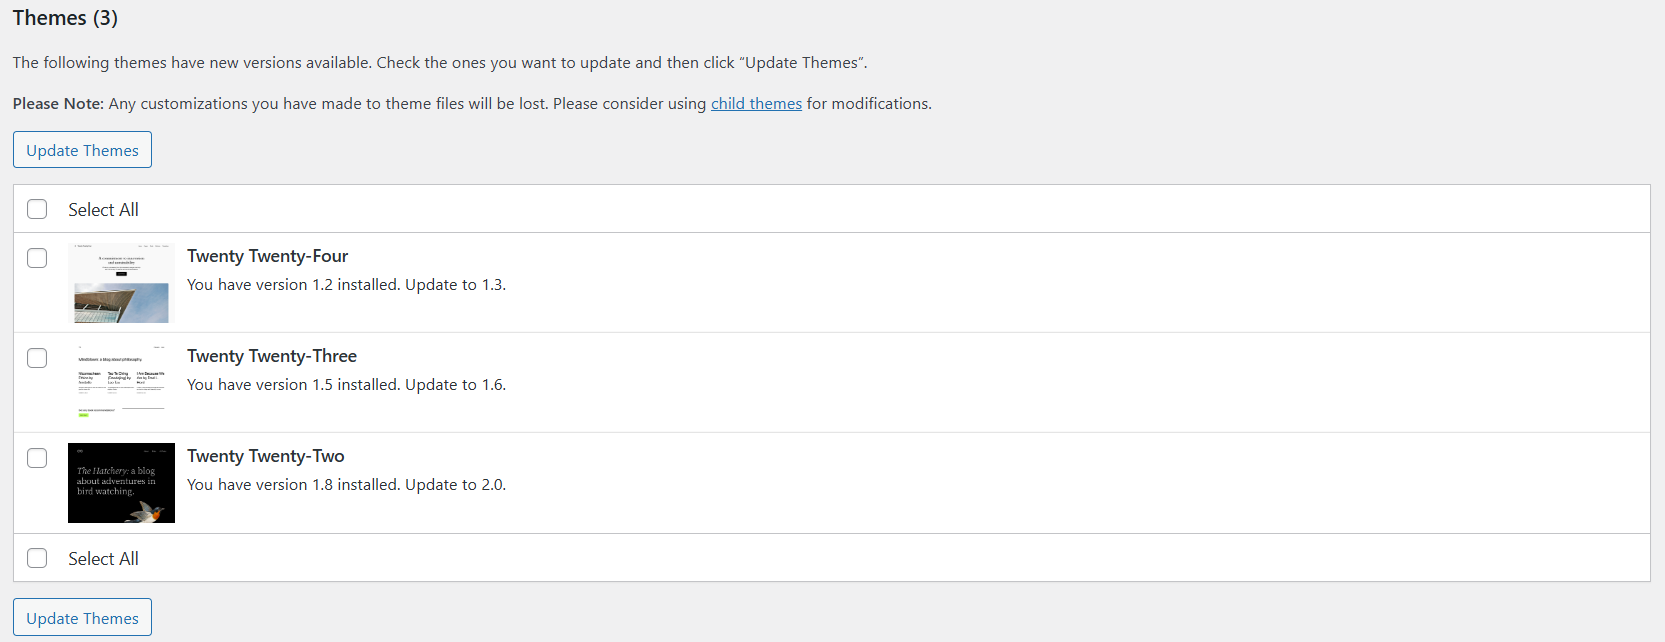
After every update, you will have to navigate back to the updates window. This process is done within 10 minutes, the environment will be completely up-to-date and ready to build your website.
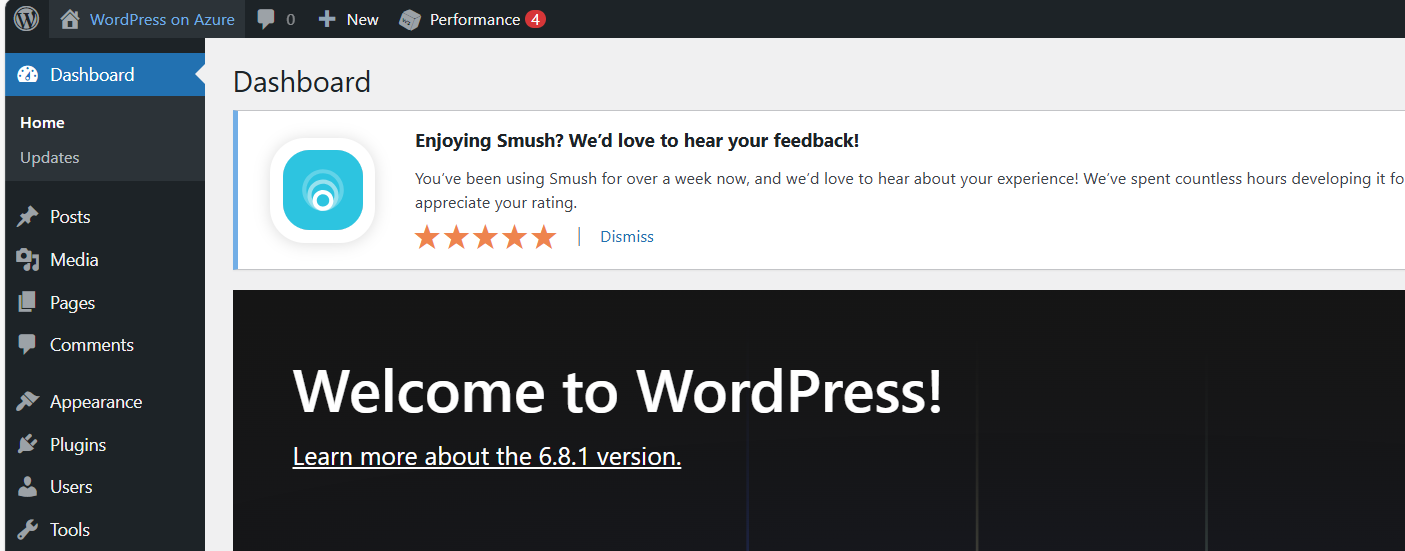
All updates are done now.
Now we can configure a custom, better readable domain for our Wordpress website. Lets get back to the Azure Portal and to the App Service.
Under “Settings” we have the “Custom domains” option. Open this:
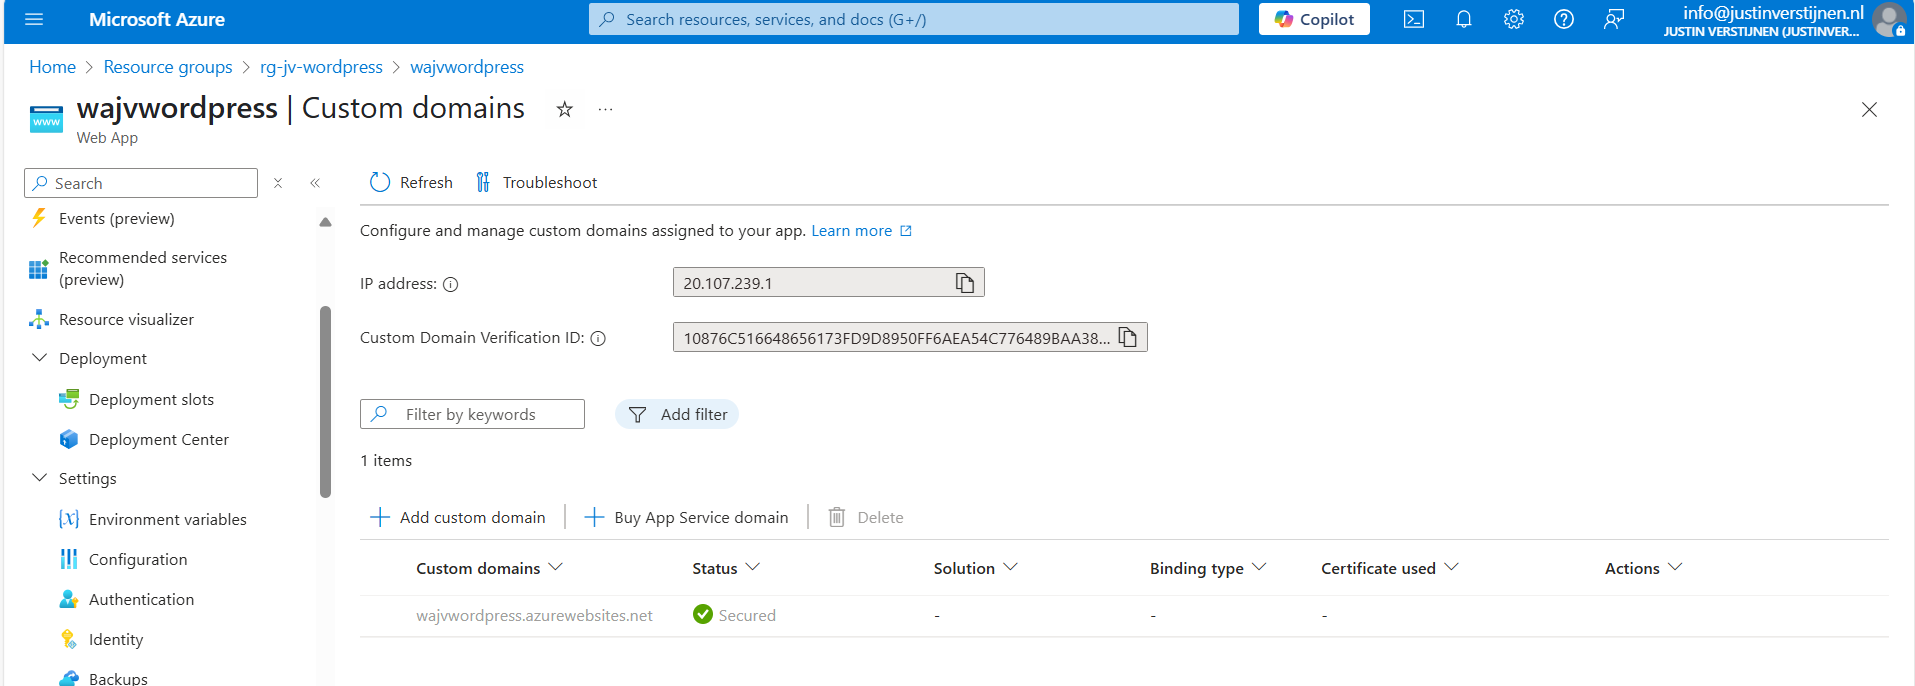
Click on “+ Add custom domain” to add a new domain to the app service instance. We now have to select some options in case we have a 3rd-party DNS provider:
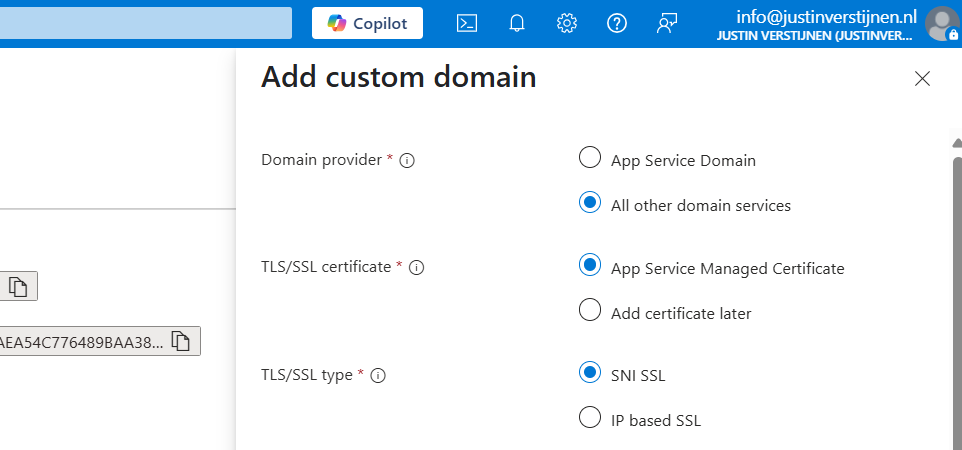
Then fill in your desired custom domain name:
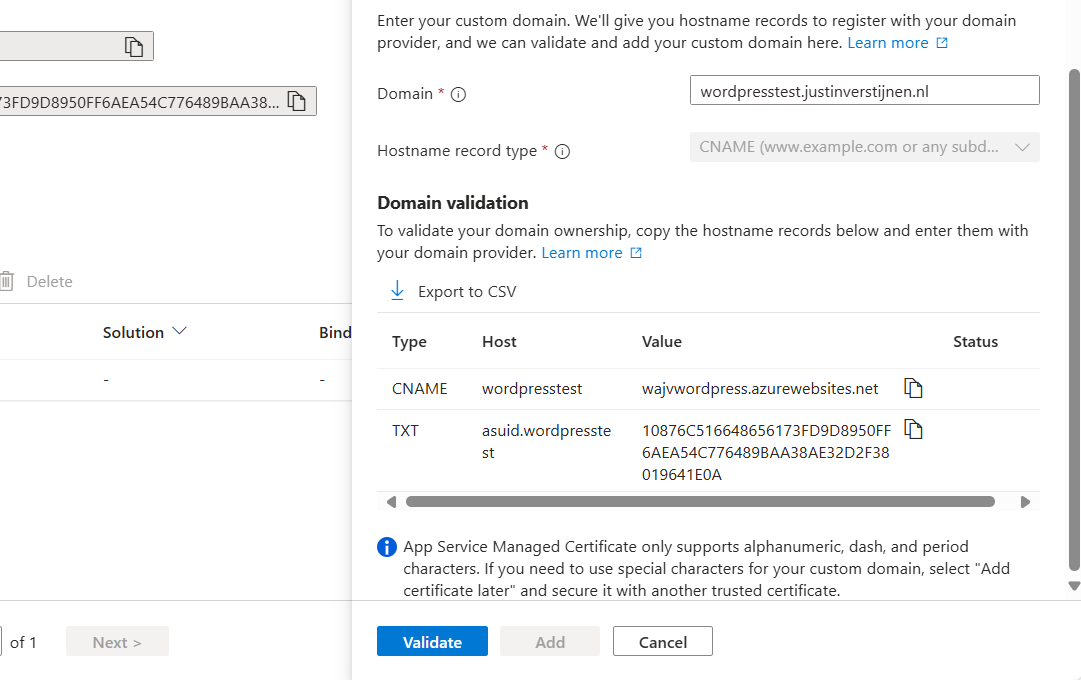
I selected the name:
This because my domain already contains a website. Now we have to head over to our DNS hosting to verify our domain with the TXT record and we have to create a redirect to our Azure App Service. This can be done in 2 ways:
In my case, I will create a CNAME record.

Make sure that the CNAME or ALIAS record has to end with a “.” dot, because this is a domain outside of your own domain.
In the DNS hosting, save the records. Then wait for around 2 minutes before validating the records in Azure. This should work instantly, but can take up to 24 hours for your records to be found.

After some seconds, the custom domain is ready:
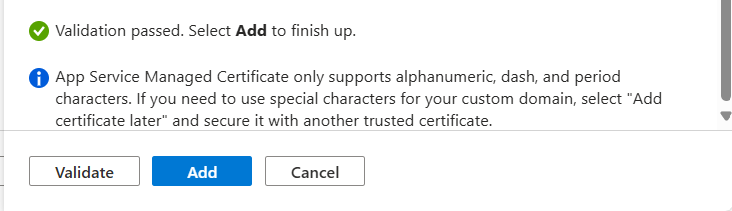
Click on “Add” to finish the wizard. After adding, a SSL certificate will be automatically added by Azure, which will take around a minute.
Now we are able to use our freshly created Wordpress solution on Azure with our custom domain name:

Let’s visit the website:
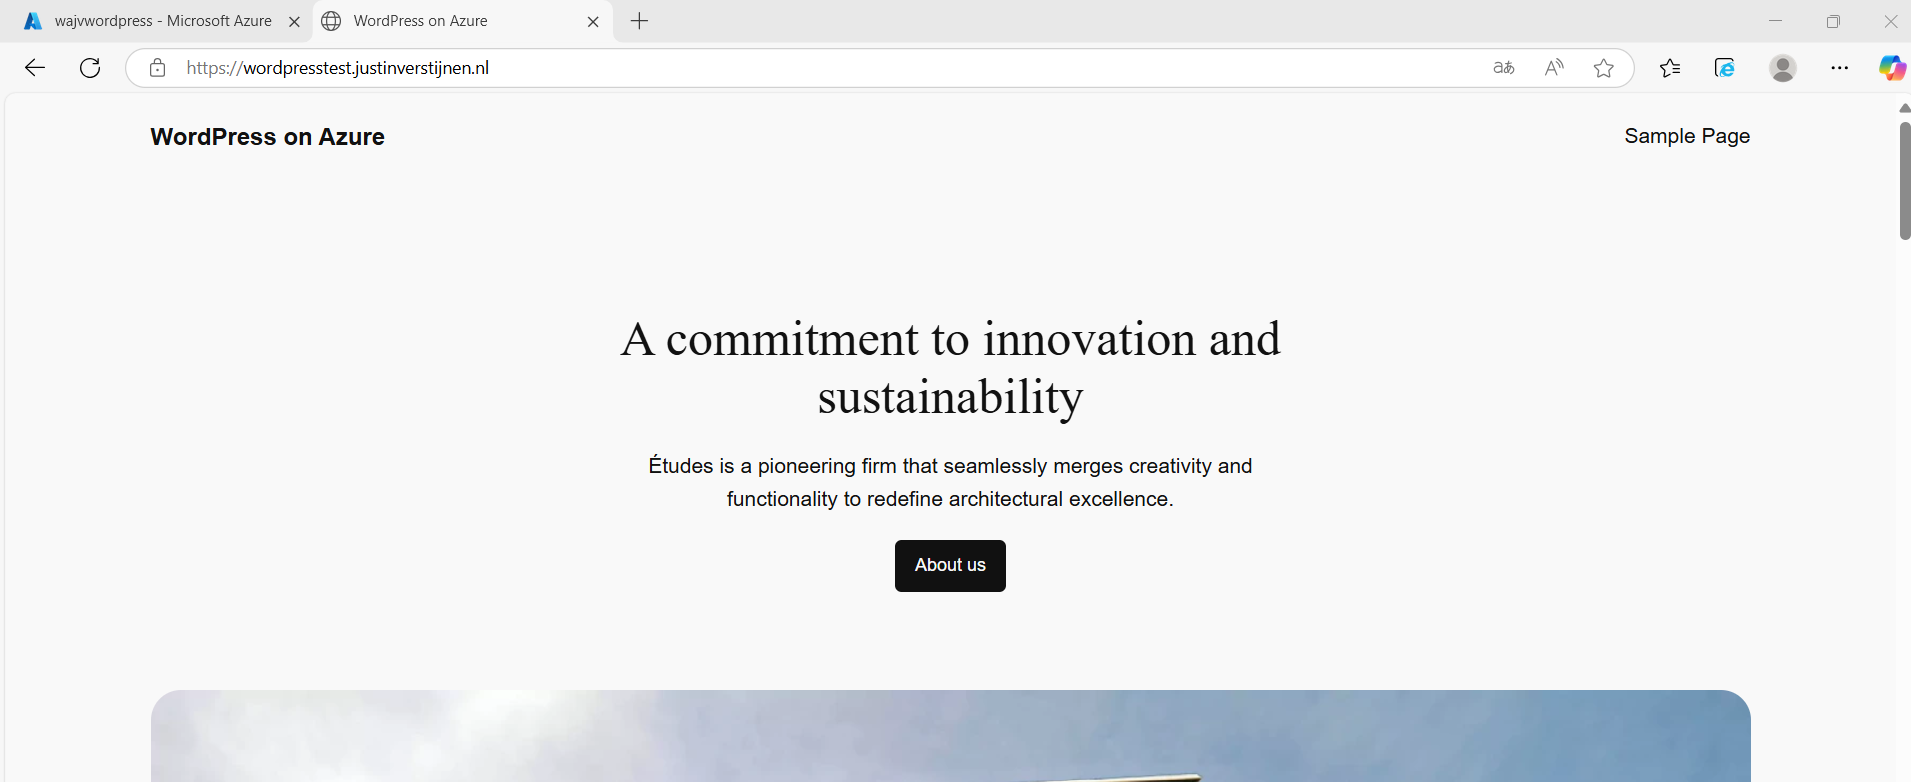
Works properly! :)
We can also visit the Wordpress admin panel on this URL now by adding /wp-admin:

Now we can login to Wordpress but we have seperate logins for Wordpress and Azure/Microsoft. It’s possible to integrate Entra ID accounts with Wordpress by using this plugin:
Head to Wordpress, go to “Plugins” and install this plugin:
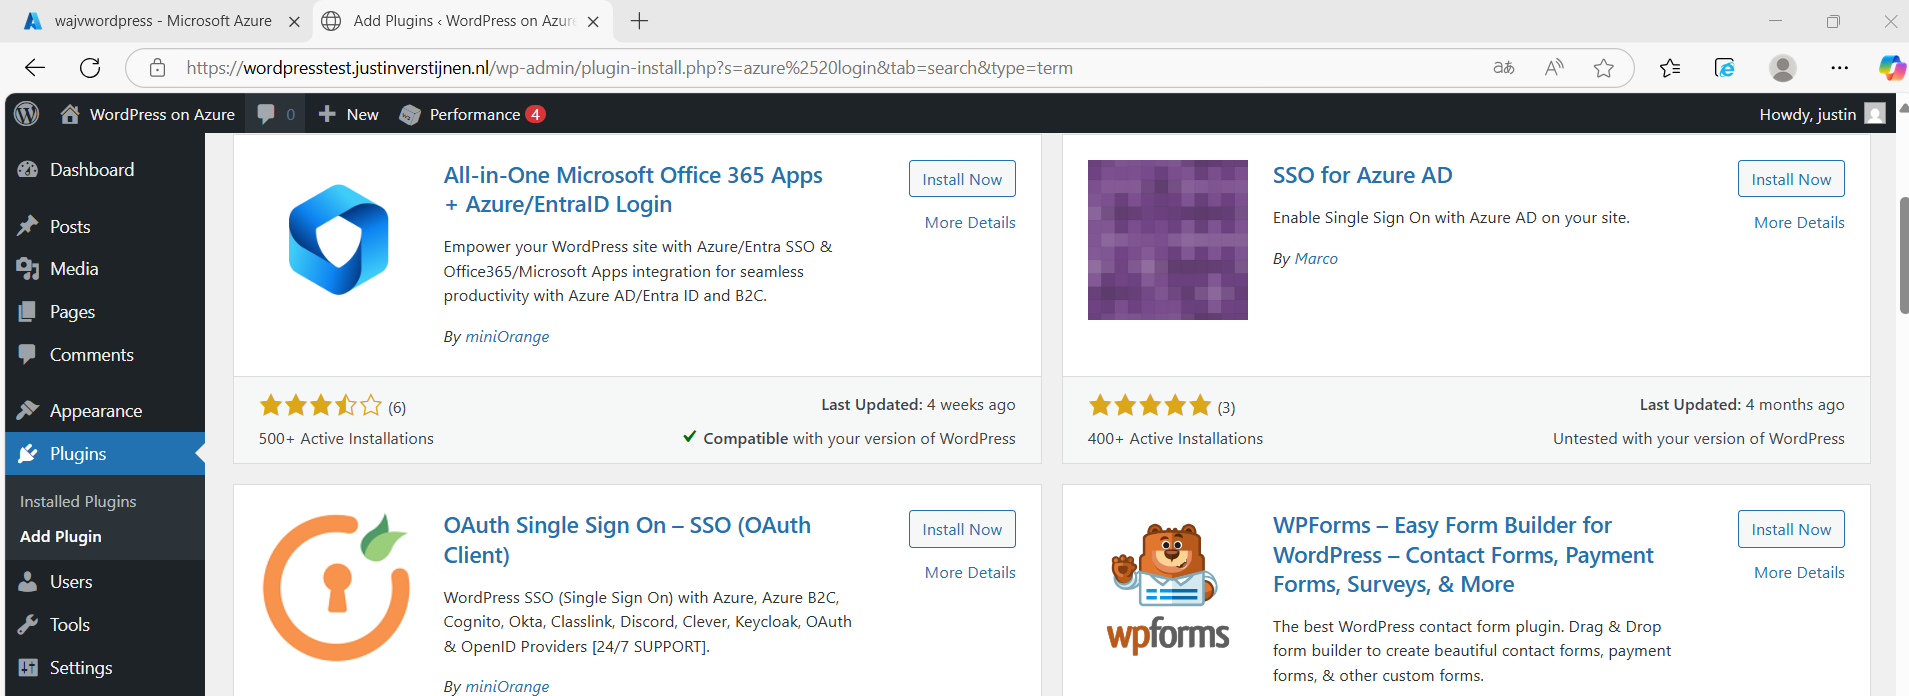
After installing the plugin and activating the plugin, we have an extra menu option in our navigation window on the left:
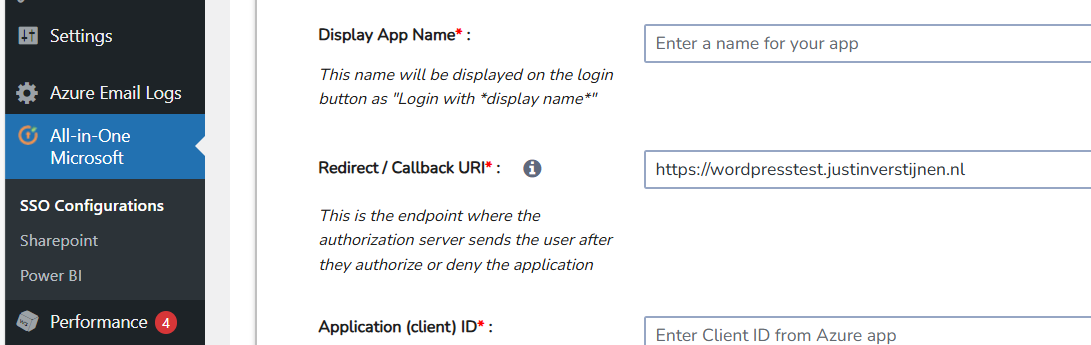
We now have to configure the Single Sign On with our Microsoft Entra ID tenant.
Start by going to Microsoft Entra ID, because we must generate the information to fill in into the plugin.
Go to Microsoft Entra ID and then to “App registrations”:
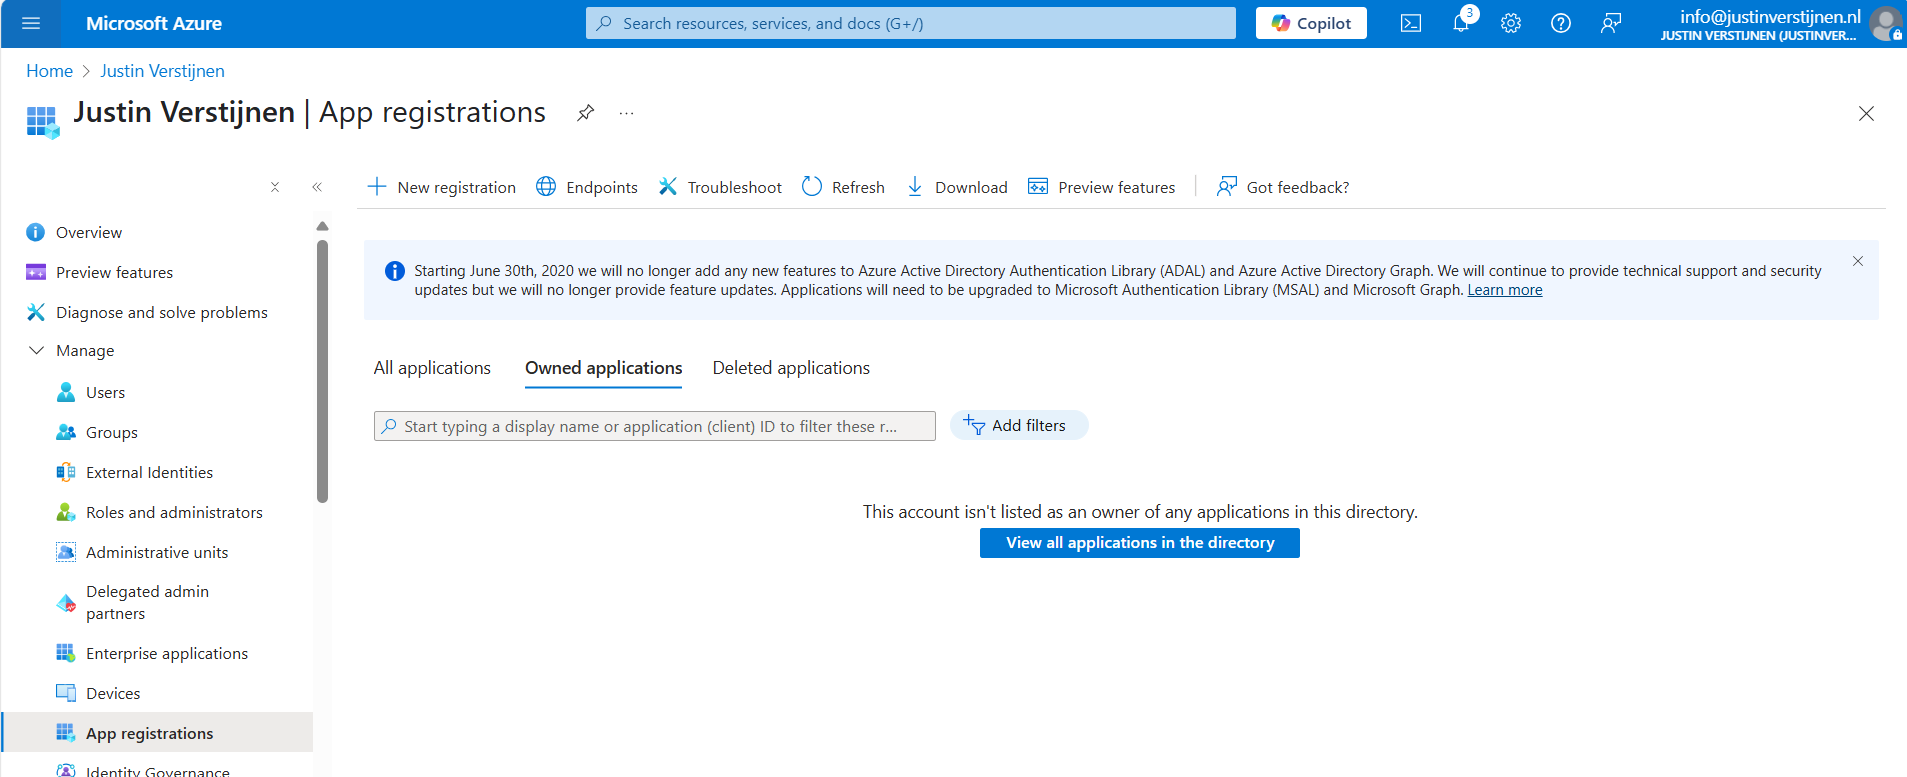
Click on “+ New registration” to create a new custom application.
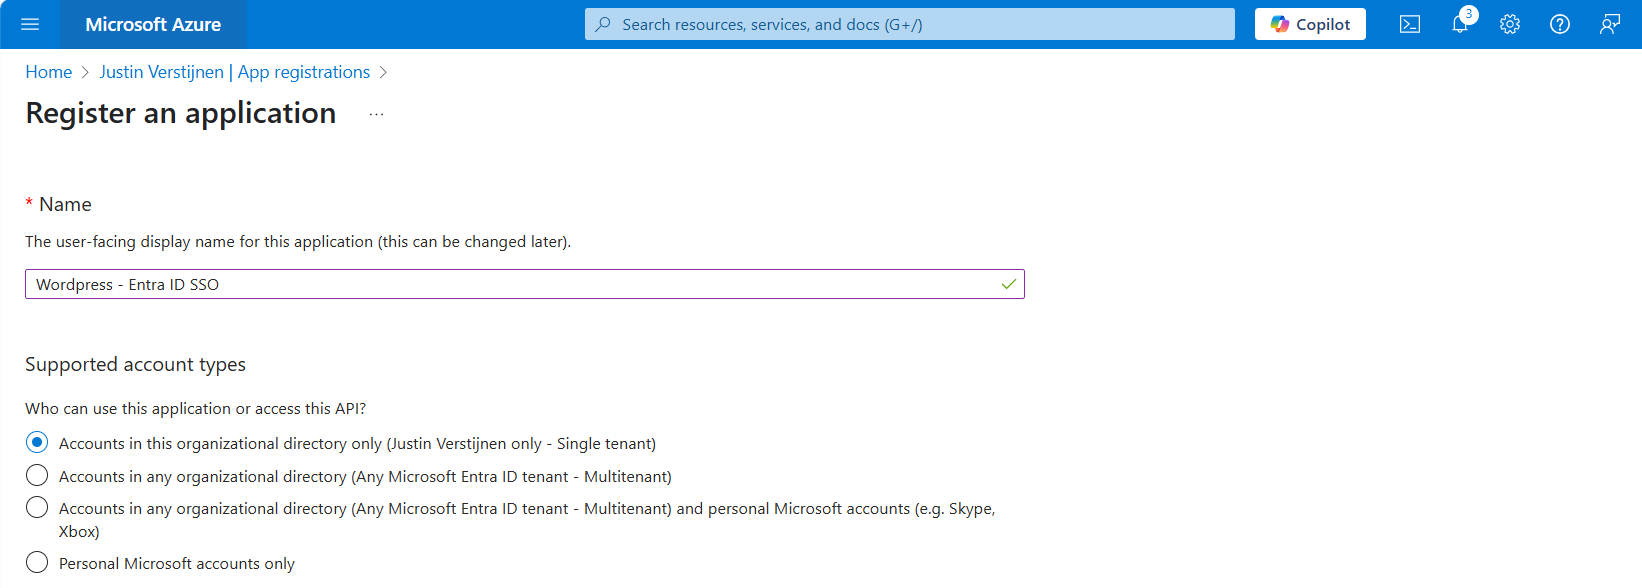
Choose a name for the application and select the supported account types. In my case, I only want to have accounts from my tenant to use SSO to the plugin. Otherwise you can choose the second option to support business accounts in other tenants or the third option to also include personal Microsoft accounts.
Scroll down on the page and configure the redirect URL which can be found in the plugin:
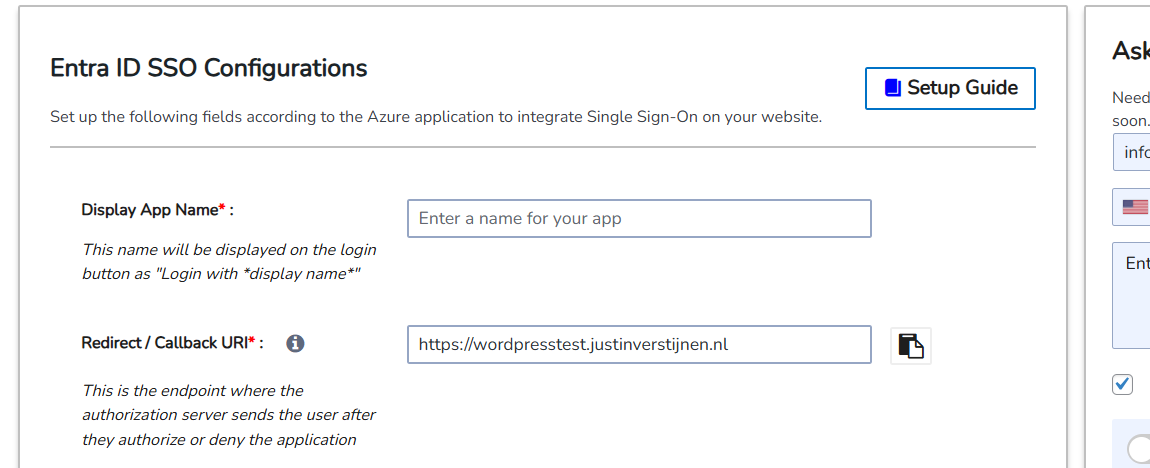
Copy this link, select type “Web” and paste this into Entra ID:
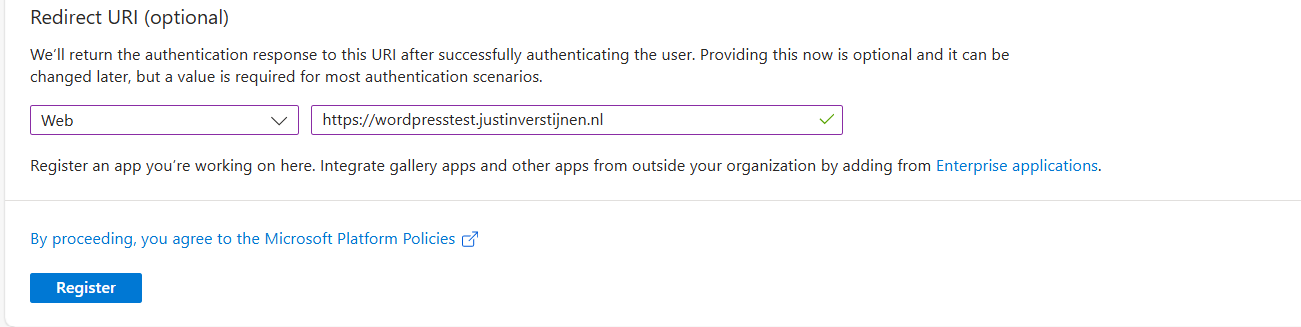
This is the URL which will be opened after succesfully authenticating to Entra ID.
Click register to finish the wizard.
After creating the app registration, we can go to “Certificates & Secrets” to create a new secret:
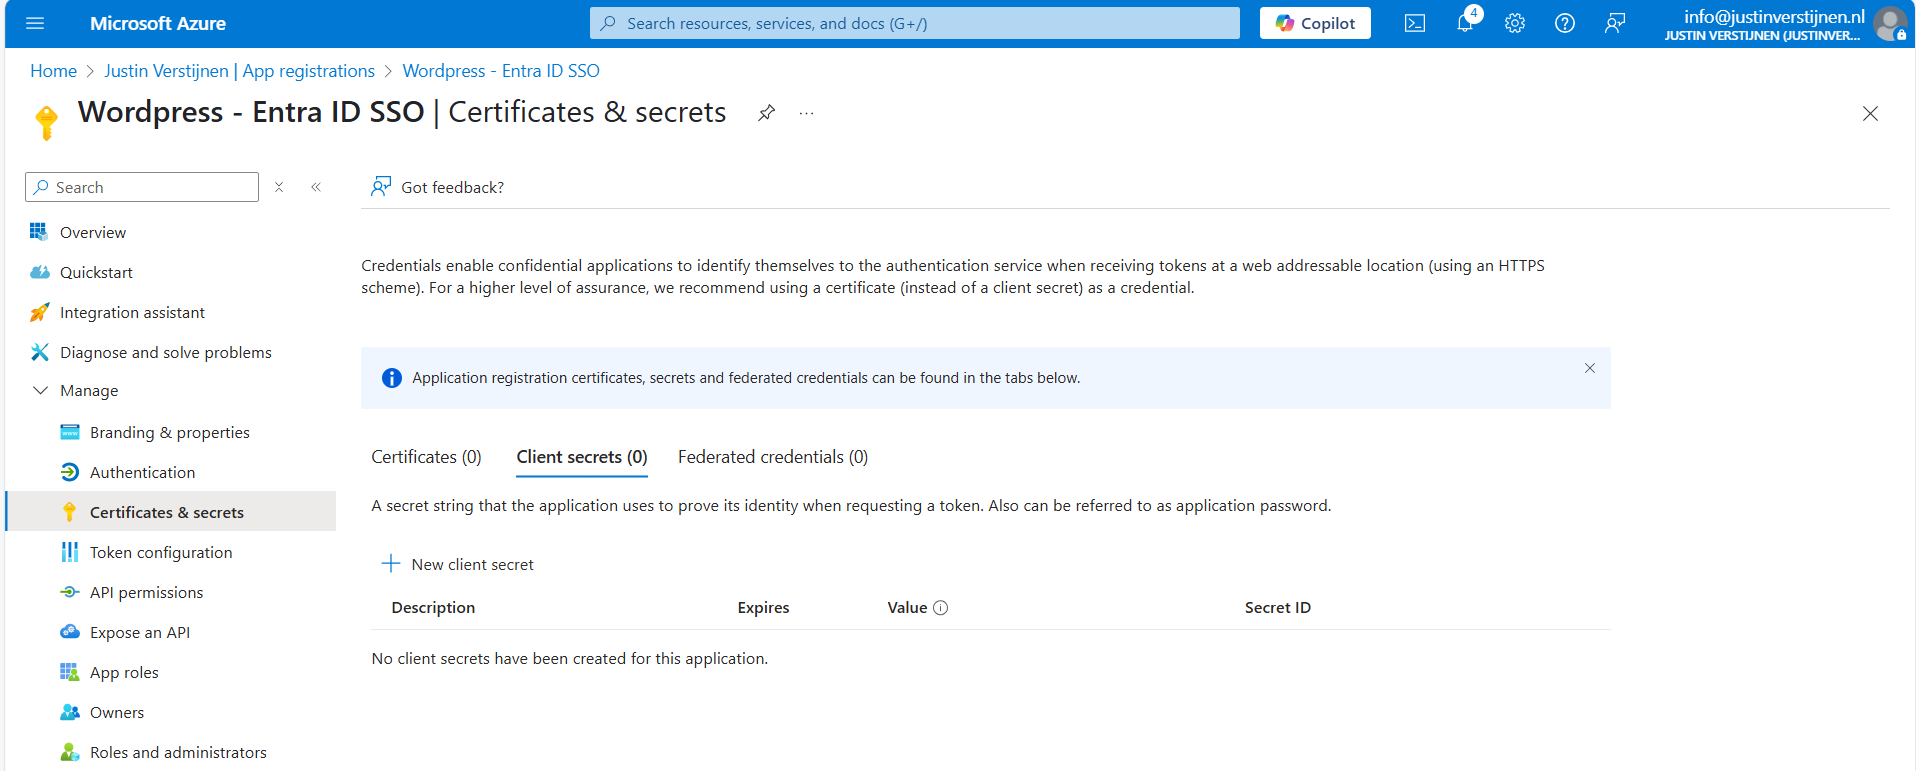
Click on “+ New client secret”.
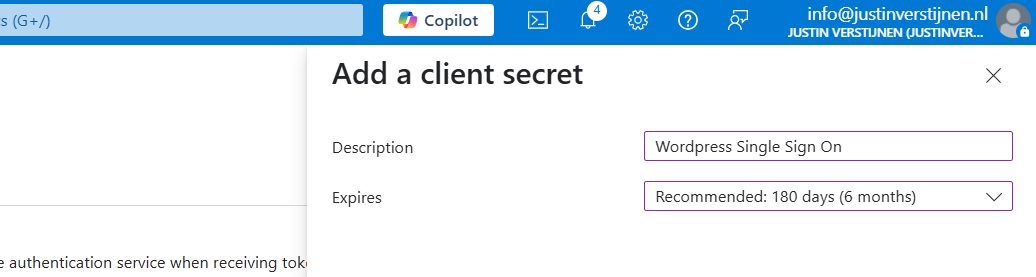
Type a good description and select the duration of the secret. This must be shorter than 730 days (2 years) because of security. In my case, I stick with the recommended duration. Click on “Add” to create the secret.
Now please copy the information and place it in a safe location, as this will be the last option to actually see the secret full. After some minutes/clicks this will be gone forever and a new one has to be created.
My advice is to always copy the Secret ID too, because you have a good identifier of which secret is used where, especially when you have like 20 app registrations.

Now that we have finished the configuration in ENtra ID, we have to collect the information we need. This is:
The Client ID (green) and Tenant ID (red) can be found on the overview page of the app registration. The secret is saved in the safe location from previous step.
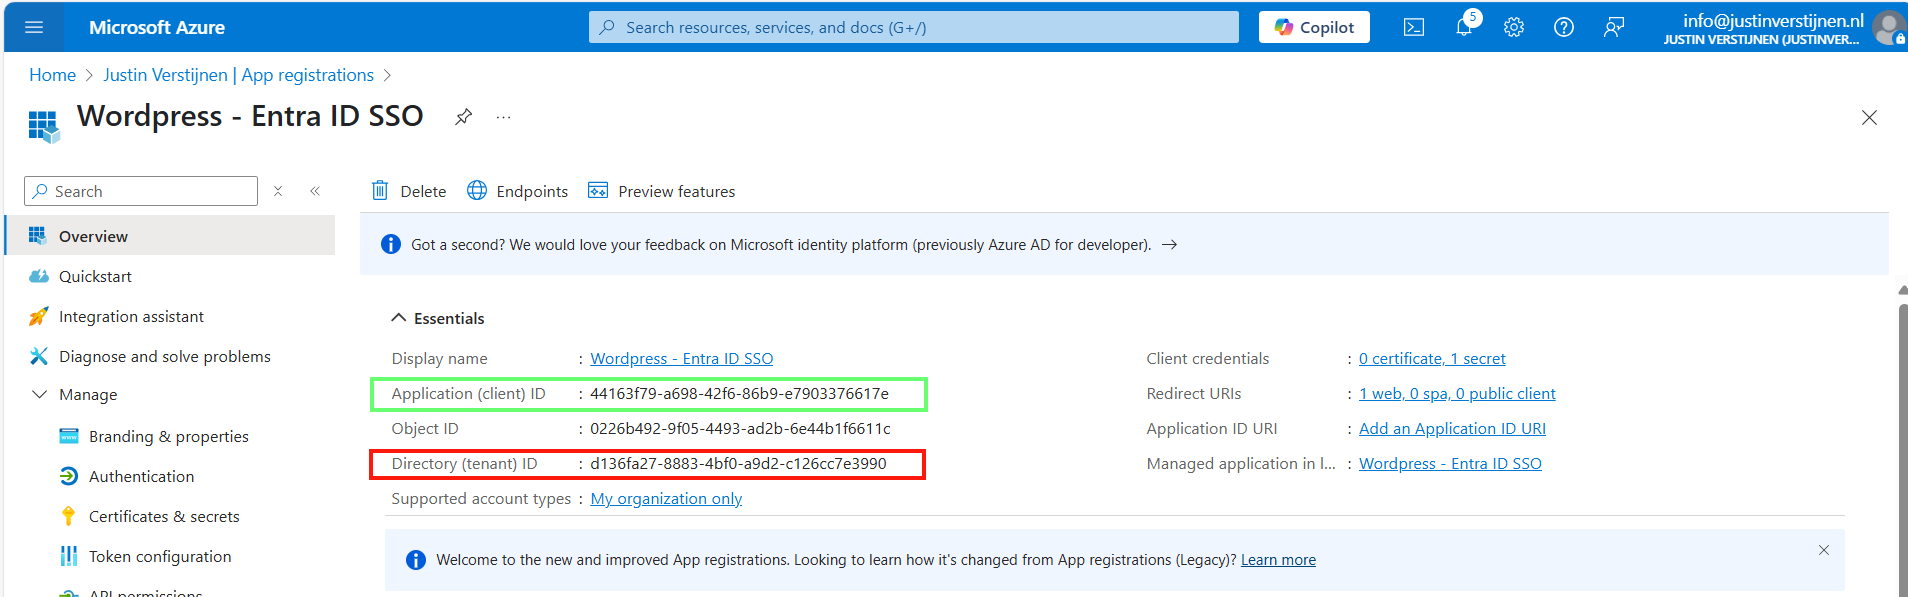
Now head back to Wordpress and we have to fill in all of the collected information from Microsoft Entra ID:
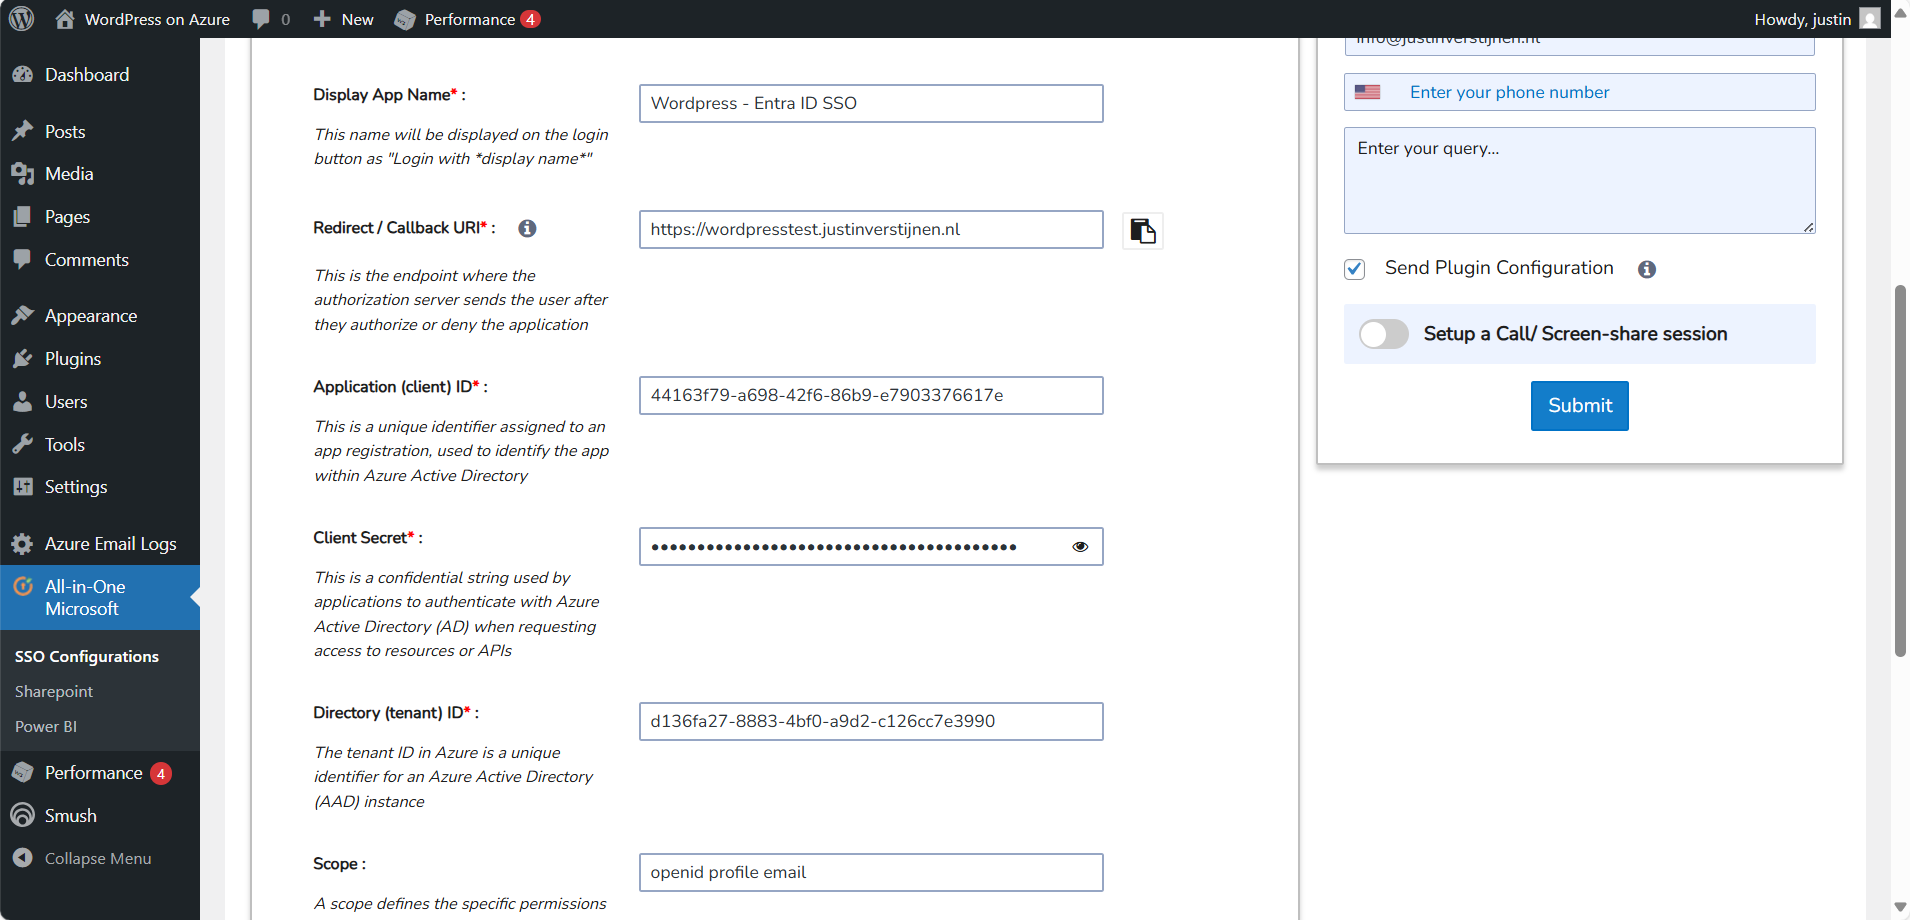
Fill in all of the collected information, make sure the “Scope” field contains “openid profile email” and click on “Save settings”. The scope determines the information it will request at the Identity Provider, this is Microsoft Entra ID in our case.
Then scroll down again and click on “Test Configuration” which is next to the Save button. An extra authentication window will be opened:
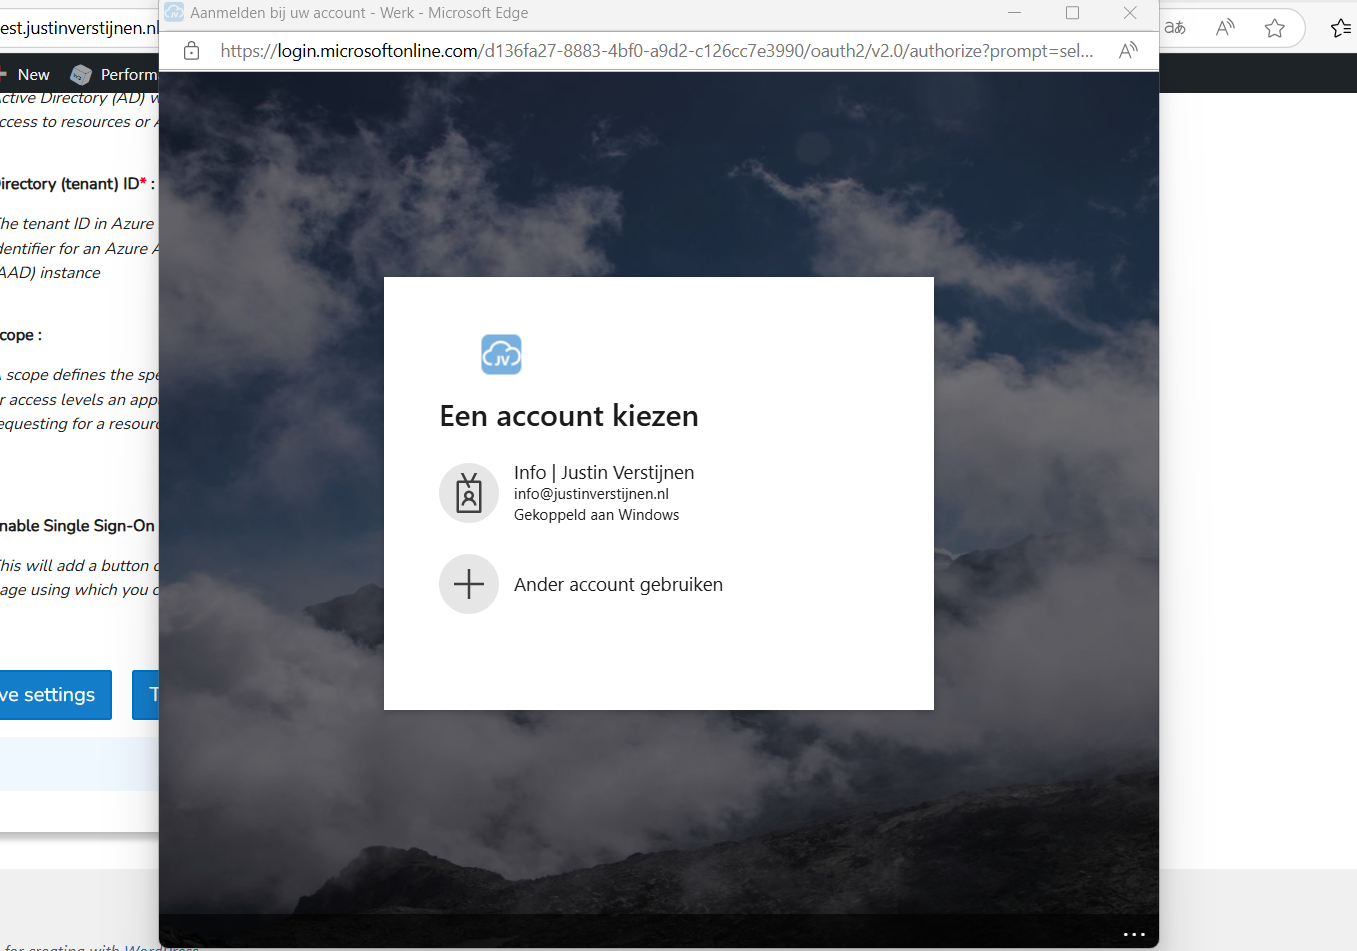
Select your account or login into your Entra ID account and go to the next step.
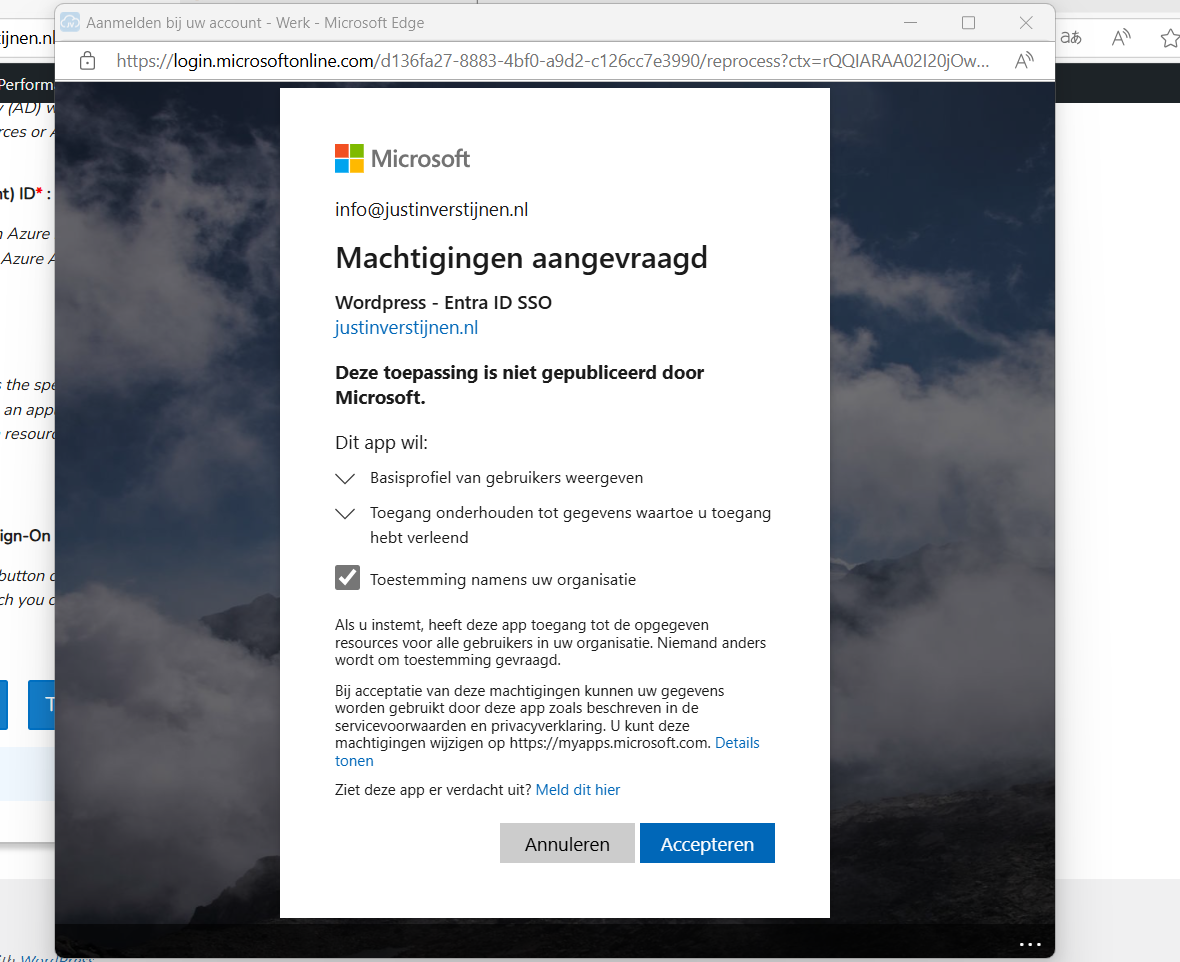
Now we have to accept the roles the application wants and to permit the application for the whole organization. For this step, you will need administrator rights in Entra ID. (Cloud Application Administrator or Application Administrator roles or higher).
Accept the application and the plugin will tell you the information it got from Entra ID:

Now we have to click on the “Configure Username” button or go the tab “Attribute/Role Mapping”.
In Entra ID, a user has several properties with can be configured. In identity, we call this attributes. We have to tell the plugin which attributes in Entra ID to use for what in the plugin.
Start by selecting “email” in the “Username field”:
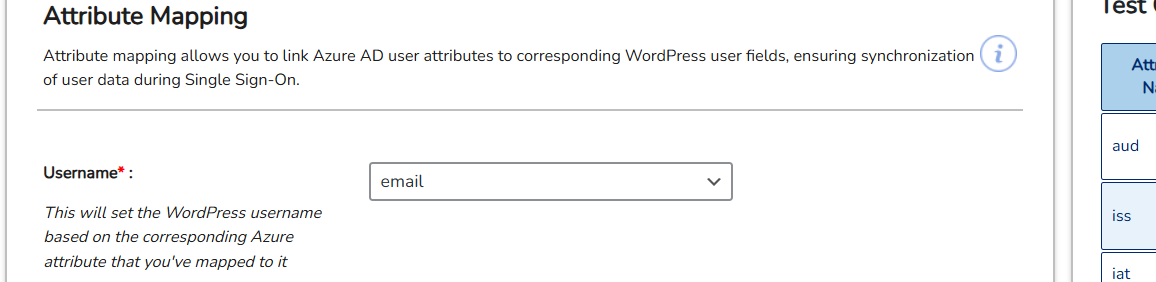
Then click on “Save settings”.
Now we can configure which role we want to give users from this SSO configuration:
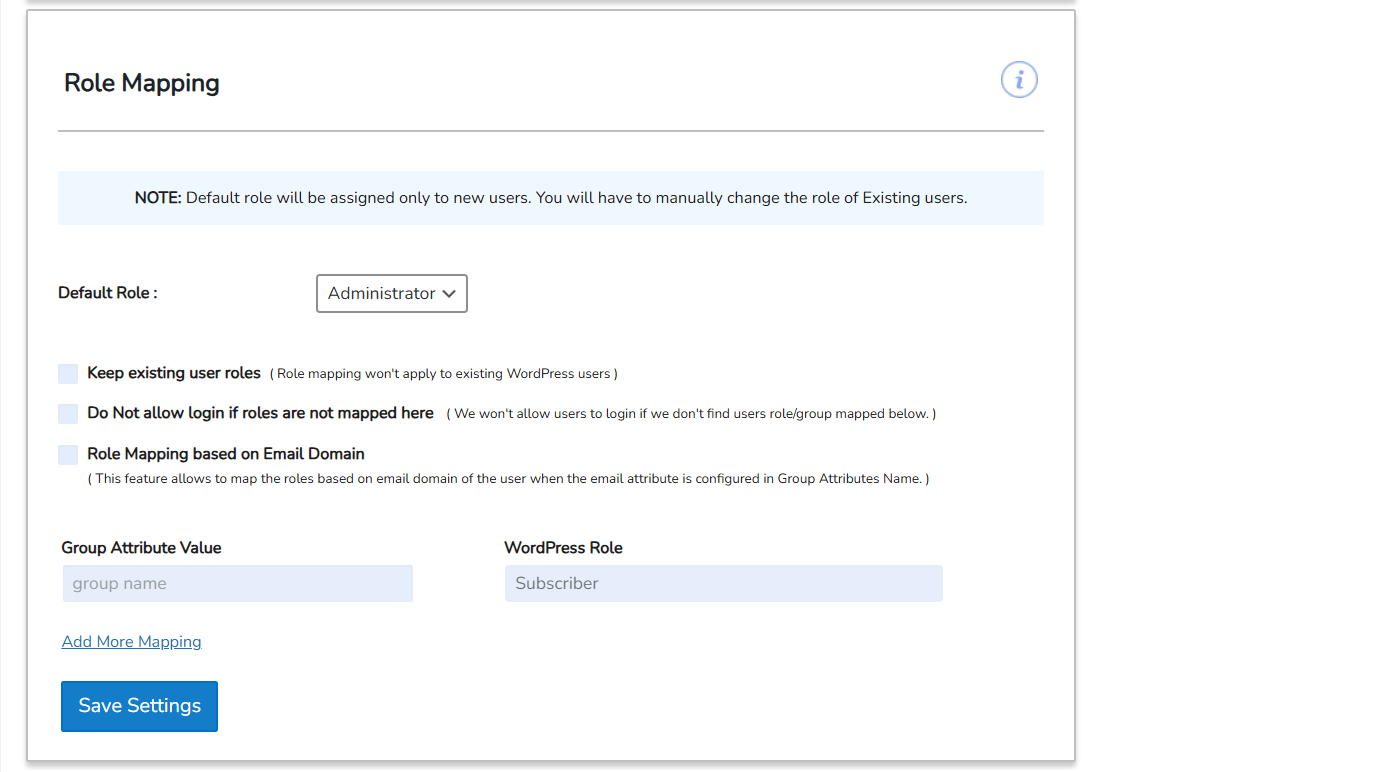
In my case, I selected “Administrator” to give myself the Administrator permissions but you can also chosse from all other built-in Wordpress roles. Be aware that all of the users who are able to SSO into Wordpress will bet this role by default.
Now we can test SSO for Wordpress by loggin out and again going to our Wordpress admin panel:
We have the option to do SSO now:

Click on the blue button with “Login with Wordpress - Entra ID”. You will now have to login with your Microsoft account.
After that you will land on the homepage of the website. You can manually go to the admin panel to get there: (unfortunately we cannot configure to go directly to the admin panel, this is a paid plugin option).
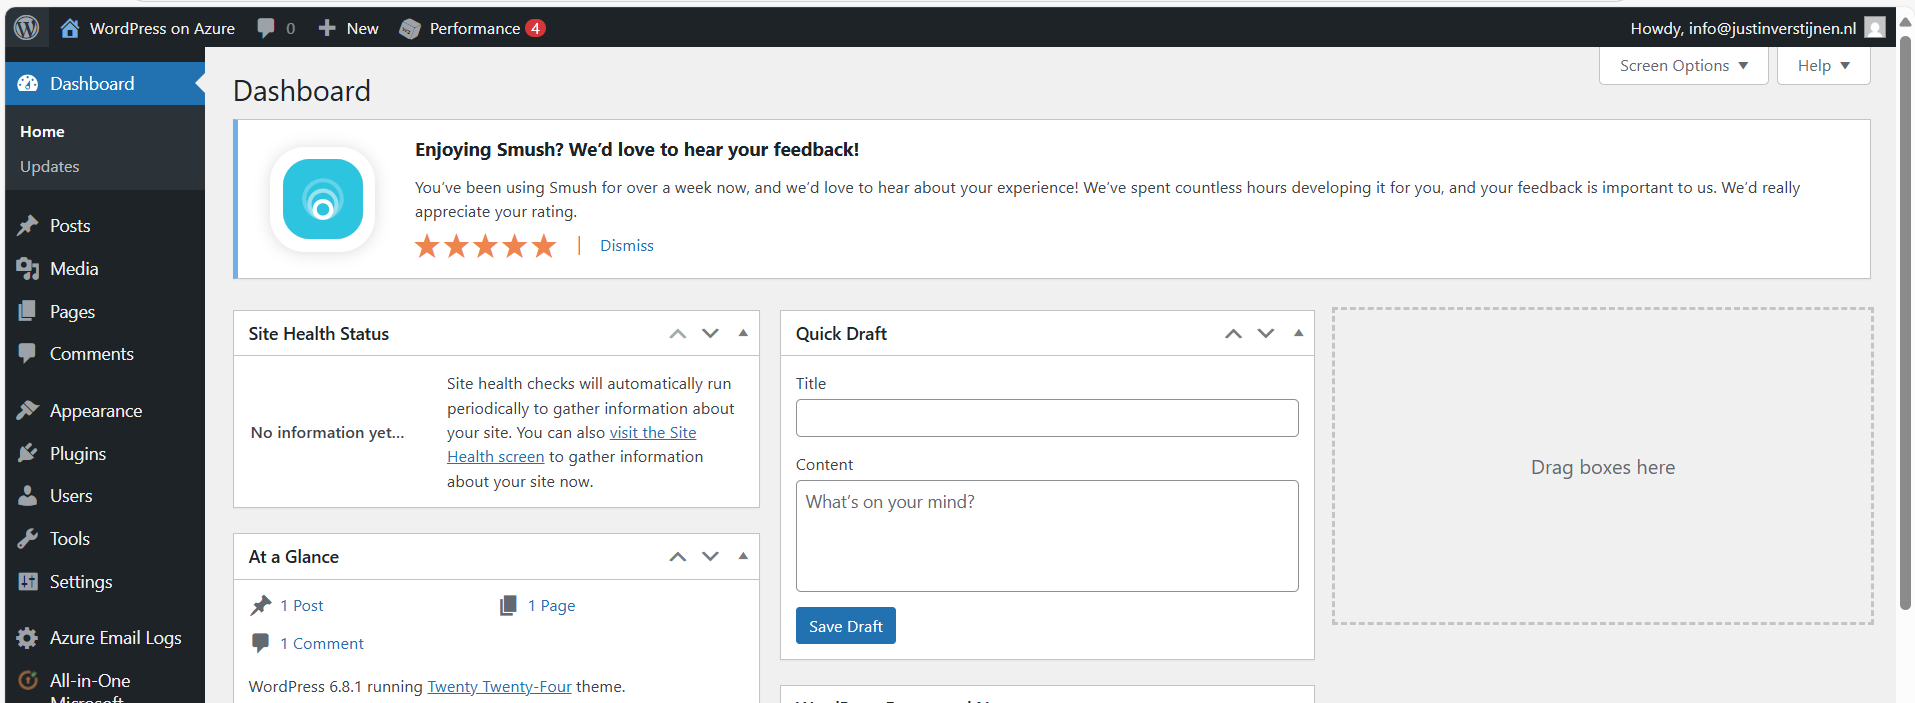
Wordpress on Azure is a great way to host a Wordpress environment in a modern and scalable way. It’s high available and secure by default without the need for hosting a complete server which has to be maintained and patched regularly.
The setup takes a few steps but it is worth it. Pricing is something to consider prior, but I think with the Basic plan, you have a great self hosted Wordpress environment for around 25 dollars a month and that is even with a hourly Backup included. Overall, great value for money.
Thank you for reading this guide and I hope it was helpful.
You have reached the end of the page. You can navigate through other blog posts as well, share this post on X, LinkedIn and Reddit or return to the blog posts collection page. Thank you for visiting this post.
If you think something is wrong with this post or you want to know more, you can send me a message to one of my social profiles at: https://justinverstijnen.nl/about/
If you find this page and blog very useful and you want to leave a donation, you can use the button below to buy me a beer. Hosting and maintaining a website takes a lot of time and money. Thank you in advance and cheers :)
The terms and conditions apply to this post.
A new feature in Microsoft Azure rised up on the Microsoft pages; Service Groups. In this guide, we will dive a bit deeper into Service Groups and what we can do with them in practice.
At the time of writing, this feature is in public preview and anyone can use it now.
Service Groups are a parralel type of group to group resources and separate permissions to them. In this manner we can assign multiple resources of different resource groups and put them into a overshadowing Service Group to apply permissions. This eliminates the need to move resources into specific resource groups with all broken links that comes with it.
This looks like this:
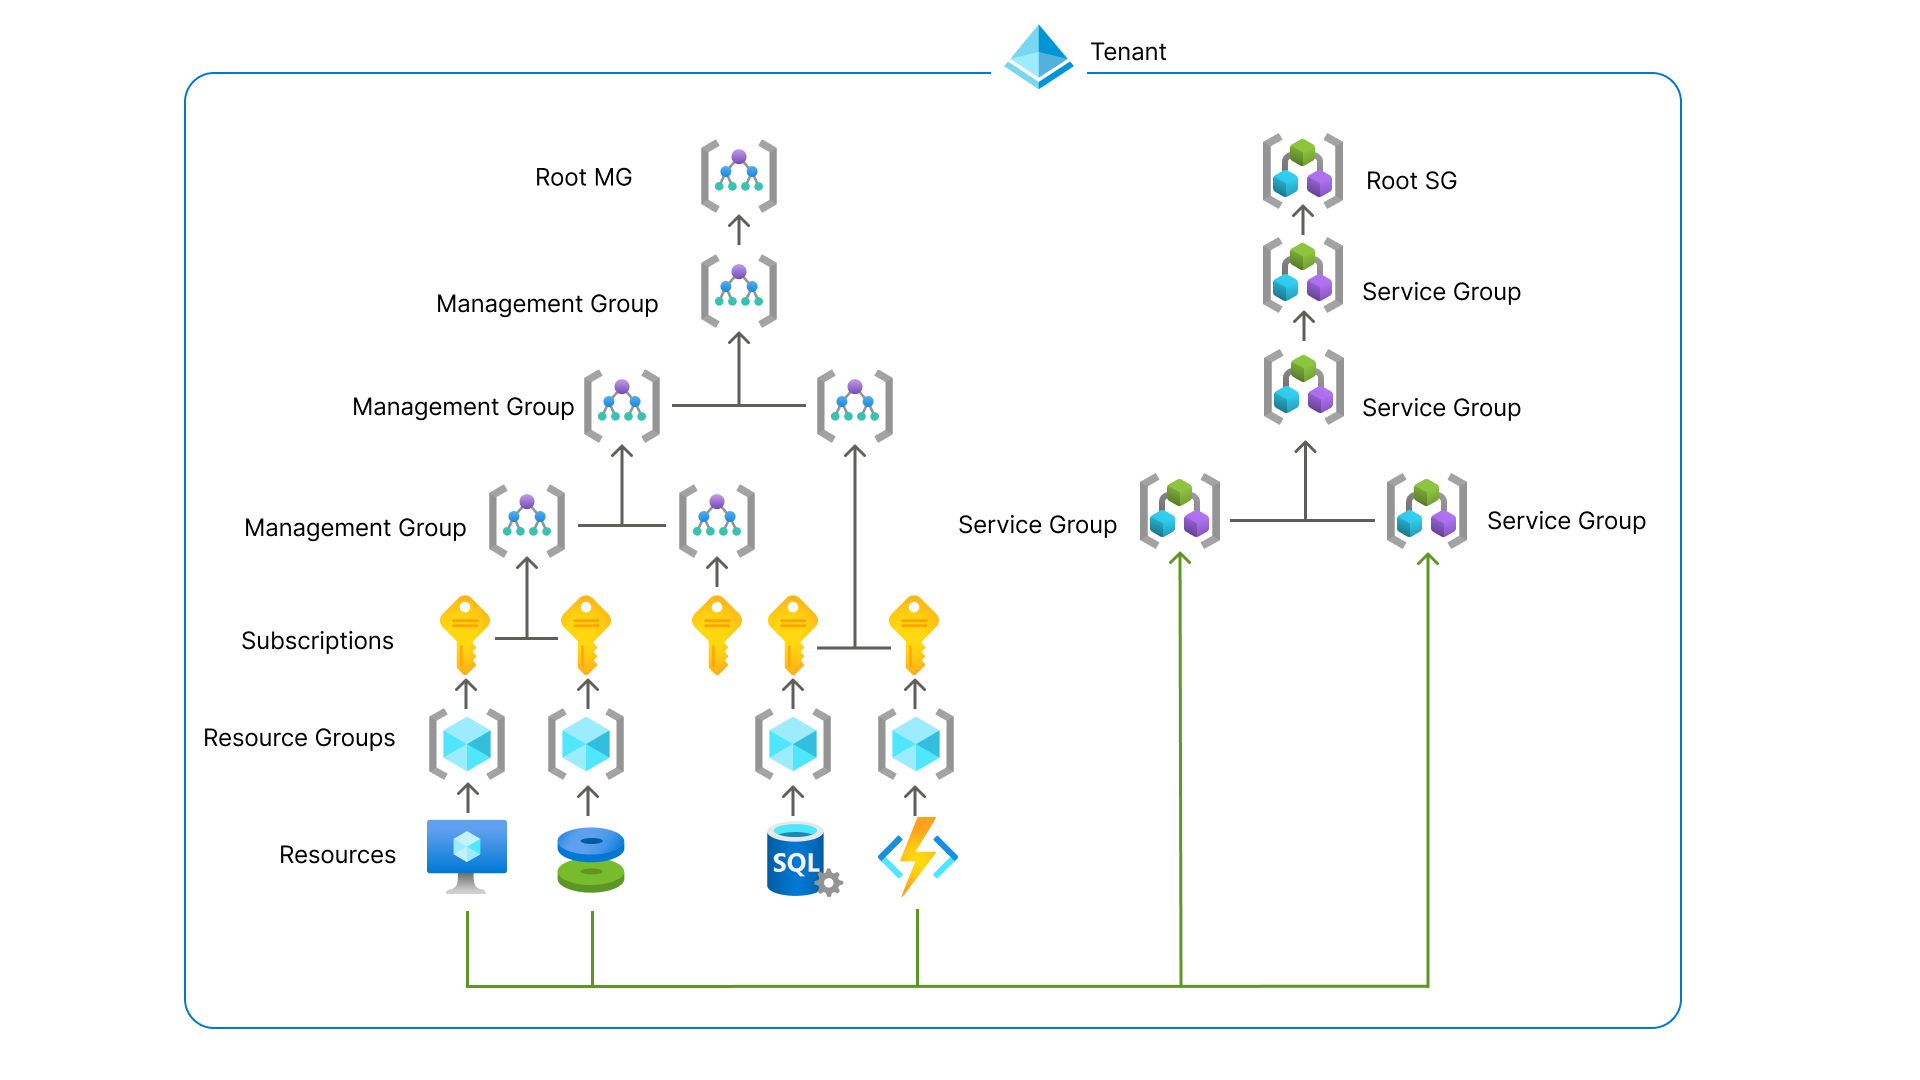
You can see these new service groups as a parallel Management Group, but then for resources.
Update 1 September 2025, the feature is in public preview, so I can do a little demonstration of this new feature.
In the Azure Portal, go to “Service Groups”:
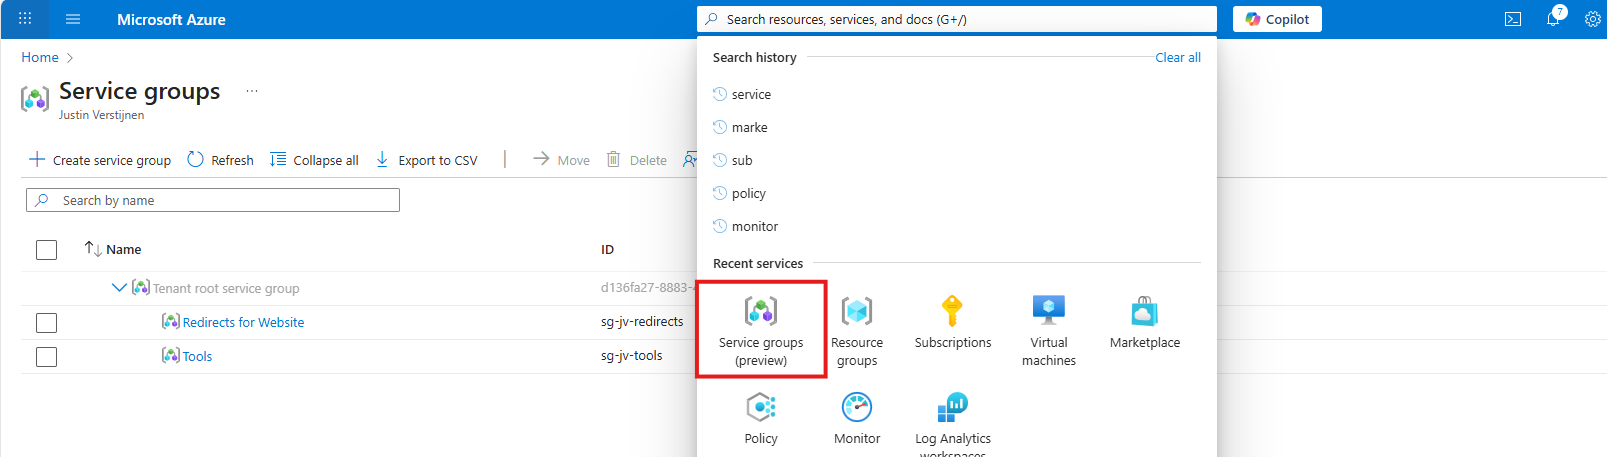
Then create a new Service Group.
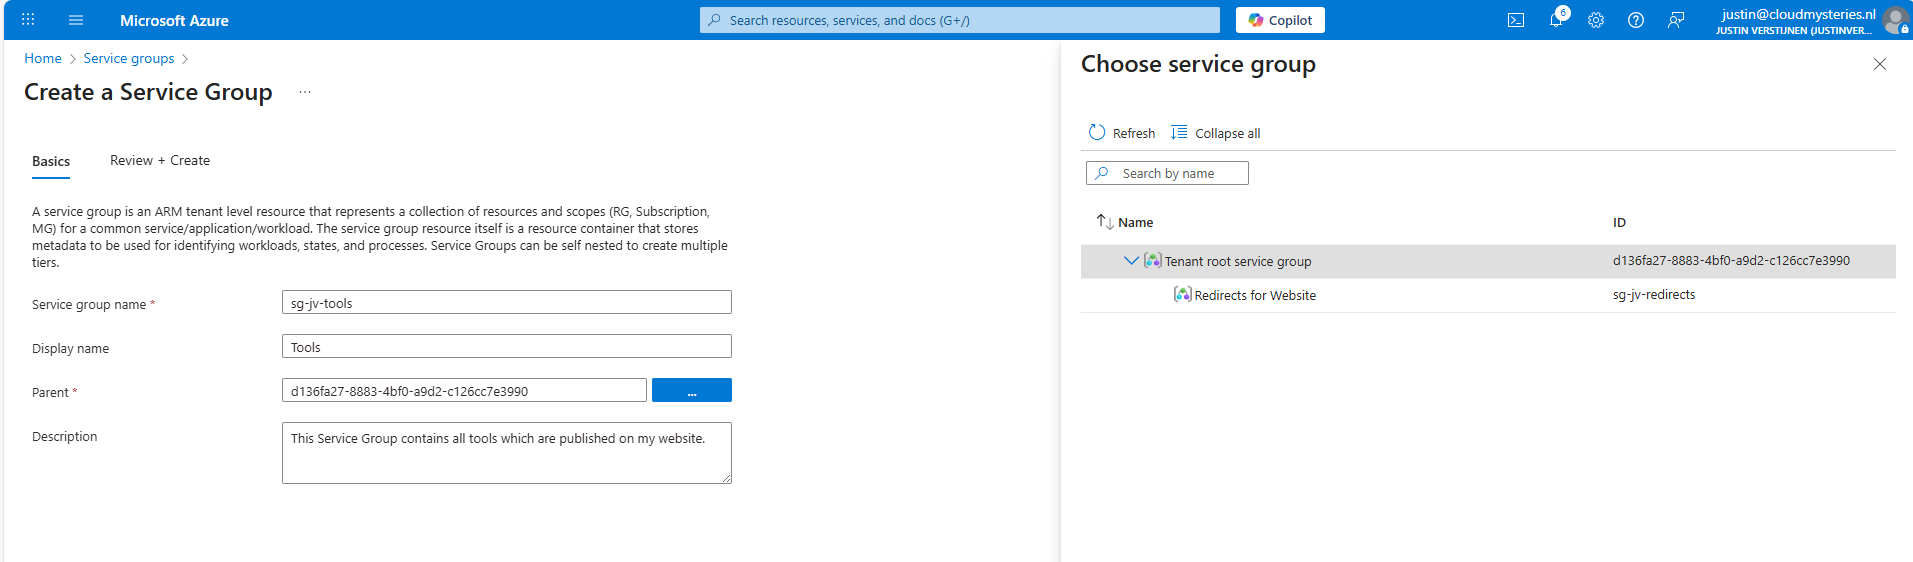
Here I have created a service group for my tools which are on my website. These reside in different resource groups so it’s a nice candidate to test with. The parent service group is the tenant service group which is the top level.
Now open your just created service group and add members to it, which can be subscriptions, resource groups and resources:
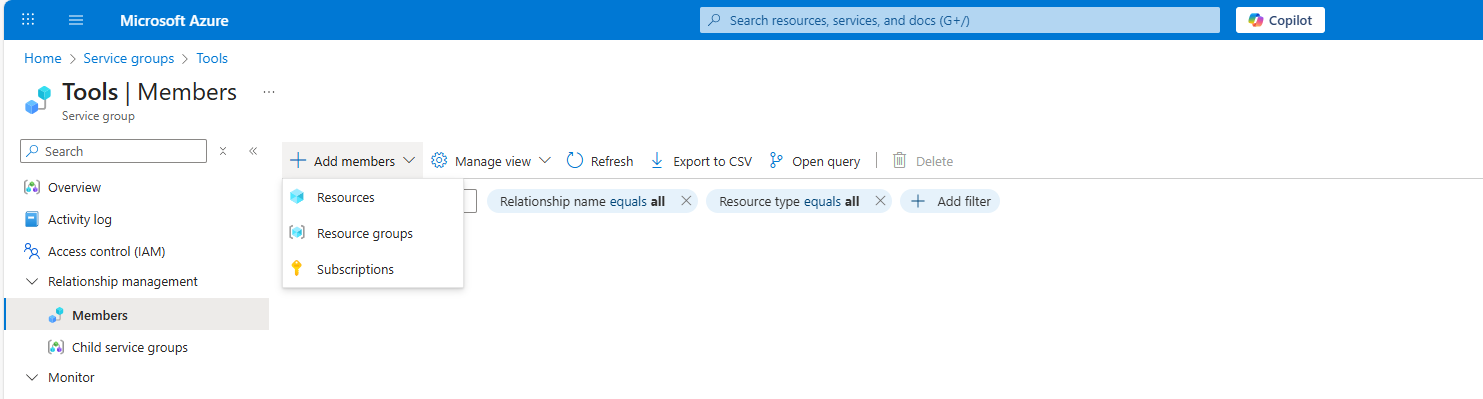
Like I did here:
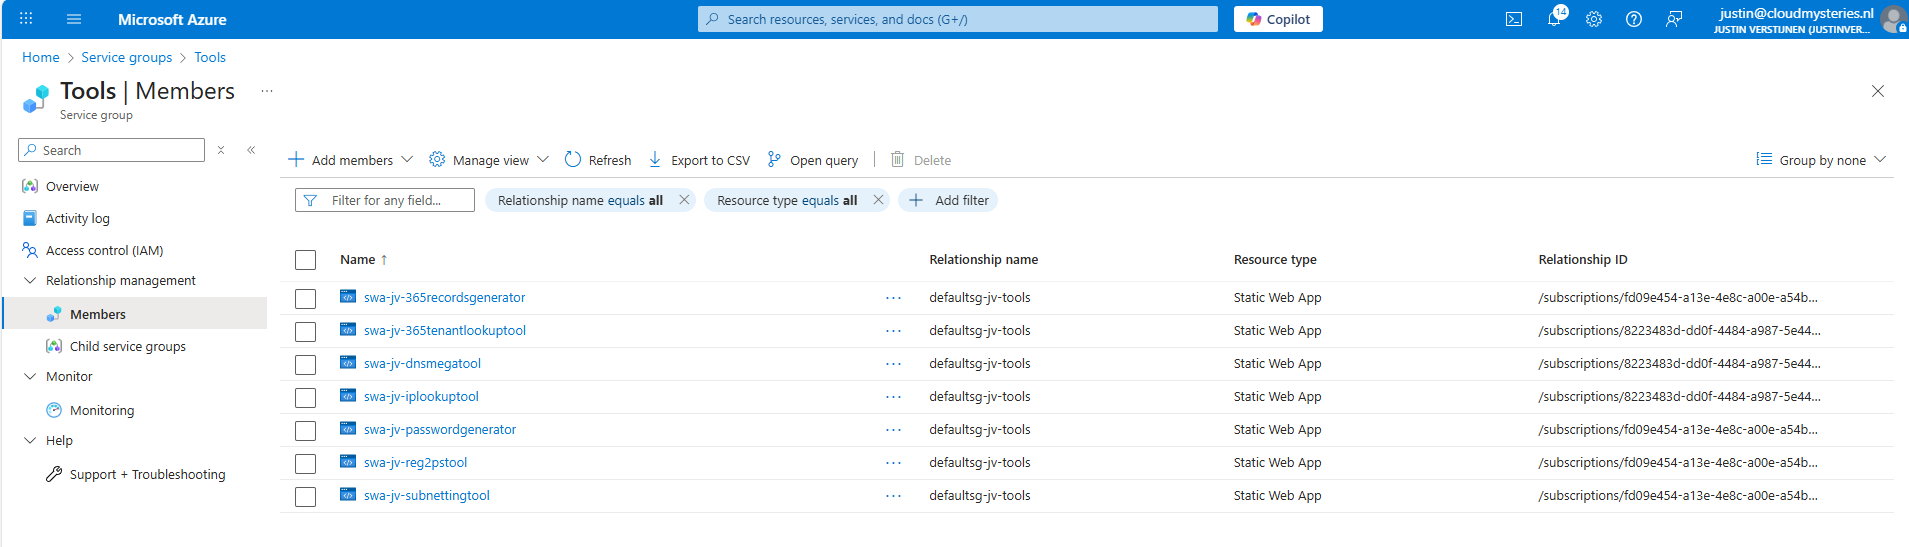
Service Groups are an great addition for managing permissions to our Azure resources. It delivers us a manner to give a person or group unified permissions across multiple resources that are not in the same resource group.
This can now be done, only with inheriting permissions flowing down, which means big privileges and big scopes. With this new function we can only select the underlying resources we want and so permit a limited set of permissions. This provider much more granular premissions assignments, and all of that free of charge!
These sources helped me by writing and research for this post;
You have reached the end of the page. You can navigate through other blog posts as well, share this post on X, LinkedIn and Reddit or return to the blog posts collection page. Thank you for visiting this post.
If you think something is wrong with this post or you want to know more, you can send me a message to one of my social profiles at: https://justinverstijnen.nl/about/
If you find this page and blog very useful and you want to leave a donation, you can use the button below to buy me a beer. Hosting and maintaining a website takes a lot of time and money. Thank you in advance and cheers :)
The terms and conditions apply to this post.
Once every 3 to 4 years you want to be on the last version of Windows Server because of new features and of course to have the latest security updates. These security updates are the most important these days.
When having your server hosted on Microsoft Azure, this proces can look a bit complicated but it is relatively easy to upgrade your Windows Server to the last version, and I will explain how to on this page.
Because Windows Server 2025 is now out for almost a year and runs really stable, we will focus in this post on upgrading from 2022 to Windows Server 2025. If you don’t use Azure, you can exclude steps 2 and 3 but the rest of the guide still tells you how to upgrade on other systems like Amazon/Google or on-premise/virtualization.
We will perform the upgrade by having a eligible server, and we will create an upgrade media for it. Then we will assign this upgrade media to the server, which will effectively put in the ISO. Then we can perform the upgrade from the guest OS itself and wait for around an hour.
Recommended is before you start, to perform this task in a maintenance window and to have a full server backup. Upgrading Windows Server isnt always a full waterproof process and errors can occur.
You’ll be happy to have followed my advice on this one if this goes wrong.
When you are planning an upgrade, it is good to determine your upgrade path beforehand. CHeck your current version and check which version you want to upgrade to.
The golden rule is that you can skip 1 version at a time. When you want to run Windows Server 2022 and you want to reach this in 1 upgrade, your minimum version is Windows Server 2016. To check all supported upgrade paths, check out the following table:
| Upgrade Path | Windows Server 2012 R2 | Windows Server 2016 | Windows Server 2019 | Windows Server 2022 | Windows Server 2025 |
|---|---|---|---|---|---|
| Windows Server 2012 | Yes | Yes | - | - | - |
| Windows Server 2012 R2 | - | Yes | Yes | - | - |
| Windows Server 2016 | - | - | Yes | Yes | - |
| Windows Server 2019 | - | - | - | Yes | Yes |
| Windows Server 2022 | - | - | - | - | Yes |
Horizontal: To Vertical: From
For more information about the supported upgrade paths, check this official Microsoft page: https://learn.microsoft.com/en-us/windows-server/get-started/upgrade-overview#which-version-of-windows-server-should-i-upgrade-to
When you have a virtual machine ready and you have determined your upgrade path, we have to create an upgrade media in Azure. We need to have a ISO with the new Windows Server version to start the upgrade.
To create this media, first login into Azure Powershell by using the following command;
Connect-AzAccountLog in with your Azure credentials which needs to have sufficient rights in the target resource group. This should be at least Contributor or use a custom role.
Select a subscription if needed:

Then after logging in succesfully, we need to execute a script to create a upgrade disk. This can be done through this script:
# -------- PARAMETERS --------
$resourceGroup = "rg-jv-upgrade2025"
$location = "WestEurope"
$zone = ""
$diskName = "WindowsServer2025UpgradeDisk"

# Target version: server2025Upgrade, server2022Upgrade, server2019Upgrade, server2016Upgrade or server2012Upgrade
$sku = "server2025Upgrade"

#--------END PARAMETERS --------
$publisher = "MicrosoftWindowsServer"
$offer = "WindowsServerUpgrade"
$managedDiskSKU = "Standard_LRS"

$versions = Get-AzVMImage -PublisherName $publisher -Location $location -Offer $offer -Skus $sku | sort-object -Descending {[version] $_.Version	}
$latestString = $versions[0].Version

$image = Get-AzVMImage -Location $location `
                       -PublisherName $publisher `
                       -Offer $offer `
                       -Skus $sku `
                       -Version $latestString

if (-not (Get-AzResourceGroup -Name $resourceGroup -ErrorAction SilentlyContinue)) {
    New-AzResourceGroup -Name $resourceGroup -Location $location
}

if ($zone){
    $diskConfig = New-AzDiskConfig -SkuName $managedDiskSKU `
                                   -CreateOption FromImage `
                                   -Zone $zone `
                                   -Location $location
} else {
    $diskConfig = New-AzDiskConfig -SkuName $managedDiskSKU `
                                   -CreateOption FromImage `
                                   -Location $location
}

Set-AzDiskImageReference -Disk $diskConfig -Id $image.Id -Lun 0

New-AzDisk -ResourceGroupName $resourceGroup `
           -DiskName $diskName `
           -Disk $diskConfig
View the script on my GitHub page
On line 8 of the script, you can decide which version of Windows Server to upgrade to. Refer to the table in step 1 before choosing your version. Then perform the script.
After the script has run successfully, I will give a summary of the performed action:
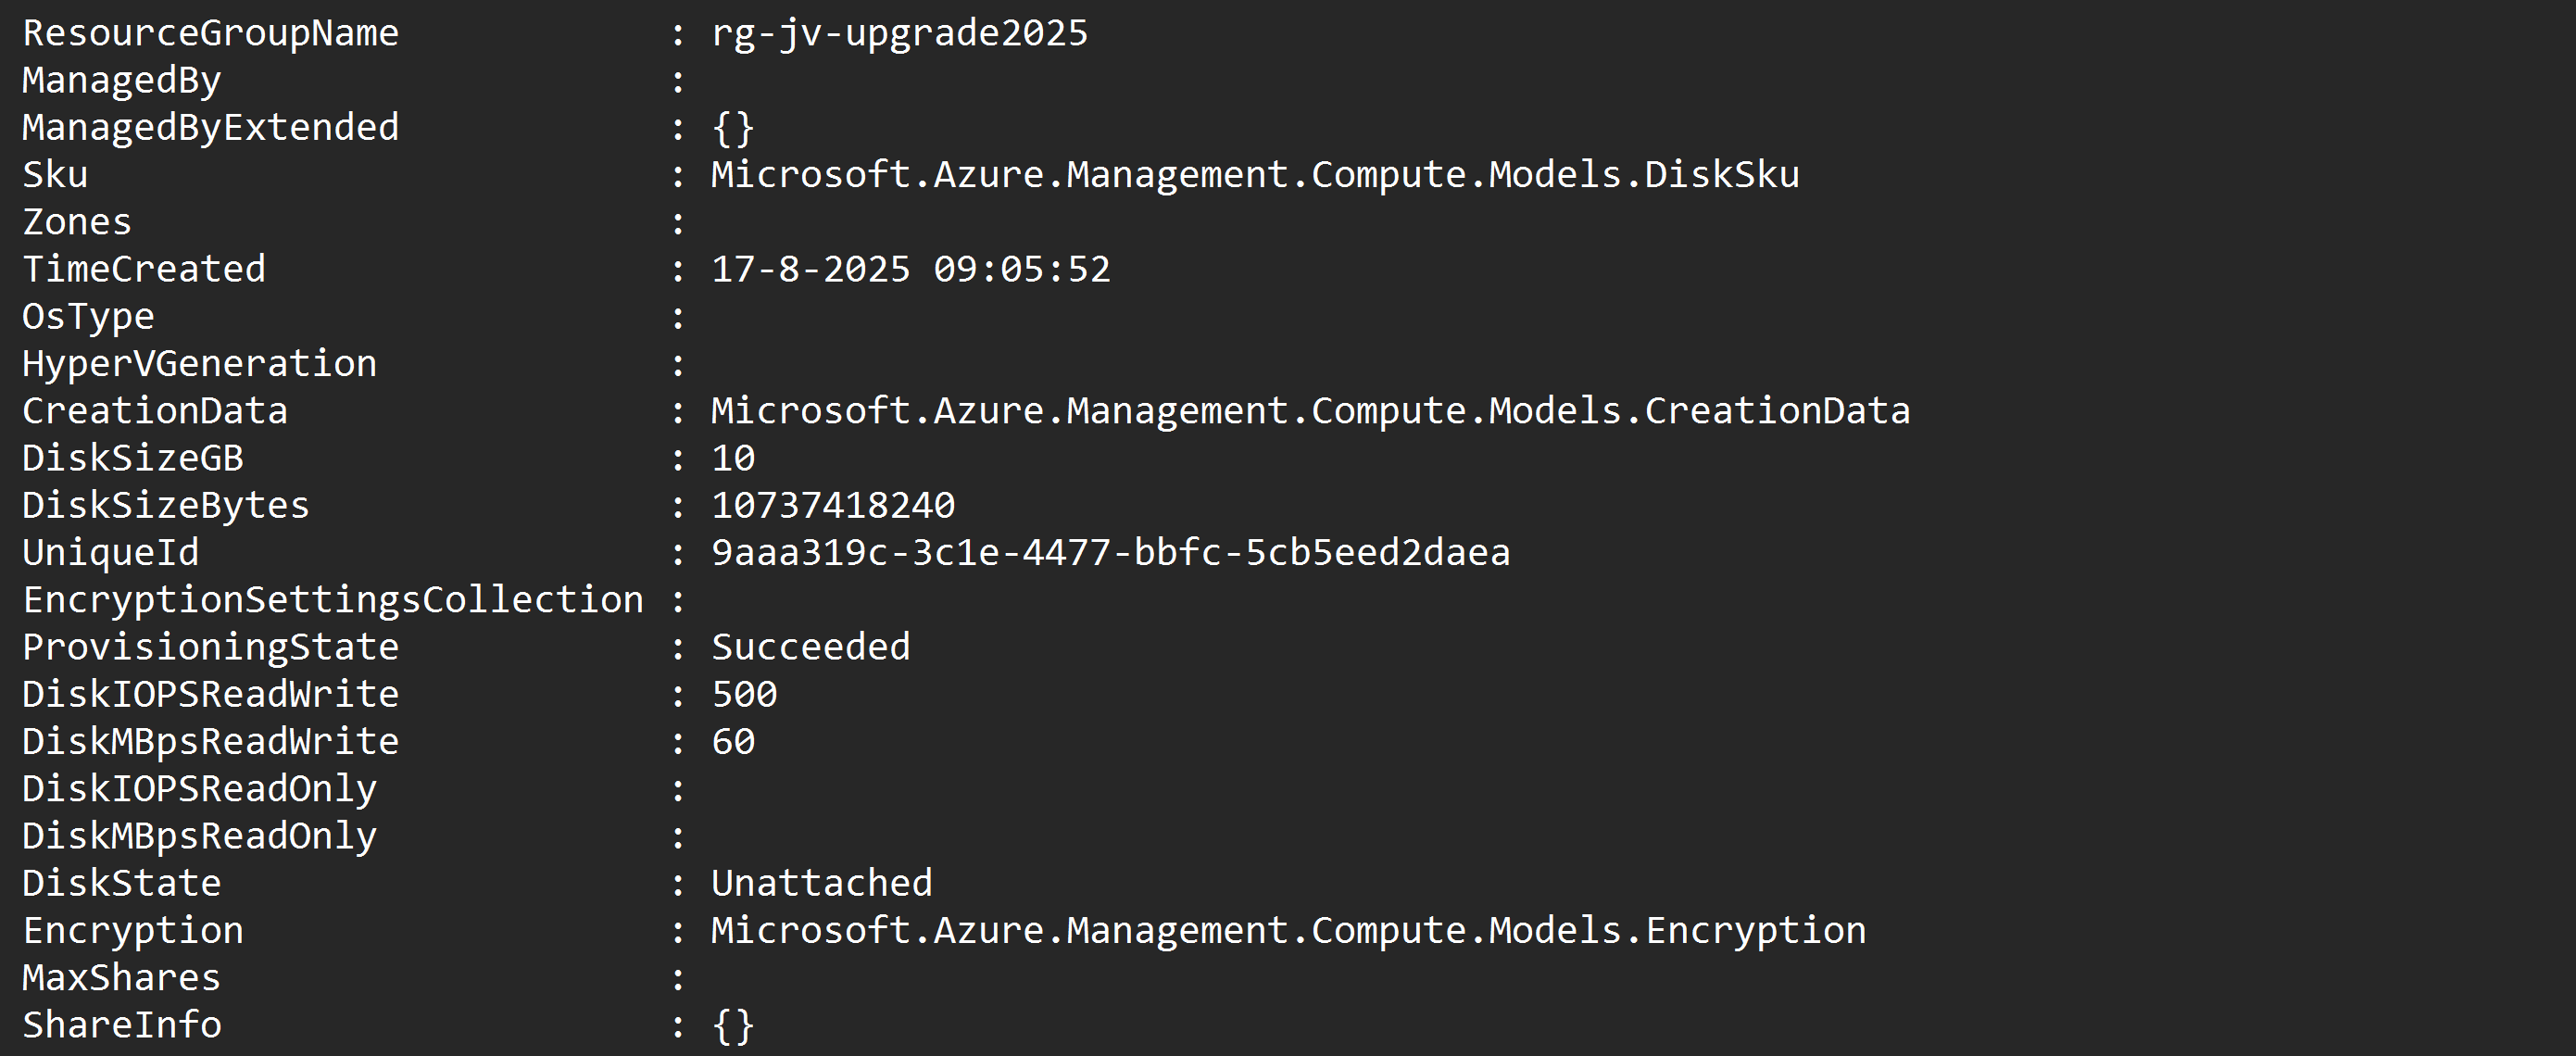
After running the script in the Azure Powershell window, the disk is available in the Azure Portal:
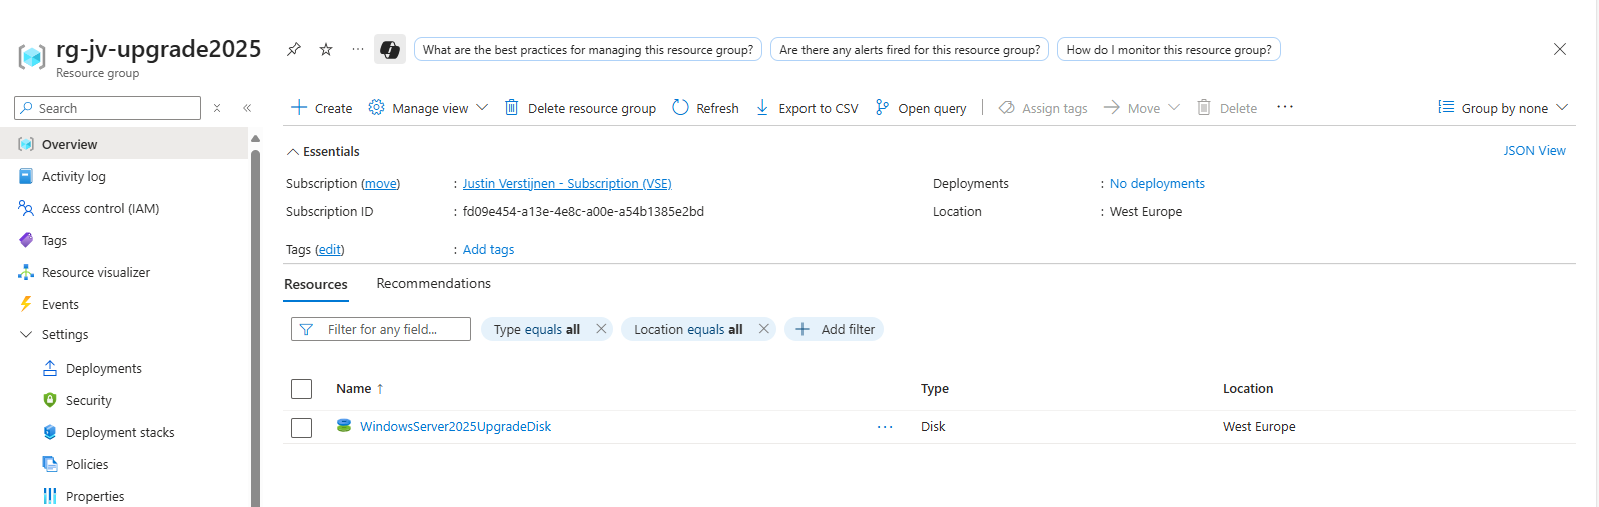
After creating the upgrade media we have to assign it to the virtual machine we want to upgrade. You can do this in the Azure Portal by going to the virtual machine. After that, hit Disks.
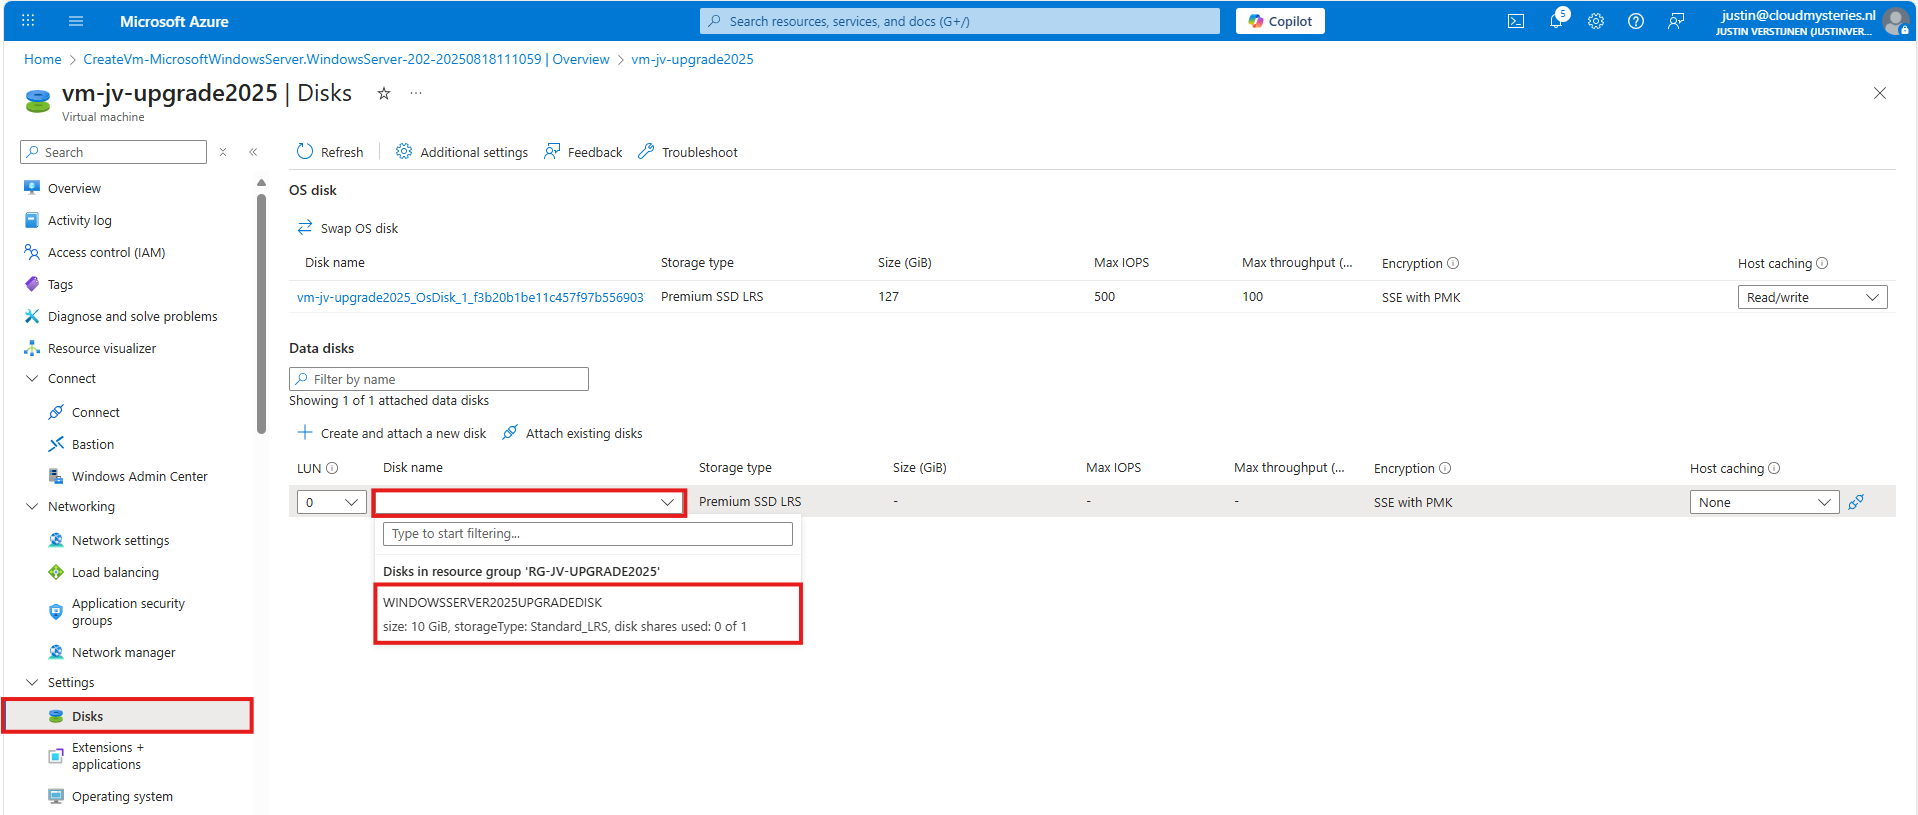
Then select to attach an existing disk, and select the upgrade media you have created through Powershell.
Note: The disk and virtual machine have to be in the same resource group to be attached.
Now we have prepared our environment for the upgrade of Windows Server, we can start the upgrade itself. For the purpose of this guide, I have quickly spun up a Windows Server 2022 machine to upgrade this to Windows Server 2025.
Login into the virtual machine and let’s do some pre-upgrade checks:
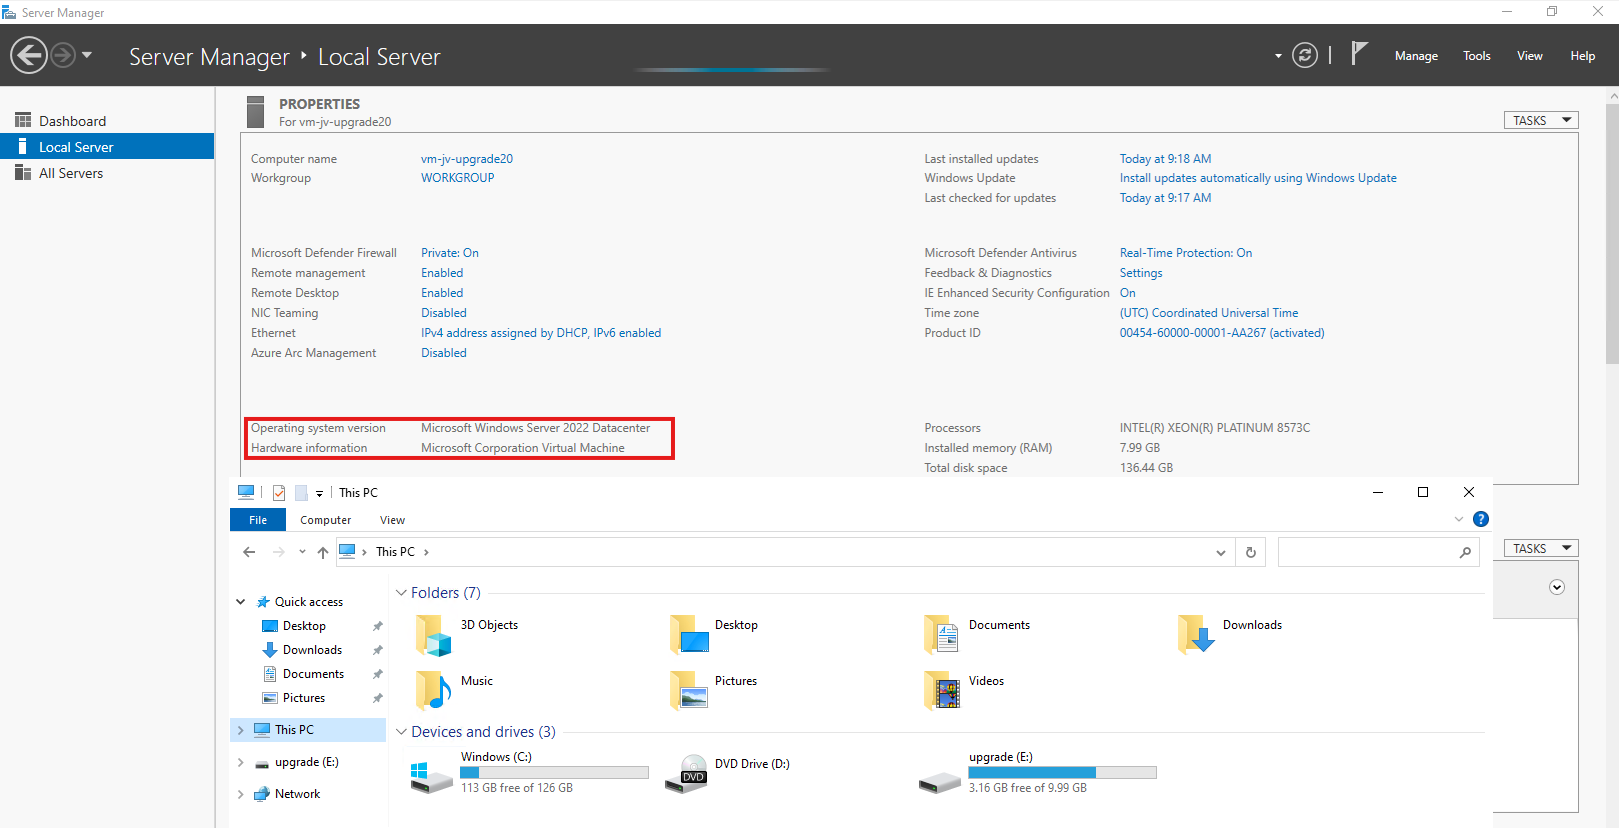
As you can see, the machine is on Windows Server 2022 Datacenter and we have enough disk space to perform this action. Now we can perform the upgrade through Windows Explorer, and then going to the upgrade disk we just created and assigned:
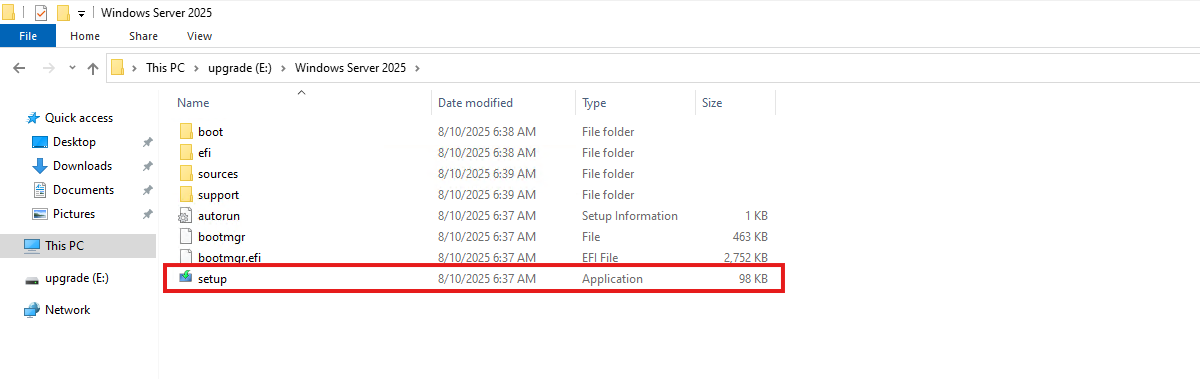
When the volume is not available in Windows Explorer, you first have to initialize the disk in Disk Management (diskmgmt.msc) in Windows. Then it will be available.
Open the volume upgrade and start setup.exe. The starup will take about 2 minutes.
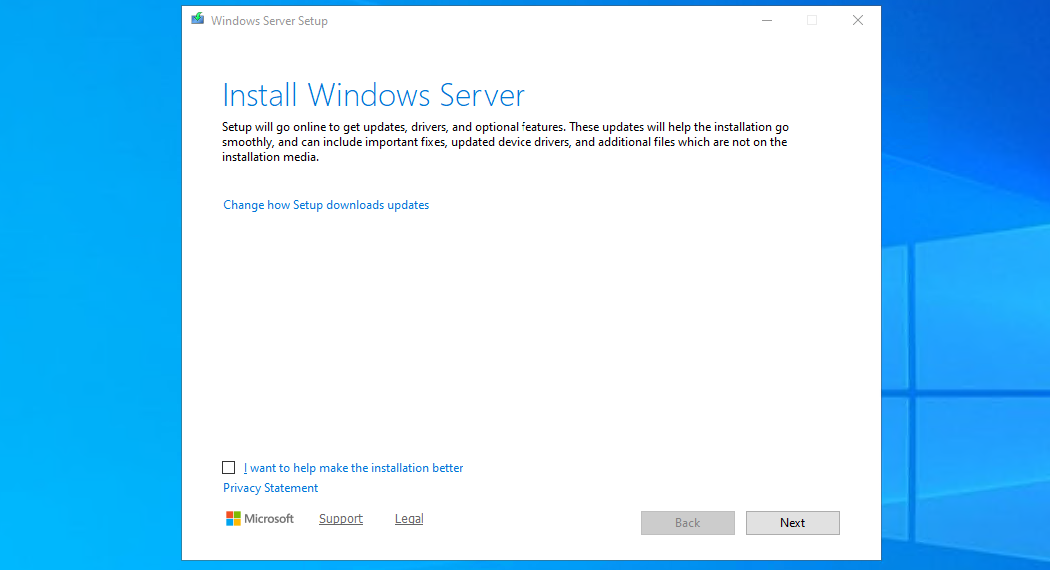
Click “Next”. Then there will be a short break of around 30 seconds for searching for updates.
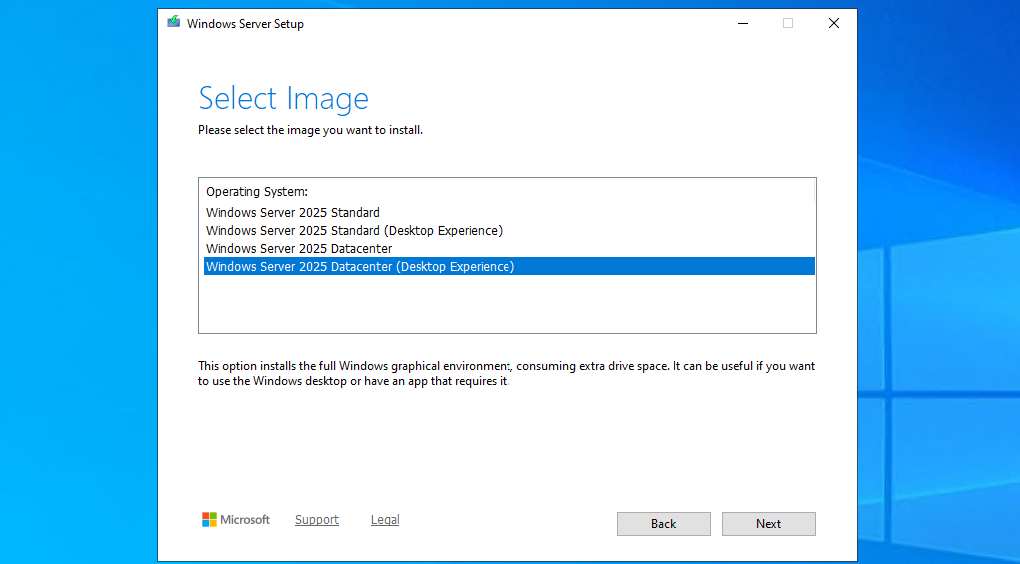
Then select you preferred version. Note that the default option is to install without graphical environment/Desktop Experience. Set this to your preferred version and click “Next”.
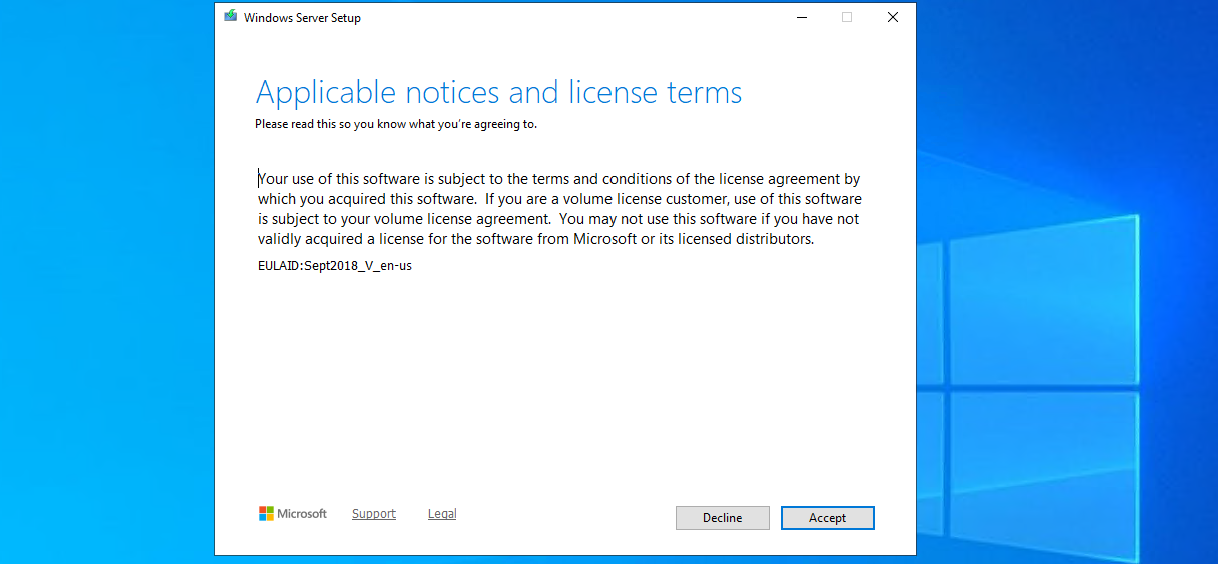
Ofcourse we have read those. Click Accept.
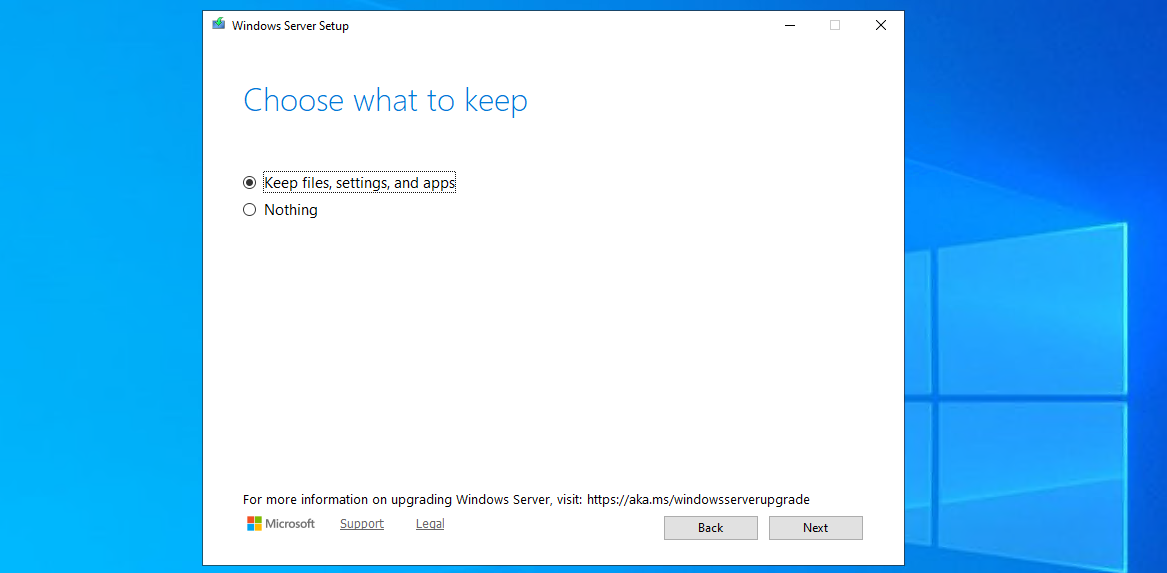
Choose here to keep files, settings and apps to make it an in-place upgrade. Click “Next”. There will be another short break of some minutes for the setup to download some updates.
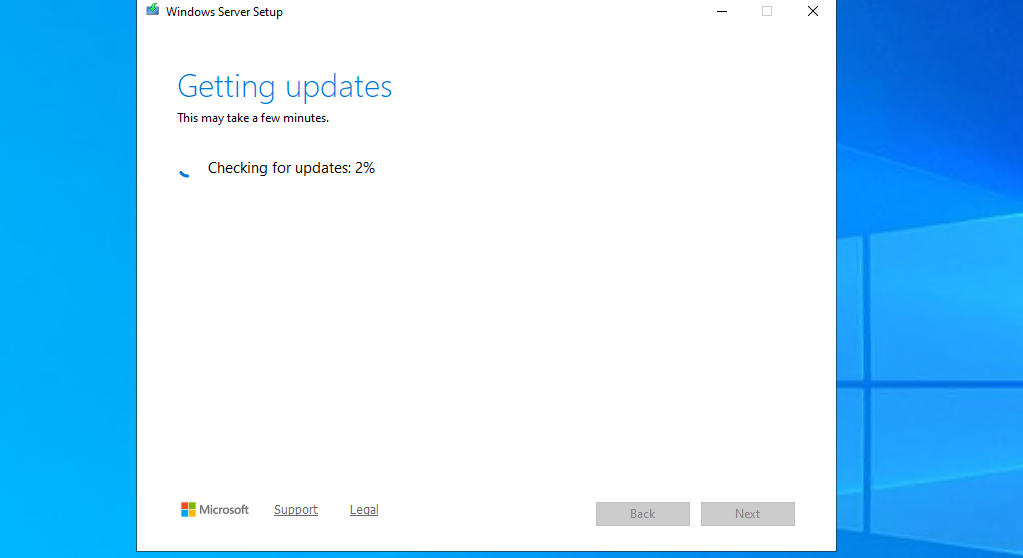
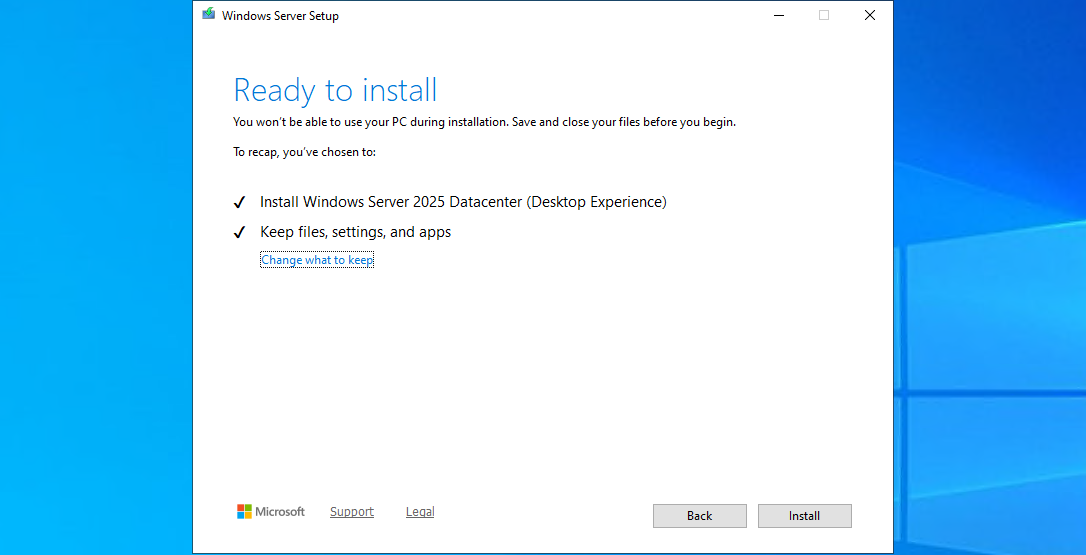
This process can take 45 minutes up to 2 hours, depending on the workload and the size of the virtual machine. Have a little patience during this upgrade.
After the machine will restart, RDP connection will be lost. However, you can check the status of the upgrade using the Azure Portal.
Go to the virtual machine you are upgrading, and go to: “Boot diagnostics”
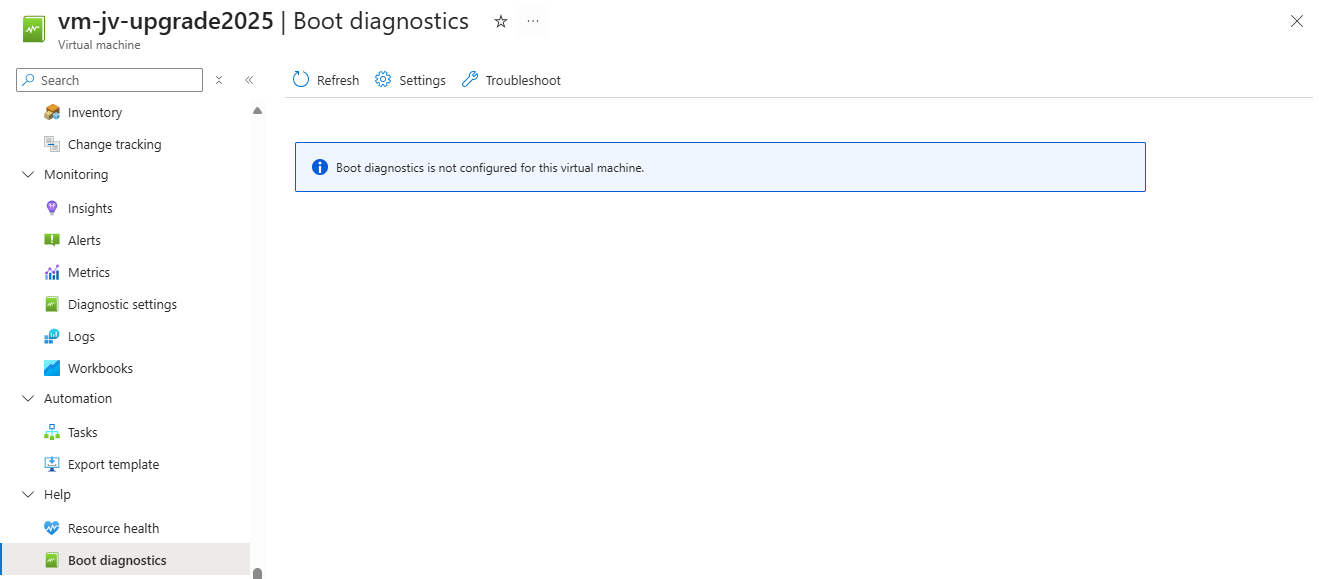
Then configure this for the time being if not already done. Click on “Settings”.
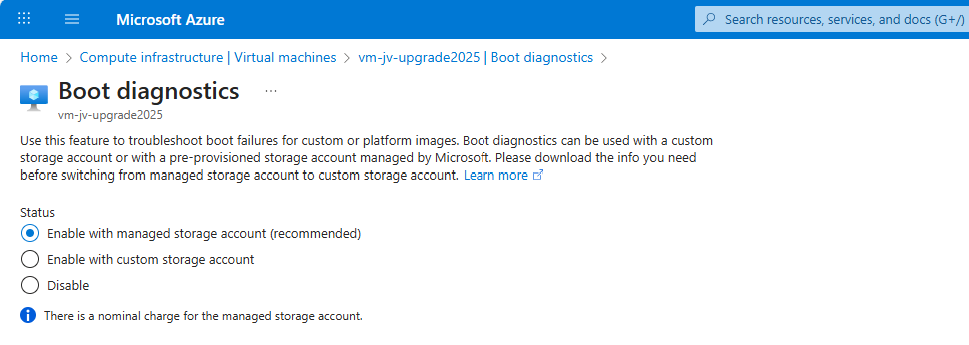
By default, select a managed storage account. If you use a custom storage account for this purpose, select the custom option and then your custom storage account.
We can check the status in the Azure Portal after the OS has restarted.
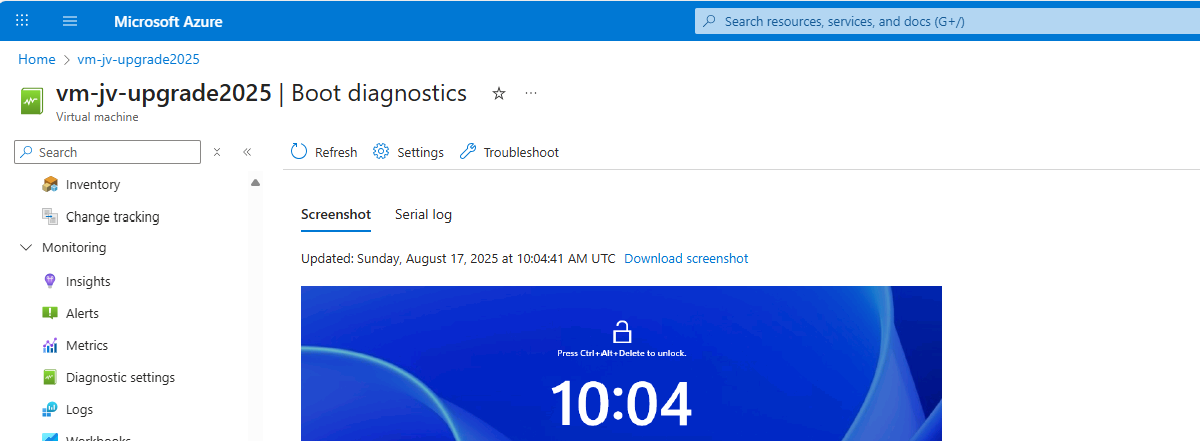
The upgrade went very fast in my case, within 30 minutes.
After the upgrade process is completed I can recommend you to test the update before going into production. Every change in a machine can alter the working of the machine, especially in production workloads.
A checklist I can recommend for testing is:
After these things are checked and no error occured, then the upgrade has been succeeded.
Upgrading a Windows Server to Server 2025 on Azure is relatively easy, although it can be somewhat challenging when starting out. It is no more than creating a upgrade disk, link to the machine and starting the upgrade like before with on-premises solutions.
The only downside is that Microsoft does not support upgrading Windows Server Azure Editions (ServerTurbine) yet, we are waiting with high hopes for this. Upgrading only works on the default Windows Server versions:
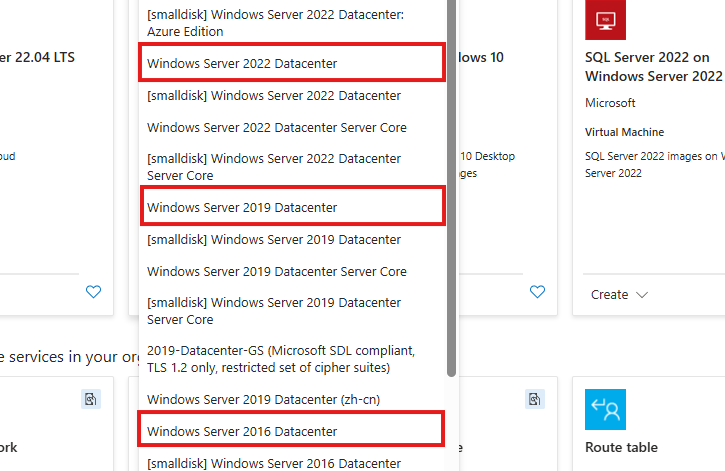
Thank you for reading ths guide and I hope it helped you out upgrading your server to the latest and most secured version.
These sources helped me by writing and research for this post;
You have reached the end of the page. You can navigate through other blog posts as well, share this post on X, LinkedIn and Reddit or return to the blog posts collection page. Thank you for visiting this post.
If you think something is wrong with this post or you want to know more, you can send me a message to one of my social profiles at: https://justinverstijnen.nl/about/
If you find this page and blog very useful and you want to leave a donation, you can use the button below to buy me a beer. Hosting and maintaining a website takes a lot of time and money. Thank you in advance and cheers :)
The terms and conditions apply to this post.
Even uitzoeken en testen of dit interresant is.
UItgezocht, ziet er heel veel handwerk uit. Naar mijn inziens is het makkelijekr om een image weer op te starten dan customizations te doen en dan weer imagen.
You have reached the end of the page. You can navigate through other blog posts as well, share this post on X, LinkedIn and Reddit or return to the blog posts collection page. Thank you for visiting this post.
If you think something is wrong with this post or you want to know more, you can send me a message to one of my social profiles at: https://justinverstijnen.nl/about/
If you find this page and blog very useful and you want to leave a donation, you can use the button below to buy me a beer. Hosting and maintaining a website takes a lot of time and money. Thank you in advance and cheers :)
The terms and conditions apply to this post.
With Azure Logic apps we can save some money on compute costs. Azure Logic apps are flow based tasks that can be run on schedule, or on a specific trigger like receiving a email message or Teams message. After the trigger has been started, we can choose what action to do. If you are familiar with Microsoft’s Power Automate, Logic Apps is almost exactly the same but then hosted in Azure.
In this guide I will demonstrate some simple examples of what Logic Apps can do to save on compute costs.
Azure Logic Apps is a solution to automate flows that we can run based on a trigger. After a certain trigger is being met, the Logic App can then perform some certain steps, like;
To keep it simple, such logic app can looks like this:
In Logic Apps there are templates to help you starting out what the possibilities are:
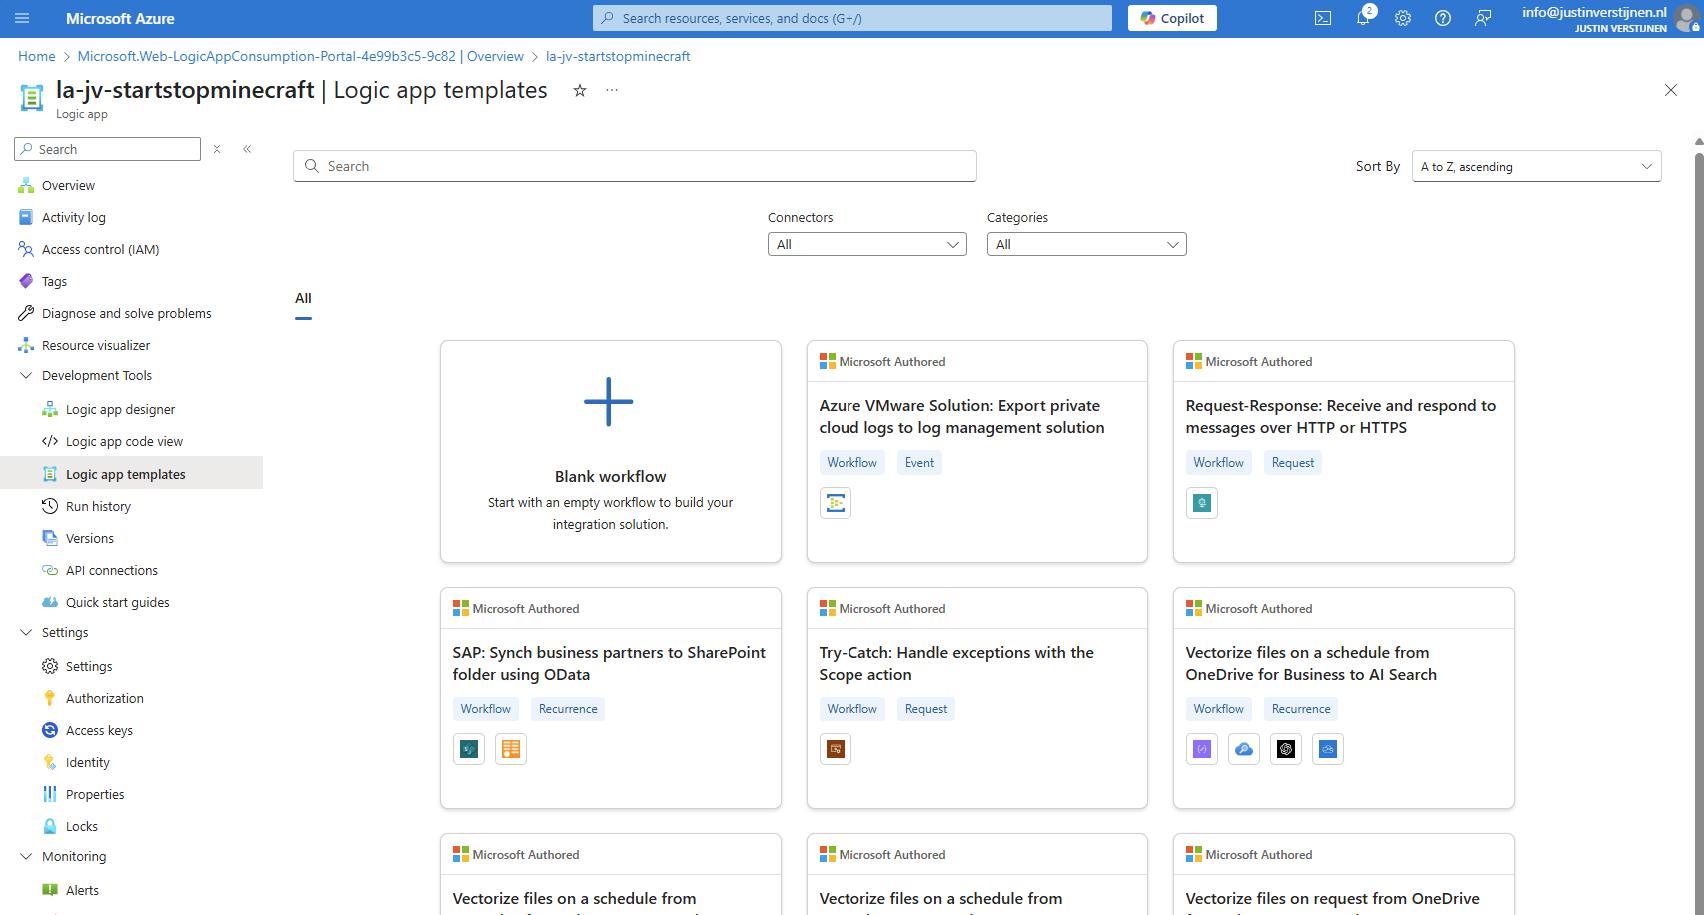
In this guide I will use a Logic app to start and stop the Minecraft Server VM from a previous guide. You can use any virtual machine in the Azure Portal with Logic Apps.
I will show some examples:
In the Azure Portal, go to “Logic Apps” and create a new Logic app. I chose the multi-tenant option as this is the least we need and saves on processing costs.
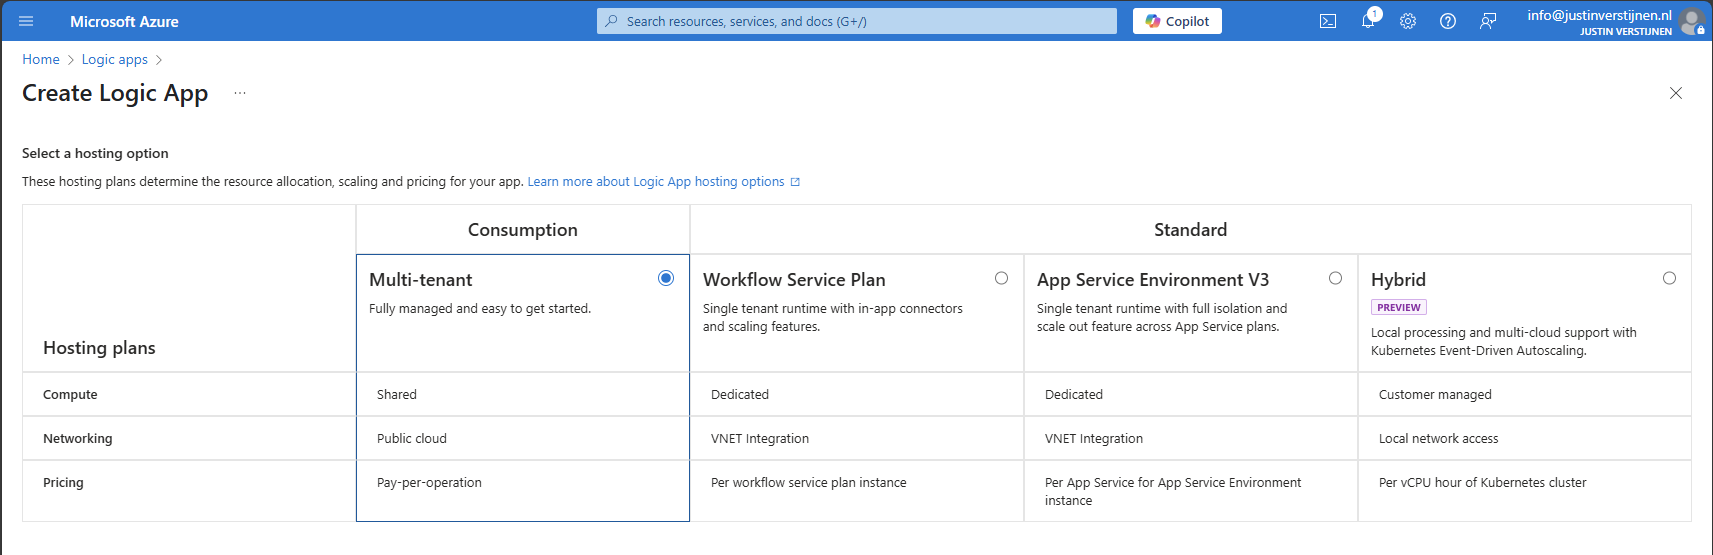
Logic Apps are relatively cheap, most of the time we can save a lot more money on compute costs than the costs of the Logic App.
Advance to the next step.
Create the app by filling in the details and finish the wizard.
After finishing the wizard, we have our Logic App in place, and now we can configure our “flows” and the 3 examples.
In every Logic App, we have a graphically designer to design our flow. Every flow has its own Logic App instance. If you need multiple flows, you have to create multiple Logic Apps, each for their own purpose.
When the Logic App is created, you can go to the “Logic App Designer” in your created Logic App to access the flow:
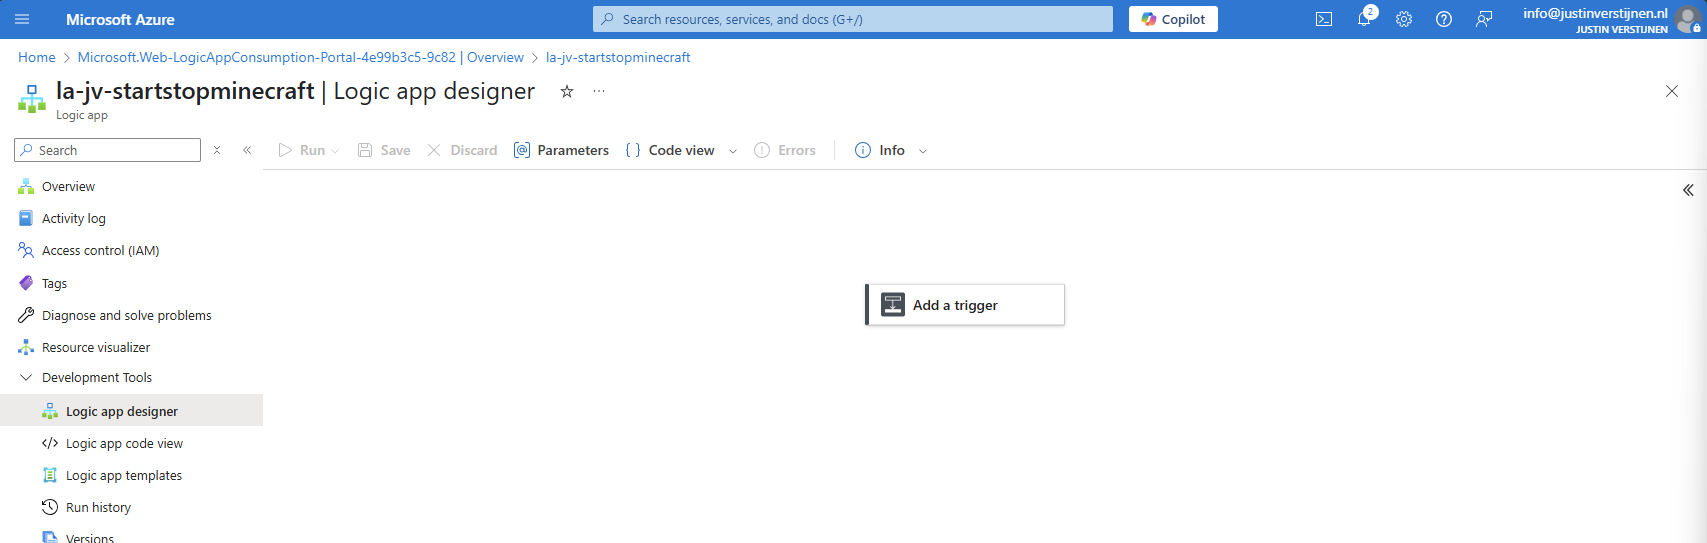
We always start with a trigger, this is the definition of when the flow starts.
We now have a Logic App created, but it cannot do something for us unless we give it permissions. My advice is to do this with a Managed Identity. This is a service-account like Identity that is linked to the Logic App. Then we will give it “Least-privilege” access to our resources.
In the Logic App, go to “Identity” and enable the System-assigned managed identity.
Now we have to give this Managed Identity permissions to a certain scope. Since my Minecraft server is in a specific Resource Group, I can assign the permissions there. If you create flows for one specific machine in a resource group with multiple machines, assign the permissions on the VM level instead.
In my example, I will assign the permissions at Resource Group level.
Go to the Resource group where your Virtual Machine resides, and open the option “Access Control (IAM)”.
Add a new Role assignment here:
Select the role “Virtual Machine Contributor” or a custom role with the permissions:
Click on “Next”.
Select the option “Managed Identity” and select the Logic App identity:
Select the Managed Identity that we created.
Assign the role and that concludes the permissions-part.
In Example 1, we will create a flow to automatically start one or more defined virtual machines at a scheduled time, without an action to shutdown a machine. You can use this in combination with the “Auto Shutdown” option in Azure.
Go to the Azure Logic App and then to the Designer;
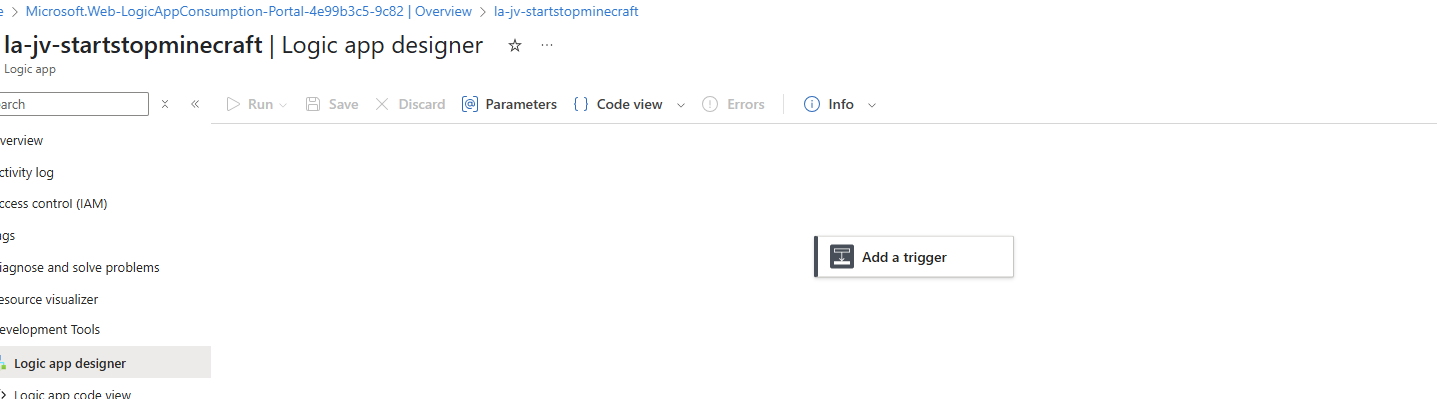
Click on “Add a trigger”.
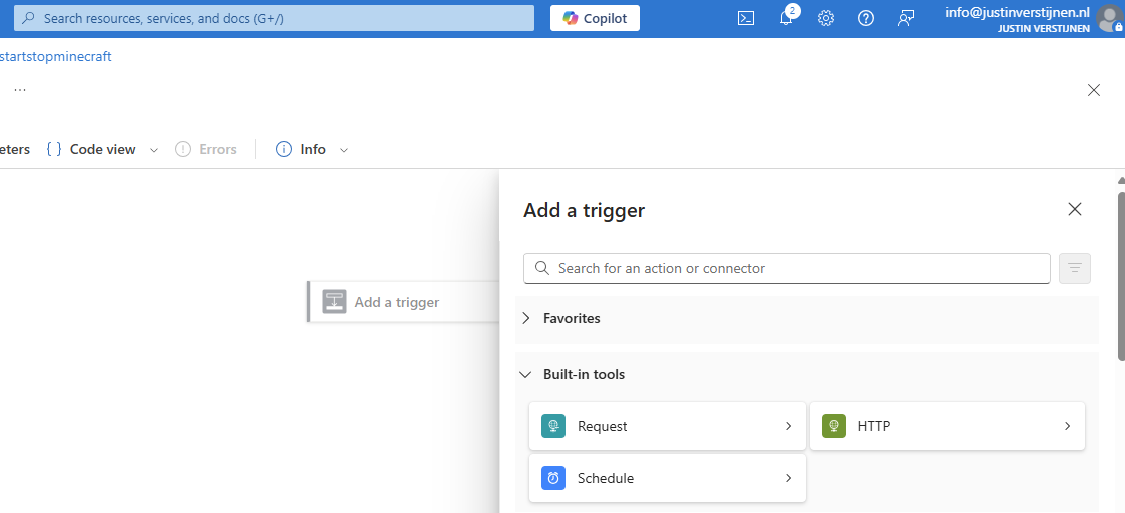
Select the “Schedule” option.
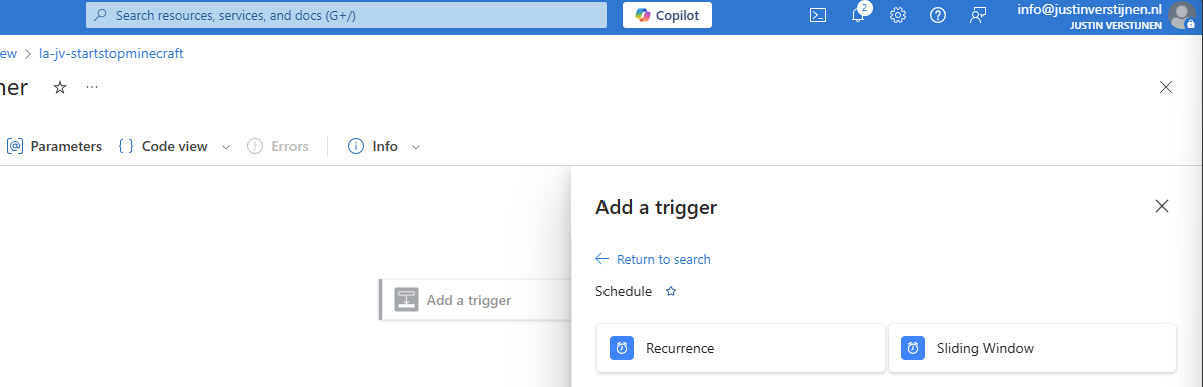
Select the “Recurrence” trigger option to let this task recur every 1 day:
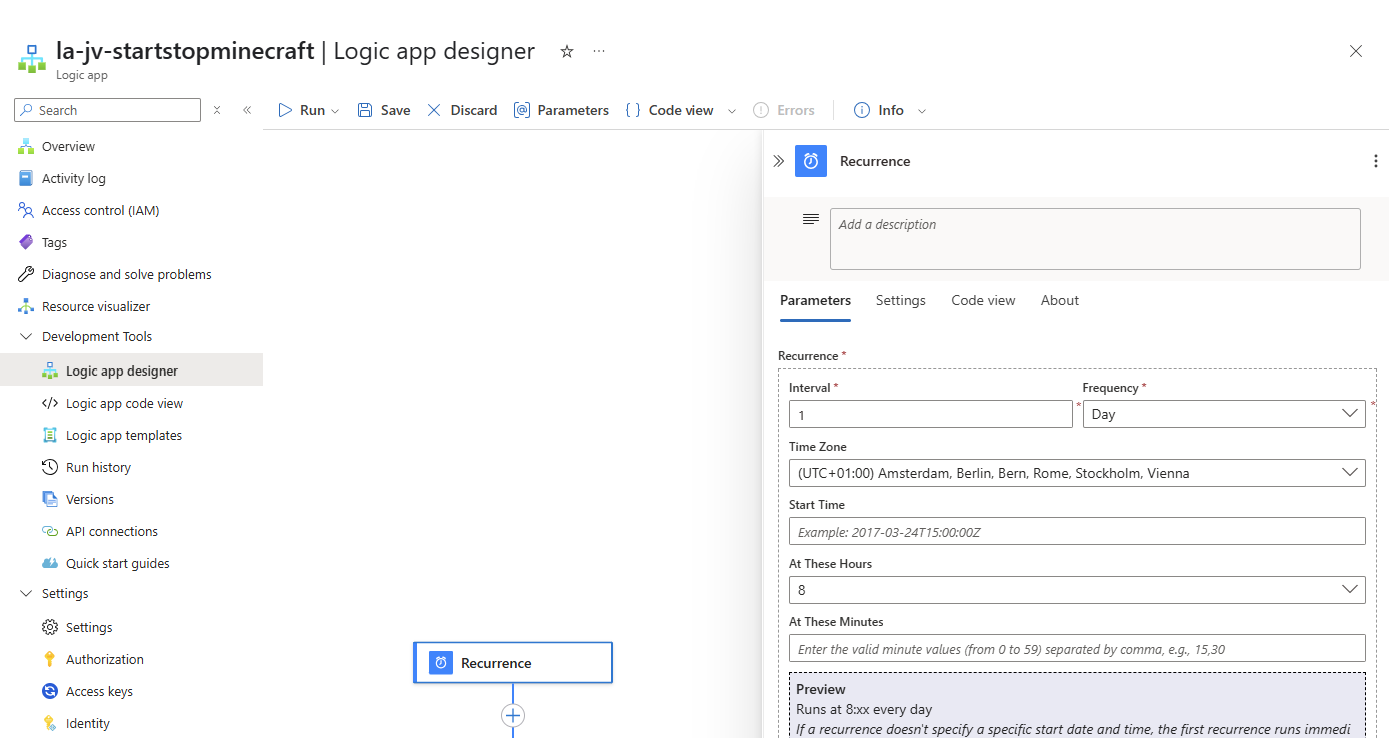
Then define the interval -> when must the task run, the timezone and the “At these Hours” to start the schedule on a set time, for example 8 o’clock. The blue block below it shows exactly when the schedule will run.
Save the trigger and now we have to add actions to perform after the trigger.

Click on the “+” under Recurrence and then “add a task” to link a task to the recurrence.
Search for: “virtual machine”
Select the option “Start virtual machine”.
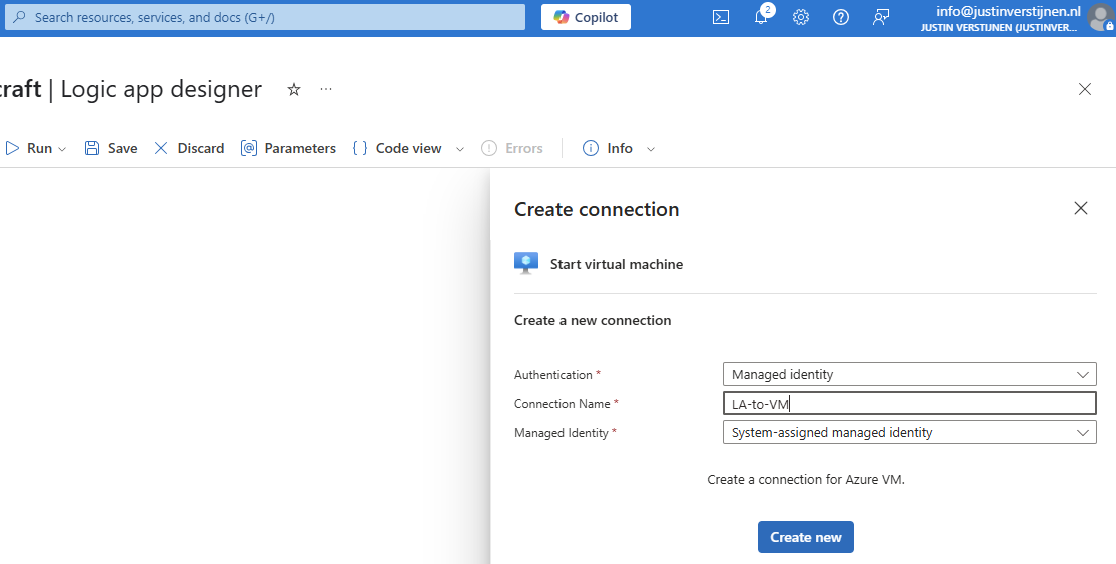
Select the Managed Identity and give the connection a name. Then click on “Create new”.
Now select the machine you want to start at your scheduled time:
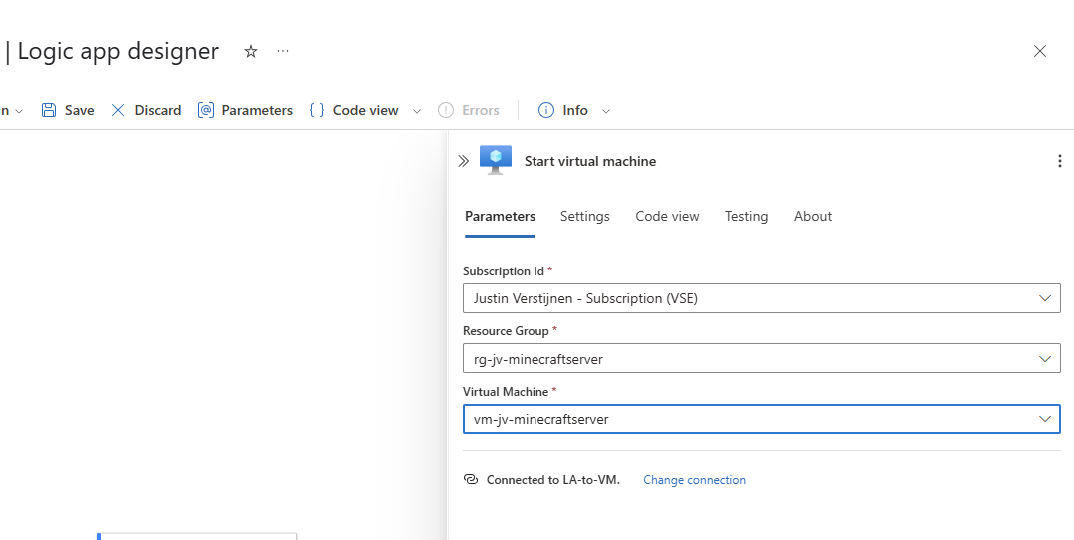
Save the Logic App and it should look like this:
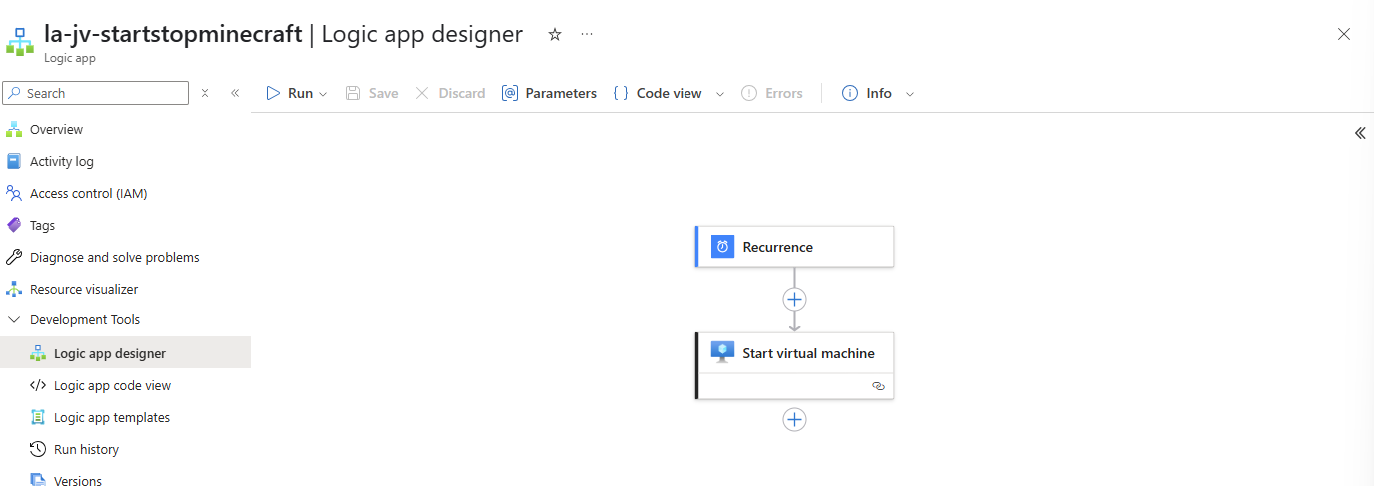
You can test in the portal with the “Run” option, or temporarily change the recurrence time to some minutes in the future.
Now we wait till the schedule has reached the defined time, and we will look what happens to the virtual machine:
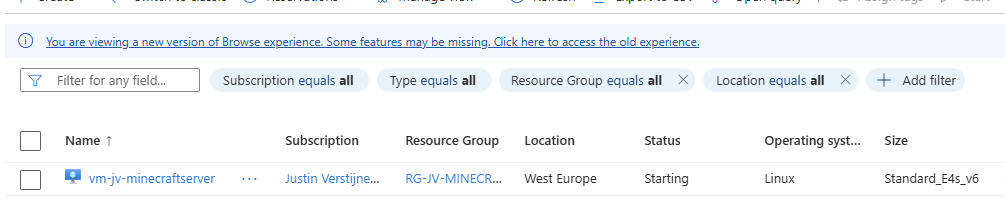
The machine is starting according to our Logic App.
Example 2 is an addition on Example 1, so follow Example 1 and then the steps below for the stop-action.
Go to the Logic app designer:
Under the “Start virtual machine” step, click on the “+” to add an action:

Search for “Delay” to add an delay to the flow.
In my example, I will shutdown the virtual machine after 4 hours:
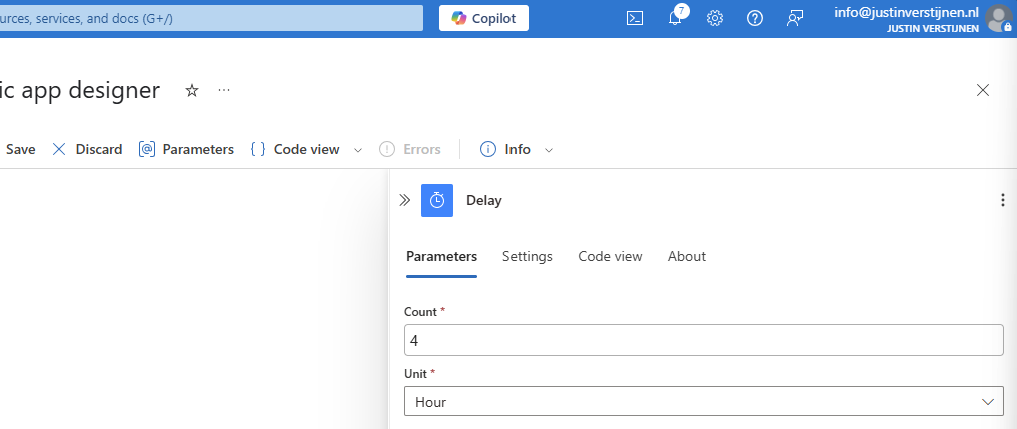
Fill in 4 and select hours or change to your preference.
Add another step under the Delay step:
Search for “Deallocate” and select the “Deallocate virtual machine”
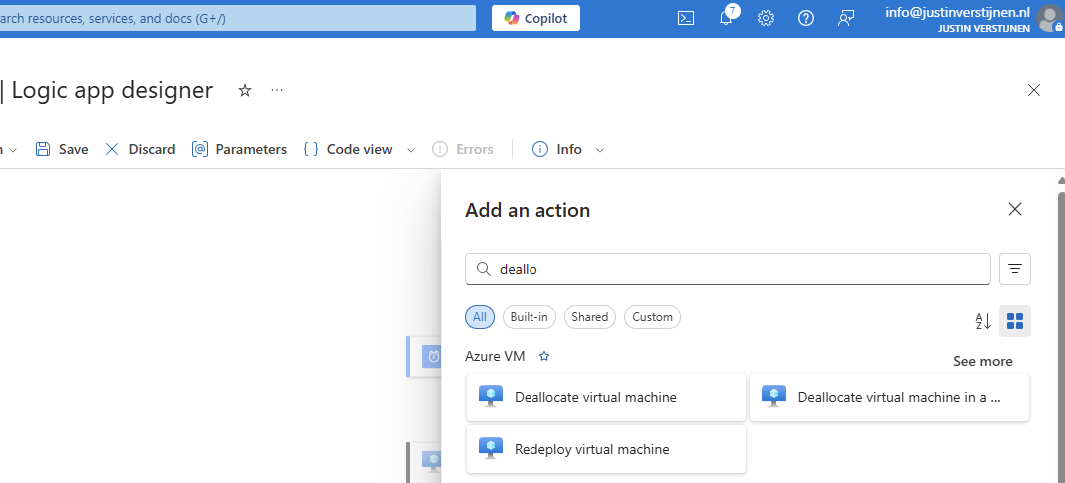
Fill in the form to select your virtual machine. It uses the same connection as the “Start” action:
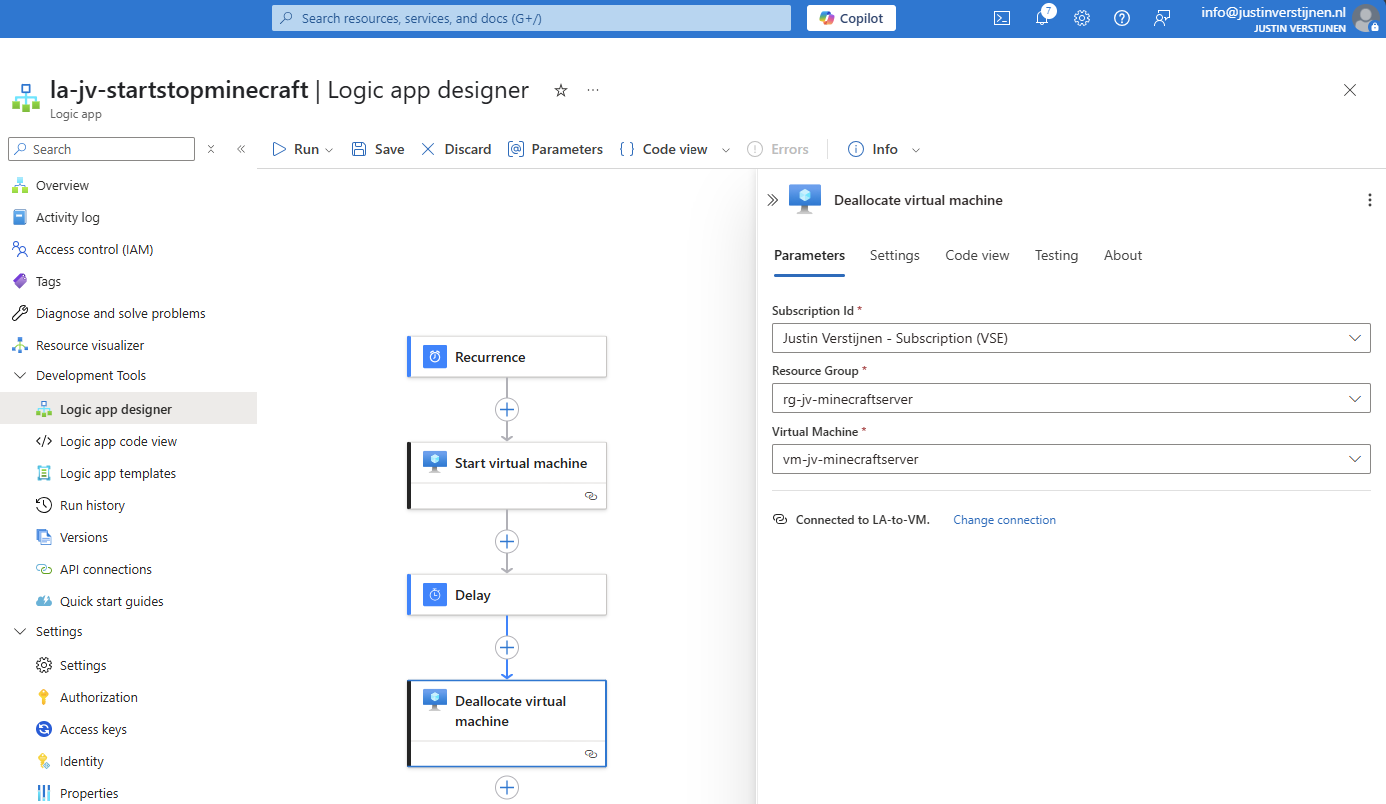
After this save the Logic app. Now the Logic App will start the virtual machine at 8:00 AM and after 4 hours it will stop the machine. I used the “Deallocate” action because this ensures the machine uses minimal costs. Stop will only stop the VM but keeps it allocated which means it still costs money.
For Example 3 we start with a new flow. Add a new trigger:
Now search for “When a new email arrives (V3)” and choose the Office 365 Outlook option:

Now we must create a connection to a certain mailbox, we have to login to the mailbox.
We can define how the mail should look to trigger the events:
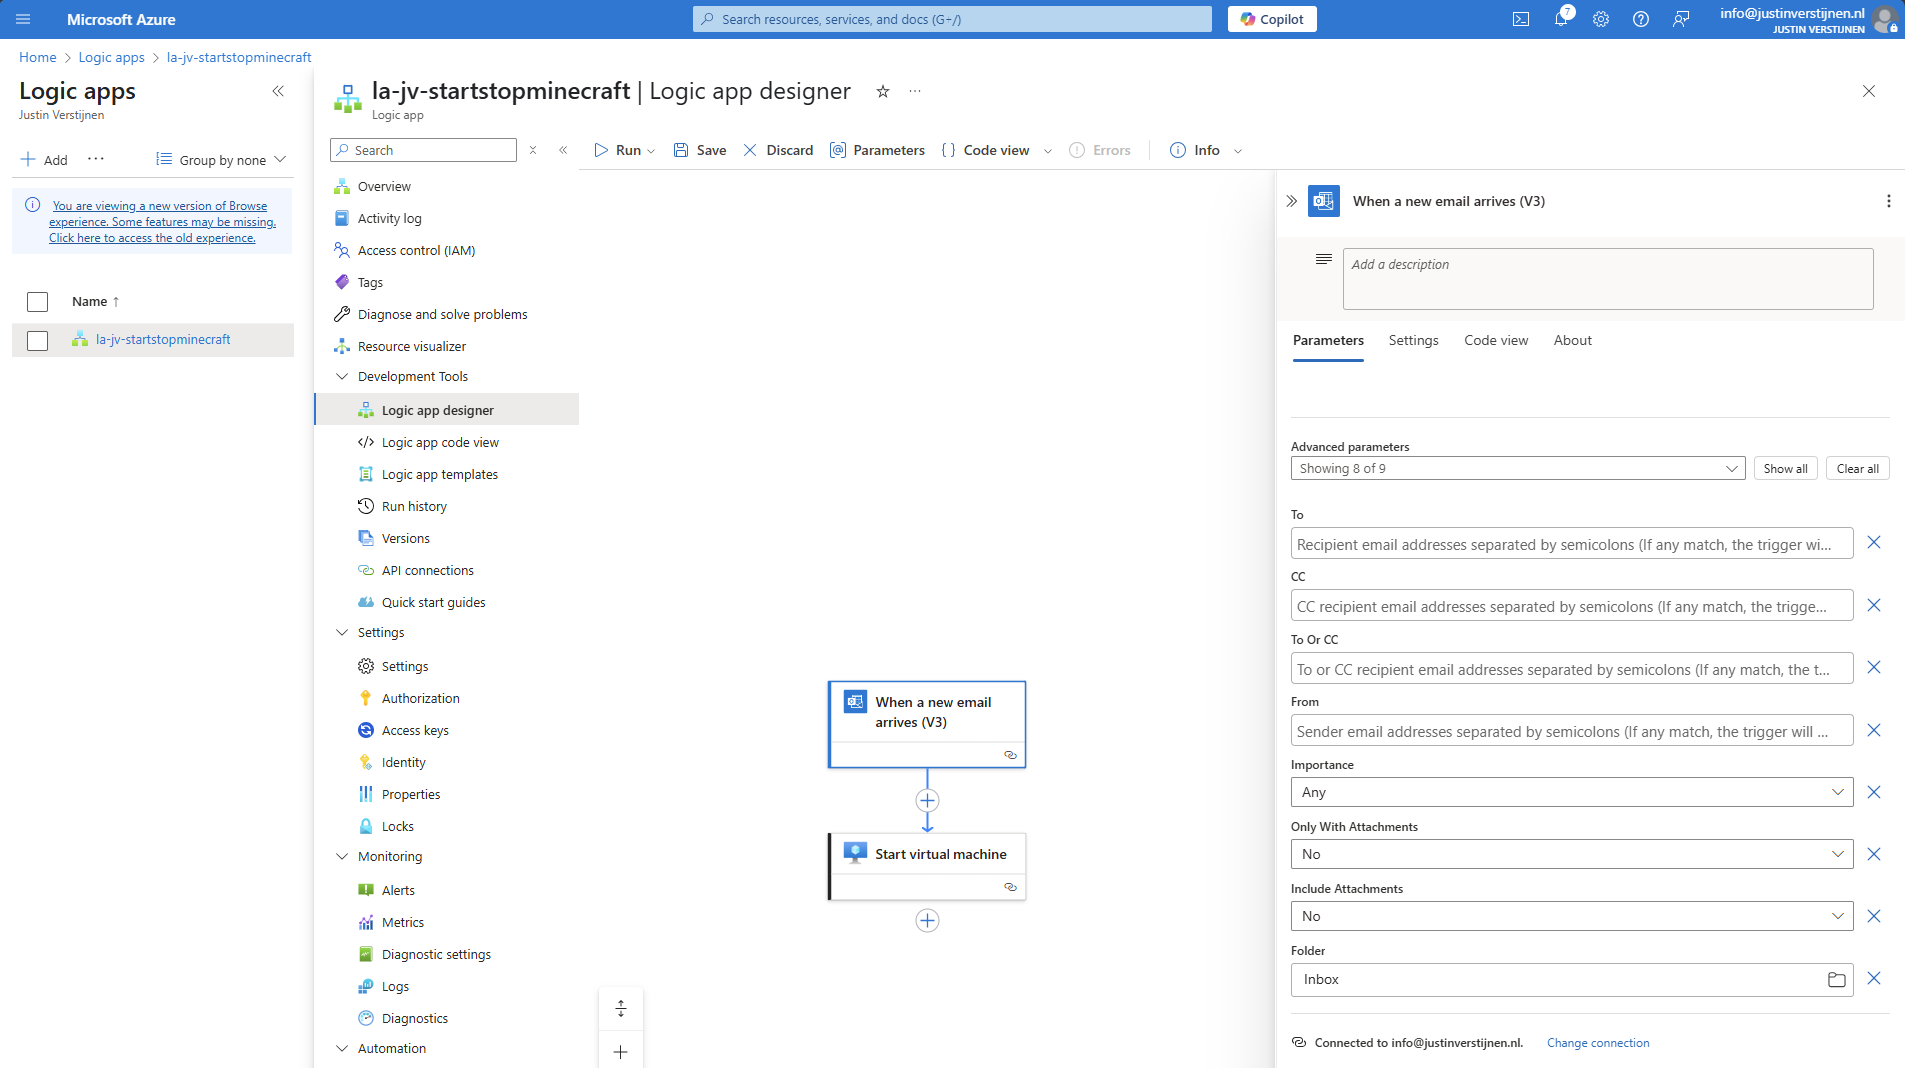
After the incoming email step, we can add an action with the “+” button:
Click on the “+” under Recurrence and then “add a task” to link a task to the recurrence.
Search for: “virtual machine”
Select the option “Start virtual machine”.
Select the Managed Identity and give the connection a name. Then click on “Create new”.
Now select the machine you want to start at your scheduled time:
Save the Logic App and it should look like this:
Now we have finished Example 3 and you can test the flow.
Azure Logic Apps are an excellent cloud-native way to automate recurring tasks in Azure. It is relatively easy to configure and can help limiting the uptime of virtual machines and so costs.
I hope this guide was very useful and thank you for reading.
You have reached the end of the page. You can navigate through other blog posts as well, share this post on X, LinkedIn and Reddit or return to the blog posts collection page. Thank you for visiting this post.
If you think something is wrong with this post or you want to know more, you can send me a message to one of my social profiles at: https://justinverstijnen.nl/about/
If you find this page and blog very useful and you want to leave a donation, you can use the button below to buy me a beer. Hosting and maintaining a website takes a lot of time and money. Thank you in advance and cheers :)
The terms and conditions apply to this post.
In this article, we are going to implement Azure Firewall in Azure. We are going to do this by building and architecting a new network and creating the basic rules to make everything work.
Before creating all resources, it is great to plan before we build. I mean planning your network before building and having different overlaps or too much/less addresses available. In most cases, Azure recommends building a Hub-and-Spoke network, where we connect all spoke networks to a big hub.
In this guide, we are going to build this network:
The details of the networks are:
| VNET Name | Address Space | Goal |
| jv-vnet-00-hub | 10.0.0.0/16 | Hub for the network, hosting the firewall |
| jv-vnet-01-infrastructure | 10.1.0.0/16 | Network for servers |
| jv-vnet-02-workstations | 10.2.0.0/16 | Network for workstations |
| jv-vnet-03-perimeter | 10.3.0.0/16 | Network for internet-facing servers Isolated network |
We will build these networks. The only exception is VNET03, which we will isolate from the test of our network to defend against internet-facing attacks. This because attacks cannot perform lateral movement from these servers to our internal network.
In Azure, search for “Virtual Networks”, select it and create a virtual network.
Create a new virtual network which we will configure as hub of our Azure network. This is a big network where the Azure Firewall instance will reside.
For the IP addresses, ensure you choose an address space that is big enough for your network. I chose for the default /16 which theoretically can host 65.000 addresses.
Finish the wizard and create the network.
Now we can create the other spoke networks in Azure where the servers, workstations or other devices can live.
Create the networks and select your preferred IP address ranges.
Now that we have all our IP ranges in place, we can now peer all spoke networks with our hub. We can do this the most efficient way by going to the Hub network and creating the peers from there:
Create a new peering here.
The peerings are “cables” between the networks. By default, all networks in Azure are isolated and cannot communicate with each other. This by default would make it impossible to have a Firewall in another network as your servers and workstations.
We have to create peerings with the following settings:
| Setting name | Hub to Spoke | Spoke to Hub |
| Allow the peered virtual network to access *remote vnet* | Enabled | Enabled |
| Allow the peered virtual network to receive forwarded traffic from *remote vnet* | Enabled | Disabled |
| Allow gateway or route server in the peered virtual network to forward traffic to *remote vnet* | Disabled | Disabled |
| Enable the peered virtual network to use *remote vnet*’s remote gateway or route server | Disabled | Disabled |
Now we know how to configue the peerings, let’s bring this in practice.
The wizard starts with the configuration of the peering for the remote network:
For the peering name, I advice you to simply use:
VNETxx-to-VNETxx
This makes it clear how the connections are. Azure will create the connection both ways by default when creating the peering from a virtual network.
Now we have to configure the peering for the local network. We do this according to the table:
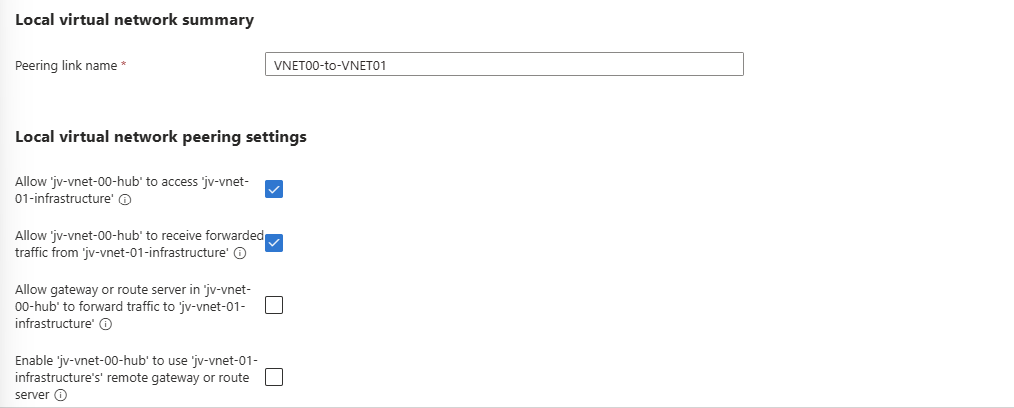
After these checks are marked correctly, we can create the peering by clicking on “Add”.
Do this configuration for each spoke network to connect it to the hub. The list of peered networks in your Hub network must look like this:
Now the foundation of our network is in place.
Azure Firewall needs a subnet for management purposes which we have to create prior to creating the instance.
We can do this very easily by going to the Hub virtual network and then go to “Subnets”.
Click on “+ Subnet” to create a subnet from template:
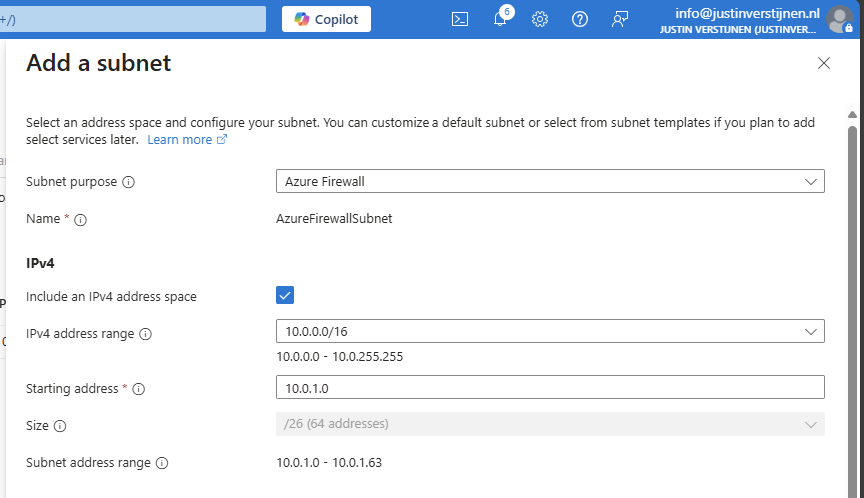
Select the “Azure Firewall” subnet purpose and everything will be completed automatically.
If you select the “Basic” SKU of Azure Firewall or use “Forced tunnling”, you also need to configure a Azure Firewall Management subnet. This works in the same way:
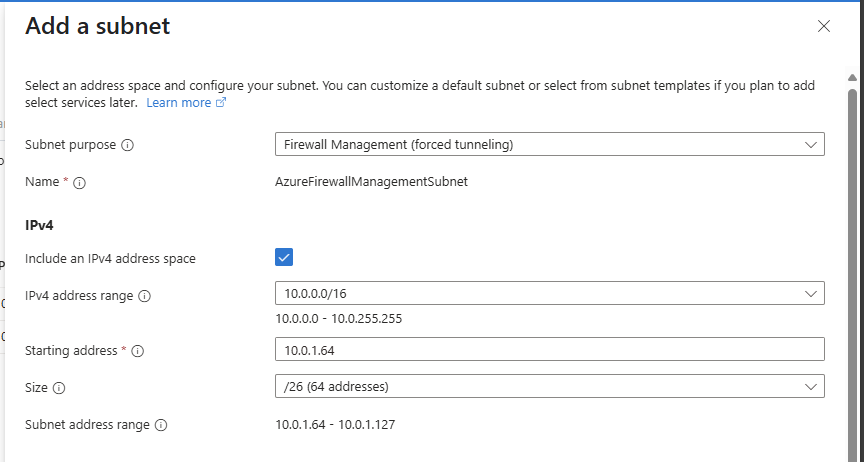
Select the “Firewall Management (forced tunneling)” option here and click on “Add” to create the subnet.
We are now done with the network configuration.
We can now start with Azure Firewall itself by creating the instance. Go to “Firewalls” and click on “+ Create” to create a new firewall. In this guide, I will create a Basic Firewall instance to show the bare minimum for its price.
Fill in the wizard, choose your preferred SKU and at the section of the virtual network choose to use an existing virtual network and select the created hub network.
After that create a new Firewall policy and give it a name:
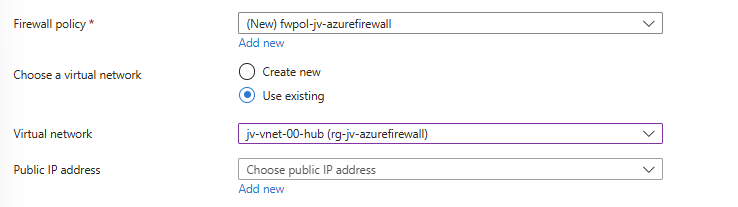
Now configure the public IP addresses for the firewall itself and the management IP address:
The complete configuration of my wizard looks like this:
Now click on “Next” and then “Review and Create” to create the Firewall instance.
This will take around 5 to 10 minutes.
After the Firewall is created, we can check the status in the Firewall Manager:
And in the Firewall policy:
Now that we have created our Firewall, we know it’s internal IP address:
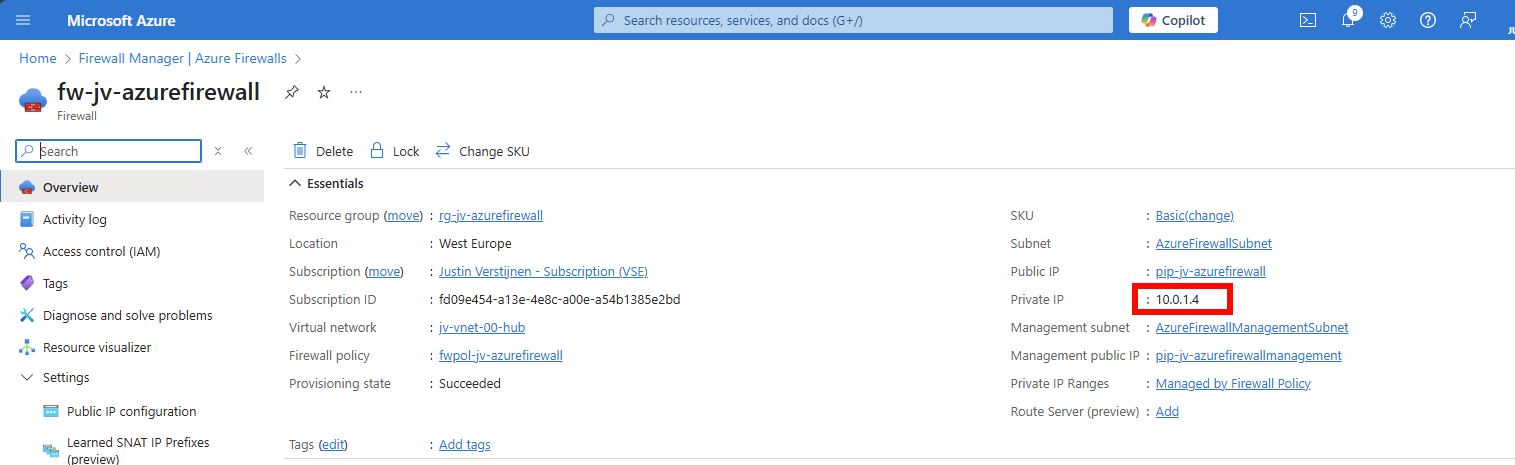
We have to tell all of our Spoke networks which gateway they can use to talk to the outside world. This is done by creating a route table, then a route and specifying the Azure Firewall instance.
Go to “Route Tables” and create a new route table. Give it a name and place it in the same region as your networks:
After this is done, we kan open the Route table and add a route in the Routes section:
Configure the route:
Create the route. Now go to the “Subnets” section, because after creating the route, we must speficy which networks will use it.
In “Subnets”, click on “+ Associate” and select your spoke networks only. After selecting, this should look like this:
Now outbound traffic of any resource in those spoke networks is routed through the firewall and we can start applying our own rules to it.
We can now start with creating the network rules to start and allow traffic. Azure Firewall embraces a Zero Trust mechanism, so every type of traffic is dropped/blocked by default.
This means we have to allow traffic between networks. Traffic in the same subnet/network however does not travel through the firewall and is allowed by default.
Go to your Firewall policy and go to “Rule Collections”. All rules you create in Azure Firewall are placed in Rule collections which are basically groups of rules. Create a new Rule collection:
I create a network rule collection for all of my networks to allow outbound traffic. We can also put the rules of inter-network here, these are basically outbound in their own context.
The action of the rules is defined in the collection too, so you must create different collections for allowing and blocking traffic.
I also put the priority of this collection group on 65000, which means it is being processed as final. If we create rules with a number closer to 100, that is processed first.
Now that we have our Network rule collection in place, we can create our rules to allow traffic between networks. The best way is to make rules per VNET, but you can specify the whole address space if you want. I stick with the recommend way.
Go to the Firewall Policy and then to “Network rules” and select your created network rule collection.
Create a rule to allow your created VNET01 outbound access to the internet.
| Name | Of your choice |
| Source type | 10.1.0.0/16 |
| Protocol | Any |
| Destination ports | * (all ports) |
| Destination type | IP Address |
| Destination | * (all IP addresses) |
Such rule looks like this:
I created the rules for every spoke network (VNET01 to VNET03). Keep in mind you have to change the source to the address space of every network.
Save the rule to make it effective.
Now we can create a network rule to block the Perimeter network to access our internal network, which we specified in our architecture. We must create a rule collection for block-rules first:
Go to Rule collections and create a new rule collection:
The most important are the priority and the action, where the priority must be closer to 100 to make it effective above the allow rules and the action to block the traffic.
Now create rules to block traffic from VNET03 to all of our spoke networks:
| Name | Of your choice |
| Source type | 10.3.0.0/16 |
| Protocol | Any |
| Destination ports | * (all ports) |
| Destination type | IP Address |
| Destination | 10.1.0.0/16 and 10.2.0.0/16 |
Create 2 rules to block traffic to VNET01 and VNET02:
Save the rule collection to make it effective.
For access from the outside network to for example RDP of servers, HTTPS or SQL we must create a DNAT rule collection for DNAT rules. By default all inbound traffic is blocked, so we must specify only the ports and source IP addresses we need to allow.
Go to the Firewall policy and then to “Rule collections”. Create a new rule collection and specify DNAT as type:
I chose a priority of 65000 because of broad rules. DNAT rules have the higest priority over network and application rules.
Create the rule collection.
Now we can create DNAT rules to allow traffic from the internet into our environment. Go to the just created DNAT rule collection and add some rules for RDP and HTTPS:
Part 2:
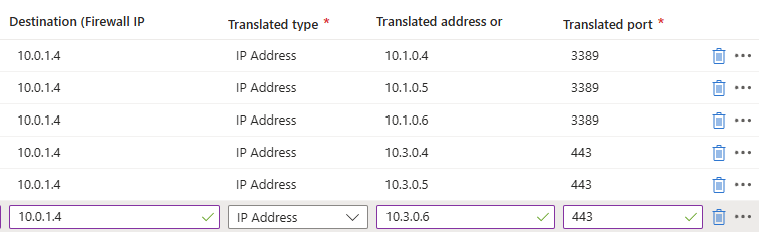
Here we have to specify which traffic from which source can access our internal servers. We can also do some translation here, with a different port number for internal and external networks. I used a 3389-1, 3389-2 and 3389-3 numbering here for the example but for real world scenario’s I advice a more scalable numbering.
So if clients want to RDP to Server01 with internal IP address 10.1.0.4, they connect to:
For DNAT rules, you need Standard or Premium SKU of Azure Firewall.
WIth application rules, you can allow or block traffic based on FQDNs and web categories. If using application rules to allow or block traffic, you must ensure there is no network rule in place, because that takes presedence over application rules.
To block a certain website for example create a new Rule collection for Application and specify the action “Deny”.
Save the collection and advance to the rules.
Now we can create some application rules to block certain websites:
For example I created 2 rules which block access from the workstations to apple.com and vmware.com. Make sure when using application rules, there has to be another rule in place to allow traffic with a higher priority number (closer to 65000)
Azure Firewall is a great solution for securing and segmenting our cloud network. It can defend your internal and external facing servers against attacks and has some advanced features with the premium SKU.
In my opinion, it is better than managing a 3rd party firewall in a seperate pane of glass, but the configuration is very slow. Every addition of a rule or collection takes around 3 or 4 minutes to apply. The good thing about this is that they are instantly applied after being saved.
I hope this guide was helpful and thank you for reading.
These sources helped me by writing and research for this post;
You have reached the end of the page. You can navigate through other blog posts as well, share this post on X, LinkedIn and Reddit or return to the blog posts collection page. Thank you for visiting this post.
If you think something is wrong with this post or you want to know more, you can send me a message to one of my social profiles at: https://justinverstijnen.nl/about/
If you find this page and blog very useful and you want to leave a donation, you can use the button below to buy me a beer. Hosting and maintaining a website takes a lot of time and money. Thank you in advance and cheers :)
The terms and conditions apply to this post.
Azure Firewall is a cloud-native Firewall which can be implemented in your Azure network. It acts as a Layer 3, 4 and 7 Firewall and so has more administrative options than for example NSGs.
Azure Firewall is an cloud based firewall to secure and your cloud networking environment. It acts as point of access, a sort of castledoor, and can allow or block certain traffic from the internet to your environment and from environment to the internet. The firewall can mostly work on layers 3, 4 and 7 of the OSI model.
Some basic tasks Azure Firewall can do for us:
An overview of how this looks:
In this diagram, we have one Azure Firewall instance with an policy assigned, and we have 3 Azure virtual networks. These have each their own purpose. With Azure Firewall, all traffic of your machines and networks is going through the Firewall so we can define some policies there to restrict traffic.
To route your virtual network outbound traffic through Azure Firewall, a Route table must be created and assigned to your subnets.
To not be 100% like Microsoft who are very often like: “Buy our stuff” and then be suprised about the pricing, I want to be clear about the pricing of this service. For the West Europe region, you pay at the moment of writing:
This is purely the firewall, and no calculated data. This isn’t that expensive, for the premium instance you pay around 20 dollars per Terabyte (1000GB).
Let’s deep further into the service itself. Azure Firewalls knows 3 types of rules you can create:
| Type | Goal | Example |
| DNAT Rule | Allowing traffic from the internet | Port forwarding Make your internal server available for the internet |
| Network Rule | Allowing/Disallowing traffic between whole networks/subnets | Block outbound traffic for one subnet DMZ configuration |
| Application Rule | Allowing/Disallowing traffic to certain FQDNs or web categories | Blocking a website Only allow certain websites/FQDN |
Like standard firewalls, Azure Firewall has a processing order of processing those rules which you have to keep in mind when designing and configuring the different rules:
The golden rule of Azure Firewall is: the first rule that matches, is being used.
This means that if you create a network rule that allows your complete Azure network outbound traffic to the internet but you want to block something with application rules, that this is not possible. This because there is a broad rule that already allowed the traffic and so the other rules aren’t processed.
Azure Firewall works with “Rule Collections”. This is a set of rules which can be applied to the firewall instances. Rule Collections are then categorized into Rule Collection Groups which are the default groups:
How this translates into the different aspects is shown by the diagram below:
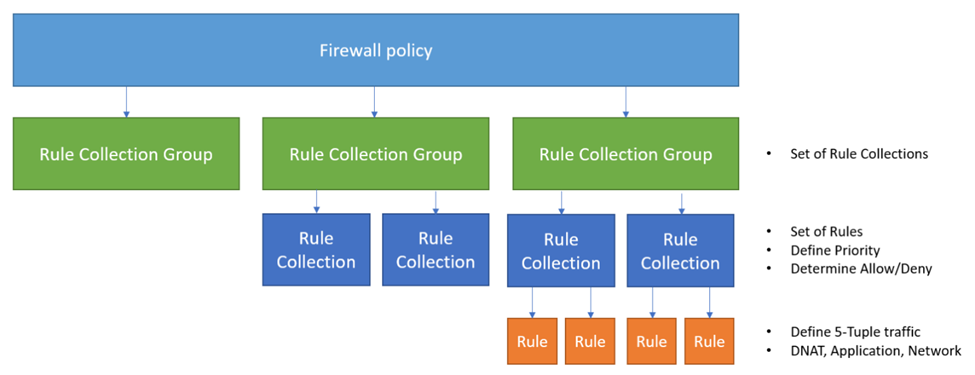
Azure Firewall works with Firewall Policies. A policy is the set with rules that your firewall must use to filter traffic and can be re-used over multiple Azure Firewall instances. You can only assign one policy per Firewall instance. This is by design of course.
When using the more expensive Premium SKU of Azure Firewall, we have the 3 extra options below available to use.
TLS inspection allows the firewall to decrypt, inspect, and then re-encrypt HTTPS (TLS) traffic passing through it. The key point of this inspection task is to inspect the traffic and block threats, even when the traffic is normally encrypted.
How it works in simplified steps:
This requires you to setup an Public Key Infrastructure and is not used very often.
IDPS stands for Intrusion Detection and Preventing System and is mostly used to defend against security threats. It uses a signature-based database of well-known threats and can so very fast determine if specific packets must be blocked.
It very much does:
Threat Intelligence is an option in the Azure Firewall Premium SKU and block and alerts traffic from or to malicious IP addresses and domains. This list of known malicious IP addresses, FQDNs and domains are sourced by Microsoft themselves.
It is basically an option you can enable or disable. You can use it for testing with the “Alert only” option.
You can configure Source Network Address Translation (SNAT) in Azure Firewall. This means that your internal IP address is translated to your outbound IP address. A remote server in another country can do nothing with your internal IP addresses, so it has to be translated.
To clarify this process:
Your workstation in Azure has private IP 10.1.0.5, and when communicating to another server on the internet this address has to be translated. This is because 10.1.0.5 is in the private IP addresses range of RFC1918. Azure Firewall automatically translates this into his public IP addresses so the remote host only sees the assigned public IP address, in this case the fictional 172.172.172.172 address.
Your home router from your provider does the same thing. Translating internal IP addresses to External IP addresses.
Azure Firewall is a great cloud-native firewalling solution if your network needs one. It works without an extra, completely different interface like a 3rd party firewall.
In my honest opinion, I like the Firewall solution but for what it is capable of but is very expensive. You must have a moderate to big network in Azure to make it profitable and not be more expensive than your VMs and VPN gateway alone.
Thank you for reading this guide. Next week we will do a deep dive into the Azure Firewall deployment, configuration and setup in Azure.
You have reached the end of the page. You can navigate through other blog posts as well, share this post on X, LinkedIn and Reddit or return to the blog posts collection page. Thank you for visiting this post.
If you think something is wrong with this post or you want to know more, you can send me a message to one of my social profiles at: https://justinverstijnen.nl/about/
If you find this page and blog very useful and you want to leave a donation, you can use the button below to buy me a beer. Hosting and maintaining a website takes a lot of time and money. Thank you in advance and cheers :)
The terms and conditions apply to this post.
Starting on 30 September 2025, default outbound connectivity for Azure VMs will be retired. This means that after this date you have to configure a way for virtual machines to actually have connection to the internet. Otherwise, you will get an VM that runs but is only available through your internal network.
In this post I will do a deep dive into this new developement and explain what is needed and what this means for your existing environment and how to transition to the new situation after this 30 September 2025 date.
This requirement means that every virtual machine in Azure created after 30 September 2025 needs to have an outbound connectivity method configured. You can see this as a “bring your own connection”.
If you do not configure one of these methods, you will end up with a virtual machine that is not reachable from the internet. It can be reached from other servers (Jump servers) on the internal network or by using Azure Bastion.
The options in Azure we can use to facilitate outbound access are:
| Type | Pricing | When to use? |
| Public IP address | 4$ per VM per month | Single VMs |
| Load Balancer | 25$ - 75$ per network per month | Multiple different VMs (customizable SNAT) |
| NAT Gateway | 25$ - 40$ per subnet per month | Multiple similar VMs (default SNAT) |
| Azure Firewall | 800$ - 1300$ per network per month | To create complete cloud network with multiple servers |
| Other 3rd party Firewall/NVA | Depends on solution | To create complete cloud network with multiple servers |
Load balancer, NAT Gateway, Azure Firewall and 3rd party firewall (NVA) also need a Public IP address.
To further explain what is going on with these types:
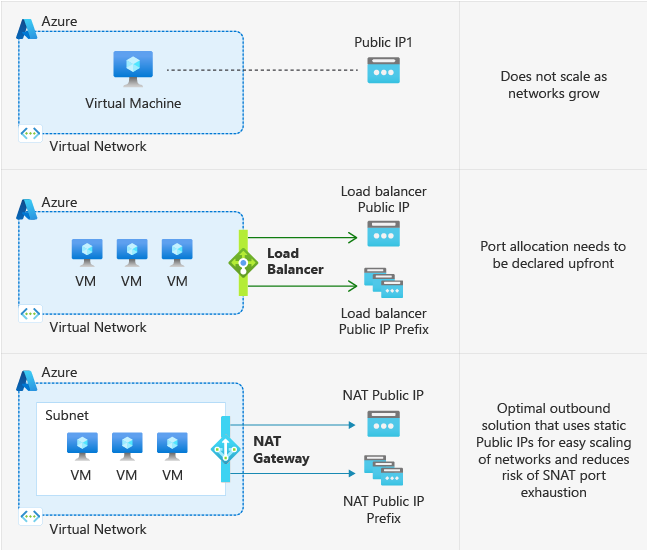
These are the Azure native solutions to achieve defualt outbound access with the details on the right.
This change means that Microsoft actually mark all subnets as “Private Subnet”, which you can already configure today:

There are some different reasons why Microsoft would choose to change this. It’s primary reason is to embrace the Zero Trust model, and so “secure-by-default”. Let’s find out all reasons:
Existing VMs will not be impacted by this change.
Only when deploying a new VM after the migration date: 30 September 2025, the VM will not have outbound internet access and one of the methods must be configured.
I thnk this is a great change of Microsoft to change this behaviour. Yes, your environment will cost more, but the added security and easier manageability will really make up for it.
I hope I informed you about this change and thank you for reading.
You have reached the end of the page. You can navigate through other blog posts as well, share this post on X, LinkedIn and Reddit or return to the blog posts collection page. Thank you for visiting this post.
If you think something is wrong with this post or you want to know more, you can send me a message to one of my social profiles at: https://justinverstijnen.nl/about/
If you find this page and blog very useful and you want to leave a donation, you can use the button below to buy me a beer. Hosting and maintaining a website takes a lot of time and money. Thank you in advance and cheers :)
The terms and conditions apply to this post.
This page shows what Microsoft Azure certifications are available for Developer-minded people. I intend to focus as much on the developers as possible, although this is not my primary subject. I did some research and i didn’t find it very clear what to do, where to start etcetera.
Microsoft has an monthly updating certification poster available to have an overview for each solution category and the certifications of that category. You can find the poster here:
Certifications in the Microsoft world consist of 4 categories/levels:
Microsoft wants you to always have lower certifications before going up the stairs. It wants you if you take an expert certification, you also have the knowledge of the fundamentals and intermediate certification levels. Some expert certifications even have hard pre-requisites.
There are multiple certifications for Azure available that can be interesting for developers (at the time of writing):
For specific solutions like Power Platform and Dynamics, there are different certifications available as well but not included in this page.
Microsoft has given codes to the exams, they are called AZ-900 or AI-900 and such. By passing the exam you will be rewarded with the certification.
No further clarify the paths you can take as developer, I have created a topology to describe the multiple paths you can take:
I have seperated the list of Developer-interesting certifications into the layers, and created the 4 different paths to take at the top. Some certifications are interesting for multiple paths and having more knowledge is always better.
Some certifications also have overlap. Some knowledge of the AZ-104 and AZ-204 are the same. In AZ-305 and AZ-400, the information also can be similar but are focussed on getting you to the level of the job title, without having to follow multiple paths.
I hope I helped you to clarify and decide what certification to take as developer with interest in Azure. Thank you for reading this guide.
You have reached the end of the page. You can navigate through other blog posts as well, share this post on X, LinkedIn and Reddit or return to the blog posts collection page. Thank you for visiting this post.
If you think something is wrong with this post or you want to know more, you can send me a message to one of my social profiles at: https://justinverstijnen.nl/about/
If you find this page and blog very useful and you want to leave a donation, you can use the button below to buy me a beer. Hosting and maintaining a website takes a lot of time and money. Thank you in advance and cheers :)
The terms and conditions apply to this post.
Microsoft Azure has a service called the ‘Static Web Apps" (SWA) which are simple but yet effective webpages. They can host HTML pages with included CSS and can link with Azure Functions for doing more advanced tasks for you. In this guide we will explore the possibilities of Static Web Apps in Azure.
Before we dive into Static Web Apps and Github, I want to give a clear explaination of both the components that will help us achieving our goal, hosting a simple web app on Azure.
In Azure we create a Static Web App, which can be seen as your webserver. However, Azure does not provide an easy way to paste your HTML code in the server. That is where we use Github for. This process looks like this:
Everytime we commit/change our code in Github, the repository will automatically start a Workflow task which is created automatically. This takes around a minute depending of the size of your repository. It will then upload the code into the Static Web App and uses a deployment token/secret for it. After this is done, the updated page will be available in your Static Web App.
In this guide, we will create a simple and funny page, called https://beer.justinverstijnen.nl which points to our Static Web App and then shows a GIF of beer. Very simple demonstration of the possibilities of the Azure service. This guide is purely for the demonstration of the service and the process, and after it runs perfectly, you are free to use your own code.
If you haven’t created your Github account, do this now. Go to https://github.com and sign up. This is really straight forward.
After creating and validating your account, create a new repository:
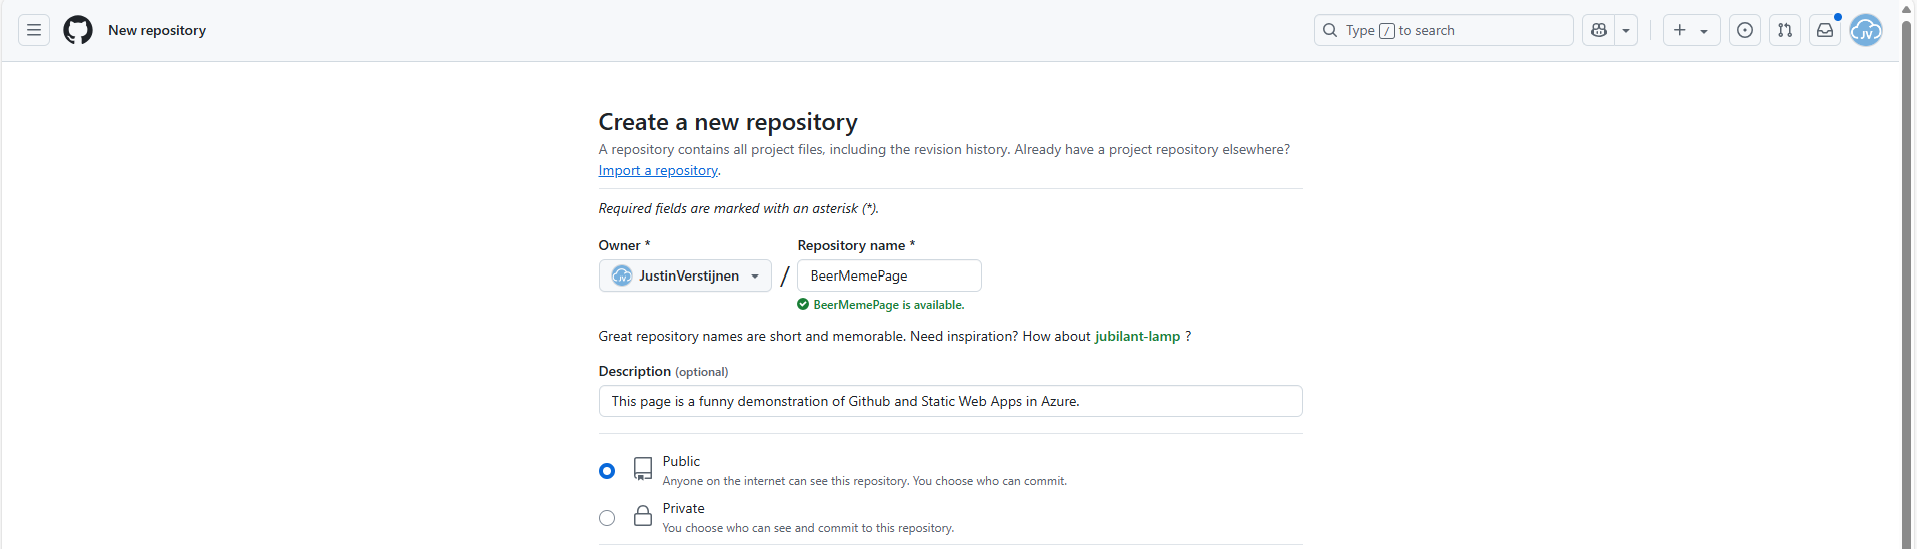
Give it a name, description and detemine if you want it to be public or private.
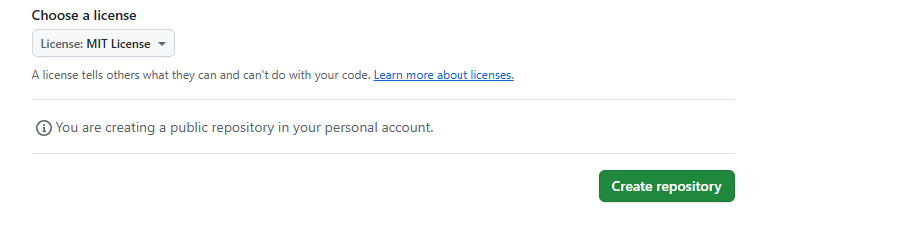
After that you have the option of choosing a license. I assigned the MIT license, which basically tells users that they are free to use my code. It isn’t that spectacular :)
Click on “Create repository” to create the repository and we are done with this step.
Now we have our repository ready, we can upload the already finished files from the project page: https://github.com/JustinVerstijnen/BeerMemePage
Click on “Code”.
Click on “Download ZIP”.
This downloads my complete project which contains all needed files to build the page in your own repository.
Unzip the file and then go to your own repository to upload the files.
Click on “Add file” and then on “Upload files”.
Select these files only;
The other 2 files will be generated by Github and Azure for your project.
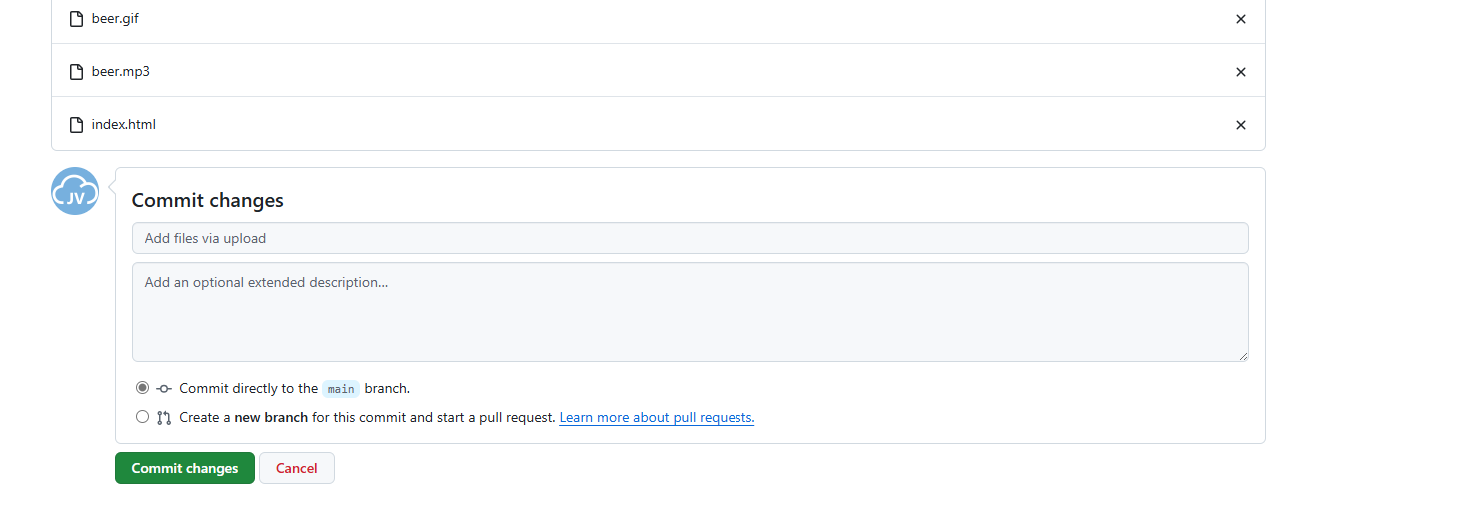
Commit (save) the changes to the repository.
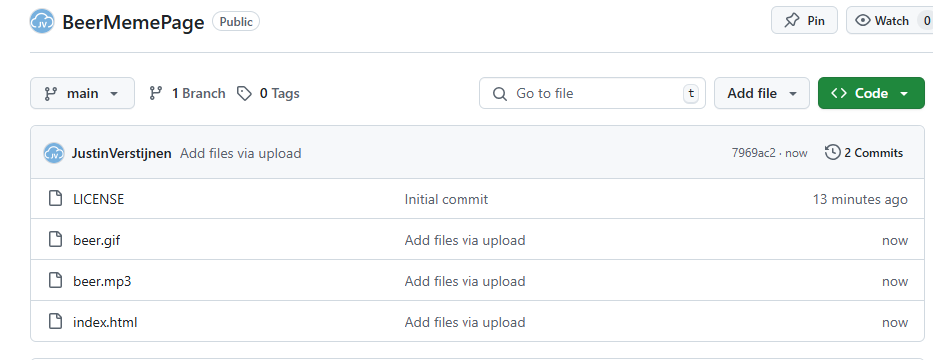
Now our repository is ready to deploy.
Now we can head to Azure, and create a new resource group for our Beer meme page project:
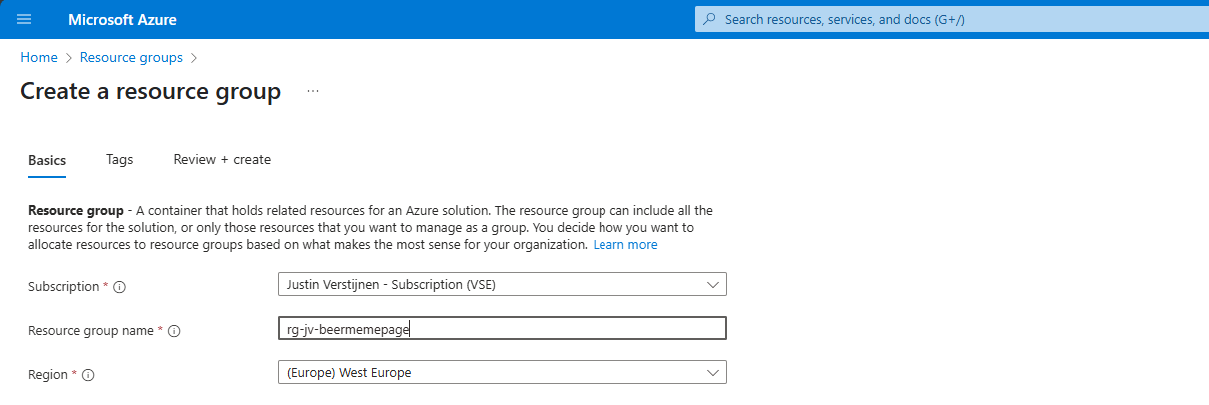
Finish the wizard and then head to “Static Web Apps”.
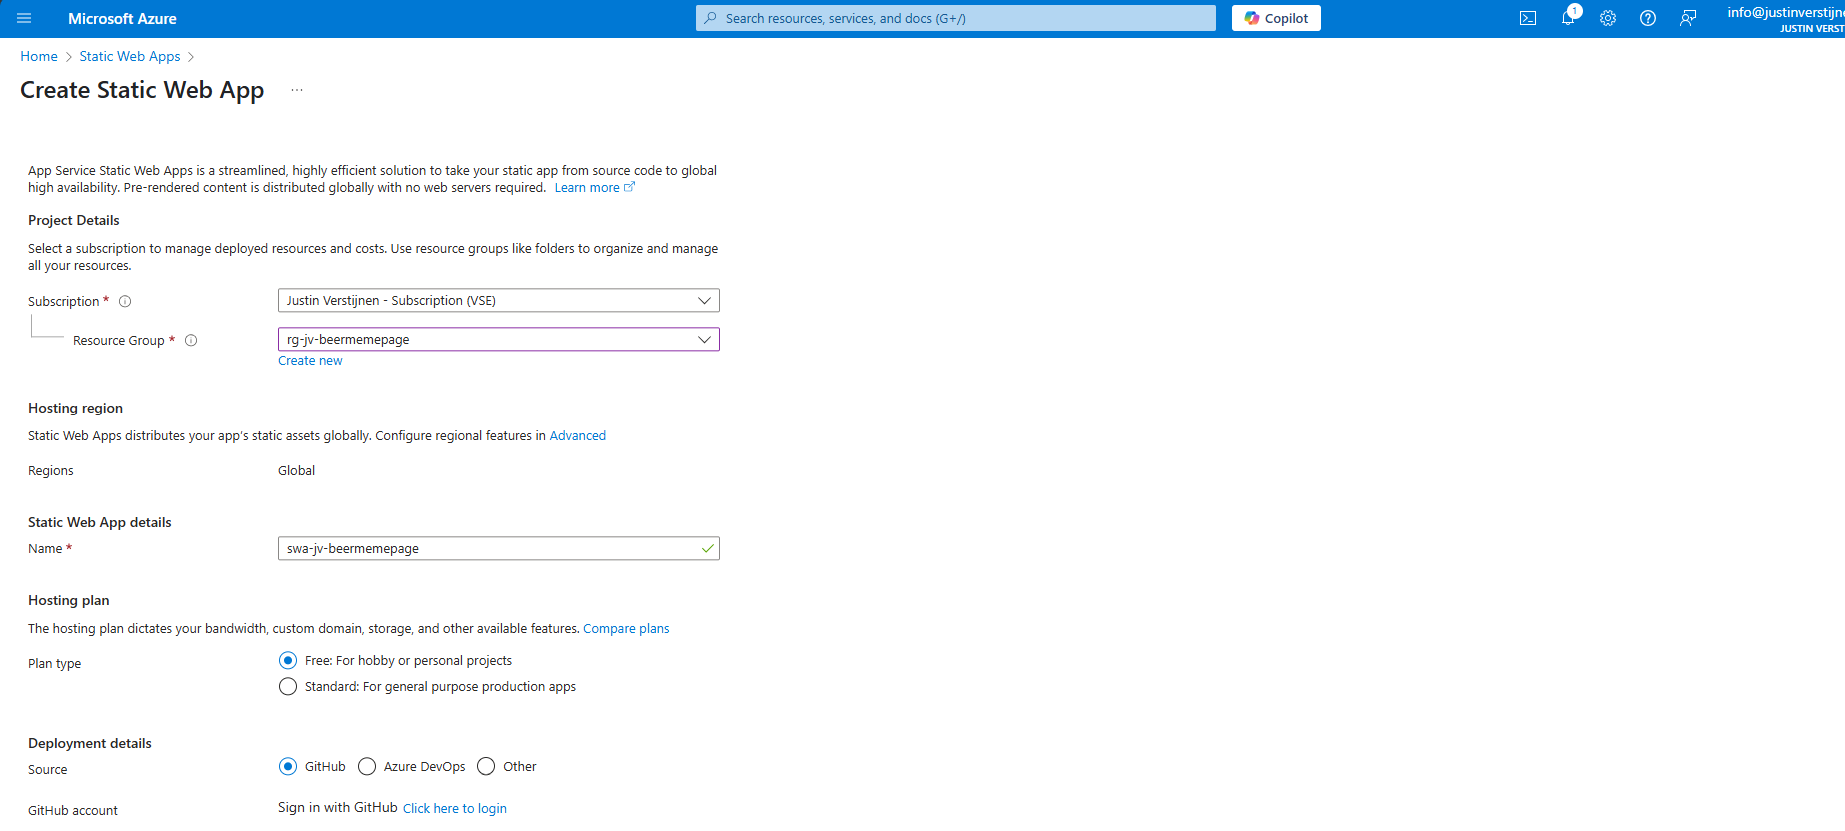
Place the web app into your freshly created resource group and give it a name.
Then I selected the “Free” plan, because for this guide I dont need the additional options.
For Deployment details, select GitHub, which is the default option. Click on “Click here to login” to link your Github account to your Azure account.
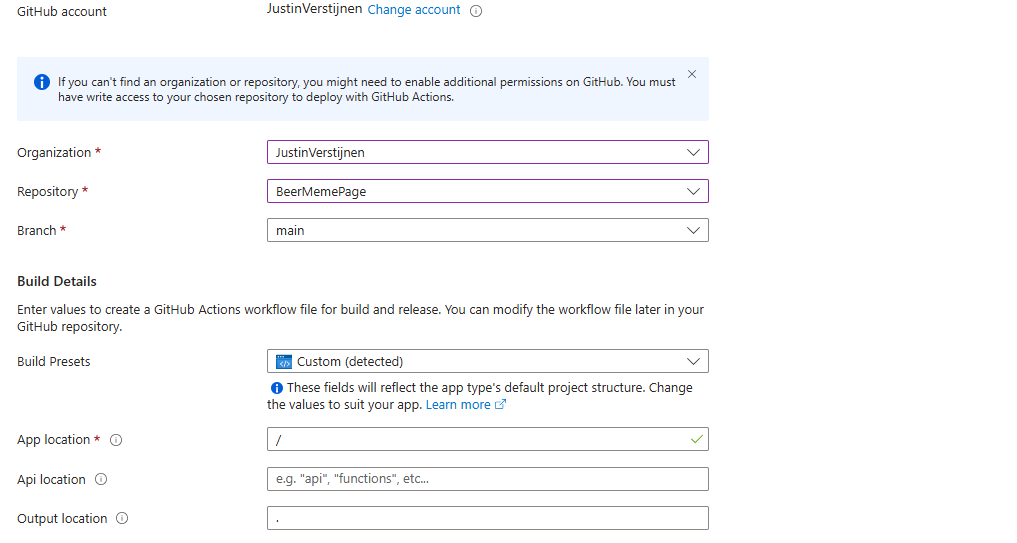
Select the right Organization and Repository. The other fields will be filled in automatically and can be left as they are.
You can advance to create the web app. There is nothing more that we need to configure for this page. Finish the creation of the Static Web App and wait for a few minutes for Azure and Github completing the actions and uploading your website assets to Azure. This takes around 3 minutes.
After the SWA deployment in Azure is done and having patience for a few minutes, we can test our website. Go to the created resource and click on “Visit your site”:
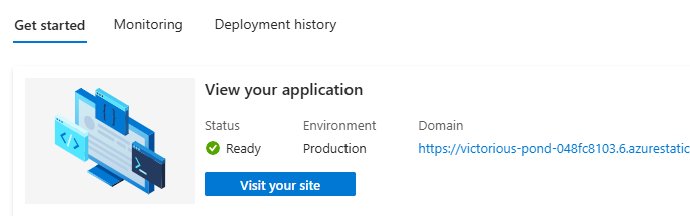
This brings up our page:

Click anywhere on the gif to let the audio play. Autoplay on visit only is not possible due to browser SPAM restrictions.
After deployment we can see in Github that a .github folder is created:
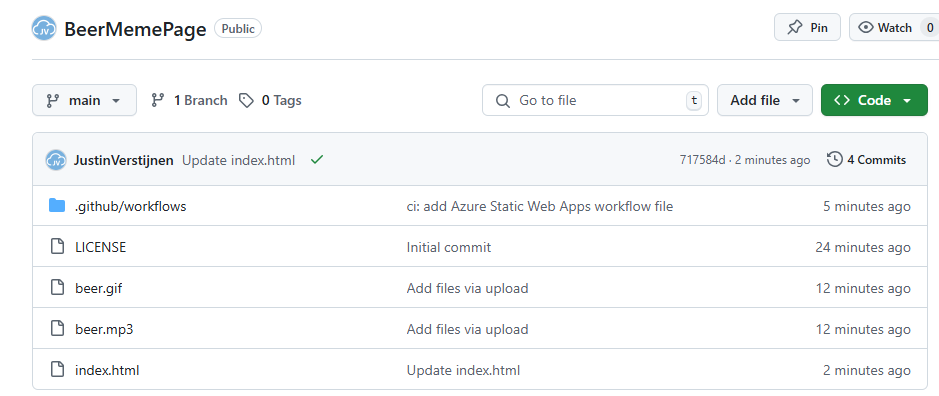
This contains a file that deploys the files into the Azure Static Web App (SWA) automatically after commiting anything. You can view the statis in the grey bar above the files. A green check means that everything is succesfully deployed to Azure.
Now that we are done with the deployment, we still have to create our cool beer.justinverstijnen.nl domain name that redirects to the static web app. We don’t want to fill in the complete Azure page when showing it to our friends, right?
In Azure, go to the Static web app and open the options menu “custom domains”
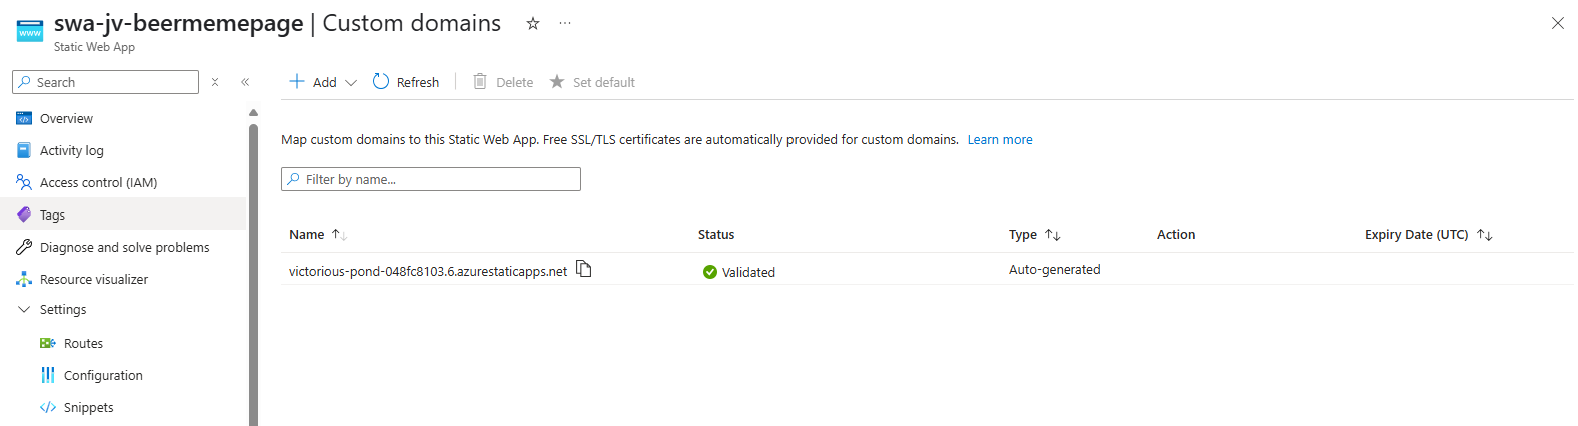
Click on “Add” to add your domain name.
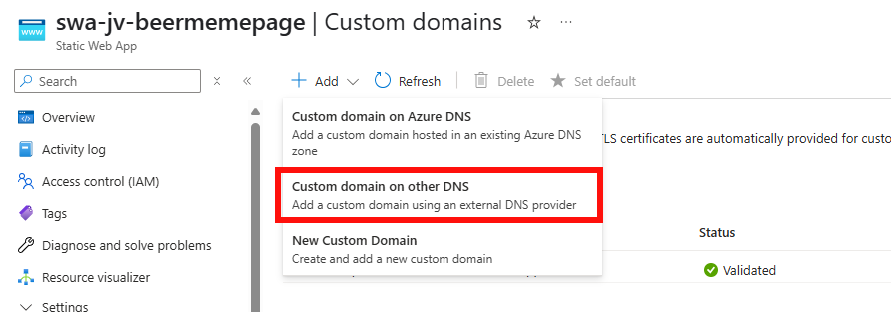
Then select “Custom domain on other DNS” if you use a external DNS provider.
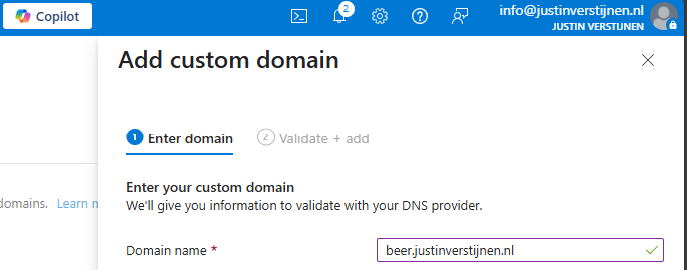
Fill in your desired domain name, and we have to validate now that we actually own this domain.
My advice is to use the CNAME option, as this is the way we forward to the static web app afterwards. This enables us to validate and redirect with one record only (instead of a verification TXT and a CNAME)
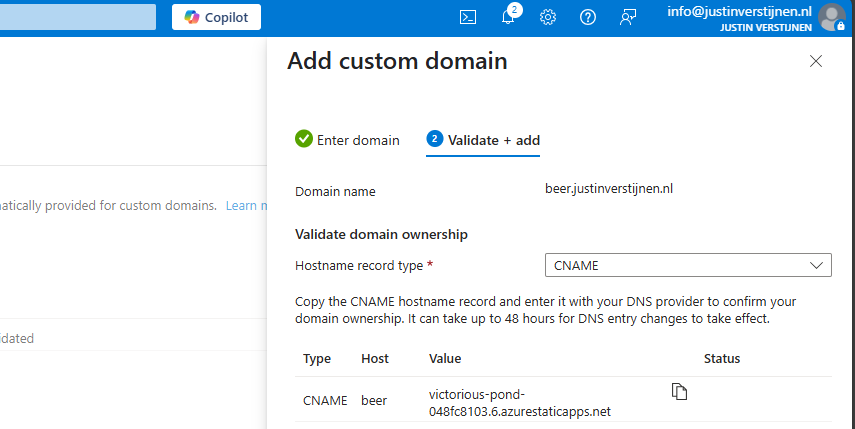
Create a CNAME record on your DNS hosting called “beer” with the value.

End the value of the CNAME record with a “.” dot because it is an external domain.
If you use a higher level domain, like justinverstijnen.nl, your DNS host may require you to create a ALIAS record instead of a CNAME record.
Save the record, wait for 2 minutes and click “Validate” in Azure to validate your CNAME record. This process is mostly done within 5 minutes, but it can take up to 48 hours.
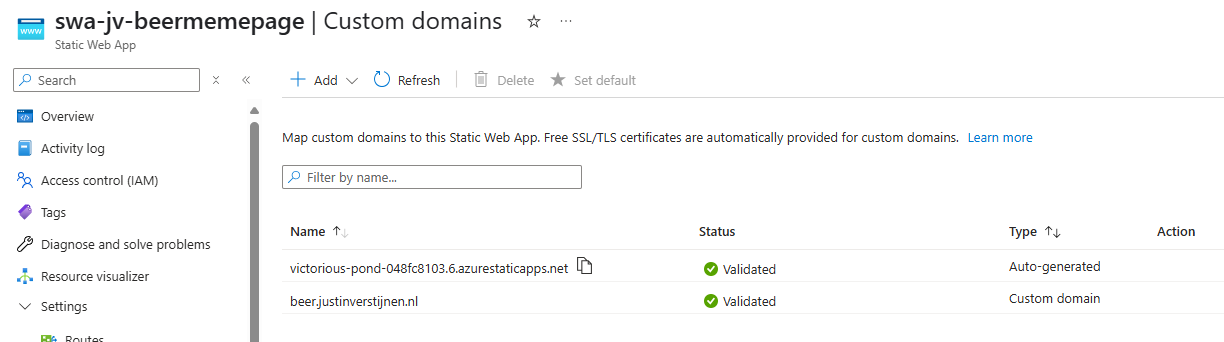
The custom domain is added. Let’s test this:
Great, it works perfectly. Cheers :)
The most great thing is that everything is handled by Azure; from deployment -> to SSL certificate so the customer deploys such sites without any major problems.
Azure Static Web Apps are a great way of hosting your simple webpages. They can be used for a variety of things. Management of the SWA instance is done in Azure, management of the code through Github.
Thank you for reading this guide and I hope it was helpful.
You have reached the end of the page. You can navigate through other blog posts as well, share this post on X, LinkedIn and Reddit or return to the blog posts collection page. Thank you for visiting this post.
If you think something is wrong with this post or you want to know more, you can send me a message to one of my social profiles at: https://justinverstijnen.nl/about/
If you find this page and blog very useful and you want to leave a donation, you can use the button below to buy me a beer. Hosting and maintaining a website takes a lot of time and money. Thank you in advance and cheers :)
The terms and conditions apply to this post.
Azure Workbooks are an excellent way to monitor your application and dependencies in a nice and customizable dashboard. Workbooks can contain technical information from multiple sources, like:
They’re highly flexible and can be used for anything from a simple performance report to a full-on investigative analysis tool. A workbook can look like this:
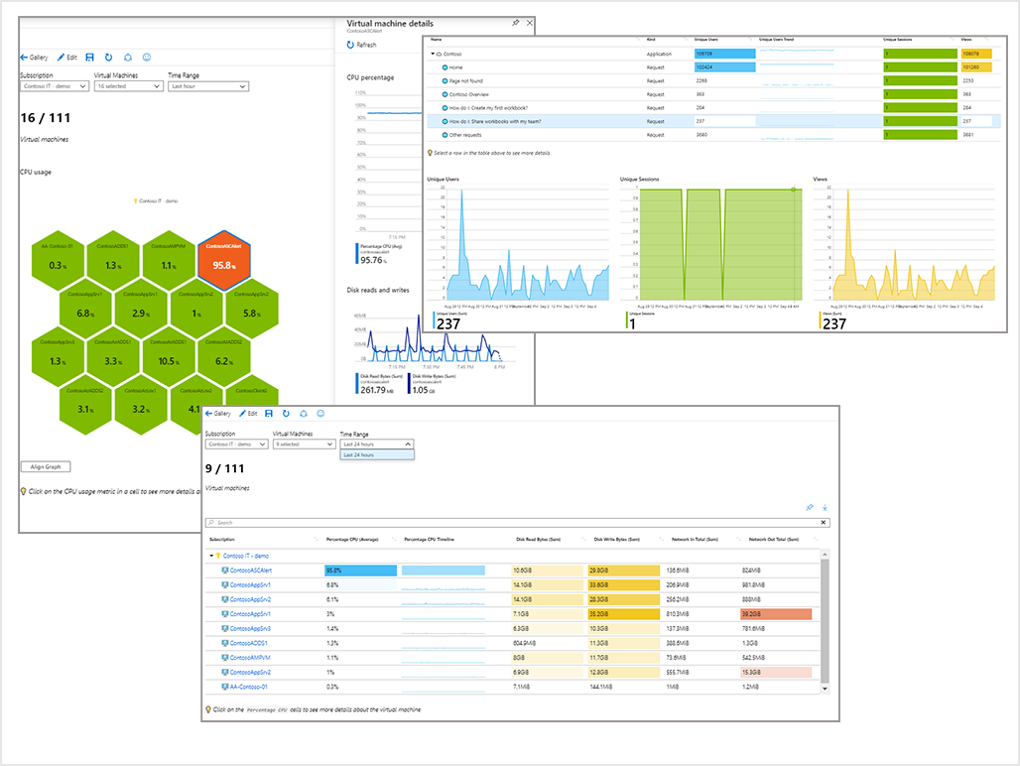
In Azure we can use the default workbooks in multiple resources that contain basic information about a resource and it’s performance. You can find those under the resource itself.
Go to the virtual machine, then to “Workbooks” and then “Overview” (or one of the others):
This is a very basic workbook that can be useful, but we want to see more.
To start off creating your own Workbooks, you can use this Github page for excellent templates/examples of how Workbooks can be:
This repository contains hunderds of workbooks that are ready to use. We can also use parts of those workbooks for our own, customized, workbook that monitors a whole application.
Here we can download and view some workbooks that are related to the Virtual Machines service.
In Azure itself, there is a “templates” page too but it contains far less templates than the above Github page. For me the Github page was far more useful.
Let’s say, we want to use some of the workbooks found on the Github page above or elsewhere. We have to import this into our environment so it can monitor resources in our environment.
In Azure, go to “Workbooks” and create a new Workbook.
We start with a completely empty workbook. In the menu bar, you have an option, the “Advanced editor”. Click on that to open the code view:

Now we see the code of an empty Workbook:
On the Github page, I found the Virtual Machine At Scale workbook which I want to deploy into my environment. On the Github page we can view the code and copy all of it.
We can paste this code into the Azure Workbook editor and then click on “Apply”.
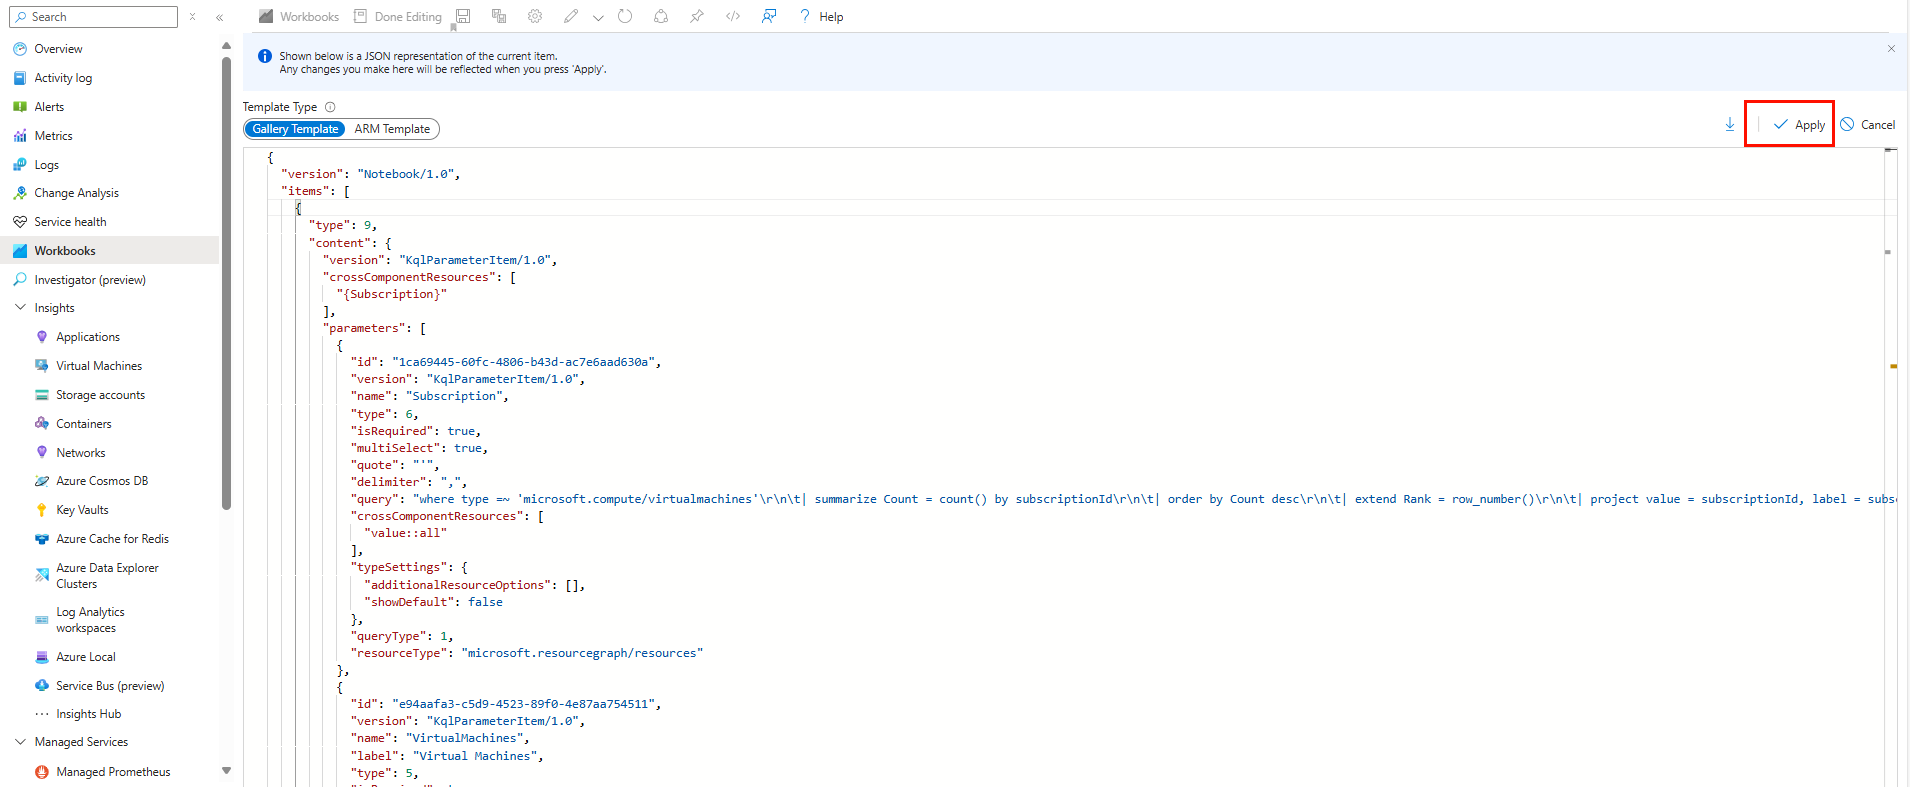
We now have a pre-defined Azure Workbook in our environment, which is basic but does the job:
We now want to create some of our own queries to monitor one or multiple VMs, which is the basic reason you may want to have a workbook for.
In a new workbook we can add multiple different things:
The most important types are:
Let’s start by adding a visualization for our CPU usage. Click on “New” and then on “Add metric”
Now we have to define everything for our virtual machine. Start by selecting the “Virtual Machines” resource type:
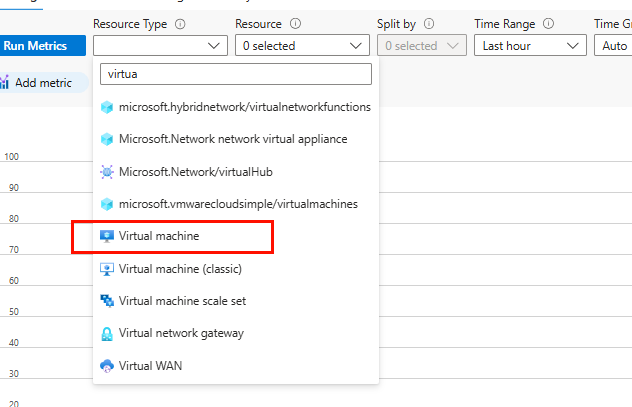
Then select the resource scope and then the virtual machine itself: (You can select multiple VMs here)
Now that we selected the scope, we can configure a metric itself. Click on “Add metric” and select the “Metric” drop-down menu. Select the “Percentage CPU” metric here.
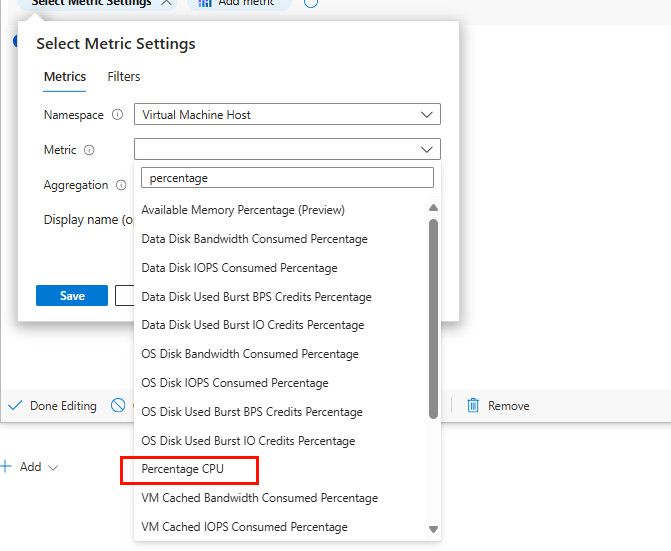
Then click on Save and then “Run metrics” to view your information.
No worries, we will polish up the visualizations later.
Save the metric.
We can add a metric for our RAM usage in mostly the same manner. Click on “Add” and the “Add metric”
Then perform the same steps to select your virtual machines and subscription.
Now add a metric named “Available Memory Percentage”
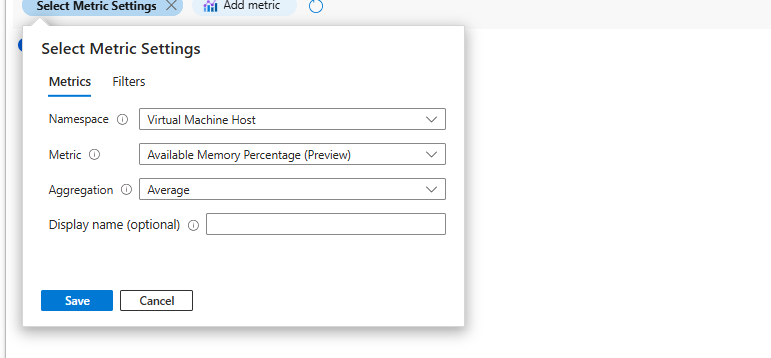
Now click on “Run metrics”
We have now a metric for the memory usage too.
Save the metric.
Now we can add a disk metric also, but the disk metrics are seperated into 4 categories (per disk):
This means we have to select all those 4 metrics in order to fully monitor our disk usage.
Add a new metric as we did before and select the virtual machine.
Click on “Add metric” and select “Disk Read Bytes” and click on “Save”
Then click on “Add metric” and select “Disk Read Operations/sec” and click on “Save”
After that click on “Add metric” and select “Disk Write Bytes” and click on “Save”
Finally click on “Add metric” and select “Disk Write Operations/sec” and click on “Save”
Select “Average” on all those metric settings for the best view.
Your metric should look like this:
Save the metric.
Now that we have 3 queries ready we can save our workbook. Give it a name, and my advice is to save it to a dedicated monitoring resource group or to group the workbook together with the application. This way access control is defined to the resource too.
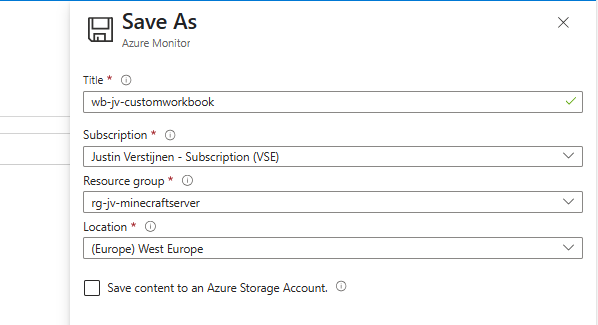
Now that we have some raw data, we can now visualise this the way we want. The workbook on my end looks like this:
We can now add some titles to our queries and visualisations to better understand the data we are looking at. Edit the query and open it’s Advanced settings.
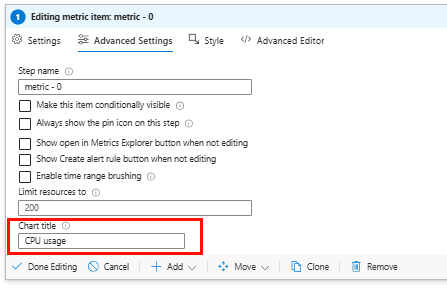
Here we can give it a title under the “Chart title” option. Then save the query by clicking on “Done Editing”.
Do this for all metrics you have made.
You can also change the tile order of the workbook. You can change the order of the queries with these buttons:
This changes the order of the tiles.
You can change the tile size in the query itself. Edit a query and go to the “Style” tab:
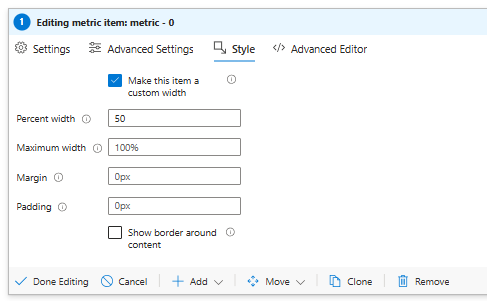
Select the option to make it a custom width, and change the Percent width option to 50. This allows 50 percent of the view pane available for this query.
Pick the second query and do the same. The queries are now next to each other:
Now we have the default “Line” graph but we want to make the information more eye-catching and to the point. We can do this with a bar chart.
Edit your query and set the visualization to “Bar chart”. We can also select a color pallette here:
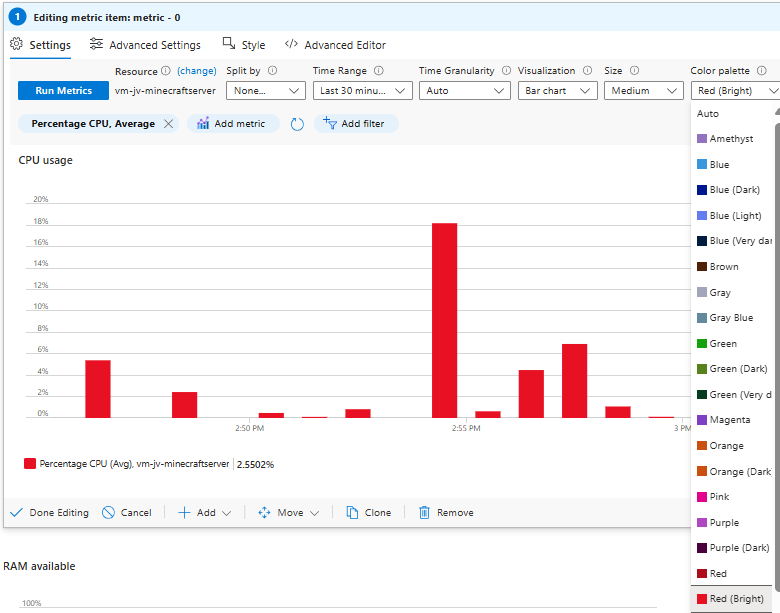
Now our workbook looks like this:
Much more clear and eye-catching isn’t it?
The grid visualization is much more functional and scalable but less visual and eye catching. I use this more in forensic research when there are issues on one or multiple machines to have much information in one view.
I have created a new tile with all the querys above in one tile and selected the “Grid” visualization:
Now you have a list of your virtual machines in one tile and on the right all the technical information. This works but looks very boring.
Grid visualizations allows for great customization and conditional formatting. We can do this by editing the tile and then click on “Column settings”.
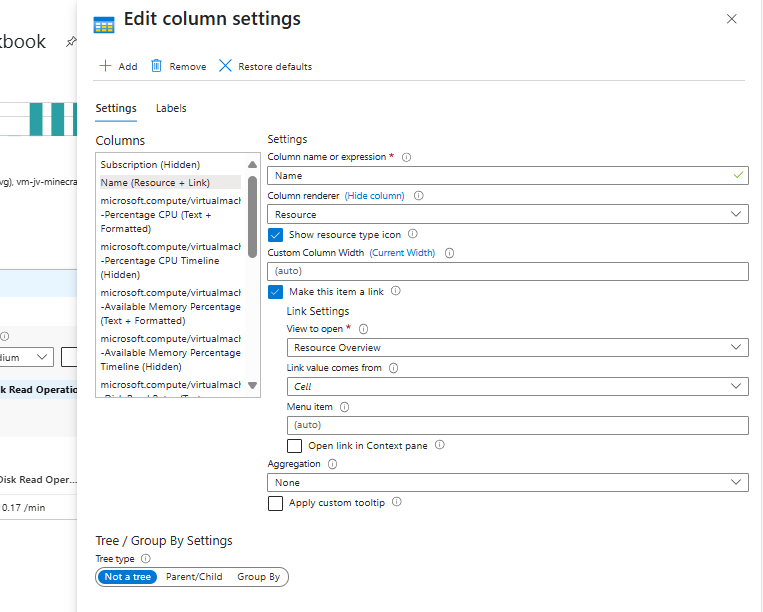
Now this are the settings of how the information of the Grid/table is displayed. First, go to the tab “Labels”.
Here we can give each column a custom name to make the grid/table more clear:
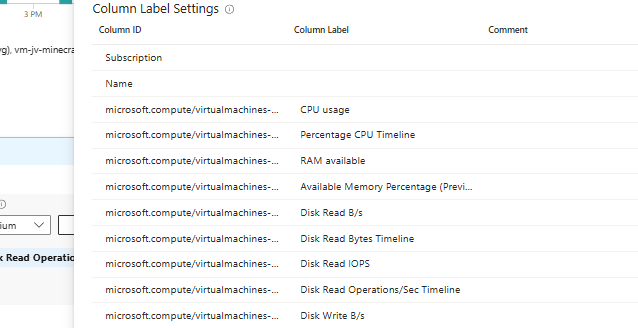
You can rename all names in the “Column Label” row to your own preferred value. Save and let’s take a look at the grid now:

This is a lot better.
Now we can use conditional formatting to further clarify the information in the grid. Again, edit the grid and go to “Column settings”.
For example, pick the “Percentage CPU”, this is the first metric of the virtual machines:
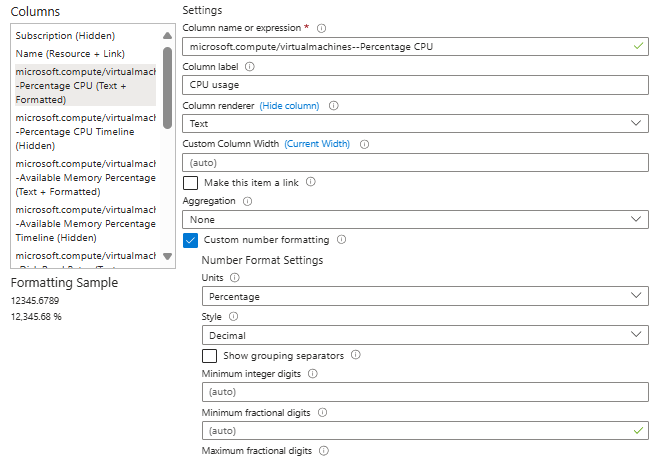
Change the “Column renderer” to “Heatmap”. Make the Color pallette “Green to Red” and put in a minimum value of 0 and a maximum value of 100.

This makes a scale for the tile to go fully green when 0 or close to zero and gradually go to red when going to 100% CPU usage.
Save the grid and let’s check:

The CPU block is now green, as the CPU usage is “just” 1,3%.
We can do the same for the RAM usage, but be aware that the RAM metric is available and not the usage like CPU. The metrics for the RAM usage has to be flipped. We can do this easily by using “Red to Green” instead of “Green to Red”:
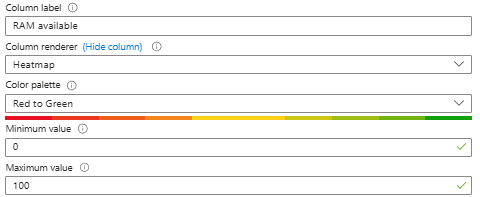
The grid now looks like this:
For the real perfectionists we can round the grid numbers. Now we see values like 1,326% and 89,259%. We want to see 1% and 89%.
Open the grid once again and open the “Column Settings”.
Go down under the “Number Format Settings” and fill in a maximum fractional digit of “0”.
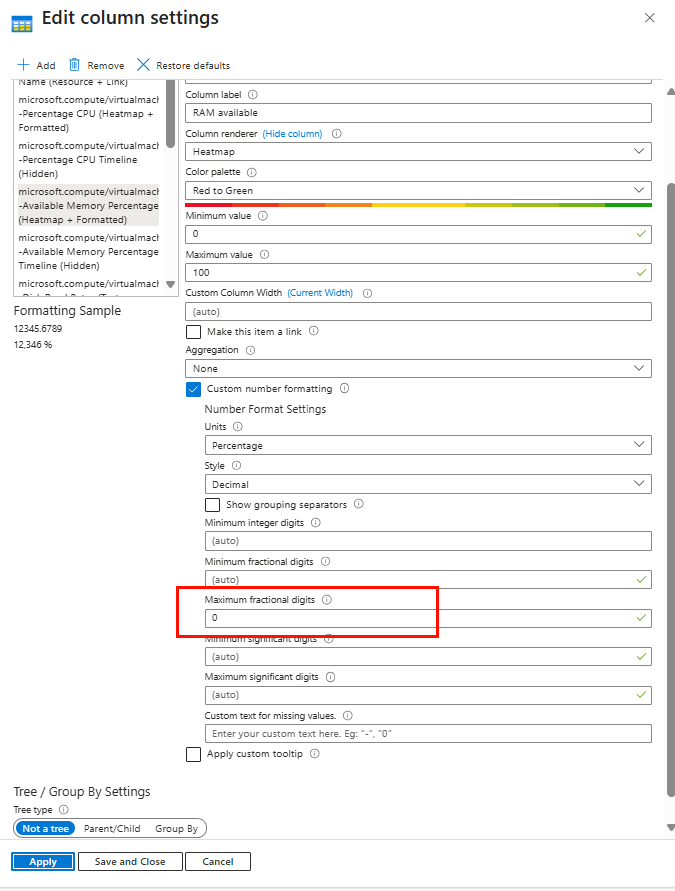
Do this for each column and save the tile.
Now the grid looks like this:
To further clarify what I have exactly done, I have published my Workbook of this guide on my Github page. You can download and use this for free.
Azure Workbooks are an excellent and advanced way to monitor and visualize what is happening in your Azure environment. They can be tough at the start but it will become more easy when time goes by. By following this guide you have a workbook that look similar to this:
Thank you for reading this guide and I hope it was helpful.
You have reached the end of the page. You can navigate through other blog posts as well, share this post on X, LinkedIn and Reddit or return to the blog posts collection page. Thank you for visiting this post.
If you think something is wrong with this post or you want to know more, you can send me a message to one of my social profiles at: https://justinverstijnen.nl/about/
If you find this page and blog very useful and you want to leave a donation, you can use the button below to buy me a beer. Hosting and maintaining a website takes a lot of time and money. Thank you in advance and cheers :)
The terms and conditions apply to this post.
Sometimes, we also want a step down from our work and want to fully enjoy a videogame. Especially when you really like games with open worlds, Minecraft is a great game. And what if I tell you we can setup a server for Minecraft on Azure so you can play it with your friends and have a 24/7 uptime this way.
For a typical Minecraft server, without Mods, the guidelines and system requirements are as stated below:
| Processor cores | Ram | Player Slots | World Size |
| 2 | 8GB | Up to 10 | Up to 8GB |
| 4 | 16GB | Up to 20 | Up to 15GB |
| 8 | 32GB | Up to 50 | Up to 20GB |
| 16 | 64GB | Up to 100 | Up to 60GB |
First, we need to setup our Azure environment for a Minecraft server. I started with creating a Resource group named “rg-jv-minecraftserver”.
This resource group can we use to put all of the related resources in. We not only need to create a VM but also an virtual network, Public IP address, Network Security Group and disk for storage.
After creating the Resource group, we can create the server and put it in the created Resource group.
For a single server-setup, we can use most of the default settings of the wizard. For an environment of multiple servers I advice you a more scalable approach.
Go to “Virtual Machines” and create a new virtual machine:
Put the server in the created resource group. I use the image Ubuntu Server 24.04 LTS - x64 Gen2 for this deployment. This is a “Long-Term Support” image, which are enterprise grade images with at least 5 years support.
For the specs, I used the size E4s_V6 which has 4vCPU’s and 32GB of RAM. Enough for 20 to 50 players and a big world so the game will not get bored.
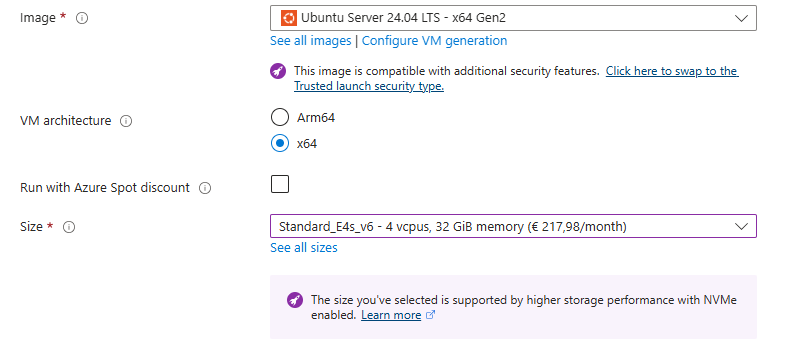
For the Authentication type, use an SSH key if you are familiar with that or use a password. I used the password option:
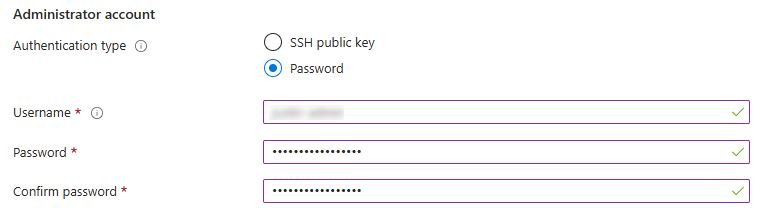
For the inbound ports, use the default option to let port 22 open. We will change this in a bit for more security.
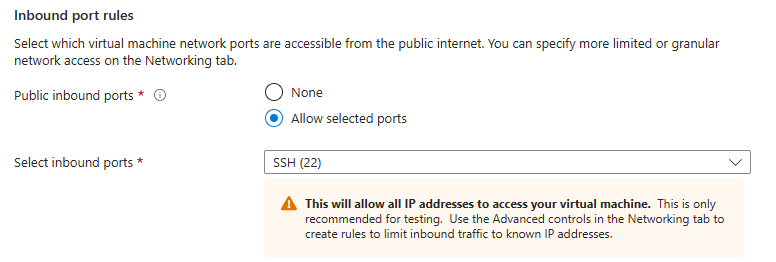
For the disk settings, let this as default:

I chose a deployment with an extra disk where the server itself is stored on. This way we have a server with 2 disks:
This has some advantages like seperate upgrading, more resilience and more performance as the Minecraft world disk is not in use by the OS.
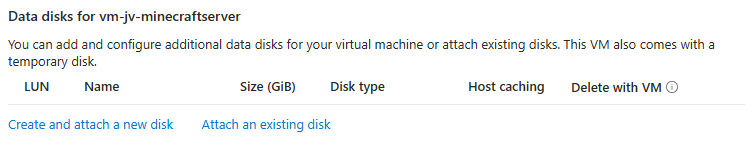
Select the option “Create and attach a new disk”. Then give the disk a name and select a proper size of your needs.
I chose 128GB as size and have the performance tier as default.
Click “OK” and review the settings:
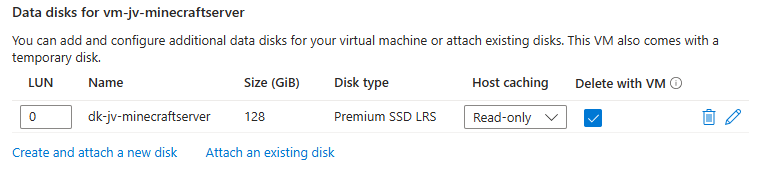
Advance to the “Networking” tab.
Azure automatically creates a virtual network and a subnet for you. These are needed for the server to have an outbound connection to the internet. This way we can download updates on the server.
Also, by default a Public IP and a Network Security Group are created. Those are for inbound connection from players and admins and to secure those connections.
I let all these settings as default and only checked “Delete Public IP and NIC when VM is deleted”.
Go to the next tab.
Here you have a setting for automatic shutdown if you want to. Can come in handy when you want to automatically shutdown your server to reduce costs. You have to manually enable the server after shutdown if you want to play again.
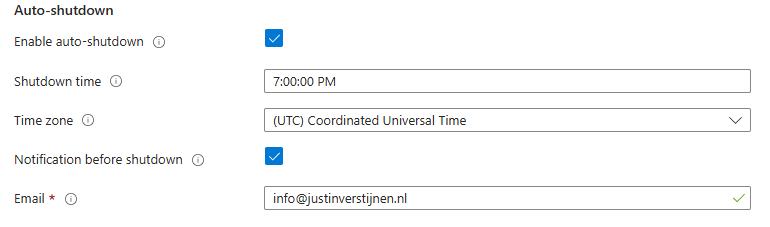
After this go to the last tab and review your settings:
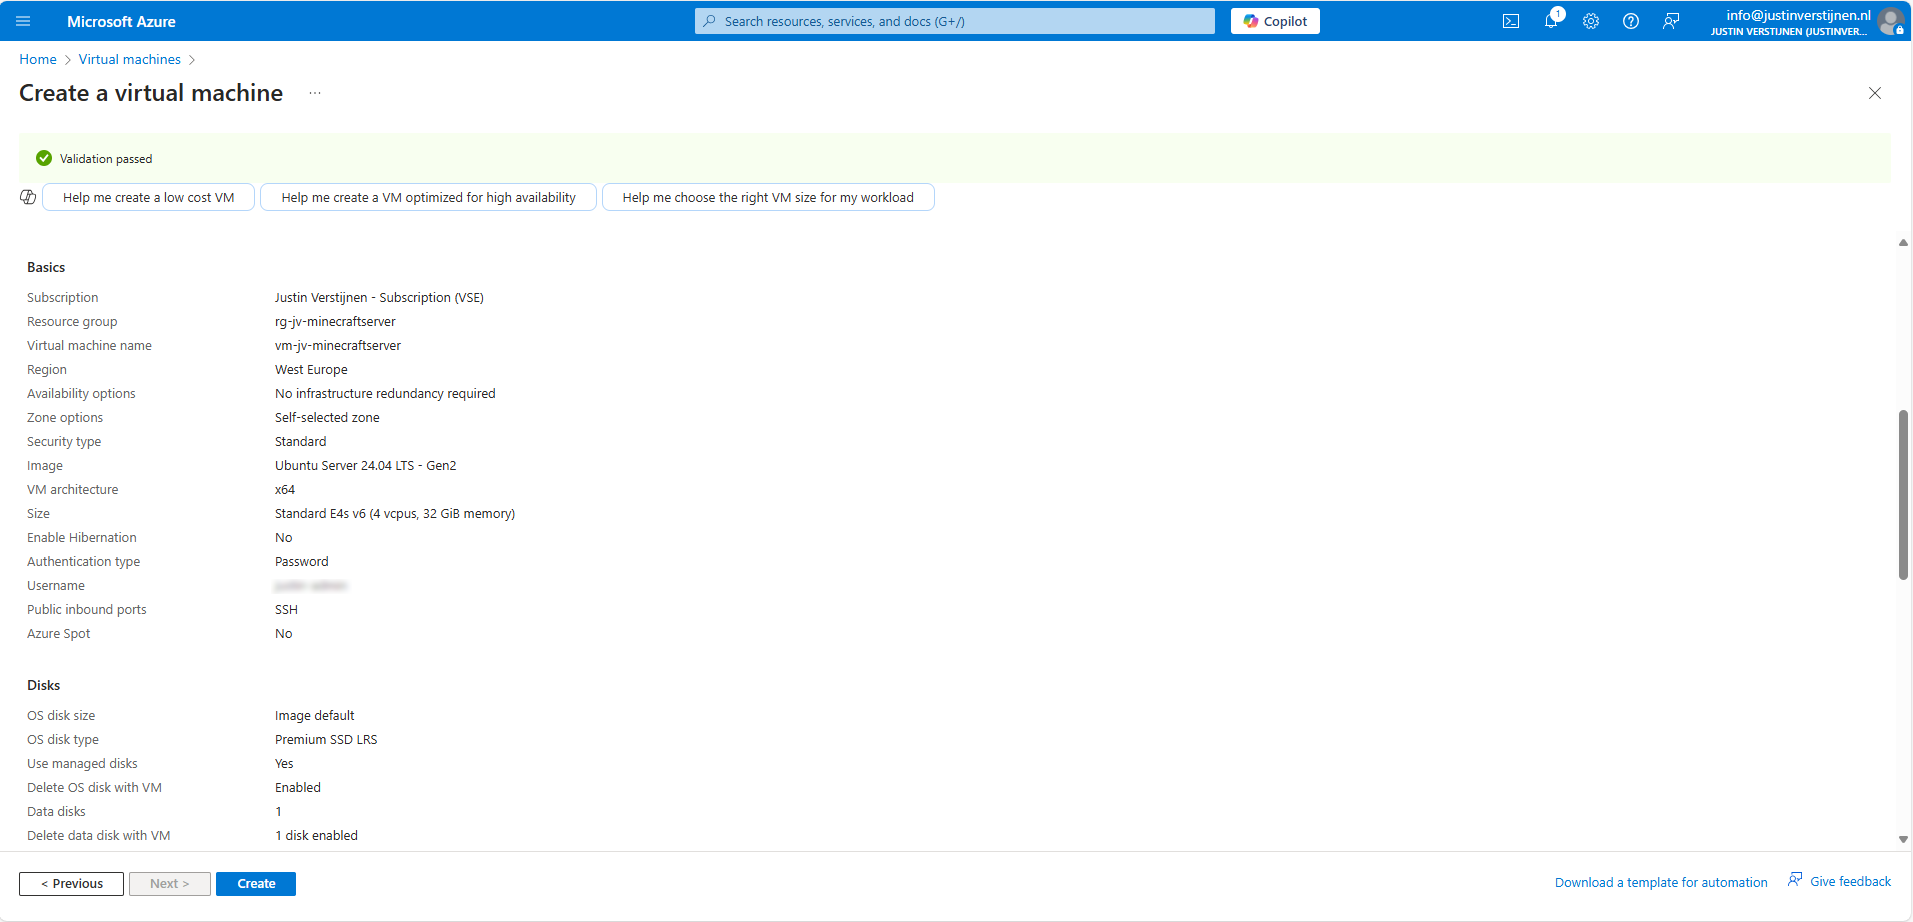
Then create the virtual machine and we are good to go! Create the virtual machine and advance to the next part of the guide.
We want to secure inbound connections made to the server. Let’s go to “Network Security Groups” (NSG for short) in Azure:
Open the related NSG and go to “Inbound Security rules”.
By default we have a rule applied for SSH access that allows the whole internet to the server. For security, the first thing we want to do is limit this access to only our own IP address. You can find your IP address by going to this page: https://whatismyipaddress.com/
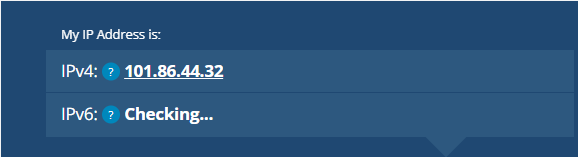
Note this IP address down and return to Azure.
Click on the rule “SSH”.
Change the “Source” to “IP addresses” and paste in the IP address from the IP lookup website. This only allows SSH (admin) traffic from your own IP-address for security. This is a whitelist.
You see that the warning is now gone as we have blocked more than 99% of all worldwide IP addresses SSH access to our server.
After limiting SSH connections to our server, we going to allow player connections to our server. We want to play with friends, dont we?
Again go to the Network Security Group of the Minecraft server.
Go to “Inbound Security rules”
Create a new rule with the following settings:
| Setting | Option |
| Source | Any* |
| Source port ranges | * (Any) |
| Destination | Any |
| Service | Custom |
| Destination port ranges | 25565 (the Minecraft port) |
| Protocol | Any |
| Action | Allow |
| Priority | 100 (top priority) |
| Name | You may choose an own name here |
*Here we do allow all inbound connections and use the Minecraft username whitelist.
My rule looks like this:
Now the network configuration in Azure is done. We will advance to the server configuration now.
Now we can login into our server to do the configuration of the OS and the installation of the Minecraft server.
We need to make a SSH connection to our server. This can be done though your preferred client. I use Windows Powershell, as this has an built-in client for SSH. You can follow the guide:
Open Windows Powershell.
Type the following command to login to your server:
ssh username@ip-addressHere you need your username from the virtual machine wizard and server IP address. You can find the server IP address under the server details in Azure:
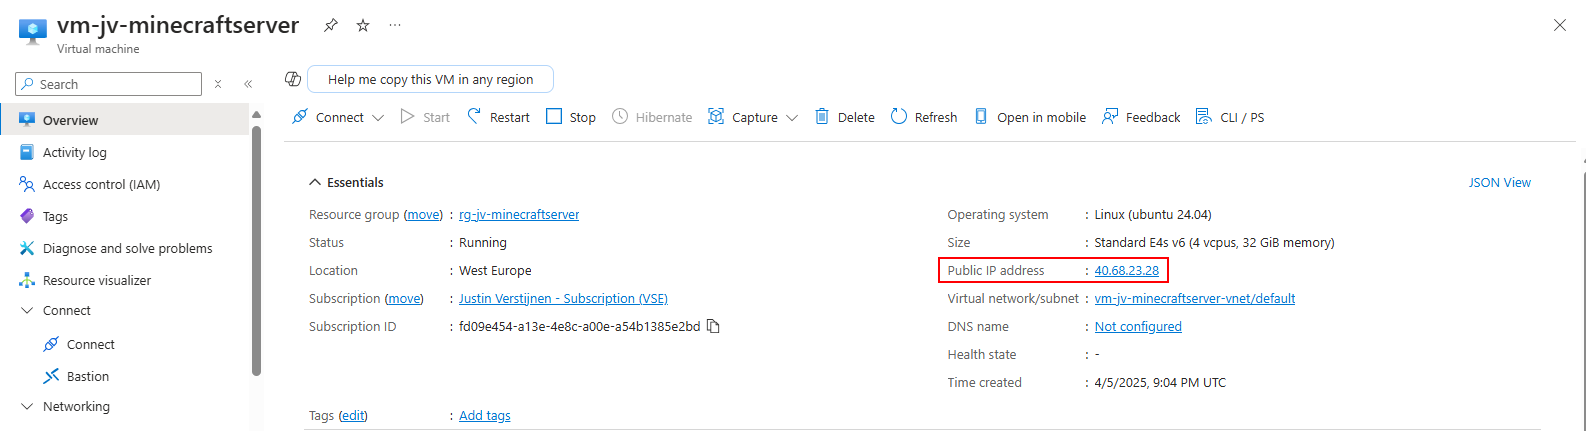
I used this in my command to connect to the server:
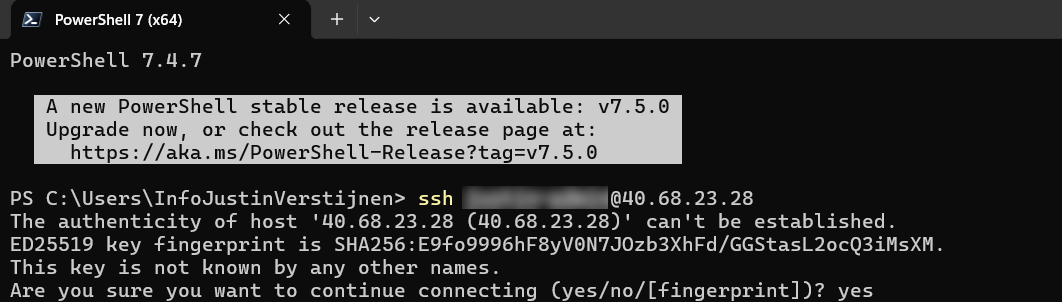
After the command, type “Yes” and fill in your password. Then hit enter to connect.
Now we are connected to the server with SSH:
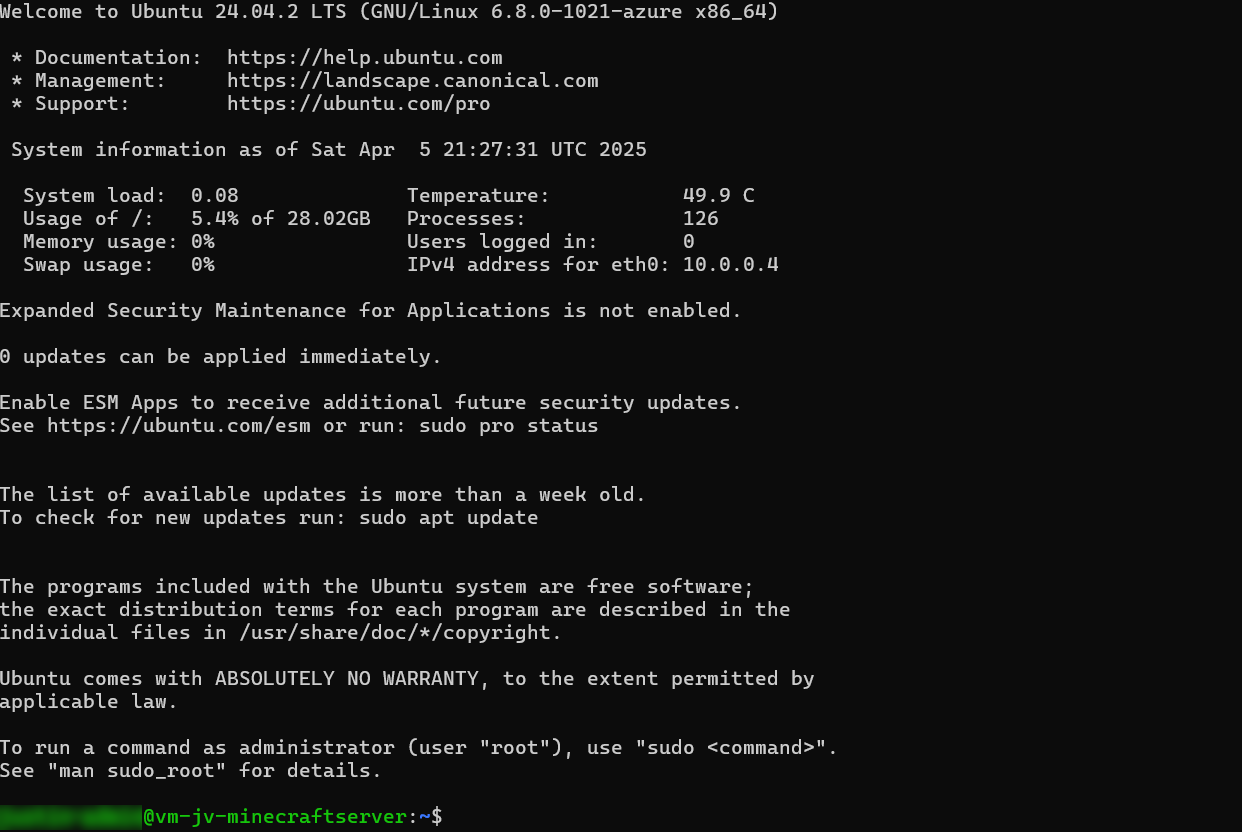
Now that we are logged into the server we can finally install Minecraft Server. Follow the steps below:
Run the following command to get administrator/sudo access:
sudo -s
Now you see the line went from green to white and starts with “root”. This is the highest level of privileges on a Linux system.
Now run the following command to install the latest updates on Ubuntu:
apt-get updateNow there will be a lot of activity, as the machine is updating all packages. This can take up to a minute.
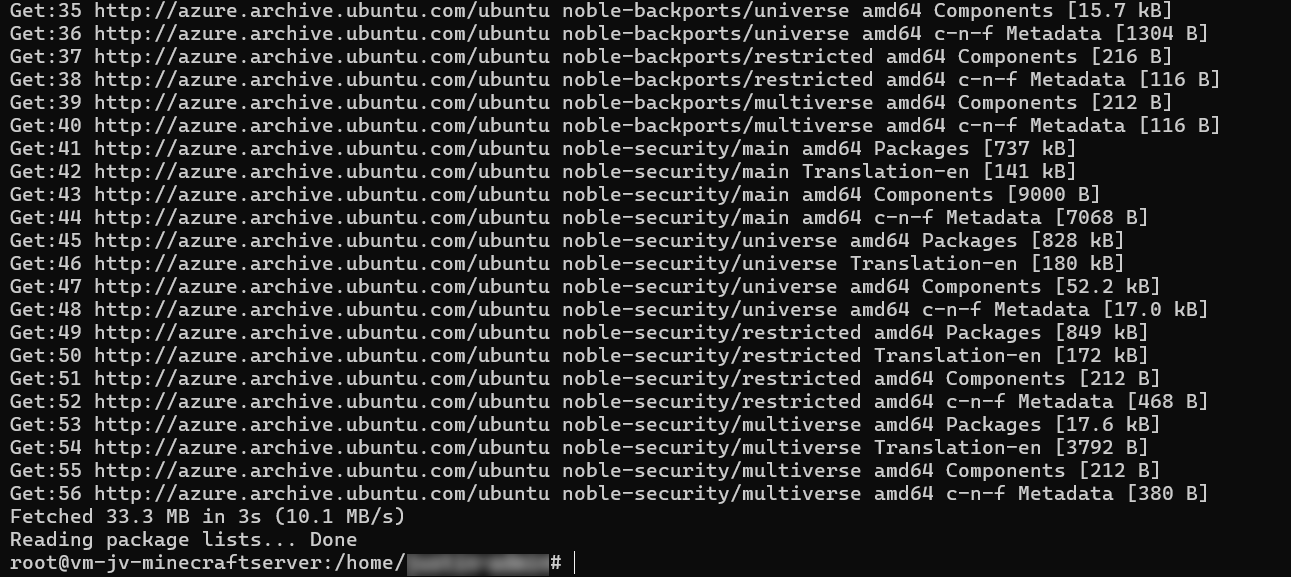
Now we have to install some dependencies for Minecraft Server to run properly. These must be installed first.
Run the following command to install Java version 21:
apt install openjdk-21-jdk-headless -yThis will take up to around a minute.
After this is done we have to install “unzip”. This is a tool to extract ZIP files.
apt-get install wget screen unzip -yThis will take around 5 seconds.
Since we have a secondary disk for Minecraft itself, we have to also configure this. It is now a standalone not mounted (not accessible) disk without a filesystem.
Run the following command to get all disks in a nice overview:
lsblk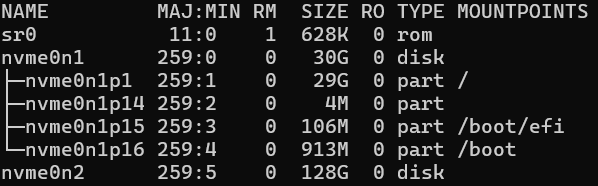
In my case, the nvme0n2 disk is the added disk. This can be different on your server, so take a good look at the size which is your disk.
Now we now our disk name, we can format the disk:
fdisk /dev/nvme0n2This will start an interactive wizard where it wants to know how to format the disk:
If we now again run the command to list our disk and partitions, we see the change we did:
lsblk
Under disk “nvme0n2” there is now an partition called “nvme0n2p1”.
We still need to assign a filesystem to the partition to make it readable. The filesystem is ext4 as this is the most used in Linux systems.
Run the following command and change the disk/partition to your own settings if needed.
sudo mkfs.ext4 /dev/nvme0n2p1After the command finishes, hit another “Enter” to finish the wizard.
Now we have to create a mount point, tell Linux what folder to access our disk. The folder is called “minecraft-data”.
mkdir /mnt/minecraft-dataAnd now we can finally mount the disk to this folder by running this command:
mount /dev/nvme0n2p1 /mnt/minecraft-dataLet’s try if this works :)
cd /mnt/minecraft-data
This works and our disks is now operational. Please note that this is non-persistent and gone after a reboot. We must add this to the systems disks of Linux to mount this at boot.
To automatically mount the secondary disk at boot we have to perform a few steps.
Run the following command:
blkid /dev/nvme0n2p1You will get an output of this command what we need. Mine is:
We have to edit the fstab system file to tell the system part that it must make this mount at boot.
Run the following command to run a text editor to change that fstab file:
nano /etc/fstabNow we have to add a line of our secondary disk including its mount point and file system. I added the line as needed:
UUID=7401b251-e0a0-4121-a99f-f740c6c3ed47 /mnt/minecraft-data ext4 defaults,nofail,x-systemd.device-timeout=10 0 2This looks like this in my fstab file:

Now press the shortcut CTRL and X to exit the file and choose Yes to save the file.
I directly restarted the server to check if the secondary disk is mounted like expected. We don’t want this happening after all of our configuration work of course.

As you can see this works like a charm.
Now we have arrived at the fun part of configuring the server, configuring Minecraft server itself.
Go to the created minecraft data folder, if not already there.
cd /mnt/minecraft-dataWe have to download the required files and place them into this folder. The latest release can be found at the official website: https://www.minecraft.net/en-us/download/server
First, again acquire Sudo/administrator access:
sudo -sWe can now download the needed file on the server by running this command:
wget https://piston-data.mojang.com/v1/objects/e6ec2f64e6080b9b5d9b471b291c33cc7f509733/server.jarNow the file is at the right place and ready to start:

We now need to create a file to agree with the End User License Agreement (EULA), and can do this with the following command:
echo "eula=true" > eula.txtThis command creates the file and fills it with the right option.
We can now finally run the server with 28GBs of RAM with the following command:
java -Xmx28672M -Xms28672M -jar server.jar noguiNow our server has been fully initialized and we are ready to play.
The moment we have been waiting for, finally playing on our own Minecraft server. Download the game and login to your account.
Let’s wait till the game opens.
Open “Multiplayer”.
Click on “Add Server” and fill in the details of your server to connect:
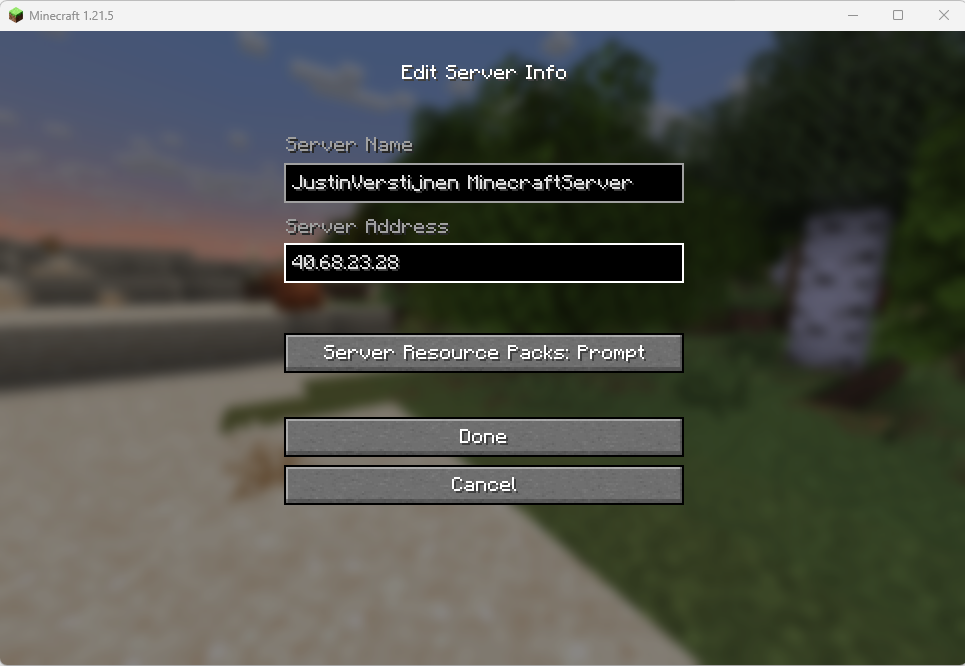
Click on “Done” and we are ready to connect:
Connect and this will open the server:

I already cut some wood for my first house. Haha.
Connecting also generated some logs:
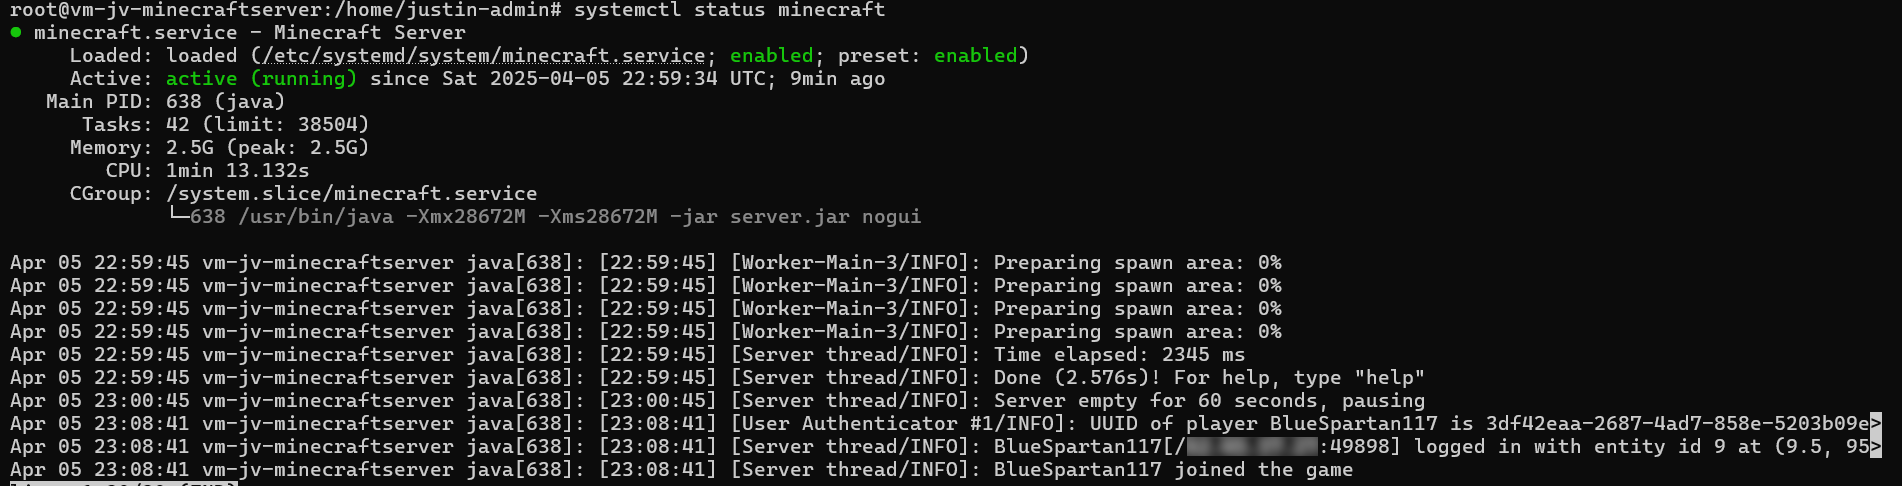
Now we ran Minecraft server manually at startup, but what we want is that the service automatically starts with the server as this is an dedicated server for it. We want to automate such things.
We are going to create a Linux system service for this. Start with running this command:
nano /etc/systemd/system/minecraft.serviceThis again opens a text editor where we have to paste in some information.
[Unit]
Description=Minecraft Server
After=network.target

[Service]
WorkingDirectory=/mnt/minecraft-data
ExecStart=/usr/bin/java -Xmx28672M -Xms28672M -jar server.jar nogui
User=root
Restart=on-failure
RestartSec=10

[Install]
WantedBy=multi-user.target
Then use the shortcut CTRL and X to exit and select Yes to save.
Now run this commands (can be run at once) to refresh the services list and to enable our newly created Minecraft-service:
sudo systemctl daemon-reexec
sudo systemctl daemon-reload
sudo systemctl enable minecraft.service
Now run this command to start Minecraft:
sudo systemctl start minecraftWe can view the status of the service by running this command:
sudo systemctl status minecraftWe made a seperate service of Minecraft which allows it to automatically run at boot. We can easily restart and stop it when needed without using the complex commands of Minecraft.
With the systemctl status minecraft command you can see the last 10 lines for troubleshooting purposes.
We can change some server settings and properties on the SSH, like:
All of these settings are in files of the minecraft directory. You can navigate to the minecraft directory by using this command:
cd /mnt/minecraft-dataOpen the file server.properties
nano server.propertiesIn this file all settings of the server are present. Lets change the status/MOTD message for example:
motd=[§6Justin Verstijnen§f] §aOnlineThis makes the text in colors and all fancy and stuff. You can find this in the internet.
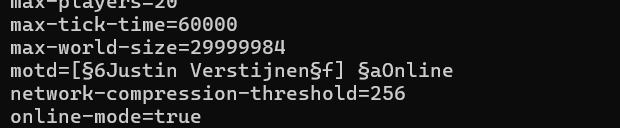
Now save the file by using CTRL + X and select Yes and hit enter. This saved the file.
After each change to those files, the service has to be restarted. You can do this with this command:
systemctl restart minecraftAfter restarting, the server shows up like this:
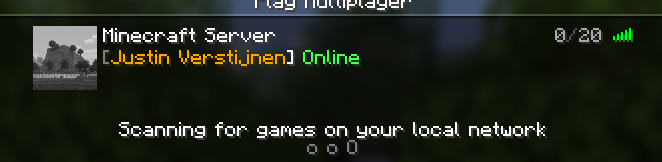
While hosting a Minecraft server setup on Azure is a possibility, it’s not that cost-efficiënt. It is alot more expensive than hosting your own server or other 3rd party cloud providers who do this. What is true is that the uptime in terms of SLA is maybe the highest possible on Azure, especially when using redundancy with Availability Zones.
However I had a lot of fun testing this solutionand bringing Minecraft, Azure and Linux knowledge together and build a Minecraft server and write a tutorial for it.
Thank you for reading this guide and I hope it was helpful.
You have reached the end of the page. You can navigate through other blog posts as well, share this post on X, LinkedIn and Reddit or return to the blog posts collection page. Thank you for visiting this post.
If you think something is wrong with this post or you want to know more, you can send me a message to one of my social profiles at: https://justinverstijnen.nl/about/
If you find this page and blog very useful and you want to leave a donation, you can use the button below to buy me a beer. Hosting and maintaining a website takes a lot of time and money. Thank you in advance and cheers :)
The terms and conditions apply to this post.
Locks in Azure are a great way to prevent accidental deletion or modify resources or resource groups. This helps further securing your environment and make it somewhat more “fool proof”.
Now with Azure Policy we can automatically deploy Locks to Resource Groups to secure them from deleting or read-only resources. In this guide I will explain how this can be done and how it works.
Note: Locks on Resource Groups can stop some automations. If you use read-only locks on a Azure Virtual Desktop resource group for example.
Take care before creating them and assigning this policy to such subscription.
This solution consists of an Azure Policy Definition, that is assigned to the subscription where this must be executed. It also consists of a custom role that only gives the needed permissions, and nothing more.
The Azure Policy evaluates the resource groups regularly and puts the lock on the resource groups. No need for manual lock deployment anymore.
It can take up to 30 minutes before a (new) resource group gets the lock assigned automatically, but most of the time it happens a lot faster.
Before we can use the policy and automatic remediation, we need to set the correct permissions. As this must be done on subscription-level, the normal permissions would be very high. In our case, we will create a custom role to achieve this with a much lower privileged identity.
Go to “Subscriptions”, and select the subscription where you want the policy to be active. Now you are here, copy the “Subscription ID”:
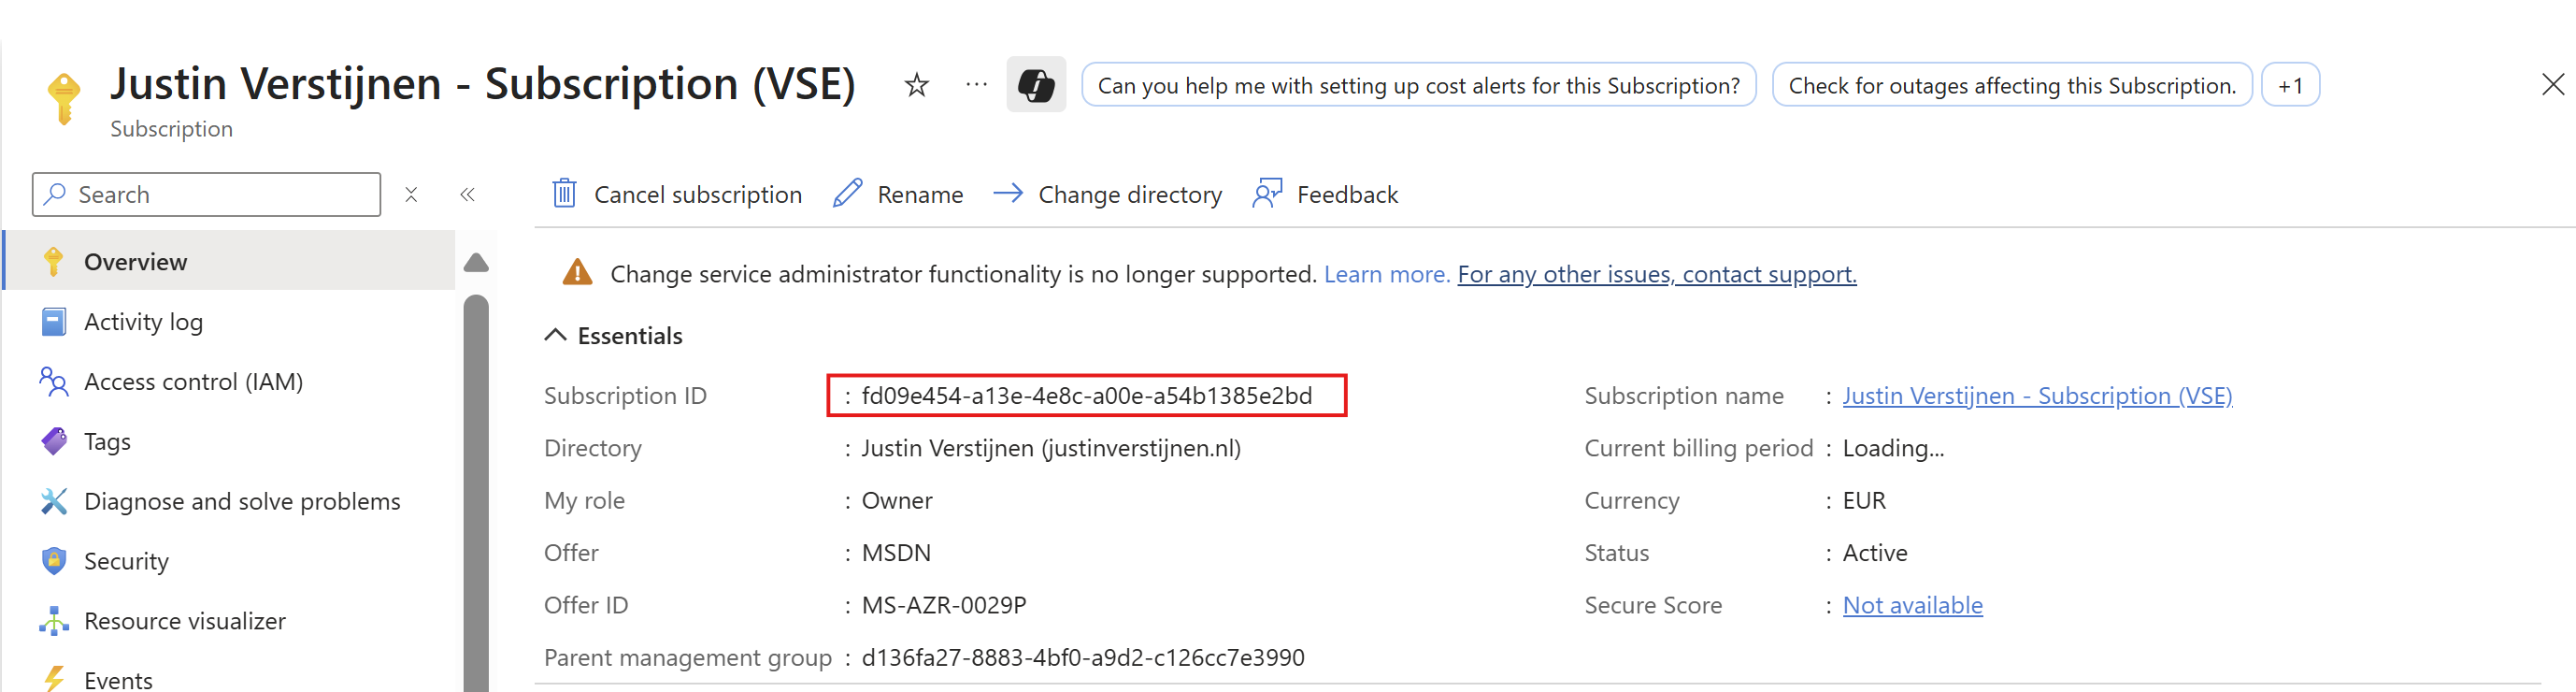
Go to “Access control (IAM)”. Then click on “+ Add” and then “Add custom role”.
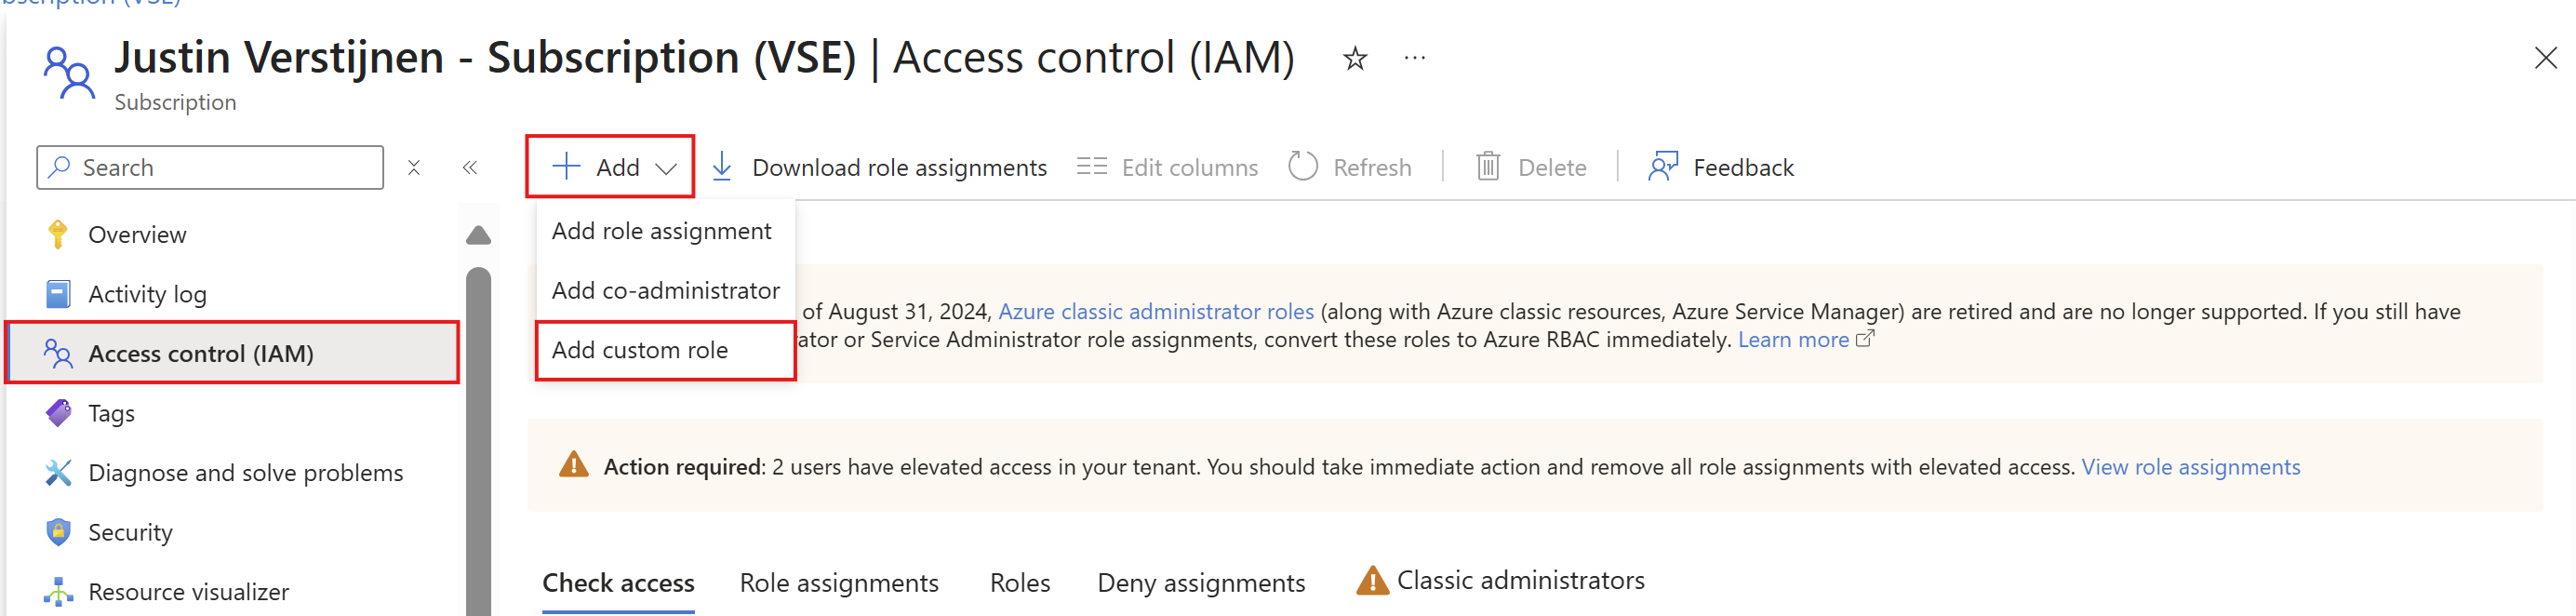
Here go directly to the “JSON” tab, click “Edit” and paste the code below, and then paste the subscription ID on the placeholder on line 6:
{
  "properties": {
    "roleName": "JV-CR-AutomaticLockRGs",
    "description": "Allows to place locks on every resource group in the scope subscription.",
    "assignableScopes": [
      "/subscriptions/*subscriptionid*"
    ],
    "permissions": [
      {
        "actions": [
          "Microsoft.Authorization/locks/*",
	        "Microsoft.Resources/deployments/*",
          "Microsoft.Resources/subscriptions/resourceGroups/read"
        ],
        "notActions": [],
        "dataActions": [],
        "notDataActions": []
      }
    ]
  }
}
Or view the custom role template on my GitHub page:
Then head back to the “Basics” tab and customize the name and description if needed. After that, create the custom role.
Now we can create the Policy Deinition in Azure. This is the definition or let’s say, the set of settings to deploy with Azure Policy. The definition is then what is assigned to a determined scope which we will do in the next step.
Open the Azure Portal, and go to “Policy”.
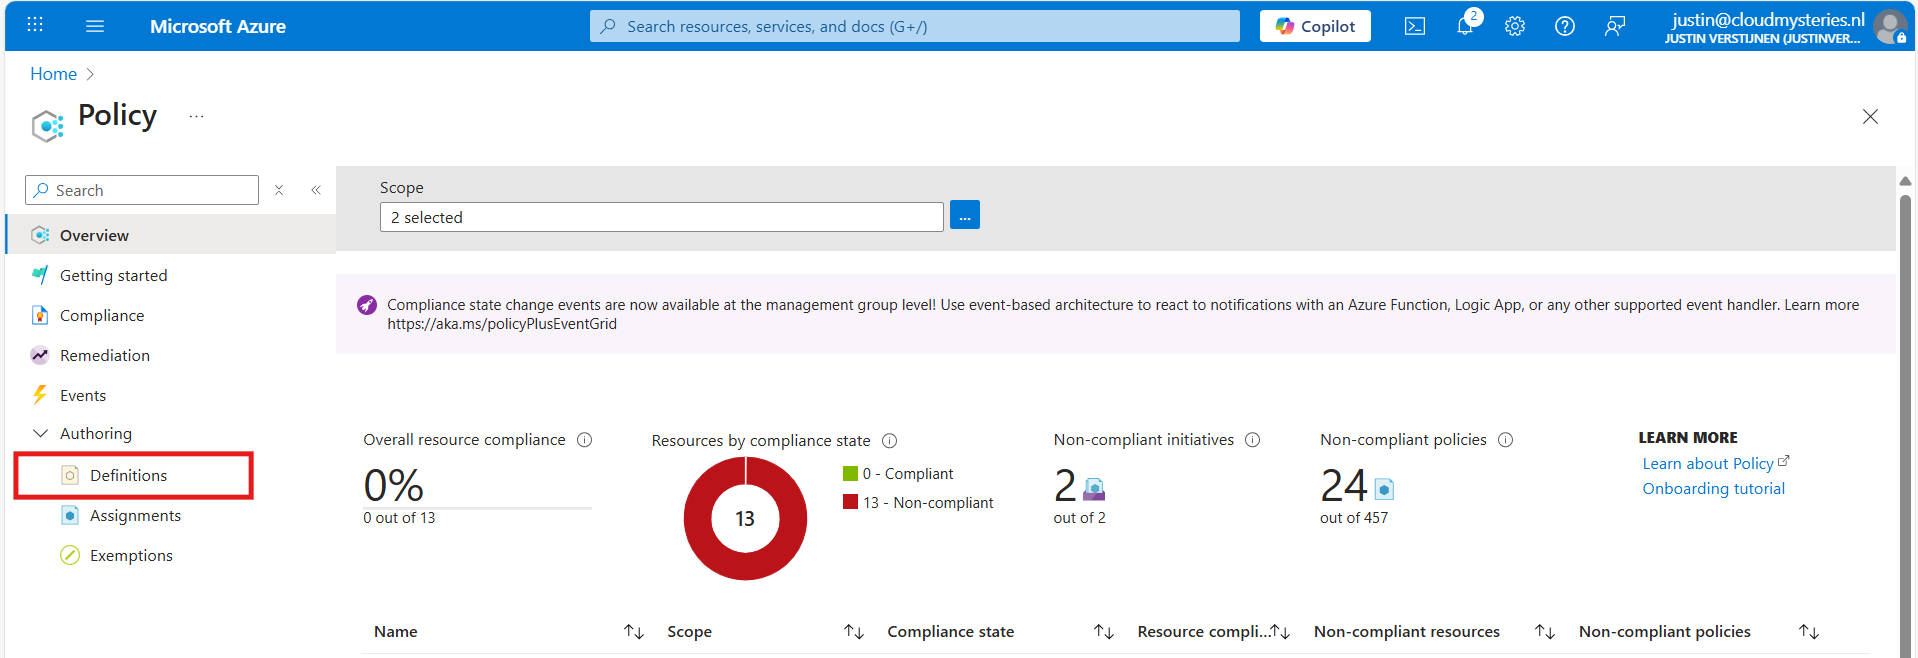
Then under “Authoring” click on “Definitions”. Then click “+ Policy Definition” to create a new policy definition.
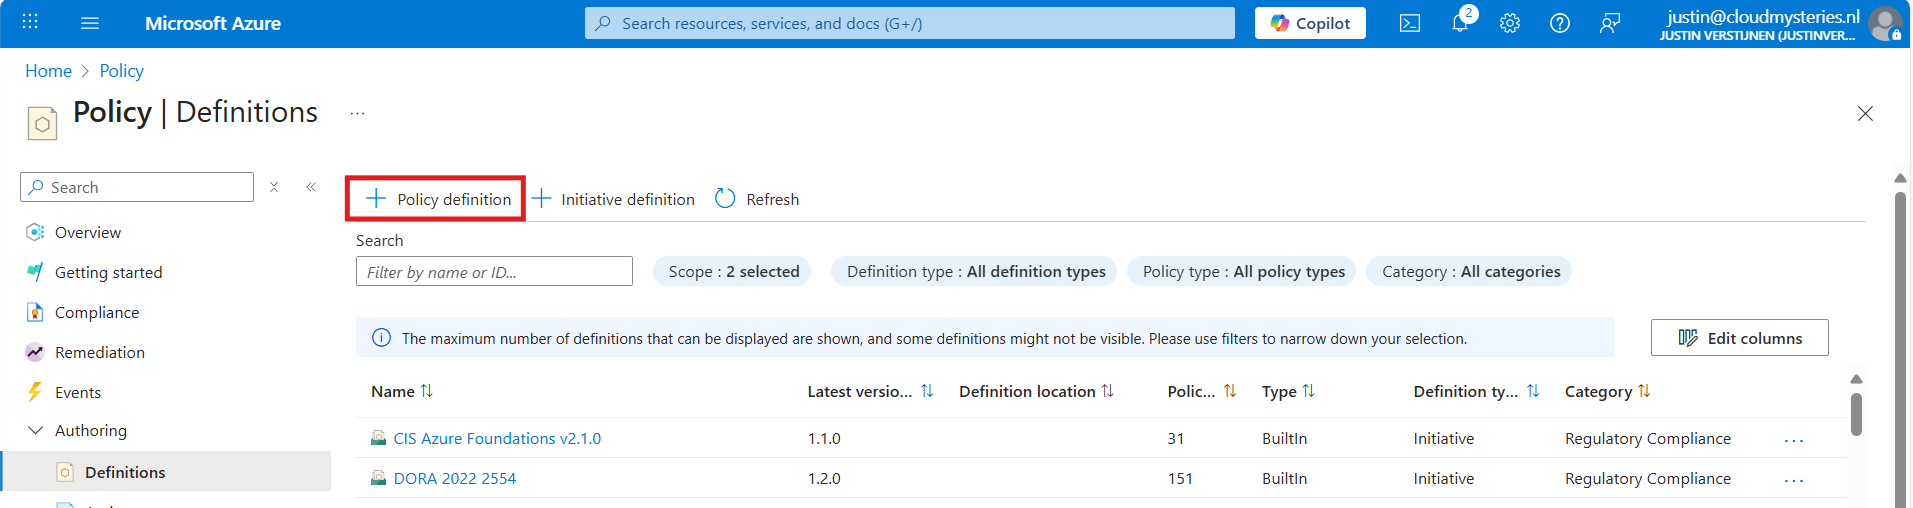
In the “Definition Location”, select the subscription where the policy must place locks. Then give the definition a name, description and select a category. Make sure to select a subscription and not a management group, otherwise it will not work.
After that, we must paste the code into the Policy Rule field. I have the fully prepared code template here:
Open the link and click this button to copy all code:

Then paste the code above into the Policy rule field in Azure:
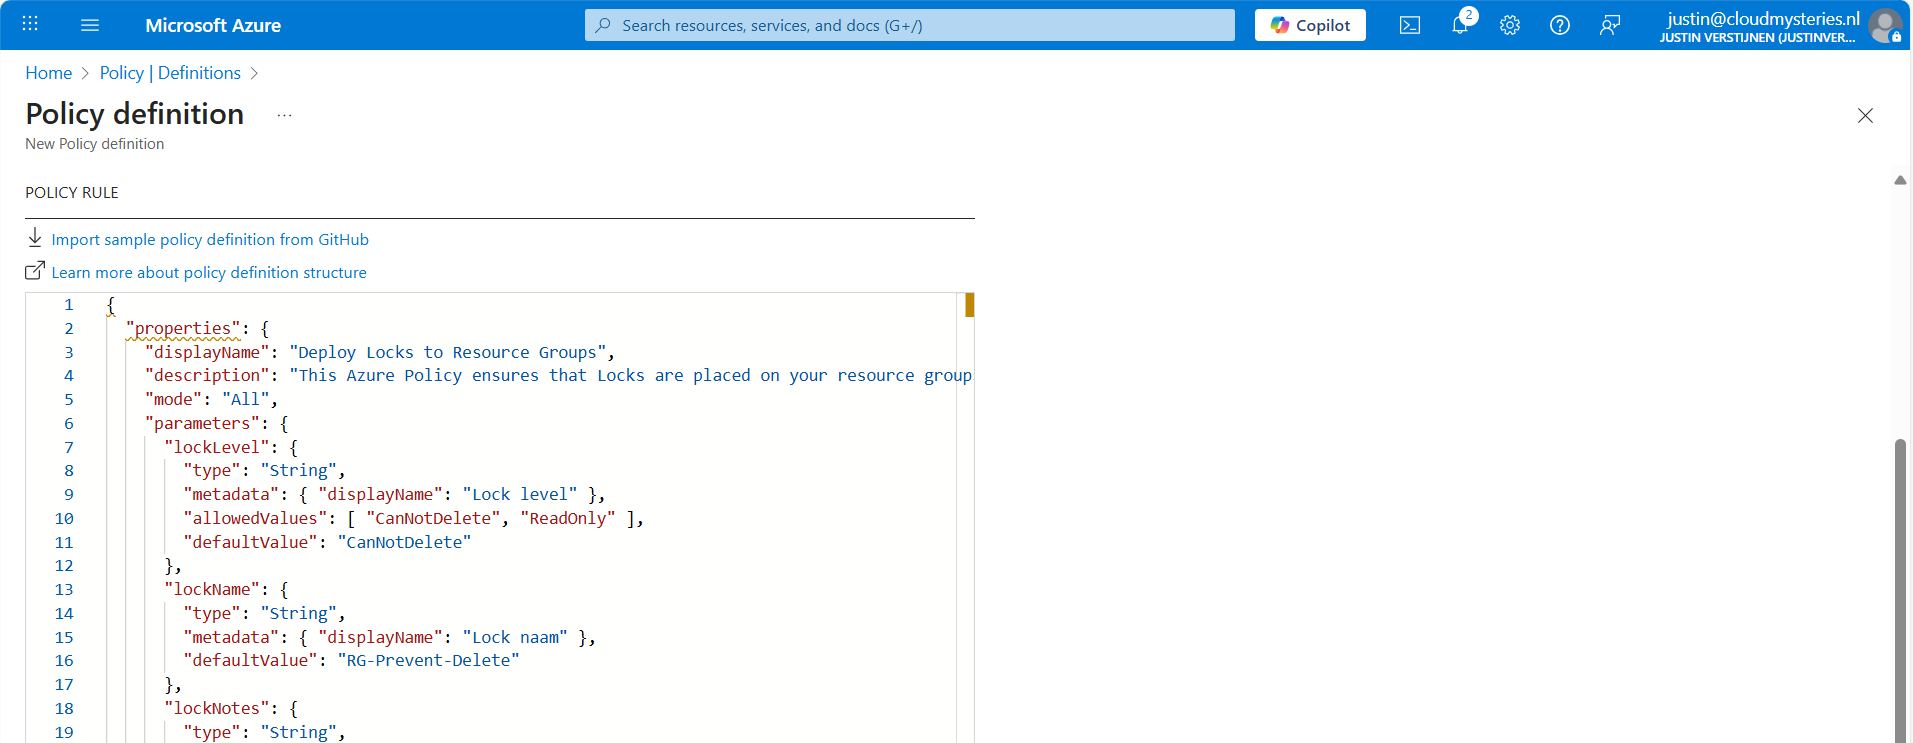
After that, save the policy definition and we are done with creating the policy definition.
Now that we have made the definition, we can assign this to our subscription(s). You can do this by clicking on “Assign policy” directly after creating the definition, or by going back to “Policy” and selecting “Assignments”:
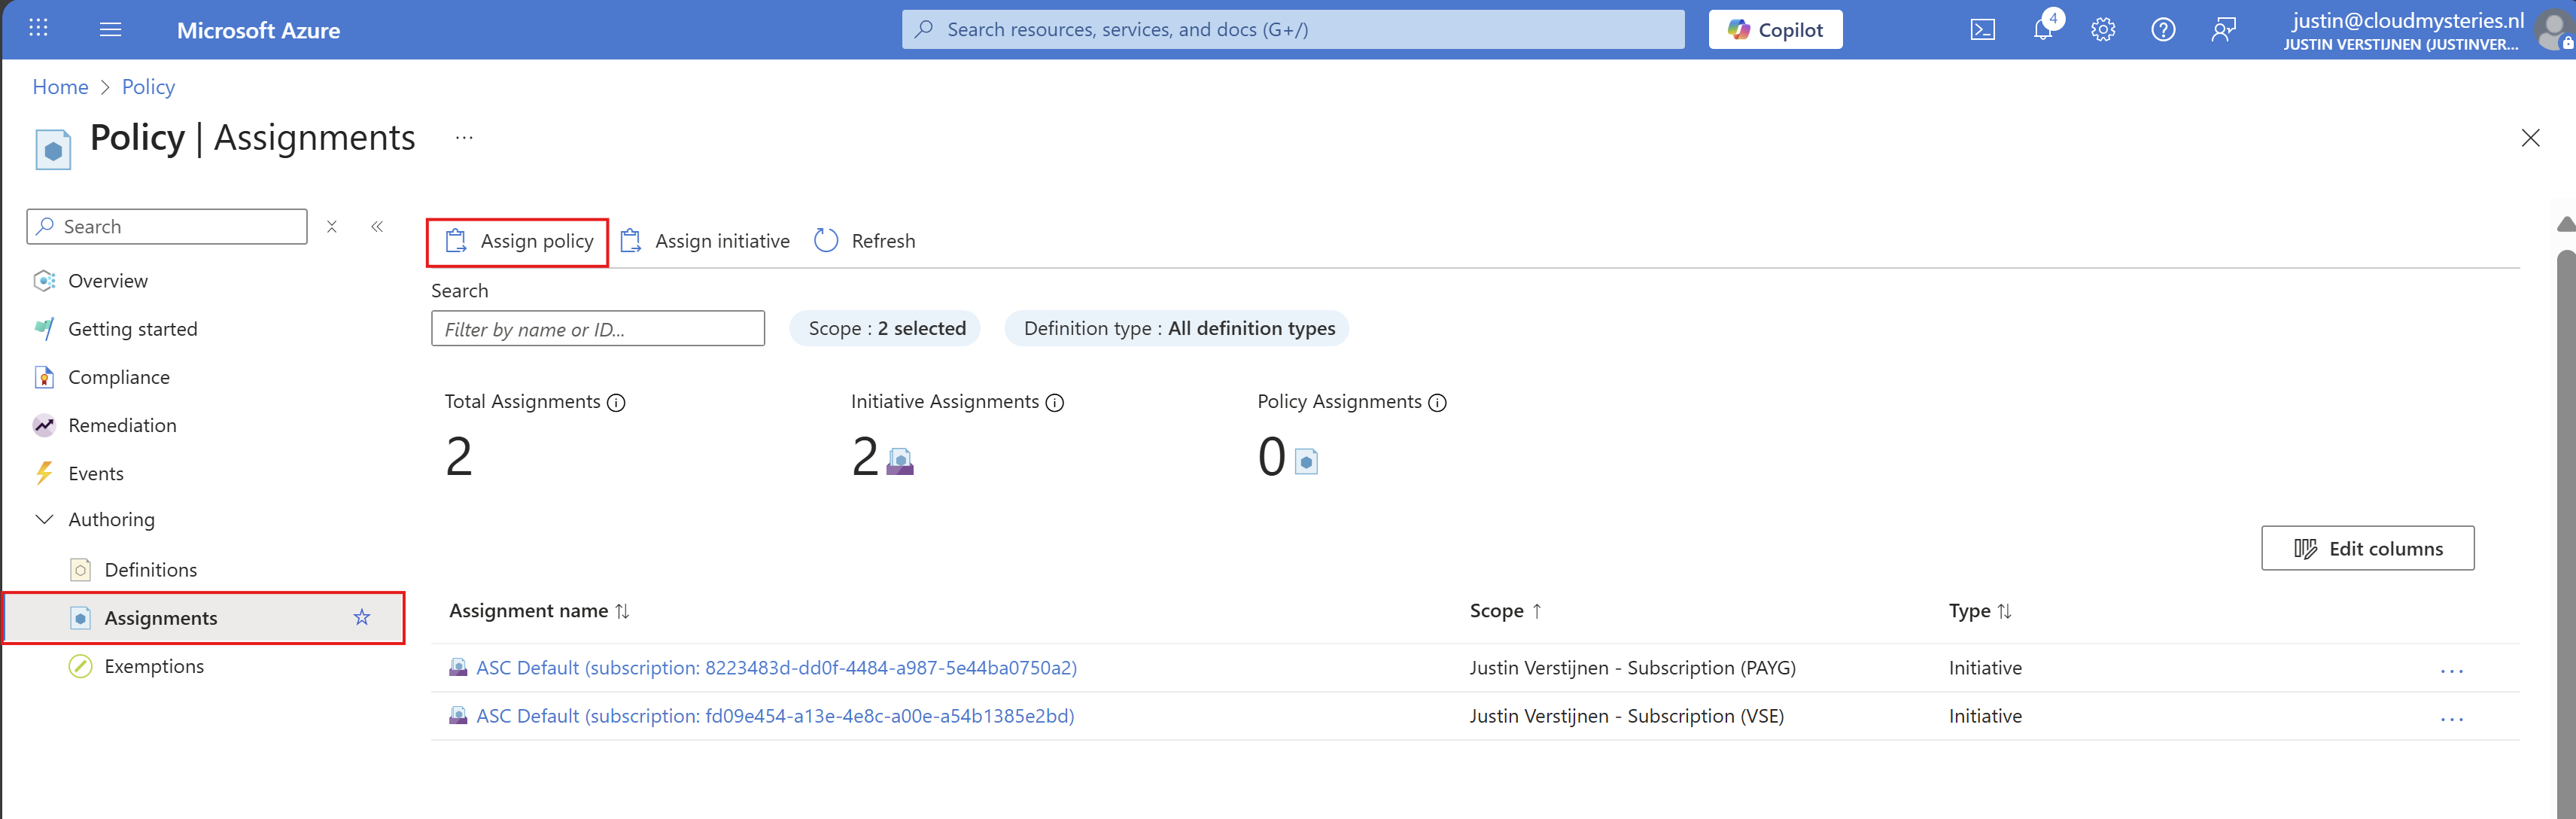
Click on “Assignments” and then on “Assign Policy”.
At the scope level, you can determine which subscription to use. Then you could set some exclusions to exclude some resouce groups in that subscription.
At the Policy definition field, select the just created definition to assign it, and give it a name and description.
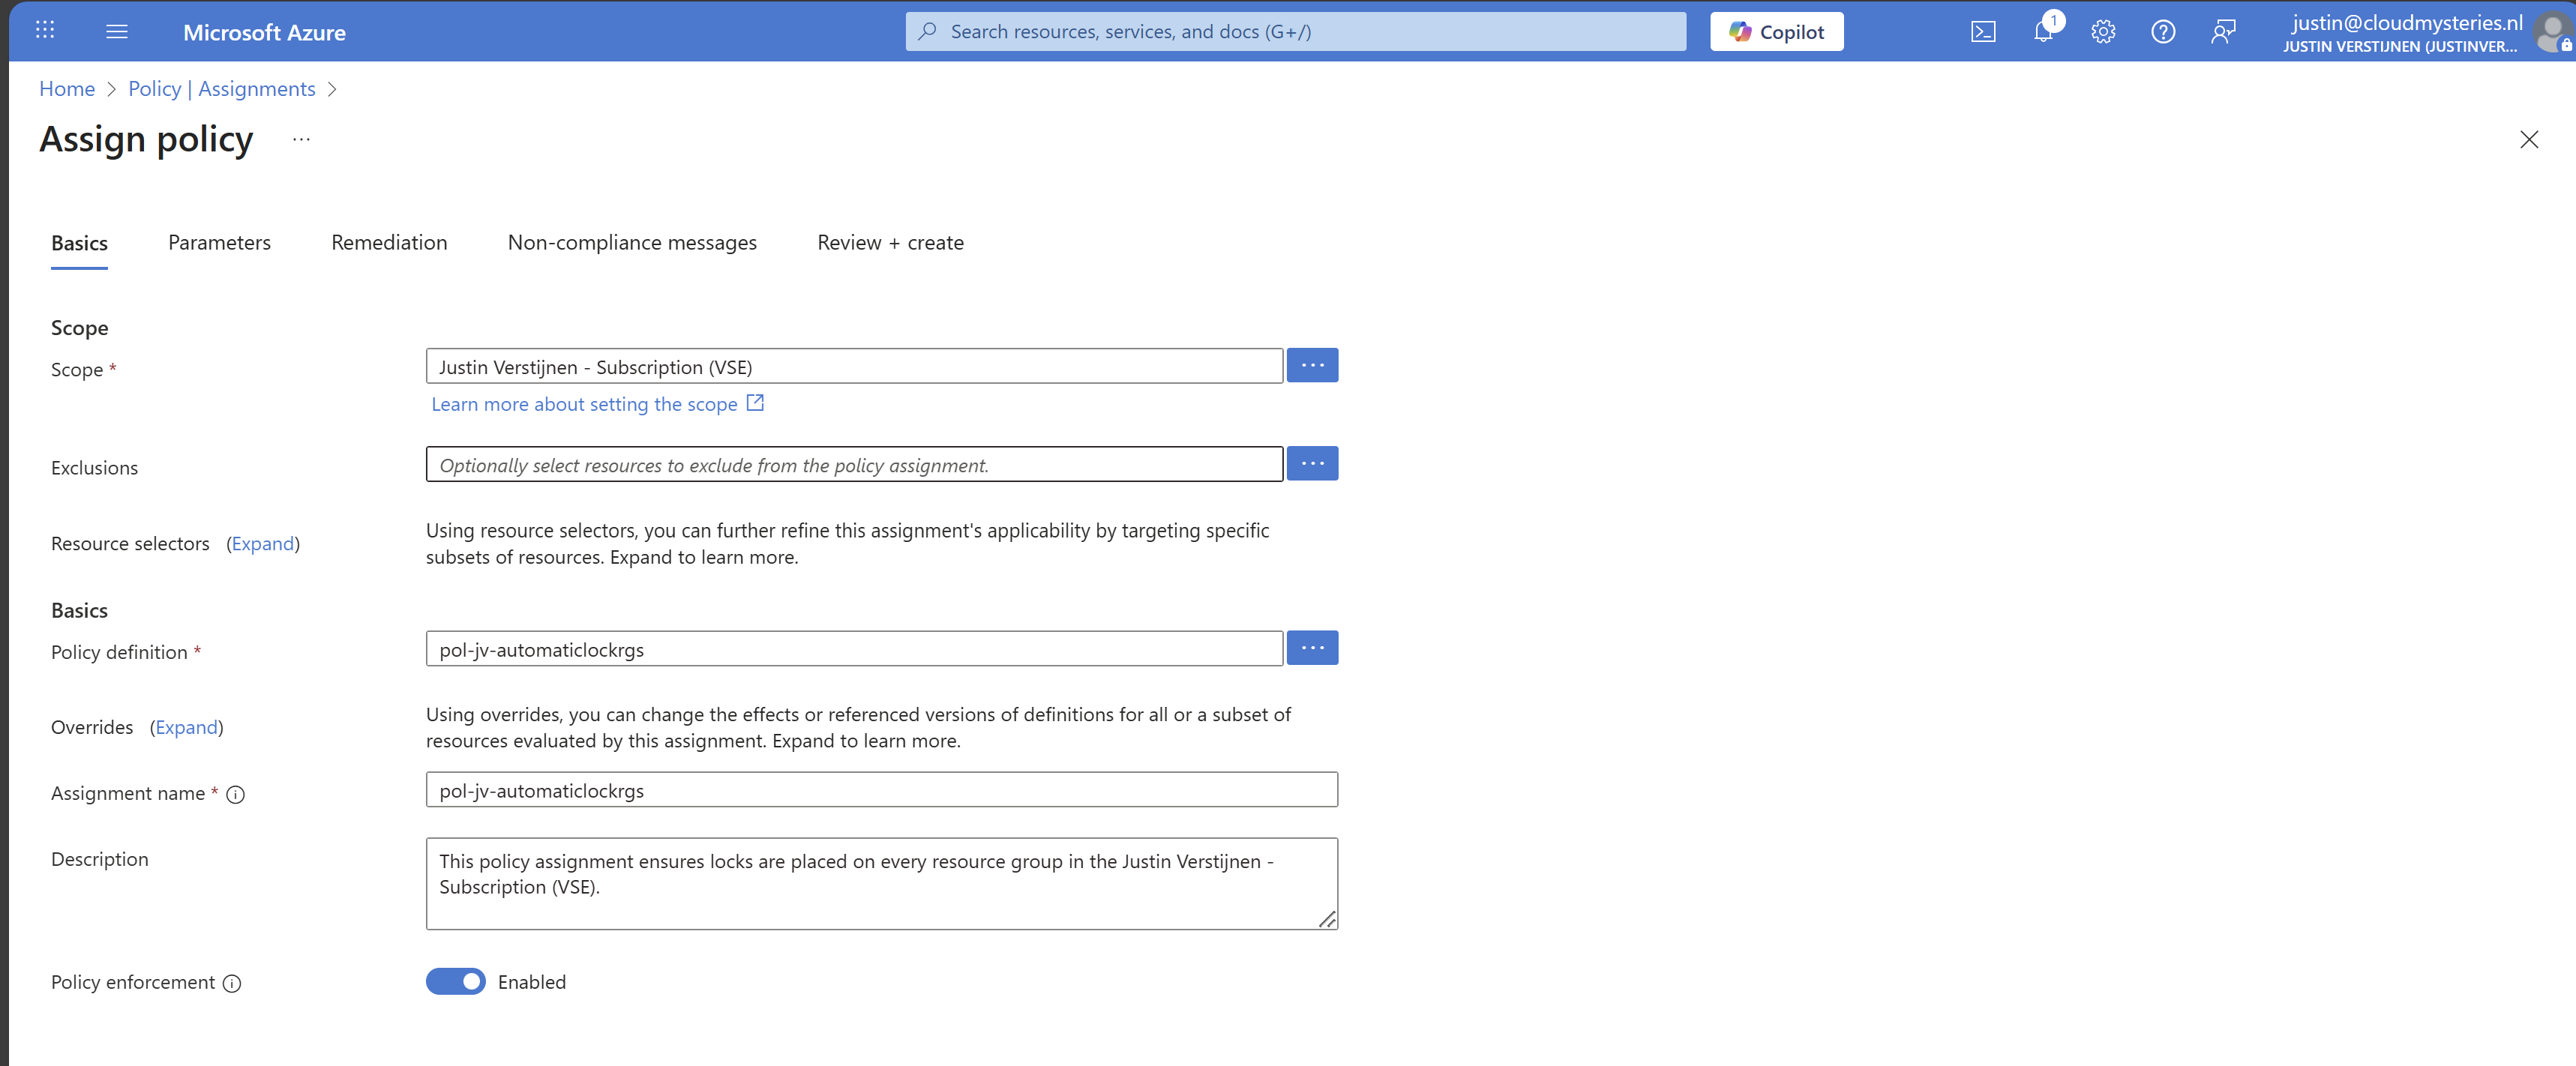
Then advance to the tab “Remediation”. The remediation task is where Azure automatically ensures that resources (or resource groups in this case) are compliant with your policy. This by automatically placing the lock.
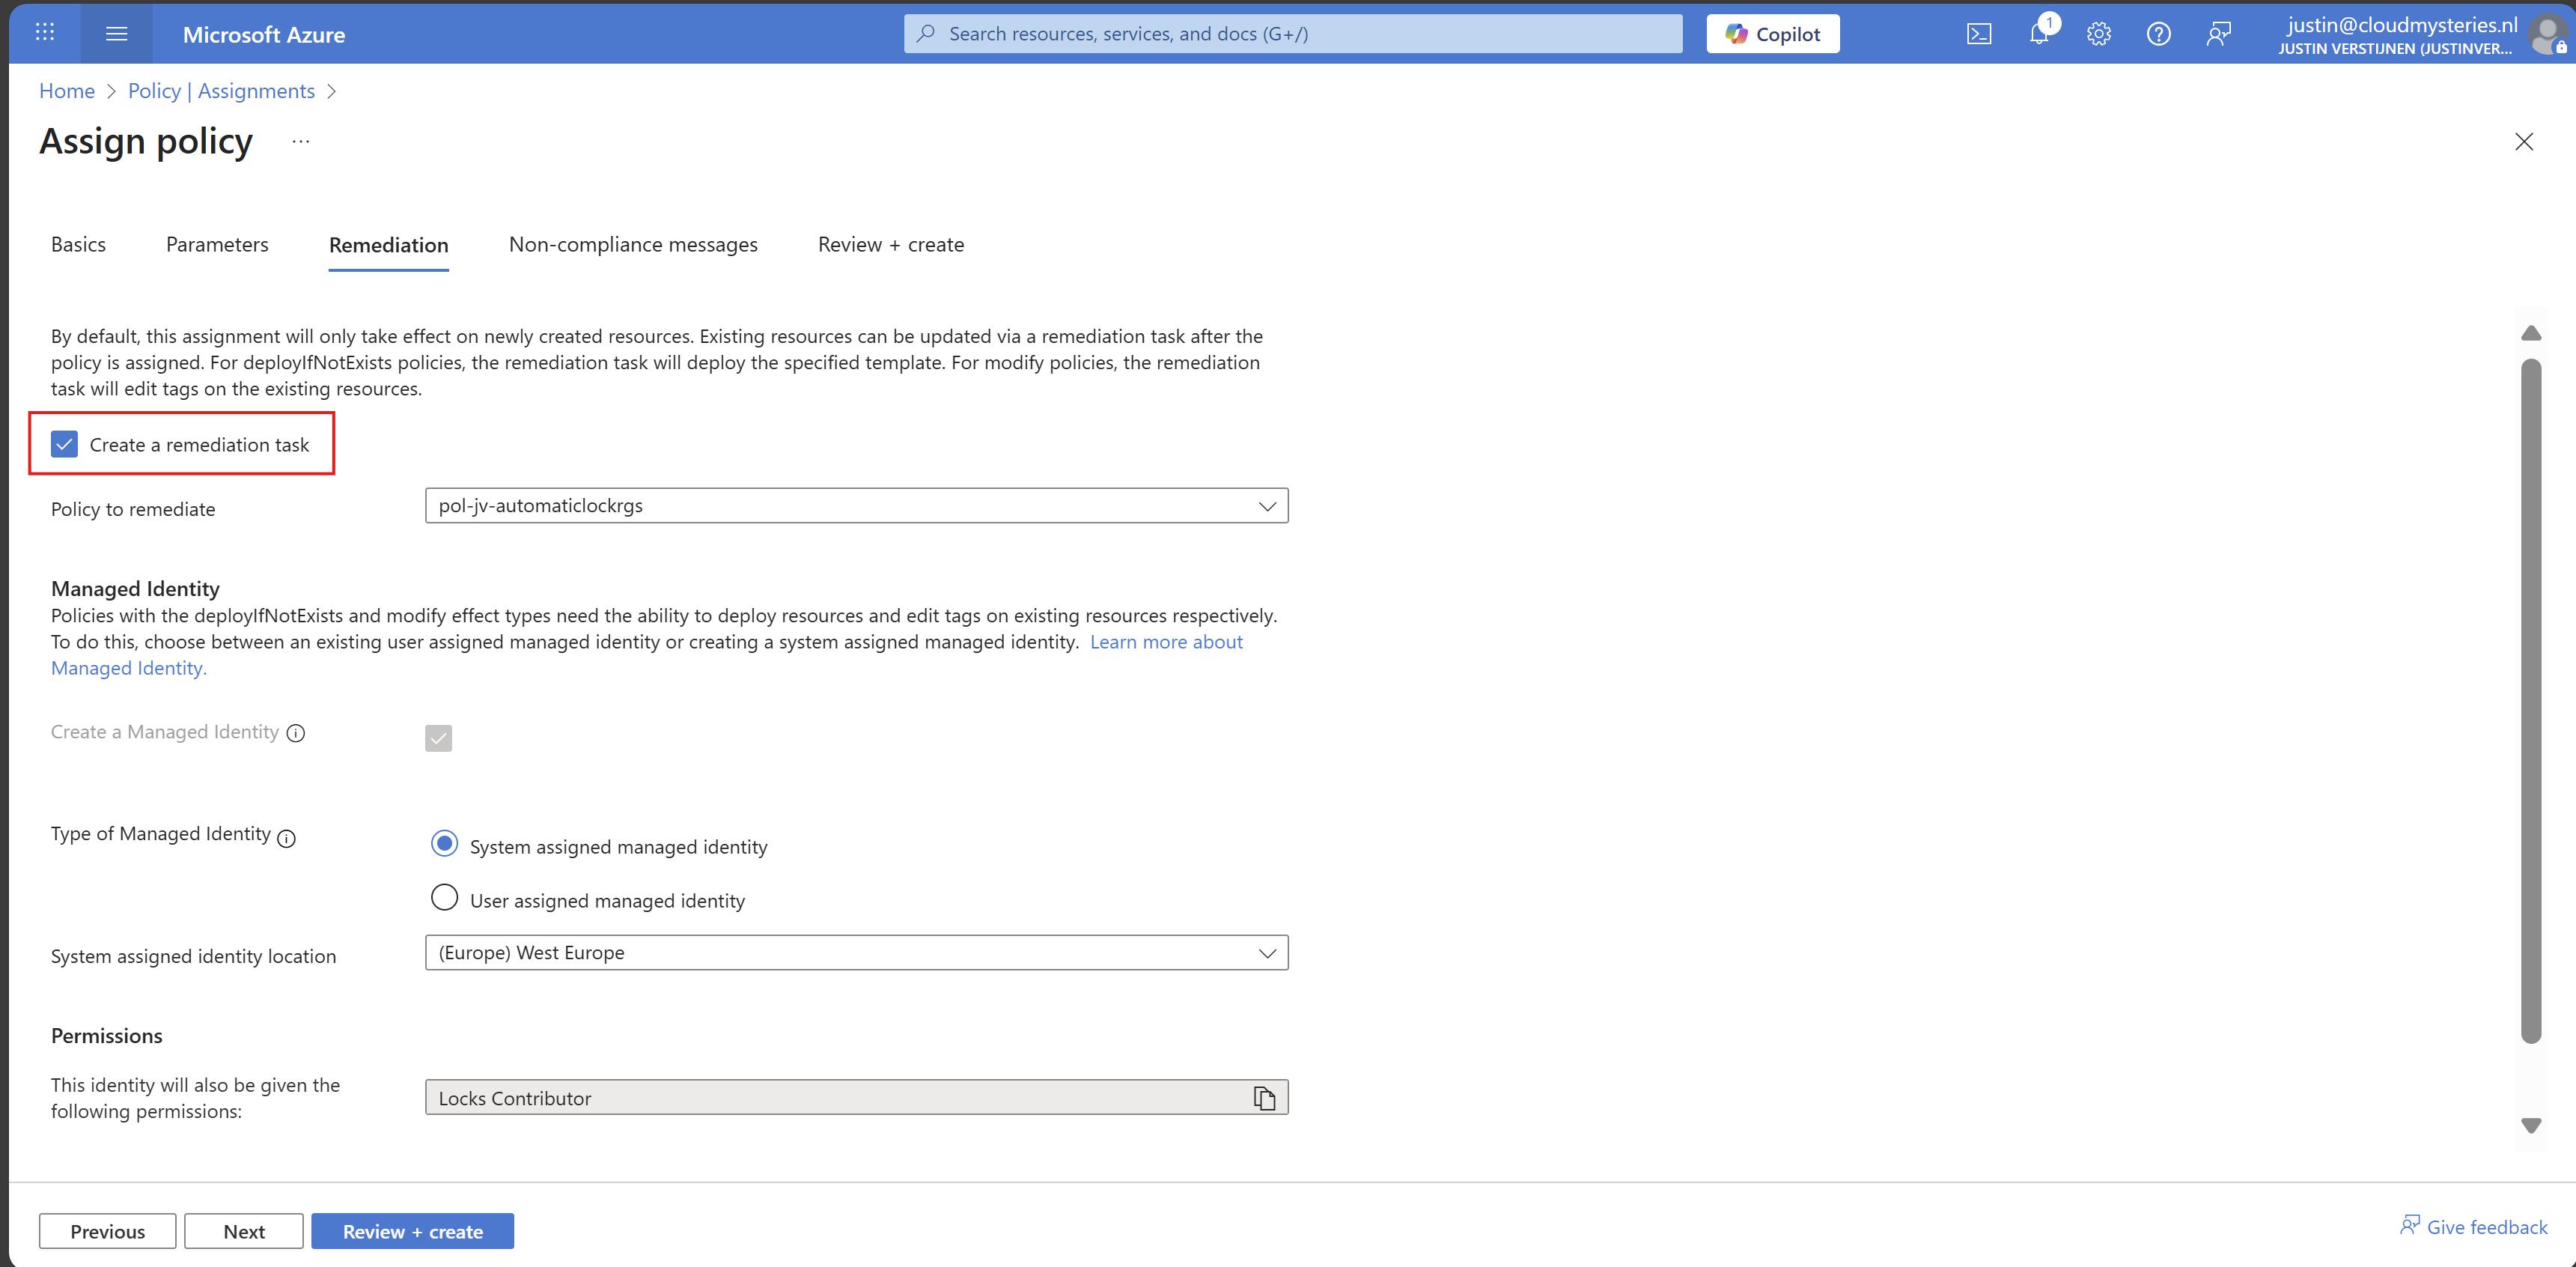
Enable “Create a remediation task” and the rest can be left default settings. You could use a user assigned managed identity if needed.
Finish the assignment and the policy will be active.
Now that we have assigned the managed identity to our remediation task, we can assign new permissions to it. By default, Microsoft assigns the lock contributor role, but is unfortunately not enough.
Go to your subscription, and once again to “Access control (IAM)”. Then select the tab “Role assignments”:
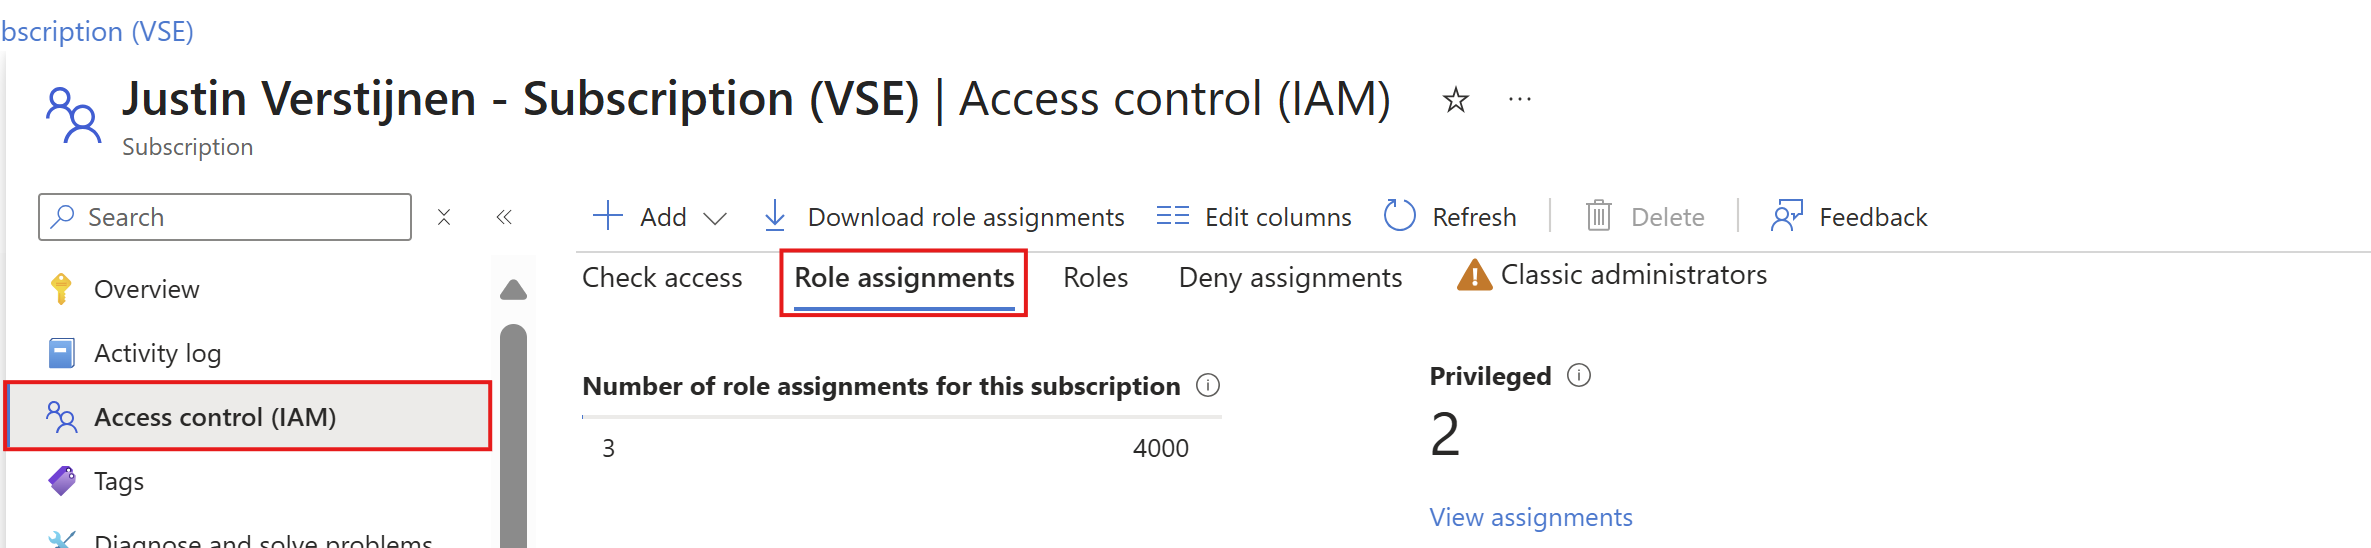
Search for the managed identity Azure just made. It will be under the “Lock Contributor” category:

Copy or write down the name and click “+ Add” and add a role to the subscription.
On the “Role” tab, select type: “Custom role” to only view custom roles and select your just created role:
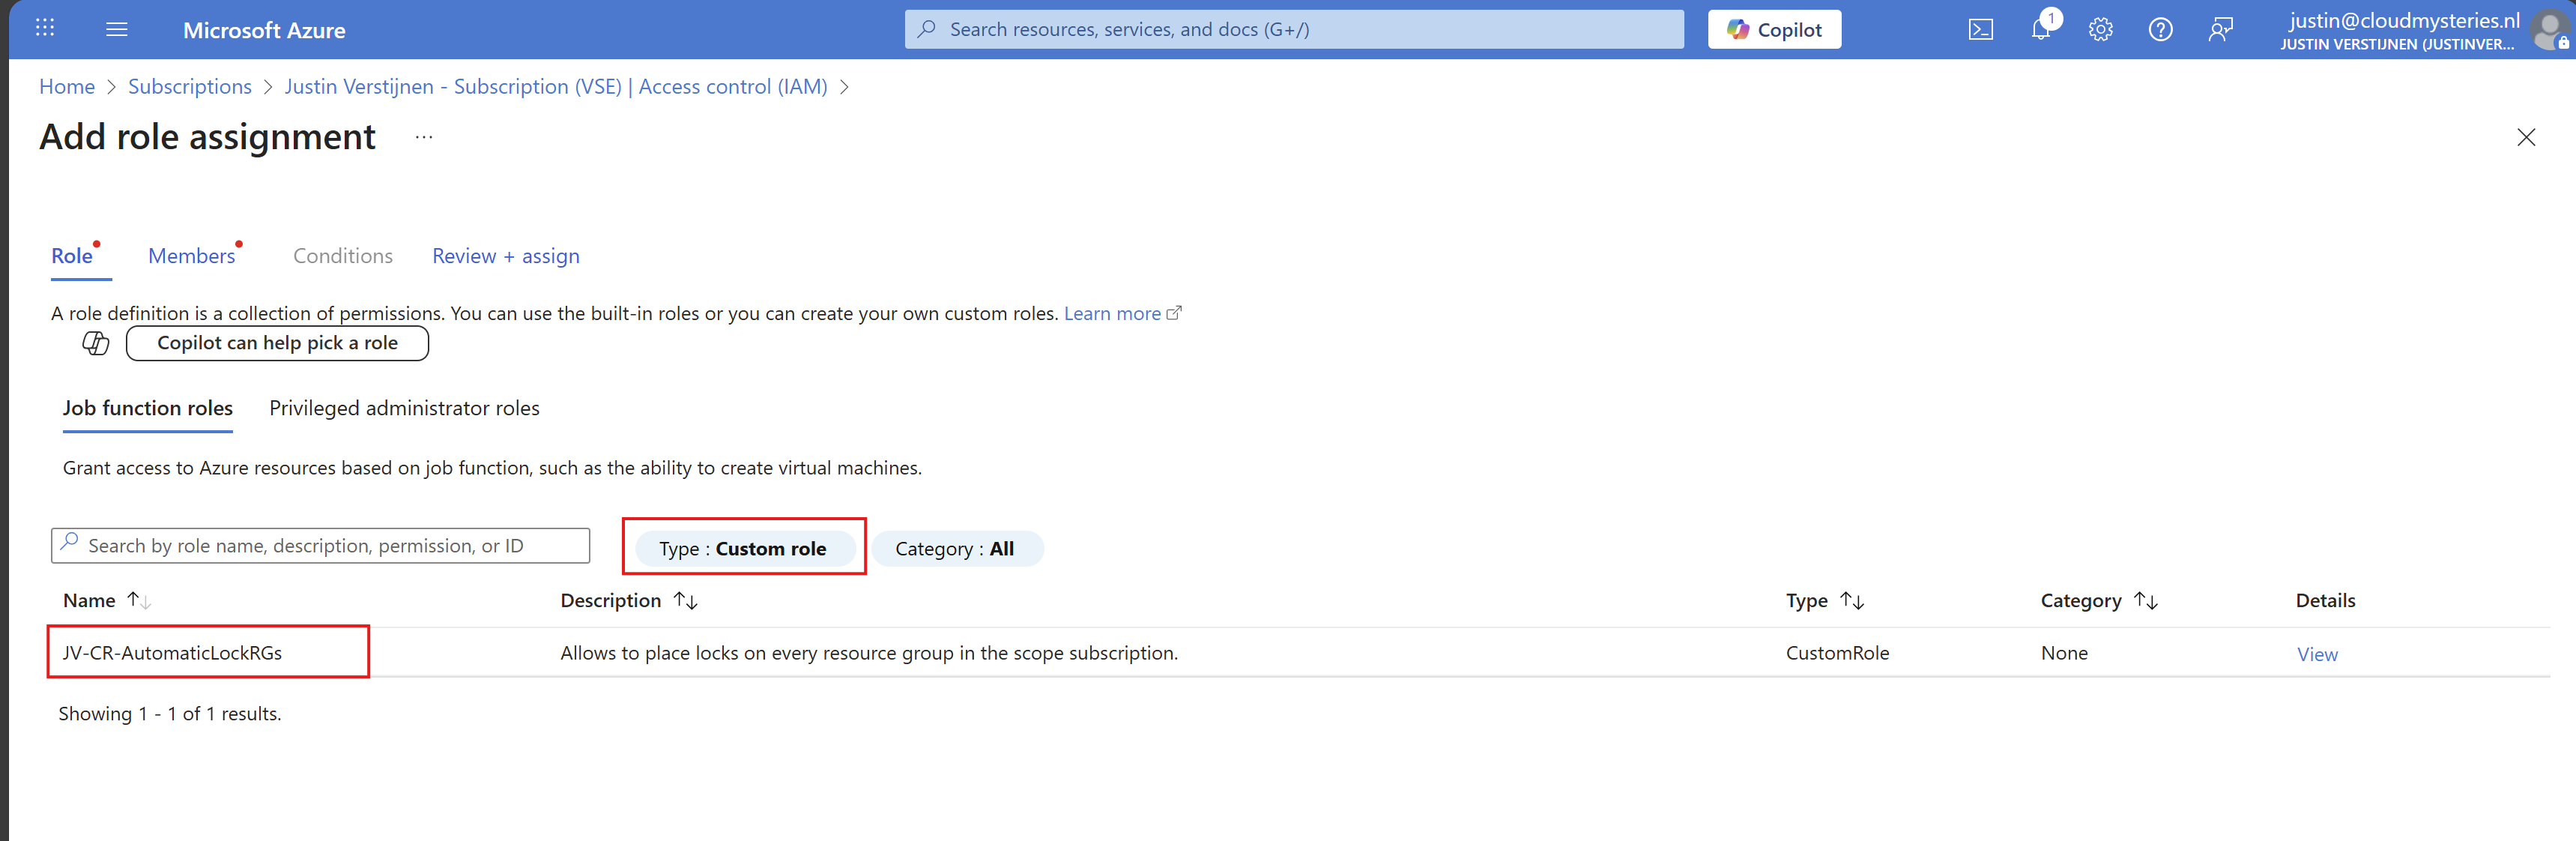
Click next.
Make sure “User, group or service principal” is selected, click “+ Select members” and paste in the name of the identity you have just copied.
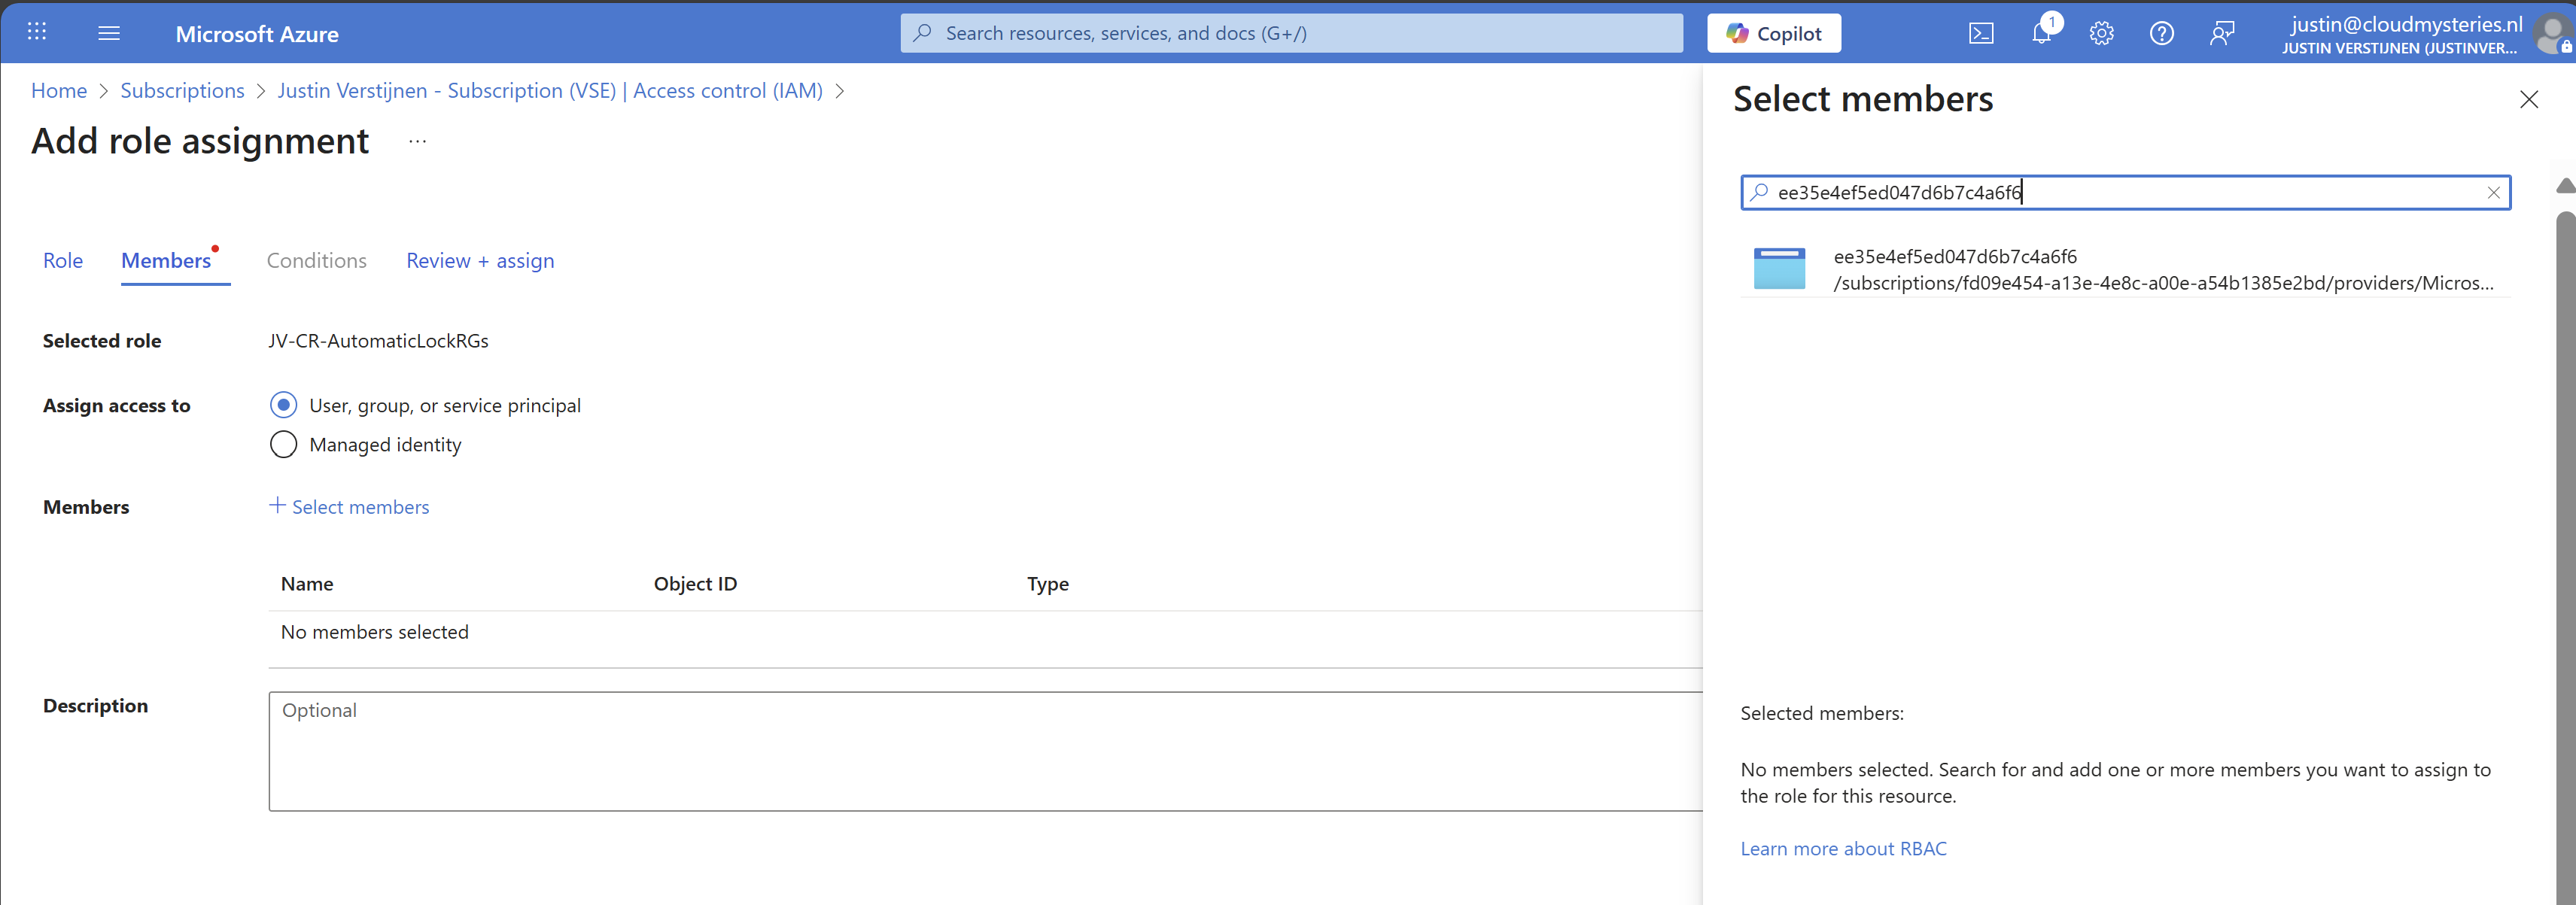
While Azure call this a managed identity, it is really a service principal which can sound very strange. WHy this is is really simple, it is not linked to a resource. Managed Identities are linked to resources so a resource has permissions. In this case, it’s only Azure Policy.
Select the Service principal and complete the role assignment.
After configuring everything, we have to wait around 15 minutes for the policy to become active and the remediation task to put locks on every resource group.
After the 15 minute window we can check the status of the remediation task:
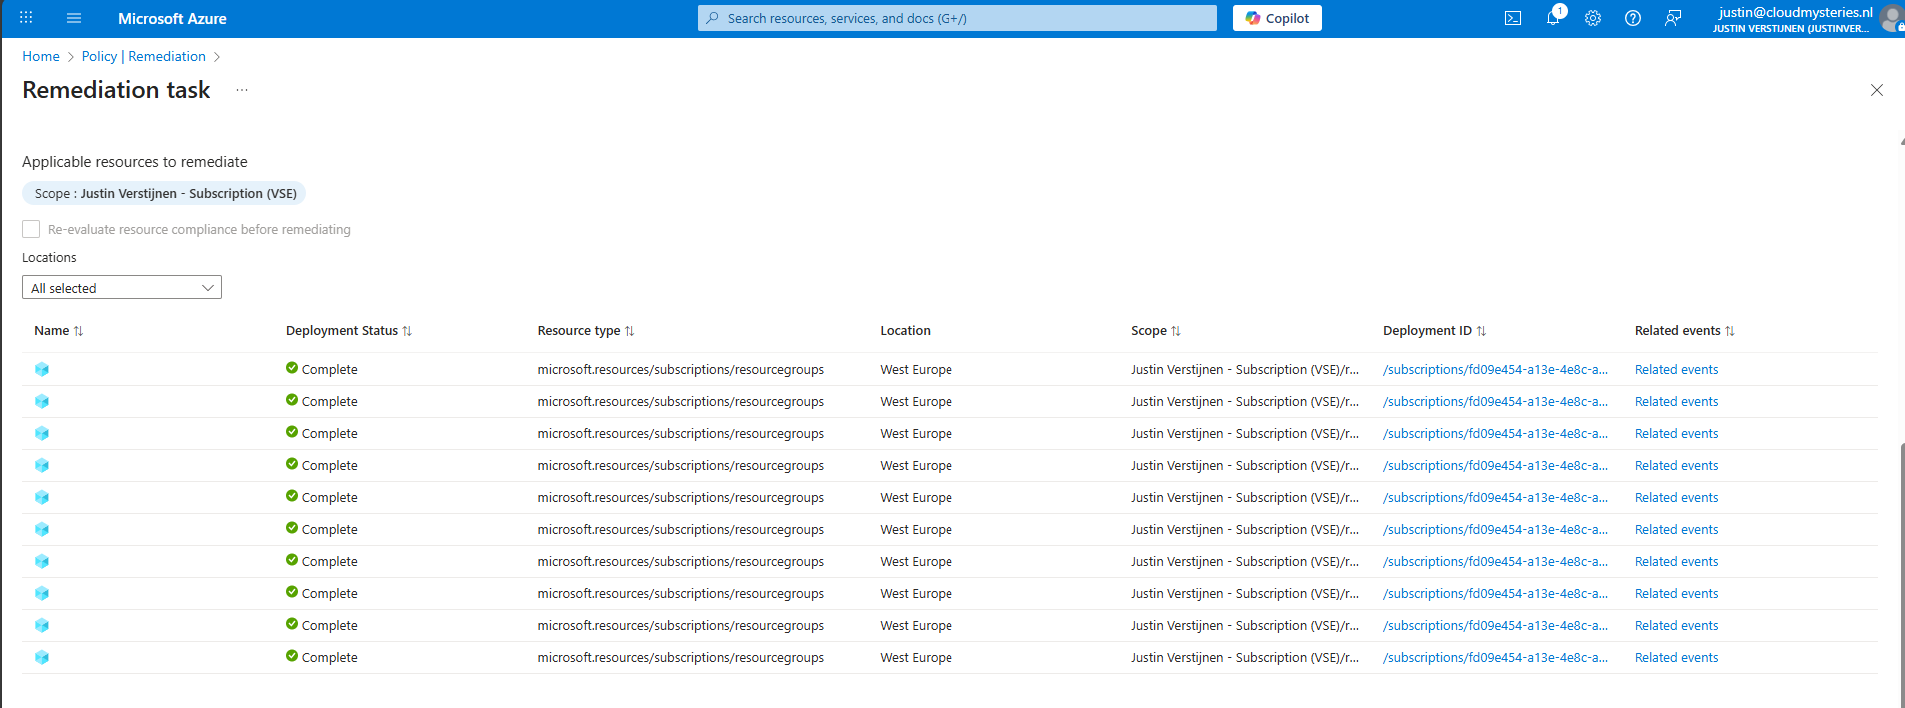
Looks promising! Let’s take a look into the resource groups itself:

Looks great and exactly what we wanted to achieve.
Now with this Azure Policy solution, every resource group created automatically gets a Delete lock type. To exclude resource groups in your subscription to get a lock, go back to the policy assignment:
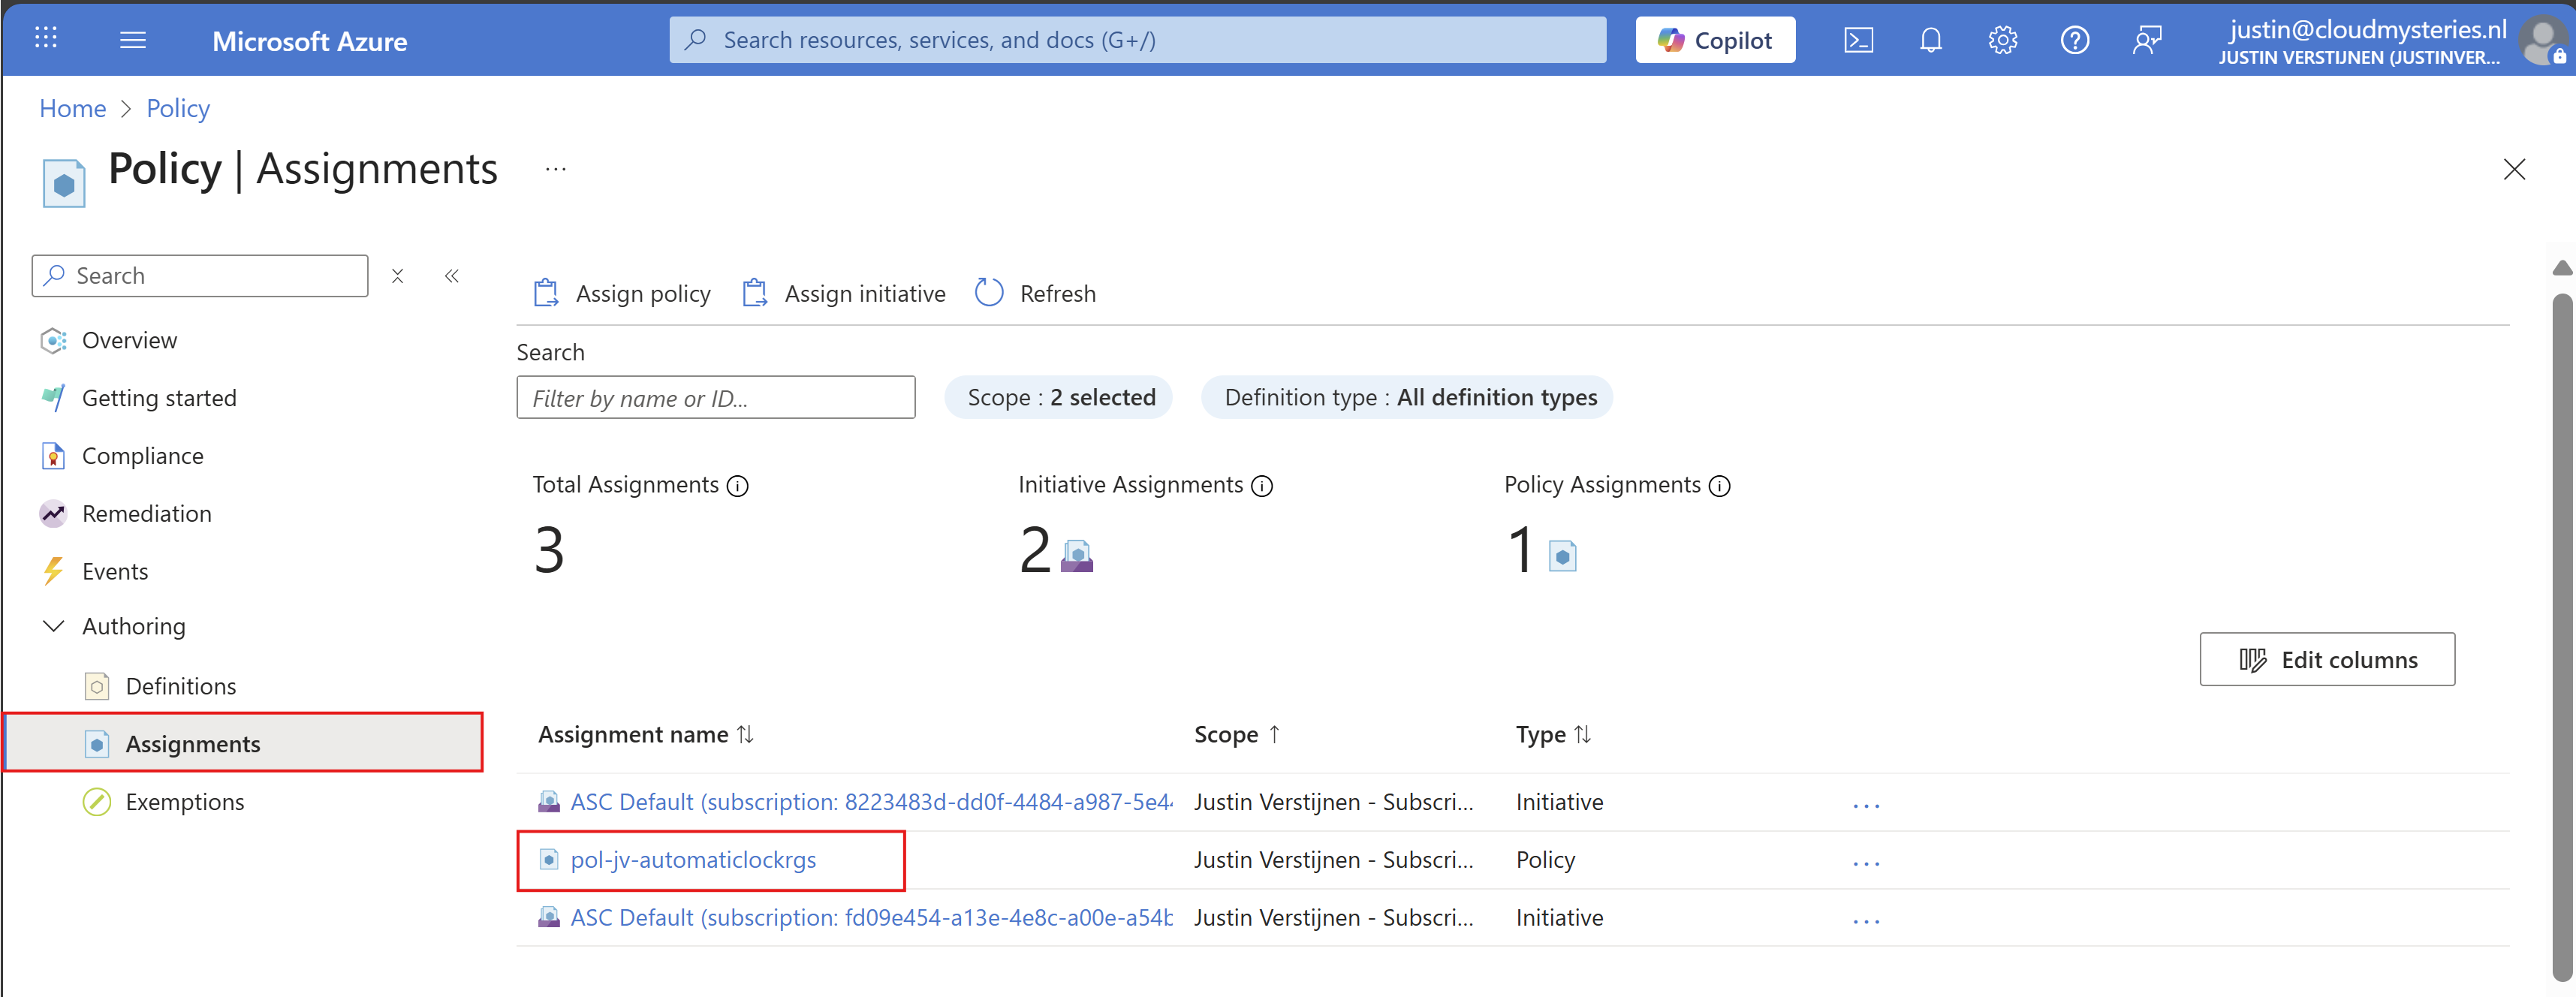
Then click on your policy assignment and then on “Edit assignment”:
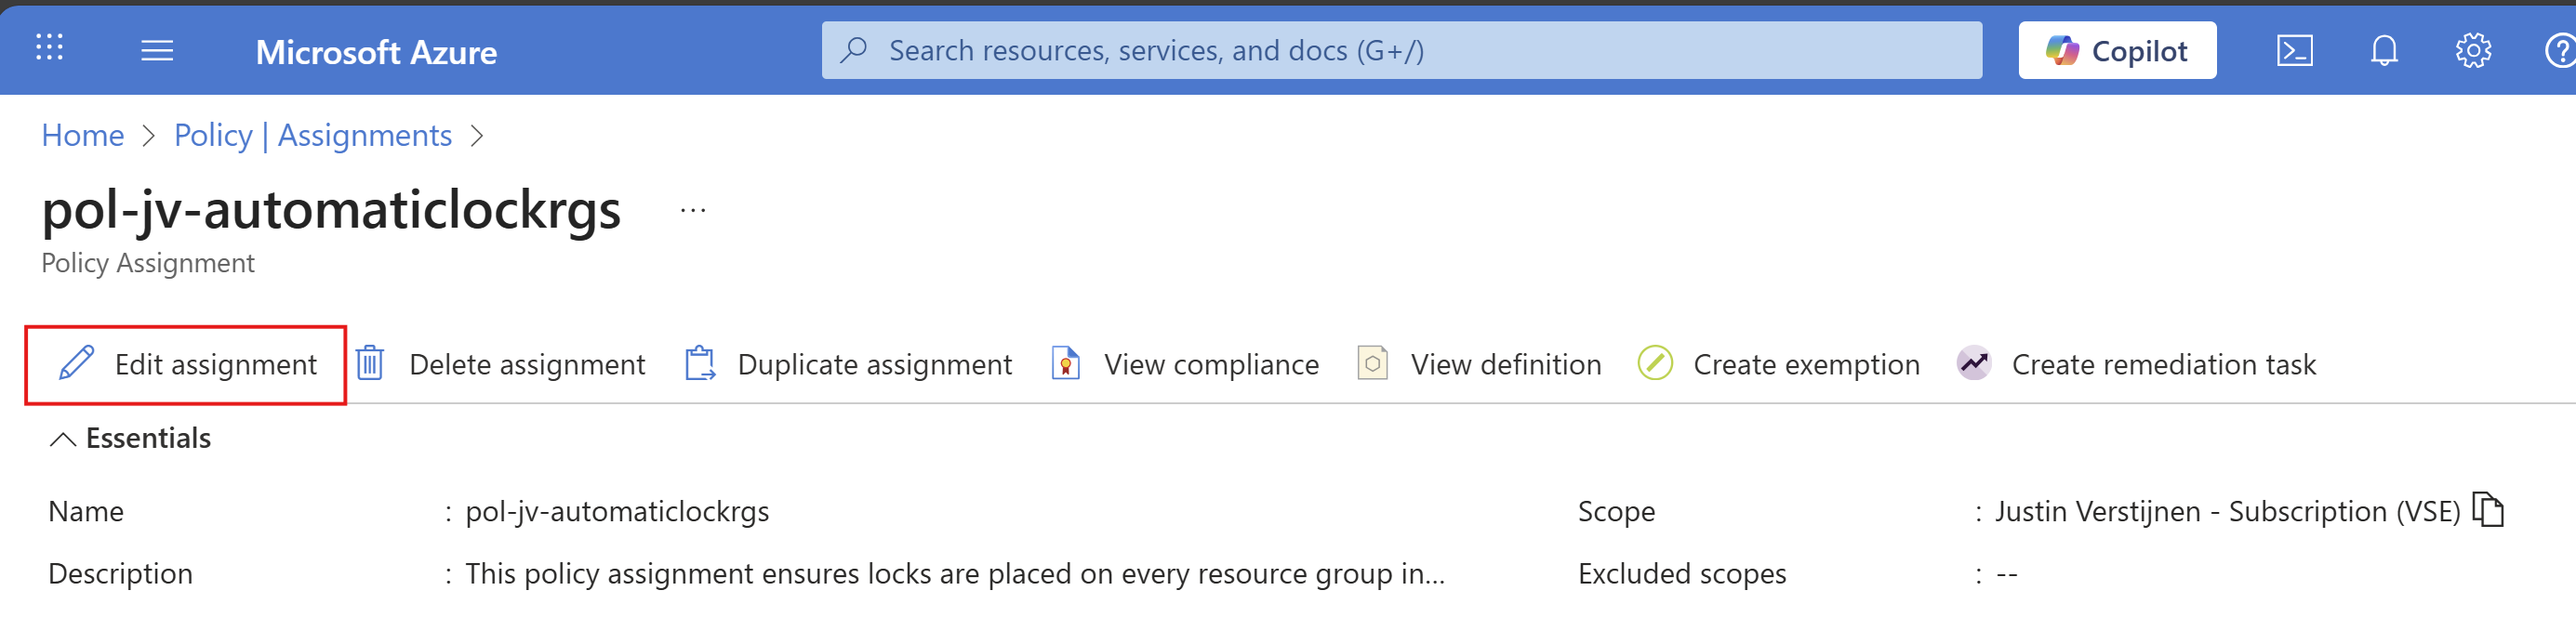
And then click on the “Exclusions” part of this page:

Here you can select the resource groups to be excluded from this automatic locking solution. Recommended is to select the resource groups here where you do some sort of automation on it. A prevent delete lock prevents automations from deleting resources in the resource group.
After selecting your resource groups to be excluded, save the configuration.
Locks in Azure are a great way to prevent some resource groups from accidental deletion and change of resource groups. It also helps by protecting the containing resources to be deleted or changed for a great inheritance-like experience. However they can be useful and great, take care on what resource group to place what lock because they can disrupt some automation tasks.
Azure Policy helps you on top of locks themselves to place Locks automatically on the resouce groups in case you forgot them.
Thank you for reading this guide and I hope it was helpful.
These sources helped me by writing and research for this post;
You have reached the end of the page. You can navigate through other blog posts as well, share this post on X, LinkedIn and Reddit or return to the blog posts collection page. Thank you for visiting this post.
If you think something is wrong with this post or you want to know more, you can send me a message to one of my social profiles at: https://justinverstijnen.nl/about/
If you find this page and blog very useful and you want to leave a donation, you can use the button below to buy me a beer. Hosting and maintaining a website takes a lot of time and money. Thank you in advance and cheers :)
The terms and conditions apply to this post.
In Microsoft Azure, we have some options to monitor and reduce your organizations Carbon emissions (CO2) from services hosted in the cloud. When hosting servers on-premises, they need power, cooling and networking and those are also needed in the cloud. By migrating servers to the cloud doesn’t mean that those emissions do not count. Those emissions are generated on an other location.
In this guide, I will show some features of Microsoft Azure regarding monitoring and reducing carbon emissions.
Azure offers several Carbon Optimization options to help organizations to monitor and reduce their CO₂ emissions and operate more sustainable. You can find this in the Azure Portal by searching for “Carbon optimizations”:
At this dashboard we can find some interesting information, like the total emissions from when your organization started using Azure services, emissions in the last month and the potential reductions that your organization can make.
On the Emissions details pane we can find some more detailed information, like what type and resources contributed to the emissions:
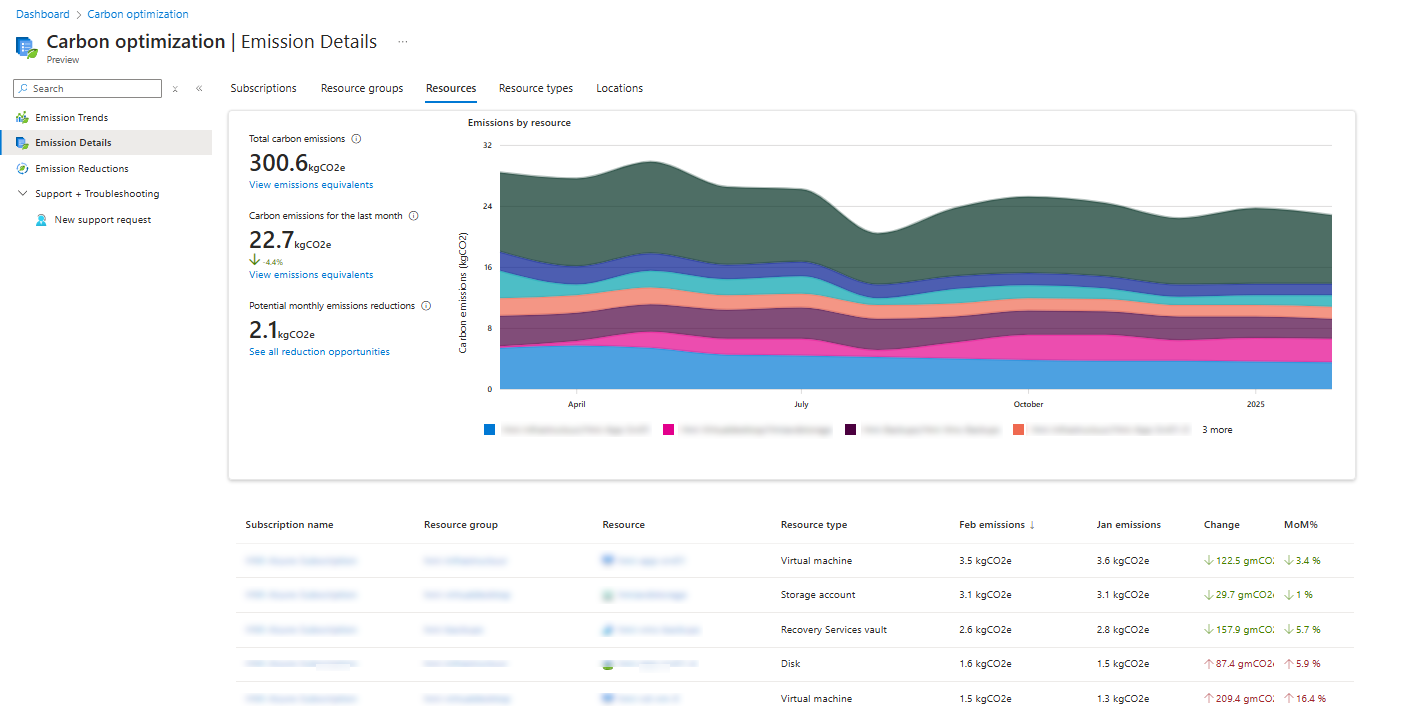
Here we have an overview of an Azure environment with 5 servers, a storage account including backup. You see that the virtual machine on top is the biggest factor of the emissions each month. This has the most impact on the datacenters of Microsoft in terms of computing power. The storage account takes the 2nd place, because of all the redundant options configured there (GRS).
We can also search per type of resources, which makes the overview a lot better and summarized:
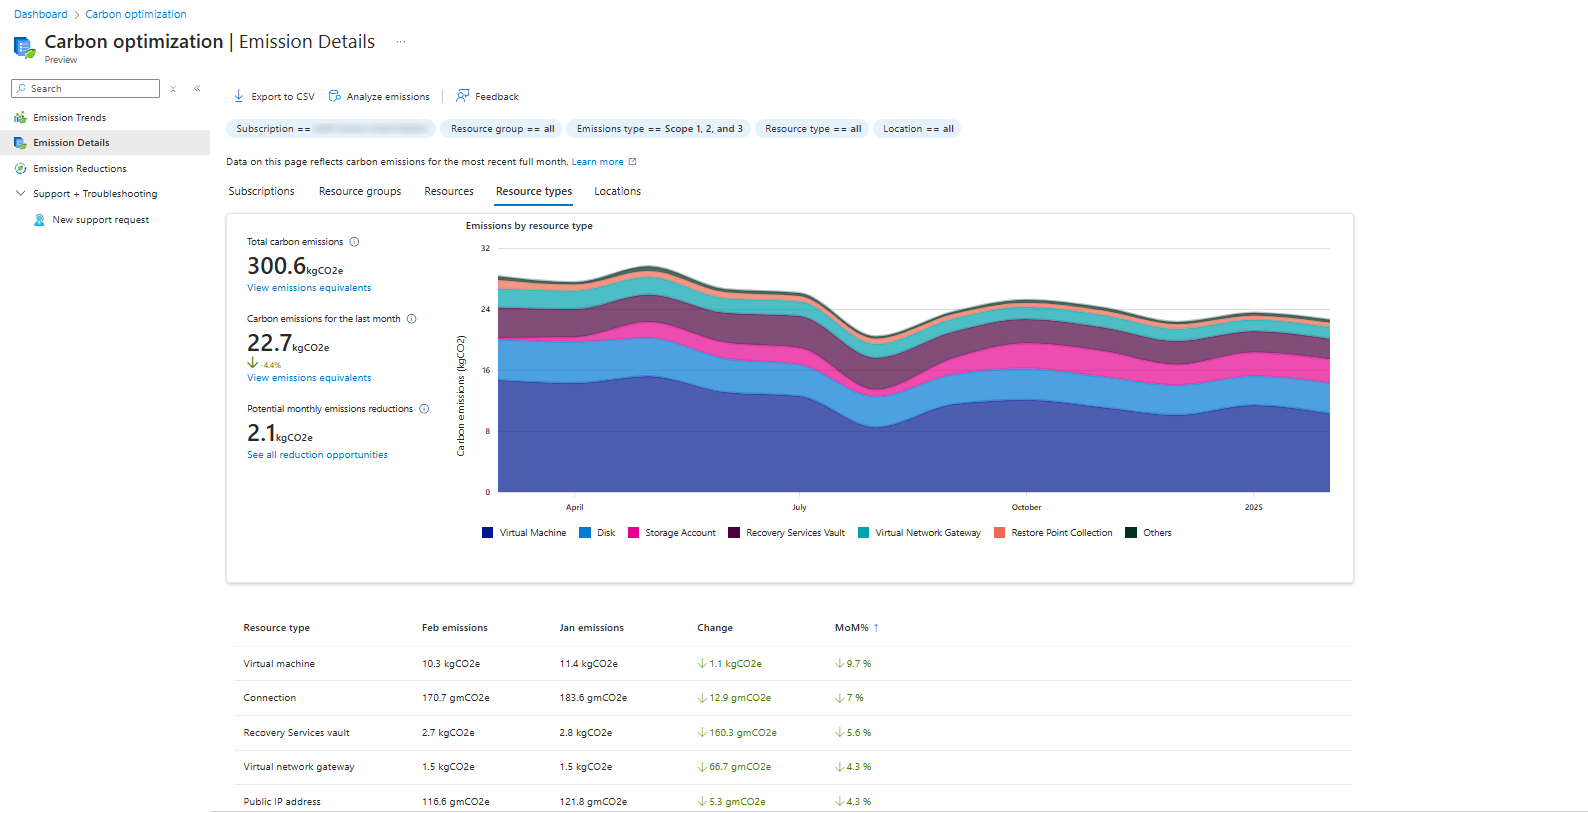
The “Emissions Reductions” detail pane contains advices about how to reduce emissions in your exact environment:
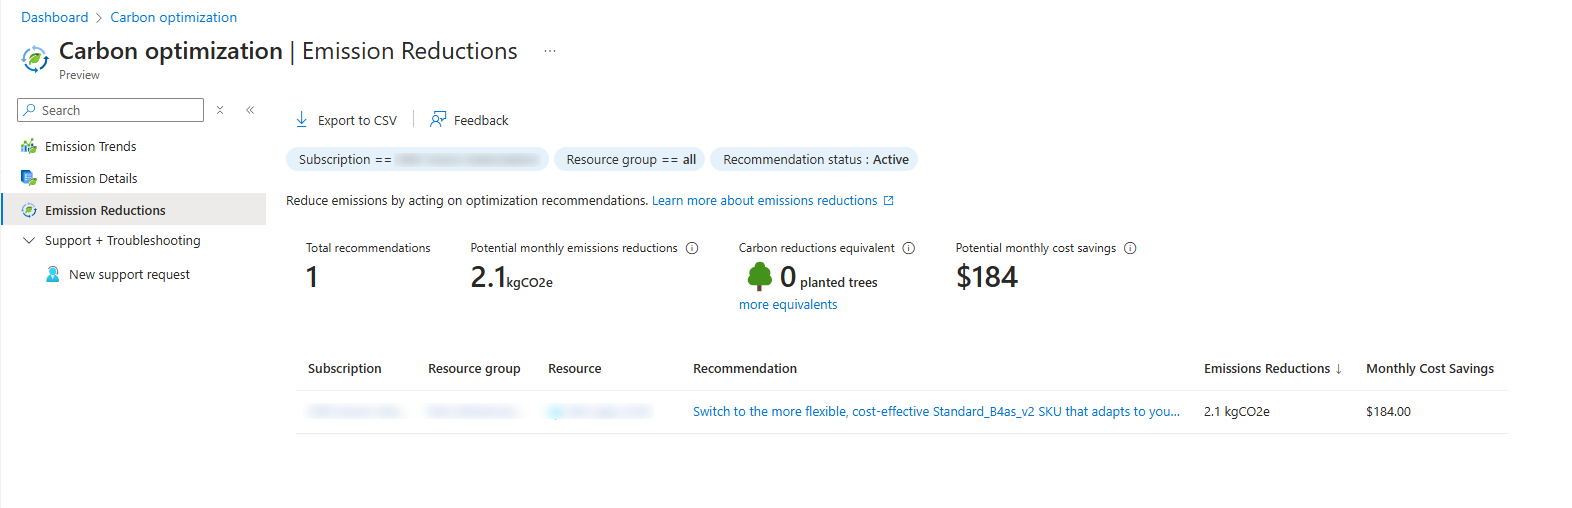
In my environment I have only 1 recommendation, and that is to downgrade one of the servers that has more resources than it needs. However, we have to stick to system requirements of an specific application that needs those resources at minimum.
To understand more about generic Carbon emission calculating, I will add a simple clarification.
Carbon emissions for organizations are mostly calculated in those 3 scopes:
| Scope | Type of Emissions | Sources | Example |
| Scope 1 | Direct emissions | Company-owned sources | Company vehicles, on-site fuel combustion, refrigerant leaks |
| Scope 2 | Indirect emissions from purchased energy | Electricity, heating, cooling | Powering offices, data centers, factories |
| Scope 3 | Indirect emissions from the value chain | Upstream (suppliers) and downstream (customers) | Supply chain, product use, business travel, employee commuting |
Like shown in the table, cloud computing will be mostly calculated as Scope 3 emissions, because of external emissions and not internal. On-premises computing will be mostly calculated as Scope 2. As you already saw, the scopes count for the audited company. This means that Scope 3 emissions of an Microsoft customer may be Scope 2 emissions for Microsoft itself.
While we can use the Azure cloud to host our environment, hosting on-premises is still an option too. However, hosting those servers yourself means a lot of recurring costs for;
An added factor is that energy to power those on-premises servers are mostly done with “grey” energy. Microsoft Azure guarantees a minimum of 50% of his energy is from renewable sources like solar, wind, and hydro. By the end of 2025, Microsoft strives to reach the 100% goal. This can make hosting your infrastructure on Azure 100% emissions free.
While this page may not be that technical and interesting for you and your company, for some companies this can be interesting information.
However, Microsoft does not recommend using these numbers in any form of marketing campaigns and to only use as internal references.
Thank you for reading this guide and I hope it was interesting.
You have reached the end of the page. You can navigate through other blog posts as well, share this post on X, LinkedIn and Reddit or return to the blog posts collection page. Thank you for visiting this post.
If you think something is wrong with this post or you want to know more, you can send me a message to one of my social profiles at: https://justinverstijnen.nl/about/
If you find this page and blog very useful and you want to leave a donation, you can use the button below to buy me a beer. Hosting and maintaining a website takes a lot of time and money. Thank you in advance and cheers :)
The terms and conditions apply to this post.
This page is about Azure Migrate and how you can migrate an on-premises server or multiple servers to Microsoft Azure. This process is not very easy, but it’s also not extremely difficult. Microsoft hasn’t made it as simple as just installing an agent on a VM, logging in, and clicking the migrate button. Instead, it is built in a more scalable way.
*Windows Server 2016 is the only supported OS, please do not install other versions as this will not work.
Evaluation versions may be used.
Officially, it is not supported to combine the Discovery Server and the Migration Server. These must be separate servers according to the official documentation. However, I was able to successfully combine them in a testing environment.
The migration of servers to Microsoft Azure consists of 3 phases: Discovery, Replicate and then Migrate.
Every migration starts with some sort of preparations. This can consist of:
Make sure that this information is described in a migration plan.
Go to the Azure Portal, navigate to Azure Migrate:

Open the “Servers, databases, and web apps” blade on the left:
On this page, create a new Azure Migrate project.
When this is set-up, we go to our migration project:
Under “Migration Tools”, click “Discover”.
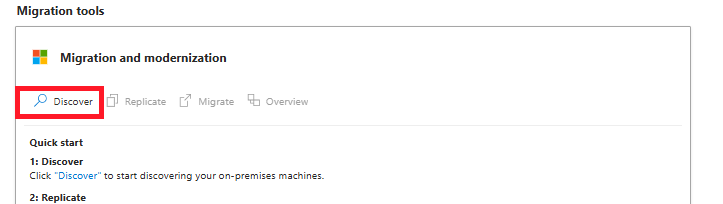
On the next page, we have to select the source and target for our migration. In my case, the target is “Azure VM”.
The source can be a little confusing, but hopefully this makes it clear:
In my case, i used VMware ESXi to host a migration testing machine, so i selected “Physical”.
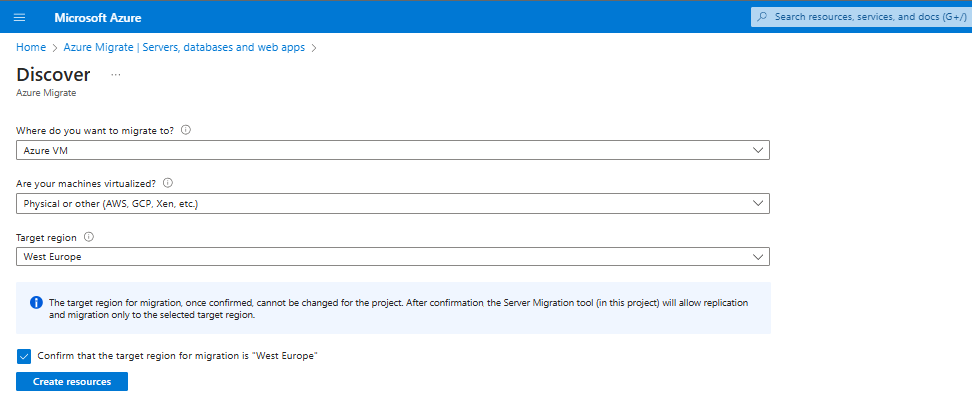
Hit “Create resources” to let Azure Migrate prepare the rest of the process.
Now we can download the required registration key to register our migration/processing machine.
Save the VaultCredentials file to a location, we will need this in a further step to register the agents to the Migration project.
In step 3 we have to configure our processing server which replicates the other servers to Microsoft Azure. This is a complete standalone machine on the same VMware host in my case and is a Windows Server 2016 Datacenter Evaluation installation.
Now, we have to install the configuration server:
After the initial installation of this server, we have to do some tasks:
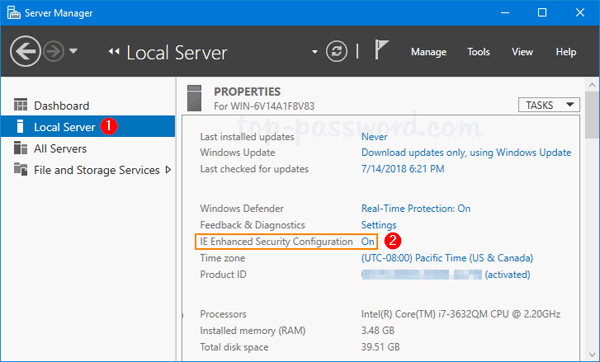
Now we have to install the Replication appliance software from the last part of Step 2. You can find this in the Azure Portal under the project or by clicking this link: https://aka.ms/unifiedinstaller_we
Install this software and import the .VaultCredentials file.
Document all settings and complete the installation process, because we will need it in step 5.
After these steps, the wizard asks us to generate a passphrase. This will be used as encryption key. We don’t want to transfer our servers unencrypted over the internet right?
Generate a passphrase of a minimum of 12 characters and store it in a safe place like a Password vault.
In step 4 we have to configure our Configuration/Processing server and prepare it to perform the initial replication and migration itself.
After installing the software in step 3, there will be some icons on the desktop:
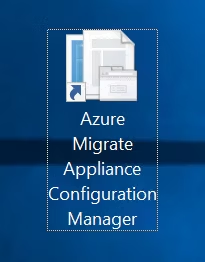
We have to create a shared credential which can be used on all servers to remote access them. We can do this with the “Cspsconfigtool”. Open this and create a new credential.
You can use all sorts of credentials (local/domain), as long as they have local administrator permissions on the target machines.
In my case, the migration machine had the default “Administrator” logon so I added this credential to the tool.
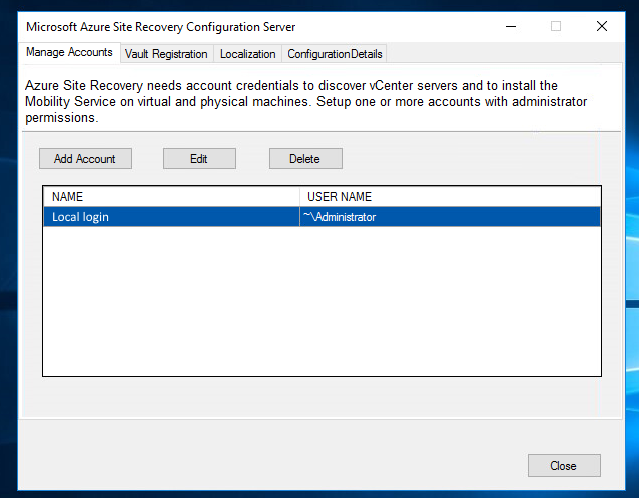
You have to create a credential for every server. This can be a “one-fits-all” domain logon, or when all logins for servers are unique add them all.
To successfully migrate machines to Microsoft Azure, each machine must have the Mobility Agent installed. This agent establishes a connection with the Configuration/Process Server, enabling data replication.
The agent can found at two different places:
On each machine you must install this agent from the Configuration/Process Server. You can easily access the folder via the network:
Open the installation (.exe file) on one of the servers and choose to install the Mobility service. Then click “Next” to start the installation.
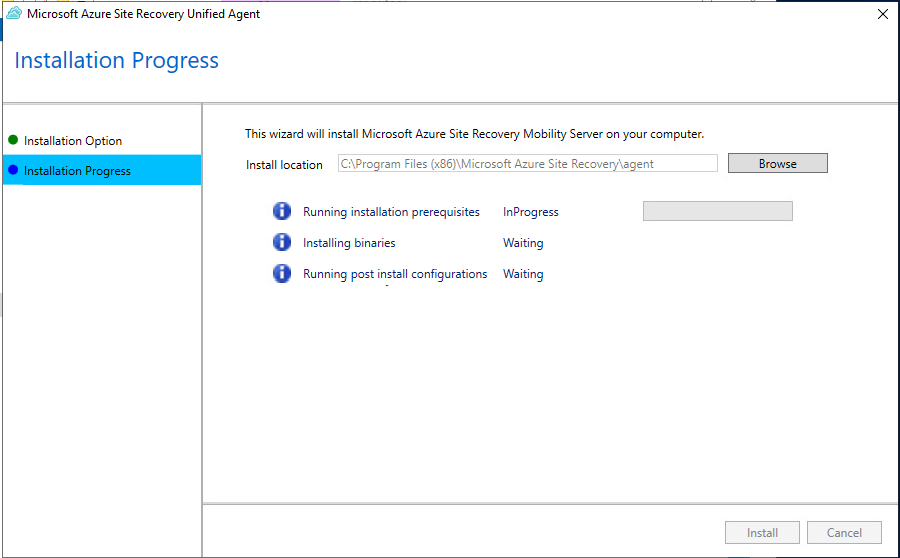
After the installation is complete (approximately 5 to 10 minutes), the setup will prompt for an IP address, passphrase, and port of the configuration server. Enter these details from step 3 and the port 443.
Once the agent is installed, the server appears in the Azure Portal. This may take 15 minutes and may require a manual refresh.
When the server is visible like in the picture above, you can proceed to step 6.
Now we can perform the initial replication (Phase 2) of the servers to Azure. To perform the replication of the virtual servers, open the Azure Portal and then navigate to Azure Migrate.
Under “Migration tools”, click on “Replicate”.
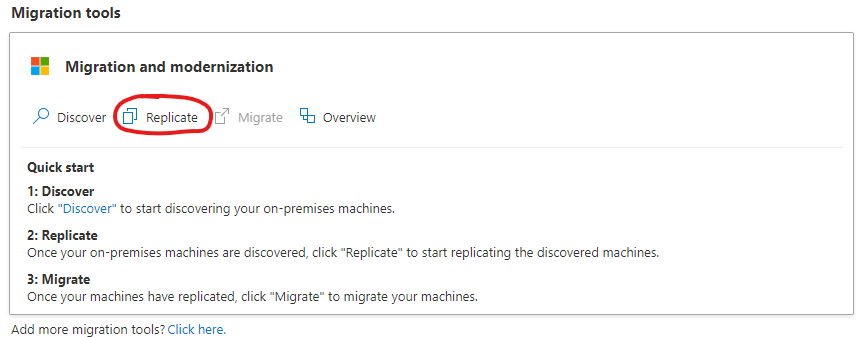
Select your option again and click Next. In my case, it is “Physical” because of using a free version of VMware ESXi.
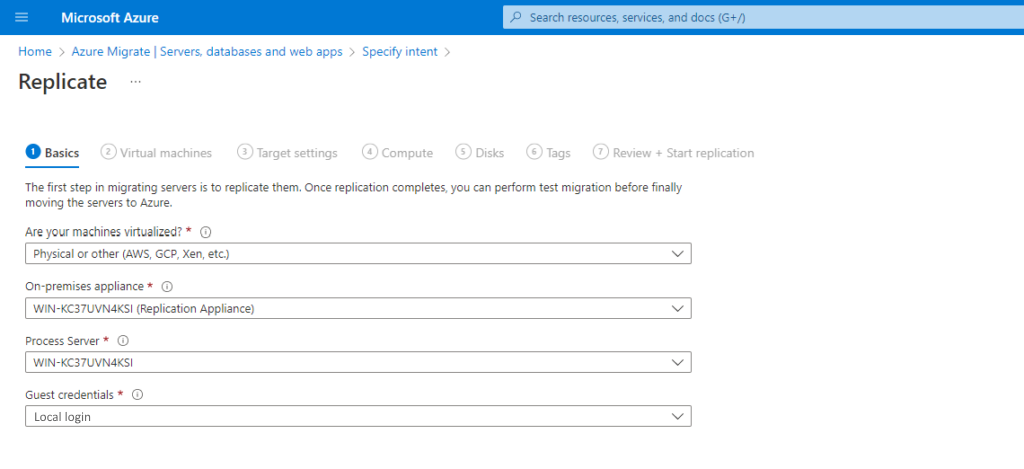
Select the machine to replicate, the processing server and the credentials you created in step 4.
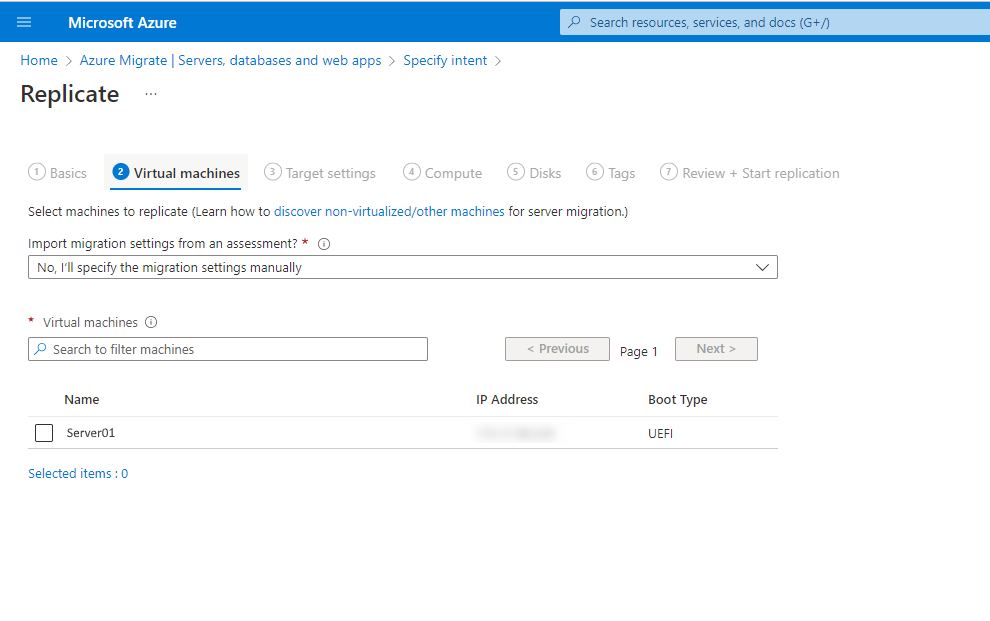
Now we have to select the machines to replicate. If all servers use the same processing server and credentials, we can select all servers here.
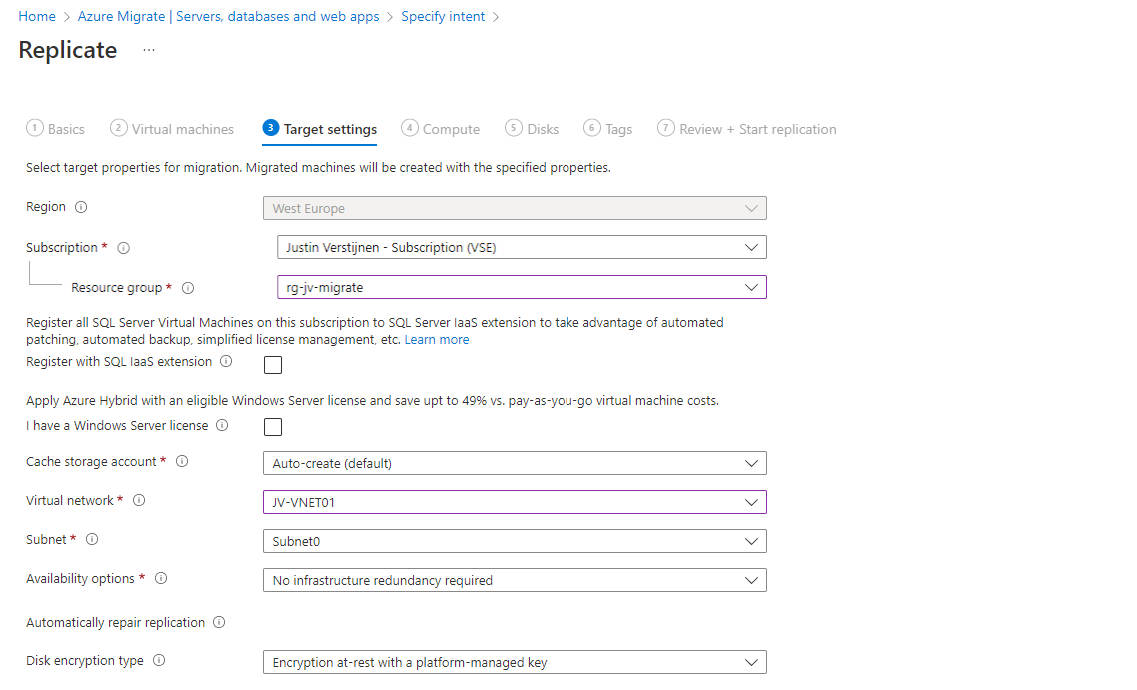
At the next page, we have to configure our target VM in Azure. Configure it to fit your needs and click “Next”.
After this wizard, the server is being synchronized at a low speed with a temporary Azure Storage account, which can take anywhere from a few hours to a few days. Once this replication is complete, the migration will be ready, and the actual final migration can be performed.
Wait for this replication to be complete and be 100% synchronized with Microsoft Azure before advancing to Step 7/Phase 3.
We arrived at the final step of the migration. Le Moment Suprême as they say in France.
Ensure that this migration is planned in a sort of maintenance window or when no end-users are working to minimize disruptions or data loss.
Now the source server must be shut down to prevent data loss. This also allows the new instance in Azure to take over its tasks. Shut it down properly via Windows and wait until it is fully powered off.
Then, go to the Azure Portal, navigate to Azure Migrate, and under “Migration tools”, click on “Migrate”.
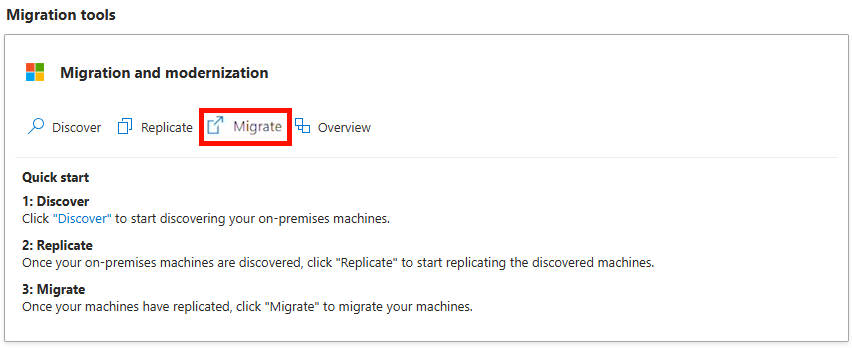
Go through the wizard and monitor the status. In my case, this process took approximately 5 minutes, after which the server was online in Microsoft Azure.
And now it’s finished.
Migrating a server or multiple servers with the Azure Migrate tool is not overly difficult. Most of the time is planning and configuring. Additionally, I encountered some issues here and there which I have described on this page along with how to prevent them.
I have also done some migration in production from on-premises to Azure with Azure Migrate and when it’s completely set-up, its a really reliable tool to perform so called “Lift-and-shift” migrations.
Thank you for reading this guide!
You have reached the end of the page. You can navigate through other blog posts as well, share this post on X, LinkedIn and Reddit or return to the blog posts collection page. Thank you for visiting this post.
If you think something is wrong with this post or you want to know more, you can send me a message to one of my social profiles at: https://justinverstijnen.nl/about/
If you find this page and blog very useful and you want to leave a donation, you can use the button below to buy me a beer. Hosting and maintaining a website takes a lot of time and money. Thank you in advance and cheers :)
The terms and conditions apply to this post.
With the Azure Start/Stop solution we can save costs in Microsoft Azure and save some environmental impact. In this guide I will explain how the solution works, how it can help your Azure solutions and how it must be deployed and configured.
The Start/Stop solution is a complete solution and collection of predefined resources built by Microsoft itself. It is purely focussed on starting VMs and stopping VMs based on some rules you can configure. The solution consists of some different resources and dependencies:
| Type of resource | Purpose |
| Application Insights | Enables live logs in the Function App for troubleshooting |
| Function App | Performs the underlying tasks |
| Managed Identity (on Function App) | Gets the permissions on the needed scope and is the “service account” for starting and stopping |
| Log Analytics Workspace | Stores the logs of operations |
| Logic Apps | Facilitate the schedule, tasks and scope and sends this to the Function App to perform |
| Action Group/Alerts | Enables notifications |
The good thing about the solution is that you can name all resources to your own likings and configure it without the need to built everything from scratch. It saves a lot of time and we all know, time is money.
To learn more about the Start/Stop solution, check out this page: https://learn.microsoft.com/en-us/azure/azure-functions/start-stop-vms/overview
After deploying the template to your resource group, you can find some Logic Apps that are deployed to the resource group:
These all have their own task:
In this guide, I will stick to the Scheduled Start and Scheduled Stop tasks because this is what we want.
With this solution you can start and stop virtual machines on scheduled times. This can save Azure Consumption costs because you pay significantly less when VMs are stopped (deallocated) instead of turned on and not being used. You can see this as lights in your house. You don’t leave them all on at night do you?
Let’s say, we have 5 servers (E4s_V5 + 256GB storage) without 1 or 3 year reservations and a full week, which is 168 hours. We are using the Azure calculator for these estimations:
| Running hours | Information | Hours | Costs (a week) | % costs saved |
| 168 hours | Full week | 24/7 | $ 619 | 0% |
| 126 hours | Full week ex. nights | 6AM to 12PM | $ 517 | 16% |
| 120 hours | Only workdays | 24/5 | $ 502 | 19% |
| 75 hours | Business hours + spare | 6AM to 9PM | $ 392 | 37% |
Check out how these calculations are made: https://azure.com/e/763a431f77dc4c73868c4f250e6cf522
As you can see, the impact on the costs is great, according to the times you enable the servers. You can save up to 35% but at the expense of availability. Also, we always have to pay for our disks IP addresses so the actual savings are not linear to the running hours.
There can be some downsides to this, like users wanting to work in the evening hours or on weekends. The servers are unavailable, so is their work.
To make our life easier, we can deploy the start/stop function directly from a template which is released by Microsoft. You can click on the button below to deploy it directly to your Azure environment:
Source: https://learn.microsoft.com/en-us/azure/azure-functions/start-stop-vms/deploy
After clicking the button, you are redirected to the Azure Portal. Log in with your credentials and you will land on this page:
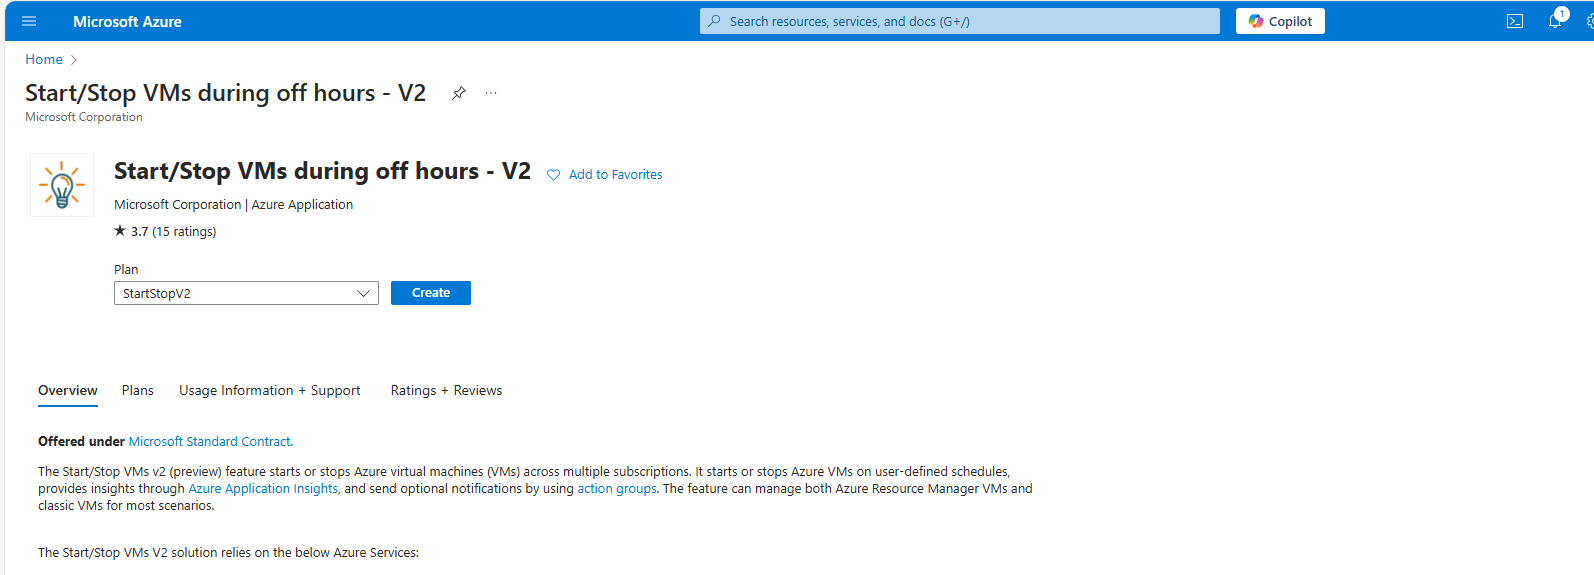
Selectthe appropriate option based on your needs and click on “Create”
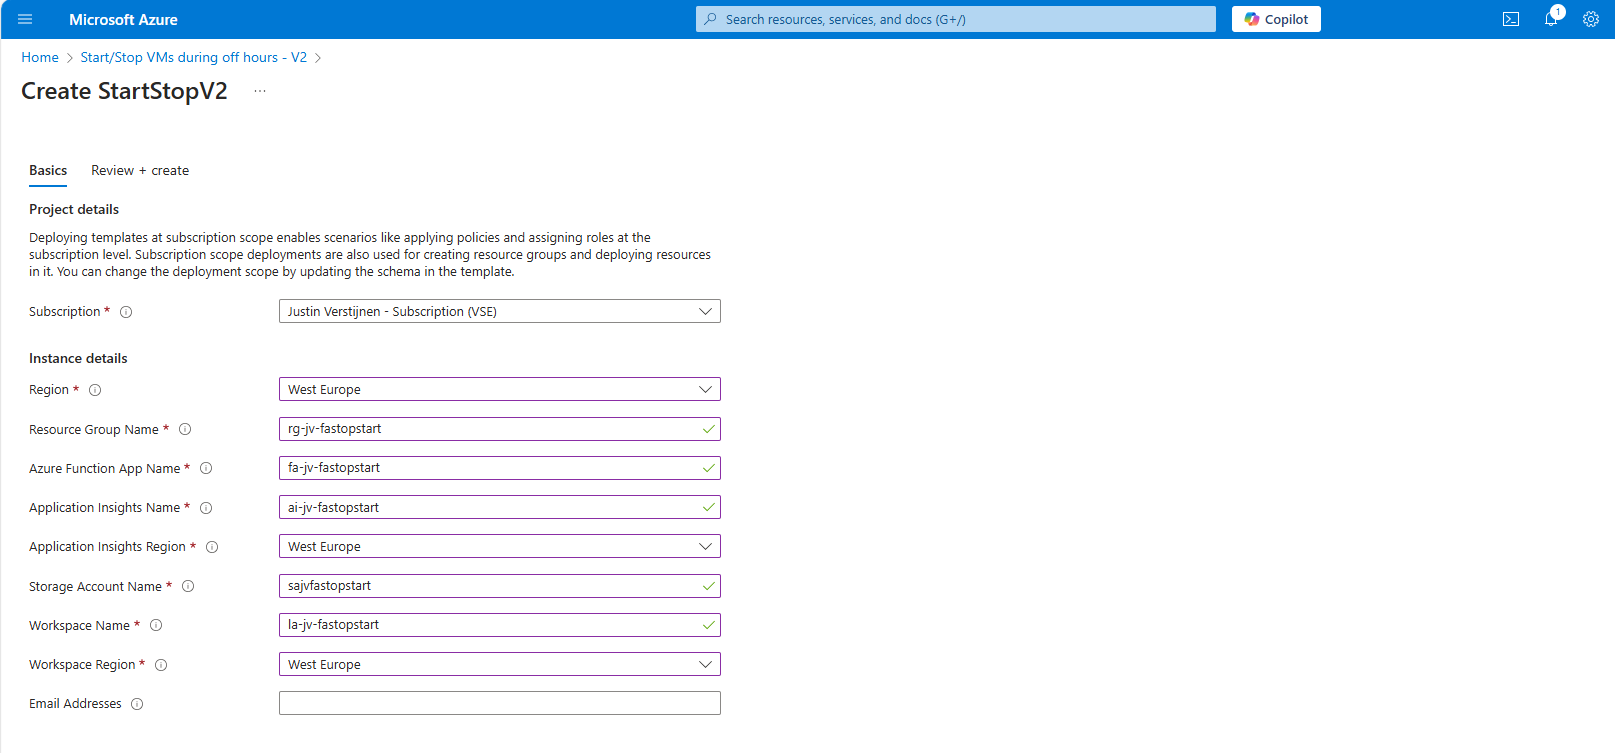
You have to define names of all the dependencies of this Start/Stop solution.
After this step, create the resource and all the required components will be built by Azure. Also all the permissions will be set correctly so this minimizes administrative effort.
There is created a managed identity and will be assigned “Contributor” permissions on the whole resource group. This way it has enough permissions to perform the tasks needed to start and shutdown VMs.
In Azure, search for Logic Apps and go to the ststv2_vms_Scheduled_start resource.
Open the Resource and on the left, click on the “Logic App Desginer”
Here you see some tasks and blocks, similar to a Power Automate flow if you are familiar with those.
We can configure the complete flow here in the blocks:
Click on the “Recurrence” block and change the parameters to your needs. In my case, i configured to start the VM on 13:45 Amsterdam time.
After configuring the scheduled start time, you can close the panel on the right and save the configuration.
After configuring the recurrence we can configure the scope of the start logic app. You can do that by clicking on “Function-Try”.
On the “Settings” tab you can see that the recurrence we configured is used in this task to check if the time is matched. If this is a “success” the rest of the Logic App will be started.
Now we have to open the “Logic app code view” option on the left and we have to make a change to the code to limit the scope of the task.
Now we have to look out for a specific part of this code which is the “Function-Try” section. In my case, this section starts on line 68:
Now we have to paste the Resource ID of the resource group in here. You can find the Resource ID of the resource very fast and in a copy-paste manner by navigating to the resource group on a new browser tab, go to properties and in the field “Resource ID”:
Paste the Resource ID of the resource group and head back to the logic app code view browser tab.
Paste the copied Resource ID there and add a part of code just under the “RequestScopes” parameter if you want to exclude specific VMs:
"ExcludedVMLists": [],In the “ExcludedVMLists” part you can paste the resource ID of virtual machines in the same resource group which you want to exclude from the Auto Start/Stop solution.
Now my “Function-Try” code block looks like this (line 68 to line 91):
"Function-Try": {
                "actions": {
                    "Scheduled": {
                        "type": "Function",
                        "inputs": {
                            "body": {
                                "Action": "start",
                                "EnableClassic": false,
                                "RequestScopes": {
                                    "ExcludedVMLists": [],
                                    "ResourceGroups": [
                                        "/subscriptions/fd09e454-a13e-4e8c-a00e-a54b1385e2bd/resourceGroups/rg-jv-fastopstart"
                                    ]
                                }
                            },
                            "function": {
                                "id": "/subscriptions/fd09e454-a13e-4e8c-a00e-a54b1385e2bd/resourceGroups/rg-jv-fastopstart/providers/Microsoft.Web/sites/fa-jv-fastopstartblfa367thsw62/functions/Scheduled"
                            }
                        }
                    }
                },
                "runAfter": {},
                "type": "Scope"
            }
If you want to copy and paste this code in your own configuration, you have to change the resource group to your own on line 12 above and the Resource ID of the Azure Function on line 17.
After this change, save the configuration and go back to the Home page of the logic app.
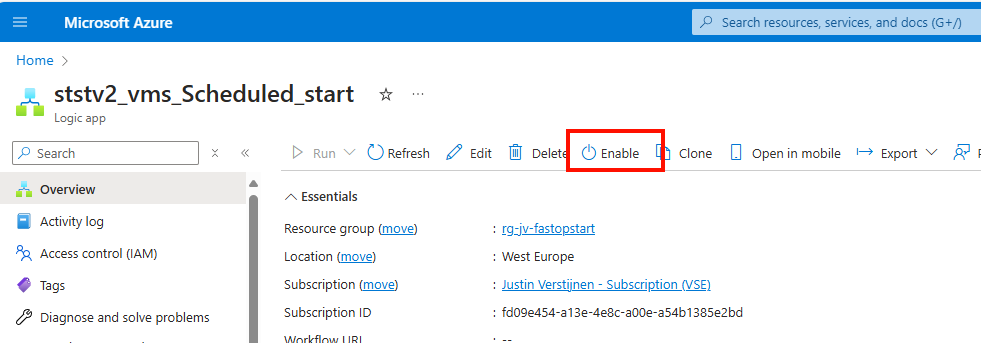
Enable the logic app by clicking “Enable”. This starts the logic app and begins checking the time and starting of the VMs.
To configure the Auto stop schedule, we have to go to the Logic app “ststv2_vms_Scheduled_stop”
Go to the Logic App Designer, just when we did with the Auto Start schedule:
Click on the “Recurrence” block and configure the desired shutdown time.
After changing it to your needs save the logic app and go to the “Logic app code view.
Again, go to Line 68 and change the resource group to the “Resource ID” of your own Resource Group. In my case, the code looks like this (line 68 to line 91):
"Function-Try": {
                "actions": {
                    "Scheduled": {
                        "type": "Function",
                        "inputs": {
                            "body": {
                                "Action": "stop",
                                "EnableClassic": false,
                                "RequestScopes": {
                                    "ExcludedVMLists": [],
                                    "ResourceGroups": [
                                        "/subscriptions/fd09e454-a13e-4e8c-a00e-a54b1385e2bd/resourceGroups/rg-jv-fastopstart"
                                    ]
                                }
                            },
                            "function": {
                                "id": "/subscriptions/fd09e454-a13e-4e8c-a00e-a54b1385e2bd/resourceGroups/rg-jv-fastopstart/providers/Microsoft.Web/sites/fa-jv-fastopstartblfa367thsw62/functions/Scheduled"
                            }
                        }
                    }
                },
                "runAfter": {},
                "type": "Scope"
            }
In the “ExcludedVMLists” part you can paste the resource ID of virtual machines in the same resource group which you want to exclude from the Auto Start/Stop solution.
After configuring the Function-Try block you can save the Logic app and head to its Home page and enable the Logic App to make it active.
Now i configured the machine to start on 13:45. You will not see the change directly in the Azure Portal but it will definitely start the VM.
At 13:45:
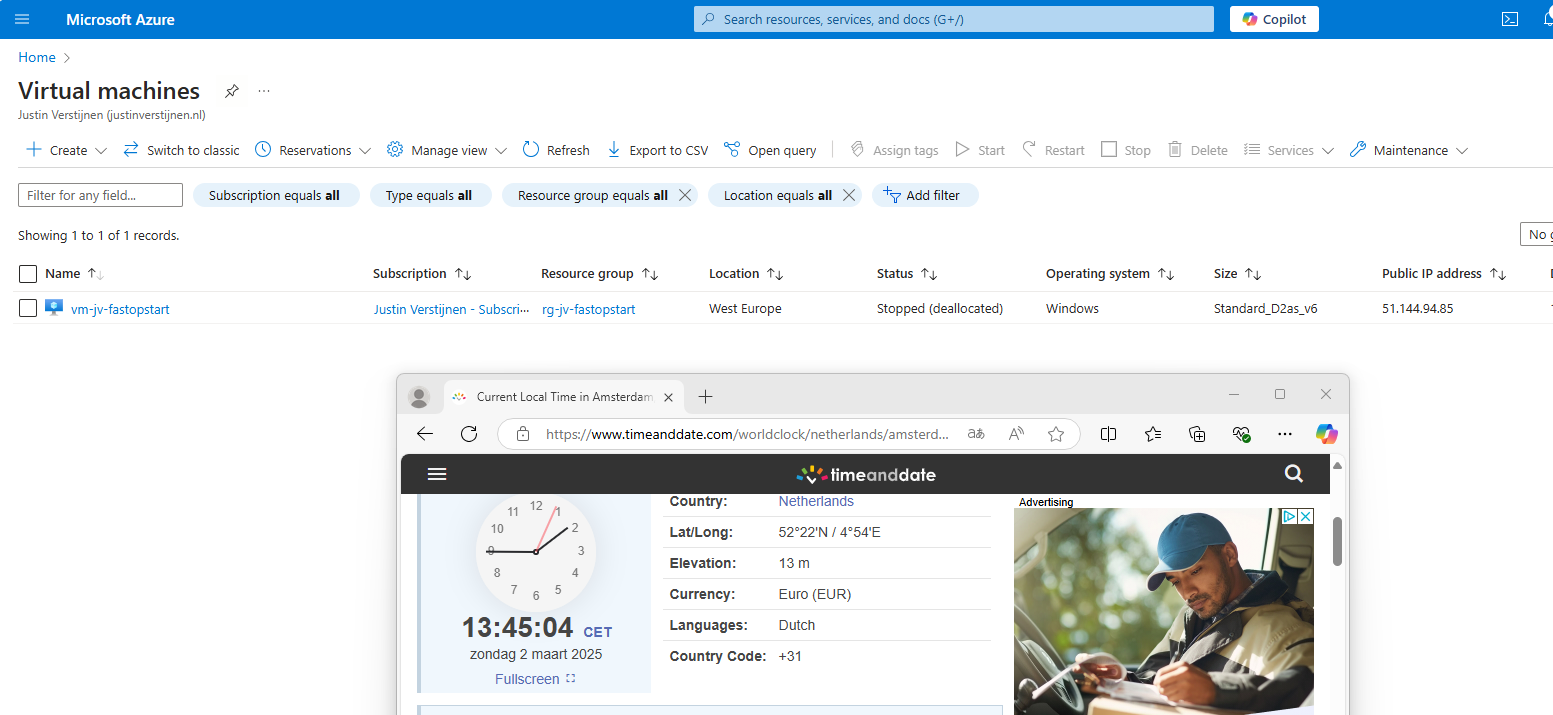
And some minutes later:
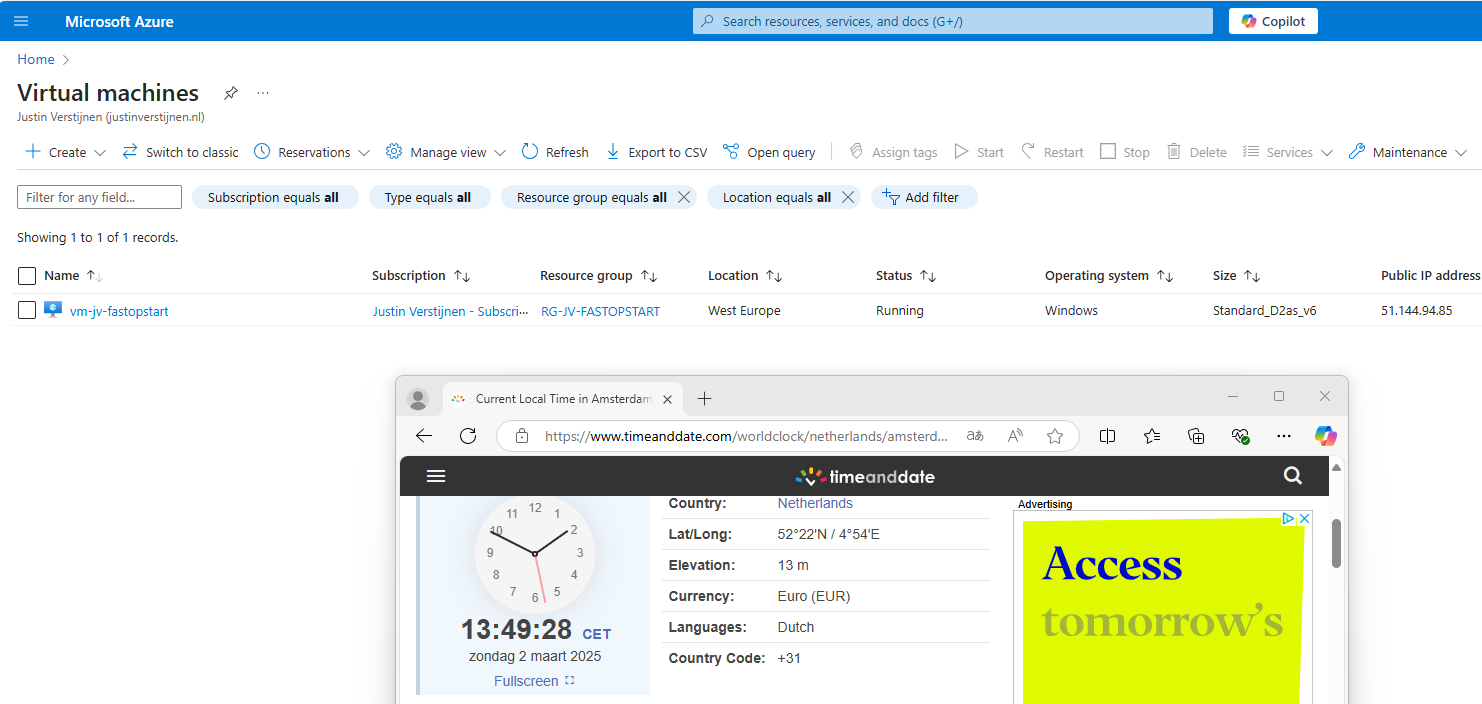
Now the starting procedure will work for all your VMs in that same resource group, excluding VMs you excluded.
Now i configured the machine to stop on 14:15. My VM is running at this time to test if it will shut down:
At 14:15:
And some time later:
This confirms that the solution is working as intended.
There may be some cases that the solution does not work or gives other errors. We can troubleshoot some basic things in order to solve the problem.
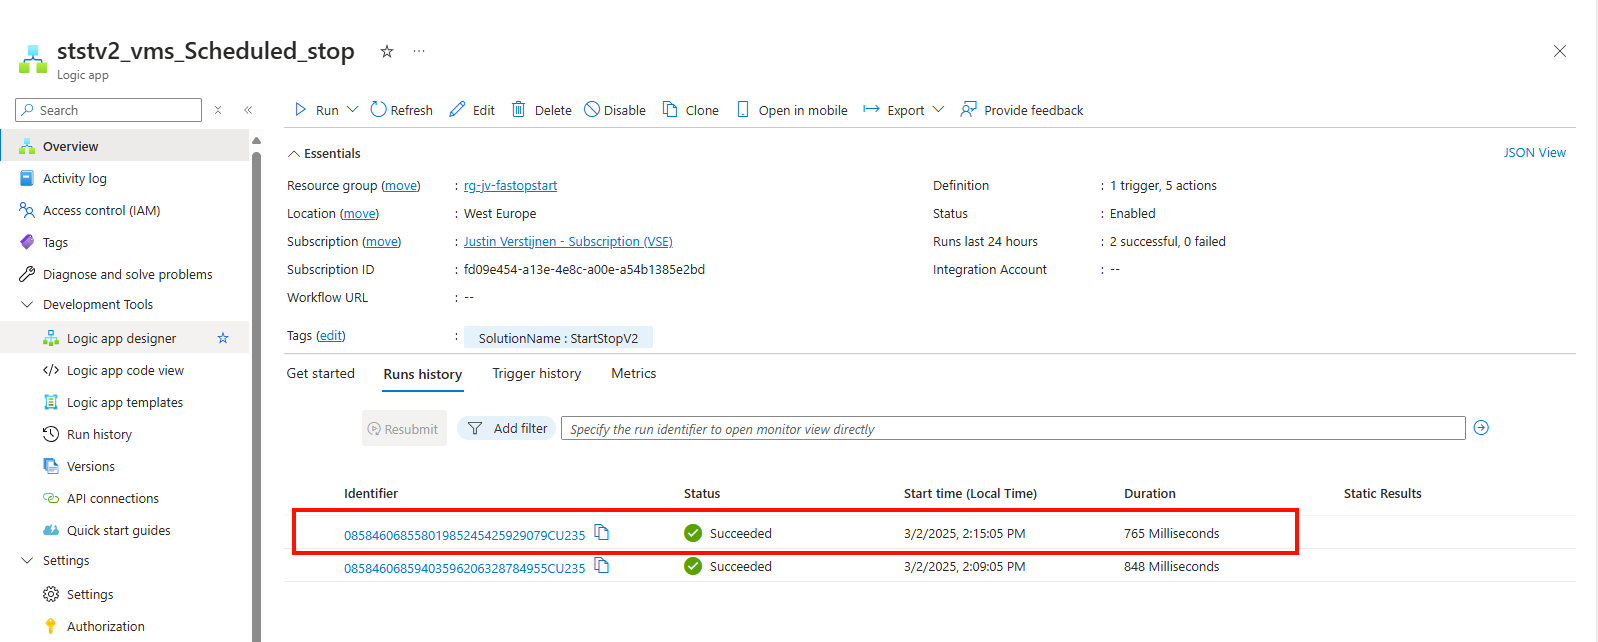
Maybe your time or timezone is incorrect. By going to the logic app and then the “Runs history” tab, you can view if the logic app has triggered at the right time.
The underlying Azure Function app must have the right permissions in your Resource Group to be able to perform the tasks. You can check the permissions by navigating to your Resource Group, and them check the Access Control (IAM) menu.
Double check if the right Functions App/Managed Identity has “Contributor” permissions to the resource group(s).
In some cases, you want to be alerted when an automatic tasks happens in Azure so if any problem ill occur, you are aware of the task being executed.
You can configure notifications of this solution by searching for “Notifications” in the Azure Portal and heading to the deployed Action Group.
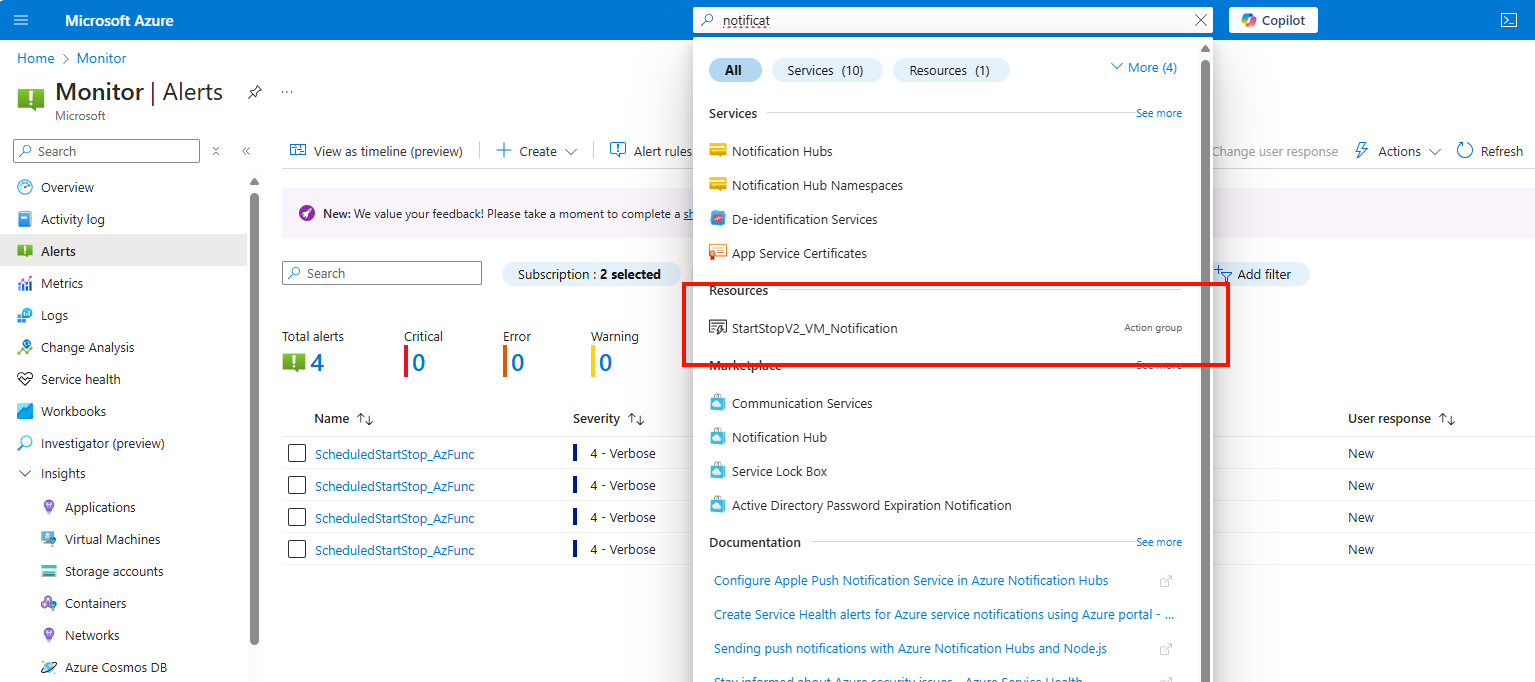
Here you can configure what type of alert you want to receive when some of the tasks are executed.
Click on the “Edit” button to edit the Action Group.
Here you can configure how you want to receive the notifications. Be aware that if this task is executed every day, this can generate a huge amount of notifications.
This is an example of the email message you will receive:
You can further change the texting of the notification by going into the alerts in Azure.
This solution is a excellent way to save on Azure VM consumption costs and shutting down VMs when you don’t need them. A great example of how computing in Azure can save on costs and minimize usage of the servers. Something which is a lot more challenging in On-premises solutions.
This solution is similar to the Scaling Plans you have for Azure Virtual Desktop, but then for non-AVD VMs.
Thank you for reading this page and i hope i helped you by saving costs on VM consumption in Microsoft Azure.
You have reached the end of the page. You can navigate through other blog posts as well, share this post on X, LinkedIn and Reddit or return to the blog posts collection page. Thank you for visiting this post.
If you think something is wrong with this post or you want to know more, you can send me a message to one of my social profiles at: https://justinverstijnen.nl/about/
If you find this page and blog very useful and you want to leave a donation, you can use the button below to buy me a beer. Hosting and maintaining a website takes a lot of time and money. Thank you in advance and cheers :)
The terms and conditions apply to this post.
In Microsoft Azure, we can build servers and networks that use IPv6 for their connectivity. This is especially great for your webservers, where you want the highest level of availability for your users. This is achieved the best using both IPv4 and IPv6 protocols.
In this guide we do a deep dive into IPv6 in Microsoft Azure and i will show some practical examples of use of IPv6 in Azure.
By default, Azure pushes you to use an IPv4 address space when creating a virtual network in Azure. Now this is the best understandable and easy version of addressing.
In some cases we want to give our IPv6 addresses only, IPv4 addresses only or use dual-stack where we assign both IPv4 and IPv6 to our resources.
In the wizard, we can remove the default generated address space and design our own, IPv6 based address space like i have done below:

This space is a block (fd00::/8) which can be used for private networks and for example in our case. These are not internet-routable.
In the same window, we can configure our subnets in the IPv6 variant:
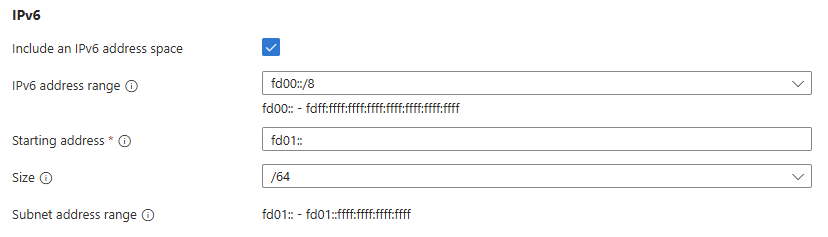
Here i created a subnet called Subnet-1 which has address block fd01::/64 which means there are 264 (18 quintillion) addresses possible in one subnet. Azure only supports /64 subnets in IPv6, this because this has the best support over all devices and operating systems worldwide.
For demonstration purposes i created 3 subnets where we can connect our resources:
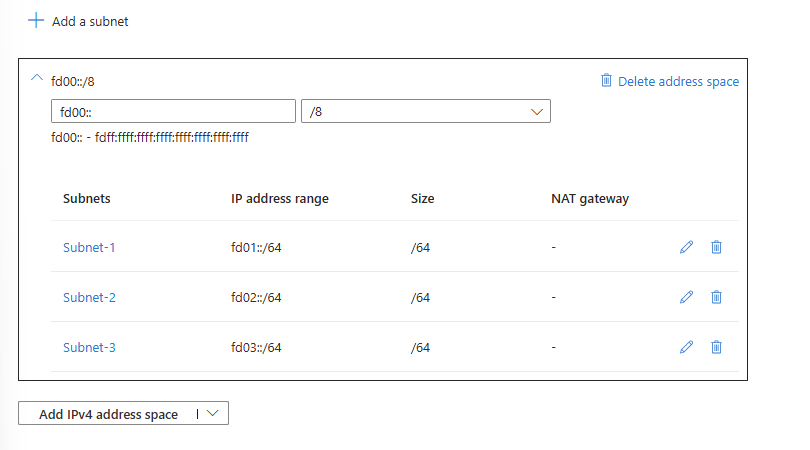
And we are done :)
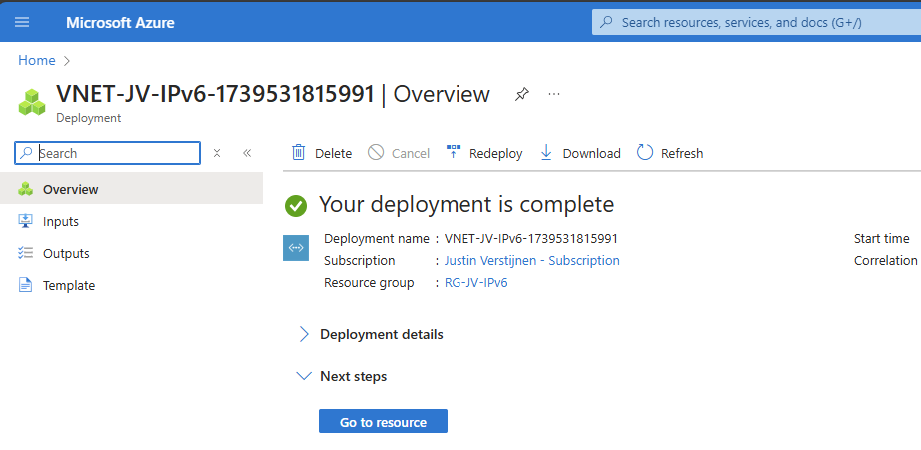
Now comes the more difficult part of IPv6 and Azure. By default, Azure pushes to use IPv4 for everything. Some options for IPv6 are not possible through the Azure Portal. Also every virtual machine requires a IPv4, selecting a subnet with only IPv6 gives an error:

So we have to add IPv4 address spaces to our IPv6 network to connect machines. This can be done through the Azure Portal:
Go to your virtual network and open “Address space”
Here i added a 10.0.0.0/8 IPv4 address space:
Now we have to add IPv4 spaces to our subnets, what i have already done:
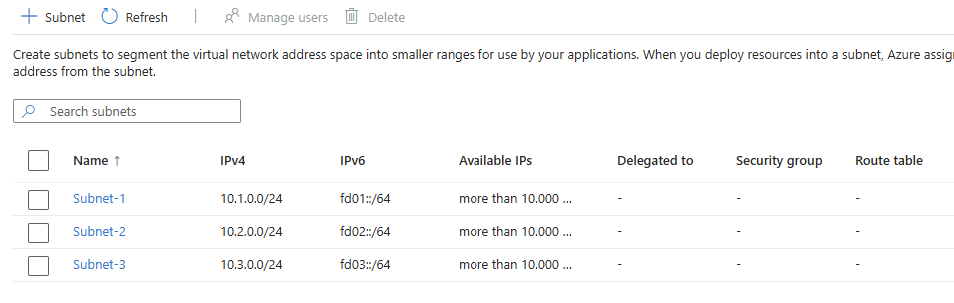
Add the virtual machine to our network:
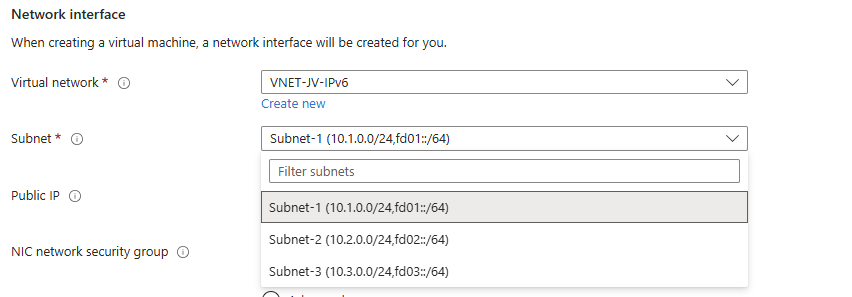
We have now created a Azure machine that is connected to our IPv4 and IPv6 stacked network.
After that’s done, we can go to the network interface of the server to configure the network settings. Add a new configuration to the network interface:
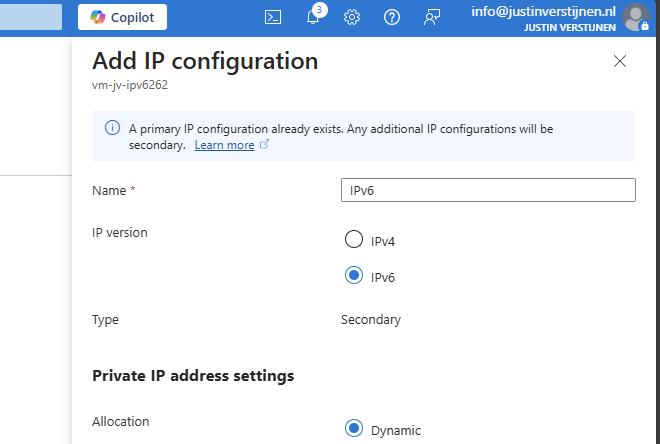
Here we can use IPv6 for our new IP configuration. The primary has to be leaved intact because the machine needs IPv4 on its primary interface. This is a Azure requirement.
Now we have assigned a new IP configuration on the same network interface so we have both IPv4 and IPv6 (Dual-stack). Lets check this in Windows:
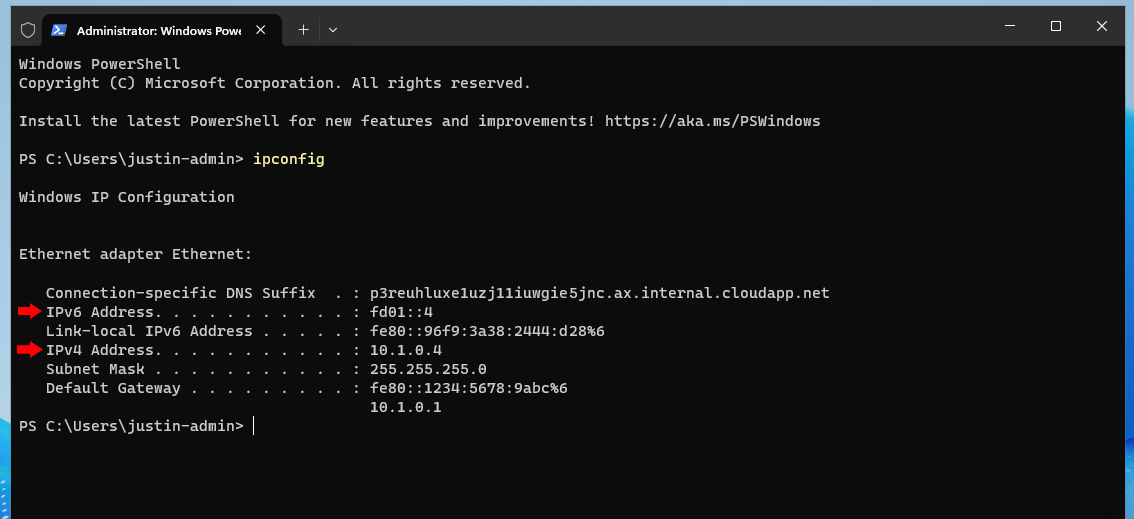
Here you can see that we have both IPv4 and IPv6 addresses in our own configured address spaces.
Now the cherry on the pie (like we say in dutch) is to make our machine available to the internet using IPv6.
I already have a public IPv4 address to connect to the server, and now i want to add a IPv6 address to connect to the server.
Go in the Azure Portal to “Public IP Addresses” and create a new IP address.
At the first page you can specify that it needs to be an IPv6 address:
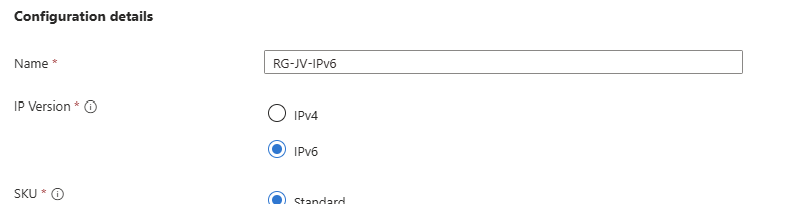
Now we can go to the machine and assign the newly created public IP address to the server:
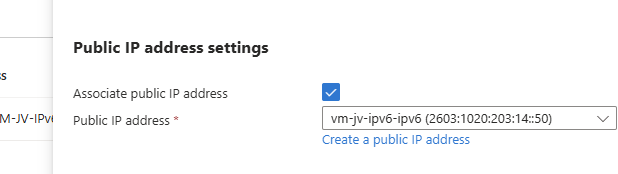
My complete configuration of the network looks like this:
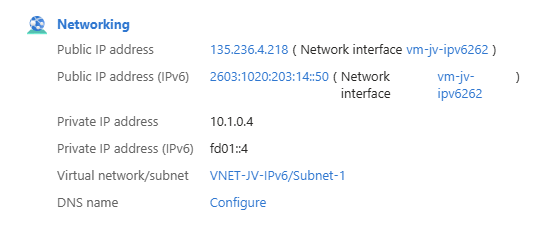
Now our server is available through IPv6. Good to mention that you may not be possible to connect to the server with this address because of 6-to-4 tunneling and ISP’s not supporting IPv6. In this case we have to use the IPv4 method.
To actually test the IPv6 connectivity, we can setup a webserver in one of the subnets and try if we can make a connection with IPv6 to that device. I used the marketplace image “Litespeed Web Server” to serve this purpose.
I used a simple webserver image to create a new VM and placed it in Subnet-2. After that i created a secondary connection just like the other Windows based VM and added a private and a public IPv6 address:
Now we are on the first VM which runs on Windows and we try to connect to the webserver:
A ping request works fine and we get a response from the webserver.
Lets try if we can open the webpage. Please note, if you want to open a website on a IPv6 address, the address has to be placed [within brackets]. THis way the browser knows how to reach the page. This only applies when using the absolute IPv6 address. When using DNS, it is not needed.
I went to Edge and opened the website by using the IPv6 address: https://[fd02::4]
The webserver works, but i get a 404 not found page. This is by my design because i did not publish a website. The connection works like a charm!
The webserver also works with the added Public IPv6 address:
Small note: some webservers/firewalls may be configured manually to listen to IPv6. With my used image, this was the case.
When playing with IPv6, you see that some things are great but its use is primarily for filling up the worldwide shortage of IPv4 addresses. Also i admit that there is no full support for IPv6 on Azure, most of the services i tested like VMs, Private Endpoints, Load balancers etcetera all requires IPv4 to communicatie which eliminates the possibility to go full IPv6.
My personal opninion is that the addressing can be easier than IPv4, when done correctly. In the addressing i used in this guide i used the fd00::/8 space which makes very short addressess and no limitation of 250 devices without having to upper the number. These days a network of 250 devices is no exception.
You have reached the end of the page. You can navigate through other blog posts as well, share this post on X, LinkedIn and Reddit or return to the blog posts collection page. Thank you for visiting this post.
If you think something is wrong with this post or you want to know more, you can send me a message to one of my social profiles at: https://justinverstijnen.nl/about/
If you find this page and blog very useful and you want to leave a donation, you can use the button below to buy me a beer. Hosting and maintaining a website takes a lot of time and money. Thank you in advance and cheers :)
The terms and conditions apply to this post.
Azure Update Manager is a tool from Microsoft and is developed to automate, installing and documenting Windows updates or updates to Linux server on Azure. This all in a single pane of glass and without installing any additional software.
Azure Update Manager supports the following systems for assessments and installing updates, therefore managing them:
Windows client (10/11) OSs are not supported.
Azure Update Manager has the following features:
To enroll a new server into Azure Update Manager, open your VM and under “Operations”, open “Updates”
Click on the “Update settings”
Select under periodic assessment the option “Enable” to enable the service to automatically scan for new updates and under “Patch Orchestration” select “Customer Managed Schedules”.
Does your VM support Hotpatching, this must be disabled to take benefit from Azure Update Manager.
In our work, most of the time we want to do things at scale. To enroll servers into Azure Update Manager, go to the Azure Update Manager-Machines blade.
Select all machines and click on “Update settings”.
Here you can do the same for all servers on your subscriptions (and Lighthouse managed subscriptions too)
By using the top drop down menu’s you can bulk change the options of the VMs to the desired settings. In my case i want to install updates on all servers with the same schedule.
With the maintenance configurations option, you can define how Azure will install the updates and if the server may reboot yes or no.
The options in a configuration are:
You can configure as many configurations as you want:
On the server we see after a succesful run + reboot the updates are installed succesfully:
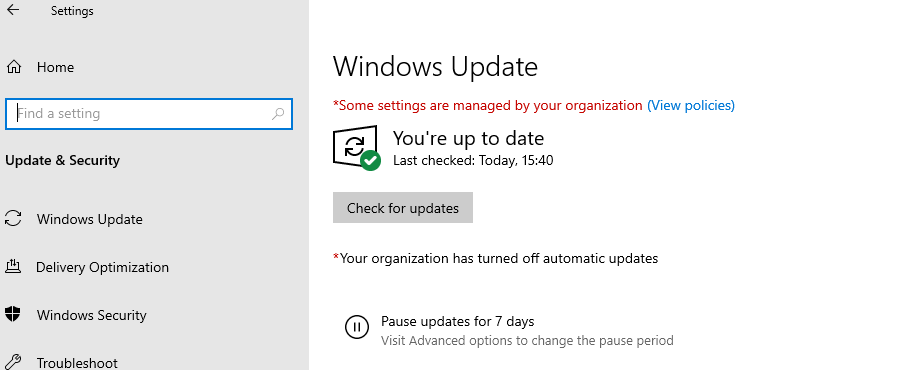
You have reached the end of the page. You can navigate through other blog posts as well, share this post on X, LinkedIn and Reddit or return to the blog posts collection page. Thank you for visiting this post.
If you think something is wrong with this post or you want to know more, you can send me a message to one of my social profiles at: https://justinverstijnen.nl/about/
If you find this page and blog very useful and you want to leave a donation, you can use the button below to buy me a beer. Hosting and maintaining a website takes a lot of time and money. Thank you in advance and cheers :)
The terms and conditions apply to this post.
When being introduced to Azure, I learned about tags very quickly. However, this is something you can use in practice but is no requirement to make stuff actually work. Now some years ahead in my Azure journey, I can recommend (at least) 10 ways to use them properly and to make them actually useful in your environment.
I will explain these ways in this article.
Tags are a pair of editable values in Microsoft Azure. These are in this pair-convention:
We can define ourselves what the Name and Value actually are, if we stay within these limits:
<, >, %, &, \, ?, /An example of a resource in my environment using tags:
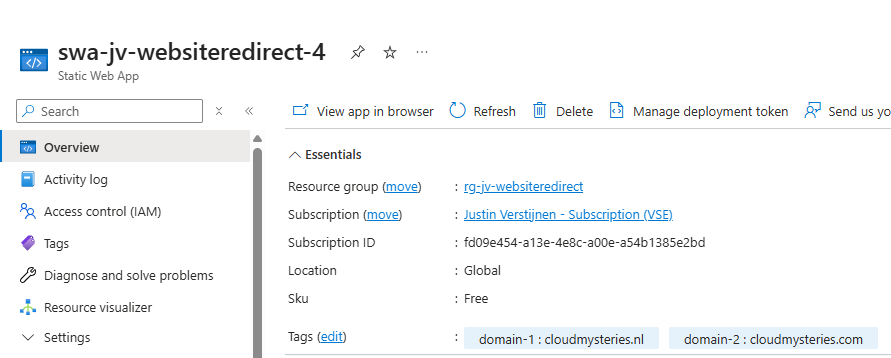
I marked two domains I use for a redirection to an other website. Therefore I have a nice overview over multiple resources.
You can only use 1 unique Name per resources. Multiple tags with the same name are not possible.
(Therefore I used domain-1 and domain-2).
Before we go logging into our environment and tag everything we see, I will first give some advice which will be useful before starting
You can add tags to a resource by opening it, and then click on “Tags”. Here we can define what tags to link to the resource. As you might use the same name/value for multiple resources, this will auto-suggest you for easy linking:
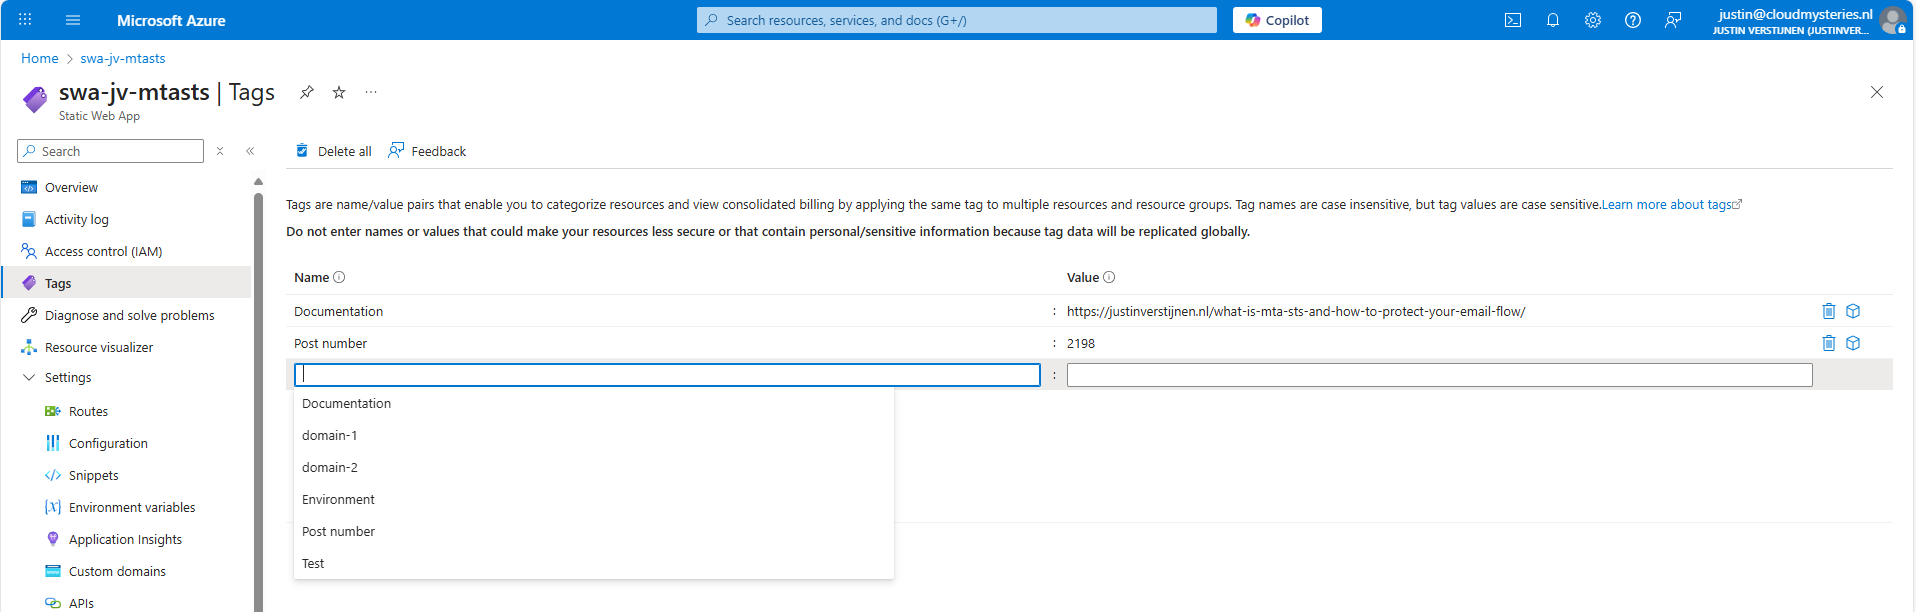
Check out this video where I demonstrate creating the tags from the example below, 1: Documentation
https://www.youtube.com/watch?v=sR4GdScNG7M
Documentation of your environment is very important. Especially when configuring things, then to not touch it for sometimes months or years. Also when managing resources with multiple people in one company, using a tag to point to your documentation is very useful.
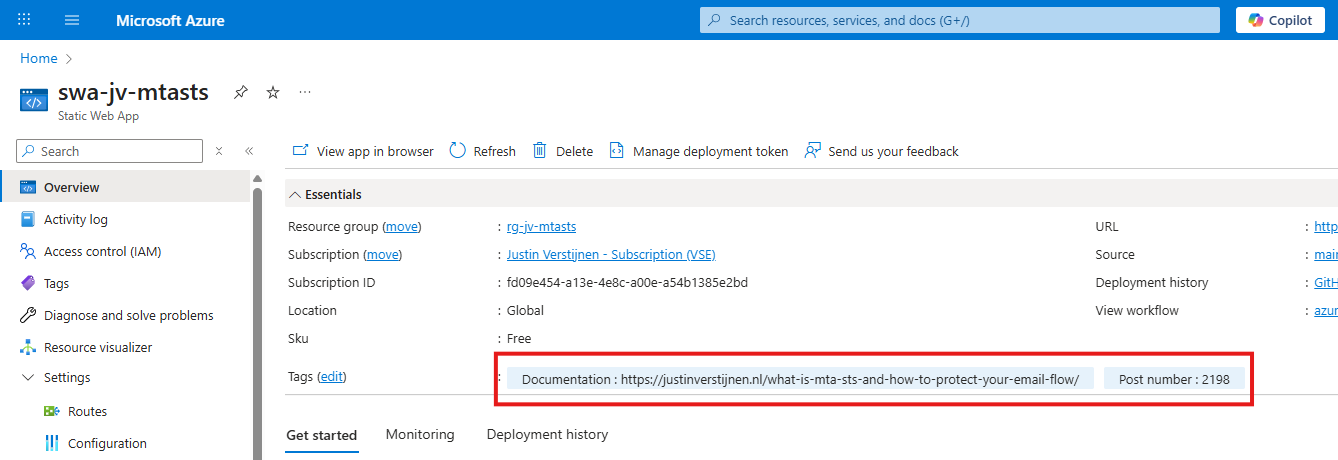
If you have a nice and numbered documentation-system, you can use the number and page number. Otherwise you can also use a whole link. This points out where the documentation of the resource can be found.
If using a Password management solution, you can also use direct links to your password entry. This way you make it yourself and other people easy to access a resource while still maintaining the security layer in your password management solution. As described, Reader access should not grant actual access to a resource.
You can use tags to mark different environments. This way every administrator would know instantly what the purpose of the resource is:
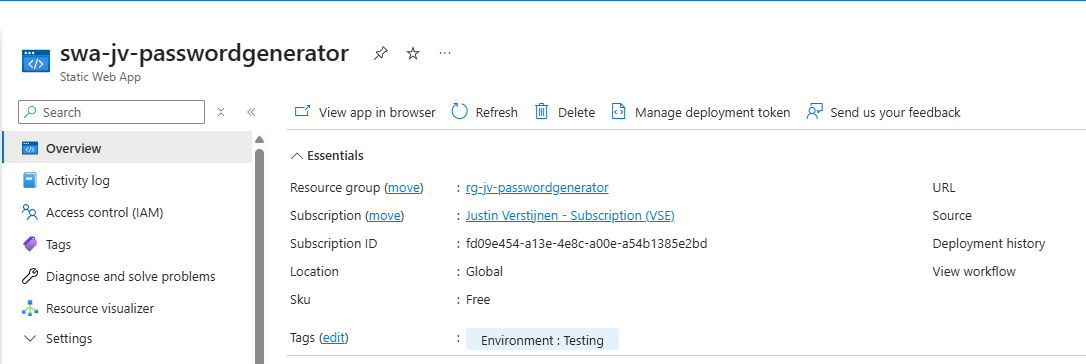
Here I marked a resource as a Testing resource as an example.
In a shared responsibility model on an Azure environment, we would mostly use RBAC to lock down access to your resources. However, sometimes this is not possible. We could define the responsibility of a resource with tags, defining the person or department.
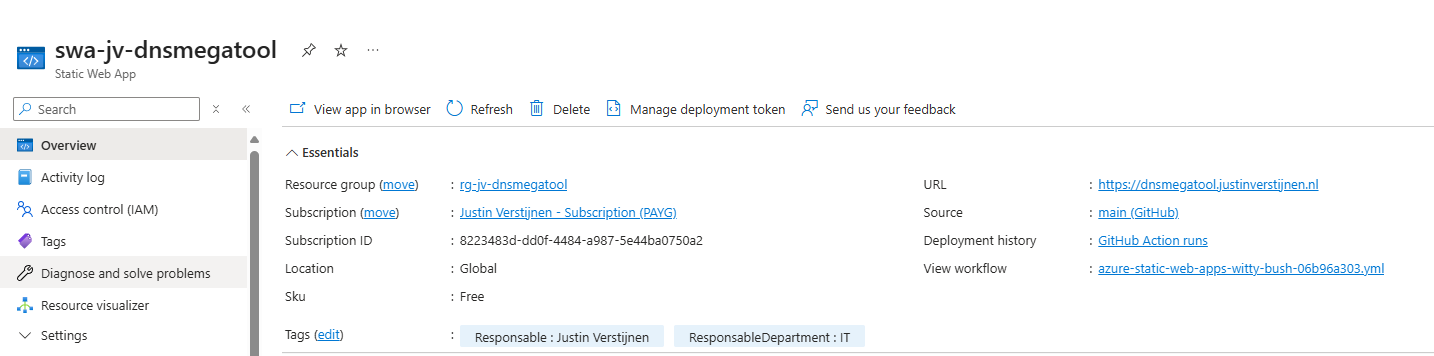
We could add tags to define the lifecycle and retention of the data of an resource. Here I have 3 examples of how this could be done:
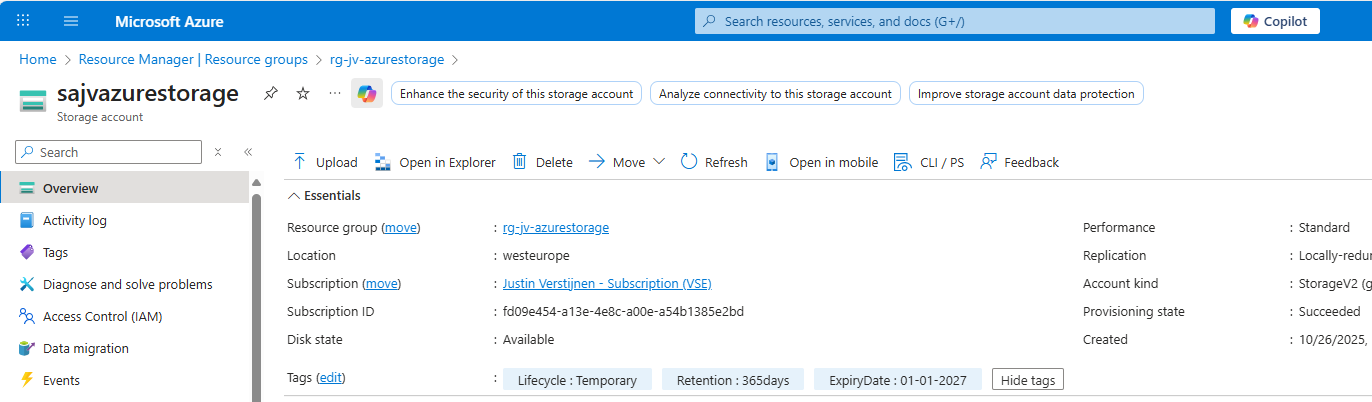
I created a tag Lifecycle, one for Retention in days and a Expiry date, after when the resource can be deleted permanently. Useful if storing some data temporarily after a migration.
We could use the tags on an Azure resource to mark if they are compliant with industry accepted security frameworks. This could lookm like this:
Compliance could be some customization, as every organization is different.
You can add tags to define the role/purpose of the resource. For example, Role: Webserver or Role: AVD-ProfileStorage, like I have done below:
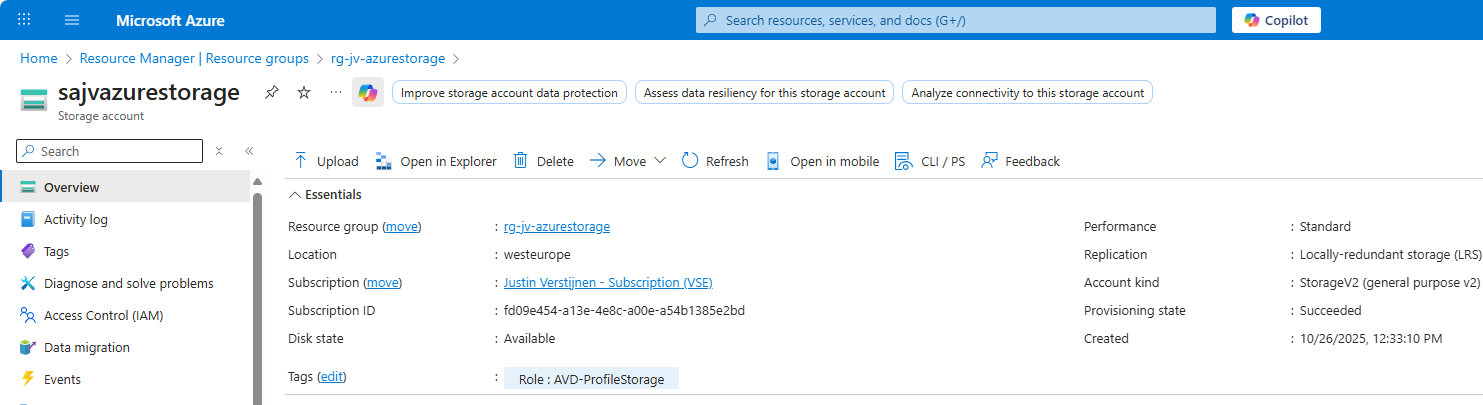
This way you can define dependencies of a solution in Azure. When having multiple dependencies, some good documentation is key.
You can make cost overviews within one or multiple subscriptions based on a tag. This make more separation possible, like multiple departments using one billing method or overviews for total costs of resources you have tagged with a purpose.
You can make these overviews by going to your subscription, then to “Cost Analysis” and then “Group By” -> Tags -> Your tag.
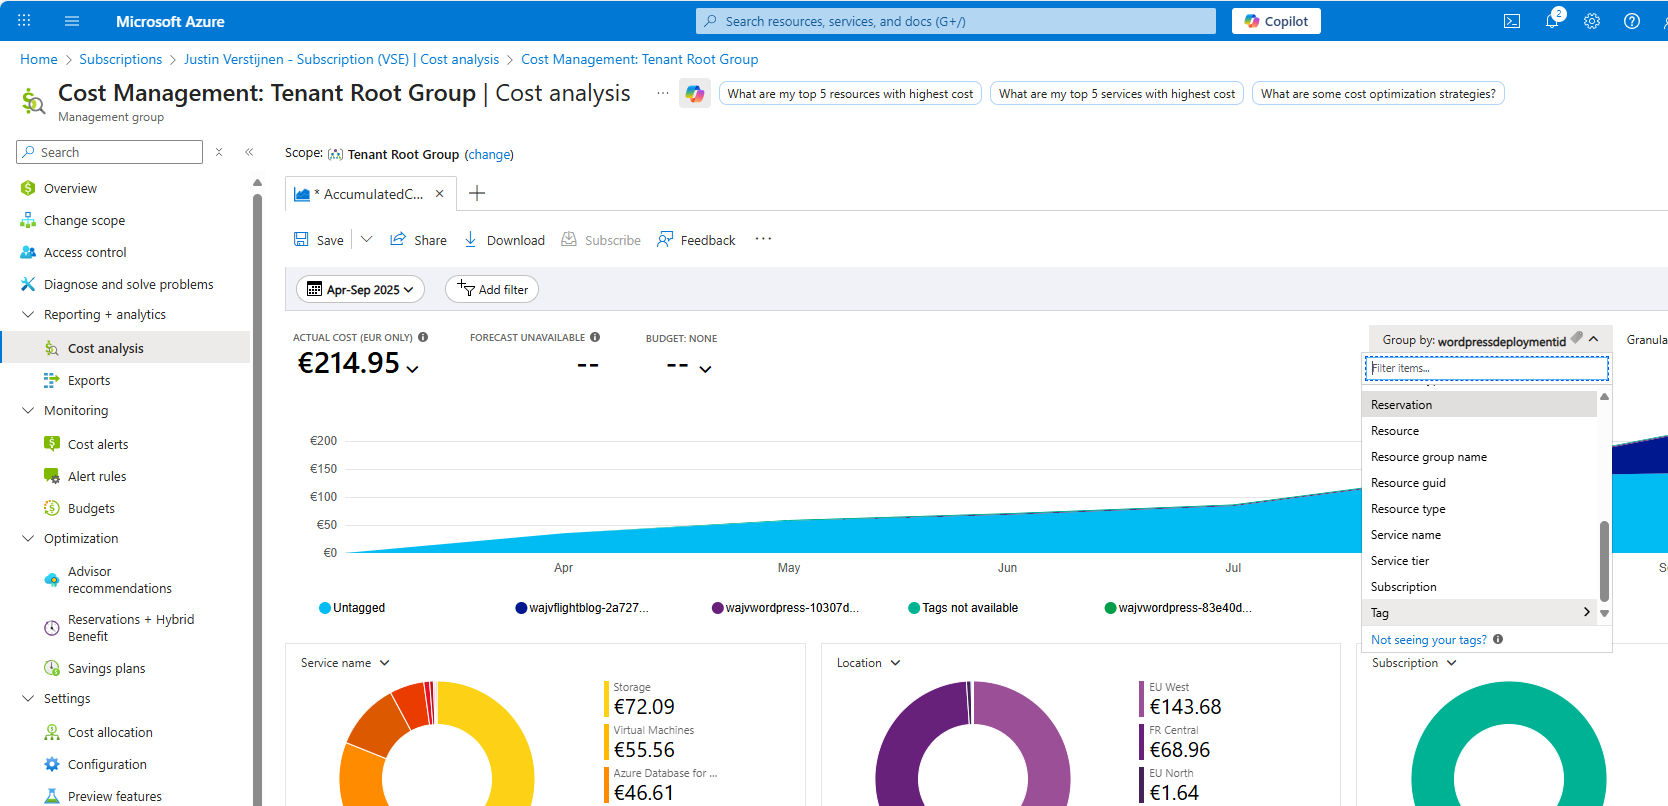
This way, I know exactly what resources with a particular tag was billed in the last period.
Tags could be used excellently to define the maintenance hours and Restore Time Objective (RTO) of a resource. This way anyone in the environment will know exactly when changes can be done and how many data-loss is acceptable if errors occur.
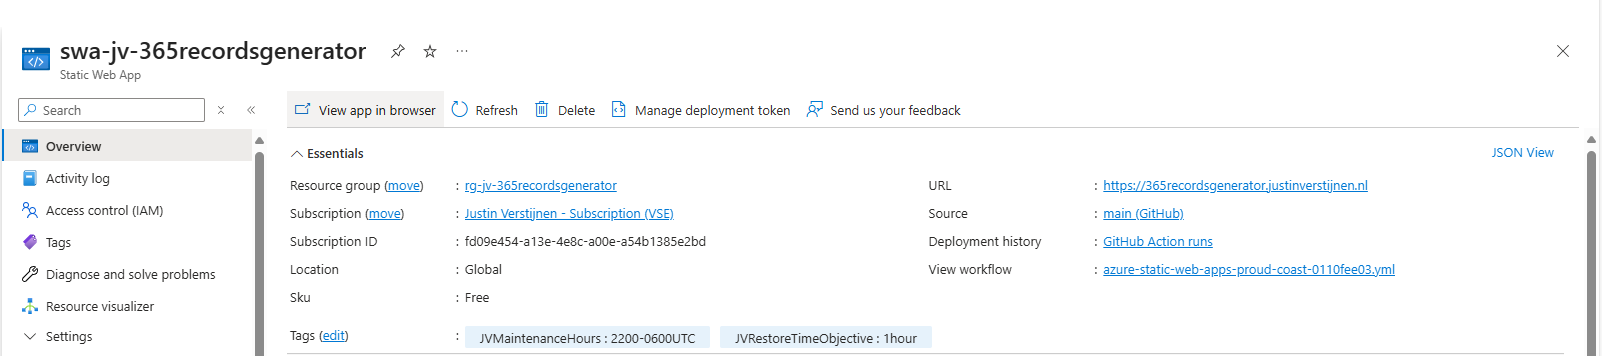
Here I have created 2 tags, defining the maintenance hours including the timezone and the Restore Time Objective.
This will be very useful if you are deploying your infrastructure with IaC solutions like Terraform and Bicep. You can tag every resource of your solution with a version which you specify with a version number. If deploying a new version, all tags will be changed and will align to your documentation.
An example of this code can look like this:
# Variables
variable "version" {
  type        = string
  description = "Version number"
  default     = "1.0.1"
}

# Provider
provider "azurerm" {
  features {}
}

# Resource Group
resource "azurerm_resource_group" "rg" {
  name     = "rg-jv-dnsmegatool"
  location = "westeurope"

  tags = {
    Version = var.version
  }
}

# Static Web App
resource "azurerm_static_web_app" "swa" {
  name                = "swa-jv-dnsmegatool"
  resource_group_name = azurerm_resource_group.rg.name
  location            = azurerm_resource_group.rg.location
  sku_tier            = "Free"
  sku_size            = "Free"

  tags = {
    Version = var.version
  }
}
And the result in the Azure Portal:
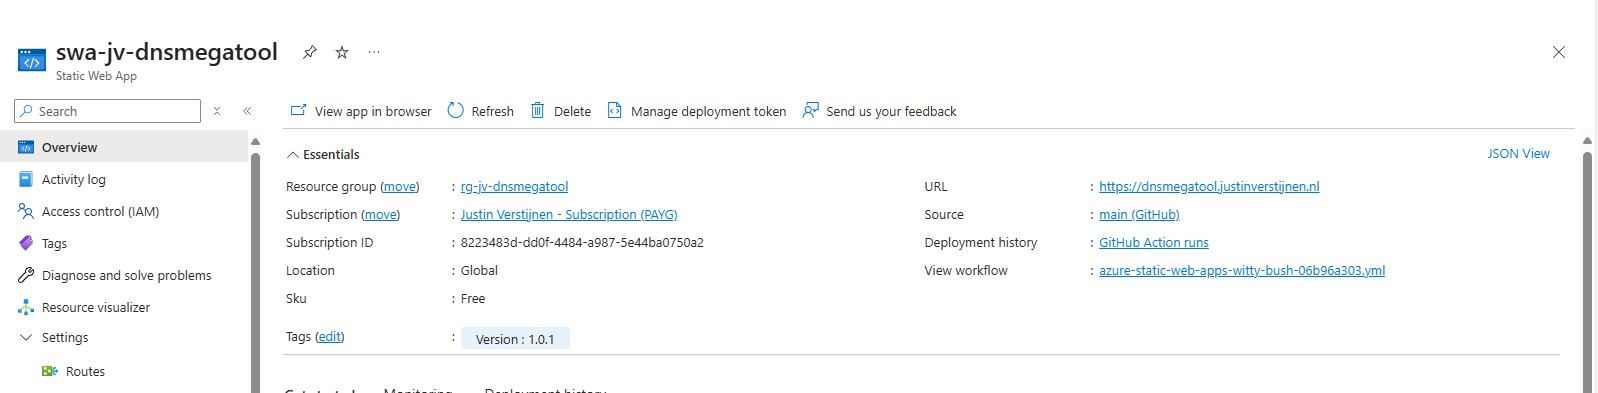
We could categorize our resources into different tiers for our Disaster Recovery-plan. We could specify for example 3 levels:
This way we write our plan to in case of emergencies, we first restore Level 1 systems/resources. After they all are online, we could advance to Level 2 and then to Level 3.
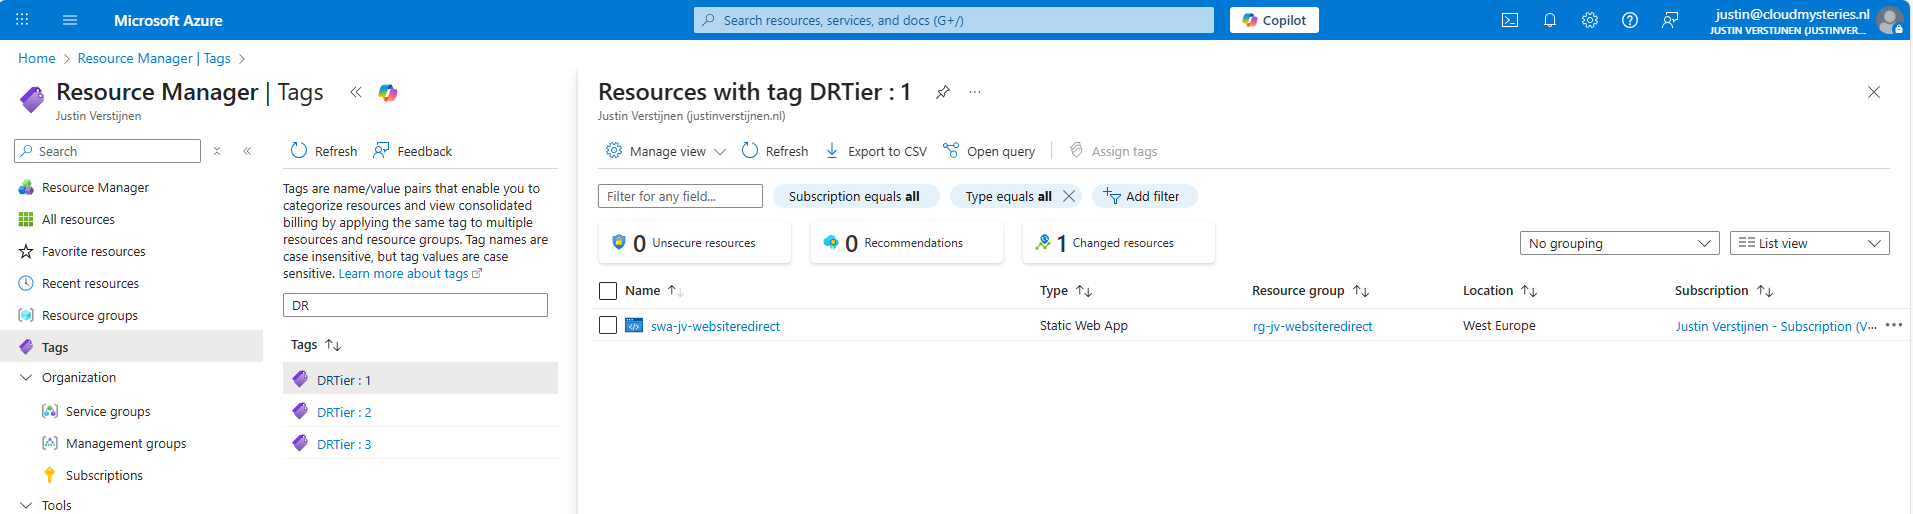
By searching for the tags, we can instantly view which resources we have to restore first according to our plan, and so on.
In an earlier guide, I described how to use a renameable tag for resources in Azure:
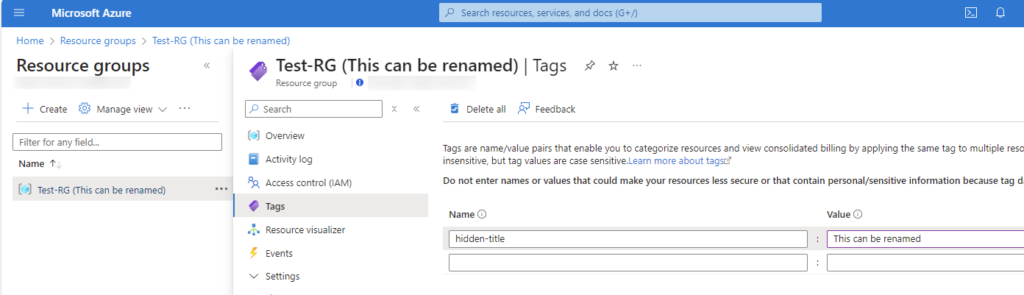
This could be useful if you want to make things a little more clear for other users, like a warning or a new name where the actual name cannot be changed unfortunately.
Check out this guide here: https://justinverstijnen.nl/renameable-name-tags-to-resource-groups-and-resources/
Tags in Microsoft Azure are a great addition to your environment and to make it perfect. It helps a way more when managing an environment with multiple persons or parties when tags are available or we could use some custom views based on tags. In bigger environments with multiple people managing a set of resources, Tags would be unmissable.
These sources helped me by writing and research for this post;
You have reached the end of the page. You can navigate through other blog posts as well, share this post on X, LinkedIn and Reddit or return to the blog posts collection page. Thank you for visiting this post.
If you think something is wrong with this post or you want to know more, you can send me a message to one of my social profiles at: https://justinverstijnen.nl/about/
If you find this page and blog very useful and you want to leave a donation, you can use the button below to buy me a beer. Hosting and maintaining a website takes a lot of time and money. Thank you in advance and cheers :)
The terms and conditions apply to this post.
Most companies who use Microsoft Azure in a hybrid setup have a Site-to-Site VPN gateway between the network in Azure and on-premises. This connection becomes mission critical for this company as a disruption mostly means a disruption in work or processes.
But sometimes, Microsoft has to perform updates to these gateways to keep them up-to-date and secure. We can now define when this will be exactly, so we can configure the gateways to update only outside of business hours. In this guide I will explain how to configure this.
We would want to configure a maintenance configuration for our VPN gateway to Azure to prevent unwanted updates during business hours. Microsoft doesn’t publish when they perform updates to their infrastructure, so this could be any moment.
Microsoft has to patch or replace their hardware regularly, and by configuring this maintenance configuration, we tell them: “Hey, please only do this for us in this window“. You could understand that configuring this is essential for availability reasons, but also don’t postpone updates too long for security and continuity reasons. My advice is to schedule these updates daily or weekly.
If the gateway is already up-to-date during the maintenance window, nothing will happen.
Let’s dive into how to configure this VPN gateway maintenance configuration. Open up the Azure Portal.
Then go to “VPN gateways“.
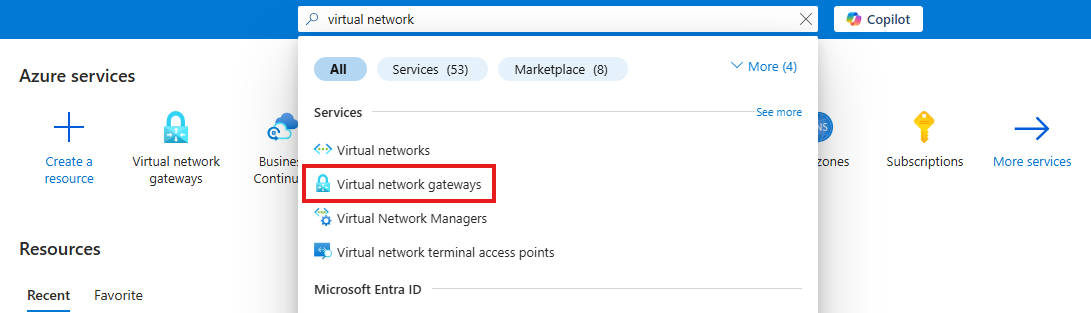
If this list is empty, you will have to select “VPN gateways“ in the menu on the left:
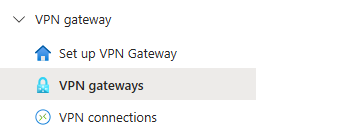
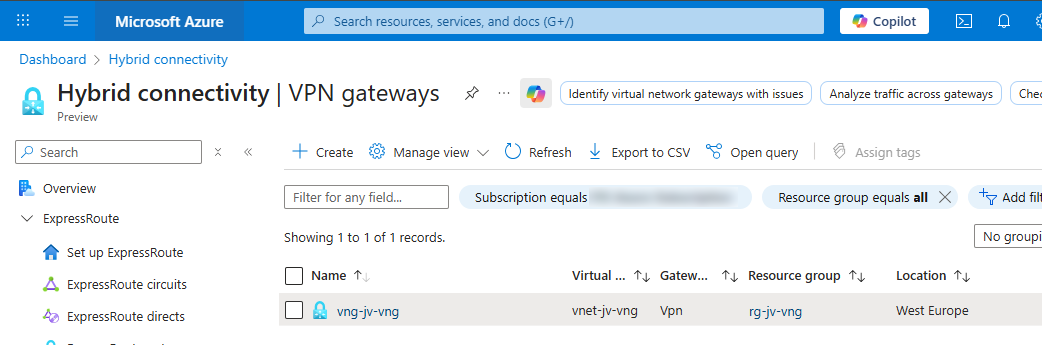
Open your VPN gateway and select “Maintenance“.
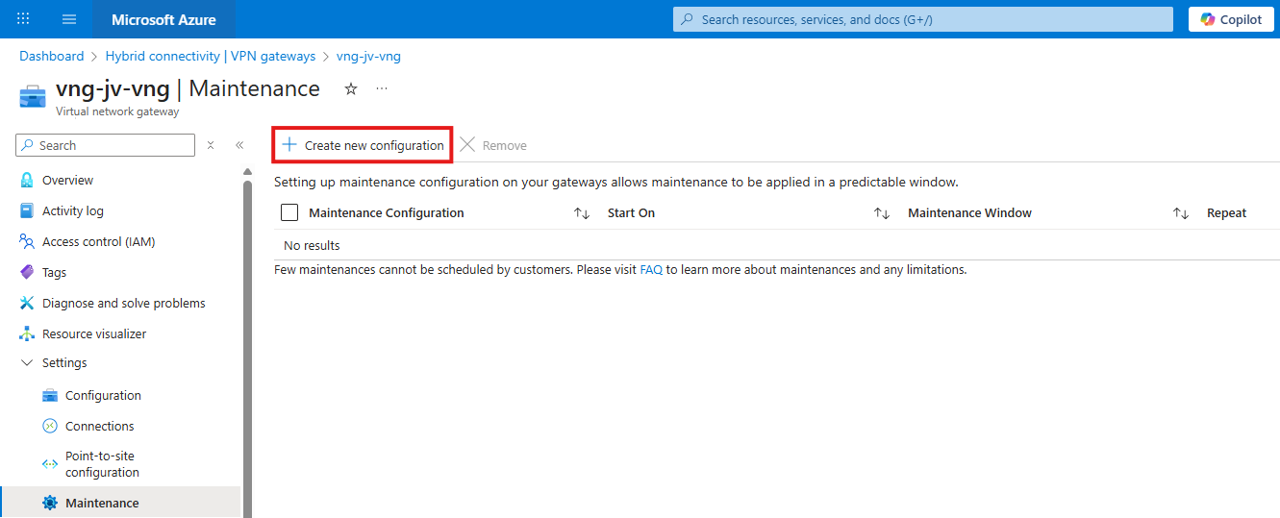
Then click on “Create new configuration“.
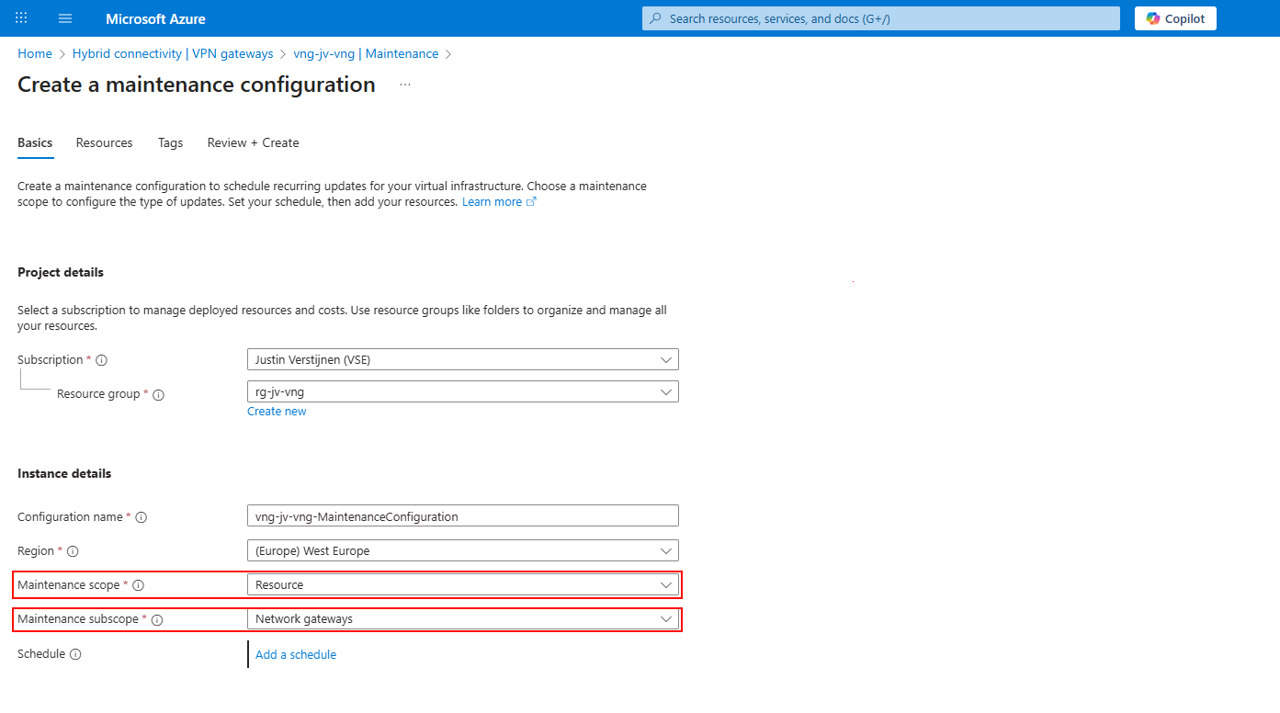
Fill in your details, select Resource at Maintenance Scope and Network Gateways for Maintenance subscope and then click “Add a schedule“.
Here I created a schedule that starts on Sunday at 00:00 hours and takes up to 6 hours:
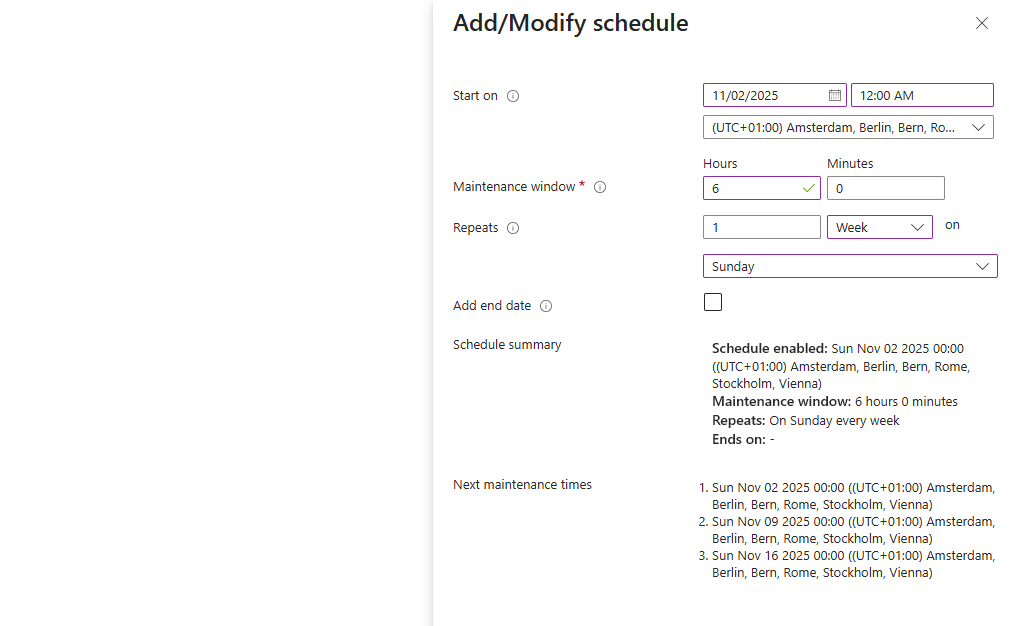
This must obviously be scheduled at a time then the VPN gateway may be offline, so outside of business hours. This could also be every day, depending on your wishes and needs.
After configuring the schedule, save the schedule and advance to the “Resources“ tab:
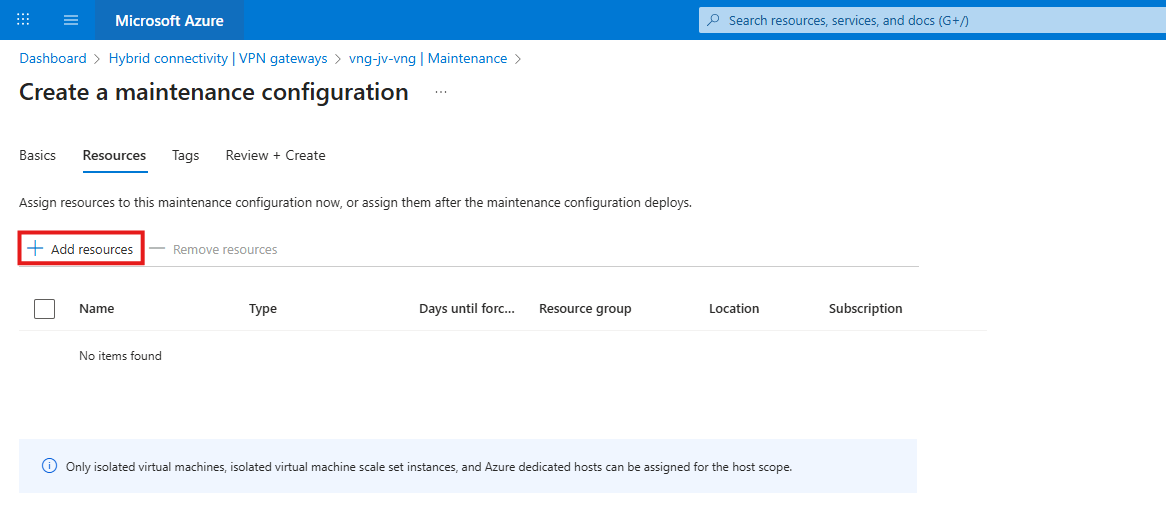
Click the “+ Add resources“ button to add the virtual network gateway.
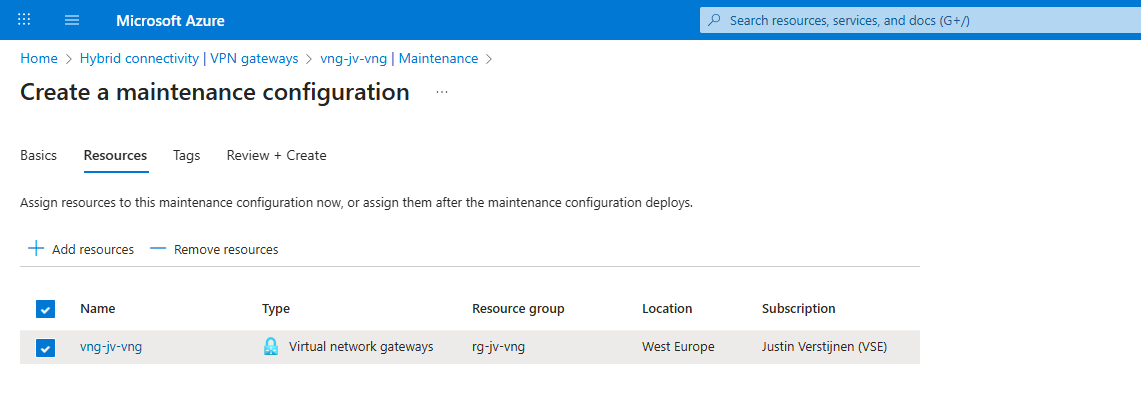
Then you can finish the wizard and the maintenance configuration will be applied to the VPN gateway.
Configuring maintenance configuration is relatively easy to do and it helps your environment to be more predictable. However this may never be the case, we know for sure that Microsoft doesn’t apply updates to our VPN gateway during business hours.
These sources helped me by writing and research for this post;
You have reached the end of the page. You can navigate through other blog posts as well, share this post on X, LinkedIn and Reddit or return to the blog posts collection page. Thank you for visiting this post.
If you think something is wrong with this post or you want to know more, you can send me a message to one of my social profiles at: https://justinverstijnen.nl/about/
If you find this page and blog very useful and you want to leave a donation, you can use the button below to buy me a beer. Hosting and maintaining a website takes a lot of time and money. Thank you in advance and cheers :)
The terms and conditions apply to this post.
Azure Key Vault is a type of vault used to store sensitive technical information, such as:
What sets Azure Key Vault apart from a traditional password manager is that it allows software to integrate with the vault. Instead of hardcoding a secret, the software can retrieve it from the vault. Additionally, it is possible to rotate a secret every month, enabling the application to use a different secret each month.
Practical use cases include:
The sensitive information can be retrieved via a unique URL for each entry. This URL is then used in the application code, and the secret is only released if sufficient permissions are granted.
To retrieve information from a Key Vault, a Managed Identity is used. This is considered a best practice since it is linked to a resource.
Access to Azure Key Vault can be managed in two ways:
A Managed Identity can also be used in languages like PHP. In this case, you first request an access token, which then provides access to the information in the vault.
There is also a Premium option, which ensures that Keys in a Key Vault are stored on a hardware security module (HSM). This allows the use of a higher level of encryption keys and meets certain compliance standards that require this level of security.
You have reached the end of the page. You can navigate through other blog posts as well, share this post on X, LinkedIn and Reddit or return to the blog posts collection page. Thank you for visiting this post.
If you think something is wrong with this post or you want to know more, you can send me a message to one of my social profiles at: https://justinverstijnen.nl/about/
If you find this page and blog very useful and you want to leave a donation, you can use the button below to buy me a beer. Hosting and maintaining a website takes a lot of time and money. Thank you in advance and cheers :)
The terms and conditions apply to this post.
When starting to learn Microsoft Azure, the resources and information can be overwhelming. At this page I have summarized some resources which found out during my Azure journey and my advice on when to use what resource.
To give a quick overview of all the training resources I used throughout the years and give you different types and sorted the resources from beginning to end:
When starting out, my advice is to first watch the following video of John Savill explaining Microsoft Azure and giving a real introduction.
https://www.youtube.com/watch?v=_x1V2ny8FWM
After this, there is a Microsoft Learn collection available which describes the beginning of Azure:
Starting out (Video) Starting out (Text)
Because we are learning to understand, administer and later on architecting a solution, it is very crucial to have some hands-on experience with the platform. I really recommend you to create a free account to explore the portal, its features and its services.
When you have a creditcard you can sign up for a free 150 to 200 dollar budget which is free. When the budget is depleted there are no costs involved till you as user agree with costs.
My advice is to explore the portal and train yourself to do for example the following:
When having some experience with the solutions, it is great to learn for your AZ-900 Azure Fundamentals certification. Its a great way to express yourself to the world that you have the knowledge of what Azure is.
Learning for the AZ-900 certification is possible through the following source:
Microsoft Learn: https://learn.microsoft.com/en-us/training/courses/az-900t00#course-syllabus
After you have done the complete cource, i recommend you watch the Study Cram of John Savil vor AZ-900. He is a great explainer of concepts, and he explains every detail you need to know for the exam including some populair exam questions.
John Savil: https://www.youtube.com/watch?v=tQp1YkB2Tgs
John has a extra playlist for each concept where he will go deeper into the subject than in the cram. You can find that here: https://www.youtube.com/playlist?list=PLlVtbbG169nED0_vMEniWBQjSoxTsBYS3
AZ-900 Text course AZ-900 Video course AZ-900 Study Cram
When you have AZ-900 in the pocket, you can go further by getting AZ-104, the level 2 Azure certification. This certification goes deeper into the concepts and technical information than AZ-900. After you get AZ-104, Microsoft wants you to be prepared to administer Azure and environments.
You can follow the AZ-104 Microsoft Learn collection which can be found here: https://learn.microsoft.com/nl-nl/training/paths/az-104-administrator-prerequisites/
Also, in the modules there are some interactive guides. These are visual but you cant do anything wrong. Great way to do things for the first time. I have the whole collection for you here:
https://mslabs.cloudguides.com/guides/AZ-104%20Exam%20Guide%20-%20Microsoft%20Azure%20Administrator
When wanting to have some great hands-on experience and inspiration for your Azure trial/test environment, there are some practice labs available based on the interactive guides to build the resources in your own environment. You can find them under heading 8.
AZ-104 Interactive labs AZ-104 Text course
When finished with all the labs and modules and maybe your own research you are ready to follow the study cram of John Savill for AZ-104. He is a great explainer and summarizes all the concepts and stuff you need to know for the exam. When you don’t know the term he explains, you have to work on that.
The video can be found here:
https://www.youtube.com/watch?v=0Knf9nub4-k
When knowing everything John axplained, you are ready to do a practice exam. You can find it here:
I have one note when using the practice exams for training. The actual exam is harder than the practice exam. In the practice exam, you only have to select one or multiple answers about “simple questions”. In the actual exam you get questions like:
Microsoft has some great Applied Skills where you have to perform certain hands-on specialized tasks in different solutions, such as Azure. It works as simple as: you get a lab simulation, you perform 2 to 8 tasks and you submit the assessment.
You can retry them in a few days after failing, and of course, it is meant to better understand how to perform the actions so you are able to do this in practice. I really advice you to not only brute force the assessments but really understand what you are doing. Only this prepares you in a good way for working with Azure.
There are some great assessments available for Azure and Windows Server which I all completed and liked a lot:
Microsoft has published a lot of labs to do in your own environment to be familiar with the Azure platform. These are real objectives you have to do, and in my Azure learning journey I found these the most fun part to do of all study recourses.
However, it requires you to have an Azure subscription to click around and deploy some resources, but some tips to have this actually really cheap:
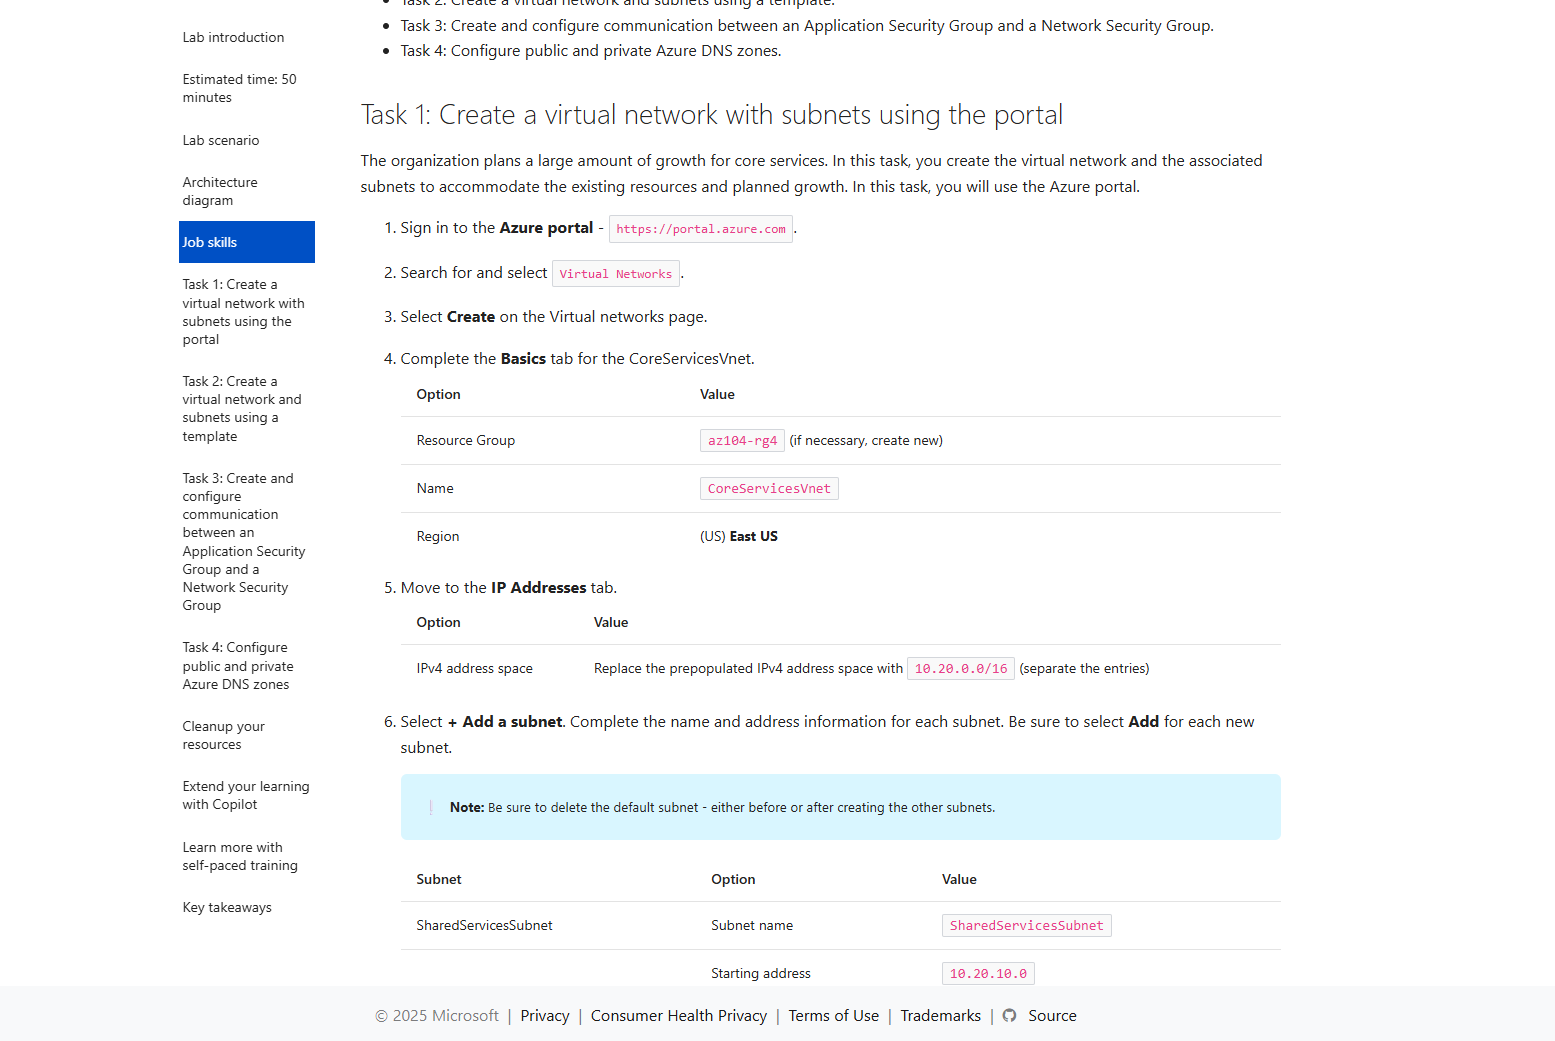
After doing everything on this page and knowing everything John explained in the study cram, you are ready to take the exam for AZ-104. The most important parts are that you must have some hands-on experience in Azure which I did really cover but the more experience you have, the more chance of success.
Good luck!
After you have the AZ-104 certification, you can pursue multiple paths to further broaden your Azure knowledge and journey:
Also I really recommend doing these labs if you are pursuing a career in Azure Networking or networking in general:
These are specialized labs like heading 4 of this page but then for networking and securing incoming connections.
You have reached the end of the page. You can navigate through other blog posts as well, share this post on X, LinkedIn and Reddit or return to the blog posts collection page. Thank you for visiting this post.
If you think something is wrong with this post or you want to know more, you can send me a message to one of my social profiles at: https://justinverstijnen.nl/about/
If you find this page and blog very useful and you want to leave a donation, you can use the button below to buy me a beer. Hosting and maintaining a website takes a lot of time and money. Thank you in advance and cheers :)
The terms and conditions apply to this post.
When managing a Microsoft Azure environment, permissions and roles with RBAC is one of the basic ways to improve your security. At one hand, you want to have the permissions to do basic tasks but at the other hand you want to restrict an user to be able to do only what he needs to. This is called, the principle of “least-privilege”.
In this guide, I want to you to understand the most of the basic knowledge of managing access controls in Azure without very complex stuff.
When talking about roles and permissions in Azure, we have the basic terms below, and later in this article all pieces of the puzzle will be set in place.
Terms to understand when planning and managing permissions:
A role is basically a collection of permissions which can be assigned to a principal in Azure. While there are over 100 roles available, they all follow the structure below:
| Reader (1) | Contributor (2) | Owner (3) |
| Can only read a resource but cannot edit anything. “Read only” | You can change anything in the resource, except permissions. “Read/write” | You can change anything in the resource including permissions. “Read/Write/Permissions” |
Those built in roles are available in Azure, but for more granular permissions there are some more defined roles:
As you can see, almost every built-in role in Azure follows the 1-2-3 role structure and allows for simple and granular security over your resources.
Aside from resource-related roles for managing security on a resource, there are also roles for the data a resource contains. These are called Data Roles and are also considered as a collection of permissions.
Data Roles are used to control what a principal can do with the data/content a resource hosts. You may think of the following resources:
To make your permissions management a lot granular, you might want to have a person managing the resource and another person te manage the content of the resouce. In this case you need those data roles.
Azure has a lot of built in roles available that might fulfill your requirements, but sometimes you want to have a role with some more security. A custom role is a role that is completely built by yourself as the security administrator.
You can start customizing a role by picking a builtin role and add permissions to that role. You can also build the role completely using the Azure Portal.
To begin creating a custom role, go to any access control blade, click “Add” and click “Add custom role”.
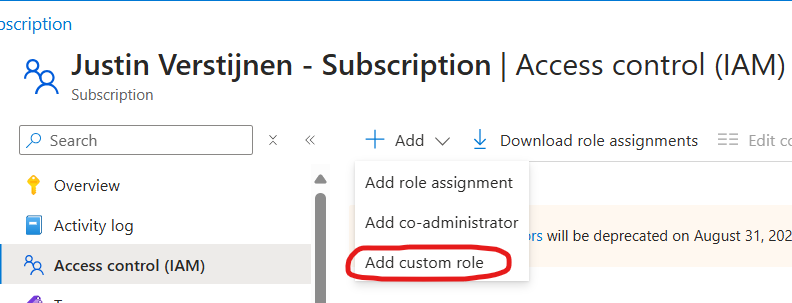
From there you have the option to completely start from scratch, or to clone a role and add or delete permissions from it to match your goal.
Creating your own role is the best way, but can take up a lot of time to build and manage. My advice is to stick to built in roles wherever it’s possible.
The scope of a role is where exactly your role is applied. In Azure we can assign roles at the following scopes:
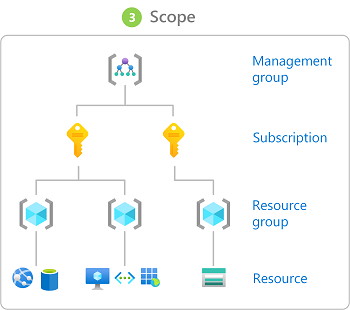
Management Group (MG) Contains subscriptions
Subscription (Sub) Contains resource groups
Resource Group (RG) Contains resources
Resource (R) Contains data
Some practical examples of assigning roles to a certain scope:
A role assignment is when we assign a role to a principal. As stated above, this can be done on 4 levels. Azure RBAC is considered an additive model.
It is possible to assign multiple roles to one or multiple principals. The effective outcome is that all those permissions will stack so all the permissions assigned will apply.
For example:
You can also check effective permissions at every level in the Azure Portal by going to “Access control (IAM)” and go to the tab “Check access”.
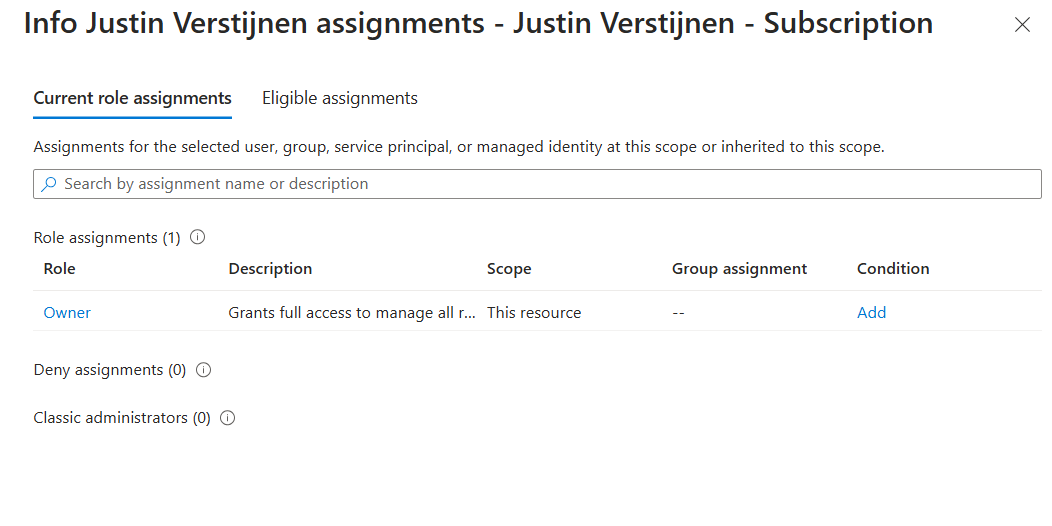
This is my list of permissions. Only “Owner” is applied to the subscription level.
A relatively new feature is a condition in a role assignment. This way you can even further control:
In Azure and Entra ID, principals are considered identities where you can assign roles to. These are:
Users and groups remain very basic terms, and since you made it to this far into my guide, I consider you as technically proven to fully understand those terms. Good job ;).
A service principal is a identity created for a application or hosted service. This can be used to assign a non-Azure application permissions in Azure.
An example of a service principal can be a third party built CRM application that needs access a Exchange Online mailbox. At the time of writing, July 2024, Basic authentication is deprecated and you need to create a service principal to reach this goal.
A managed identity is a identity which represents a resource in Azure like a virtual machine, storage account or web app. This can be used to assign a resource a role to another resource.
For example; a group of virtual machines need access to your SQL database. You can assign the roles on the SQL database and define the virtual machines as principal. This will look like this the image below.
All principals are stored in Microsoft Entra ID which is considered a Identity Provider, a database which contains all principals.
So to summarize this page; the terms mean:
This guide is very basically how permissions works. Basic access management and knowing who have what access is a basic tool to improve your security posture and prevent insider risks. This is nothing different in a system like Azure and fortunately has various options for roles permissions.
This page is a great preparation of this subject for the following Microsoft exams:
You have reached the end of the page. You can navigate through other blog posts as well, share this post on X, LinkedIn and Reddit or return to the blog posts collection page. Thank you for visiting this post.
If you think something is wrong with this post or you want to know more, you can send me a message to one of my social profiles at: https://justinverstijnen.nl/about/
If you find this page and blog very useful and you want to leave a donation, you can use the button below to buy me a beer. Hosting and maintaining a website takes a lot of time and money. Thank you in advance and cheers :)
The terms and conditions apply to this post.
When designing, managing and securing a network in Microsoft Azure we have lots of options to do this. We can leverage third-party appliances like Fortinet, Palo Alto, PFSense or Sophos XG Firewall but we can also use the somewhat limited built-in options; Network Security Groups (NSG for short) and Application Security Groups (ASG).
In this guide I will explain how Network Security Groups (NSG) and Application Security Groups (ASG) can be used to secure your environment.
A network Security Group is a layer 4 network security layer in Azure to filter incoming and outgoing traffic which you can apply to:
In a Network Security Group, you can define which traffic may enter or leave the assigned resource, this all based on layer 4 of the OSI model. In the Azure Portal, this looks like this:
To clarify some of the terms used in a rule;
To learn more about NSG’s in Azure, check out this webpage: https://learn.microsoft.com/en-us/azure/virtual-network/network-security-groups-overview
When having rules in a Network Security Group, we can have theoretically thousands of rules. The processing will be applied like the rules below;
There are 2 types of rules in a Network Security Group, inbound rules and outbound rules which have the following goal;
To further clarify some practice examples i will create some different examples:
When you want to have your server in Azure accessible through the internet, we need to create a inbound rule and will look like below:

We have to create the rule as shown below:
A advice for opening RDP ports to the internet is to specify at least one IP-adress. Servers exposed with RDP to the internet are easy targets to cybersecurity attacks.
When you want to only allow certain traffic from your Azure server to the internet, we need to create 2 outbound rules and will look like below:
Here i have created 2 rules:
Effectively only ports 80, 443 and 53 will work to the internet and all other services will be blocked.
Aside from Network Security Groups we also have Application Security Groups. These are fine-grained, application-assigned groups which we can use in Network Security Groups.
We can assign virtual machines to Application Security Groups which host a certain service like SQL or webservices which run on some certain ports.
This will look like this:
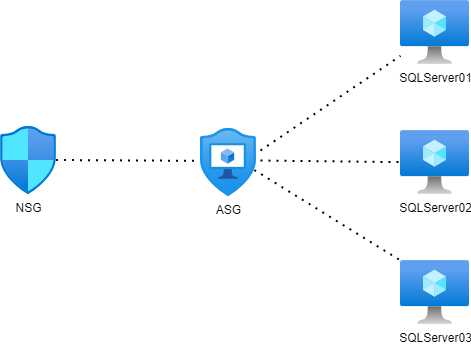
This will come in handy when managing a lot of servers. Instead of changing every NSG to allow traffic to a new subnet or network, we can only add the new server to the application security group (ASG) to make the wanted rules effective.
To create a Application Security Group, go in the Azure Portal to “Application Security Groups” and create a new ASG.
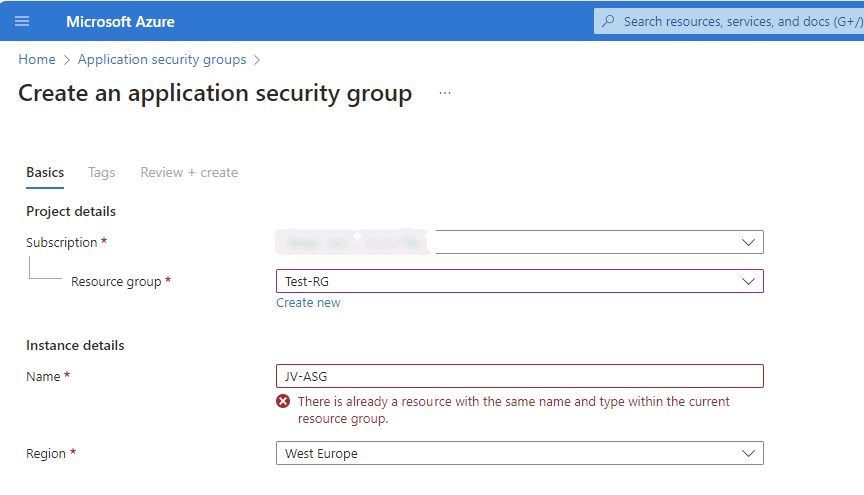
Name the ASG and finish the wizard.
After creating the ASG we can assign a virtual machine to it by going to the virtual machine, and assign the ASG to it:
Now we have a Application Security Group with virtual machines assigned we can go and create a Network Security Group and define the new ASG in it:
After this we have replicated the situation like in the diagram above which will be future proof and scalable. This situation can be replicated for every situation where you have a set of identical machines that need to be assigned to a NSG.
Network Security Groups (NSG)s are an great way to protect your Azure network on Layer 4 of the OSI model. This means you can configure any IP based communication with ports and such. However, this is no complete replacement of an Firewall hosted in Azure. A firewall can do much more, like actively block connections, block certain applications and categories and websites.
I hope this guide was interesting and thank you for reading.
These sources helped me by writing and research for this post;
You have reached the end of the page. You can navigate through other blog posts as well, share this post on X, LinkedIn and Reddit or return to the blog posts collection page. Thank you for visiting this post.
If you think something is wrong with this post or you want to know more, you can send me a message to one of my social profiles at: https://justinverstijnen.nl/about/
If you find this page and blog very useful and you want to leave a donation, you can use the button below to buy me a beer. Hosting and maintaining a website takes a lot of time and money. Thank you in advance and cheers :)
The terms and conditions apply to this post.
When it comes to naming your Azure Resource Groups and resources, most of them are not renameable. This due to limitations on the platform and maybe some underlying technical limitations. However, it is possible to assign a renameable tag to a resource in Azure which can be changed or used to clarify its role. This looks like this:
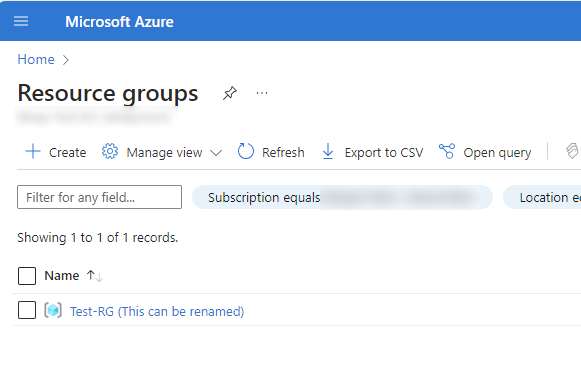
You can add this name tag by using a tag in Microsoft Azure. In the portal, go to your resource and go to tags. Here you can add a new tag:
| Name | Value |
|---|---|
| hidden-title | “This can be renamed“ |
An example of how this looks in the Azure Portal:
I thought of how this renameable titels can be used in production. I can think of the following:
These sources helped me by writing and research for this post;
You have reached the end of the page. You can navigate through other blog posts as well, share this post on X, LinkedIn and Reddit or return to the blog posts collection page. Thank you for visiting this post.
If you think something is wrong with this post or you want to know more, you can send me a message to one of my social profiles at: https://justinverstijnen.nl/about/
If you find this page and blog very useful and you want to leave a donation, you can use the button below to buy me a beer. Hosting and maintaining a website takes a lot of time and money. Thank you in advance and cheers :)
The terms and conditions apply to this post.
In the modern era like where we are today, security is a very important aspect of every system you manage. Bad security of 1 system can mess with all your systems.
So have a good overview of how secure your complete IT environment is, Microsoft released the Microsoft Cloud Security Benchmark, which is an collection of high-impact security recommendations you can use to secure your cloud services, even when utilizing a hybrid environment. When using Microsoft Defender for Cloud, this MCSB is included in the recommendations.
The Microsoft Cloud Security Benchmark checks your overall security and gives you recommendations about the following domains:
The recommendations look like the list below:
The tool gives you overall recommendations which have previously compromised environments and are based on best practices to help you to secure you complete IT posture at all aspects. The aim is to secure all your systems, not just one.
For more information about this very interesting benchmark, check out this page: https://learn.microsoft.com/en-us/security/benchmark/azure/introduction
You have reached the end of the page. You can navigate through other blog posts as well, share this post on X, LinkedIn and Reddit or return to the blog posts collection page. Thank you for visiting this post.
If you think something is wrong with this post or you want to know more, you can send me a message to one of my social profiles at: https://justinverstijnen.nl/about/
If you find this page and blog very useful and you want to leave a donation, you can use the button below to buy me a beer. Hosting and maintaining a website takes a lot of time and money. Thank you in advance and cheers :)
The terms and conditions apply to this post.
The Azure Well-Architected Framework is a framework to improve the quality of your Microsoft Azure Deployment. This does it by spanning 5 pillars so an architect can determine with IT decision makers how they can get the most Azure with the planned budget.
The 5 pillars of the Well-Architected Framework are:
| Pillar | Target |
| Reliability | The ability to recover a system and/or contine to work |
| Security | Secure the environment in all spots |
| Cost Optimization | Maximize the value when minimizing the costs |
| Operational Excellence | The processes that keep a system running |
| Performance Efficiency | The ability to adapt to changes |
Like it is shown in the image up here is that the Well-Architected Framework is the heart of all Cloud processes. Without this well done, all other processes can fail.
Review your Azure design
Microsoft has a tool available to test your architecting skills ath the following page: https://learn.microsoft.com/en-us/assessments/azure-architecture-review/
With this tool you can link your existing environment/subscription or answer questions about your environment and cloud goal. The tool will give feedback on what to improve and how.
I filled in the tool with some answers and my result was this:
I only filled in the pillars Reliability and Security and filled it in as bad as possible to get as much as advices to improve. This looks like this:
You have reached the end of the page. You can navigate through other blog posts as well, share this post on X, LinkedIn and Reddit or return to the blog posts collection page. Thank you for visiting this post.
If you think something is wrong with this post or you want to know more, you can send me a message to one of my social profiles at: https://justinverstijnen.nl/about/
If you find this page and blog very useful and you want to leave a donation, you can use the button below to buy me a beer. Hosting and maintaining a website takes a lot of time and money. Thank you in advance and cheers :)
The terms and conditions apply to this post.
More and more organizations are moving to the cloud. In order to do this succesful, we can use the Cloud Adoption Framework which is described by Microsoft.
The framework is a succesful order of processes and guidelines which companys can use to increase the success of adopting the cloud. The framework is described in the diagram below:
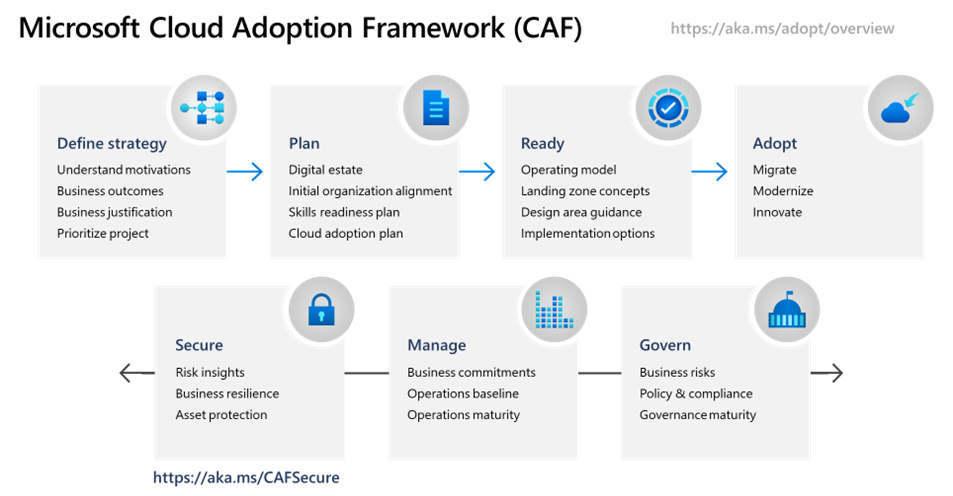
The CAF has the following steps:
For more information, check out this page: https://learn.microsoft.com/en-us/azure/cloud-adoption-framework/scenarios/
This framework (CAF) can be very useful if your organization decides to migrate to the cloud. It contains a variety of steps and processes from earlier migrations done by companies and their faults.
You have reached the end of the page. You can navigate through other blog posts as well, share this post on X, LinkedIn and Reddit or return to the blog posts collection page. Thank you for visiting this post.
If you think something is wrong with this post or you want to know more, you can send me a message to one of my social profiles at: https://justinverstijnen.nl/about/
If you find this page and blog very useful and you want to leave a donation, you can use the button below to buy me a beer. Hosting and maintaining a website takes a lot of time and money. Thank you in advance and cheers :)
The terms and conditions apply to this post.
All pages referring or tutorials for Microsoft Defender XDR.
In this guide, i will show how to do some popular Active Directory attacking tests and show how Defender for Identity (MDI) will alert you about the attacks.
Not everyting detected by Defender for Identity will be directly classified as potential attack. When implementing the solution, it will learn during the first 30 days what normal behaviour in the network is.
So i want to mention, that most of the attacks to Active Directory can be easily prevented if everybody locks their computer everytime they walk away from it and also use good enough authentication methods. Some other attacks cannot always be prevented but we can do the most of it detecting them and acting in a greatly manner.
So let’s imagine, we are walking through a generic office building and searching for computers that are unmonitored by people and the Windows Desktop is on the screen aside from the email and documents the user is working on. An attacker, in our case we, are going to that computer and run some commands to exactly know how the network is built.
We are gonna run some commands and tests on the workstation that will generate alerts in Microsoft Defender for Identity.
Run the following command on the workstation:
ipconfig /allWe get the full IP-configuration of the machine, including DNS servers and domain-name:
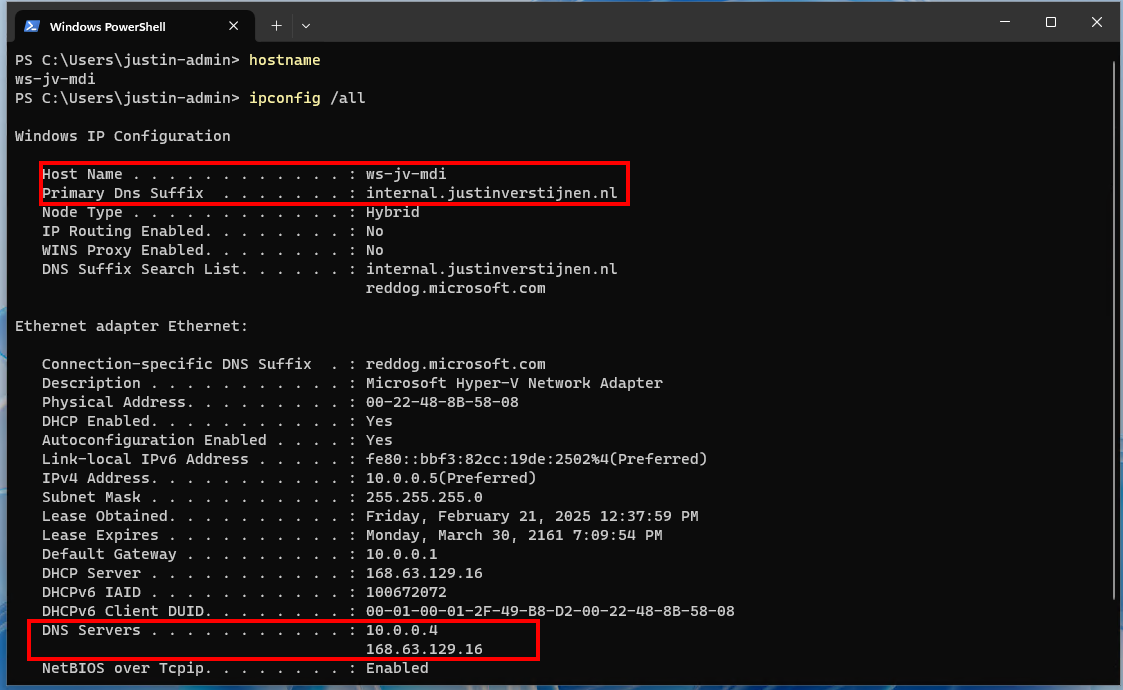
This will be needed in the next commands.
Run the following command on the workstation:
nslookupThe output will show more details of the DNS server itself and launches a DNS console where we can put some extra commands in:
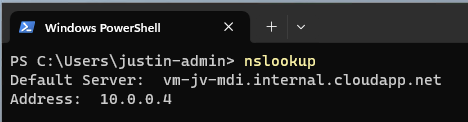
Now issue the following command in the nslookup tool:
ls -d internal.justinverstijnen.nlIf the DNS is correctly secured, we will get an error like below:

We tried to do a DNS Zone transfer, which means that we wanted to make a full export of the DNS zone internal.justinverstijnen.nl in my case. The DNS server refused this request which is a security best practice by default.
Now we have generated our first alert and the Security Operations Center (SOC) of the company will be notified. We can find the alert in the Security Portal by going to “Hunting” and then to “Advanced Hunting”. There we can use the query “IdentityQueryEvents”:
This will show all events where attackers tried to do sensitive queries. We can investigate this further by expanding the alert:
Now the SOC knows exactly on which computer this happend and on what time.
Every user and computer in an Active Directory domain has read permissions acros all other Active Directory objects. This is done to make the most applications work properly and for users to logon into every PC.
While this is really convinient for the users, it is a big attack vector for attackers because they just breached one of the business accounts and are hungry for more. With this information, they can launch a potential attack on the rest of the companies users.
On the workstation, run the command:
net user /domainNow we get a report of all the users in the domain, with username and so their emailaddresses:
Now we can run a command to get all groups in the domain:
net group /domainThis list shows some default groups and some user created groups that are in use for different use cases. We now want to go a level deeper, and that is the members of one of these groups:
net group "Domain Admins" /domainNow, as an attacker, we have gold on our hands. We know exactly which 5 users we have to attack to get domain admin permissions and be able to be destructive.
If we want to have even more permissions, we can find out which user has Enterprise Admin permissions:
net group "Enterprise Admins" /domainSo we can aim our attack to that guy Justin.
Let’s see in the portal after we have issued this command above in complete silence or if we are detected by Defender for Identity:
So all the enumeration and query events we did are audited by the Defender for Identity sensor and marked as potentially dangerous.
We can further investigate every event by expanding it:
After some time (around 10 minutes in my case), an official incident will be opened in the Security portal, and notifiies the SOC with possible alerts they have configured:
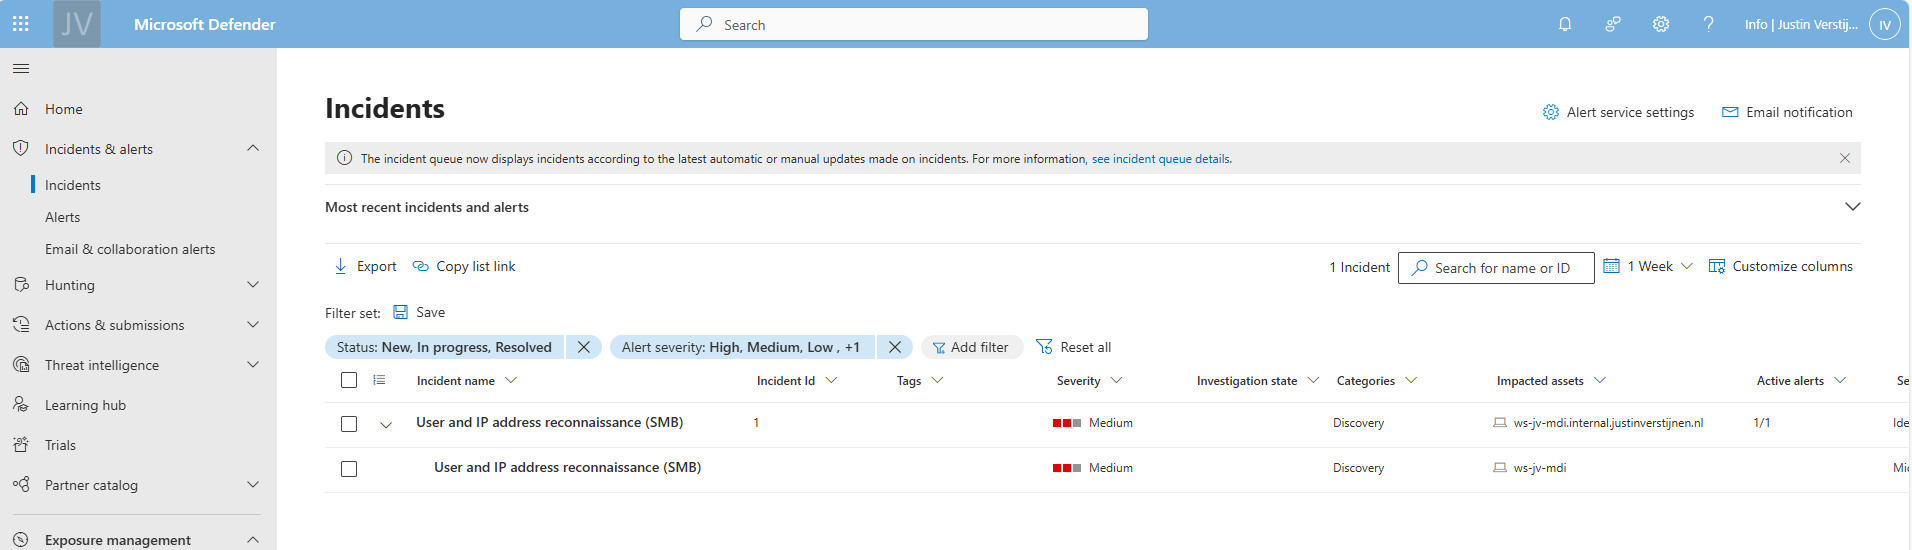
In Active Directory, SYSVOL is a really important network share. It is created by default and is used to store Group Policies, Policy definitions and can be used to enumerate active sessions to the folder. This way, we know all currently logged in users with their IP addresses without access to a server.
For this steps, we need a tool called NetSess, which can be downloaded here: https://www.joeware.net/freetools/tools/netsess/
Place the tool on your attacking workstation and navigate to the folder for a convinient usage. In my case, i did it with this command:
cd C:\Users\justin-admin\Desktop\NetsessNow we are directly in the folder where the executable is located.
Now lets run a command to show all logged in users including their IP addresses
Netsess.exe vm-jv-mdiNow we know where potential domain admins are logged in and could launch attacks on their computer, especially because we know on which computer the user credentials are stored. This all without any access to a server (yet).
On Windows 10, computers are vulnerable to dump cached credentials from memory and such which we can exploit. Microsoft solved this in later versions of Windows 10 and Windows 11 by implementing a Core isolation/Memory security feature with Windows Defender which prevent attacks from using this tool.
Now we need to run another 3rd party tool called mimikatz, and this can be downloaded here: https://github.com/gentilkiwi/mimikatz
Mimikatz is a tool which can be used to harvest stored credentials from hosts so we can use this to authenticate ourselves.
Note: Windows Defender and other security tools don’t like mimikatz as much as we do, so you have to temporarily disable them.
We can run the tool with an elevated command prompt:
mimikatz.exe "privilege::debug" "sekurlsa::logonpasswords" "exit" >> C:\temp\victims.txtNow the tool generates a text file with all logged on users and their hashes. I couldnt test it myself, but i have an example file:
Authentication Id : 0 ; 302247 (00000000:00049ca7)
Session           : RemoteInteractive from 2
User Name         : alexander.harris
Domain            : JV-INTERNAL
Logon Server      : vm-jv-mdi
Logon Time        : 02/21/2025 2:37:48
SID               : S-1-5-21-1888482495-713651900-1335578256-1655
        msv :
         [00000003] Primary
         * Username : alexander.harris
         * Domain   : JV-INTERNAL
         * NTLM     : F5262921B03008499F3F197E9866FA81
         * SHA1     : 42f95dd2a124ceea737c42c06ce7b7cdfbf0ad4b
         * DPAPI    : e75e04767f812723a24f7e6d91840c1d
        tspkg :
        wdigest :
         * Username : alexander.harris
         * Domain   : JV-INTERNAL
         * Password : (null)
        kerberos :
         * Username : alexander.harris
         * Domain   : internal.justinverstijnen.nl
         * Password : (null)
        ssp :
        credman :
If i were on a vulnerable workstation, i could run the following command where i stole the hash of user Alexander Harris (remember, this was a domain admin) and issue it against the server:
mimikatz.exe "privilege::debug" "sekurlsa::pth /user:alexander.harris /ntlm:F5262921B03008499F3F197E9866FA81 /domain:internal.justinverstijnen.nl" "exit"A new command prompt will open with the permissions of Alexander Harris in place:
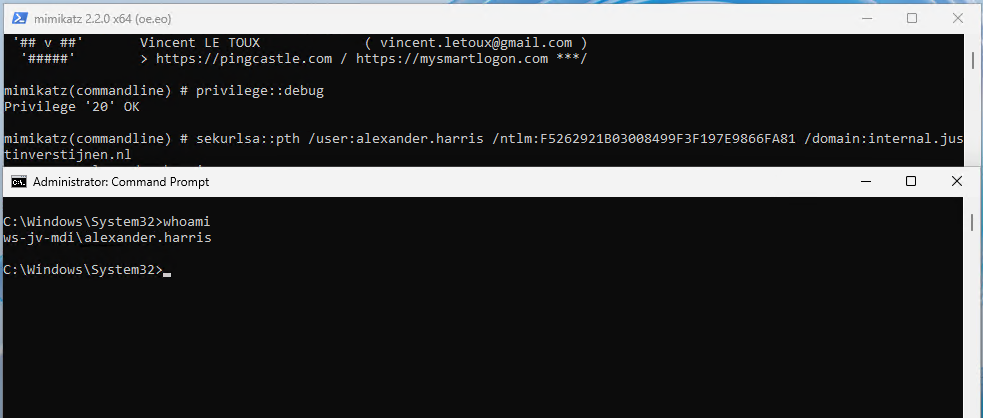
This situation is worst case scenario which is not that easy to execute anymore due to kernel improvements of Windows and not be able to export hashes from the memory anymore.
An attacker now has access to a domain admin account and can perform some lateral movement attacks to the rest of the Active Directory domain. It basically has access to everything now and if else, it can itself gain access. It also can create a backdoor for itself where he can gain access without using the account of Alexander Harris.
In Microsoft Defender for Identity (MDI) we can configure some honeytokens. This are accounts that doesn’t have any real function but are traps for attackers that immediately triggers an event. Most of the time they are named fakely to seem they are treasure.
We can add users and devices to this list.
I now have created a user that seems to give the attacker some real permissions (but in fact is a normal domain user):
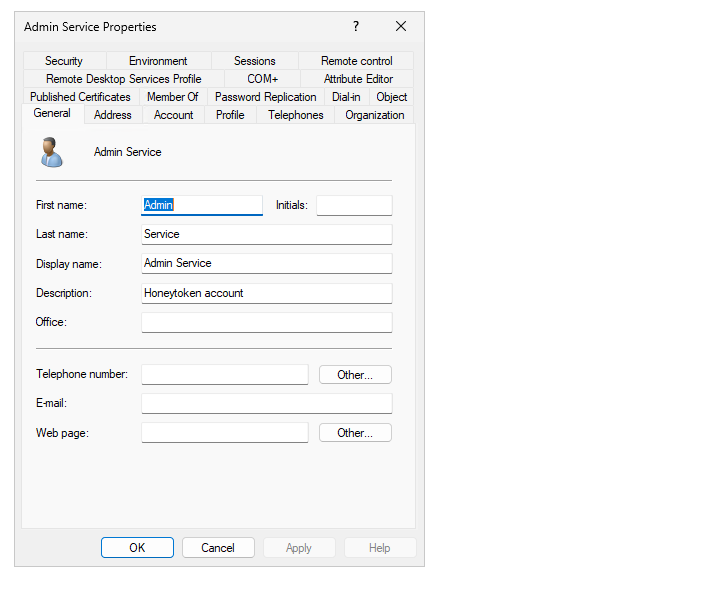
Let’s configure this account as Honeytoken account in the Security portal. Go to the Settings -> Identities -> Honeytoken accounts
Tag the user and select it from the list.
After that save the account and let’s generate some alerts.
Now, as an attacker, we cloud know that the admin.service account exists through the Enumeration of users/groups and group memberships. Let’s open the Windows Explorer on a workstation and open the SYSVOL share of the domain.
It asks for credentials, we can try to log in with some basic, wrong passwords on the admin.service account.
This will generate alerts on that account because the account is not really supposed to logon. The SOC will immediately know that an malicious actor is running some malicious behaviour.
After filling in around 15 wrong passwords i filled in the right password on purpose:

In the Security Portal, after around 5 minutes, an alert is generated due to our malicious behaviour;
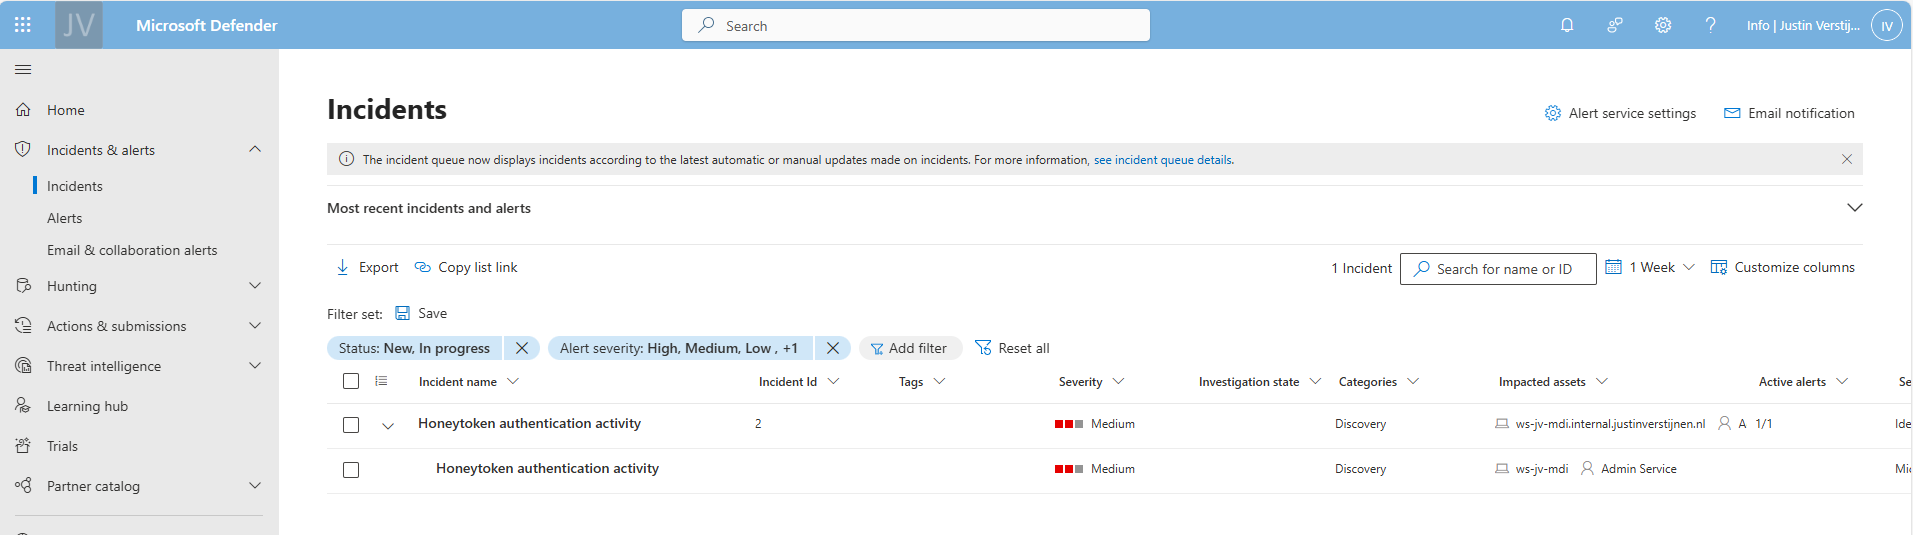
So in the end, Active Directory is out there for around 25 years and it can be a great solution for managing users, groups and devices in your environment. But there are some vulnerabilities with it who can be mitigated really easy so that the attacks in this guide cannot be performed that easy.
My advices:
Thank you for reading this guide!
You have reached the end of the page. You can navigate through other blog posts as well, share this post on X, LinkedIn and Reddit or return to the blog posts collection page. Thank you for visiting this post.
If you think something is wrong with this post or you want to know more, you can send me a message to one of my social profiles at: https://justinverstijnen.nl/about/
If you find this page and blog very useful and you want to leave a donation, you can use the button below to buy me a beer. Hosting and maintaining a website takes a lot of time and money. Thank you in advance and cheers :)
The terms and conditions apply to this post.
When it comes to security, it is great to secure every perimeter. In the Zero Trust model, it has been stated that we have to verify everything, everytime, everywhere. So why consider not monitoring and defending your traditional Active Directory that is still in use because of some legacy applications?
Microsoft Defender for Identity (MDI for short) is a comprehensive security and monitoring tool which is part of the Microsoft XDR suite that defends your Windows Server-based Active Directory (AD DS). This does it by installing agents on every domain controller and so monitoring every authentication request.
It monitors every authentication request that happens on the Active Directory like:
Microsoft Defender for Identity (MDI) can mitigate some special attacks such as;
When starting with Defender for Identity, it is possible to start a free 3-month trial of the service. You get 25 user licenses with this trial so you can test this with a pilot group. My advice is to use this on high-sensitive users, like users with local administrator rights or such.
You can get this one-time trial through the Microsoft 365 marketplace by looking up Defender for Identity:
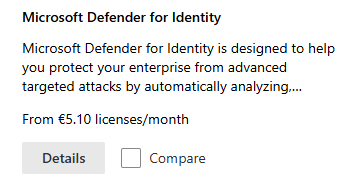
After that, if you are eligible for a trial, you can get it by clicking on “Details” and then on “Start Trial”.
In my environment, i have assigned the license to my user:
After starting the trial or purchasing the right licenses, please log out of the tenant and log back in. This will make sure all of the required options are available in your environment.
To use the Defender for Identity service we have to install a sensor application on every domain controller. This sensor sits between the online Defender for Identity service and your local server/Active Directory. A sort of connector to push the event logs and warnings to the cloud so we can view all our Defender related alerts in one single pane of glass.
You can find the sensors in the Microsoft Security admin center by going to “https://security.microsoft.com”.
There you can open one of the settings for Defender for Identity by going to Settings -> Identities.
If this is your first Defender service in the Microsoft 365 tenant, the following message will appear:
This can take up to 15 minutes.
After the mandatory coffee break we have access to the right settings. Again, go to Settings -> Identities if not already there.
Download the sensor here by clicking “Add sensor”.
If your environment already has its servers joined to Microsoft Defender, there is a new option available that automatically onboards the server (Blue). In our case, we did not have joined the server, so we choose the classic sensor installation (Grey) here:
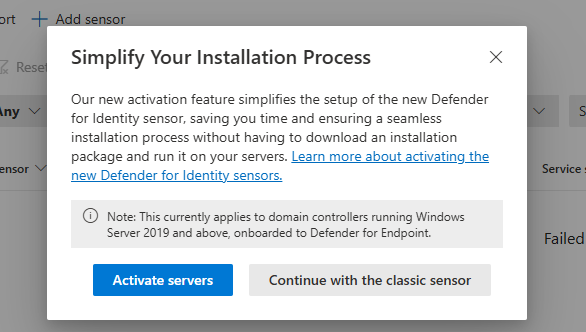
After clicking on the classic sensor installation, we get the following window:
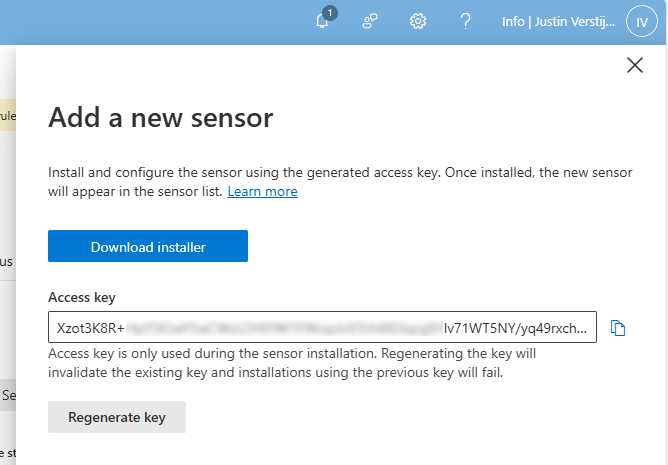
Here we get the right installer file and an access key. We have to install this sensor on every domain controller for full coverage and fill in the access key. This way the server knows exactly to which of the billions of Microsoft 365 tenants the data must be sent and simultaneously acts like a password.
Download the installer and place it on the target server(s).
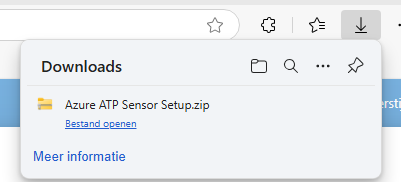
Extract the .zip file.
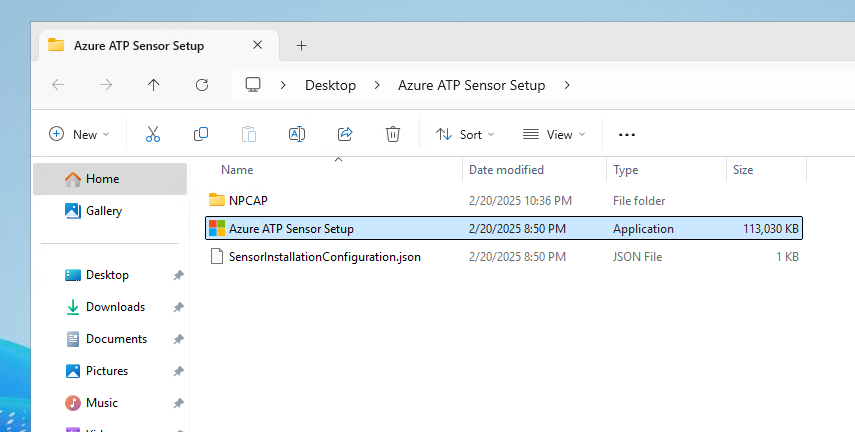
We find 3 files in the .zip file, run the setup.

Select your preferred language and click on “Next”.
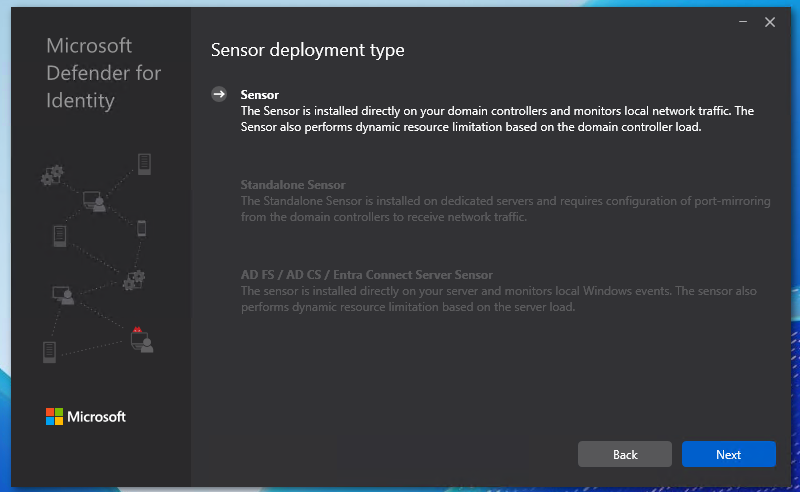
We have 3 deployment types:
I chose the option “Sensor” because my environment only has one server to do the installation and is a demo environment.
Choose your preferred deployment type and click next.

Here we have to paste the access key we copied from the Security portal.
Paste the key into the “Access Key” field and click “Install”.
It will install and configure the software now:
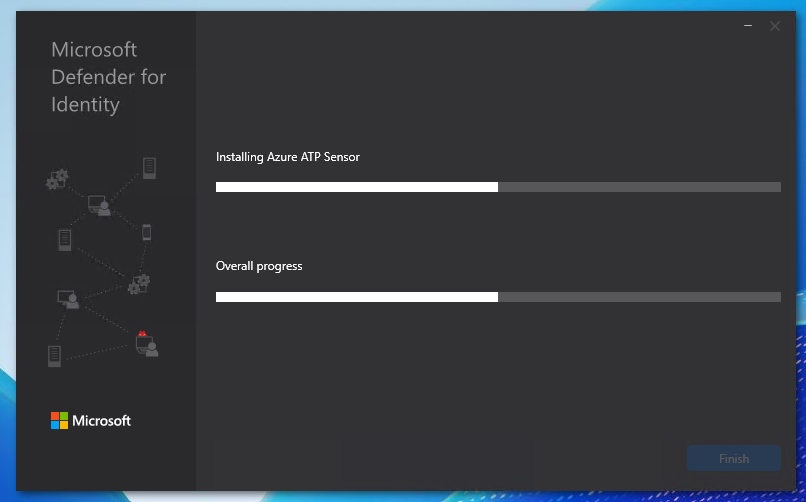
After a minute or 5, the software is installed succesfully:
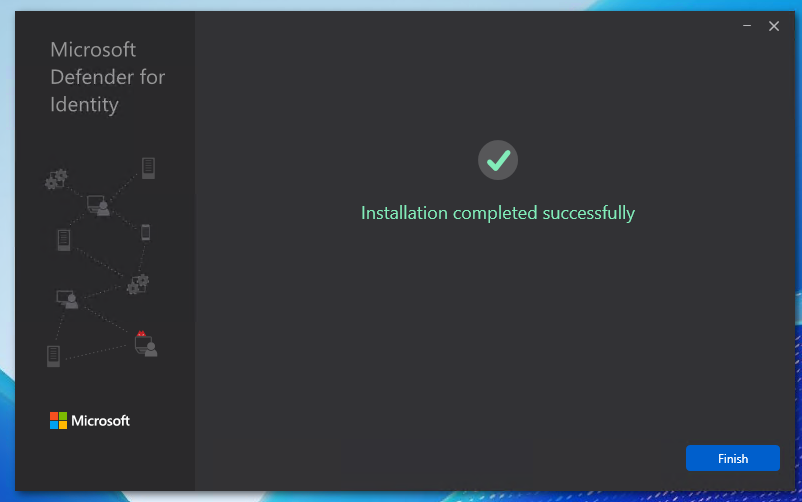
After succesfully installing the sensor, we can now find the sensor in the Security portal. Again, go to the Security portal, then to Settings -> Identities.
Now the sensor is active, but we have to do some post-installation steps to make the sensor fully working.
Click on the sensor to review all settings and information:
We can edit the configuration of the sensor by clicking on the blue “Manage sensor” button. Also, we have to do 2 tasks for extra auditing which i will explain step by step.
First, click on the “Manage Sensor” button.
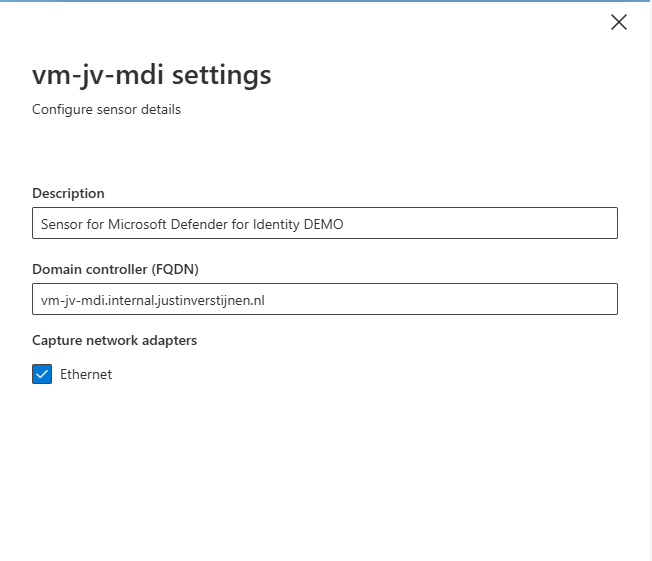
We can configure the network interfaces where the server must capture the information. This can be usefull if your network consists of multiple VLANs.
Also we can give the sensor a description which my advice is to always do.
Hit “Save” to save the settings.
It is also possible to enable “Delayed Update” for sensors. This works like Update Rings, where you can delay updates to reduce system load and not rolling out updates on all your sensors at the same time. Delayed Updates will be installed on sensors after 72 hours.
Now we have to do three post-installation steps for our domain. The good part is, that they have to be done once and will affect all the servers.
Before we can fully use MDI, we must configure NTLM Auditing. This means that all authentication methods on the domain controllers will be audited. This is disabled by default to save computing power and storage.
Source: https://aka.ms/mdi/ntlmevents
In my opinion, the best way to enable this is through Group Policy. Open the Group Policy Management tool on your server (gpmc.msc).
I created a new Group Policy on the OU of “Domain Controllers”. This is great to do, because all domain controllers in this domain will be placed here automatically and benefit from the settings we made here.
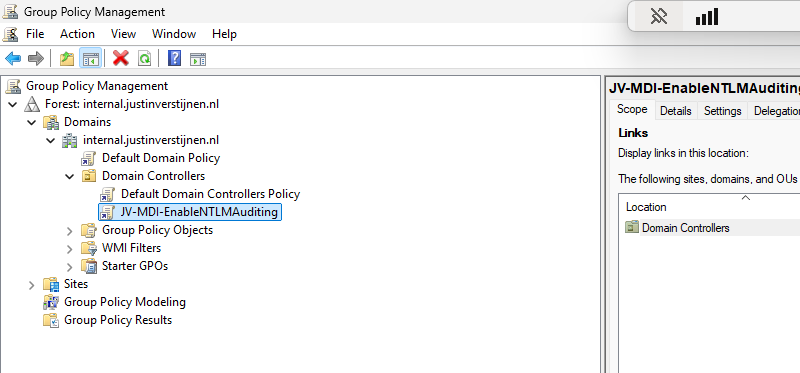
Edit the group policy to configure NTLM Auditing.
Go to Computer Configuration -> Policies -> Windows Settings -> Security Settings -> Local Policies -> Security Options
Here we have to change 3 settings:
| Setting name | Required option |
| Network security: Restrict NTLM: Outgoing NTLM traffic to remote servers | Audit all |
| Network security: Restrict NTLM: Audit NTLM authentication in this domain | Enable all |
| Network security: Restrict NTLM: Audit Incoming NTLM Traffic | Enable auditing for all accounts |
Change the settings like i did below:
Please review the settings before changing them, it can be easy to pick the wrong one.
The second step is to enable Advanced Auditing for AD. We have to add some settings to the group policy we made in the first post-installation step.
Go to Group Policy Management (gpmc.msc) and edit our freshly made GPO:
Go to Computer Configuration -> Policies -> Windows Settings -> Security Settings -> Advanced Audit Policy Configuration -> Audit Policies -> Account Logon
Now we have to make changes in several policy categories, where we enable auditing events. By default they are all disabled to save compute power but to monitor any suspicious behaviour, we want them to be collected.
Change all of the audit policies below to the desired option. Take a look at the image below the table to exactly know where to find what option.
| Policy category (Red) | Setting name (green) | Required option (Blue) |
| Account Logon | Audit Credential Validation | Success and Failure |
| Account Management | Audit Computer Account Management | Success and Failure |
| Account Management | Audit Distribution Group Management | Success and Failure |
| Account Management | Audit Security Group Management | Success and Failure |
| Account Management | Audit User Account Management | Success and Failure |
| DS Access | Audit Directory Service Changes | Success and Failure |
| DS Access | Audit Directory Service Access | Success and Failure |
| System | Audit Security System Extension | Success and Failure |
To check which event IDs are enabled with this settings, check out the Microsoft page.
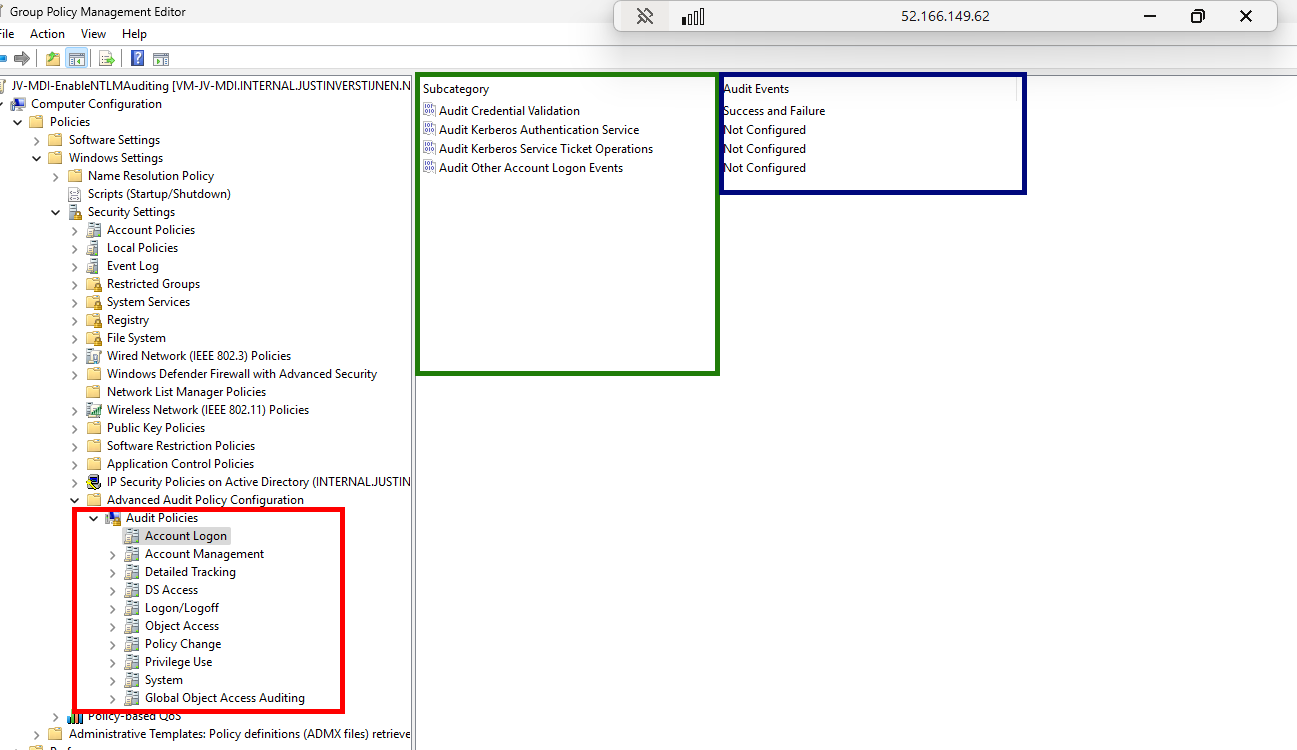
After you set all the Audit Policies, we can close the Group Policy Management console. Then we can restart the server to make all changes made in the policies effective.
After the restart, we want to check if the policies are active. We can check this with Powershell with one simple command:
auditpol.exe /get /category:*You then get the output of all the live audit policies that are active on the system:
System audit policy
Category/Subcategory                      Setting
System
  Security System Extension               Success and Failure
  System Integrity                        No Auditing
  IPsec Driver                            No Auditing
  Other System Events                     No Auditing
  Security State Change                   No Auditing
Account Management
  Computer Account Management             Success and Failure
  Security Group Management               Success and Failure
  Distribution Group Management           Success and Failure
  Application Group Management            No Auditing
  Other Account Management Events         No Auditing
  User Account Management                 Success and Failure
DS Access
  Directory Service Access                Success and Failure
  Directory Service Changes               Success and Failure
  Directory Service Replication           No Auditing
  Detailed Directory Service Replication  No Auditing
Account Logon
  Kerberos Service Ticket Operations      No Auditing
  Other Account Logon Events              No Auditing
  Kerberos Authentication Service         No Auditing
  Credential Validation                   Success and Failure
*Overview shortened to save screen space.
If your settings matches with the settings above, then you correctly configured the auditing policies!
The third and last post installation task is to enable domain object auditing. This will enable event IDs 4662 and audits every change in Active Directory like creating, changing or deleting users, groups, computers and all other AD objects.
We can enable this in the Active Directory Users and Computers (dsa.msc) console:
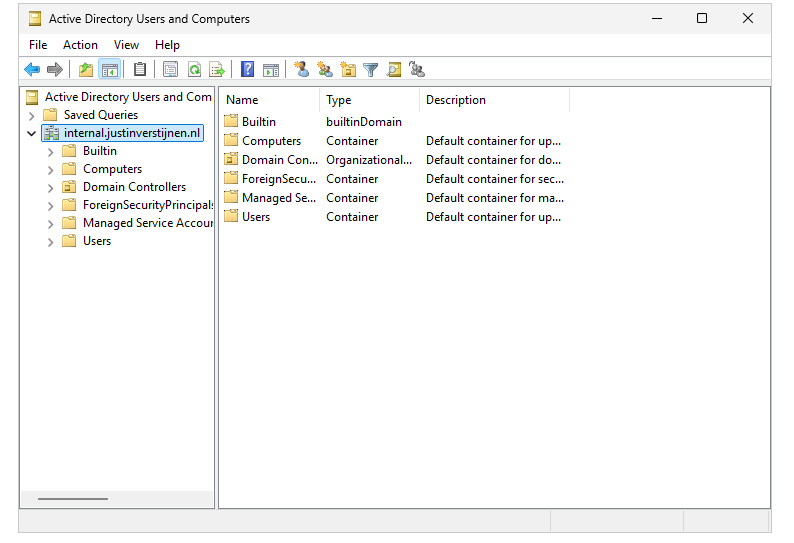
First, we have to enable the “Advanced Features” by clicking on “View” in the menu bar and then clicking “Advanced Features”.
Then right click the domain you want to enable object auditing and click on “Properties”
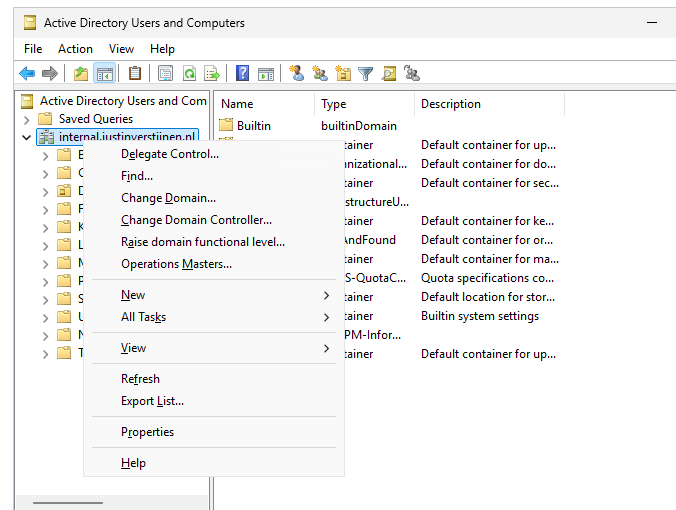
Then click on the tab “Security” and then the “Advanced” button.
Now we get a huge pile of permissions and assignments:
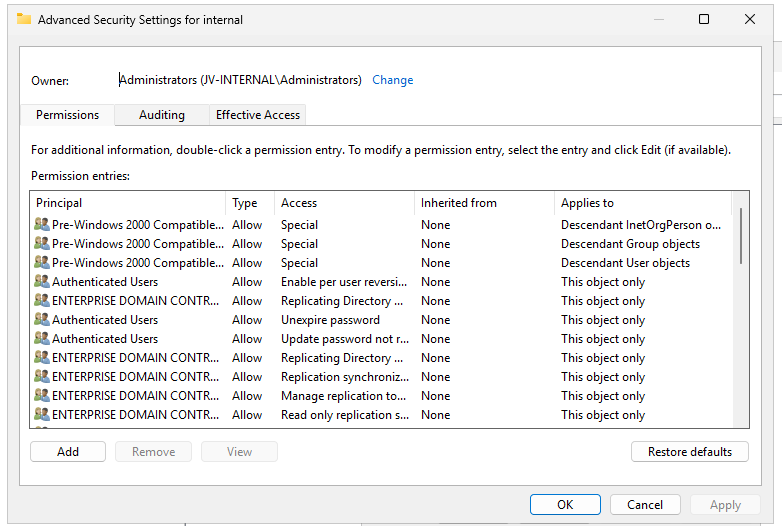
Click on the “Auditing” tab.
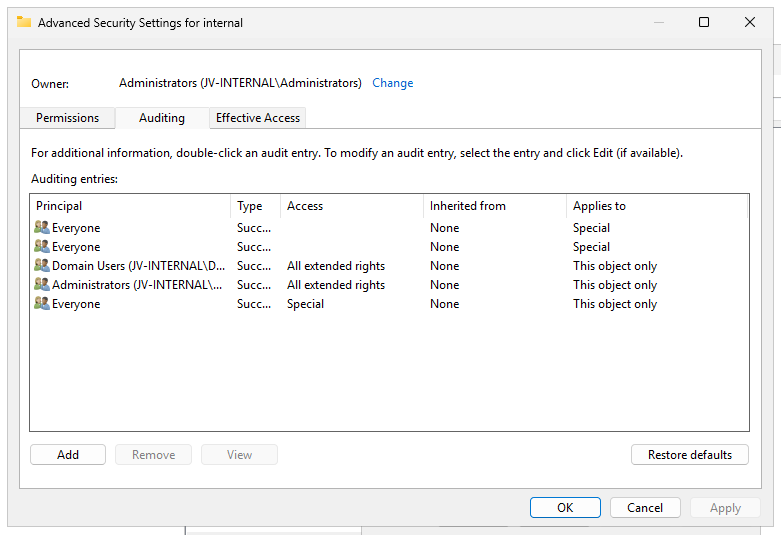
We have to add permissions for auditing here. Click on the “Add” button, and then on “Select a principal”.
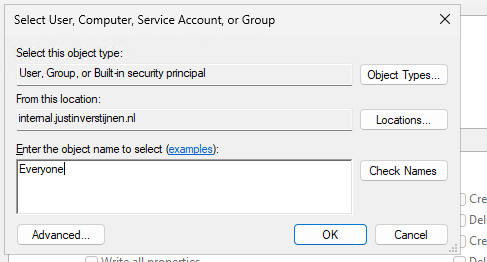
Type “Everyone” and hit “OK”.
Selecting the “Everyone” principal may seem unsecure, but means we collect changes done by every user.
Now we get a pile of permissions:
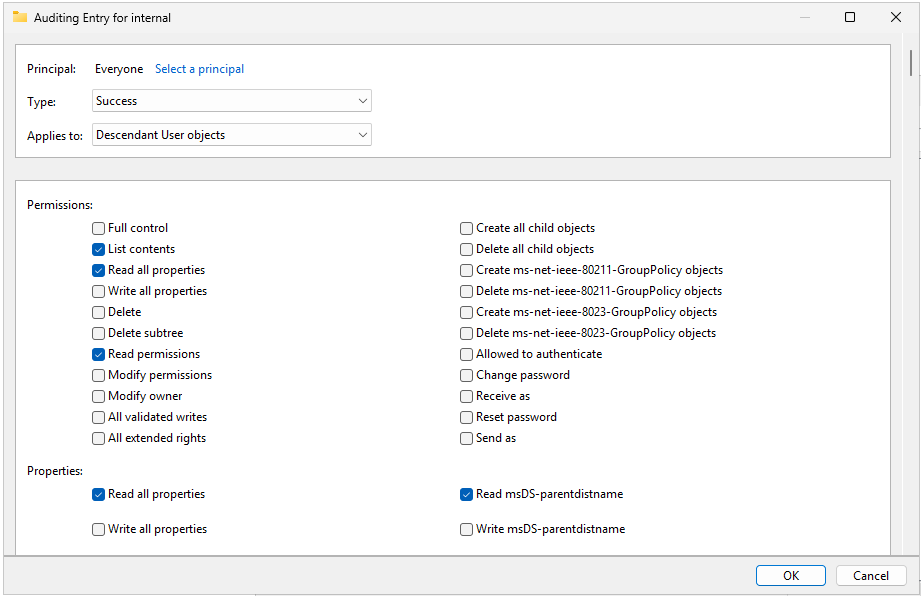
We have to select “Type” and set it to “Success” and then the Applies to: “Decendant User objects” like i have done in the picture above.
Now we have to scroll down to the “Clear all” button and hit it to make everything empty.
Then click “Full Control” and deselect the following permissions:
This should be the outcome:
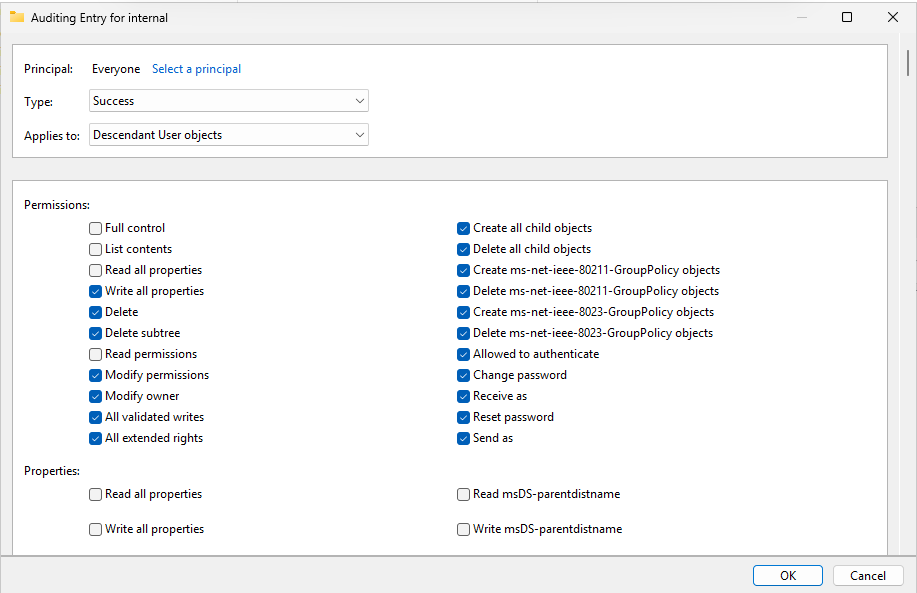
We have to repeat the steps for the following categories:
Start with the Clear all button and then finish like you have done with the Decendant User objects.
After selecting the right permissions, click “OK”, then “Apply” and “OK” to apply the permisions.
Now we are done with all Active Directory side configuration.
After performing all post installation tasks, the sensor will be on the “Healthy” status in the portal and all health issues are gone:
This means the service is up and running and ready for monitoring and so spying for any malicious activity.
Defender for Identity is a great solution and monitoring tool for any malicious behaviour in your Active Directory. It is not limited to on-premises, it also can run on domain controllers in Azure, like i did for this DEMO.
Next up, we are going to simulate some malicious behaviour to check if the service can detect and warn us about it. Refer this guide: https://justinverstijnen.nl/penetration-testing-defender-for-identity-and-active-directory
You have reached the end of the page. You can navigate through other blog posts as well, share this post on X, LinkedIn and Reddit or return to the blog posts collection page. Thank you for visiting this post.
If you think something is wrong with this post or you want to know more, you can send me a message to one of my social profiles at: https://justinverstijnen.nl/about/
If you find this page and blog very useful and you want to leave a donation, you can use the button below to buy me a beer. Hosting and maintaining a website takes a lot of time and money. Thank you in advance and cheers :)
The terms and conditions apply to this post.
Microsoft Defender External Attack Surface Management (EASM) is a security solution for an organization’s external attack surfaces. It operates by monitoring security and operational integrity across the following assets:
In addition to these components, EASM can also forward all relevant information and logs to SIEM solutions such as Microsoft Sentinel.
It is also possible to manually input company-specific data, such as all domain names and IP addresses associated with its services.
The costs for this solution are minimal; you pay €0.01 per day per host, domain, or IP address added. For example, I configured it with 10 instances of each, resulting in a total monthly cost of €9.17. The costs are billed on your Azure invoice.
The best features of this solution include:
Here, for example, you can see a common vulnerability detected in servers, even when running in environments such as Amazon Web Services (AWS):
To summarize this solution, its a must-need for organizations who want security on every level. Security is like a team sport, it has to be great on every level. Not just one level. This solution will help you achieve this.
You have reached the end of the page. You can navigate through other blog posts as well, share this post on X, LinkedIn and Reddit or return to the blog posts collection page. Thank you for visiting this post.
If you think something is wrong with this post or you want to know more, you can send me a message to one of my social profiles at: https://justinverstijnen.nl/about/
If you find this page and blog very useful and you want to leave a donation, you can use the button below to buy me a beer. Hosting and maintaining a website takes a lot of time and money. Thank you in advance and cheers :)
The terms and conditions apply to this post.
The MITRE ATTACK (ATT&CK) Framework is a framework which describes all stages and methods cyberattacks attacks are launched on companies in the last 15 years. The main purpose of the framework is to help Red and Blue security teams to harden their systems and to provide a library of known attacks to help mitigate them.
MITRE is the organization who is in charge of this community-driven framework and is a non-profit organization. ATT&CK stands for:
The framework itself can help organizations help to secure their environment really good, but keep in mind that the framework is built based on known attacks and techniques. It doesn’t cover new techniques where an organization can be vulnerable to.
The framework can be found on this website: MITRE ATT&CK®
Each cybersecurity attack follows multiple or all stages below. Also, i added a summary of that the stage contains:
| Stage | Primary goal |
| Reconnaissance | Gathering information prior to the attack |
| Resource Development | Aquiring the components to perform the attack |
| Initial Access | Initial attempts to get access, the attack starts |
| Execution | Custom-made code (if applicable) will be executed by the adversary |
| Persistence | The attacker wants to keep access to the systems by creating backdoors |
| Privilege Escalation | The attacker tries to get more permissions than he already has |
| Defense Evasion | The attacker wants to avoid detection for a “louder bang” |
| Credential Access | Stealing account names and passwords |
| Discovery | Performing a discovery of the network |
| Lateral Movement | Aquire access to critical systems |
| Collection | Collecting data which often is sensitive/PII* data |
| Command and Control | The attacker has full control over the systems and can install malware |
| Exfiltration | The attacker copies the collected data out of the victims network to his own storage |
| Impact | The attacker destroys your systems and data |
*PII: Personal Identifible Information, like birth names and citizen service numbers
The attack stages are described very consise, but the full explaination can be found on the official website.
The MITRE ATT&CK framework is a very great framework to get a clear understanding about what techniques and tactices an attacker may use. This is can be a huge improvement by securing your systems by thinking like a attacker.
The best part about the framework are the mitigation steps where you can implement changes to prevent attacks that already happend with a big impact.
You have reached the end of the page. You can navigate through other blog posts as well, share this post on X, LinkedIn and Reddit or return to the blog posts collection page. Thank you for visiting this post.
If you think something is wrong with this post or you want to know more, you can send me a message to one of my social profiles at: https://justinverstijnen.nl/about/
If you find this page and blog very useful and you want to leave a donation, you can use the button below to buy me a beer. Hosting and maintaining a website takes a lot of time and money. Thank you in advance and cheers :)
The terms and conditions apply to this post.
All pages referring or tutorials for Microsoft Entra.
As we want to secure our Break Glass Accounts as good as possible, we cloud want to get alerts when break glass admins are used to login. Maybe they are used on a daily basis, or are being attacked. When we configure notifications, we instantly know when the accounts are being used and can check why a login has taken place.
In this guide we will configure this without Microsoft Sentinel. If you already have a Sentinel workspace, the recommended action is to configure it there and to configure a automation rule/playbook.
The solution we will configure looks like this:
Here we use all the features inside Azure only, and no 3rd party solutions.
We will start configuring our Log Analytics Workspace in Azure. This can be simply described as database for logs and metrics. Using specific queries, we can pull data our of it to use in dashboards, workbooks and like we do now; Alert rules.
Login to the Azure Portal and search for “Log Analytics Workspace”:
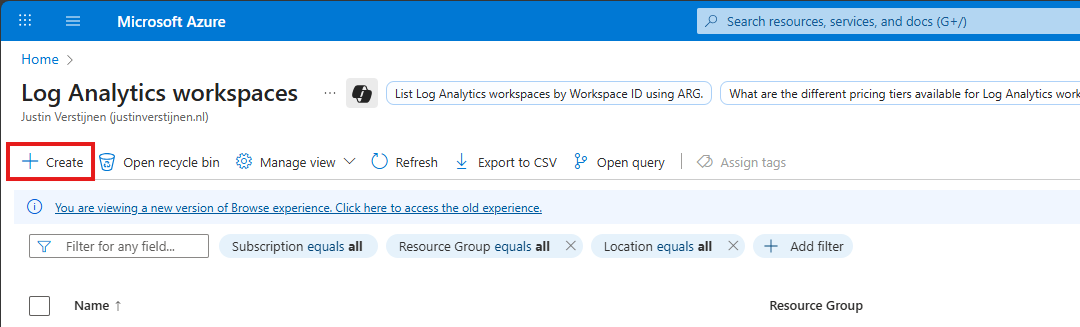
Click on “+ Create” to create a new workspace.
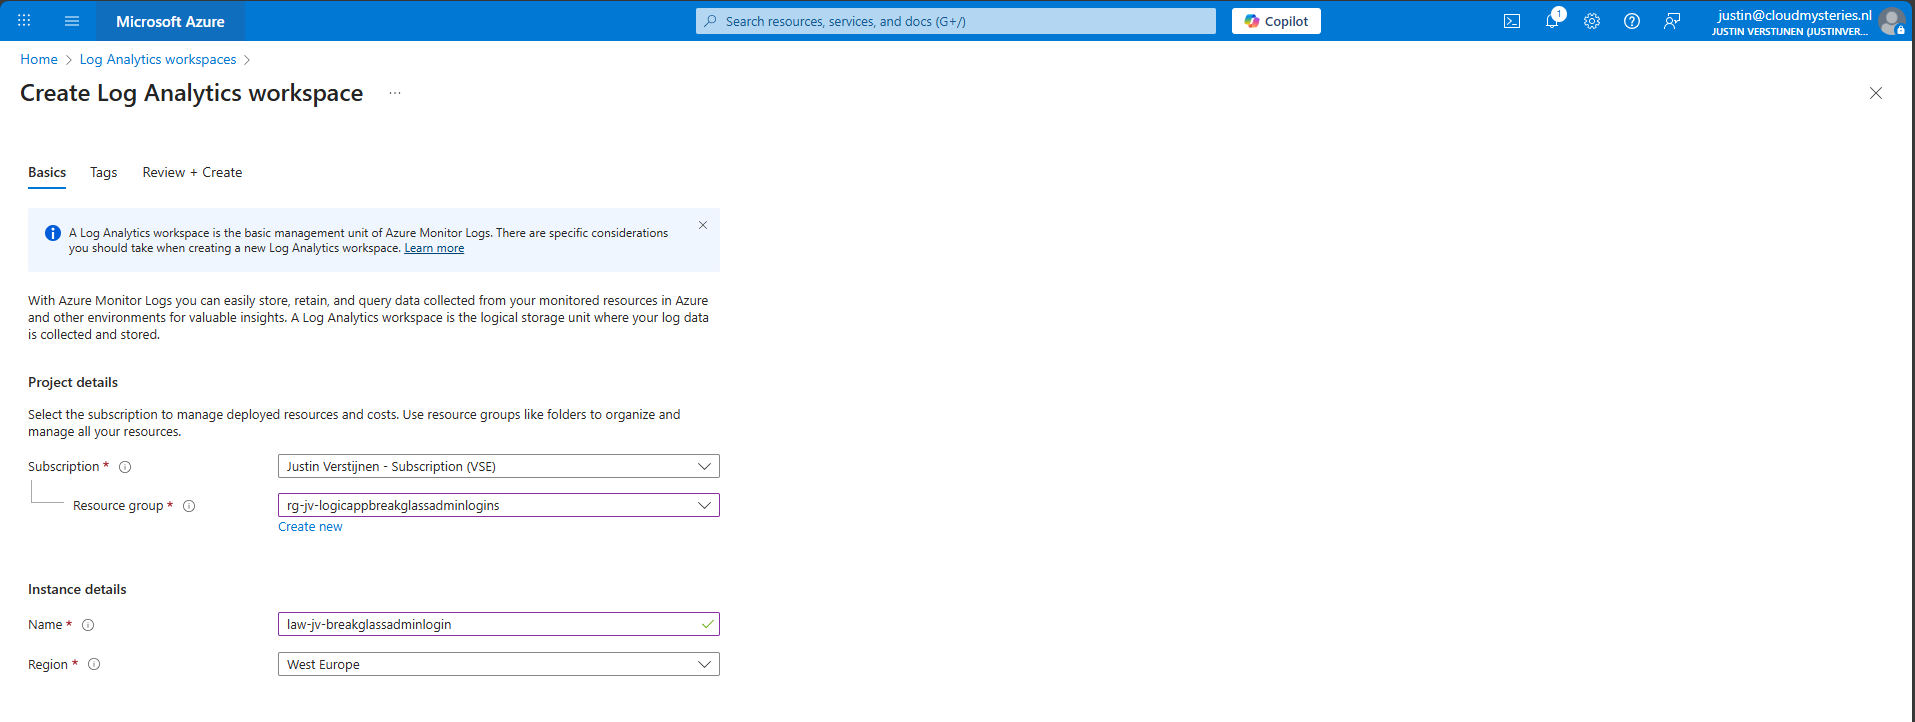
Select the desired resource group and give it a name and create the workspace.
After the workspace is configured, we can configure the data retention and daily cap of the Log Analytics Workspace. As ingesting a lot of data could be very expensive at the end of the month, you could configure some caps. Also, we will only ingest the data needed for this solution, and nothing more.
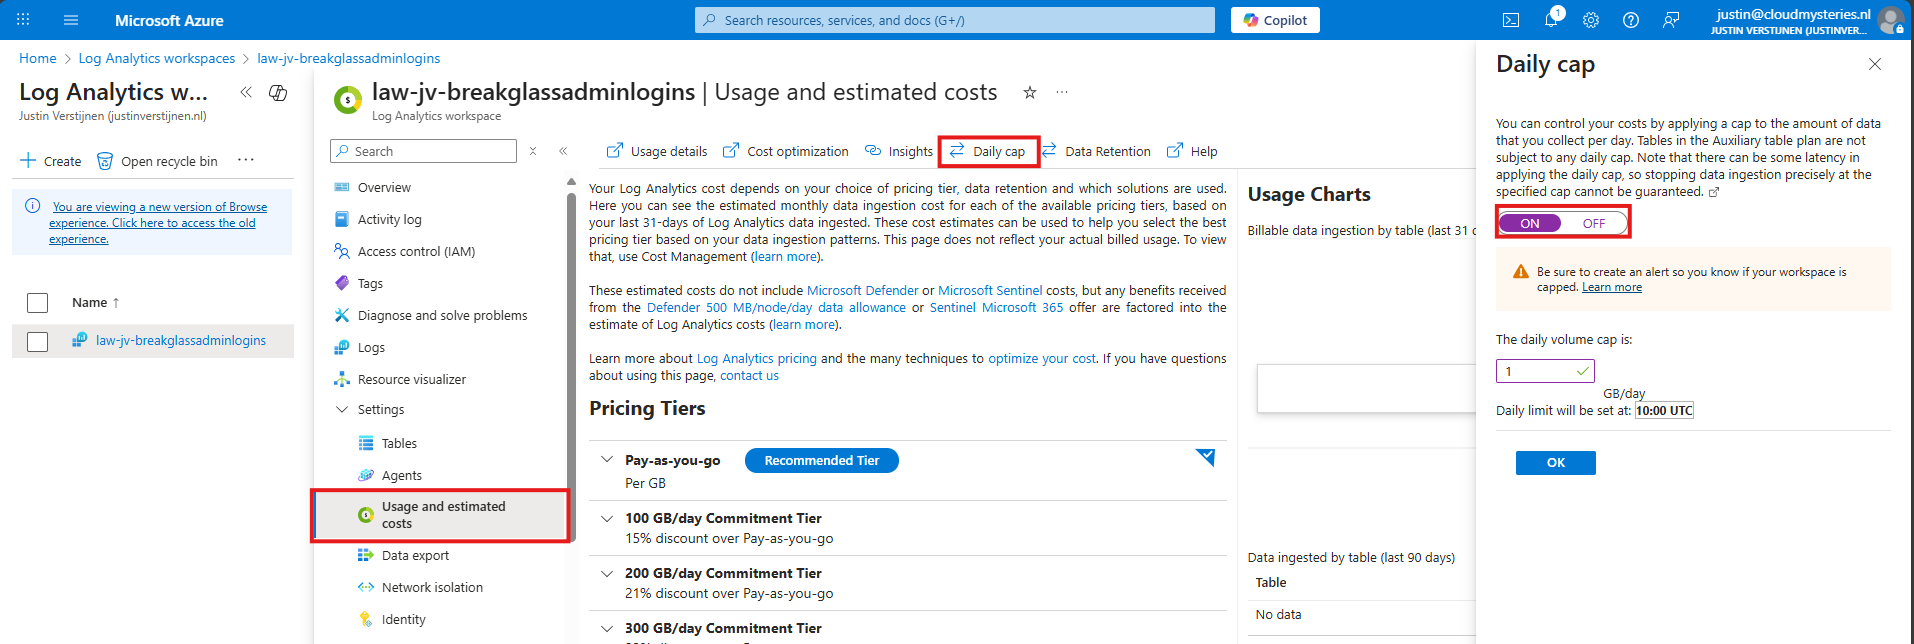
Here I have set the daily cap to 1 gigabyte max per day, which would be more than enough for this solution in my case. In bigger environments, you could set this to a higher value.
Now we need to configure the Sign in logs writing to our Log Analytics Workspace. We will do this through the Entra admin center: https://entra.microsoft.com.
Go to “Monitoring and Health” and then to “Diagnostic Settings”
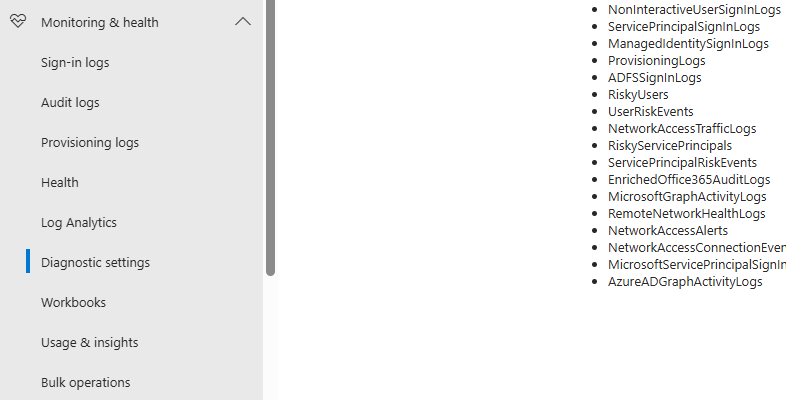
On there, click on “+ Add diagnostic setting”

On this page, give the connector a describing name, select SignInLogs on the left and on the right select “Send to Log Analytics workspace” and then select your just created workspace there.
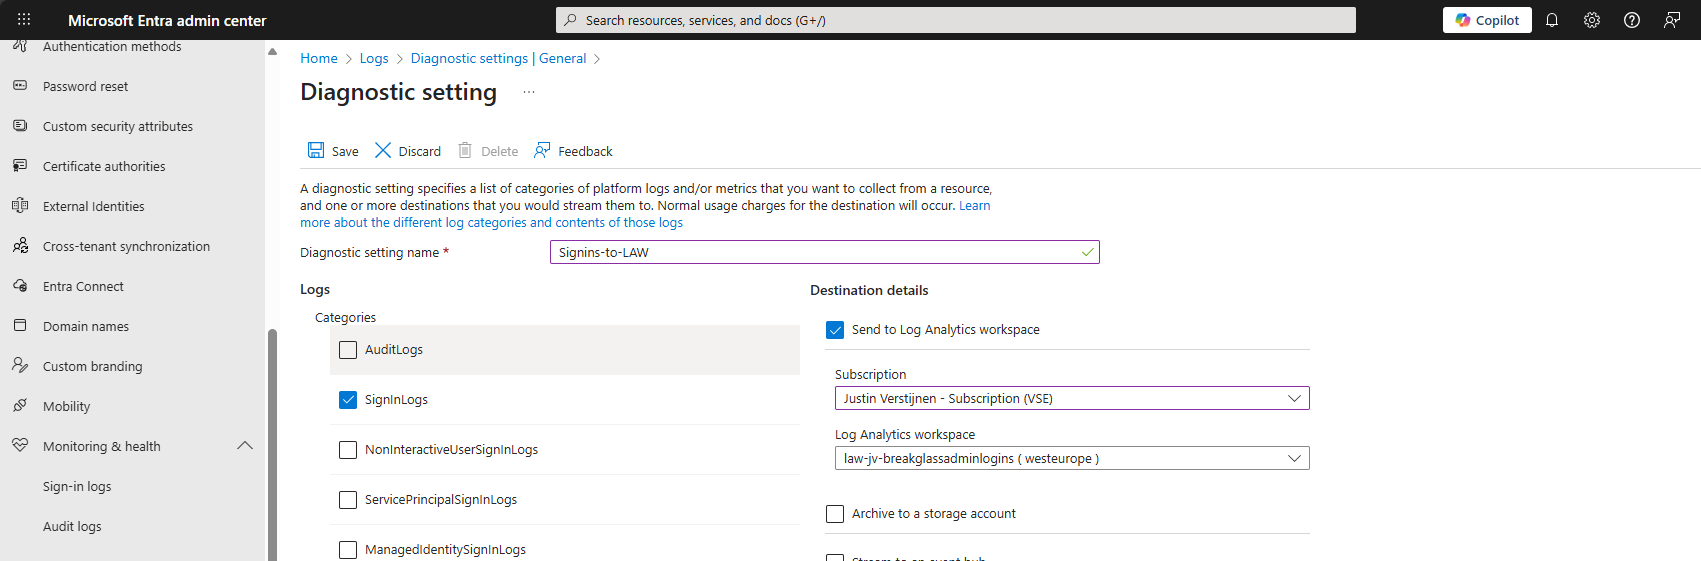
Then click the “Save” button to save this configuration. Now newly created sign in logs will be written to our Log Analytics workspace, so we can do further investigation.
Quick note before diving into the log analytics workspace and checking the logs. When initially configuring this, it can take up to 20 minutes before data is written to the workspace.
And another note, sign in logs take up to 5-10 minutes before showing in the Portal and before written to Log Analytics.
In this step we need to configure a query to search login attempts. We can do this by going to our Log Analytics Workspace in Azure, and the go to “Logs”.
We can select a predefined query, but I have some for you that are specific for this use case. You can always change the queries to your needs, these are for example what you could search for.
SigninLogs
| where UserPrincipalName == "account@domain.com"
| where ResultType == 0
| project TimeGenerated, UserPrincipalName, IPAddress, Location, ResultType, ResultDescription, ConditionalAccessStatus, AuthenticationRequirement
| sort by TimeGenerated descSigninLogs
| where UserPrincipalName == "account@domain.com"
| where ResultType != 0
| project TimeGenerated, UserPrincipalName, IPAddress, Location, ResultType, ResultDescription, ConditionalAccessStatus, AuthenticationRequirement
| sort by TimeGenerated descSigninLogs
| where UserPrincipalName == "account@domain.com"
| project TimeGenerated, UserPrincipalName, IPAddress, Location, ResultType, ResultDescription, ConditionalAccessStatus, AuthenticationRequirement
| sort by TimeGenerated descNow we know the queries, we can use this in Log Analytics and set the query type to KQL. Paste one of the queries above and change the username to get the results in your tenant:
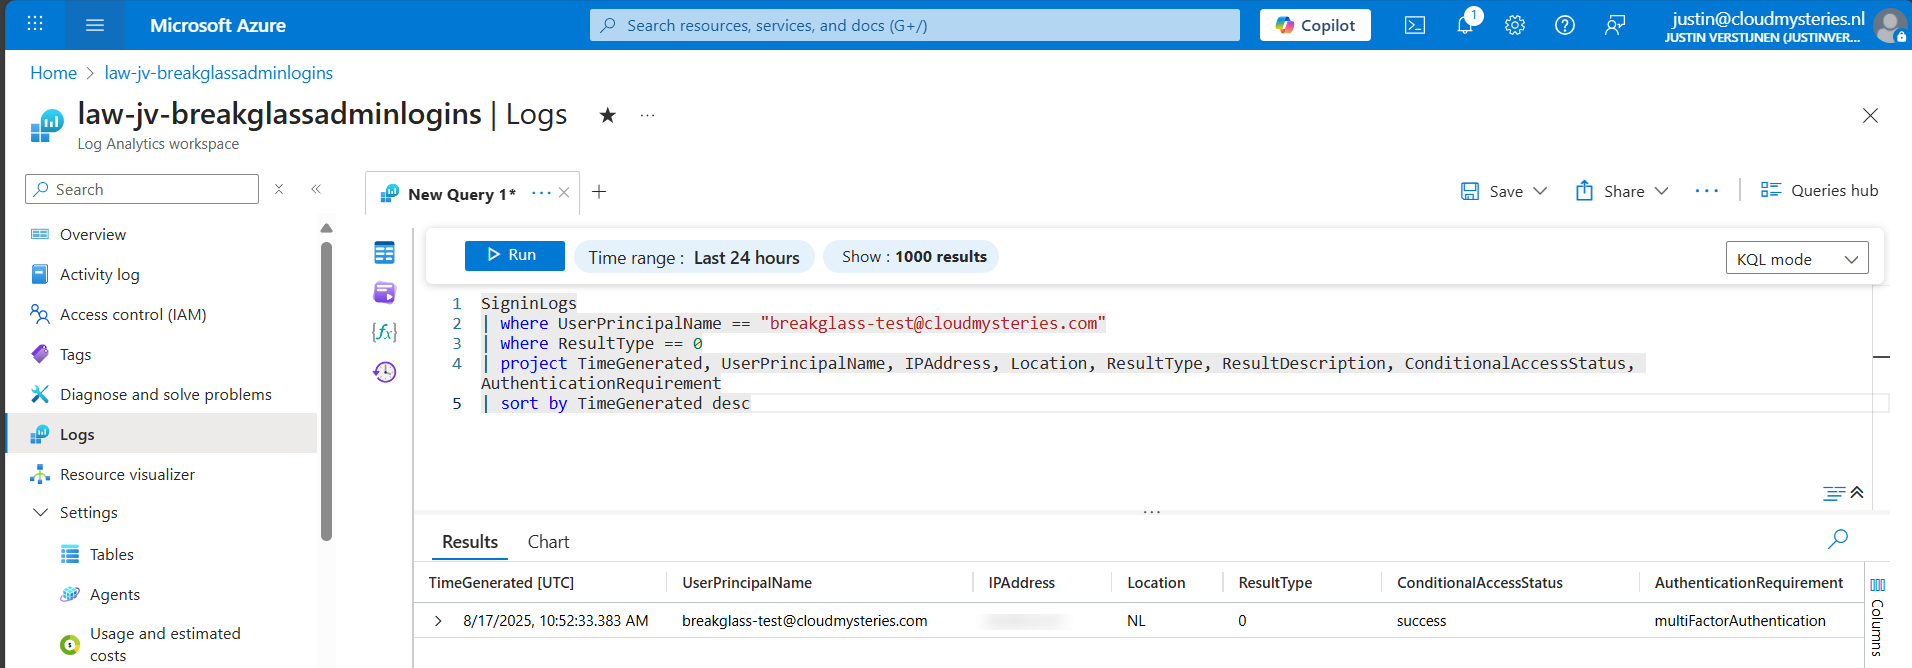
Now we have a successful login attempt of our testing account, and we can see more information like the source IP address, location, if Conditional Access was applied and the resulttype. Resulttype 0 means a successful login.
You could also use the other queries, but for this solution we need to use query one where we only search for successful attempts.
Now that we have a successful query, we need to configure a alert rule. We can do this while still being in the Log Analytics query pane:
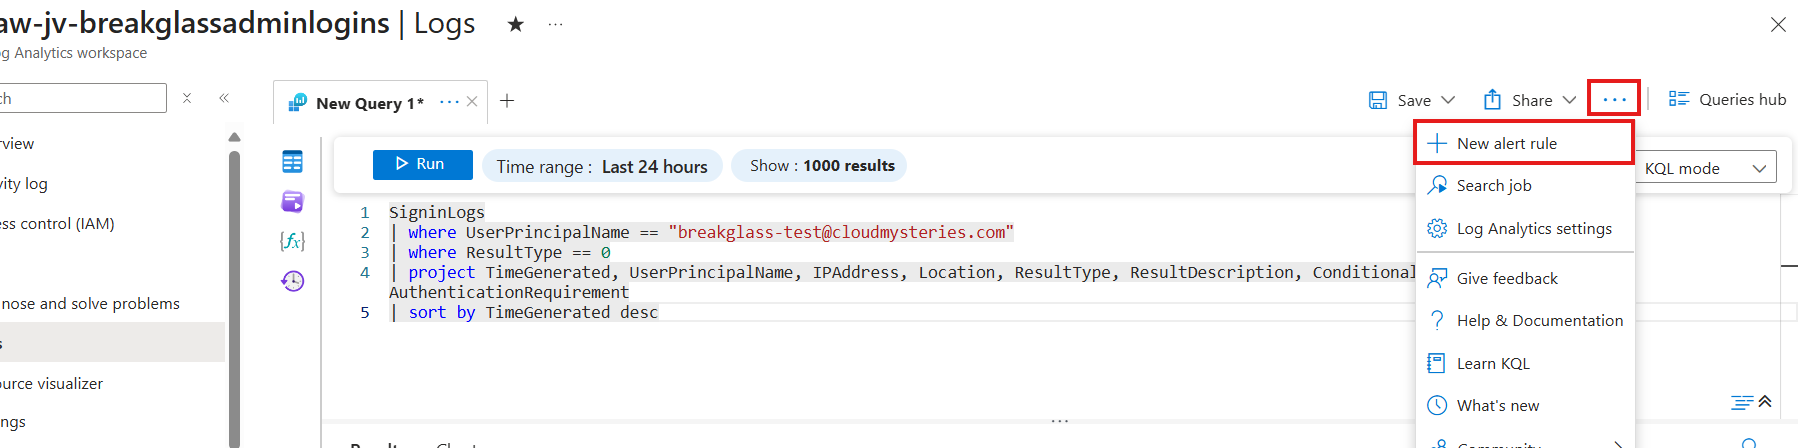
Click on the 3 dots and then on “+ New alert rule”. This creates an alert rule completely based on the query we have used.
On this page, scroll down to “Alert logic” and set the following settings:
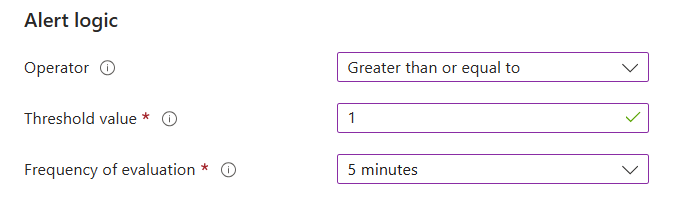
This means the alert is triggered if the query finds 1 or more successful attempts. You can customize this is needed.
Now go to the “Actions” tab. We now need to create an Action group, where we define what kind of notification to receive.
Create a action group if you don’t already have one.
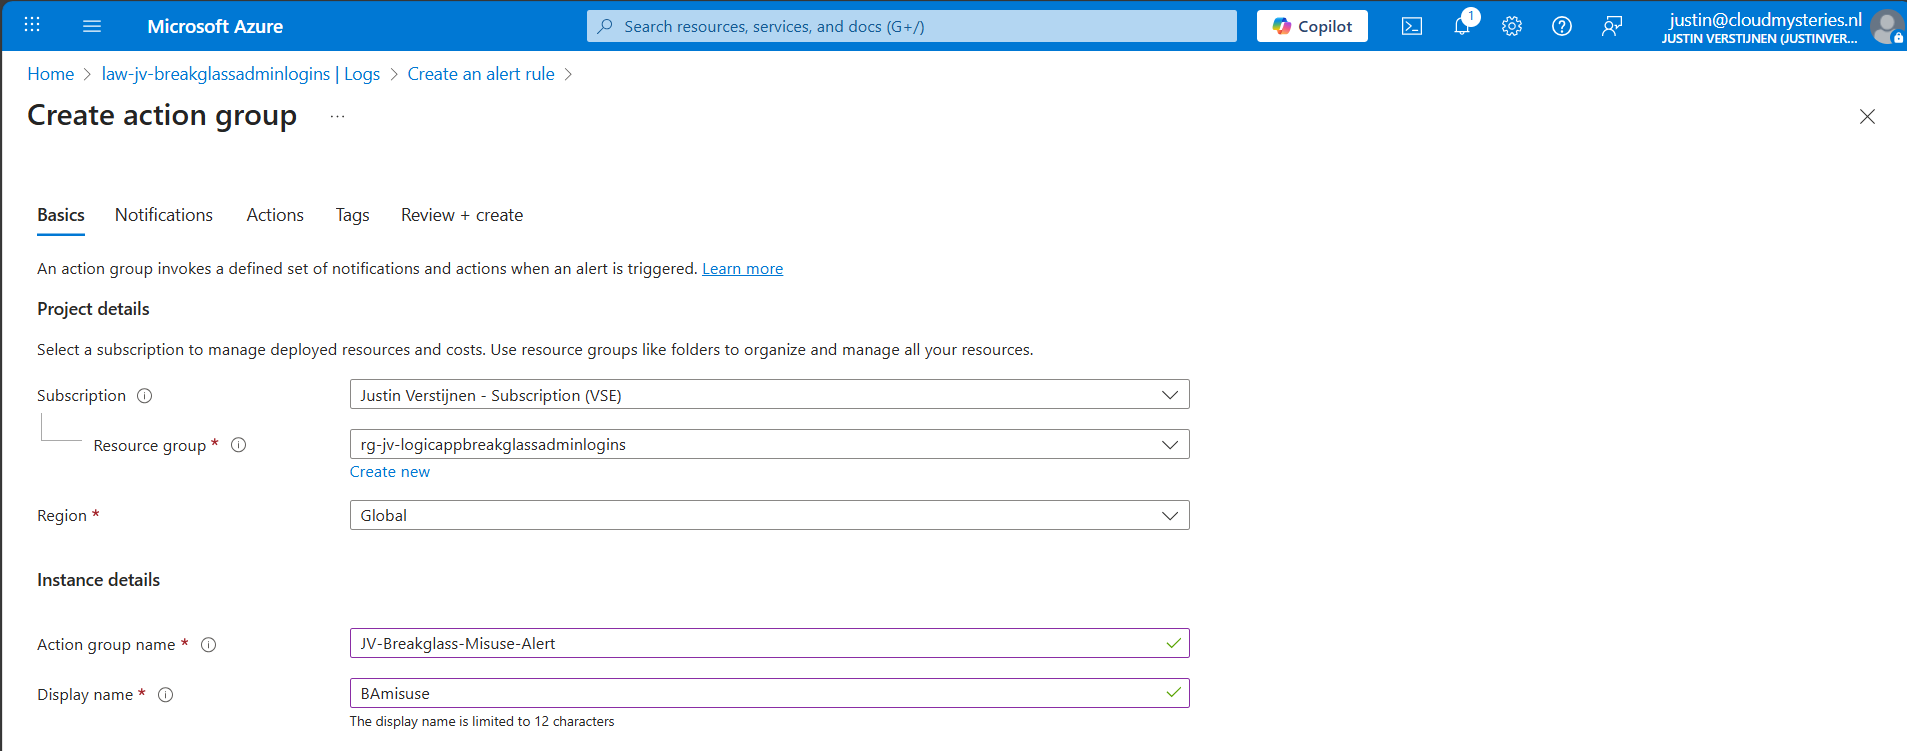
Give it a name and displayname. Good practice is to use a different action group for this alert, as you can define per action group what kind of notification and receivers you want to use.
Now go to the “Notifications” tab. Select “Email/SMS message/Push/Voice” and configure the alert. This is pretty straight forward.
I have configured Microsoft to call me when this alert is triggered:
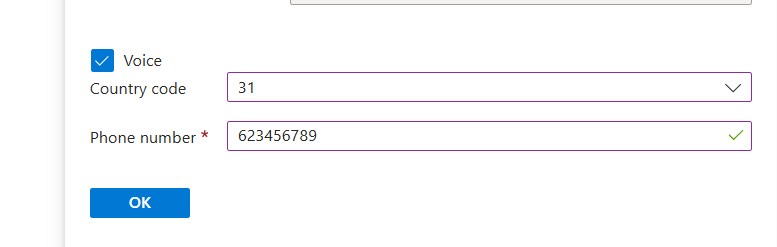
Advance to the next tab.
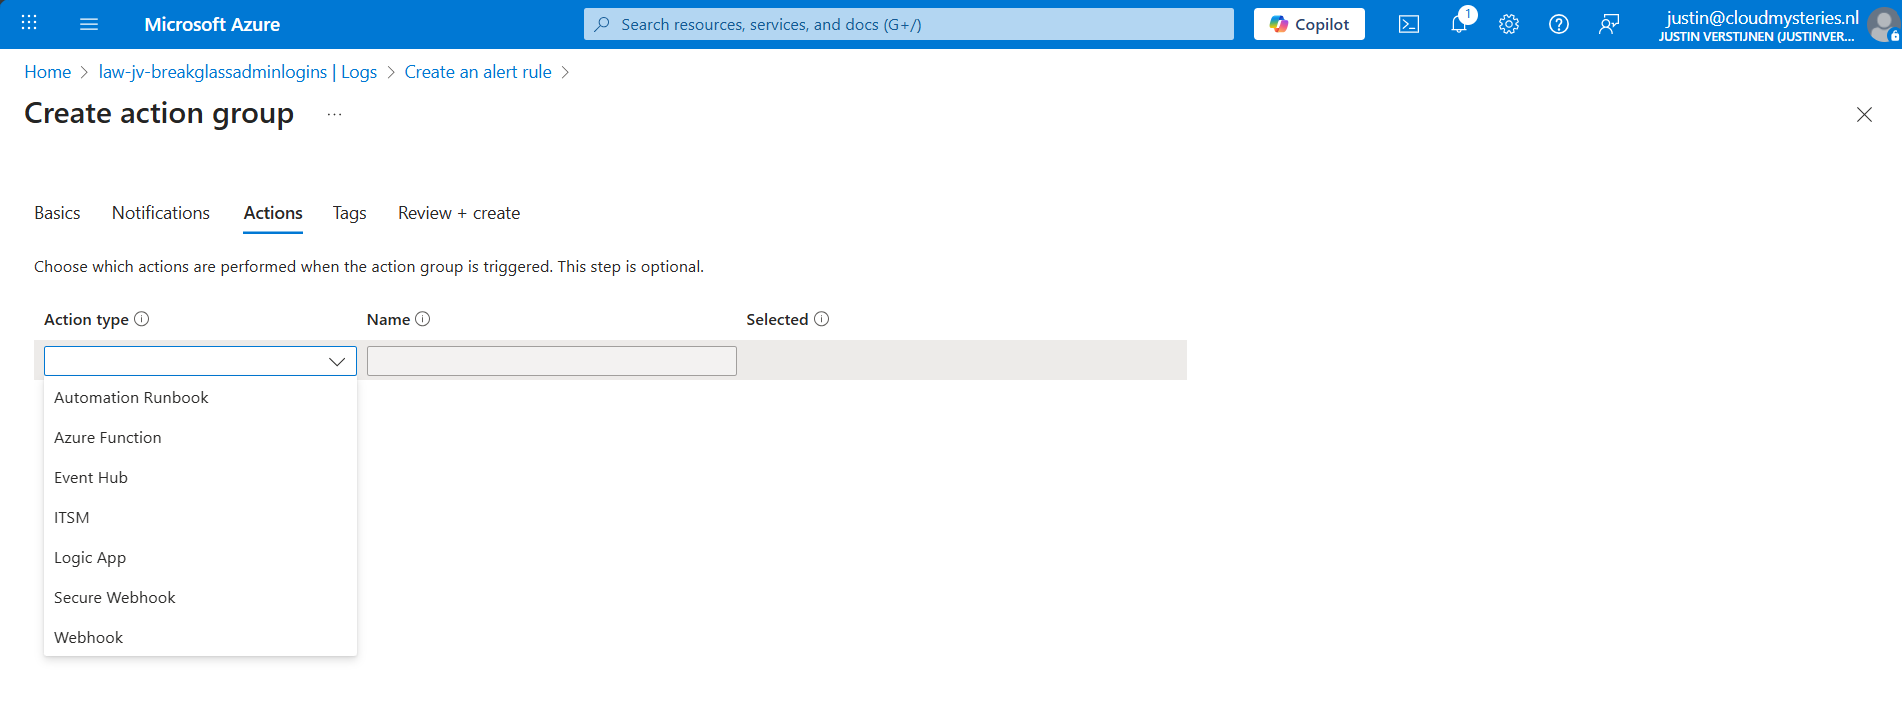
You could also run an automated action against this trigger. As this includes Webhook, you could get customized messages for example on your Microsoft Teams account.
Finish the creation of the Action group.
Now we have configured everything, we can test the working of this alert. Let’s prepare an InPrivate window to login to the account:
I have logged in seconds from 13:20:08 hours. Let’s wait till I receive the alerting phone call.
And at 13:27, 7 minutes later, I got an call from Microsoft that the alert was triggered:

This way we will know in a very direct way our break glass account is possibly misused. We could also choose to only get messages from this or use the webhook option which will be less rigorous than getting a phone call. But hey, at least the option exists.
Monitoring the use of your Break Glass Admins is very important. Those accounts should be a last resort of managing Azure when nothing else and personal accounts doesn’t work. They should be tested at least twice a year and good monitoring like this on the accounts is preferred.
Thank you for reading this post and I hope it was helpful.
These sources helped me by writing and research for this post;
You have reached the end of the page. You can navigate through other blog posts as well, share this post on X, LinkedIn and Reddit or return to the blog posts collection page. Thank you for visiting this post.
If you think something is wrong with this post or you want to know more, you can send me a message to one of my social profiles at: https://justinverstijnen.nl/about/
If you find this page and blog very useful and you want to leave a donation, you can use the button below to buy me a beer. Hosting and maintaining a website takes a lot of time and money. Thank you in advance and cheers :)
The terms and conditions apply to this post.
In our environment, we will do everything to secure it as much as possible. We give users only the permissions they need and only at given times, we enable Conditional Access to limit access to our data as much as possible.
But we also create Break Glass administrator accounts as our last resort, a method to login if everything else doesn’t work. Security wise, this sounds against all rules but we prefer a account to login in emergency situations over a complete tenant lockout.
To help you secure break glass administrator accounts, I have 10 generic industry-known advices for these accounts which you can implement relatively easy. These help you on top of all other security mechanisms (CA/MFA/PIM/Least privilege) securing, decreasing the chance of lockouts and decrease the value for possible attackers.
The list of recommendations which I will describe further:
Very important to have at least 2 accounts (with a maximum of 4) with Global Administrator permissions. Most of the time, we will limit the amount of privileges but we need to have at least 2 accounts with those permissions.
For administrator accounts, it is recommended to use cloud only accounts. This way, any compomise in local or cloud accounts doesn’t mean the attack flows into the other direction.
If attackers manage to break into a active directory account, they will also get into your cloud environment which we want to limit.
For administrator accounts, and especially break glass administrator accounts, it is recommended to only use the .onmicrosoft.com domain. This domain is the ultimate fallback if something happens to your domain, or someone managed to make a (big) mistake in the DNS records. It can happen that user accounts fall back to the .onmicrosoft.com domain.
I have seen this happening in production, and so using the .onmicrosoft.com domain helps you gaining quicker access in case of emergency.
To ensure Break Glass administrators are always permitted to login, ensure they are excluded from all blocking conditional access policies. If you make a sudden mistake in obe of the policies, and your Break glass administrator is included, there is no way to sign in anymore, and you’ll be lcoked out.
Do not use licenses on Administrator accounts. Using licenses potentially make them a bigger target in recoinassance stages of an attack, they are easier to find and the licenses expose services of M365 further.
A great recommendation is to use long and strong passwords. Strong passwords consists of all 4 possible character types:
Use anywhere between 64 and 256 characters passwords for break glass administrator accounts. Save those in a safe place like an encrypted password storage.
Tip: use my Password generator for generatng passwords: https://password.jvapp.nl/
We have to name our break glass administrators well. During breaches, attackers will search for possible high-value targets to shift their attack to.
A good advice is to name break glass accounts to a person, a product you and your company likes or to a movie. Let you creativity be king on this one.
You can also register FIDO2 keys for break glass administrators. These are a hardware key used as second factor which we can put in a safe or store somewhere else really safe. It must also be audited if anyone in the company gains access to the security key so everyone knows who, when and why it was last used.
As we don’t want break glass administrator accounts to be used on a daily basis and being actively attacked, you might want to setup alerts for people logging in to the account.
To setup notifications like phone calls, I have this guide for you: https://justinverstijnen.nl/get-notifications-when-entra-id-break-glass-admins-are-used
We create the break glass administrator accounts, but mostly never test them properly. It is important to test break glass accounts at least twice per year, and know exactly if they work properly and the correct roles and permissions are active.
To test this, login to the account and check if you still have the correct roles and that they are “Active”, instead of the PIM “Eligible”.
It is really important to have back-up/break glass accounts available in your environment. You’ll never know when someone makes a mistake or a account doesn’t work because of some outage or other problem. Maybe your account is brute-forced and locked out for 30 minutes.
I hope this guide was helpful and thank you for reading.
These sources helped me by writing and research for this post;
You have reached the end of the page. You can navigate through other blog posts as well, share this post on X, LinkedIn and Reddit or return to the blog posts collection page. Thank you for visiting this post.
If you think something is wrong with this post or you want to know more, you can send me a message to one of my social profiles at: https://justinverstijnen.nl/about/
If you find this page and blog very useful and you want to leave a donation, you can use the button below to buy me a beer. Hosting and maintaining a website takes a lot of time and money. Thank you in advance and cheers :)
The terms and conditions apply to this post.
Sometimes, the ADSync service stops without further notice. You will see that the service has been stopped in the Services panel:

In this guide I will explain how I solved this problem using a simple PowerShell script.
The PowerShell script that fixes this problem is on my GitHub page:
The script simply checks if the service is running, if this is the case the script will be terminated. If the service is not running, the service will be started.
The problem is caused after a server restart, then the service will not start itself automatically, even when this is selected in Windows. This is enabled by defaut by the installation wizard.
In the Event Log there will be these events:
The fun part is that it cannot login according to the Entra Connect Sync tool but after some minutes it does.
We can run the script manually using the PowerShell ISE application.
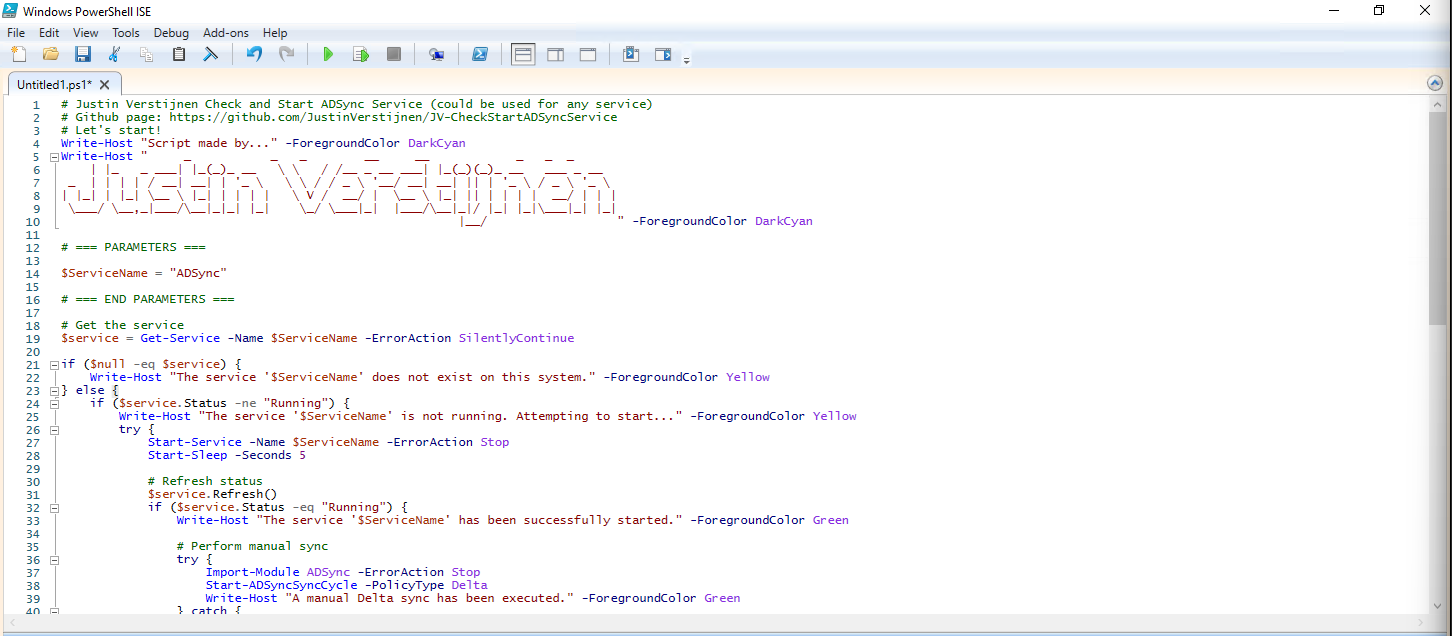
After running the script, the service does run:

For installation with Task Scheduler I included an installation script that, by default, configures a task in the Windows Task Scheduler that runs it;
If these settings are great for you, you can leave them as-is.
The Installation script creates a folder in C:\ named “Scripts” if not already there and places the cleaning script there.
Click on the blue button above. You now are on the Github page of the script.
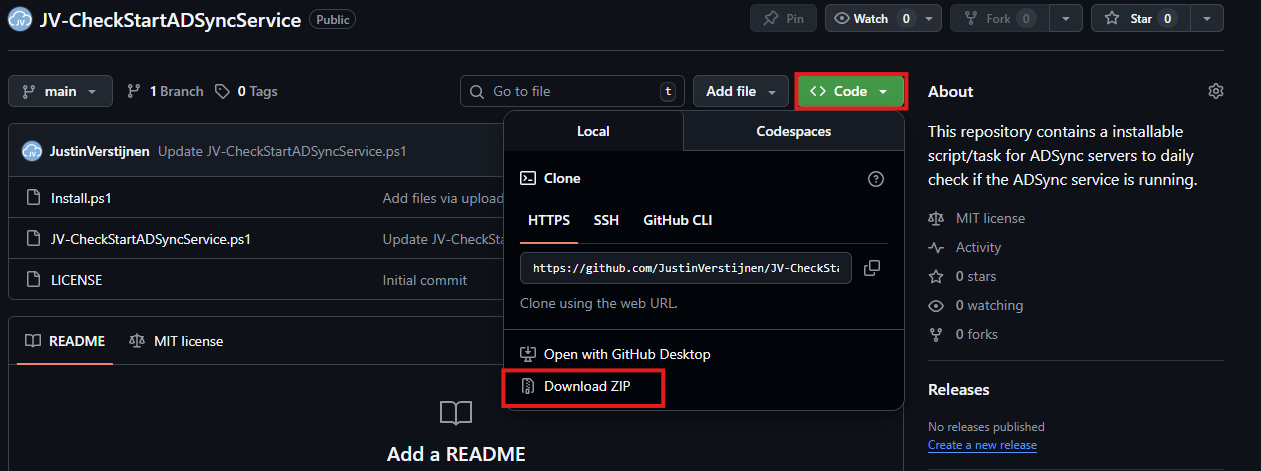
Click on “Code” and then “Download ZIP”.
Then place the files on the server where you want to install the script.
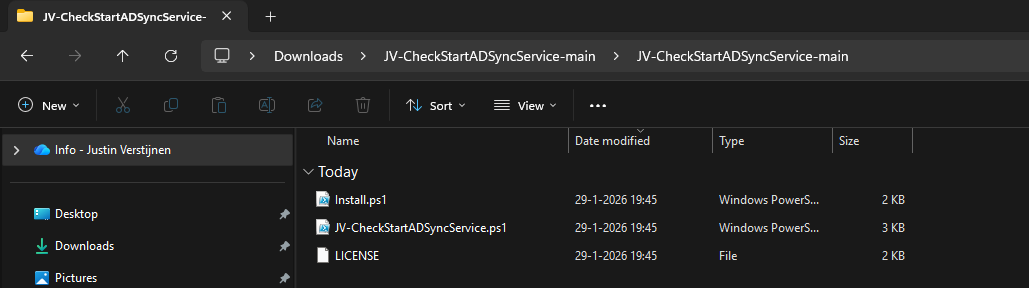
Open Powershell ISE as administrator.
Now open the “Install” script.
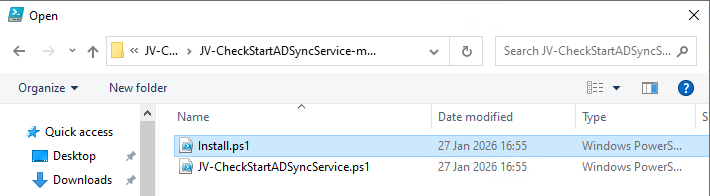
Review it’s default settings and if you feel at home in PowerShell, review the rest of the script to understand what it does.
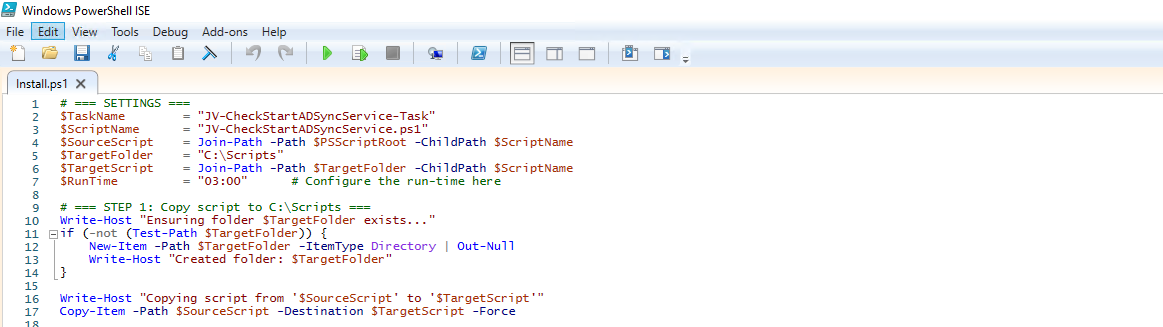
You can change the schedule very easily by changing the runtime: 0:00 till 23:59 and the day of month to specify the day number of the month (1-31).
After your schedule is ready, let’s ensure we temporarily bypass the Execution Policy by typing the command in the blue window below:
Set-ExecutionPolicy Unrestricted -Scope Process -ForceThis way the execution policy stays enabled but for this session only it’s been lowered. When you close the window, you have to type this again before be able to run scripts.
Execute the command, and when prompted to lower the policy, click Yes.
Now execute the Install script by clicking the green “Run” button:
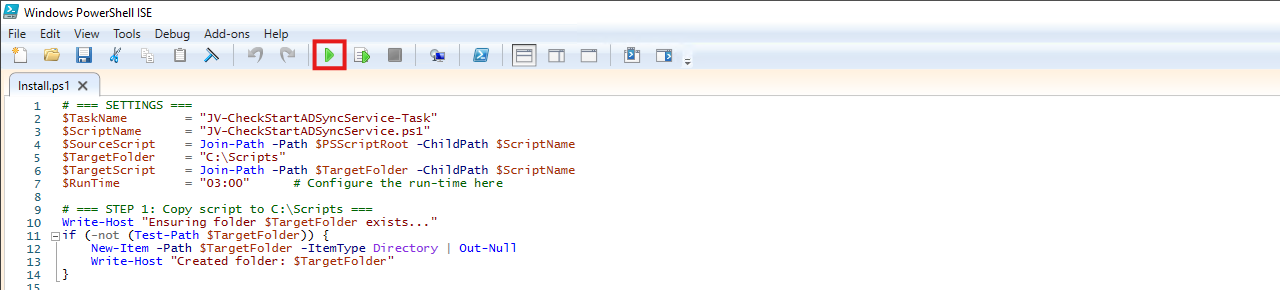
After executing the script, we get the message that the task has been created succesfully:

Let’s check this in the Windows Task Scheduler:
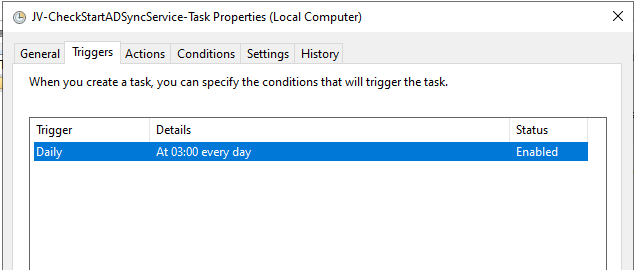
As you can see, the script is succesfully installed to Task Scheduler. This ensures it runs every first of the month at 03:00 (or at your own defined schedule). Also, the script has been placed in C:\Scripts for a good overview of the scripts of the system.
This simple script resolved me a lot of problems, checking the service automatically and starting it. A Entra Connect Sync not running is very stable. Users can get different types of errors, de-synchronisations and passwords that are not working.
Thank you for visiting this page and I hope it was helpful.
These sources helped me by writing and research for this post;
You have reached the end of the page. You can navigate through other blog posts as well, share this post on X, LinkedIn and Reddit or return to the blog posts collection page. Thank you for visiting this post.
If you think something is wrong with this post or you want to know more, you can send me a message to one of my social profiles at: https://justinverstijnen.nl/about/
If you find this page and blog very useful and you want to leave a donation, you can use the button below to buy me a beer. Hosting and maintaining a website takes a lot of time and money. Thank you in advance and cheers :)
The terms and conditions apply to this post.
Sometimes, it is necessary to match an existing local Active Directory (AD) user through Entra Connect with an existing Entra ID user (formerly known as Azure AD). This process ensures that the account in both environments is aligned and maintains the same underlying configurations and settings across systems.
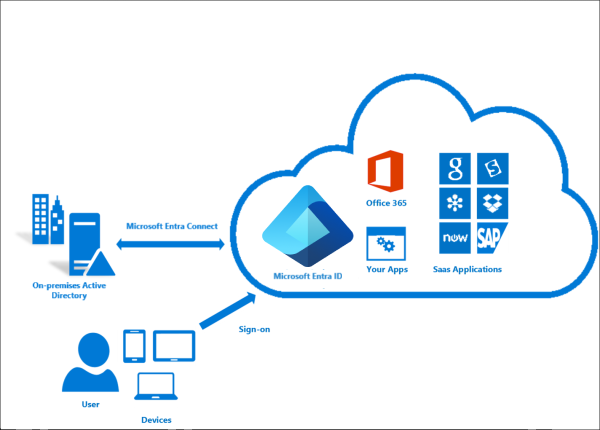
Most of the time the system itself will match the users automatically using soft-matching. Here the service will be matching users in both Entra ID and Active Directory by using known attributes like UserPrincipalName and ProxyAddresses.
In some cases, especially when you use different Active Directory and Entra ID domains, we need to give the final tip to match the users. We will tell Entra ID what the GUID of the on-premises user is by getting that value and encode it into Base64. Then we pass Entra ID this value so it understands what local user to link with what cloud user. This process is called “hard-matching”.
The steps to hard-match an Entra ID and Active Directory user are in short:
To merge an existing on-premises user and an existing cloud user into one unified user account under the hood, follow these steps:
Log in to your Active Directory management server
Open PowerShell.
Execute the following command:
Get-ADUser -Identity *username*Replace *username* by the username of the user you want to match.
The output of the command above will be something like this:
DistinguishedName : CN=administrator,OU=Users,DC=justinverstijnen,DC=nl
Enabled           : True
GivenName         : Administrator
Name              : administrator
ObjectClass       : user
ObjectGUID        : c97a6c98-ded8-472c-bfb6-87ed37d324f5
SamAccountName    : administrator
SID               : S-1-5-21-1534517208-3616448293-1356502261-1244
Surname           : Administrator
UserPrincipalName : administrator@justinverstijnen.nl
Copy the value of the ObjectGUID, in this case:
c97a6c98-ded8-472c-bfb6-87ed37d324f5Because Active Directory uses GUID for a unique identifier of the user and Entra ID uses a Base64 value for a unique identifier, we need to convert the GUID string to a Base64 string. We can do this very easy with Powershell too:
[Convert]::ToBase64String([guid]::New("c97a6c98-ded8-472c-bfb6-87ed37d324f5").ToByteArray())We get a value like this:
mGx6ydjeLEe/toftN9Mk9Q==Now we have the identifier Entra ID needs. We change the ID of the cloud user to this value. This way the system knows which on-premises user to sync with which cloud user.
To actually match the users, we need to login to Microsoft Graph in PowerShell, as we can there perform the actions. For installation instructions of the Microsoft Graph PowerShell module: https://www.powershellgallery.com/packages/Microsoft.Graph/2.24.0
Run the following command to login to Microsoft Entra ID with Microsoft Graph:
Connect-MgGraph -Scopes "User.ReadWrite.All"Login with your Microsoft Entra ID administrator account.
After succesfully logging into Microsoft Graph, run the command to set a (new) Immutable ID for your cloud user:
Update-MgUser -UserId "administrator@justinverstijnen.nl" -OnPremisesImmutableId "mGx6ydjeLEe/toftN9Mk9Q=="Now the user is hard matched. You need to run a Entra Connect synchronization to finish the process.
Log in to the server with AD Connect/Entra Connect sync installed and run the command:
Start-ADSyncSyncCycle -PolicyType DeltaNow your on-premises user and cloud user have been matched!
Hardmatching users is relatively easy, but requires some steps that are good to know. After doing this around 3 times you will perform this completely on “auto-pilot”.
These sources helped me by writing and research for this post;
You have reached the end of the page. You can navigate through other blog posts as well, share this post on X, LinkedIn and Reddit or return to the blog posts collection page. Thank you for visiting this post.
If you think something is wrong with this post or you want to know more, you can send me a message to one of my social profiles at: https://justinverstijnen.nl/about/
If you find this page and blog very useful and you want to leave a donation, you can use the button below to buy me a beer. Hosting and maintaining a website takes a lot of time and money. Thank you in advance and cheers :)
The terms and conditions apply to this post.
When using Entra ID, we can automate a lot of different tasks. We can use a script processing server for this task but doing that normally means we have to save credentials or secrets in our scripts. Something we don’t want.
Today I will show how to implement certificate-based authentication for App Registrations instead of using a client secret (which still feels like a password).
Certificate based authentication means that we can authenticate ourselves to Entra ID using a certificate instead of user credentials or a password in plain text. When using some automated scripts it needs permissions to perform its actions but this means storing some sort of authentication. We don’t want to store our credentials on the server as this decreases our security and a potential risk of compromise.
Certificate based authentication works by generating a certificate (SSL/Self-signed) and using that for authentication. The certificate has to be enabled and on both sides, like described in the picture above.
This means that if an client doesn’t have a allowed certificate installed, we can never connect. This is great, so we can store our certificates in a digital safe and only install this on our script processing server. When generating a self signed certificate, a private key is also generated by the computer which means this also has to be in hands of an attacker to abuse your certificate.
After authenticating, we have the permissions (API or Entra Roles) assigned to the Enterprise Application/App Registration, which we will call a “Service Principal”.
Note: Self Signed certificaties will expire after 365 days (1 year).
In the old Windows Server days, we could sometimes find really unsecure jokes like these:
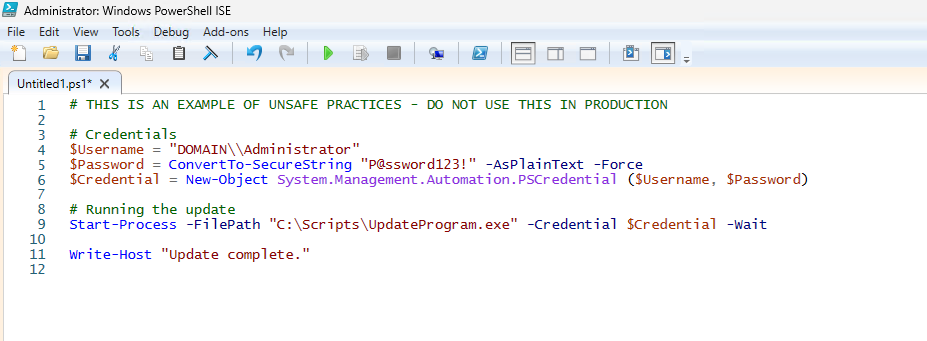
This is something that is really unsecure and I advice you to never do actions like these. With certificate-based authentication we eliminate the need for this by a lot.
On our server or workstation where you want to setup the connection, we can generate a self signed certificate. The server then generates a certificate which is unique and can be used for the connection.
Let’s open PowerShell to generate a new Self Signed certificate. Make sure to change the *certificatename to your own value:
New-SelfSignedCertificate -Subject *certificatename* -CertStoreLocation Cert:\CurrentUser\MyThen we have to get the certificate to prepare it for exporting:
$Cert = Get-ChildItem -Path Cert:\CurrentUser\My | Where-Object {$_.Subject -eq "CN=*certificatename*"}Then give your certificate a name:
$CertCerPath = "Certificate.cer"And then export it to a file using the settings we did above:
Export-Certificate -Cert $Cert -FilePath $CertCerPath -Type CERTWe now have generated a self signed certificate using the settings of the server. We now must import this into Entra ID. This file doesn’t include a private key and this is stored on the server.
Now head to the Entra ID portal and go to your already created App registration, and then to “Certificates & Secrets”.
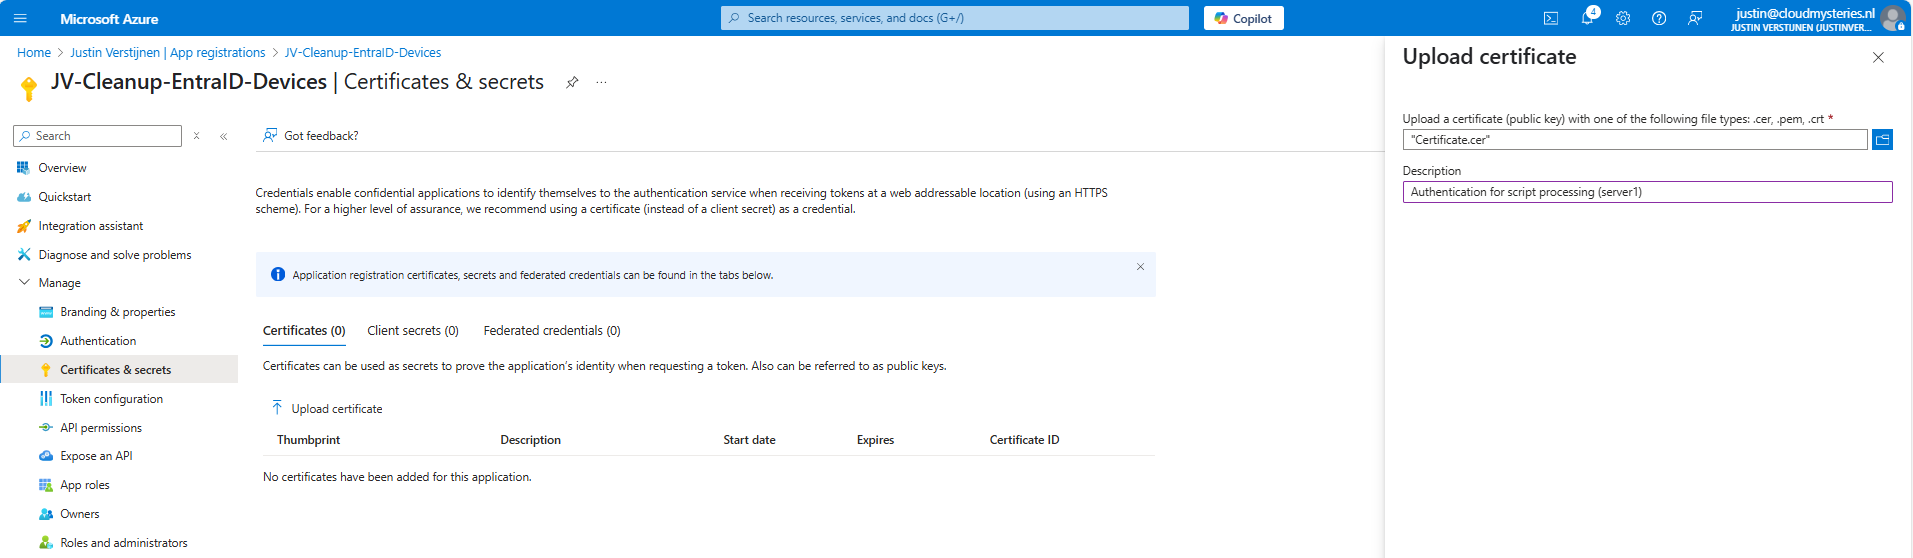
Upload the .cer file there to assign it to the app registration and get the assigned roles.
Now you will see the certificate uploaded:

Now we have the thumbprint of the certificate, which is a identifier of the certificate. You can also get this on the server where you just generated the certificate:
$cert.ThumbprintInstalling the Microsoft Graph Powershell module can be done with:
PowerShell
Install-Module Microsoft.Graph -Scope CurrentUser -Repository PSGallery -Force
We can now logon to Microsoft Graph using this certificate, we must first fill in the parameters on your server:
$clientId = "your client-id"
$tenantId = "your tenant-id"
$thumbprint = "your thumbprint"

$cert = Get-ChildItem -Path Cert:\CurrentUser\My | Where-Object { $_.Thumbprint -eq $thumbprint }
Make sure you use your own client ID, Tenant ID and certificate thumbprint.
Now let’s connect to Graph with your certificate and settings:
Connect-MgGraph `
    -ClientId $clientId `
    -TenantId $tenantId `
    -Certificate $cert
Now you should be logged in succesfully:
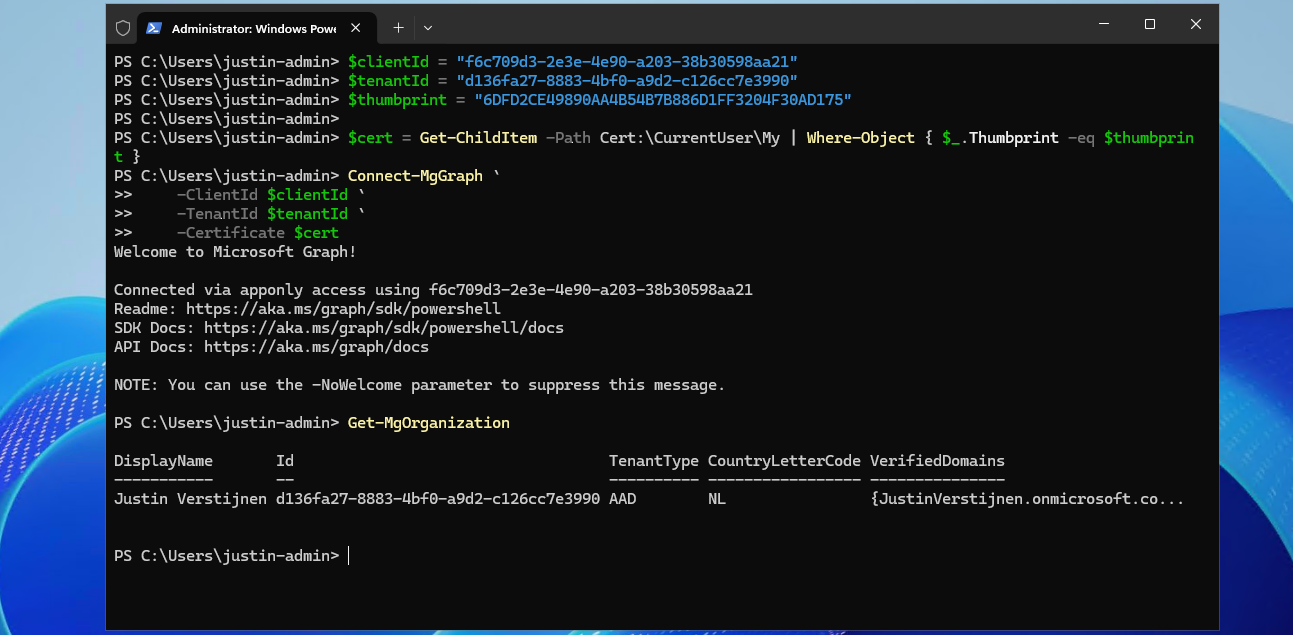
I double checked if we were able to get our organization and that was the case. This is a command that doesn’t work when not connected.
As we should not be able to connect without the certificate installed, we will test this for sure on another device:

Powershell cannot find our certificate in the store. This is as expected as we didn’t install it. But let’s try another method:

With Exchange Online Powershell, this also doesn’t work because we don’t have the certificate installed. Working as intended!
Implementing Certificate based authentication is a must for unattended access to Entra ID and app registrations. Its a great authentication method when having a script processing server that needs access to Entra ID or any Microsoft 365/Azure service and not wanting to hard-code credentials which you shouldn’t do either.
This can also be used with 3rd party applications when supported. Most of the applications will only support Client ID and secrets, as this is much easier to implement.
These sources helped me by writing and research for this post;
You have reached the end of the page. You can navigate through other blog posts as well, share this post on X, LinkedIn and Reddit or return to the blog posts collection page. Thank you for visiting this post.
If you think something is wrong with this post or you want to know more, you can send me a message to one of my social profiles at: https://justinverstijnen.nl/about/
If you find this page and blog very useful and you want to leave a donation, you can use the button below to buy me a beer. Hosting and maintaining a website takes a lot of time and money. Thank you in advance and cheers :)
The terms and conditions apply to this post.
Today I have a relatively short blog post. I have created a script that exports all Entra ID user role assignments with Microsoft Graph. This can come in handy when auditing your users, but then realizing the portals doesn’t always show you the information in the most efficient way.
Therefore, I have created a script that only gets all Entra ID role assignments to users of every role and exports it to a nice and readable CSV file.
To start off with the fast pass, my script can be downloaded here from my Github page:
I have already downloaded the script, and have it ready to execute:
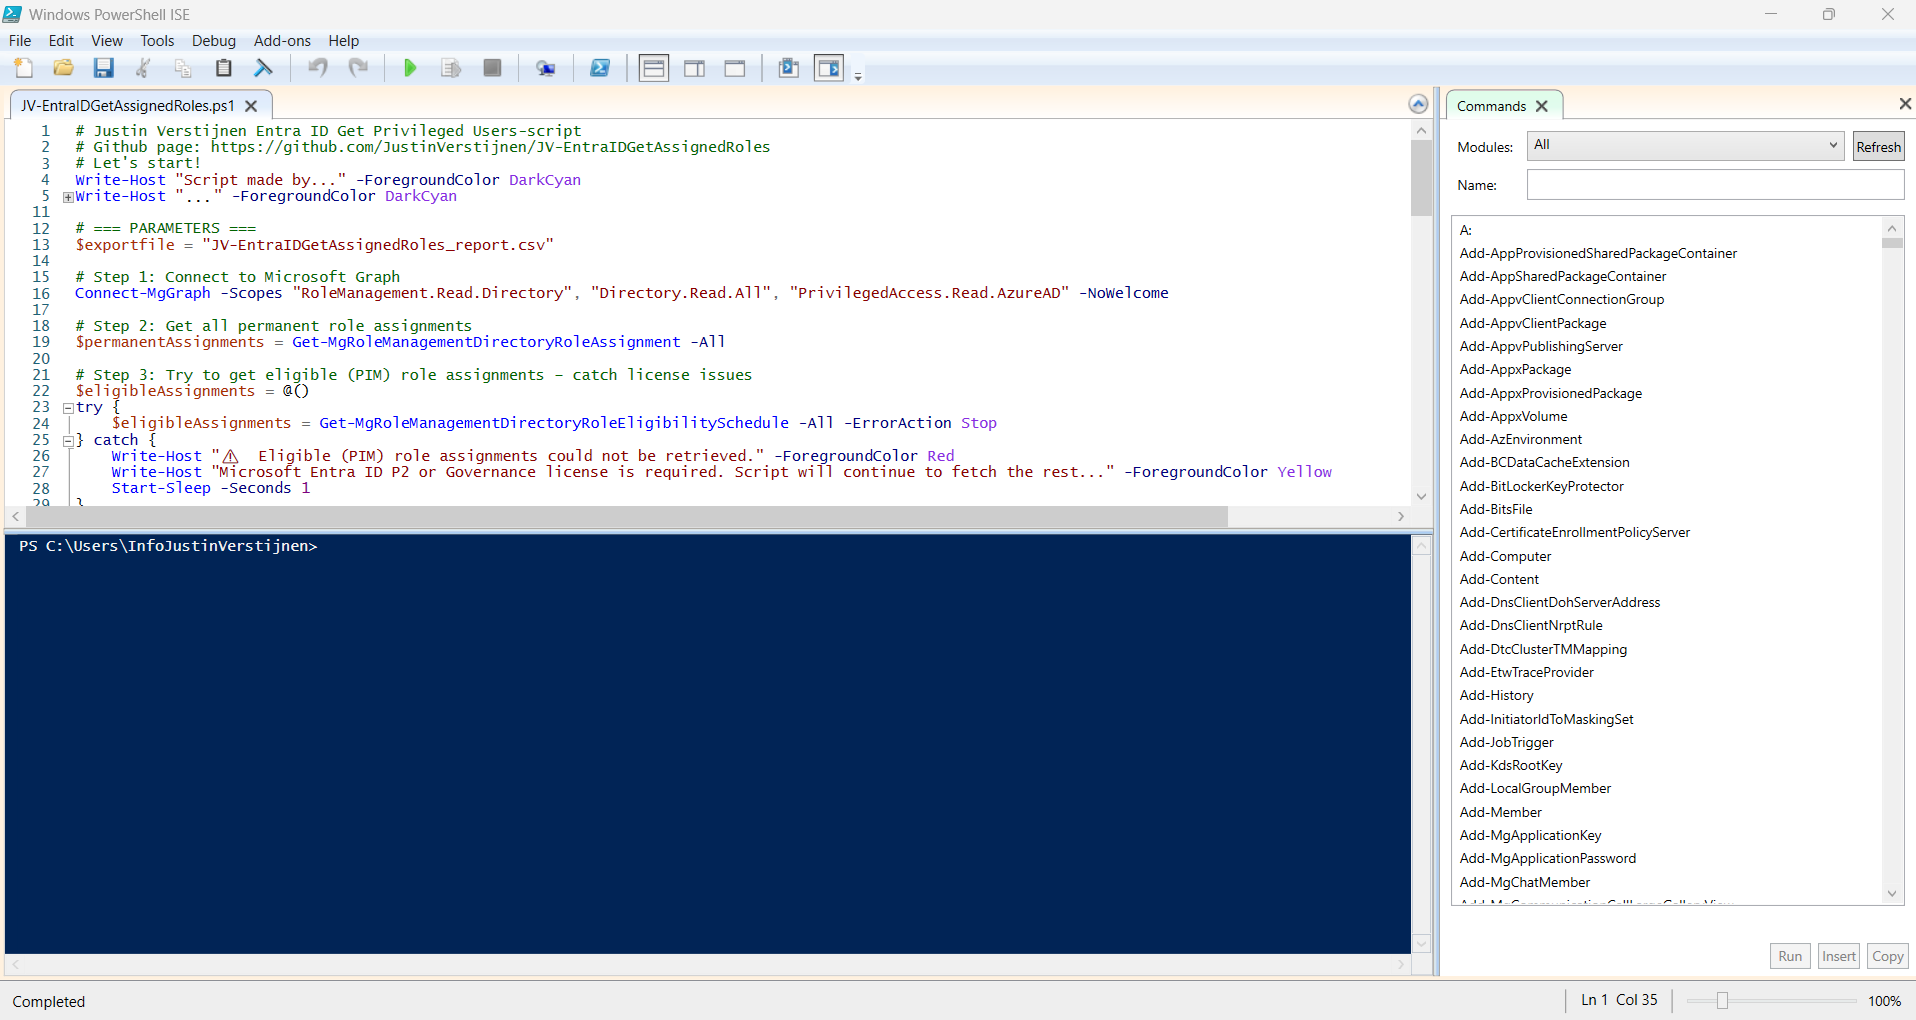
When executed, it asks to login to a tenant. Here you have to login to the tenant you want to audit. After that it will be performing the checks. This can take a while with several users and role assignments.
When prompted that the Execution Policy is restricted, you can use this command for a one-time bypass (till the window closes):
PowerShell
Set-ExecutionPolicy Unrestricted -Scope Process
After the script finishes all the checks, it puts out a CSV file in the same folder as the script which we can now open to review all the Entra ID user role assignments:

As you can see, this shows crystal clear what users and assigned roles this environment has.
If your environment doesn’t have any licenses for Privileged Identity Management (PIM), we can still use the script, but an error will be printed in the processing of the script:
⚠️  Eligible (PIM) role assignments could not be retrieved.
Microsoft Entra ID P2 or Governance license is required. Script will continue to fetch the rest...This very short blog post shows the capabilities of this users script. In my opnion, the GUI shows most of the information, but is not particularly good at summarizing information from multiple pages. Powershell is, as we can get information from everywhere and put it in one single file.
These sources helped me by writing and research for this post;
I hope my script is useful and thank you for reading.
You have reached the end of the page. You can navigate through other blog posts as well, share this post on X, LinkedIn and Reddit or return to the blog posts collection page. Thank you for visiting this post.
If you think something is wrong with this post or you want to know more, you can send me a message to one of my social profiles at: https://justinverstijnen.nl/about/
If you find this page and blog very useful and you want to leave a donation, you can use the button below to buy me a beer. Hosting and maintaining a website takes a lot of time and money. Thank you in advance and cheers :)
The terms and conditions apply to this post.
In Microsoft Entra ID it’s possible to create App registrations and Enterprise applications who can get high privileges if not managed and monitored regularly. We do our best with Identities to be secure, with security processes like MFA, access reviews and such, but most of the companies don’t care that much about the Enterprise applications.
In this post, I will try to convince you that this is as much as important as identities. For helping you to solve this I built a PowerShell script to get a complete overview of all the applications and their permissions.
To start off with the fast pass, my script can be downloaded here from my Github page:
This script can be used to get a report of all high privileged applications across the tenant. Go to this section for instructions of how to use the script and the output.
Enterprise Applications in Entra ID are the applications which will be registered when users need them. Somethimes, it can be for a add-on of Outlook or Teams, but other times this can be to enable Single Sign On to 3rd party applications.
In terms of Entra ID and Identity, we call a Enterprise Application a “Service Principal”. A principal for a service to give permissions to.
Enterprise applications are mostly pre-configured by the 3rd party publisher of the application that needs permission. However, a user can be prompted to give their information to a application. This looks like this:
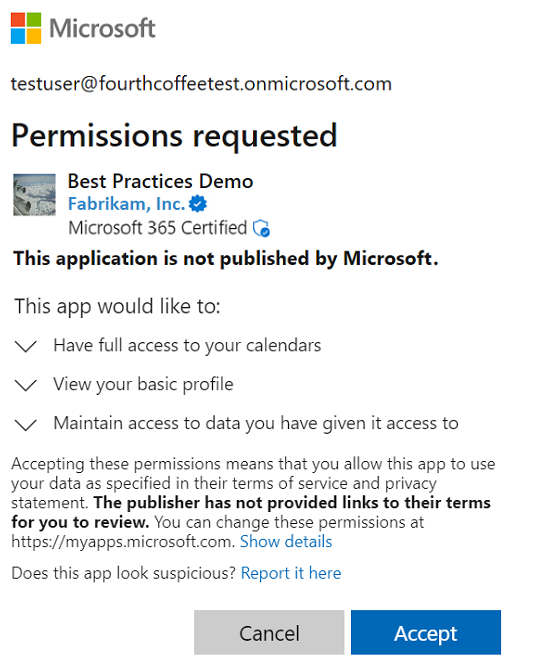
As we can see, the application gets the information of the calendars, the profile of the user and gets data. These alone aren’t not that much privileged, but this can be much worse. Let’s take a look at “App Registrations”.
App Registrations are applications who are mostly custom. These can be used for Single Sign On integration with 3rd party applications or to provide access from another application to Microsoft Entra ID and subservices.
App Registrations are commonly more privileged and can be dangerously high privileged, even not having a requirement for MFA. The only thing you need to use an app registration is:
App registrations can have permissions far above “Global Administrator”, but we don’t handle them like global administrators or even higher accounts. The Microsoft Secure Score also doesn’t report them and they can be hard to find.
These applications are used in practice by hackers to leave backdoors in tenants to remain in the tenant. If they do this right, they can be unseen for months while still stealing company information.
We can do several things to avoid being hacked by this sort of things:
We will now create a high privileged app registration, purely to showcase the permissions and to show you how much of a deal this could be.
Open the Microsoft Entra admin center and go to: Applications -> App registrations
Click on “+ New registration”:
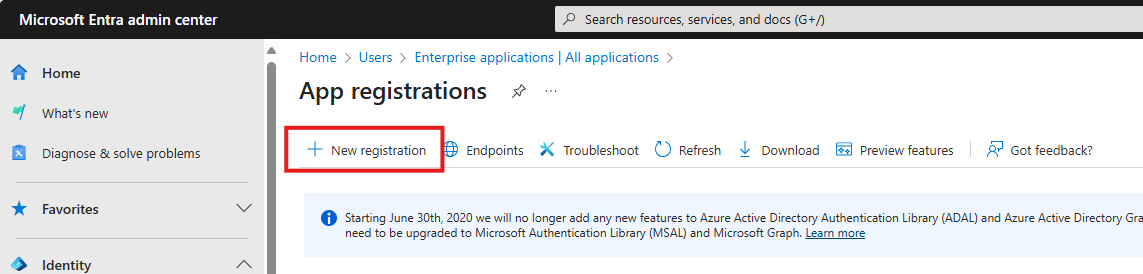
Fill in a name and the rest doesn’t care for testing purposes. You can leave them default.
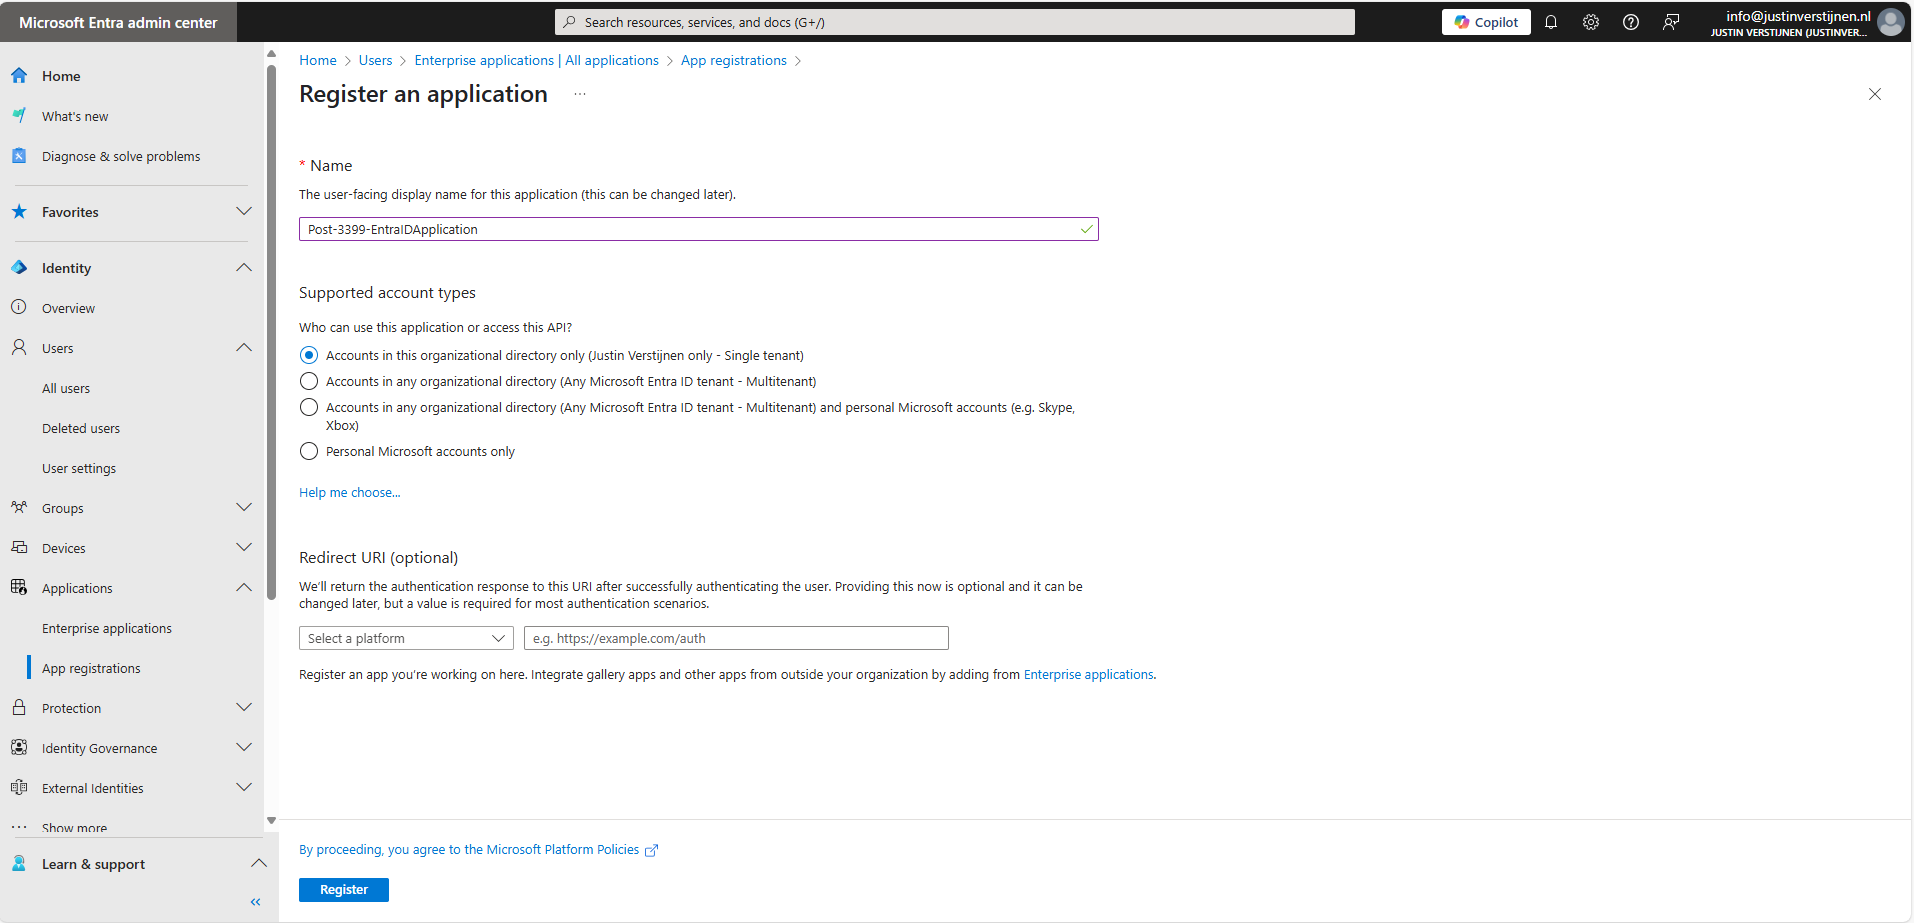
Click Register.
Now the application is created. Open it if not already redirected. Write down the “Client ID” and the “Tenant ID” because we will need them in a short moment. Then go to the section “API permissions”.
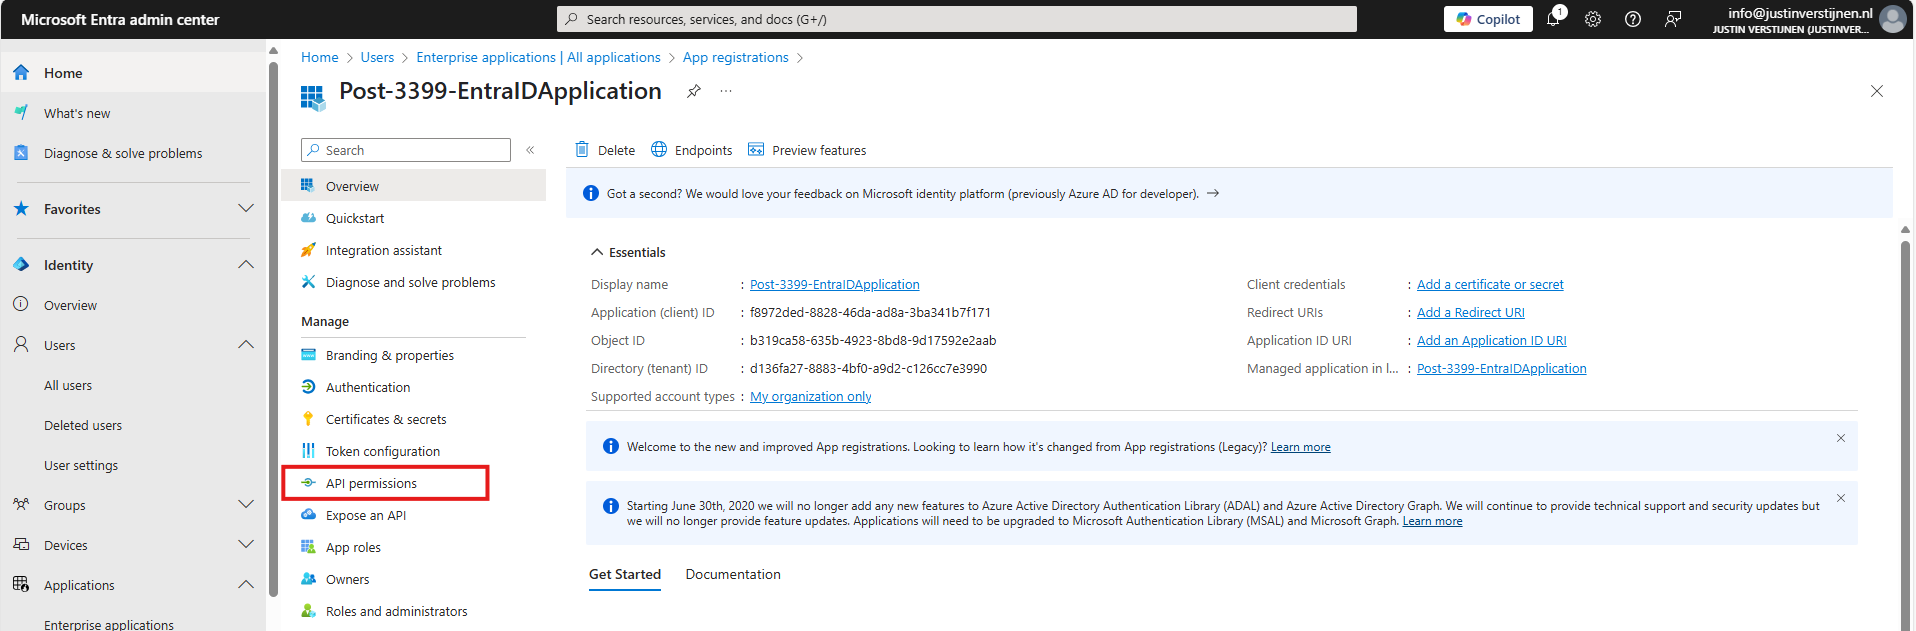
Here you find all assigned permissions to the application. Click on “+ Add a permission” to add permissions to this application. Then click on “Microsoft Graph”.
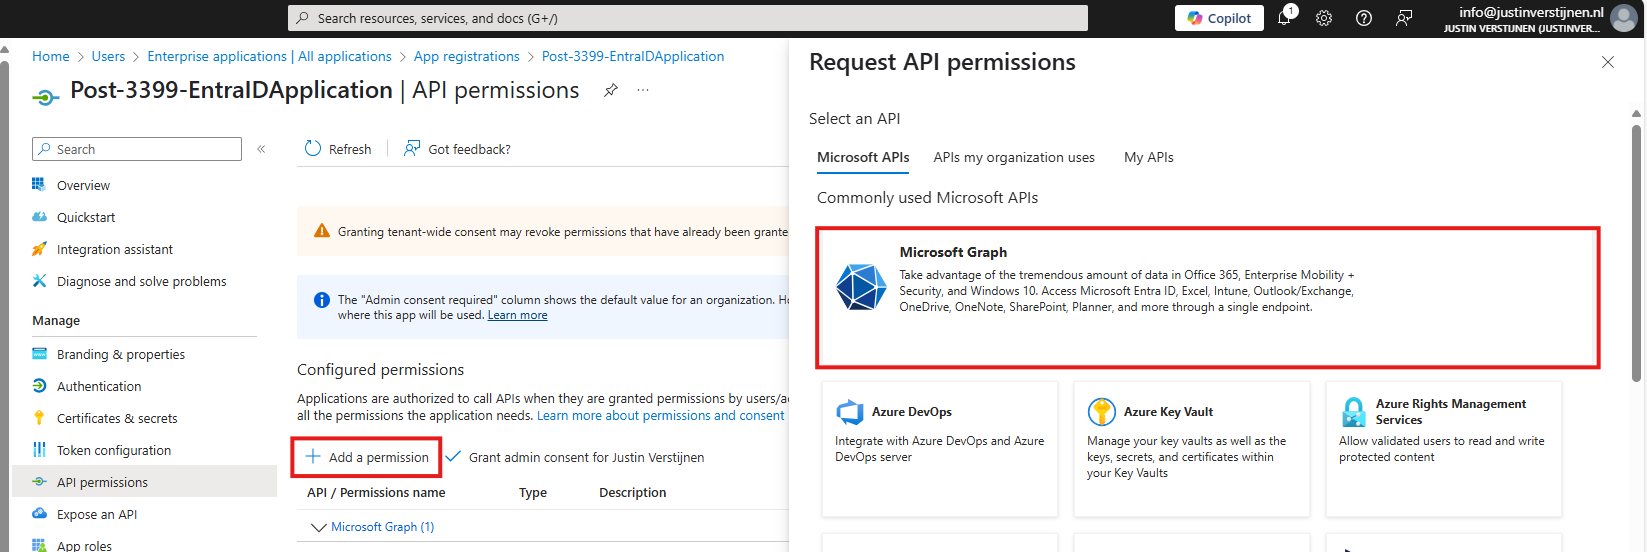
Microsoft Graph is the new API of Microsoft that spans across most of the Microsoft Online services.
Then click on “Application permissions”:
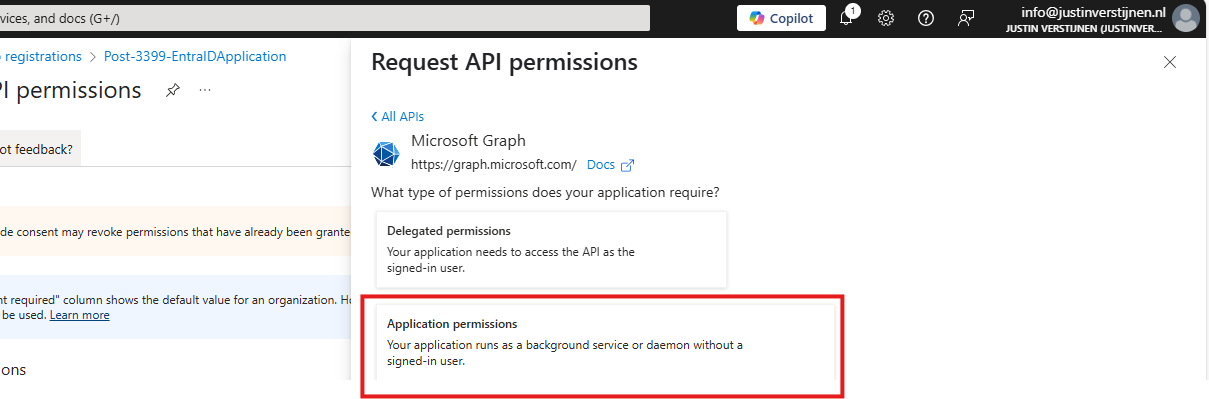
Now we can choose several permissions that the application gets. You can search for some of the High privileged apps, for example these:
| Permission name | Action |
|---|---|
| Directory.ReadWrite.All | Read and write directory data |
| User.ReadWrite.All | Read and write all users’ full profiles |
| Policy.ReadWrite.ConditionalAccess | Read and write your organization’s conditional access policies |
| Mail.ReadWrite | Read and write mail in all mailboxes |
| Application.ReadWrite.All | Read and write all applications |
| PrivilegedAccess.ReadWrite.AzureResources | Read and write privileged access to Azure resources |
As you can see; if I create the application with these permissions I have a non-monitored account which can perform the same tasks as a Global Administrator, disabling MFA, exporting all users, reading contents of all mailboxes, creating new backdoors with applications and even escalate privileges to Azure resources.
Create the application with your permissions and click on “Grant admin consent for ‘Tenant’” to make the permissions active.
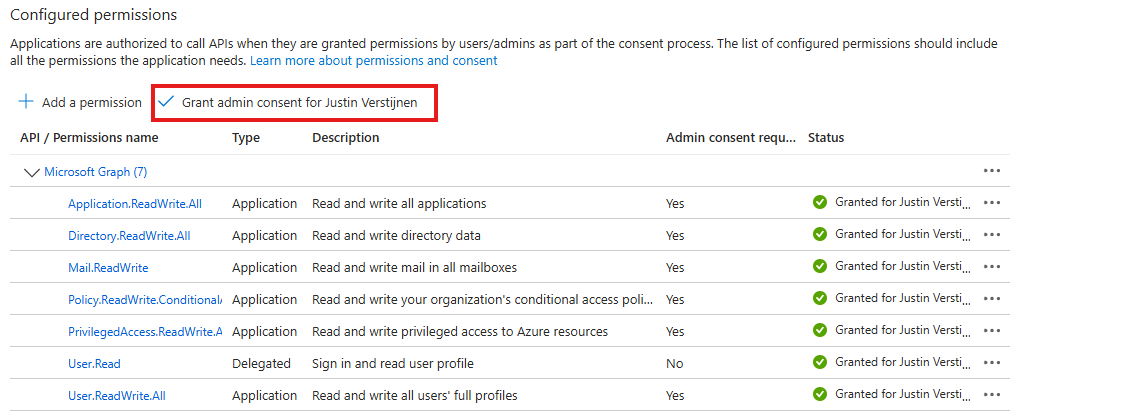
We can now create a Client secret for this application. This is a sort of master password for accessing the service principal. This can also be done with certificates, which is more preferred in practice environments, but it works for the demo.
In Entra, go to the application again, and the to “Certificates & secrets”:
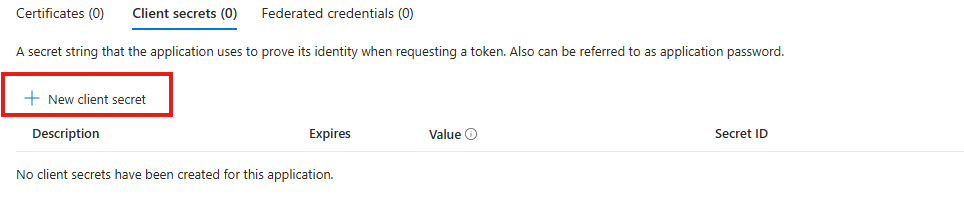
Create a new secret.
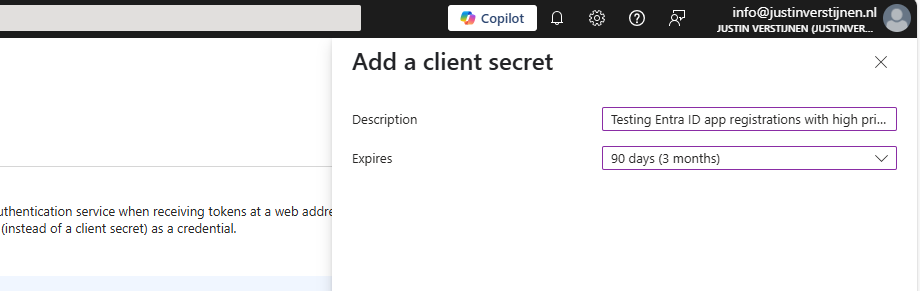
Specify the period and the lifetime and click on “Add” to create the secret.

Now copy both the Value, which is the secret itself and the Secret ID and store them in a safe place, like a password manager. These can be viewed for some minutes and then will be concealed forever.
We can now use the application to login to Microsoft Graph with the following script:
Refer to my GitHub page for the requirements for using the script and Microsoft Graph.
# Fill in these 3 values
$ApplicationClientId = '<your-app-client-id>'
$TenantId = '<your-tenant-id>'
$ApplicationClientSecret = '<your-client-secret>'

Import-Module Microsoft.Graph.Authentication

# Create a ClientSecretCredential object
$ClientSecretCredential = [Microsoft.Graph.Auth.ClientCredentialProviderFactory]::CreateClientSecretCredential(
    $TenantId,
    $ApplicationClientId,
    $ApplicationClientSecret
)

# Connect to Microsoft Graph without the welcome banner
Connect-MgGraph -ClientSecretCredential $ClientSecretCredential -NoWelcome
Here we can fill in the Client ID and Tenant ID from the previous steps and the Secret from the created client secret. Then run it with PowerShell. I advice to use the Windows PowerShell ISE for quick editing of the script and executing + status for debugging.
After logging in we can try to get and change information:
Get all Users:
Get-MgUserCreate user:
$PasswordProfile = @{
  Password = 'Pa$$w)rd!'
}
New-MgUser -Displayname "Test" -MailNickname "test" -Userprincipalname "test@justinverstijnen.nl" -AccountEnabled -PasswordProfile $PasswordProfile
Remove user:
Remove-MgUser -UserId "247f8ec8-c2fc-44a0-9665-48b85c19ada4" -ConfirmWatch the demo video here:
Now a user isn’t that destructive, but given the scopes we assigned: we can do a lot more. For more Microsoft Graph commands, visit: https://learn.microsoft.com/en-us/powershell/module/microsoft.graph.users/?view=graph-powershell-1.0
Now that we have created and abused our demo application, let’s use my script to get a report where this application must be reported.
You can, once again, download the script here:
I have already downloaded the script, and have it ready to execute:
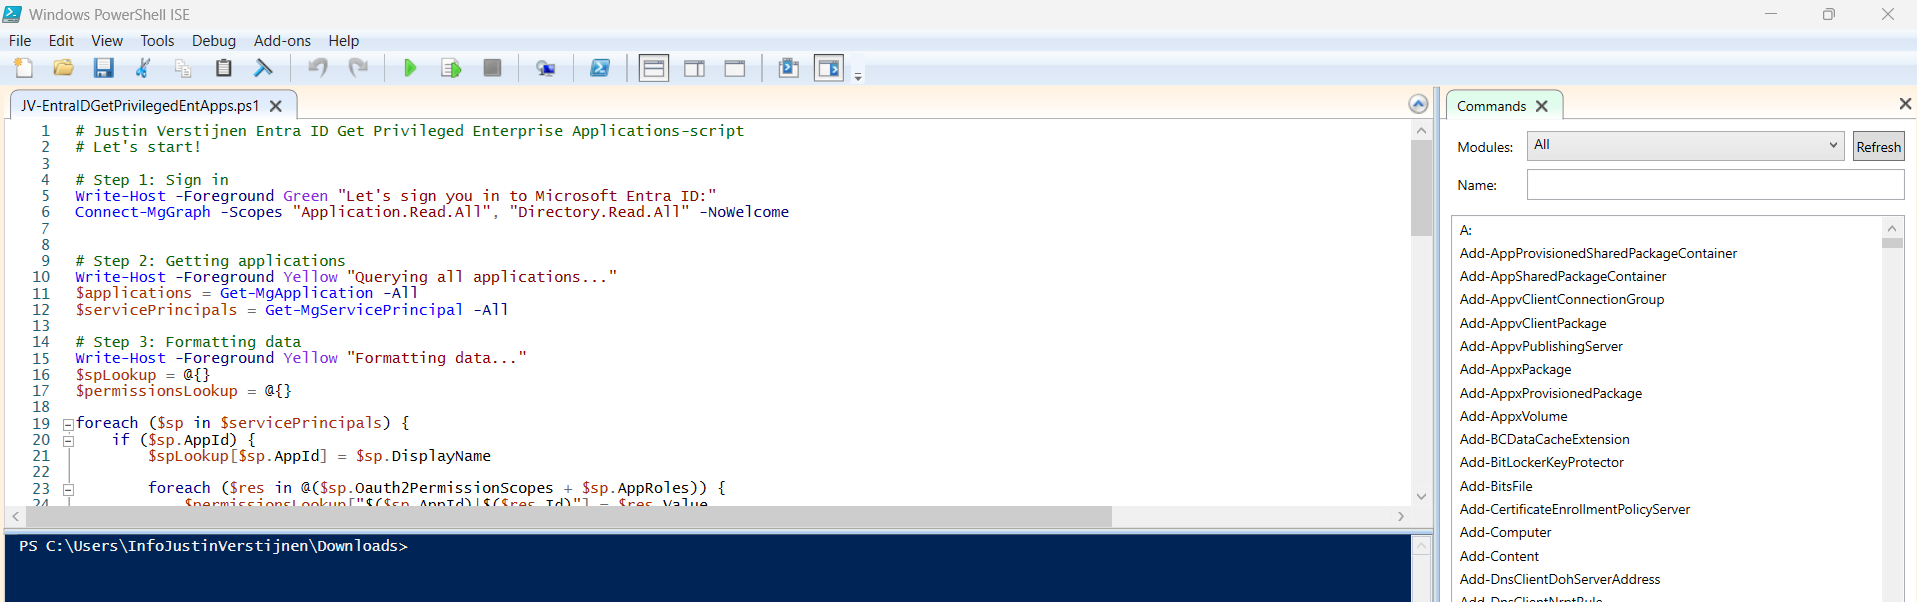
When executed, it asks to login to a tenant. Here you have to login to the tenant you want to audit. After that it will be performing the checks. This can take a while with several applications.
When prompted that the Execution Policy is restricted, you can use this command for a one-time bypass until the window closes:
<div class="td-card card border me-4">
Set-ExecutionPolicy Unrestricted -Scope ProcessAfter the script finishes all the checks, it puts out a CSV file in the same folder as the script which we can now open to review the applications and their permissions:

As we can see, this must be a far too much privileged application, and everything must be done to secure it:

It also queries if the applications has active secrets or certificates:

So this way we know within minutes which applications we must monitor and even deleted or seperated into more, smaller, less privileged applications.
I hope I convinced you with this guide how much of an risk the applications in Microsoft Entra ID really can be. They can be used by threat actors, as Break glass application or by attackers to leave backdoors in a tenant after a breach.
These sources helped me by writing and research for this post:
I hope I informed you well with this post and thank you for reading. I also hope my PowerShell script comes in very handy, because I couldn’t find a good one working online.
You have reached the end of the page. You can navigate through other blog posts as well, share this post on X, LinkedIn and Reddit or return to the blog posts collection page. Thank you for visiting this post.
If you think something is wrong with this post or you want to know more, you can send me a message to one of my social profiles at: https://justinverstijnen.nl/about/
If you find this page and blog very useful and you want to leave a donation, you can use the button below to buy me a beer. Hosting and maintaining a website takes a lot of time and money. Thank you in advance and cheers :)
The terms and conditions apply to this post.
The Zero Trust model is a security model to enhance your security posture by using 3 basic principles, and segmenting aspects of your IT environment into pillars.
The 3 primary principles are:
At first, those terms seem very unclear to me. To further clarify the principles, i have added some practice examples to further understand what they mean:
| Principle | Outcomes |
| Verify Explicity | Ensure people are really who they say they are Audit every login attempt from specific users Audit login attempts Block access from non-approved countries |
| Least privileged access | Assign users only the permissions they need, not more Assign only the roles when they need them using PIM Use custom roles when default roles expose too much permissions |
| Assume breach | At every level, think about possible breaches Segment your network Password-based authentication only is too weak |
The model is the best illustrated like this:
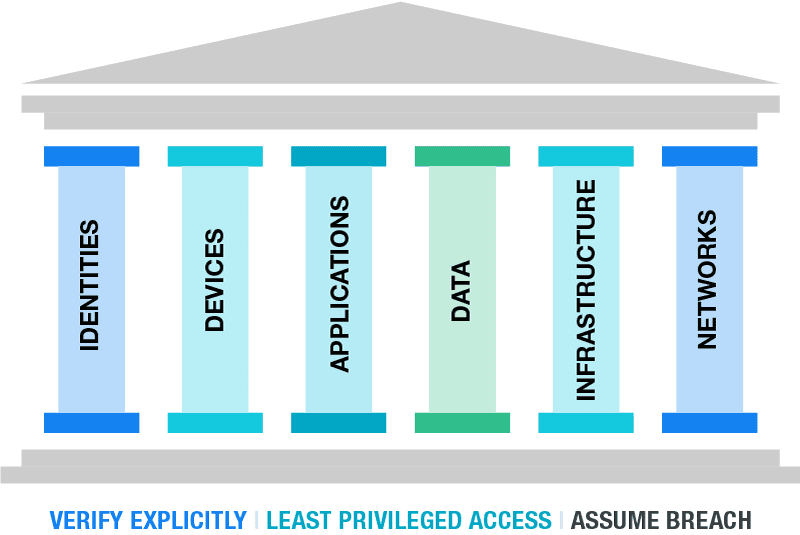
Your security posture can be seen as a building. The principles are the foundation, and all aspects in a organization are the pillars.
The fun fact in this model is, that if the foundation and/or one of the pillars are not secured enough, your security posture collapses like a unstable building.
A fun example of this can be a 5 million dollar cybersecurity budget, but users are not using strong authentication to logon and are getting compromised.
The last 20 years, the network was the primairy pillar. If a malicious user or device doesn’t have access to your network, no breach is possible.
The last 5 years, especially now in the post-COVID19 period, more people tend to work remotely. Also are companies shifting to cloud applications and infrastructure. This makes the pillar of Identity now the primary pillar, because this is the way users connecto to their infrastructure, applications and data. Breaching one of the pillar can give access to all.
The stupid part is, the Identity pillar is the pillar where the most people come along. People make mistakes and that is exactly where attackers are searching for. The path of the least resistance.
Changes to your infrastructure, especially when talking about Security can take up very much of your time and can get complex very fast. Most companies will disregard the changes and go on, when still using unsecured systems until a great company-devastating breach.
To roll out the most critical Zero trust principles in a short timely manner, you can use the RaMP plan which is a Rapid Modernization plan. This gives you a kickstart, but leaves the more complex and time-consuming changes for the near-future.
To further expand your Zero Trust vision and security posture, a great resource is to use the following 2 references by Microsoft:
Azure Cybersecurity Benchmark: https://learn.microsoft.com/en-us/security/benchmark/azure/overview-v3
Azure Cybersecurity Reference Architectures: https://github.com/MicrosoftDocs/security/blob/main/Downloads/mcra-december-2023.pptx?raw=true
You have reached the end of the page. You can navigate through other blog posts as well, share this post on X, LinkedIn and Reddit or return to the blog posts collection page. Thank you for visiting this post.
If you think something is wrong with this post or you want to know more, you can send me a message to one of my social profiles at: https://justinverstijnen.nl/about/
If you find this page and blog very useful and you want to leave a donation, you can use the button below to buy me a beer. Hosting and maintaining a website takes a lot of time and money. Thank you in advance and cheers :)
The terms and conditions apply to this post.
Now and then we come across a problem with Entra Connect Sync which states “DeletingCloudOnlyObjectNotAllowed”. This error looks like this:
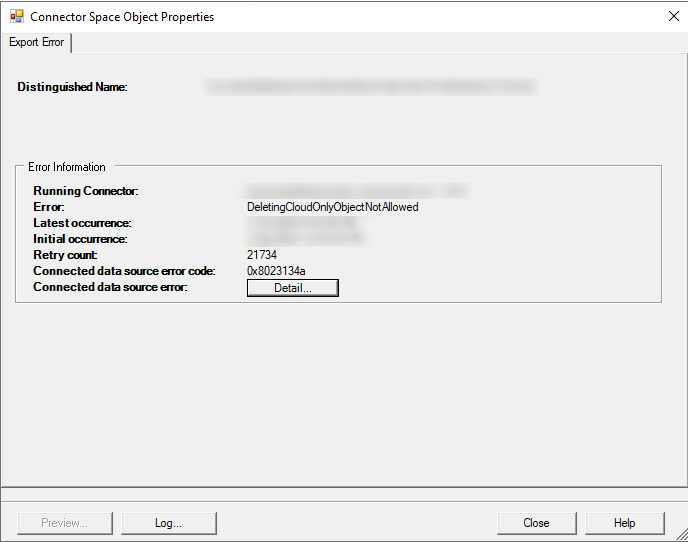
This error will be shown if opening the Syncronization Service and email messages of this error will aso be sent to your tenant’s technical contact.
In this guide, I will explain the cause of this problem and the options to solve the issue.
The cause of this problem is mostly an object that is first created cloud-only and then created in Active Directory, or a user that was synced previously but is deselected or deleted. Entra Connect Sync will not match the users correctly, and a the ImmutableId of the user in Entra still exists. In short; it still wants to sync a user that not exists.
In the Synchronization Service Manager on the Entra Connect server, the sync will complete but with a warning:
This error indicates that a deleted object was recovered from the recycle bin in Azure AD before Azure AD Connect was able to confirm its deletion. Please delete the recovered object in Azure AD to fix this issue. Please refer to https://docs.microsoft.com/en-us/azure/active-directory/hybrid/tshoot-connect-sync-errors#deletion-access-violation-and-password-access-violation-errors
Tracking Id: 482d9cb0-f386-47e4-a56f-f33b6b6421db ExtraErrorDetails: [{“Key”:“ObjectId”,“Value”:[“aa5c5d7b-2bde-40f4-94f1-b29ff664e669”]}]
As this gives us only the ObjectId of the cloud user, we still have to dig into our systems to make sure which account is affected.
We can find the affected account by pasting the object ID into Microsoft Entra:
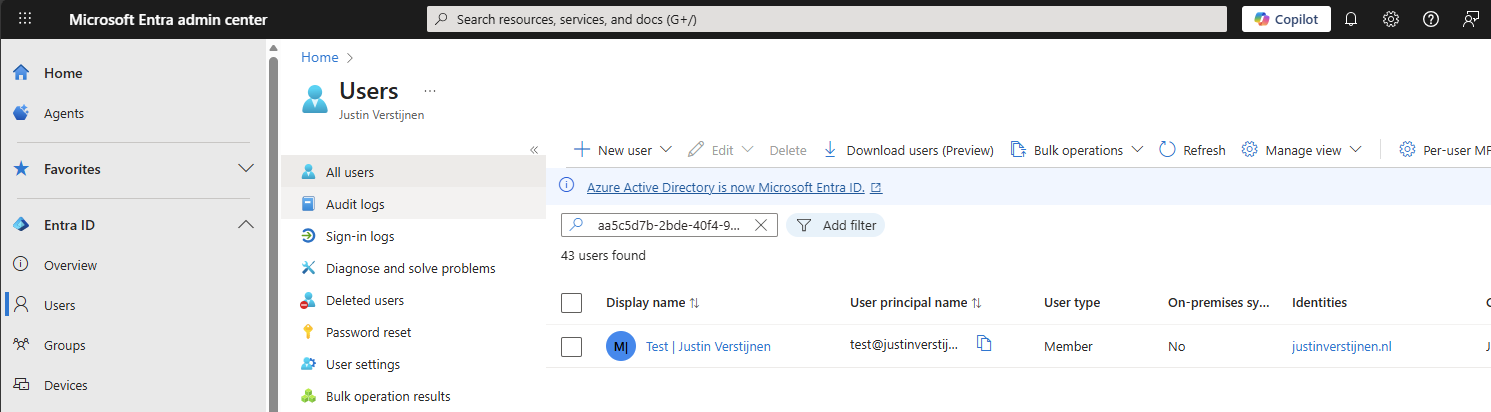
This will return the affected user.
Or you could do this with Microsoft Graph, where the UserId is the ObjectId which we know:
PS C:\Windows\system32> Get-MgUser -UserId aa5c5d7b-2bde-40f4-94f1-b29ff664e669
Now we know which user gives us the errors, let’s solve the problem.
We can solve this problem using Microsoft Graph Powershell. This is the newest Powershell module to manage Microsoft 365 and related services. If you don’t already have Microsoft Graph installed, run this command first:
Install-Module Microsoft.Graph -Scope CurrentUserIf you already have it installed, let’s proceed to the sign in:
Connect-MgGraph -Scopes User.ReadWrite.AllYou will get a prompt that Microsoft Graph wants to login to your tenant using the permissions to read and write on all users. Accept that and Graph will proceed.
Then we have to execute this command with the username/UPN to set the ImmutableId to null:
Invoke-MgGraphRequest -Method PATCH -Uri "https://graph.microsoft.com/v1.0/Users/user@justinverstijnen.nl" -body '{"OnPremisesImmutableId": null}'Now we have set the ImmutableId to null, and told Entra that this user has no on-premises entity anymore. It will delete the user from the sync database:
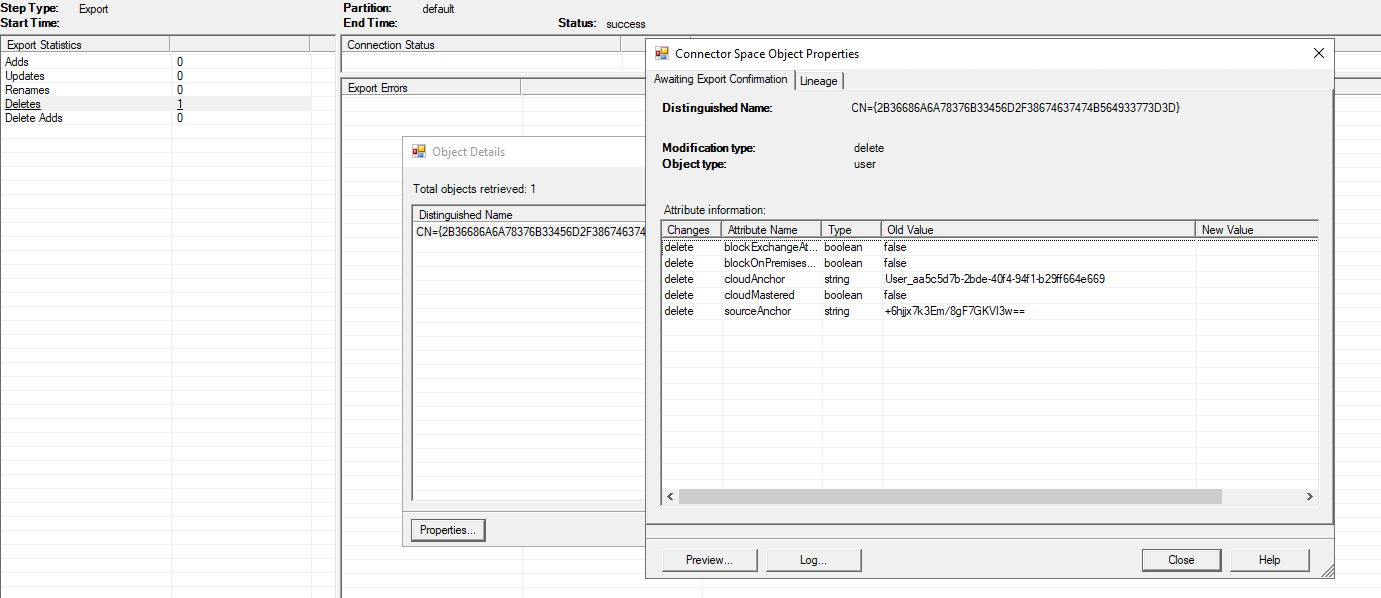
These steps above describe very easily how to solve this problem. Now and then we come across this problem and we need these commands. It is also possible through the GUI but requires you to delete the account, then sync to clean it from the database and then restore the user. However, these steps will require you to do more effort and has more impact on possible users.
Thank you for reading this guide and I hope it was helpful.
These sources helped me by writing and research for this post;
You have reached the end of the page. You can navigate through other blog posts as well, share this post on X, LinkedIn and Reddit or return to the blog posts collection page. Thank you for visiting this post.
If you think something is wrong with this post or you want to know more, you can send me a message to one of my social profiles at: https://justinverstijnen.nl/about/
If you find this page and blog very useful and you want to leave a donation, you can use the button below to buy me a beer. Hosting and maintaining a website takes a lot of time and money. Thank you in advance and cheers :)
The terms and conditions apply to this post.
When using Windows 365 in your organization, the deployment is very easy to do. When it comes to adding more users to the service, it can be much manual clicks to reach your goal. My advice is to leverage the Dynamic Group feature of Microsoft Entra.
The Dynamic Groups feature of Microsoft Entra is a great tool for auto-managing members of a group based on a single rule or collection of rules. Some examples of using dynamic groups:
Dynamic group don’t need any manual assignment or un-assignment. Instead of that, members will be automatically added based on the rules. Great feature for automation purposes!
To create a dynamic group for every user which has a Windows 365 license assigned follow the following steps:
Go to the Microsoft Entra admin center (entra.microsoft.com)
Go to “Groups” and create a new group and select the membership type “Dynamic User”
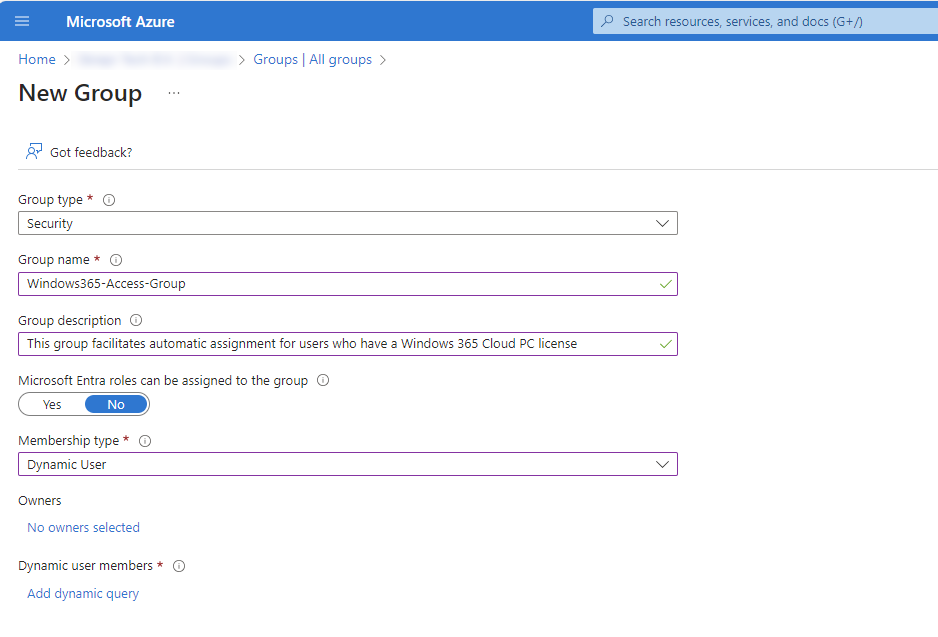
Now we have the group, we need to create the rules for the group to determine which users can be added. Click on “Add dynamic query” to configure the rules.
To filter on users with a specific assigned license, we need to use the “assignedPlans” property. The operator needs to be “Equals”.
Now at the “Value” field, we need to have the Service Plan ID of the license. Every Entra ID assignable license has an underlying Service Plan ID which represents the license. A list of all this Service Plan ID’a can be found here: https://learn.microsoft.com/en-us/entra/identity/users/licensing-service-plan-reference
In my environment, we have 2 types of Windows 365 licenses available:
| License type | ServicePlanId |
|---|---|
| Windows 365 Enterprise (2 vCPU / 8GB / 128GB) (non-hybrid benefit) | 3efff3fe-528a-4fc5-b1ba-845802cc764f |
| Windows 365 Enterprise (4 vCPU / 16GB / 128GB) (non-hybrid benefit) | 2de9c682-ca3f-4f2b-b360-dfc4775db133 |
Note: Every Windows 365 machine configuration has it’s own Service Plan ID, but the ServicePlan ID’s are globaly identical.
With this Service Plan ID now in place, we can complete the rule:
We use the And/Or option “Or” because the users has the license for 2vCPU/8GB or 4vCPU/16GB.
After creating the group, the group will contain only members who have one of this licenses.
Now is the page of Microsoft filled with every single Service Plan ID available which is a mess. You can find all Service Plan ID’s in your environment easily with Azure AD Powershell. I will tell you how.
Log into Azure AD with Powershell:
Connect-AzureADWe can find all licenses and referring Service Plan ID’s which your environment is subscribed to by using the following command:
Get-AzureADSubscribedSku | Select-Object -ExpandProperty ServicePlansYou can also search all Service Plans referring to Windows 365 Cloud PC with the following commands:
$searchstring = "*CPC*"
Get-AzureADSubscribedSku | Select-Object -ExpandProperty ServicePlans | Where-Object {$_.ServicePlanName -like $searchstring} | Select-Object ServicePlanId, ServicePlanName
You will get a output like this with the Service Plan ID’s you need.
ServicePlanId ServicePlanName
------------- ---------------
3efff3fe-528a-4fc5-b1ba-845802cc764f CPC_2
2de9c682-ca3f-4f2b-b360-dfc4775db133 CPC_E_4C_16GB_128GBDynamic Groups are an excellent way to automating and securing your environment with the least administrative tasks possible. I hope i helped you a little bit by automating some more of your environment!
You have reached the end of the page. You can navigate through other blog posts as well, share this post on X, LinkedIn and Reddit or return to the blog posts collection page. Thank you for visiting this post.
If you think something is wrong with this post or you want to know more, you can send me a message to one of my social profiles at: https://justinverstijnen.nl/about/
If you find this page and blog very useful and you want to leave a donation, you can use the button below to buy me a beer. Hosting and maintaining a website takes a lot of time and money. Thank you in advance and cheers :)
The terms and conditions apply to this post.
All pages referring or tutorials for generic Networking.
This page is an introduction to Networks. We don’t need to know everything about it, but often face it in our work. In this guide I will give you a basic understanding of networks, IP addresses, VLANs, Segmenting etcetera. Basically everything you need to understand the process, and hopefully even more than that.
Networking is the process of connecting devices to share data and resources. It allows communication between users over local or global distances. Networks can range from small home setups to large corporate infrastructures. Key components include routers, switches, and protocols that manage data traffic. Effective networking ensures reliable, secure, and efficient information exchange. As technology advances, networking plays a critical role in enabling digital communication worldwide.
Logically this means that every device will have an IP address and this can be used to communicate with other devices. This can look like the diagram below:
This shows a simple network with 8 devices, all connected to each other. In practice, the circle will represent the infrastructure; the Routers and Switches.
In every network, we have a device that plays the “Router” role. This is basically connecting different networks to each other. In most bigger networks, this can be the firewall.
On Azure, the routing and switching part is done with creating a virtual network. This means that this is all managed and you only select the network you want to connect with.
Switches are the distribution part of a network. These are literally like power strips but then for networks. One cable goes in (called the “Uplink)”, and all other cables are going out of the switch (called “Downlinks)”. Connecting a device to a downlink of a switch gives access to the network.
Routers and Switches can seem the same as terms but they are different in a particular way. Routers connects our devices to different networks, and Switches redistribute those networks.
IP addresses are needed on a network for every device to know where to deliver a package. You can compare this like in a real world city, where every street has a name and every house has a house number. IP addressing works kind of the same way, but translated in a way so computers can also work with it.
We have two types/versions of IP addresses:
IP address are built in this way:
The first part represents the “Network ID”, which is a static part and will remain till configured different. The last part represents the “Host ID” which is a number that is different for every host. The Network ID can be compared to a real life Street and the Host ID is the house number.
Now this is a basic explaination of a Class C address, where we only use the last number. We have 3 classes that we use in networking:
Now this tells us how many devices we can use in our network:
The most important here is the Subnet mask which tells devices on what part of the IP addressing scheme they are.
You must have seen them in your daily life of being an IT guy, Subnet masks. This is a number like:
This number decides how many hosts we can use in our network. The more zeros in the subnet mask, the more host addresses are available. For example, /24 (255.255.255.0) allows 254 usable hosts, while /16 (255.255.0.0) allows 65.534 usable hosts. Subnet masks help divide networks into smaller parts, making management and security easier. A best practice is always to have your subnets as small as possible for networks or VLANs, but the bottom line is mostly /24.
A smaller subnet is basically a higher performance. Because some requests, like broadcasts are sent to every address. This process is faster to 254 addresses than to 65.000 addresses.
Tip: use my Subnet calculator to calculate your networks: https://subnet.justinverstijnen.nl/
IPv4 addresses, like 172.16.254.1, are decimal representations of four 8-bit binary blocks, known as octets. Each octet ranges from 0 to 255, making every IPv4 address 32 bits in total.
The IP address 172.16.254.1 can be represented in binary format like shown in the picture below:

So an IP address is basically a human readable way of how the devices work under the hood. All based on 0’s and 1’s.
Subnetting is a technique used in networking to divide a larger IP network into smaller, more manageable subnetworks (subnets). It helps optimize IP address allocation, improve network performance, and enhance security by segmenting traffic.
Each subnet operates as an independent network while still being part of the larger network. By using subnetting, organizations can efficiently manage IP address space, reduce network congestion, and implement better access control.
Subnetting is achieved by modifying the subnet mask, which determines how many bits are used for the network and how many for the host portion of an IP address. Understanding subnetting is essential for network engineers and administrators to design scalable and efficient network infrastructures.
In Azure, we do this by creating a virtual network which has an address space (for example: 10.0.0.0/16) and we can build our subnets in that space (10.0.0.0/24, 10.0.1.0/24, 10.0.2.0/24 etc.). I have done this for demonstration in the picture below:
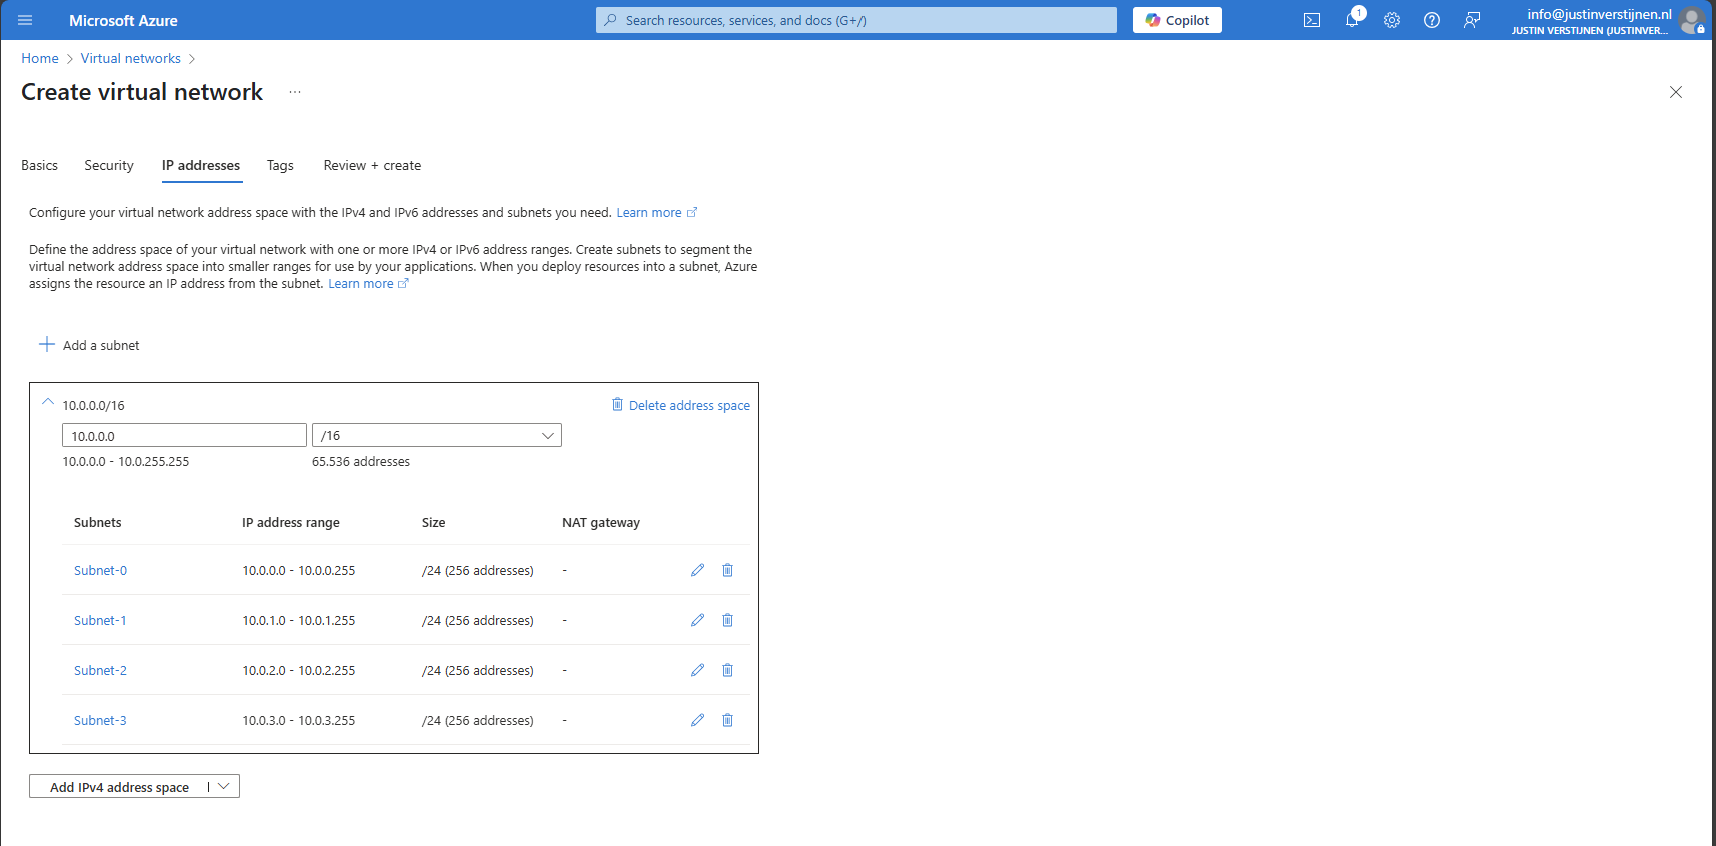
When using routers and switches, we can segment our network in different, Virtual networks which are called VLANs. This can help us by dividing devices into different isolated networks without the need of having seperate physical networks.
For designing VLANs you have to calculate the subnet sizes and ip address schemes. I have a tool available for doing this:
So when designing networks, you will never know how long you are gonna use it. My advice is to always have a good networking plan and document your plan for future use and expansion.
I have some tips for designing networks that work well:
To have a cheat sheet of subnet masks, I have created a complete table of all usable Subnet masks including how much addresses you can assign in those networks:
| Prefix | Subnet mask | Usable addresses |
|---|---|---|
| Supernets (ISPs) | ||
| /0 | 0.0.0.0 | Used as wildcard |
| /1 | 128.0.0.0 | 2,147,483,646 |
| /2 | 192.0.0.0 | 1,073,741,822 |
| /3 | 224.0.0.0 | 536,870,910 |
| /4 | 240.0.0.0 | 268,435,454 |
| /5 | 248.0.0.0 | 134,217,726 |
| /6 | 252.0.0.0 | 67,108,862 |
| /7 | 254.0.0.0 | 33,554,430 |
| Class A networks | ||
| /8 | 255.0.0.0 | 16,777,214 |
| /9 | 255.128.0.0 | 8,388,606 |
| /10 | 255.192.0.0 | 4,194,302 |
| /11 | 255.224.0.0 | 2,097,150 |
| /12 | 255.240.0.0 | 1,048,574 |
| /13 | 255.248.0.0 | 524,286 |
| /14 | 255.252.0.0 | 262,142 |
| /15 | 255.254.0.0 | 131,070 |
| Class B networks | ||
| /16 | 255.255.0.0 | 65,534 |
| /17 | 255.255.128.0 | 32,766 |
| /18 | 255.255.192.0 | 16,382 |
| /19 | 255.255.224.0 | 8,190 |
| /20 | 255.255.240.0 | 4,094 |
| /21 | 255.255.248.0 | 2,046 |
| /22 | 255.255.252.0 | 1,022 |
| /23 | 255.255.254.0 | 510 |
| Class C networks | ||
| /24 | 255.255.255.0 | 254 |
| /25 | 255.255.255.128 | 126 |
| /26 | 255.255.255.192 | 62 |
| /27 | 255.255.255.224 | 30 |
| /28 | 255.255.255.240 | 14 |
| /29 | 255.255.255.248 | 6 |
| /30 | 255.255.255.252 | 2 |
| /31 | 255.255.255.254 | 0 |
| /32 | 255.255.255.255 | 0 |
Comma’s used in Usable addresses to not be confused with IP addresses ;)
I hope I gave you a great basic understanding of how networks work and the fundamentals to use networking in Azure. Its part of our jobs and not very easy to start out with.
Thank you for reading my guide and i hope it was helpful.
You have reached the end of the page. You can navigate through other blog posts as well, share this post on X, LinkedIn and Reddit or return to the blog posts collection page. Thank you for visiting this post.
If you think something is wrong with this post or you want to know more, you can send me a message to one of my social profiles at: https://justinverstijnen.nl/about/
If you find this page and blog very useful and you want to leave a donation, you can use the button below to buy me a beer. Hosting and maintaining a website takes a lot of time and money. Thank you in advance and cheers :)
The terms and conditions apply to this post.
IPv6. We hear it a lot these days and it’s a very common network addressing protocol and the successor of the older IPv4, but will not necessarily take over IPv4 100% (yet). On this page I will describe the basics, some tips and the benefits.
When we speak of a network, we speak of a set connected devices (we call them clients/nodes) where each device has its own use. Also there are some fundamental components every network has:
Like i said, your network contains several devices and each devices has to know how to connect to an other device. This will be done using an IP address. Using IP addresses enables you to have a very efficient network in terms of cabling. In the past there some coaxial based networks where every device was physically connected to each other.
You can pretty much compare IP addresses to sending a post card in real life. Your postal company has to know where your postcard must be delivered, but then in terms of finding the right device in your network.
An IP address looks like the addresses below:
In the early ages of computers, a digital manner of adressing network devices was needed. After some research IPv4 was born. A very efficient addressing manner which is easily understandable by computers but also for humans. We humans like easy dont we?
The whole IPv4 addresses space contains 32 bits which means there are 4,3 billion (232) different addresses possible. In the early 80’s when IPv4 was founded this was more than enough.
With the rapid increase in devices worldwide, the shortage of IPv4 addresses became increasingly apparent. This is not surprising, considering that the global number of people is nearly twice the number of available IPv4 addresses.
To fulfill the shortage of IP addresses, IPv6 was born in 1998 which has as primary goal to fulfill the requirement of having enough addresses available for everyone. Fortunately, they did not go way over the top and instead used a 128 bits (2128) address space. In this space, the total usable addresses in IPv6 are 340.282.366.920.938.463.463.374.607.431.768.211.456 (340 undecillion).
Did you know my webserver is accessible though IPv6? You can test this yourself in CMD or Powershell
ping -6 justinverstijnen.nlThis will ping my domain-name by using IPv6. The following will be the outcome:
Pinging justinverstijnen.nl [2a01:7c8:f0:1142:0:2:ca6:d853] with 32 bytes of data:
Request timed out.
The ping request will fail because my webserver is configured to do so. This for security reasons. Lets continue our IPv6 journey.
Both IPv4 and IPv6 use a similar addressing scheme which is similar to your physical home address and number:
| Type | Network ID | Host ID | Full address |
| IPv4 | 192.168.10.0/24 | .25 | 192.168.10.25 |
| IPv6 | fd12:3456:789a::/64 | ::100 | fd12:3456:789a::100 |
A great way to better understand this:
Network ID represents the street, which is the same for all buildings in that street.
Host ID represents the unique number of your building/house, which is different for each building in the same street.
Most of the time in our job, a higher number means faster. Unfortunately this is not the case with IPv6. IPv6’s main job is to create more possible addresses. It does have some great advantages because at the time of founding there was more knowledge, like real world scenario’s where IPv4 weak points were.
| Advantage IPv6 | More information |
| Larger address space | IPv6 has more than a million IP addresses available per person on earth and IPv4 has 0,5 IP addresses per person. |
| Better security with IPSec | IPv6 supports built in IPsec where every package is encrypted at sending and decrypted at receiving to prevent an attacker to steal packages and monitor your behaviour online. |
| Easy network setup with SLAAC | IPv4 requires DHCP or static adressing where IPv6 the device can assign a address itself using duplicate detection, router advertisements and auto assignment. |
| No NAT needed | Because we dont need to share IP addresses anymore, the need of NAT is eliminated. You can directly connect on a device (when the firewall is configured to do so of course). |
| Multicast instead of broadcast | In a network, some devices like Chromecast, Sonos and Airplay use broadcast to advertise themselves. This means it sends a package to all devices. Multicast in IPv6 sends only to specified devices to reduce network load. |
When it comes to compare generic terms in networking, you can use the table below:
| Explaination | IPv4 | IPv6 |
| Localhost address | 127.0.0.1 | ::1 |
| No DHCP server (APIPA) | 169.254.0.0/16 | fe80::/10 |
| Subnet mask | 255.255.255.0 | /64 |
| Types of network routing | Class A, B and C | 1 class |
| Type of notation | Decimal (0-9) with dots . | Hexadecimal (0-9 and A-F) with colons : |
This page greatly explains how IPv4 and IPv6 addresses and their basics and benefits work, and there is a lot to also tell about. Obviously too much to include on a single page. Also i want the content to be readable and to stay within the best attention span of humans :).
You have reached the end of the page. You can navigate through other blog posts as well, share this post on X, LinkedIn and Reddit or return to the blog posts collection page. Thank you for visiting this post.
If you think something is wrong with this post or you want to know more, you can send me a message to one of my social profiles at: https://justinverstijnen.nl/about/
If you find this page and blog very useful and you want to leave a donation, you can use the button below to buy me a beer. Hosting and maintaining a website takes a lot of time and money. Thank you in advance and cheers :)
The terms and conditions apply to this post.
All pages referring or tutorials for PowerShell.
To help us IT identifying certain configurations on a server and possible misconfigurations I have made a PowerShell script which creates a complete overview of the current server configuration and exports it as a single HTML file.
In this post I will explain how to use it and how the script works.
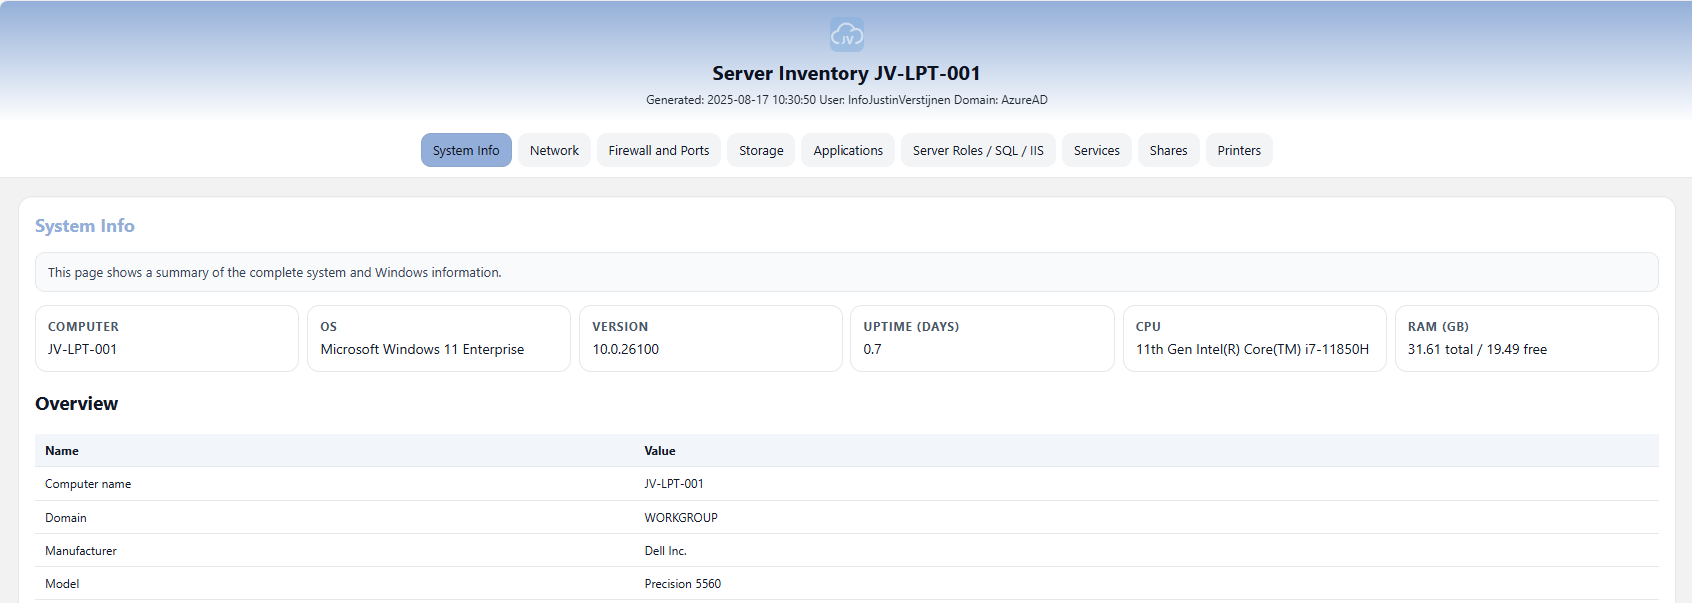
An example of the output of the script.
For the fast pass, my script can be downloaded here:
The script I have made creates a full system configuration report which shows us a lot of information:
I have uploaded this script to the PowerShell Gallery for quick and easy installation/use. You can download and install the script by typing this into your PowerShell window:
Install-Script JV-ServerInventoryReportAt the question for the untrusted repository, answer “Yes to all” (A).

Now the script is installed, and we can execute it by running:
JV-ServerInventoryReportThis immediately runs the script and saves the output to your desktop folder.
To use the script, we need to do some steps. You can do it in your own way, but I show the most easiest way to run the script without compromising system security.
First download the script from GitHub:
Click on the blue button above. You now are on the GitHub page of the script.
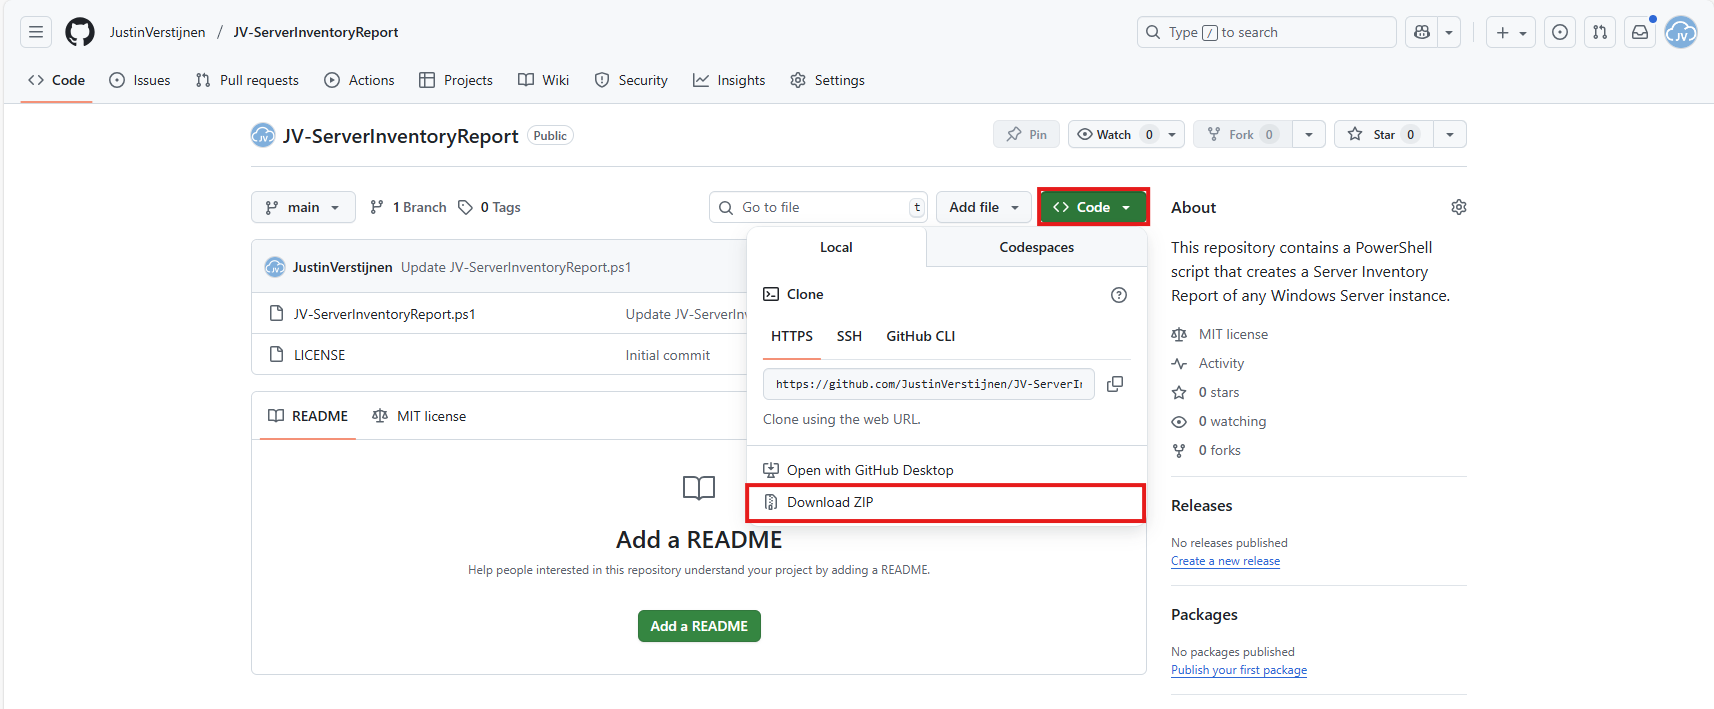
Click on “Code” and then “Download ZIP”.
Now place the files on the server where you want to install the script.
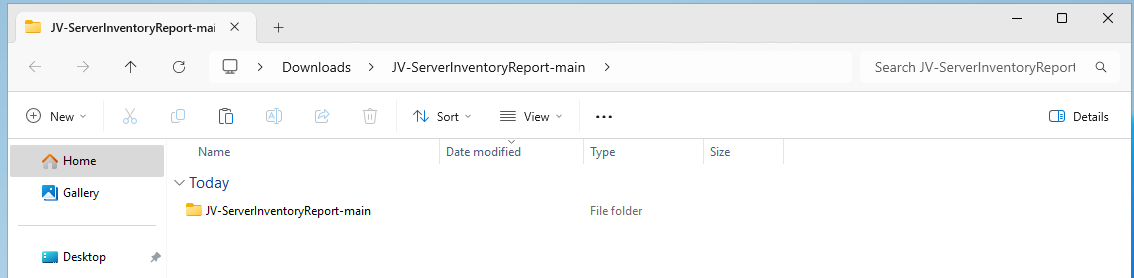
Unzip the file and then we can run the “Install” script. This must be run as administrator and temporarily without Execution Policy.
Open Powershell ISE as administrator.
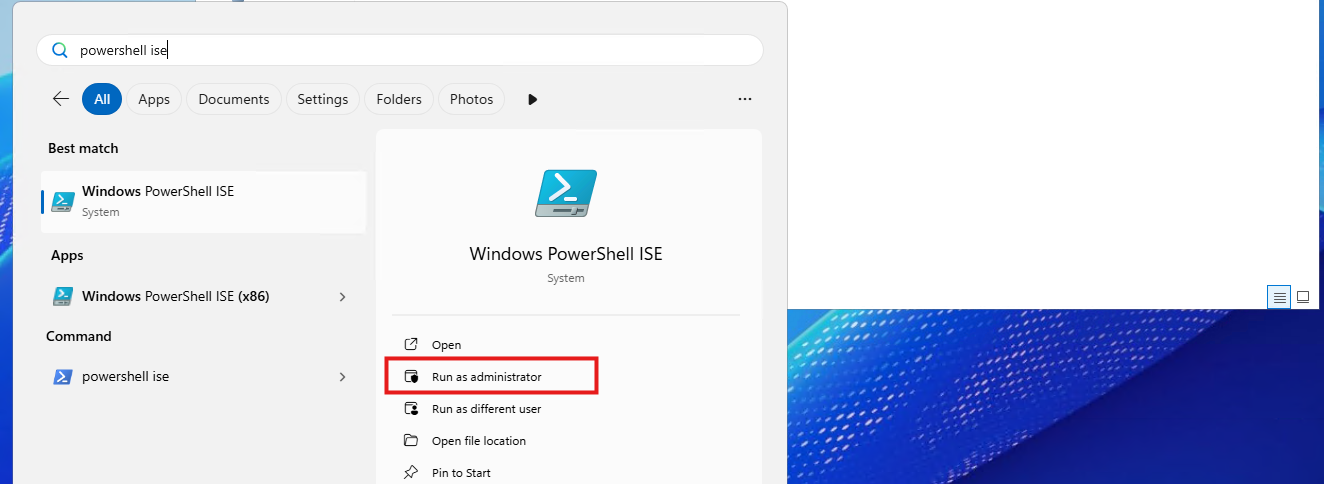
After opening PowerShell ISE and after authenticating, open the “Install” script.
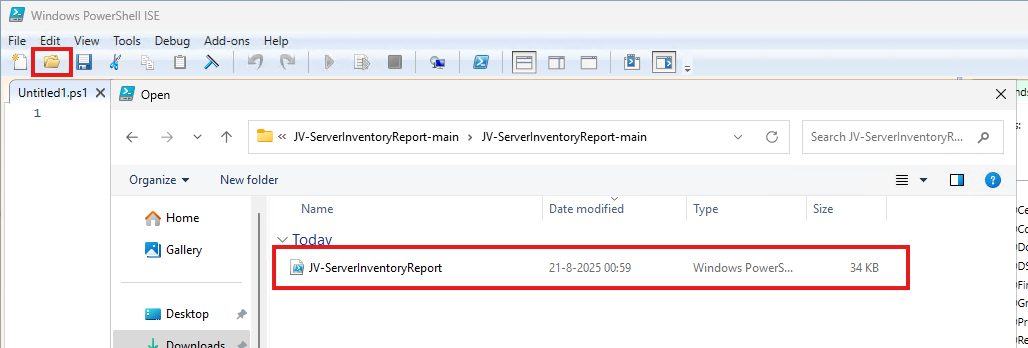
Review the script to understand what it does. This is always a recommendation before executing unknown scripts.
After reviewing, run the following command to temporarily disable the PowerShell execution policy:
Set-ExecutionPolicy Unrestricted -Scope ProcessThis disables the default PowerShell execution policy for only the duration of your PowerShell window. After closing PowerShell, every other window will have this enabled again.
Then run the script by clicking the “Play” button:

The script will run. This takes about 30 seconds. After it has been succesfully completed, the HTML-file will be placed on the desktop (or other location if you specify this while running).
PS C:\Users\justin-admin> Set-ExecutionPolicy Unrestricted -Scope Process

PS C:\Users\justin-admin> C:\Users\justin-admin\Downloads\JV-ServerInventoryReport-main\JV-ServerInventoryReport.ps1
Script made by...
     _           _   _        __     __            _   _  _
    | |_   _ ___| |_(_)_ __   \ \   / /__ _ __ ___| |_(_)(_)_ __   ___ _ __
 _  | | | | / __| __| | '_ \   \ \ / / _ \ '__/ __| __| || | '_ \ / _ \ '_ \
| |_| | |_| \__ \ |_| | | | |   \ V /  __/ |  \__ \ |_| || | | | |  __/ | | |
 \___/ \__,_|___/\__|_|_| |_|    \_/ \___|_|  |___/\__|_|/ |_| |_|\___|_| |_|
                                                       |__/
Report written to: C:\Users\justin-admin\Desktop\Server-Inventory_20250821_101816.html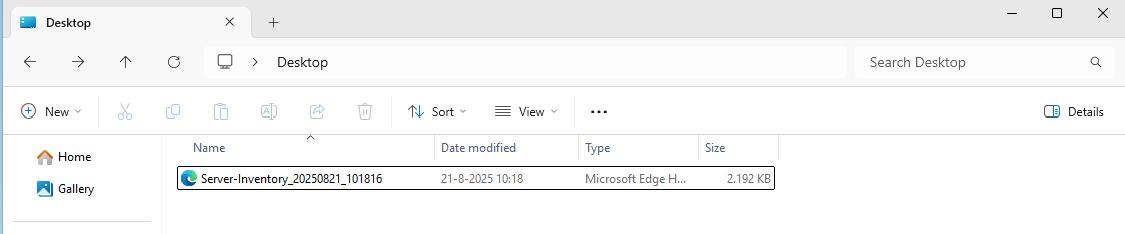
Then you can open this file with your favorite webbrowser and review the information.
This script provides a great and simple overview of the full server configuration. It places everything in nice and clear tables, while still granting access to the raw outputs it used to markup the tables.
Everything is placed in nice and clear tabs so information is categorized, and the information can be easily exported.
I hope my script is helpful for you and thank you for viewing.
These sources helped me by writing and research for this post;
You have reached the end of the page. You can navigate through other blog posts as well, share this post on X, LinkedIn and Reddit or return to the blog posts collection page. Thank you for visiting this post.
If you think something is wrong with this post or you want to know more, you can send me a message to one of my social profiles at: https://justinverstijnen.nl/about/
If you find this page and blog very useful and you want to leave a donation, you can use the button below to buy me a beer. Hosting and maintaining a website takes a lot of time and money. Thank you in advance and cheers :)
The terms and conditions apply to this post.
Sometimes in IT, we have software or solutions that need to to save temporary files in your filesystem. Let’s say, a feed with logs or CSV files that are saved, logs or back-ups like the Bartender software. The software itself doesn’t have a solution to clean up those files and after 2 years, the size can be massive.
To let this files clean on schedule I have created a Powershell script which cleans those files in specific folders after they are not modified in *specfied* days . You can define the folders and number of days at the parameters section of the script.
Note: Think out very carefully how long the retention must be. Deleting files is a irreverible action!
The Powershell script for cleaning up files is on my GitHub page:
It starts with a parameter to define the amount of days you want to retain the files. It checks this at the last write time to the file.
After that, it defines the folders where it must check for files with no exclusion of file extensions. It removes all files and folders in the defined folders.
The script is meant for cleaning specific files after X days. A great example of it in practice is if you have Bartender installed on a server. Bartender will every day save deleted database records to a file without it even bothering cleaning it up. After 2 years, such folder can be over 25GB’s. With this script, it only keeps 30 versions of the file. Assuming we have more retention on our backups, we don’t need any more than that.
The script works in this way:
At the beginning of the script, we can set some parameters for customization of the script. The rest of the script can be as-is to ensure it still runs.
I will refer to the line numbers of the script on GitHub:
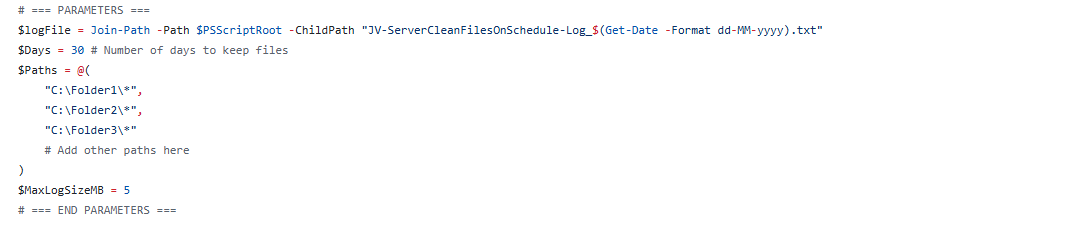
For installation with Task Scheduler I included an installation script that, by default, configures a task in the Windows Task Scheduler that runs it;
If these settings are great for you, you can leave them as-is.
The Installation script creates a folder in C:\ named “Scripts” if not already there and places the cleaning script there.
Click on the blue button above. You now are on the Github page of the script.
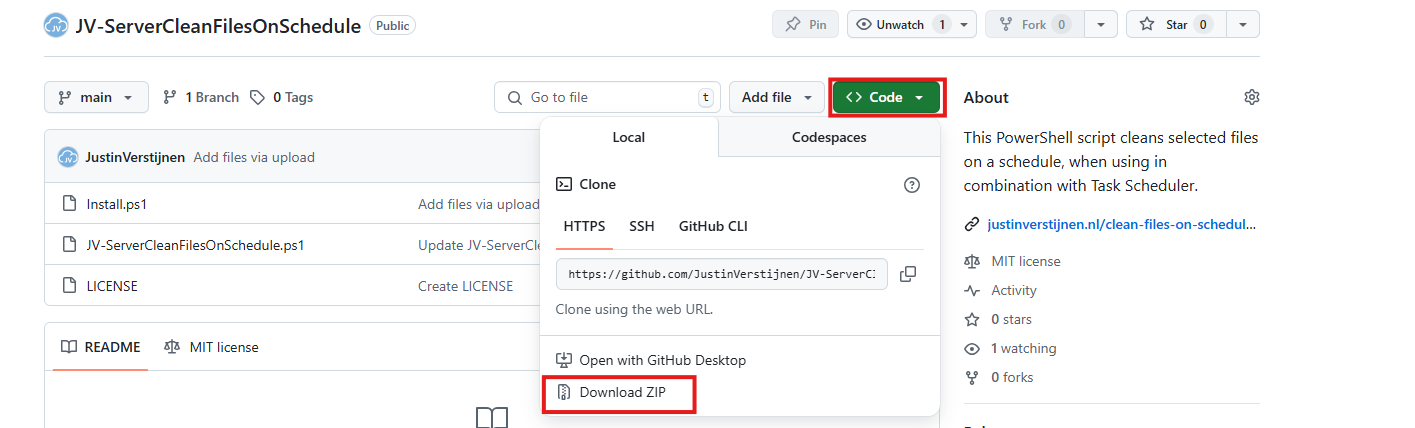
Click on “Code” and then “Download ZIP”.
Then place the files on the server where you want to install the script.
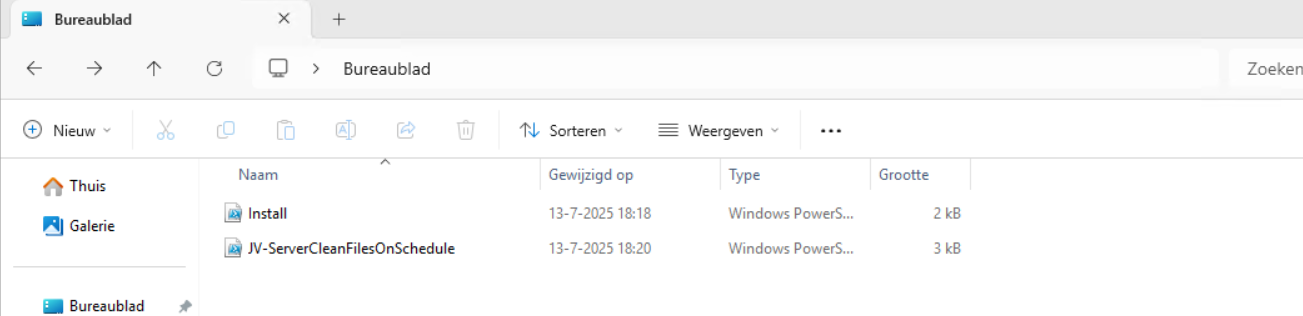
Open Powershell ISE as administrator.
Now open the “Install” script.
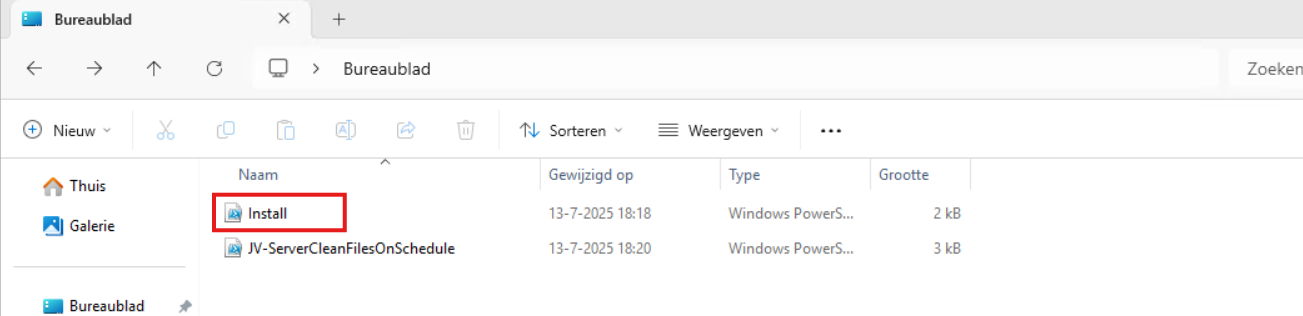
Review it’s default settings and if you feel at home in PowerShell, review the rest of the script to understand what it does.
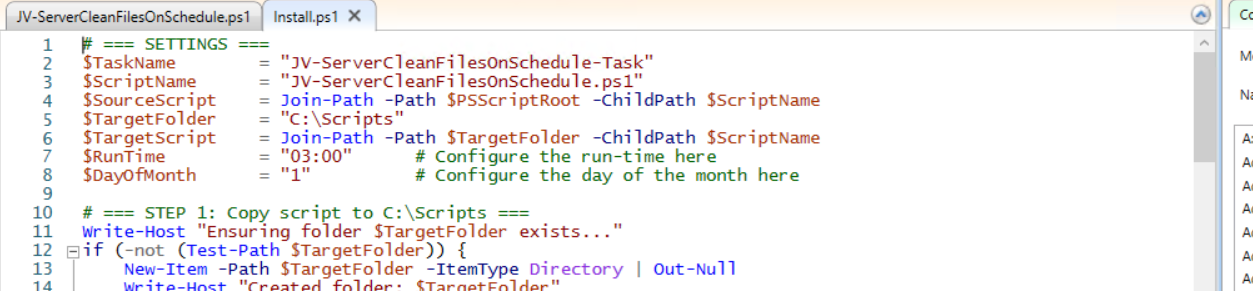
You can change the schedule very easily by changing the runtime: 0:00 till 23:59 and the day of month to specify the day number of the month (1-31).
After your schedule is ready, let’s ensure we temporarily bypass the Execution Policy by typing the command in the blue window below:
Set-ExecutionPolicy Unrestricted -Scope ProcessThis way the execution policy stays enabled but for this session only it’s been lowered. When you close the window, you have to type this again before be able to run scripts.
Execute the command, and when prompted to lower the policy, click Yes.
Now execute the Install script by clicking the green “Run” button:

After executing the script, we get the message that the task has been created succesfully:

Let’s check this in the Windows Task Scheduler:

As you can see, the script is succesfully installed to Task Scheduler. This ensures it runs every first of the month at 03:00 (or at your own defined schedule). Also, the script has been placed in C:\Scripts for a good overview of the scripts of the system.
For demonstration of the clean script, I created a second, simple script that creates 100 dummy files in the C:\Temp directory. This with last write times between 15 and 365 days ago.
$targetFolder = "C:\Temp"
New-Item -ItemType Directory -Force -Path $targetFolder | Out-Null

1..100 | ForEach-Object {
    $fileName = "TestFile_$($_)_$(Get-Random -Minimum 1000 -Maximum 9999).txt"
    $filePath = Join-Path $targetFolder $fileName
    New-Item -ItemType File -Path $filePath -Force | Out-Null

    # Generate a random past date between 15 and 365 days ago
    $daysAgo = Get-Random -Minimum 15 -Maximum 365
    $randomDate = (Get-Date).AddDays(-$daysAgo)
    (Get-Item $filePath).LastWriteTime = $randomDate
    (Get-Item $filePath).CreationTime = $randomDate
}
After executing the script from my GitHub page, the files older than 30 days only must be removed while files between the 15 and 30 days must be retained.
Before we can run any of the scripts, we have to do a one-time bypass for the Powershell Execution Policy by typing the command in the blue window below:
Set-ExecutionPolicy Unrestricted -Scope ProcessThis way the execution policy stays enabled but for this session only it’s been lowered. When you close the window, you have to type this again before be able to run scripts.
Execute the command, and when prompted to lower the policy, click Yes.
Now we can run the script itself by clicking the green “Play” button.
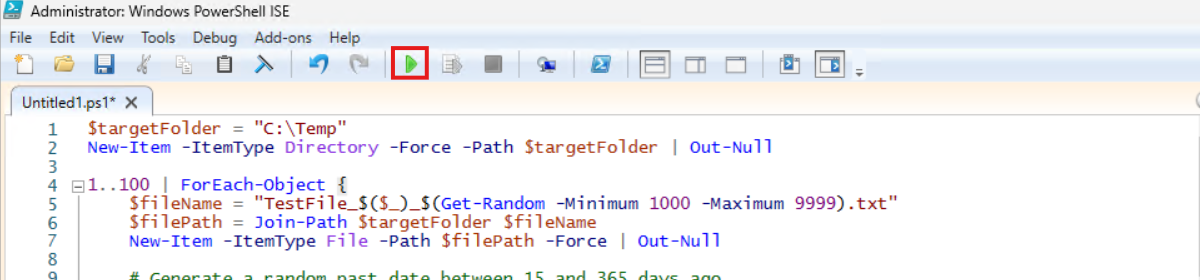
Now we have a folder with 100 files with random last write times:
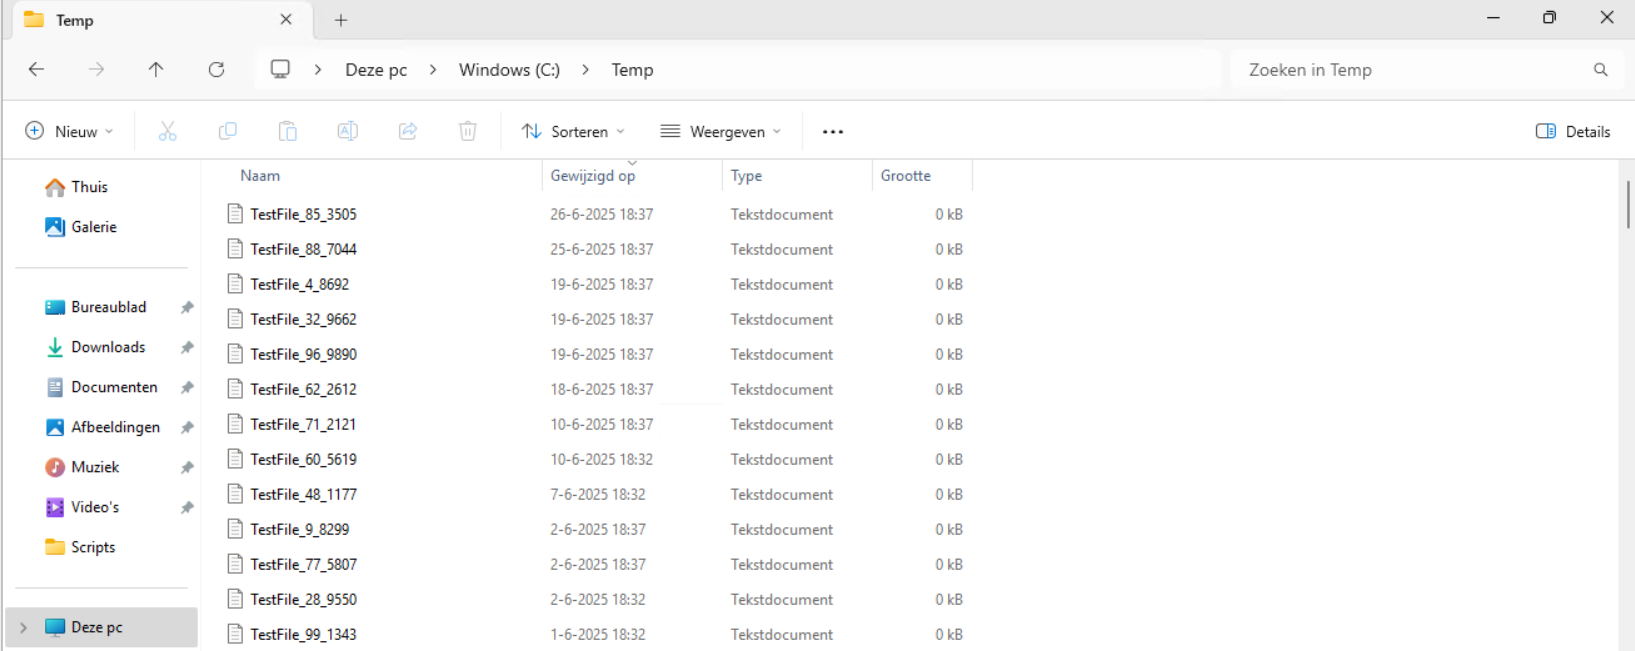
If we would execute the cleanup script, only the files from 18-6-2025 and newer will be retained.
Review the parameters on line 12 to 20, change them to your needs and then execute the script. I have changed the Paths to C:\Temp only.

The script will now delete every file older than the specified days:

Let’s take a look at the folder:
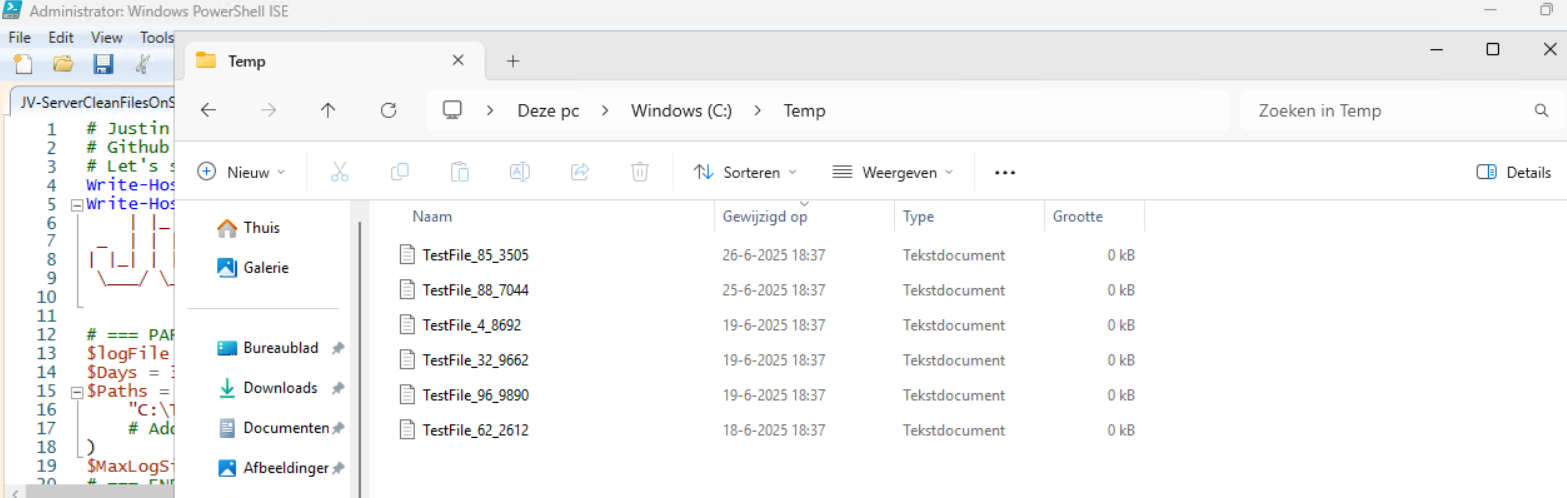
All cleared now and only versions younger than 30 days are retained.
In the Script directory, a file is created, containing all the filenames it has removed:
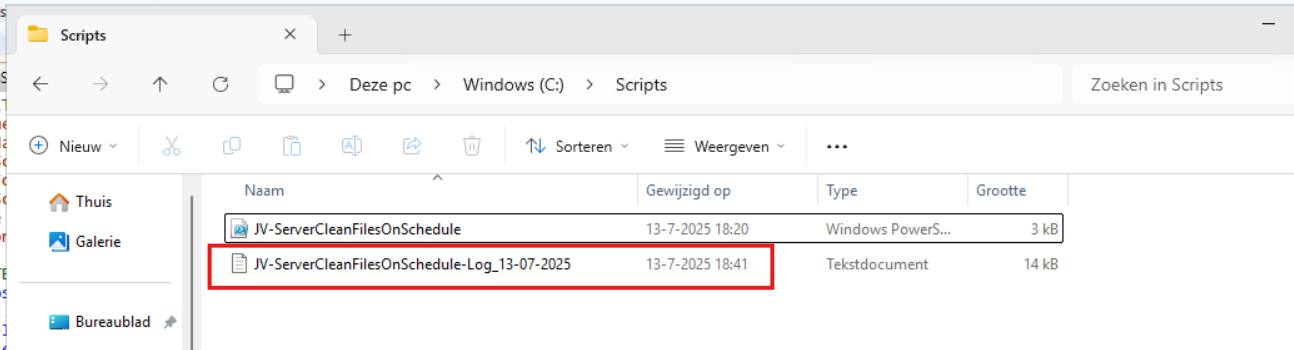
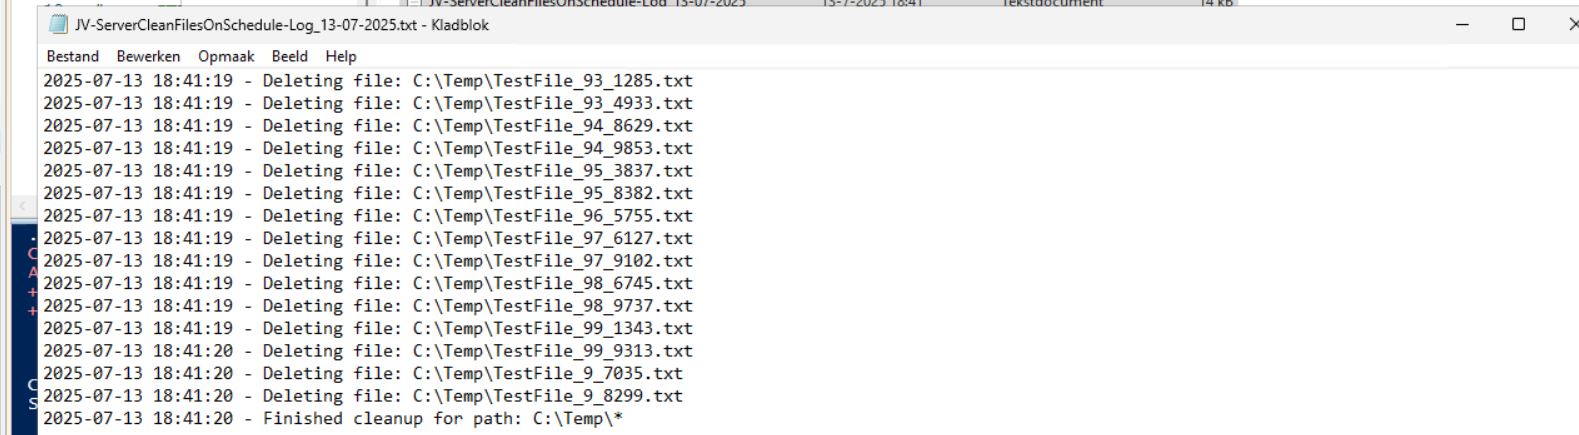
This Powershell script can help cleaning up files in specific folders. mostly i use this for maintenance on servers where software is installed without proper retention settings of their temporary files. This script helps keeping your disks clean and indirectly improves the availability of your infrastructure.
Thank you for reading this guide and I hope this was helpful.
These sources helped me by writing and research for this post;
You have reached the end of the page. You can navigate through other blog posts as well, share this post on X, LinkedIn and Reddit or return to the blog posts collection page. Thank you for visiting this post.
If you think something is wrong with this post or you want to know more, you can send me a message to one of my social profiles at: https://justinverstijnen.nl/about/
If you find this page and blog very useful and you want to leave a donation, you can use the button below to buy me a beer. Hosting and maintaining a website takes a lot of time and money. Thank you in advance and cheers :)
The terms and conditions apply to this post.
One of the small things I experienced in one of the updates for Windows 11 (24H2) is that the language bar/selector get’s automatically visible on the Windows taskbar. In previous versions of Windows, this was only available when using multiple keyboard languages.
Because this can get very annoying, I researched on how to disable this button to clean up our taskbar and only use it for the applications and space we need.
In most cases, this button will appear automatically when more than 1 language is installed in Windows. However, after one of the updates for 24H2, it appeared for me on multiple PC’s. Especially the PC’s which were installed with the Dutch language.
When using the Dutch language, we also have to configure “United States International” as keyboard layout, or we get issues with some of the symbols.
Initially, I started with browsing on the internet how to disable this button ans they all pointed to this registry key:
And set the value for “ShowStatus” to 3. However, this didn’t work for me, but you can try this by running this command in PowerShell:
Set-ItemProperty -Path "HKCU:\Software\Microsoft\CTF\LangBar" -Name "ShowStatus" -Value 3The way I finally manage to disable the button is to run these commands.
First run this command. This disables the Input manager which loads the language switcher:
New-ItemProperty -Path "HKCU:\Software\Microsoft\CTF" -Name DisableThreadInputManager -PropertyType DWord -Value 1 -ForceThen run this command to disable the startup item for the Text Services Framework:
reg delete "HKCU\Software\Microsoft\Windows\CurrentVersion\Run" /v "ctfmon.exe" /fBecause I want to share how I solved the problem doesn’t mean you should actually do this. Running these commands can interrupt some of your systems’ functions or other components. So only run them if you are familiar with your computer and be able to be up and running within an hour in case this happens.
If you managed to run the commands, I hope I helped you to get rid of this annoying bar :).
You have reached the end of the page. You can navigate through other blog posts as well, share this post on X, LinkedIn and Reddit or return to the blog posts collection page. Thank you for visiting this post.
If you think something is wrong with this post or you want to know more, you can send me a message to one of my social profiles at: https://justinverstijnen.nl/about/
If you find this page and blog very useful and you want to leave a donation, you can use the button below to buy me a beer. Hosting and maintaining a website takes a lot of time and money. Thank you in advance and cheers :)
The terms and conditions apply to this post.
When deploying Windows VMs in Azure, we get the default settings. This means we get a 12-hour clock, standard UTC/Zulu timezone and such. For users like us in the Netherlands we want to change this but not by hand.
For this purpose I built this script. It sets the timezone for Western Europe and sets the clock to 24-hour system. It also does some bonusses like responding to ping and disabling the IE Enhanced Security as it’s mostly server focussed. We don’t change the Windows language and this stays English.
For the fast pass, my script can be downloaded here:
The script itself has 6 steps:
To use the script, we must first download it from the Github page:
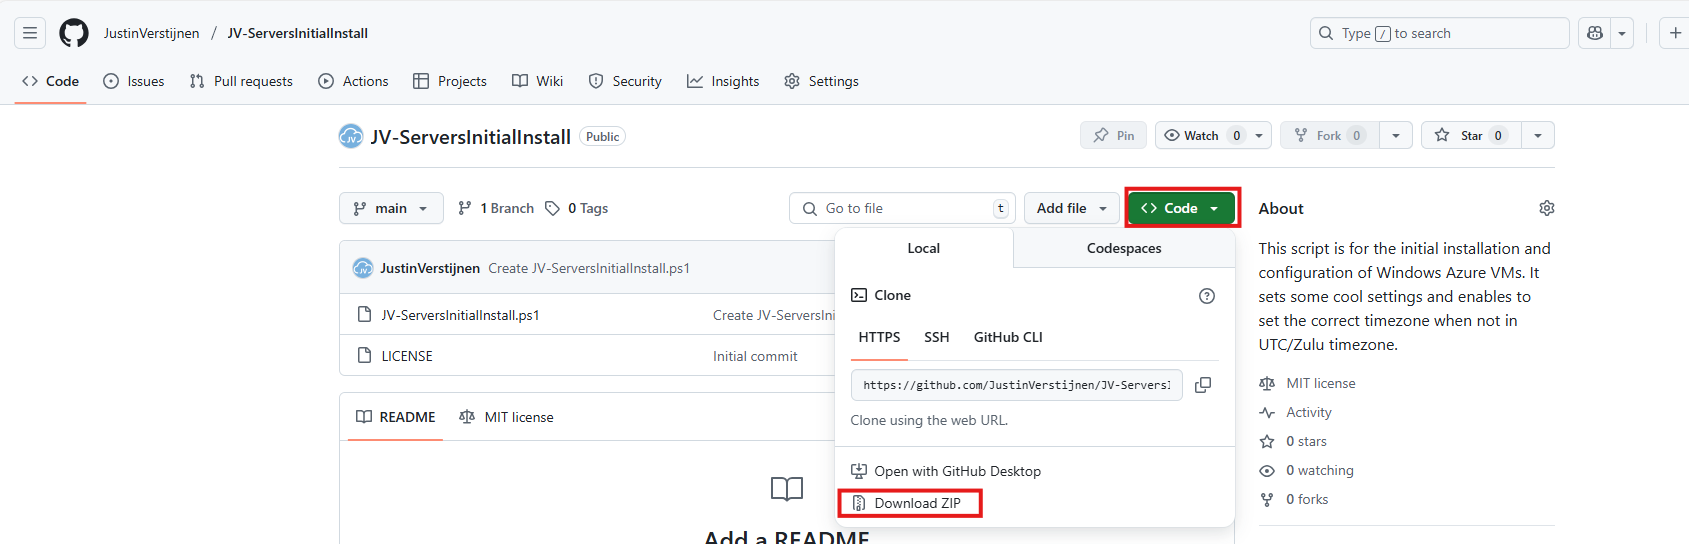
Click on “Code” and then “Download ZIP”.
Now place the script on the machine where it must run, If not already done so.
To run this in the most user-friendly way possible, open the PowerShell ISE as administrator:
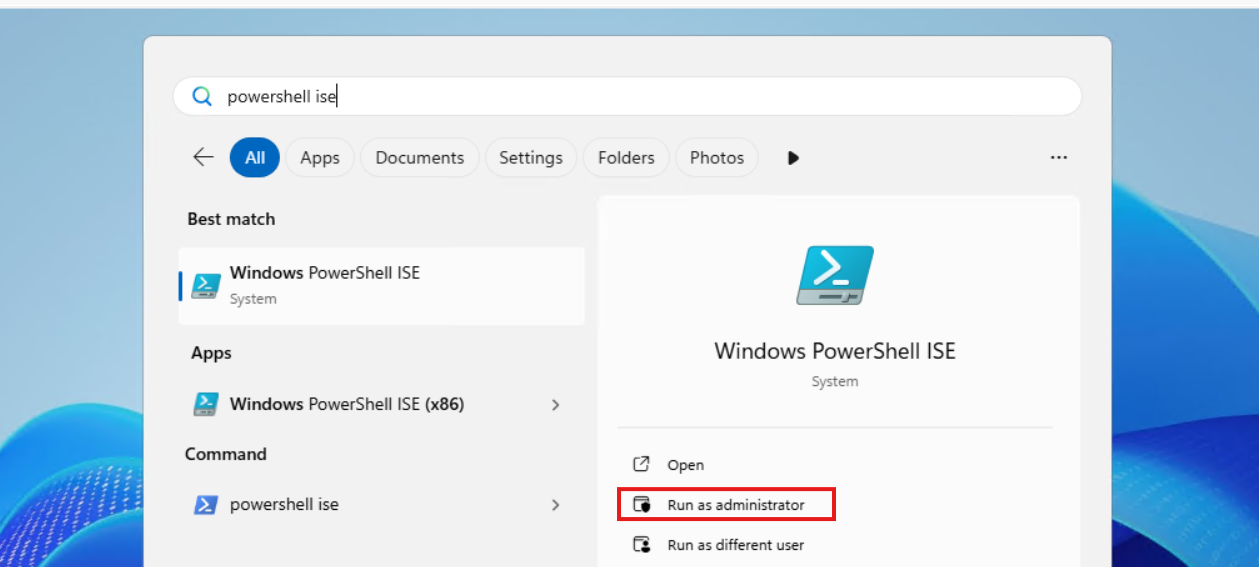
Type in your credentials and advance.
Now open the script by using the “Open” function:
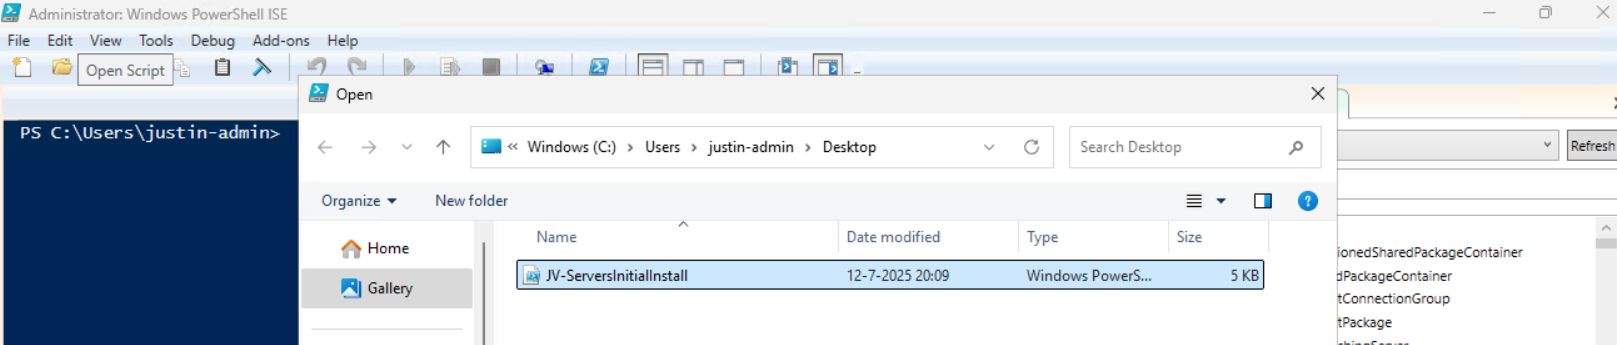
Before we can run, we must change the Powershell Execution policy temporarily. We can do this by typing the command in the blue window below:
Set-ExecutionPolicy Unrestricted -Scope ProcessThis way the execution policy stays enabled but for this session only it’s been lowered. When you close the window, you have to type this again before be able to run scripts.
Execute the command, and when prompted to lower the policy, click Yes.
Now we are ready to execute the script. Double check the parameters section (Line 13 to 18) of the script to ensure this complies with your desired settings.

Then run the script:

This shows that the script runs and sets every setting correctly. After running correctly, the server will instantly reboot to apply all settings:
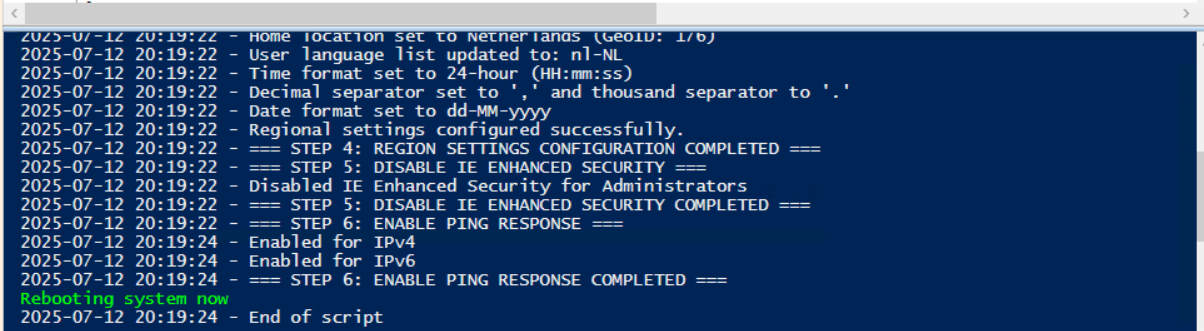
This is a great script to use for installing Windows Servers on initial. These are some settings we must do by hand normally but we can now to with a simple script. Also setting the correct timezone can sometimes be stupid as the timezone may roll back to the Azure default. This script ensures this doesn’t happen.
Thank you for reading the post and I hope the script is useful.
These sources helped me by writing and research for this post;
You have reached the end of the page. You can navigate through other blog posts as well, share this post on X, LinkedIn and Reddit or return to the blog posts collection page. Thank you for visiting this post.
If you think something is wrong with this post or you want to know more, you can send me a message to one of my social profiles at: https://justinverstijnen.nl/about/
If you find this page and blog very useful and you want to leave a donation, you can use the button below to buy me a beer. Hosting and maintaining a website takes a lot of time and money. Thank you in advance and cheers :)
The terms and conditions apply to this post.
Sometimes we want to install updates by hand because of the need for fast patching. But logging into every server and installing them manually is a hell of a task and takes a lot of time.
I have made a very simple script to install Windows Updates by hand using PowerShell including logging to exactly know which updates there were installed for monitoring later on.
The good part about this script/PowerShell module is that it does support both Windows Client and Windows Server installations.
For the fast pass, my script can be downloaded here:
The script I have made focusses primarily on searching for and installing the latest Windows Updates. It also creates a log file to exactly know what updates were installed for monitoring and documentation purposes.
The script itself has 6 steps:
For installation with Task Scheduler I included an installation script that, by default, configures a task in the Windows Task Scheduler that runs it;
If these settings are great for you, you can leave them as-is.
The Installation script creates a folder in C:\ named “Scripts” if not already there and places the cleaning script there.
Click on the blue button above. You now are on the Github page of the script.
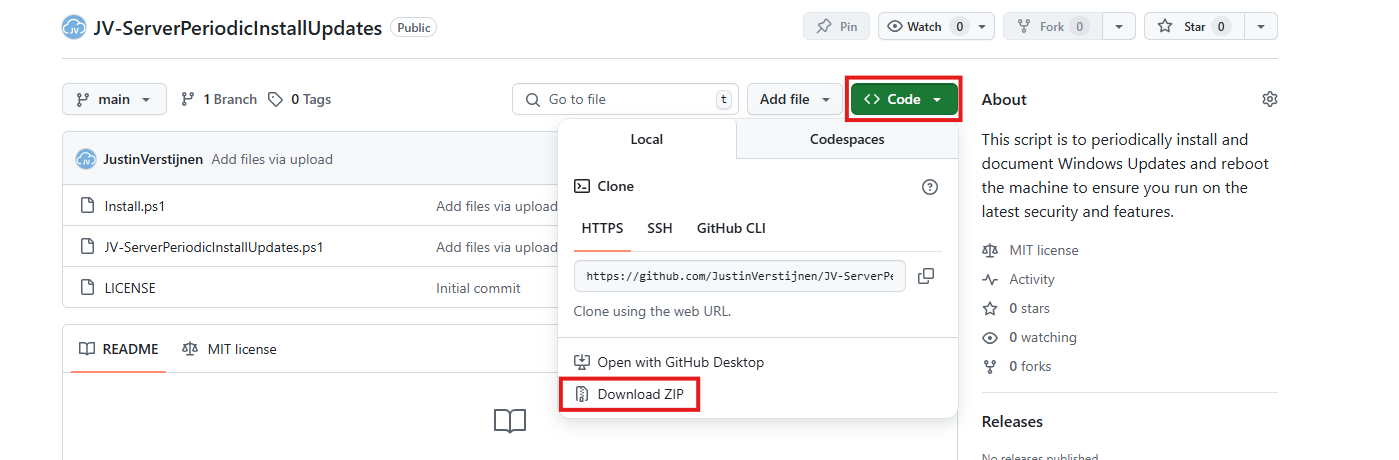
Click on “Code” and then “Download ZIP”.
Now place the files on the server where you want to install the script.
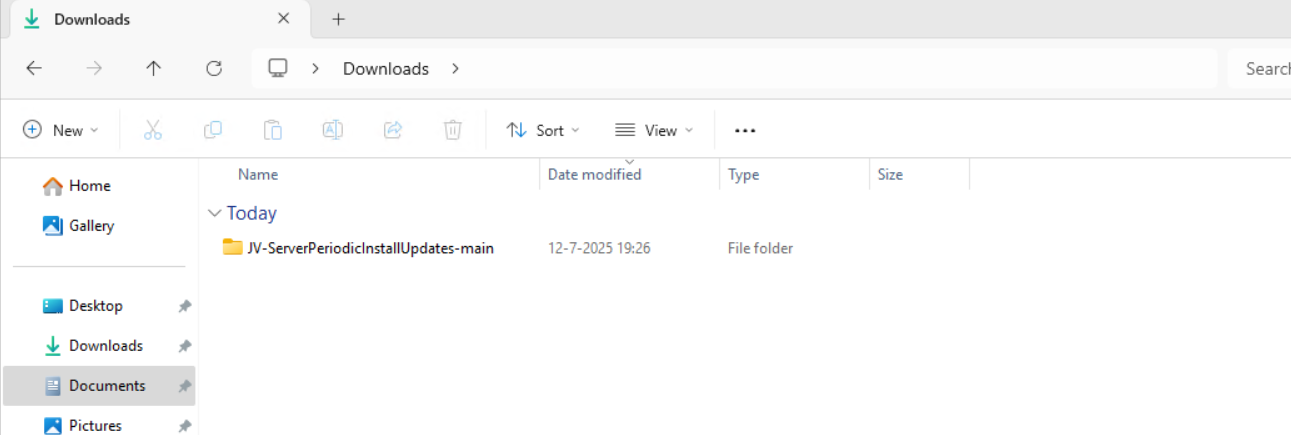
Unzip the file and then we can run the “Install” script. This must be run as administrator and temporarily without Execution Policy.
Open Powershell ISE as administrator.
Now open the “Install” script.
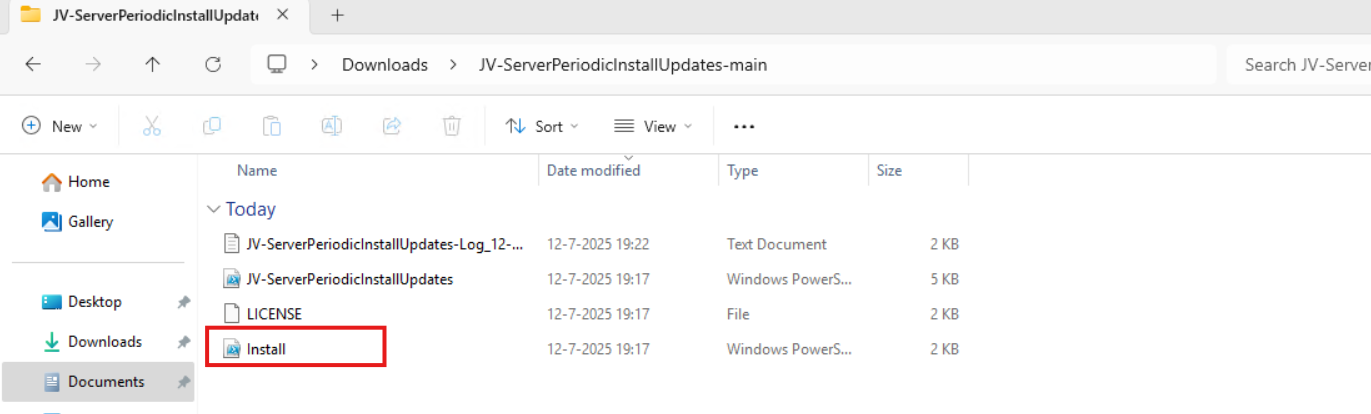
Review it’s default settings and if you feel at home in PowerShell, review the rest of the script to understand what it does.
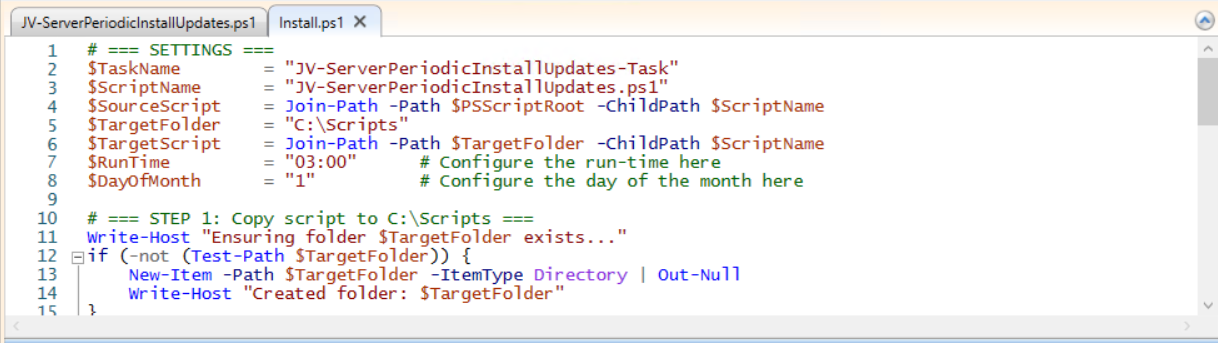
You can change the schedule very easily by changing the runtime: 0:00 till 23:59 and the day of month to specify the day number of the month (1-31).
After your schedule is ready, let’s ensure we temporarily bypass the Execution Policy by typing the command in the blue window below:
Set-ExecutionPolicy Unrestricted -Scope ProcessThis way the execution policy stays enabled but for this session only it’s been lowered. When you close the window, you have to type this again before be able to run scripts.
Execute the command, and when prompted to lower the policy, click Yes.
Now execute the Install script by clicking the green “Run” button:

After executing the script, we get the message that the task has been created succesfully:

Let’s check this in the Windows Task Scheduler:

As you can see, the script is succesfully installed to Task Scheduler. This ensures it runs every first of the month at 03:00 (or at your own defined schedule). Also, the script has been placed in C:\Scripts for a good overview of the scripts of the system.
If you want to define your own schedule and script location, it can be better to install the script yourself or only using it when you need it.
Click on the blue Download button at the beginning of the page.
Click on “Code” and then “Download ZIP”.
Then place the ZIP file on the server where you want to install the disk cleanup script.
Select the script and place it in your preferred location. My advice is to not install this in a user profile, but in a location accessible for all users. Like C:\Scripts.

I have placed the scipt into the correct folder. If you also want the script to run on a schedule, open up the “Task Scheduler” (taskschd.msc).
Do a “Right-mouse click” on the empty space and click on “Create New Task…”.
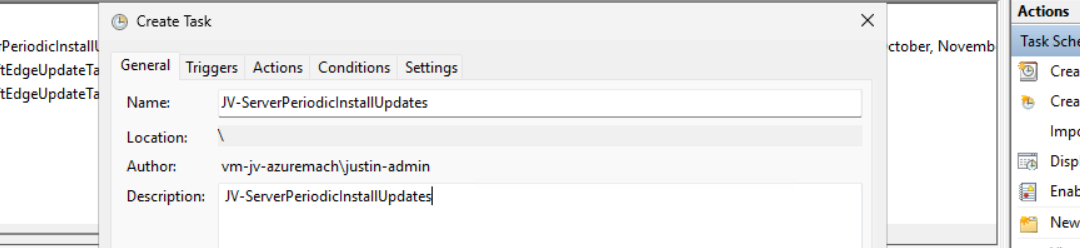
Give the task a name and description that alings with your documentation.
Then change the user to “SYSTEM” to run this in SYSTEM context for the highest privileges:
Then check the “Run with highest privileges” and select the highest OS possible in the “Configure for” dropdown menu.
Go to the “Triggers” tab and add a new trigger.
Select “Monthly” and select all months. Then change the “Days” field to 1 to run it on the first day.
You can defer from this schedule if your environment needs that. This is just an example.
Now the page looks like this:
Click “OK” and go to the “Actions” tab. Create a new action.
In the “Program/Script” field, type in the following:
powershell.exeIn the “Add arguments (optional):” field, type in the following:
-ExecutionPolicy Bypass -File C:\Scripts\JV-ServerPeriodicInstallUpdates.ps1Now click on “OK” twice to create the task.
Now we can manually run the task to ensure it runs on a schedule too. Right click the task and click on “Run” to start the task.
As we can see, the script runs succesfully as it still runs after 30 seconds. This means the task and permissions are correct.

The script can take up to several hours when cleaning everything, depending on the server size.
In the folder of the script, a log file is created:
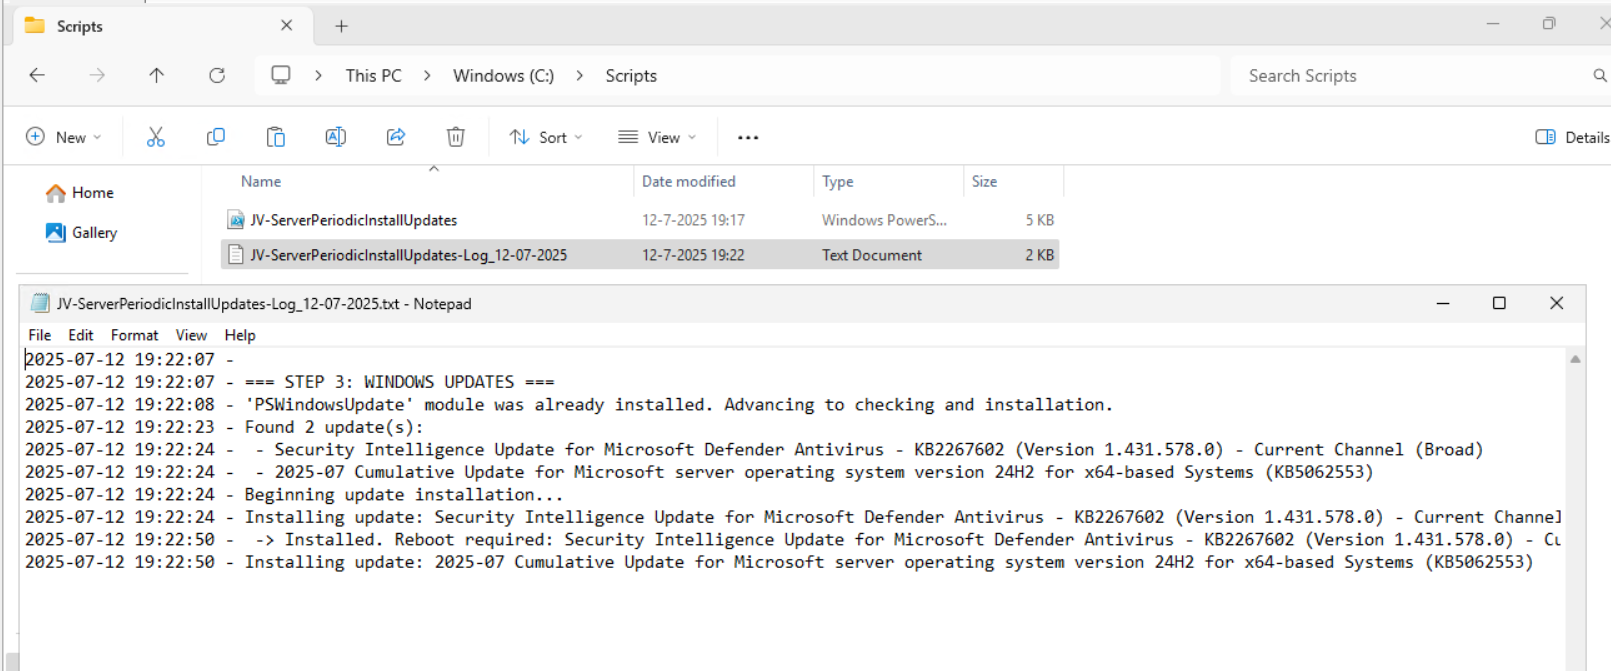
Every update installed will be logged for documentation and monitoring purposes. This can come in handy when an update unfortunately brings bugs with it so we can search for and remove this update.
Installing Windows Updates is critical for maintaining and securing your servers. In the history of IT, we did very often wait till we installed updates because of possible errors or misfunctioning with our applications but the price you pay with this approach, not being secured against zero day threats and vulnerabilities is much higher. We can’t install updates to much.
This script is useful when doing update installations by hand. When searching for automatic installation of Windows Updates in Azure, I would recommend using Azure Update Manager.
These sources helped me by writing and research for this post;
You have reached the end of the page. You can navigate through other blog posts as well, share this post on X, LinkedIn and Reddit or return to the blog posts collection page. Thank you for visiting this post.
If you think something is wrong with this post or you want to know more, you can send me a message to one of my social profiles at: https://justinverstijnen.nl/about/
If you find this page and blog very useful and you want to leave a donation, you can use the button below to buy me a beer. Hosting and maintaining a website takes a lot of time and money. Thank you in advance and cheers :)
The terms and conditions apply to this post.
On Windows Servers, a critical point is maintaining the disk space. If a disk fills up to the end, several errors can occur and impacting the end-users experience of your applications. Something we definitely not want.
To help reducing this chance, I have created a PowerShell script that cleans up your server using built in tools of Windows. In this post, I will explain what the script does, how to install it and how to use it.
For the fast pass, my script can be downloaded here:
The script I have made focusses primarily on cleaning up some folders we don’t need for the server to work. This consists of:
The script itself has 6 steps:
For installation with Task Scheduler I included an installation script that, by default, configures a task in the Windows Task Scheduler that runs it;
If these settings are great for you, you can leave them as-is.
The Installation script creates a folder in C:\ named “Scripts” if not already there and places the cleaning script there.
Click on the blue button above. You now are on the Github page of the script.
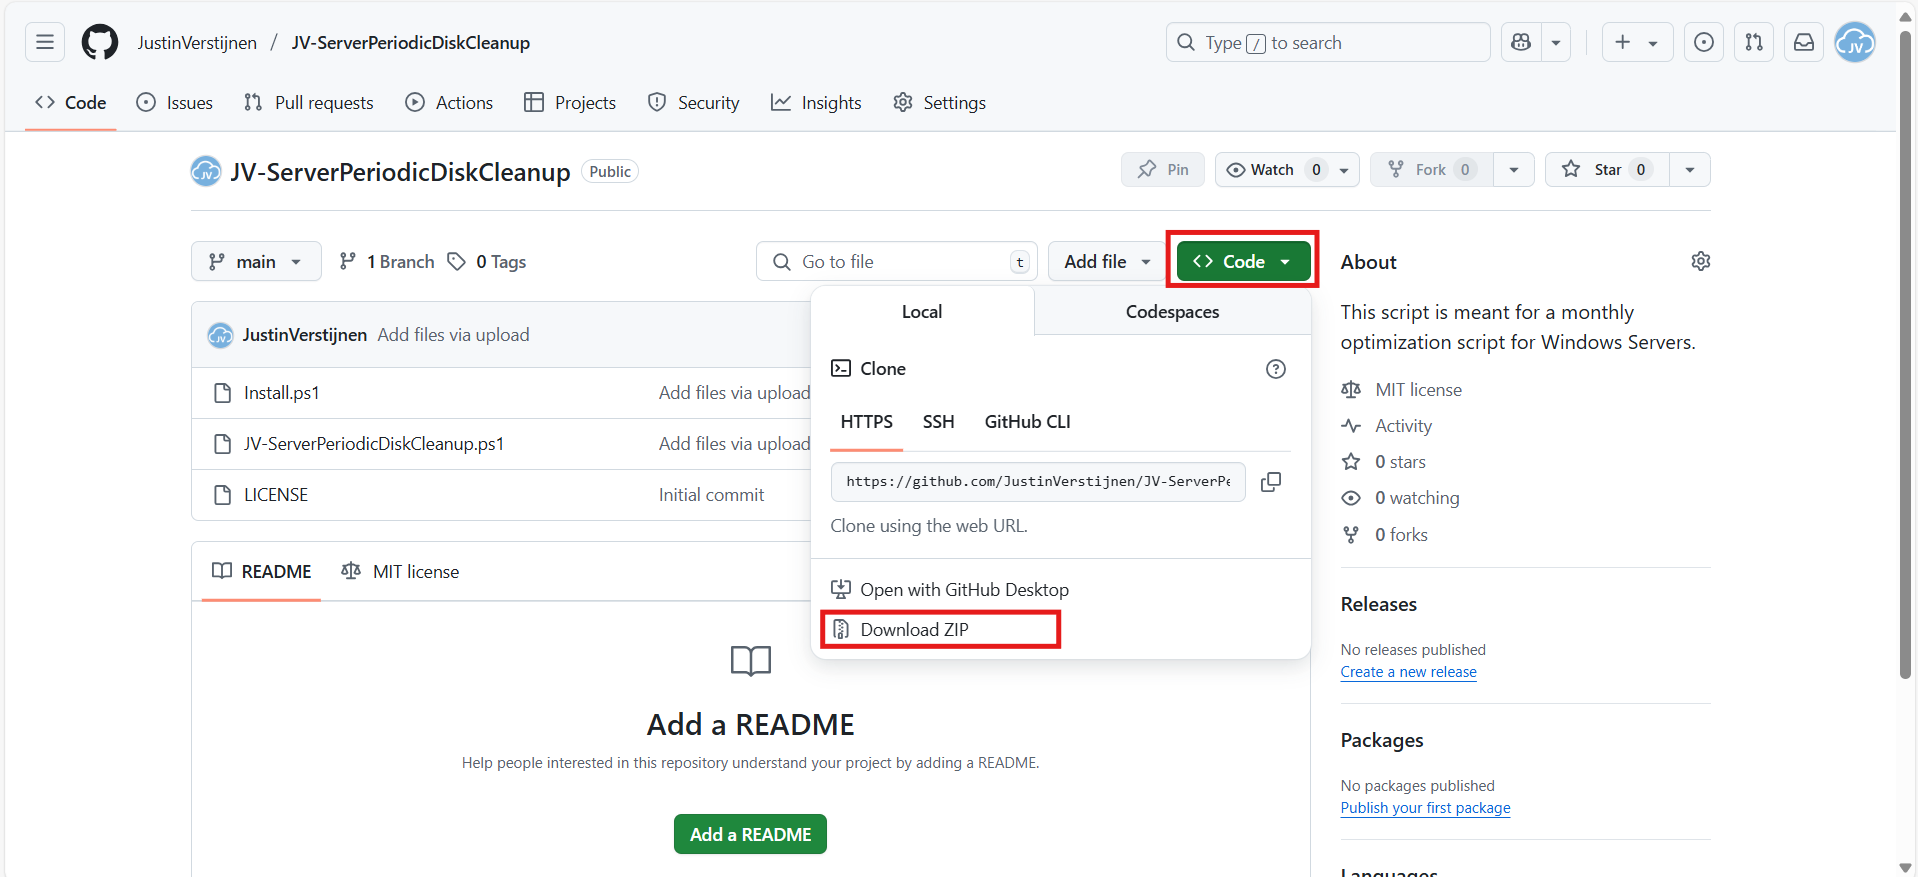
Click on “Code” and then “Download ZIP”.
Now place the files on the server where you want to install the script.
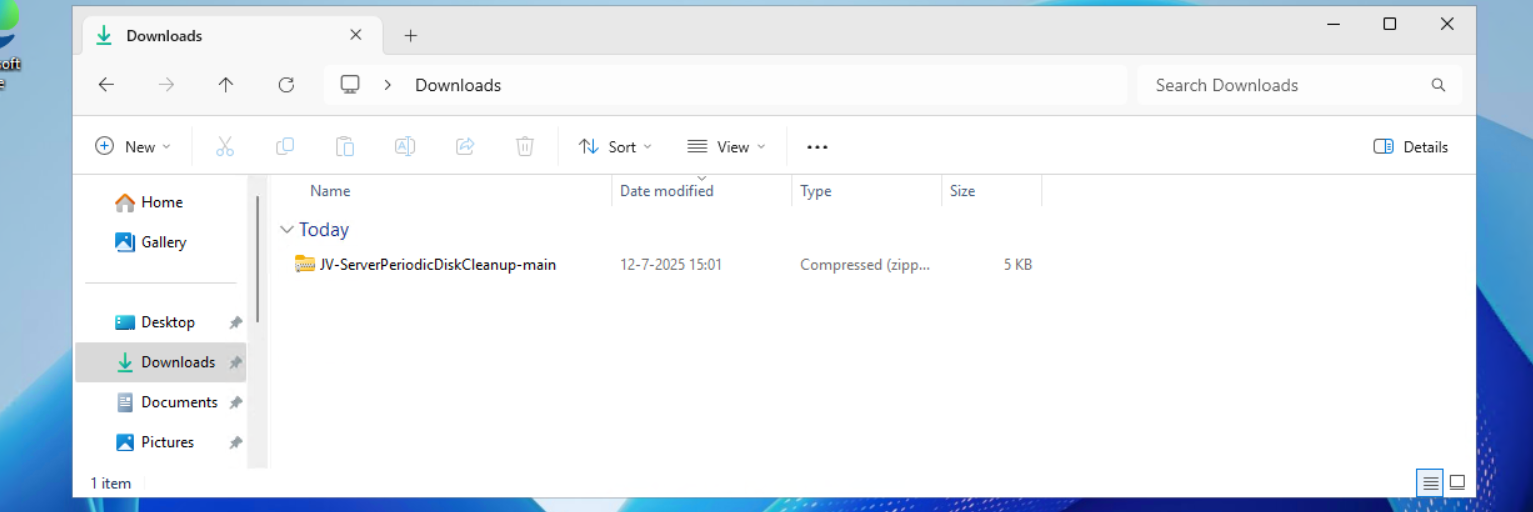
Unzip the file and then we can run the “Install” script. This must be run as administrator and temporarily without Execution Policy.
Open Powershell ISE as administrator.
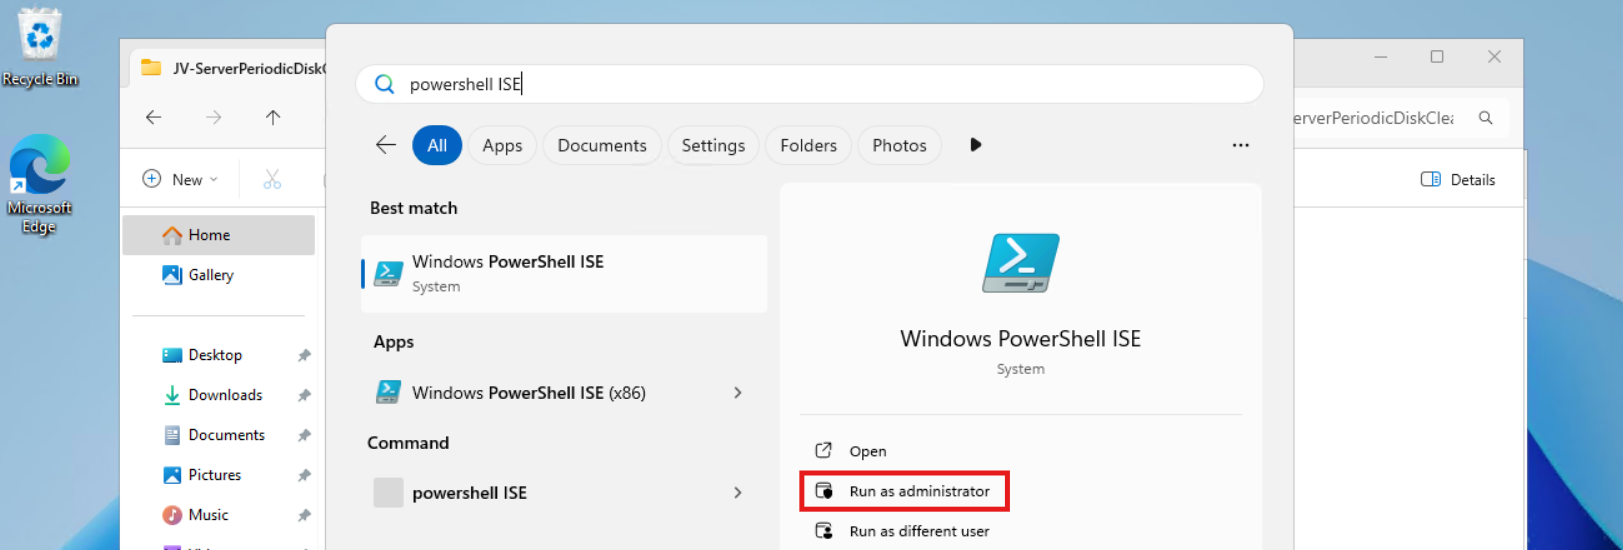
Now open the “Install” script.
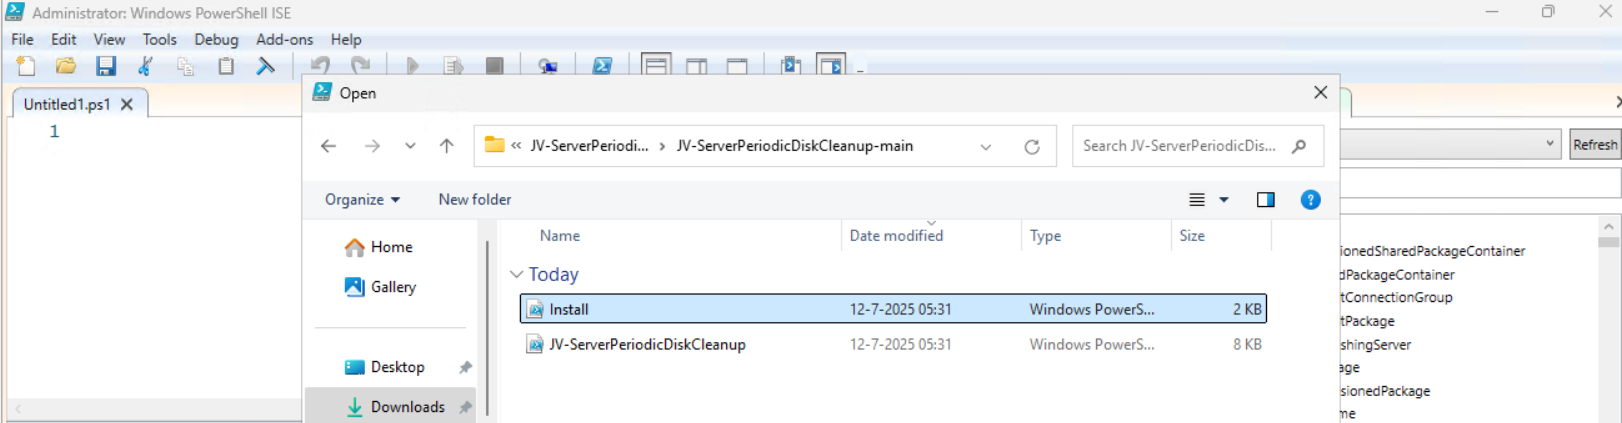
Review it’s default settings and if you feel at home in PowerShell, review the rest of the script to understand what it does.
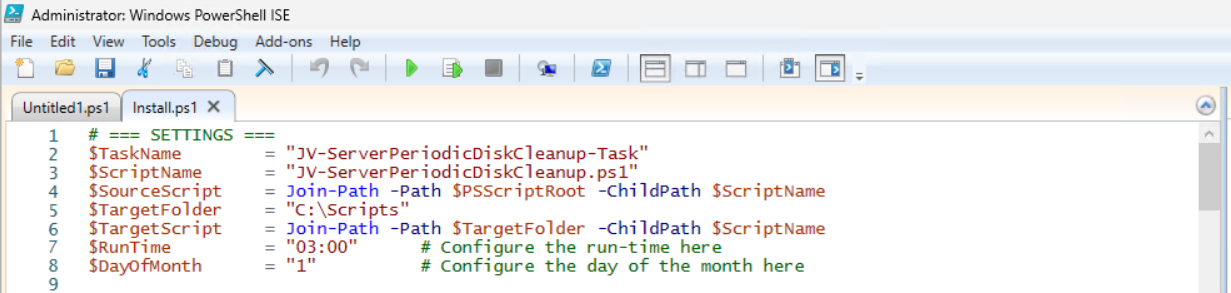
You can change the schedule very easily by changing the runtime: 0:00 till 23:59 and the day of month to specify the day number of the month (1-31).
After your schedule is ready, let’s ensure we temporarily bypass the Execution Policy by typing the command in the blue window below:
Set-ExecutionPolicy Unrestricted -Scope ProcessThis way the execution policy stays enabled but for this session only it’s been lowered. When you close the window, you have to type this again before be able to run scripts.
Execute the command, and when prompted to lower the policy, click Yes.

Now execute the Install script by clicking the green “Run” button:

After executing the script, we get the message that the task has been created succesfully:

Let’s check this in the Windows Task Scheduler:
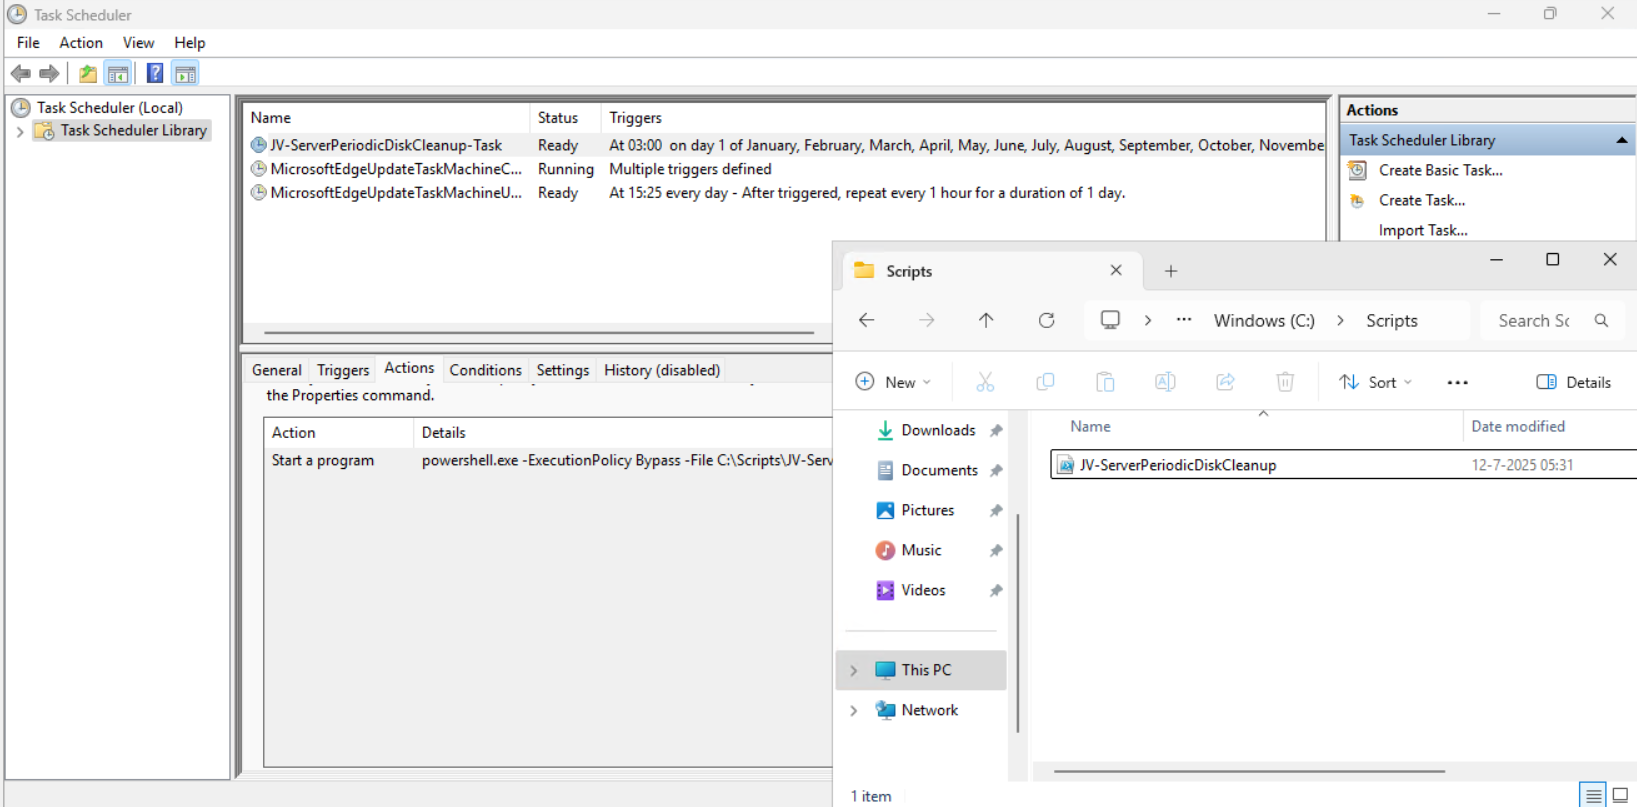
As you can see, the script is succesfully installed to Task Scheduler. This ensures it runs every first of the month at 03:00 (or at your own defined schedule). Also, the script has been places in C:\Scripts for a good overview of the scripts of the system.
If you want to define your own schedule and script location, it can be better to install the script yourself or only using it when you need it.
Click on the blue Download button at the beginning of the page.
Click on “Code” and then “Download ZIP”.
Then place the ZIP file on the server where you want to install the disk cleanup script.
Select the script and place it in your preferred location. My advice is to not install this in a user profile, but in a location accessible for all users. Like C:\Scripts.
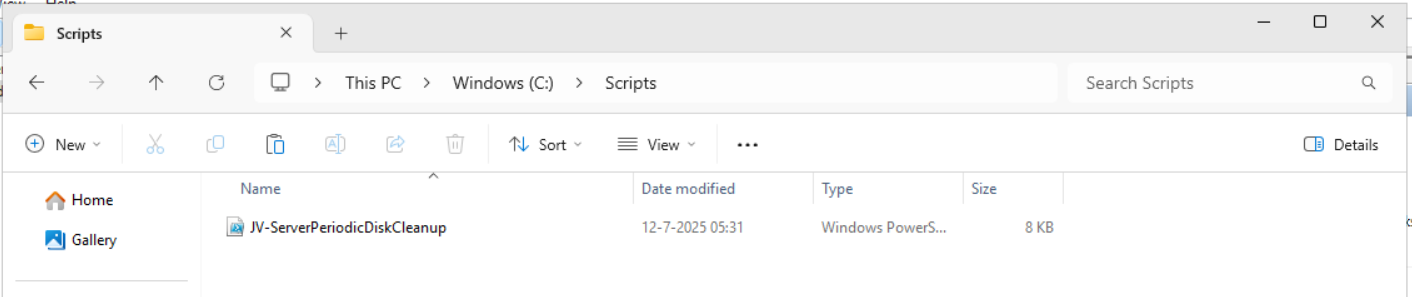
I have placed the scipt into the correct folder. If you also want the script to run on a schedule, open up the “Task Scheduler” (taskschd.msc).
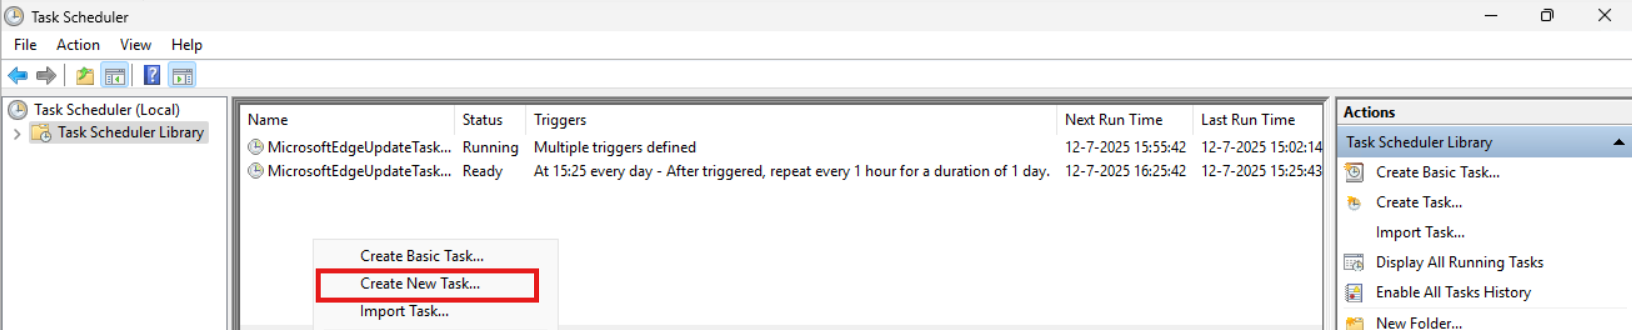
Do a “Right-mouse click” on the empty space and click on “Create New Task…”.
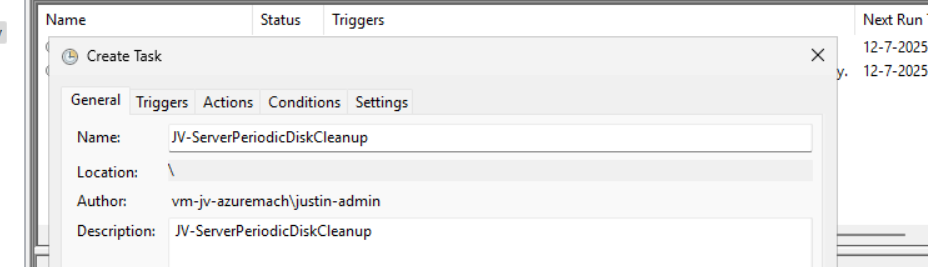
Give the task a name and description that alings with your documentation.
Then change the user to “SYSTEM” to run this in SYSTEM context for the highest privileges:
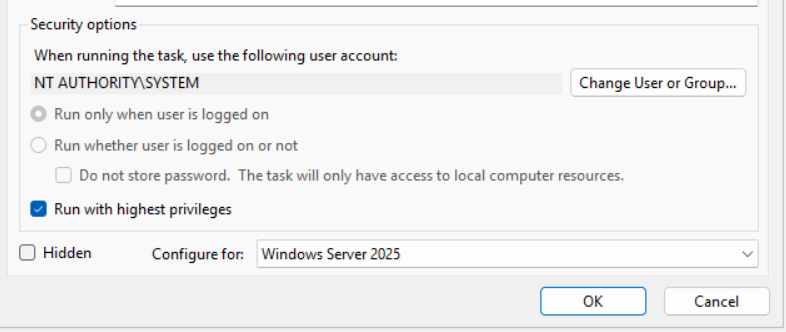
Then check the “Run with highest privileges” and select the highest OS possible in the “Configure for” dropdown menu.
Go to the “Triggers” tab and add a new trigger.
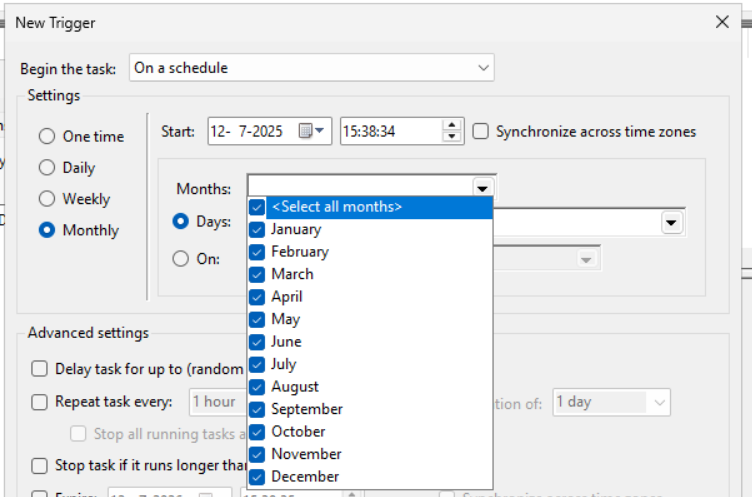
Select “Monthly” and select all months. Then change the “Days” field to 1 to run it on the first day.
You can defer from this schedule if your environment needs that. This is just an example.
Now the page looks like this:
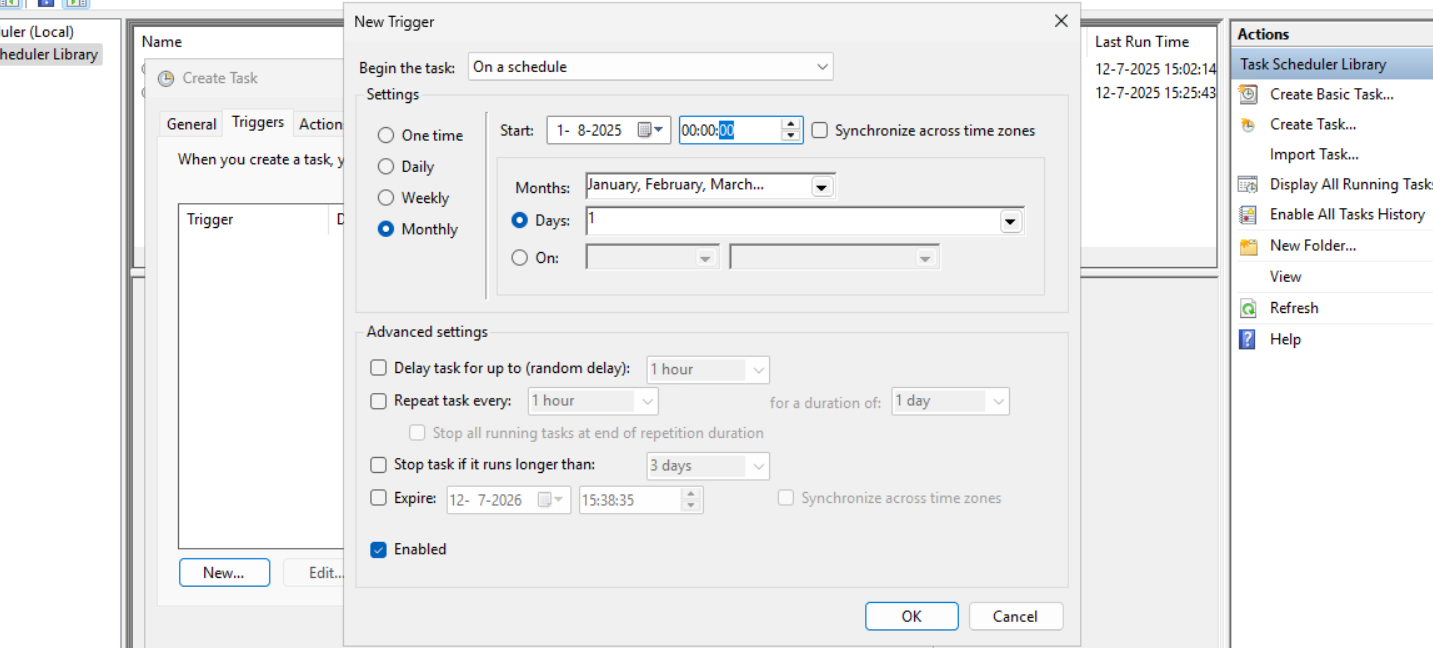
Click “OK” and go to the “Actions” tab. Create a new action.
In the “Program/Script” field, type in the following:
powershell.exeIn the “Add arguments (optional):” field, type in the following:
-ExecutionPolicy Bypass -File C:\Scripts\JV-ServerPeriodicDiskCleanup.ps1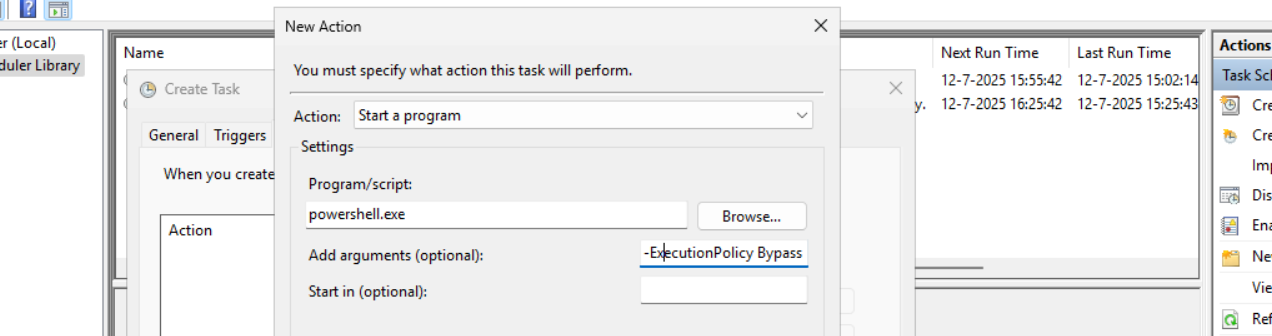
Now click on “OK” twice to create the task.
Now we can manually run the task to ensure it runs on a schedule too. Right click the task and click on “Run” to start the task.

As we can see, the script runs succesfully as it still runs after 30 seconds. This means the task and permissions are correct.

The script can take up to several hours when cleaning everything, depending on the server size.
In the folder of the script, a log file is created:
I think it’s a great way to use scripts like these once per month on your server. We can better be pro-actively cleaning up our servers than waiting till some issue occurs. However, my advice is to not run this script too often. Once or twice per month is good enough.
We IT guys’ work is to minimize disruptions and ensure end users don’t need to call us. If we IT guys are completely invisible and users think: “What are those guys even doing?”, then we do your jobs correctly.
Thank you for reading this post and I hope it was helpful.
These sources helped me by writing and research for this post;
You have reached the end of the page. You can navigate through other blog posts as well, share this post on X, LinkedIn and Reddit or return to the blog posts collection page. Thank you for visiting this post.
If you think something is wrong with this post or you want to know more, you can send me a message to one of my social profiles at: https://justinverstijnen.nl/about/
If you find this page and blog very useful and you want to leave a donation, you can use the button below to buy me a beer. Hosting and maintaining a website takes a lot of time and money. Thank you in advance and cheers :)
The terms and conditions apply to this post.
Dit is mijn Collective Intelligence voor mei 2025 over PowerShell. Ik ga hier wat leuke dingen over laten zien, zie de inhoud voor handige links naar de kopteksten.
Aan het einde heb ik nog een leuke praktijkopdracht waarin we een PowerShell module gaan installeren en uitvoeren.
Ik heb mijn best gedaan om de uitleg zo simpel maar duidelijk te geven, ook voor onze niet-technische mensen.
Powershell is een shell en script taal en sinds Windows 8/Server 2012 de onderliggende CLI van Windows. Eigenlijk alles in de grafische interface van Windows wordt door Powershell verwerkt, zoals te zien in onderstaande afbeelding:
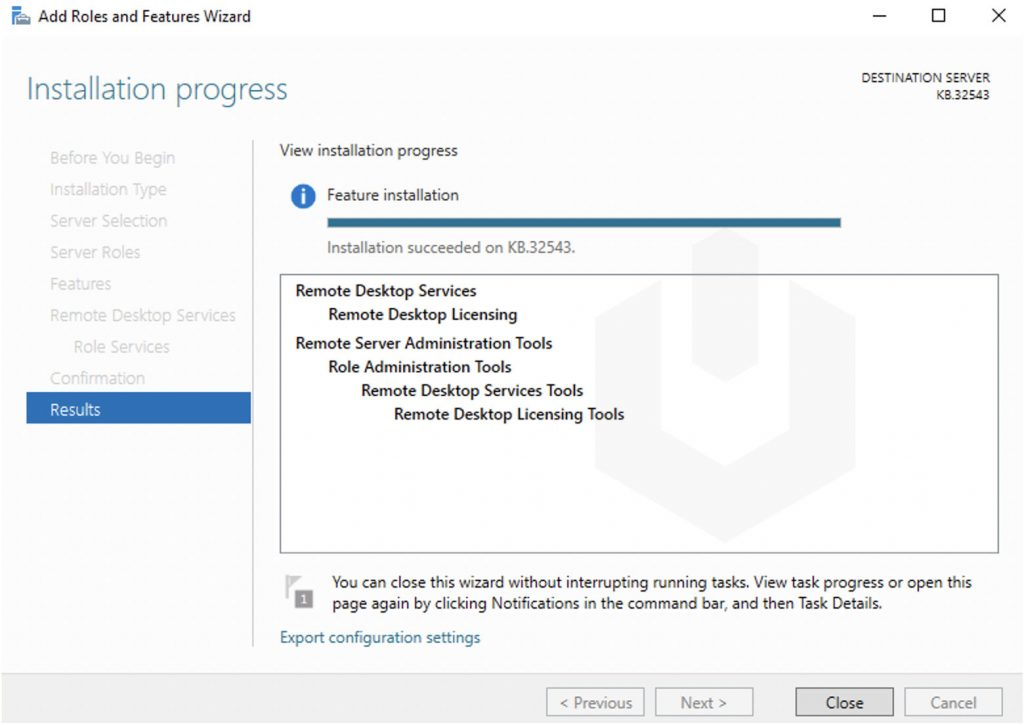
Klik op “Export configuration settings” en je krijgt:
# Zorg ervoor dat je PowerShell uitvoert als Administrator
# Installeer RSAT tools
Write-Host "Installing RSAT tools..."
Add-WindowsCapability -Online -Name "Rsat.RemoteAccess.Tools~~~~0.0.1.0"

# Installeer Remote Desktop Services tools
Write-Host "Installing Remote Desktop Services tools..."
Add-WindowsCapability -Online -Name "Rsat.RemoteDesktopServices.Tools~~~~0.0.1.0"

# Wacht tot de installatie voltooid is
Write-Host "De RSAT en Remote Desktop Services tools zijn geïnstalleerd."

# Optioneel: Controleer of de tools correct zijn geïnstalleerd
Write-Host "Controleren van geïnstalleerde tools..."
Get-WindowsCapability -Online | Where-Object {$_.Name -like "Rsat*" -or $_.Name -like "RemoteDesktopServices*"} | Format-Table -Property Name, State
Ziet er leuk uit, maar wat kun je er nu eigenlijk precies mee en wat levert het gebruik van PowerShell jouw precies op?
Microsoft heeft vanaf de oorsprong zijn best gedaan om de drempel voor het gebruik van Powershell zo laag mogelijk te maken. Vroeger met CMD en bij Linux zijn alle commando’s gekozen op basis van wie de tool maakte. Met Powershell hebben ze hier uniformiteit in gemaakt.
Een Powershell commando ziet er daarom ook altijd als volgt uit:
Werkwoord - Zelfstandig naamword (verb - noun)
Voorbeelden:
Tegenwoordig zijn er 2 versies van Powershell beschikbaar:
Het verschil hierin is voornamelijk dat Windows Powershell alle commando’s voor Windows bevat en de andere Powershell meer uniform is. Deze kan namelijk ook op Linux en Apple geinstalleerd worden.
Nu kunnen we Powershell gebruiken als CLI taal waar we alle taken interactief moeten doen. Hiermee bedoelen we dat je alles zelf moet typen en eventueel een resultaat (output) van commando 1 in een comando 2 of zelfs 3 wil gaan gebruiken. Hiervoor moet je 3 regels typen en op enter klikken. Dit kost tijd en moeite.
Powershell is ook een script-taal en een script is hiermee precies zoals een film ook gemaakt wordt. Er wordt uitgedacht hoe een scene eruit ziet, wat er gebeurd, welke auto er crashed en wie die bestuurt, wie er dood gaat etc. Een Powershell script is niets anders, alleen wat gezelliger.
In een Powershell script kun je bijvoorbeeld alle gebruikers in een systeem ophalen en deze wijzigen. Stel je voor, een bedrijf krijgt naast een .nl domein ook een .com of .be domein en alle gebruikers moeten hierop ook te benaderen zijn.
Nu kun je ervoor kiezen om 500 gebruikers handmatig bij langs te gaan, of een simpel script te maken die dit voor je doet. Om je helemaal over de streep te halen om voor Powershell te gaan:
Met dit voorbeeld hebben we dus 2,5 uur bespaard door Powershell te gaan gebruiken. Hoe complex ziet zo’n script er dan uit?
$allegebruikers     = Get-Mailbox
$nieuwedomeinalias  = "@justinverstijnen.be"

foreach ($user in $allegebruikers) {
  $primaryEmail = $user.PrimarySmtpAddress.ToString()
  $newAlias = $primaryEmail.Split('@')[0] + $nieuwedomeinalias
  Set-Mailbox $user.Identity -EmailAddresses @{Add=$newAlias} }
Lijkt complex maar is redelijk simpel na de uitleg, toch?
Belangrijke componenten in Powershell zijn variabelen, strings en booleans. Vast wel eens van gehoord maar wat zijn het precies?
| Component | Extra uitleg | Voorbeeld |
| Variabele | Een object die steeds anders kan zijn op basis van input of error/succes | $allegebruikers $user $resultaat |
| String | Een stuk tekst. Vaak gebruikt voor output om deze naar een variabele of nieuw commando te schrijven. | “info@justinverstijnen.nl” “Succes” “Error” |
| Boolean | Een waarde die waar of niet waar kan zijn | $true $false |
Nu hebben we scripts en modules in Powershell. 2 begrippen die op elkaar lijken maar net iets anders zijn;
De taal van een module ziet er ongeveer zo uit:
# Functie 1: Welkomstbericht
function Get-WelcomeMessage {
    param (
        [string]$Name
    )
    if ($Name) {
        return "Welkom, $Name!"
    } else {
        return "Welkom, onbekende gebruiker!"
    }
}

# Functie 2: Optellen van twee getallen
function Add-Numbers {
    param (
        [int]$Number1,
        [int]$Number2
    )
    return $Number1 + $Number2
}
Een module moet altijd geinstalleerd worden in Powershell, en scripts kunnen direct vanaf een bestand uitgevoerd worden.
Er zijn verschillende tools om Powershell scripts en modules te schrijven. Deze kunnen van simpel naar complex gaan en je bent vrij om te kiezen welke je wilt gebruiken. Ik raad zelf aan om Windows Powershell ISE of VS Code te gebruiken, dit vanwege de ingebouwde foutcorrectie en aanbevelingen die jouw code verbetert alsof je in Word een aantal spelvauten maakt;
Een aantal voorbeelden van gratis software;
Bij Skrepr Tech gebruik ik voor een paar dingen PowerShell om taken makkelijk uit te voeren en te automatiseren:
Om een kleine hands-on demo te geven van Powershell heb ik speciaal voor deze CI een Powershell module gemaakt die te installeren is. Dit is niet moeilijk.
Om de module te installeren kun PowerShell starten op je Windows apparaat en de commando’s invullen.
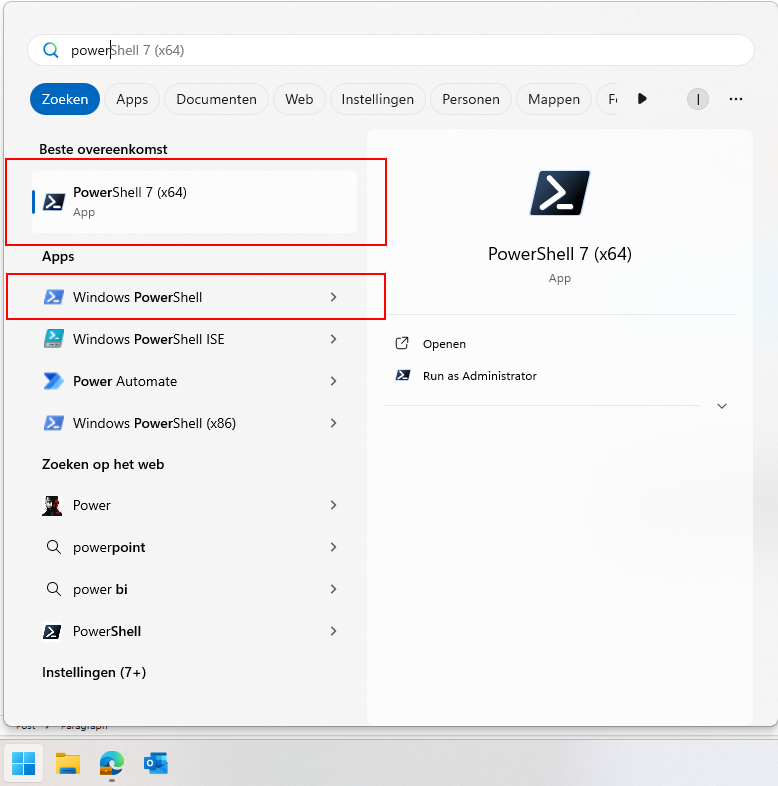
Beide gearceerde versies op Windows kun je hiervoor gebruiken.
In elk zwart vakje op deze pagina heb je rechts bovenin een kopieer-knop waarmee je makkelijk vanuit dit venster de commando’s kan kopieren en in PowerShell plakken. Om tekst te plakken in een PowerShell venster hoef je alleen maar in het venster de rechtermuisklik in te drukken. Na het plakken druk je op Enter en het commando wordt uitgevoerd.
Heb je een Apple apparaat? Balen voor jou. Je kan Powershell 7 dan hier downloaden: https://learn.microsoft.com/en-us/powershell/scripting/install/installing-powershell-on-macos?view=powershell-7.5#installation-via-direct-download
Let op: de werking op Mac is niet getest.
Open Powershell en voer het volgende commando uit:
Install-Module JVCollectiveIntelligenceMay2025 -Scope CurrentUserPowershell zal nu vragen of je zeker weet of de module geïnstalleerd mag worden. Druk eenmaal of tweemaal op y en druk op Enter.
Dit installeert de module die ik gemaakt heb waarmee we wat leuke commando’s kunnen uitvoeren die het verduidelijken wat Powershell doet op basis van de input.
Standaard heeft PowerShell een zogeheten uitvoerings-restrictie. Deze zorgt ervoor dat een gebruiker niet zomaar van alles kan uitvoeren op de computer. Zie het als een toegangscontrole voordat je een gebouw in mag in het echte leven.
Deze kunnen we voor de tijd van onze CI tijdelijk uitschakelen met het volgende commando:
Set-ExecutionPolicy Unrestricted -Scope ProcessDit schakelt de toegangscontrole tijdelijk uit voor alleen ons venster. Bij wegklikken van het venster staat deze controle weer aan.
Nu kunnen we echt beginnen met de module inladen. Zie dit als het openen van een Word bestand waarna je eraan kan werken.
Dit doe je met dit commando:
Import-Module JVCollectiveIntelligenceMay2025Als dit gelukt is zonder foutmeldingen, dan kunnen we de commando’s van de module gebruiken.
Krijg je bij deze stap een foutmelding, roep dan even.
Laten we nu eens testen of de module succesvol ingeladen is:
Test-ModuleJVCIAls je nu een bericht voor je krijgt dat de module succesvol geladen is kunnen we beginnen. Wordt de module niet gevonden, dan is er iets mis en roep dan even.
Je mag er bij deze stap voor kiezen om niet je echte gegevens te gebruiken. Vul hier dan neppe informatie in, dit verandert verder niets aan de uitkomst.
Wanneer de module wel succesvol geladen is kun je het onderstaande commando uitvoeren. Powershell vraagt nu om je naam:
Set-NameJVCIPowerShell reageert nu terug met jouw ingevulde naam omdat je hem dit hebt verteld. Dit wordt opgeslagen in een variabele.
Daarna kun je het volgende commando invullen. Powershell vraagt nu om je geboortejaar:
Set-BirthYearJVCINu weet Powershell hoe oud je bent en kan hiermee verdere berekeningen uitvoeren.
Daarna kun je het volgende commando invullen:
Set-FavoriteColorJVCINu weet Powershell ook jouw favoriete kleur, en kan daardoor de tekst hierop aanpassen.
Nu we PowerShell van alles over onszelf hebben verteld kunnen we dit uitdraaien. Dit doe je door het laatste commando uit te voeren:
Write-SummaryJVCIJe krijgt nu een overzicht met alles wat je hebt ingevuld, in jouw aangegeven favoriete kleur. Dit geeft weer wat je met Powershell onder andere zou kunnen doen. Informatie ophalen op basis van input, weergeven, dupliceren en berekeningen op uitvoeren.
Deze module geeft op een vrij simpele manier weer wat de mogelijkheden zijn van PowerShell, maar is wel rekening gehouden om dit zo snel en makkelijk mogelijk te doen. In echte gevallen zal een module of script veel uitgebreider zijn.
Bedankt voor het bijwonen van mijn CI, en de informatie blijft voorlopig beschikbaar op deze website. Mocht je nog een keer deze gids en de bijbehorende informatie willen volgen kan dat!
You have reached the end of the page. You can navigate through other blog posts as well, share this post on X, LinkedIn and Reddit or return to the blog posts collection page. Thank you for visiting this post.
If you think something is wrong with this post or you want to know more, you can send me a message to one of my social profiles at: https://justinverstijnen.nl/about/
If you find this page and blog very useful and you want to leave a donation, you can use the button below to buy me a beer. Hosting and maintaining a website takes a lot of time and money. Thank you in advance and cheers :)
The terms and conditions apply to this post.
With Windows 24H2 and the deprecation of WMIC, a easy command to find your devices’ serial number is gone. However, we can still look this up with Powershell.
Use the following command:
Get-WmiObject win32_bios | select SerialNumber
You have reached the end of the page. You can navigate through other blog posts as well, share this post on X, LinkedIn and Reddit or return to the blog posts collection page. Thank you for visiting this post.
If you think something is wrong with this post or you want to know more, you can send me a message to one of my social profiles at: https://justinverstijnen.nl/about/
If you find this page and blog very useful and you want to leave a donation, you can use the button below to buy me a beer. Hosting and maintaining a website takes a lot of time and money. Thank you in advance and cheers :)
The terms and conditions apply to this post.
When using the PowerShell Gallery to upload and publish your scripts and PowerShell modules to the world it’s recommended to use Github Actions for CI/CD to automatically update your live packages on the PowerShell Gallery. At first, this looked somewhat complex to me but it’s relatively easy.
On this page I will show how I’ve uploaded scripts from Github to the PowerShell Gallery with using a Github Action.
In short, the PowerShell Gallery is a public repository which contains PowerShell scripts and modules which all PowerShell users can download and install. All of this using some simple commands:
Install-Module ExchangeOnlineManagementThe official “ExchangeOnlineManagement” module is an example of a module dat is uploaded to the gallery which can be download. Before installing, the user needs administrative permissions, the Powershell execution policy applies and we have to accept downloading from the repository.
It has a report-system where malicious scripts and modules can get reported and the deleted, so we can state that it’s pretty secure to use the PowerShell Gallery.
Github is a industry-accepted repository hosting service. This allows you to create a repository for a custom solution which you have created, which can be complete applications, source code but in our case a Powershell script. The goal of Github is to publish your source code so others can use and learn from it. You can also create private repositories to share with only specific users.
Inside our Github repository, we have Github Actions which can automate processes for us. As we want to develop using Github, we want our new version automatically pushed to the PowerShell Gallery. Github Actions can do this for us.
The action automatically kicks in every time a file in your repository is changed:
Assuming you have a PowerShell script which is ready to upload to the PowerShell Gallery, we must first create a Github repository. Head to Github to do this.
In the top-right corner, click on the “+” button and then on “New repository”.
Give the repository a name and description, and determine the visibility. Then press “Create repository”.
For this solution to work, the repository can be either Public or Private. As we upload our script to a public reposity, we can also set this to “Public”. This gives users access to the “source code”.
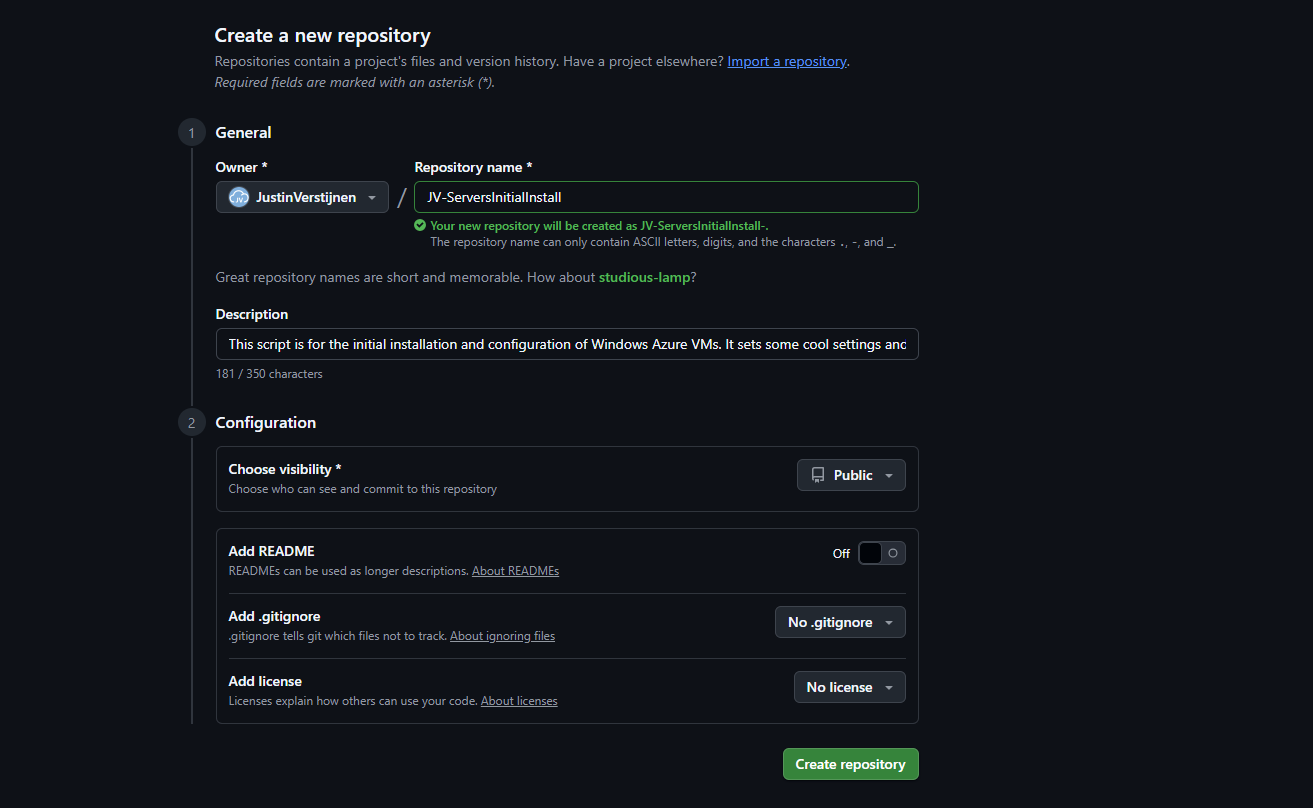
Now the repository is created, and we can upload our PowerShell script to it.
Select the script on your local machine, change the name and upload it to Github.
Because we upload our script to a public repository, we must define some metadata in our script. This includes an Author, tags, description and version number and such.
In Github, change your script and add this part to the top of the .ps1 file
<#PSScriptInfo

.VERSION 1.0.0
.GUID fb0384df-0dd8-4a57-b5e5-d3077c30a404
.AUTHOR Justin Verstijnen
.COMPANYNAME JustinVerstijnen
.COPYRIGHT (c) 2025 Justin Verstijnen. All rights reserved.
.TAGS PowerShell, Script, Example
.PROJECTURI https://github.com/JustinVerstijnen/JV-ServerInventoryReport
.RELEASENOTES First publish.
.DESCRIPTION A good description of your script
.LICENSEURI https://opensource.org/licenses/MIT

#>
Change the information, and generate a new GUID with your own Powershell window:
New-GuidPowershell then generates a new GUID for you to use in your script:
My script looks like this now:
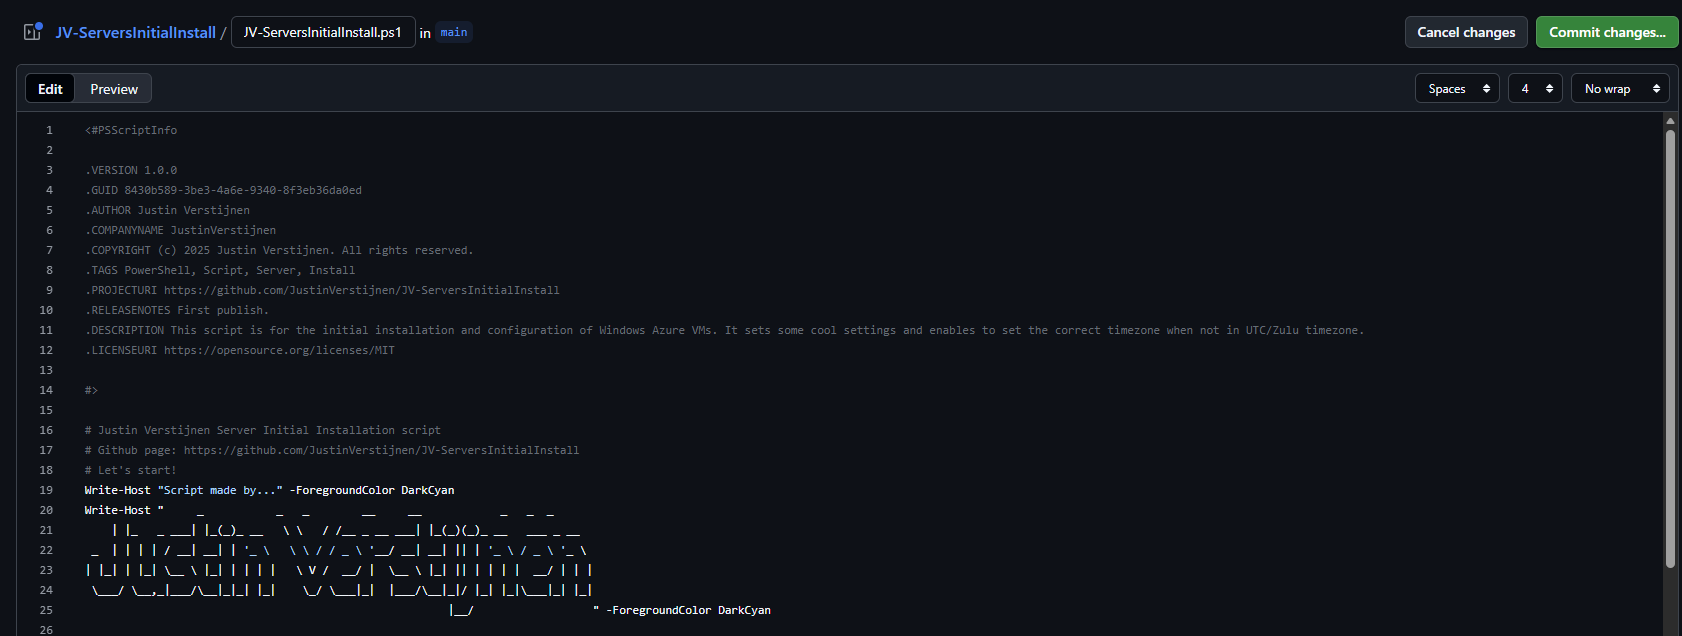
When you are done pasting and changing the script information, we can save the changes by pressing “Commit changes” twice.
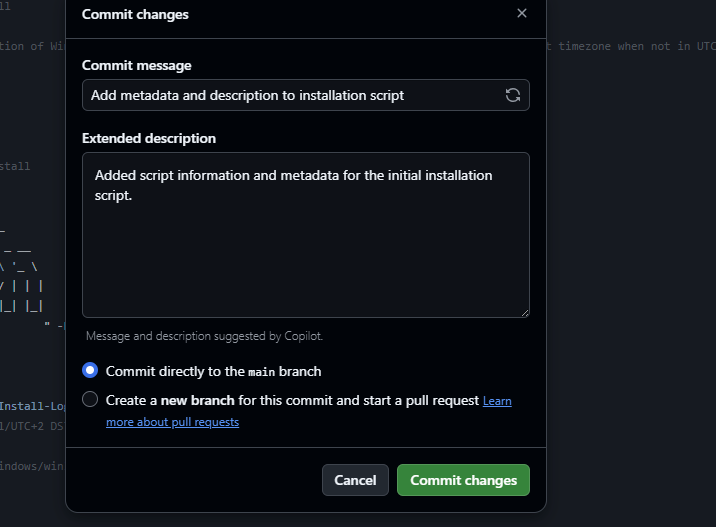
Press again to change the file, and we have prepared our script to be uploaded.
For Github to have access to our PowerShell Gallery account, we must create an API key. Head to the PowerShell Gallery.
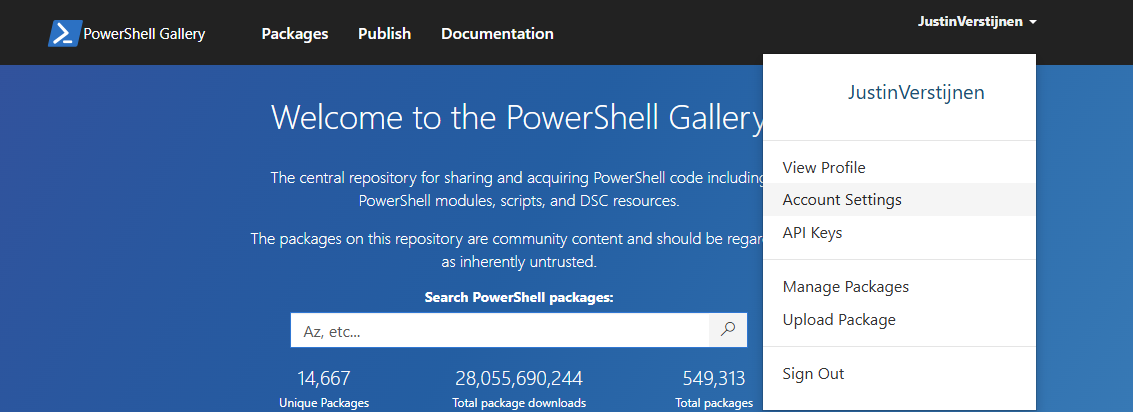
Go to “API Keys”. Then click on “Create”.
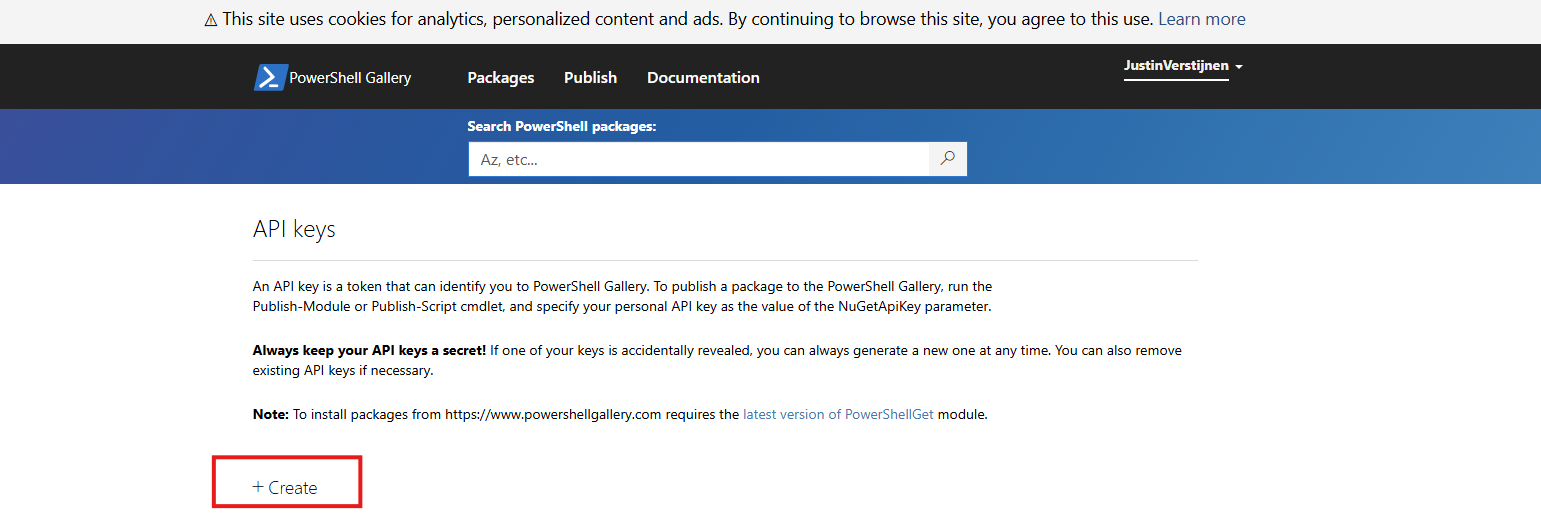
Now we have to fill in some information. In general, it is best-practice to create an API key for every project/repository.
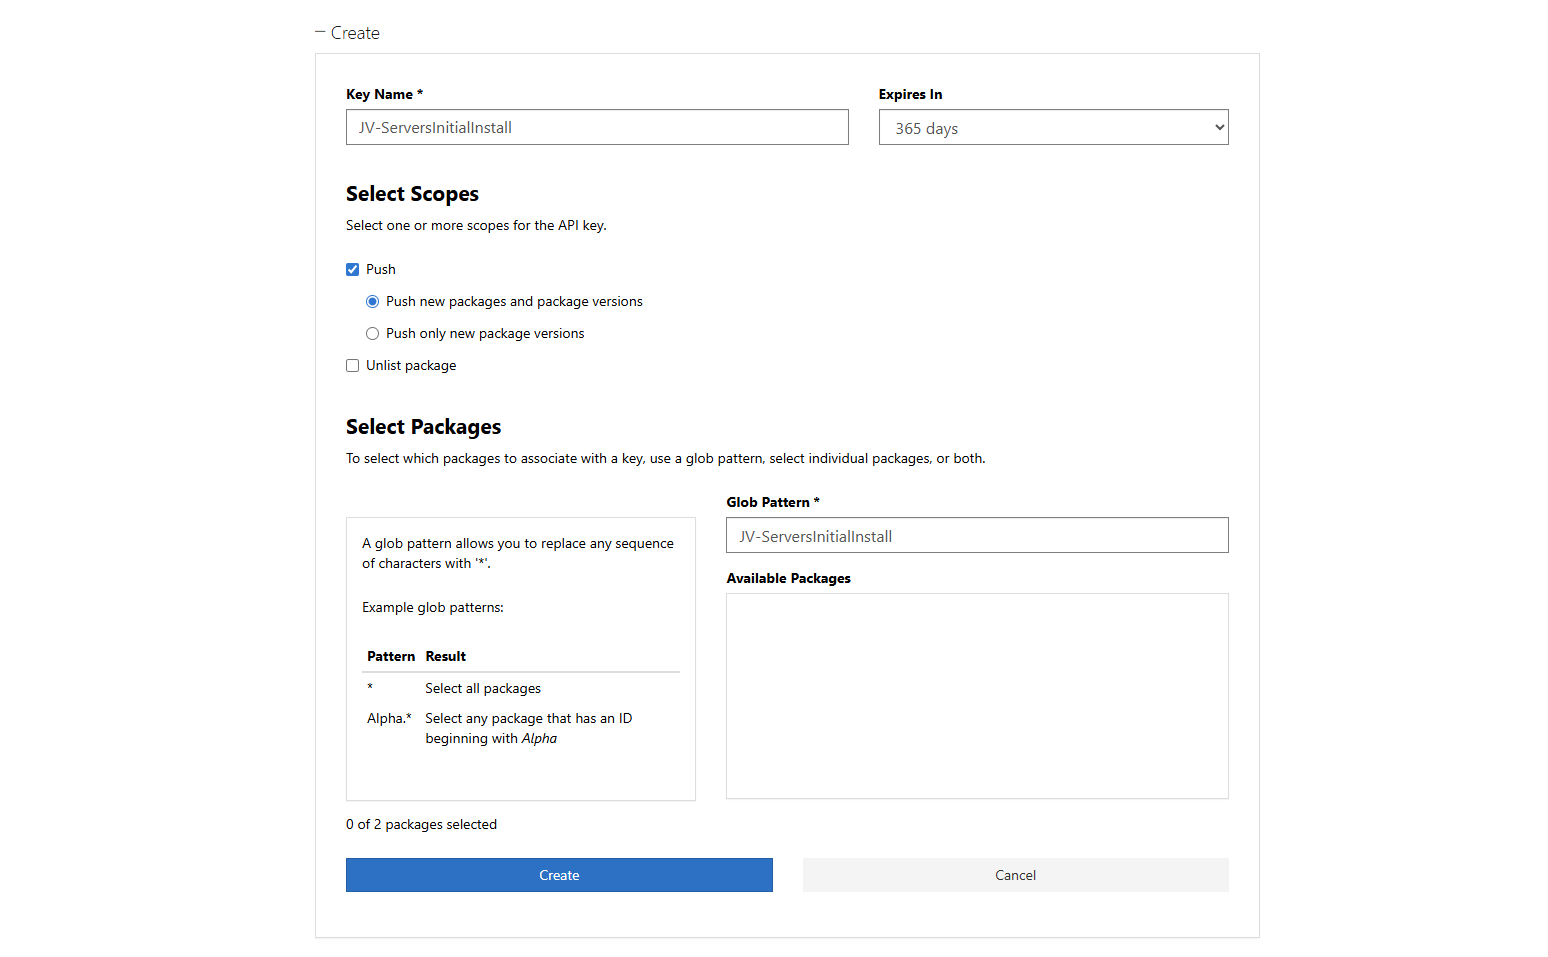
Click “Create” and that gives you the API key. You can only get the key now, so save it in a safe place like your Password manager.
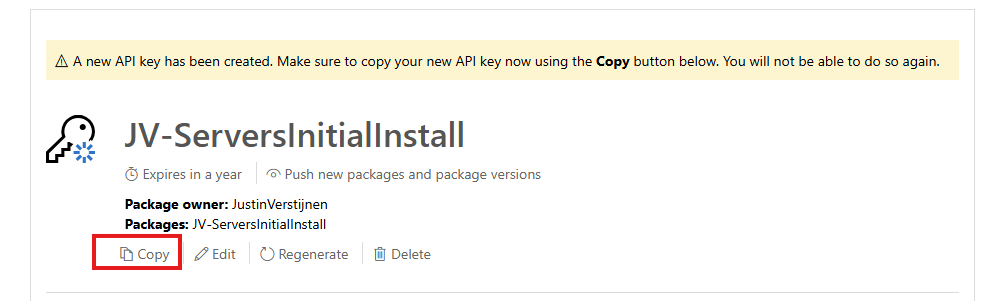
We need this API key in the next step.
Now let’s head back to Github to insert our API key.
In your Github repository, go to “Settings”, then “Secrets and variables” and then create a new repository secret.
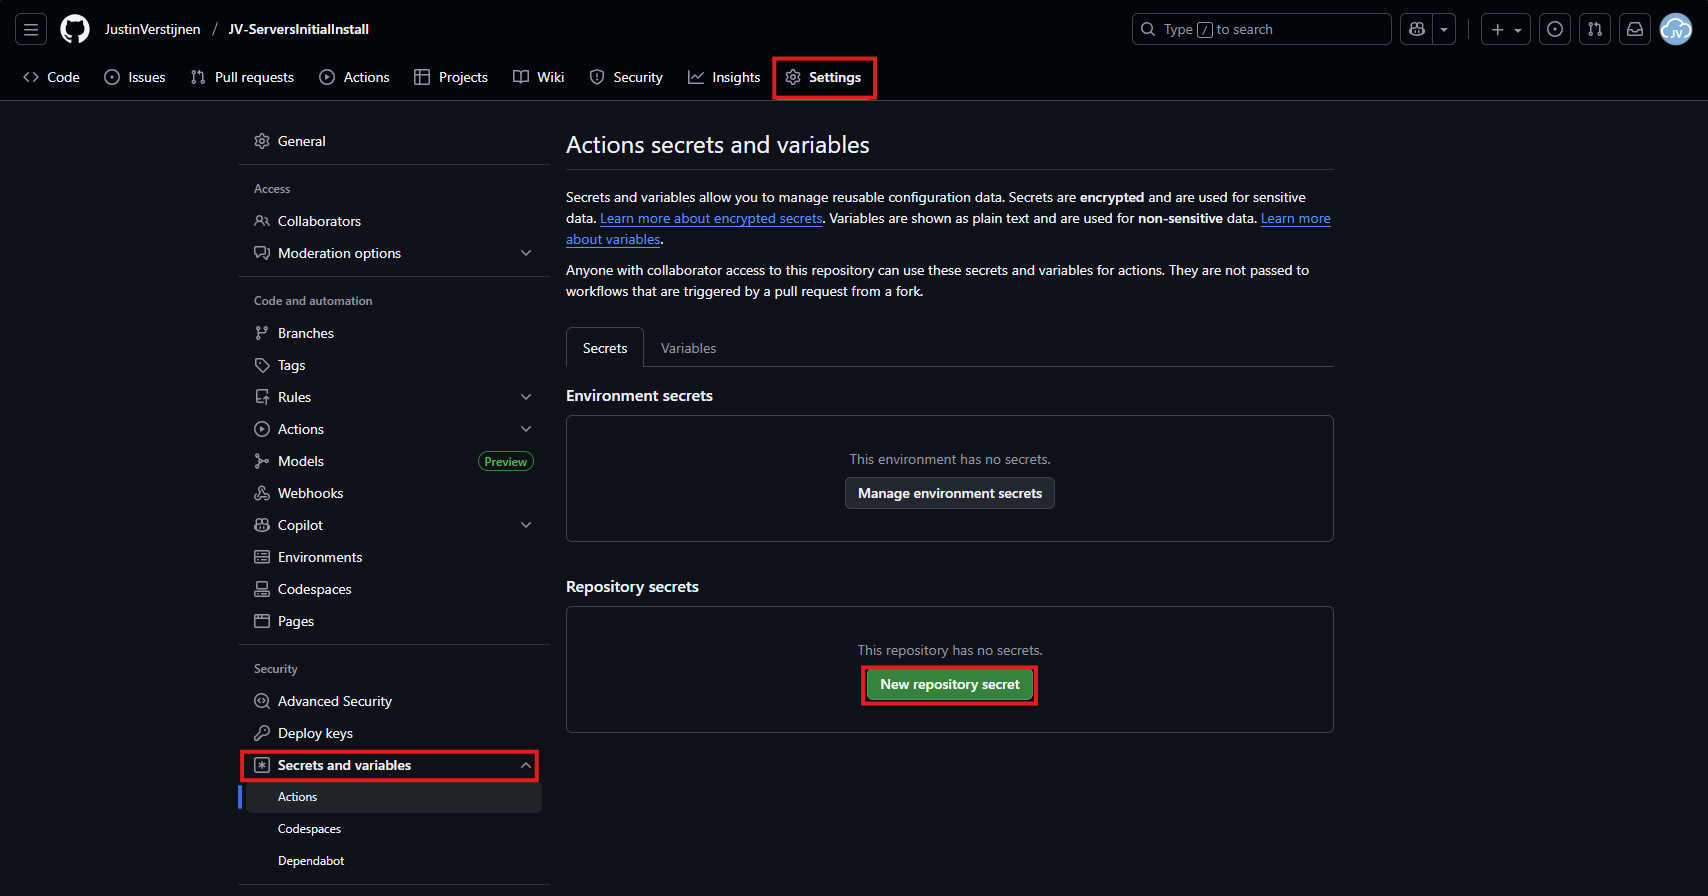
In the “Name” field, paste this:
PSGALLERY_API_KEYIn the “Secret” field, paste your just saved API key:
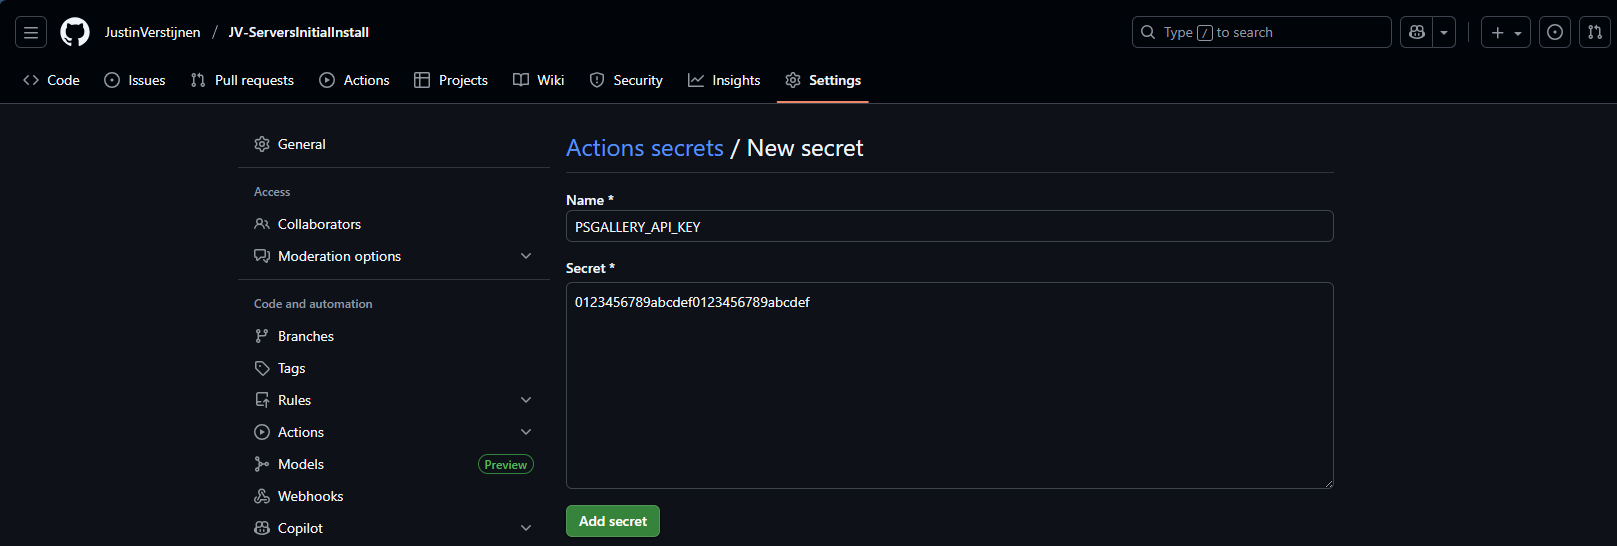
Click on “Add secret” to add the secret to your repository.
The API key is saved secretly, and in the code we refer to this secret. This is a best-practice to save API keys instead of plain text in your public code.
Now we have the API key inserted, head back to the repository on Github and let’s create the Github Action that pushes our script automatically to the PowerShell Gallery.
An action is completely based on a single .yml (YAML) file which executes everytime the repository is changed. We will create this file now.
Click on “Add file” and then the option “Create new file”:
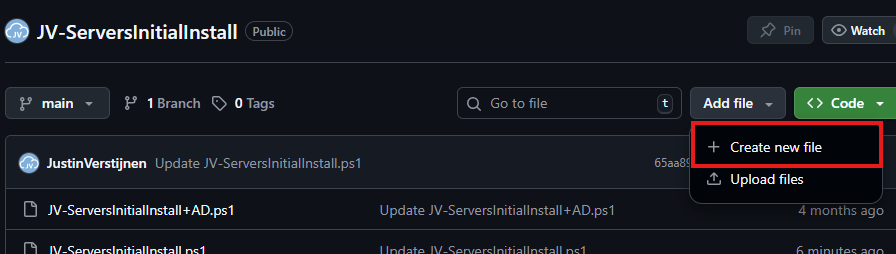
In the top-left corner, type or paste in:
.github/workflows/publish.ymlThen paste in this code below, which is a completely prepared action for exactly this use-case:
name: Publish PowerShell Script to PowerShell Gallery

on:
  push:
    branches:
      - main
    paths:
      - '**/*.ps1'
      - '.github/workflows/publish.yml'

jobs:
  publish:
    runs-on: windows-latest

    env:
      # Variables (change this to your script)
      SCRIPT_NAME: JV-ServersInitialInstall
      SCRIPT_PATH: ./JV-ServersInitialInstall.ps1
      DISPLAY_NAME: JV-ServersInitialInstall
      PSGALLERY_SECRET: ${{ secrets.PSGALLERY_API_KEY }}

    steps:
      - name: Checkout repository
        uses: actions/checkout@v4

      - name: Ensure NuGet and PowerShellGet are available
        shell: pwsh
        run: |
          Set-PSRepository -Name "PSGallery" -InstallationPolicy Trusted
          [Net.ServicePointManager]::SecurityProtocol = [Net.SecurityProtocolType]::Tls12

          if (-not (Get-PackageProvider -Name NuGet -ErrorAction SilentlyContinue)) {
              Install-PackageProvider -Name NuGet -MinimumVersion 2.8.5.201 -Force
          }

          Install-Module PackageManagement -Force -AllowClobber -Scope CurrentUser
          Install-Module PowerShellGet -Force -AllowClobber -Scope CurrentUser

      - name: Validate script metadata
        shell: pwsh
        run: |
          Test-ScriptFileInfo -Path "$env:SCRIPT_PATH"

      - name: Publish script to PowerShell Gallery
        shell: pwsh
        run: |
          $ErrorActionPreference = 'Stop'
          Publish-Script -Path "$env:SCRIPT_PATH" -NuGetApiKey "$env:PSGALLERY_SECRET" -Verbose

      - name: Confirm publication
        shell: pwsh
        run: |
          Write-Host "Successfully published $env:DISPLAY_NAME to PowerShell Gallery."
Change the information on lines 17, 18 and 19 to your own information and then save the file by clicking “Commit changes” in the top right corner. Make sure the script name and path exactly match your file name on the repository and do not change anything else.

For about a minute, this will show on the homepage of your repository:
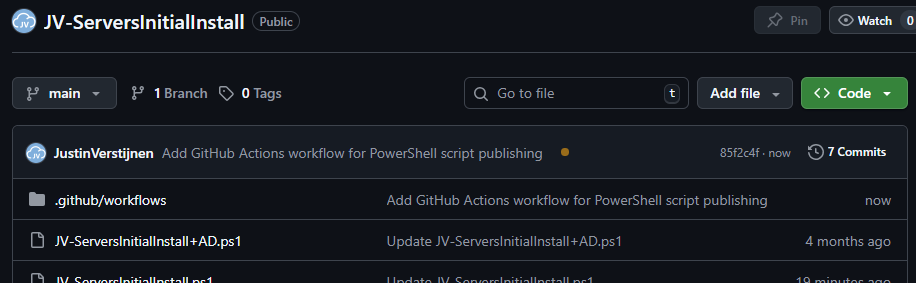
This means the Action is now actually processing the changes and publishing our new script. It will directly upload the script to the PowerShell Gallery for us.
Now the the action has ran, and did not give any error. It must now be available on the PowerShell Gallery.

Lets head back to the PowerShell Gallery to check the status. Click on your profile, and then on “Manage Packages”.
Here we see that the packages has been uploaded:

If you click on it you get actual instructions to install the script on your computer and we will see the information we have added to the script:

Pretty cool in my opinion.
Now we have our script on the PowerShell Gallery, we can actually download and execute the script using some simple commands.
Do not execute my example script, unless you know what you are doing.
Open PowerShell on your testing environment and execute this command with your script name to install your newly uploaded script.
Install-Script -Name JV-ServersInitialInstallAfter executing this command you need to need to answer some questions:
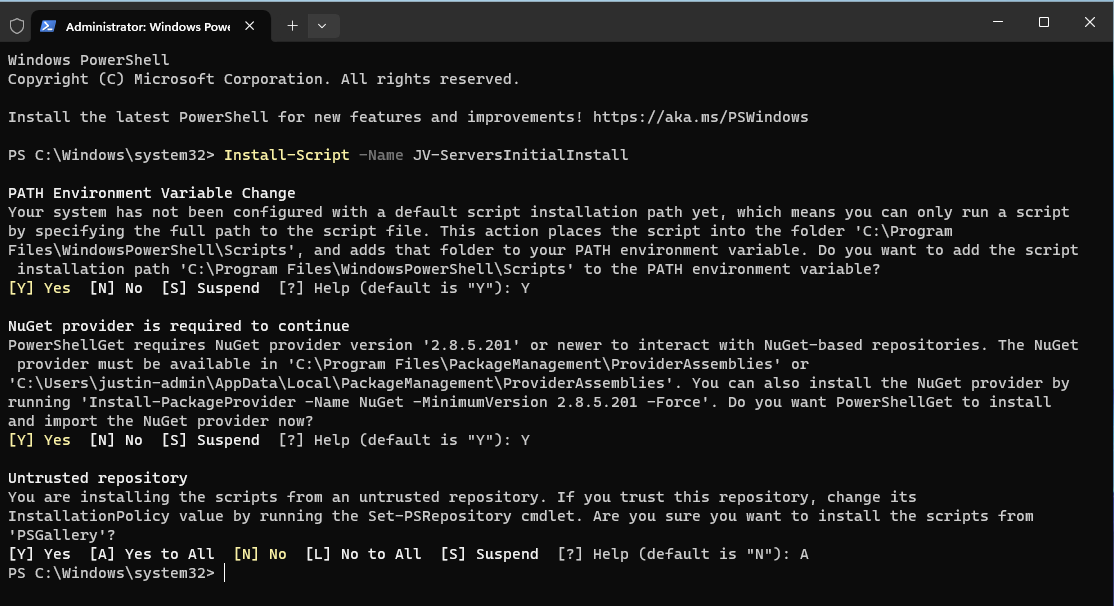
In order to actually run the script, you need to answer all with Yes/All.
After the script is installed, we can run it with your script name:
JV-ServersInitialInstall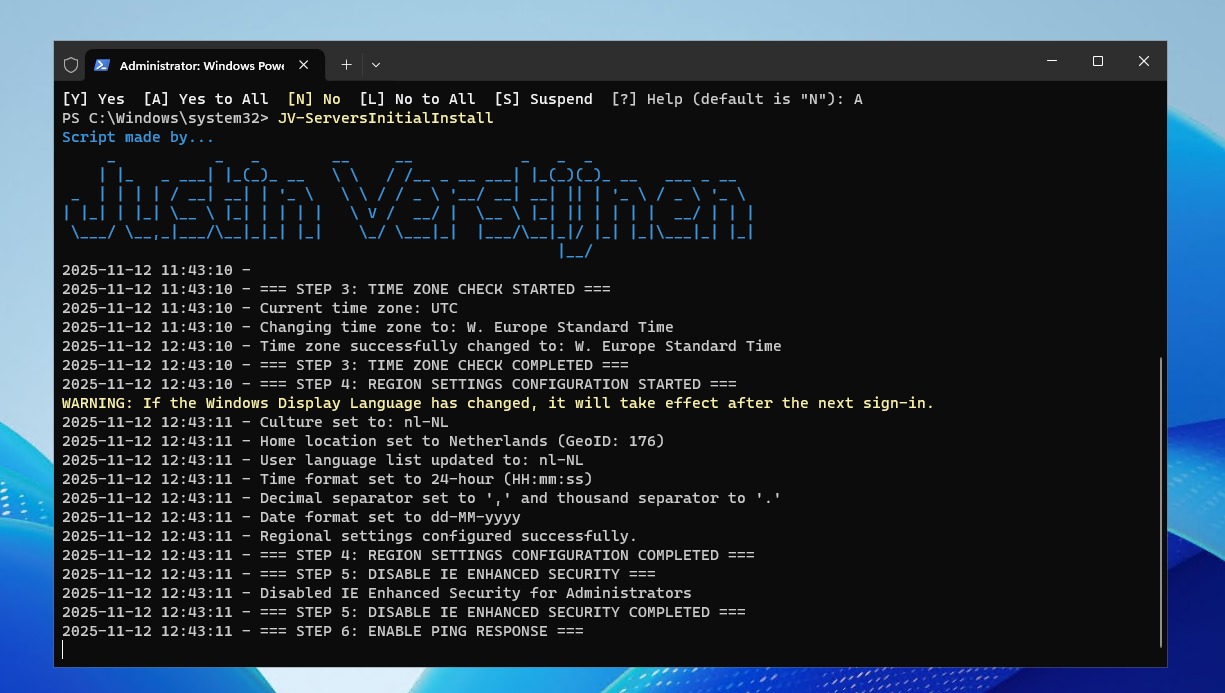
The script will run directly which is very nice and useful for mass use.
This setup for uploading scripts to the PowerShell Gallery is really great. We can change our script on one place and it will automatically upload to the live gallery for users to download.
These sources helped me by writing and research for this post;
Thank you for reading this guide and I hope it was helpful.
You have reached the end of the page. You can navigate through other blog posts as well, share this post on X, LinkedIn and Reddit or return to the blog posts collection page. Thank you for visiting this post.
If you think something is wrong with this post or you want to know more, you can send me a message to one of my social profiles at: https://justinverstijnen.nl/about/
If you find this page and blog very useful and you want to leave a donation, you can use the button below to buy me a beer. Hosting and maintaining a website takes a lot of time and money. Thank you in advance and cheers :)
The terms and conditions apply to this post.
Today I have a PowerShell script that creates users by asking the user what to fill in. This works by having a fully prepared “New-ADUser” command with all the properties filled in to have all users using the same attributes.
I will explain how this script works on this page.
For the fast pass, the script can be downloaded from my GitHub page:
The script is relatively easy and consists of 4 steps:
The script contains a set of pre-defined attributes which you can change to your own settings:
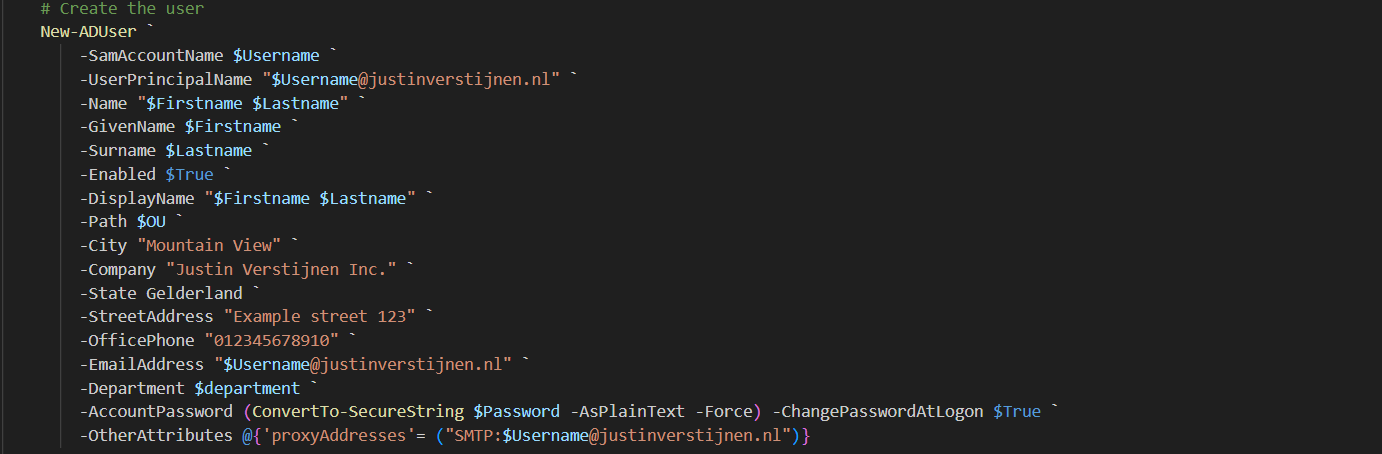
You can change all of these settings, but I advice you to not change any $variables because that will break the script.
On line 12 to 14, you have a parameter that specifies the OU to create the user in:

Change this to your own OU when using. You can find this by enabling the “Advanced Features” in the “View” menu and then going to the OU properties and the “Attributes”.
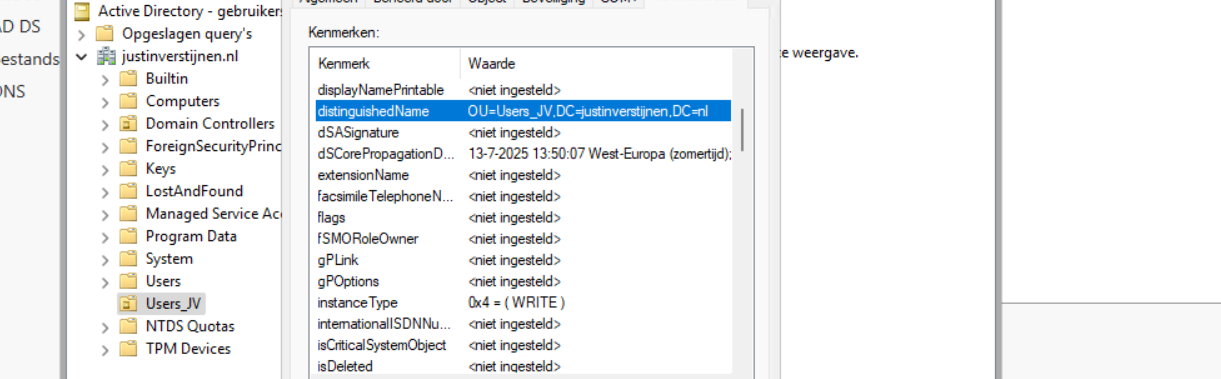
Search for the “DistinguishedName” attribute and copy that value.
To use my create ad users script, go to my GitHub page and download the script there:
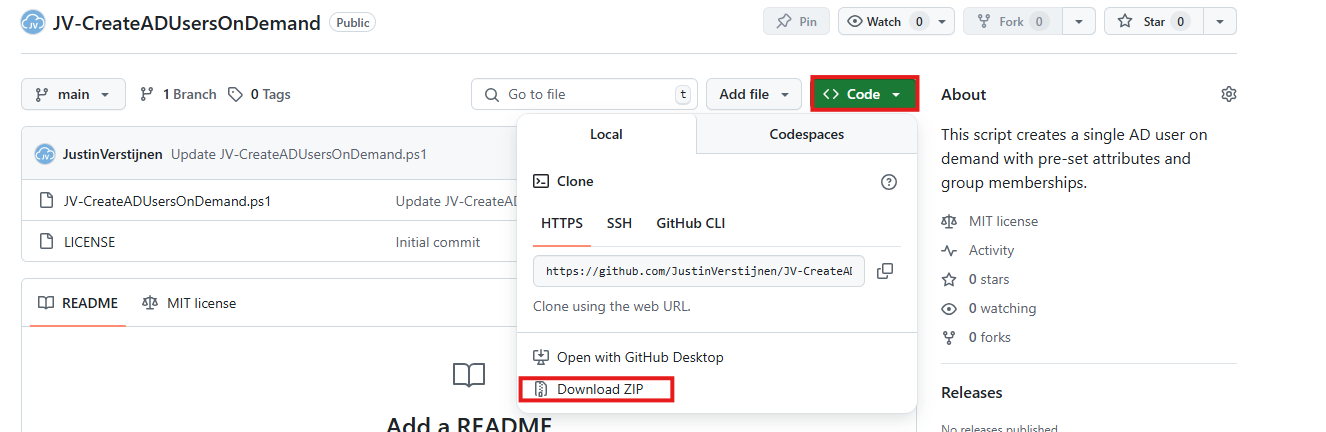
Click on “Code” and then on “Download ZIP”.
Then place the ZIP file on your Active Directory management server.
Open PowerShell ISE as Administrator:
Verify your credentials if needed and then use the “Open” function of PowerShell ISE and open the script file:
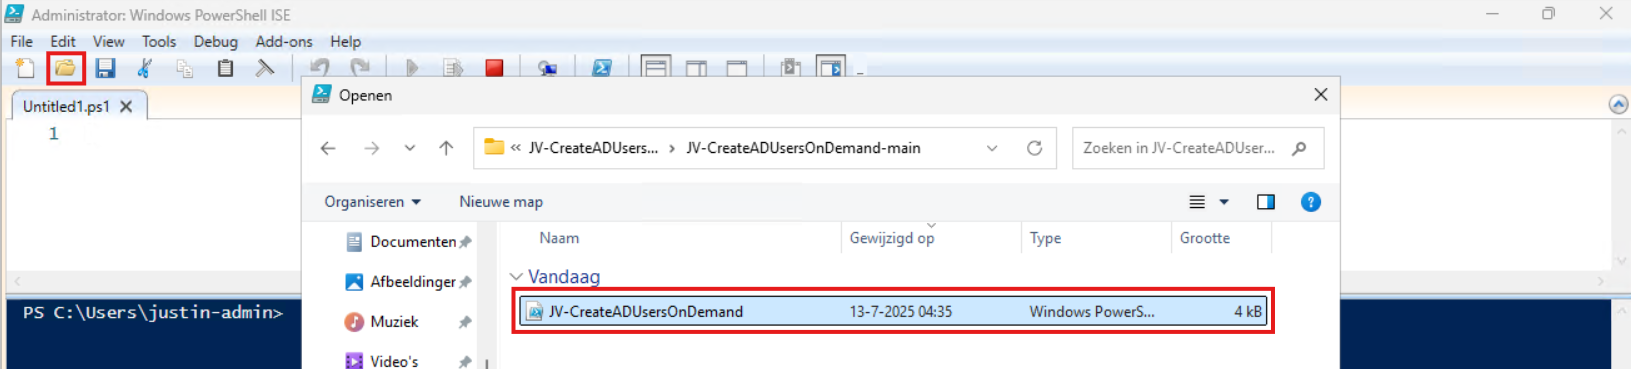
Review:
Correct those if needed.
Before we can run the script, we have to do a one-time bypass for the Powershell Execution Policy by typing the command in the blue window below:
Set-ExecutionPolicy Unrestricted -Scope ProcessThis way the execution policy stays enabled but for this session only it’s been lowered. When you close the window, you have to type this again before be able to run scripts.
Execute the command, and when prompted to lower the policy, click Yes.
Now we can run the script itself by clicking the green “Play” button.
Now the script will ask the details for the user:
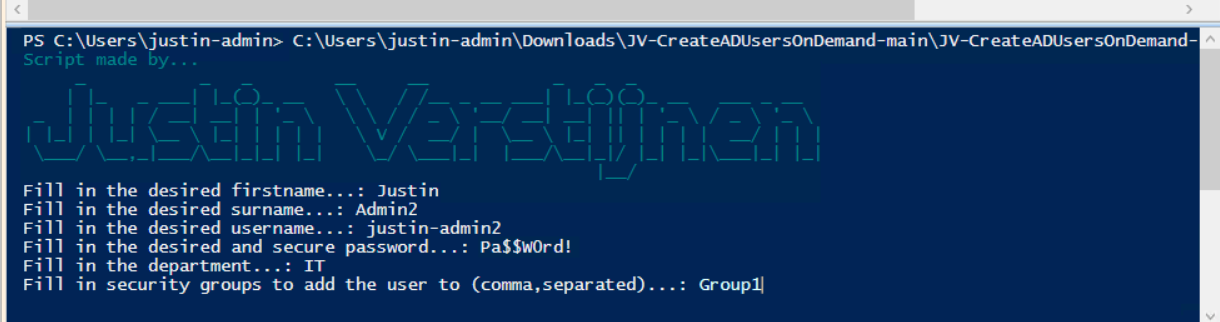
After filling this in and hit Enter, the user will be created almost instantly:
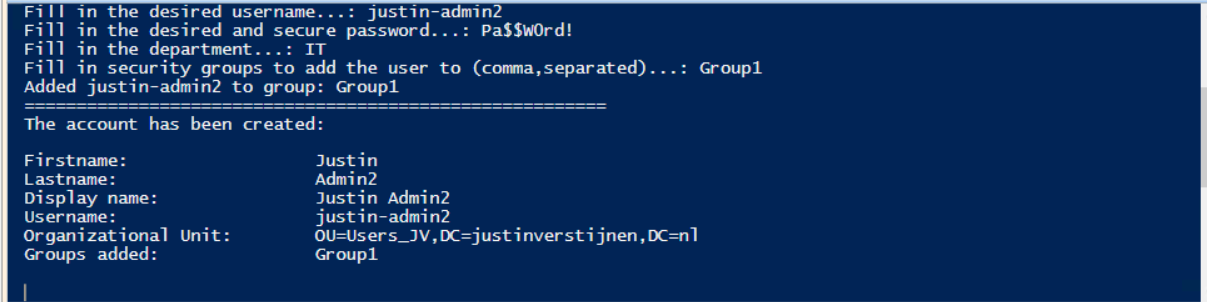
Now let’s take a look in the Active Directory Users and Computers snap-in (dsa.msc):
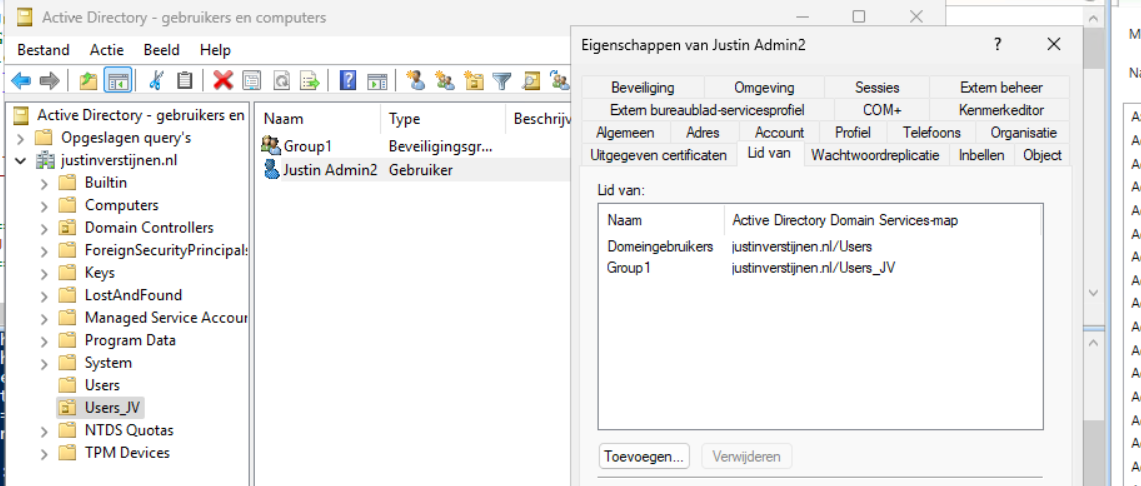
The user is succesfully created in the desired OU and Group1 has been added to the member of list. Also the extra attributes has been added to the user:
This script can ultimately be used when all users must be created in the same way. Let’s say, the emailaddress field must always be filled in, or the address or department. Those are steps that often will be skipped in real life. Using a pre-determined script will ensure this is always filled in.
Thank you for reading this post and I hope it is helpful.
These sources helped me by writing and research for this post;
You have reached the end of the page. You can navigate through other blog posts as well, share this post on X, LinkedIn and Reddit or return to the blog posts collection page. Thank you for visiting this post.
If you think something is wrong with this post or you want to know more, you can send me a message to one of my social profiles at: https://justinverstijnen.nl/about/
If you find this page and blog very useful and you want to leave a donation, you can use the button below to buy me a beer. Hosting and maintaining a website takes a lot of time and money. Thank you in advance and cheers :)
The terms and conditions apply to this post.
Sometimes we need to export all of our AD users. The one time for applying changes, sometimes for monitoring the inventory but often for licensing purposes.
At this page I will show you how to export all your AD users fast and easy.
For the fast pass, I uploaded the script to my Github page:
To export the users without using a script, navigate to your Active Directory management server and open up Powershell. We will do all the action the script above does, but then by hand and type in every command separately.
Type in the first command to ensure the correct module is loaded:
Import-Module ActiveDirectoryThen we can execute the command to query all AD users:
$adusers = Get-ADUser -filter * -Properties UserPrincipalName,Mobile,Givenname,sn,name | select UserPrincipalName,Mobile,Givenname,sn,nameThis saves all the users in the $adusers variable. Now let’s print this list:
$adusersThis shows all users in the PowerShell window itself, but we are able to export this to a CSV file:
$adusers | Export-Csv "C:\Users\$env:USERNAME\Desktop\AD_Export.csv" -NTI -Delimiter ";"This gives us a nice and “Excel-ready” export of all the AD users. It is also very clean, but you can add or remove extra attributes from Active Directory from the second command.
For a complete list of all the attributes that can be used, visit this Microsoft Learn article.
This page shows an easy way to export all your AD users in a great and readable way. It also has some possibilities for customization but it shows how to do it in the most simple way possible. I also included a automatic way and a manual/by hand way to learnexactly what happens.
Thank you for reading and I hope it was helpful.
These sources helped me by writing and research for this post;
You have reached the end of the page. You can navigate through other blog posts as well, share this post on X, LinkedIn and Reddit or return to the blog posts collection page. Thank you for visiting this post.
If you think something is wrong with this post or you want to know more, you can send me a message to one of my social profiles at: https://justinverstijnen.nl/about/
If you find this page and blog very useful and you want to leave a donation, you can use the button below to buy me a beer. Hosting and maintaining a website takes a lot of time and money. Thank you in advance and cheers :)
The terms and conditions apply to this post.
By default, all Azure VMs are set to English language and UTC/Zulu timezone. This will work for a great portion of the Azure VM users but there are users in other parts of the world too. Like in the Netherlands, where I live we are 1 or 2 hours ahead of that timezone depending on the season.
Also, in the case of Azure Virtual Desktop, we want to present our users their native language as system language. For this case, I have made a script to correct those settings.
For the fast pass, I have the script here:
Download the script from GitHub
The script consists of 7 steps:
To use my script, download it from Github and place it on your newly created or existing Azure VM.
Click on “Code” and then on “Download ZIP”.
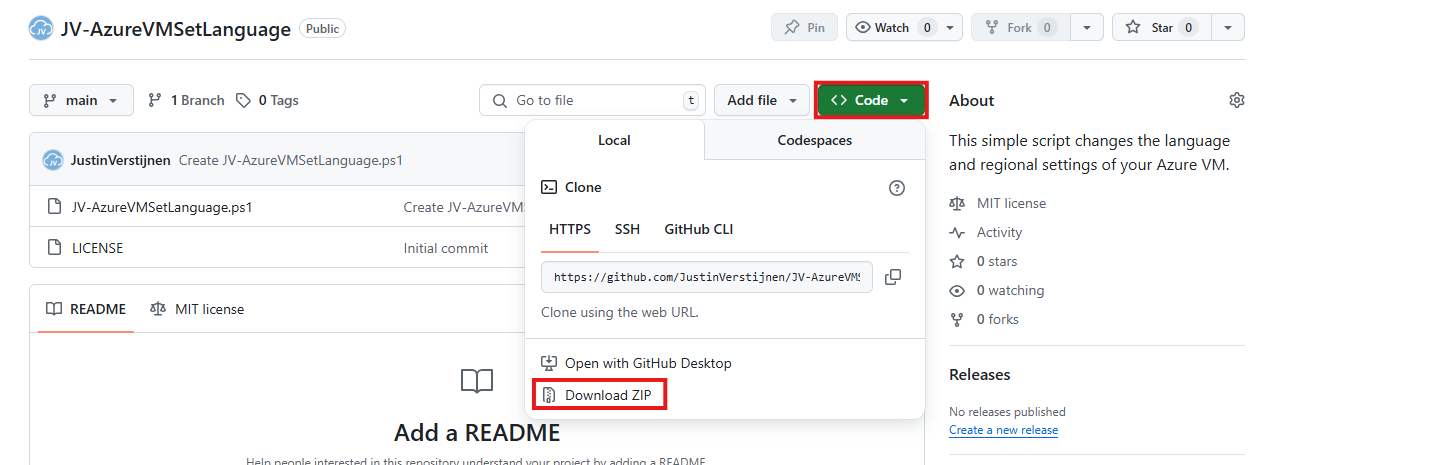
Place the ZIP file on your server. Then unzip it so we can navigate to the script itself.
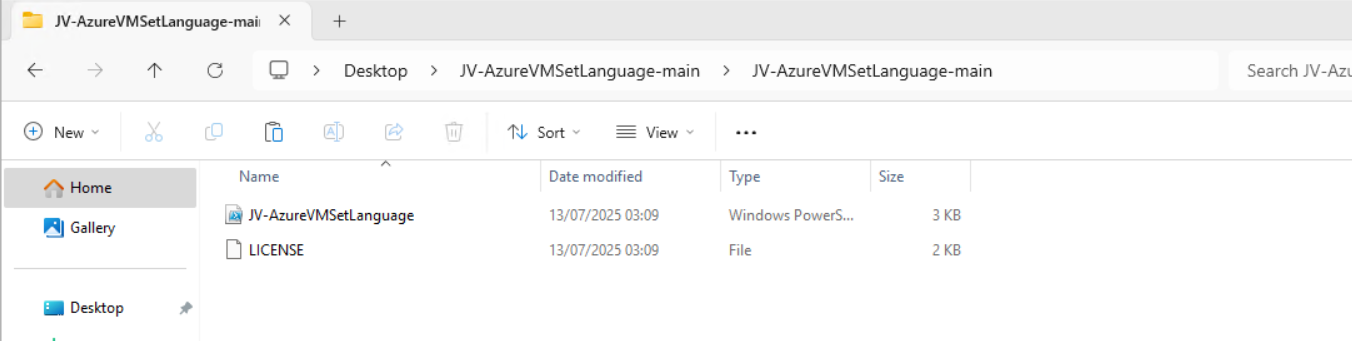
Now we can execute this script. The easiest way is to open the PowerShell ISE version as this eliminates navigating to the script by hand.
Open PowerShell ISE as Administrator:
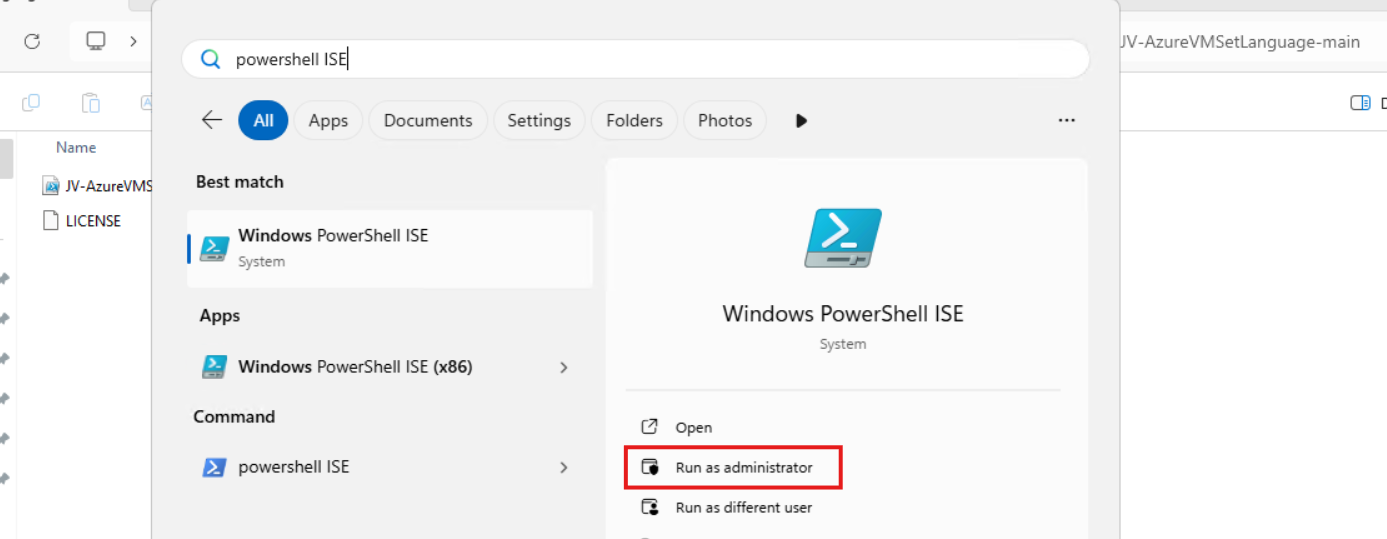
Verify your credentials if needed and then use the “Open” function of PowerShell ISE and open the script file:
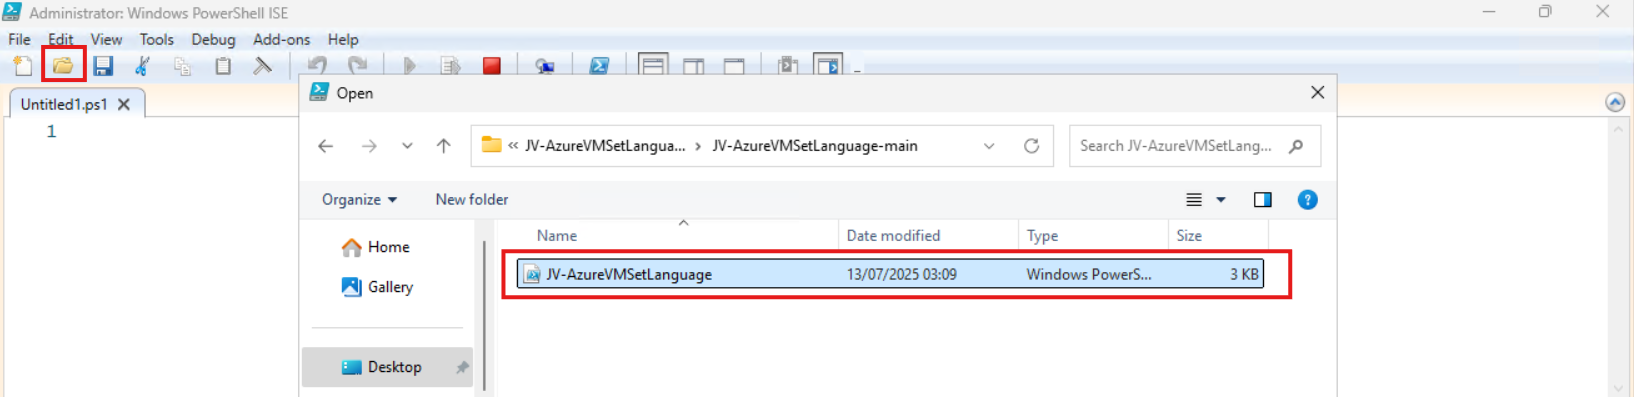
The script will now be opened and review the parameters on line 12 till 16:

By default, everything is set to “Dutch” but you can change them. I added links to the corresponding artices of Microsoft to quickly lookup what your settings must be. The links are also added to the sources at the bottom of this post.
Before we can run the script, we have to do a one-time bypass for the Powershell Execution Policy by typing the command in the blue window below:
Set-ExecutionPolicy Unrestricted -Scope ProcessThis way the execution policy stays enabled but for this session only it’s been lowered. When you close the window, you have to type this again before be able to run scripts.
Execute the command, and when prompted to lower the policy, click Yes.

Now we can run the script itself by clicking the green “Play” button.
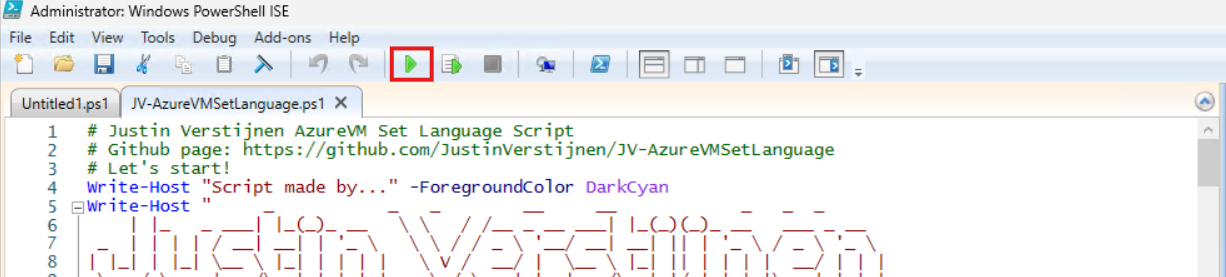
The script can take up to 20 minutes, so have a little patience.
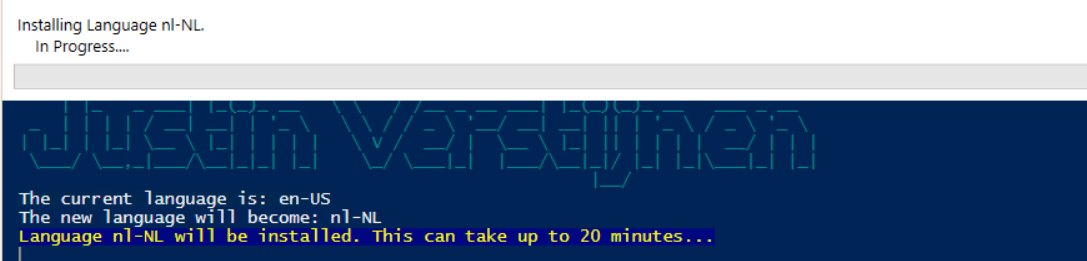
After every task is completed the server will reboot and you will be presented with the new settings.
Before the script ran, my machine looked like this:
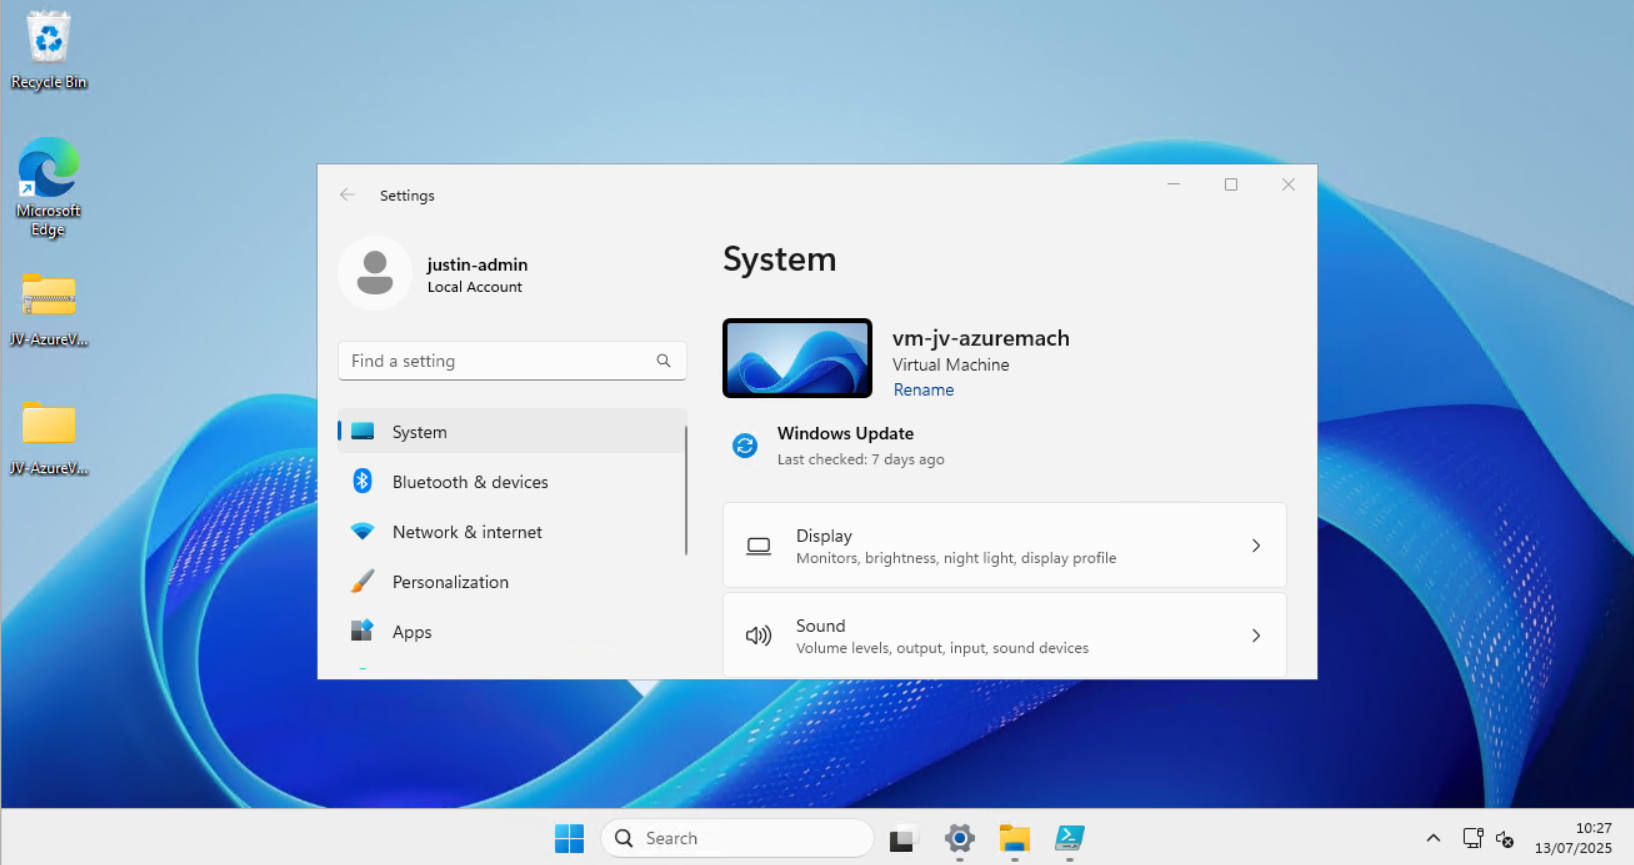
After the script ran, my machine looked like this:
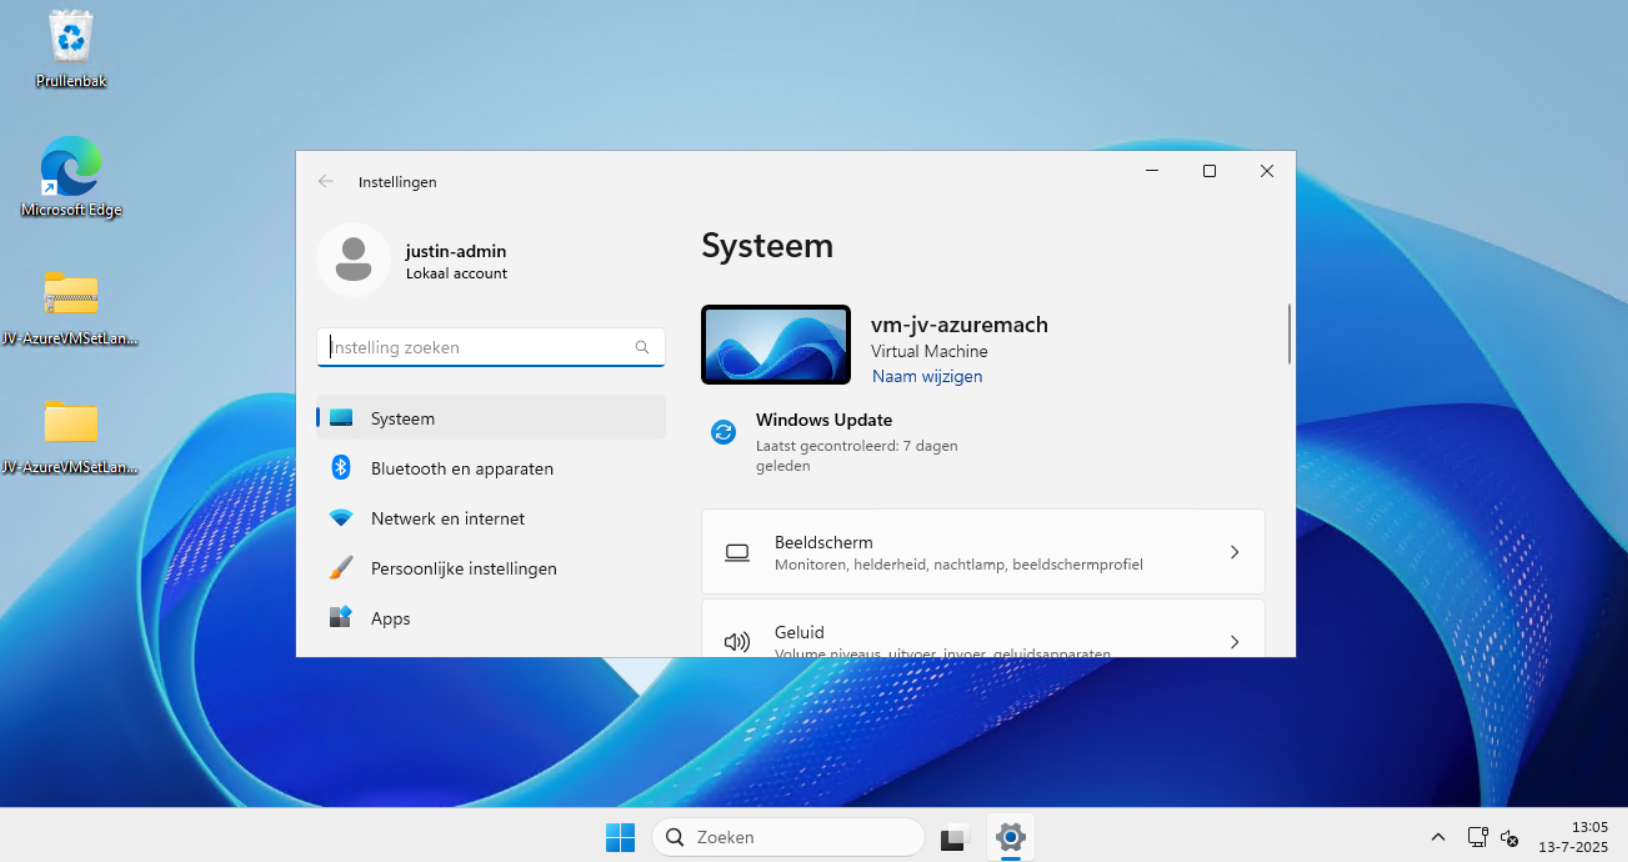
Perfectly in Dutch settings and ready to go.
Because of usability of my script, I did not include the use of the 24 hour clock because Windows does this because of the culture settings. If wanting to set this manually, you can execute these commands in PowerShell manually:
$24hclock = Get-UICulture

($24hclock.DateTimeFormat).ShortTimePattern = 'HH:mm'

Set-Culture $24hclock
This sets the time indication to 24-hour clock system.
In the beginning of creating Azure VMs this was something I found to be annoying. This was exactly the reason I wrote the script. This is especially useful when deploying Azure Virtual Desktop machines, as you want to present the users with their native language. We IT guys often like the systems in English so for us, it’s no problem.
I hope the script is useful and thank you for reading.
These sources helped me by writing and research for this post;
You have reached the end of the page. You can navigate through other blog posts as well, share this post on X, LinkedIn and Reddit or return to the blog posts collection page. Thank you for visiting this post.
If you think something is wrong with this post or you want to know more, you can send me a message to one of my social profiles at: https://justinverstijnen.nl/about/
If you find this page and blog very useful and you want to leave a donation, you can use the button below to buy me a beer. Hosting and maintaining a website takes a lot of time and money. Thank you in advance and cheers :)
The terms and conditions apply to this post.
Azure Stack HCI is a solution for Microsoft Azure to host Azure resources on your own hardware and location. This sounds traditional but can help to boost your Azure resources for your customer and/or use case.
For example, with Azure Stack HCI it is possible to host some Azure Virtual Desktop hosts in your own network to boost performance by decreasing latency. Also it is possible to use GPU enabled software on this.
Azure Stack HCI became part of Azure Local after writing this post, see more information here: https://azure.microsoft.com/en-us/products/local
The supported Azure services at the moment of writing are:
You need the following to follow this guide and make sure to minimize errors:
In my guide, i will focus on creating a cluster with 2 nodes. I have included and tested the steps to create a single-server cluster too:
Multi node cluster setup Single node cluster setup
My environment consists of one physical server with 3 VMs on it. In a production environment it is better to physically segment the HCI cluster nodes to multiple fault domains. This setup is purely for educational purposes. In production environments, one hardware error will result in 100% outage
I create a Multi-node server cluster to experiment with Stack HCI. The environment looks like this.
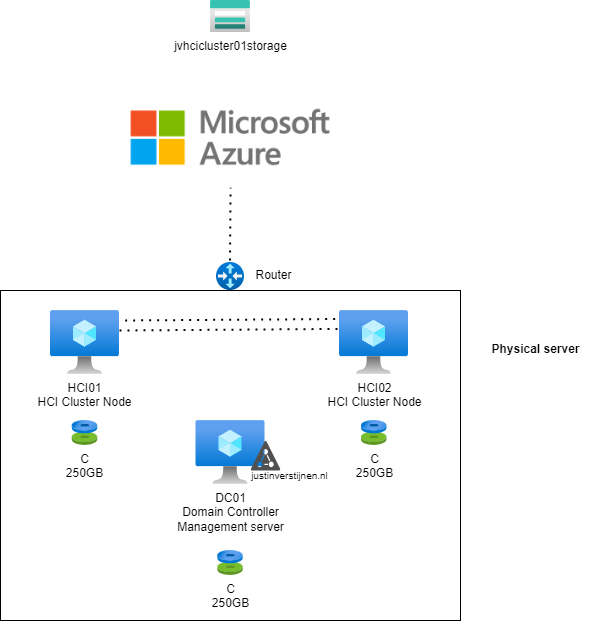
In Azure i have a single resource group where i want to deploy my cluster into:
The installation of Azure Stack HCI is very straight-forward, and the same as installing Windows 11 or Windows Server. At the time you follow this guide i think you understand how to do this.
Install Azure Stack HCI on both of the nodes. Sit back or get a cup of coffee because this will take around 15 minutes :). To not waste time, my advice is to prepare the Active Directory during the installation.
We have to prepare our Active Directory for the coming change, the introduction of a new Cluster. This cluster will be settled in its own OU for future machines. Unfortunately, this OU cant be created through the GUI and has to be created with PowerShell.
Create a new Active Directoy forest when you don’t have one.
On the domain controller/management server, you have to first install the following Powershell module:
Install-Module AsHciADArtifactsPreCreationTool -Repository PSGallery -ForceAfter that, create a new OU for your HCI nodes by using the HCI module (only possible with this module). Change the name of your desired OU to your needs. I created it with the command below:
New-HciAdObjectsPreCreation -AzureStackLCMUserCredential (Get-Credential) -AsHciOUName "OU=StackHCI,DC=justinverstijnen,DC=nl"At the credential section, you have to specify a new user who can manage the HCI cluster and is used as service account. The user must comply with the following requirements:
I created my user like shown below:
The module accepted my account:
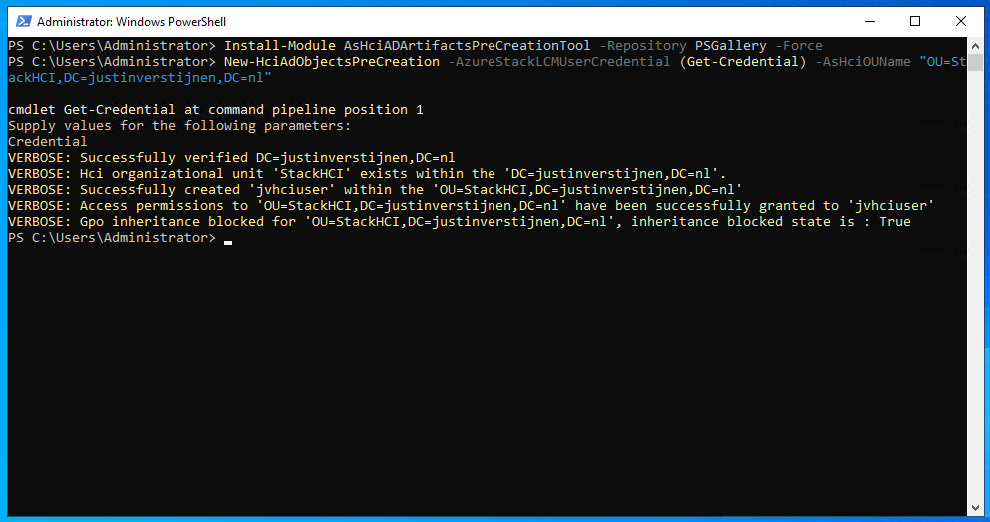
When going to the Active Directory Users and Computers center, you see the changes are processed succesfully:
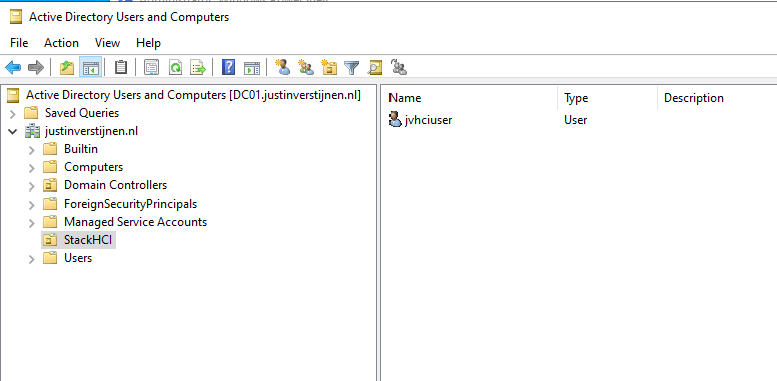
Now we have configured the Active Directory and we can go on to configure the cluster nodes.
After the installation and preparation of the nodes we can perform a default configuration of the nodes through sconfig:
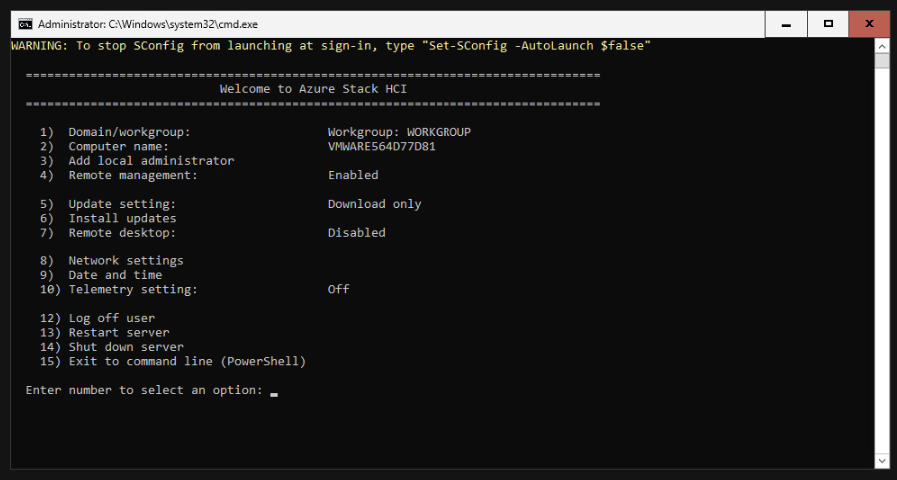
This menu is the same as on server-core installations of Windows Server. Navigate through the menu by using the numbers and the extra options you get afterwards.
I have done the following steps on both of the nodes:
Note: do NOT join your nodes to Active Directory, otherwise the wizard to create a cluster will fail.
The result after these steps.
After the basic configuration of the nodes is complete, we have to do the following pre-configuration steps on every node:
Install Hyper-V (needed for virtualization purposes)
Enable-WindowsOptionalFeature -Online -FeatureName Microsoft-Hyper-V -AllAfter installation of this feature, restart the node. You can do this with the following command:
Restart-ComputerWhen the node is restarted, install the needed Powershell modules. Install these on all of the nodes.
Install-Module AzsHCI.ARCinstaller -Force
Install-Module Az.Accounts -Force
Install-Module Az.ConnectedMachine -Force
Install-Module Az.Resources -Force
After installing all the needed modules, we can register every node to Azure Arc. We can perform this by running the commands below and change the parameters:
$AzureSubscription = "SUBSCRIPTION ID"
$AzureTenantID = "TENANT ID"

Connect-AzAccount -SubscriptionId $AzureSubscription -TenantId $AzureTenantID -DeviceCode
Now you have to login via the Device code on a browser on your local computer or management server. This is because the Azure Stack HCI operating system doesn’t have a browser and doesn’t support interactive login.
Now we have to run another command with parameters:
$AzureResourceGroup = "Resource Group Name"
$AzureARMtoken = (Get-AzAccessToken).Token
$AzureAccountID = (Get-AzContext).Account.Id

Invoke-AzStackHciArcInitialization -SubscriptionId $AzureSubscription -ResourceGroup $AzureResourceGroup -TenantId $AzureTenantID -Region westeurope -ArmAccessToken $AzureARMtoken -AccountID $AzureAccountID -Cloud "AzureCloud"
Now the node will be registered to Azure Arc. This will take around 10 minutes.

After some minutes, the nodes appear in the Azure portal:
Now we have achieved this, we don’t need the nodes anymore and we can close the connections to it. The rest of the cluster/node configuration will be done in the Azure Portal. This was just the setup of the nodes itself.
After the machines appear in the Azure Portal, the service will install the needed extensions on all of the cluster nodes. You can’t go further before all the extensions are installed. You can follow the status by clicking on one of the cluster nodes and the open the blade “Extensions”.
All of the nodes must have at least 3 extensions and the status must be “Succeded”.
Now we have prepared everything, and we can create the cluster in the Azure portal now.
Go to Azure Arc and open the blade “Azure Stack HCI”:
Select the option “Deploy cluster”
We now have to fill in some details. Next to a HCI cluster, Azure needs a Key Vault to store some secrets for encryption purposes. We have to create that in this wizard:
After that, we have to validate our cluster nodes by Azure to check if all pre-requisites are done:
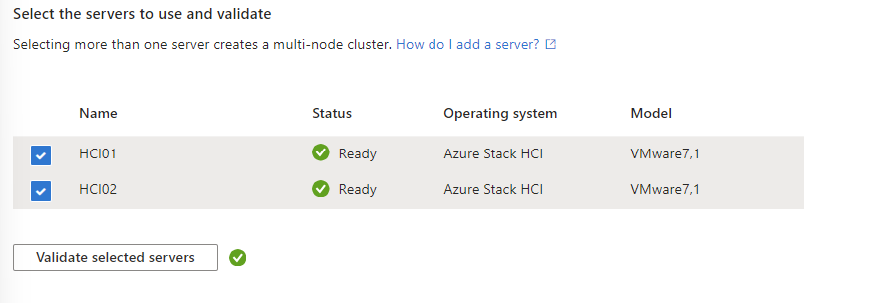
After succesfully validating the nodes, we can go further in the wizard.
On the tab “Configuration”, i chose for a new configuration:
On the tab “Networking”, i chose for “Network switch for storage”. This means if there is a network switch between the servers. In my environment, i am using VMware as Hypervisor for my cluster nodes. This has a internal switching system and has no direct link to the PCIe connected network interface.
Further, you have the option to segment your cluster network by using different network links for:
In my environment i chose to group all traffic. In real world and business critical environments, it is often better to segment the traffic to increase performance and security.
After that step, we have to configure network connectivity. Select the network interface and at the IP configuration section, keep in mind at the DNS servers you need connection to your domain controller.
When everything is filled in correctly, we can advance to the “Management” tab.
At the Management Tab, you can define a location name tag. After that you need to define your storage account which will be used to keep the cluster online when a node is offline. In clustering, you always need to have your cluster online for 50% of your nodes + 1 witness.
Then we have to configure our Active Directory domain and OU. The OU has to be the distinguished name which you can find by using the “Attribute Editor” tab on a OU in Active Directory.
Also we have a deployment account and a local administrator account:
Fill in those details and click Next: Security
We want the highest level of security, so we choose the recommended settings:
After that we can go to the tab “Validation”. Here we have to validate the complete configuration of the cluster:
Microsoft doesn’t officially support a single node cluster, but you can create this. When you want to configure this, most of the steps must be done in PowerShell.
For testing, this is a great way to explore the service. My advice in a production environment is to use 2 or more nodes at minimum.
To test your current configuration of all nodes, run a pre-creation check. A cluster has to succeed all the validation tests, otherwise the configuration is not supported by Microsoft and therefore not production-ready.
On the Management-server, run the following command:
Test-Cluster -Node HCI01 -Include "Storage Spaces Direct", "Inventory", "Network", "System Configuration"Te result i got is the following:
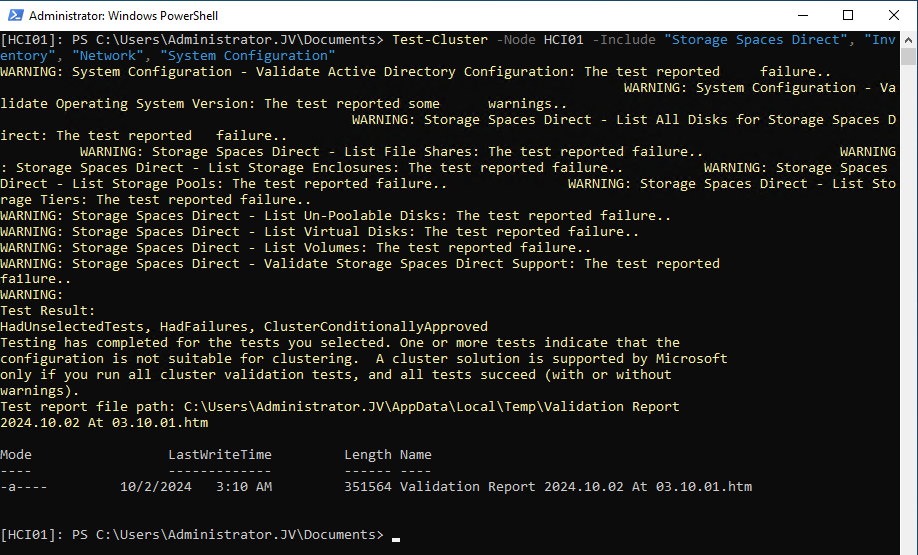
It gives us the steps we have to fix first before creating the cluster. We get the warnings because at this point we didn’t have everything configured. The following components needs configuration
Create a new Active Directoy forest when you don’t have one.
Then, install the needed HCI Powershell module when you don’t have it already:
Install-Module AsHciADArtifactsPreCreationTool -Repository PSGallery -ForceAfter that, create a new OU for your HCI nodes by using the HCI module (only possible with this module). Change the name of your desired OU to your needs. I created it with the command below:
New-HciAdObjectsPreCreation -AzureStackLCMUserCredential (Get-Credential) -AsHciOUName "OU=StackHCI,DC=justinverstijnen,DC=nl"At the credential section, you have to specify a new user who can manage the HCI cluster and is used as service account. The user must comply with the following requirements:
I created my user like shown below:
The module accepted my account:

Before creating the cluster we have to prepare the drives for using Storage Spaces Direct. THis means, clearing them, setting them to read/write mode and setting them as “Primordial”
This can be done with the following commands:
On the management-server, define all your cluster nodes by using their computer name of Active Directory:
$ServerList = "HCI01"Then prepare the drives with these commands (run all at once) with the following commands:
Invoke-Command ($ServerList) {
    Update-StorageProviderCache
    Get-StoragePool | ? IsPrimordial -eq $false | Set-StoragePool -IsReadOnly:$false -ErrorAction SilentlyContinue
    Get-StoragePool | ? IsPrimordial -eq $false | Get-VirtualDisk | Remove-VirtualDisk -Confirm:$false -ErrorAction SilentlyContinue
    Get-StoragePool | ? IsPrimordial -eq $false | Remove-StoragePool -Confirm:$false -ErrorAction SilentlyContinue
    Get-PhysicalDisk | Reset-PhysicalDisk -ErrorAction SilentlyContinue
    Get-Disk | ? Number -ne $null | ? IsBoot -ne $true | ? IsSystem -ne $true | ? PartitionStyle -ne RAW | % {
        $_ | Set-Disk -isoffline:$false
        $_ | Set-Disk -isreadonly:$false
        $_ | Clear-Disk -RemoveData -RemoveOEM -Confirm:$false
        $_ | Set-Disk -isreadonly:$true
        $_ | Set-Disk -isoffline:$true
    }
    Get-Disk | Where Number -Ne $Null | Where IsBoot -Ne $True | Where IsSystem -Ne $True | Where PartitionStyle -Eq RAW | Group -NoElement -Property FriendlyName
} | Sort -Property PsComputerName, Count
This will give no output when succeeded:
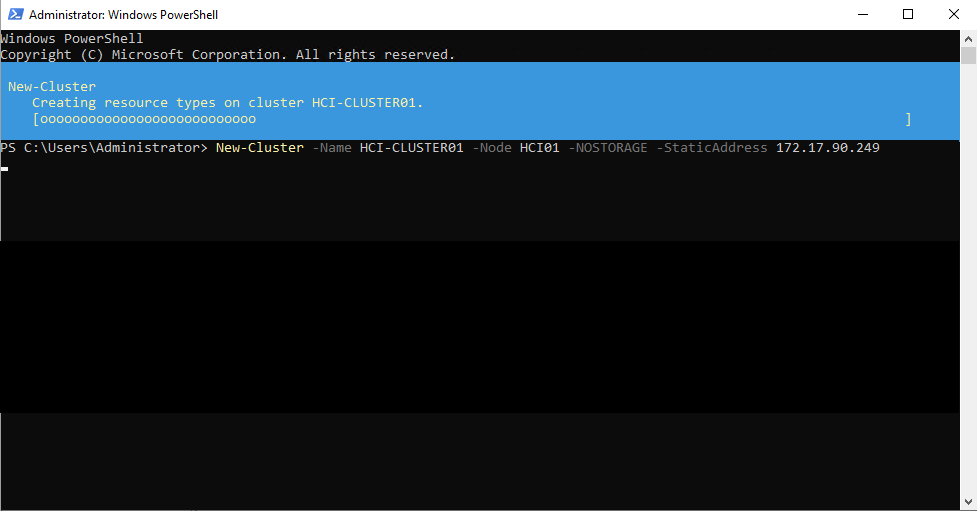
New-Cluster -Name HCI-CLUSTER01 -Node HCI01 -NOSTORAGE -StaticAddress 172.17.90.249After creating the cluster, we have to enable Storage Spaces Direct, but without Cache. We do this with the following command:
Enable-ClusterStorageSpacesDirect -CacheState Disabled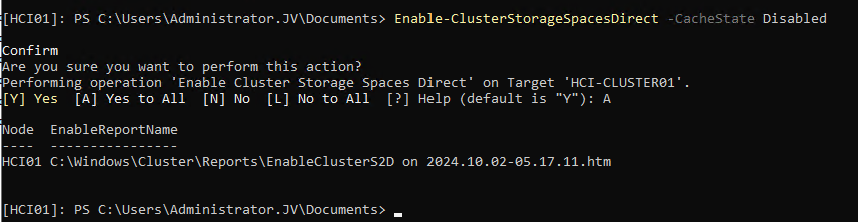
The output shows the command has been processed succesfully.
To fully let your cluster work, you have to update the functional level of the cluster. This is a version of the language the nodes use to speak with each other.
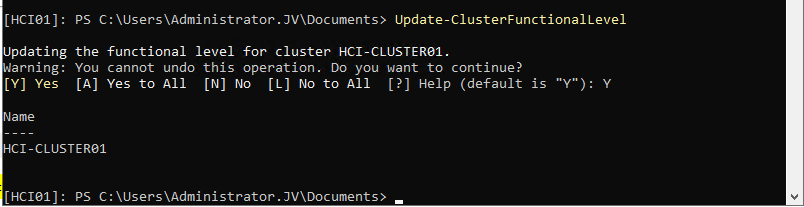
After everything for the cluster has been created, we have to create a Cluster Shared Volume (CSV). We can also do this from Powershell but can also be done with the Server Manager.
For Powershell, run the following command:
New-VirtualDisk -StoragePoolFriendlyName S2D* -FriendlyName CSVDisk -Size 240GB -ResiliencySettingName SimpleMy output was:
After you configured everything of the local server we have to register the cluster to Azure Arc/Stack HCI. We can do this by following these steps:
First, register the needed resource providers in the Azure Portal. You can find this under your active subscription where you want to register the Cluster.
Register the following resource providers here:
By registering the resource providers, you enable every setting needed to use the service in your subscription. Microsoft does not enable everything by default to save its infrastucture from unneeded load.
After the Resource Providers are registered, we can finally register our cluster to Azure Arc. Go back to your HCI nodes and install the Azure StackHCI Powershell module:
Install-Module -Name Az.StackHCIAfter installing the module on every HCI cluster node, we can register the cluster node to Azure. You have to do this on every node, and this cannot be done through Powershell Remote.
Register-AzStackHCI -SubscriptionId "SUBSCRIPTION ID" -ResourceGroupName jv-test-stackhci -TenantId "TENANT ID" -Region westeurope -ResourceName HCI01Here you need to login via https://microsoft.com/devicelogin
After that step, you have to wait around 10 minutes for the registration to be done.
You can access Azure Stack HCI in the Azure Portal:
Here you can manage the nodes and clusters.
To actually create resources on the hardware on-premises through Azure Stack HCI, you have to configure a Arc Resource Bridge. This is a connection between the host OS of the cluster nodes and Azure. We can configure this through Windows Admin Center, which can be enabled on the cluster nodes.
Azure Stack HCI is the newest evolution in hybrid setups, where you want to leverage as much as possible from the Azure services, but want the flexibility of using your own hardware and increasing security and performance. Another pro of this setup is that you can save costs by not using the expensive servers on Azure with certain needs, like GPU-enabled machines.
You have reached the end of the page. You can navigate through other blog posts as well, share this post on X, LinkedIn and Reddit or return to the blog posts collection page. Thank you for visiting this post.
If you think something is wrong with this post or you want to know more, you can send me a message to one of my social profiles at: https://justinverstijnen.nl/about/
If you find this page and blog very useful and you want to leave a donation, you can use the button below to buy me a beer. Hosting and maintaining a website takes a lot of time and money. Thank you in advance and cheers :)
The terms and conditions apply to this post.
Sometimes we need to have the original installed Windows Product Key just for documentation purposes. We simple can do this with one command in PowerShell:
(Get-ItemProperty -Path "HKLM:\SOFTWARE\Microsoft\Windows NT\CurrentVersion\SoftwareProtectionPlatform").BackupProductKeyDefault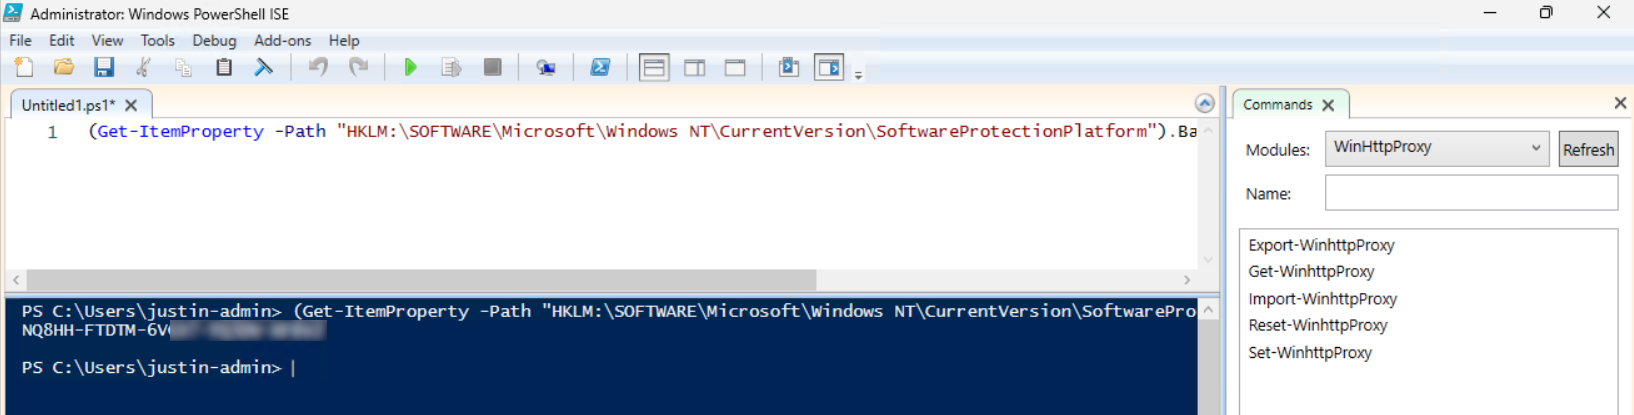
Please note that I am not encouraging software abuse or pirating, just sharing a tip to make our IT life a bit easier. It happens that a server or computer gets installed and we forget to document the product key or just to match it with our known information.
You have reached the end of the page. You can navigate through other blog posts as well, share this post on X, LinkedIn and Reddit or return to the blog posts collection page. Thank you for visiting this post.
If you think something is wrong with this post or you want to know more, you can send me a message to one of my social profiles at: https://justinverstijnen.nl/about/
If you find this page and blog very useful and you want to leave a donation, you can use the button below to buy me a beer. Hosting and maintaining a website takes a lot of time and money. Thank you in advance and cheers :)
The terms and conditions apply to this post.
PowerShell Remote Sessions can be a great way to administer your virtual machines, cluster-nodes or physical Windows-based devices. With a Powershell remote session you can execute powershell commands on a remote device.
It works the best with servers in a specific management subnet. I do not recommend to administer client devices with Powershell because this can be a huge security risk.
Before we can use Powershell to administer remote computers, we need to enable two things:
On the endpoint you have to enable WinRM. This can be done manually with one simple command, or at scale with Group Policy.
Simple and one command:
winrm quickconfigAt scale with Group Policy:
Create a new or use an existing Group Policy object and go to:
Computer Configuration > Policies > Administrative Templates > Windows Components > Windows Remote Management (WinRM) > WinRM Service.
Pick the option: “Allow remote server management through WinRM”
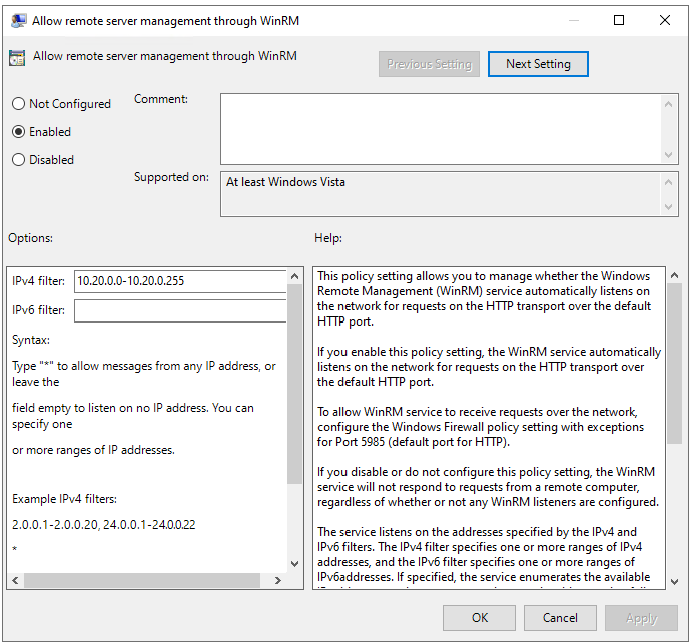
Here we can define from what IP-addresses we can use WinRM for a more secure use of WinRM.
After this option we have to allow WinRM access in the Windows Firewall to work. This also has to be done on the endpoint.
In the GPO, go to:
Computer Configuration -> Policies -> Windows Settings -> Windows Defender Firewall with Advanced Security
Create a new Inbound rule based on a Predefined rule:
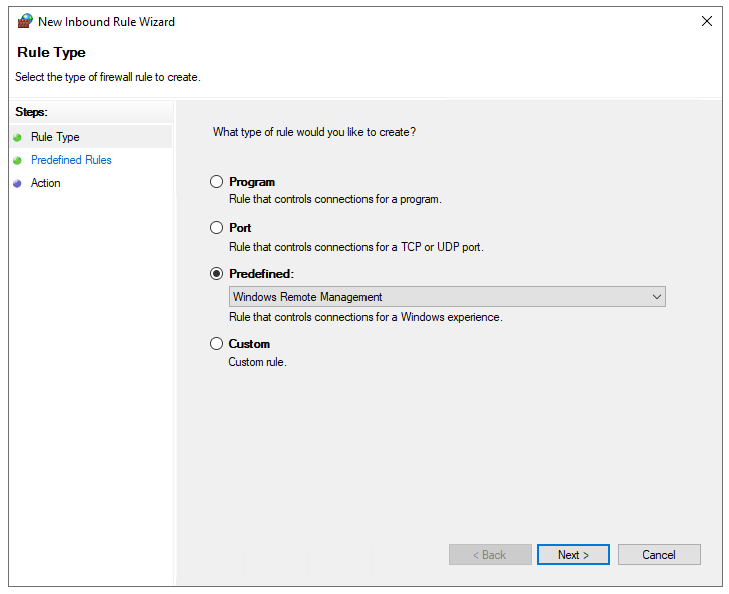
Click next till the wizard is done.
Now we have a GPO to enable WinRM on all endpoints. Apply this to the OU with the endpoints and wait for the GPO to apply. In the meantime we can configure TrustedHosts on our management workstation.
To configure your trustedhosts you can use a simple command on your management server:
Set-Item WSMan:\localhost\Client\TrustedHosts #IP-address#You can use IP-addresses, DNS-names, FQDNs and wildcards. To add a whole subnet (like 10.20.0.0/24) to your trustedhosts list, use the following command:
Set-Item WSMan:\localhost\Client\TrustedHosts -Value "10.20.0.*"Another really unsafe option is to add everything to your TrustedHosts list (not recommended):
Set-Item WSMan:\localhost\Client\TrustedHosts -Value "*"One small note: we use the command Set-Item. This will set the complete TrustedHosts setting to the setting in your command and will overwrite all existing entries. We can also use the following command to add an entry with keeping the current configuration:
Add-Item WSMan:\localhost\Client\TrustedHosts -Value "10.20.0.*"If you have set this up like one of the methods above, we are all set and done.
To start using a PowerShell remote session after you have done all the prerequisites, use the command below:
Enter-PSSession -ComputerName 10.20.0.1You get a prompt to logon with your credentials. The account has to be member of the local Administrators group.
Now we are logged in and we can execute commands like being locally on the server.
[JV-TEST-SERVER]: PS C:\Users\justinverstijnen\Documents>To automate some tasks, we can execute commands on our management server on multiple remote endpoints. Think about a group policy update, starting a service or a script that has to be executed directly without restarting the servers to make it work.
We can do this with the Invoke-Command command. In the brackets we can paste our script or command to execute on the endpoints.
Invoke-Command -Computername Server1,Server2,Server3,Server4,Server5 -Scriptblock {gpupdate /force}With Powershell remoting we can also save sessions in a parameter. We mostly use this to execute a script on multiple servers. This can also be done to use it with the Invoke-Command above This works like:
$sessions = New-PSSession -ComputerName Server01, Server02, Server03

Invoke-Command -Session $sessions -ScriptBlock { gpupdate /force }
The way this works is that you save the connections in a variable and you use this as a whole to execute your commands. Makes it simple for executing commands at scale.
PowerShell remote is a very handy tool to remote connect to a endpoint/server. In practice we want to use simple and GUI-based tools but we have to dig into console commands at some point. For example, if you accidentally stop the Remote Desktop service or during a system outage.
You have reached the end of the page. You can navigate through other blog posts as well, share this post on X, LinkedIn and Reddit or return to the blog posts collection page. Thank you for visiting this post.
If you think something is wrong with this post or you want to know more, you can send me a message to one of my social profiles at: https://justinverstijnen.nl/about/
If you find this page and blog very useful and you want to leave a donation, you can use the button below to buy me a beer. Hosting and maintaining a website takes a lot of time and money. Thank you in advance and cheers :)
The terms and conditions apply to this post.
Sometimes you want to force a group policy update on multiple computers. Often when i am configuring Azure Virtual Desktop Session Hosts i need this option instead of logging into all hosts and executing the command manually.
There is a option in Group Policy management to force a group policy update to all computers in a OU:

Actually, this only works after you configured this on the remote computers. The good part is, there is a way to do this with Group Policy!
When you do not configure remote group policy update, you get errors like:
These state that access to the remote computer cannot be established, which is actually because of security reasons.
To enable remote Group Policy update with a GPO, create a new GPO or use an existing one:
Go to the settings for the Windows Firewall:
Computer Configuration -> Policies -> Windows Settings -> Security Settings -> Windows Defender Firewall with Advanced Security
Create 2 new inbound rules based on a predefined sets:
Select all rules of both of the predefined rulesets.
After this link the GPO to the right OU and do a last manual GPupdate or wait for the scheduled GPupdate to finish.
You can use the Group Policy update option in Group Policy Management (gpmc.msc) to perform a group policy update on all computers in a OU.
After that you will get succeeded notifications:
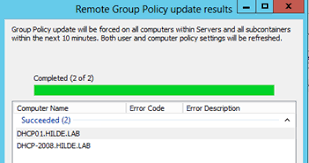
Remote Group Policy update is an excellent way to manage traditional Active Directory computers and updating them remotely instead of physically walk to the computers to perform the update yourself. Even on Microsoft Azure servers, it is a very handy tool because updating policies can be done through your central management server.
Thank you for reading this guide!
You have reached the end of the page. You can navigate through other blog posts as well, share this post on X, LinkedIn and Reddit or return to the blog posts collection page. Thank you for visiting this post.
If you think something is wrong with this post or you want to know more, you can send me a message to one of my social profiles at: https://justinverstijnen.nl/about/
If you find this page and blog very useful and you want to leave a donation, you can use the button below to buy me a beer. Hosting and maintaining a website takes a lot of time and money. Thank you in advance and cheers :)
The terms and conditions apply to this post.
When it comes to creating users for Active Directory, especially in new implementations, you want to minimize the time needed to create the accounts. This is possible by creating the AD users with Powershell.
Here is the full script including CSV that creates the ad users:
Show PowerShell script on Github
Fill in the CSV file with all required information.
The script I am using and sharing at this page has the following headings:
firstname,lastname,username,passwordThis is a very simple and effective manner where the script will base additional information like the emailaddress and proxyaddress attributes on the username.
The script has the domain justinverstijnen.nl everywhere in it. This has to be changed at the following lines to your own preference:
Download the script file and copy the script and csv file to the same folder on the destination server. After that run the script and it will create the users.
Note: If you want to bypass the Powershell Execution Policy in the most effective and secure way possible, use the following command:
Set-ExecutionPolicy RemoteSigned -Scope ProcessThis will allow all scripts to be runned in the Powershell window till it is closed. After closing the window, running scripts will be blocked again till running this command again.
After running this command you can navigate to the folder where the CSV file and PS1 file are located and run the script by using:
.\bulk_user.ps1
You have reached the end of the page. You can navigate through other blog posts as well, share this post on X, LinkedIn and Reddit or return to the blog posts collection page. Thank you for visiting this post.
If you think something is wrong with this post or you want to know more, you can send me a message to one of my social profiles at: https://justinverstijnen.nl/about/
If you find this page and blog very useful and you want to leave a donation, you can use the button below to buy me a beer. Hosting and maintaining a website takes a lot of time and money. Thank you in advance and cheers :)
The terms and conditions apply to this post.
All pages referring or tutorials for Microsoft Secure Score.
On this page, I will describe how I implemented my current Microsoft Secure Score on the Devices pillar. This means altering mostly the options of Microsoft Defender and Intune.
I collected all the options of the Microsoft Device Secure Score on this page, and we will address them all. I also added some industry-accepted options which are not in the secure score framework but are really helpful in avoiding or minimizing attacks in your environment.
You can use all options, or only use a subset of the options. This is up to you :)
Remember, having a secure score of 100% doesn’t mean 100% security. This only means you are using 100% of the security toolbox.
Starting this page, my Secure Score for Devices overview is already at 80% (due to strict policies I already created myself to play around):
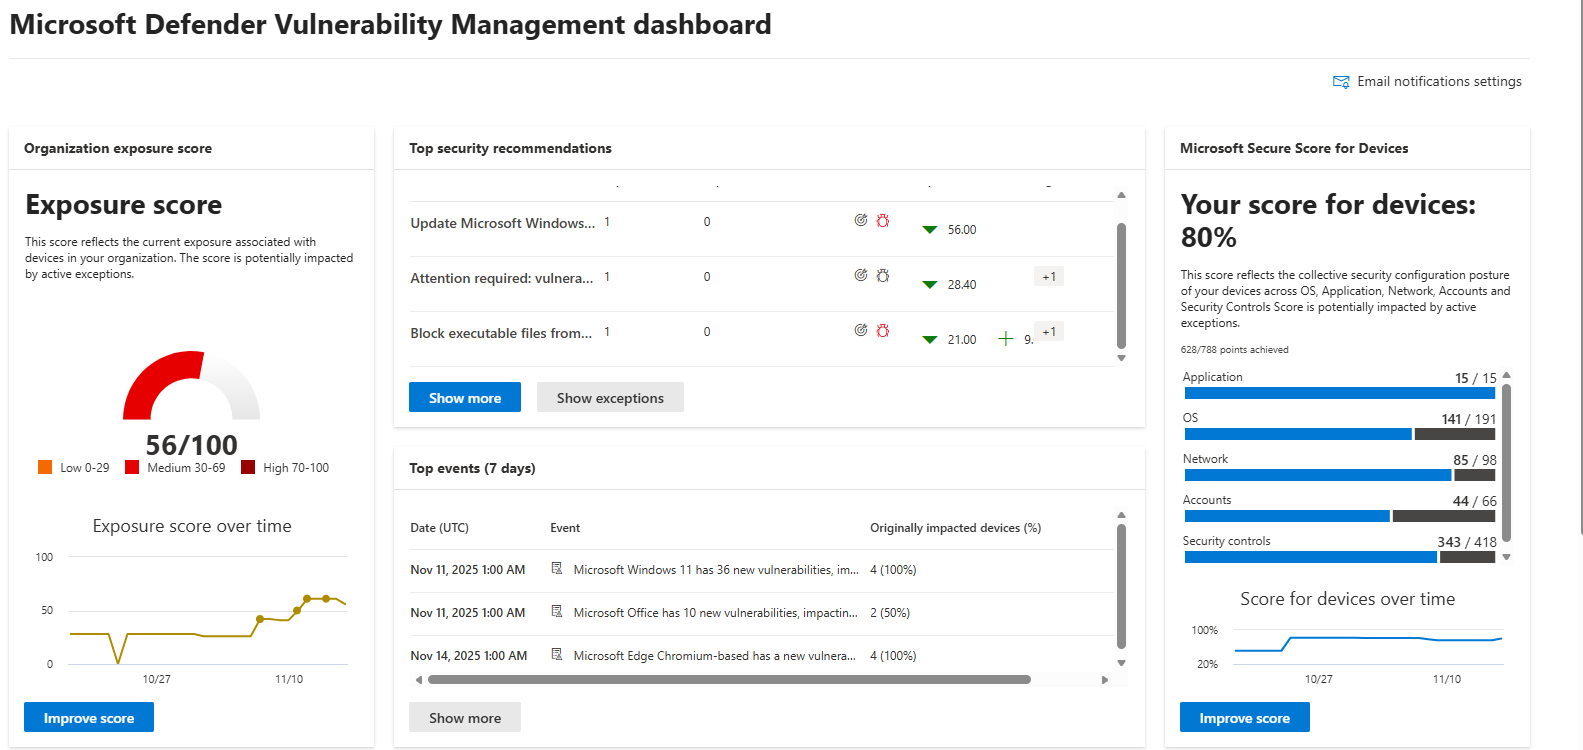
The current recommendations that I have to address are 20 of the 104 total items:
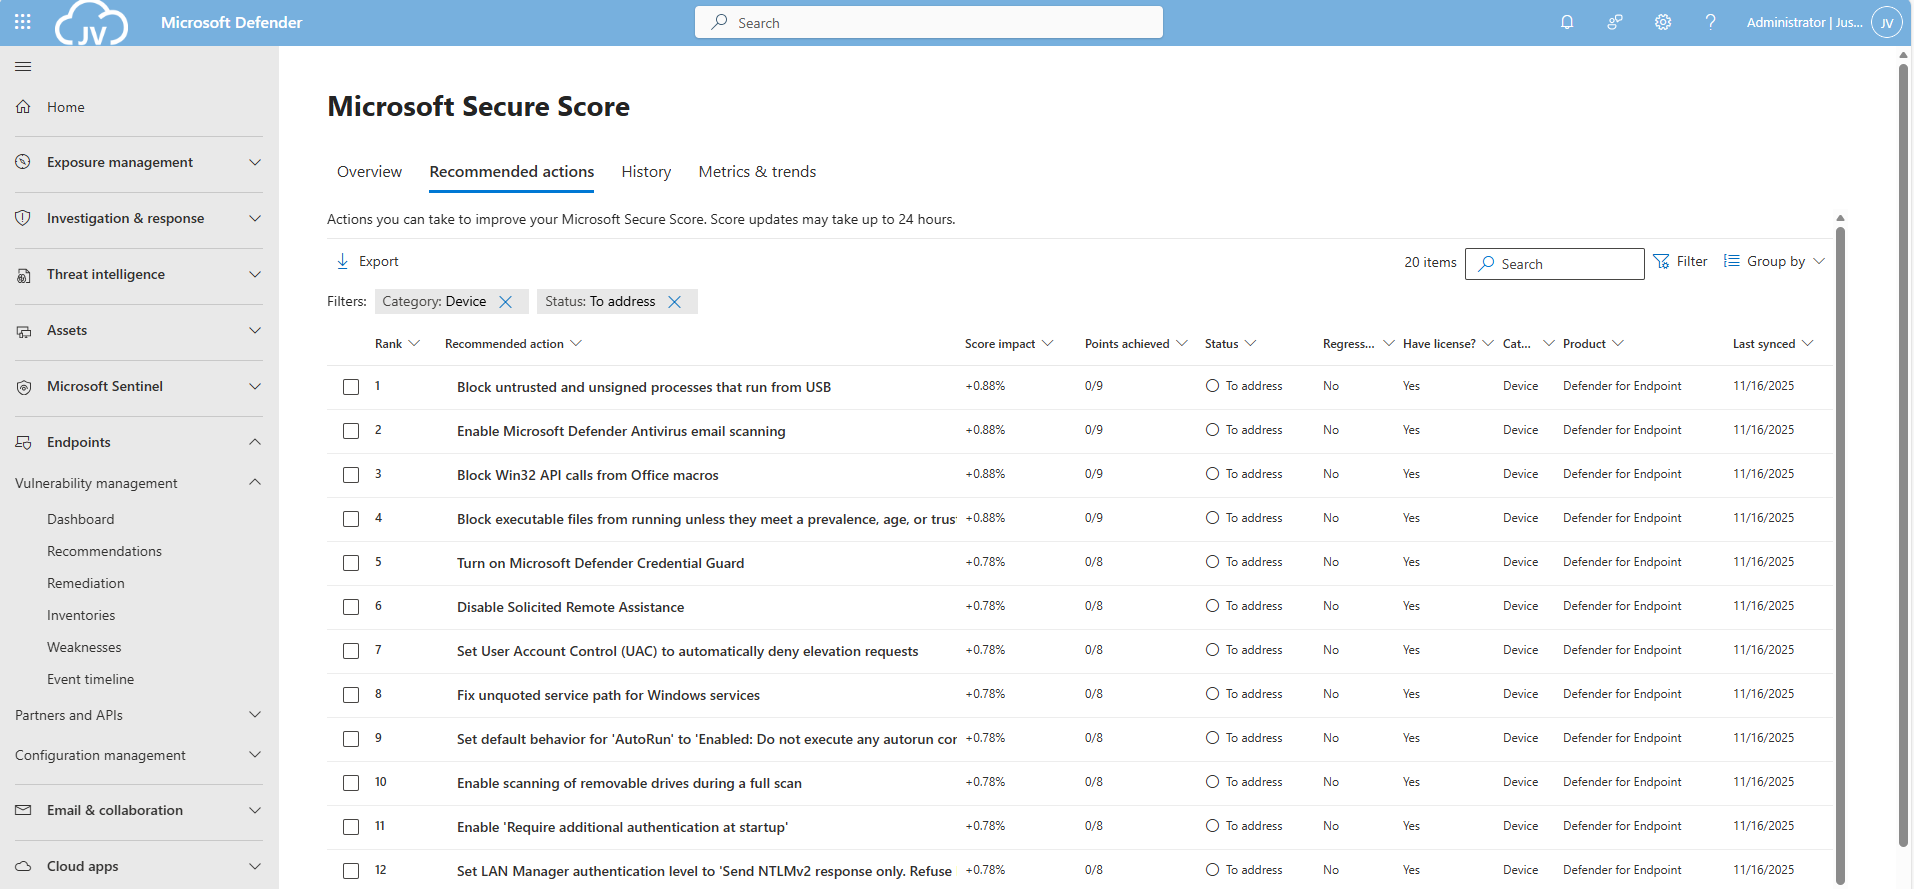
For the devices pillar, we have the Endpoints/Vulnerability Management overview which also gives us the action to take to resolve them: https://security.microsoft.com/security-recommendations
On this page, I will show how to address the recommendations of the Microsoft Device Secure Score. You can choose which items to implement, if you want to use one or multiple policies and such. I will put everything in a single policy and will export the policy for your use.
It may be very boring to do this by hand, but is actually very useful to learn. I am sorry for the bitwhat boring page this time, but my focus is on the reader to set all settings easily.
The first recommendation was to update Windows. This was indeed the case for my device:
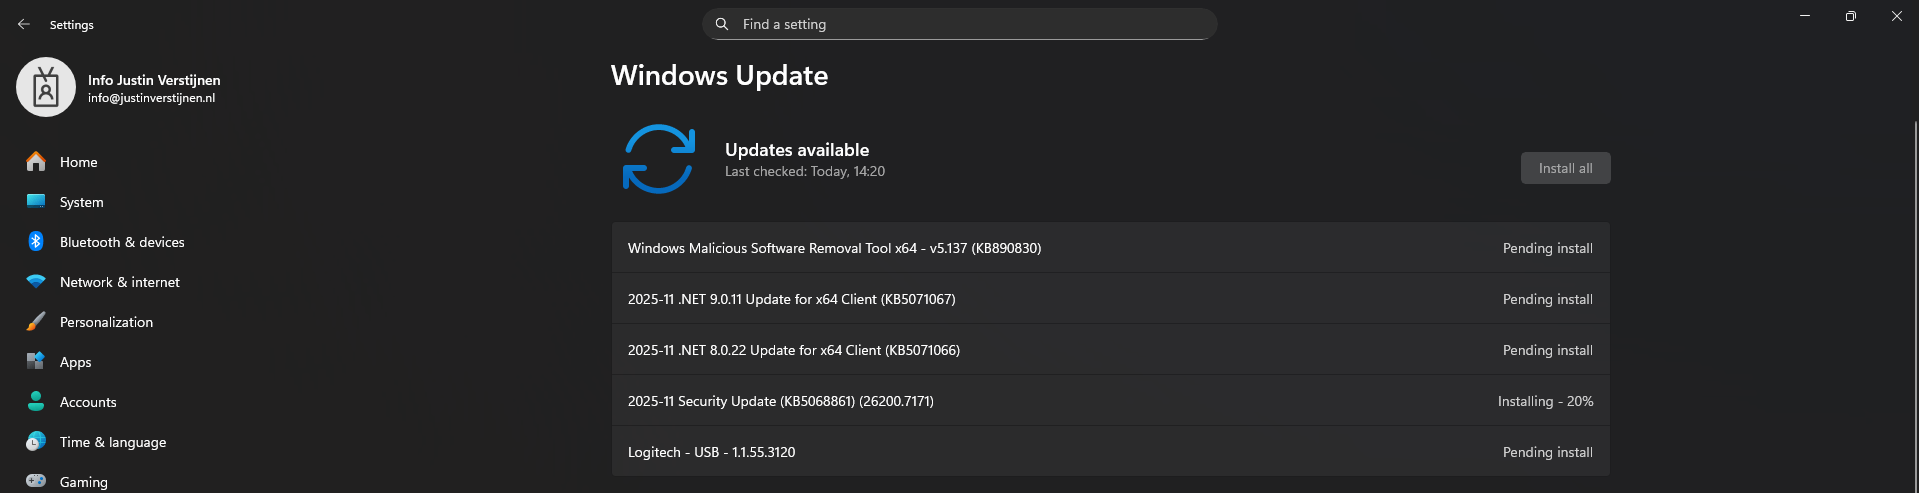
This is pretty straight forward and doesn’t need further explaination I think. You can automate this process using Windows Update Rings in Intune.
This recommendation states we may not store credentials locally, actually disabling the Windows Credential Manager on your devices.
Open Microsoft Intune, create a new policy for Windows or use an existing one and find this option:

Select the setting, and then set it to “1” to enable forbidding to store credentials.
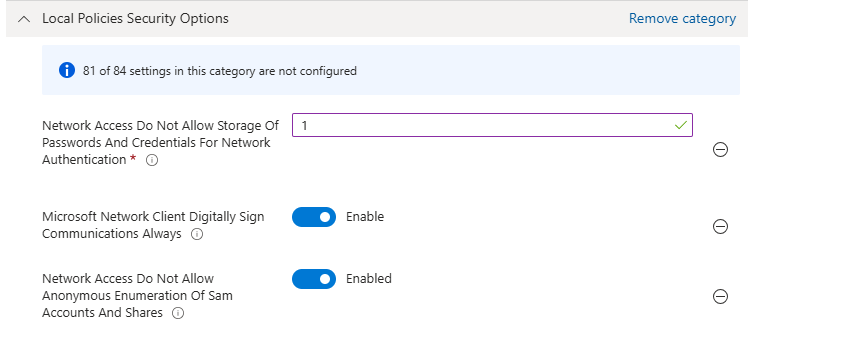
Save the policy and assign this to your devices.
This recommendation wants us to set IPv6 source routing to the highest protection. This means IPv6 source routing is locked down to the highest level, blocking source-routed packets so attackers can’t influence how traffic moves through the network.
You can achieve this by searching for this option:
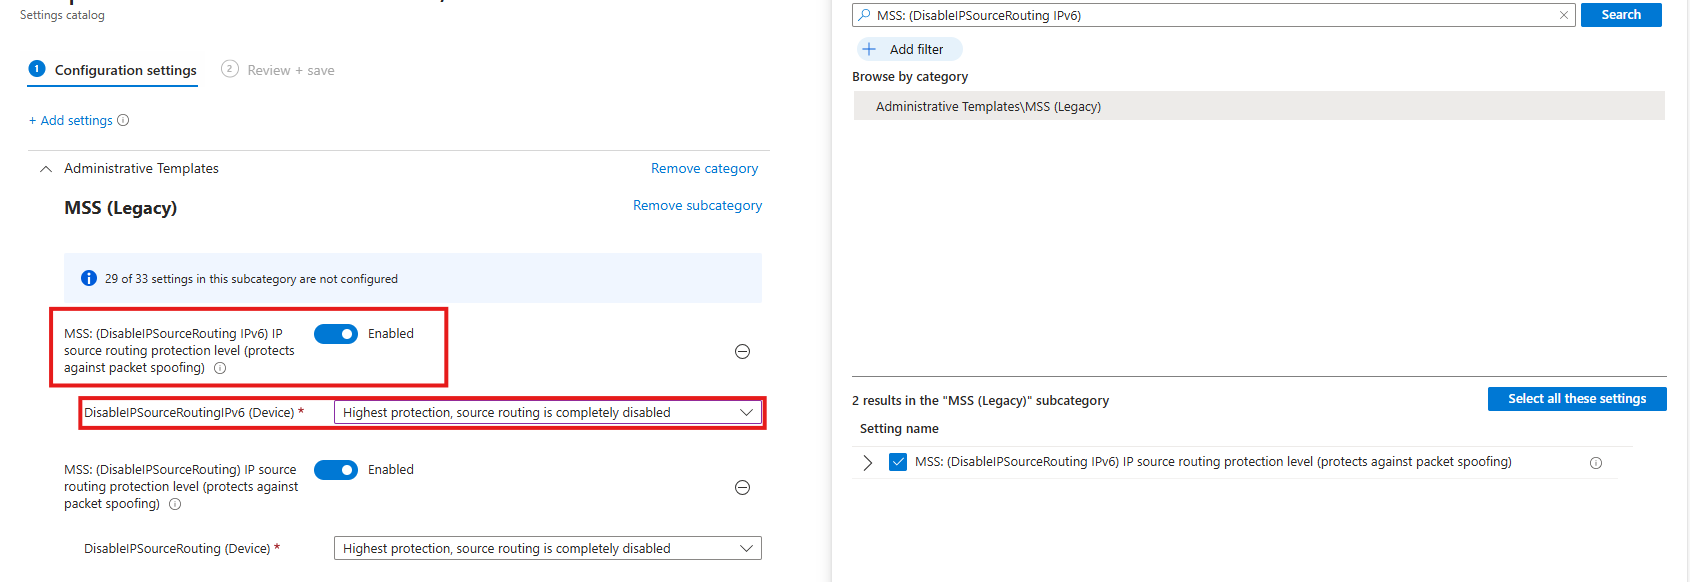
Then select the option and enable it, then set it to the highest protection as the recommendation states.
This recommendation wants us to apply restrictions on User Account Control to local accounts. Extra UAC checks are applied to local accounts when they log in over the network, limiting their permissions and reducing the risk of misuse or lateral movement.
You can find this setting by searching for:
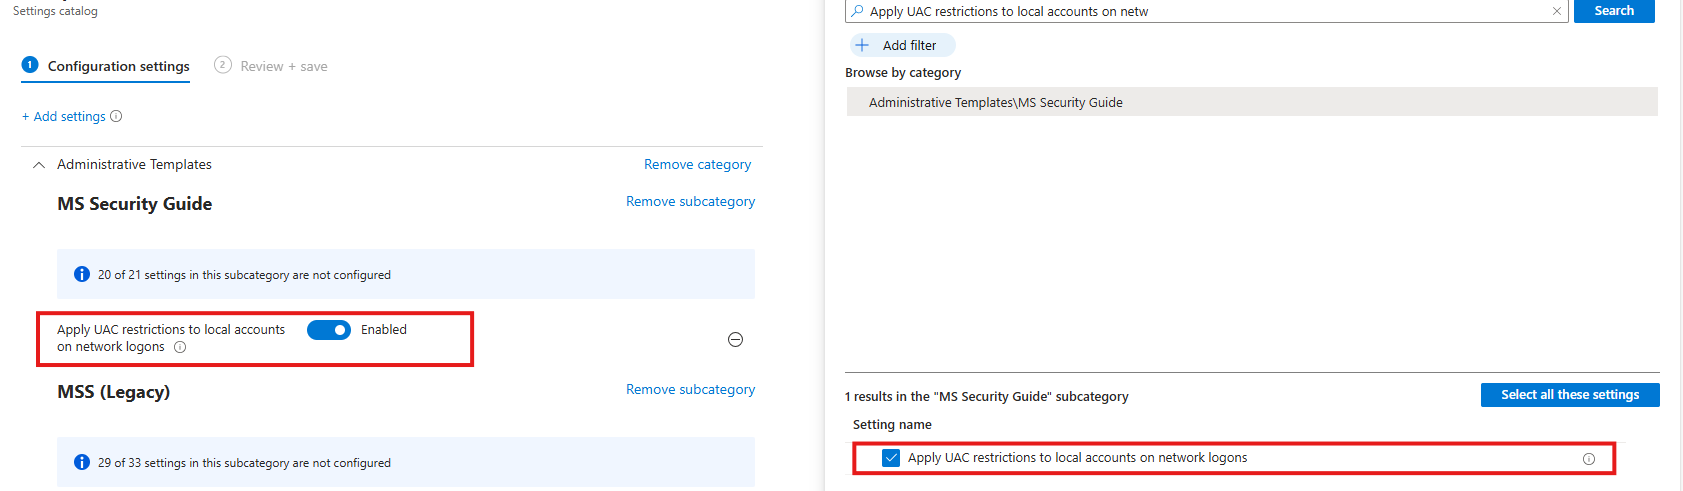
Select the option on the right and then enable it on the left.
This recommendation wants us to disable merging of Windows Firewall rules. Local Microsoft Defender Firewall rules are ignored for the Public profile, so only centrally managed Group Policy rules apply, preventing users or apps from weakening firewall protection.
Search for the Windows Firewall settings, and select these two settings:
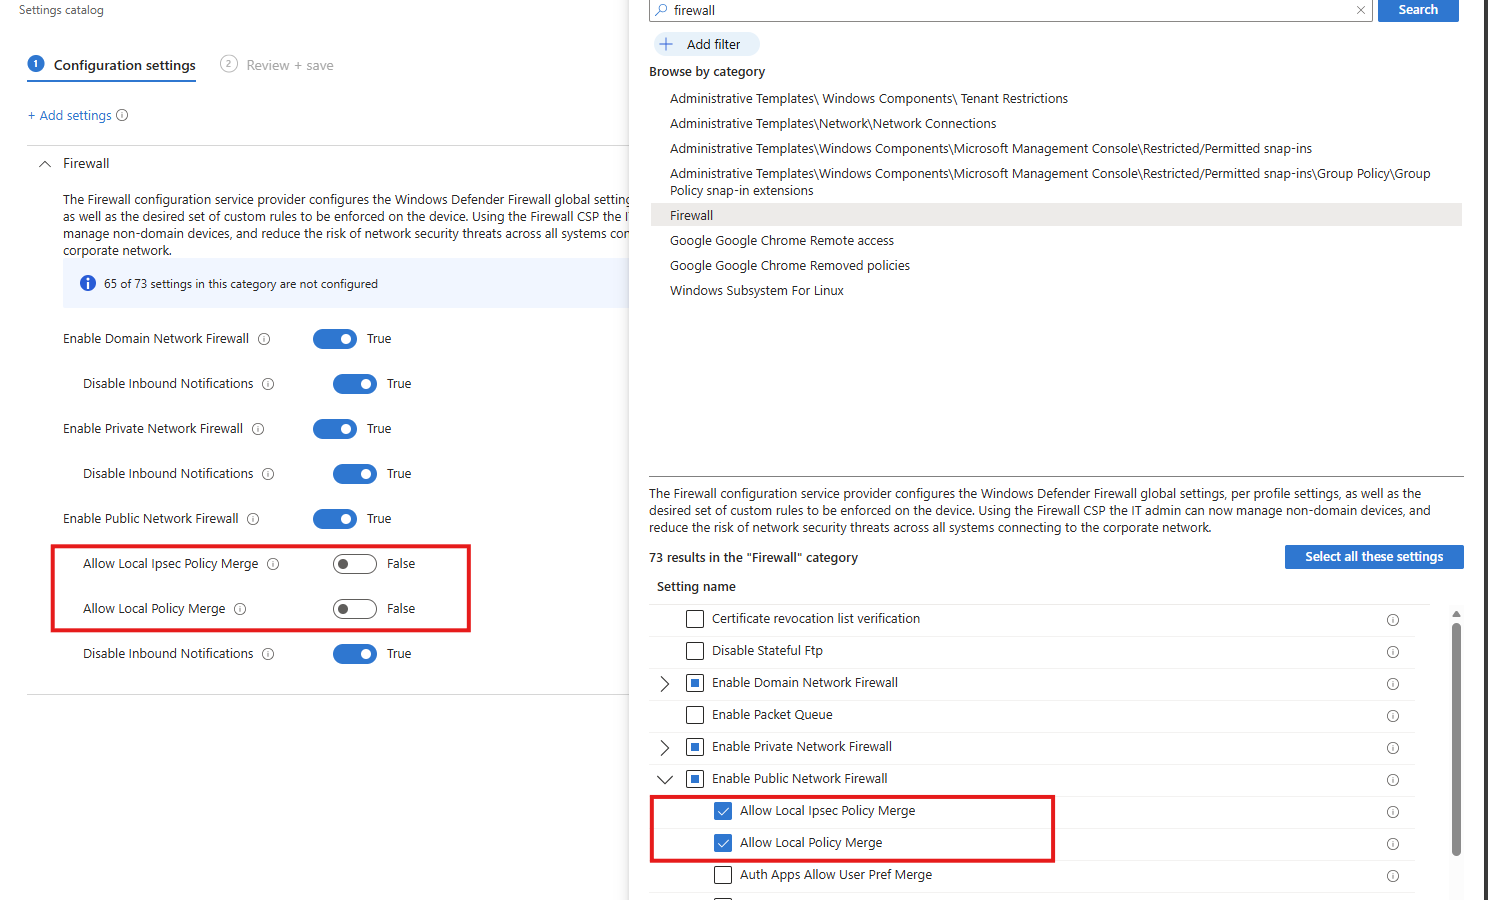
This recommendation wants us to enable Windows Defender to scan removable devices after they are connected. They also can contain malicious files or software and we don’t want to be compromised that way.
Search for:
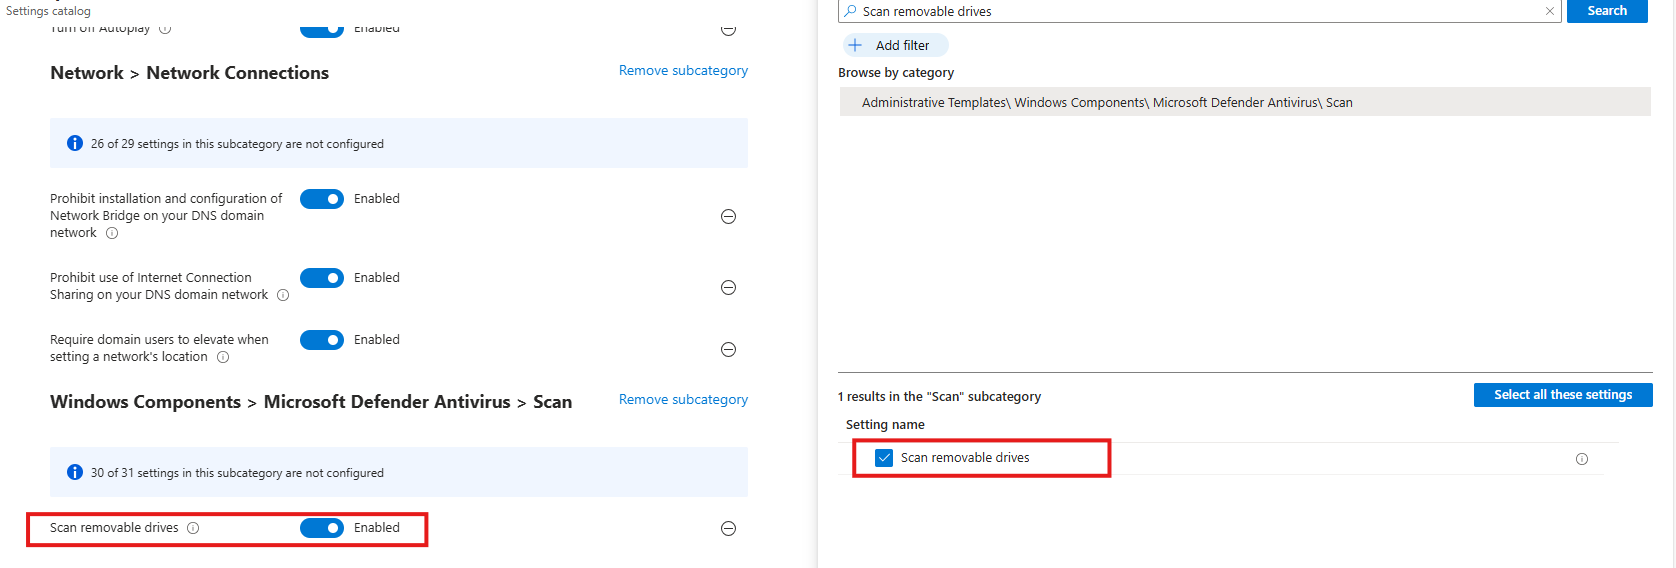
Select the option on the right and then enable it on the left.
This recommendation wants us to disable Remote Assistance without user intervention. Solicited Remote Assistance is disabled to prevent users from granting remote access to their system, reducing the attack surface and the risk of unauthorized control or social-engineering abuse.
Search for:
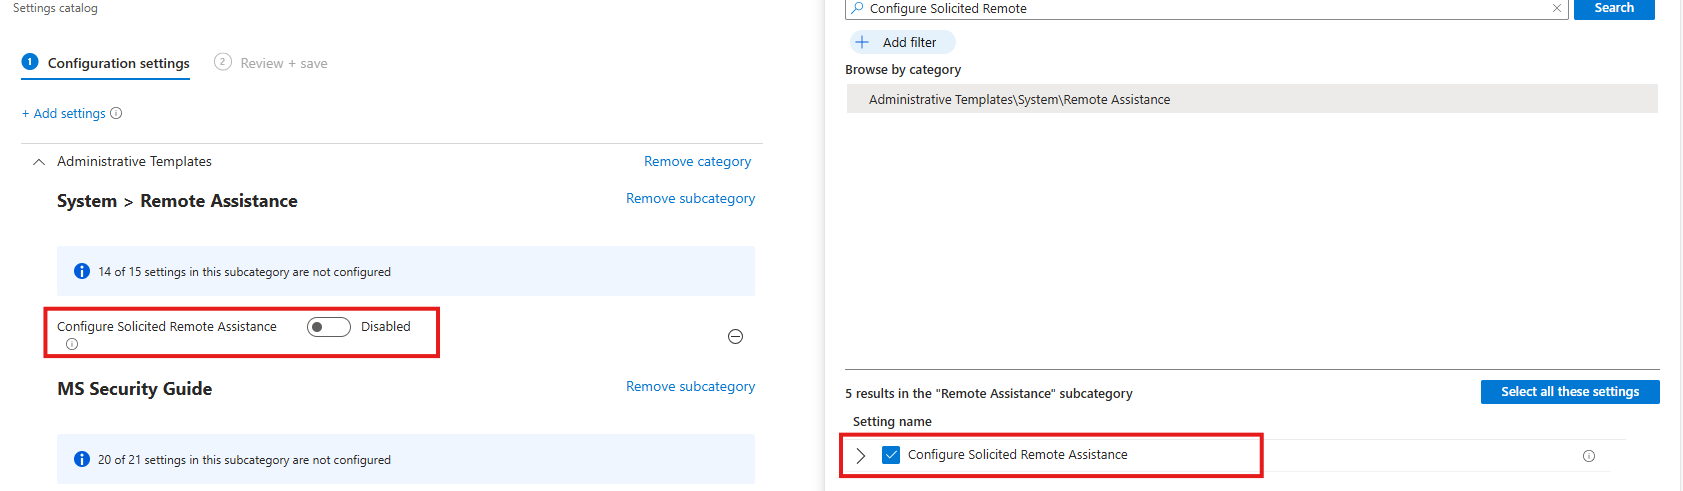
Select the option on the right and then disable it on the left.
This recommendation wants us to disable LM and NTLM authentication methods, forcing the use of stronger, modern authentication methods and reducing exposure to credential theft, relay, and downgrade attacks.
Search for:
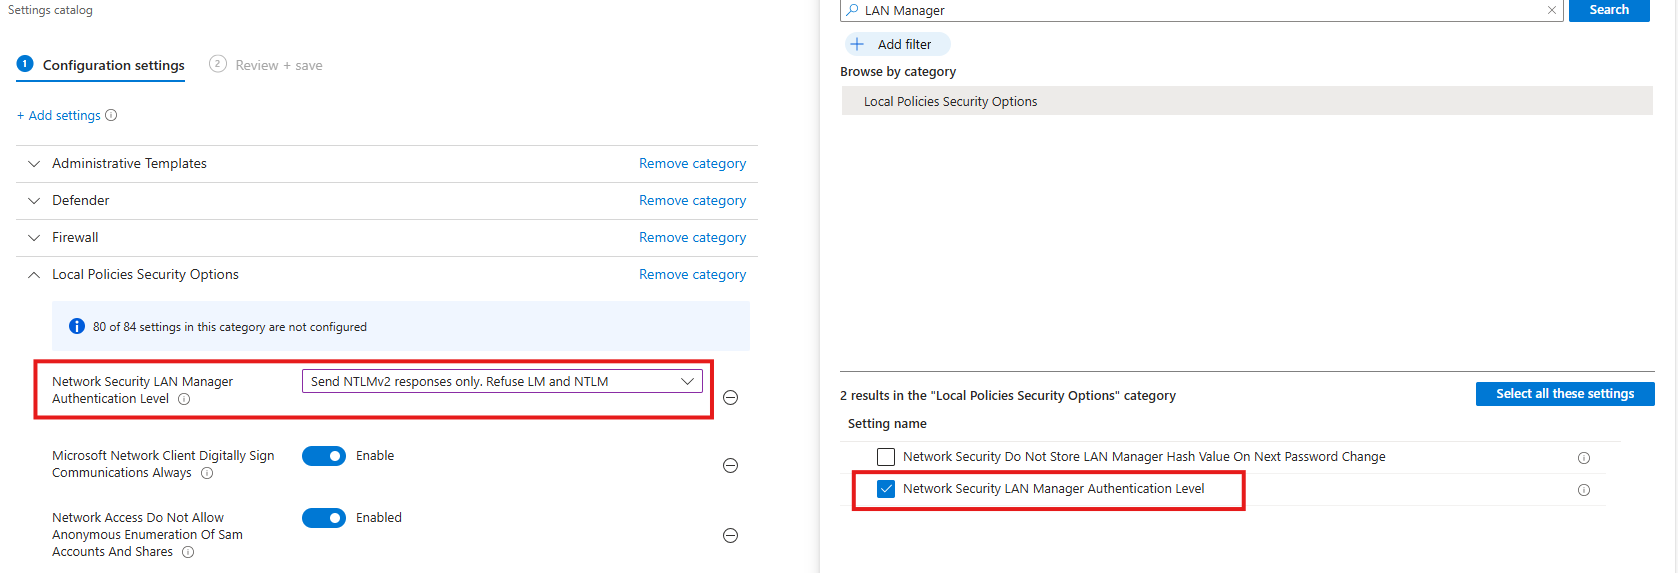
Select the option on the right and then select “Send NTLMv2 responses only. Refuse LM and NTLM”.
This recommendation wants us to set the AutoRun behaviour to “Disabled”. AutoRun is configured to block all automatic execution of commands from removable or external media, preventing malware from running automatically without user interaction.
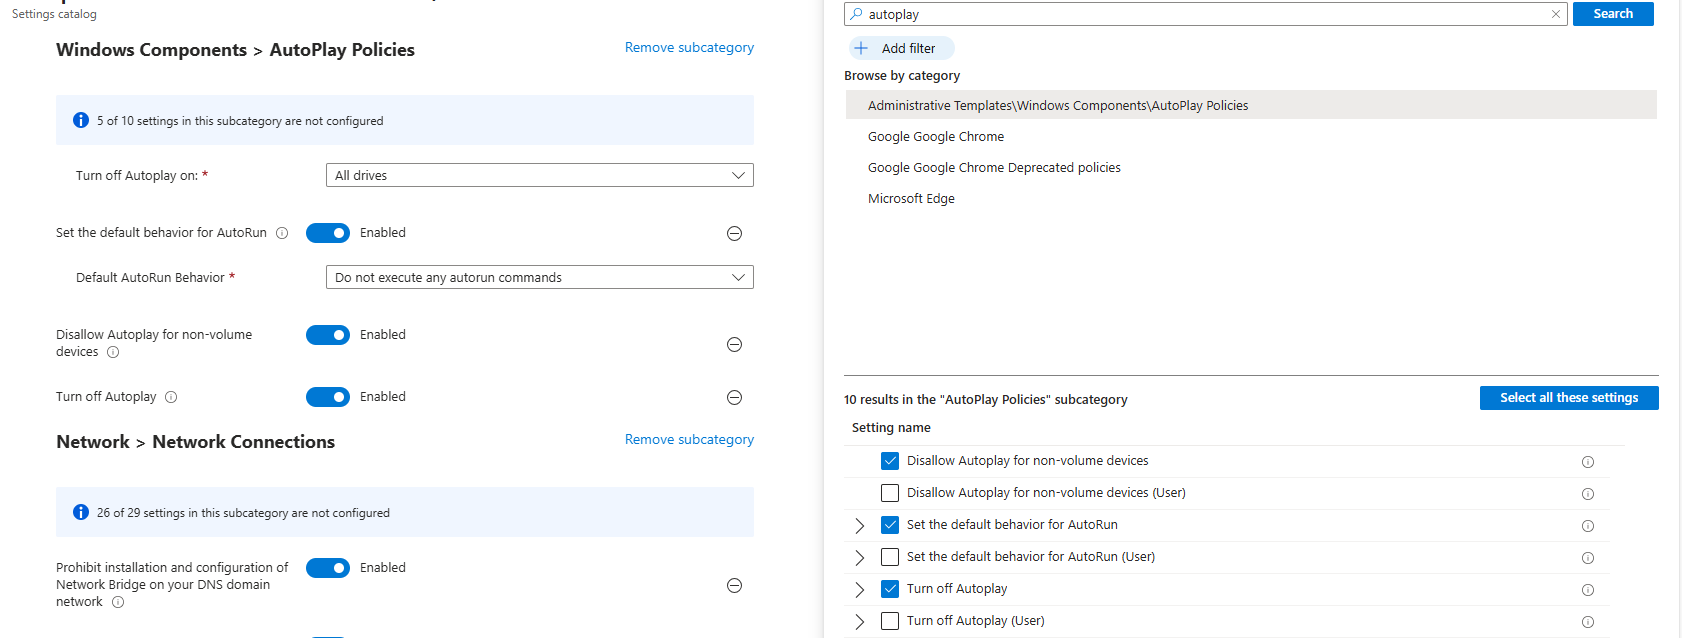
Then set the settings as follows:
This might sound strange, but yea, we have to actually enable some settings to fully disable the feature.
This recommendation wants us to block untrusted and unsigned processes from running when launched from USB devices, reducing the risk of malware execution and unauthorized code running from removable media.
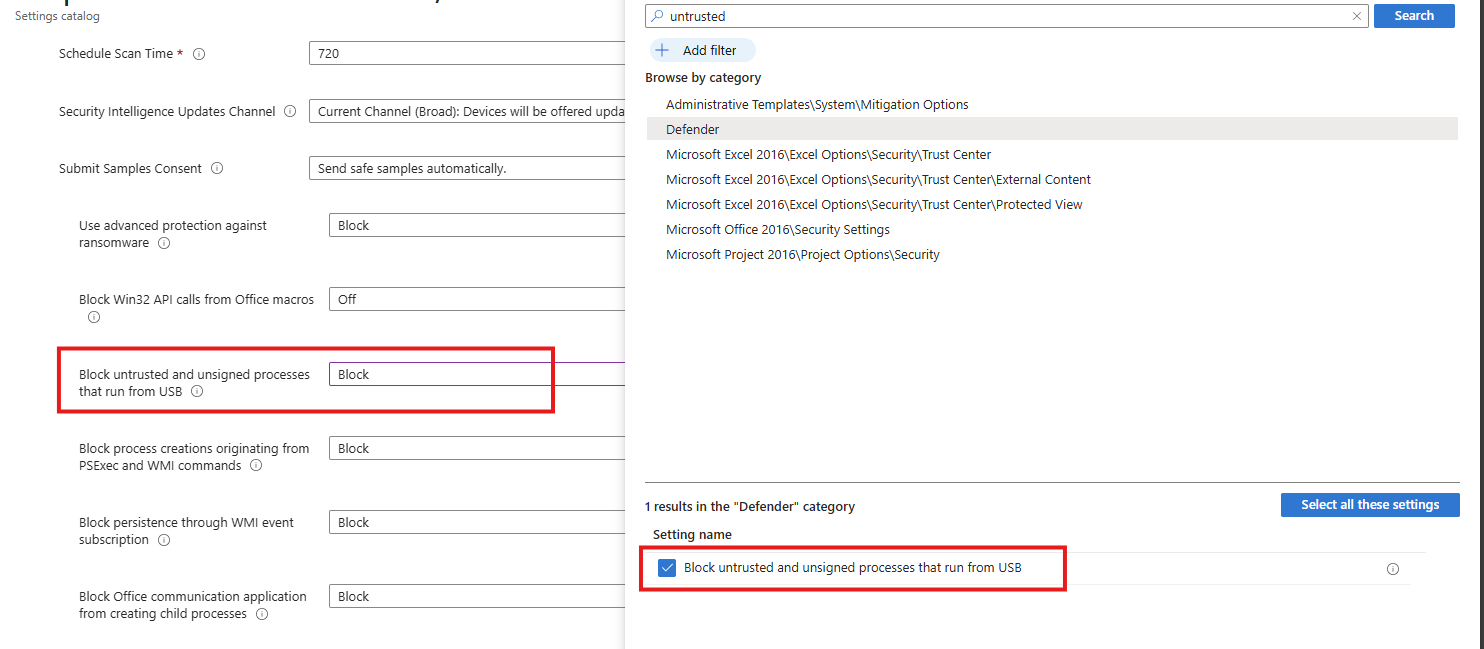
Select the option on the right and then Block it on the left.
This recommendation wants us to enable Microsoft Defender for scanning your email messages.
Search for the setting:
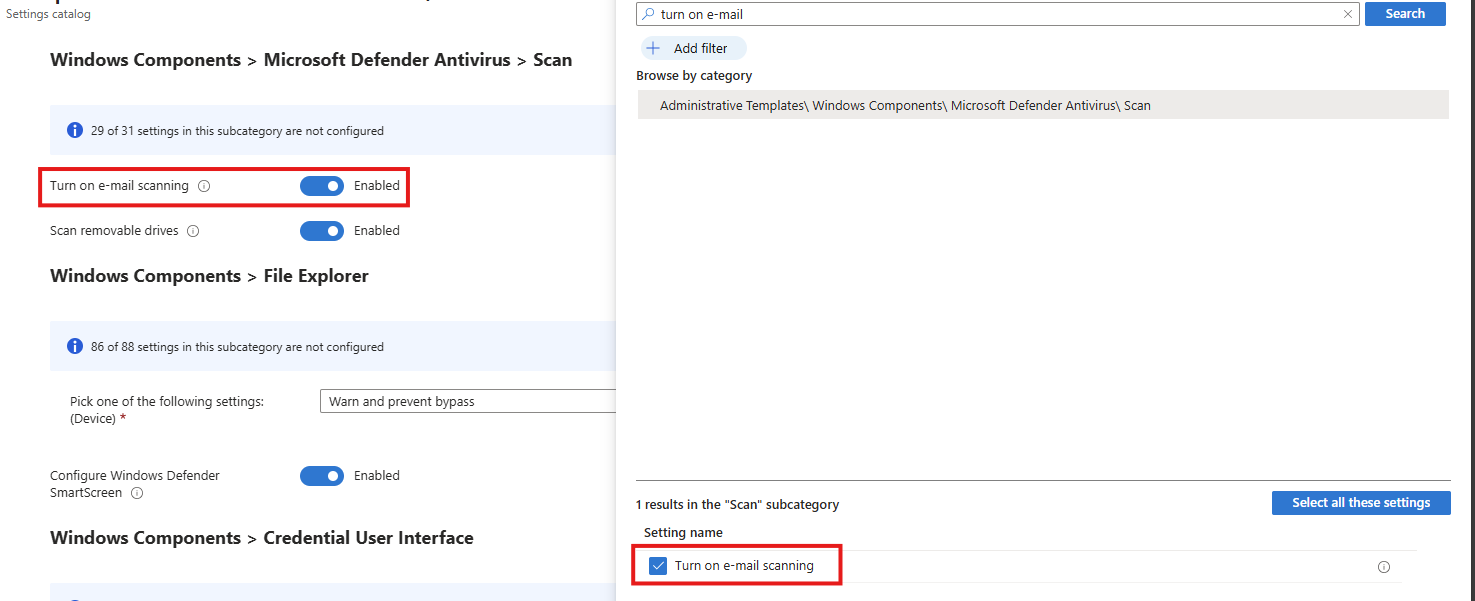
Select the option on the right and then enable it on the left.
This recommendation wants us to block Office macros from calling Win32 APIs, limiting their ability to execute system-level actions and significantly reducing the risk of macro-based malware and abuse.
Search for the setting:
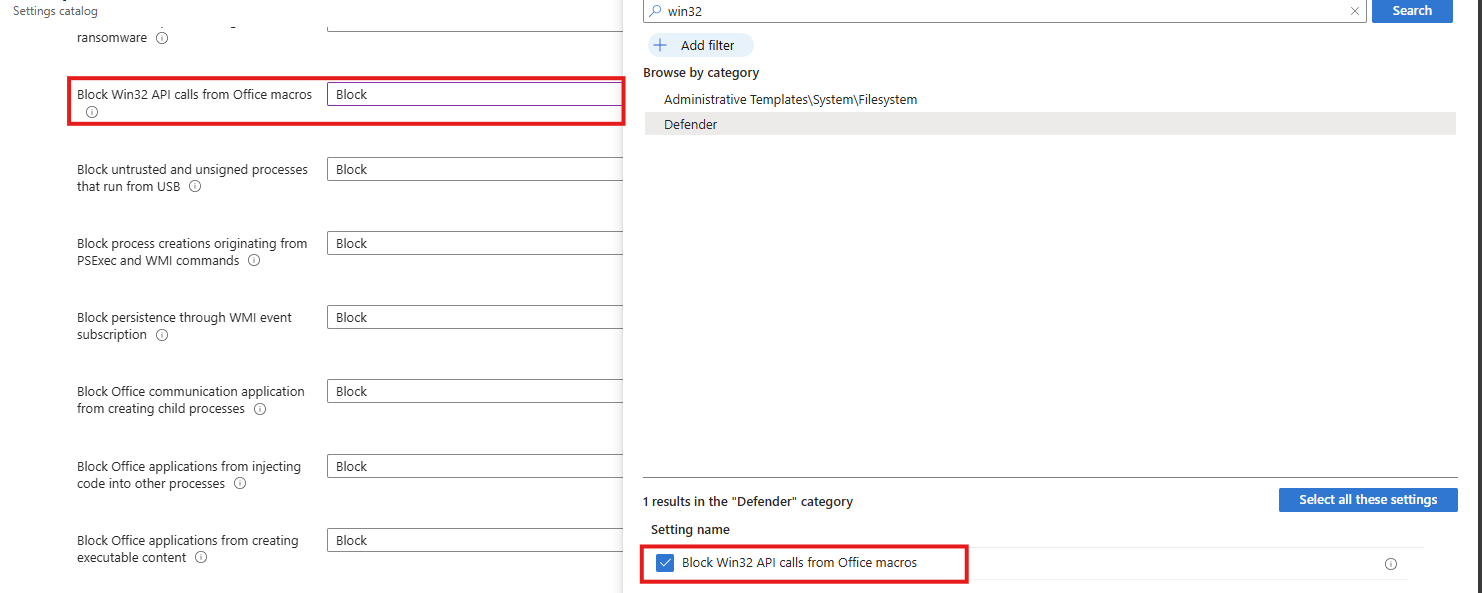
Select the option on the right and then Block it on the left.
This recommendation wants us to block executable files from running, preventing unauthorized or malicious software from being launched and reducing the risk of malware execution.
Search for the setting:
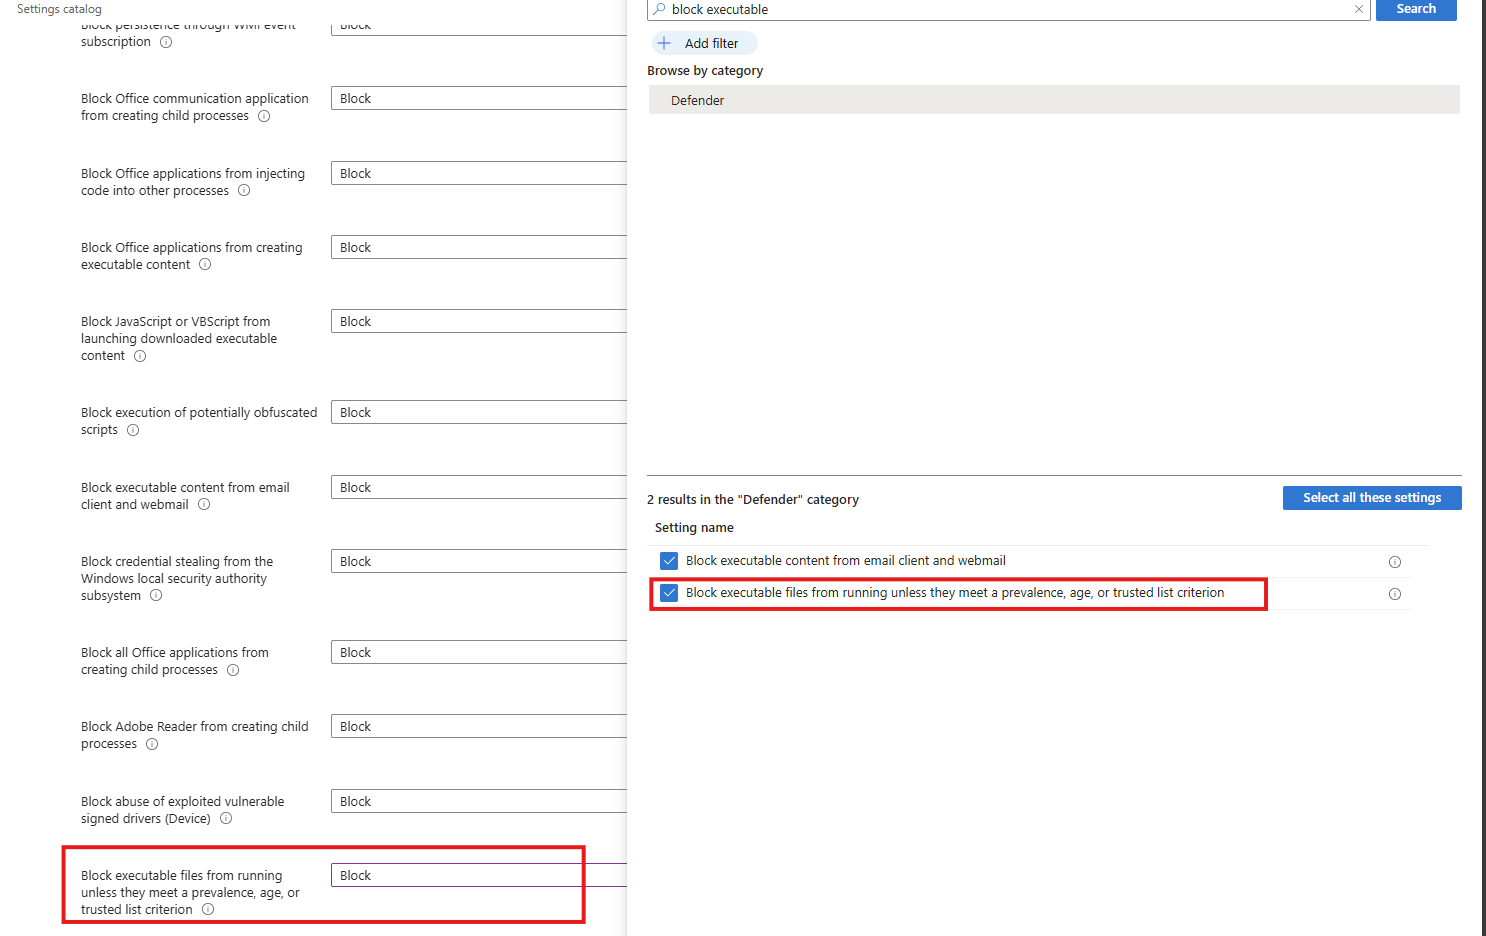
Select the option on the right and then block it on the left.
This recommendation wants us to enable the Microsoft Defender Credential Guard. Microsoft Defender Credential Guard is enabled, isolating credentials in a protected virtualization-based environment to reduce the risk of credential theft from memory by malicious software.
Search for the setting:

Select the option on the right and then enable it on the left (with or without UEFI lock)
This recommendation wants us to configure User Account Control to automatically deny elevation requests for non-admins, preventing users and malware from gaining administrative privileges and reducing the risk of privilege escalation. This blocks windows they don’t have permission to either.
Search for the setting
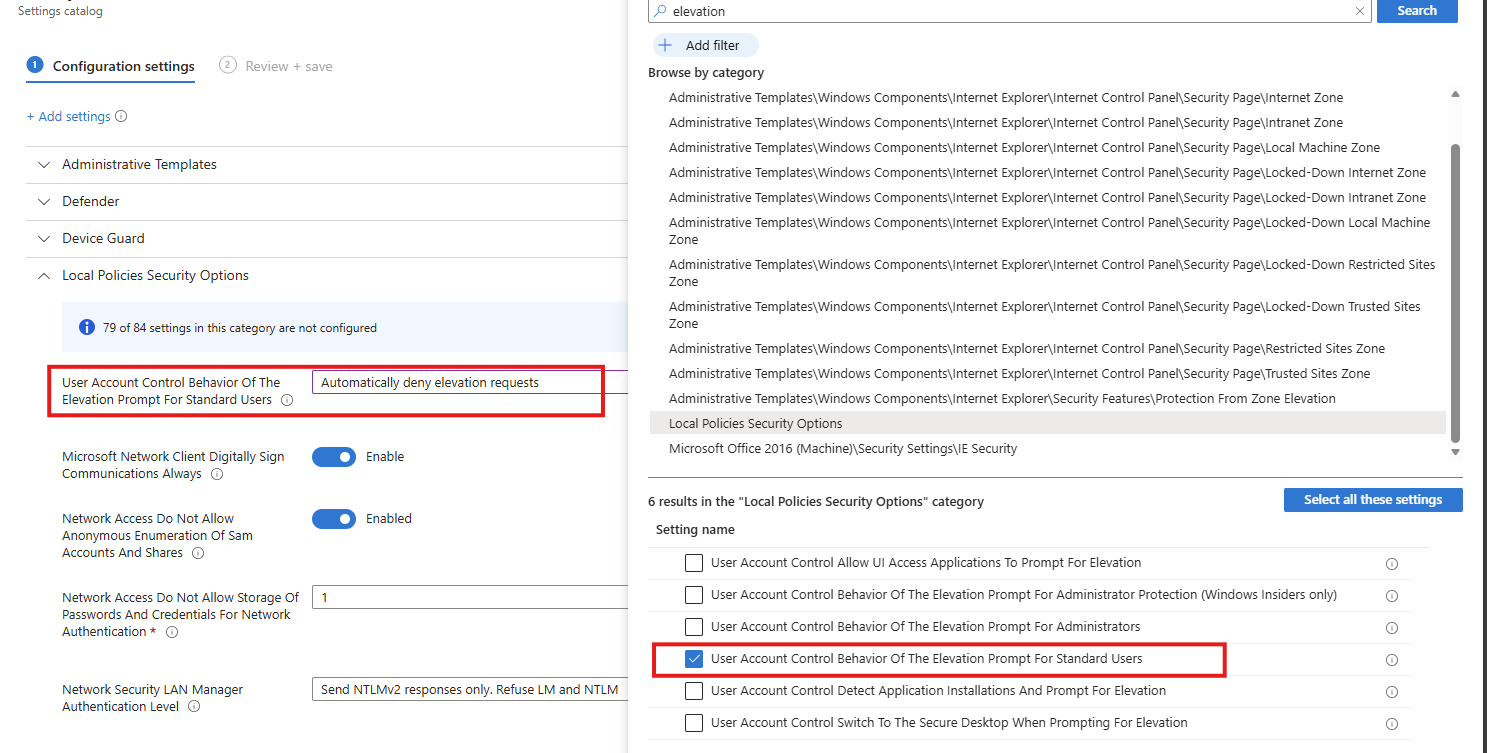
Select the option on the right and then enable it on the left.
This recommendation wants us to enable removable drives to be included in full antivirus scans, increasing the chance of detecting and blocking malware introduced via USB or other external media.
Search for the setting
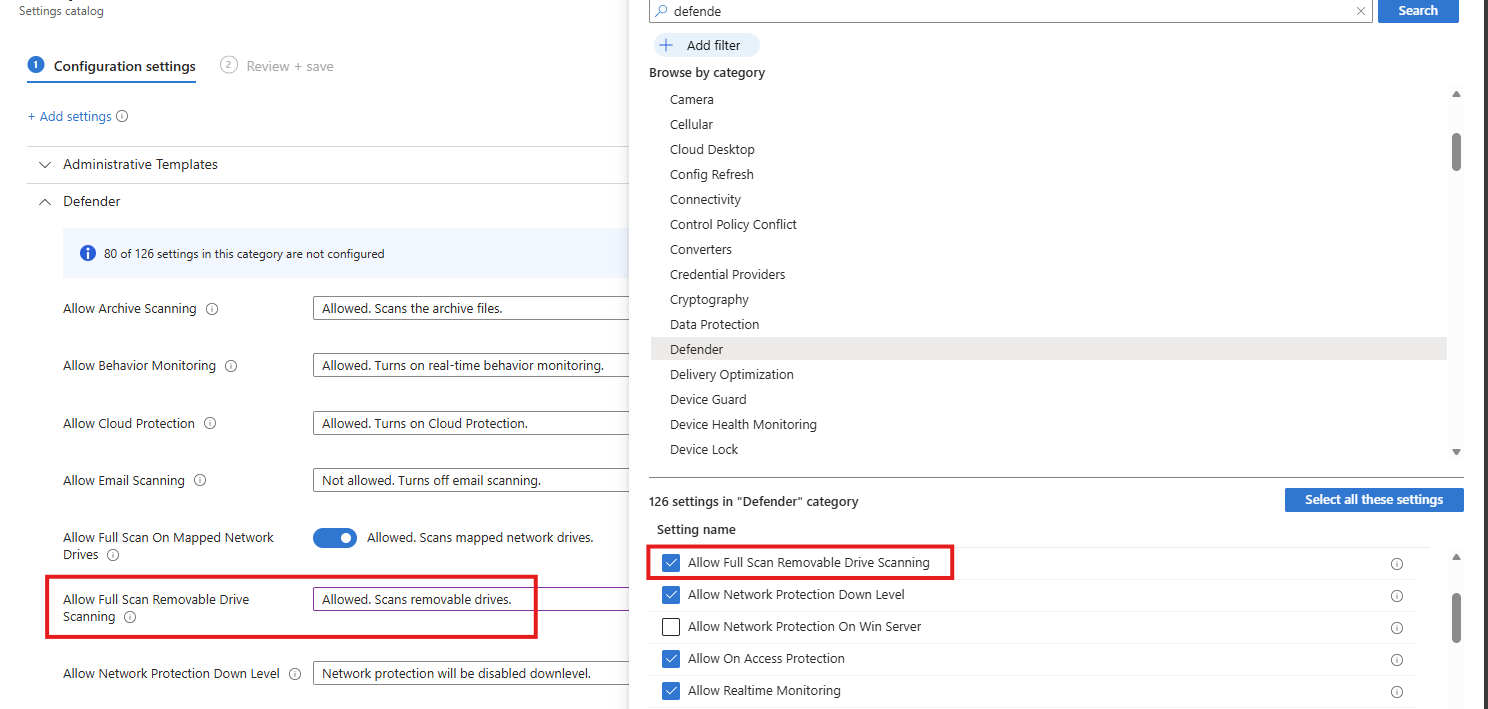
Select the option on the right and then enable it on the left.
This recommendation wants us to enable additional authentication to be required at system startup, ensuring the device cannot boot without user verification and reducing the risk of unauthorized access if the device is lost or stolen.
Search for the setting

Select the option on the right and then enable it on the left.
This recommendation wants us to enforce a minimum Windows PIN of 6 characters. A minimum startup PIN length of six characters is enforced, increasing resistance to brute-force and guess-based attacks during pre-boot authentication.
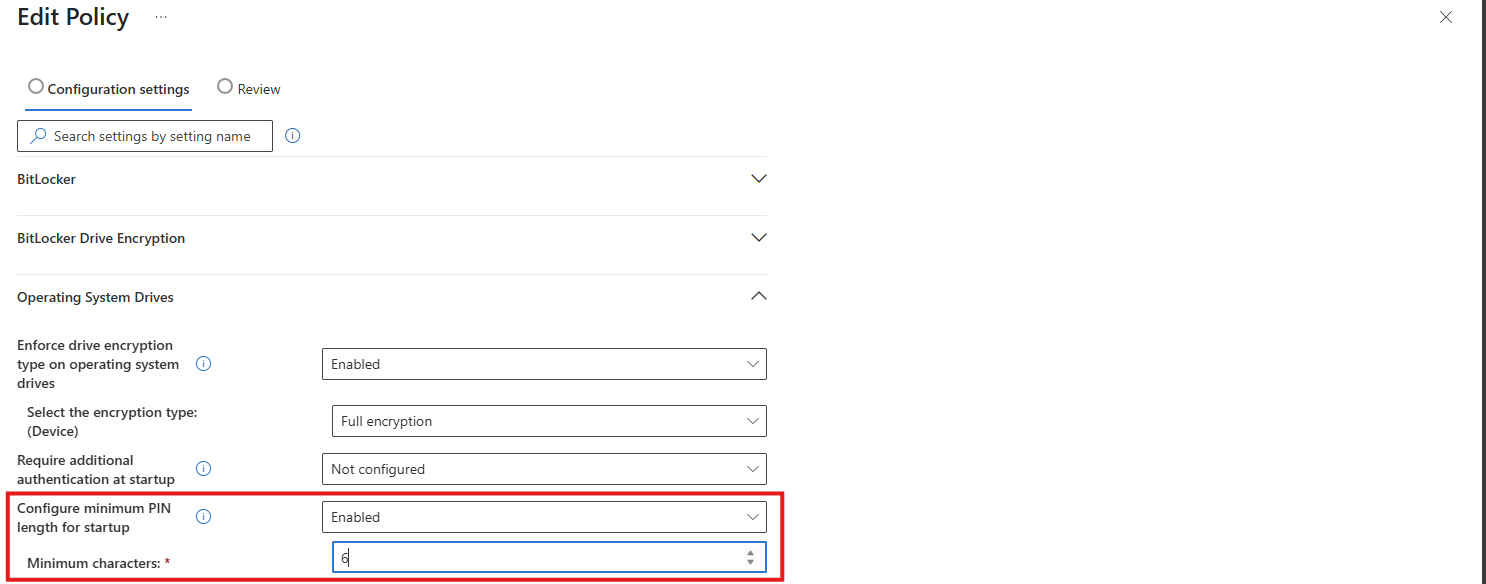
This can be found under the Drive Encryption settings:
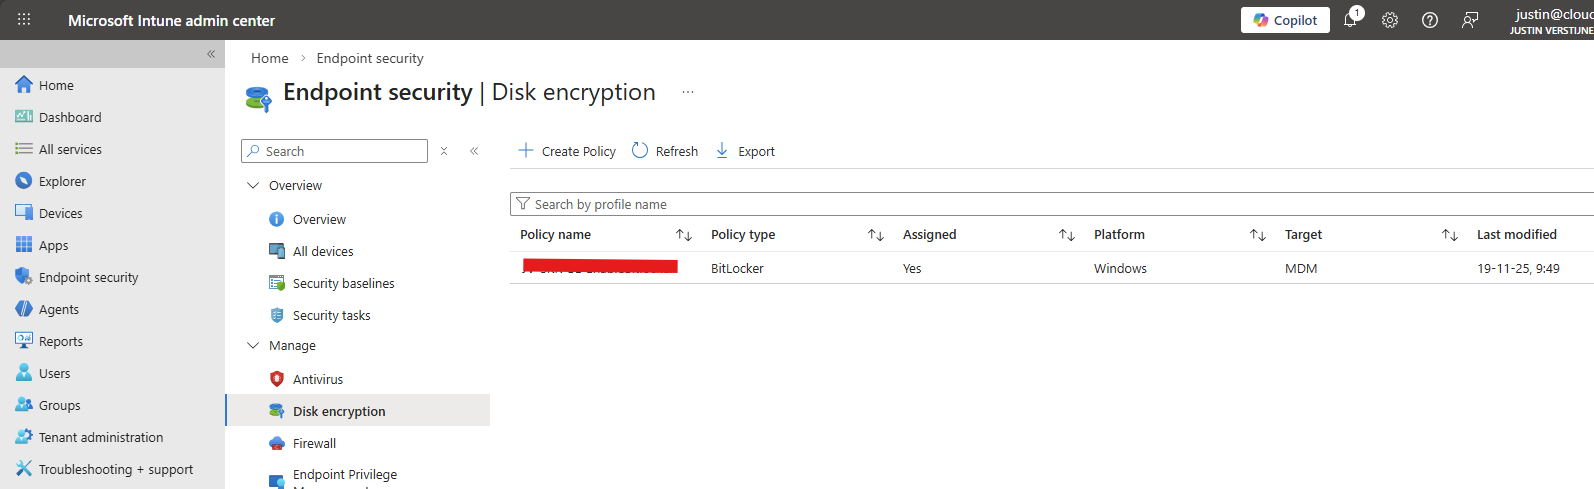
To be generous and if you don’t want to click through the Intune portal, I have my Intune configuration policy here to download:
Download Configuration policy from GitHub
You have reached the end of the page. You can navigate through other blog posts as well, share this post on X, LinkedIn and Reddit or return to the blog posts collection page. Thank you for visiting this post.
If you think something is wrong with this post or you want to know more, you can send me a message to one of my social profiles at: https://justinverstijnen.nl/about/
If you find this page and blog very useful and you want to leave a donation, you can use the button below to buy me a beer. Hosting and maintaining a website takes a lot of time and money. Thank you in advance and cheers :)
The terms and conditions apply to this post.
On this page, I will describe how I implemented my current Microsoft Secure Score on the Identity pillar. This means altering mostly the options of Microsoft Entra ID.
I collected all the options of the Microsoft Entra ID Identity Secure Score on this page, and we will address them all. I also added some industry-accepted options which are not in the secure score framework but are really helpful in avoiding or minimizing attacks in your environment.
You can use all options, or only use a subset of the options. This is up to you :)
Remember, having a secure score of 100% doesn’t mean 100% security. This only means you are using 100% of the security toolbox.
Starting this page, my Secure Score overview is this:
Let’s check first which requirements we have to address. Go to https://security.microsoft.com/securescore and select Microsoft Entra ID.
We then will get this list of items:
As you can see, the bottom 4 items are already done. The top 4 items must be addressed but I will explain how to address them all.
| Recommendation | Entra Information |
| 1. Enable Microsoft Entra ID Identity Protection sign-in risk policies | Ensure you block Medium and High sign-in risks with Conditional Access |
| 2. Enable Microsoft Entra ID Identity Protection user risk policies | Ensure you block High user risks with Conditional Access |
| 3. Ensure multifactor authentication is enabled for all users | Register MFA for all users and enforce it with Conditional Access. Registering is only making sure the user can use MFA. Enforcing it means we will actually use it. |
| 4. Ensure multifactor authentication is enabled for all users in administrative roles | Pretty straight forward |
| 5. Enable Conditional Access policies to block legacy authentication | Pretty straight forward |
| 6. Use least privileged administrative roles | Use less privileged roles for those who need it. Someone only managing billing options or resetting passwords doesn’t need Global Administrator access. |
| 7. Ensure ‘Self service password reset enabled’ is set to ‘All’ | Make sure everyone is able to reset their password themselves, so they can change it when needed, or enforce users to change them with Conditional Access. |
| 8. Ensure the ‘Password expiration policy’ is set to ‘Set passwords to never expire | Never expire passwords, as users will not select stronger passwords. They will mostly choose their birth month/place of birth and add a ascending number like 1, 2, 3 etc. Also those passwords will appear on post-its on their desk. |
| 9. Change password for accounts with leaked credentials | Entra ID will scan regularly with Identity Protection if users’ passwords are leaked. The users with a leaked password must change their password to be compliant with this recommendation. |
| 10. Ensure user consent to apps accessing company data on their behalf is not allowed | Disable users to have permissions to allow 3rd party apps accessing their data. |
| 11. Designate more than one global admin | Always ensure you have one or two back-up accounts. This is to avoid being locked out. Also always exclude on of the accounts from all policies with a very strong password and use this as “break-glass” account. |
As 1 and 2 are mostly to achieve the same goal, I really like to create one policy to address them both. Go to Microsoft Entra, then to “Security” and then to “Conditional Access”. (or use this link).
First, check the list of users that might be blocked due to the results of this new policy: https://entra.microsoft.com/#view/Microsoft_AAD_IAM/SecurityMenuBlade/~/RiskyUsers/menuId/RiskyUsers/fromNav/
Then proceedd creating the policy.
In my environment, I use a very clear naming scheme for Conditional Access. I start with JV, then state if this policy allows or blocks users and then some more information. I call this new policy “JV-Block-RiskyUsersSignins”.
Create a new policy and name it to your desired naming scheme.
Then select “Users” and include all users.
After that, click on “Exclude”, select “Users and groups” and select your break-glass administrator account to have this account excluded from this policy. This ensures if you make any mistake, you have still access to the tenant with this account. Great recommendation, can save you weeks from support of Microsoft who wants to know in 5 different ways that its actually you.
For “Target Resources”, select “All resources”.
At “Conditions”, select the following options, according to Microsoft’s best practices (source)
You can set this more tight, but expect false positives among users who are unable to sign in.
Then at “Grant”, set “Block access”. This ensures if users are at risk they are unable to sign in to their account and they need the skilled helpdesk to regain access to their account. It’s up to the helpdesk to confirm if the account is compromised, to collect sign-in actions, to take action and most of the time enforce a password change.
Now the policy can be created and ready to be enforced:
Make sure you have a Conditional Access policy in place where you enforce Multi Factor Authentication for all users for this to work:
I have a policy in place that requires MFA or sign-in from a compliant device. This generally is a good approach. Make sure to exclude your break-glass administrator from the policy if making errors and/or not having a compliant device and/or having problems with your normal account.
Then proceed by logging into all of your user accounts, go to aka.ms/mfasetup and register at least 2 methods. You can enforce this using a registration policy. Users then must register for MFA otherwise they will be rejected to access any data.
Microsoft really recommends us to disable legacy authentication for all users, as they are protocols without MFA and any additional security. These are protocols like SMTP/IMAP/POP.
We can actually create one Conditional Access policy to do this. Let’s head back to Conditional Access to create a new policy.
Select “All Users” and exclude your break-glass administrator account.
Select all target resources.
Under “Conditions”, select “Client Apps” and select the options:
Then under “Grant”, select “Block access” to block any legacy authentication protocols from being used.
Make sure you use lower-privileged administrative roles for your users. This is not particularly a setting but more a process and teamwork to achieve.
Microsoft Entra ID has some lower-privileged roles which we must utilize. I will give some good examples of practice use of lower privileged roles, to minimize the Global Administrator role.
| Requirement | Correct role |
| User must be able to export users for billing purposes | User Administrator |
| User must be able to change licenses and add new products | Billing Administrator |
| User must be able to invite guest users | Guest Inviter |
| User must be able to manage applications and give consent | Cloud Application Administrator |
For a comprehensive list of Entra ID roles, check out this Microsoft page: https://learn.microsoft.com/en-us/entra/identity/role-based-access-control/permissions-reference
Microsoft recommends us that users have the Self Service Password Reset (SSPR) option enabled for all users. You can find this in Microsoft Entra -> Password reset (or use this link: https://entra.microsoft.com/#view/Microsoft_AAD_IAM/PasswordResetMenuBlade/~/Properties/fromNav/
Set this switch to “All” to enable this for all users. After a users logging in after this change, they will have to register for this new feature. Make sure you also set the methods needed to reset a password is “2” to enhance security.
A good recommendation is to let passwords of users never expire. This was a best practice in IT for around 15 years, but multiple researches pointed out that they will not work. Users will use a weak base password and will only add ascending numbers to that.
To disable this option (which is already disabled by default), go to Microsoft 365 Admin Center.
Then go to “Settings”, “Org settings”, then the tab “Security & privacy” and then search for “Password expiration policy”. Then check the box to disable this option.
Microsoft Entra ID Protection will automatically scan for users with leaked credentials. If any user have leaked credentials, the user risk will be “High” and will be blocked by the policy we created in step 1. Changing the password of the user will be enough to give them access again.
You can check pro-actively in this dashboard for risky users or sign ins:
It is generally a good approach to disable users to give 3rd parties access to their profile and organization data. https://entra.microsoft.com/#view/Microsoft_AAD_IAM/ConsentPoliciesMenuBlade/~/UserSettings
Setting this to “Do not allow user consent” will give your users a prompt where they can request access. Let’s configure that to make sure we have this flow correctly.
Go to “Admin consent settings” and configure the following options:
Select “Yes” to the “Users can request…” option and select users, groups or roles who are able to allow the consent. Then save the new configuration.
Now if users get any request from 3rd party applications, they can do a request to their admins to allow the application:
The request will then popup into this window: https://portal.azure.com/#view/Microsoft_AAD_IAM/StartboardApplicationsMenuBlade/~/AccessRequests/menuId~/null
It’s always recommended to have a break-glass administrator account. Secure this break-glass account in multiple ways, like:
Give this administrator account Global Administrator account and only use it as last-resort from accessing your tenant.
Something that is in no Secure Score check, but very important is to block manual sign in of your Shared Mailbox accounts. As we only want to delegate access to those using Manage/SendAs/Send on behalf permissions, we don’t need to expose those accounts.
Open up the Microsoft 365 Admin Center, search for the shared Mailbox and click on “Block Sign-in”.
Something that is also in no Secure Score check, is to disable some user settings. By default, simple users have some really high permissions to do certain actions.
In Microsoft Entra Admin Center, go to “Users” and the “User Settings”.
Set the following options:
This must look like this for the highest level of security:
On this page we did everything to defend ourselves from certain identity attacks. However, being 100% secure is a fairy tale and attackers mostly will break into accounts to send phishing emails, as this must look very legit to other users.
This type of attack is described as such by the MITRE ATTACK framework:
| Category | Technique Name | Technique ID | Notes |
|---|---|---|---|
| Identity Attacks | Credential Harvesting | T1589 / T1557 / T1552 | Used to collect or intercept credentials. |
| Identity Attacks | Valid Accounts | T1078 | Using a compromised legitimate account. |
| Phishing from Compromised Accounts | Internal Spearphishing | T1534 | Sending phishing emails from a legitimate internal account to increase credibility. |
| Phishing from Compromised Accounts | Masquerading | T1036 | Impersonating a legitimate user. |
A good recommendation I can give is to limit the amount of outbound email messages a user can send per hour or day. We can do this in Microsoft Denfender with an Outbound anti-spam policy:
In this policy, I was very strict and set the maximum limit of every user to 100 messages. You can set this higher, but be aware that an attacker can send thousands of messages within minutes. The Exchange Online default limit is 10.000 messages which can cause devastating damage if being breached. Not only financial damage, but your good name is being abused too.
After I did all the configurations described on this page, my Identity secure score was at a whopping 98.48%.
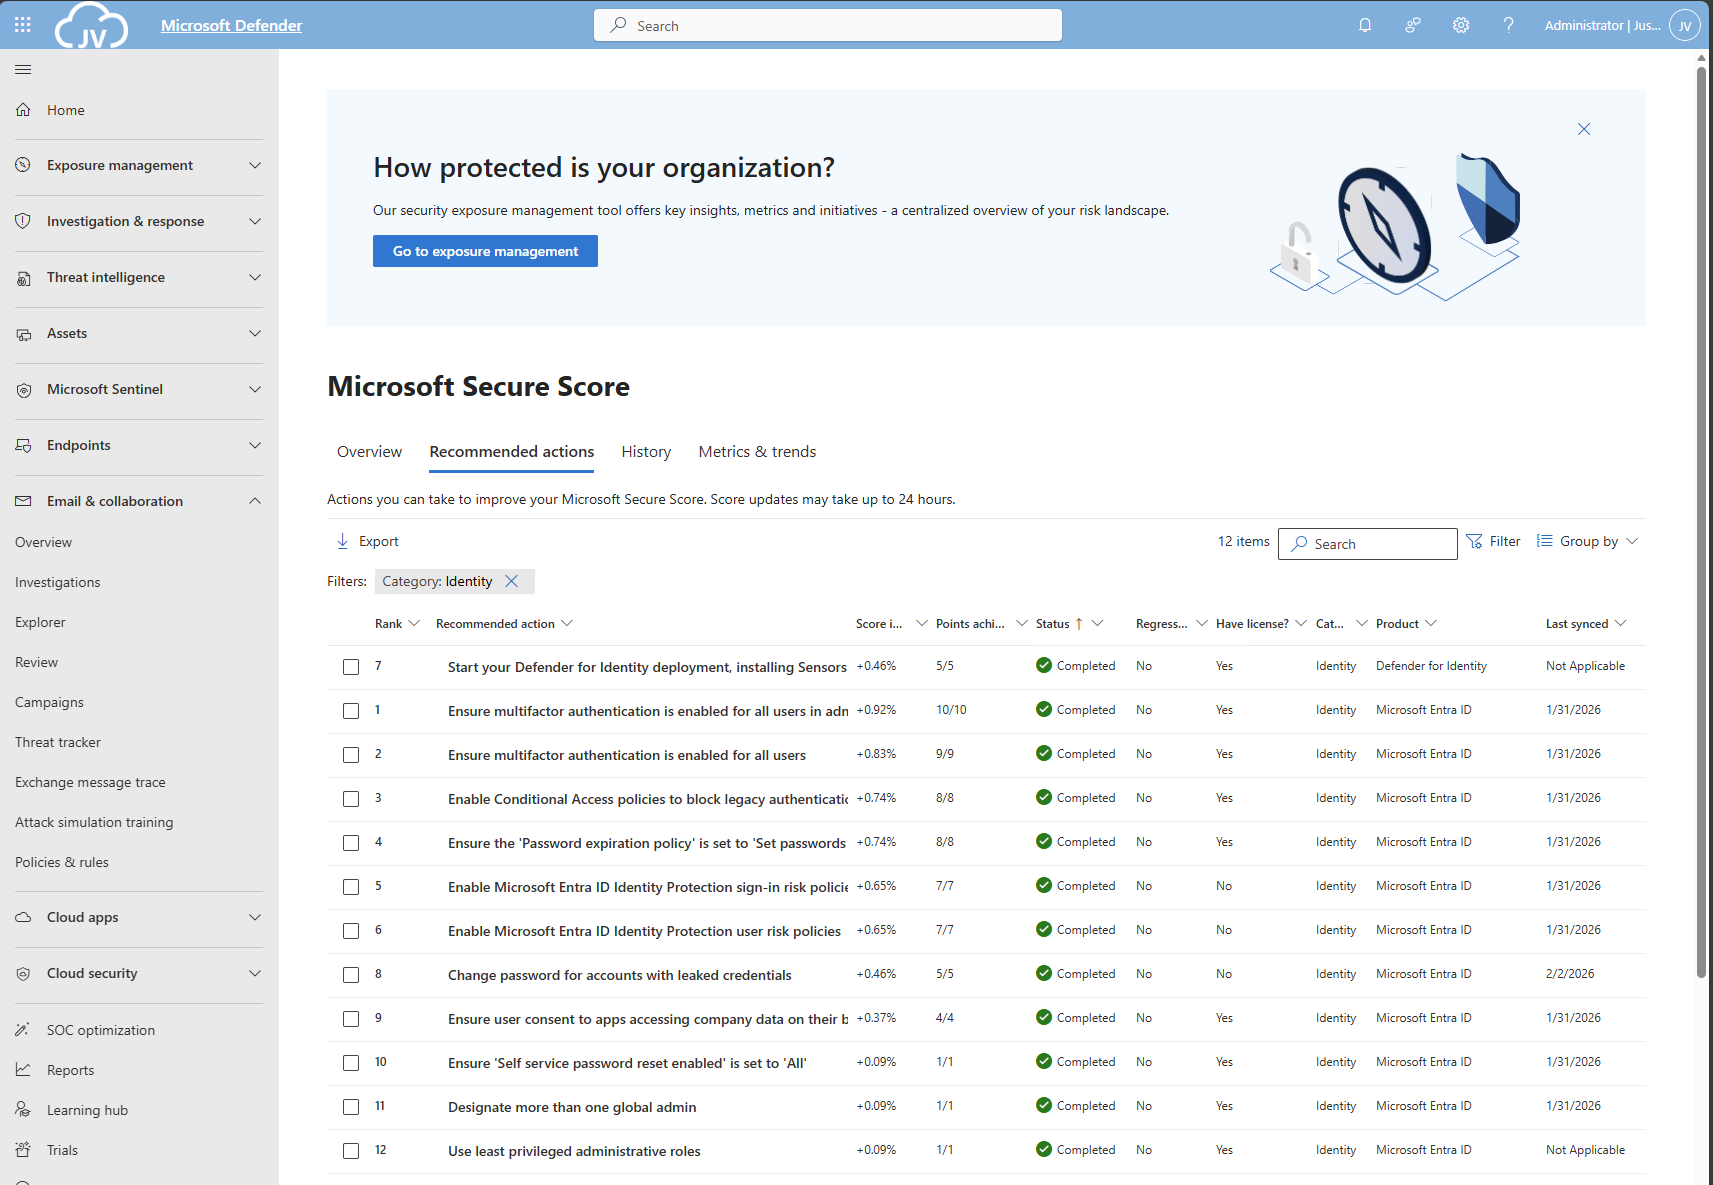
And the result on the overview pages:
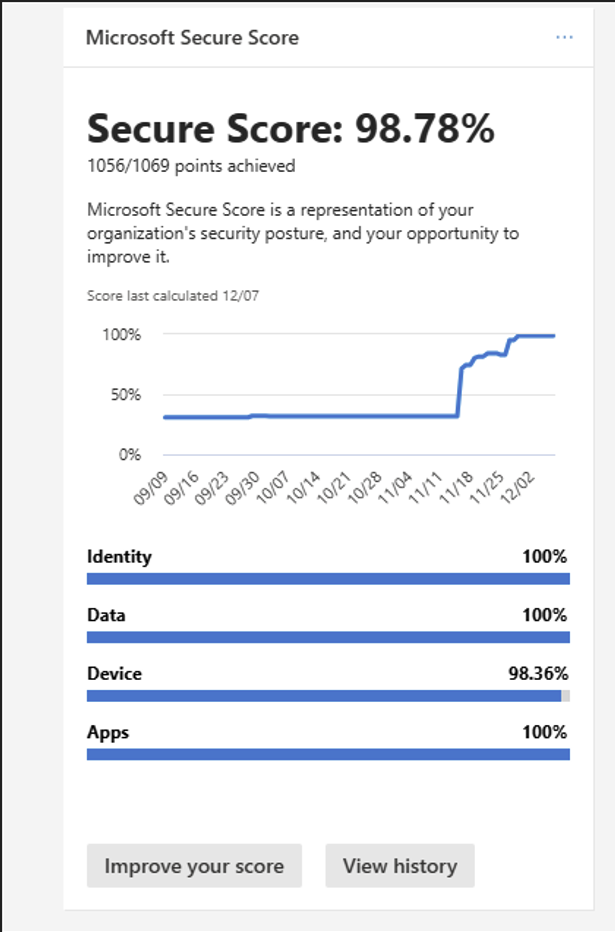

This page contains all the recommendations to enhance your Secure Score for the Identity pillar. This really helps defending your identities from several attacks and utilizing as much as 100% of the toolbox on this, somewhat fragile pillar.
Thank you for reading this post and I hope it was helpful.
These sources helped me by writing and research for this post;
You have reached the end of the page. You can navigate through other blog posts as well, share this post on X, LinkedIn and Reddit or return to the blog posts collection page. Thank you for visiting this post.
If you think something is wrong with this post or you want to know more, you can send me a message to one of my social profiles at: https://justinverstijnen.nl/about/
If you find this page and blog very useful and you want to leave a donation, you can use the button below to buy me a beer. Hosting and maintaining a website takes a lot of time and money. Thank you in advance and cheers :)
The terms and conditions apply to this post.
All pages without a category. Mostly generic and hidden pages.
All pages referring or tutorials for Windows Server.
Active Directory Domain Controllers are assigned 5 different FSMO roles, which all have their own function. We can separate them over multiple servers to create more redundancy, but make sure to handle those all as servers. All roles neeed a 24/7 uptime for your environment to work properly.
In this guide, I will give a brief explaination of the roles, what their function is and how to move them to different servers to enhance availability and redundancy.
FSMO stands for Flexible Single Master Operations. Active Directory is normally multi-master, meaning changes can be made on any domain controller. However, some operations must be handled by one specific domain controller at a time to avoid conflicts. These special responsibilities are called the FSMO roles.
There are five FSMO roles:
Let’s look at them all and explain what their function is:
| FSMO Role | Scope | Primary Responsibilities |
|---|---|---|
| Schema Master | Forest | Manages Schema updates |
| Domain Naming Master | Forest | Adds/removes domains |
| PDC Emulator | Domain | Time service, password updates, Group Policy |
| RID Master | Domain | Assigns RID pools for unique SIDs |
| Infrastructure Master | Domain | Maintains cross-domain references |
For more information about the specifics of the roles, check out the official Microsoft page: https://learn.microsoft.com/en-us/troubleshoot/windows-server/active-directory/fsmo-roles
Depending on your environment, these roles can run on one or multiple domain controllers. If having an environment with a single domain controller, all roles will be done by that single server. As you might already guess, this is a single point of failure.
In my environment, I have 3 domain controllers. This means we can separate all roles over the 3 servers. I also use Microsoft Azure to run them, and so placed the 3 servers into 3 availability zones.
| Server | Roles | Availability Zone |
| JV-DC01.justinverstijnen.nl | Primary Domain Controller (PDC) Infrastructure master | Zone 1 |
| JV-DC02.justinverstijnen.nl | Domain naming master RID Master | Zone 2 |
| JV-DC03.justinverstijnen.nl | Schema Master Entra Connect Sync | Zone 3 |
Because Entra Connect Sync is also a critical function of my domain, I placed this on my third server to give all 3 servers 2 dedicated roles.

To view how the roles are separated at this time, run this command at one of your AD management servers (or domain controllers):
netdom query fsmoYou will get an output like this:
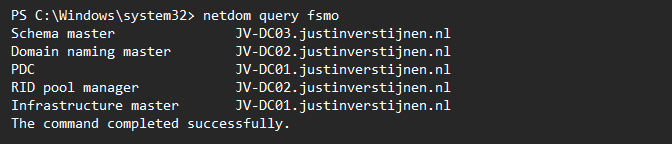
Here I have separated the roles onto 3 different servers. In Microsoft Azure, I have the servers set-up in different availability zones to also defend my environment to datacenter-outages.
We can move those roles with PowerShell by using those commands:
Move-ADDirectoryServerOperationMasterRole -Identity *server* -OperationMasterRole PDCEmulator -Confirm:$falseMake sure to change the *server* placeholder to your server name.
To move all roles to predetermined servers, you can also run all commands at once:
Move-ADDirectoryServerOperationMasterRole -Identity *server* -OperationMasterRole PDCEmulator -Confirm:$false
Move-ADDirectoryServerOperationMasterRole -Identity *server* -OperationMasterRole InfrastructureMaster -Confirm:$false
Move-ADDirectoryServerOperationMasterRole -Identity *server* -OperationMasterRole RIDMaster -Confirm:$false
Move-ADDirectoryServerOperationMasterRole -Identity *server* -OperationMasterRole DomainNamingMaster -Confirm:$false
Move-ADDirectoryServerOperationMasterRole -Identity *server* -OperationMasterRole SchemaMaster -Confirm:$false
Make sure to change the *server* placeholder to your server names.
Every now and then, we need to move some FSMO roles to other servers or we need this when setting up. Dividing the roles onto multiple servers ensure not the whole domain is interrupted with one server failing and so creates redundancy and availability for your users.
These sources helped me by writing and research for this post;
You have reached the end of the page. You can navigate through other blog posts as well, share this post on X, LinkedIn and Reddit or return to the blog posts collection page. Thank you for visiting this post.
If you think something is wrong with this post or you want to know more, you can send me a message to one of my social profiles at: https://justinverstijnen.nl/about/
If you find this page and blog very useful and you want to leave a donation, you can use the button below to buy me a beer. Hosting and maintaining a website takes a lot of time and money. Thank you in advance and cheers :)
The terms and conditions apply to this post.
When you use Hyper-V server, you want to manage this with the management tools. However, by default Hyper-V only allows connections from domain-joined machines by design because of security and trust reasons.
We can bypass this requirement by building these trust ourselves and so managing the server from a machine that isnt even in a domain but Entra ID Joined or in a workgroup.
When you use Windows 11 Pro/Education/Enterprise, you have the option to install Hyper-V on your machine. This can be done through the features on demand window:
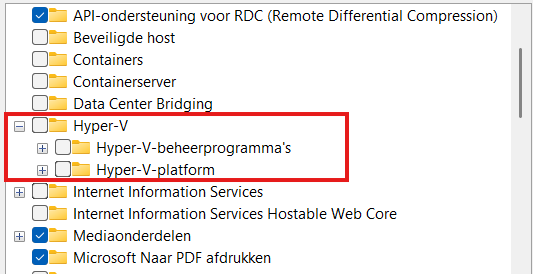
Here select the management tools and you are good to go.
Before we can manage Hyper-V server from our non-domain joined machine, we need to configure some things on both sides. Both has to trust each other before we can make the connection.
Let’s dive into these steps to make the connection work.
When using Hyper-V server and logging in will present you this “sconfig” window:
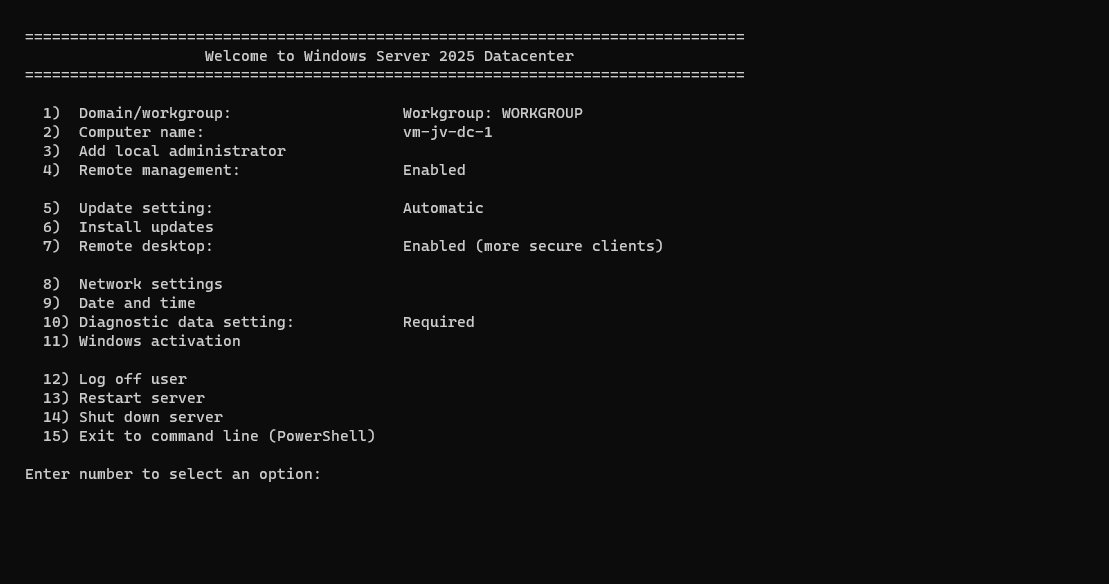
Press number “4” here to open the “Configure Remote Management” menu. Check if “Remote Management is enabled, otherwise enable it by pressing number “1”. Then press number “3” here to optionally enable ping response.
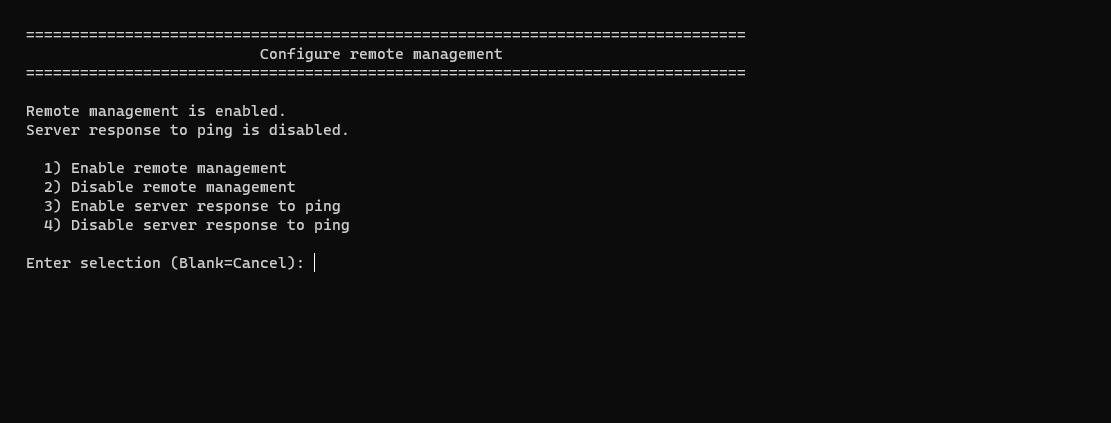
Then back on the home page, press number “2” to configure a hostname. This will be the hostname of your Hyper-V server. Do not reboot yet.
Then go back to the home of the sconfig menu, and press number “15” to go to Powershell.
In Powershell, type in the following command:
Enable-PSRemotingThis enables PowerShell to listen to remote sessions. Then type in a second command:
Enable-WSManCredSSP -Role serverThis enables CredSSP authentication and accepts local users on the server to authenticate from remote. Now reboot the server.
We can now head over to our client workstation for some configurations and the Hyper-V server can reboot in the meanwhile.
On your workstation where you want to connect with Hyper-V, we need to execute some commands for checks and changes.
Open PowerShell as Administrator here and run this command:
Get-NetAdapter | Get-NetConnectionProfileThis will return the configuration of your network interface card. This must be on “NetworkCategory: Private”
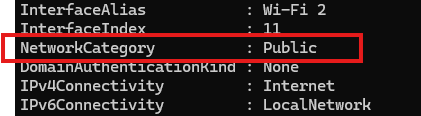
If this is Public, we need to run this command:
Set-NetConnectionProfile -InterfaceAlias "Wi-Fi 2" -NetworkCategory PrivateChange the Interface Alias to the output of your command and this will set the interface prfile to “Private” which is the least restrictive profile.
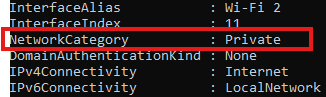
Now the profile is “Private”. Now we need to run another command to add the server to the Trustedhosts file of the workstation. We do this by executing this commands:
Start-Service -Name WinRMThis starts the WinRM service, now add the server:
Set-Item WSMan:\localhost\Client\TrustedHosts -Value *servername* -ForceChange the *servername* value to your configured servername. After that we can stop the WinRM service, as you might not want to have this running on your workstation.
Stop-Service -Name WinRMNow we would be able to connect to the server with Hyper-V.
Open the Hyper-V Manager on your workstation:
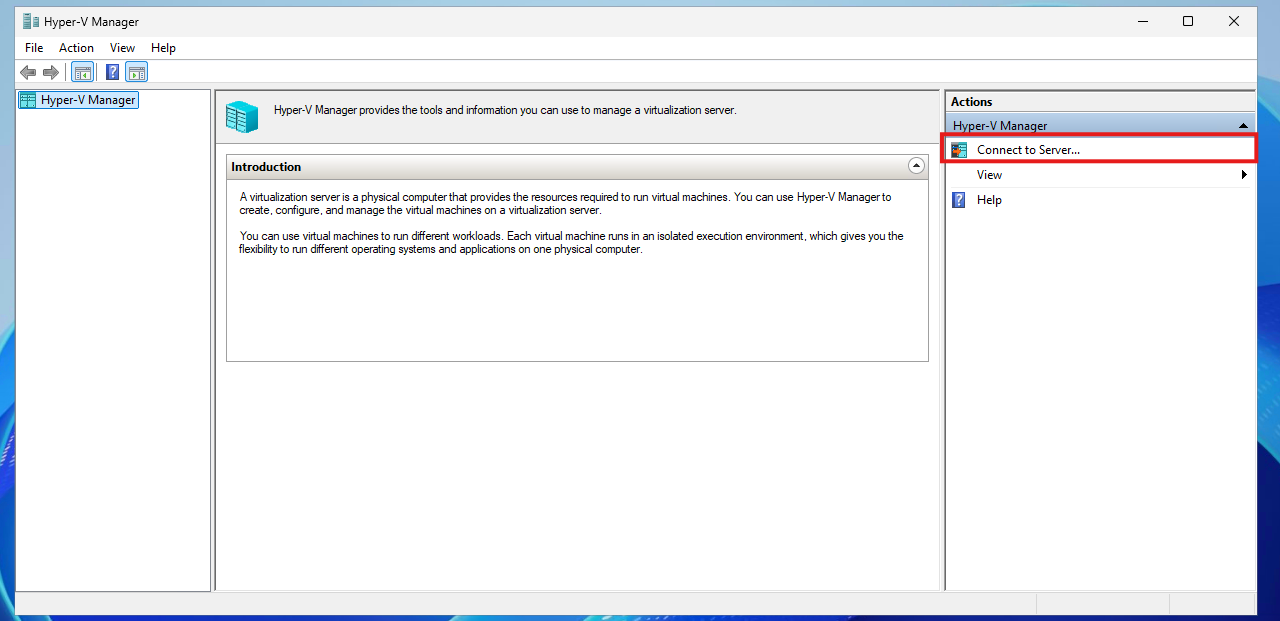
Click on “Connect to Server…” and the select another computer:
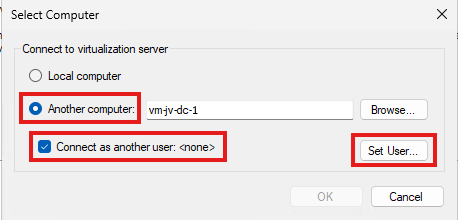
Type in the hostname of the external computer, select connect as another user and the set the user.
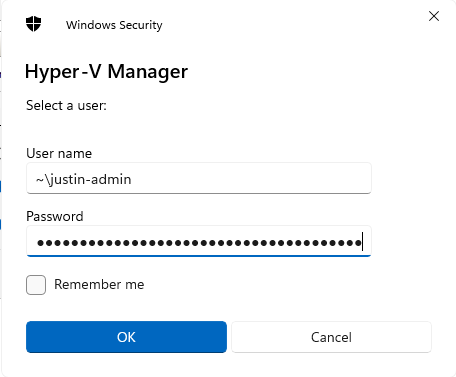
Use servername\username or ~\username which is basically the same and your password. Click OK now.
We will manage the Hyper-V server now while still being in a workgroup and non-domain joined environment.
If it still doesn’t work, you have to add the credentials to your credential manager on the workstation by running this command:
cmdkey /add:*servername* /user:justin-admin /pass:Pa$$W0rd!You see, setting this up is relatively easy. It’s somewhat more work but definitely worth it against other virtualization tools. When I had my own lab for the first time, this got me in some real errors. Fixing those is pretty easy.
These sources helped me by writing and research for this post;
You have reached the end of the page. You can navigate through other blog posts as well, share this post on X, LinkedIn and Reddit or return to the blog posts collection page. Thank you for visiting this post.
If you think something is wrong with this post or you want to know more, you can send me a message to one of my social profiles at: https://justinverstijnen.nl/about/
If you find this page and blog very useful and you want to leave a donation, you can use the button below to buy me a beer. Hosting and maintaining a website takes a lot of time and money. Thank you in advance and cheers :)
The terms and conditions apply to this post.
If you are managing Windows Servers, Group Policies are a great way to distribute settings to your endpoints. However, a recent update of August 2024 in Windows Server 2022 and 2019 breaks user filtering in Group Policy (GPO) Item Level Targeting
When applying printers, registery settings or drive maps to users, we use Group Policy Item level targeting to filter users so only users with a group membership gets the policy applied.
Since the updates of August 2024 this isn’t working anymore:
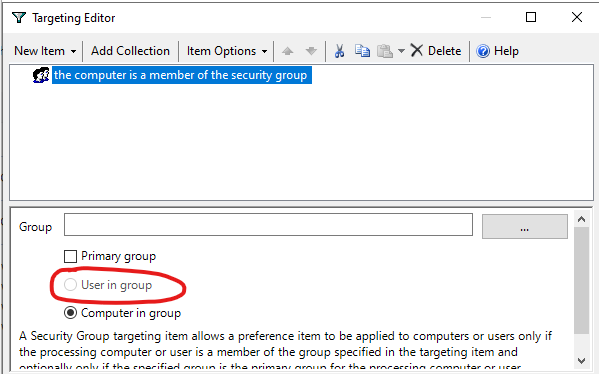
We cannot select “User in group”, only “computer in group”. This applies only to new and existing policies. If you already have policies in place with “User in group” selected before the updates, this will still work as expected.
The cause of this problem are two updates which have to be removed to make it work again:
| Operating System | Update (KB) |
| Windows Server 2019 | KB5042350 |
| Windows Server 2022 | KB5041160 |
This update has to be removed on the server where you manage your Active Directory and/or Group Policies. You can keep the update installed on all other critical servers.
To remove this update, open Control Panel -> Programs and Features (appwiz.cpl)
Click on “View installed updates”
Select the right update for your OS and click “Uninstall”. After uninstalling the update the server has to be restarted. Make sure you perform this action in your maintenance window to decrease impact of this change.
Please note that this is a temporary solution, and not a persistent solution. Microsoft has to fix this in the coming update wave.
My advice is to leave the update installed. Uninstalling a update can do more than letting it installed. My advice is to only remove the update when you must configure such policies. If all your policies are in place and working and you don’t have to change anything, my advice is to leave the server alone and wait for the next update wave and hope for a solution from Microsoft.
You have reached the end of the page. You can navigate through other blog posts as well, share this post on X, LinkedIn and Reddit or return to the blog posts collection page. Thank you for visiting this post.
If you think something is wrong with this post or you want to know more, you can send me a message to one of my social profiles at: https://justinverstijnen.nl/about/
If you find this page and blog very useful and you want to leave a donation, you can use the button below to buy me a beer. Hosting and maintaining a website takes a lot of time and money. Thank you in advance and cheers :)
The terms and conditions apply to this post.
Once in a while, we as IT administrators need to export and import our Group Policies of Windows Server to another server. Sometimes to copy a great policy you’ve built, or to migrate a customer to a new server.
By default, the only option Microsoft has built in into Group Policy Management (gpmc.msc) is the backup option. This creates some administrative tasks.
I have created two scripts with Powershell that fully exports and imports all Group Policy Objects (GPOs). This with 2 seperate scripts. These can be found and downloaded from my Github page:
When having our Group Policies in place on a server, create a new folder on a preferred place like Desktop.
Save my Export script to a .ps1 file and place that into the newly created folder.
If you haven’t changed your Powershell script execution policy yet, do a shift + right click on a empty space in the folder, and run the command:
Set-ExecutionPolicy Unrestricted -Scope ProcessAfter that you can run the script by typing .\*tab button*
.\ExportGroupPolicies.ps1This will temporarily accept our script and other scripts till we close the Powershell window. This is the best and most secure way handling the Execution Policy of Powershell.
Now lets run our script to export all non-default Group Policy objects:
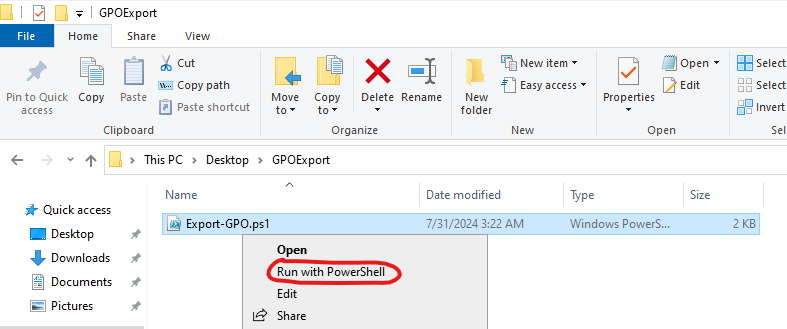
It will save all needed files in this folder, so you can copy the whole folder and start the importing process on the destination server:
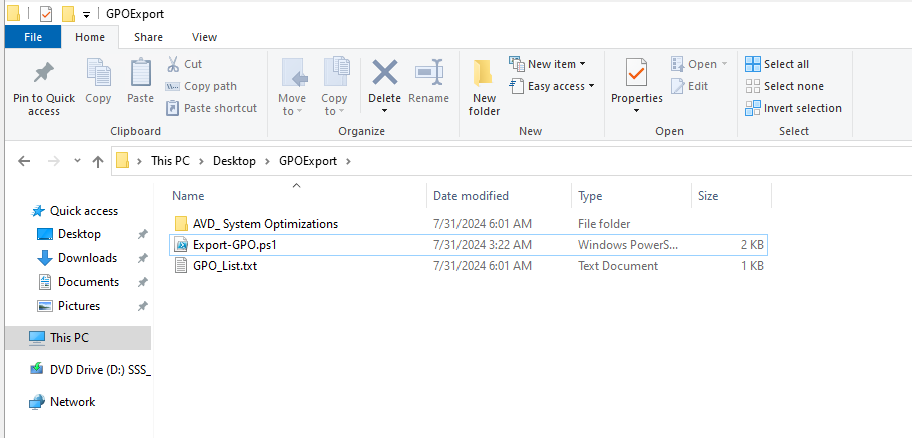
Lets say, we have just created our new forest and promoted our first server to a domain controller. We now want to import the GPOs we exported using this export script to this new server.
I have saved the script as .ps1 file for quick execution, and have saved in the same folder as my export script saved the GPO’s:
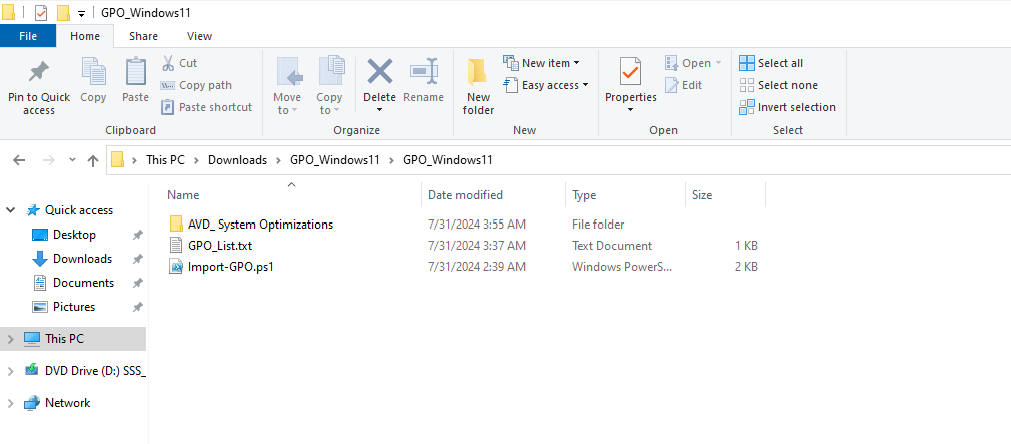
When checking our Group Policy Management console, it is completely empty and clean:

We now execute the script to import the Group Policies:
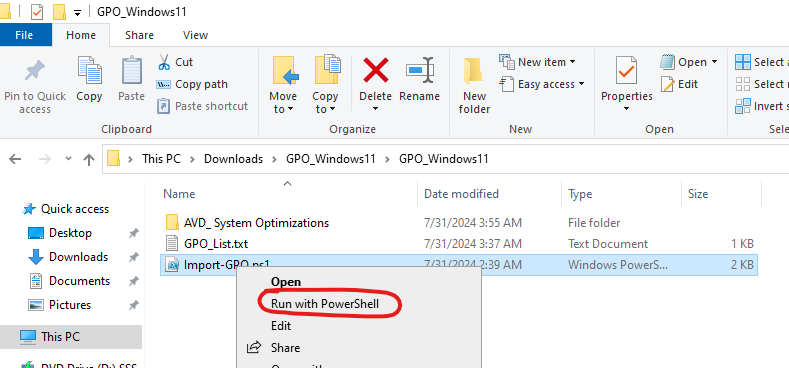
If you haven’t temporarily disabled your PowerShell execution policy yet, do this just like in the exporting action.
After succesfully executing the script, our GPO is available and ready to link to our OU. This is the only task what we have to do manually.

These 2 scripts will export and import our Group Policy easy for migration. Unfortunately Microsoft does not offer a native and easy solution for this.
I have used this script multiple times and I am very satisfied.
Thank you for reading this page and hope it was interesting and helpful.
You have reached the end of the page. You can navigate through other blog posts as well, share this post on X, LinkedIn and Reddit or return to the blog posts collection page. Thank you for visiting this post.
If you think something is wrong with this post or you want to know more, you can send me a message to one of my social profiles at: https://justinverstijnen.nl/about/
If you find this page and blog very useful and you want to leave a donation, you can use the button below to buy me a beer. Hosting and maintaining a website takes a lot of time and money. Thank you in advance and cheers :)
The terms and conditions apply to this post.
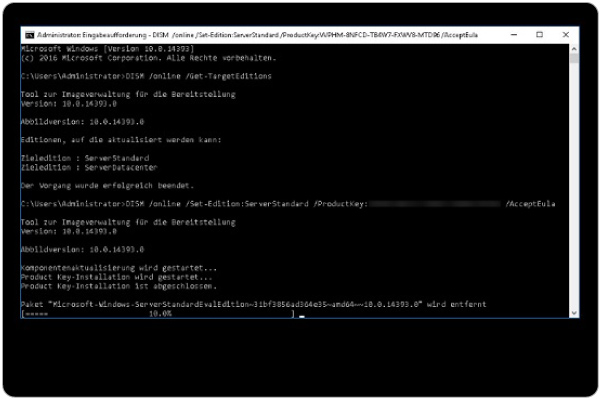
When you install a fresh Windows Server installation from a .iso file, it will be installing the OS as a Evaluation version. When you want to activate the installation with a key you need to rebuild the OS and set the edition to Standard.
Microsoft considers Standard and Standard Evaluation as different editions of Windows, because of this we have to change the edition before you can activate the installation. When you want to use the edition Datacenter, you can change the command to Datacenter which also works.
You can download the ISO file for Windows Server 2025 Evaluation here: https://www.microsoft.com/en-us/evalcenter/evaluate-windows-server-2025
You first have to install your instance of Windows Server Evaluation. After this you can install the latest updates and configure the rest of your needs.
After finishing up the configuration of your server, we need to run a command to upgrade the edition of Windows Server.
Open a command prompt window, and run the following command:
DISM /online /Set-Edition:ServerStandard /ProductKey:XXXXX-XXXXX-XXXXX-XXXXX-XXXXX /AcceptEulaHere you have to use your own product key for Standard/Datacenter depending on your version. Replace this with the XXXXX-XXXXX placeholder. Also, you can choose your target edition by changing the edition:
When installing a Windows Server instance, your edition could be an evaluation version. This is considered as a different edition, and for some features, it must be upgraded.
I hope I helped you upgrading your edition to a non-evaluation version.
You have reached the end of the page. You can navigate through other blog posts as well, share this post on X, LinkedIn and Reddit or return to the blog posts collection page. Thank you for visiting this post.
If you think something is wrong with this post or you want to know more, you can send me a message to one of my social profiles at: https://justinverstijnen.nl/about/
If you find this page and blog very useful and you want to leave a donation, you can use the button below to buy me a beer. Hosting and maintaining a website takes a lot of time and money. Thank you in advance and cheers :)
The terms and conditions apply to this post.
This category contains all Microsoft Windows Server Master Class pages.
