This category contains all Microsoft Azure Master Class pages..
This is the multi-page printable view of this section. Click here to print.
Azure Master Class
- AMC - Module 11: Infrastructure as Code (IaC) and DevOps
- AMC - Module 10: Monitoring and Security
- AMC - Module 9: Databases & AI
- AMC - Module 8: Application Services and Containers
- AMC - Module 7: Virtual Machines and Scale Sets
- AMC - Module 6: Networking in Microsoft Azure
- AMC - Module 5: Storage in Azure
- AMC - Module 4: Resiliency and Redundancy in Azure
- AMC - Module 3: Governance in Microsoft Azure
- AMC - Module 2: Identity in Azure
- AMC - Module 1: Fundamentals of Cloud and Microsoft Azure
- Microsoft Azure Master Class - Navigation page
AMC - Module 11: Infrastructure as Code (IaC) and DevOps
In this module, we cover Azure: Infrastructure as Code (IaC) and DevOps. This module focuses more on development on Azure, with less emphasis…
In this module, we cover Azure: Infrastructure as Code (IaC) and DevOps. This module focuses more on development on Azure, with less emphasis on automation and IT management. While IaC and DevOps might seem less exciting at first, they are essential for modern cloud-based application development and operations, helping streamline deployments, ensure consistency, and integrate continuous delivery pipelines.
Azure Portal, Azure Powershell and Azure CLI
There are multiple environments to manage Azure and its resources:
- Azure Portal: This is the web-based environment, which is the easiest to use.
- Advantages: Intuitive, organized, and easy to navigate.
- PowerShell: This is the PowerShell-based environment for Azure.
- It allows you to manage Azure resources via scripts and command-line commands.
- CLI (Command-Line Interface): This is the CLI-based environment for Azure.
- Like PowerShell, it provides command-line management, but it’s based on the cross-platform Azure CLI.
Each of these environments offers different levels of flexibility and control, with the portal being more user-friendly for beginners, and PowerShell/CLI being preferred for automation and advanced scripting. We IT guys don’t want to eternally click around to do some basic tasks, don’t we?
Azure Portal
The Azure Portal is the home of your Azure environment and is the most used tool to manage Azure. From the start, you always use it and in case of emergencies, it is the easiest, fastest and most reliable tool for some troubleshooting.
You visit the Azure Portal by going to: https://portal.azure.com
Azure Powershell
Azure Powershell is a Powershell module built on the Azure Resource Manager and can be used to manage and deploy resources into Azure. When deploying multiple instances, it fastly becomes a faster and less time consuming tool than the Azure Portal.
In practice i sometimes stumbled on some errors with Virtual Machines freezing in the Azure Portal and having to restart them with Powershell. It therefore gives you access to a deeper level of your Azure Environment.
You can access Azure Powershell by installing the Powershell module or by going to https://shell.azure.com
Azure CLI
Azure CLI is the deepest level of managing Azure and is based on Bash. This enables Linux and Unix based developers to also benefit from Azure without having to learn a complete new set of commands.
You can access Azure CLI by installing the Azure CLI module or by going to https://shell.azure.com
Azure CLI vs Azure PowerShell
Azure PowerShell and Azure CLI are both needed in Azure to manage all services. Some tasks can be performed in both shells, but they will be triggered by different commands.
Besides the way of triggering, there are a few other important differences between Azure PowerShell and Azure CLI:
- Azure PowerShell is a module and requires PowerShell.
- Azure CLI can be installed on any platform.
- Azure CLI is Linux-based, whereas Azure PowerShell is Windows-based.
- Azure CLI is required for managing Linux servers.
- Azure PowerShell is required for managing Windows servers.
It comes mostly to personal preference what you will use more often.
Automation in Azure
Automation can be summarized in two categories:
Declarative:
Declarative means that we proactively tell systems, “Meet this requirement,” for example, by specifying that they should contain at least certain versions, packages, dependencies, etc.
Examples of declarative automation are:
- PowerShell DSC (Desired State Configuration)
- Configuration Management
- Terraform (coming up later)
- Bicep (coming up later)
Imperative:
Imperative means that we perform an occasional “Do this” action on a system, such as installing a specific package, applying an update, or making a change using a script that we run one time.
Examples of imperative automation are:
- Provisioning
- Automation
Azure Resource Graph
Azure Resource Graph is a database designed to retrieve advanced information about resources. It allows you to efficiently fetch data from multiple subscriptions and resources. The data retrieval from Azure Resource Graph is done using the query language Kusto Query Language (KQL).
Azure Resource Graph is purely a central point for data retrieval, and it does not allow you to make changes to resources. Additionally, Azure Resource Graph is a service that does not require management and is included by default in Azure, similar to Azure Resource Manager (ARM), the Azure Portal, and other core services.
Azure Resource Graph Explorer-tool
Azure Resource Graph also provides a tool for visual data retrieval, called Azure Resource Graph Explorer. This tool allows you to view and fetch live data using Kusto (KQL) and includes a query builder to write queries without needing extensive technical knowledge.
Check out the Resource Graph Explorer tool here: https://portal.azure.com/#view/HubsExtension/ArgQueryBlade
Azure Resource Manager
Under the hood, resource deployment in Azure is managed by the Azure Resource Manager (ARM) service using the JSON programming language. In almost every blade in the Azure Portal, you can access the JSON view or the option to export a template, where you can view and export the complete configuration of a resource in JSON. This allows you to quickly deploy identical configurations across multiple subscriptions.
Bicep and Azure
Bicep is an alternative language for deploying Azure resources. It is a declarative language that communicates directly with Azure Resource Manager (ARM) but with much simpler syntax. When deploying resources, the administrator provides a Bicep template to ARM, which then translates the instructions into JSON and executes them.
Here’s an example to show the difference in syntax between Bicep and JSON when implementing the same resources:

Using Bicep with Azure
Step 1: Install Visual Studio Code
If you haven’t already installed Visual Studio Code (VS Code), follow these steps:
- Download and install Visual Studio Code from the official website: https://code.visualstudio.com/.
Step 2: Install the Bicep Extension for VS Code
To make it easier to work with Bicep, you can install the Bicep extension for VS Code. This way VS Code will know exactly what you are working on and can auto complete your scripts.
- Open Visual Studio Code.
- Go to the Extensions view by clicking on the Extensions icon in the Activity Bar on the side of the window or pressing Ctrl + Shift + X.
- Search for “Bicep” in the search bar.
- Click Install on the Bicep extension by Microsoft.
This extension provides syntax highlighting, IntelliSense, and support for deploying Bicep templates directly from VS Code.
Step 3: Install Azure CLI
To deploy directly to Azure from VS Code, you’ll need the Azure CLI. If you don’t already have it installed, you can install it by following the instructions here.
Once installed, log in to Azure using the following command in your terminal:
BASH
az loginStep 4: Write Your First Bicep Template in VS Code
- Open VS Code and create a new file with the .bicep extension (e.g., storage-account.bicep).
- Write a simple Bicep template to create an Azure Storage Account.
Example Bicep template:
BICEP
resource myStorageAccount 'Microsoft.Storage/storageAccounts@2021-04-01' = {
  name: 'mystorageaccount001'
  location: 'East US'
  sku: {
    name: 'Standard_LRS'
  }
  kind: 'StorageV2'
}
In this template:
- The resource is a Storage Account
- The name of the storage account is mystorageaccount001 (must be globally unique)
- We are using the Standard_LRS SKU (Locally Redundant Storage) and the StorageV2 kind
Step 5: Deploy the Bicep Template Directly from VS Code
To deploy the Bicep template directly from VS Code, you can use the Azure CLI integrated into the Terminal in VS Code.
- Open the Terminal in VS Code by navigating to Terminal -> New Terminal or pressing Ctrl + (backtick).
- Run the following command to deploy the Bicep template:
BASH
az deployment group create --resource-group *YourResourceGroupName* --template-file storage-account.bicep- Replace
*YourResourceGroupName* with the name of the Azure Resource Group you want to deploy to.
This command will deploy the Bicep template defined in storage-account.bicep to your Azure resource group.
Step 6: Verify the Deployment
Once the deployment command is successfully executed, we can verify the deployment in the Azure Portal:
- Go to the Resource Group you specified
- You should see the Storage Account named mystorageaccount001 deployed
Alternatively, we can check the deployment using the Azure CLI:
BASH
az storage account show --name mystorageaccount001 --resource-group *YourResourceGroupName*Step 7: Modify and Redeploy the Template
If we need to make changes to your template (e.g., changing the SKU or location), simply edit the Bicep file and redeploy it using the same command:
BASH
az deployment group create --resource-group <YourResourceGroupName> --template-file storage-account.bicepAzure will handle the update automatically.
Step 8: (Optional) Convert Bicep to JSON ARM Template
If you ever need to generate a traditional ARM template (JSON), we can compile the Bicep file to JSON using the following command in VS Code’s terminal:
BASH
bicep build storage-account.bicepThis will generate a storage-account.json file containing the equivalent ARM template in JSON format.
Conclusion
That’s it! You we have a workflow for writing Bicep templates in Visual Studio Code and deploying them directly to Azure using the Azure CLI. The Bicep extension in VS Code makes it easier to manage your Azure resources with a simplified syntax compared to traditional JSON-based ARM templates.
Terraform and Azure
Terraform is an open-source infrastructure as code (IaC) tool created by HashiCorp. It allows users to define, provision, and manage cloud infrastructure using a declarative configuration language (HCL - HashiCorp Configuration Language).
With Terraform, you can manage infrastructure across multiple cloud providers (like Azure, AWS, Google Cloud, etc.) and services by writing simple code files. This eliminates the need for manual configuration, automating the setup, updating, and scaling of infrastructure in a consistent and repeatable manner. This has as an advantage that the formatting is the same across all cloud platforms.
Using Terraform with Azure
Step 1: Install Visual Studio Code
If you haven’t already installed Visual Studio Code (VS Code), download and install it from the official website: https://code.visualstudio.com/.
Step 2: Install the Terraform Extension for VS Code
To make it easier to work with Terraform in VS Code, you can install the Terraform extension. This extension provides syntax highlighting, IntelliSense, and other features to help you write Terraform code.
- Open Visual Studio Code.
- Go to the Extensions view by clicking on the Extensions icon in the Activity Bar on the side or pressing Ctrl + Shift + X.
- In the search bar, type “Terraform”.
- Install the Terraform extension (by HashiCorp).
Step 3: Install Terraform
If you don’t already have Terraform installed, follow these steps to install it:
- Go to the official Terraform website: https://www.terraform.io/downloads.html.
- Download and install the appropriate version of Terraform for your operating system.
- Verify the installation by running the following command in your terminal:
BASH
terraform --versionThis should return the installed version of Terraform.
Step 4: Install Azure CLI
You will also need the Azure CLI installed to interact with Azure. Follow the instructions to install the Azure CLI from the official documentation: https://docs.microsoft.com/en-us/cli/azure/install-azure-cli.
Once installed, log in to Azure by running:
BASH
az loginStep 5: Write Your First Terraform Configuration
Now, let’s create a simple Terraform configuration that provisions an Azure Storage Account.
- Open Visual Studio Code and create a new file with the .tf extension (e.g., main.tf).
- Add the following Terraform configuration to the file:
JSON
# Configure the Azure provider
provider "azurerm" {
  features {}
}

# Create a Resource Group
resource "azurerm_resource_group" "example" {
  name     = "example-resources"
  location = "East US"
}

# Create a Storage Account
resource "azurerm_storage_account" "example" {
  name                     = "examplestorageacc"
  resource_group_name       = azurerm_resource_group.example.name
  location                 = azurerm_resource_group.example.location
  account_tier               = "Standard"
  account_replication_type = "LRS"
}- Defines the Azure provider (
azurerm). - Creates an Azure Resource Group named
example-resourcesin the East US region. - Creates a Storage Account named
examplestorageaccwithin the resource group.
Step 6: Initialize Terraform
Before deploying your resources, you need to initialize Terraform. Initialization downloads the necessary provider plugins and sets up your working directory.
- Open the Terminal in VS Code by navigating to Terminal -> New Terminal or pressing Ctrl + (backtick).
- Run the following command to initialize the Terraform configuration:
BASH
terraform initTerraform will download the required provider and prepare your environment for deployment.
Step 7: Plan the Deployment
Once the configuration is initialized, you can run a terraform plan to preview the actions Terraform will take based on your configuration. This is a safe way to ensure everything is correct before making changes.
Run the following command in the terminal:
BASH
terraform planThis will display a list of actions Terraform will take to provision the resources.
Step 8: Apply the Terraform Configuration
Once you’re happy with the plan, you can apply the configuration to deploy the resources to Azure.
- Run the following command to apply the Terraform configuration:
BASH
terraform apply- Terraform will ask you to confirm the changes before proceeding. Type
yesto confirm.
Terraform will now deploy the resources defined in your main.tf file to Azure. Once the process is complete, you will see output confirming that the resources have been created.
Step 9: Verify the Deployment in Azure
Once the Terraform apply process completes, you can verify the deployment in the Azure Portal:
- Go to Resource Groups and check for the example-resources group.
- Inside that resource group, you should see the Storage Account examplestorageacc.
Step 10: Modify and Redeploy
If you need to make changes (e.g., update the account tier of the storage account), simply edit the main.tf file, then run:
BASH
terraform planThis will show you the changes Terraform will make. If everything looks good, run:
BASH
terraform applyStep 11: Destroy the Resources
If you no longer need the resources and want to clean them up, you can run the following command to destroy the resources created by Terraform:
BASH
terraform destroyTerraform will ask you to confirm, type yes to proceed, and it will remove the resources from Azure.
Conclusion
You have now set up a complete workflow to write Terraform configurations in Visual Studio Code, and deploy resources to Azbure using the Azure CLI. Terraform is a powerful tool that simplifies infrastructure management, and with VS Code’s Terraform extension, you have a streamlined and productive environment to develop and deploy infrastructure as code.
Git and Azure
Git is an open-source version control system used to manage different versions of projects and take periodic snapshots. This allows you to, for example, start from a specific version during debugging and then make changes (or “break” the code) without losing the original state.
Additionally, Git enables merging code with other versions. Think of it as a form of collaboration similar to working in Word, where every minute represents a “save” action. With Git, you can return to any version from any minute, but applied to code instead of a document.
Github
GitHub is a public or private repository service from Microsoft for storing code and collaborating with multiple DevOps engineers or programmers on a project involving code. It works by allowing developers to work locally on their machines, and then click “push changes,” which essentially acts as a save-to-server option.
GitHub can be used in combination with Git to get the best of both worlds, allowing developers to save changes via the command line while benefiting from version control and collaboration features provided by GitHub.
Summary
While this module is not my primary focus, it contains really cool stuff for automation purposes. When done properly it can save a ton of time but also helps secure and unifies your environments. Humans can make mistakes, but when having a correct template, the number of errors will drop significantly.
However, using those tools is not a must and there is no “wrong” way of how you perform tasks in Azure. Only one can be faster or slower than the other based on multiple factors.
Thank you for reading this module, and the rest of the master class. Unfoetunately, this is the last page.
To go back to the navigation page: https://justinverstijnen.nl/microsoft-azure-master-class-navigation/
End of the page 🎉
You have reached the end of the page. You can navigate through other blog posts as well, share this post on X, LinkedIn and Reddit or return to the blog posts collection page. Thank you for visiting this post.
If you think something is wrong with this post or you want to know more, you can send me a message to one of my social profiles at: https://justinverstijnen.nl/about/
If you find this page and blog very useful and you want to leave a donation, you can use the button below to buy me a beer. Hosting and maintaining a website takes a lot of time and money. Thank you in advance and cheers :)

The terms and conditions apply to this post.
AMC - Module 10: Monitoring and Security
In this module, i want you to understand all the possibilities of Monitoring and some Security features of Microsoft Azure…
In this module, i want you to understand all the possibilities of Monitoring and some Security features of Microsoft Azure. We know that Security these days is a very hot topic and monitoring is not really unimportant either. Very valuable information for you, i hope :).
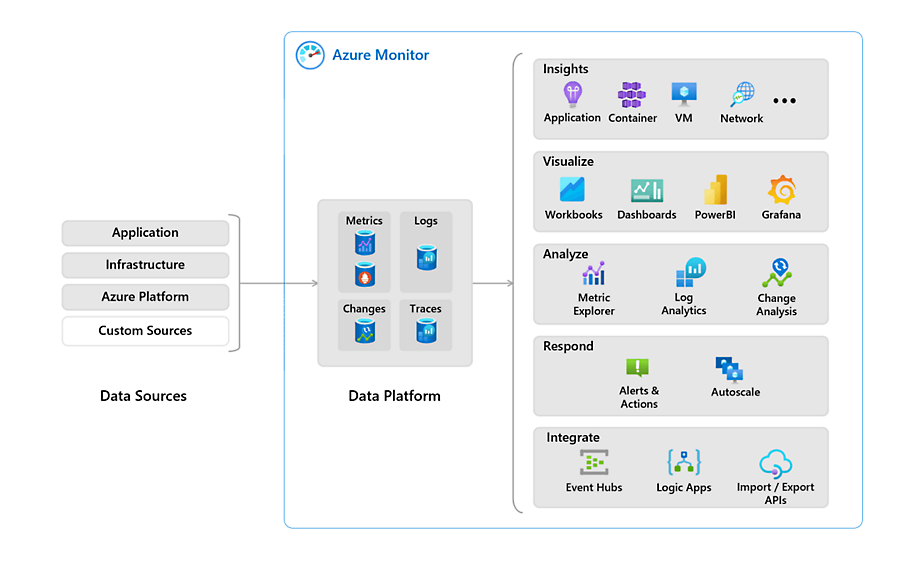
Azure Monitor
Azure Monitor is a service in Azure that enables monitoring. With it, you can monitor various resources and quickly identify potential issues during an outage. Azure Monitor supports almost all resources in Azure and can, for example, retrieve event logs and metrics from the guest operating system of virtual machines.
Azure Monitor Agent (AMA)
The Azure Monitor Agent is an agent that can run on Windows- and Linux-based VMs in Azure. These agents operate as a service to send information from the VM to Azure Log Analytics.
This information can include:
- Event Logs (Windows)
- Syslog (Linux)
- IIS Logs
- Performance Counters (CPU/RAM/DISK/NIC)
The agent is automatically installed as a VM extension when a Data Collection Rule is created and linked to the VM. This means customers do not need to install anything manually.
Previously, a manually installable agent was used for this purpose, which had several names:
- Log Analytics Agent
- Monitor Agent
- Microsoft Monitoring Agent
- OMS Agent
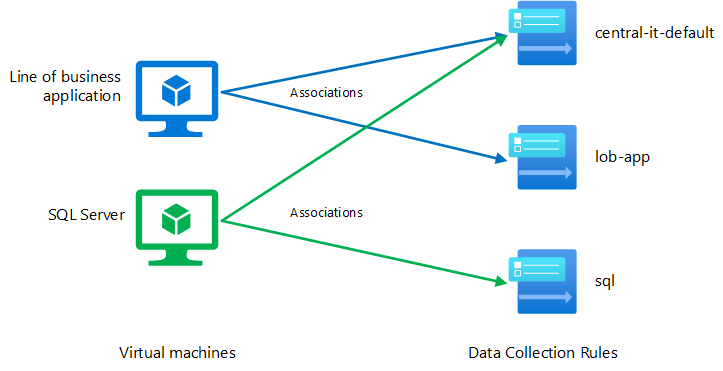
Data Collection Rules (DCR)
Data Collection Rules are centralized rules that allow you to collect the same data from one or multiple resources at once. When you add a VM to its first Data Collection Rule, the Azure Monitor Agent is automatically installed.
Previously, diagnostic settings had to be configured per resource. With Data Collection Rules, you can enable this for, for example, 100 VMs at once or even enforce it using Azure Policy.
In a Data Collection Rule, you define:
- Which resources you want to collect data from
- What information you want to collect
- In which workspace you want to store the data
Custom Dashboards
Azure Monitor allows you to create a custom dashboard with key information and shortcuts. Such a dashboard looks like this:
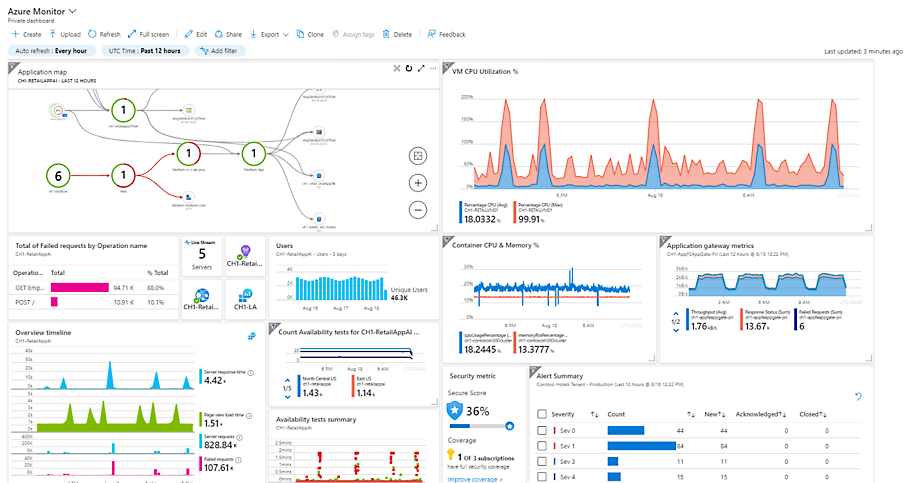
This dashboard gets information from various places, like Virtual Machine insights, Guest OS insights, Azure Resource Graph and Log Analytics workspaces.
Resource Insights
In almost every resource in Azure, you can view resource-specific insights. This is information relevant to the selected resource and can be found under "Monitoring" and then “Insights”.
However, this information is predefined and cannot be customized. Additionally, it only covers a small portion of the entire application you want to monitor.
Azure Workbooks
Azure Workbooks are flexible overviews in Azure. You can fully customize what you want to see for a specific service and even add tabs. This option is more advanced than an Azure Dashboard. The information displayed in an Azure Workbook comes mostly from a Log Analytics workspace, but it is possible to get information from Azure Resource Graph too.
An workbook can look like this:
The advantages of an Azure Workbook are that every button, every column and every type of conditional formatting is customizable. However, it can quickly become very complex and it requires a bit of knowledge of Kusto Query Language (KQL) to make it totally yours. I speak out of experience here.
What really helped me were the free Azure Workbook templates from Microsoft themselves. They have created a whole Github repository full of templates which you can import in your own environment and use some modules from. You can find them in the link below:
https://github.com/microsoft/Application-Insights-Workbooks/tree/master/Workbooks
I also did a guide to Azure Workbooks and how to create your own custom workbook a while ago: https://justinverstijnen.nl/create-custom-azure-workbooks-for-detailed-monitoring/
Log Analytics
Log Analytics is an Azure service for centrally storing logs and metrics. It acts as a central database where you can link all resources of a solution or application. Azure Dashboards and Workbooks, in turn, retrieve their information from Log Analytics. By sending data to a Log Analytics workspace, you can retrieve it and build reports. Data from Log Analytics can be queried using the Kusto Query Language (KQL).
Log Analytics data is organized within a Workspace, which is the actual Log Analytics resource. Within this workspace, you can choose to store all information for a specific application, as data retention settings are defined at the workspace level.
It is very important to watch the data retention of the workspace. The more data you store, the more expensive it will get.
In Azure, you can send logs to Log Analytics from almost every resource under “Diagnostics Settings”:
And then “+ Add diagnostic setting”:
Alternatives to Log Analytics
While Log Analytics is a great service of Azure, it can be very expensive for small environments. There are two alternatives to Log Analytics:
- Storage Account (Archive): With a Storage Account, you store data as an archive in Azure Storage. This is the most cost-effective option, but it does not allow for real-time data retrieval or analysis.
- Event Hub: Event Hub serves as a central point for sending events and data to be used with other solutions, such as Microsoft Sentinel or another Security Information & Event Management (SIEM) solution.
Practice Examples of Log Analytics
Log Analytics can be of services for some business and technical requirements:
- Company defined log retention policy: If you company states that logs have to be stored for 180 days, you can use Log Analytics to store the logs. For example, Entra ID sign in logs have a retention of 30 days. With storing them in Log Analytics, we extend this to 180 days.
- Performance Counters of VMs: By default in Azure we can only view the host-level resource usage of the VM. However, some usage bursts will not be displayed. By capturing the counters exactly from the the VMs guest OS we have a clear view of these counters and can act if anything happens like abnormal CPU or RAM usage.
- Event Logs of VMs
- Heartbeats
Azure Activity Logs
Every came in the situation that something has changed but you don’t know what exactly, who did the change and when?
The Azure Activity logs solve this problem and can be displayed on every level in Azure. Here is an example of the Activity logs on Resource Group-level:
Let’s say we have an storage account named sa-jv-amc10 and suddenly, the application doesn’t have access to the storage account anymore, starting like 5 minutes ago. You can fire up the activity log to search for possible changes.
And there it is, like 5 minutes ago someone disabled public internet access to the storage account and this caused the outage.
Alert rules in Microsoft Azure
It is possible to create specific alerts in Azure based on collected data. For example, you can trigger an alert when a virtual machine exceeds a certain load threshold or when there are multiple failed login attempts.
Alerts in Azure may seem complex, but they are designed to be scalable. They consist of the following components:
- Alert Rule (Trigger): Defines which resources are monitored, what triggers the alert, and any conditions that must be met.
- Alert Processing Rules: Modify existing alerts after they have been triggered. These rules can ensure that an alert is only received once, is automatically resolved when the condition is no longer met, or is only active during specific times. They can also suppress certain notifications.
- Action Groups (Action): Define what action should be taken when an alert is triggered. Actions can include sending a notification (email, SMS, or push notification via the Azure app) or executing an automated response to resolve an issue. For example, an automated cleanup can be triggered if disk usage exceeds 95%.
The available action types for Action Groups include:
- Notification methods: Email, SMS, and push notifications
- Automation Runbooks
- Azure Functions
- ITSM Incidents
- Logic Apps
- Secure Webhooks
- Webhooks
- Event Hubs
An overview of how this works looks like this:
Basic security principles in Microsoft Azure
Some basic principles in Microsoft Azure are:
- Use the least privileges possible (JEA/JIT) and Privileged Identity Management (PIM): Limit permissions to only what is necessary and apply Just Enough Administration (JEA) and Just-In-Time (JIT) access where possible.
- Use MFA/Passwordless authentication: Enforce Multi-Factor Authentication (MFA) or passwordless authentication to enhance security.
- Implement monitoring: Ensure proper monitoring is in place to detect and respond to issues proactively.
- Encryption: Every resource in Azure is encrypted by default. Additionally, ensure that the application itself is encrypted and that secure protocols such as SSL and TLS 1.2+ are used within a VM.
- Have at least 2 and a maximum of 4 global administrators: We want to assign this role as least as possible. Always have a minimum of 2 global administrators to prevent lockout of the tenant in case one account doesn’t work.
The Zero Trust model is also considered as a must-have security pillar today. You can read more about the zero trust model here: https://justinverstijnen.nl/the-zero-trust-model
Zero Trust solutions in Azure
Solutions that help facilitate Zero Trust in Microsoft Azure include:
- Conditional Access: Enforces access policies based on conditions such as user identity, device compliance, location, and risk level.
- Privileged Identity Management (PIM): Provides just-in-time access and role-based access control (RBAC) to minimize the risk of excessive permissions.
- Network Security Groups (NSG): Controls inbound and outbound traffic at the network level, enforcing least-privilege access.
- Microsoft Defender for Cloud: Provides threat protection, security posture management, and compliance monitoring across Azure and hybrid environments.
- Encryption: Ensures that data at rest and in transit is encrypted, securing sensitive information from unauthorized access.
Microsoft Defender for Cloud
Microsoft Defender for Cloud is a security service for Azure, AWS, Google Cloud, and Arc resources. It provides security recommendations in the Azure Portal, such as identifying open ports that should be closed, enabling backups, and more.
The main objectives of Defender for Cloud are:
- Secure Score: Measures the security posture of your cloud environment and provides recommendations to improve it.
- Best Practice analyzer
- Azure Policy Management and Recommendations: Ensures compliance by enforcing security policies and best practices.
- Cloud Security Posture Management (CSPM): Continuously monitors cloud environments to detect misconfigurations and vulnerabilities.
- Cloud Security Explorer: Allows in-depth security investigations and queries to analyze risks across cloud resources.
- Security Governance: Helps implement security controls and best practices to maintain compliance with industry standards.
Microsoft Defender for Cloud also provides a dashboard with Secure Score, which evaluates your entire environment. Not just Azure, but also AWS, Google Cloud, and Azure Arc (on-premises) resources.
Defender for Cloud is partially free (Basic tier), but it also offers a paid version with advanced features and resource-specific plans, such as protection for SQL servers, Storage accounts, Windows Server VMs and more.
Security Policies and Compliance
In addition to its standard recommendations, Defender for Cloud allows you to apply global security standards to your Azure subscriptions. This provides additional recommendations to ensure compliance with industry standards, such as:
- PCI DSS v4
- SOC TSP
- SOC 2 Type 2
- ISO 27001:2022
- Azure CIS 1.4.0
- NIST SP 800 171 R2
- CMMC Level 3
- FedRAMP H
- HIPAA/HITRUST
- SWIFT CSP CSCF v2020
Microsoft Sentinel (SIEM & SOAR)
Azure/Microsoft Sentinel is an advanced Security Information & Event Management (SIEM) and Security Orchestrated Automation and Response (SOAR) solution. It provides a centralized platform for investigating security events. Sentinel integrates with many Microsoft services as well as third-party applications and solutions.

Azure Sentinel stores its data in Log Analytics and allows the creation of custom Workbooks for visualization. Additionally, it supports Playbooks, which enable automated responses to security incidents based on incoming data.
Key objectives of Microsoft Sentinel:
- Collect data: Aggregate security data from cloud, on-premises, and third-party sources.
- Detect threats: Identify potential threats using built-in AI and analytics.
- Respond to incidents: Automate responses with Playbooks to mitigate risks.
- Investigate incidents: Analyze and correlate security events to improve threat detection and response.
Microsoft Sentinel Playbooks
Playbooks are collections of procedures that are executed from Azure Sentinel in response to a specific alert or incident. These workflows are built on top of Azure Logic Apps, allowing automated actions to be triggered based on security events.
Microsoft Sentinel and AI
In addition to manually investigating security incidents, Microsoft Sentinel uses AI-driven learning to continuously improve its threat detection and response. If a specific alert is resolved multiple times using the same Playbook, Sentinel will recognize this pattern and automatically trigger the Playbook in future occurrences.
Managed Identities (MI)
Managed Identities in Microsoft Azure are the next generation of service accounts. They represent a resource in Azure and can be assigned Entra ID roles. They are stored in Entra ID as well.
The main advantage is that they do not use passwords or secrets that need to be securely stored, reducing the risk of leaks. Additionally, each resource can be granted only the necessary permissions following the principle of least privilege.
Types of Managed Identities in Azure:
- System-Assigned Managed Identity:
- Directly tied to one specific resource.
- Exclusive to the resource where it was created.
- Automatically deleted when the resource is removed.
- Advantage: No maintenance required.
- User-Assigned Managed Identity:
- Created separately and can be linked to multiple resources.
- Advantage: More flexibility and customization in identity management.
- Created separately and can be linked to multiple resources.
Mostly you use a System-assigned MI when you must allow access to for example a storage account for one resource, but if you need to have multiple resources needing access to this storage account you use a User-asssigned MI. This to have one Managed Identity and minimize administrative effort.
Azure Key Vault
Azure Key Vault is a resource in Microsoft Azure where you can store:
- Secrets
- Certificates
- Passwords
It offers the ability to rotate keys, ensuring they are periodically changed to enhance security.
Azure services can be linked to the Key Vault to specify that the secrets are stored there. This allows you to centrally manage the lifecycle of these resources and define how frequently keys should be rotated, ensuring better security control across your environment.
It is also possible to leverage Azure Policy for some specific enforcements and to ensure resources for example use encryption with the encryption key stored in Azure Key Vault.
Summary
With Monitoring and Security in Azure, there almost is no limit. Workbooks enables you to create really interactive overviews of the health of your environment/application and be alerted when anything is wrong. With security and auditing tools, Microsoft has everything to embrace the zero trust model and having the bar very low to start and use them today.
Thank you for reading this page.
To go back to the navigation page: https://justinverstijnen.nl/microsoft-azure-master-class-navigation/
End of the page 🎉
You have reached the end of the page. You can navigate through other blog posts as well, share this post on X, LinkedIn and Reddit or return to the blog posts collection page. Thank you for visiting this post.
If you think something is wrong with this post or you want to know more, you can send me a message to one of my social profiles at: https://justinverstijnen.nl/about/
If you find this page and blog very useful and you want to leave a donation, you can use the button below to buy me a beer. Hosting and maintaining a website takes a lot of time and money. Thank you in advance and cheers :)
The terms and conditions apply to this post.
AMC - Module 9: Databases & AI
In this module we will explore various possibilities of Databases and AI in Microsoft Azure.
In this we will explore various possibilities of Databases and AI in Microsoft Azure.
Types of data and structures
Data in general can be stored in different ways for various purposes.
- Relational: Relational data consists of rows and columns following a predefined schema. The schema is represented as a table, which is essentially a type of spreadsheet where the rows contain entities and the columns store properties. For example, in an online webshop, orders would be represented as rows (entities), while columns would contain data such as the order ID, customer address, timestamp, payment method, etc.
- Examples: SQL Server, MySQL, PostgreSQL
- Non-relational: Non-relational data is less structured, such as a document or a JSON file. However, it is self-descriptive, meaning the file itself makes it clear how the data is stored.
- Examples: NoSQL, MongoDB, Gremlin, Cosmos DB
- Unstructured: Unstructured data consists of various file types where the structure is not clearly defined.
- Examples:.docx, .xlsx, .jpg, .mp4 and other standalone files
Databases in Microsoft Azure
In Microsoft Azure, there are different ways to deploy a database where each type has it’s own charasteristics and requirements:
- Microsoft SQL-based
- Azure Database for PostgreSQL/MySQL/MariaDB
- Azure Cosmos DB
We will take a further look into each type of database and the features there.
Microsoft SQL-based
These SQL solutions are all based on the Microsoft SQL protocol. This means they all have support to replace the installation based SQL server and talk with the same protocol. However, note that some applications may not support all of those options.
SQL Server on a Virtual Machine (IaaS)
It is possible to build an SQL database within a virtual machine. This provides a high level of compatibility, but as a customer, you are responsible for all aspects from the operating system onwards, including security, availability, backups, disaster recovery, updates, and performance tuning. It is possible to install an extension for the virtual machine, which allows Azure to monitor, back up, patch, and manage the SQL Server within the VM.
This option has the most supported 3rd party solutions because it is not very different from an on-premises server with SQL installed.
Azure SQL Database (PaaS)
In Microsoft Azure, you can create a serverless SQL Server, where Microsoft manages the host, and you, as the customer, only manage the database itself. This service can be deployed in four options:
- Full PaaS
- Serverless
- Single Database
- Elastic Pool
After creating a Azure SQL server with an Database on it, you can connect with your applications to the database. Table level changes has to be done through a management computer with the SQL Management Tools installed.
This option has the least generic support with using 3rd party applications, but this has increased substantially.
Azure SQL Managed Instance (PaaS)
With Azure SQL Managed Instance, Microsoft provides a managed virtual machine, but you do not need to manage the VM itself. Your only concern is the data within the database and its data flow. A managed instance also comes with a dedicated IP address in your virtual network.
You can manage the database on table-level with the Microsoft SQL Management Tools
Azure SQL Hyperscale
Azure SQL Hyperscale is a Microsoft Azure service that provides an SQL Server with high performance and scalability, designed for demanding workloads requiring rapid scaling. This option is comparable with Azure SQL but at a higher cost and a better SLA.
Azure Database for PostgreSQL/MySQL/MariaDB
Azure also offers options for open-source database software. These are the following solutions, but hosted and managed by Microsoft:
- PostgreSQL
- MySQL
- MariaDB
These are mostly for custom applications and Linux based solutions.
Azure Cosmos DB
Azure Cosmos DB is a cloud-focused database solution designed for global distribution. It supports multiple regions with replication options that you can configure according to your needs. It also is a NoSQL database and supports multiple Database models which may not be supported on the other options.
Some charasteristics about Azure Cosmos DB:
- Globally Distributed: Supports multi-region replication with low-latency access.
- Fully Managed: Serverless and PaaS-based, with no infrastructure management required.
- Built-in Indexing: Automatically indexes all data for fast queries without manual tuning.
- Guaranteed Performance: Offers 99.999% availability with low latency (single-digit milliseconds).
- Practical Cases: Ideal for IoT, real-time analytics, e-commerce, gaming, and AI-powered applications
Database Encryption in Azure
All databases can be encrypted using either a Microsoft-managed key or a customer-managed key.
By default, Microsoft-managed keys provide encryption for databases without requiring user intervention. However, customer-managed keys (CMK) allow organizations to have full control over encryption, offering additional security and compliance benefits.
Encryption Options in Azure Databases
- Transparent Data Encryption (TDE)
- Encrypts data at rest automatically.
- Protects against unauthorized access to storage.
- Works without requiring application changes.
- Always Encrypted
- Ensures end-to-end encryption, so even database administrators cannot view sensitive data.
- Uses client-side encryption with keys stored externally.
- Data Masking
- Dynamically obscures sensitive data in query results.
- Used to protect personal data such as credit card numbers, email addresses, and phone numbers.
- TLS Encryption for Data in Transit
- Encrypts all data transfers between the database and the client using Transport Layer Security (TLS).
- Protects against man-in-the-middle (MITM) attacks and ensures secure connections.
Customer-Managed Keys (CMK) for Database Encryption
The primary use-case of customer managed keys is to let the customer have full control over the key lifecycle. This means you can adjust the encryption standard and rotation to your needs. Some companies require this or are bound within some regulations that require some of these features.
A summary of the advantages of Customer-managed keys
- Create, rotate, disable, or revoke keys at any time.
- Ensure compliance with security regulations such as GDPR, HIPAA, and ISO.
- Enforce strict access control, limiting who can view or modify encryption settings.
- Monitor key usage using Azure Security Center and Key Vault logs.
This level of control is particularly useful for finance, healthcare, and government sectors, where data privacy and regulatory compliance are critical.
Data Warehouse & Analytics with Azure Synapse
Azure offers Azure Synapse as a data warehouse and analytics solution. It is a fully managed service that enables big data processing, data integration, and real-time analytics. Azure Synapse allows users to query and analyze large datasets using SQL, Spark, and built-in AI capabilities. It integrates seamlessly with Azure Data Lake, Power BI, and Azure Machine Learning for advanced analytics and visualization. The platform supports both on-demand and provisioned compute resources, optimizing performance and cost. With built-in security, role-based access control, and encryption, Azure Synapse ensures data privacy and compliance.
Practice example
A cool practice example of Azure Synapse is as follows:
A global e-commerce company wants to analyze customer behavior, sales trends, and supply chain efficiency. Here comes Azure Synapse into play and can solve the following challenges:
- Ingest data from point-of-sale (POS) systems, online transactions, and customer reviews into Azure Synapse
- Use SQL and Spark analytics to identify shopping patterns and predict inventory needs
- Integrate with Power BI to create real-time sales dashboards
The practical outcome is that all live data from the databases are ingested into human-readable dashboards with Power BI to analyze and find trends for the future.
Artificial Intelligence
In 2025, you must heard of the term Artificial Intelligence (AI) and Azure has not missed the boat.
AI stands for Artificial Intelligence, a term used to describe the ability of computers to make predictions, calculations, and assessments, mimicking human thought processes. Machine Learning is a subset of AI, where the system learns from input data to improve its performance over time.
Azure offers Artificial Intelligence services in multiple areas, including the following:
- Azure Cognitive Services: Azure Cognitive Services is a service in Azure for developing AI-powered solutions. The following options are available within a Cognitive Services workspace.
- Anomaly Detection: Detects irregularities in data or unusual patterns, which can help identify fraud, system failures, or security threats.
- Computer Vision: Enables visual processing capabilities, such as image recognition, object detection, and text extraction from images. Microsoft’s Seeing AI app helps visually impaired users identify objects and surroundings.
- Natural Language Processing (NLP): Allows AI to understand, interpret, and process spoken and written language, enabling applications such as chatbots, voice assistants, and text analytics.
- Knowledge Mining: Extracts valuable information from large volumes of unstructured data, helping build a searchable knowledge base from documents, images, and databases.
Anomaly detection
Anomaly Detection is a term in AI that can detect inconsistencies in data or find unusual patterns, which may indicate fraud or other causes.
- Example 1: In motorsports, Anomaly Detection can be used to identify a mechanical problem before it becomes critical.
- Example 2: An application that monitors an automated production line and can detect errors at different time intervals.
Different actions can be performed on the “anomalies” that this service can detect, such as sending a notification or executing an action/script to resolve the issue.
Computer Vision
Computer Vision is a part of AI that can perform visual processing. Microsoft, for example, has the Seeing AI app, which can inform blind or visually impaired people about things around them.
It can perform tasks like:
- Describe an image in one sentence with a maximum of 10 words
- Read aloud text that you scan or photograph
- Read out currency
- Scan barcodes and provide information about the product
- Recognize people
Natural Language Processing (NLP)
Natural Language Processing is the part of Azure AI that can understand and recognize spoken and written language. This can be used for the following applications:
- Analyzing and interpreting text in documents, emails, and other sources
- Interpreting spoken language and providing responses
- Automatically translating spoken or written sentences between languages
- Understanding commands and executing associated actions
A great example of an AI application combined with the Natural Language Processing feature is Starship Commander. This is a VR game set in a futuristic world. The game uses NLP to provide players with an interactive experience and to respond to in-game systems. Examples include:
- The game reacts to the player, allowing the player to speak with characters in the game
- The game responds personally to what the player says to the in-game characters
Knowledge Mining
Knowledge mining is a term used to describe the process of extracting information from large volumes of data and unstructured data to build a searchable knowledge base.
Azure offers a service called Azure Cognitive Search. This solution includes tools to build an index, which can be used for internal use or made searchable through a secure internet-facing server.
With this approach, Azure can process images, extract content, or retrieve information from documents. A great example of this concept is Microsoft 365 Copilot.
Artificial Intelligence Guiding Principles
Microsoft has established several guidelines and recommendations for implementing and handling AI solutions to ensure the are ethically responsible:
- Fairness:
- AI must not discriminate and should ensure fairness for all users.
- Example: A machine learning model approving loans should not consider gender, ethnicity, or religion.
- Reliability and Safety:
- AI systems must be reliable and safe to avoid harmful consequences.
- Example: AI used in autonomous vehicles or medical diagnosis must be rigorously tested before deployment.
- Privacy and Security:
- AI solutions must protect sensitive personal data and respect privacy regulations.
- Even after deployment, data security and privacy monitoring should continue.
- Inclusiveness:
- AI should be beneficial to everyone, regardless of gender, ethnicity, or physical accessibility.
- It should support and enhance human capabilities rather than exclude certain groups.
- Transparency:
- AI systems must be understandable and transparent.
- Users should be aware of how the AI works, its purpose, and its limitations.
- Accountability:
- Humans remain responsible for AI decisions and outcomes.
- Developers must follow ethical frameworks and organizational principles to ensure responsible AI usage.
Machine Learning
Machine Learning is a term used to describe software that learns from the data it receives. It is considered the foundation of most AI solutions. To build an intelligent solution, Machine Learning is often the starting point, as it allows the system to be trained with data and make predictions or decisions.
Examples of Machine Learning in Practice
- Example 1: After analyzing 15 images of apples, the software can recognize an apple. By adding more images, it can determine how ripe or rotten an apple is with a certain percentage of accuracy. In a production/sorting process, this can be used to automatically classify apples as B-grade and filter them accordingly.
- Example 2: If multiple photos of a particular flower species are imported, the software can identify the flower in different images or through cameras.
Azure Machine Learning Capabilities
- Automated Machine Learning: Allows non-experts to quickly create a machine learning model using data.
- Azure Machine Learning Designer: A graphical interface for no-code development of machine learning solutions.
- Data and Compute Management: A cloud-based storage solution for data analysts to run large-scale experiments.
- Pipelines: Enables data analysts, software developers, and IT specialists to define pipelines for model training and management tasks.
Two Types of Machine Learning Outcomes
- Regression: Used to predict a continuous value, such as daily sales numbers, inventory forecasting, or monthly/yearly revenue.
- Classification: Used to categorize values, such as weather predictions or diagnosing medical conditions.
Azure Machine Learning Studio
Azure has a dedicated management tool for Machine Learning, available at https://ml.azure.com.
In Machine Learning Studio, you need to create a workspace. There are four types of compute resources available for your workspace:
- Compute Instances: Development environments that data analysts can use to work with data and models.
- Compute Clusters: Clusters of virtual machines for scalability and on-demand processing.
- Inference Clusters: Used for running predictive services that support your models.
- Attached Compute: Enables connections to existing Azure compute resources, such as VMs or Databricks.
Summary
In Azure, the possibilities are endless in terms of Databases and AI are almost limitless. I hope i gave a good understanding of all the services and features possible.
Thank you for reading this page.
To go back to the navigation page: https://justinverstijnen.nl/microsoft-azure-master-class-navigation/
End of the page 🎉
You have reached the end of the page. You can navigate through other blog posts as well, share this post on X, LinkedIn and Reddit or return to the blog posts collection page. Thank you for visiting this post.
If you think something is wrong with this post or you want to know more, you can send me a message to one of my social profiles at: https://justinverstijnen.nl/about/
If you find this page and blog very useful and you want to leave a donation, you can use the button below to buy me a beer. Hosting and maintaining a website takes a lot of time and money. Thank you in advance and cheers :)
The terms and conditions apply to this post.
AMC - Module 8: Application Services and Containers
This module is about application services and containers in Microsoft Azure. It mainly focuses on containers and containerized…
This module is about application services in Microsoft Azure. It mainly focuses on containers and containerized solutions but also explores other serverless solutions. These are solutions where, as a customer or consumer of Microsoft Azure, you do not need to manage a server.
Statefull vs. Stateless
We can categorize servers/VMs into two categories: Stateful and Stateless:
Stateful: Stateful servers are uniquely configured and have a specific role, for example:
- SQL servers
- Domain Controllers with FSMO roles
- Application servers
Stateless: Stateless servers do not have a unique role and can be easily replicated, for example:
- Web servers that connect to a database
- Application servers that connect to a database
Containers
Containers represent a new generation of virtualization. With Hyper-V, Azure, and VMware, we virtualize hardware, but with Containers, we virtualize the operating system. The goal is to quickly and efficiently host scalable applications.
Some key features and benefits of using containers are:
- Containers virtualize the operating system (OS) and deploy within seconds.
- A container hosts a process/application alongside multiple containers, sharing the lifecycle.
- High availability at the software level.
- High scalability and the ability to “burst” when needed.
- Tasks can be automated.
- Smaller footprint per solution compared to virtual machines.
Microsoft Azure offers the following container solutions:
- Azure Container Registry
- Azure Container Instance
- Azure Kubernetes Service
- Azure Container Apps
- Azure Spring Apps
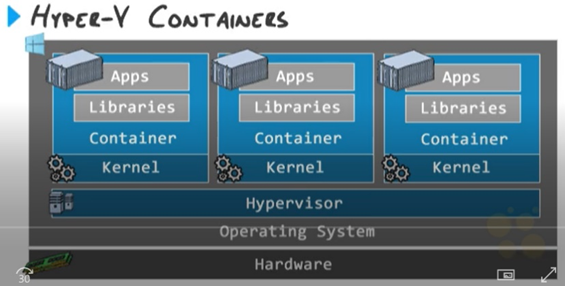
Container Architecture
The configuration of containers in blocks is structured as follows:
The main advantage of containers over virtual machines is that you don’t need to configure a separate operating system, network configuration, and instance settings for each deployment. All containers on the container host share the same kernel.
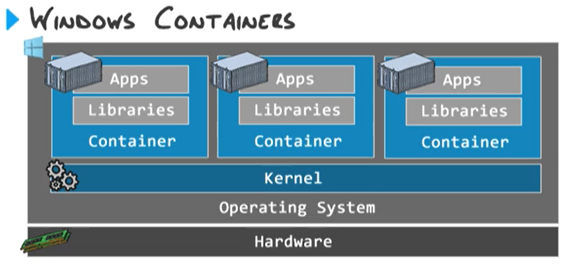
Isolated containers (Hyper-V containers)
Instead of creating normal, software based containers it is also possible to create isolated containers. This also virtualizes the hardware. This is an option used often when on shared environments or data-protected environments:
Docker
Docker is a container runtime solution that allows you to create and manage containers. This container solution can be managed via PowerShell and does not have a GUI, as it is purely a tool designed for technical professionals.

Azure Container Registery
Azure Container Registry is a Microsoft Azure service that allows you to store Docker images that you have built for later use. Before this service existed, this was a standalone server role that needed to be installed.
Azure Container Registry ensures that images are stored with the following benefits:
- High availability
- Secure access with RBAC (Role-Based Access Control)
- Centralized management of images
Container maintenance/rebuilding
A completely different approach to maintaining containers is that containers are based on the container host they run on.
With virtual machines, each VM installs updates individually, and every update needs to be installed separately on each VM. Containers, however, work differently. Instead of updating each container separately, you update the container host and then rebuild all containers. This ensures that your application is hosted with the latest features and security updates across all containers immediately.
Azure Container Instances (ACI)
Azure Container Instances (ACI) is the simplest Azure solution for running containers as a Platform-as-a-Service (PaaS) offering. With ACI, customers are not responsible for the infrastructure or operating system— only the container and how their application runs on ACI.
Azure Container Instances support both Windows and Linux, with Linux offering the most features.
Key Features of Azure Container Instances:
- You can select an image from your own repository or the Azure Marketplace.
- The container receives a Public or Private IP address, allowing access either from the internet or only within an Azure Virtual Network.
- The container gets a restart policy, which can be configured to either:
- Restart immediately on failure.
- Restart at a scheduled time.
- Isolation by default: ACI does not share the kernel between containers, ensuring security.
- A fast and cost-effective way to deploy multiple containers without managing a Kubernetes cluster.
Azure Kubernetes Service (AKS) (K8S)
Azure Kubernetes Service (AKS) is a managed service in Microsoft Azure designed to manage multiple containers efficiently. Often, a service consists of multiple containers to enhance resilience and scalability, using load balancers to distribute traffic. AKS offers a much more advanced solution compared to Azure Container Instances (ACI).
What is Kubernetes itself?
Kubernetes is an orchestration tool for managing multiple containers. It handles:
- Deployment of containers
- Scaling based on demand
- Updating containers with minimal downtime
- Maintenance and auto-healing of containerized applications
Kubernetes has become the industry standard for container management. With Azure Kubernetes Service (AKS), you get all the benefits of Kubernetes as a fully managed PaaS solution in Microsoft Azure, reducing the complexity of setting up and maintaining a Kubernetes cluster manually.
Azure Kubernetes plans
AKS is available in two pricing tiers in Microsoft Azure:
| Free (AKS Free) | Standard (AKS Standard) |
| The Kubernetes control plane is free, meaning you don’t pay for the management and orchestration services. | Includes an SLA-backed Kubernetes control plane for higher availability and reliability. |
| You only pay for the underlying virtual machines (VMs), storage, and networking used by your worker nodes. | Advanced security features, including Azure Defender for Kubernetes and private cluster options. |
| No Service Level Agreement (SLA) is provided for the uptime of the control plane. | Enhanced scalability and performance options. |
| Ideal for production workloads requiring enterprise-grade support and uptime guarantees. | |
| Price: Free | Price: $0.10 per cluster per hour + Pay as you go pricing for other resources |
Azure Kubernetes Management
In Azure Kubernetes Service (AKS), users can manage their Kubernetes clusters through two primary methods:
Azure Kubernetes UI (Web Interface)
- Available via the Azure Portal, providing a graphical overview of AKS clusters.
- Enables users to:
- View cluster health, node status, and deployed applications.
- Manage and scale workloads.
- Access logs and monitoring insights via Azure Monitor and Log Analytics.
- Ideal for users who prefer a visual interface and need basic Kubernetes management without the CLI.
KubeCTL CLI (Command-Line Interface)
- The kubectl CLI is used for managing AKS clusters via Azure Cloud Shell, PowerShell, or a local terminal.
- Provides full control over Kubernetes resources, allowing users to:
- Deploy, scale, and update applications running in AKS.
- View and modify cluster configurations.
- Manage networking, secrets, and storage within the AKS environment.
- Ideal for DevOps engineers and those who need automation and scripting capabilities for Kubernetes workloads.
The key points for using the tools are:
- Use the UI if you need a quick and visual way to check cluster health and manage deployments.
- Use KubeCTL CLI if you need full automation, advanced configuration, and scripting capabilities for AKS.
Kubernetes Control Plane
The control plane of Kubernetes is the brain behind managing Kubernetes. The control plane is divided into four services:
- API Server: The API server is the core service that runs the Kubernetes API. This allows Kubernetes to be managed from the web interface or the KubeCTL command-line interface.
- Scheduler: The Scheduler is the service that determines where there is available space to place a container. This service is aware of which nodes and pods have available resources.
- Controller-Manager: The Controller-Manager is the service that runs controller processes. This service is consolidated so that a single service takes care of all controller tasks.
- ETCD Database: ETCD is a database where all cluster data is stored. It is considered a “key-value” database.
For more information, check out this website: https://kubernetes.io/docs/concepts/overview/components/
The above services are managed by Microsoft Azure in Azure Kubernetes Services.
Kubernetes Worker Nodes
Kubernetes will distribute a workload across Nodes. These are virtual machines where the Pods, containing the containers, will run. The Node is a standalone environment that runs Docker for the actual deployment and building of the containers.
Kubernetes Pods
In the Pods, all containers run that host an application or a part of the application.
Azure Container Apps
Azure Container Apps are microservices that are deployed in containers. This means that a large application is divided into containers, allowing each component to be scaled independently while also minimizing the impact on the overall application.
Some key points of Azure Container Apps are:
1. Serverless Containers
- Azure Container Apps provide a fully managed serverless platform for running containers without managing infrastructure
- Unlike Azure Kubernetes Service (AKS), you don’t need to configure nodes, scaling, or networking manually. This is all managed by the service itself
2. Microservices and Event-driven Architecture
- Container Apps are designed for microservices architectures, allowing independent deployment and scaling of services
- They integrate well with event-driven processing, making them ideal for applications with real-time event handling
3. Autoscaling with KEDA
- Azure Container Apps use KEDA (Kubernetes Event-Driven Autoscaling) to scale containers automatically based on:
- HTTP requests
- CPU/memory usage
- Message queue events (e.g., Azure Service Bus, Kafka)
- Custom event triggers
4. Ingress Traffic Control
- Built-in ingress supports internal and external traffic routing
- Supports HTTP/HTTPS-based ingress for securely exposing services
- Fully compatible with Azure API Management for API gateways
5. Integrated Dapr Support
- Dapr (Distributed Application Runtime) is built-in, enabling service-to-service communication, state management, pub/sub messaging, and secret management
- Helps developers build resilient and portable microservices
6. Secure and Managed Environment
- Supports managed identity for authentication and access to other Azure services
- Secure connections to Azure Key Vault, Azure Monitor, and Application Insights
- Private networking with VNET integration
7. Flexible Deployment Options
- Supports container images from Azure Container Registry (ACR), Docker Hub, or other registries
- Can be deployed via CI/CD pipelines, Bicep, Terraform, or Azure CLI
8. Built-in Logging & Monitoring
- Native integration with Azure Monitor, Log Analytics, and Application Insights for real-time observability
- Provides structured logging, distributed tracing, and application performance monitoring
Azure Spring Apps
Azure Spring Apps is a Spring Cloud service built on top of Azure Kubernetes Service (AKS), providing a fully managed microservices framework for deploying and scaling Spring Boot applications.
However, it is a premium enterprise service, making it relatively expensive, as it is designed for large-scale enterprise-grade applications requiring high availability, security, and scalability.
Azure App Services
Microsoft Azure originally started with App Services as a Platform-as-a-Service (PaaS) offering, and it has since grown into one of the many services available in Azure. Azure App Services primarily focus on running web applications without requiring customers to manage the underlying server infrastructure.
In Azure App Services, you can run the following types of applications:
- From Code
- Deploy applications written in .NET, Java, Node.js, Python, PHP, and Ruby.
- Supports CI/CD pipelines for automated deployments.
- From Containers
- Run web apps in Docker containers using Linux or Windows-based images.
- Supports Azure Container Registry (ACR) and Docker Hub.
- Static Web Apps
- Ideal for Jamstack applications and front-end frameworks like React, Angular, and Vue.js.
- Supports serverless APIs with Azure Functions.
Key Advantages of Azure App Services
- Simplicity:
- Setting up a web server is easy – you simply create an App Service resource and upload your website files via FTP, Git, or Azure DevOps.
- Built-in Scaling & Redundancy:
- Supports Auto-Scaling, Load Balancing, and Geo-Redundancy for high availability.
- Can scale up/down based on traffic demand.
App Service Plans
Azure App Services are sold through an App Service Plan, which defines the quotas, functionality, and pricing of one or more App Services.
- The cost of an App Service is based on the chosen App Service Plan.
- The higher the scalability and functionality, the higher the cost.
- Pricing is determined by compute power (CPU, memory), storage, and networking capabilities.
- When you purchase an App Service Plan, you get a fixed amount of compute resources.
- Resources are distributed across all App Services running within that plan.
- Supports auto-scaling and manual scaling based on traffic demand.
The available App Service Plans summarized:
| App Service Plan | Scaling Options | Features | Pricing |
|---|---|---|---|
| Free (F1) | None | N/A | Free |
| Shared (D1) | None | Custom Domains | Low |
| Basic (B1; B2; B3) | Manual | Hybrid Connections, Custom Domains | Moderate |
| Standard (S1; S2; S3) | Auto-Scaling | Custom Domains, VNET integration, Custom Domains, SSL | Higher |
| Premium (P1V3; P2V3; P3V3) | Auto-Scaling | Custom Domains, VNET integration, Custom Domains, SSL | Premium |
| Isolated (I1; I2; I3 - ASE) | Auto-Scaling | Custom Domains, VNET integration, Custom Domains, SSL | Enterprise-Level |
As seen in the table above, for a production environment, it is highly recommended to choose at least the Standard Plan due to its advanced functionality.
Deployment slots in App Services
Deployment slots in App Services are intended to create a test/acceptance environment within your App Service Plan. This allows you to roll out a new version of the application to this instance without impacting the production environment. It is also possible, using a “Virtual-IP,” to swap the IP address of the production application and the test/acceptance application to test the app in a real-world scenario.
Azure Functions
Azure Functions are scripts in Azure that can be executed based on a trigger/event or according to a schedule (e.g., every 5/15 minutes, daily, etc.). These functions are serverless and utilize Microsoft Azure’s infrastructure resources.
In practice, Azure Functions can perform actions such as:
- Turning virtual machines on/off according to a schedule
- Retrieving information from a server and transferring it via FTP/SCP
- Clean Azure Storage accounts based on rules
It is possible to run Azure Functions as part of an App Service Plan. However, the default option is based on consumption, meaning you only pay for the resources needed to run the function.
The scripting languages supported by Azure Functions are:
- C#
- JavaScript
- F#
- Java
- PowerShell
- Python
- TypeScript
Azure Logic Apps
Azure Logic Apps are similar to Azure Functions, but instead of being based on code/scripts, they use a graphical interface. Like Azure Functions, they operate with triggers that execute an action.
Logic Apps function as a low-code/no-code solution, similar to Power Automate, which itself is based on Azure Logic Apps. Additionally, Logic Apps offer the ability to configure connectors with external applications and services.
Examples of what you can do with Logic Apps:
- Send a monthly email report on the uptime of virtual machines
- Automate emails for monitoring purposes within Azure
- Execute Sentinel Playbooks
Azure Static Web Apps
Azure Static Web Apps is a service for static, pre-defined web pages that are scalable but require minimal functionality. This is also the cheapest way to host a website in Microsoft Azure, with a paid option of €9 per month and a free option available for hobbyists.
This service does have limitations, as websites must be pre-defined. This means that the website cannot perform server-side calculations. Static Web Apps are therefore limited to the following technologies:
- HTML
- JavaScript
- CSS
However, it is possible to perform server-side calculations using Azure Functions, which can be added as an extension to a Static Web App.
Azure Event Grid
Azure Event Grid is a fully managed event routing service that enables event-driven architectures by delivering events from various Azure services services such as AKS, ACI, App Services, Blobs and custom sources to event handlers or subscribers. It uses a publish-subscribe model, ensuring reliable, scalable, and real-time event delivery.
Key Features of Azure Event Grid
- Event-driven: Enables real-time communication between services without polling.
- Fully managed: No need to set up or maintain infrastructure.
- Scalable: Handles millions of events per second.
- Reliable: Built-in retry policies ensure event delivery.
- Secure: Supports authentication and role-based access control (RBAC).
- Flexible event routing: Supports various event sources and destinations.
Some use cases of Azure Event Grid are:
- Storage Event Handling
- Automatically trigger an Azure Function when a new file is uploaded to Azure Blob Storage.
- Serverless Workflows
- Combine Event Grid with Logic Apps to create automated workflows, such as sending notifications when an event occurs.
- Kubernetes Event Monitoring
- Collect AKS (Azure Kubernetes Service) events and send alerts or logs to a monitoring service.
- Automated Deployment Triggers
- Notify a CI/CD pipeline when a new container image is pushed to Azure Container Registry (ACR).
- IoT Event Processing
- Route IoT device telemetry data to a Stream Analytics service for processing.
- Audit and Security Alerts
- Capture and forward Azure Security Center alerts to a SIEM (Security Information and Event Management) system.
Summary
This chapter is very based on microservices and automation, this all with serverless applications. This minimizes attack surface and so increases security, availability and reliability of your services. For custom applications this works great.
However, some legacy systems and applications that require Windows Servers to run cannot be run on these serverless applications.
To go back to the navigation page: https://justinverstijnen.nl/microsoft-azure-master-class-navigation/
End of the page 🎉
You have reached the end of the page. You can navigate through other blog posts as well, share this post on X, LinkedIn and Reddit or return to the blog posts collection page. Thank you for visiting this post.
If you think something is wrong with this post or you want to know more, you can send me a message to one of my social profiles at: https://justinverstijnen.nl/about/
If you find this page and blog very useful and you want to leave a donation, you can use the button below to buy me a beer. Hosting and maintaining a website takes a lot of time and money. Thank you in advance and cheers :)
The terms and conditions apply to this post.
AMC - Module 7: Virtual Machines and Scale Sets
This module explicitly covers virtual machines and virtual machines in combination with VMSS (Virtual Machine Scale Sets). Also we cover…
This module explicitly covers virtual machines and virtual machines in combination with VMSS (Virtual Machine Scale Sets). Also we cover most of the VM family names, their breakdown, and advanced VM features.
Virtual Machines (VMs)
Virtual Machines are one of the most commonly used services in Microsoft Azure. This is because a customizable virtual machine allows for nearly unlimited possibilities, and most software requires a real desktop environment for installation.
Technically, all virtual machines run on Microsoft’s hardware within Azure. A server that hosts one or more virtual machines is known as a Hypervisor. In on-premises environments, this could be Hyper-V, VMware, or VirtualBox.
With virtual machines, the system administrator or customer is responsible for everything within the VM. This makes it an IaaS (Infrastructure as a Service) solution. Microsoft ensures the VM runs properly from a technical standpoint, but the customer is responsible for everything from the VM’s operating system and beyond.
Virtual Machine Extensions
Azure can enable various extensions for virtual machines. These are small pieces of software installed as Windows Services within the VM to enhance integration with the Azure Backbone and the Azure Portal. When an extension is required for a specific function, Azure will automatically install it at the VM-bus level.
Below is a list of much used extensions which mosty will be installed automatically:
- Azure Monitoring Agent: Enables monitoring and performance tracking
- PowerShell DSC (Desired State Configuration): Used for PowerShell Configuration Management
- Azure Disk Encryption: Encrypts data within a VM and stores encryption keys in Azure Key Vault
- NVIDIA GPU Driver Extension: Provides drivers for GPU-powered virtual machines
- Microsoft Entra ID signin: Makes it possible to logon with Entra ID into a VM
These extensions help optimize and automate VM management within Microsoft Azure.
Virtual Machine workloads
Before choosing a VM size and family, we first want to do some research about the actual workload/tasks that the VM has to support. Compare this to driving a car, we have to buy tires that exactly fit the car and type of rims of your car and driving style.
In Azure, various virtual machine configurations are available to meet different requirements. The amount of resources a VM needs depends entirely on its workload. Below is a reference guide to help determine the appropriate resource allocation for different types of workloads:
RAM-Dependent Workload
These workloads require a high amount of memory (RAM):
- Database/SQL servers
- Application servers
CPU-Dependent Workload
For CPU-intensive workloads, it is crucial to choose the right number of vCPUs and the correct CPU generation.
- vCPUs (virtual CPUs) are not physical cores; they can be logical/hyperthreaded cores from a 64-core (128T) processor.
- A good rule of thumb is that 2 vCPUs can be compared to 2 to 3 single-core physical processors.
- The generation (v2, v3, v4, v5) determines the performance and efficiency of the underlying physical CPU.
Examples of CPU-dependent workloads:
- Domain Controllers
- Application servers
- Math-intensive applications
- Analytics-based applications
- Email servers
Disk-Dependent Workload
Disk performance depends on capacity, IOPS/throughput, and latency. Workloads that require high disk performance include:
- File servers
- Database/SQL servers
- Email servers
As you might have noticed, workloads are not limited to one type of resource but can rely on multiple types of resources. My advice from practice is to always allocate more than recommended specs and to use SSD based storage for real-world scenario’s.
Every application/software is different and always review the recommended specs of the software to comply.
Virtual Machine families and sizes
In Azure, every type of virtual machine is classified into families and sizes. You have to select one of the available sizes that suit your needs. This is a difference when used to on-premises virtualization solutions like Hyper-V or VMware where you can exactly assign the resources you need. To exactly know which VM you must pick, it is good to know where to pick from.
The family of a virtual machine determines the type of use the virtual machine is intended for. There are millions of different workloads, each with many options. These families/editions are always indicated in CAPITAL letters.
The following virtual machine families/editions are available:
| Type | Ratio vCPU:RAM | Letters family | Purpose |
| General Purpose | 1:4 | B, D, DC, DS | Desktops/testing/web servers |
| Compute-optimized | 1:2 | F, FX | Data analytics/machine learning |
| Memory-optimized | 1:8 | E, M | (in memory) database servers |
| Storage-optimized | 1:8 | L | Big data storages and media rendering with high I/O requirements |
| Graphical-optimized | 1:4 | NC, ND, NV | 3D and AI/ML based applications |
| HPC-optimized | 1:4 | HB, HC, HX | Simulations and modeling |
The ratio of vCPU and RAM can be confusing, but it stands for; General purpose has 4 GBs of RAM for every vCPU and Memory-optimized has 8 GBs of RAM for every vCPU.
Virtual Machine sub-families
When a virtual machine family/edition has more than one letter (for example: DC), the second letter serves as a sub-family. This indicates that the virtual machine is designed for two purposes. The available second letters/sub-families stands for:
- B: Higher memory bandwidth
- C: Confidential VMs for high security and reliability (FIPS-140)
- S: Premium Storage and Premium Storage caching
- X: Genoa X-CPUs and DDR5 RAM with 800GB/s memory bandwidth
Each type of virtual machine in Azure is identified by a name, such as E8s_v5, D8_v2, F4s_v1. This name provides information about the configuration and composition of the virtual machine. Here are some more examples of names:
Virtual Machine naming convention
| VM size name |
| D4_v5 |
| E8s_v3 |
| EC8as_v5 |
| ND96amsr_A100_v4 |
This name derives from a convention that works like this:
| Family | # of vCPUs | Functions | Accelerator | Version |
So all features and details are included in the name of the VM, but if a machine does not have a certain feature, the part is not included. Lets break down some names:
| VM name | Family | # of vCPUs | Functions | Accelerator | Version |
| D4_v5 | D-series | 4 | N/A | N/A | 5 |
| E8s_v3 | E-series | 8 | Premium Storage | N/A | 3 |
| EC8as_v5 | E-series | 8 | Confidential Computing AMD Premium Storage | N/A | 5 |
| ND96amsr_A100_v4 | ND-series | 96 | AMD Memory upgrade Premium Storage RDMA capable | Nvidia A100 | 4 |
Virtual Machine features
Virtual machines also have specific features, which are indicated in the VM name/size. If the feature is not mentioned, the virtual machine does not have that feature.
These features are always indicated in lowercase letters:
- a: The letter “a” in a VM size indicates that the VM uses AMD processors. Example: D8asv4
- d: The letter “d” in a VM size indicates that the VM runs on NVMe SSDs. Example: D8dv4
- i: The letter “i” in a VM size indicates that the VM is isolated. Example: D8iv4
- L: The letter “L” in a VM size indicates that the VM has less RAM compared to other machines in the same family. Example: D2lv4
- m: The letter “m” in a VM size indicates that the VM has more RAM compared to other machines in the same family. Example: D2mv3
- p: The letter “p” in a VM size indicates that the VM uses ARM processors. Example: D4plsv5
- s: The letter “s” in a VM size indicates that the VM is optimized for use with Premium SSDs or Ultra Disks/SSDs. Example: D2sv5
- t: The letter “t” in a VM size indicates that the VM has much less (tiny) RAM compared to other machines in the same family. Example: E4tv5
Virtual Machine accelerators
Certain types of virtual machines also include an accelerator, which is often a GPU. Azure has several different types of GPUs for different purposes:
- NVIDIA Tesla V100 Use Cases: Simulations, Deep Learning, AI
- NVIDIA A100 Use Cases: HPC-optimized applications
- NVIDIA Tesla M60 Use Cases: Remote visualizations, streaming, gaming, encoding, VDI
- AMD Radeon MI25 Use Cases: VDI, Remote visualizations
The type of GPU is directly reflected in the virtual machine name, such as:
- NC24ads_A100_v4
Virtual Machine versions
Each virtual machine edition has its own version number, which indicates the generation of physical hardware the virtual machine runs on. The best practice is to always select the highest version possible. Lower versions may be “throttled” to simulate lower speeds, and you’ll pay the same amount for a higher version number.
Versions available to this day are v1 to v6 in some families.
The biggest factor influencing performance is the CPU. The higher the version number, the faster and newer the CPU will be.
Generation 1 VMs vs Generation 2 VMs
Azure is based on Hyper-V, where you also deal with Generation 1 and Generation 2 virtual machines. The differences are as follows:
Generation 1 (Gen 1)
- BIOS-based
- IDE boot (max. 2TB disk)
- MBR (Master Boot Record)
Generation 2 (Gen 2)
- UEFI-based
- Secure Boot
- vTPM (Virtual Trusted Platform Module)
- SCSI boot (max. 64TB disk)
- GPT/GUID (GUID Partition Table)
Not all virtual machines support both generations. So, you should take this into account when designing your architecture. Also, because Windows 11 and up requires Secure Boot and TPM so Gen 2 is required for Windows 11.
Azure VM building blocks
A virtual machine on Azure is not a standalone resource; it is a collection of various resources that make the term “virtual machine” workable. It consists of:
- The VM: Contains information about the image/OS used by the VM, the size, the generation, and other settings.
- The NICs (Network Interface Cards): Connect the VM to the Azure virtual network and the internet.
- The OS Disk: Stores the bootloader and other files on the C:\ disk.
- Temp Disk: Some VM sizes come with a temporary disk.
- Data Disks: Additional disks for storing application data.
- Extensions: For adding functionality or configuring the VM further.
- Public IP: An IP address for accessing the VM over the internet.
- Availability Set, Zone, Proximity Placement Group: For ensuring high availability, redundancy, and optimal placement of VMs.
- Reserved Instance: For reserving a VM for a longer term at a discounted price.
Supported OSs on Azure VMs
On Azure, the basic support is available for:
- Windows
- Linux
Through the Azure Marketplace, it is possible to install a wide range of different operating systems, but it also offers ready-made solutions that are deployed with ARM templates. These ARM (Azure Resource Manager) templates help automate the deployment and configuration of complex environments, including both OS and application-level setups.
Isolated VM options
In Microsoft Azure, by default, your virtual machine is placed on a hypervisor. It is quite possible that virtual machines from completely different companies are running on the same hypervisor/physical server. By default, Azure does not allow these machines to connect with each other, as they are well isolated for security reasons.
However, there may be cases where a company, due to legal or regulatory requirements, cannot run virtual machines on the same server as another company. For such cases, Azure offers the following options:
Azure Isolated VM
- An Azure Isolated VM is a VM that runs exclusively on a physical server, without any other VMs from your own company or others.
- Drawbacks: These VMs have a relatively short lifespan as they are often replaced by Microsoft, and they tend to be more expensive, starting with editions that have 72 vCPUs.
- Alternative: In such cases, Azure Dedicated Host may be a better option.
Azure Dedicated Host
- With Azure Dedicated Host, you rent an entire physical server according to your specifications, and you can populate it with your own VMs.
- Advantages: This server is dedicated solely to your tenant and will not be used by Azure for other purposes, ensuring complete isolation.
Both options provide greater control and isolation for specific regulatory needs but come at a higher cost.
Virtual Machine Scale Sets (VMSS)
In Azure, you can create a Virtual Machine Scale Set. This means it is a set of identical virtual machines, all with 1 purpose like hosting a website on the web-tier. These sets of virtual machines can scale up or down according to the load of the machines. Scale Sets focusses primarily on achieving High Availability and saving costs.
The features of Virtual Machine Scale Sets are;
- Auto-scaling: VMSS can automatically scale the number of VMs based on load or custom policies.
- Load balancing: VMs within the scale set are distributed across different physical servers and automatically balanced for traffic.
- High availability: Ensures applications have redundancy and fault tolerance across multiple availability zones or regions.
Let’s say, a webserver needs 100 clients to be overloaded and we have a set of 4 machines. When the number of client increases to 500, Azure can automatically roll out some machines for the extra load. When the clients goes down to 200, the extra machines are automatically deleted.
Virtual Machine Scale Sets are an example of “Horizontal Scaling” where more instances are added to complete the goal.
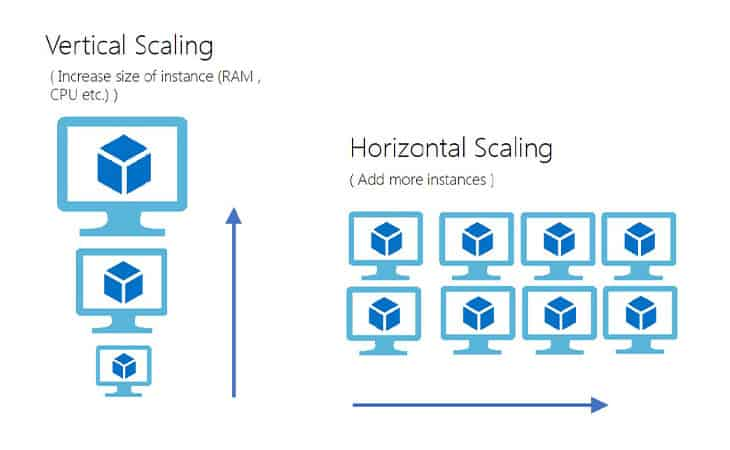
VMSS configuration
The configuration of VMSS can be done in the Azure Portal and starts with configuring a condition to scale up and down and defining the minimum, maximum and default amount of instances:
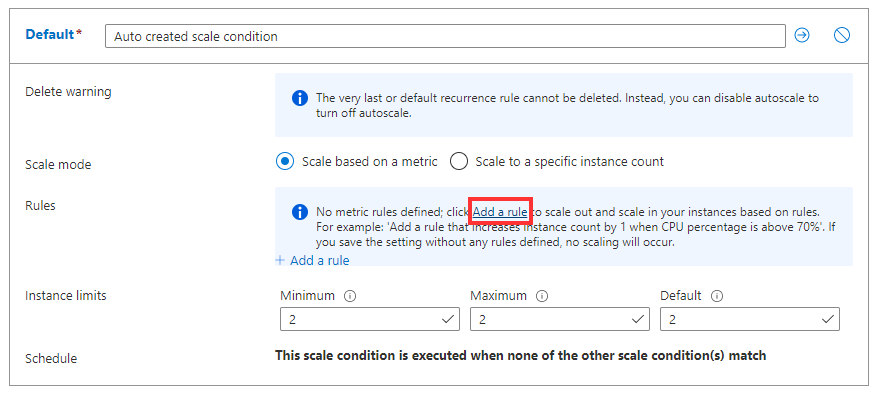
After the conditions are configured, we can define the rules where we plan when to scale up or down:
I am no expert in Scale Sets myself but i know the basic concept. If you want to learn more, refer to this guide: https://learn.microsoft.com/en-us/azure/virtual-machine-scale-sets/virtual-machine-scale-sets-autoscale-portal
Practice Scenarios
What type of scenario’s can really profit from scale sets?
- Web Application: You could use a VMSS to run a web application with fluctuating traffic. When traffic increases, VMSS can add more VMs to handle the load, and scale down during off-peak hours to save costs.
- Microservices Architecture: In a microservices-based system, each microservice could run in its own VMSS, ensuring scalability and managing each service’s demand separately.
- Big Data Processing: VMSS can be used to create a cluster of VMs that automatically scale to process large datasets when needed, ensuring that resources are used efficiently.
Maintenance and Hotpatching
Microsoft automatically maintains virtual machines and hypervisors. It’s possible for Microsoft to put a VM into a “freeze” mode, where the virtual machine does not need to be turned off, but critical updates can still be applied, often without the customer noticing.
To protect your applications from these micro-outages, it’s recommended to place multiple virtual machines in an availability set. Here, you can define different update domains, ensuring that not all VMs are patched at the same time.
Azure Guest Patch Orchestration
Azure Guest Patch Orchestration is an extension for the VM that automatically installs Windows updates on a schedule. This solution always works according to the “Availability-first” model, meaning it will not update all virtual machines in the same region simultaneously.
Azure Update Manager
Azure Update Management Center is a solution within Azure that can update virtual machines directly from the Azure Portal. It allows for applying both Windows and Linux updates without logging into the VMs. Additionally, you can update a whole batch of Azure VMs and Azure ARC machines from a central system.
These solutions help manage updates while ensuring that applications and VMs on Azure stay up-to-date without risking downtime or performance issues.
To learn more about Azure Update Manager, check out my guide: https://justinverstijnen.nl/using-azure-update-manager-to-manage-updates-at-scale/
Azure Compute Gallery
The Azure Compute Gallery is a service that allows you to create custom images for deployment. You can use this for Azure Virtual Desktop, virtual machines, and more.
You can create an image definition and associate multiple versions under it to ensure that you always keep an older version.
In the Azure Compute Gallery, you can also choose between LRS (Locally Redundant Storage) or ZRS (Zone-Redundant Storage) for data center redundancy.
Azure VMware solutions
In Azure, it is possible to use VMware as a service. In this setup, Azure provisions a VMware server for you on its own physical hardware. This server connects to Azure via ExpressRoute.
Normally, virtual machines in Azure run on Hyper-V, which is Microsoft’s own virtualization solution. However, with this service, you can create your own VMware host or even a cluster of hosts. Additionally, these VMware hosts can be connected to an on-premises vCenter server. This allows you to integrate your existing VMware environment with Azure’s infrastructure.
Azure Arc
Azure Arc is a service that allows you to add servers outside of Azure as if they were part of Azure. This means you can integrate servers from AWS, Google Cloud, other public clouds, or on-premises servers to be managed in Azure.
Servers in other clouds are added to Azure Arc by generation a installation package in the Azure Portal and installing this package on the target server outside of Azure.
Additionally, Azure Arc enables you to leverage other Azure benefits on non-Azure servers, such as:
- Azure Policy
- Azure Monitoring and Workbooks
- Azure Backup
- Azure RBAC (Role-Based Access Control)
- Alert Rules based on monitoring
This allows you to have consistent management, monitoring, and security policies across your entire infrastructure, regardless of where it is hosted.
Summary
Virtual Machines are the most important feature of cloud computing in general. Virtual Machines enable you to build possibly 95% of all applications needed for an organization. It also gives great flexibility but not profit that much of the cloud as a whole. Remember, there is no such “cloud”. Its only others computer.
To go back to the navigation page: https://justinverstijnen.nl/microsoft-azure-master-class-navigation/
End of the page 🎉
You have reached the end of the page. You can navigate through other blog posts as well, share this post on X, LinkedIn and Reddit or return to the blog posts collection page. Thank you for visiting this post.
If you think something is wrong with this post or you want to know more, you can send me a message to one of my social profiles at: https://justinverstijnen.nl/about/
If you find this page and blog very useful and you want to leave a donation, you can use the button below to buy me a beer. Hosting and maintaining a website takes a lot of time and money. Thank you in advance and cheers :)
The terms and conditions apply to this post.
AMC - Module 6: Networking in Microsoft Azure
In Module 6, we will explore all the possibilities of Azure regarding networking, VPNs, load balancing methods, proxies, and gateways. This…
In Module 6, we will explore all the possibilities of Azure regarding networking, VPNs, load balancing methods, proxies, and gateways. This chapter also covers most the topics and solutions included in the AZ-700 exam, the Azure Networking certification.
Check out the AZ-700 Azure Networking Certification at: https://learn.microsoft.com/en-us/credentials/certifications/azure-network-engineer-associate/?practice-assessment-type=certification
Introduction to generic Networking
A network is described as a group of devices who communicate with each other. In Microsoft Azure, we have to create and design networks for our resources to communicatie with each other. We only use TCP/IP networking, which works with IP addresses, DHCP, routing etcetera.
To keep things basic at the beginning, we have 2 types of networks:
- Your local network: where your devices are at and can communicatie with each other with private IP addresses
- The Internet: where a device is connected with the whole world
On a network, we have traffic. Just like you have roads and highways with cars and trucks driving to their destination. A network is litteraly the same. Each device (city) is connected through a cable/wifi (road) and sends TCP/IP packages (cars/trucks) their destination addresses.
Virtual Networks (VNETs) in Microsoft Azure
A virtual network in Azure is a private network within the Azure cloud. Within this network, you can deploy various services and extend an existing physical network into the cloud.
This Azure service does not require physical switches or routers. When creating a virtual network, you specify an address space, which defines the range of IP addresses available for subnet creation. An example of an address space would be: 10.0.0.0/16. This is the default setting when creating a virtual network in Microsoft Azure.
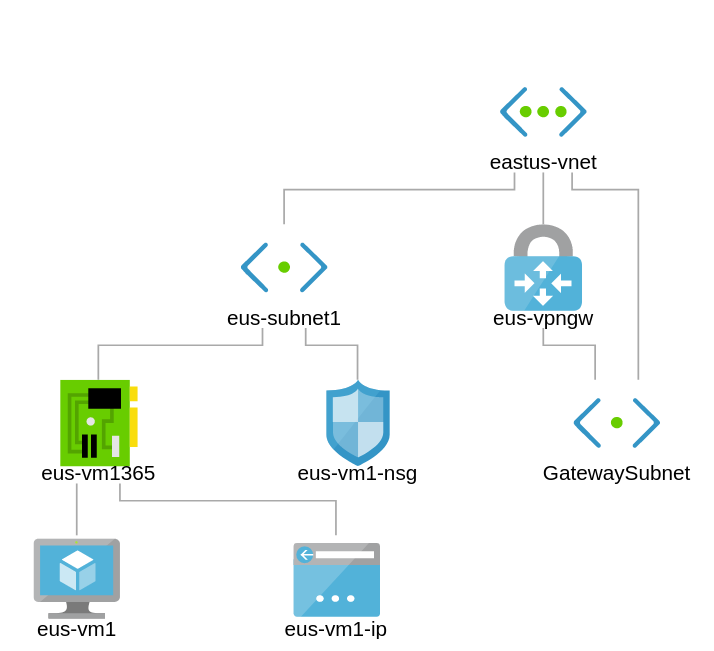
An example network in Microsoft Azure.
Azure Virtual Networks provide the following functionalities:
- Communication with the internet (not when using private subnets)
- Communication between Azure resources
- Communication between Azure and on-premises networks
- Filtering network traffic
- Routing network traffic
The most important features of virtual networks in Azure are:
- IPv4-based: All virtual networks in Azure use IPv4 with the option to also use IPv6.
- Highly available within a region: Virtual networks and subnets use Availability Zones to ensure redundancy and high availability. This is enabled by default and cannot be disabled.
- Reserved IP addresses per subnet: Azure automatically reserves specific IP addresses in each subnet:
x.x.x.0→ Network IDx.x.x.1→ Gateway servicex.x.x.2→ DNSx.x.x.3→ DNSx.x.x.255→ Broadcast address- For example: a /29 subnet, which in generic networks supports 6 devices, can only use 3 IP addresses in Azure.
- Azure Virtual Networks are free: You only pay for data throughput (measured in Gbps) and for traffic over peerings or VPNs.
- CIDR-based addressing: Networks must be based on CIDR ranges (as per RFC1918).
- Software-Defined Networking (SDN): Azure Virtual Networks operate using SDN, allowing for flexibility and scalability.
- Within a virtual network, you can create multiple subnets using the given address space for different purposes.
- Routing between subnets is automatically enabled by default.
- You cannot span a virtual network across multiple subscriptions or regions.However, with VNET Peering, you can connect virtual networks across different regions, enabling communication between them with routing-like behavior.
Designing Virtual Networks in Microsoft Azure
Before going ahead and building the network without thinking, we first want to design our network. We want to prevent some fundamental errors which can be a huge challenge later on.
- IPv4 address spaces: When defining the address space for an Azure Virtual Network, it must comply with RFC 1918 private IP address ranges:
- 10.0.0.0 - 10.255.255.255 (/8 prefix)
- 172.16.0.0 - 172.31.255.255 (/12 prefix)
- 192.168.0.0 - 192.168.255.255 (/16 prefix)
- IPv6 address spaces: When defining the address space for an Azure Virtual Network in IPv6, it must comply with RFC 4862 private IP address ranges:
- Unique Local Address Range:
fc00::/7fd00::/8is the most commonly used part of this space.
- Unique Local Address Range:
- The address space must not overlap with other networks which must be connected to each other
- 1: It is not possible to route to the same network ID
- 2: It makes your task very hard if you read an IP address and first having to lookup if its network 1, 2 or 3. Make your network numbering logical, easy and effective.
- Ensure additional isolation if required for security or compliance.
- Verify that all subnets have enough allocated IP addresses to accommodate expected growth.
- Determine if the network needs to connect to on-premises networks via VPN or ExpressRoute.
- Identify whether Azure services require a dedicated Virtual Network, such as:
- Azure Site Recovery
- Azure Image Builder
Subnets
To keep things simple, we stick to IPv4 for this part.
Within an Azure Virtual Network, you can create subnets that use a smaller portion of the allocated IP address space. A subnet is defined as a part/segment of a broader network.
For example, if the Azure network uses the address space 172.16.0.0/16, it theoretically provides 65,535 available addresses. This space can be divided into segments, typically used to group specific services and apply security measures at the subnet level. Let’s share an example of a possible real-world scenario:
| Subnet name | Purpose subnet | Network space |
| GatewaySubnet | VPN connection to on premises | 172.16.0.0/27 (27 hosts) |
| Subnet-1 | Infrastructure | 172.16.1.0/24 (250 hosts) |
| Subnet-2 | Azure Virtual Desktop hosts | 172.16.2.0/24 (250 hosts) |
| Subnet-3 | Windows 365 hosts | 172.16.3.0/24 (250 hosts) |
| Subnet-4 | Database-servers | 172.16.4.0/24 (250 hosts) |
| Subnet-5 | Web-servers | 172.16.5.0/24 (250 hosts) |
| Subnet-6 | Management-servers | 172.16.6.0/24 (250 hosts) |
To learn more about basic subnetting, check out this page: https://www.freecodecamp.org/news/subnet-cheat-sheet-24-subnet-mask-30-26-27-29-and-other-ip-address-cidr-network-references/
Here an example of Microsoft which I found really usefull and well-architected:
Network Interface Cards (NIC) in Microsoft Azure
In Azure we can configure the network interface cards of services like virtual machines and private endpoints. Here we can configure what IP address it has, which network it is connected to and what Network Security Group (more about that later) is assigned.
Note: Network configurations of virtual machines may never be done in the guest OS to prevent outage.
By default, Azure assigns IP addresses to virtual machines dynamically, but these addresses are reserved. In Azure, the term “Dynamic” actually means that the assigned IP address remains the same unless the resource is deleted or deallocated. It is also possible to configure a static IP address through the Azure Portal or via automation tools like PowerShell and Azure CLI. With a static IP address you can exactly define the address, and the portal will check if this is available prior to save the configuration.
Accelerated networking
All network interfaces in Azure support Accelerated Networking, which enhances network performance by bypassing the virtual switch on the hypervisor. This reduces latency, jitter, and CPU overhead, resulting in improved throughput and lower network latency. Compare this to SR-IOV when having great knowledge of Hyper-V or VMware.
How does this work?
- Without Accelerated Networking, packets are processed through the virtual switch on the host hypervisor, adding overhead and a extra step
- With Accelerated Networking, packets are offloaded directly to the network interface of a virtual machine, bypassing the virtual switch for faster processing
Connecting virtual networks in Azure
In Microsoft Azure, we can connect multiple virtual networks to each other to enable connection between them by using one of the options below:
A virtual network is tied to a resource group or subscription. It is possible to connect it in two ways:
- VNET Peering: For solutions where latency is important and additional encryption is not (Bandwidth max 3 Gbps).
- Site-to-Site with a virtual network gateway: For solutions where latency is not important but additional encryption is (Bandwidth max 100 Mbps).
My advice is to to link multiple virtual networks together to build a hub-and-spoke network. This allows multiple spokes to be connected to each other and not having traffic to transition through multiple networks before reaching its destination.
Billing and subscriptions
In terms of costs, you only pay for inbound and outbound gigabits. Creating VNETs and Peerings is free. Additionally, the network plan must be well-structured, as there should be no overlapping IP addresses or ranges.
With VNET Peering, it is possible to connect to VNETs in other regions and subscriptions. When a connection is created in one direction, the other side will also be established.
Connecting physical networks to Azure
There are two ways to connect your entire Azure network to your on-premises, physical network:
1. Site-to-Site (S2S) VPN Connection
A Site-to-Site VPN allows you to connect an on-premises network to a virtual network gateway in Azure via a router or firewall.
When to choose this solution:
- Cost savings
- No low latency or high bandwidth requirements
- Physical security is not a major concern
- ExpressRoute is not available
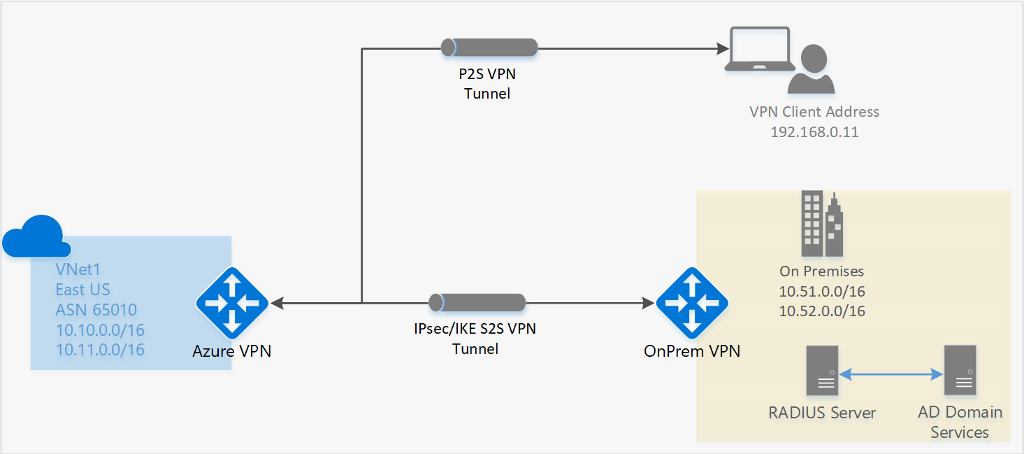
2. ExpressRoute
ExpressRoute is a private connection to an Azure datacenter. Microsoft establishes a dedicated connection based on MPLS, and you receive a router that connects to your Azure Virtual Network.
When to choose this solution:
- Cost is not a limiting factor
- High bandwidth requirements (up to 10 Gbps)
- Low latency requirements
- Physical security, traffic does not traverse the public internet
Point-to-Site (P2S) VPN Connections (users)
It is also possible to connect a single or multiple devices to a Virtual Network Gateway (VNG) in Microsoft Azure. This is often more cost-efficient than deploying a router and establishing a Site-to-Site (S2S) VPN connection.
Supported Protocols for Azure Virtual Network Gateways
- OpenVPN
- Uses port 443 TCP with TLS
- SSTP (Secure Socket Tunneling Protocol)
- Uses port 443 TCP with TLS
- IKEv2 (Internet Key Exchange version 2)
- Uses ports 500 and 4500 UDP
VPN clients that support these protocols will work with VPN options in Microsoft Azure. For the best integration, Azure provides its own VPN client.
To configure a Point-to-Site VPN, navigate to “Settings” → “Point-to-site configuration” in the Virtual Network Gateway. From there, you can download a .zip file containing the required installation files and the correct VPN profile.
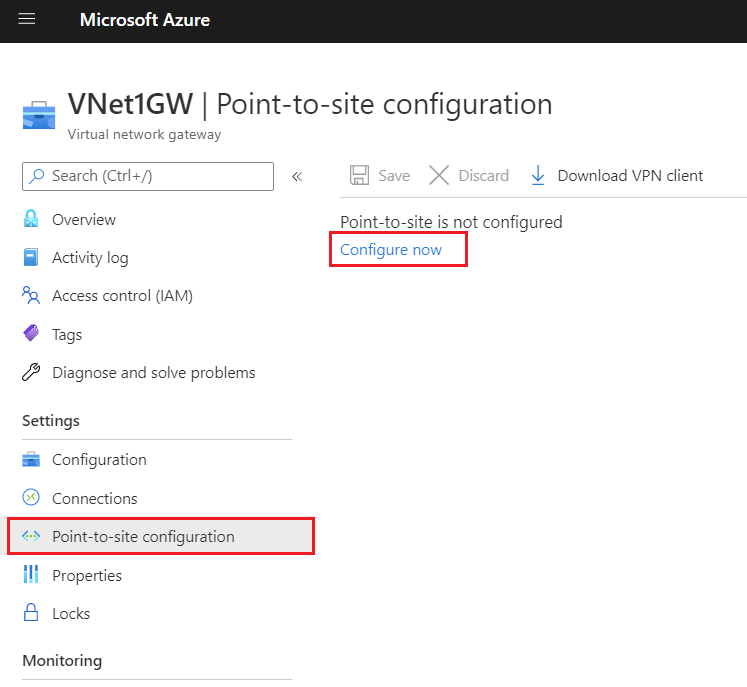
VPN Authentication
To keep the connection secure, authentication/login must be performed on the VPN connection. Azure Virtual Network Gateways (VNG) support the following authentication methods:
- Azure certificate
- Azure Active Directory
- Active Directory Domain Services with RADIUS
Network security in Microsoft Azure
In Azure, there are two ways to secure a network:
- Azure Firewall: A serverless firewall that can be linked to subnets and virtual networks to define rules for allowed and denied traffic.
- Operates on Layer 3, 4, and 7 of the OSI model (Network, Transport & Application).
- Network Security Groups (NSG): In Microsoft Azure, it is possible to create network security groups that control incoming and outgoing traffic on top of the firewall of resources (e.g., Windows Firewall). NSGs operate at the subnet level and the network interface level.
- Operates on Layer 4 of the OSI model (Transport).
Because we use Network Security Groups a lot, and Azure Firewall way less, we will cover that later and stick to Network Security Groups.
Network Security Groups
Network Security Groups can be created at two levels with the purpose of filtering incoming and outgoing network traffic. By default, all traffic within Azure virtual networks is allowed when it passes through the firewall of virtual servers. By applying Network Security Groups, traffic can be filtered. Here, inbound and outbound rules can be created to allow or block specific ports or protocols.
There are two options for applying NSGs:
- Network interface: Applied to individual servers.
- Subnet: Applied to a subnet with similar machines, such as web servers, AVD session hosts, etc.
If a resource does not have a Network Security Group or is not protected by Azure Firewall, all traffic is allowed by default, and the guest OS firewall (Windows Firewall or UFW for Linux) becomes the only point where security is enforced for incoming and outgoing traffic.
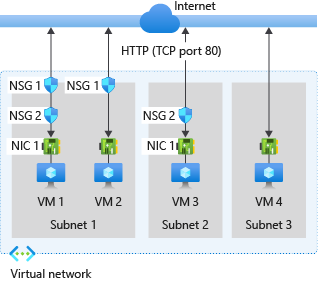
Network Security Group inbound processing order
Network Security Groups (NSGs) can filter incoming traffic. This means traffic from the internet to the machine, such as RDP access, HTTP(s) access, or a specific application.
A virtual machine or endpoint can have two Network Security Groups applied: one at the subnet level and one at the network interface (NIC) level.
The following order of rules is applied:
- NSG of the subnet
- NSG of the NIC
- Windows Firewall / Linux Firewall
Traffic must be allowed at all levels. If traffic is blocked at any point, it will be dropped, and so the connection will not work.
Network Security Group outbound processing order
Network Security Groups (NSGs) can also filter outgoing traffic. This means traffic from the resource to the internet.
For outbound connections, the order of rule processing is reversed:
- Windows Firewall / Linux Firewall
- NSG of the NIC
- NSG of the subnet
Traffic must be allowed at all levels. If traffic is blocked at any point, it will be dropped, and so the connection will not work.
Why use Network Security Groups?
Examples of using Network Security Groups (NSGs) can be:
- Allowing incoming ports on a server, such as RDP, HTTPS from specified IP addresses only or specific application ports
- Blocking certain outgoing ports, such as VPN ports (500 and 4500)
- Restricting access to a virtual machine by allowing only specific IP ranges
- Denying outbound internet access for specific subnets, such as database servers
- Allowing only internal communication between application servers and backend databases while blocking external traffic
Supported protocols
Microsoft Azure Virtual Networks primarily operate at Layer 3 of the OSI model. The supported protocols in virtual networks are:
- TCP
- UDP
- ICMP
The following protocols are blocked by Microsoft in virtual networks:
- Multicast
- Broadcast
- IP-in-IP encapsulation
- Generic Routing Encapsulation (GRE)
- VLANs (Layer 2)
- DHCP (Blocked)
The reason for these restrictions is that all networking capabilities in Azure are virtualized and based on Software Defined Networking (SDN). This means there are no physical wires connecting your resources.
Application Security Groups
Application Security Groups are definitions for a Network Security Group. This enables to have a third protection layer, because you can allow or disallow traffic based on a ASG member ship. Lets take a look at the image below:
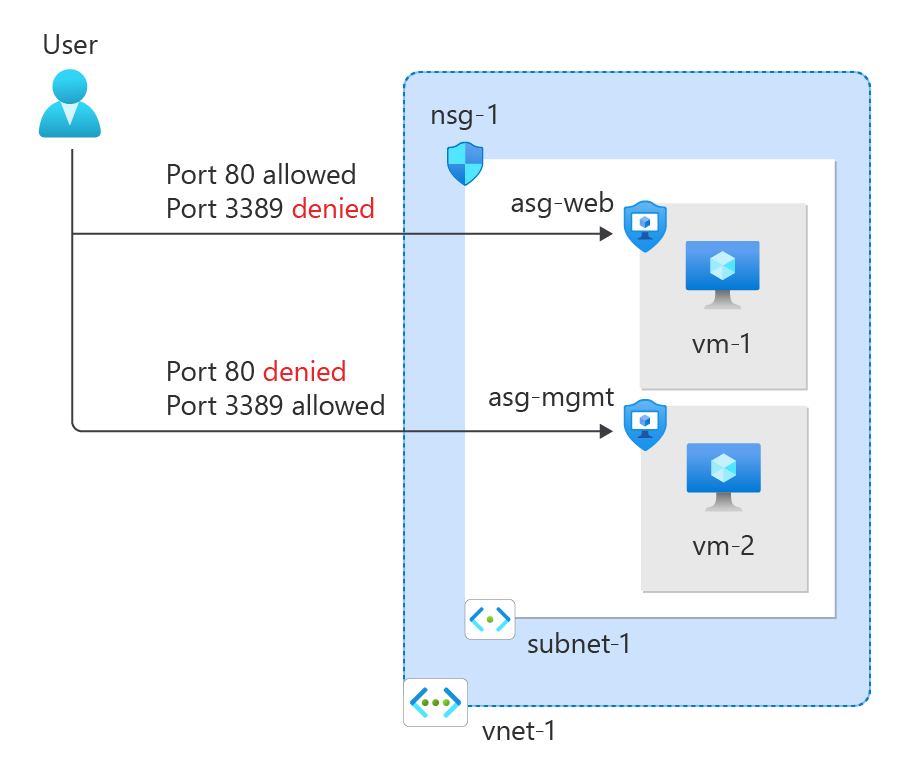
Here we have a single subnet. Normally all traffic in and out is allowed. But because we created a rule in the NSG of the VM specific NIC and added ASGs for web and mgmt, the user can only connect to the webservers for port 80 and port 3389 to mgmt servers. This enables that third layer of traffic filtering.
Typically, you use either an NSG per machine or an NSG for the entire subnet combined with ASGs. ASGs in this way eliminates the need of specifying every source in the NSG. Instead of that, you simply add a server to it.
Routing tables
Within Azure, you can also create route tables. These allow you to define custom rules on top of the virtual network or subnet to direct traffic. The routing table which contains all the user defined routes (UDR’s) has to be linked to one of the created subnets.
Every network uses routing to determine where specific traffic should be directed. In Azure, this works the same way within a virtual network. There are the following types of routing:
System routes are the default routes that Azure creates. These ensure that resources automatically have access to the internet and other resources/networks. The default routes created by Azure include:
System Routes (Default Routing)
- Internet access
- VNET Peering (ARM-only)
- Virtual Network Gateway
- Virtual Network Service Endpoint (ARM-only)
Custom Routes (User-Defined Routing)
In addition to the system routes automatically created by Azure, you can define your own custom routes. These take precedence over system routes and allow traffic to be routed according to specific needs.
Examples:
- Using a custom firewall for traffic control.
- Implementing a NAT Gateway for specific outbound traffic.
Route presedence/order in Azure
When determining how network traffic is routed, Azure follows this order:
- User-defined route
- BGP route
- System route
In a route table, you can configure various static routes, specifying that a particular IP range should be reachable via a specific gateway when using multiple subnets or networks.
Creating Routes
When creating routes, you need to know several values to ensure the route functions correctly:
- Route name
- Destination IP address or subnet
- Next Hop address (if applicable)
- Next Hop type
After this step there are different Next Hop types, each with its own purpose:
| Next Hop Type | Purpose |
| Virtual Network Gateway | Route traffic to Virtual Network Gateway/VPN |
| Virtual Network | Route traffic to Virtual Network |
| Internet | Route traffic to the Internet |
| Virtual Appliance | Route traffic to specified IP Address/Firewall |
| None (Drop) | Drop traffic |
Troubleshooting routing tables (client side)
It is good to know that all routes can be viewed through a network interface that is connected to the network. Additionally, you can check whether a route is a system route or a user-defined route. You can find this in the Network Interface Card (NIC) of the virtual machine.
This can be helpful if a routing doesn’t work properly and you want to find out if this is by a User defined route.
Forced Tunneling
It is possible to secure and monitor an Azure Virtual Network using Forced Tunneling. This ensures that all traffic is routed through an on-premises Site-to-Site VPN, where it can be monitored and secured before reaching the internet.
By default, Azure traffic communicates directly with the internet, as this results in fewer hops and higher speed.
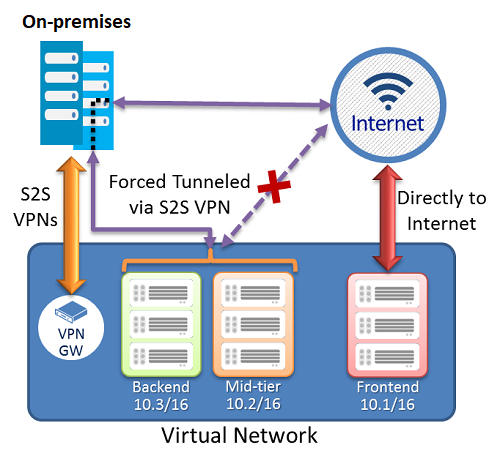
Now i don’t neccesarily recommend this option as it increases hops and lower the performance but when it is required for security and governance purposes it will do the trick.
Resources and Endpoints
In Azure, we have our resources that all use their own Endpoints to connect to. There are possibilities to further enhance and secure them.
We have the following types of endpoints:
- Public Endpoints
- Service Endpoints
- Private Endpoints
The order of these are very important, because i ordered them most inclusive to most restrictive.
Public Endpoints
When you create resources like the resources below, you get an URL to connect to the resource. This is called an Public Endpoint, which is accessible to the whole internet by default. You may want to limit this.
Resources who use public endpoints:
- Azure SQL Database and SQL Managed Instance
- Storage Accounts
- Recovery Services Vaults
In the configuration of the resource, its possible to still use the public endpoint for its simplicity but limit the access to specified IP addresses/ranges:
Service Endpoints
Service endpoints are extensions for virtual networks that enhance security by allowing traffic to specific Azure resources only from a designated virtual network. The following resources support both service endpoints and private endpoints:
- Azure Storage
- Azure SQL Database
- Azure Synapse Analytics
- Azure Database for PostgreSQL server
- Azure Database for MySQL server
- Azure Database for MariaDB
- Azure Cosmos DB
- Azure Key Vault
However, service endpoints are not the most secure option for access control, as they remain routable via the internet and the resource retains its public DNS name. For the highest level of security, a Private Endpoint should be used.
Private Endpoints
A private link ensures that a resource is only accessible from the internal network and not from both the internet and the internal network. It assigns the resource an IP address within your virtual network, allowing for additional security and control.
This provides extra security and performance since the route to the resource is optimized for efficiency. It also allows you to place a load balancer between the client and the resource if needed.
To give a better understanding of how this works:
In this case, John Savill created a Private Endpoint on his Storage Account and so connected it to his private network. It does get a local IP address instead of being routed over the internet.
This increases:
- Security: Traffic stays in your private virtual network
- Performance: Traffic takes a very short route from A to B because its from local to local
Service Endpoint vs. Private Endpoint
Because i find both terms still really confusing till this day, i have created a table to describe the exact differences:
| Service Endpoint | Private Endpoint |
| Access through public IP | Access through private IP |
| Isolation from VNETs | Complete isolation |
| Public DNS | Private DNS |
| Better performance by limiting hops |
Azure DNS
Azure DNS is a service in Azure that allows you to link a registered public domain name and create DNS records for it. Azure DNS is available in both a public and private variant for use within a virtual network. In the private variant, you can use any domain name.
This service is available in two service types:
- Public DNS: Publicly accessible DNS records for your website, servers, etc.
- Private DNS: Internal DNS for naming servers, databases, or web servers within your virtual network.
The default IP address for all DNS/DHCP-related services in Azure is 168.63.129.16. You can use this IP address as secondary or tertiary DNS server.
Azure NAT Gateway
Azure NAT Gateways are designed to provide one or more virtual networks within an Azure region (the same region as the VNET) with a single, static inbound/outbound IP address.
This allows you, for example, to enable an entire Azure Virtual Desktop host pool with 100 machines to communicate using the same external IP address.
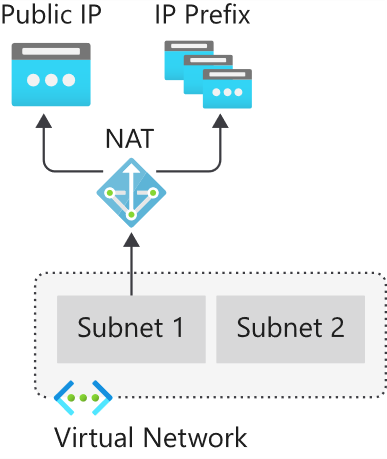
Use cases for Azure NAT Gateway are for example:
- When using applications or services that require an IP whitelist
- When using Conditional Access and so create a named/trusted location
Azure Virtual WAN
With Azure Virtual WAN, you can build a Hub-and-Spoke network in Microsoft Azure by configuring Azure as the “Hub” and the on-premises networks as “Spokes.”
This allows you to link all connections to Azure, such as VPN (S2S/P2S) and connections to other branches or other Azure virtual networks (VNETs) in different Azure Tenants/subscriptions. Microsoft utilizes its own backbone internet for this.
The topology looks as follows:
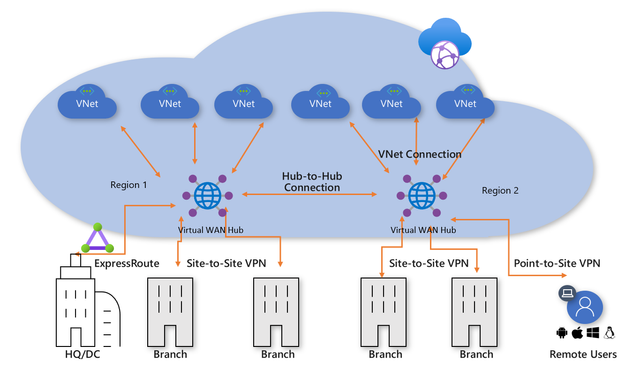
Azure Virtual WAN serves as the Hub for all externally connected services, such as:
- Branch Offices with SD-WAN or VPN CPE
- Site-to-Site VPNs (S2S)
- Point-to-Site VPNs (P2S)
- ExpressRoute
- Inter-Cloud connectivity
- VPN and ExpressRoute connectivity
- Azure Firewall and Routing
- Azure VNETs in other Azure tenants (cross-tenant)
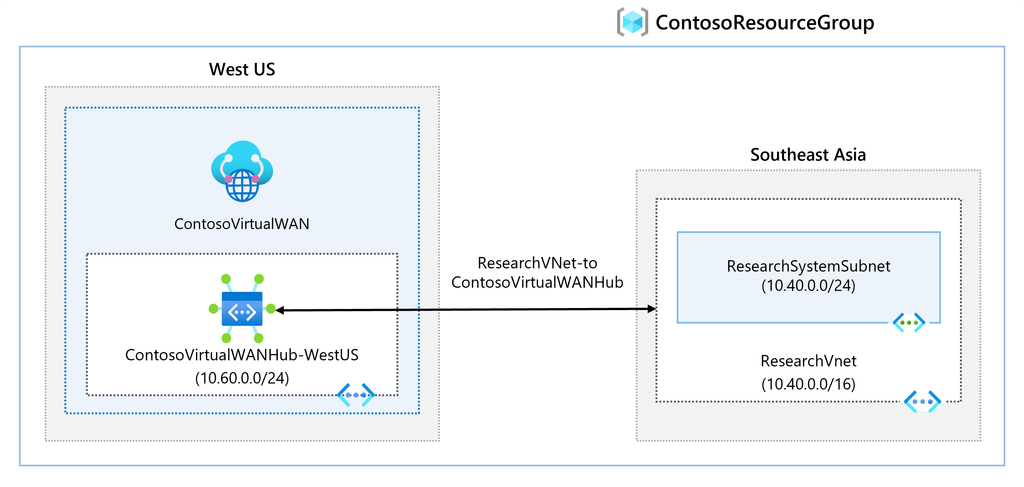
An Azure Virtual WAN consists of a base network that must be at least a /24 network or larger, to which all endpoints are connected. Additionally, it is possible to deploy a custom NVA (Network Virtual Appliance) or Firewall to secure traffic. The NVA must be deployed in the Virtual WAN Hub that you have created.
Overall, Azure Virtual WAN ensures that when a company has a network in Azure along with multiple branch offices, all locations are centrally connected to Azure. This architecture is a more efficient and scalable solution compared to manually connecting various virtual networks using different VPN gateways.
Azure Virtual WAN replaces VPN connections with Azure Virtual Network Gateways to Virtual WAN. It also supports more tunnels (2000 versus 30 in a virtual network gateway).
Azure ExpressRoute
Azure ExpressRoute is another method to connect an existing physical network to an Azure network. It works by establishing a dedicated, private fiber-optic connection to Azure, which is not accessible from the public internet.
With this method, you achieve much higher speeds and lower latency compared to Site-to-Site VPN connections. However, ExpressRoute can be quite expensive.
For a current overview of ExpressRoute providers: https://learn.microsoft.com/nl-nl/azure/expressroute/expressroute-locations-providers?tabs=america%2Ca-c%2Ca-k#global-commercial-azure
For using Azure ExpressRoute, there are 4 methods of connecting your network with ExpressRoute to Azure:
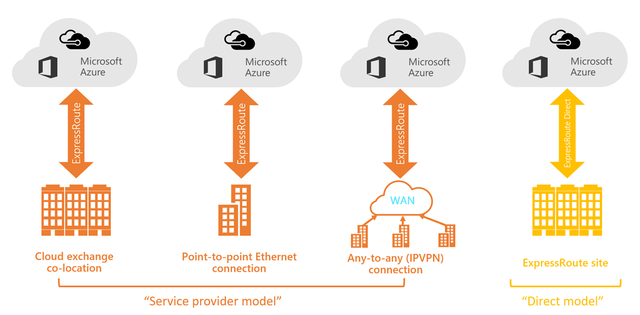
Co-location in a Cloud Exchange
If you are located at the same site as a cloud exchange, you can request virtual overlapping connections to the Microsoft Cloud via the co-location provider’s Ethernet exchange. Co-location providers can offer Layer 2 overlapping connections or managed Layer 3 overlapping connections between your infrastructure in the co-location facility and the Microsoft Cloud.
Point-to-Point Ethernet Connections
You can connect your on-premises data centers/offices to the Microsoft Cloud through point-to-point Ethernet links. Point-to-point Ethernet providers can offer Layer 2 connections or managed Layer 3 connections between your location and the Microsoft Cloud.
Any-to-Any (IPVPN) Networks
You can integrate your WAN with the Microsoft Cloud. IPVPN providers (typically MPLS VPN) offer any-to-any connectivity between your branches and data centers. The Microsoft Cloud can also be connected to your WAN, making it appear as just another branch. WAN providers generally offer managed Layer 3 connectivity.
Direct from ExpressRoute Sites
You can connect directly to Microsoft’s global network at a strategically located peering site worldwide. ExpressRoute Direct provides dual connectivity of 100 Gbps or 10 Gbps, supporting active/active connectivity at scale.
External access with custom services
When having to load balance external traffic to for example webservers, database servers etc. Azure has some solutions to achieve this:
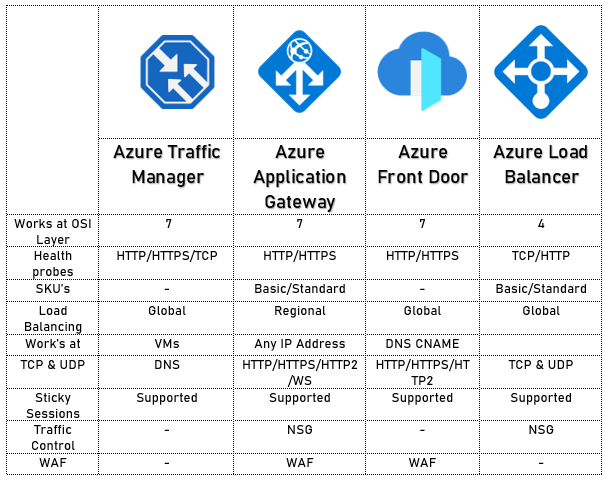
The solutions mentioned above each have their own use cases but work best with the following applications:
- Azure Traffic Manager
- Non-HTTP/HTTPS
- Azure Load Balancer
- Non-HTTP/HTTPS
- Azure Front Door
- HTTP/HTTPS
- Azure Application Gateway
- HTTP/HTTPS
Azure Application Gateway
Azure Application Gateway is an HTTP/HTTPS load balancer with advanced functionality. Like other load balancing options in Azure, it is a serverless solution.
The features of Azure Application Gateway include:
- Layer 7 load balancing (Application)
- Path-based routing / Multiple site routing
- Support for HTTP, HTTPS, HTTP/2, and WebSockets
- Web Application Firewall (WAF)
- End-to-end encryption
- Autoscaling
- Redirection
- HTTP request and response rewriting
- Custom error pages
Azure Application Gateway supports 2 load balancing methods:
- Path-based routing: Determines the endpoint or pool of endpoints based on a specific URL. (See image)
- Multiple site routing: Determines the endpoint or pool of endpoints based on a specific domain name. (See image)
On the frontend, Azure Application Gateway has a virtual WAN IP address that allows access to the web service. On the backend, you must determine how requests are routed to internal servers.
A load balancer also typically includes a health probe rule. This checks whether the backend web servers are functioning correctly by periodically opening an internal website. If a web server does not respond, the load balancer will immediately stop sending traffic to that server.
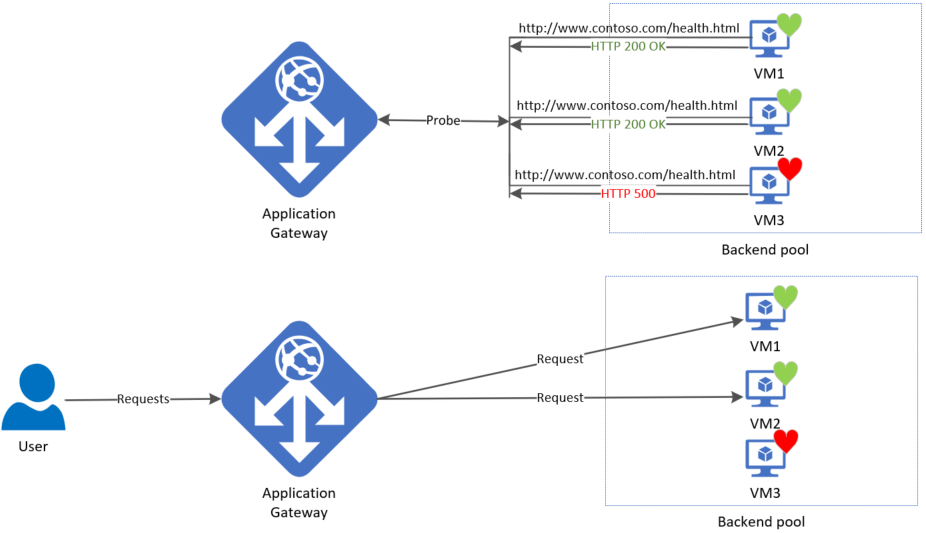
Azure Front Door
Azure Front Door is a Content Delivery Network (CDN) that runs on Azure. It is not a regional service and can be deployed across multiple regions. Essentially, it acts as a large index of all resources a company has and selects the appropriate backend resource for a client. In this sense, it also functions as a type of load balancer.
To learn more about Front Door, please review the image below:
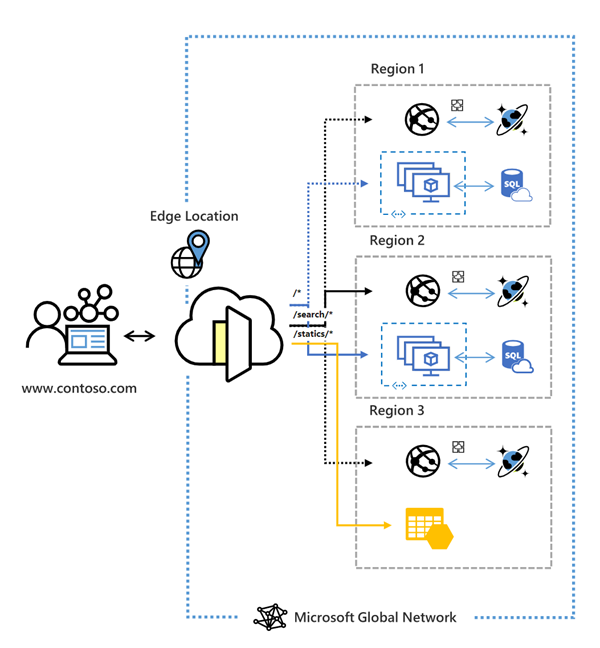
Azure Front Door has the following security features:
- Cross-site scripting
- Java attacks
- Local file inclusion
- PHP injection attacks
- Remote command execution
- Remote file inclusion
- Session fixation
- SQL injection protection
- Protocol attackers
Azure Bastion
Bastion is a service in Microsoft Azure that allows you to manage all virtual machines within an Azure Virtual Network (VNET-level). It works similarly to RDP but runs directly in your browser using port 443 combined with a reverse-connect technique.
This service is primarily focused on security, just-in-time access and ease of access. With this solution, there is no need to open any ports on the virtual machine, making it a highly secure option. It also functions as a jump-server where you can give someone permission to the server for 30 minutes to complete their task and disallowing access after that time window.
The topology of Azure Bastion:
Azure Firewall
Azure Firewall is a serverless, managed security service in Microsoft Azure that provides network-level protection for your virtual networks. It operates as a stateful firewall, meaning it inspects both incoming and outgoing traffic.
Azure Firewall has support for:
- Network Rules (Layer 3)
- Application Rules, allowing you to control traffic based on IP addresses, ports, and fully qualified domain names (FQDNs) (Layer 4)
- Threat Intelligence, which will block malicious traffic based on real-time security signals.
While Azure Firewall does what it convinces you, most people (including myself) are not a big fan of the solution. It is great for some basic protection, but it is very expensive and configuring it can be a long road. Fortunately, we have some great alternatives:
Custom Firewalls (NVA) in Azure
In Microsoft Azure we can use custom firewalls such as Palo Alto, Fortinet, Opensense, or Sophos XG. These have a lot more functionality than the default Azure Firewall and are a lot better to configure. The only downside to them is that they have a seperate configure page and the settings cannot be configured in the Azure Portal.
To make our Firewall effective, we configure a routing table with next hop “Network Appliance” and define the IP address to route traffic through the custom firewall.
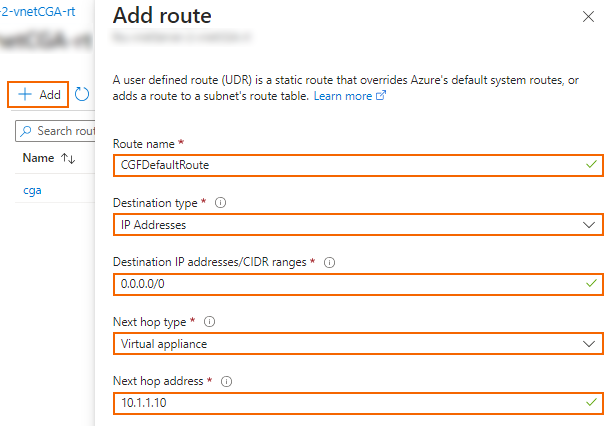
Summary
Networking is a critical part of administering and architecturing solutions in Microsoft Azure. It really is the backbone of all traffic between services, devices and maybe customers. So it is not strange that this is a really large topic.
Most of the knowledge is needed to architect and configure the solutions and most of the time, you sporadically add an IP address to a whitelist or make a minor change.
To go back to the navigation page: https://justinverstijnen.nl/microsoft-azure-master-class-navigation/
End of the page 🎉
You have reached the end of the page. You can navigate through other blog posts as well, share this post on X, LinkedIn and Reddit or return to the blog posts collection page. Thank you for visiting this post.
If you think something is wrong with this post or you want to know more, you can send me a message to one of my social profiles at: https://justinverstijnen.nl/about/
If you find this page and blog very useful and you want to leave a donation, you can use the button below to buy me a beer. Hosting and maintaining a website takes a lot of time and money. Thank you in advance and cheers :)
The terms and conditions apply to this post.
AMC - Module 5: Storage in Azure
This module focuses purely on the various storage services that Azure offers and provides. Additionally, we will
This module focuses purely on the various storage services that Azure offers and provides. Additionally, we will explore the different options available to increase redundancy and apply greater resilience.
The importance and types of storage
Storage fundamentally exists in three different types:
- Structured: Structured data is information stored according to a specific structure or model, allowing queries to be written to retrieve data.
- Examples: Databases, Database tables
- Semi-structured: Semi-structured data is not stored according to a strict schema, but each file contains a clear structure, making the data understandable.
- Examples: XML files, JSON files
- Unstructured: Unstructured data consists of individual files, each containing its own data.
- Examples: Text files, Video files, Images, Emails
In this chapter, we will primarily focus on Unstructured data.
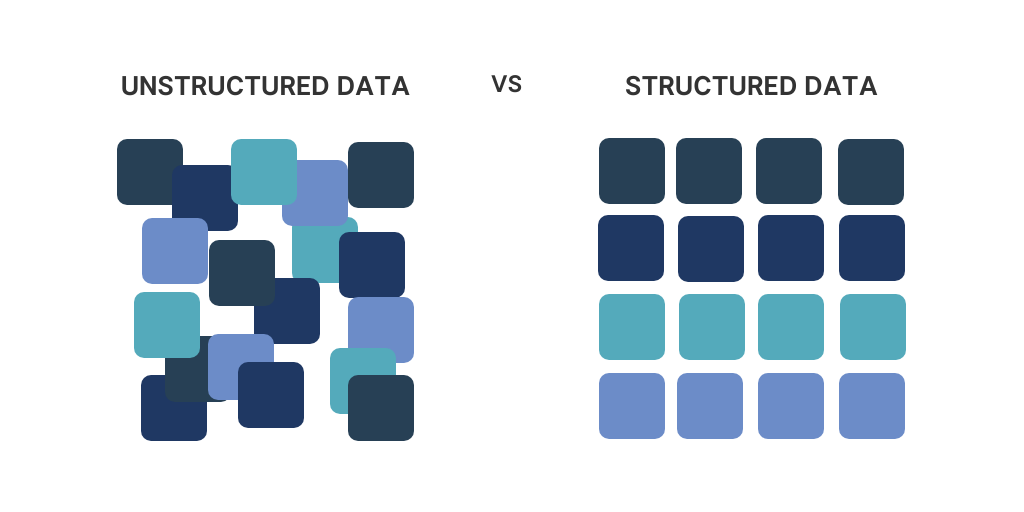
Storage accounts
For most storage services, you need an Azure Storage Account. You can think of this as a file server—a top-level, logical container for all storage services and shares. It is possible to create multiple Storage Accounts within a subscription.
Standard/General Purpose V2: This option provides all storage services in one but uses HDD-based storage.
Premium: This option provides only one specific storage service but uses SSD-based storage. The account is optimized for the selected service.
Please note: The name of a Storage Account must be globally unique and comply to DNS naming requirements.
Roles and Access to Storage Accounts
Access to Azure Storage Accounts can be managed in three different ways:
1. Azure AD Authentication (preferred)
- Used for authentication of Azure Active Directory (Azure AD) users.
- Provides role-based access without needing account keys.
- More secure and manageable than other access methods.
2. Shared Access Signature (SAS)
- A SAS token grants temporary and restricted access to specific storage services, applications, or IP addresses.
- Can be configured with expiration times and limited permissions (e.g., read-only access).
- More secure than the Storage Access Key since access is limited and can be revoked easily.
3. Storage Access Key
- A static access key that provides full control over the storage account.
- Each Storage Account has two access keys, which can be rotated for security.
- Acts as a fallback solution and should not be used in applications due to the lack of auditing (i.e., it does not track which user performed an action).
Example: Roles for Azure Files
For each Azure Storage service, there are specific roles available to manage access effectively. These roles ensure that users and applications only have the necessary permissions for their tasks.
- Storage SMB Contributor → Grants read and write access to Azure Files shares.
- Storage SMB Elevated Contributor → Grants full control permissions to the SMB file share.
- Storage SMB Reader → Grants read-only access to Azure Files shares.
Types of storage in Azure
Azure Storage is a service provided by Azure for storing data in the cloud. Instead of merely simulating a traditional file server, it offers various storage services. These services include:
- Azure Disks (no storage account required): OS disks or shared disks for virtual machines on Azure.
- Azure Blobs: Optimized for unstructured data, commonly used as back-end storage for websites, streaming services, or other random access scenarios.
- Azure Queues: Used for asynchronous message queueing between application components.
- Azure Tables: Suitable for storing structured NoSQL data.
- Azure Files: Can be used as SMB or NFS file shares (but not both simultaneously) for end users or system data.
- Azure NetApp Files: Enterprise-grade SMB or NFS file shares (both protocols simultaneously) with ultra-low latency, built on fiber-optic-based SANs within Azure.
Service Level Agreements (SLAs)
An important aspect of storage in Azure is that different SLAs exist for resiliency, interaction, and durability:
- Durability: Azure ensures data is stored securely and reliably, with extremely high SLAs to protect against data corruption:
- LRS: 99.99999999999% (11 nines)
- ZRS: 99.999999999999% (12 nines)
- GRS: 99.9999999999999999% (16 nines)
- Interaction/Availability: The ability to access data and ensure its availability has a lower SLA compared to durability but is still very high:
- LRS: 99.99%
- ZRS: 99.999%
- GRS: 99.9999%
Storage Redundancy
Azure offers several options to ensure high availability of data by making smart use of Microsoft’s data centers. When designing an architecture, it’s important to ensure that a service is available just enough for its purpose to optimize costs.
Azure is structured into different regions, and within these regions, there are multiple availability zones, which are groups of data centers.
Storage redundancy is divided into three main methods:
- LRS (Locally Redundant Storage): Stores three instances of the data within the same data center.
- ZRS (Zone-Redundant Storage): Stores three instances of the data across different availability zones within an Azure region.
- GRS (Geographically Redundant Storage): Stores three instances of the data in one data center and an additional three instances in a paired region.
Note: Synchronizations between regions are asynchronous.
Aside from the options LRS, ZRS and GRS there is a 4th option available;
GZRS (Geo-Zone-Redundant Storage) stores three instances of the data across three availability zones within a region and an additional three instances in a paired region.
It is possible to enable read-access (RA), which allows the storage to be accessed via a secondary URL for failover purposes. This adds RA- to the redundancy type, resulting in RA-GRS or RA-GZRS.
Storage Tiers
Azure divides storage into different tiers/classes to ensure that customers do not pay more than necessary:
- Hot: Hot storage is the fastest storage (low latency) based on SSDs.
- Cool: Cool storage is slower storage (higher latency) based on HDDs.
- (Blobs) Archive: This storage tier is offline and based on HDDs. Access to Archive storage can take up to 48 hours.
- (Files) Transaction Optimized: Fast storage but without low latency, based on HDDs.
These tiers are designed for the customer to choose exactly the option needed. It is good to know that access to archive and cool data is more expensive than to Hot data.
Azure Storage billing
Billing for Azure Storage is done in 2 different types:
- Provisioning based billing: This means you pay a fixed price at some discount for “provisioning” a block of storage. I can be cheaper when storing huge amounts of data and is a little commitment to Azure.
- For Managed Disks
- Consumption based billing: This means you pay exactly what you use. More storage and transactions means paying more money.
- For Storage accounts
Provisioning based billing
Azure Storage will increase IOPS, throughput, and reduce latency when you allocate more storage space for Premium options or managed disks. See the image below:
Consumption based billing
The lower-tier Azure Storage options are always billed based on usage. This includes:
- Data storage
- Read operations
- Write operations
- Failover actions and read/write operations
Encryption storage
All Azure Storage options are encrypted with AES-256 by default for security reasons. This encryption is on platform-level and is the basic level which cannot be disabled.
Networking
Azure Storage offers the following networking options:
- Public Endpoint: The Public Endpoint is the default option when creating resources like SQL servers and Storage accounts which have a publicly accessible URL (like *.blob.windows.net)
- Private Endpoint: The storage account receives an internal IP address within an Azure virtual network and is only accessible from there. This option is commonly used for sensitive information, which may not travel over the internet.
- Service Endpoint: The storage account recognizes existing virtual networks, allowing you to restrict access so that only specific subnets of an Azure virtual network can reach the storage account.
- IP-based Firewall: Within the storage account, you can restrict access to specific IP addresses or Azure networks.
It is always recommended to enable the IP-based firewall and to block public access. Only use public access for testing and troubleshooting purposes.
Azure File Sync
Azure File Sync is a service within Azure Files that allows you to synchronize an on-premises SMB-based file share with an Azure Files share in Azure. This creates replication between these two file shares and is similar to the old DFS (Distributed File System) in Windows Server, but better and easier.
Azure File Sync can be used for two scenarios:
- Migrating an on-premises file share to an Azure Files share
- Keeping a file share synchronized between Azure Files and an on-premises server for hybrid solutions
The topology of Azure File Sync is broadly structured as follows:
Managed Disks
Azure provides the ability to create custom disks for use with virtual machines. It is possible to attach a single virtual disk to up to three virtual machines (MaxShares). If you pay for more capacity, this limit increases, like described earlier (Provisional based billing).
The different options:
- Standard HDD
- Standard SSD
- Premium SSD
- Ultra SSD
Source: https://learn.microsoft.com/nl-nl/azure/virtual-machines/disks-types#disk-type-comparison
Managed Disks are, like described, based on provisioning due to Operating System limitations. There has to be a fixed amount of storage available. You pay for a size and performance tier.
Goog to know, a Managed Disk can be resized but only increased. You cannot downgrade a Managed Disk from the portal. You have to create a new disk and migrate the data in this case.
Managed Disk Availability
Managed Disks are redundant with LRS and ZRS (Premium SSD only). These managed disks do not support GRS, as the disk is often used in conjunction with a virtual machine, making GRS unnecessary in this case.
With Azure Site Recovery, it is possible to create a copy of the VM along with the associated disk in another region. However, this process is asynchronous, and data loss may occur.
VM Storage
Virtual Machines rely on Managed Disks to store their data on. The disks where this data is stored, is stored on Azure Storage. VMs have a required OS disk, and can have some data disks. Also, you can have a temporary disk if you select this in the portal.
OS Disks
A virtual machine is placed on a host by Azure, and as a customer, you have no control over this placement. Azure uses an algorithm to do this automatically.
The storage for a virtual machine is by default always a managed disk, as this disk is accessible throughout the entire region within Azure.
Temporary Disks
Some VM generations include a “Temporary Disk” as the D: drive (or /dev/sdb1 for Linux). As the name suggests, this is temporary storage. After a machine is restarted or moved to another host/hypervisor, the data on this disk will be lost.
The purpose of this disk is to store the pagefile and cache. The performance of this disk is very high since it runs on the same host and uses the VM bus. This is why it is used for cache and pagefile (the Windows variant of Swap).
Tools
The different tools for working with Azure Storage are:
- Azure Storage Explorer: A Win32 installable application used to connect to an Azure Storage account and make changes or migrate data.
- AZCopy: A PowerShell-based tool used to migrate data to Azure Files.
Import/Export Services
Azure offers a service for importing or exporting large amounts of data.
- Azure Data Box: Microsoft sends you a hard drive, you load the data onto it along with a CSV file specifying where each file should go, and then send it back to Microsoft. This is an offline method. For Export, the process works in reverse.
To go back to the navigation page: https://justinverstijnen.nl/microsoft-azure-master-class-navigation/
End of the page 🎉
You have reached the end of the page. You can navigate through other blog posts as well, share this post on X, LinkedIn and Reddit or return to the blog posts collection page. Thank you for visiting this post.
If you think something is wrong with this post or you want to know more, you can send me a message to one of my social profiles at: https://justinverstijnen.nl/about/
If you find this page and blog very useful and you want to leave a donation, you can use the button below to buy me a beer. Hosting and maintaining a website takes a lot of time and money. Thank you in advance and cheers :)
The terms and conditions apply to this post.
AMC - Module 4: Resiliency and Redundancy in Azure
This module is all about resiliency and redundancy in Microsoft Azure. Resiliency literally means flexibility. It refers to how resistant…
This module is all about resiliency and redundancy in Microsoft Azure. Resiliency literally means flexibility. It refers to how resistant a solution is to certain issues and failures. We want to build our solutions redundant, because we don’t want outage in a system so a customer can’t do their work.
Areas to implement resilliency
The different layers where you can and should apply resiliency and how you can improve the area are:
- Software: Operating system, application, runtime
- Replication
- Hardware: UPS, server, switch, infrastructure, network, data center
- Replication
- Corruption/Encryption: Ransomware, corrupted data, avoid using replication as a backup
- Backup
- Attack/DDoS: DDoS protection, firewall
- Isolated export/backup/other
- Regulatory Requirements: Uptime according to an SLA, specific methods for data storage
- Backup
- Humans: Human errors, wrong implemented changes or processes
- Processes
How to decrease outages of infrastructure
There are several ways to protect yourself against infrastructure problems, depending on the issue and the service.
- Replication: Replication helps mitigate infrastructure problems and provides a quick way to get back online. However, replication is not a backup and does not protect against data corruption.
- Snapshot: A snapshot is a package that contains the changes between a specific state and the current state. Snapshots protect against data corruption but do not protect against infrastructure issues. Moreover, there is a risk that the source becomes corrupted, in which case a snapshot becomes useless.
- Backup: A backup is considered a complete copy of current data stored elsewhere. Typically, you create at least two backups for each system:
- Internal Backup: A backup on the same infrastructure for quick data recovery.
- External Backup: A backup on a completely separate infrastructure, ideally located in a different geographic region, as a last resort in case of data loss.
How to decrease outages of human errors
People should have as little contact as possible with production environments. For any changes, ensure the presence of a test/acceptance environment. Human errors are easily made and can have a significant impact on a company or its users, depending on the nature of the mistake.
The best approach is to automate as much as possible and minimize human interaction. Also make use of seperated user/admin accounts and use priveleged access workstations.
Recovery Point Objective (RPO)
It is important to define the Recovery Point Objective (RPO) for each service. This determines the maximum amount of data you can afford to lose based on real-life scenarios. A customer might often say, “I can’t afford to lose any data,” but achieving such a solution could cost hundreds of thousands or even millions.
An acceptable RPO is determined based on a cost-benefit analysis, such as: “If I lose one day of data, it will cost me €1,000, which is acceptable.” In this case, the backup solution can be configured to ensure that, in the event of an issue, no more than one day of data is lost.
Recovery Time Objective (RTO)
The Recovery Time Objective (RTO) defines the amount of time required to initiate a specific recovery action, such as a disaster recovery to a secondary region.
Know your solution
The most important aspect is to thoroughly understand the application you are building in Azure. When you understand the application, you will more quickly identify improvements or detect issues. Additionally, it is crucial to know all the dependencies of the application. For example, Azure Virtual Desktop has dependencies such as Active Directory, FSLogix, and Storage.
In solutions as these, documentation is key. Ensure your organization has a proper tool to write topologies like these down.
Requirements and SLAs
When designing and building an environment in Microsoft Azure, it is important to understand the requirements.
In Azure, most services come with a specific SLA (Service Level Agreement) that defines the annual uptime percentage. It is crucial to choose the right SLA in relation to the costs. For example, adding an additional “9” to achieve 99.999999% uptime might provide just a few extra minutes of availability but could cost an additional €50,000 annually.
To get a nice overview of the services available with all SLA options available, you can check this page: https://azurecharts.com/sla?m=adv
Azure Chaos Studio
Azure Chaos Studio is a fault simulator in Azure that can perform actions such as:
- Shutting down a virtual machine
- Adding latency to the network
- Disabling a virtual network
- Disabling a specific availability zone
In summary, Azure Chaos Studio enables you to test the resiliency of your application/solution and enhance its resilience.
Azure Resiliency Contructs
To create actual resiliency for your application in Azure, the following functionalities can be used:
- Fault Domains
- Availability Sets
- Availability Zones
To achieve resiliency in your Azure application, these constructs must always be properly designed and configured. Simply adding a single virtual machine to an availability set, scale set, or availability zone does not automatically make it highly available.
Fault Domains, Availability Sets and Virtual Machine Scale Sets (VMSS)
A Fault Domain is a feature of Availability Sets and VM Scale Sets that ensures multiple virtual machines remain online in the event of a failure within a physical datacenter. However, true resiliency requires designing and configuring the application to handle such disruptions effectively, as fault domains are only one part of the broader resiliency strategy.
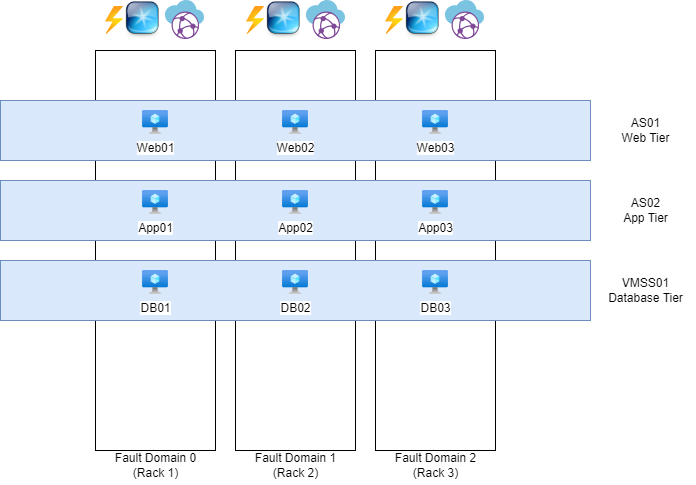
The white blocks represent physical server racks, each with its own power, network, and cooling systems. Each rack is considered a “Fault Domain,” meaning a domain or area where a failure could impact the entire domain/area.
The blue blocks represent Availability Sets (AS) and Virtual Machine Scale Sets (VMSS), which distribute multiple virtual machines with the same role across three fault domains. For instance, if one of the three server racks catches fire or loses power, the other two machines will remain online.
To maintain clarity and organization, ensure that each application has its own separate set. So you have implemented a good level of redundancy.
Availability Sets, Virtual Machine Scale Sets, and Fault Domains do not provide protection against failures at the datacenter level. You need Availability Zones for that.
Availability Zones
Nearly every Microsoft Azure region has 3 Availability Zones. These are groups of datacenters with independent power, network, and cooling systems. This allows you to make solutions zone-redundant, protecting your application from failures at the datacenter level. However, this redundancy and resiliency must be specifically designed. This can be done by using a method like the method below:
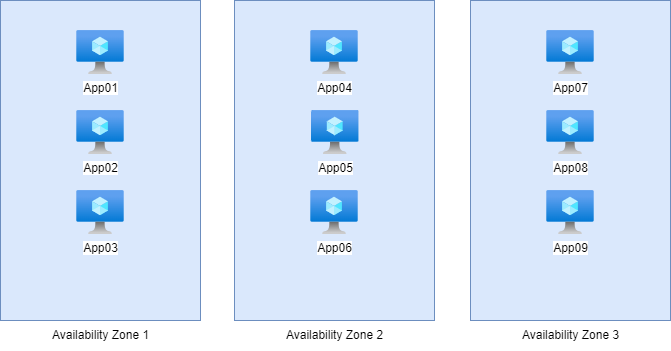
Here, we have 9 servers with the exact same role, distributed across the 3 Availability Zones in groups of 3. In this setup, if one of the three zones goes down, it will not impact the service. The remaining 6 servers in the other two zones will continue to handle the workload, ensuring uninterrupted service.
This type of design is a good example of zone-redundant architecture, providing resilience against datacenter-level failures while maintaining service availability.
Availability Sets vs. Availability Zones
The exact difference between these options, which appear very similar, lies in their uptime and redundancy:
Here’s a concise comparison of the options with their uptime and redundancy:
| Option | Uptime | Redundancy |
|---|---|---|
| Availability Set | 99.95% | Locally redundant |
| Availability Zone | 99.99% | Zone-redundant |
Proximity Placement Group
Azure does not guarantee that multiple virtual machines will be physically located close to each other to minimize latency. However, with a Proximity Placement Group (PPG), you can instruct Azure: “I want these machines to be as close to each other as possible.” Azure will then place the machines based on latency, ensuring they are located as close together as possible within the physical infrastructure.
This is particularly useful for applications where low latency between virtual machines is critical, such as high-performance computing (HPC) workloads or latency-sensitive databases.
You can configure this Proximity Placement Group on your Virtual Machines.
Azure Backup
Azure offers two distinct services to configure backups for your resources:
1.Recovery Services Vault:
- Designed for broad disaster recovery and backup scenarios.
- Supports Azure Backup, Azure Site Recovery, and other recovery solutions.
- Ideal for long-term data retention and regulatory compliance.
- Commonly used for virtual machine backups, SQL Server backups, and more.
2.Backup Vault:
- A lightweight and cost-optimized service specifically for Azure Backup.
- Focused on storing backup data for IaaS VMs, databases, and file shares.
- Designed for simplified deployment and management of backup solutions.
- Ideal for environments where disaster recovery is not a primary concern.
Key Difference:
- Recovery Services Vault is a comprehensive solution for backup and disaster recovery needs, including advanced scenarios. We also use this solution often in business workloads.
- Backup Vault is a streamlined, cost-effective solution for basic backup storage and operations. We often use this solution for testing purposes.
Choose based on the scope and complexity of your backup requirements.
Summary Module 4
Backup and Resilience in Microsoft Azure is very important. This starts with knowing exactly what your solution does. Therefore you can apply high availability and backup to it.
To go back to the navigation page: https://justinverstijnen.nl/microsoft-azure-master-class-navigation/
End of the page 🎉
You have reached the end of the page. You can navigate through other blog posts as well, share this post on X, LinkedIn and Reddit or return to the blog posts collection page. Thank you for visiting this post.
If you think something is wrong with this post or you want to know more, you can send me a message to one of my social profiles at: https://justinverstijnen.nl/about/
If you find this page and blog very useful and you want to leave a donation, you can use the button below to buy me a beer. Hosting and maintaining a website takes a lot of time and money. Thank you in advance and cheers :)
The terms and conditions apply to this post.
AMC - Module 3: Governance in Microsoft Azure
Governance in Azure refers to the enforcement of rules and the establishment of standards in solutions, naming conventions…
Introduction to Govenance in Azure
Governance in Azure refers to the enforcement of rules and the establishment of standards in solutions, naming conventions, technology, etc. This is achieved through the management and importance of Management Groups, Subscriptions, Resource Groups, Policies, RBAC, and Budgets.
In the cloud, Governance is crucial because processes and behaviors differ significantly from on-premises hardware. Additionally, certain services can be made publicly accessible, which requires an extra layer of security.
Azure Policy
With Azure Policy, you can set up rules that different subscriptions, resources, or resource groups need to follow. Some examples include:
- Always assigning certain tags
- Automatically adding a prefix (like a company or department abbreviation)
- Assigning specific permissions by default
- Blocking certain settings
- Limiting which regions can be used
- Applying locks to resource groups
- Automatically deploying the Log Analytics Agent if it’s not installed
The main goals of Azure Policy are:
- Making sure certain settings are enforced
- Giving insight and analysis on policy compliance
- Automating tasks (like deployifnotexists)
To better understand how Azure Policy works, here are its key components:
Definitions: A definition outlines what actions, configurations, or tasks are allowed or not. It can include multiple rules, so you can enforce or allow several things with one definition. Azure also offers many built-in definitions that you can use.
Initiatives: An initiative is a collection of definitions, so you can group policies together under a single initiative for things like company-wide policies or specific applications. Azure also has standard initiatives available, like checking if a subscription meets country regulations, NIST 800, or ISO 27001.
Assignments: These are the subscriptions that the policies apply to.
Exemptions: Exemptions are exceptions to a policy, like for a specific resource or type. You can also set an expiry date to make the exemption temporary. There are two types:
- Mitigated: The exemption is given because the policy’s goal was met through a different method.
- Waiver: The exemption is given because the resource is temporarily allowed to not follow the policy.
Tags
A Tag in Azure can be added to various types of resources to categorize them, making it easier to delegate or assign management to individuals or support teams. Tags can be added to resource groups, but the resources within these groups won’t automatically inherit the tags.
The main use of tags is to provide better organization, group resources, and are useful in scripts or other purposes. Tags consist of a name and a value, and they might look something like this for a resource group:
For example:
- Tag Name: Department
- Tag Value: IT
Here i have configured the tag on a resource group to show the outcome:
Write access to the resources is required to modify or add a tag. Additionally, a tag cannot contain special characters such as ?, <, >, ,, /, or ..
A maximum of 10,000 tags can be assigned per subscription.
Tags need to be added directly to objects; within the Tags section, you can only view the tags that have already been assigned.
Azure Role structure and assignment
Access to specific components in Microsoft Azure is managed using Access Control (IAM):
In Microsoft Azure, there are hundreds of different roles for each service, but the basic structure is as follows, ranked from the fewest to the most permissions:
- Reader: This role allows access to view the entire configuration but does not grant permission to make any changes.
- Contributor: This role allows access to modify the entire configuration, but does not permit the user to change permissions at the assigned level.
- Owner: This role provides full access to modify the entire configuration, including the ability to manage permissions.
The highest permissions are effective if multiple roles are assigned.
These roles define the scope of control users or groups have over resources in Azure, ensuring that access can be finely tuned based on the level of responsibility.
To learn more about Azure Roles and assignments, check out my easy Azure Roles guide: https://justinverstijnen.nl/introduction-to-microsoft-azure-roles-rbac-iam-the-easy-way/
Effective access tool
At every level in Microsoft Azure, it’s possible to check the access permissions for a specific user or group. In the Access Control (IAM) blade of any level (such as subscription, resource group, or resource), you can click on the “Check Access” tab, and then on the “Check Access” button.
Azure will then display a clear overview of the roles assigned to the user and the associated permissions. This feature helps ensure that you can easily verify who has access to what resources and at what level of control.
Creating custom Azure roles for more granular access
In Azure, you can also create custom roles to allow or restrict specific actions with a role. This can be done in any window where you see Access Control (IAM).
A role in Azure is structured as follows:
- Role Name: This is the name of the role, used to locate the role within the system and for documentation purposes.
- Resource Permissions: Permissions are assigned in two basic ways: Actions and notActions. Permissions are granted based on the resource providers in Azure (more on this later).
- Actions are the actions a user is allowed to perform (whitelist).
- notActions are the actions a user is not allowed to perform. This option takes precedence over Actions. (If a user has multiple roles where the same action is defined in both Actions and notActions, access to this action will be blocked) (blacklist).
- Data Permissions: For SQL/Storage accounts, DataActions and notDataActions are used, following the same principles but applying to underlying data rather than at the resource level.
- Scope: The level at which the role assignment should be applied.
Role assignment scopes
Built-in and custom roles in Microsoft Azure can be assigned to:
- Users
- Groups
- Service Principals
- Managed Identities
Azure Role-Based Access Control (RBAC) and hierarchy
With Azure RBAC, you ensure that a specific user only has access to the services/resources they need. In Azure, there are various predefined roles, and you can also create custom roles. These roles can then be applied at different levels.
In this diagram, several levels are illustrated:
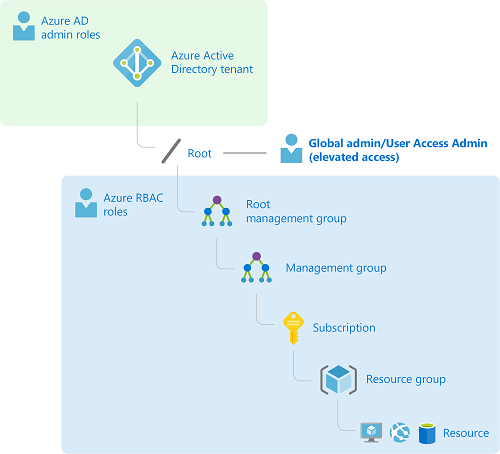
- Microsoft Entra ID: Microsoft Entra ID is the Identity Provider (IdP) for Microsoft Azure.
- Root Management Group: The Root Management Group is automatically created when you start setting up management groups. This is the highest level where permissions can be assigned. By default, all subscriptions are also members of this Management Group.
- Management Group: A management group is a grouping where permissions can be granted, and subscriptions can be added. Management groups can go up to a maximum of 6 levels deep. The primary purpose is to organize subscriptions into management groups, ensuring permissions are inherited downward but not upward.Management groups can be based on organizational units, partners, etc.
- Subscription: A subscription is a logical container for all resource groups, where billing is managed. With multiple subscriptions, you can also have multiple billing methods.
- Resource Group: A resource group is a logical container for storing resources to host a particular application. Think of it as a server cabinet with resources for a specific application. Every resource created is a member of a resource group.
- Resource: A resource is a virtual entity, such as a disk, virtual machine, virtual network, storage account, SQL server, Log Analytics workspace, etc.
Each level serves to organize and control access within Azure, with permissions flowing from higher to lower levels to manage resources efficiently.
Inheritance of roles
Please note, role assignments will always propagate to underlying levels. There is no “Block-inheritance” option. Therefore, determining the level at which roles are applied is very important.
Please take a look at the following image for a practice example:
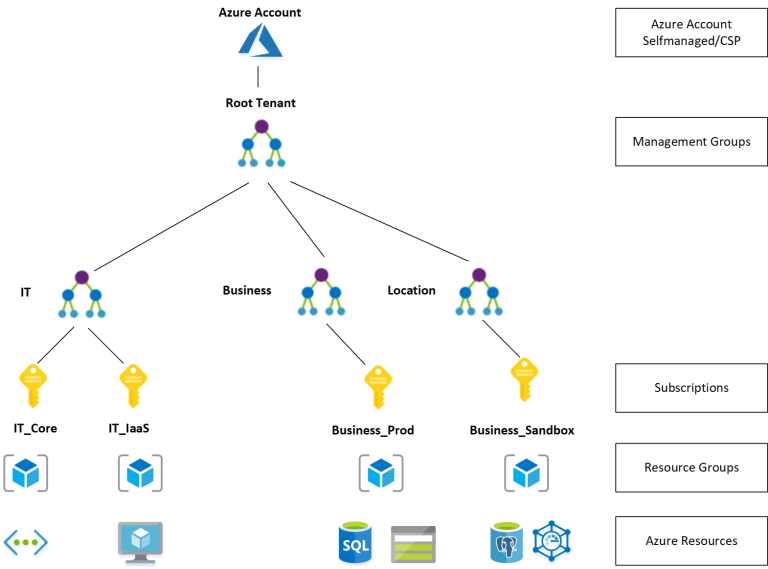
- Azure Account: At the top, we have the main Azure Account, which can be self-managed or provided through a Cloud Solution Provider (CSP).
- Root Tenant: Under the Azure Account is the Root Tenant, which serves as the primary identity and management boundary within Azure. This is typically linked to Microsoft Entra ID and represents the overall organization.
- Management Groups: Below the Root Tenant are Management Groups, which are used to organize subscriptions into logical groups, often aligned by departments, business functions, or regions. These groups enable centralized management and control. In this example, there are three management groups:
- IT: Used to manage resources related to IT infrastructure.
- Business: Focused on resources that support business operations.
- Location: Organized by specific locations, potentially representing geographical groupings.
- Subscriptions: Within each Management Group, there are individual Subscriptions. Subscriptions act as containers for billing and access control and are aligned with different environments or purposes:
- IT Core and IT IaaS under the IT Management Group.
- Business Prod under the Business Management Group, used for production-related resources.
- Business Sandbox under the Location Management Group, likely used for testing and sandbox purposes.
- Resource Groups: Each subscription contains Resource Groups. These are logical containers to host specific sets of related resources that work together on a particular application or project.
- Azure Resources: Finally, within each Resource Group are the actual Azure Resources. These can include:
- Compute resources (e.g., Virtual Machines, Kubernetes clusters),
- Storage accounts,
- SQL databases,
- Networking components, and more.
Attribute Based Access Control
A relatively new feature of Microsoft Entra ID (formerly Azure AD) is attribute-based access. In the Microsoft Entra admin center, it is possible to create custom attributes and assign them to users. Permissions can then be applied based on these attributes.
Azure Budget
In an Azure Subscription, it is possible to create a budget. This helps ensure that costs stay within certain limits and do not exceed them.
Azure Resource locking
In Azure, you can apply locks to resource groups and resources. Locks are designed to provide extra protection against accidental deletion or modification of resource groups and resources. A lock always takes precedence over the permissions/roles of certain users or administrators. There are two types of locks:
- ReadOnly: A ReadOnly lock ensures that a resource can only be viewed.
- Delete: A Delete lock prevents a resource from being deleted.
These locks add an extra layer of security to help prevent unintended changes to critical resources.
Azure Resource Manager (ARM)
Azure Resource Manager (ARM) is the management layer for your resources, providing an easy way to deploy resources in sets. Additionally, it allows the creation of templates to deploy a specific configuration across multiple environments. Deploying a solution via the Azure Marketplace is also a responsibility of ARM.
Azure Resource Manager ensures that all resources comply with defined Azure Policies and that security configurations set with RBAC function correctly on a technical level. ARM is a built-in service in Azure, not a standalone resource that requires management.
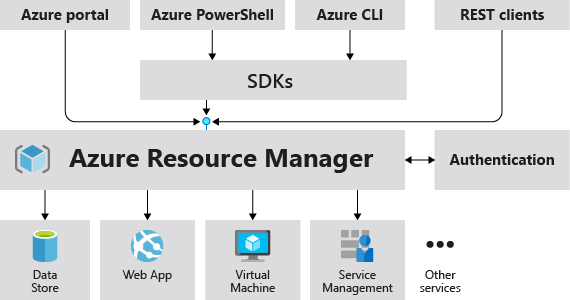
Azure Resource Provider
Azure Resource Providers are technical (REST) definitions at the Subscription level for the resources that are available. They are represented in the following format:
| Azure Service | Azure Resource Provider |
|---|---|
| Virtual Machines | Microsoft.Compute/virtualMachines |
| Availability Sets | Microsoft.Compute/availabilitySets |
These definitions are used, for instance, when creating custom roles to determine the scope of an action.
Before a resource provider can be used within your Azure subscription, it must be registered. The resource creation wizard will automatically prompt you to register a provider if necessary. This is “by design” to prevent unused resource providers from being exploited by malicious users.
In a given subscription, you can view an overview of which providers are registered and which are not.
Ways to save costs in Microsoft Azure
When using Microsoft Azure, there are multiple ways to save money:
- Using the right sizes and specifications
- Using serverless solutions rather than using in VM solutions
- Using Reserved instances for virtual machines
- You reserve your size VM for 1 or 3 years for a 40% or 60% discount, but you can’t stop, upgrade or downgrade your VM
- Using Azure Savings Plans for flexible savings
Summary
Governance in Azure ensures that your cloud resources are used effectively and securely, aligned with organizational policies and compliance requirements. You can reach this outcomes by using the solutions defined on this page.
To go back to the navigation page: https://justinverstijnen.nl/microsoft-azure-master-class-navigation/
End of the page 🎉
You have reached the end of the page. You can navigate through other blog posts as well, share this post on X, LinkedIn and Reddit or return to the blog posts collection page. Thank you for visiting this post.
If you think something is wrong with this post or you want to know more, you can send me a message to one of my social profiles at: https://justinverstijnen.nl/about/
If you find this page and blog very useful and you want to leave a donation, you can use the button below to buy me a beer. Hosting and maintaining a website takes a lot of time and money. Thank you in advance and cheers :)
The terms and conditions apply to this post.
AMC - Module 2: Identity in Azure
This Azure Master Class (AMC) chapter is all about Identity in Microsoft Azure. This means we discuss the following: Users, Groups, Ente…
This Azure Master Class (AMC) chapter is all about Identity in Microsoft Azure. This means we discuss the following:
- Users
- Groups
- Devices
- Enterprise Applications
- Service Principals
- Authentication
What is identity?
For every service that a user accesses, it is necessary to have an identity. Access needs to be determined, and the service must know who the user is in order to open the correct environment.
Best practice is to always assign the least possible privileges. A person who performs 3 tasks does not need permissions for 200 tasks, but for the 3 tasks only. “Least privilege” is one of the 3 key principals of the Zero Trust model.
Central Identities/Identity Provider
To store identities, you need an Identity Provider. In Azure, we have a built-in identity provider called Azure Active Directory. An Identity Provider itself is a database where all identities are stored, and it can securely release them through Single Sign-On applications.
An overview of what this process looks like:
In this diagram, Azure Active Directory, our Identity Provider, is at the center. When an application is set up, a ’trust’ is established with the Identity Provider. This allows a user to log in to third-party applications through the Identity Provider using the same credentials, and they will be logged in automatically.
Decentralized Identities
Another possibility is to use the Decentralized Identity model. In this model, the user owns all their application credentials and can decide for themselves which entities/applications they share their credentials with.
An overview of what this process looks like:
Microsoft Entra ID (formerly known as: Azure Active Directory)
Microsoft Entra ID is the Identity Provider for all enterprise Microsoft Cloud services and 3rd-party applications:
- Microsoft Azure
- Microsoft 365
- Microsoft Dynamics 365
- Power Platform
- Exchange Online
- SharePoint Online
- TOPdesk (3rd-party)
- Salesforce (3rd-party)
This was previously known as Azure Active Directory which sounds similar to the traditional Active Directory Domain Services that you install on Windows Servers, but it differs significantly in terms of functionality and purpose. The name of it was changed in 2023 to make it less confusion.
However, it differs some from the old Active Directory Domain Services protocols:
| Active Directory Domain Services | Microsoft Entra ID | |
| Verification protocols | NTLM & Kerberos | Open ID, OAuth 2.0, SAML, WS-FED |
| Query protocols | LDAP | Powershell |
Federation
The Federation process means that an application trusts a federation server, allowing it to issue tokens for Single Sign-On.
Multiple Entra ID tenants
It is possible to create multiple Azure ADs within a single .onmicrosoft tenant. For example, for a partner who works on the same tenant with a different domain name. This can be done in the Microsoft Azure marketplace.
Microsoft Entra ID SKUs
Microsoft Entra ID consists of 4 different licenses:
- Microsoft Entra ID Free
- Microsoft Entra ID Free is the default you get when your tenant has 0 licenses.
- Microsoft Entra ID for Microsoft 365
- You get this SKU when you have Microsoft 365 licenses.
- Microsoft Entra ID Premium P1
- You get this SKU when one or more users have Microsoft Entra ID Premium P1 licenses.
- Microsoft Entra ID Premium P2
- You get this SKU when one or more users have Microsoft Entra ID Premium P2 licenses.
Each SKU has its own functionality:
For the actual list of features, please visit: https://learn.microsoft.com/en-us/entra/identity/authentication/concept-mfa-licensing#available-versions-of-azure-ad-multi-factor-authentication
Microsoft Secure Score
The Microsoft Secure Score is a score for the Azure AD tenant on a scale from 0 to 100%. By using various security features, this score will increase, indicating how secure your identities and organization are with the use of Azure AD.
A few tasks that improve the Secure Score of the Azure AD environment include:
- Using Multi-Factor Authentication
- Disabling users’ rights to create or mark company applications as trusted
- Using Identity Protection
- Assigning reduced administrative privileges
Identity has become the primary factor to secure because, in the past 5 years, approximately 85% of cyberattacks have originated from leaked, harvested or stolen credentials.
There are multiple overviews of the Microsoft Secure Score. In the Security portal (https://security.microsoft.com) you have the best overview with the most information:
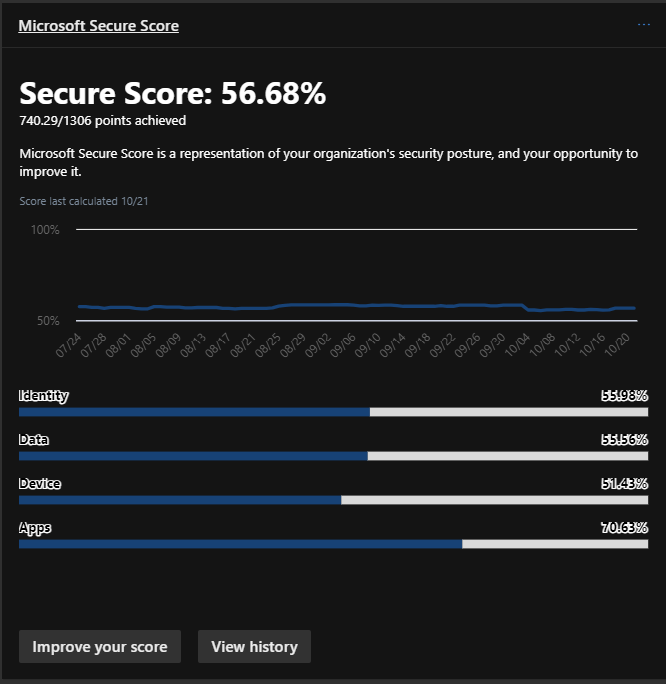
In the Microsoft Entra portal, only the “Identity” score is shown:
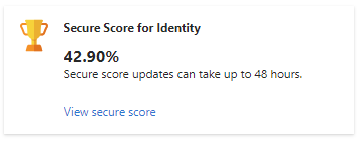
Identities in Microsoft Entra ID
All types of identities stored in Microsoft Entra ID are:
- Users: Real people/employees or shared accounts.
- Guest Users: Individuals from external companies who have an account with reduced rights within your tenant.
- Groups: A group of users or devices. Groups can be Assigned or Dynamic, where you define a rule for membership in the group. For example, all users with the role “IT Specialist.”
- Devices: Devices such as laptops, phones, tablets, PDAs.
- Enterprise Applications and App Registrations: Used for Single Sign-On (SSO) or assigning specific API permissions with OAuth 2.0.
- Service Principals (PowerShell only): A service principal is an entity that obtains access to resources secured by Microsoft Entra ID. For instance, you need a service principal to grant an enterprise application permissions to users/groups, etc.
Entra ID Join/Hybrid Entra ID Joined/Entra ID Registered
Devices can be added to Microsoft Entra ID for various reasons:
- Single Sign-On for users to enhance user convenience.
- Apply configurations using Endpoint Manager MDM.
- Device registration.
- Security with compliance policies.
Devices can be added to Microsoft Entra ID in multiple ways, for different purposes/reasons:
- Microsoft Entra ID registered: to register devices such as BYOD (Bring Your Own Device). Works with Windows/Mac/Android/iOS/Ubuntu. No configuration capabilities, just registration to track which accounts are used on which device.
- Microsoft Entra ID joined: to manage and register devices. In addition, it provides Single Sign-On. This is supported on Windows 10 and later (no support for Windows Server).
- Hybrid Microsoft Entra ID joined*: devices are added to Active Directory Domain Services (AD DS) and synced to Microsoft Entra ID. This offers the benefits of both AD DS and Microsoft Entra ID. Supported on Windows 10 and later (no support for Windows Server).
*Active Directory Domain Services and Entra ID Connect required
Synchronize Active Directory (AD DS) to Microsoft Entra ID
Synchronizing traditional Active Directory (AD DS) to Microsoft Entra ID offers the following benefits:
- Single Sign-On
- Centralized management
- Accounts exist in both locations and don’t need to be created twice.
To synchronize AD DS with Microsoft Entra ID, there are two solutions available:
- Microsoft Entra ID Connect: This is installed as an agent on a domain-joined server and initiates synchronization to Microsoft Entra ID. However, this is a single point of failure.
- Advantages: Supports Hybrid Entra ID join.
- Disadvantages: Single point of failure.
- Microsoft Entra ID Cloud Sync: This is a newer variant initiated from the cloud. A small agent is installed on each domain-joined server, allowing synchronization access to AD DS resources. Settings can be managed in the cloud, and the major benefit is that synchronization can be made redundant.
- Advantages: Cloud-only, highly available.
- Disadvantages: Does not support Hybrid Entra ID join.
Roles and Administrative units
Microsoft Entra ID has several built-in roles, which are packages with predefined permissions. These can be assigned to users to grant them access to specific functions. It is possible to create a custom role using JSON, defining actions that a user can or cannot perform (Actions/NotActions).
To learn more about roles and custom roles, check out my guide where i go in depth of this subject: https://justinverstijnen.nl/introduction-to-microsoft-azure-roles-rbac-iam-the-easy-way/
Roles cannot be assigned to groups, except if you create a custom group. In this case, you can specify that Microsoft Entra ID roles can be applied:

Administrative units are similar to OUs (Organizational Units) in traditional AD DS, but they differ in a few aspects. They are logical groups used to add identities, with the purpose of applying additional security to control what users can and cannot manage. For example, an administrative unit for Executives can be created so that not all administrators can manage these identities.
Identities that can be added to administrative units are:
- Users
- Groups
- Devices
However, administrative units have some limitations/security constraints:
- Group members are not added, only the group itself.
- Nesting is not possible.
- ACLs (Access Control Lists) are not possible.
Privileged Identity Management (P2)
Privileged Identity Management (PIM) is a feature in Microsoft Entra ID to reinforce the “least privilege” concept. With PIM, you can assign roles to users or groups, but also for specific time periods. Does someone need to make a change between 12:00 PM and 12:30 PM but otherwise doesn’t need these permissions? Why should they always have those rights?
Privileged Identity Management is your central tool for assigning all permissions to users within your Microsoft Entra ID tenant and Azure subscriptions.
Privileged Identity Management works for Microsoft Entra ID roles and Azure Resource Manager roles, ensuring a systematic approach to resolving changes.
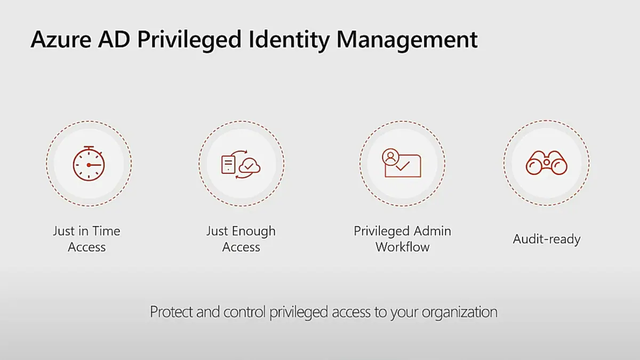
The four pillars of Entra ID Privileged Identity Management
There are 3 types of assignments:
- Eligible: This means that a user or group can be granted the permissions, but they are not active. A PIM administrator can activate these roles at any time or schedule them for a specific time. During activation, for example, you can add a reference number. You can also set in the assignment wizard how long Eligible assignments remain valid.
- Active: An active assignment is a role that is currently active.
- Permanent: A permanent assignment is an assignment that does not expire, meaning the user has the specified access until it is revoked or the account is disabled.
Access Reviews (P2)
Another option in Microsoft Entra ID is access reviews. This allows you to periodically review user assignments to groups and ensure that users who no longer need access are removed.
Access reviews can assist by notifying administrators about users, but also by sending an email to the users themselves, asking whether access is still needed. If they respond with “no” or fail to respond within a set number of days, the assignment is removed, and access is revoked. This enhances the level of security while also reducing the workload for administrators.
Entra ID Multi Factor Authentication
Multi-Factor Authentication prevents alot of password-based attacks. However, enabling MFA isn’t a clean security method. It can still be phished by attacks like Evilnginx: https://evilginx.com/
Additionally, the two recommended ways to enable MFA are Security defaults (free) or through Conditional Access (P1).
Microsoft Entra ID supports Multi-Factor Authentication. This means that, in addition to entering an email address and password, you also need to complete multiple factors.
During authentication (AuthN), it is verified whether you are truly who you say you are, and whether your identity is valid. Multi-Factor Authentication means that you can perform two or more of the following methods:
- Something you know
- Password/PIN/Secret
- Something you have
- A phone
- A FIDO hardware key
- A laptop
- A token
- Something you are
- Biometric verification
- Facial recognition
Complexity levels for MFA methods
| Method | Level | Explanation |
| Password | Not secure | Passwords can be guessed, hacked, or stolen. With only a password, an account is not sufficiently protected in 2025. |
| PIN code | Not secure | A PIN code can also be guessed or stolen alongside a password. |
| Secret | Not secure | A secret, alongside a password, can also be guessed or stolen, regardless of its complexity or length. |
| SMS | Safer | SMS verification provides protection against credential theft but can be accessed when a phone is unlocked or stolen. Additionally, the code can be guessed (1 in 1,000,000). |
| Voice call | Safer | Phone call verification provides protection against credential theft but can always be answered when a phone is unlocked. Additionally, the code can be guessed (1 in 1,000,000). |
| Face recognition | Safer | Facial recognition is a good method; however, people who look alike could misuse it. |
| Biometric verification | Safer | Biometric verification significantly improves security but must be used alongside a password. |
| Authenticator app (OTP/notification) | Pretty safe, but not phising resistant | An authenticator app is still extra secure on the device and will ask for an additional check when approving access to the OTP. |
| Authenticator app passkey | Pretty safe | An authenticator app with the use of passkeys is very safe. It is like a software FIDO key and is very hard to phish (yet). |
| FIDO 2 key | Pretty safe | Use of a FIDO 2 key is the most secure option at this moment to use to authenticate. |
Smart use of MFA
MFA should be deployed intelligently so that it doesn’t become an action that appears for every minor activity, to prevent MFA fatigue. In Conditional Access, for example, you can set how long a session can remain active, so that the user doesn’t have to perform any action during that time, using the same cookies. If an attacker logs in from elsewhere in the world, they will still receive the MFA prompt to complete.
The user cannot mindlessly click “Allow” but must also confirm the number displayed on the screen. While the user could guess the number, the chance of guessing correctly is 1 in 100, and the number changes with each request.
Registration for MFA and SSPR
Before a user can use MFA, they must register for it. This means the initial configuration of the method and verifying the method. When registering for MFA, the registration for Self-Service Password Reset (SSPR) is also completed at the same time.
With Microsoft Entra ID security defaults, all users must register for MFA but don’t need to use it for every login (exception: administrators). When a system requires MFA from a user, the user must always register and use it immediately.
Self-Service Password Reset (SSPR)
Self-Service Password Reset is a feature of Microsoft Entra ID that allows a user to change their password without the intervention of the IT department by performing a backup method, such as MFA, an alternate private email address, or a phone number.
You can find the portal to reset your password via the link below, or by pressing CTRL+ALT+DELETE on a Microsoft Entra ID-joined computer and then selecting “Change Password”. Otherwise, this is the link:
https://passwordreset.microsoftonline.com
Conditional Access (P1)
Conditional Access is a feature of Microsoft Entra ID that allows users to access resources based on “if-then” rules.
This works in 3 steps:
- Signals: Signals can include access to a specific application, certain Microsoft Entra ID roles, specific locations based on IP addresses, certain user groups, certain devices, or compliance of devices.
- Verify/Grant: In this step, you can specify whether access should be allowed or blocked. It’s also possible to enforce MFA.
- Session: In the Session step, you can specify how long a session remains active.
Examples:
- A user tries to access Windows 365 from IP address 88.134.65.213. For this, they must complete an MFA challenge every 2 hours.
- A user logs in into a service from a blocked country -> Block access
- A normal user doesn’t have to do MFA but a administrative user must do MFA
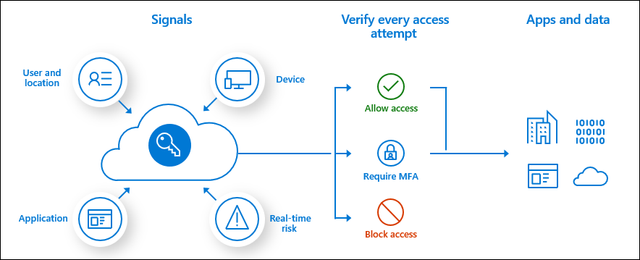
Conditional Access Policy presedence
Because you can create many different policies for Conditional Access to secure access to your resources, these policies work slightly differently than you might expect. For example, with firewall rules, only the first policy that is triggered applies.
With Conditional Access, the effective policy for a user is determined by all the available policies, and they are combined. In addition, the following two rules are taken into account:
- Blocking takes precedence over allowing: If the same user is subject to two policies, where one blocks access and the other allows access, the effective access will be blocked.
- The most restrictive policy wins over the less restrictive policy: This means the policy that allows the least access will be effectively applied.
B2B en B2C (Business to Business en Business to Customer)
B2B and B2C can be seen as similar to how trusts used to work. This allows a user in an external Microsoft Entra ID tenant to access resources such as Teams channels or SharePoint sites in your own Microsoft Entra ID. The external user will be created as a guest in your Microsoft Entra ID, but the user from the external Microsoft Entra ID will use their own credentials and MFA. This provides high security and ease of use.
It is possible to block certain tenants (blacklist) or only allow certain tenants (whitelist) for use with guest users to prevent attacks or unwanted access. This can be configured in Microsoft Entra ID → External Identities → Cross-tenant access settings.
With B2C, it is entirely focused on customers. Customers can, for example, log in with Google or Facebook to an application published with Microsoft Entra ID. B2C does not work with guest users and is used purely for authentication. This must first be set up in Microsoft Entra ID → External Identities.
Azure Active Directory Domain Services (Azure AD DS)
The traditional Active Directory with OUs and Group Policies is an outdated solution but is still needed for some applications/use cases (AVD/FSLogix). It is possible to get this as a service in Azure. A subscription to Azure is required for this.
With this solution, it is no longer necessary to set up and configure a separate VM as a Domain Controller. By default, this service is configured redundantly with 2 servers and a load balancer and costs about half (~90-100 euros per month, depending on the SKU and the number of objects) compared to a good server (~200 euros).
However, it has some limitations:
- The schema cannot be extended (no custom attributes).
- Administrative groups are predefined, and OU delegation is not possible.
- OUs are created by default and cannot be modified, only custom OUs can be created.
- Users cannot be divided into custom OUs.
- Azure AD DS joined machines cannot be managed with Intune.
- Azure AD DS joined machines cannot be added to Microsoft Defender for Endpoint.
All in all, Microsoft Entra Domain Services is a good and quick solution with minimal administrative overhead for a company with a maximum of 30 employees and not too many different groups. For larger companies, I would definitely recommend 2 domain controllers and a self-hosted Active Directory.
Summary Module 2
The Identity part is a huge part of Microsoft Azure. At each level it’s good to know for the platform who is accessing it, what access policy must be enforced and what permissions the user has after completing the authentication process.
Because Identity has become the primary attack vector the last years, we have to defend ourselves to Identity-based attacks. This is because humans do the most with their identity and this is the most easy target for attackers.
Always keep the Zero Trust principals in mind when configuring identities:
- Least privilege
- Verify explicitly
- Assume breach
To go back to the navigation page: https://justinverstijnen.nl/microsoft-azure-master-class-navigation/
End of the page 🎉
You have reached the end of the page. You can navigate through other blog posts as well, share this post on X, LinkedIn and Reddit or return to the blog posts collection page. Thank you for visiting this post.
If you think something is wrong with this post or you want to know more, you can send me a message to one of my social profiles at: https://justinverstijnen.nl/about/
If you find this page and blog very useful and you want to leave a donation, you can use the button below to buy me a beer. Hosting and maintaining a website takes a lot of time and money. Thank you in advance and cheers :)
The terms and conditions apply to this post.
AMC - Module 1: Fundamentals of Cloud and Microsoft Azure
This chapter is about the term “Cloud” and the fundamentals of Microsoft Azure and Cloud Services in general.
This chapter is about the term “Cloud” and the fundamentals of Microsoft Azure and Cloud Services in general.
What is “the Cloud”?
The Cloud is a widely used term to say, “That runs elsewhere on the internet.” There are many different definitions, but the National Institute of Standards and Technology (NIST) in the United States has identified five characteristics that a service/solution must meet to call itself a cloud service:
- On-demand self-service
- Broad network access
- Resource pooling and pay-per-use
- Rapid elasticity or flexible up/downscaling
- Measured service
Public Cloud, Private Cloud, and Community Cloud
Within cloud services, we have two different concepts of the Cloud: Public Cloud and Private Cloud:
Public Cloud: In the case of a Public Cloud, we refer to a cloud service such as Microsoft Azure, Google Cloud, or Amazon Web Services. With these services, servers are shared among different customers. Hence the term “Public Cloud.” However, data security is well-managed to ensure that sensitive business data doesn’t become publicly exposed, and various security options are available. In the case of the Public Cloud, you run your workload on servers in a data center owned by the Cloud Service Provider.
Private Cloud: With a Private Cloud/On-premises solution, a company hosts its own servers on its premises or in a rented data center. The customer is also responsible for resolving outages, designing the appropriate hardware configurations, managing the correct licenses, software, maintenance, and security.
Community Cloud: In a Community Cloud, a cloud provider makes part of the infrastructure available to, for example, government agencies and other non-profit organizations. These may be further isolated, and different pricing models apply, often with fixed pricing agreements.
Different types of services (IaaS/PaaS/SaaS)
When we talk about cloud or “As-a-service,” we mean that we are purchasing a specific service. In the past, you would often buy a server, a software package, or a certain license. In an as-a-service model, you pay monthly or annually for its use.
What is important to understand about different cloud services is that as a customer, even though you are using a service, you are still responsible for certain areas. See the matrix below; for example, with IaaS services, you are always responsible for the operating system, applications, and data.
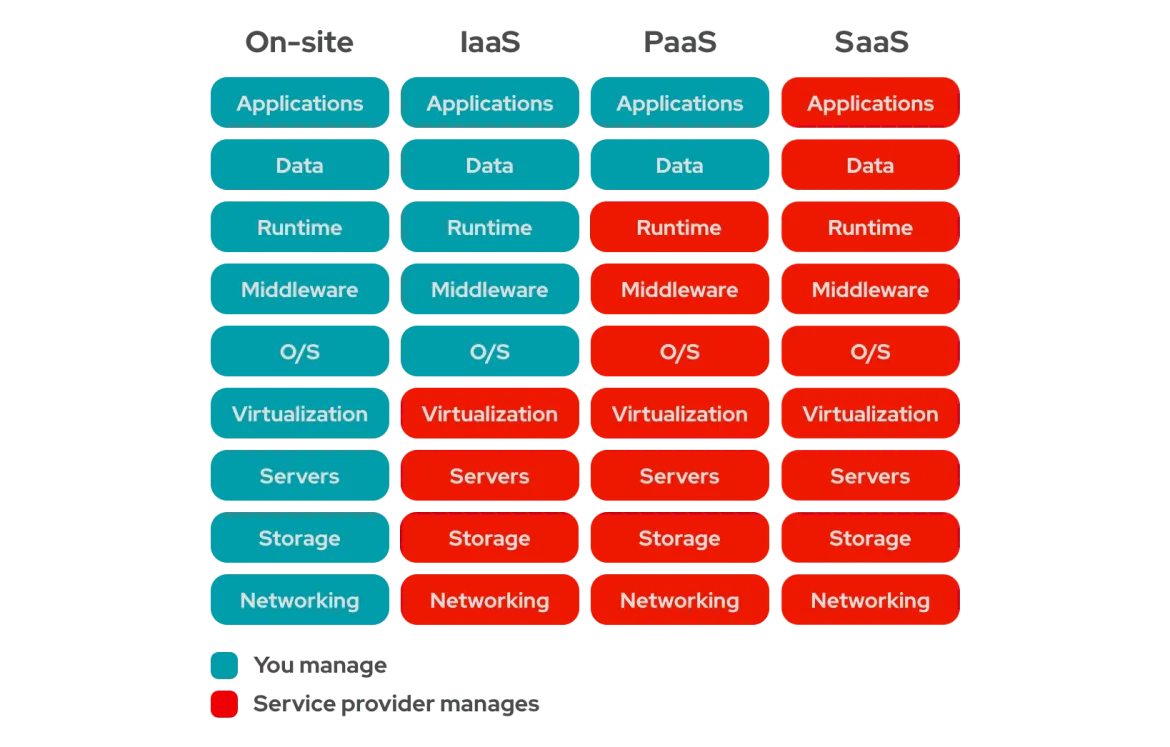
In general, there are three main types of cloud services:
Infrastructure-as-a-Service (IaaS): With IaaS, a company/customer is only responsible for the operating system layer and above. The infrastructure is provided as a service and is managed by the provider.
- Examples: Virtual machines, Virtual Desktop, Virtual network, SQL on VM
Platform-as-a-Service (PaaS): With PaaS, a company/customer is only responsible for the applications and data.
- Examples: Azure SQL, Cosmos DB
Software-as-a-Service (SaaS): With SaaS, a company/customer is only responsible for the configuration and permissions of the software. All underlying infrastructure and software are managed by the provider.
- Examples: Microsoft 365, Dynamics 365, Power Platform, AFAS Online, TOPdesk
And we call self hosted servers:
- On-premises: With on-premises, a company/customer is 100% responsible for all components but also has the most information and control.
- Examples: Own servers/hypervisors
When to choose Public or Private Cloud?
There is no definitive answer to this question. Companies often have their own reasons for keeping certain servers on-site, such as sensitive data, outdated applications, or specific (hardware-related) integrations.
Different companies also have different priorities. One company may prefer a large hardware replacement cycle every 3 to 5 years with the high associated costs but lower operational expenses. Another company may prefer the opposite approach.
Good consultation with the customer and solid technical insight will help provide an answer to this question.
Other good scenarios for choosing the Public Cloud include:
- Predicted or unpredictable scaling
- Rapidly growing companies
- On-and-off scenarios, such as seasons, during the Olympics or the FIFA World Cup.
Explaining the cloud to customers
This is because prices may initially seem quite high. However, when you take into account all the factors, such as those in the image below, you’ll see that the Cloud isn’t such a crazy option after all:
For on-premises (local) servers, for example, you incur the following costs that you don’t have in the cloud:
- Applying patches/updates to hardware
- Daily/weekly/monthly maintenance of physical hardware
- Downtime
- Electricity costs
- Backup power supply
- Cooling systems
- Tuning performance
What is Microsoft Azure?
Microsoft Azure is an Infrastructure-as-a-Service (IaaS) cloud service designed to run compute and storage solutions.
It can serve as a replacement for physical servers and consists of dozens of different services, such as:
- Virtual Machines
- Azure Storage
- Azure SQL
- Azure Cosmos DB
- Azure Virtual Desktop
- Azure Firewall
- Azure Virtual Network
- Azure Backup (with Recovery Services)
Most services in Microsoft Azure are “serverless.” This means you use a service without needing to manage or secure a server. Serverless solutions require the least maintenance, and Microsoft manages them for us and the customer.
Costs management in Microsoft Azure
Microsoft Azure works with the “Pay-as-you-go” model. This means you pay based on the usage of the cloud service and its resources. This makes the platform very flexible in terms of pricing.

Billing by Azure to a customer or reseller happens at the Subscription level, and payment methods are quite limited, usually to various types of credit cards.
To get an idea of what a specific service with your custom configuration costs, you can use the official Azure calculator, which can be found here: Pricing Calculator | Microsoft Azure.
Access and manage Microsoft Azure
Microsoft Azure has its own management portal. If an organization already has Microsoft 365, Microsoft Azure will already be set up, and you’ll only need a subscription and a payment method.
If an organization does not yet have Microsoft Azure, you can create an account and then set up a subscription.
The management portal is: Microsoft Azure. (https://portal.azure.com)
Limits and Quotas in Microsoft Azure
In Microsoft Azure, there are limits and quotas on what a specific organization can use. By default, the limits/quotas are quite low, but they can be increased. Microsoft wants to maintain control over which organizations can use large amounts of power and which cannot, while also dealing with the physical hardware that needs to be available for this. The purpose of quotas is to ensure the best experience for every Microsoft Azure customer.
Quotas can easily be increased via the Azure Portal → Quotas → Request quota increase. Here, you can submit a support request to increase a specific quota, and 9 out of 10 times, it will be increased within 5 minutes. If you submit a large request, it may take 2 to 3 business days.
Hierarchy of availability in Microsoft Azure
Connecting many data centers and servers together requires a solid hierarchy and grouping. Additionally, it’s helpful to understand how the service is structured to identify any weaknesses in terms of resilience and redundancy.
Azure is structured as follows:
- Continents/Global: The world consists of different continents with several Azure Regions. Some Azure services are global.
- Azure Regions: Across various continents around the world, Azure has designed several regions.
- Availability Zones: In different Azure regions, Microsoft has divided data centers into Availability Zones. These are logical groups of data centers with independent power, cooling, networking, and other essentials, but with extremely fast interconnections of <2 ms latency.
- Data Centers: Within the different Availability Zones, the data centers are divided. A data center is a large building housing a collection of servers, sometimes up to 5,000 servers per building.
- Servers: Inside the Azure data centers are the physical servers that host the full range of Microsoft Azure services.
Services and Availability levels
Microsoft Azure puts a lot of effort into ensuring the best availability for its customers and has the best options in place for this. However, there are differences in how Azure services are available or can be made available. This is important to consider when designing a solution architecture on Azure.
- Global: A global service is an Azure service that operates Azure-wide and is not deployed in a specific region. A failure in an Azure region will not cause issues for global services.
- Regional: A regional service is an Azure service deployed in a specific region. Failure of this region will mean an interruption of the service.
- Zone-redundant: A zone-redundant service is an Azure service distributed across the 3 availability zones within a single region. This makes the service redundant and able to withstand the failure of one or more data centers but not the complete region. However, this extra redundancy must always be configured and selected.
- Zonal: A zonal service is an Azure service deployed in a specific availability zone, or a service that can be deployed in Availability Zones but isn’t. Failure of a data center in this case would mean an interruption of the service.
The table below shows which services can be categorized under the above concepts:
| Global | Regional | Zone-redundant | Zonal |
|---|---|---|---|
| Azure AD | Azure Virtual Networks | Azure Virtual Machines | Azure Virtual Machines |
| Azure Traffic Manager | Azure Functions | Azure Managed Disks | Azure SQL Database |
| Azure Front Door | Azure Key Vault | Azure Blob Storage | Azure VPN Gateway |
| Azure CDN | Azure Storage | Azure SQL Databases | |
| Azure Cosmos DB (with multi-master) | Azure Load Balancer | Azure Kubernetes Services | |
| Azure DevOps Services | Azure Service Bus | Azure Key Vault | |
| Azure Search | Azure Application Gateway | ||
| Azure Event Hub | Azure Load Balancer | ||
| Azure Firewall |
Summary Module 1
Microsoft Azure is a Infrastructure-as-a-service platform which is cloud based. It focusses primairly on replacing your infrastructure and hosting it in the cloud. This goes further than hosting a virtual machine or hosting a file storage.
{{< ads >}}
{{< article-footer >}}
Microsoft Azure Master Class - Navigation page
Hey there! I have a new collection of blog posts here. A while ago (2023) I followed the Azure Master Class course of John Savill, and done…
Introduction to this Azure Master Class
Hey there! I have a new collection of blog posts here. A while ago (2023) I followed the Azure Master Class course of John Savill, and done some extra research into some of the components of Azure. I wrote those things down to learn from it and have some documentation. Firstly, this was for personal use but after founding this website and blog I decided to rework it and publish all the information because I think it can be very helpful.
The pages are very interesting (according to myself ;), but are not neccesarily to prepare you for a specific exam. It contains overal general knowledge of Azure, its components and some deep information about services. It is true that some information can really help you understand those concepts which can appear in your Azure exams journey.
Modules
1: Fundamentals of Cloud & Azure
7: Virtual Machines and Scale Sets
8: Application Services and Containers
11: Infrastructure as Code (IaC) and DevOps
Sources
The biggest source of all the information found in this Master Class are the Azure Master Class video’s of John Savill, which you can find here:
https://www.youtube.com/watch?v=BlSVX1WqTXk&list=PLlVtbbG169nGccbp8VSpAozu3w9xSQJoY
Some concepts are basically the explaination, some of them are added with some practical knowledge or other knowledge from the internet or added with AI. Check out the “AI Generated Content” tag on the pages to learn more about this.
Other information comes from or is confirmed using the official learn.microsoft.com page.
End of the page 🎉
You have reached the end of the page. You can navigate through other blog posts as well, share this post on X, LinkedIn and Reddit or return to the blog posts collection page. Thank you for visiting this post.
If you think something is wrong with this post or you want to know more, you can send me a message to one of my social profiles at: https://justinverstijnen.nl/about/
If you find this page and blog very useful and you want to leave a donation, you can use the button below to buy me a beer. Hosting and maintaining a website takes a lot of time and money. Thank you in advance and cheers :)
The terms and conditions apply to this post.