All pages referring or tutorials for Azure Virtual Desktop.
This is the multi-page printable view of this section. Click here to print.
Azure Virtual Desktop
- Update your Kerberos configuration with Azure Virtual Desktop (RC4)
- I tested Azure Virtual Desktop RemoteAppV2
- Azure Virtual Desktop V6/V7 VMs imaging
- Remove Microsoft Print to PDF and OneNote printers script
- Azure Virtual Desktop FSLogix and Native Kerberos authentication
- FSLogix and maximum Azure Files security
- Azure Virtual Desktop RDP Properties
- Azure Compute Gallery and (AVD) VM images
- Customize Office apps installation for Azure Virtual Desktop
- Joining storage account to Active Directory (AD DS)
- Clean up old FSLogix profiles with Logic Apps
- Using FSLogix App Masking to hide applications on Virtual Desktops
- Use Ephemeral OS Disks in Azure
- RDP Multipath - What is it and how to configure?
- Pooled Azure Virtual Desktop with Azure AD cloud users only
- Test Azure Virtual Desktop connectivity and RTT
- Windows Search optimization on Azure Virtual Desktop
- Monitor Azure Virtual Deskop logon speed
- Storage Account performance and pricing for Azure Virtual Desktop
- Solved - FSLogix release 25.02 breaks Recycle Bin - Azure Virtual Desktop
- Stop OneNote printer from being default printer in AVD
- Automatic AVD/W365 Feed discovery for mobile apps
- Solved - Windows Store applications on FSLogix/Azure Virtual Desktop
- Optimize Windows 11 for Azure Virtual Desktop (AVD)
Update your Kerberos configuration with Azure Virtual Desktop (RC4)
Microsoft released that the Kerberos protocol will be hardened by an update coming in April to June 2026 to increase the security. This was…
Microsoft released that the Kerberos protocol will be hardened by an update coming in April to June 2026 to increase security. This was released by Microsoft here:
At first, they are not very specific about how to check what Kerberos encryption your environment uses and how to solve this before becoming a problem. I will do my best to explain this and show you how to solve it.
Microsoft already introduced Kerberos-related hardening changes in updates released since November 2022, which significantly reduced RC4 usage in many environments. However, administrators should still verify whether specific accounts, services or devices are explicitly or implicitly relying on RC4 before disabling it. In this guide, I will explain to you how to do this.
The update and protocols described
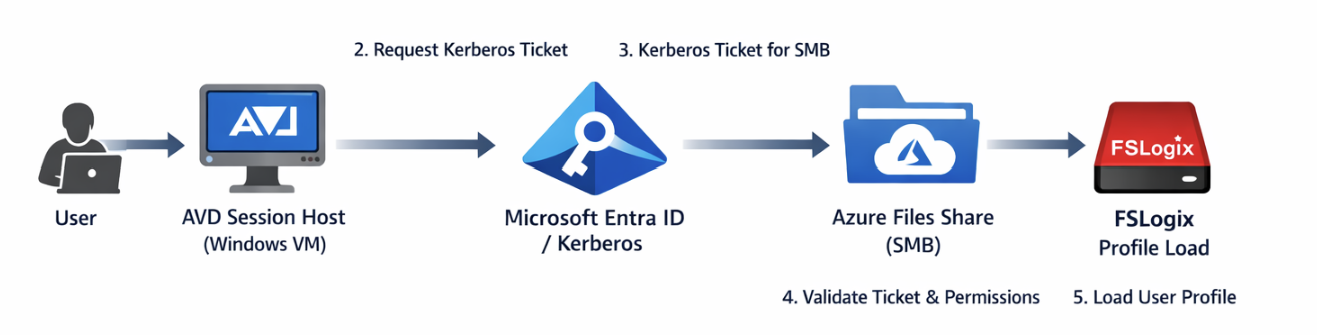
Kerberos is the authentication protocol used in Microsoft Active Directory Domain Services. This is being used to authenticate yourself to servers and different services within that domain, such as an Azure Files share.
Kerberos works with tickets and those tickets can be encrypted using different encryption types, where we have two important ones:
- RC4-HMAC: This protocol is deprecated and the whole point of this blog is to disable this protocol. The deprecation is because of the unsafety and the possible attack surface
- AES-256: This is a newer protocol being used from about 2022 till now and is the more secure option to encrypt Kerberos tickets which we must use from today
These tickets are being granted in step 3 of the diagram below:
Impacted resources
The resources impacted by this coming update and protocol deprecation are all sorts of domain-joined dependencies using Kerberos tickets, like AD DS-joined Azure Files shares.
However, this scope may not be limited to Azure Files or FSLogix only. Any resource that depends on Kerberos authentication can be affected if RC4 is still being used somewhere in the chain. This can include file servers, SMB shares, legacy service accounts, older joined devices, third-party appliances and applications that rely on Active Directory authentication. In many environments, the real risk is not the primary workload itself, but an older dependency that still expects RC4 without this being immediately visible.
Check your configuration - Azure Portal
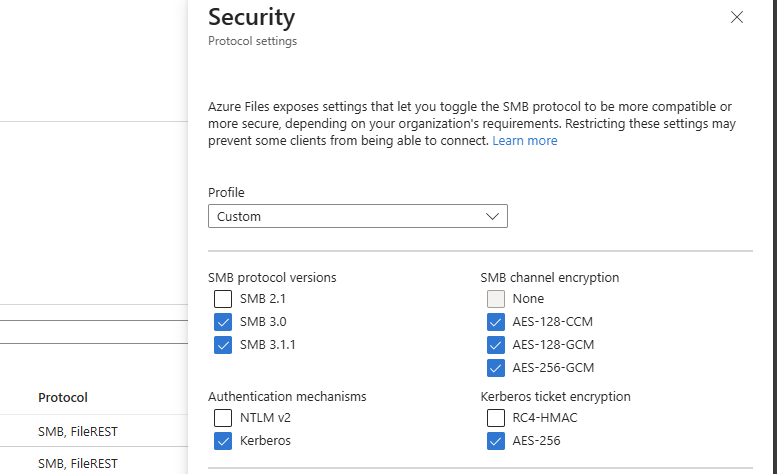
We can check our current storage account configuration in Azure to check if we still use both protocols or only the newer AES-256 option by going to the storage account:
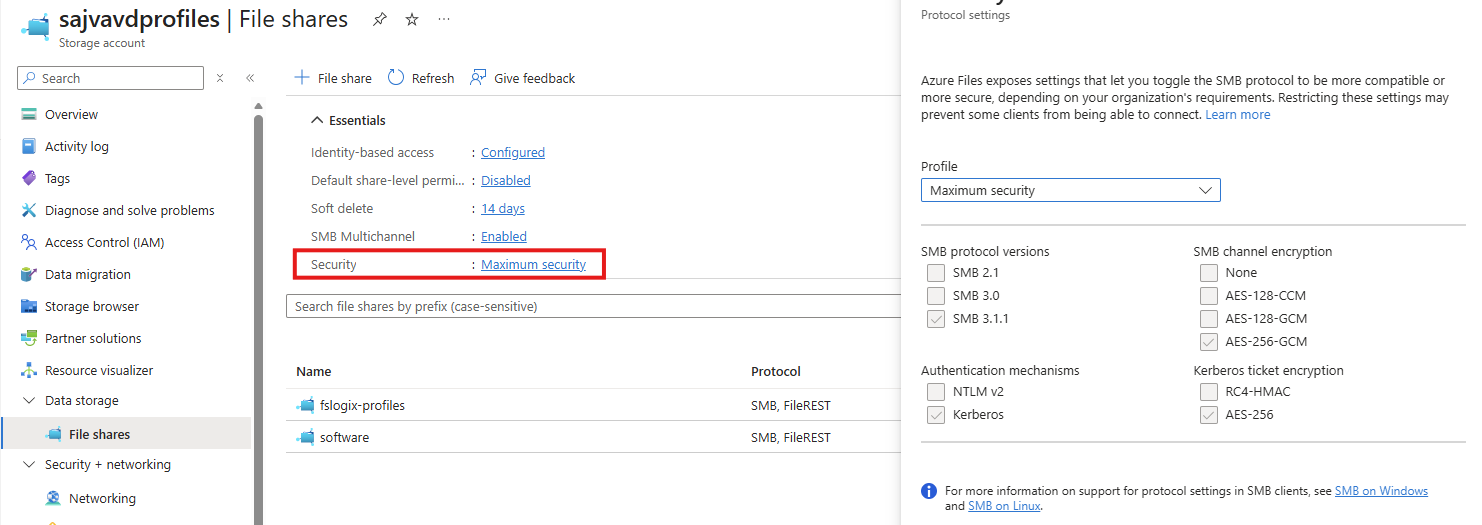
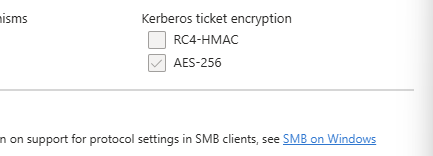
By clicking on the “Security” part, we get the overview of protocols being used by AD DS, Kerberos and SMB. This part goes about the part in the bottom right corner (Kerberos ticket encryption):
If you are already using the maximum security preset, you don’t have to change anything and you are good to go for the coming updates.
After the hardening updates coming to Windows PCs and Windows Server installations, the RC4-HMAC protocol will be phased out and not available to use, so we must take steps to disable this protocol without user disruption.
Check your configuration - PowerShell
To check different server connections in your Active Directory for other resources, you can use this command. This will show the actual encryption method by Kerberos used to connect to a resource.
Replace “servername” with the actual file server you connect to.
POWERSHELL
klist get cifs/servernameFor example:
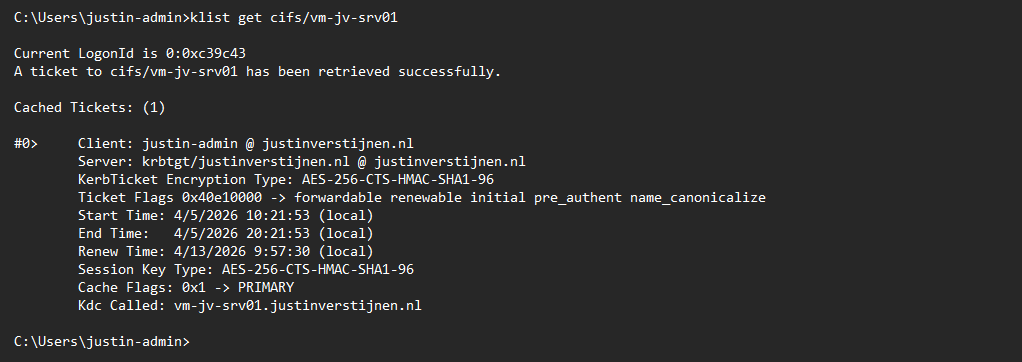
This returns the information about the current Kerberos ticket, and as you can see at the KerbTicket Encryption Type, AES-256 is being used, which is the newer protocol.
You can also retrieve all current tickets on your computer to check all tickets for their encryption protocol with this command:
POWERSHELL
klistCheck your configuration - Active Directory
In our Active Directory, we can audit if RC4 encryption is being used. The best and easiest way is to open up the Event Logs on a domain controller in your environment and check for these event IDs:
- Event ID 4768
- Event ID 4769
You can also use this PowerShell one-liner to get all RC4 events in the last 30 days.
POWERSHELL
Get-WinEvent -FilterHashtable @{LogName='Security'; Id=4768,4769; StartTime=(Get-Date).AddDays(-30); EndTime=(Get-Date)} | Select-Object TimeCreated, Id, MachineName, Message | Format-Table -AutoSize -WrapIf there are any events available, you can trace what resource still uses this older encryption and what possibly can be impacted after the update. If no events show, then your environment is ready for this upcoming change.
My advice is to check this on all your domain controllers to make sure you have checked all types of RC4 requests.
Change protocols of Storage account in Azure Portal
As Microsoft already patched this in November 2022, we can disable the RC4-HMAC protocol in the Azure Portal. Most Windows versions supported today already are patched, disabling the RC4-HMAC by default but optional if scenarios still require this protocol.
In my environment, I am using a Windows 11-based AVD environment and have a Domain Controller with Windows Server 2022. I disabled the RC4-HMAC without any problems or user interruption.
Although, I highly recommend performing this change during off-business hours to prevent any user interruption.
If the protocol is disabled and FSLogix still works, the change has been successfully done. We prepared our environment for the coming change and can now possibly troubleshoot any problems instead of a random Windows Update disabling this protocol and impacting your environment.
Summary
This blog post described the deprecation of the older RC4-HMAC protocol and what can possibly impact your environment. If using only modern operating systems, there is a great chance you don’t have to change anything. However, if older operating systems than Windows 11 are being used, this update can possibly impact your environment.
If your environment already uses AES-based Kerberos encryption for Azure Files, FSLogix and other SMB-dependent workloads, you are likely in a good position. If not, now is the right time to test, remediate and switch in a controlled way instead of finding out after the Windows updates are installed. We IT guys like controlled change of protocols where we actually know what could impact different workloads and give errors.
Thank you for visiting this page and I hope it was helpful.
Sources
These sources helped me by writing and research for this post;
End of the page 🎉
You have reached the end of the page. You can navigate through other blog posts as well, share this post on X, LinkedIn and Reddit or return to the blog posts collection page. Thank you for visiting this post.
If you think something is wrong with this post or you want to know more, you can send me a message to one of my social profiles at: https://justinverstijnen.nl/about/
If you find this page and blog very useful and you want to leave a donation, you can use the button below to buy me a beer. Hosting and maintaining a website takes a lot of time and money. Thank you in advance and cheers :)

The terms and conditions apply to this post.
I tested Azure Virtual Desktop RemoteAppV2
Microsoft announced RemoteAppV2 under some pretty enhancements on top of the older RemoteApp engine. This newer version has some…
Microsoft announced RemoteAppV2 under some pretty enhancements on top of the older RemoteApp engine. This newer version has some improvements like:
- Better multi monitor support
- Better resizing/window experience
- Visuals like window shadows
I cannot really show this in pictures, but if you test V2 alongside V1, you definitely notice these small visual enhancements. However, a wanted feature called “drag-and-drop” is still not possible on V2.
Source: https://learn.microsoft.com/en-us/azure/virtual-desktop/remoteapp-enhancements
How to enable RemoteAppV2
To enable RemoteAppV2, you need to set a registry key as long as the preview is running. Make sure you are compliant with the requirements as described on this page (client + hosts):
https://learn.microsoft.com/en-us/azure/virtual-desktop/remoteapp-enhancements#prerequisites
We can do this manually or through a Powershell script which you can deploy with Intune:
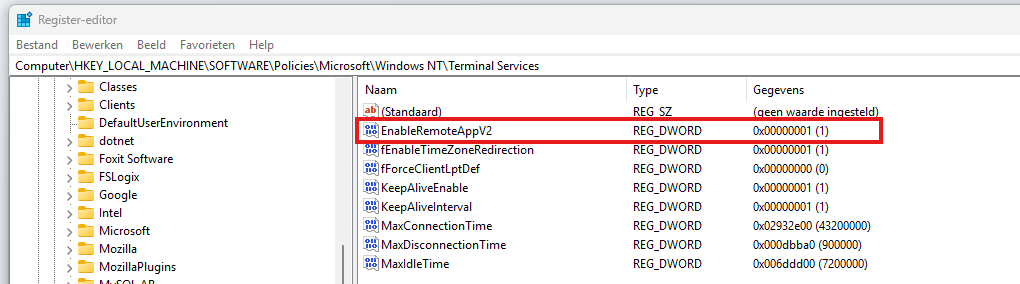
- Key: HKLM\Software\Policies\Microsoft\Windows NT\Terminal Services
- Type: REG_DWORD
- Value name: EnableRemoteAppV2
- Value data: 1
POWERSHELL
$registryPath = "HKLM:\Software\Policies\Microsoft\Windows NT\Terminal Services"

if (-not (Test-Path $registryPath)) {
    New-Item -Path $registryPath -Force | Out-Null
}

New-ItemProperty `
    -Path $registryPath `
    -Name "EnableRemoteAppV2" `
    -PropertyType DWord `
    -Value 1 `
    -Force | Out-Null
This should look like this:
Check out the status
When enabled the registry key, the host must be restarted to make the changes effective. After that, when opening a Remote App, press the following shortcut:
- CTRL + ALT + END
Then right click the title bar and click Connection Information
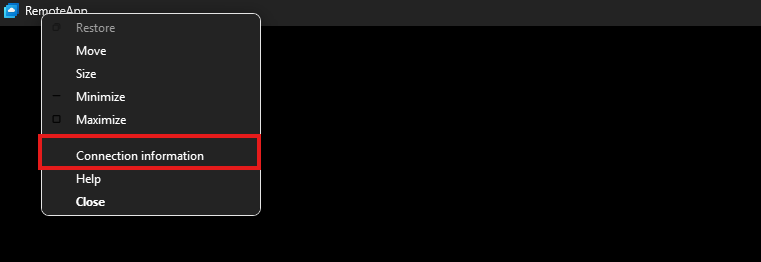
This gives you the RDP session information, just like with full desktops.
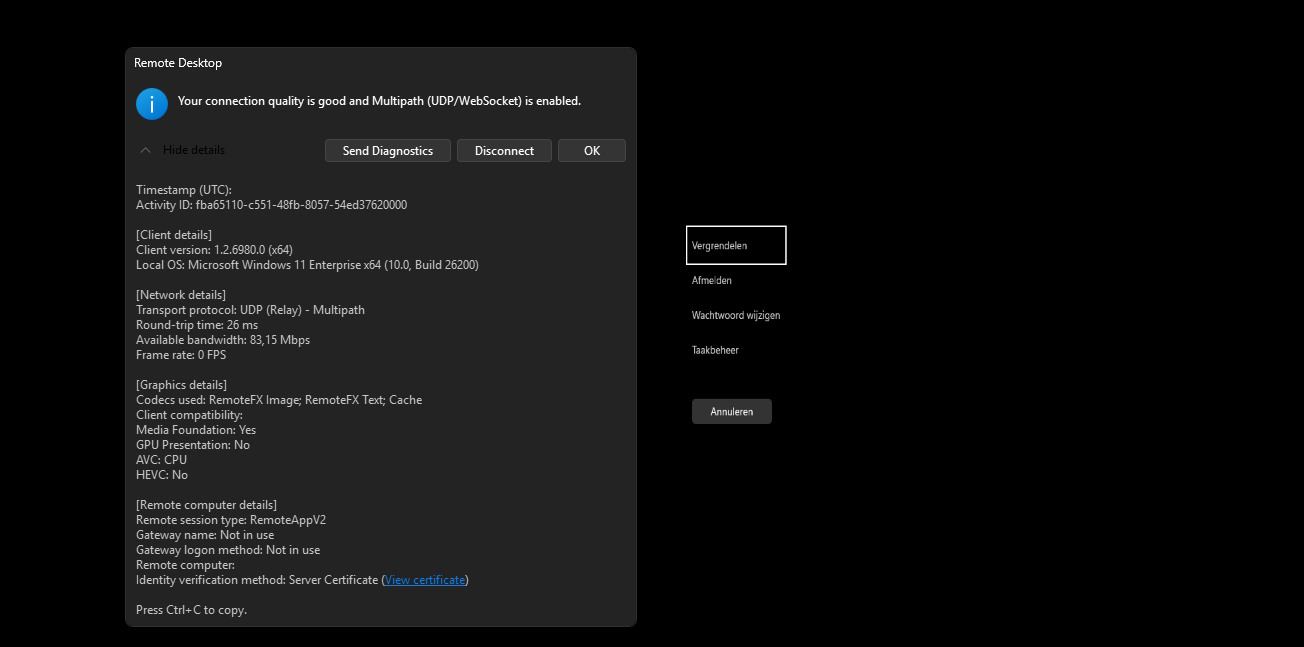
Under the Remote session type, you must see RemoteAppV2 now. Then the new enhancements are applied.
Downsides of RemoteAppV2
The one thing which pushes me away from using RemoteApp is the missing drag and drop functionality. This is something a lot of users want when working in certain applications. This V2 version also lacks this functionality.
I also couldn’t get it to work with the validation environment setting only. In my case, I had to create the registry key.
Sources
These sources helped me by writing and research for this post;
End of the page 🎉
You have reached the end of the page. You can navigate through other blog posts as well, share this post on X, LinkedIn and Reddit or return to the blog posts collection page. Thank you for visiting this post.
If you think something is wrong with this post or you want to know more, you can send me a message to one of my social profiles at: https://justinverstijnen.nl/about/
If you find this page and blog very useful and you want to leave a donation, you can use the button below to buy me a beer. Hosting and maintaining a website takes a lot of time and money. Thank you in advance and cheers :)
The terms and conditions apply to this post.
Azure Virtual Desktop V6/V7 VMs imaging
When I first chose to use V6 or V7 machines with Azure Virtual Desktop, I ran into some boot controller errors about the boot…
When I first chose to use V6 or V7 machines with Azure Virtual Desktop, I ran into some boot controller errors about the boot controller not supporting SCSI images.
- The VM size ‘Standard_E4as_v7’ cannot boot with OS image or disk. Please check that disk controller types supported by the OS image or disk is one of the supported disk controller types for the VM size ‘Standard_E4as_v7’. Please query sku api at https://aka.ms/azure-compute-skus to determine supported disk controller types for the VM size. (Code: InvalidParameter)
- This size is not available because it does not support the SCSI disk controller type.
Because I really wanted to use higher version VMs, I went to research on how to solve this problem. I will describe the process from creating the initial imaging VM, to capture and installing new AVD hosts with our new image.
The problem described
When using V6 and higher version Virtual Machines in Azure, the Boot Controller will also change from the older SCSI to NVMe. When using local VM storage, this could give a pretty disk performance increase but not really for Azure Virtual Desktop. We mostly use managed disks here so we don’t use that storage.
This change means that we have to also use a NVMe capable image storage, and this brings us to Azure Compute Gallery. With this Azure solution, we are able to do image versioning and has support for NVMe enabled VMs.
I used the managed images option in the past, as this was the most efficient option to deploy images very fast. However, NVMe controller VMs are not supported by those managed images and we can install up to V5 only.
| VM Version | Boot controller |
| v1-4 | SCSI |
| v5 | SCSI |
| v6 | NVMe |
| v7 | NVMe |
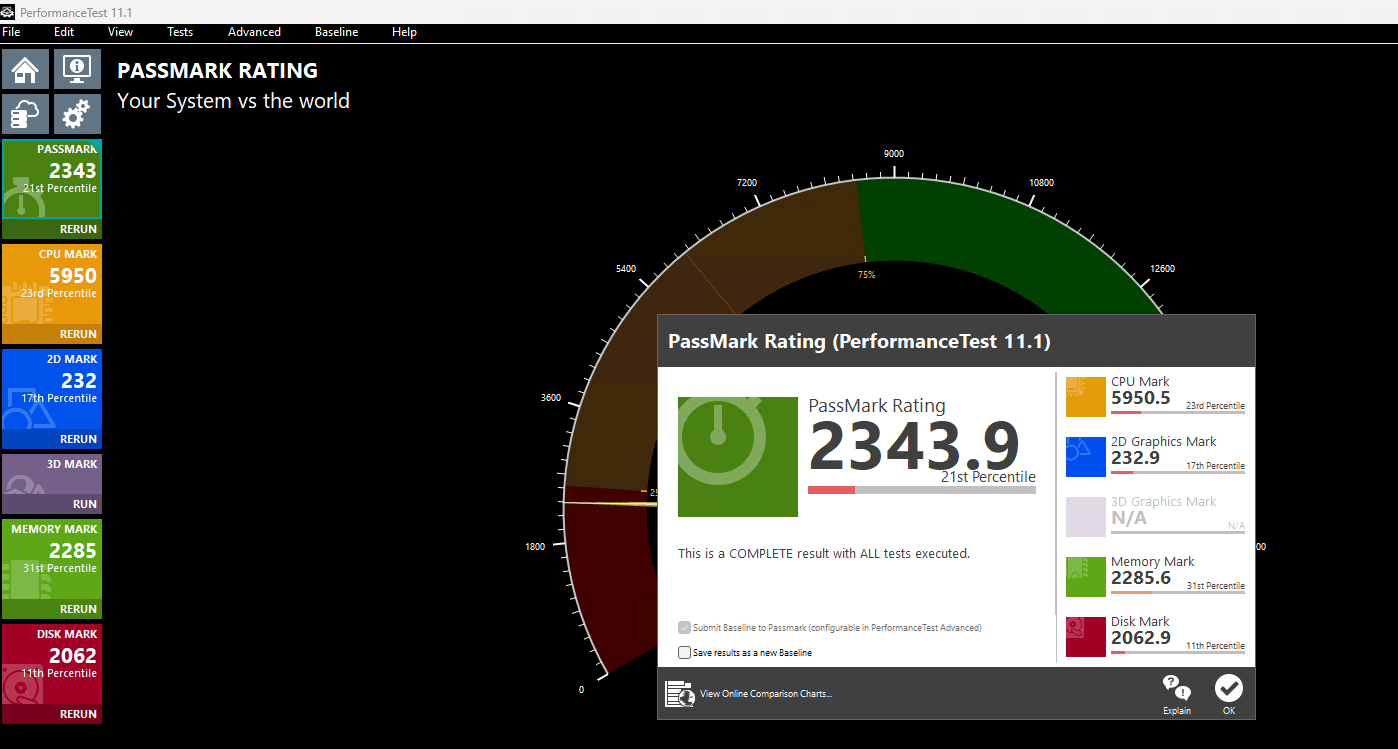
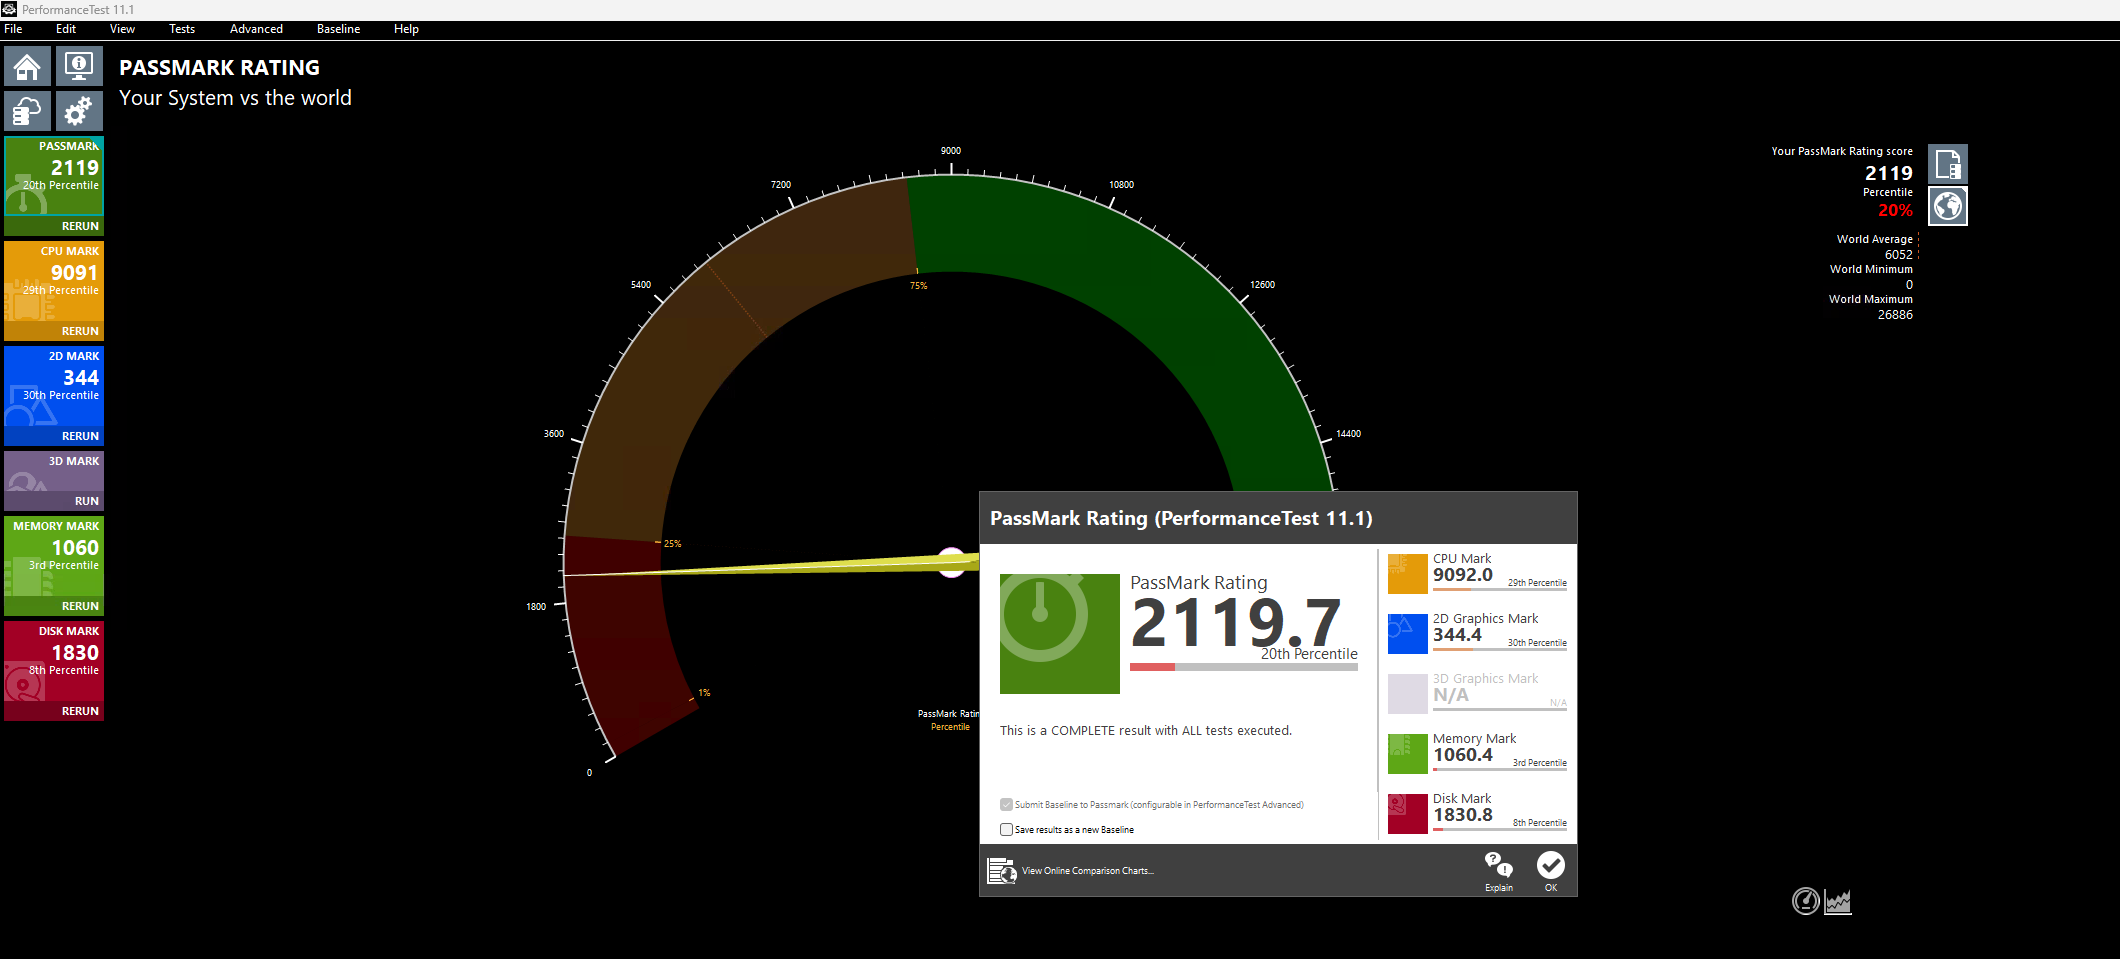
CPU performance v5 and v7 machines
Because I wondered what the performance difference could be between similar v5 and v7 machines in Azure, I did two benchmark tests on both machines. Both using these software:
- Geekbench 6
- Passmark PerformanceTest
This gave pretty interesting results:
| Benchmark software | E4s_v5 | E4as_v7 |
| Geekbench 6 Single Core | 1530 | 2377 |
| Geekbench 6 Multi Core | 3197 | 5881 |
| Passmark CPU | 5950 | 9092 |
This result would indicate a theoretical CPU performance increase of around 55%.
Click here for benchmark results
Step 1: Creating an imaging PC
Let’s start by creating our imaging PC. This is a temporary VM which we will do all our configurations on before mass deployment. Think of:
- Installing applications
- Installing dependencies
- Installing latest Windows Updates
- Optimizations
- Configuring the correct language
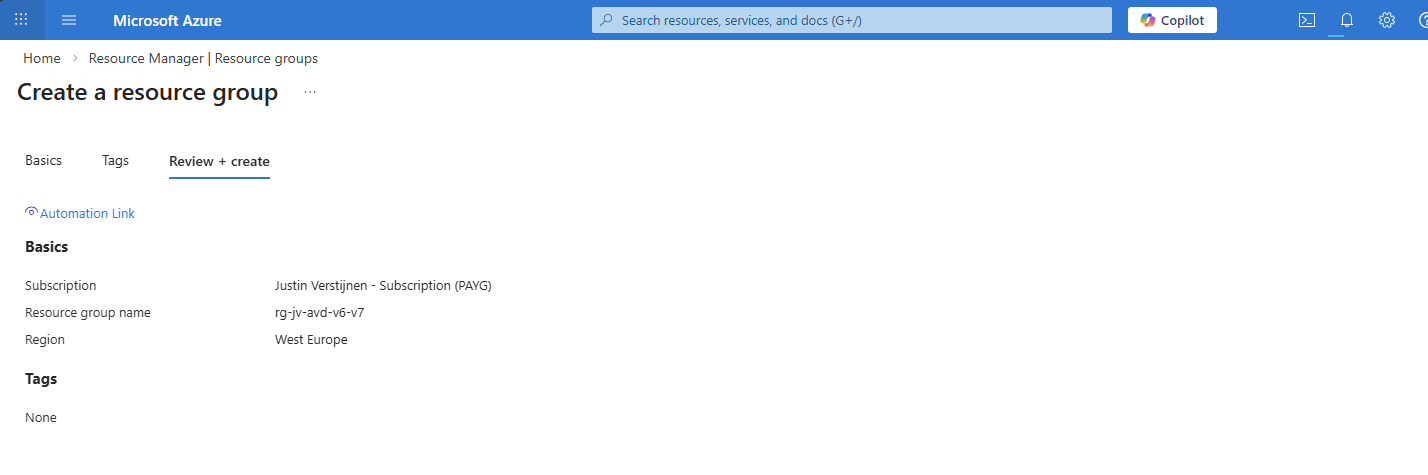
In the Azure Portal (https://portal.azure.com), create a resource group if not already having one for this purpose.
Now let’s go to “Virtual Machines” to create a temporary virtual machine. My advice is to always use the exact same size/specs as you will roll out in the future.

Create a new virtual machine using your settings. I chose the RDP top be opened so we can login to the virtual machine to install applications and such. Ensure you select the Multi-session marketplace image if you use a Pooled hostpool.
The option “Trusted launch virtual machines” is mandatory for these NVMe based VM sizes, so keep this option configured.
This VM creation process takes around 5 minutes.
Step 2: Virtual Machine customizations
Now we need to do our customizations. I would advise to do this in this order:
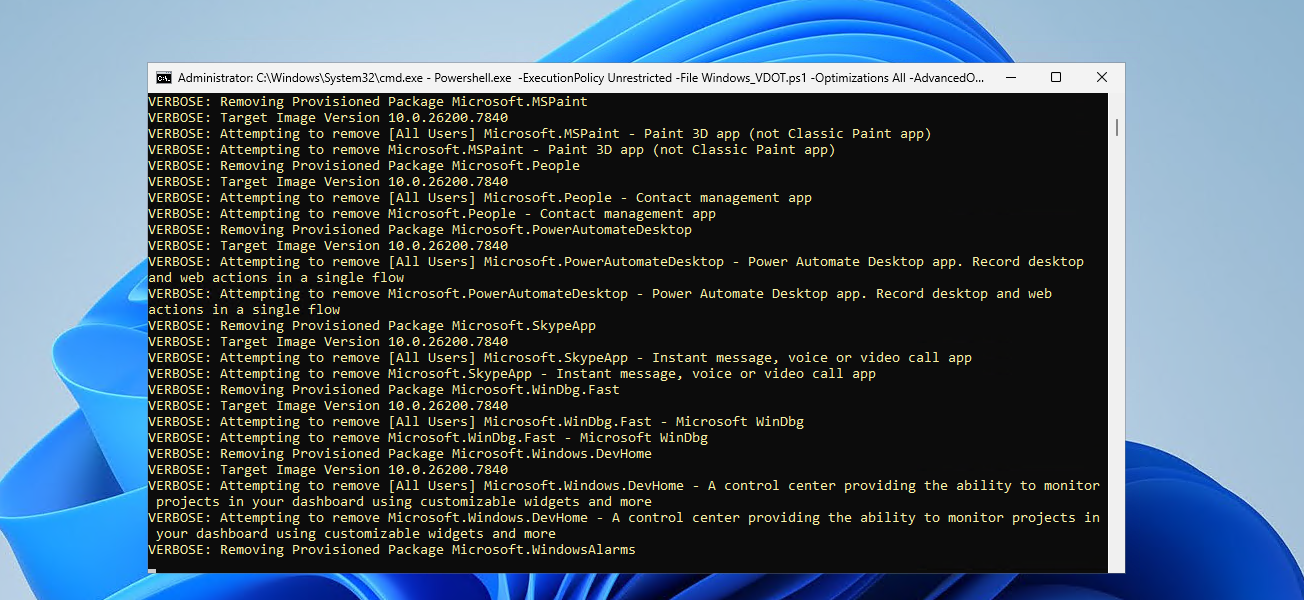
- Execute Virtual Desktop Optimization Tool (VDOT)
- Configuring the right system language
- Install 3rd party applications
Connect to the virtual machine using RDP. You can use the Public IP assigned to the virtual machine to connect to:
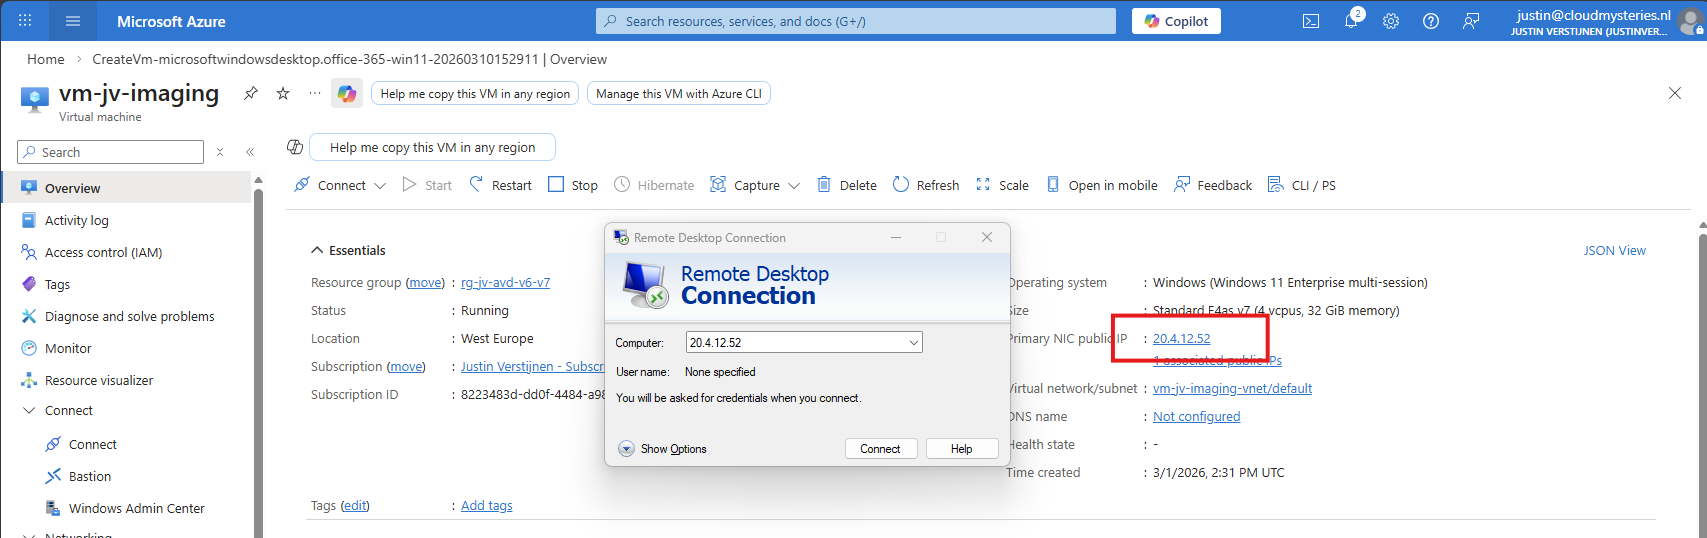
After logging in with the credentials you spefidied in the Azure VM wizard we are connected.
First I executed the Virtual Desktop Optimization tool:
Then ran my script to change the language which you can find here: https://justinverstijnen.nl/set-correct-language-and-timezone-on-azure-vm/
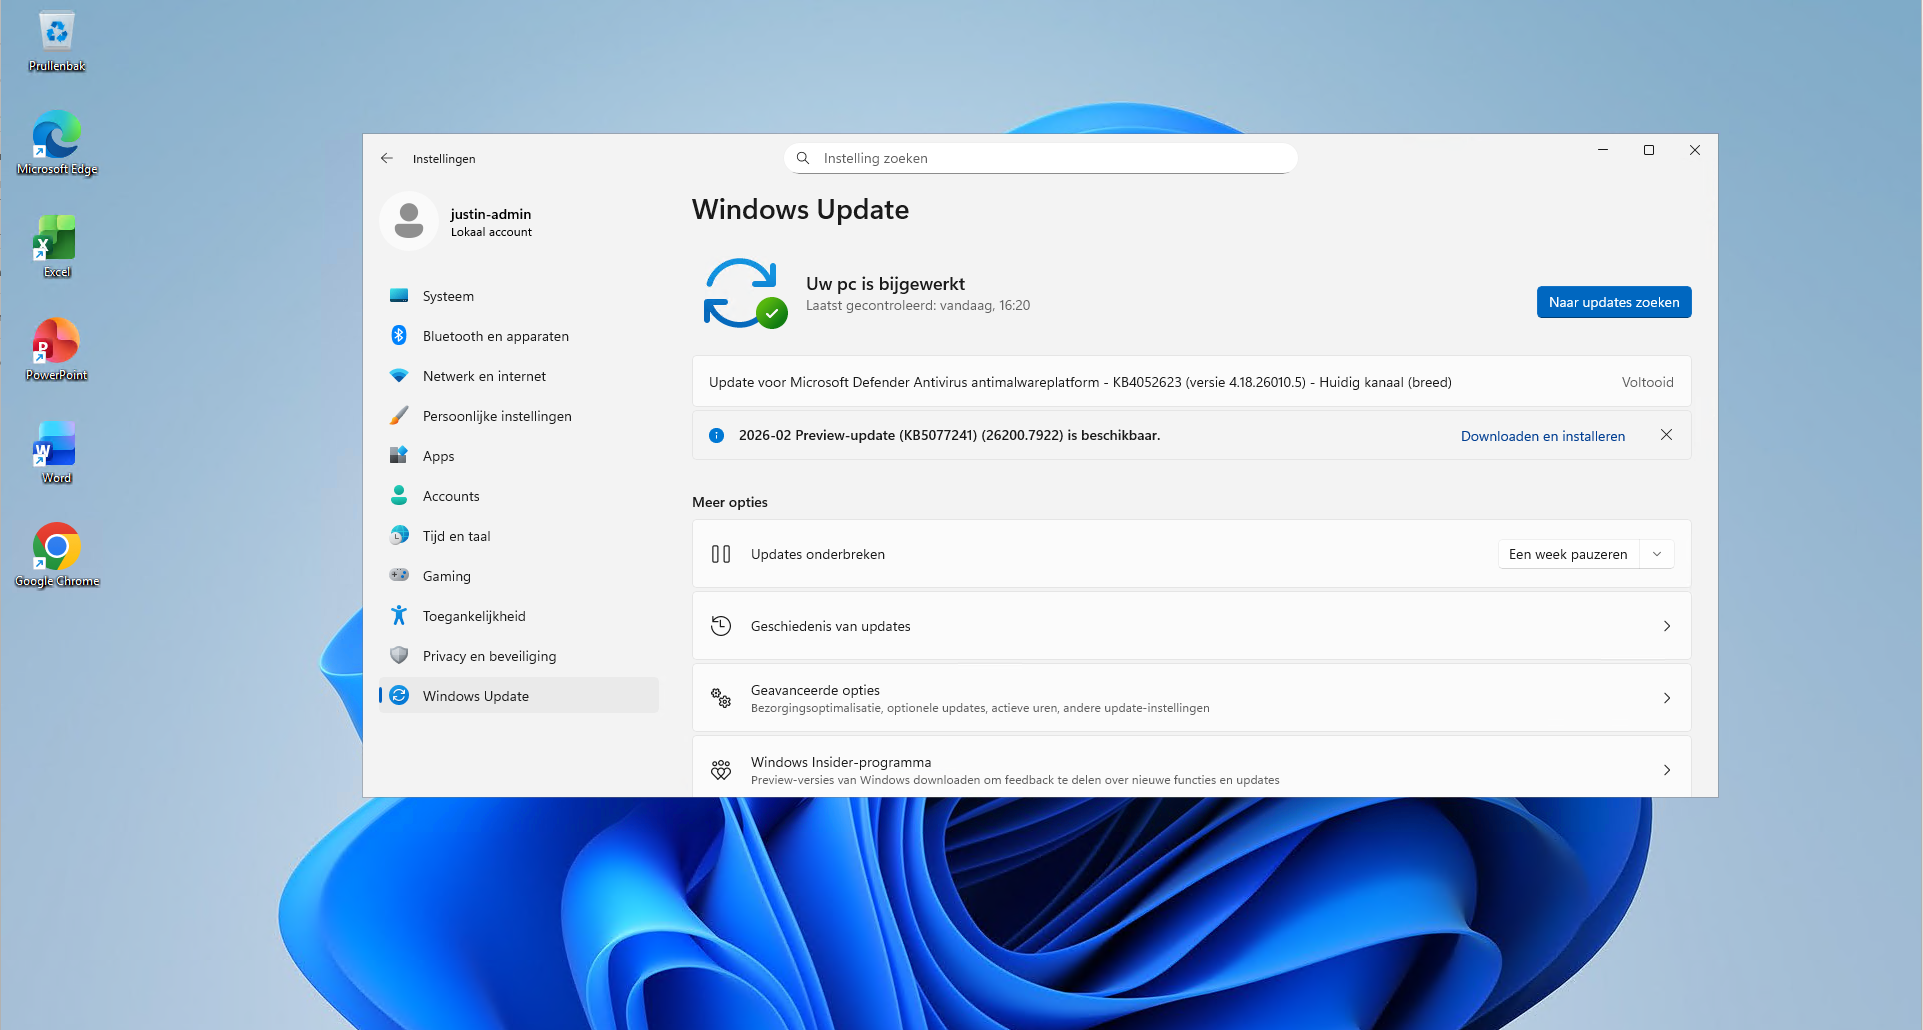
And finally installed the latest updates and applications. I dont like preview updates in production environments so not installed the update awaiting.
Step 3: Sysprepping the Virtual Machine
Now that we have our machine ready, it’s time to execute an application called sysprep. This makes the installation ready for mass deployment, eliminating every driver, (S)ID and other specific information to this machine.
You can find this here:
- C:\Windows\System32\Sysprep\sysprep.exe
Put this line into the “Run” window and the applications opens itself.
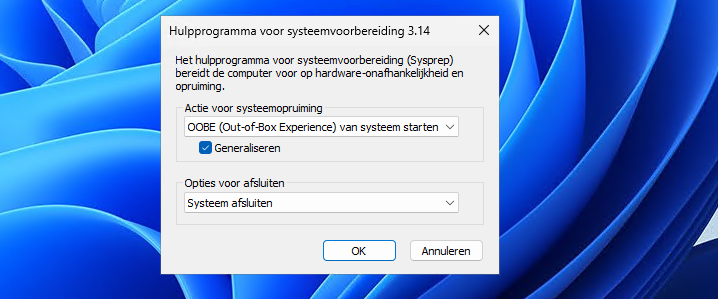
Select “Generalize” and choose the option to shutdown the machine after completing.
If getting an error that Bitlocker Drive Encryption is enabled, execute this command to disable it (you can re-enable it after deployment):
PowerShell
manage-bde -off C:
Wait for around 15 minutes to finish decryption, then try Sysprep again.
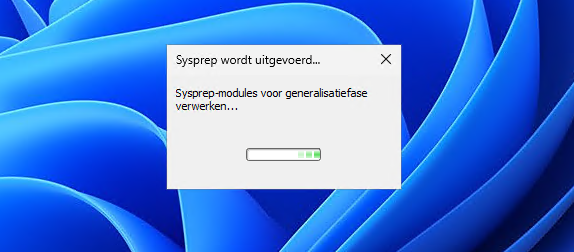
The machine will now clean itself up and then shutdown. This process can take up to 20 minutes, in the meanwhile you can advance with step 4.
Step 4: Create Azure Compute Gallery instance
Before we can capture the VM, we must first create a space for it. This is the Azure Compute Gallery, a managed image repository inside of your Azure environment.
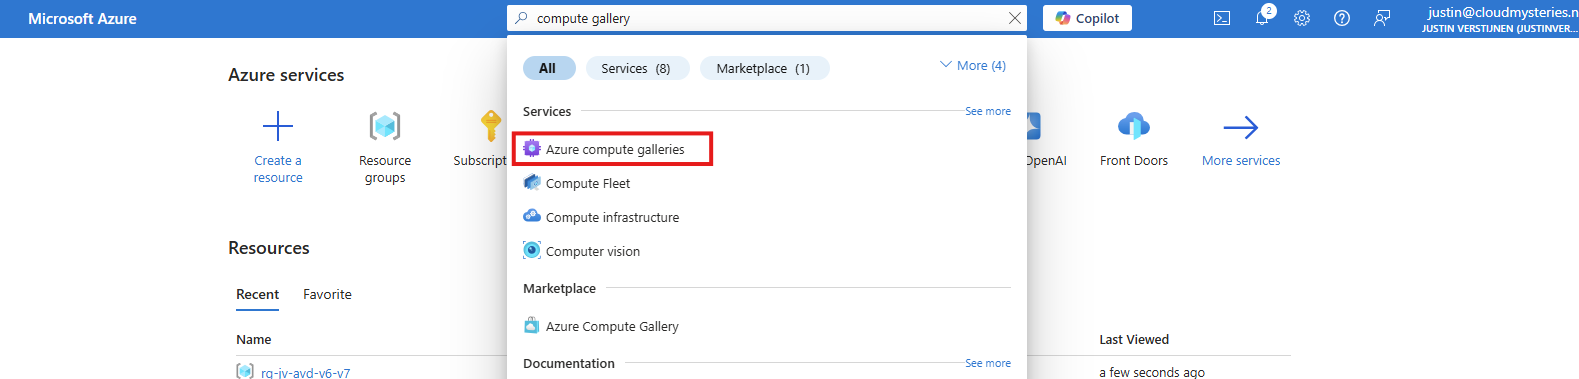
Go to “Azure compute galleries” and create a new ACG.
Give the ACG a name and place it in the right Subscription/Resouce Group.
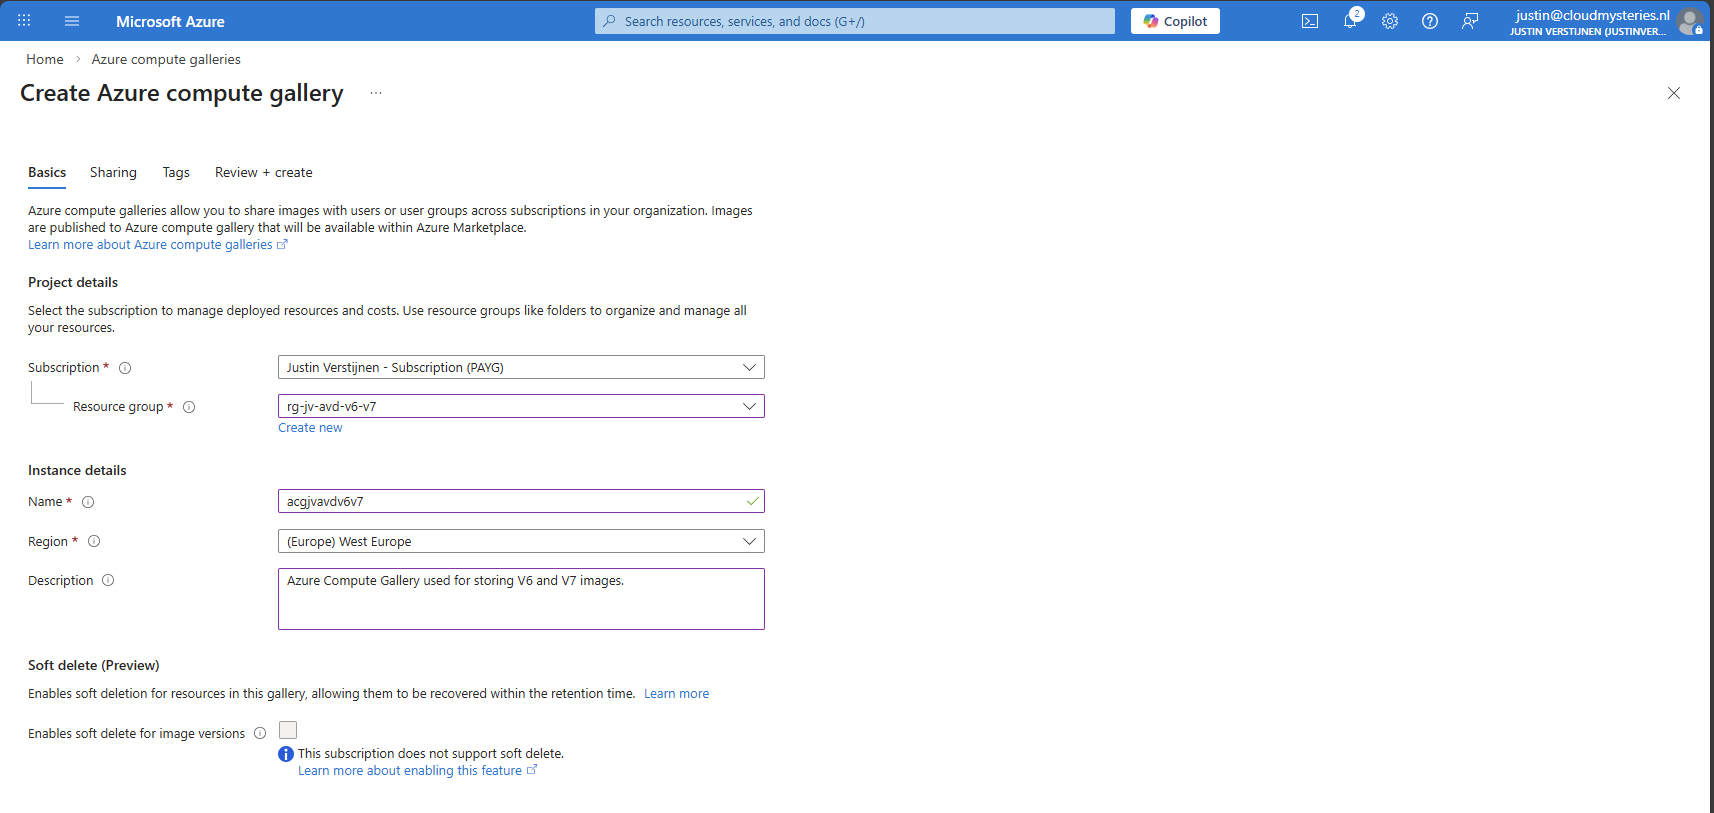
Then click “Next”.
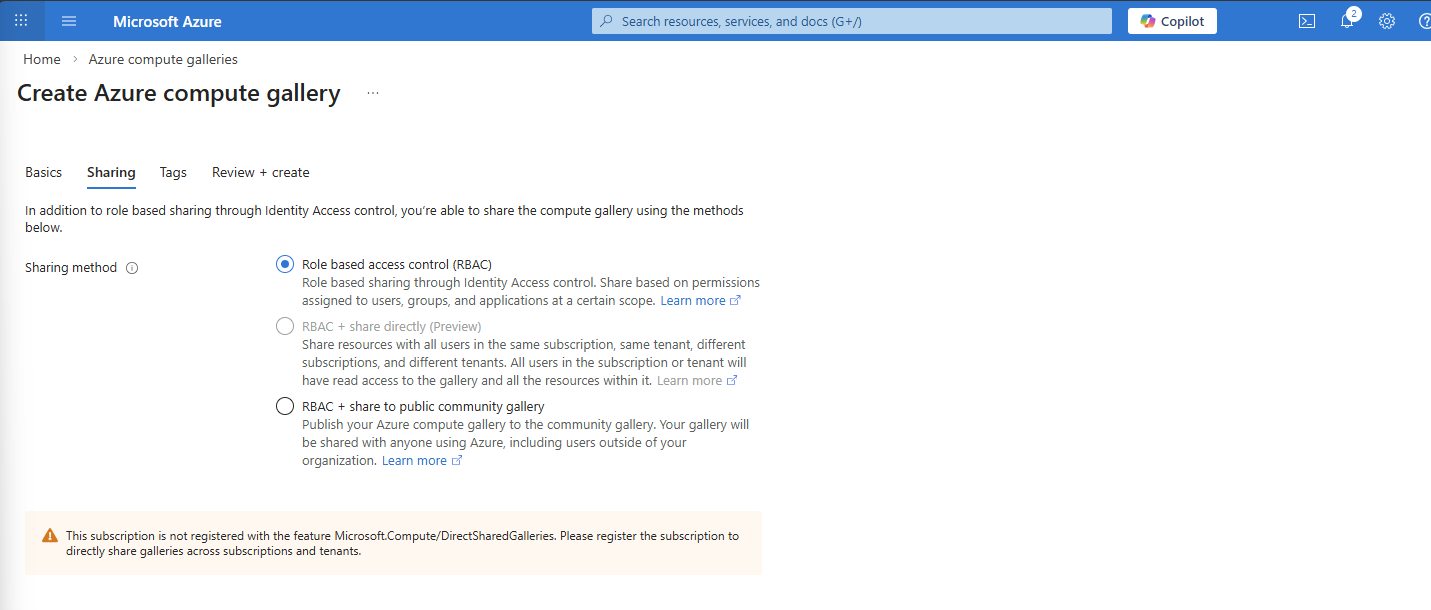
I use the default “RBAC” option at the “Sharing” tab as I dont want to publicy share this image. With the other options, you could share images acros other tenants if you want.
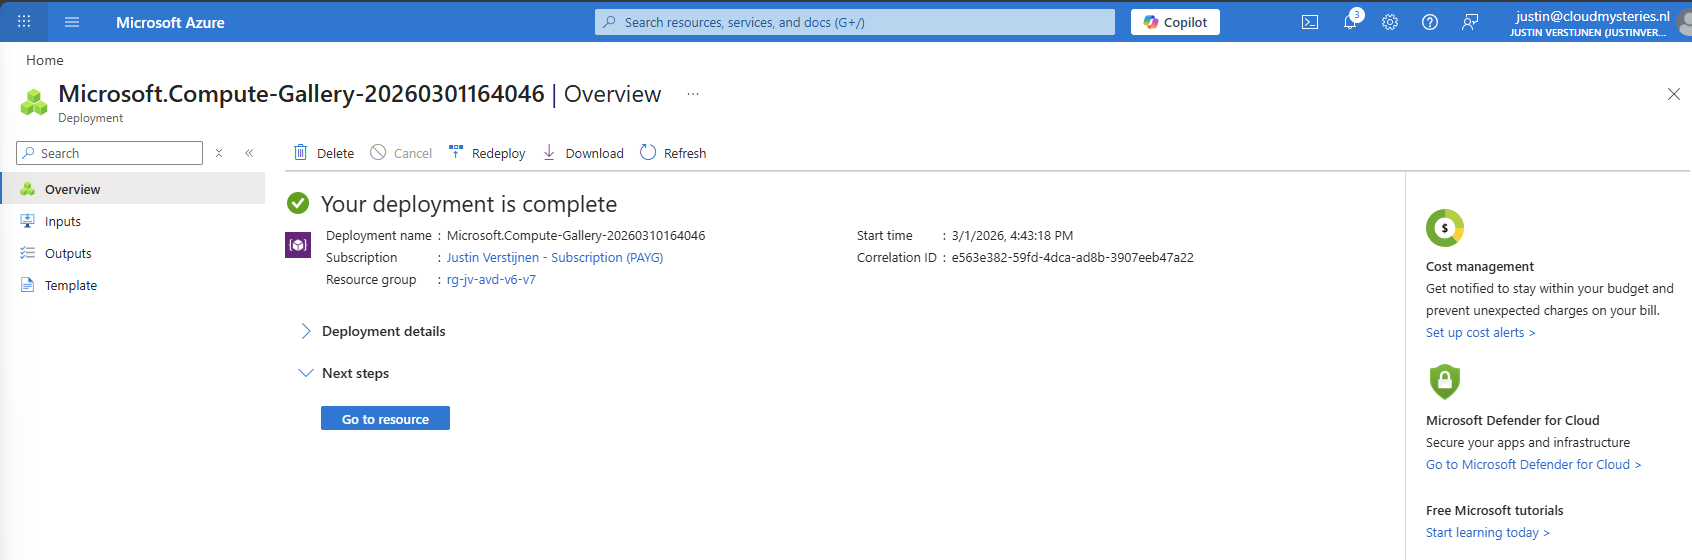
After finishing the wizard, create the Compute Gallery and wait for it to deploy which takes several seconds.
Step 5: Capture VM image and create VM definition
We can now finally capture our VM image and store it in the just created ACG. Go back to the virtual machine you have sysprepped.
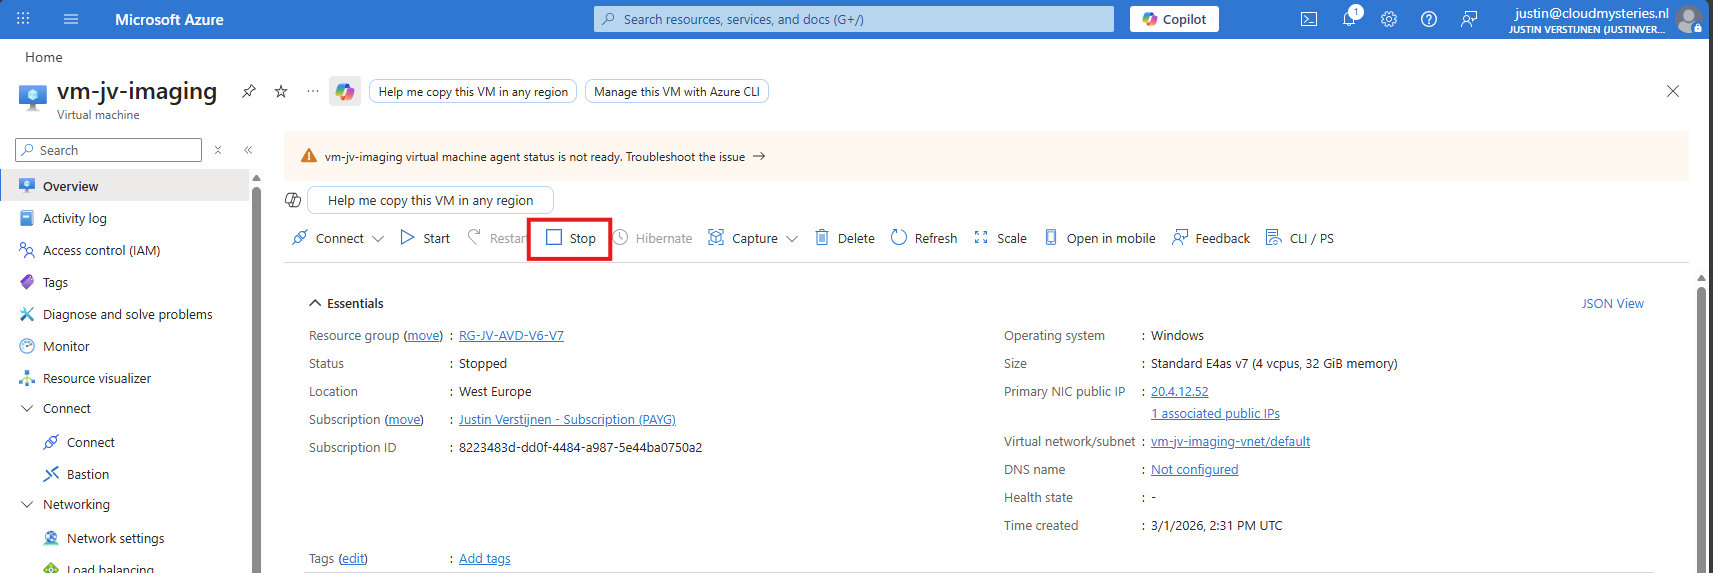
As it is “Stopped” but not “Deallocated”, we must first click “Stop” to deallocate the VM. This is because the OS itself gave the shutdown command but this does not really de-allocate the machine, and is still stand-by.
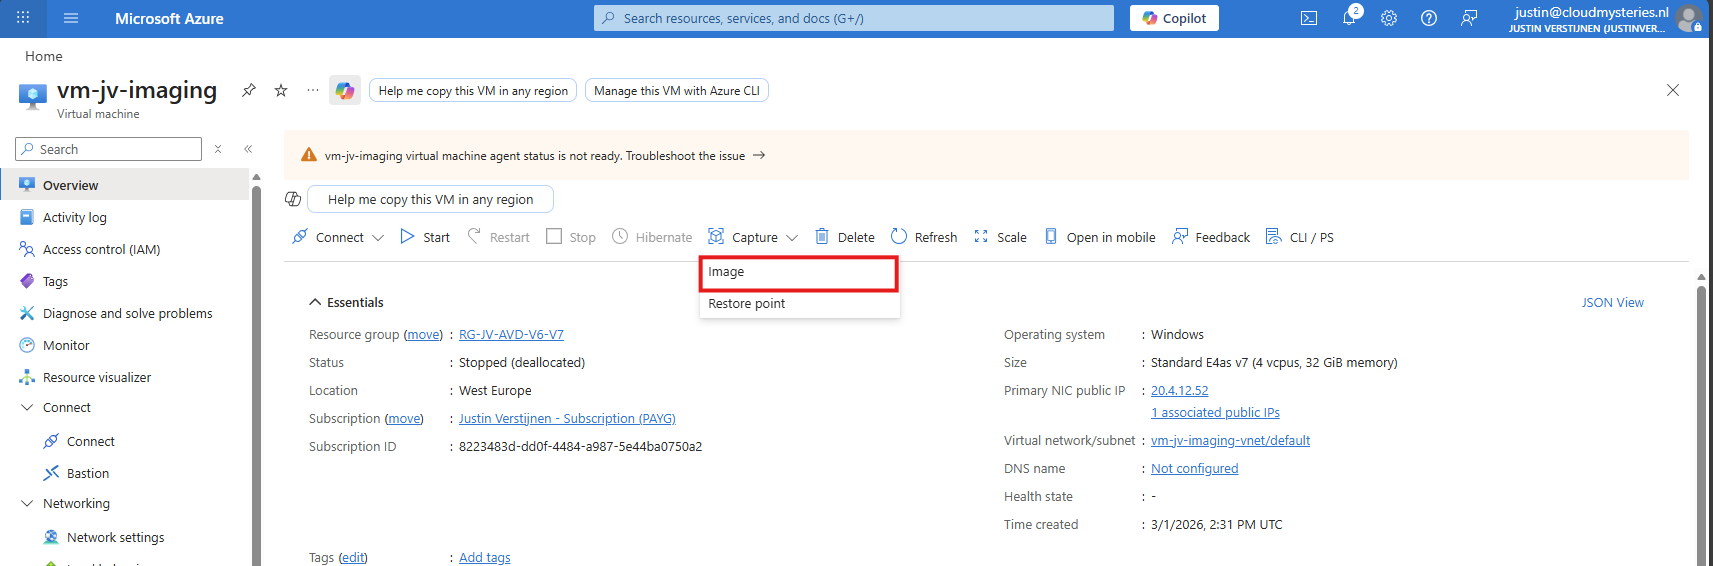
Now click “Capture” and select the “Image” option.
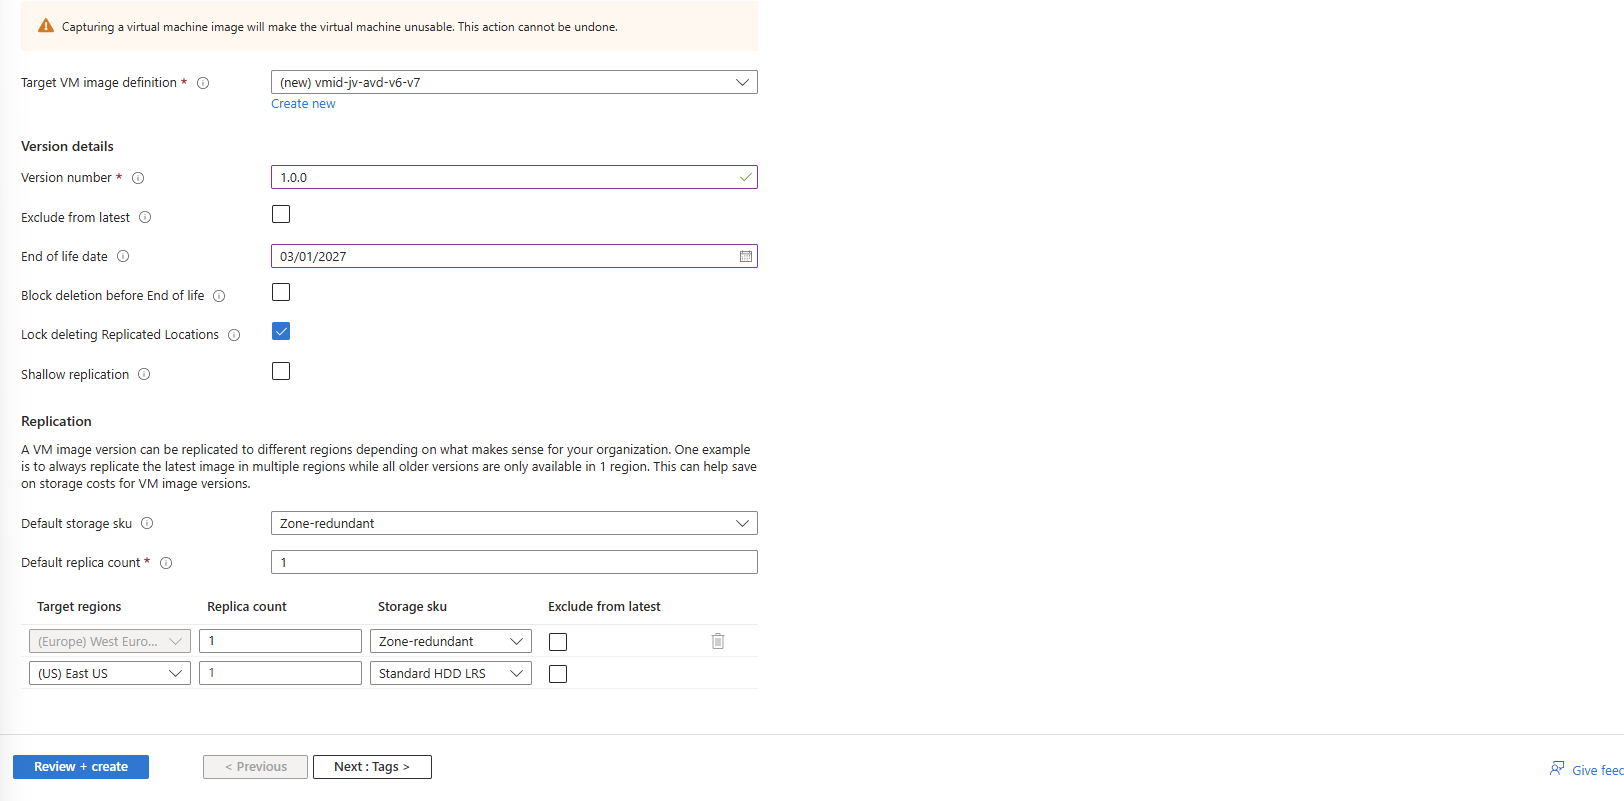
Now we get a wizard where we have to select our ACG and define our image:
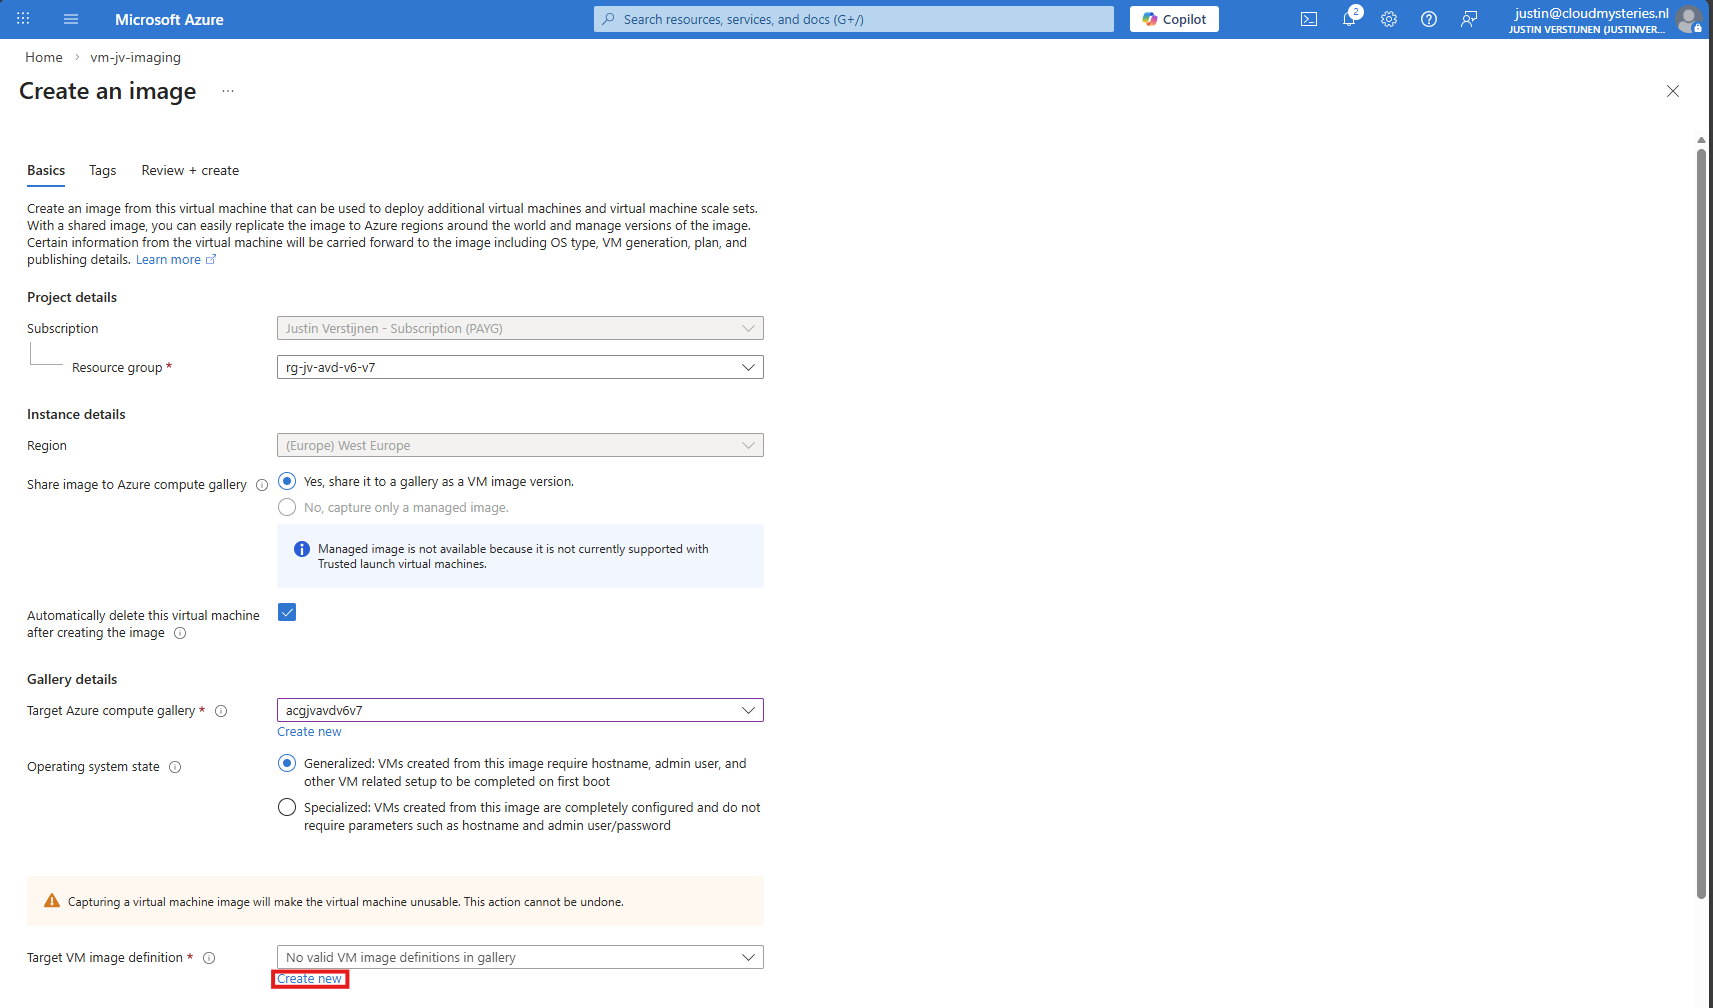
Click on “Create new” to create a new image definition:
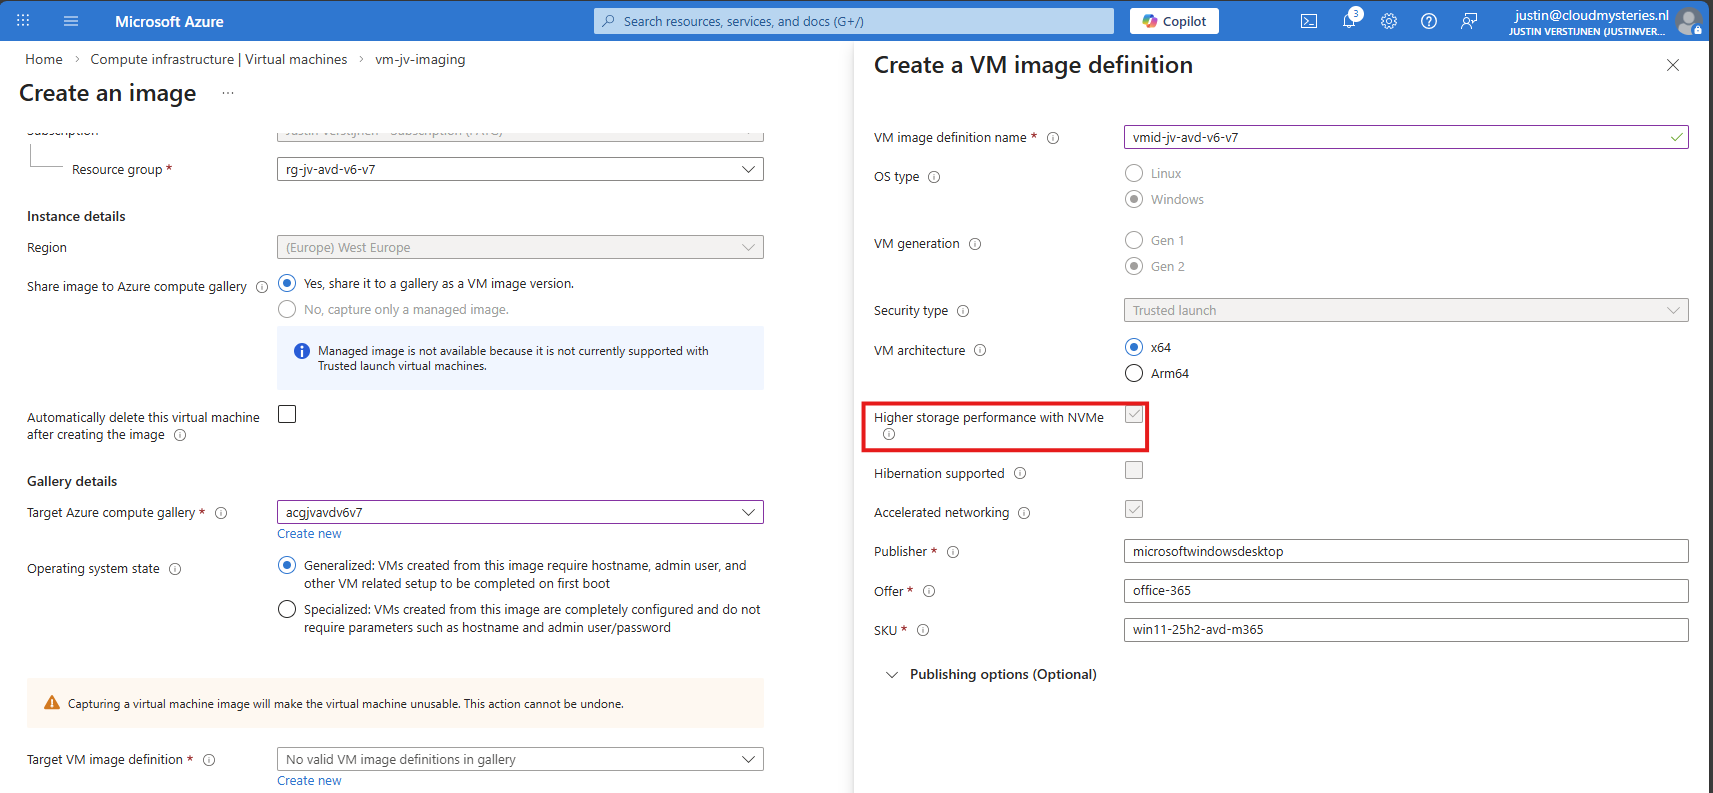
Give this a name and ensure that the check for “NVMe” is checked. Checking this mark enables NVMe support, while also still maintaining the SCSI support. Finish the versioning of the image and then advance through the wizard:
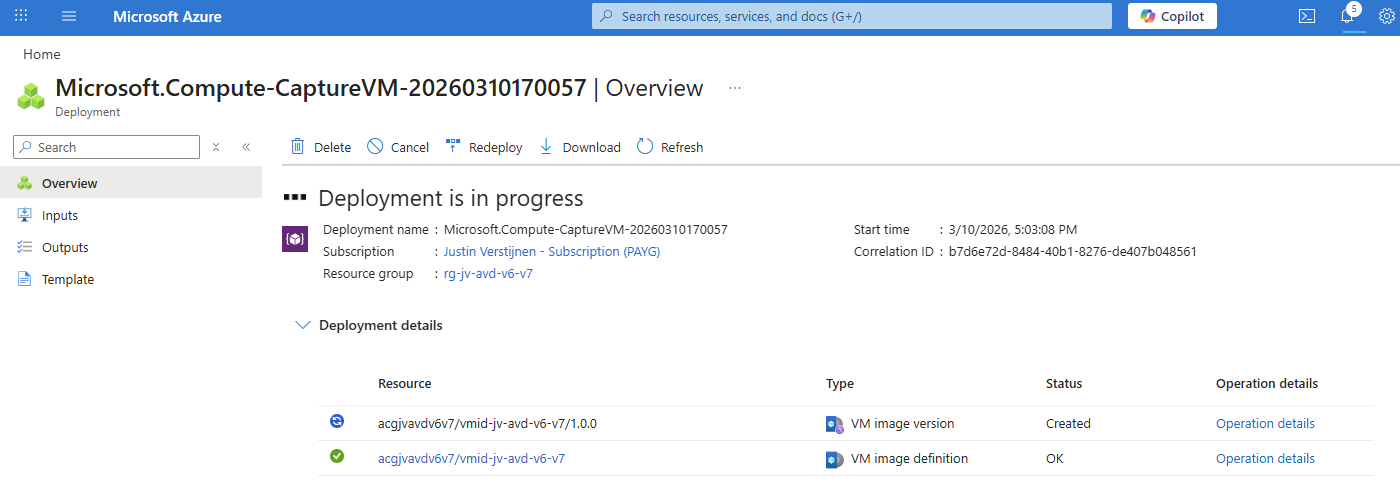
The image will then be created:
Checking image disk controller types
If you want, you can check the VM support of your image using this simple Azure PowerShell scipt:
POWERSHELL
$rg = "your resourcegroup"
$gallery = "your gallery"
$imageDef = "your image definition"

$def = Get-AzGalleryImageDefinition `
    -ResourceGroupName $rg `
    -GalleryName $gallery `
    -Name $imageDef

$def.Features | Format-Table Name, Value -AutoSize
This will result something like this:
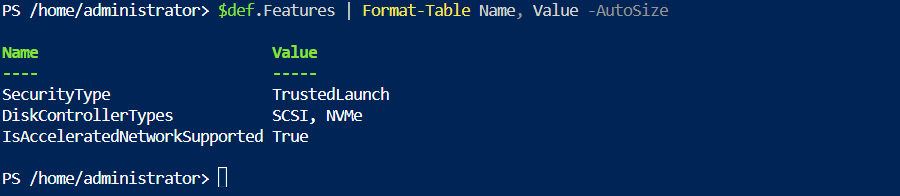
This states at the DiskControllerTypes that it supports both SCSI and NVMe for a broad support.
Step 6: Deploy the new NVMe image
After the image has captured, I removed the imaging PC from my environment as you can do in the image capture wizard. I ended up having these 3 resources left:
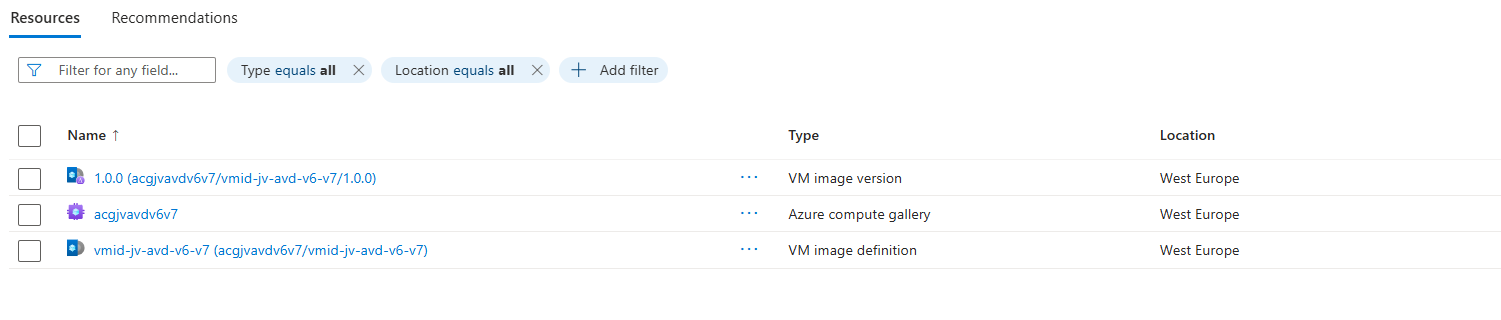
These resources should be kept, where the VM image version will get newer instances as you capture more images during the lifecycle.
We will now deploy a Azure Virtual Desktop hostpool with one VM in it, to test if we can select V7 machines at the wizard. Go to “host pools” and create a new hostpool if not done so already. Adding VMs to an existing hostpool is also possible.
The next tab is more important, as we have to actually add the virtual machines there:
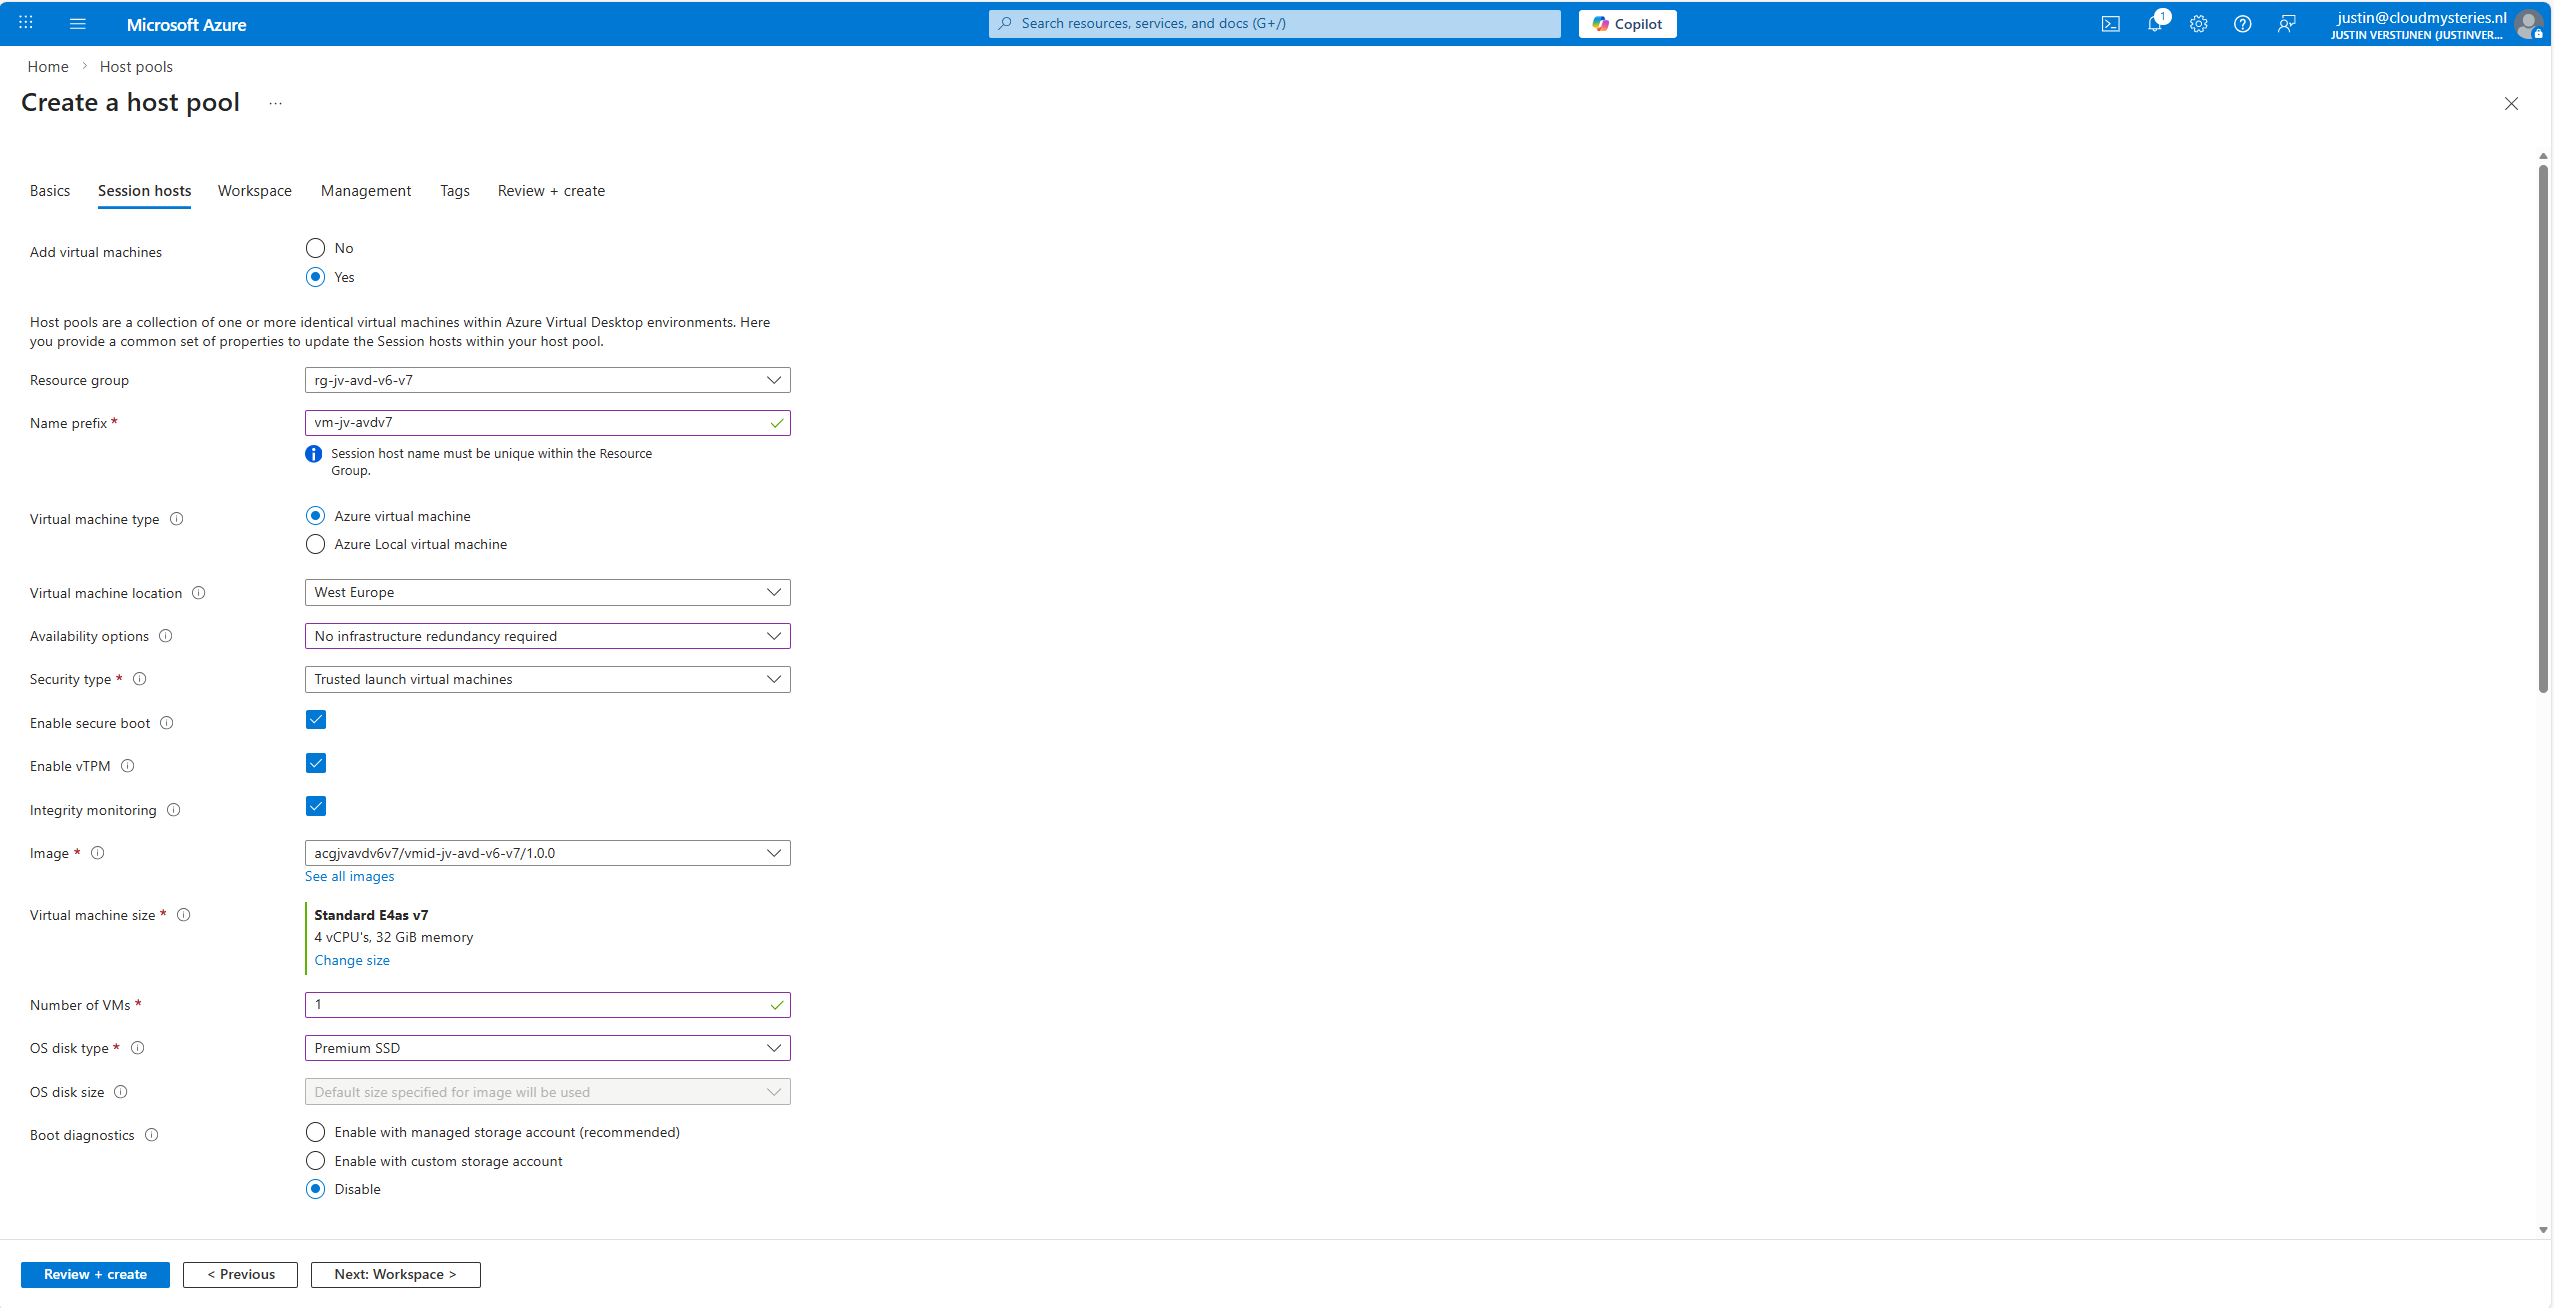
At the “Image” section, click on “see all images”, and then select your shared image definition. This will automatically pick the newest version from the list you saved there.
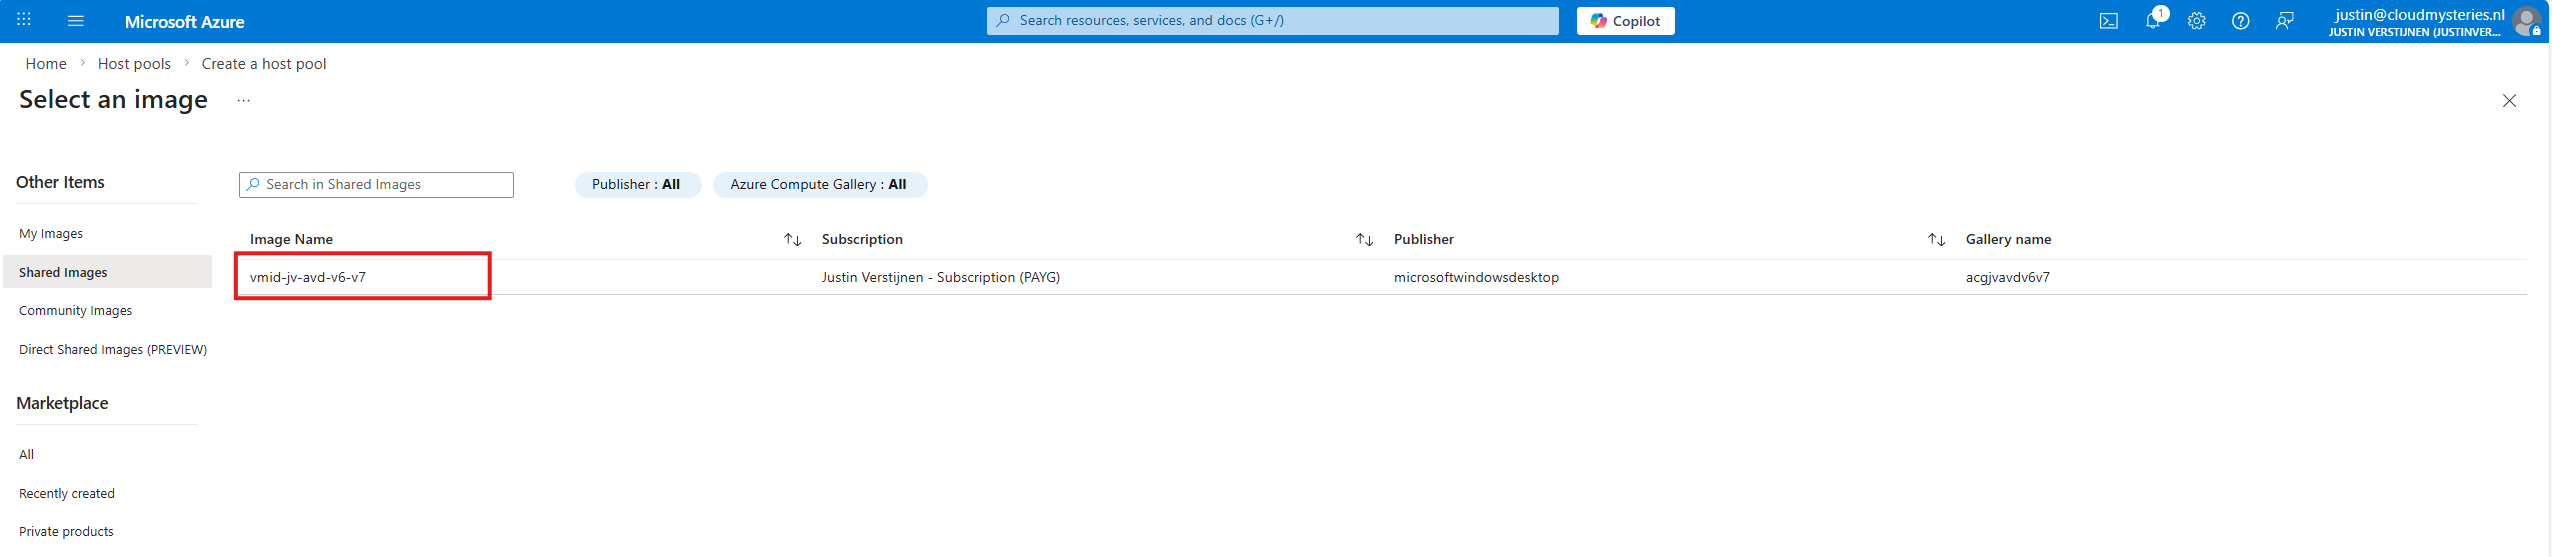
Now advance through the Azure Virtual Desktop hostpool wizard and finish.
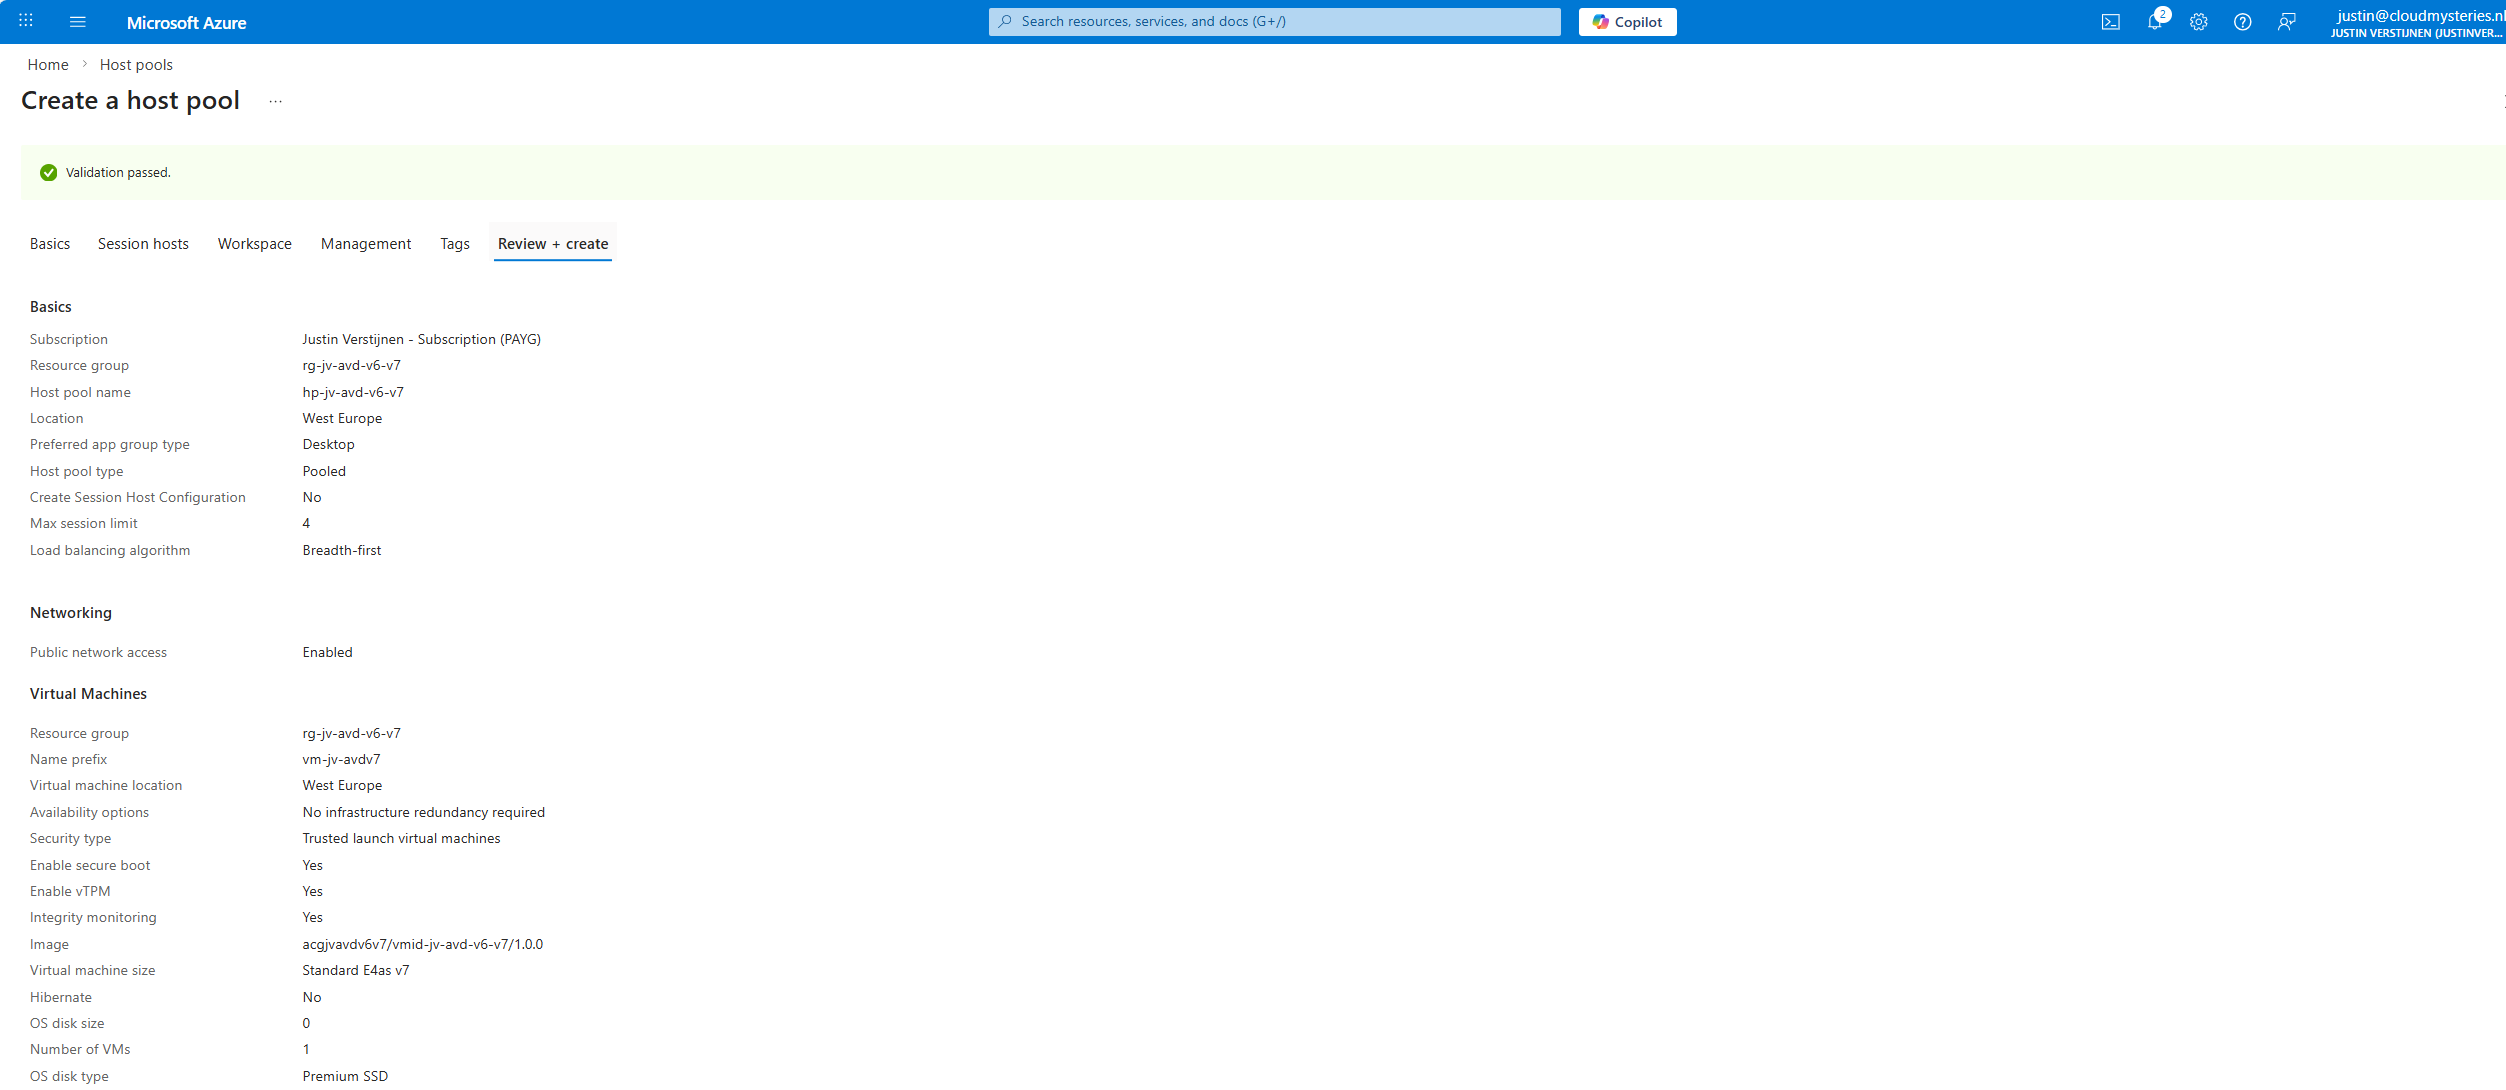
This will create a hostpool with the machines in it with the best specifications and highest security options available at this moment.
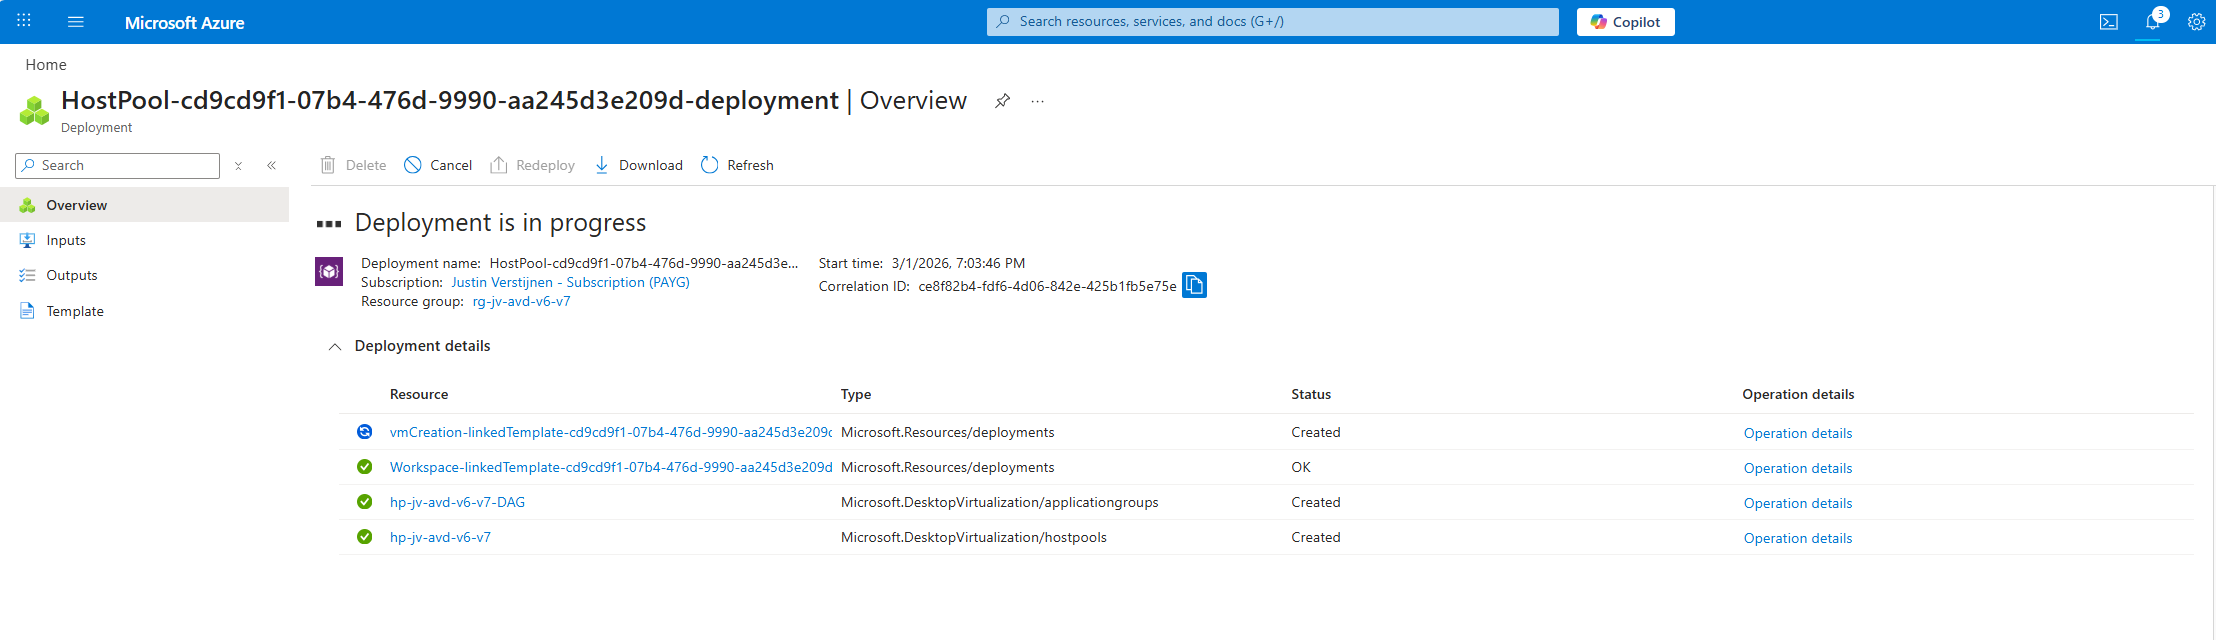
Step 7: Testing the virtual machine
After the hostpool is deployed, we can check how this works now. The hostpool and machine are online:
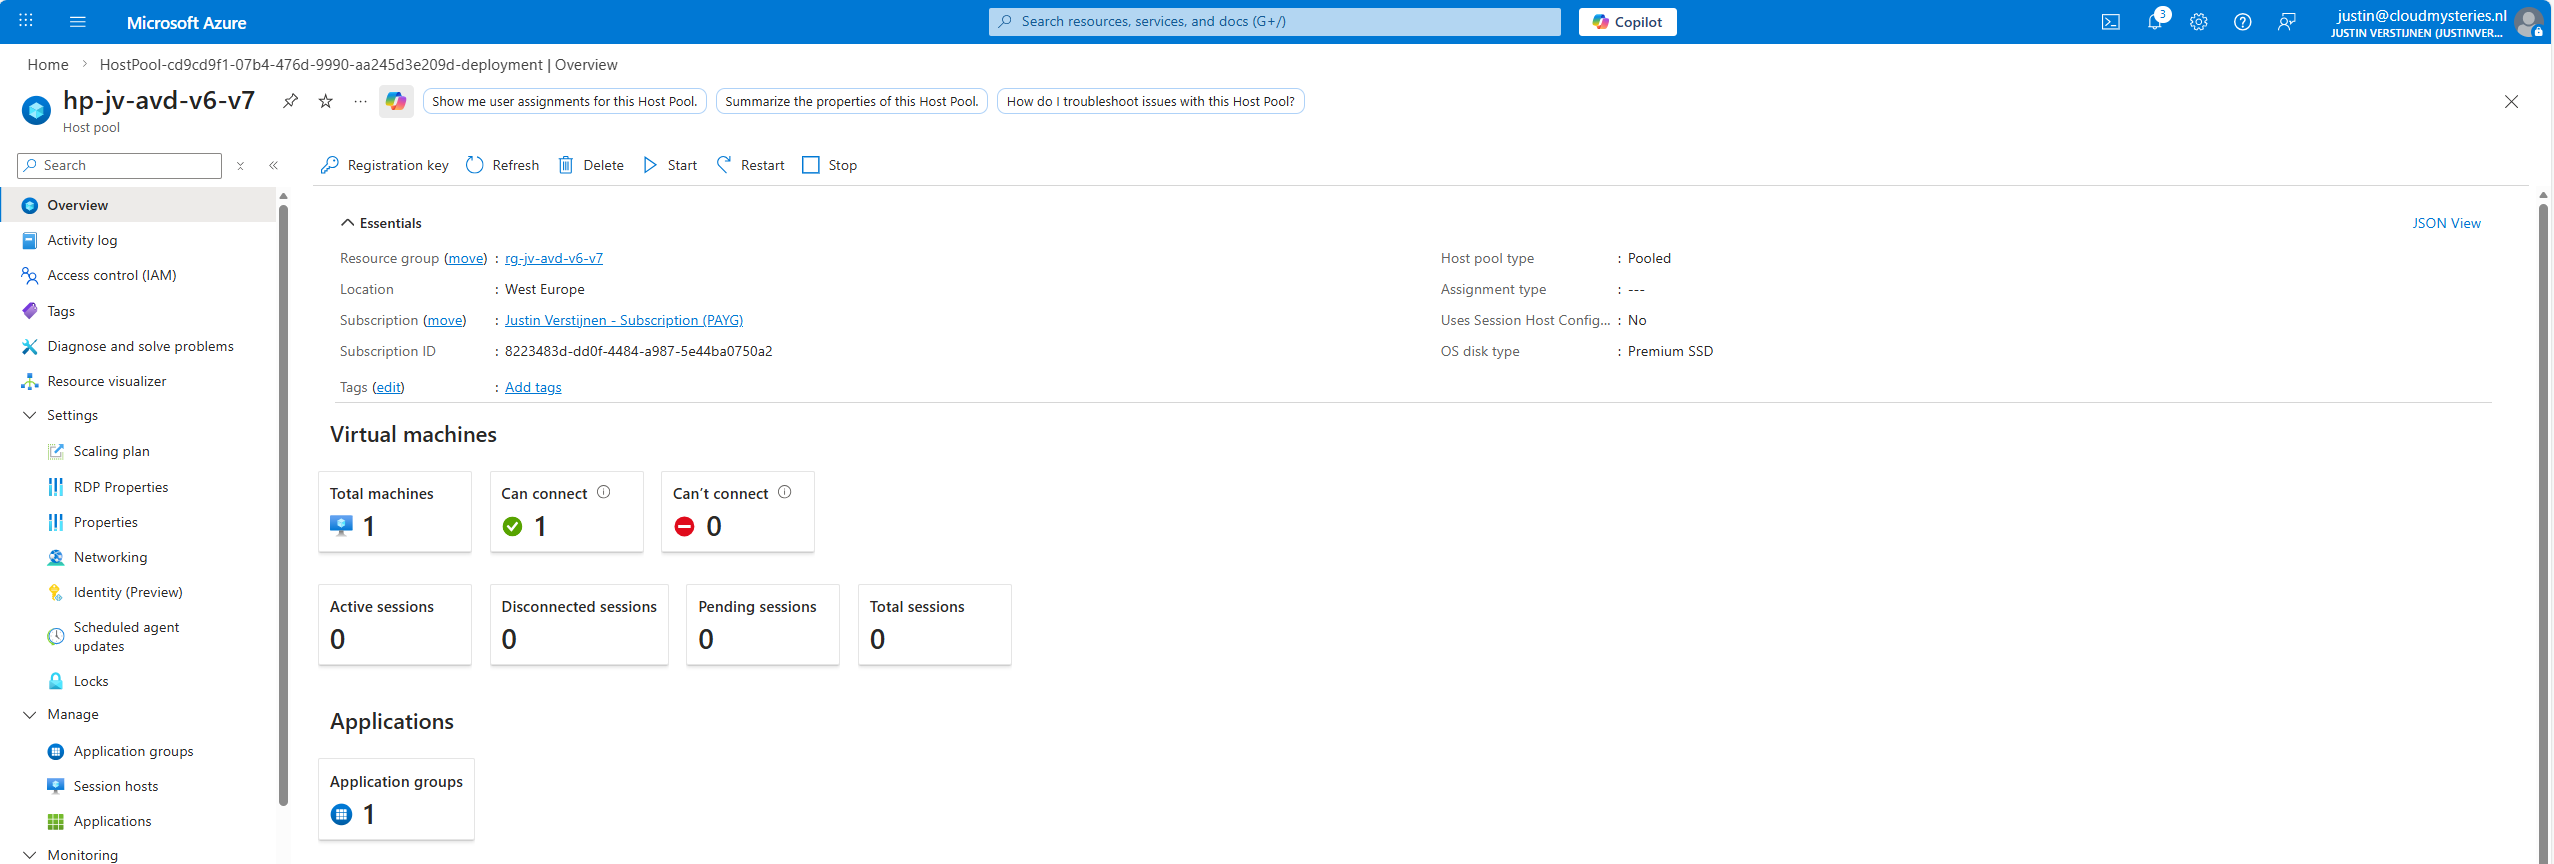
And looking into the VM itself, we can check if this is a newer generation of virtual machine:
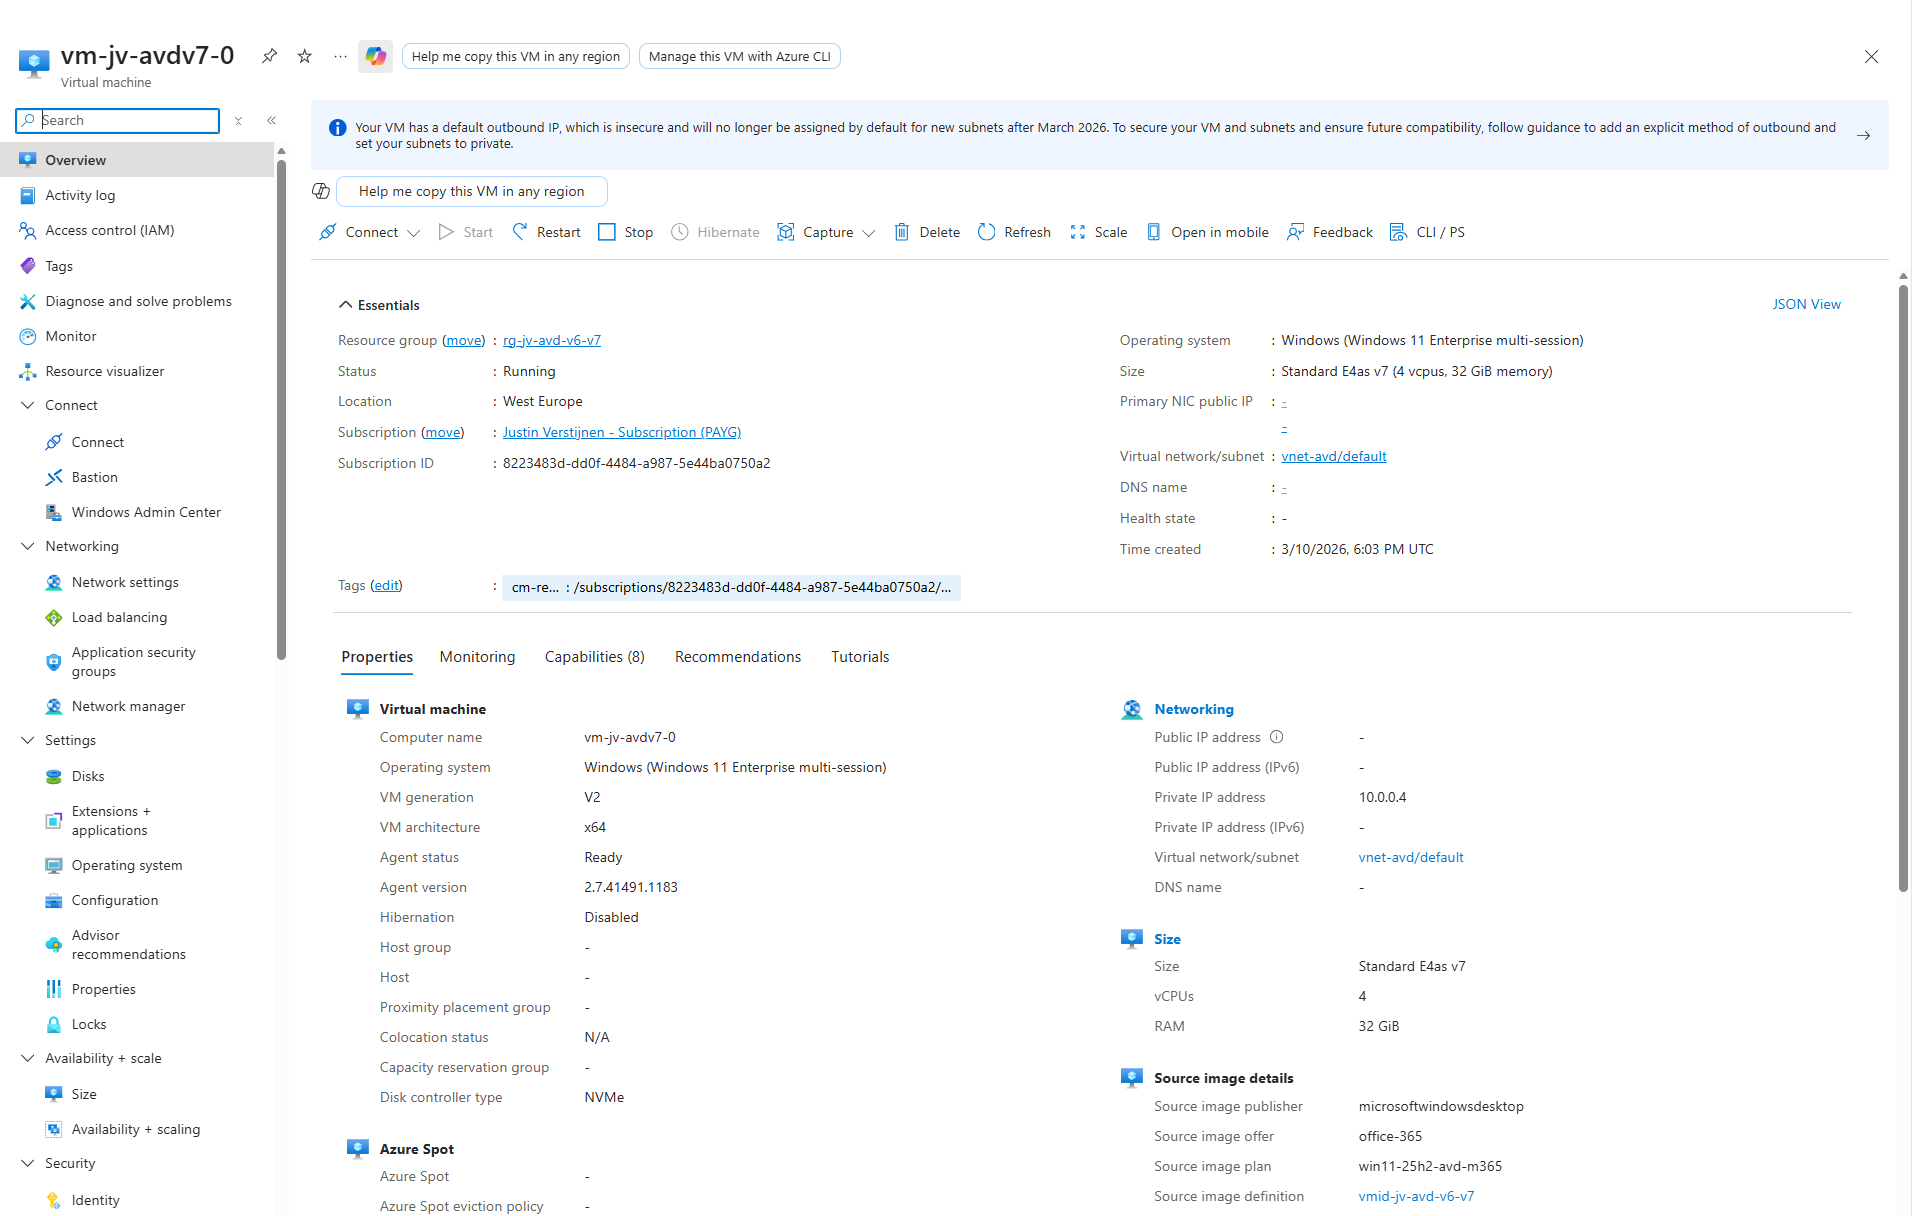
Now I have finished the configuration of the hostpool as described in my AVD implementation guide: https://justinverstijnen.nl/azure-virtual-desktop-fslogix-and-native-kerberos-authentication/#9-preparing-the-hostpool
Summary
If you want to use newer V6 or V7 AVD machines, you need to switch to an NVMe-compatible image workflow with Azure Compute Gallery. That is the supported way to build, version, and deploy modern AVD session hosts.
I hope I also informed you a bit on how these newer VMs work and why you cloud get the errors in the first place. Simply by still using a method Microsoft wants you to stop doing. I really think the Azure Compute Gallery is the better option right now, but takes a bit more configuration.
Thank you for reading this guide and I hope it was helpful.
Sources
These sources helped me by writing and research for this post;
- https://learn.microsoft.com/en-us/azure/virtual-machines/shared-image-galleries
- https://learn.microsoft.com/en-us/azure/virtual-machines/nvme-overview
- https://learn.microsoft.com/en-us/azure/virtual-machines/enable-nvme-interface
- https://justinverstijnen.nl/azure-compute-gallery-and-avd-vm-images/
End of the page 🎉
You have reached the end of the page. You can navigate through other blog posts as well, share this post on X, LinkedIn and Reddit or return to the blog posts collection page. Thank you for visiting this post.
If you think something is wrong with this post or you want to know more, you can send me a message to one of my social profiles at: https://justinverstijnen.nl/about/
If you find this page and blog very useful and you want to leave a donation, you can use the button below to buy me a beer. Hosting and maintaining a website takes a lot of time and money. Thank you in advance and cheers :)
The terms and conditions apply to this post.
Remove Microsoft Print to PDF and OneNote printers script
In this guide, I will show you how to delete the printers using a PowerShell script. This is compatible with Microsoft Intune and Group Po…
In this guide, I will show you how to delete the printers using a PowerShell script. This is compatible with Microsoft Intune and Group Policy and can be used on physical devices, Azure Virtual Desktop and Windows 365.
By default in Windows 11 with Microsoft 365 apps installed, we have two software printers installed. These are:
- OneNote (Desktop)
- Microsoft Print to PDF
However, some users don’t use them and they will annoyingly be as default printer sometimes, which we want to avoid. Most software have built-in options to save to PDF, so this is a bit redundant. Our real printers will be further down which causes their own problems for end users.
The PowerShell script
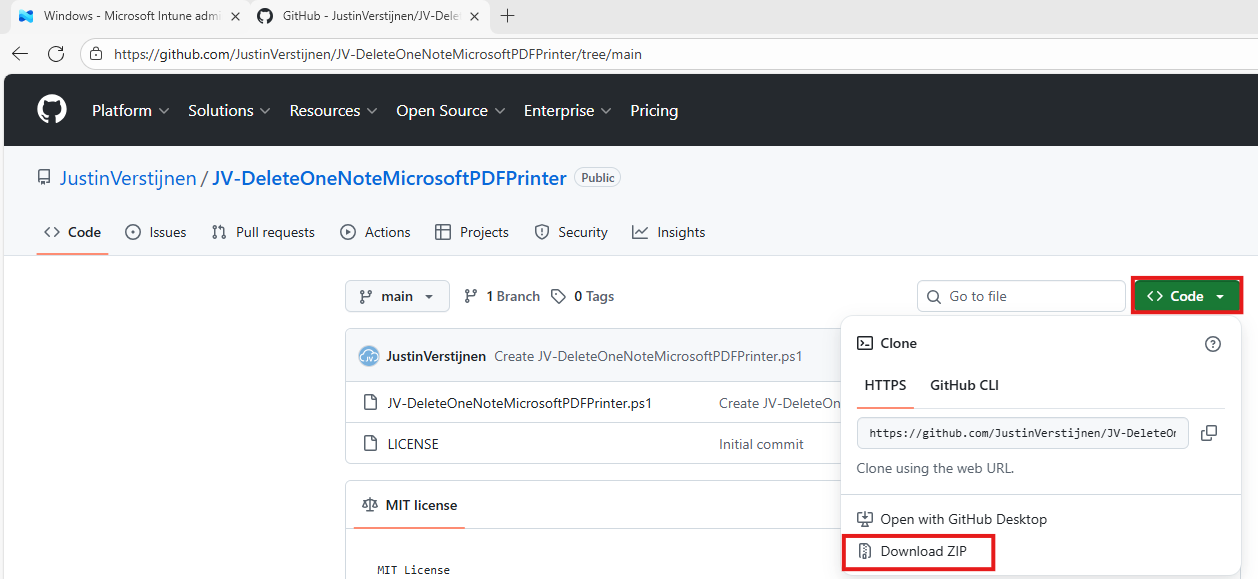
The PowerShell script can be downloaded from my Github page:
On the Github page, click on “<> Code” and then on “Download ZIP”.
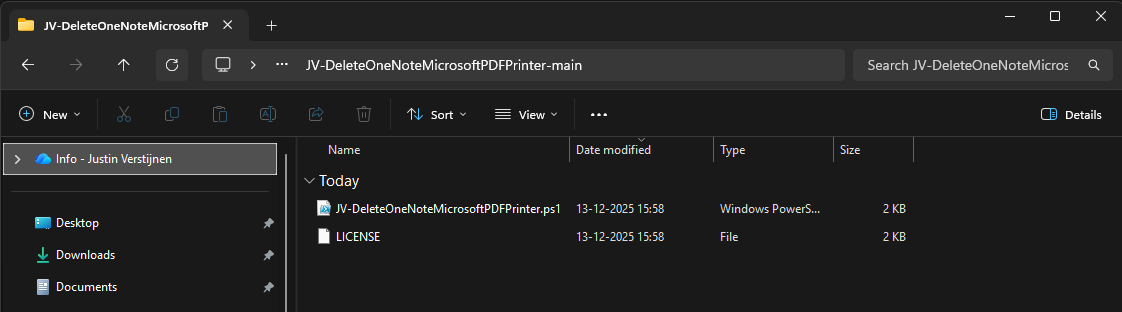
Unzip the file to get the PowerShell script:
The script described
The script contains 2 steps, one step for deleting one of the two printers. The Onedrive printer is a very easy removal as this only needs removing and will never return till you reinstall Office. The Microsoft PDF printer needs removing a Windows Feature.
This however cannot be accomplished by native Intune/GPO settings so we have to do this by script. Therefore I have added two different options to deploy the script to choose which one to use. It can also be used on other management systems too but steps may be different.
Option 1: Deploy script with Microsoft Intune
To deploy this script, let’s go to the Microsoft Intune Admin Center: https://intune.microsoft.com
Navigate to Devices -> Windows -> Scripts and remediations and open the “Platform scripts” tab. Click on “+ Add” here to add a new script to your configuration.

Give your script a name and good description of the result of the script.
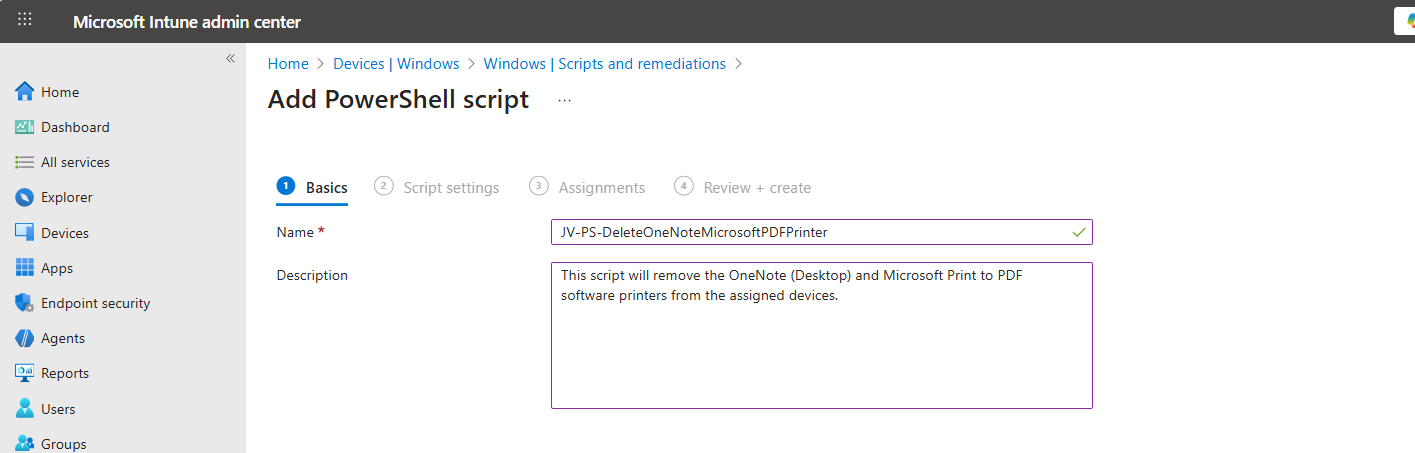
Then click “Next” to go to the “Script settings” tab.
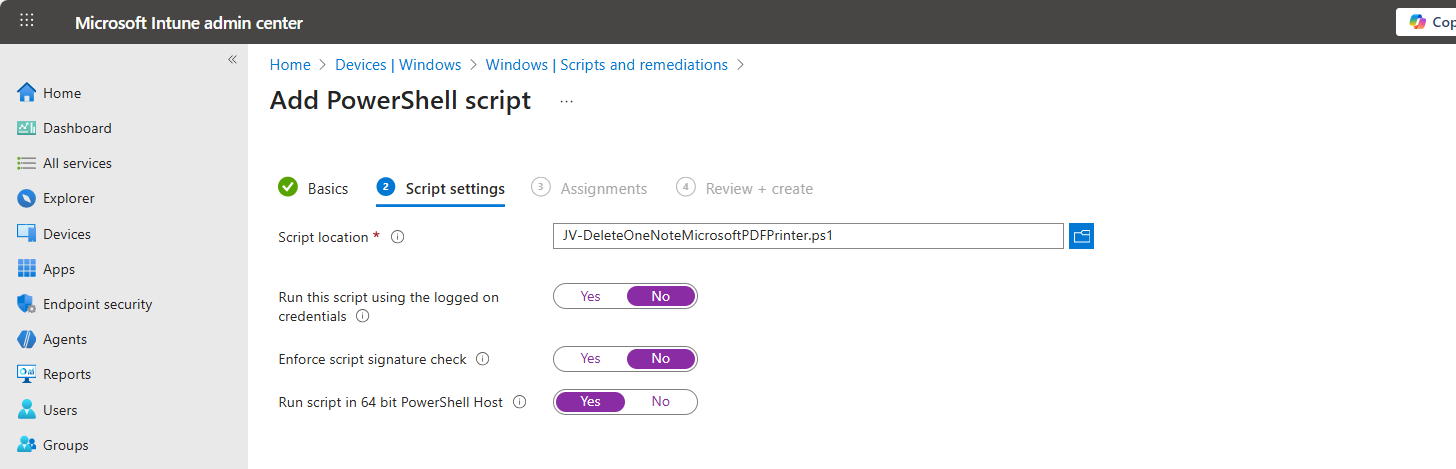
Import the script you just downloaded from my Github page. Then set the script options as this:
- Run this script using the logged on credentials: No
- Enforce script signature check: No
- Run script in 64 bit PowerShell Host: Yes
Then click “Next” and assign it to your devices. In my case, I selected “All devices”.
Click “Next” and then “Create” to deploy the script that will delete the printers upon execution.
Option 2: Deploy script with Group Policy
If your environment is Active Directory based, then Group Policy might be a good option to deploy this script. We will place the script in the Active Directory SYSVOL folder, which is a directory-wide readable folder for all clients and users and will then create a task that starts when the workstation itself starts.
Login to your Domain-joined management server and go to File Explorer and go to your domains SYSVOL folder by typing in: \domain.com in the File Explorer bar:

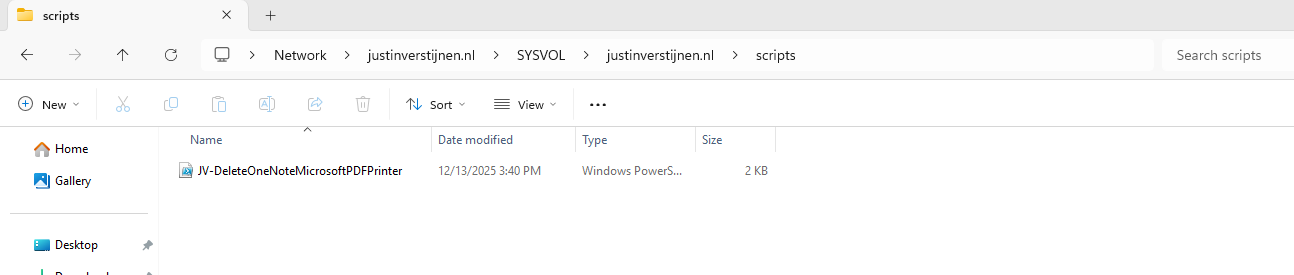
Open the SYSVOL folder -> domain -> scripts. Paste the script in this folder:
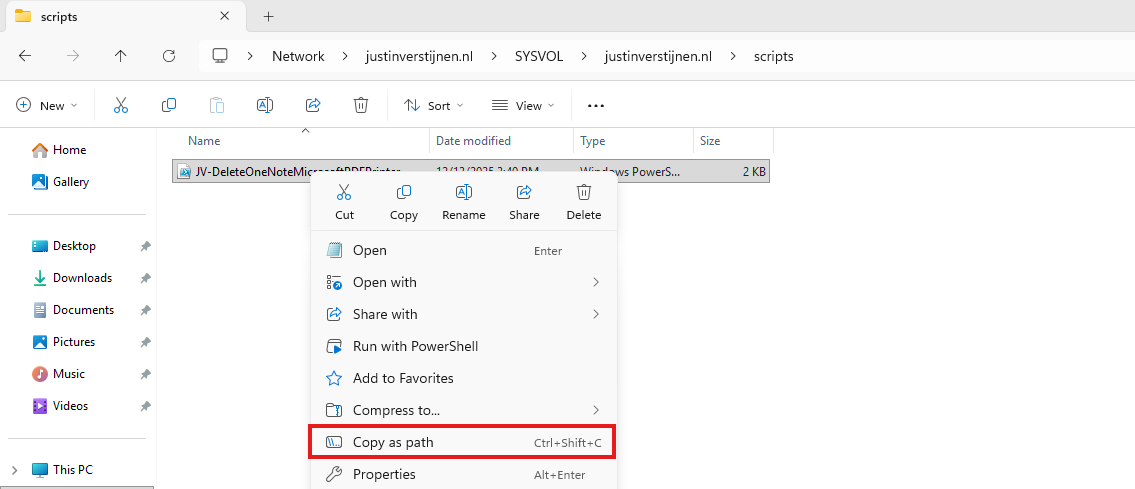
Then right-click the file and select “Copy as path” to set the full scipt path in your clipboard.
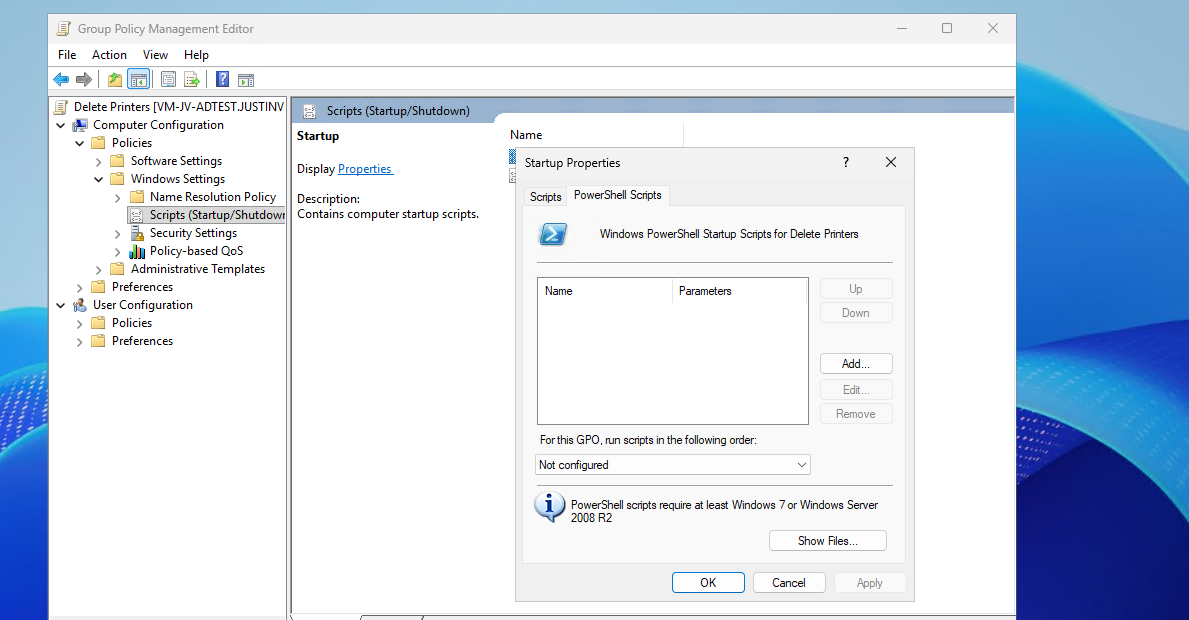
Open Group Policy Management on the server to create a new start-up script. Use an existing GPO or create a new one and navigate to:
Computer Configuration -> Policies -> Windows Settings -> Scripts -> Startup
Create a new script here and select the “PowerShell scripts” tab.
Add a new script here. Paste the copied path and remove the quotes.
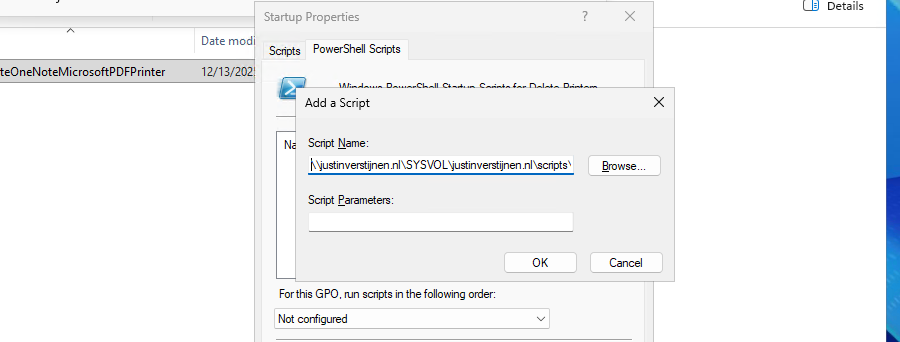
Then click “OK” to save the configuration. This will bring us to this window:
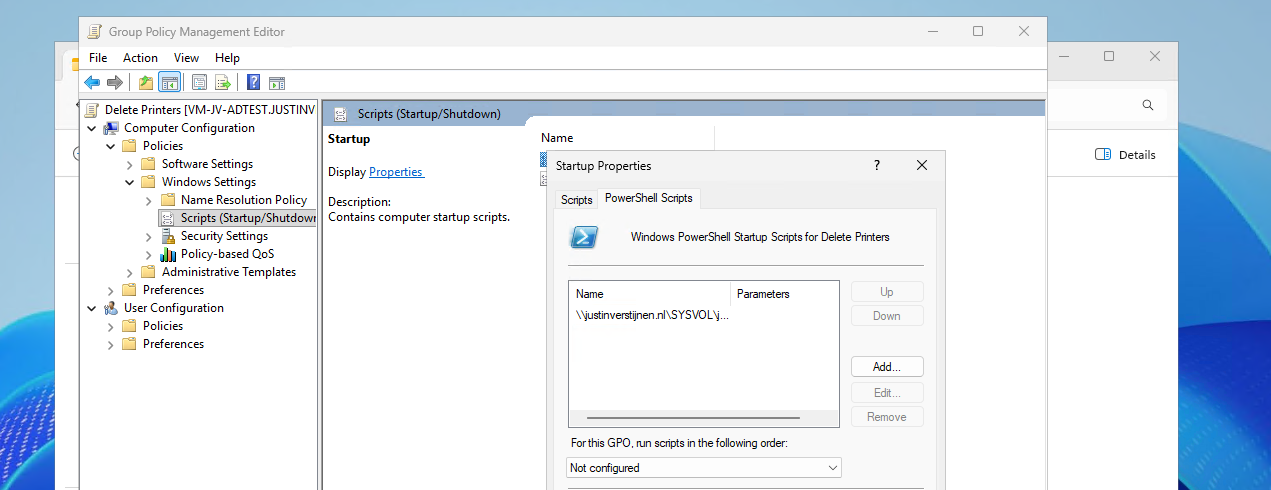
We have now made a start-up script which will run at every startup of the machine. If you place a updated script as the same name in the same directory, this new version will be executed.
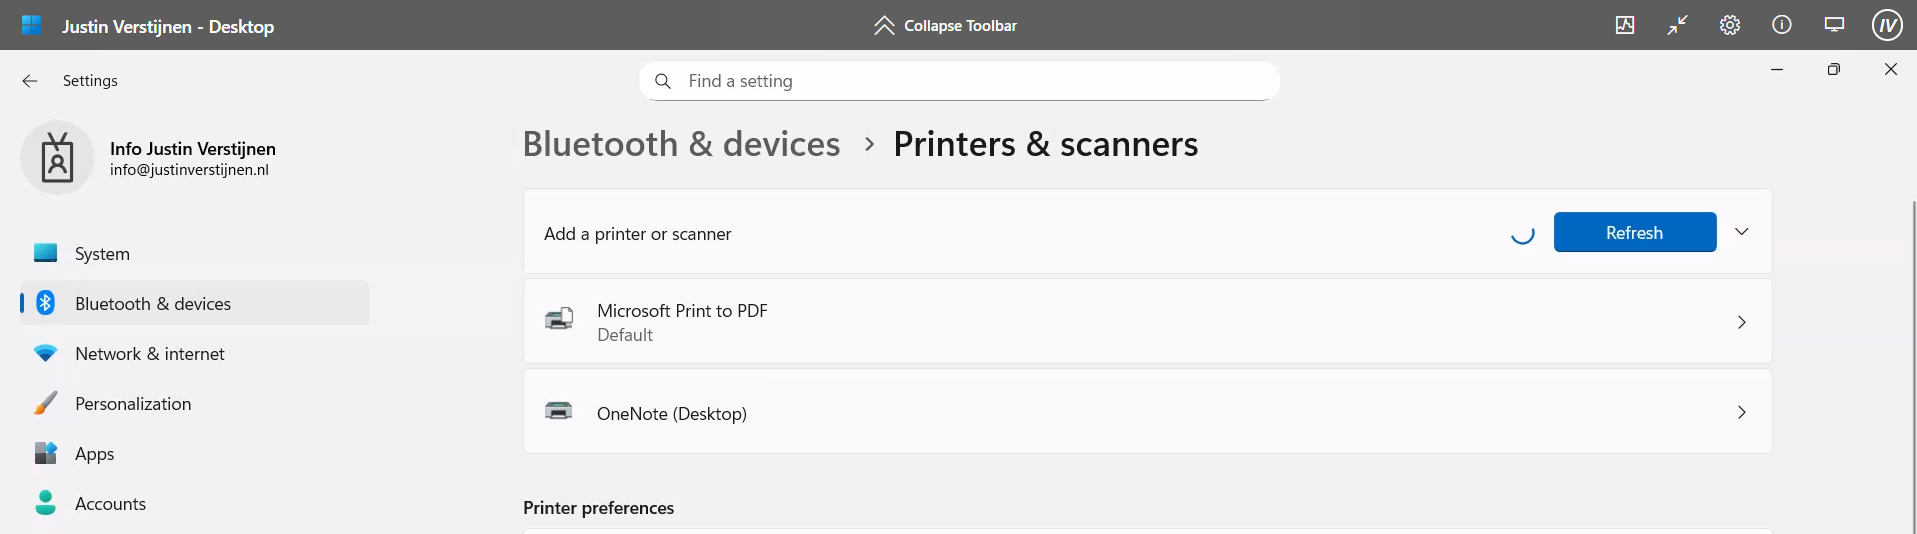
The results on the client machine
After the script has been executed succesfully, which should be at the next logon, we will check the status in the Printers and Scanners section:
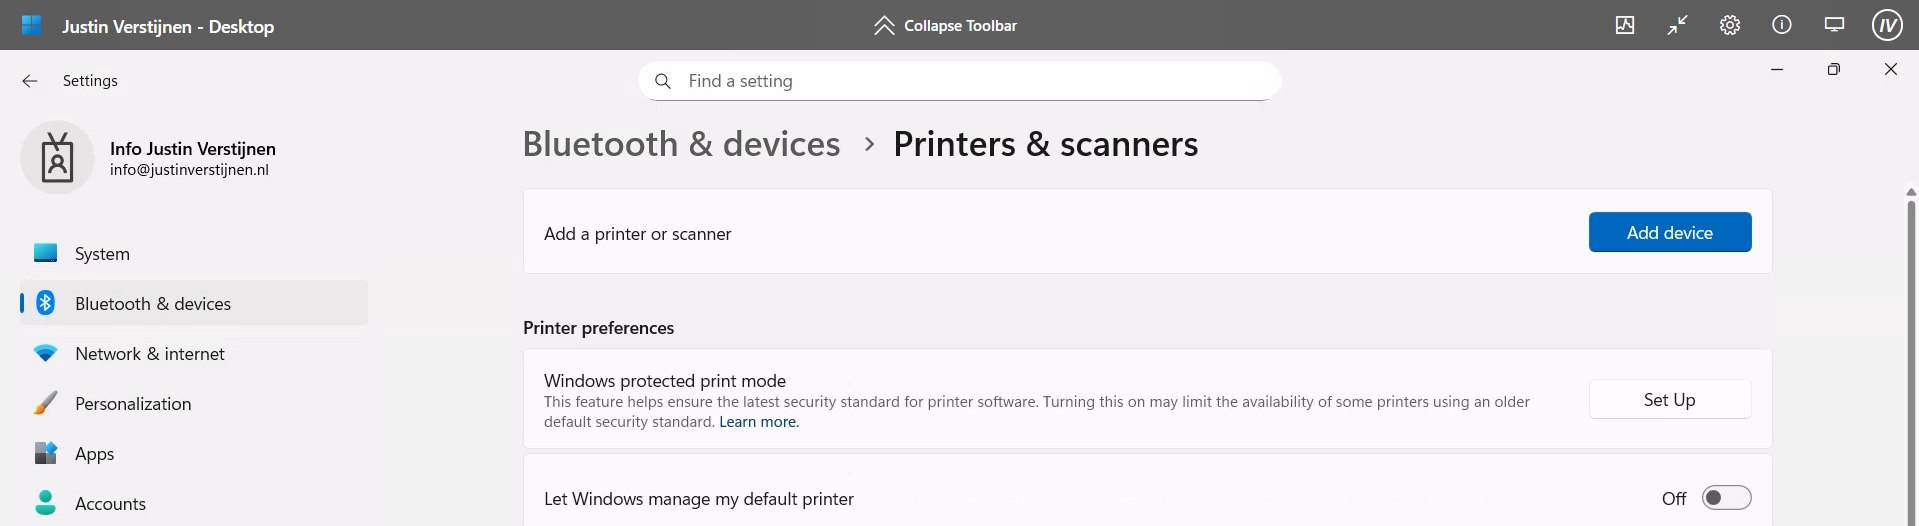
No software printers left bothering us and our end users anymore :)
Summary
Removing the default software printers may be strange but can help enhancing the printing for your end users. No software printer installed by default can take over being default printer anymore or even filling the list with printers. Almost every application has a option to save as PDF these days so this would be a little bit redundant.
Thank you for reading this guide and I hope it was helpful.
Sources
These sources helped me by writing and research for this post;
- None
End of the page 🎉
You have reached the end of the page. You can navigate through other blog posts as well, share this post on X, LinkedIn and Reddit or return to the blog posts collection page. Thank you for visiting this post.
If you think something is wrong with this post or you want to know more, you can send me a message to one of my social profiles at: https://justinverstijnen.nl/about/
If you find this page and blog very useful and you want to leave a donation, you can use the button below to buy me a beer. Hosting and maintaining a website takes a lot of time and money. Thank you in advance and cheers :)
The terms and conditions apply to this post.
Azure Virtual Desktop FSLogix and Native Kerberos authentication
On this page I will describe how I built an environment with a pooled Azure Virtual Desktop hostpool with FSLogix and using the Entra…
On this page I will describe how I built an environment with a pooled Azure Virtual Desktop hostpool with FSLogix and using the Entra Kerberos option for authentication. This new authentication option eliminates the unsafe need of storing the storage key in hosts’ registry like we did in my earlier AVD full Entra blog.
In this guide I will dive into how I configured an simple environment where I placed every configuration action in separate steps to keep it simple and clear to follow and also will give some describing information about some concepts and settings.
I also added some optional steps for a better configuration and security than this guide already provides for a better user experience and more security.
The solution described
The day has finally come; we can now build a Azure Virtual Desktop (AVD) hostpool in pooled configuration without having to host an Active Directory, and/or having to host an unsecured storage account by having to inject the Storage Access Key into the machines’ registry. This newer setup enhances performance and security on those points.
In this post we will build a simple Azure Virtual Desktop (AVD) setup with one hostpool, one session host and one storage account. We will use Microsoft Entra for authentication and Microsoft Intune for our session host configuration, maintenance and security.
This looks like this, where I added some session host to get a better understanding of the profile solution.
FSLogix is a piece of software that can attach a virtual disk from a network location and attach it to Windows at logon. This ensures users can work on any machine without losing their settings, applications and data.
In the past, FSLogix always needed an Active Directory or Entra Domain Services because of SMB and Kerberos authentication. We now finally got a solution where this is a thing of the past and go full cloud only.
For this to work we also get an Service Principal for your storage account, building a bridge between identity and storage account for Kerberos authentication for the SMB protocol.
1: Create Security Groups and configure roles
Before we can configure the service, we will first start with creating a security group to give users permissions to the FSLogix storage. Every user who will use FSLogix will need at least Read/write (Contributor) permissions.
Go to the Entra Admin center (https://entra.microsoft.com) and go to “Groups”.
Create a user group
Create a new security group here:
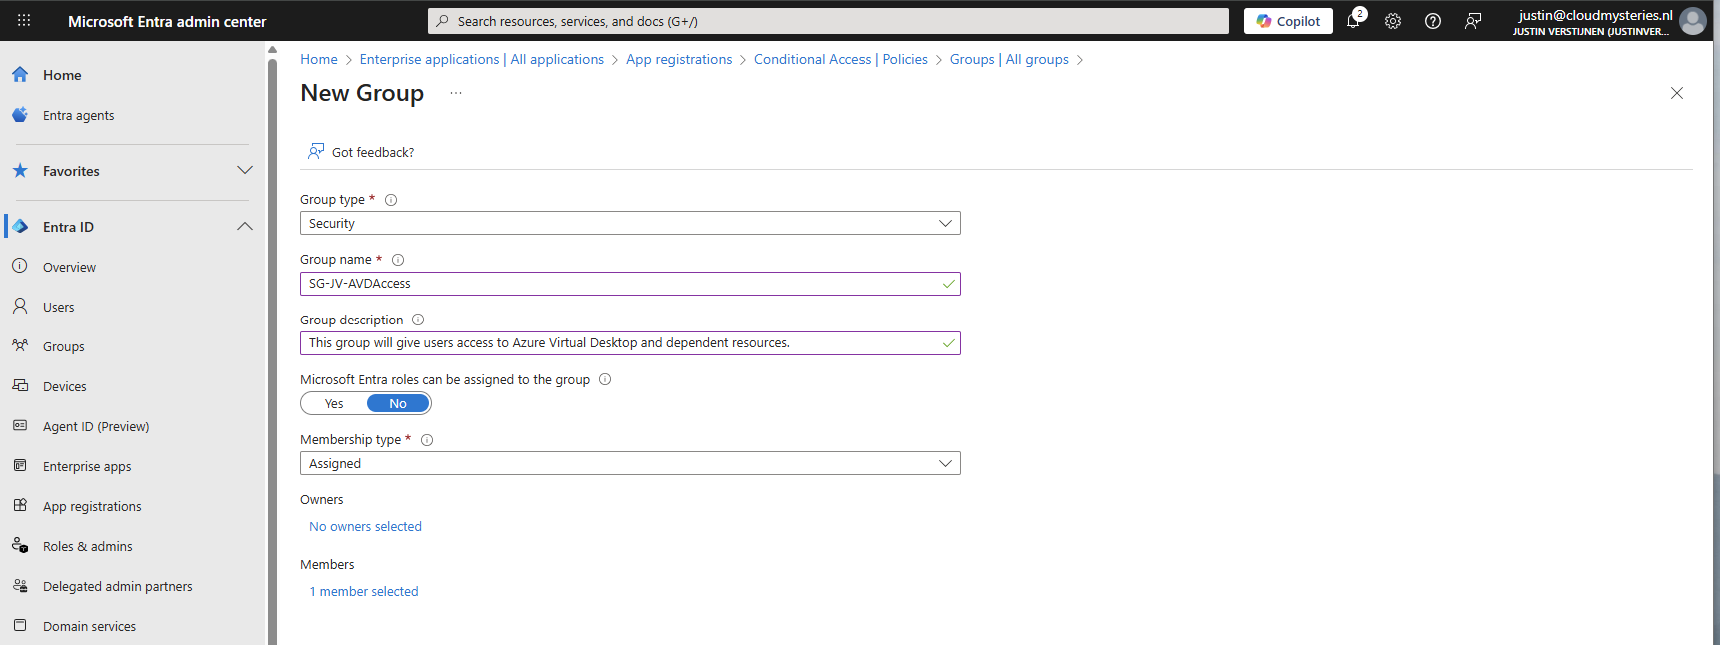
You can use a assigned group if you want to manage access, or you can use a dynamic group to automate this process. Then create the group, which in my case will be used for storage permissions and hostpool access.
Create a device group
If having a larger Intune environment, it is recommended to create a Azure Virtual Desktop device/session hosts group. This way you can apply computer settings to the hosts group in Intune.
You can create a group with your desired name and this can be an assigned or dynamic group. An examples of dynamic group rules can be this:
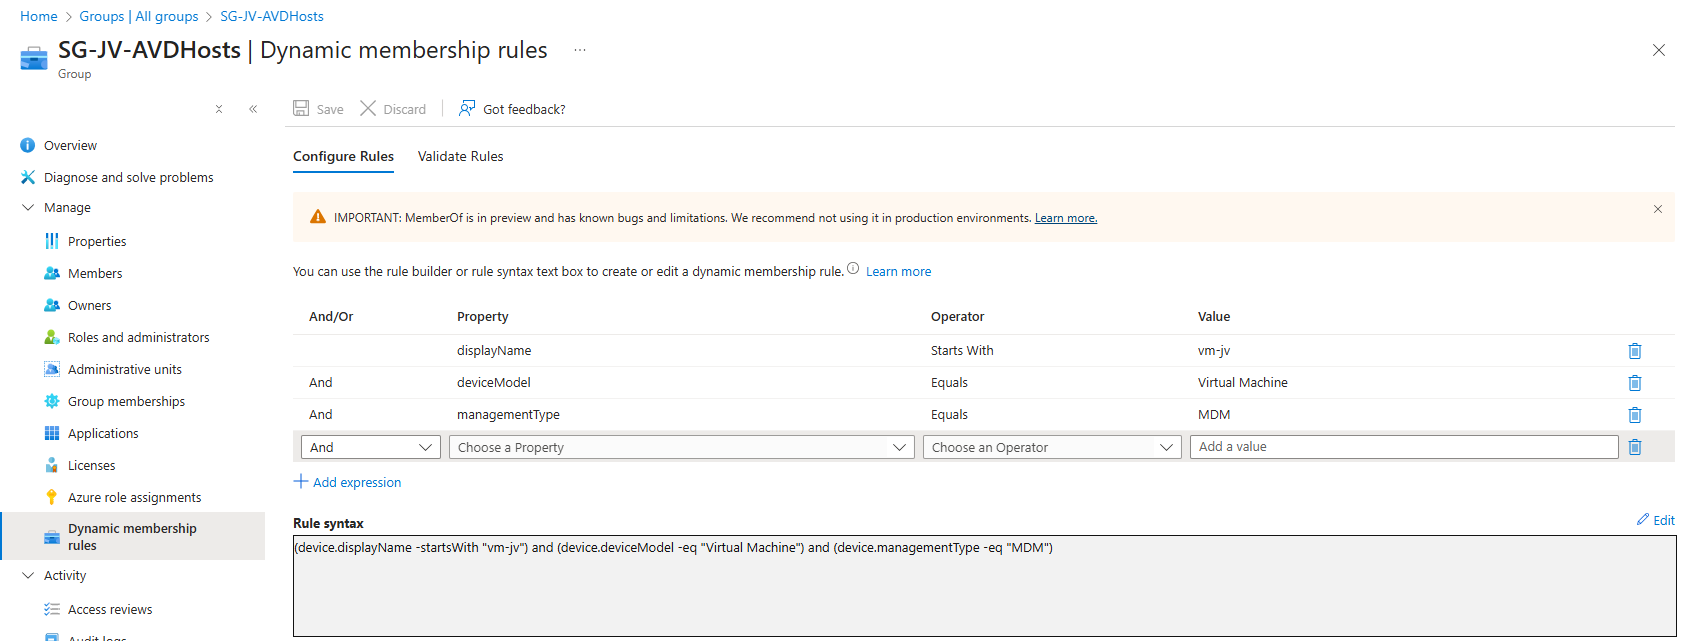
JSON
(device.displayName -startsWith "vm-jv") and (device.deviceModel -eq "Virtual Machine") and (device.managementType -eq "MDM")For AVD hosts, I really like dynamic groups, as you deploy more virtual machines, policies, scripts and such are all applied automatically.
Assign Virtual Machine login roles to users
After the group is created, we need to assign a role to the group. This role is:
- Virtual Machine User Login on all session hosts -> Resource group
- For default, non administrative users
- Virtual Machine Administrator Login on all session hosts -> Resource group
- For administrative users
We will use the role “Virtual Machine User Login” in this case for normal end users. Go to the resource group where your AVD hosts are and go to “Access control (IAM)”.
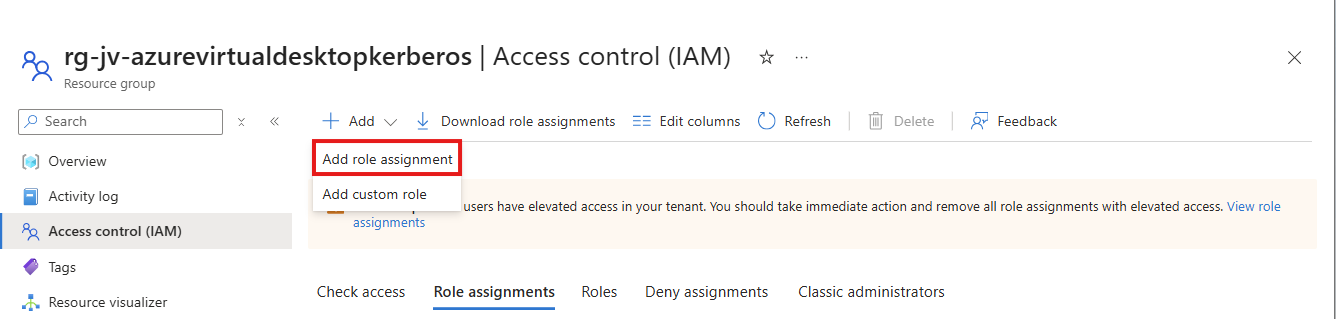
Click on “+ Add” and then “Add role assignment”.
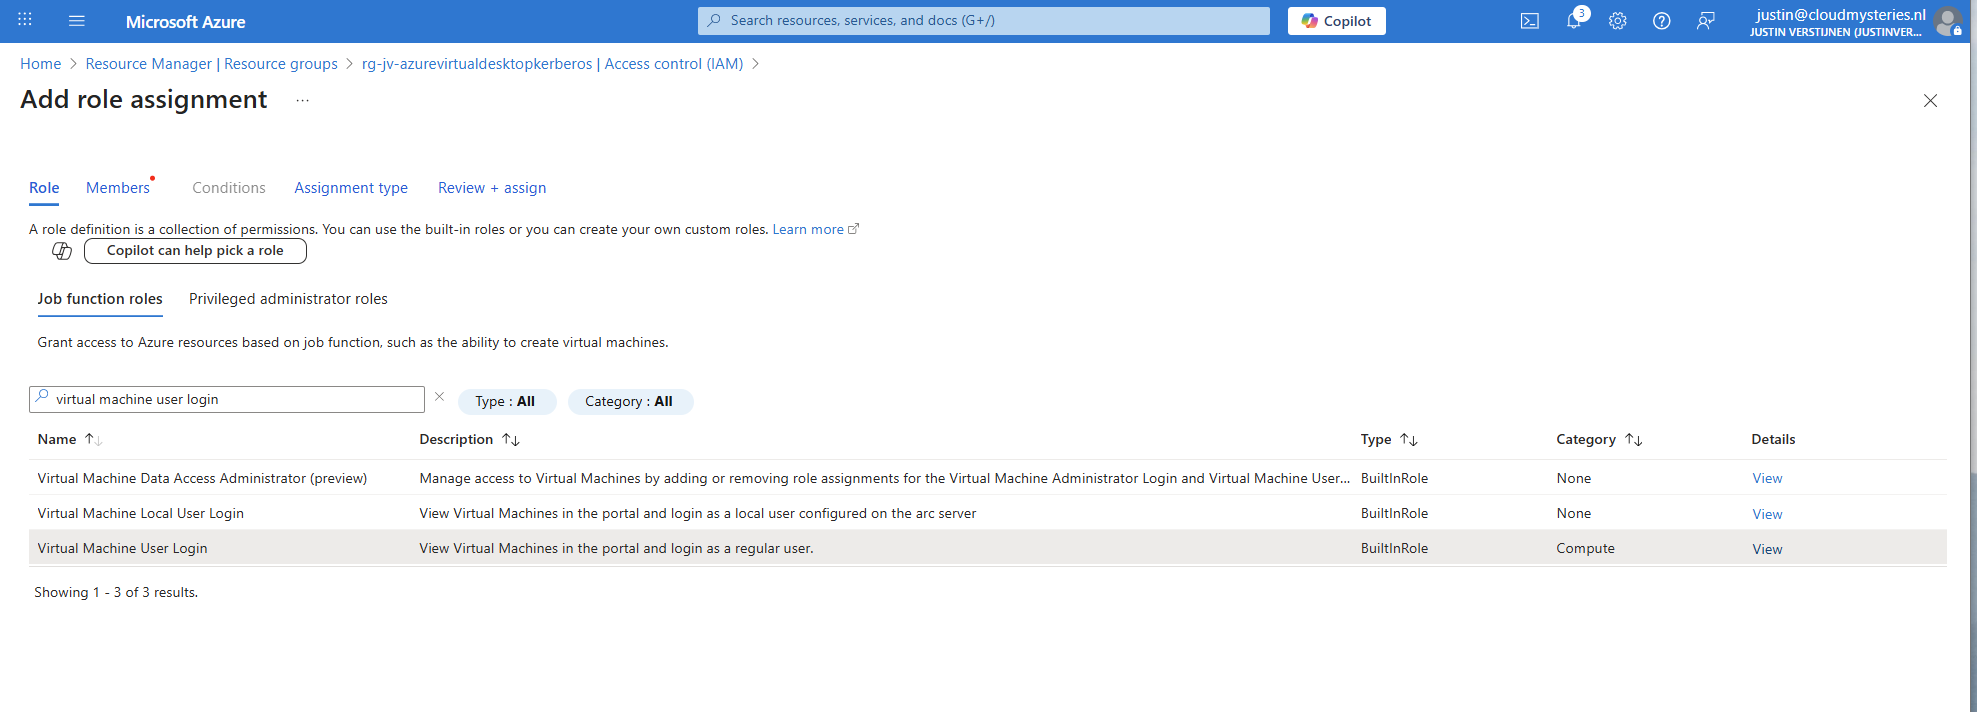
Select the role “Virtual Machine User Login” and click on “Next”. On the Members page, click on “+ Select members” and select the group with users you just created.
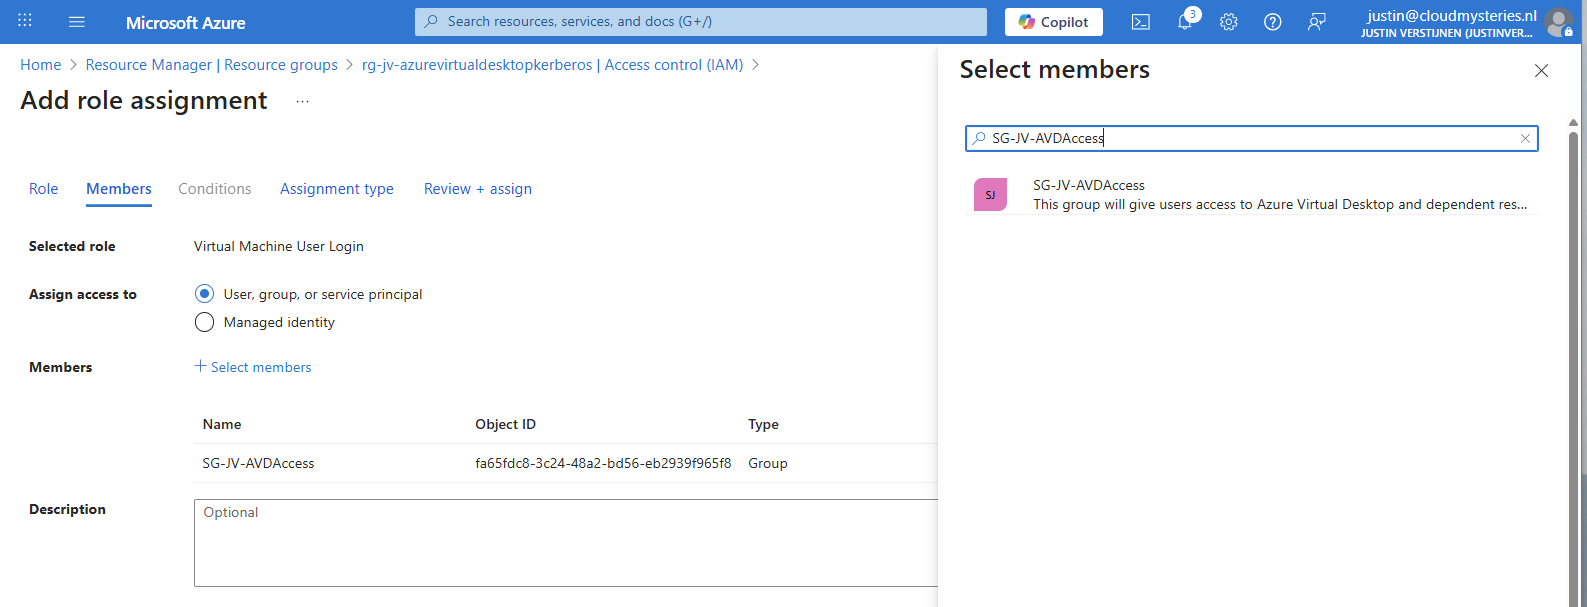
The role assignment is required because users will be loggin into a virtual machine. Azure requires the users to have the RBAC role for security.
You can do this on Resource, Resource Group and Subscription level, but mostly we will be placing similar hosts in the same resource group. My advice in such situation would be to use the resource group for the permissions.
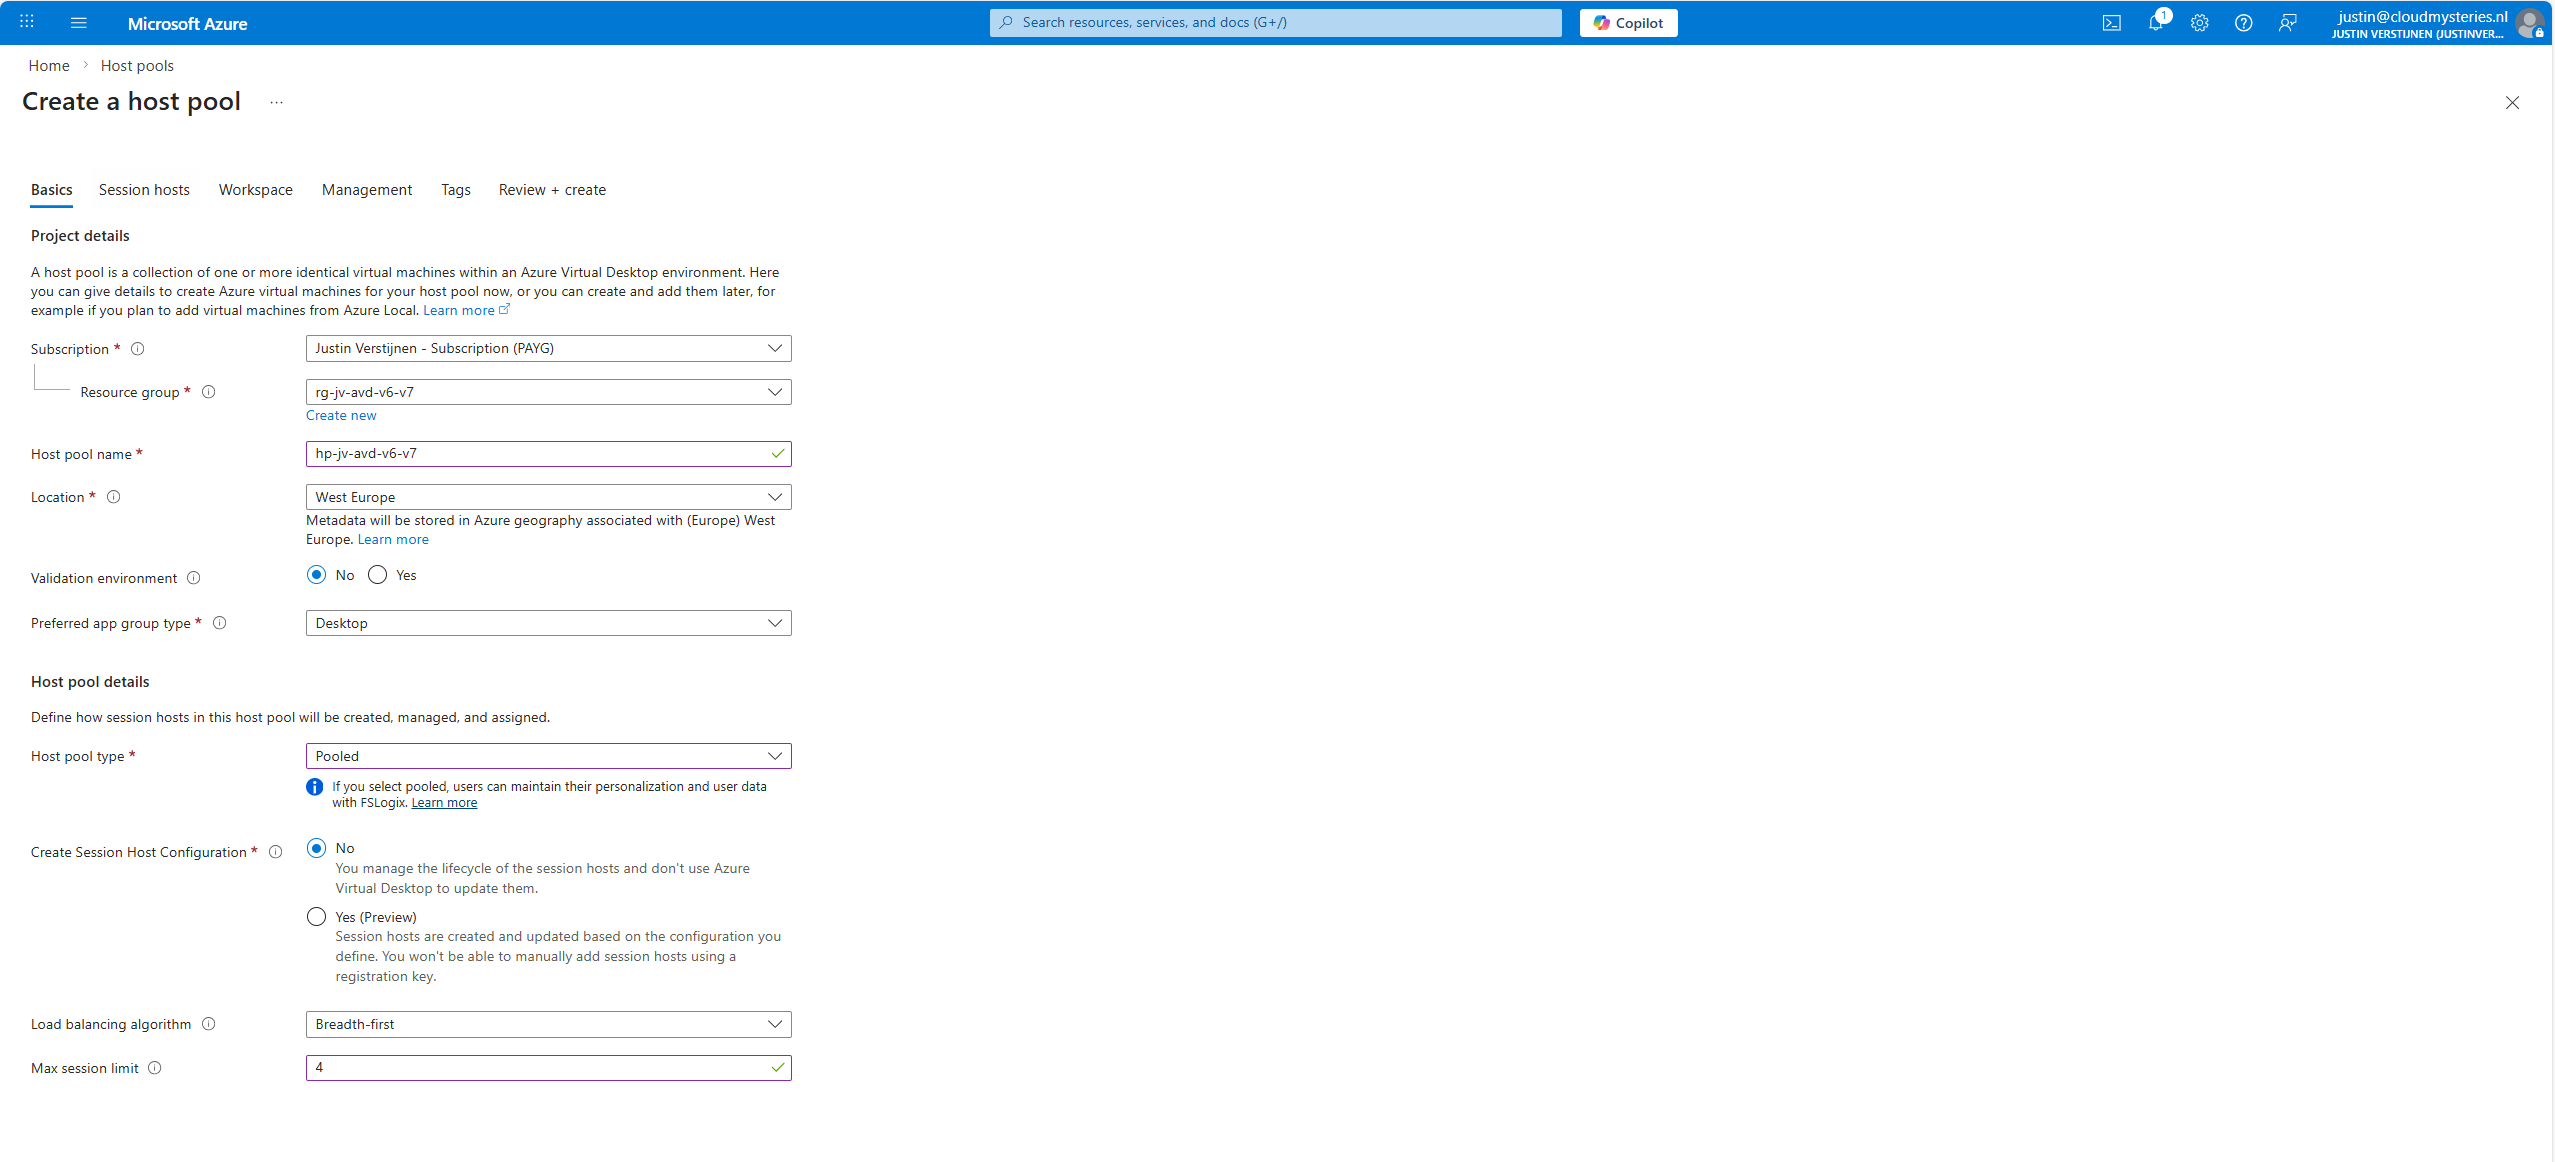
2: Create Azure Virtual Desktop hostpool
Now we have to create a hostpool for Azure Virtual Desktop. This is a group of session hosts which will deliver a desktop to the end user.
In Microsoft Azure, search for “Azure Virtual Desktop”.

Then click on “Create a hostpool”.

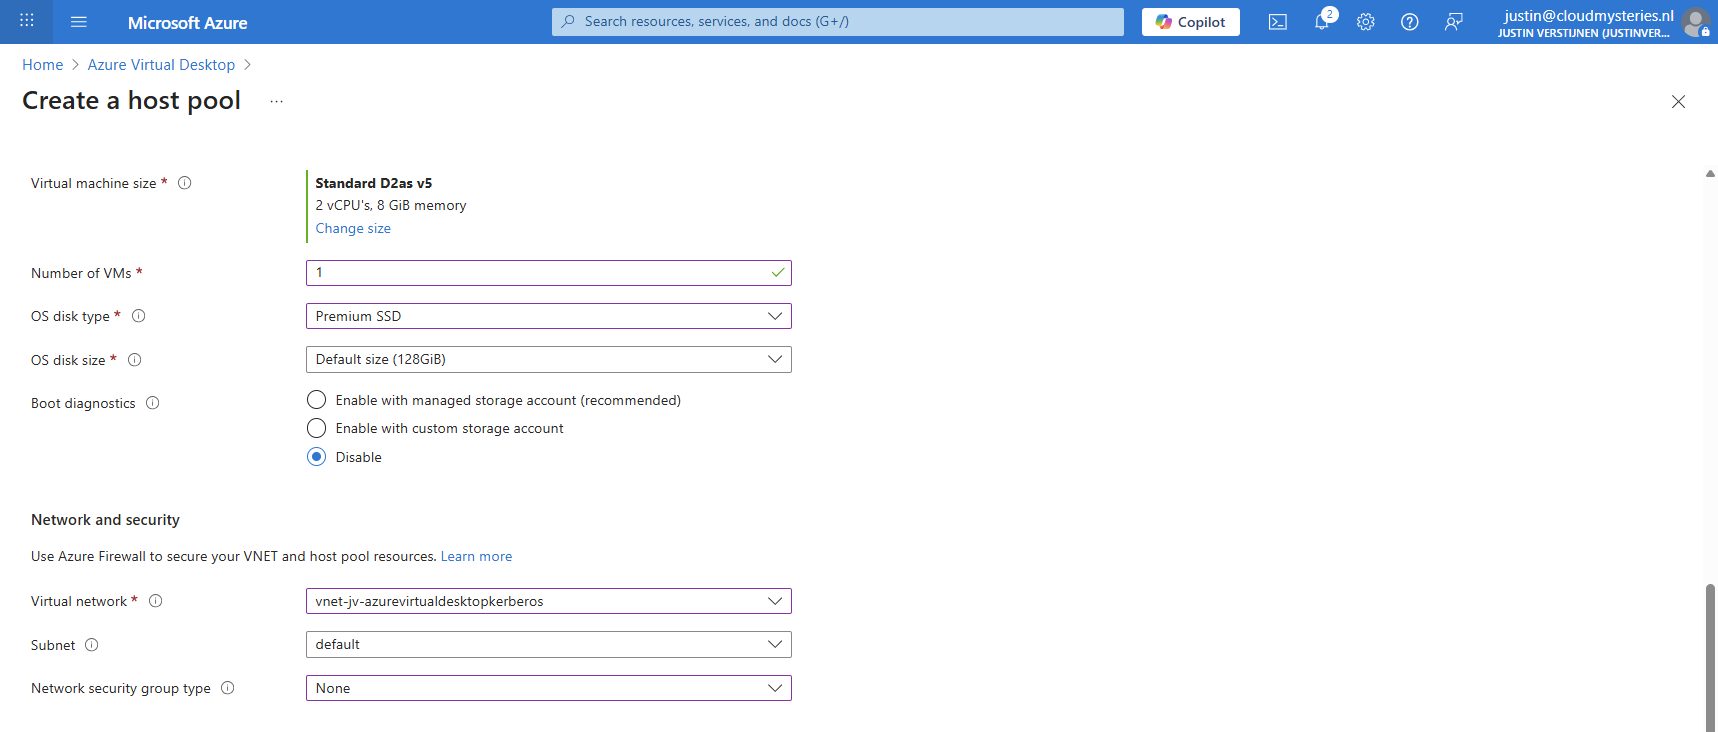
Fill in the details of your hostpool like a name, the region you want to host it and the hostpool type. Assuming you are here for FSLogix, select the “Pooled” type.
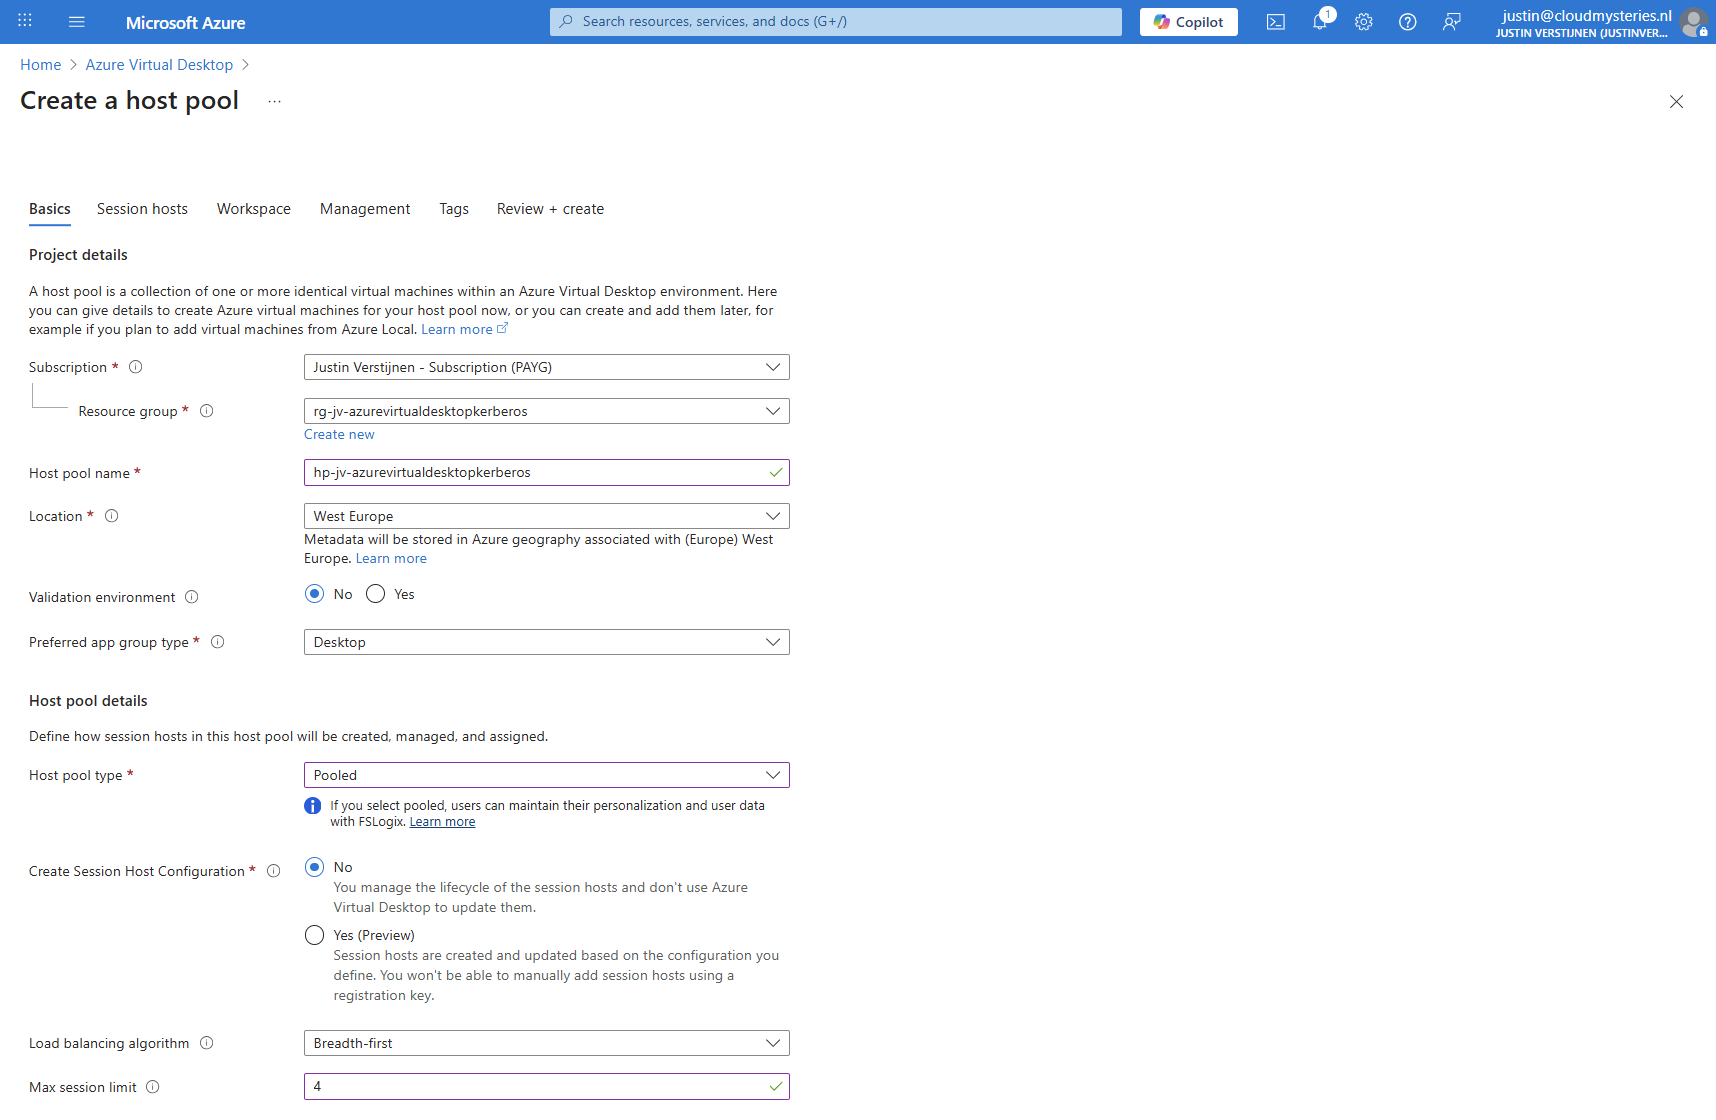
Then click “Next” to advance to the next configuration page. Here we must select if we want to deploy a virtual machine. In my case, I will do this.
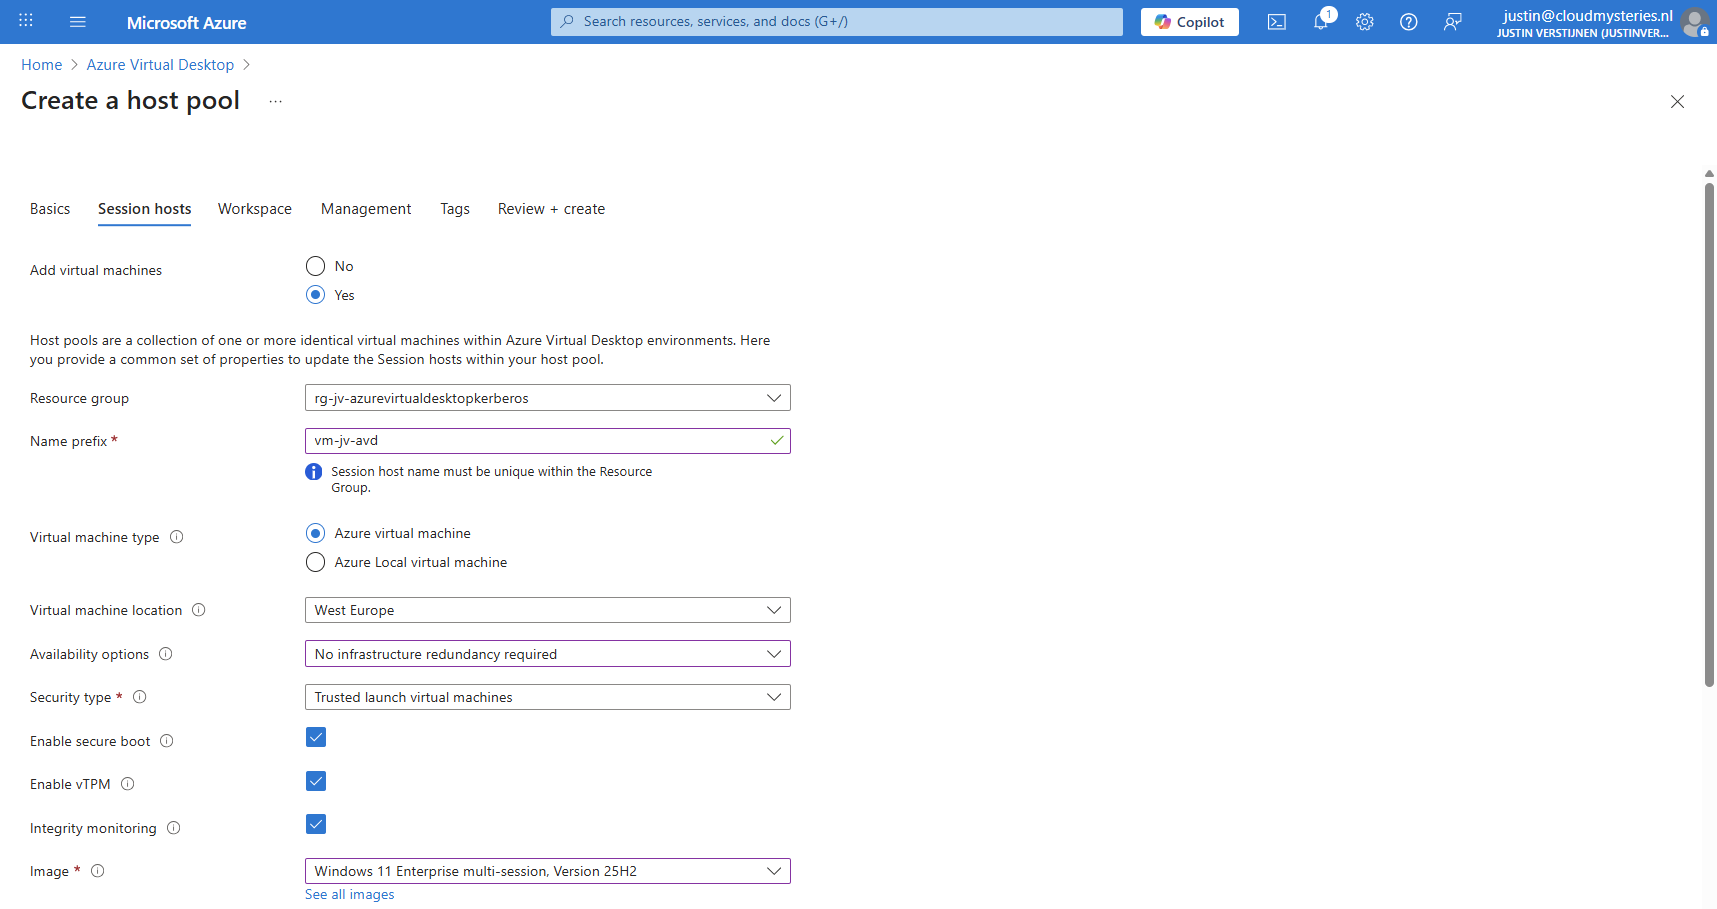
And at the end select the option “Microsoft Entra ID”.
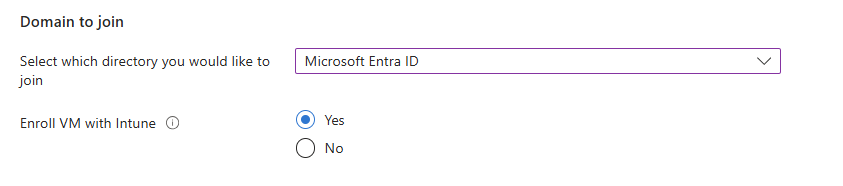
Create your local administrator account for initial or emergency access and then finish creating the hostpool.
3: Create Storage Account for FSLogix
After having the hostpool ready and the machine deploying, we have to create a storage account and fileshare for storing the FSLogix profiles. In the Azure Portal, go to Azure Files and create a new storage account:
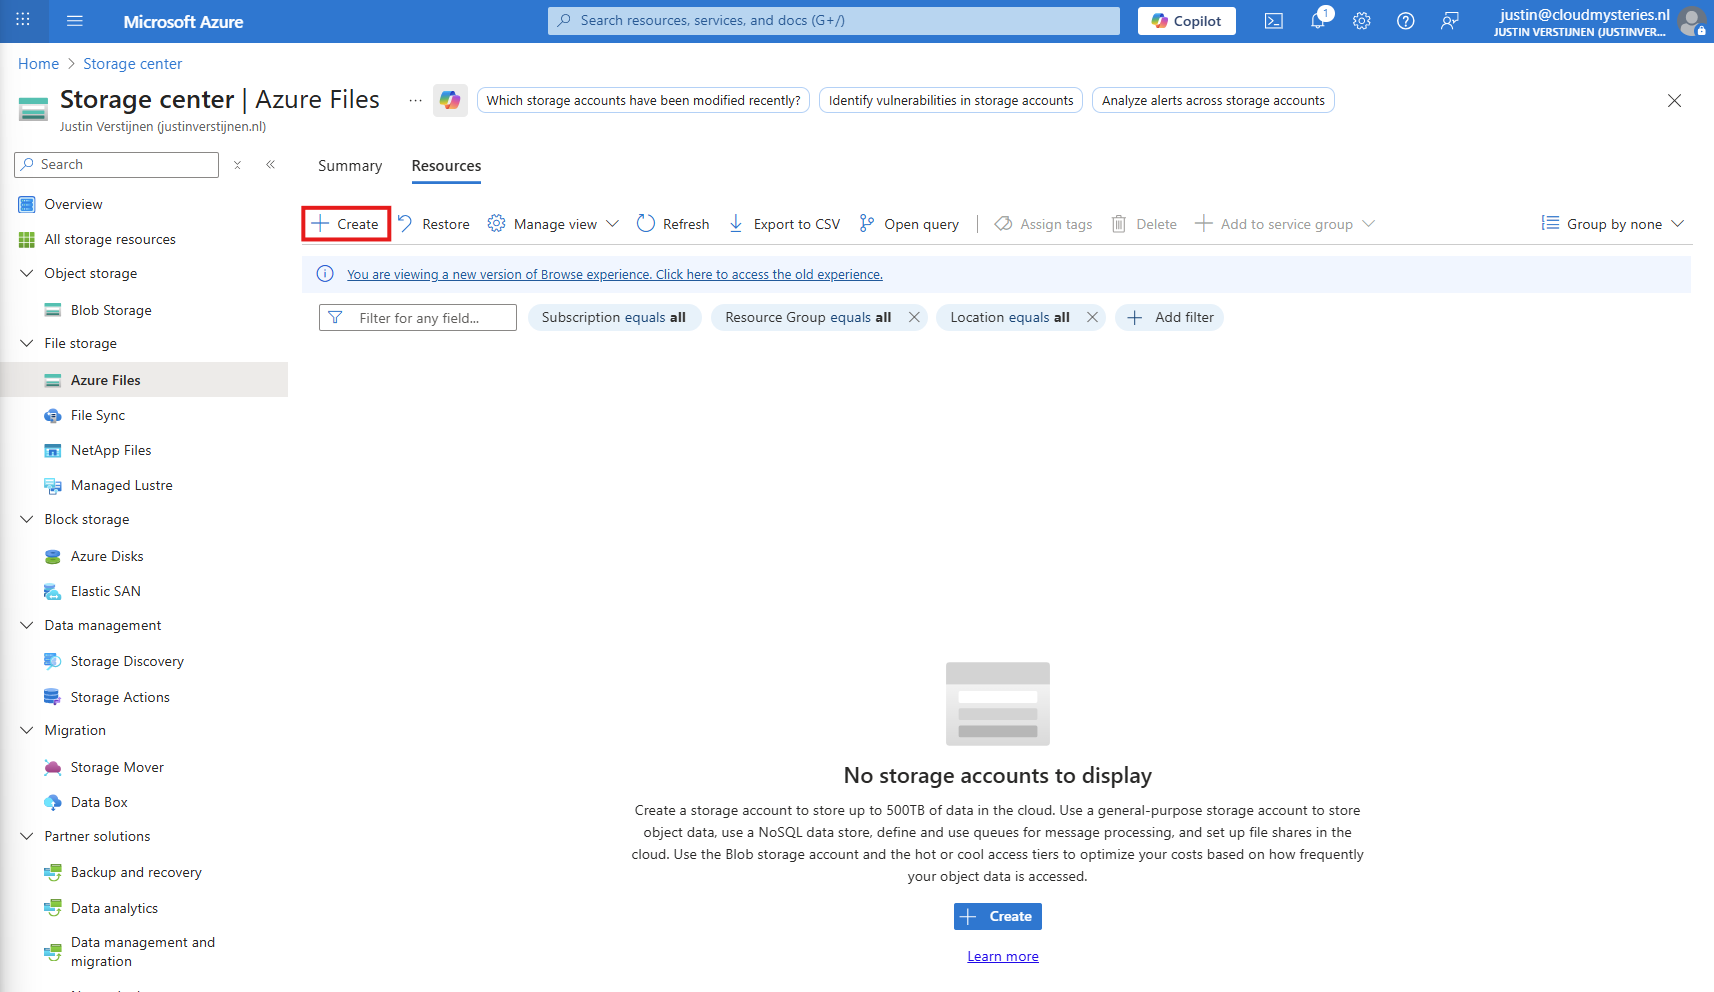
Then fill in the details of your storage account:
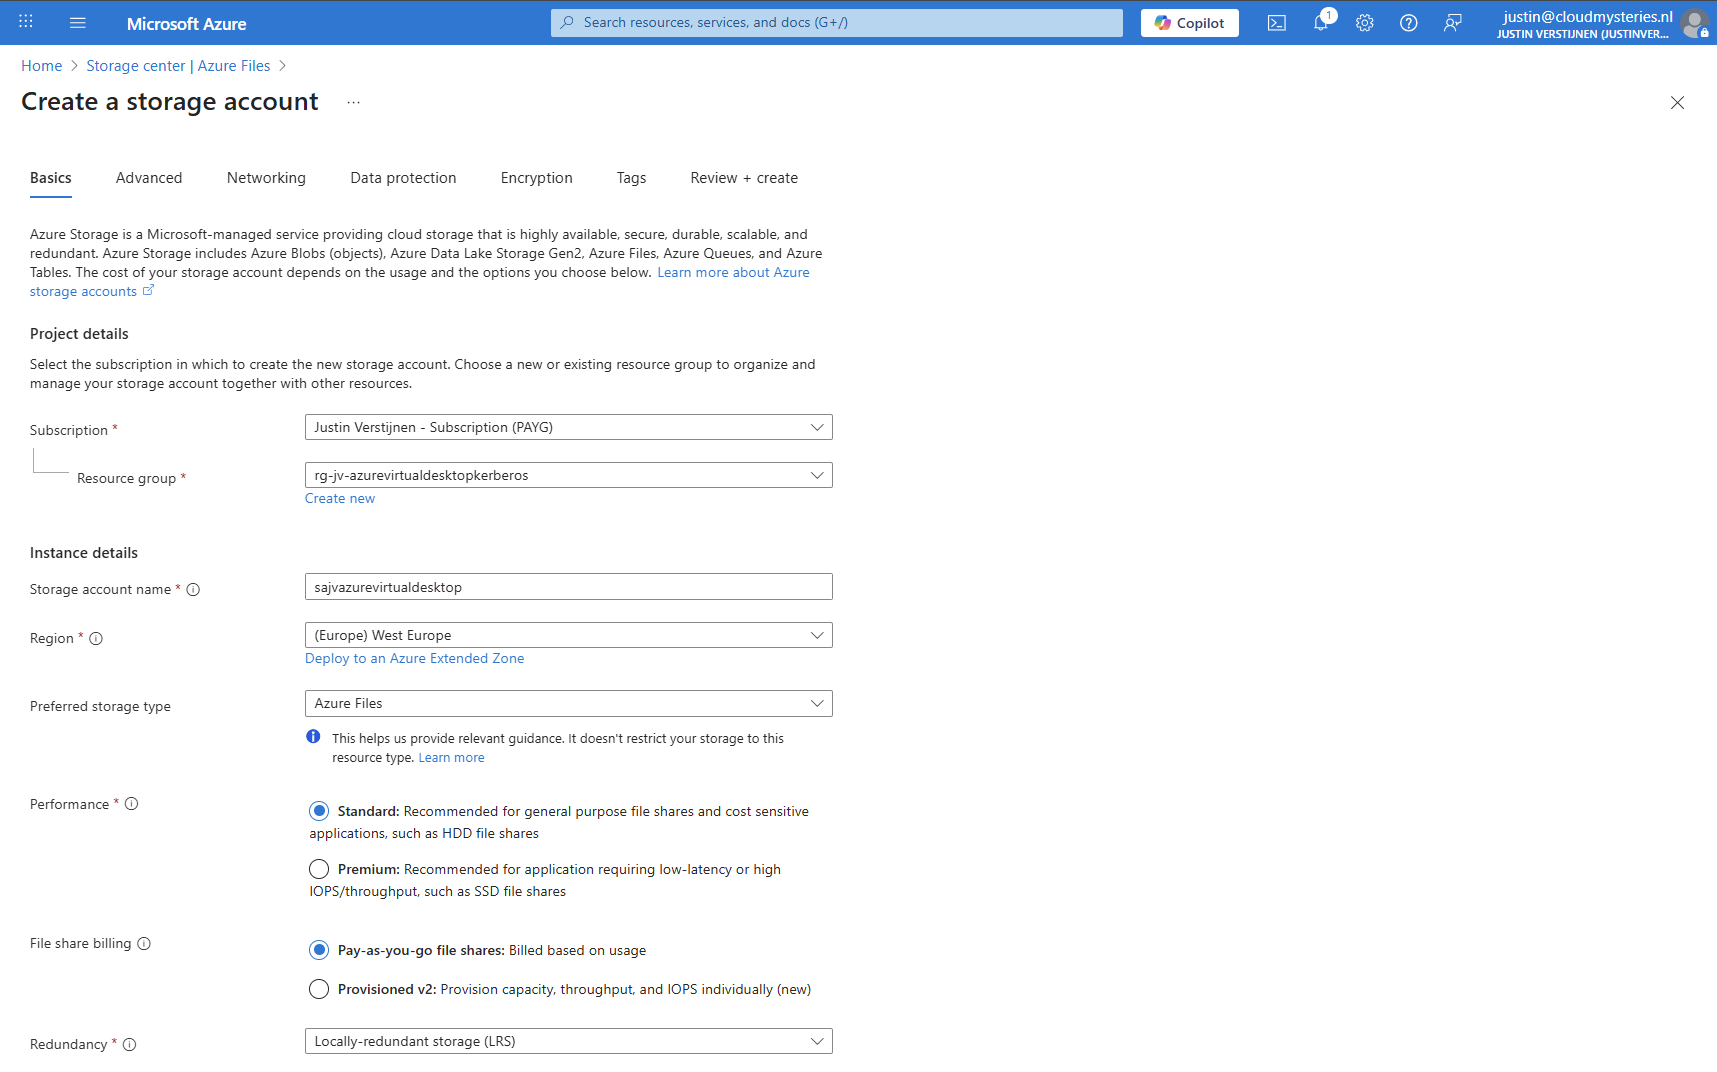
I chose the Azure Files type as we don’t need the other storages. We can skip to the end to create the storage account.
Storage account security
After creating the storage account, we must do some configurations. Go to the storage account and then to “Configuration”.
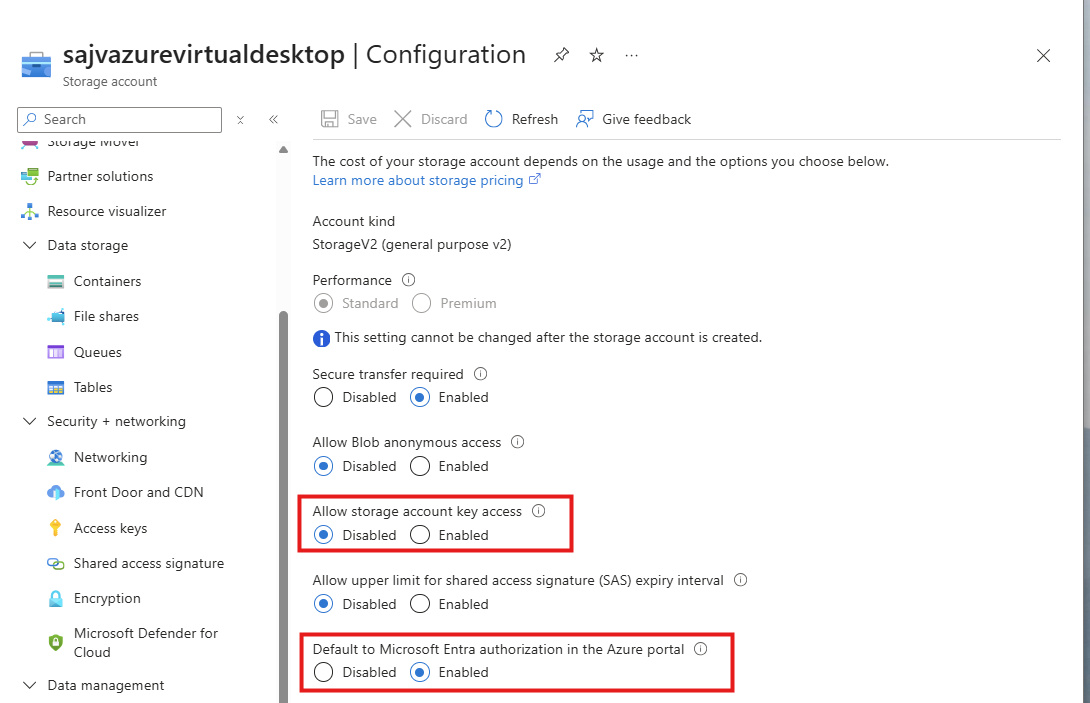
Set these two options to this setting:
- Allow storage account key access: Disabled
- Default to Microsoft Entra authorization in the Azure Portal: Enabled
Storage account firewall settings
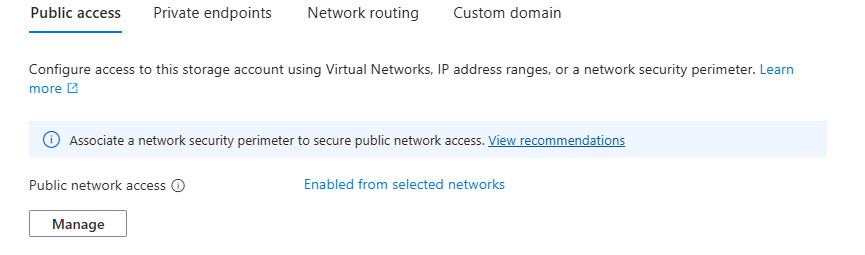
Navigate in the Storage account to the blade “Networking”. We will limit the networks and IP addresses that can access the storage account which is by default the whole internet.
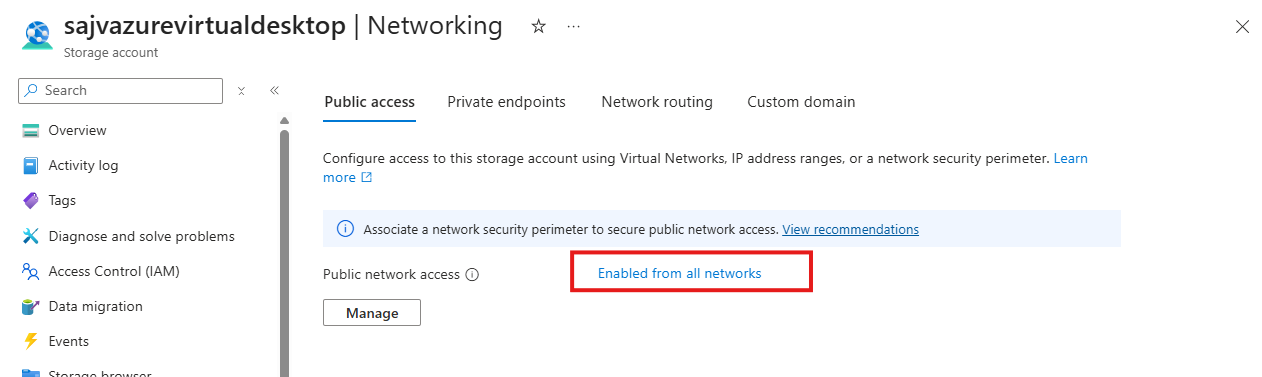
Click on “Enabled from all networks”.
Here select the “Enable from selected networks” option, and select your network containing your Azure Virtual Desktop hosts.
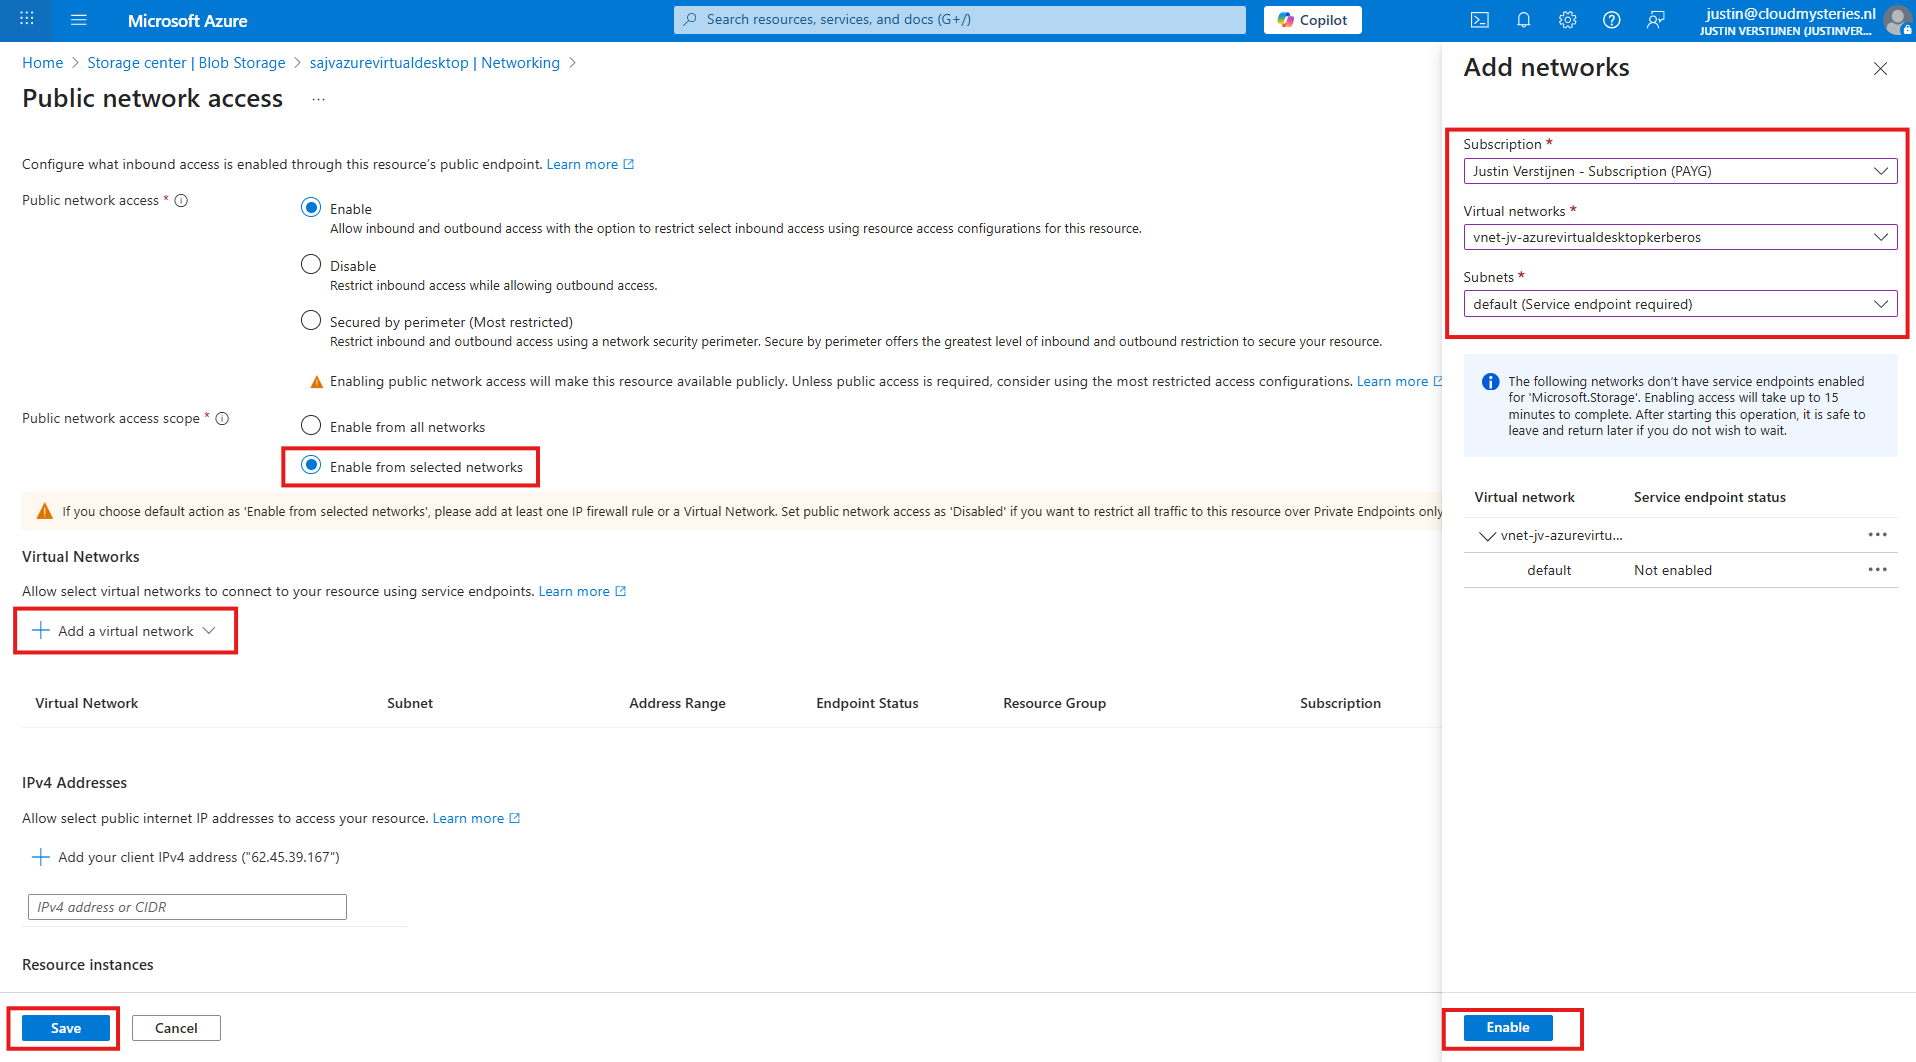
Click “Enable” to let Azure do some under the hood work (Creates a Service Endpoint for the AVD network to reach the Storage account).
Then click “Save” to limit access to your Storage Account only from your AVD hosts network.
Configuring this shifts the option to “Enabled from selected networks”.
4: Create the File Share and Kerberos
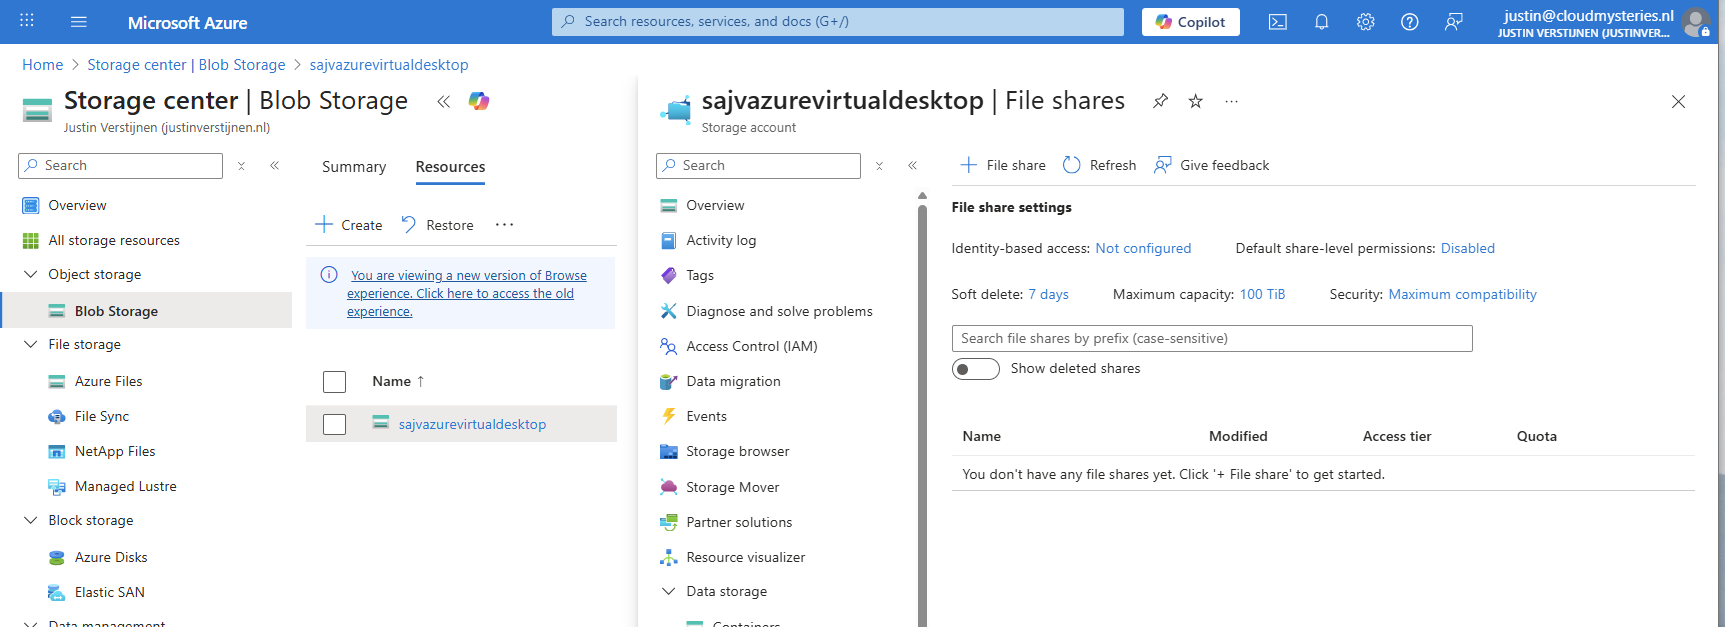
After creating, navigate to the storage account. We have to create a fileshare to place the FSLogix profiles.
Navigate to the storage account and create on “+ File share”.
Give the file share a name and decide to use back-up or not. For production environments, this is highly recommended.
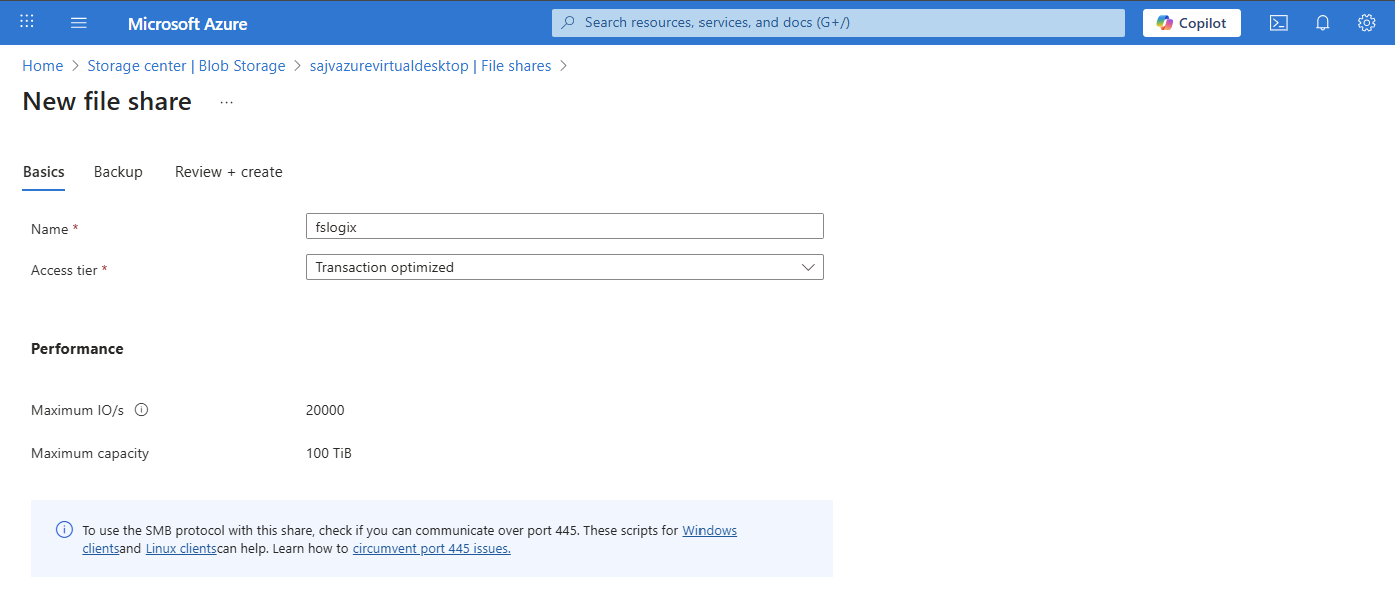
Finish the wizard to create the file share.
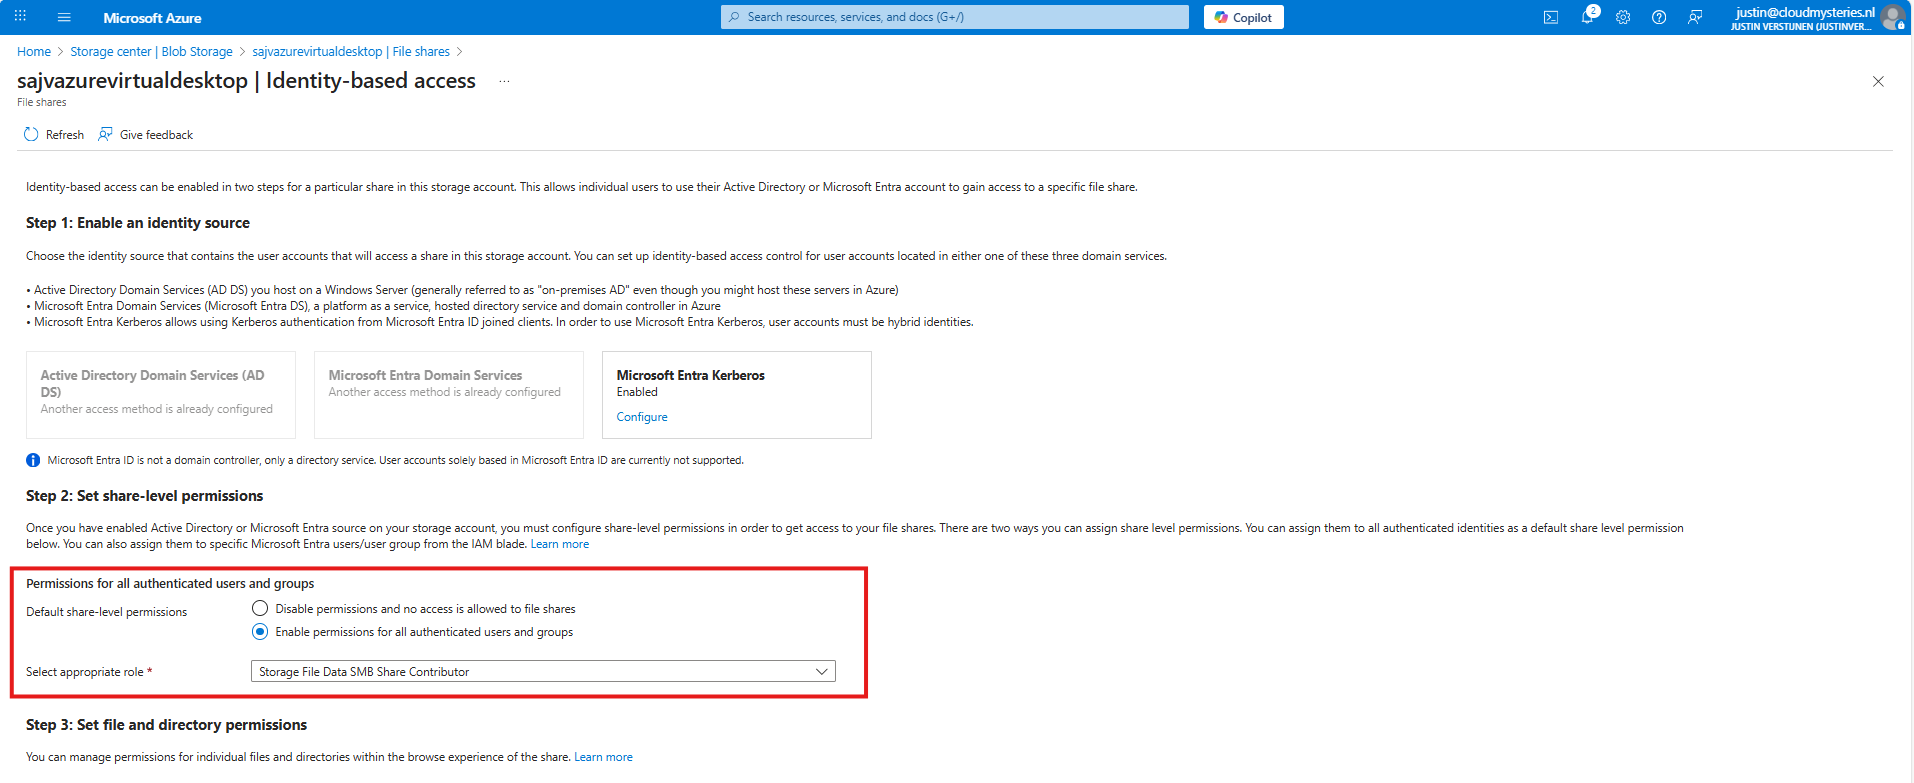
Now we have to configure the Microsoft Entra Authentication to authenticate against the file share. Go to the storage account, then “file shares” and then click on “Identity-based access”.
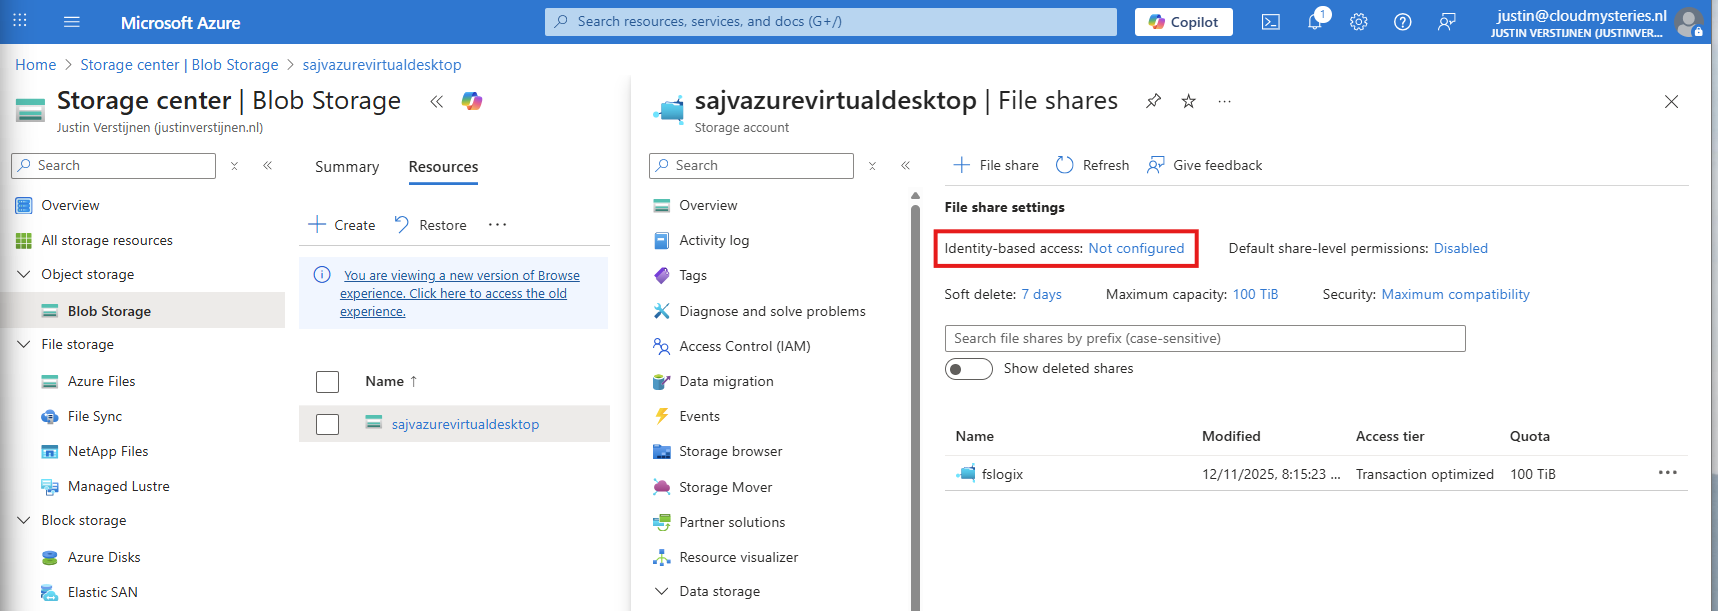
Select the option “Microsoft Entra Kerberos”.

Enable Microsoft Entra Kerberos on this window.
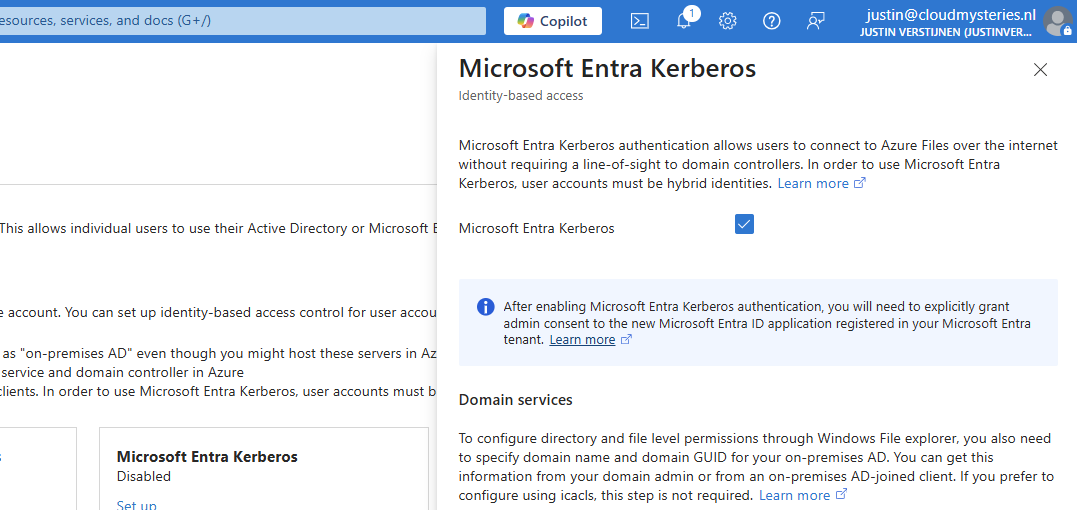
After enabling this option, save and wait for a few minutes.
Enabling this option will create a new App registration in your Entra ID.

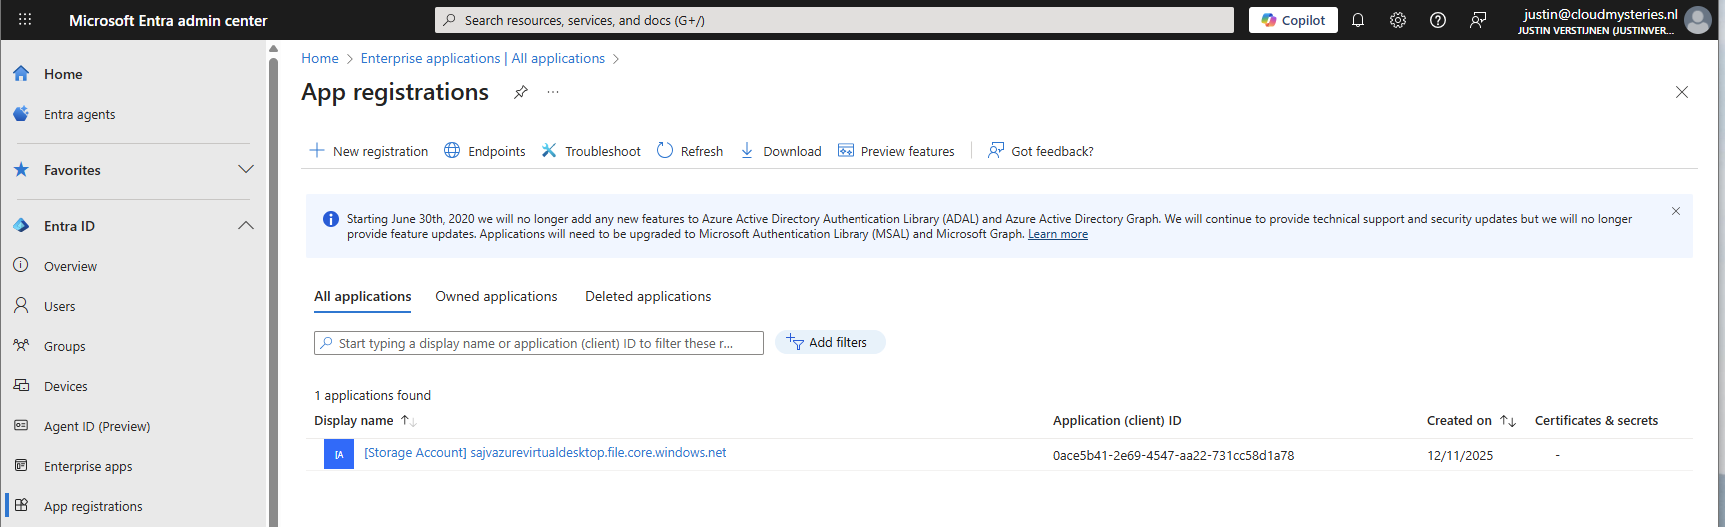
5: Configure the App registration
Now that we have enabled the Entra Kerberos option, an App registration will be created. This will be used as Service Principal for gaining access to the file share. This will be a layer between the user logging into Azure Virtual Desktop and the file share.
Go to the Microsoft Entra portal: https://entra.microsoft.com
Head to “App registrations” and open it. We need to give it some permissions as administrator.
Then head to “API permissions”.
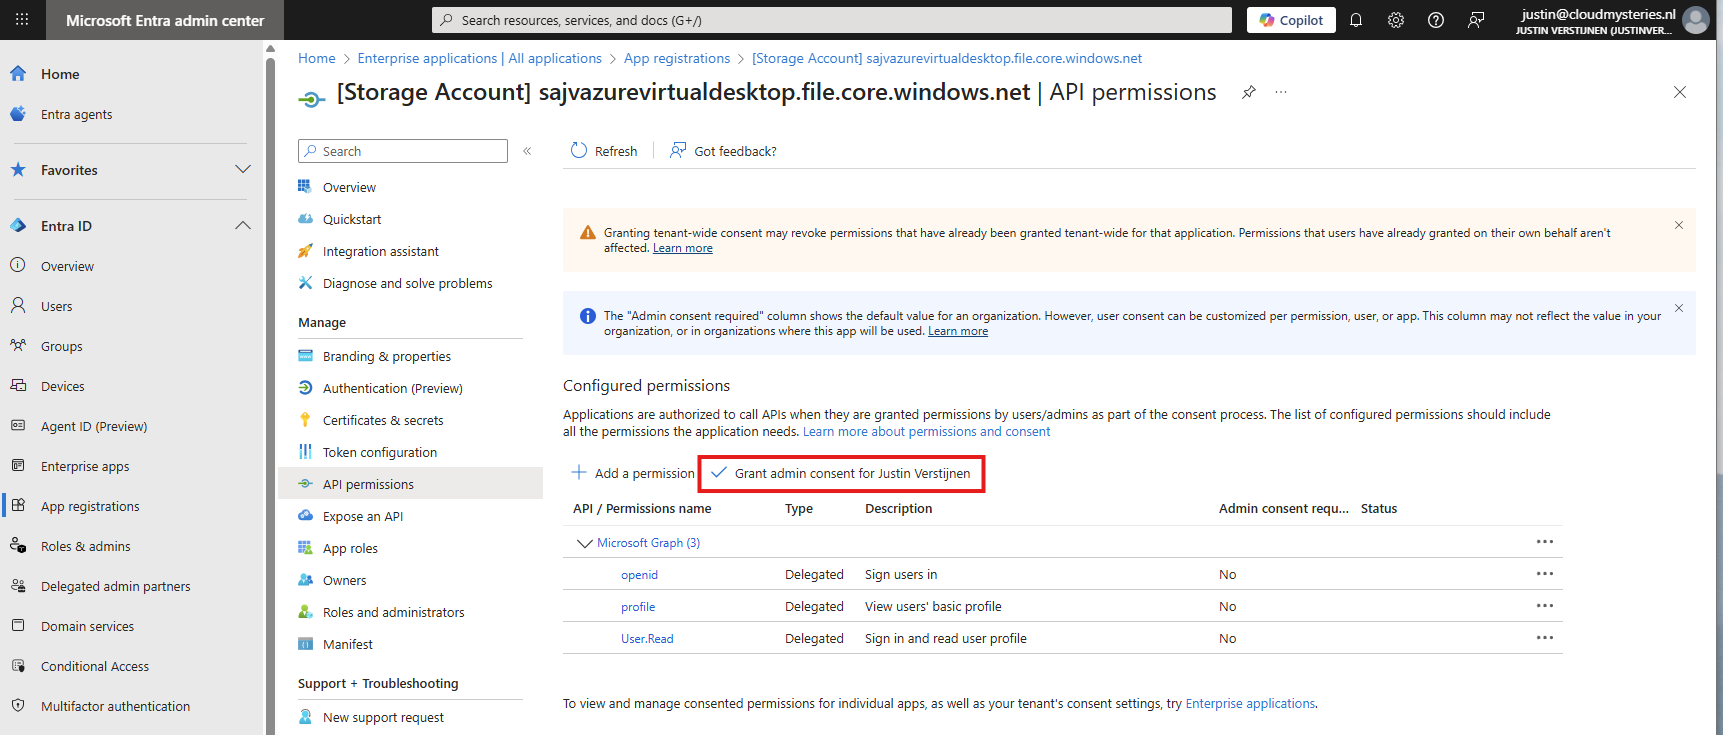
The required permissions are already filled in by Azure, but we need to grant admin consent as administrator. This means we tell Azure that it may read our users and can use it to sign in to the File share.

Click on “Yes” to accept the permissions.

Without granting access, the solution will not work. Even when it stated that admin consent is not required.
You also need to exclude the application from your Conditional Access policies. For every policy, add it as excluded resource:
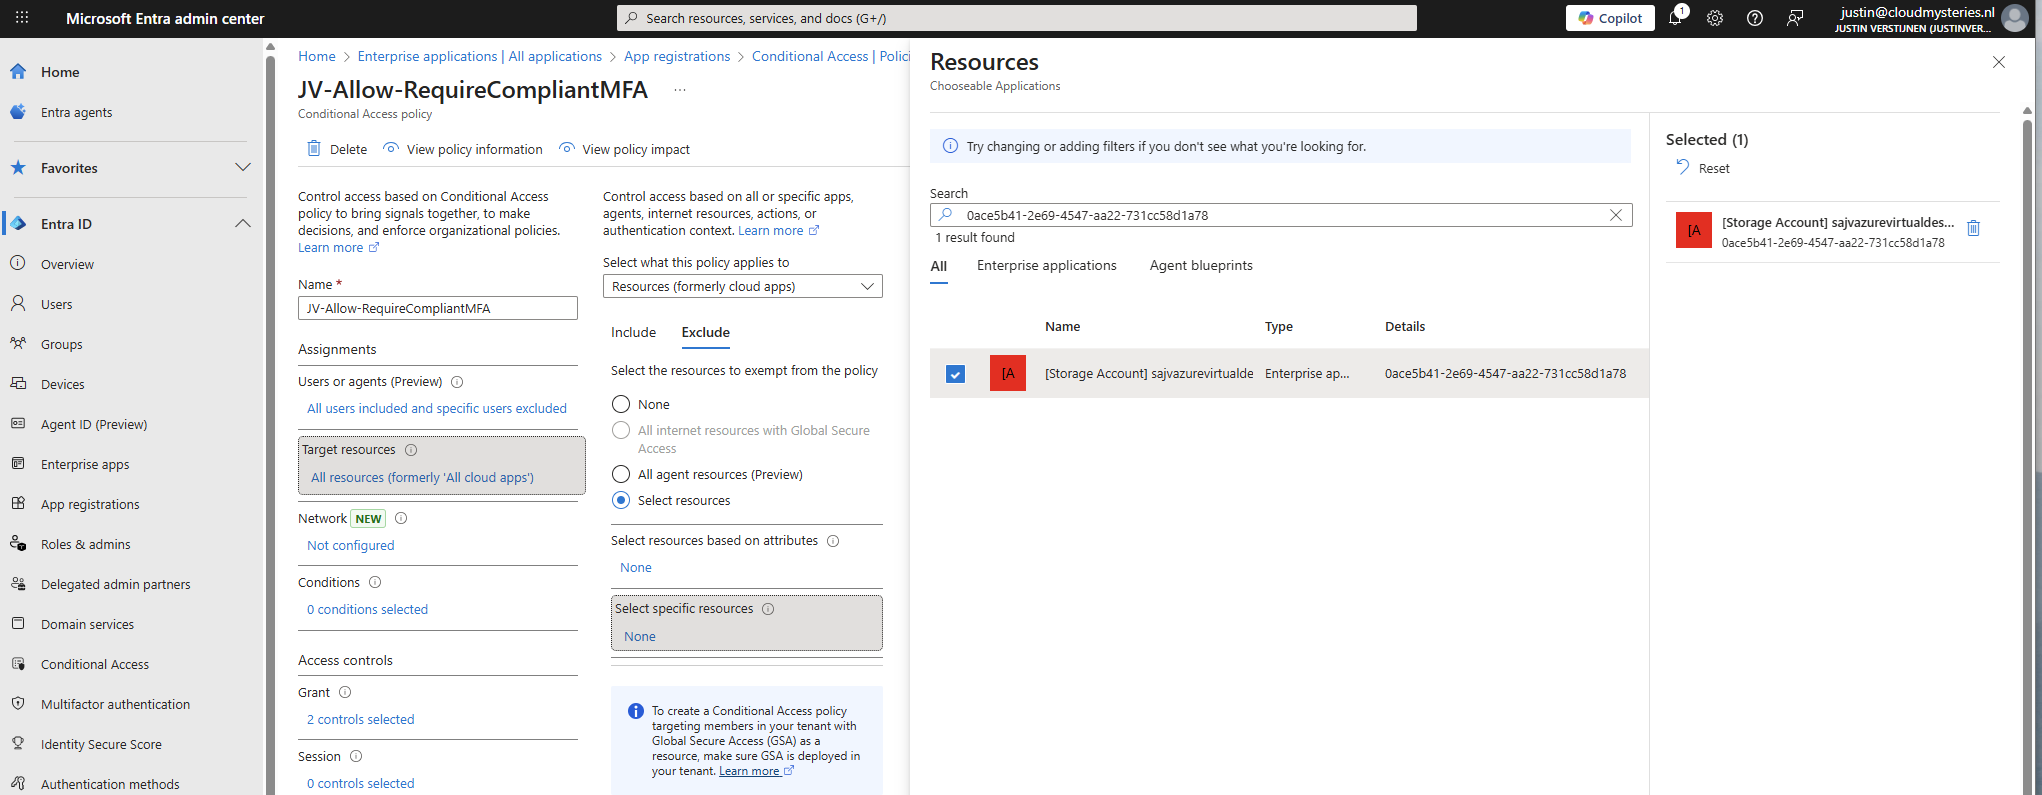
In my case, the name did not pop-up so I used the Application ID instead.
Add this to the excluded resource of every Conditional Access policy in your tenant to make sure this will not interrupt.
6: Configure storage permissions
To give users and this solution access to the storage account, we need to configure the permissions on our storage account. We will give the created security group SMB Contributor permissions to read and write the profile disks.
User permissions
Go to the Storage account, then to the file share and open the file share. For narrow security, we will give only permissions on the file share we just created some steps earlier.
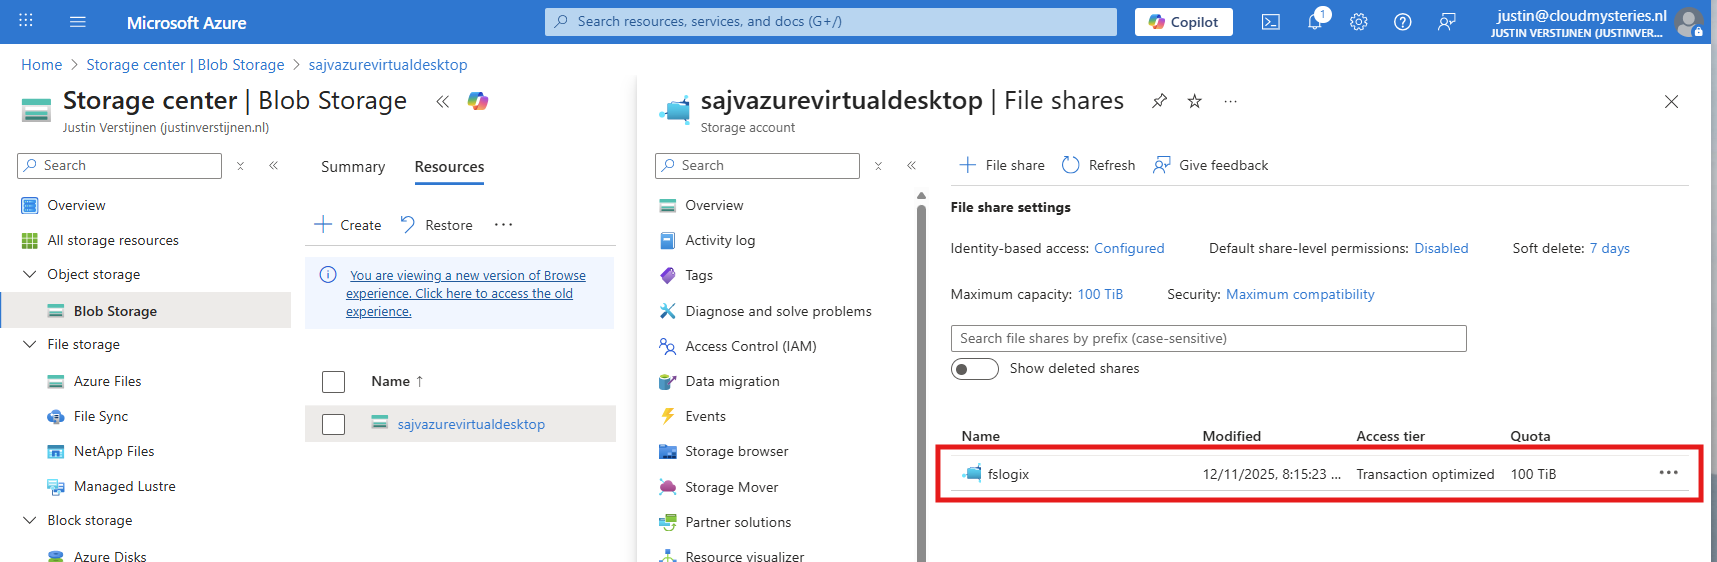
Open the file share and open the “Access Control (IAM)” blade and add a new role assignment.
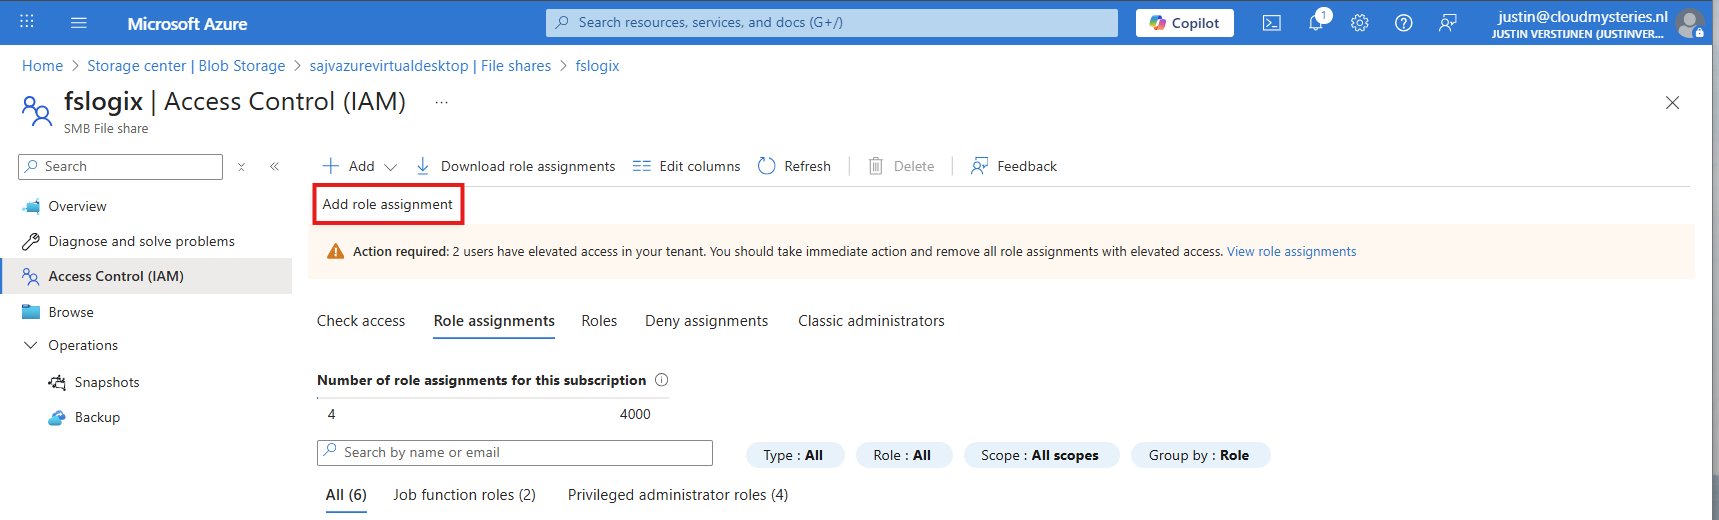
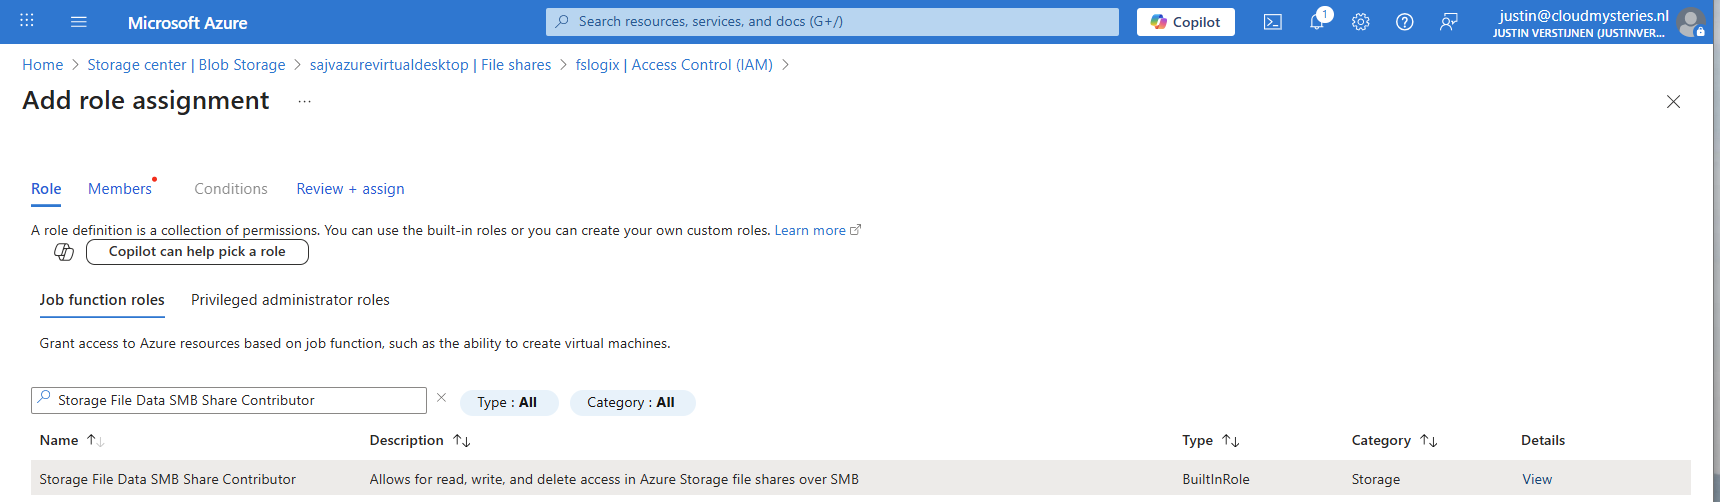
Now search for the role named:
- Storage File Data SMB Share Contributor
This role gives read/write access to the file share, which is the SMB protocol. We will assign this role to our created security group.
Click “Next” to get to the “Members” tab.
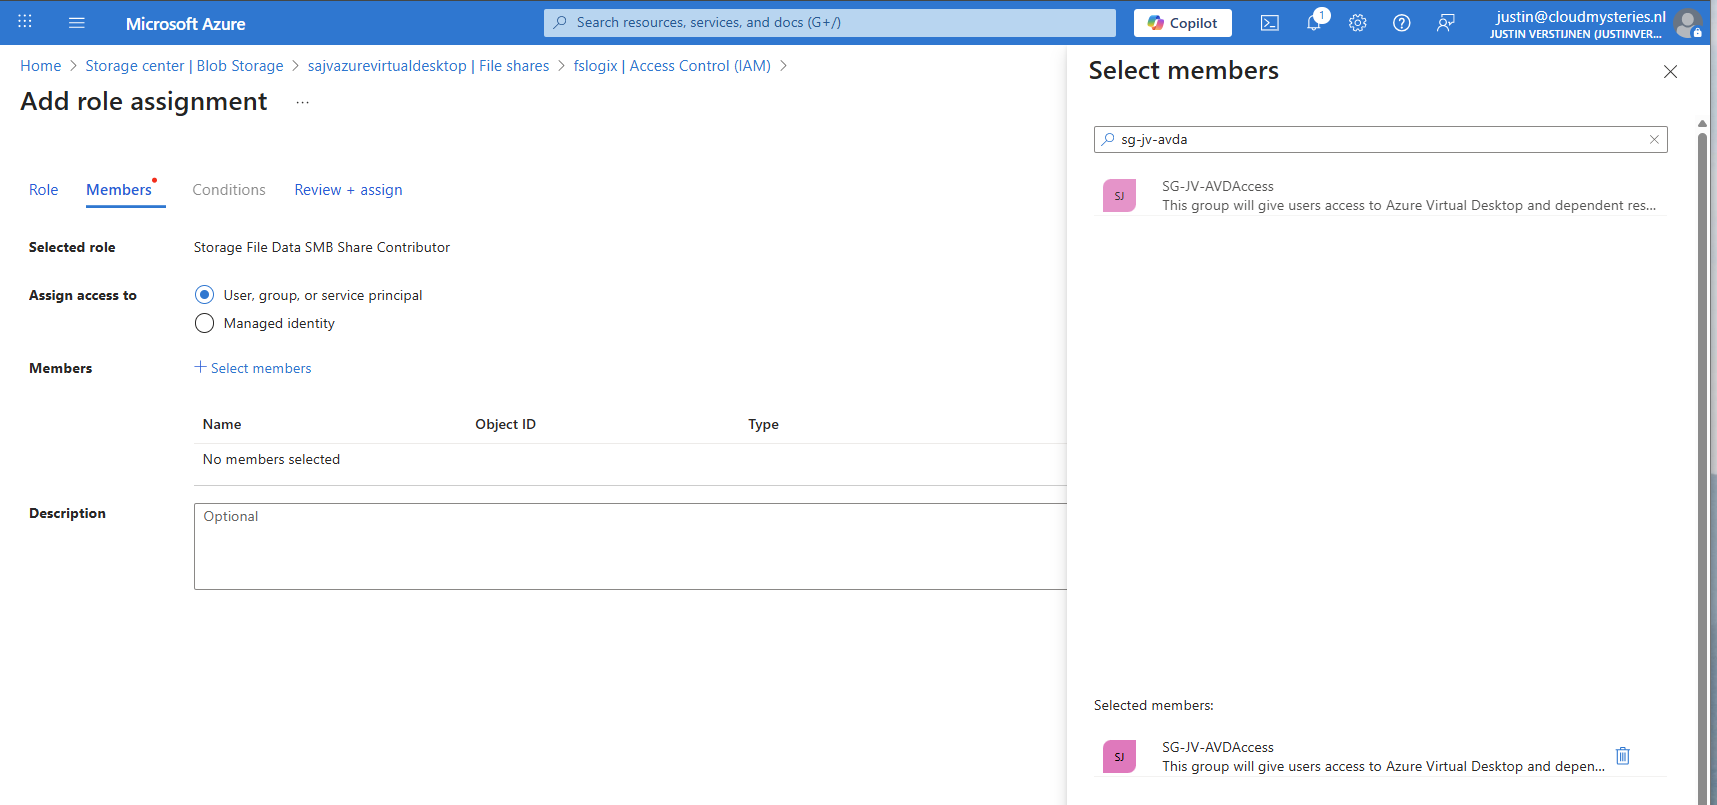
Search for your group and add it to the role. Then finish the wizard.
Administrator permissions
To view the profiles as administrator, we must give our accounts another role, this is to use Microsoft Entra authentication in the portal as we disabled the storage account key for security reasons.
Again, add a new role assignment:
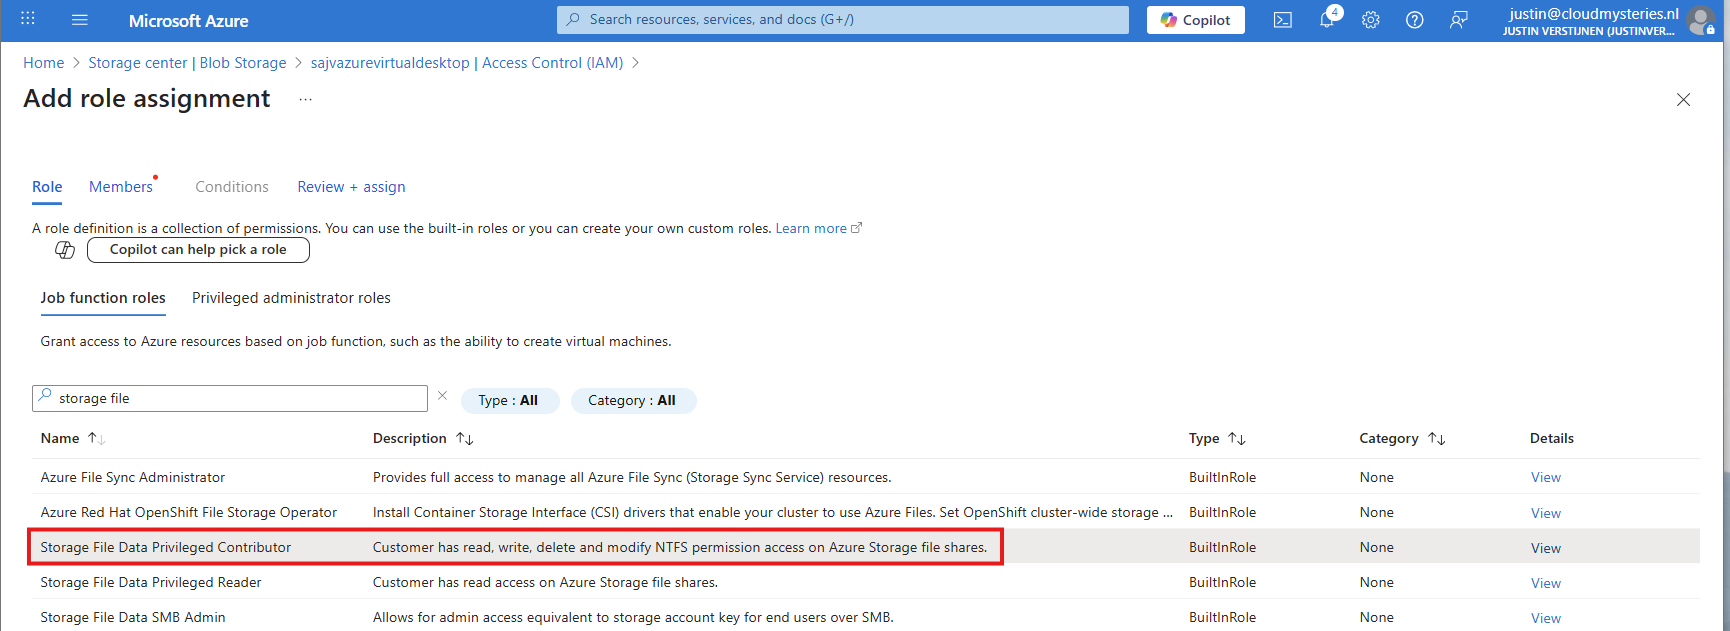
Search for the role: Storage File Data Privileged Contributor
Assign this to your administrator accounts:
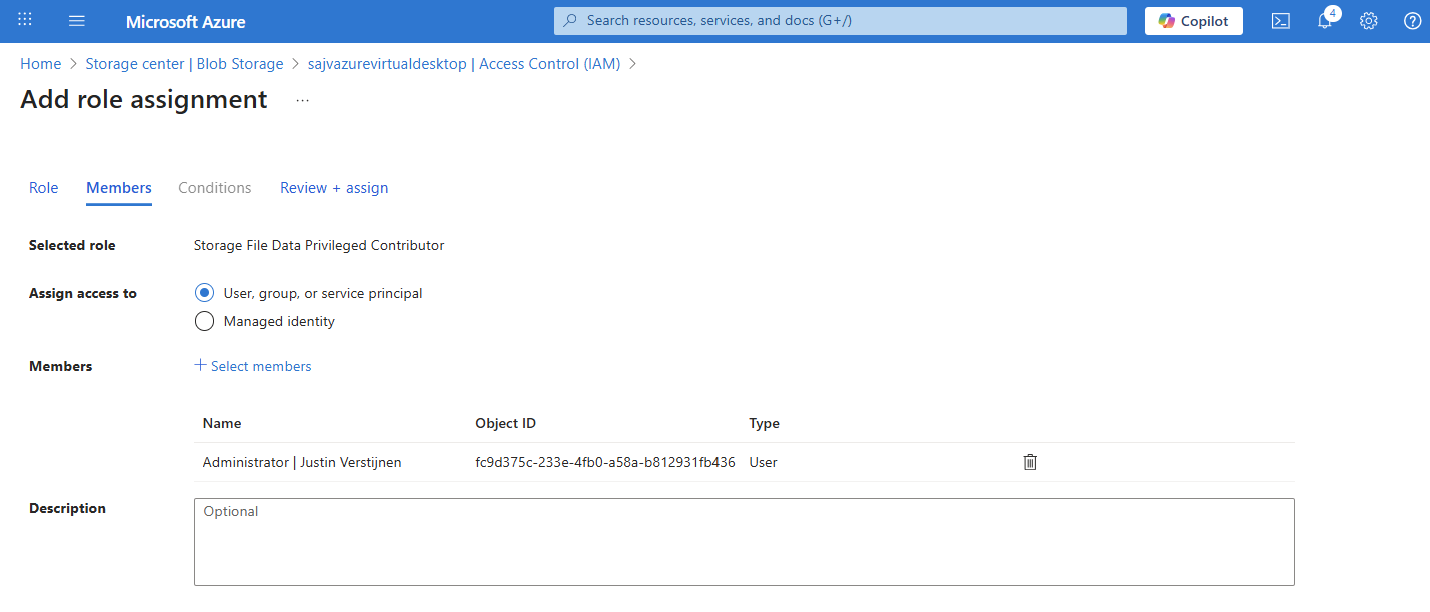
Finish the wizard to make the assignment active.
Default share-level permissions
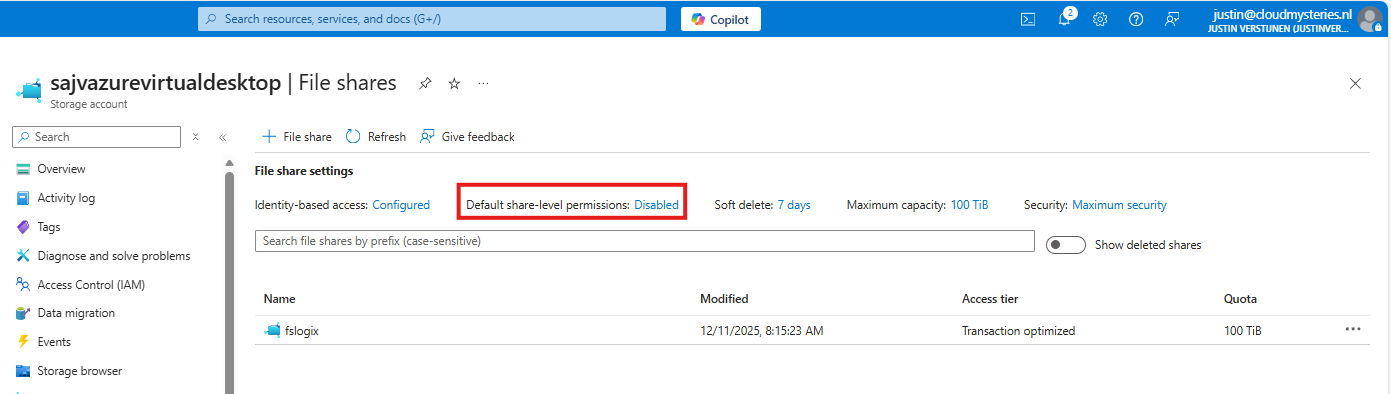
We must also do one final configuration to the storage account permissions, and that is to set default share-level permissions. Is is a requirement of this Microsoft Entra Kerberos thing.
Go back to the storage account, click on FIle shares and then click on “Default share-level permissions”
Set the share-level permissions to “Enable permissions for all authenticated users and groups”. Also select the “Storage File Data SMB Share Contributor” role, which includes read/write permissions.
Save the configuration, and we will now dive into the session host configuration part.
7: Intune configuration for AVD hosts
Now we need to configure the following setting for our AVD hosts in Intune:
- Kerberos Cloud Ticket Retrieval: This setting allows cloud devices to obtain Kerberos tickets from Microsoft Entra ID by using cloud credentials to use against SMB file shares
Go to the Intune Admin center (https://intune.microsoft.com). We need to create or change an existing configuration policy.
Search for “Kerberos” and search for the “Cloud Kerberos Ticket Retrieval” option and enable it.
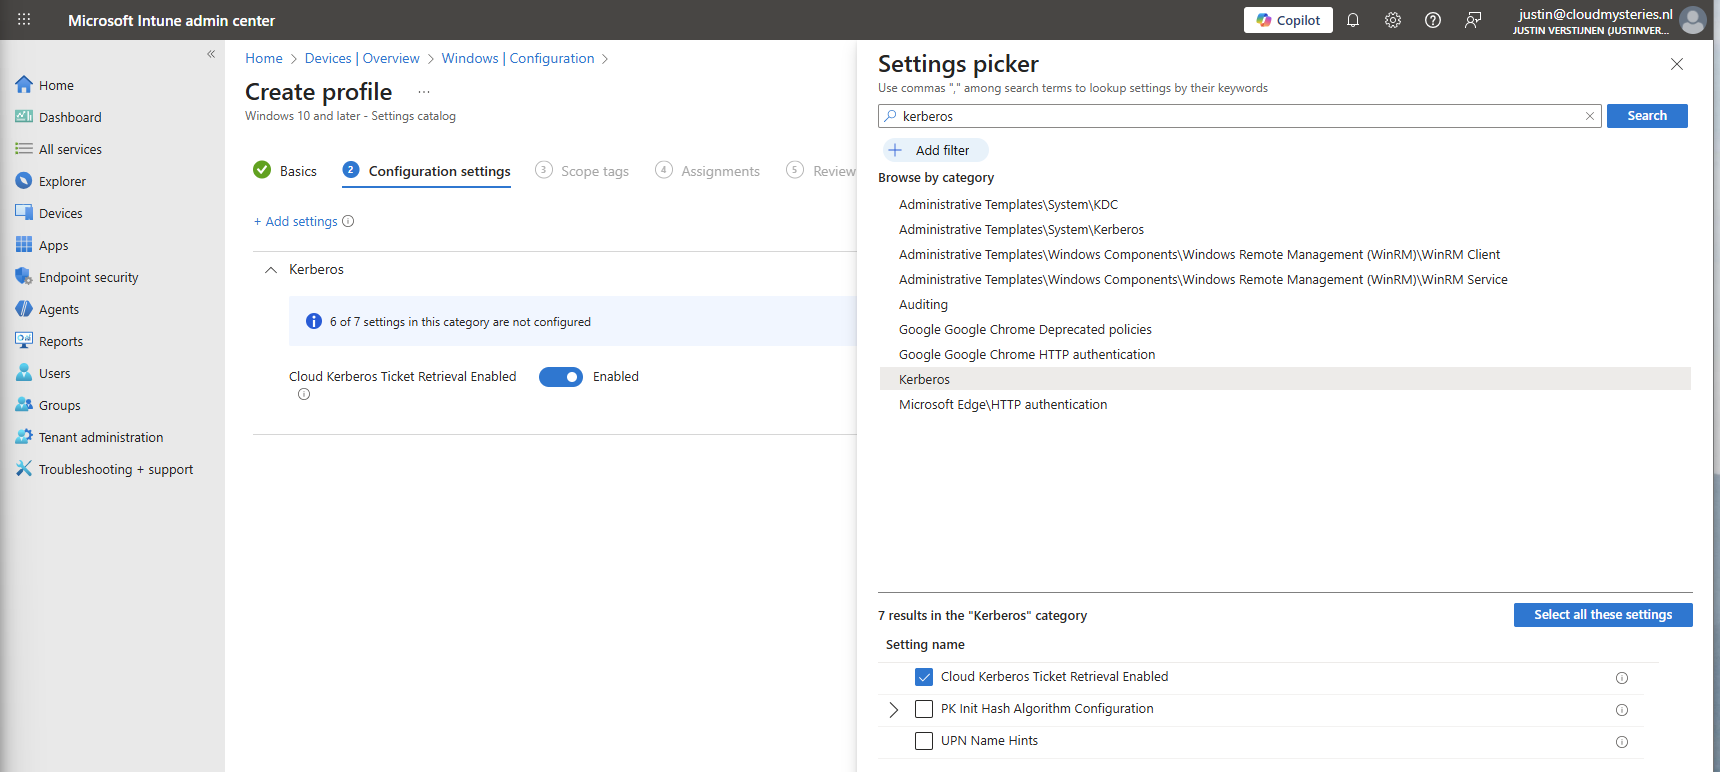
Then assign the configuration policy to your AVD hosts to apply this configuration.
8: FSLogix configuration
We can now configure FSLogix in Intune. I do this by using configuration profiles from settings catalogs. These are easy to configure and can be imported and exported.
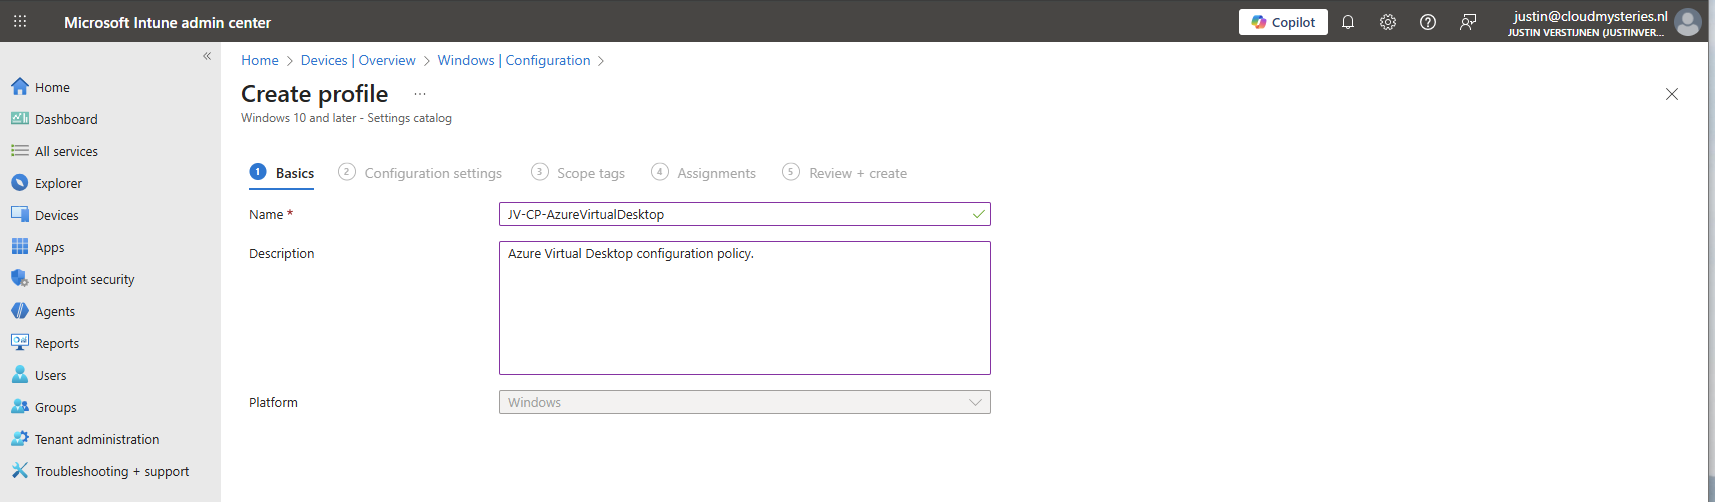
To configure this create a new configuration template from scratch for Windows 10 and higher and use the “Settings catalog”.
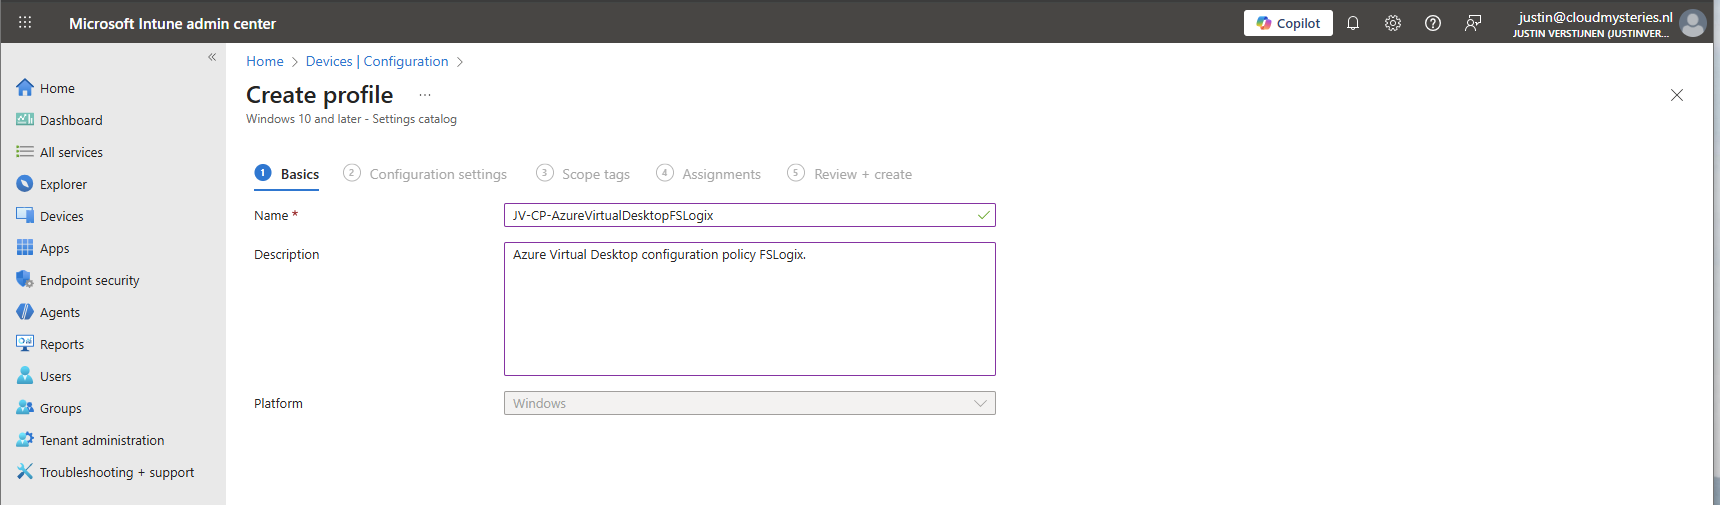
Give the profile a name and description and advance.
Click on “Add settings” and navigate to the FSLogix policy settings.
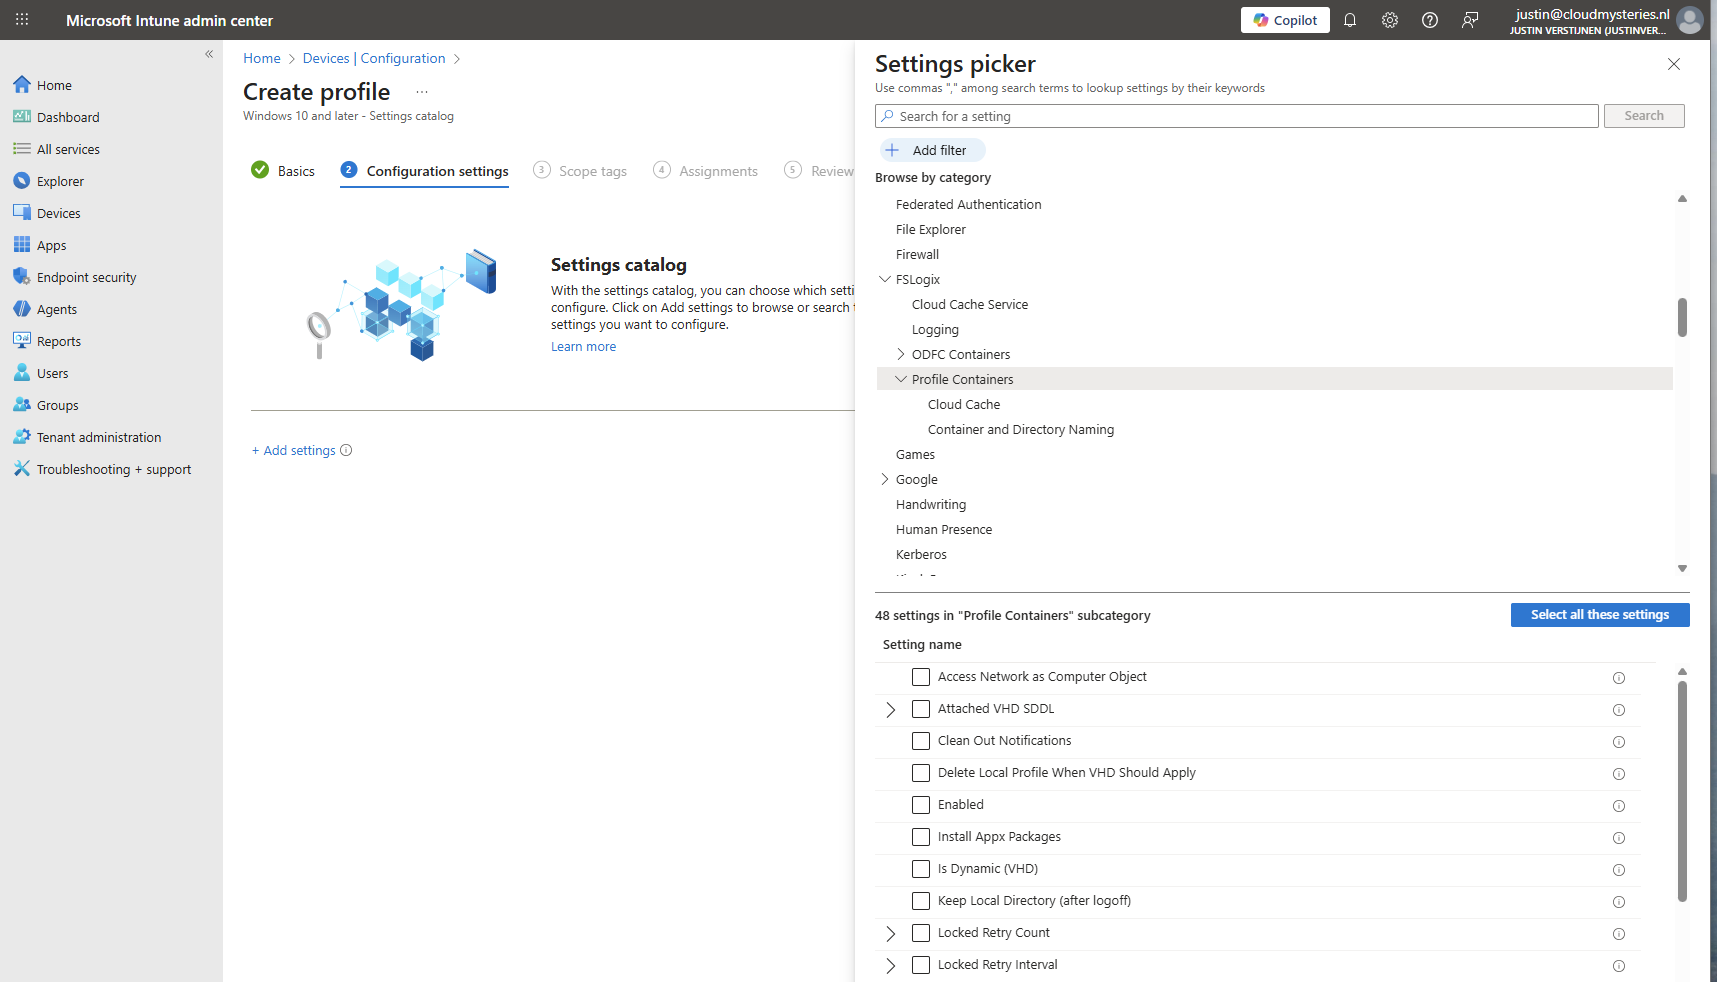
Profile Container settings
Under FSLogix -> Profile Containers, select the following settings, enable them and configure them:
| etting name | Value |
| Access Network as Computer Object | Disabled |
| Delete Local Profile When VHD Should Apply | Enabled |
| Enabled | Enabled |
| Is Dynamic (VHD) | Enabled |
| Keep Local Directory (after logoff) | Enabled |
| Prevent Login With Failure | Enabled |
| Roam Identity | Enabled |
| Roam Search | Disabled |
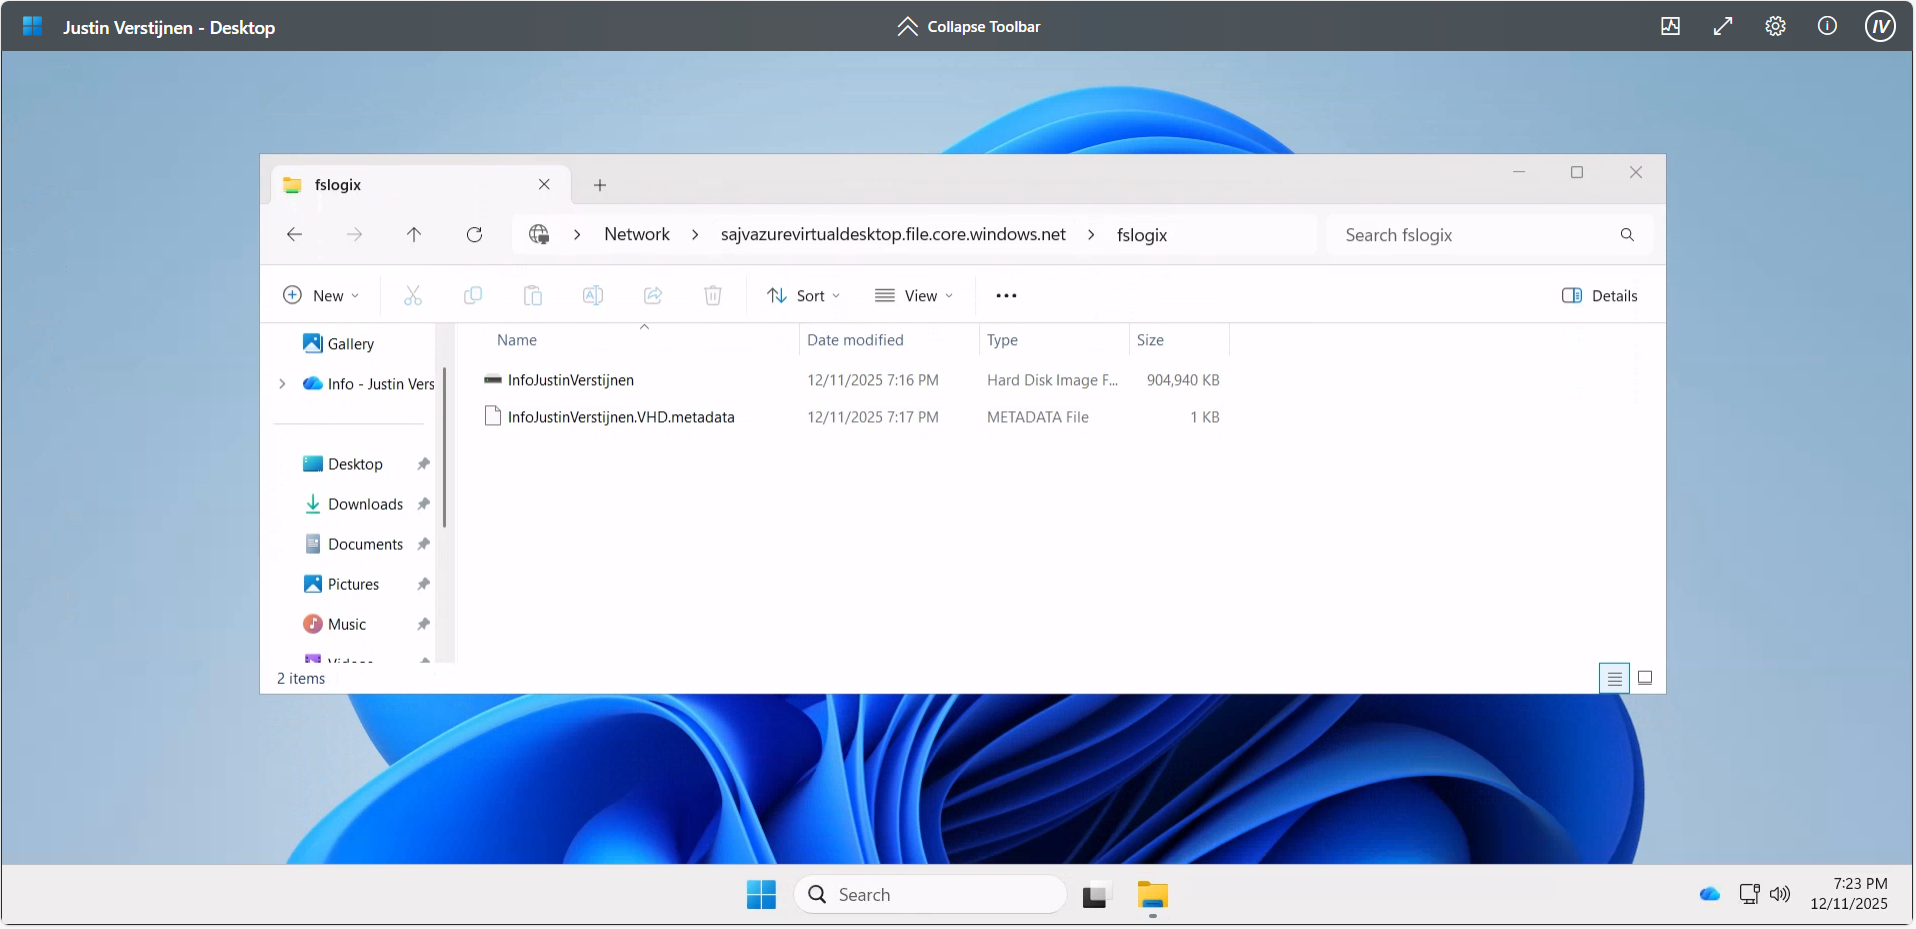
| VHD Locations | Your storage account and share in UNC. Mine is here: \sajvazurevirtualdesktop.file.core.windows.net\fslogix |
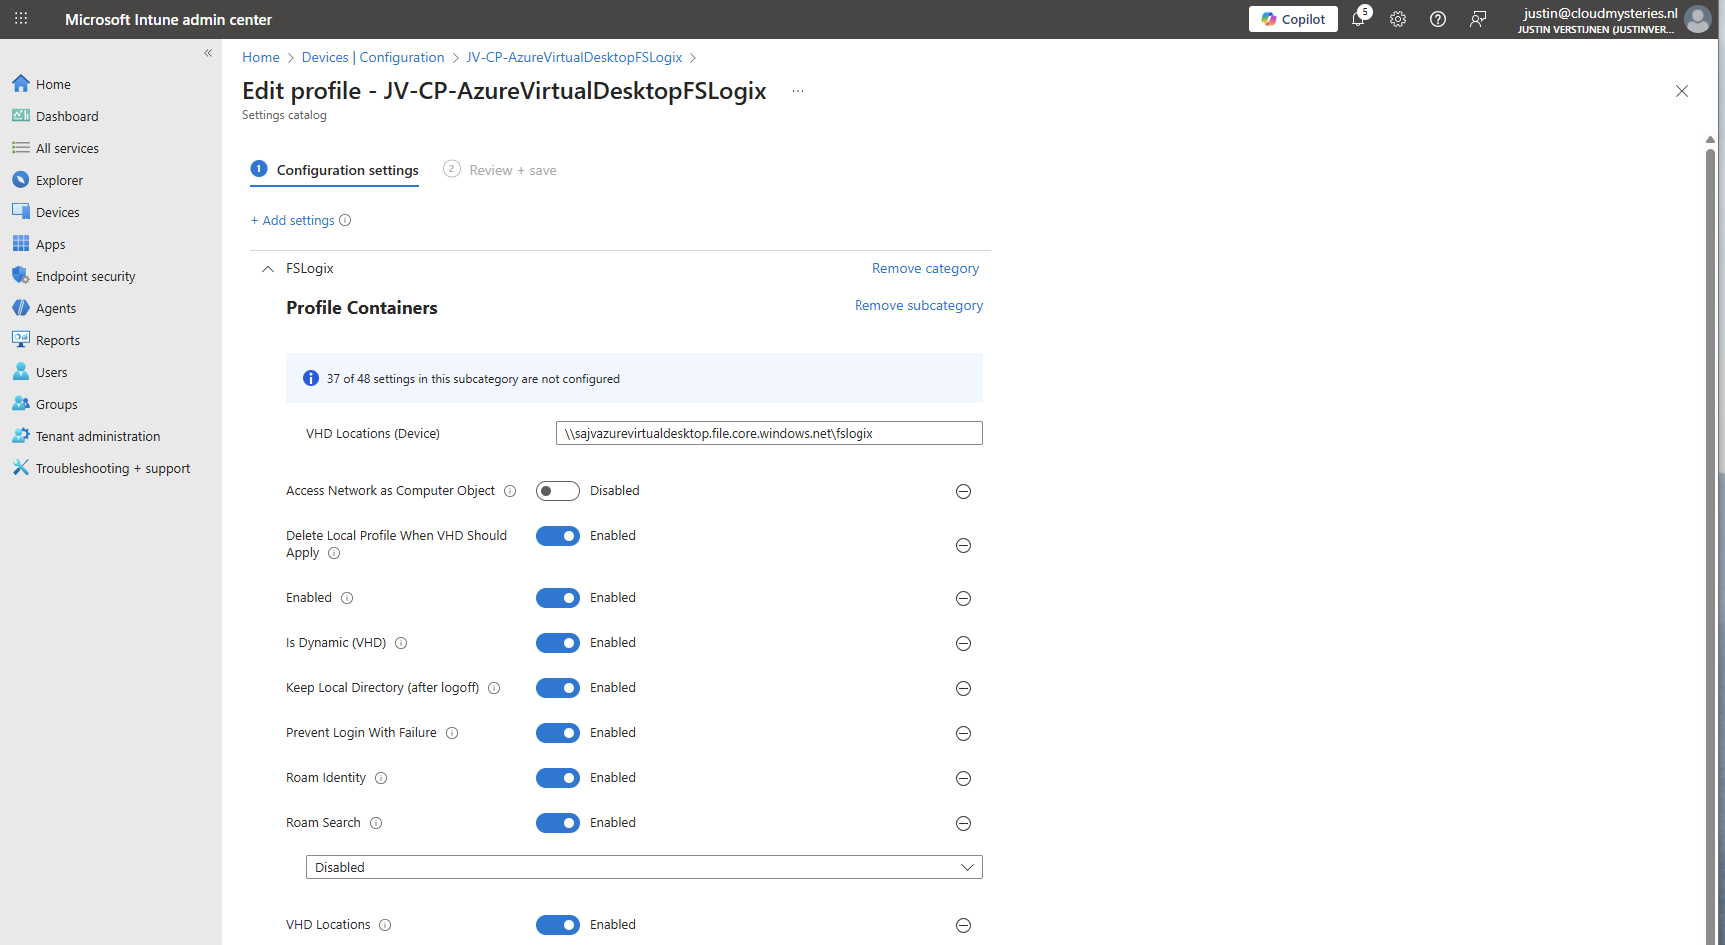
Make sure the option “Access Network as Computer Object” is Disabled, as this is a requirement for user authentication. Otherwise the solution will not work and sign in will result in a FSLogix “Error code: 0x000000035, Message: Impossibile to find network path” error.
Container naming settings
Under FSLogix -> Profile Containers -> Container and Directory Naming, select the following settings, enable them and configure them:
| Setting name | Value |
| No Profile Containing Folder | Enable |
| VHD Name Match | %username% |
| VHD Name Pattern | %username% |
| Volume Type (VHD or VHDX) | VHDX |
You can change this configuration to fit your needs, this is purely how I configured FSLogix to keep the configuration as simple and effective as possible.
Save the policy and assign this to your AVD hosts.
9: Preparing the hostpool
We need to do some small final configurations, gaining access to the virtual desktops by giving the permissions.
Go to the hostpool and then to Application Groups.
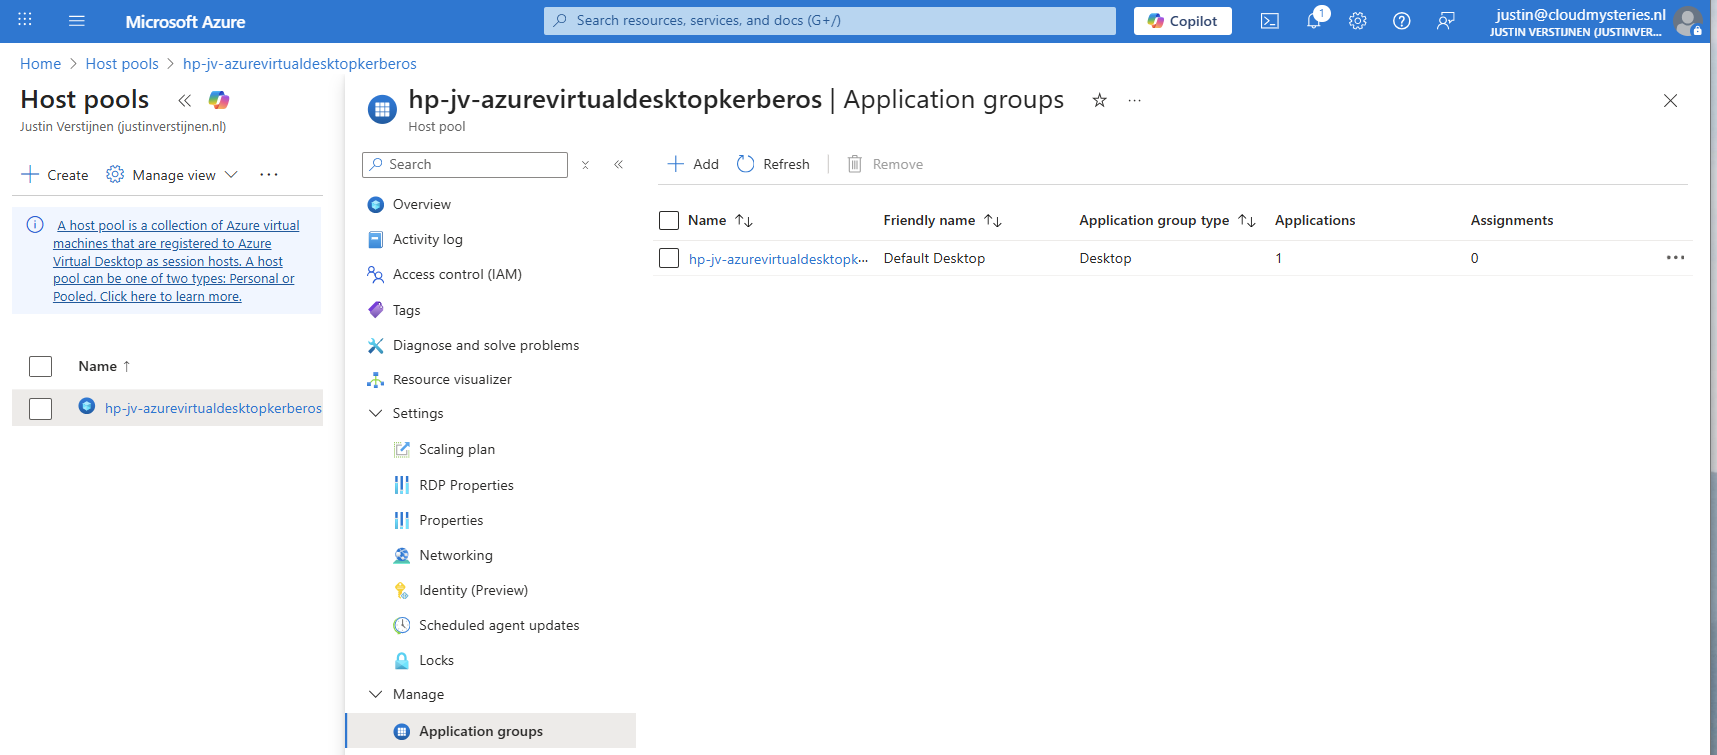
Then open the application group that contains the desktop. Then click on “Assignments”.
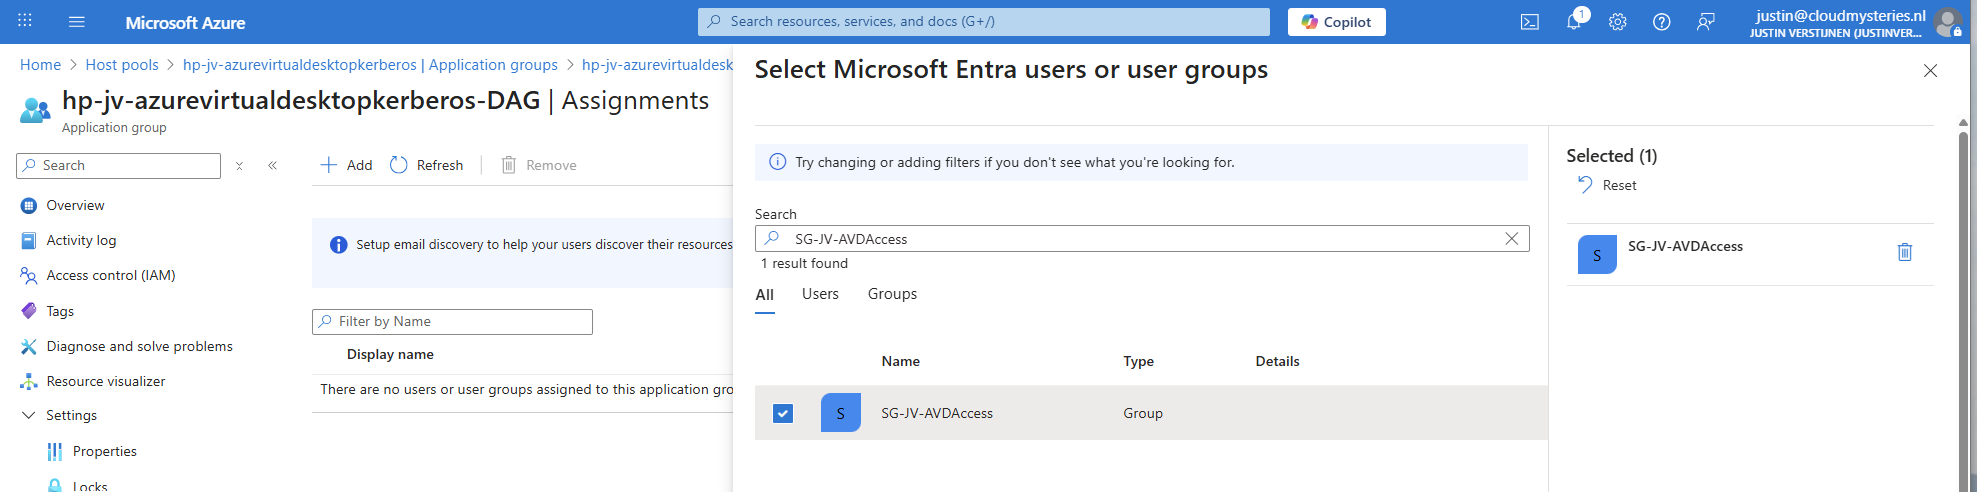
Select the group to give desktop access to the users. Then save the assignment.
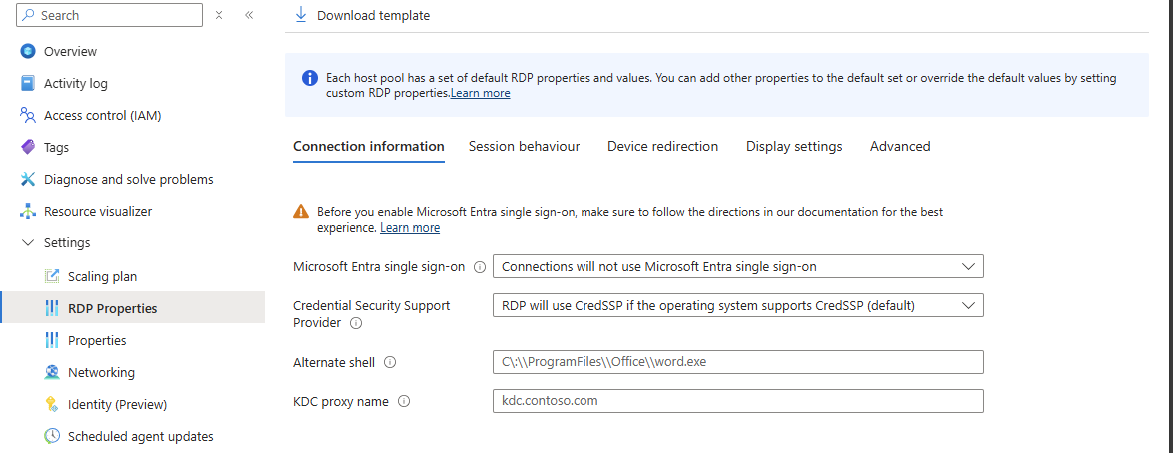
After assigning the group we would have to do one last configuration, enabling Single Sign On on the hostpool. Go to your hostpool and open the RDP Properties
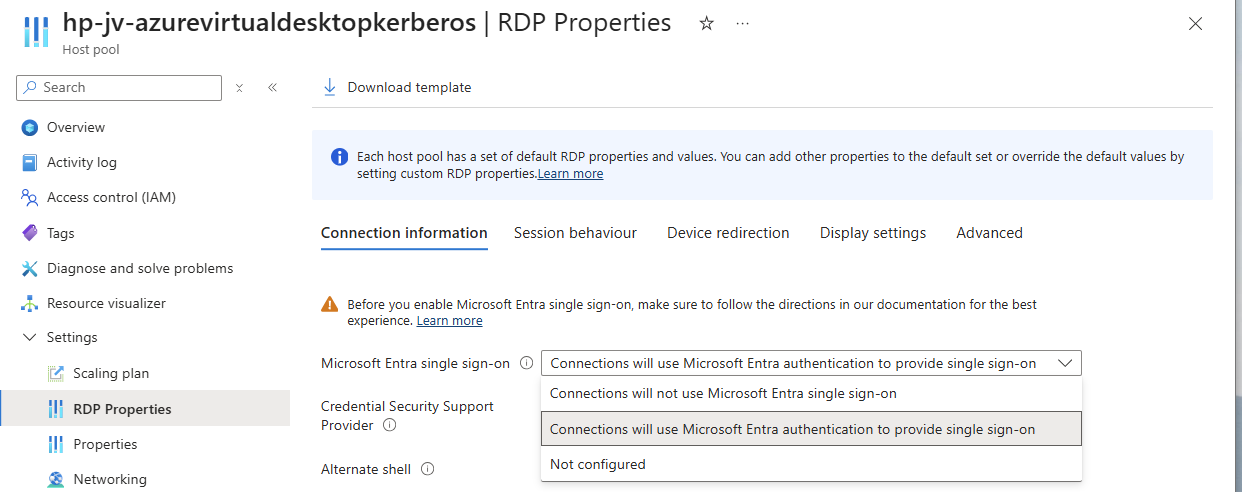
For a comprehensive guide about Azure Virtual Desktop and RDP Properties, visit: https://justinverstijnen.nl/azure-virtual-desktop-rdp-properties/
On the “Connection Information” tab, select the “Microsoft Entra single sign-on” option and set this to provide single sign-on. Then save the configuration.
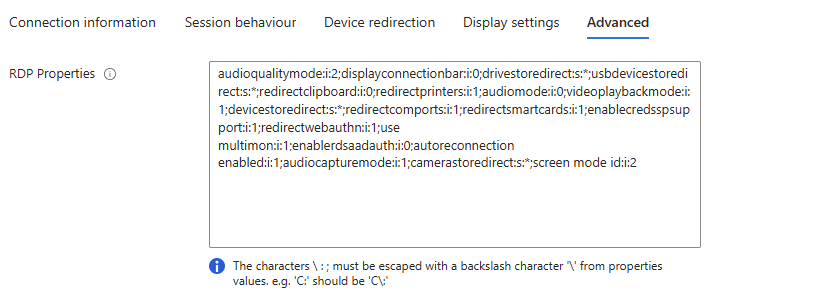
At this point, my advanced RSP Properties configuration is:
POWERSHELL
drivestoredirect:s:;usbdevicestoredirect:s:;redirectclipboard:i:0;redirectprinters:i:0;audiomode:i:0;videoplaybackmode:i:1;devicestoredirect:s:*;redirectcomports:i:1;redirectsmartcards:i:1;enablecredsspsupport:i:1;redirectwebauthn:i:1;use multimon:i:1;enablerdsaadauth:i:110: Connecting to the hostpool
Now we have everything ready under the hood, we can finally connect to our hostpool. Download the Windows App or use the webclient and sign into your account:
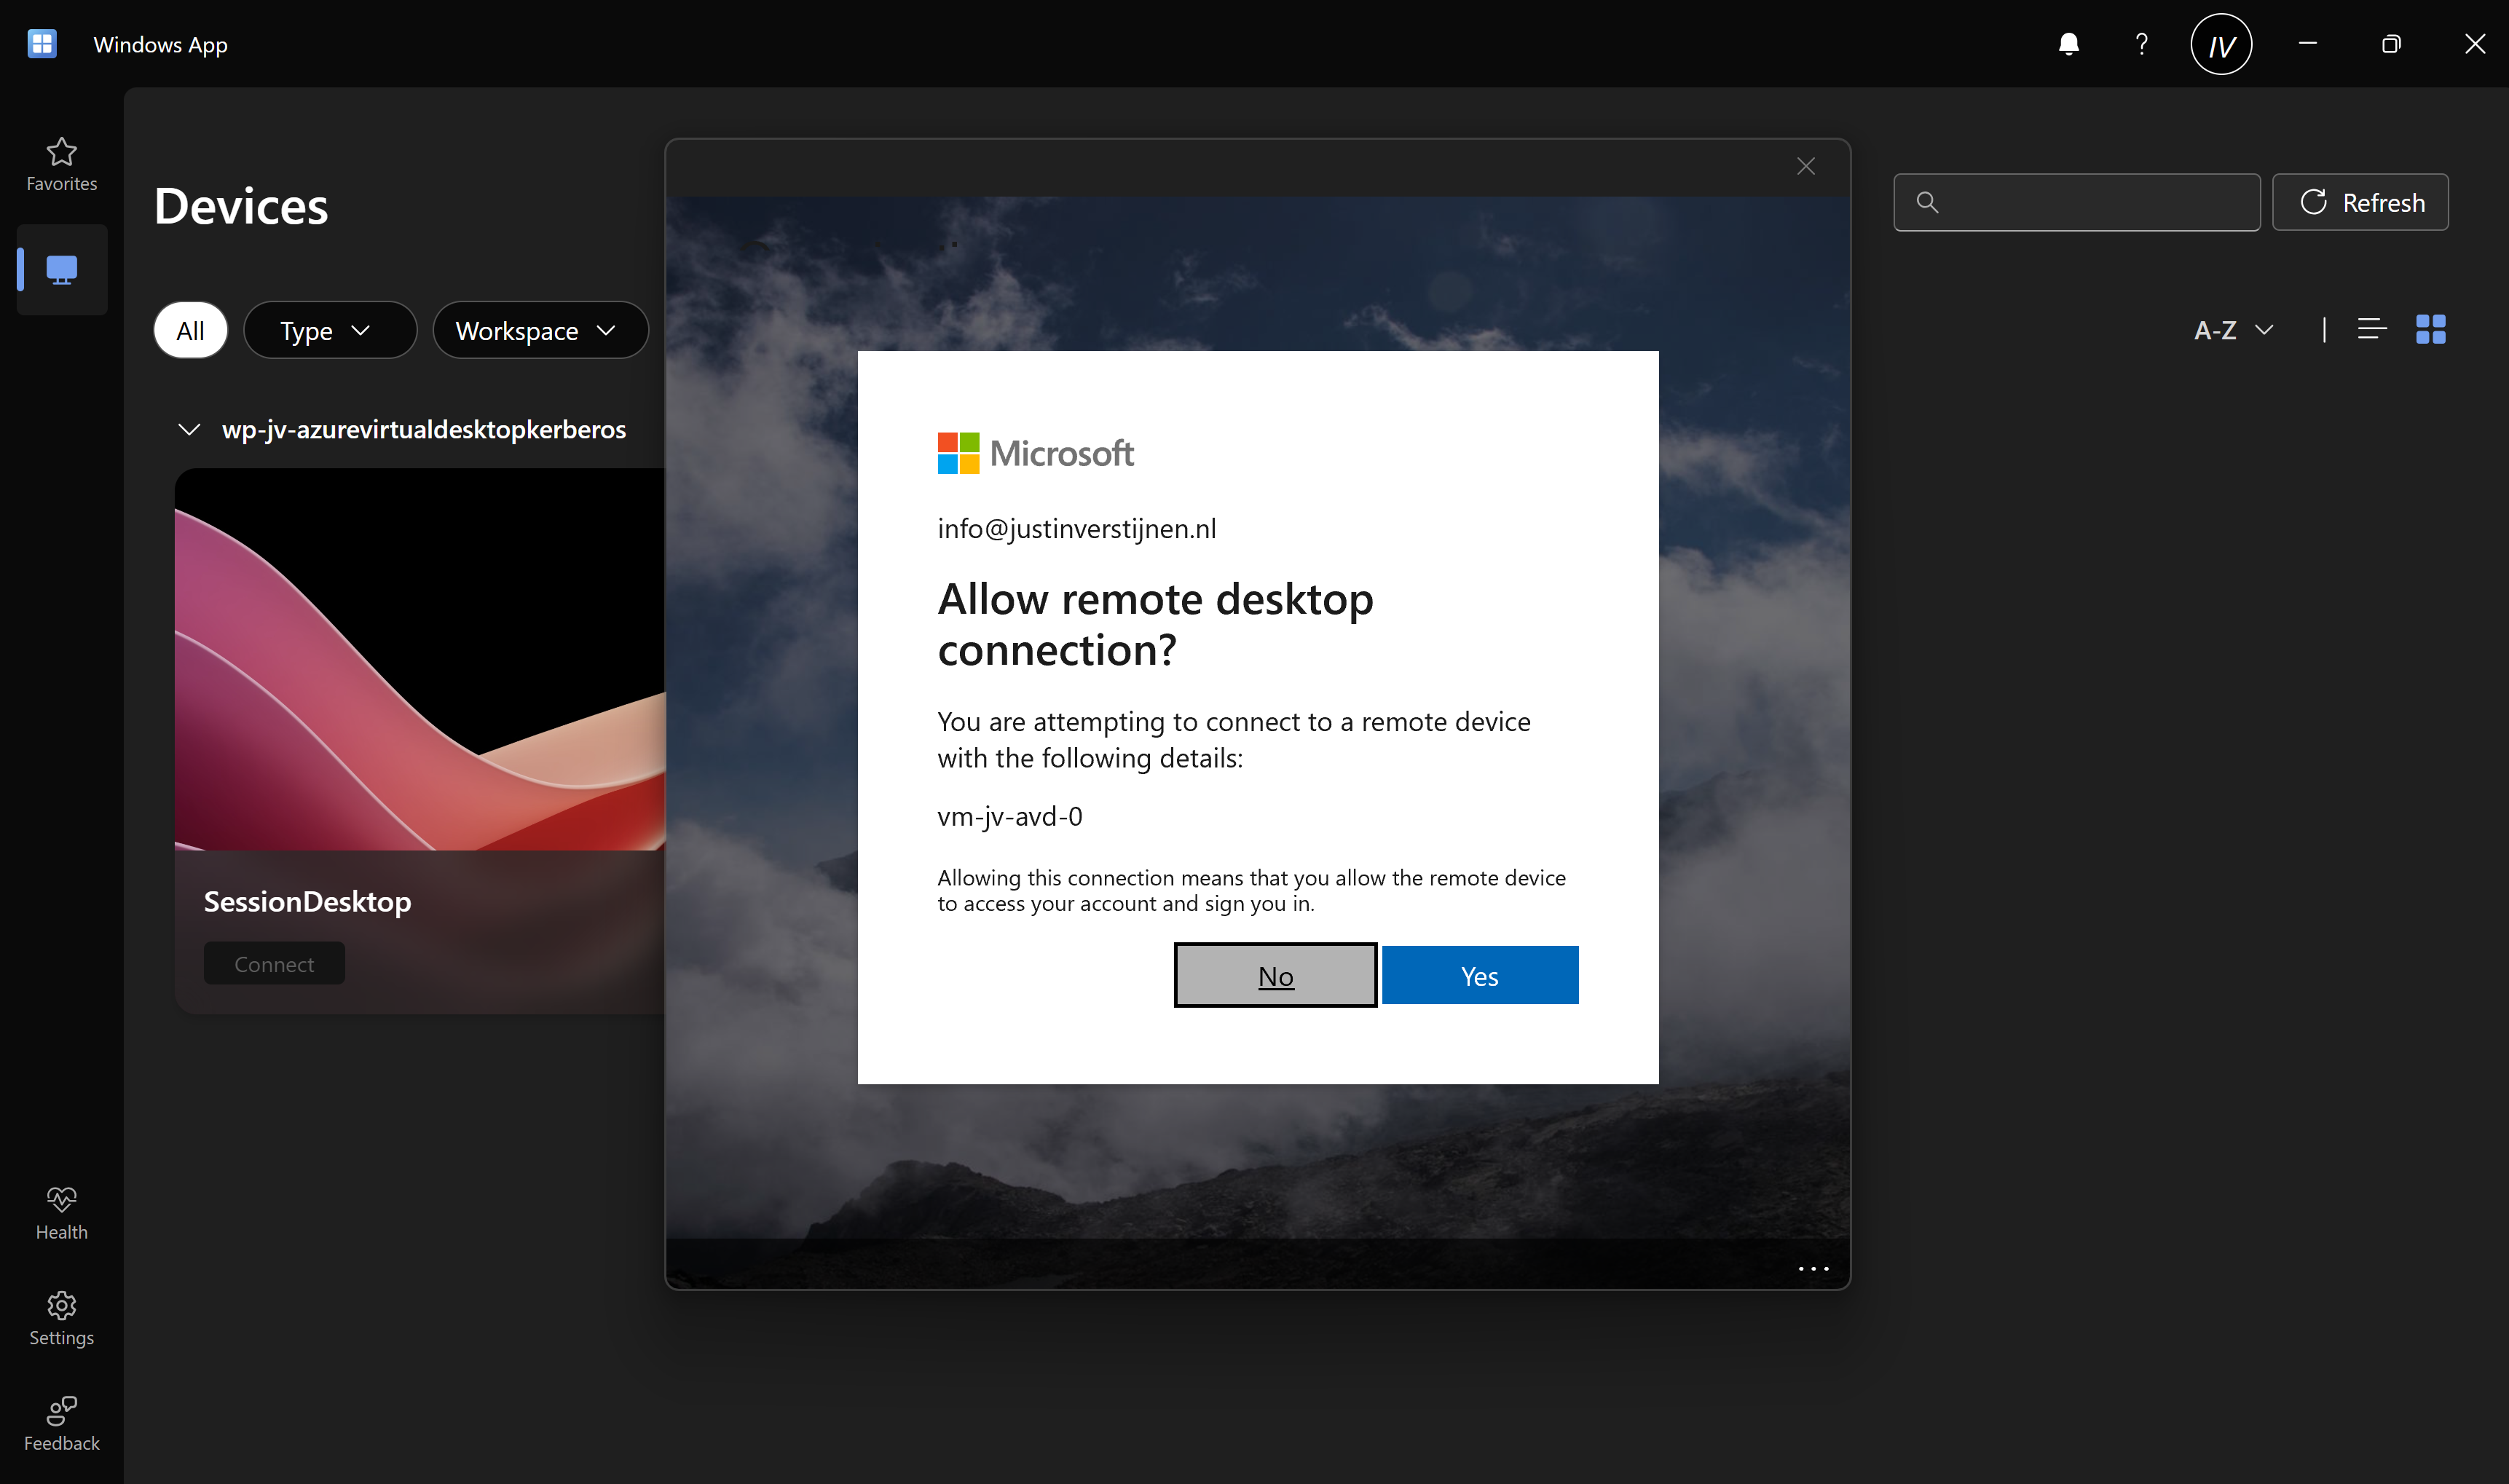
Also click on “Yes” on the Single sign-on prompt to allow the remote desktop connection.
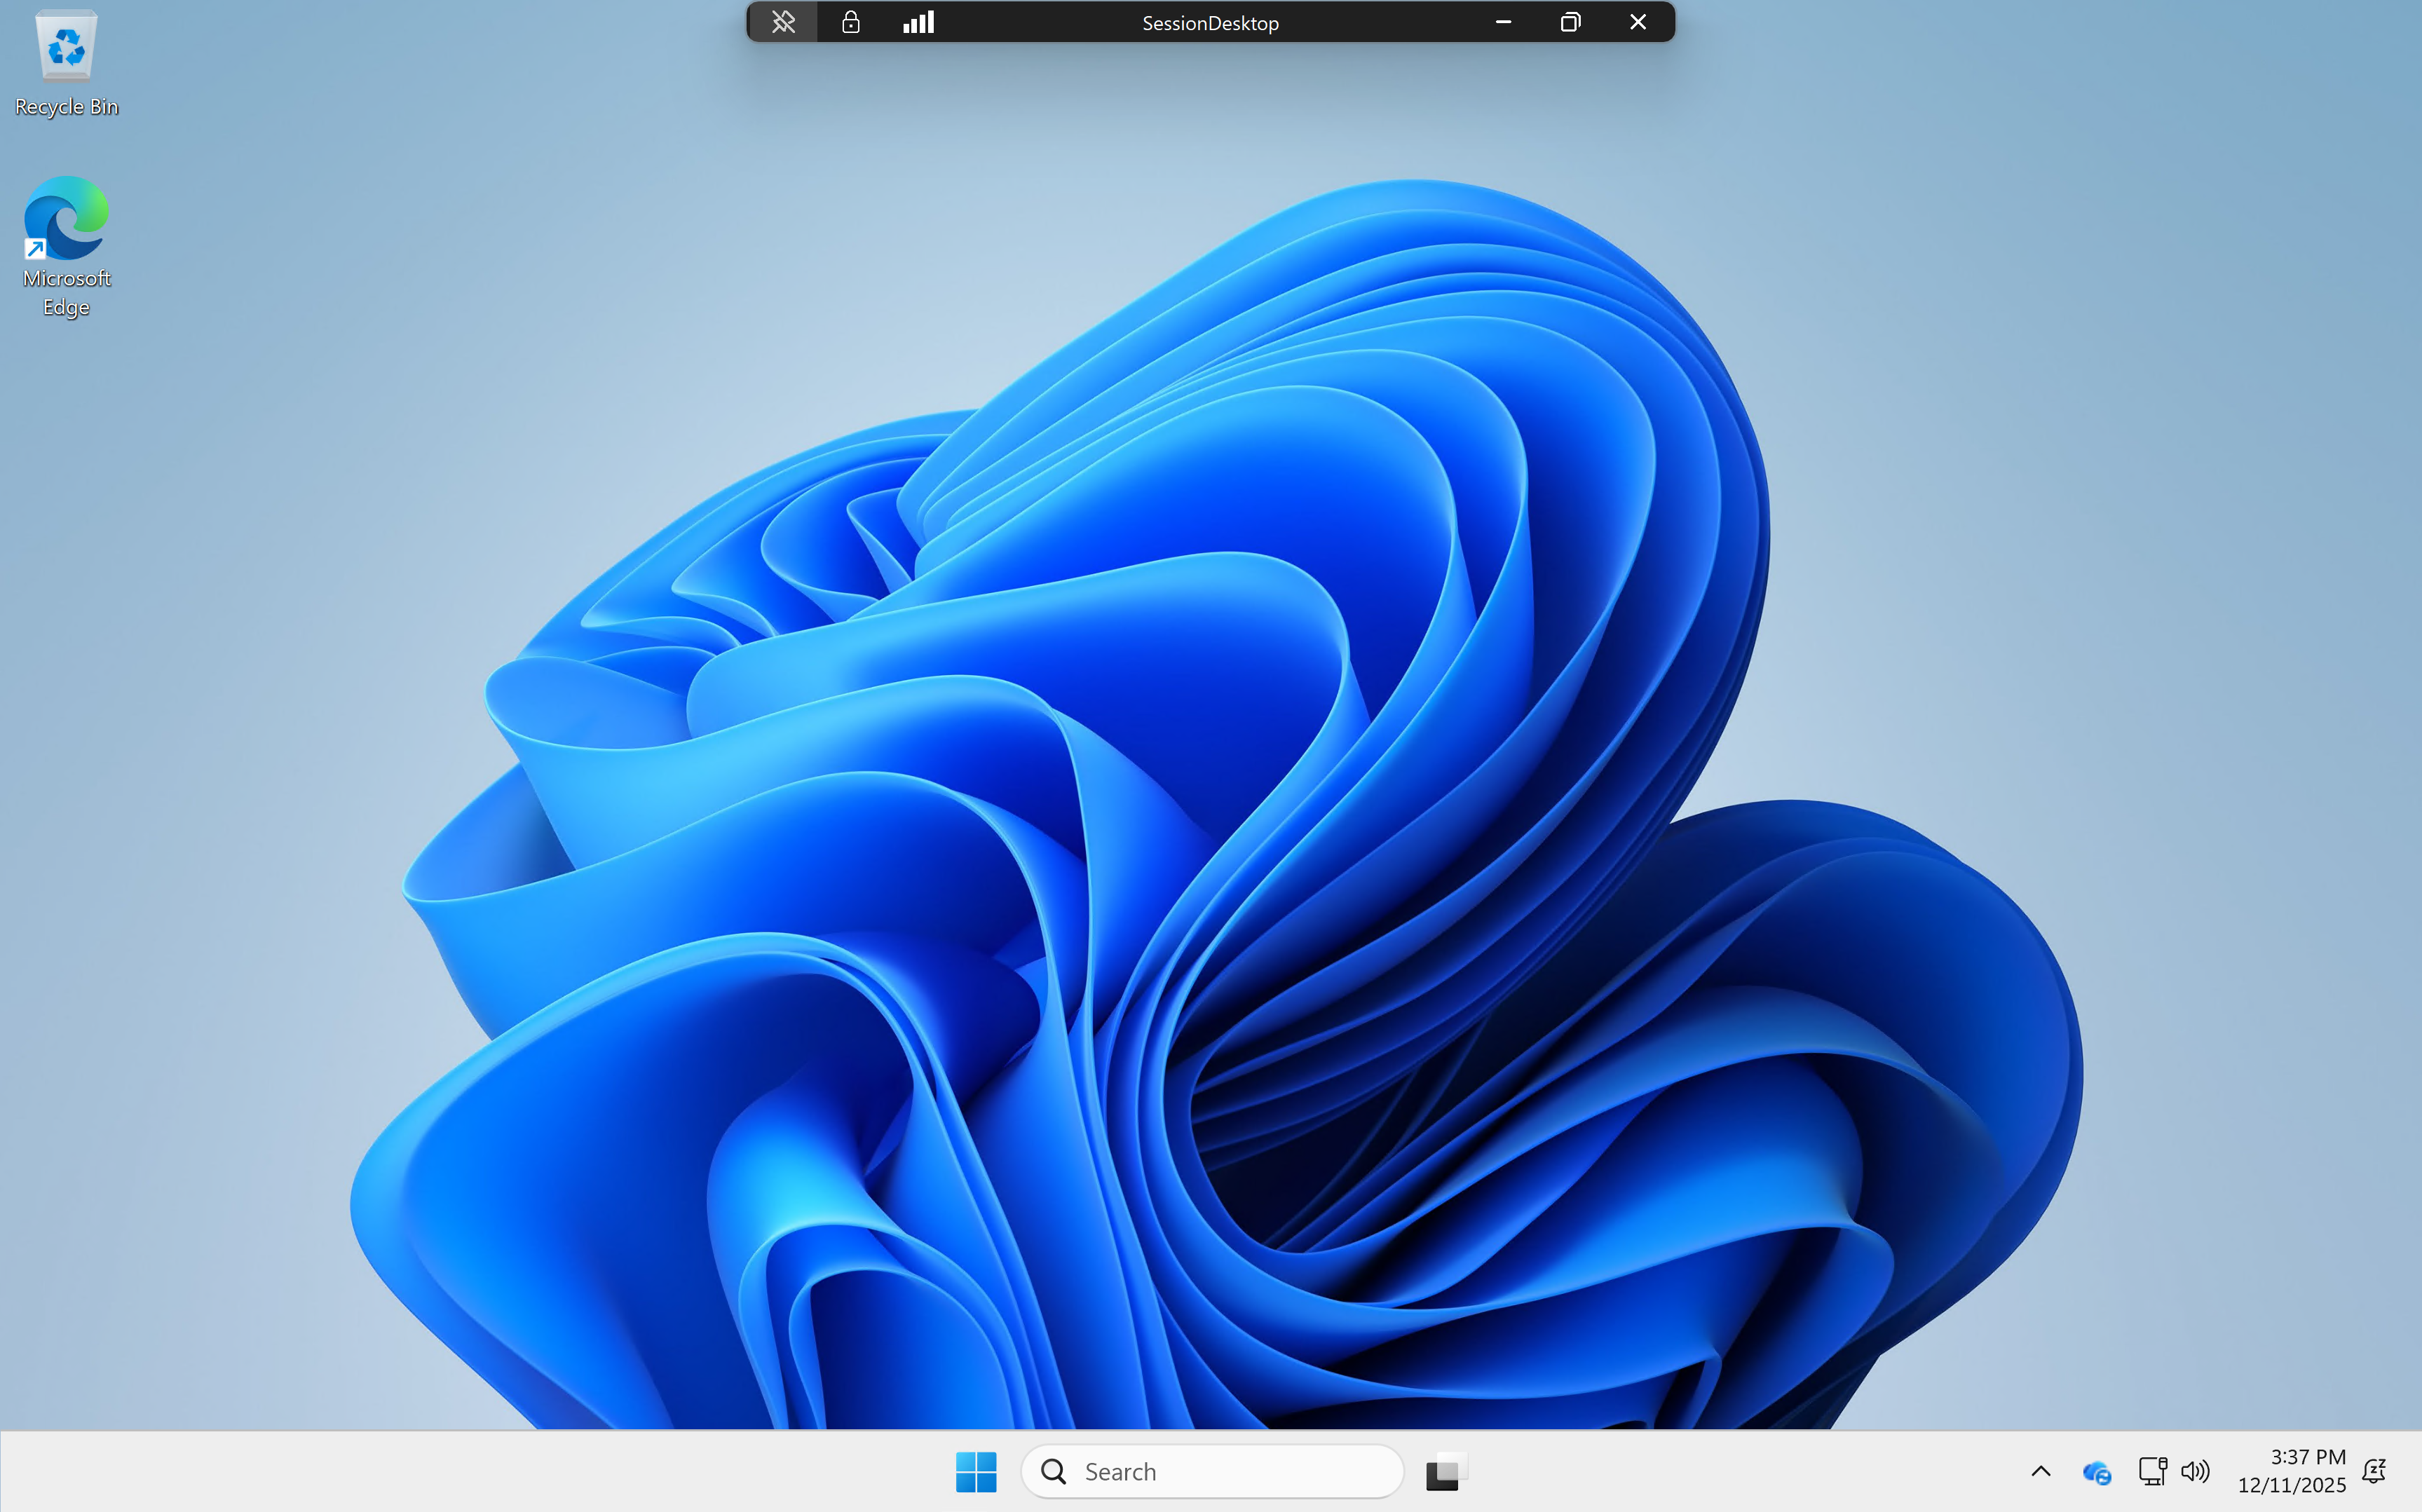
Here we are on our freshly created desktop. After connecting the FSLogix profile will be automatically created on the storage account.
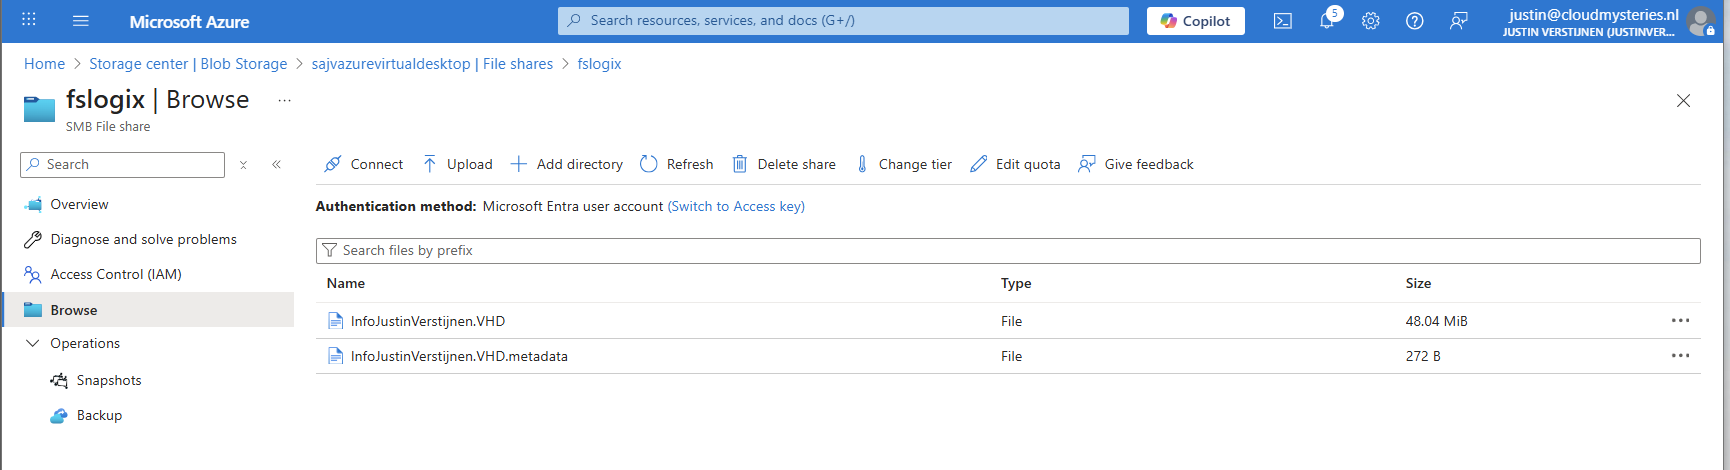
And this with only these resources:
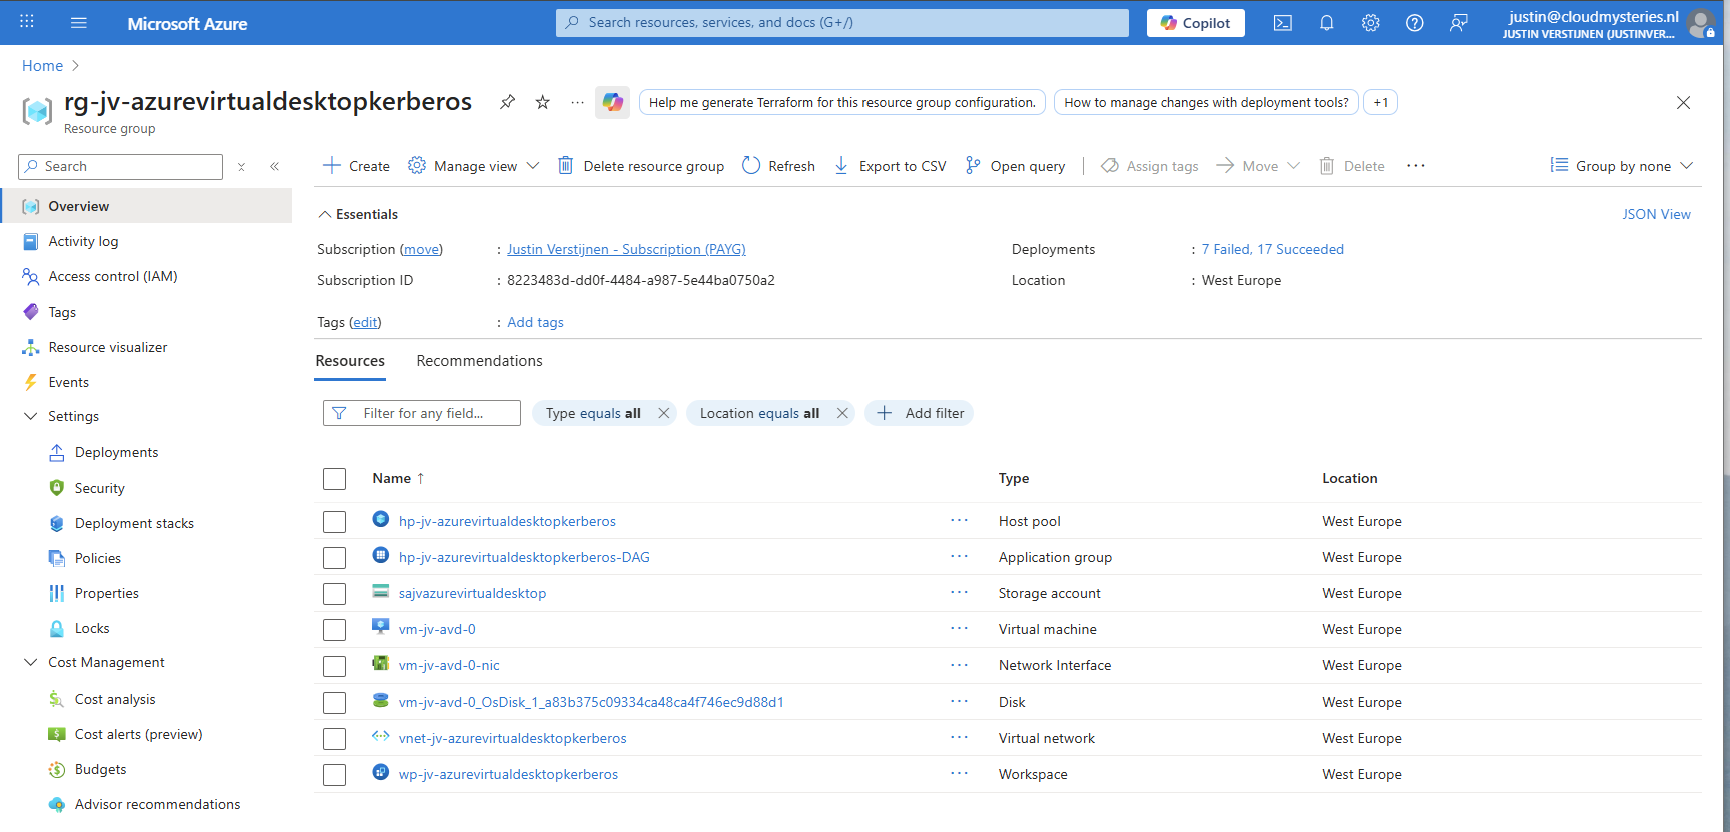
11: Shaping your AVD Workspace (optional)
In the Windows app, you get a workspace to connect to your desktop. By default, these are filled in automatically but it is possible to change the names for a better user experience.
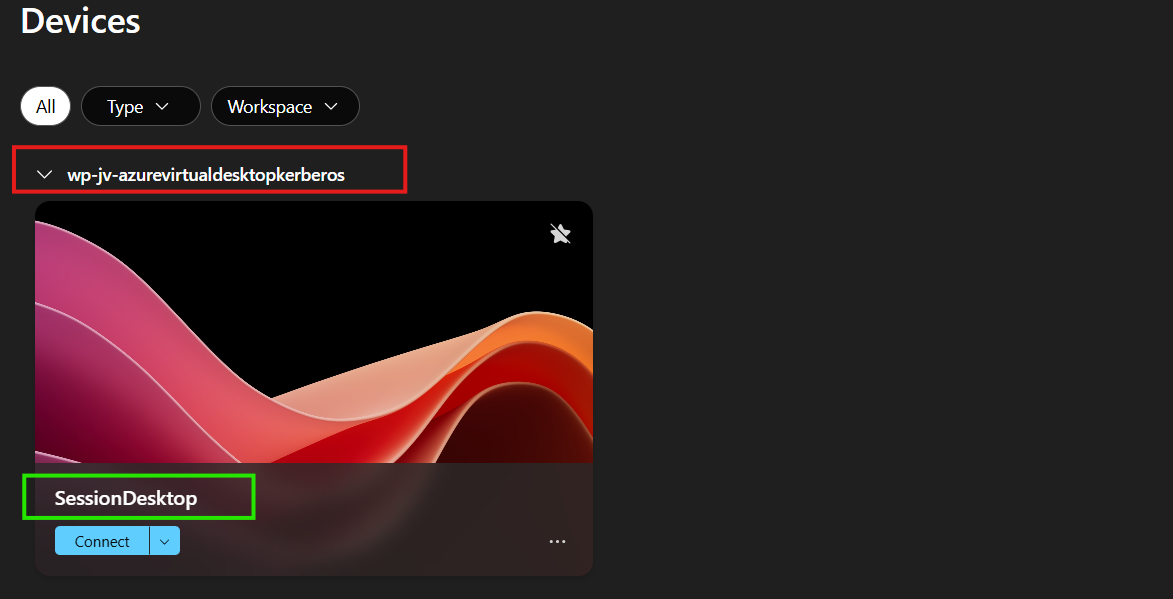
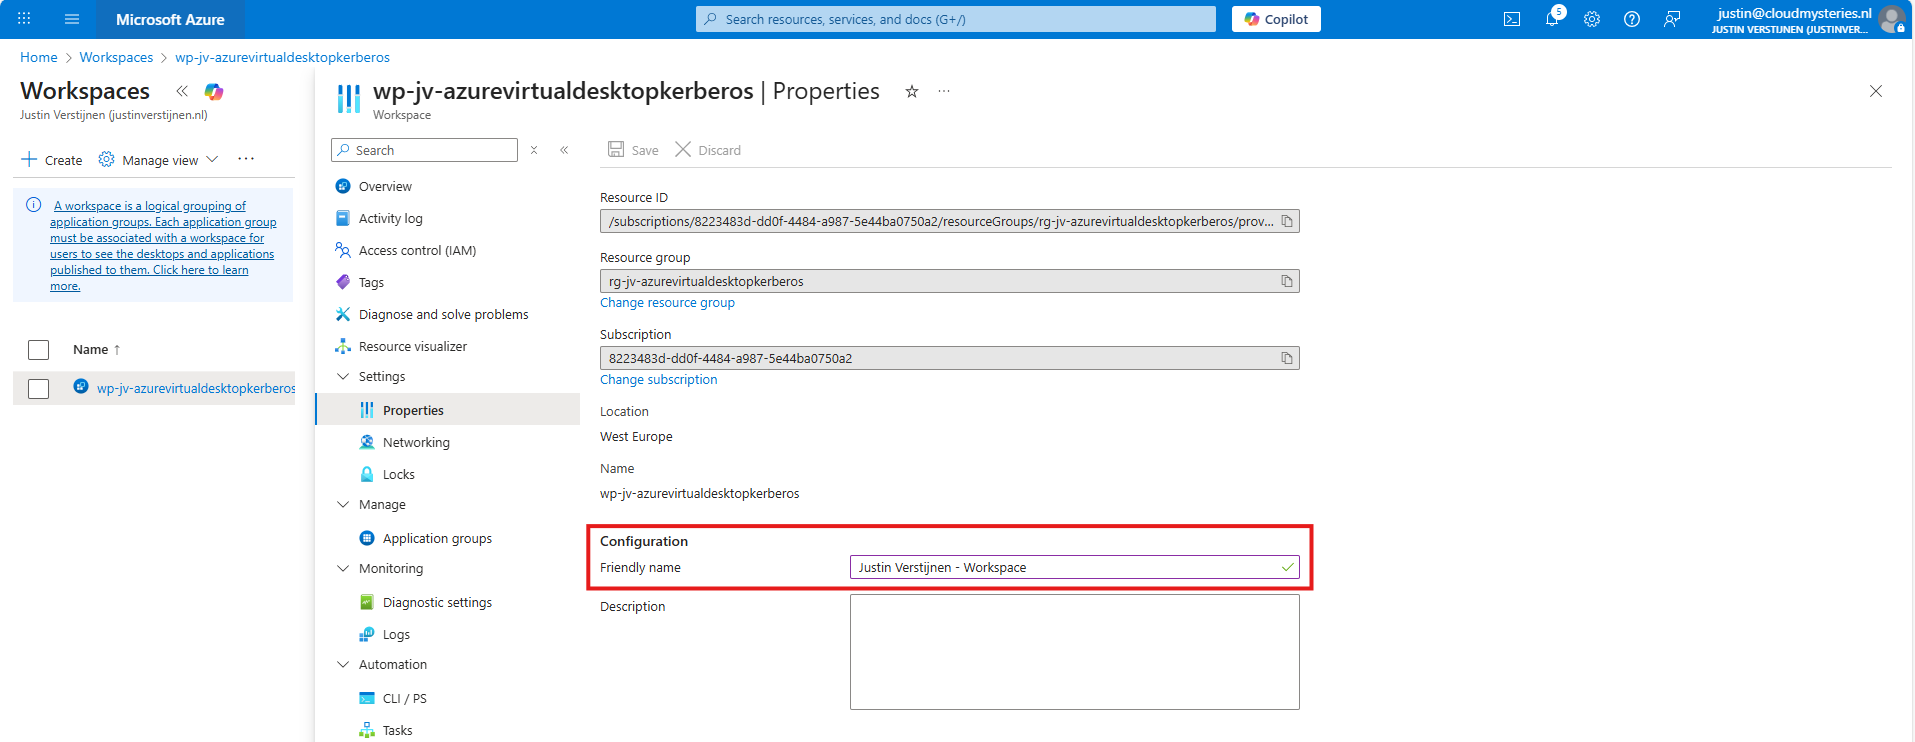
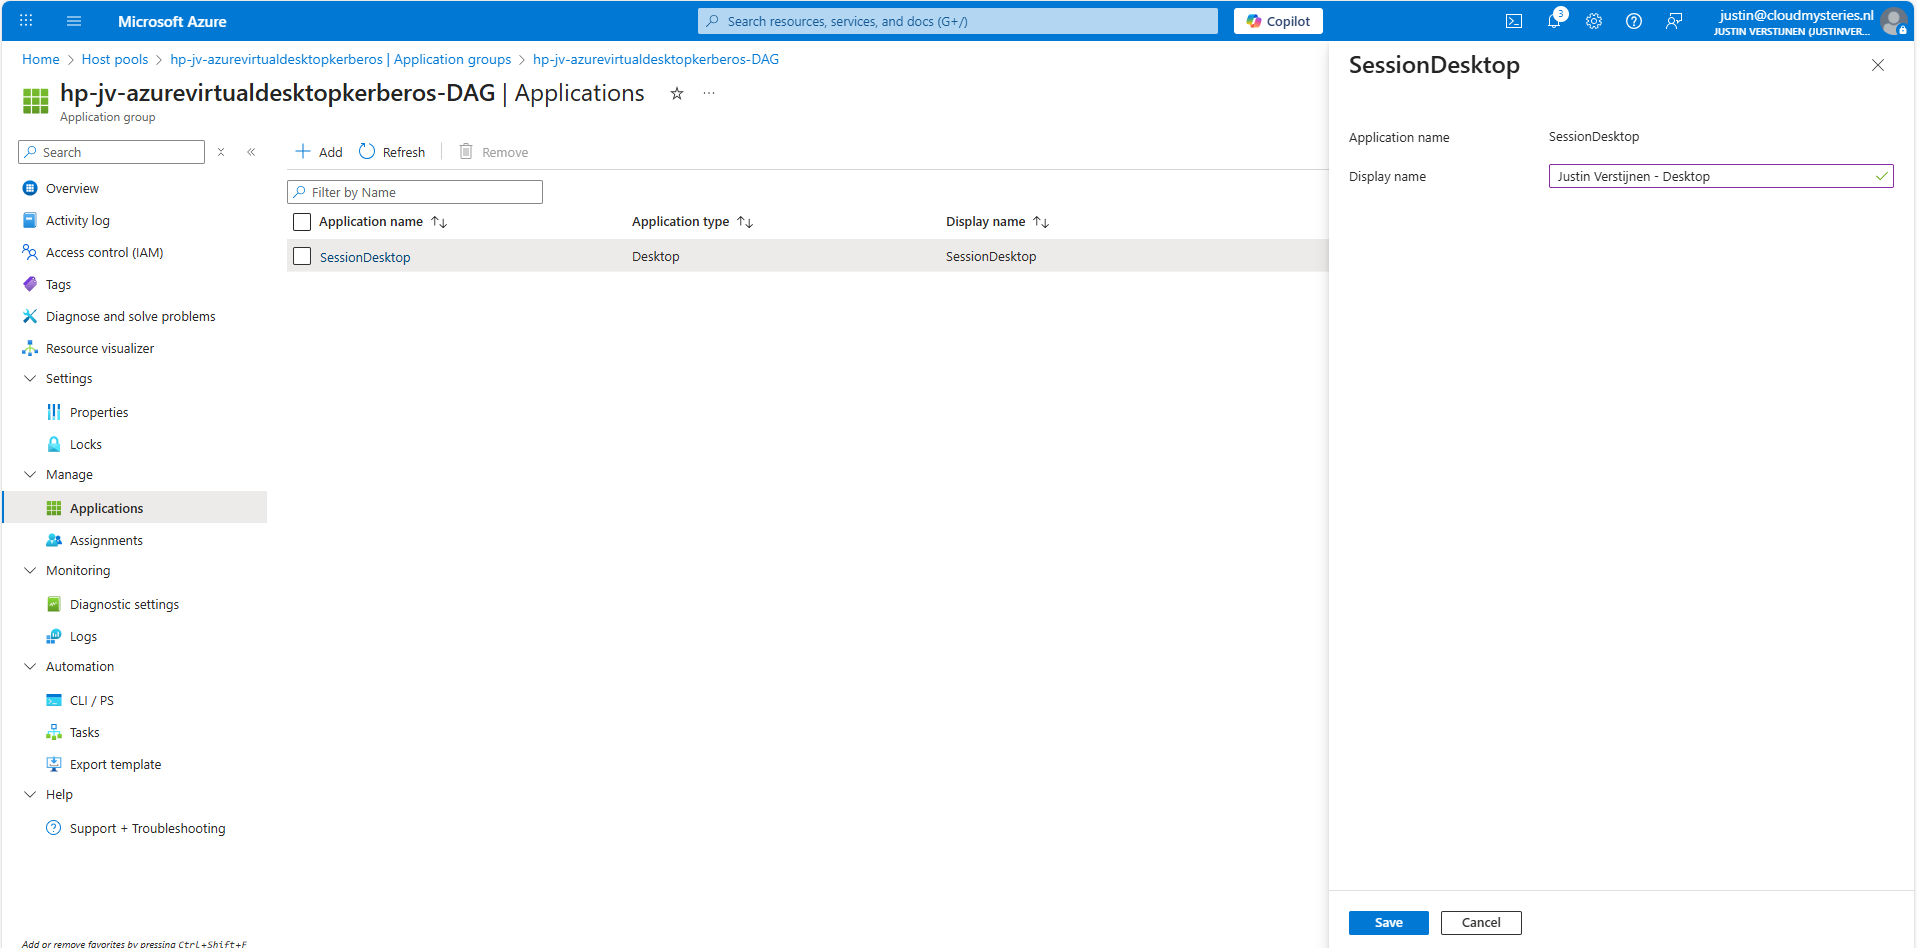
The red block can be changed in the Workspace -> Friendly name and the green block can be changed in the Application Group -> Application -> Session Desktop.
For the red block, go to your Workspace, then to Properties and change and save the friendly name:
For the green block, go to your application groups, and then the Desktop Application Group (DAG) and select the SessionDesktop application. You can change and save the name here.
After refreshing the workspace, this looks a lot better to the end user:
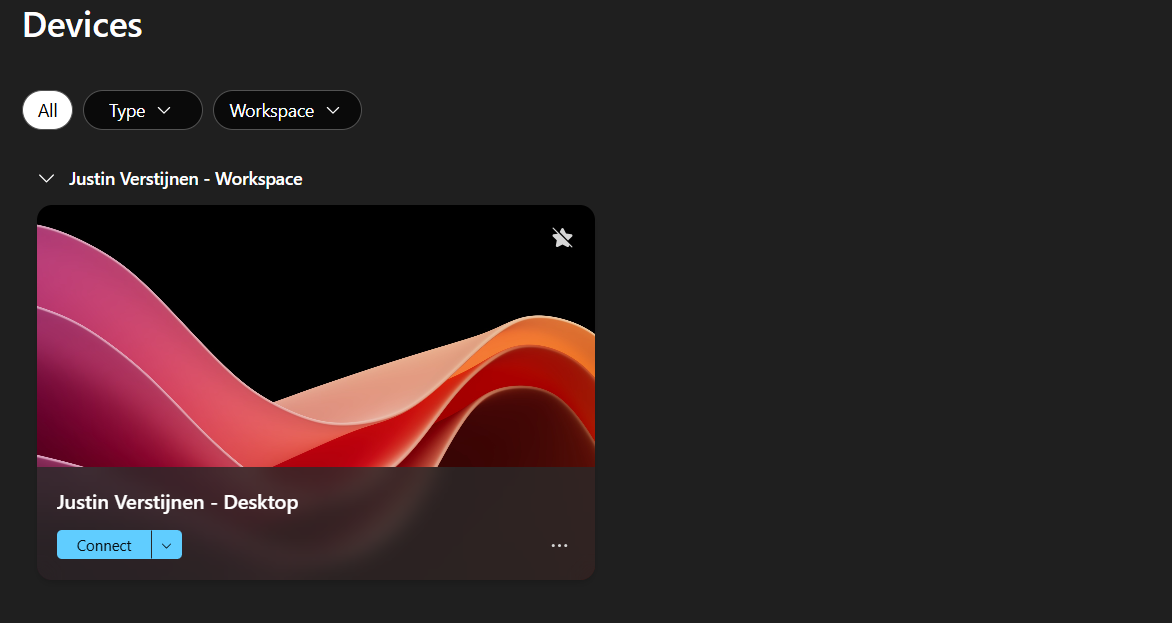
Building great solutions is having attention for the smallest details ;)
12: Setting maximum SMB encryption (optional)
This step is optional, but recommended for higher security.
In another guide, I dived into the SMB encryption settings to use the Maximum security preset of Azure Files. You can find that guide here:
Guide for maximum SMB encryption
Using the Maximum security preset for Azure Files ensures only the best encryption and safest protocols are being used between Session host and File share. For example, this only allows Kerberos and disables the older, unsafe NTLM authentication protocol.
13: Troubleshooting (optional)
It is possible that this setup doesn’t work at your first try. I have added some steps to troubleshoot the solution and come to the cause of the error.
FSLogix profile errors
If you get an error like below picture, the profile failed to create or mount which can have various different causes based on the error.
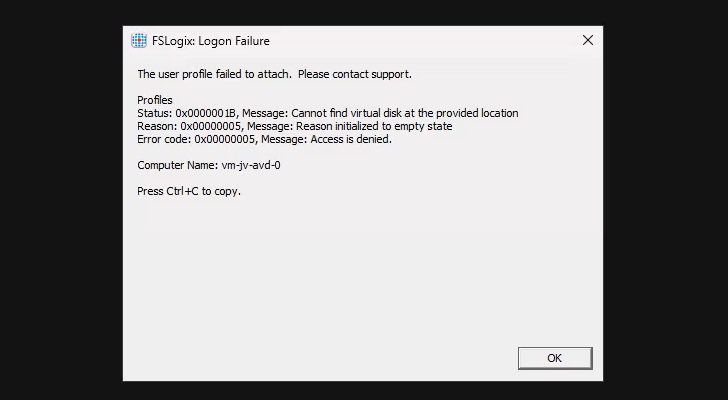
In this case, the error is “Access is denied”. This is true because I did this on purpose. Check the configuration of step 6.
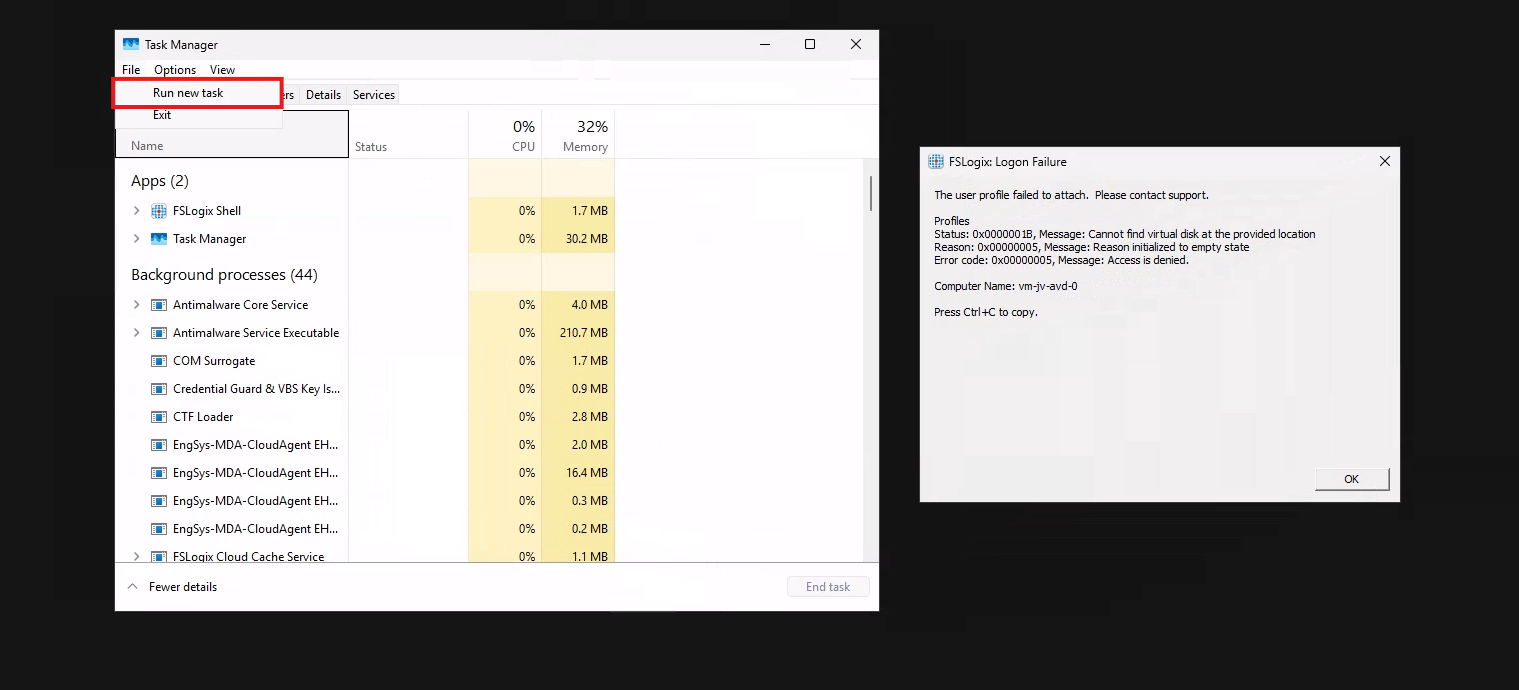
When presented this type of errors, you are able to get to CMD by pressing CTRL+SHIFT+ESC and run a new task there, which is CMD.
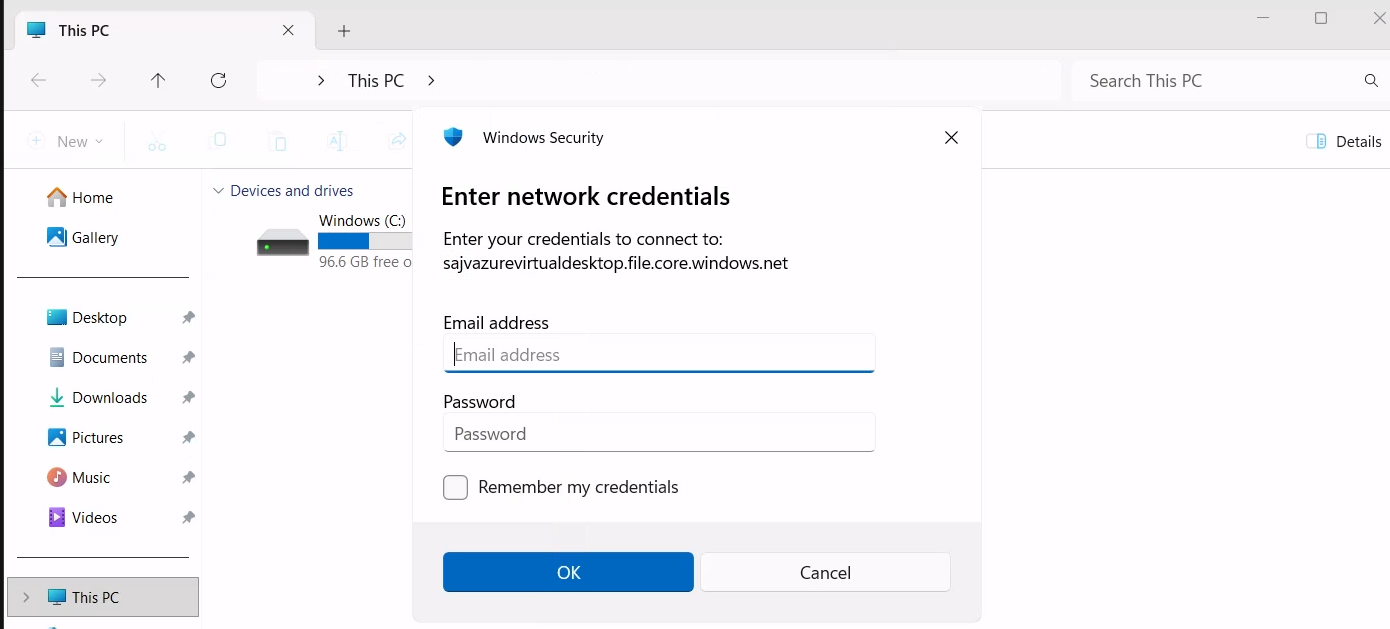
To check if you can navigate to the share, you can open explorer.exe here and navigate manually to the share to see if its working. If you get any authentication prompts or errors, this means that this is the reason FSLogix doesn’t work either.

If not getting any FSLogix error and no profile is created in the storage account after logging in, check your FSLogix configuration from step 8 and the assignments in Intune.
Kerberos errors
It is also possible that you get an error that the network path cannot be found. This states that the kerberos connection is not working. You can use this command to check the configuration:
POWERSHELL
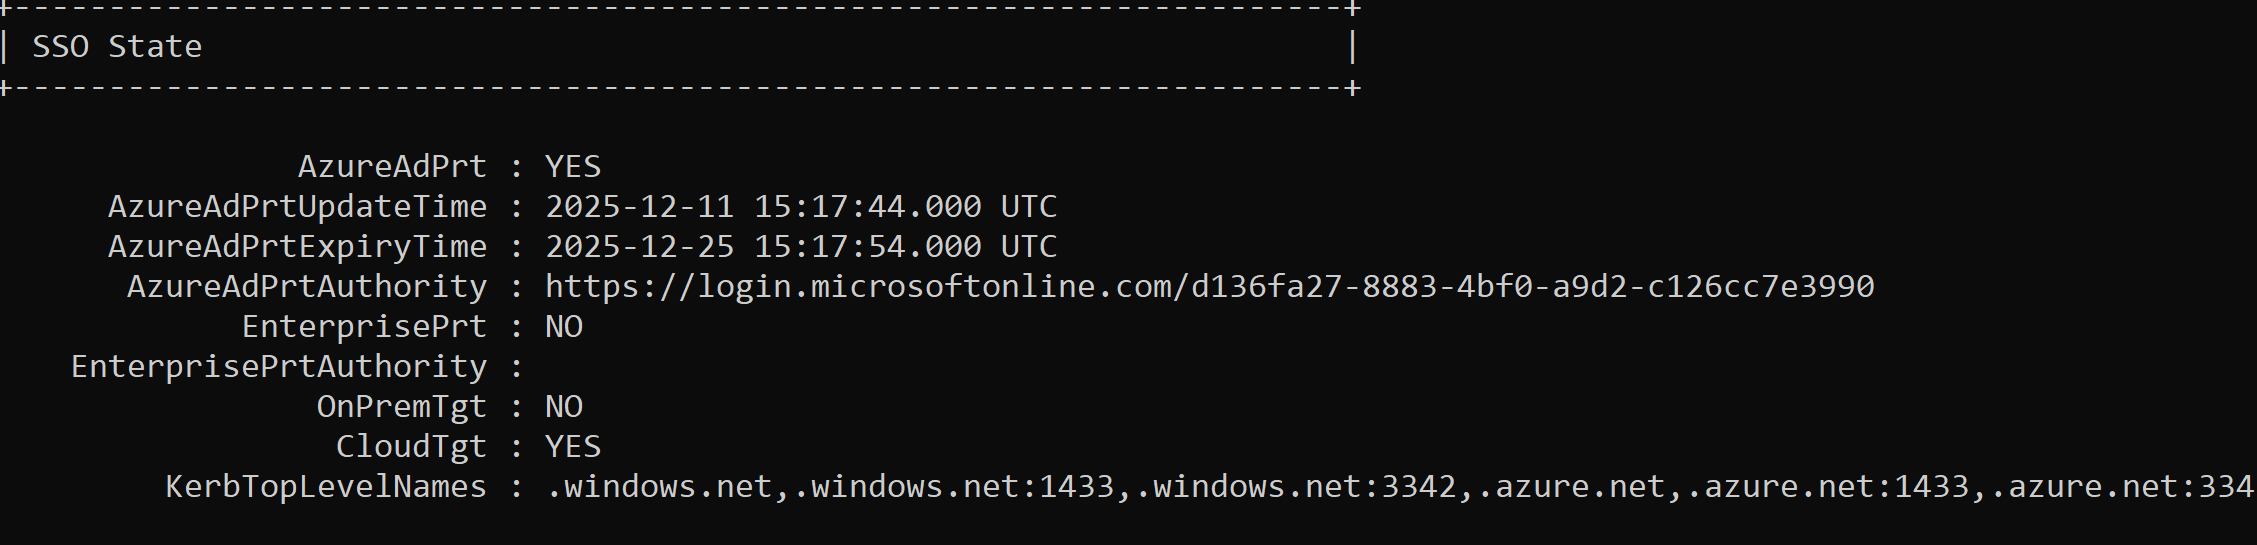
dsregcmd /statusThis returns an overview with the desktop configuration with Entra and Intune.
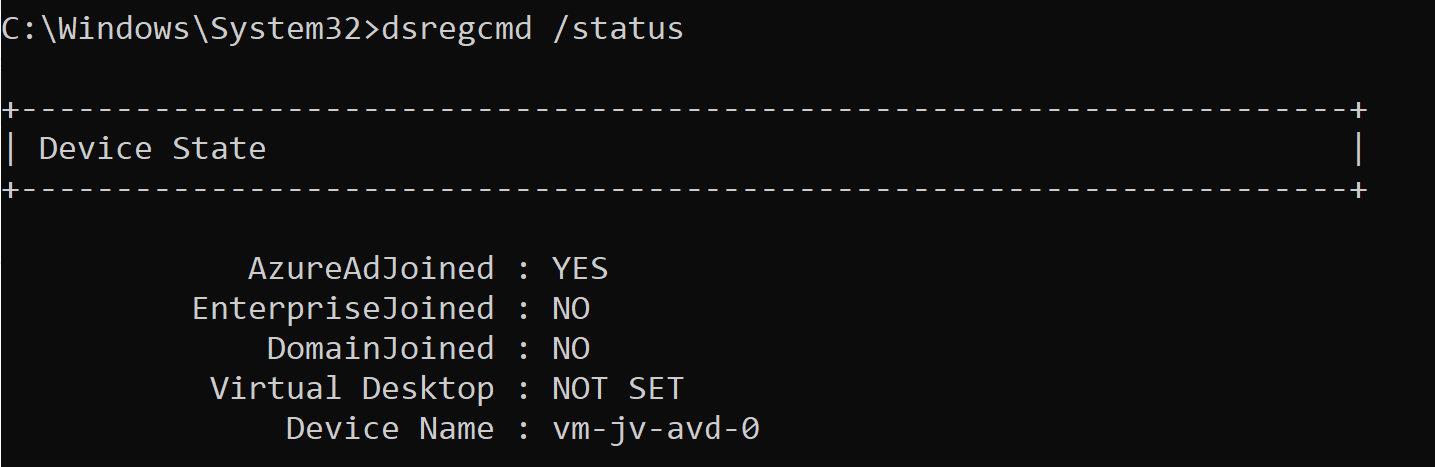
This overview shows that the Azure AD primary refresh token is active and that the Cloud TGT option is available. This must both be yes for the authentication to work.
And to check if the Kerberos tickets is given, you can run this command:
POWERSHELL
klist get cifs/sajvazurevirtualdesktop.file.core.windows.netChange the name to your storage account name.
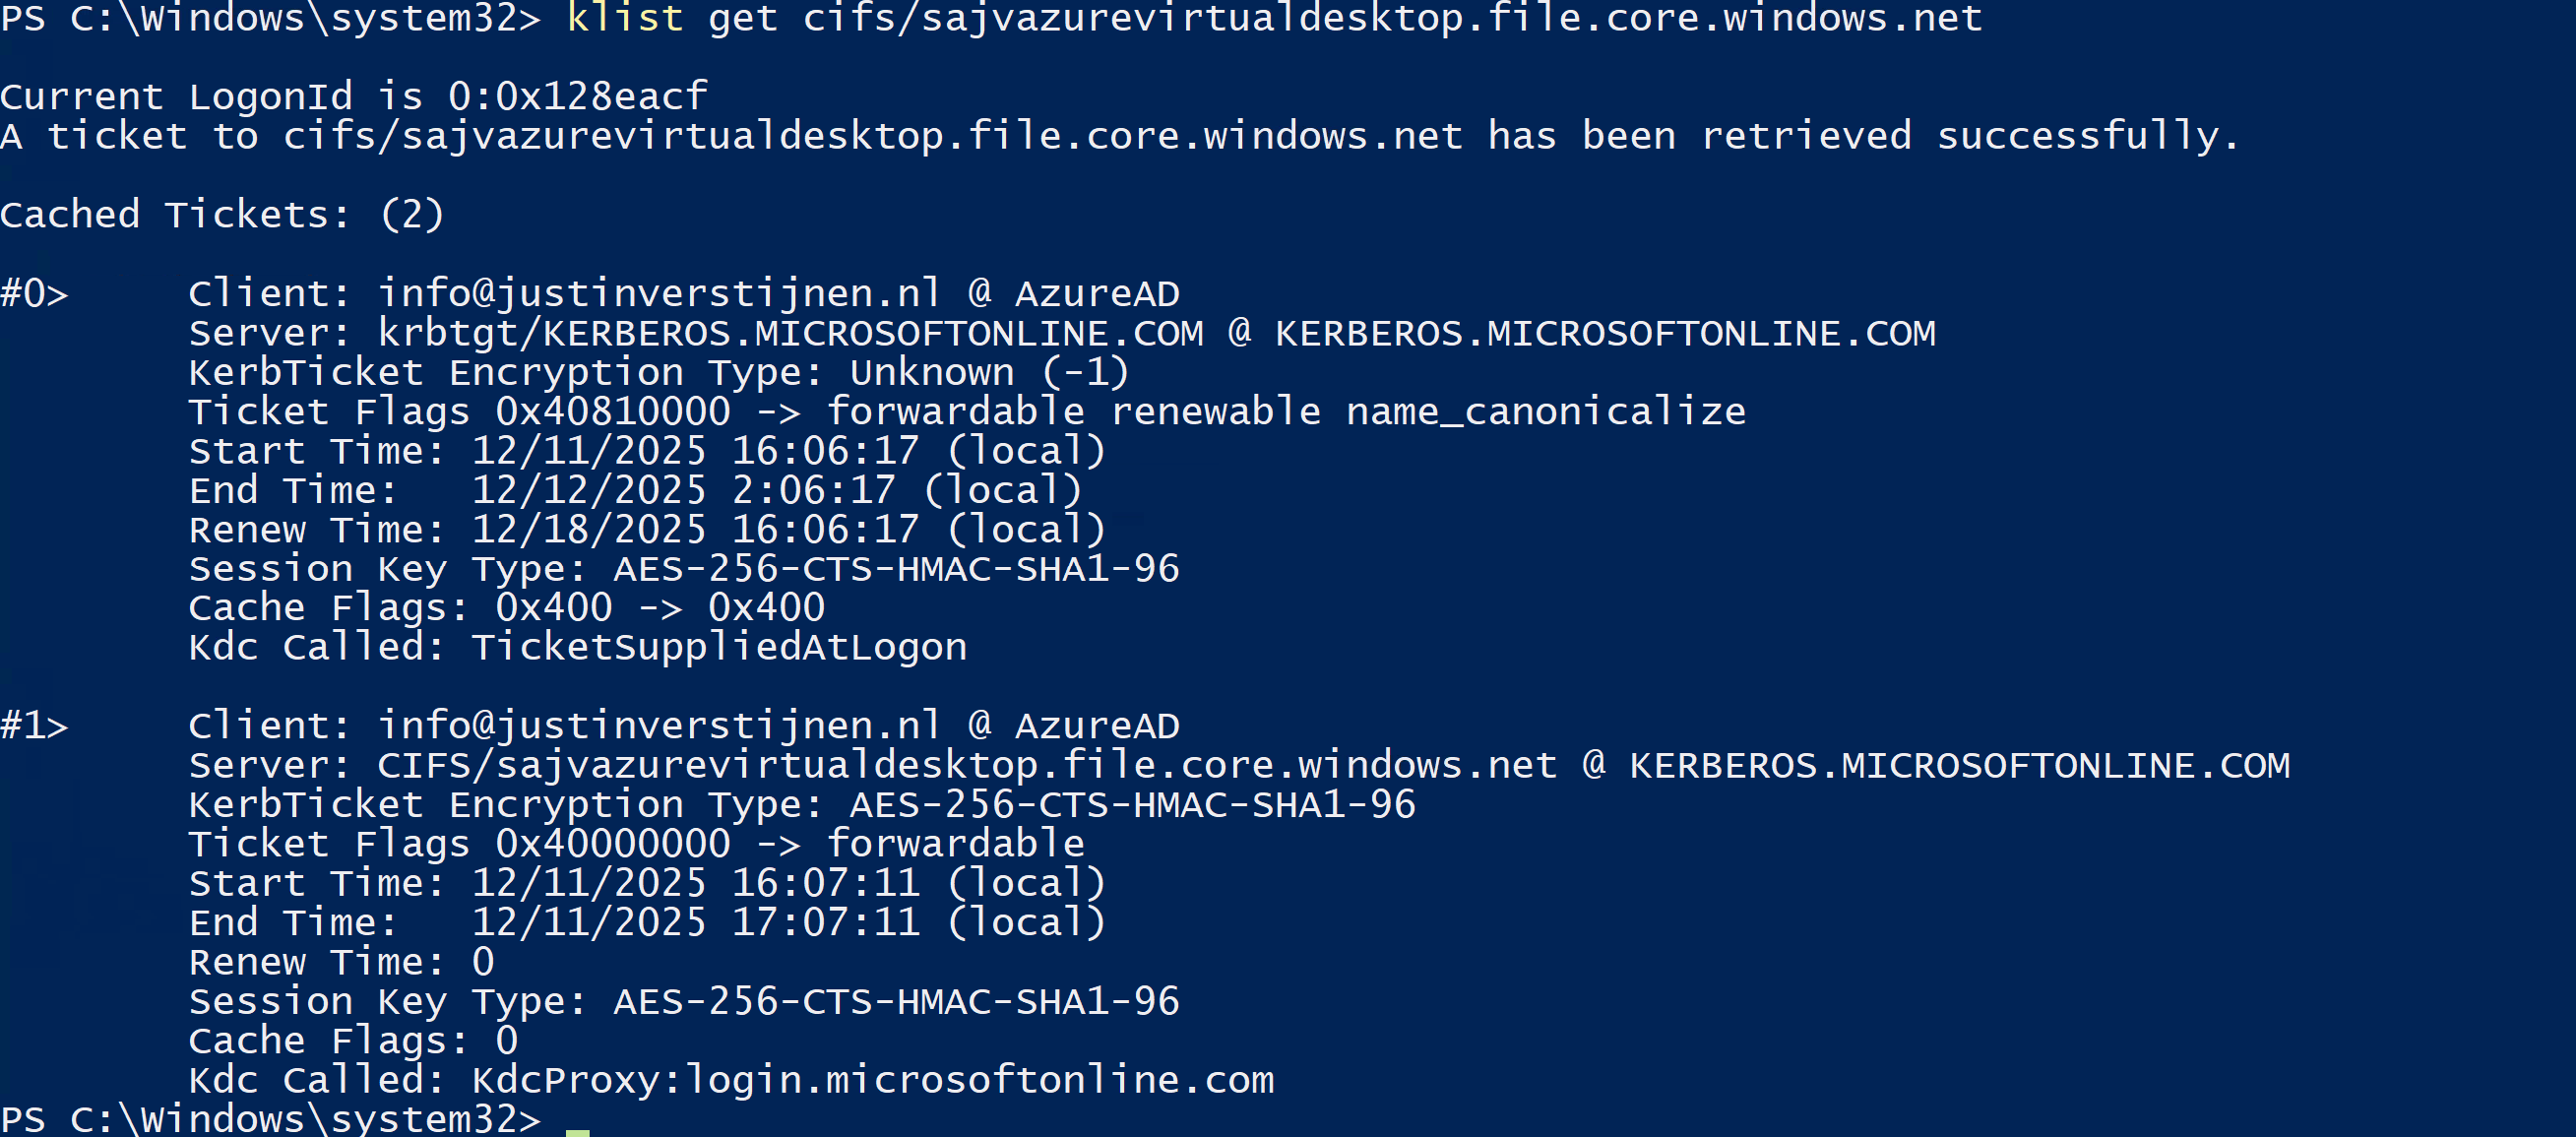
In my case, I get two tickets who are given to my user. If this shows nothing, there is anything wrong with your Kerberos configuration.
Summary
This new (in preview at the time of writing) Microsoft Entra Kerberos option is a great way to finally host an Azure VIrtual Desktop environment completely cloud only and without the need for extra servers for a traditional Active Directory. Hosting servers is a time consuming and less secure manner.
Going completely cloud only enhances the manageability of the environement keeps things simple to manage. It also makes your environment more secure which are things we like.
Thank you for reading this page and I hope it was helpful.
Sources
These sources helped me by writing and research for this post;
- https://learn.microsoft.com/en-us/entra/identity/authentication/kerberos#how-microsoft-entra-kerberos-works
- https://learn.microsoft.com/en-us/microsoft-365/enterprise/manage-microsoft-365-accounts?view=o365-worldwide#cloud-only
- https://learn.microsoft.com/en-us/azure/storage/files/storage-files-identity-assign-share-level-permissions?WT.mc_id=Portal-Microsoft_Azure_FileStorage&tabs=azure-portal#choose-how-to-assign-share-level-permissions
End of the page 🎉
You have reached the end of the page. You can navigate through other blog posts as well, share this post on X, LinkedIn and Reddit or return to the blog posts collection page. Thank you for visiting this post.
If you think something is wrong with this post or you want to know more, you can send me a message to one of my social profiles at: https://justinverstijnen.nl/about/
If you find this page and blog very useful and you want to leave a donation, you can use the button below to buy me a beer. Hosting and maintaining a website takes a lot of time and money. Thank you in advance and cheers :)
The terms and conditions apply to this post.
FSLogix and maximum Azure Files security
When using Azure Files and Windows 11 as operating system for Azure Virtual Desktop, we can leverage the highest SMB encryption/security…
When using Azure Files and Windows 11 as operating system for Azure Virtual Desktop, we can leverage the highest SMB encryption/security available at the moment, which is AES-256. While we can change this pretty easily, the connection to the storage account will not work anymore by default.
In this guide I will show how I got this to work in combination with the newest Kerberos Authentication.
The Maximum Security preset in the Azure Portal
We can also run the SMB security on the Maximum security preset in the Azure Portal and still run FSLogix without problems. In the Azure Portal, go to the storage account and set the security of the File share to “Maximum security”:
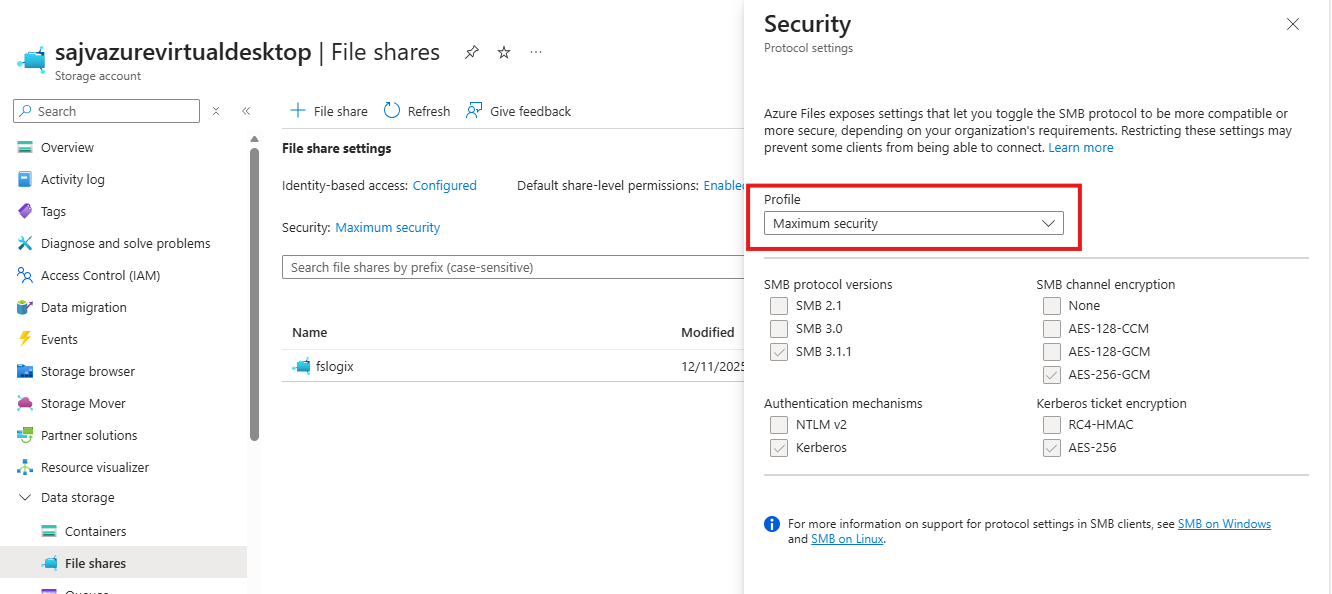
This will only allow the AES_256_GCM SMB Channel encryption, but Windows 11 defaults to the 128 version only. We now have to tell Windows to use the better secured 256 version instead, otherwise the storage account blocks your requests and logging in isn’t possible. I will do this through Intune, but you could do this with Group Policy in the same manner or with PowerShell.
POWERSHELL
Set-SmbClientConfiguration -EncryptionCiphers "AES_256_GCM" -Confirm:$falseConfigure SMB Encryption with Microsoft Intune
Go to the Intune Admin center (https://intune.microsoft.com). We need to create or change an existing policy in Intune to configure these 2 settings. This policy must be assigned to the Azure Virtual Desktop hosts.
Search for these 2 settings and select the settings:
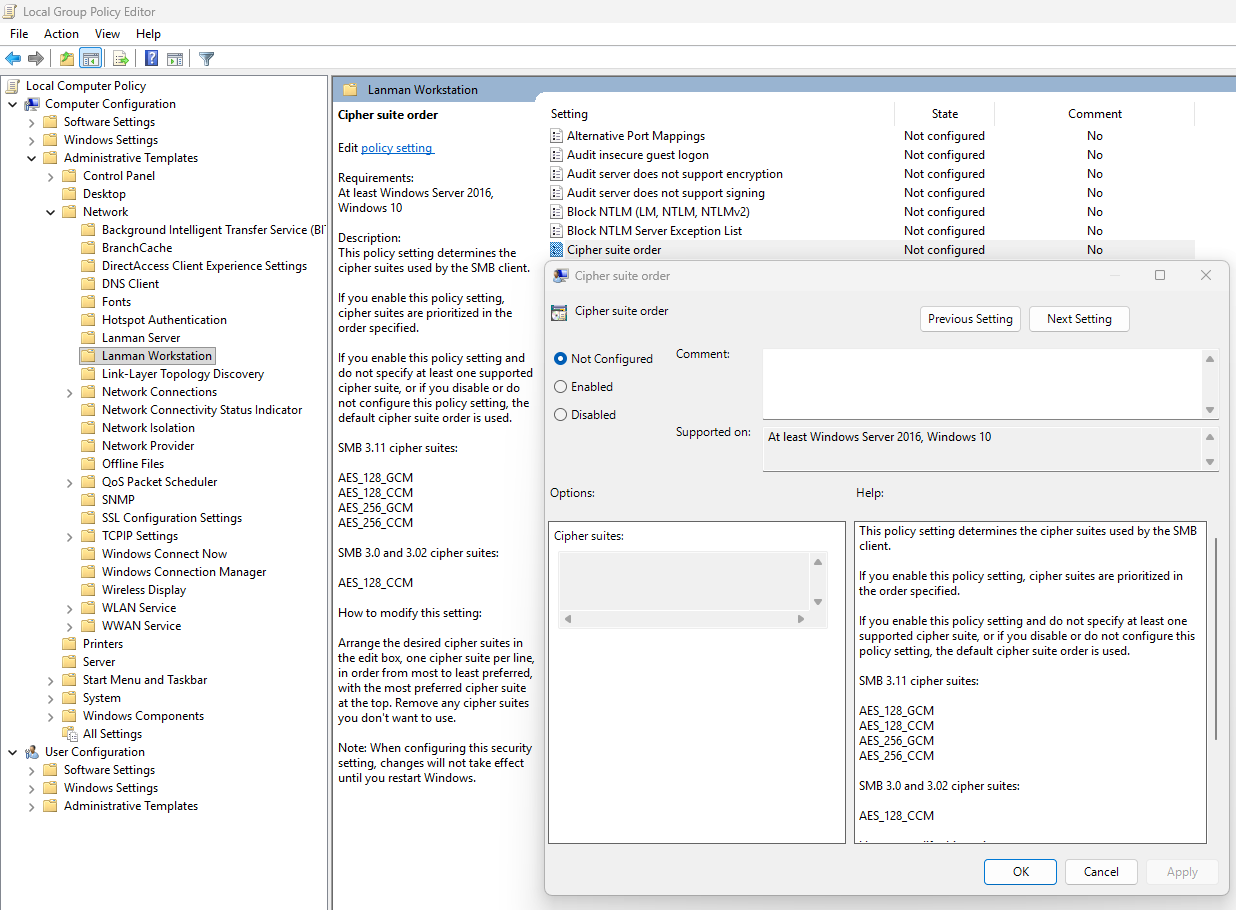
- Administrative Templates -> Network -> Lanman Workstation
- Setting name: Cipher suites
- Lanman Workstation
- Setting name: Require Encryption
Both of these options are in different categories in Intune, altough they partly work with each other to facilitate SMB security.
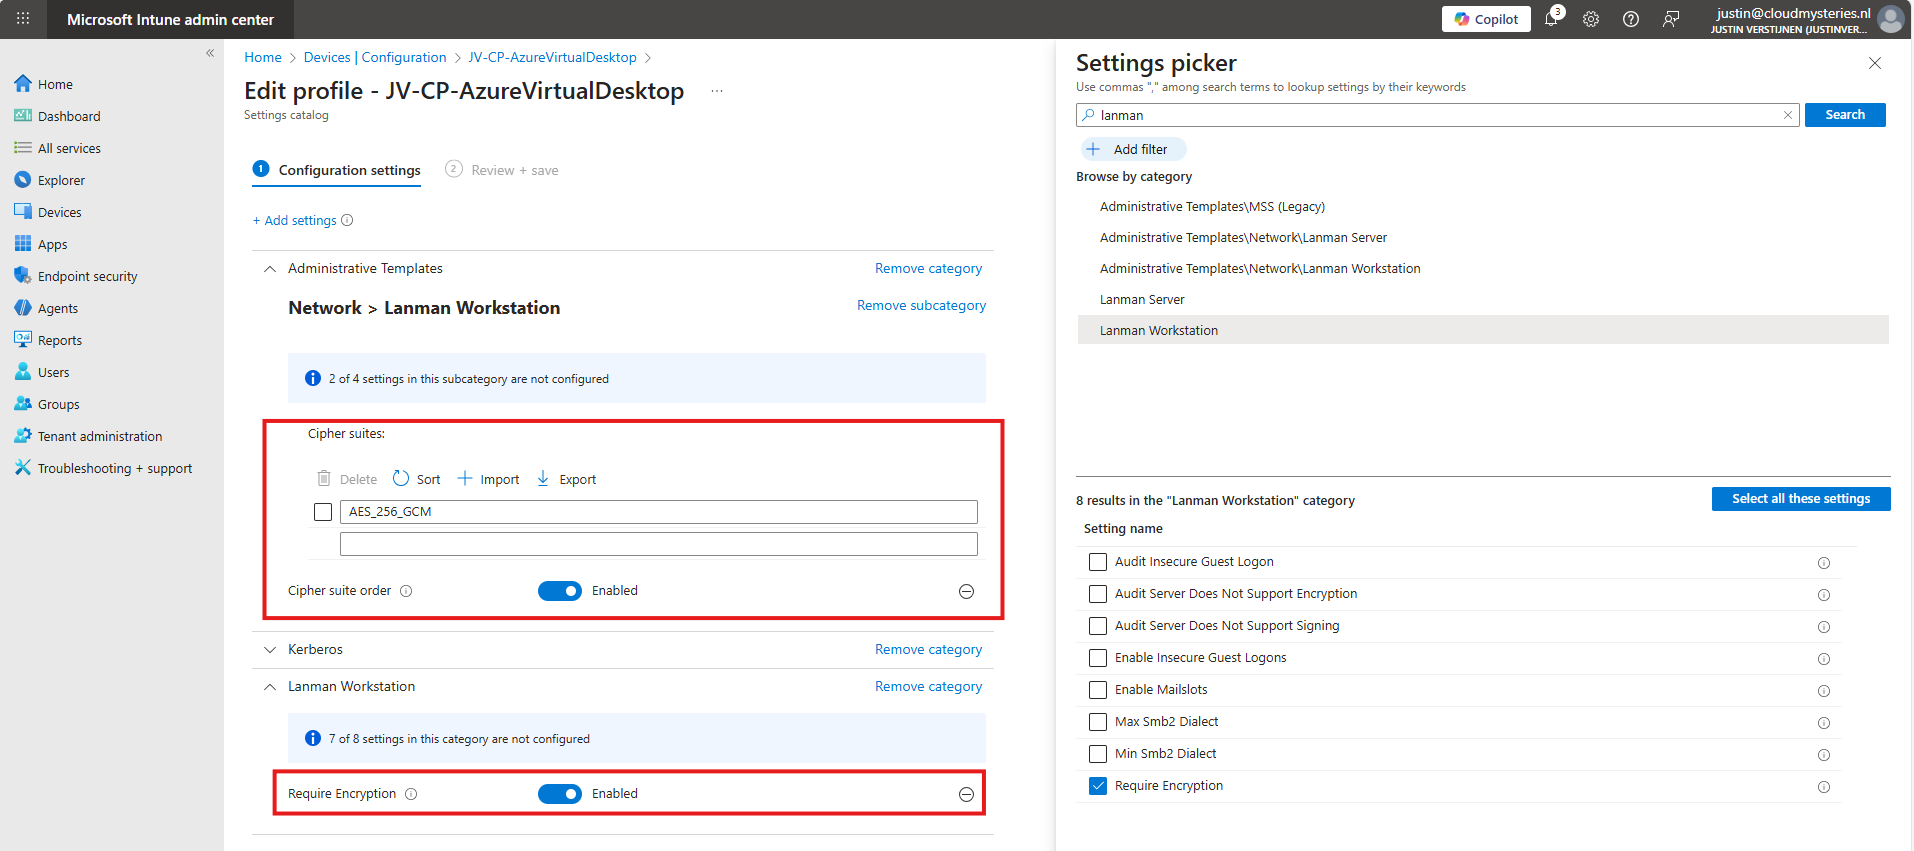
Set the Encryption to “Enabled” and paste this line into the Cipher Suites field:
JSON
AES_256_GCMIf you still want to use more ciphers as backup options, you can add every cipher to a new item in Intune, where the top Cipher is used first.
JSON
AES_256_GCM
AES_256_CCM
AES_128_GCM
AES_128_CCM
This is stated by the local group policy editor (gpedit.msc):
After finishing this configuration, save the policy and assign it to the group with your session hosts. Then reboot to make this new changes active.
Let’s test the configuration
Now that we have set the configuration, I have rebooted the Azure Virtual Desktop session host, and let the Intune settings apply. This was seconds after reboot. When logged into the hostpool the sign in was working again, using the highest SMB ecryption settings:
Summary
The Maximum security preset for Azure Files applies the most restrictive security configuration available to minimize the attack surface. It enforces:
- Private network access only
- Encryption for data in transit
- Strong authentication and authorization controls (such as Entra-based access with Kerberos only) and blocks older SMB and NTLM protocols
This preset is intended for highly sensitive workloads with strict compliance and security requirements.
Thank you for reading this guide and I hope it was helpful.
Sources
These sources helped me by writing and research for this post;
End of the page 🎉
You have reached the end of the page. You can navigate through other blog posts as well, share this post on X, LinkedIn and Reddit or return to the blog posts collection page. Thank you for visiting this post.
If you think something is wrong with this post or you want to know more, you can send me a message to one of my social profiles at: https://justinverstijnen.nl/about/
If you find this page and blog very useful and you want to leave a donation, you can use the button below to buy me a beer. Hosting and maintaining a website takes a lot of time and money. Thank you in advance and cheers :)
The terms and conditions apply to this post.
Azure Virtual Desktop RDP Properties
In this post, we will be looking at the most popular different RDP Properties we can use in Azure Virtual Desktop.I will be talking about…
In this post, we will be looking at the most popular different RDP Properties we can use in Azure Virtual Desktop.
I will be talking about local PC’s and remote PC’s alot, where the remote PC is of course the Azure Virtual Desktop host and the local PC is the device you can physically touch.
What are RDP properties?
RDP properties are specific settings to change your RDP experience. This can be to play sound on the remote or local PC, enable or disable printer redirection, enable or disable clipboard between computers and what to do if connection is lost.
In the previous years, this was also the case for normal RDP files or connections to Remote Desktop Services, but Azure Virtual Desktop brings this to a nice and centralized system which we can change to our and our users’ preference.
How to configure RDP properties
The 3 most popular RDP properties which I also used a lot in the past are these below.
Clipboard redirection
redirectclipboard:i:0
This setting enables or disables if we are allowed to use the clipboard between the local PC and the remote PC. We can find this on the tab “Device redirection”:

The default option is “disabled”, so text and files are not transferable between computers. Enabling this means that users this can do, but we trade in some security. We can configure this in the Azure Portal GUI or by changing the setting on the “Advanced Settings” tab.
Display RDP connection bar
displayconnectionbar:i:0
We can hide the RDP connection bar by default for users. They can only bring it up with the shortcut “CTRL+ALT+HOME”. This makes the user experience a bit better as they don’t have that connection bar in place for the whole session. By default, this option is enabled, so 1.
There is no way to configure this in the GUI, only through the advanced settings. This also doesn’t have official AVD support but can confirm it works like expected.
Drive redirection
drivestoredirect:s:dynamicdrives
Changing the drive redirection setting ensures that drives are only redirected when you want this. We can use the option “DynamicDrives” which only redirects drives that are connected after the RDP session is connected.
My most used RDP settings
My full and most used configuration is here:
POWERSHELL
audioqualitymode:i:2;displayconnectionbar:i:0;drivestoredirect:s:dynamicdrives;usbdevicestoredirect:s:*;redirectclipboard:i:0;redirectprinters:i:1;audiomode:i:0;videoplaybackmode:i:1;devicestoredirect:s:*;redirectcomports:i:1;redirectsmartcards:i:1;enablecredsspsupport:i:1;redirectwebauthn:i:1;use multimon:i:1;enablerdsaadauth:i:0;autoreconnection enabled:i:1;audiocapturemode:i:1;camerastoredirect:s:*;screen mode id:i:2Mostly the default configuration, but I like the Connection bar hided by default.
The location to change RDP properties
We can find the RDP properties in the hostpool of your environment, and then on “RDP properties”:
We can find the advanced options at the “Advanced” page:
Full list of RDP properties
Here is a list with all RDP properties published, with the support for Azure Virtual Desktop and RDP files considered.
All RDP options are in the convention: option:type:value
You can search through the list with the search button, and support for AVD and seperate .RDP files is added.
RDP Settings Table
| Property | Type | Value (by default) | Support AVD | Support RDP | Description |
|---|---|---|---|---|---|
administrativesession | i | 0 | No | Yes | Connect to the administrative session (console) of the remote computer. 0 - Do not use the administrative session 1 - Connect to the administrative session |
allowdesktopcomposition | i | 0 | No | Yes | Determines whether desktop composition (needed for Aero) is permitted when you log on to the remote computer. 0 - Disable desktop composition in the remote session 1 - Desktop composition is permitted |
allowfontsmoothing | i | 0 | No | Yes | Determines whether font smoothing may be used in the remote session. 0 - Disable font smoothing in the remote session 1 - Font smoothing is permitted |
alternatefulladdress | s | No | Yes | Specifies an alternate name or IP address of the remote computer that you want to connect to. Will be overruled by RDP+. | |
alternateshell | s | No | Yes | Specifies a program to be started automatically when you connect to a remote computer. The value should be a valid path to an executable file. This setting only works when connecting to Windows Server instances. | |
audiocapturemode | i | 0 | No | Yes | Determines how sounds captured (recorded) on the local computer are handled when you are connected to the remote computer. 0 - Do not capture audio from the local computer 1 - Capture audio from the local computer and send to the remote computer |
audiomode | i | 0 | No | Yes | Determines how sounds on a remote computer are handled when you are connected to the remote computer. 0 - Play sounds on the local computer 1 - Play sounds on the remote computer 2 - Do not play sounds |
audioqualitymode | i | 0 | No | Yes | Determines the quality of the audio played in the remote session. 0 - Dynamically adjust audio quality based on available bandwidth 1 - Always use medium audio quality 2 - Always use uncompressed audio quality |
authenticationlevel | i | 2 | No | Yes | Determines what should happen when server authentication fails. 0 - If server authentication fails, connect without giving a warning 1 - If server authentication fails, do not connect 2 - If server authentication fails, show a warning and allow the user to connect or not 3 - Server authentication is not required This setting will be overruled by RDP+. |
autoreconnectmaxretries | i | 20 | No | Yes | Determines the maximum number of times the client computer will try to. |
autoreconnectionenabled | i | 1 | No | Yes | Determines whether the client computer will automatically try to reconnect to the remote computer if the connection is dropped. 0 - Do not attempt to reconnect 1 - Attempt to reconnect |
bandwidthautodetect | i | 1 | No | Yes | Enables the option for automatic detection of the network type. Used in conjunction with networkautodetect. Also see connection type. 0 - Do not enable the option for automatic network detection 1 - Enable the option for automatic network detection |
bitmapcachepersistenable | i | 1 | No | Yes | Determines whether bitmaps are cached on the local computer (disk-based cache). Bitmap caching can improve the performance of your remote session. 0 - Do not cache bitmaps 1 - Cache bitmaps |
bitmapcachesize | i | 1500 | No | Yes | Specifies the size in kilobytes of the memory-based bitmap cache. The maximum value is 32000. |
camerastoredirect | s | No | Yes | Determines which cameras to redirect. This setting uses a semicolon-delimited list of KSCATEGORY_VIDEO_CAMERA interfaces of cameras enabled for redirection.No | |
compression | i | 1 | No | Yes | Determines whether the connection should use bulk compression. 0 - Do not use bulk compression 1 - Use bulk compression |
connecttoconsole | i | 0 | No | Yes | Connect to the console session of the remote computer. 0 - Connect to a normal session 1 - Connect to the console screen |
connectiontype | i | 2 | No | Yes | Specifies pre-defined performance settings for the Remote Desktop session. 1 - Modem (56 Kbps) 2 - Low-speed broadband (256 Kbps - 2 Mbps) 3 - Satellite (2 Mbps - 16 Mbps with high latency) 4 - High-speed broadband (2 Mbps - 10 Mbps) 5 - WAN (10 Mbps or higher with high latency) 6 - LAN (10 Mbps or higher) 7 - Automatic bandwidth detection. Requires bandwidthautodetect. By itself, this setting does nothing. When selected in the RDC GUI, this option changes several performance related settings (themes, animation, font smoothing, etcetera). These separate settings always overrule the connection type setting. |
desktopsizeid | i | 0 | Yes | Yes | Specifies pre-defined dimensions of the Remote Desktop session. 0 - 640x480 1 - 800x600 2 - 1024x768 3 - 1280x1024 4 - 1600x1200 This setting is ignored when either /w and /h, or desktopwidth and desktopheight are already specified. |
desktopheight | i | 600 | Yes | Yes | The height (in pixels) of the Remote Desktop session. |
desktopwidth | i | 800 | Yes | Yes | The width (in pixels) of the Remote Desktop session. |
devicestoredirect | s | No | Yes | Determines which supported Plug and Play devices on the client computer will be redirected and available in the remote session. No value specified - Do not redirect any supported Plug and Play devices. * - Redirect all supported Plug and Play devices, including ones that are connected later. DynamicDevices - Redirect any supported Plug and Play devices that are connected later. The hardware ID for one or more Plug and Play devices - Redirect the specified supported Plug and Play device(s) | |
disablefullwindowdrag | i | 1 | No | Yes | Determines whether window content is displayed when you drag the window to a new location. 0 - Show the contents of the window while dragging 1 - Show an outline of the window while dragging |
disablemenuanims | i | 1 | No | Yes | Determines whether menus and windows can be displayed with animation effects in the remote session. 0 - Menu and window animation is permitted 1 - No menu and window animation |
disablethemes | i | 0 | No | Yes | Determines whether themes are permitted when you log on to the remote computer. 0 - Themes are permitted 1 - Disable theme in the remote session |
disablewallpaper | i | 1 | No | Yes | Determines whether the desktop background is displayed in the remote session. 0 - Display the wallpaper 1 - Do not show any wallpaper |
disableconnectionsharing | i | 0 | No | Yes | Determines whether a new Terminal Server session is started with every launch of a RemoteApp to the same computer and with the same credentials. 0 - No new session is started. The currently active session of the user is shared 1 - A new login session is started for the RemoteApp |
disableremoteappcapscheck | i | 0 | No | Yes | Specifies whether the Remote Desktop client should check the remote computer for RemoteApp capabilities. 0 - Check the remote computer for RemoteApp capabilities before logging in 1 - Do not check the remote computer for RemoteApp capabilities |
displayconnectionbar | i | 1 | No | Yes | Determines whether the connection bar appears when you are in full screen mode. Press CTRL+ALT+HOME to bring it back temporarily. 0 - Do not show the connection bar 1 - Show the connection bar Will be overruled by RDP+ when using the parameter. |
domain | s | No | Yes | Configures the domain of the user. | |
drivestoredirect | s | No | Yes | Determines which local disk drives on the client computer will be redirected and available in the remote session. No value specified - Do not redirect any drives. * - Redirect all disk drives, including drives that are connected later. DynamicDrives - Redirect any drives that are connected later. | |
enablecredsspsupport | i | 1 | No | Yes | Determines whether Remote Desktop will use CredSSP for authentication if it’s available. 0 - Do not use CredSSP, even if the operating system supports it 1 - Use CredSSP, if the operating system supports it |
enablesuperpan | i | 0 | No | Yes | Determines whether SuperPan is enabled or disabled. SuperPan allows the user to navigate a remote desktop in full-screen mode without scroll bars, when the dimensions of the remote desktop are larger than the dimensions of the current client window. The user can point to the window border, and the desktop view will scroll automatically in that direction. 0 - Do not use SuperPan. The remote session window is sized to the client window size. 1 - Enable SuperPan. The remote session window is sized to the dimensions specified through /w and /h, or through desktopwidth and desktopheight. |
encoderedirectedvideocapture | i | 1 | No | Yes | Enables or disables encoding of redirected video. 0 - Disable encoding of redirected video 1 - Enable encoding of redirected video |
fulladdress | s | No | Yes | Specifies the name or IP address (and optional port) of the remote computer that you want to connect to. | |
gatewaycredentialssource | i | 4 | No | Yes | Specifies the credentials that should be used to validate the connection with the RD Gateway. 0 - Ask for password (NTLM) 1 - Use smart card 4 - Allow user to select later |
gatewayhostname | s | No | Yes | Specifies the hostname of the RD Gateway. | |
gatewayprofileusagemethod | i | 0 | No | Yes | Determines the RD Gateway authentication method to be used. 0 - Use the default profile mode, as specified by the administrator 1 - Use explicit settings |
gatewayusagemethod | i | 4 | No | Yes | Specifies if and how to use a Gateway) server. 0 - Do not use an RD Gateway server 1 - Always use an RD Gateway, even for local connections 2 - Use the RD Gateway if a direct connection cannot be made to the remote computer (i.e. bypass for local addresses) 3 - Use the default RD Gateway settings |
keyboardhook | i | 2 | Yes | Yes | Determines how Windows key combinations are applied when you are connected to a remote computer. 0 - Windows key combinations are applied on the local computer 1 - Windows key combinations are applied on the remote computer 2 - Windows key combinations are applied in full-screen mode only |
negotiate security layer | i | 1 | No | Yes | Determines whether the level of security is negotiated. 0 - Security layer negotiation is not enabled and the session is started by using Secure Sockets Layer (SSL) 1 - Security layer negotiation is enabled and the session is started by using x.224 encryption |
networkautodetect | i | 1 | No | Yes | Determines whether to use auomatic network bandwidth detection or not. Requires the option bandwidthautodetect to be set and correlates with connection type 7. 0 - Use automatic network bandwitdh detection 1 - Do not use automatic network bandwitdh detection |
password51 | b | No | Yes | The user password in a binary hash value. | |
pinconnectionbar | i | 1 | No | Yes | Determines whether or not the connection bar should be pinned to the top of the remote session upon connection when in full screen mode. 0 - The connection bar should not be pinned to the top of the remote session 1 - The connection bar should be pinned to the top of the remote session |
promptforcredentials | i | 0 | No | Yes | Determines whether Remote Desktop Connection will prompt for credentials when connecting to a remote computer for which the credentials have been previously saved. 0 - Remote Desktop will use the saved credentials and will not prompt for credentials. 1 - Remote Desktop will prompt for credentials. This setting is ignored by RDP+. |
promptforcredentialsonclient | i | 0 | No | Yes | Determines whether Remote Desktop Connection will prompt for credentials when connecting to a server that does not support server authentication. 0 - Remote Desktop will not prompt for credentials 1 - Remote Desktop will prompt for credentials |
promptcredentialonce | i | 1 | No | Yes | When connecting through an RD Gateway, determines whether RDC should use the same credentials for both the RD Gateway and the remote computer. 0 - Remote Desktop will not use the same credentials 1 - Remote Desktop will use the same credentials for both the RD gateway and the remote computer |
publicmode | i | 0 | No | Yes | Determines whether Remote Desktop Connection will be started in public mode. 0 - Remote Desktop will not start in public mode 1 - Remote Desktop will start in public mode and will not save any user data (credentials, bitmap cache, MRU) on the local machine |
redirectclipboard | i | 1 | Yes | Yes | Determines whether the clipboard on the client computer will be redirected and available in the remote session and vice versa. 0 - Do not redirect the clipboard 1 - Redirect the clipboard |
redirectcomports | i | 0 | Yes | Yes | Determines whether the COM (serial) ports on the client computer will be redirected and available in the remote session. 0 - The COM ports on the local computer are not available in the remote session 1 - The COM ports on the local computer are available in the remote session |
redirectdirectx | i | 1 | No | Yes | Determines whether DirectX will be enabled for the remote session. 0 - Do not enable DirectX rendering 1 - Enable DirectX rendering in the remote session |
redirectedvideocaptureencodingquality | i | 0 | No | Yes | Controls the quality of encoded video. 0 - High compression video. Quality may suffer when there’s a lot of motion 1 - Medium compression 2 - Low compression video with high picture quality |
redirectlocation | i | 0 | No | Yes | Determines whether the location of the local device will be redirected and available in the remote session. 0 - The remote session uses the location of the remote computer 1 - The remote session uses the location of the local device |
redirectposdevices | i | 0 | No | Yes | Determines whether Microsoft Point of Service (POS) for .NET devices connected to the client computer will be redirected and available in the remote session. 0 - The POS devices from the local computer are not available in the remote session 1 - The POS devices from the local computer are available in the remote session |
redirectprinters | i | 1 | Yes | Yes | Determines whether printers configured on the client computer will be redirected and available in the remote session. 0 - The printers on the local computer are not available in the remote session 1 - The printers on the local computer are available in the remote session |
redirectsmartcards | i | 1 | Yes | Yes | Determines whether smart card devices on the client computer will be redirected and available in the remote session. 0 - The smart card device on the local computer is not available in the remote session 1 - The smart card device on the local computer is available in the remote session |
redirectwebauthn | i | 1 | Yes | Yes | Determines whether WebAuthn requests on the remote computer will be redirected to the local computer allowing the use of local authenticators (such as Windows Hello for Business and security key). 0 - WebAuthn requests from the remote session aren’t sent to the local computer for authentication and must be completed in the remote session 1 - WebAuthn requests from the remote session are sent to the local computer for authentication |
remoteapplicationicon | s | No | Yes | the file name of an icon file to be displayed in the while starting the RemoteApp. By default RDC will show the standard Note: Only .ico files are supported.No | |
remoteapplicationmode | i | 0 | No | Yes | Determines whether a RemoteApp shoud be launched when connecting 0 - Use a normal session and do not start a RemoteApp 1 - Connect and launch a RemoteApp |
remoteapplicationname | s | No | Yes | the name of the RemoteApp in the Remote Desktop interface while starting the RemoteApp. | |
remoteapplicationprogram | s | No | Yes | Specifies the alias or executable name of the RemoteApp. | |
screenmodeid | i | 2 | Yes | Yes | Determines whether the remote session window appears full screen when you connect to the remote computer. 1 - The remote session will appear in a window 2 - The remote session will appear full screen |
selectedmonitors | s | Yes | Yes | Specifies which local displays to use for the remote session. The selected displays must be contiguous. Requires use multimon to be set to 1. Comma separated list of machine-specific display IDs. You can retrieve IDs by calling mstsc.exe /l. The first ID listed will be set as the primary display in the session. Defaults to all displays. | |
serverport | i | 3389 | No | Yes | Defines an alternate default port for the Remote Desktop connection. Will be overruled by any port number appended to the server name. |
sessionbpp | i | 32 | No | Yes | Determines the color depth (in bits) on the remote computer when you connect. 8 - 256 colors (8 bit) 15 - High color (15 bit) 16 - High color (16 bit) 24 - True color (24 bit) 32 - Highest quality (32 bit) |
shellworkingdirectory | s | No | Yes | The working directory on the remote computer to be used if an alternate shell is specified. | |
signature | s | No | Yes | The encoded signature when using .rdp file signing. | |
signscope | s | No | Yes | Comma-delimited list of .rdp file settings for which the signature is generated when using .rdp file signing. | |
smartsizing | i | 0 | Yes | Yes | Determines whether the client computer should scale the content on the remote computer to fit the window size of the client computer when the window is resized. 0 - The client window display will not be scaled when resized 1 - The client window display will automatically be scaled when resized |
spanmonitors | i | 0 | No | Yes | Determines whether the remote session window will be spanned across multiple monitors when you connect to the remote computer. 0 - Monitor spanning is not enabled 1 - Monitor spanning is enabled |
superpanaccelerationfactor | i | 1 | No | Yes | Specifies the number of pixels that the screen view scrolls in a given direction for every pixel of mouse movement by the client when in SuperPan mode. |
usbdevicestoredirect | s | Yes | Yes | which supported RemoteFX USB devices on the client computer will be redirected and available in the remote session when you connect to a remote session that supports RemoteFX USB redirection. No value specified - Do not redirect any supported RemoteFX USB devices * - Redirect all supported RemoteFX USB devices for redirection that are not | |
usemultimon | i | 0 | Yes | Yes | Determines whether the session should use true multiple monitor support when connecting to the remote computer. 0 - Do not enable multiple monitor support 1 - Enable multiple monitor support |
username | s | No | Yes | the name of the user account that will be used to log on to the remote computer. | |
videoplaybackmode | i | 1 | No | Yes | Determines whether RDC will use RDP efficient multimedia streaming for video playback. 0 - Do not use RDP efficient multimedia streaming for video playback 1 - Use RDP efficient multimedia streaming for video playback when possible |
winposstr | s | 0,3,0,0,800,600 | No | Yes | Specifies the position and dimensions of the session window on the client computer. |
workspaceid | s | No | Yes | This setting defines the RemoteApp and Desktop ID associated with the RDP file that contains this setting. |
Summary
This page contains a lot of different RDP settings which we can still use today. Some of the RDP settings are categorized by Microsoft as not supported but will do their work in Azure Virtual Desktop too, for example the option to hide the connection bar by default.
Sources
These sources helped me by writing and research for this post;
Thank you for reading this post and I hope it was helpful!
End of the page 🎉
You have reached the end of the page. You can navigate through other blog posts as well, share this post on X, LinkedIn and Reddit or return to the blog posts collection page. Thank you for visiting this post.
If you think something is wrong with this post or you want to know more, you can send me a message to one of my social profiles at: https://justinverstijnen.nl/about/
If you find this page and blog very useful and you want to leave a donation, you can use the button below to buy me a beer. Hosting and maintaining a website takes a lot of time and money. Thank you in advance and cheers :)
The terms and conditions apply to this post.
Azure Compute Gallery and (AVD) VM images
Azure Compute Gallery is a great service in Azure to store, capture and maintain your VM images. This can be helpful when deploying…
Azure Compute Gallery is a great service in Azure to store, capture and maintain your VM images. This can be helpful when deploying multiple similar VMs. Use cases of this can be VM Scale Sets, webservers , containers or Azure Virtual Desktop session hosts.
In this blog post, I will tell more about Azure Compute Gallery, how to use it when imaging VMs and how it can help you storing and maintaining images for your VMs.
Requirements
- Around 40 minutes of your time
- Basic knowledge of (Windows) VMs
- Basic knowledge of Azure
- An Azure subscription to test the functionality
What is Azure Compute Gallery?
Azure Compute Gallery (ACG) is a service in Azure that helps you storing, categorizing and maintaining images of your virtual machines. This can be really helpful when needing to deploy similar virtual machines, which we do for Virtual Machine Scale Sets but also for Azure Virtual Desktop. Those are 2 services where similar images needs to be deployed. You can also build “specialized” images for different use cases where similarity is not a requirement, like Active Directory Domain Controllers or SQL/Application servers.
The features of Azure Compute Gallery:
- Image versioning: We can build our own versioning and numbering for images, storing newer images under a new version number for documentation and testing purposes. This makes it easy to rollback to a previous version if something is wrong.
- Global Replication: Images can be distributed across multiple regions for more availability and faster deployment
- Sharing of images: You can share Azure Compute Gallery images with tenants outside of your own organization, especially useful when you have Azure Landing Zones
- Security and Access control: Access to different images and versions can be restricted through Azure RBAC.
How does Azure Compute Gallery work?
Azure Compute Gallery itself is a sort specialized storage account for storing images only. In the gallery, you have a VM definition, which is a group of images for a specific use case and under the definitions, we put the images itself. All of this looks like this:
This is an example of a use-case of Azure Compute Gallery, where we store images for Azure Virtual Desktop VMs and for our Webservers, which we re-image every month in this case.
Azure Compute Gallery vs Managed Images
Azure Compute Gallery has some advantages over the “older” and more basic Managed Images which you may use. Let’s dive into the key differences:
| Feature | Azure Compute Gallery | Managed Images |
| Creating and storing generalized and specialized images | ✅ | ✅ |
| Region availability | ✅ | ❌ |
| Versioning | ✅ | ❌ |
| Trusted Launch VMs (TPM/Secure Boot) | ✅ | ❌ |
Pricing of Azure Compute Gallery
The costs of Azure Compute Gallery is based on:
- How much images you store
- How many regions you store a copy for availability
- The storage tier you run the images on
In my exploratory example, I had a compute gallery active for around 24 hours on Premium SSD storage with one replica, and the costs of this were 2 cents:

This was a VM image with almost nothing installed, but let it increase to 15 cents per 24 hours (5 euro per month) and it still is 100% worth the money.
Create a Azure Compute Gallery
Let’s dive into the Azure Portal, and navigate to “Azure Compute Gallery” to create a new gallery:
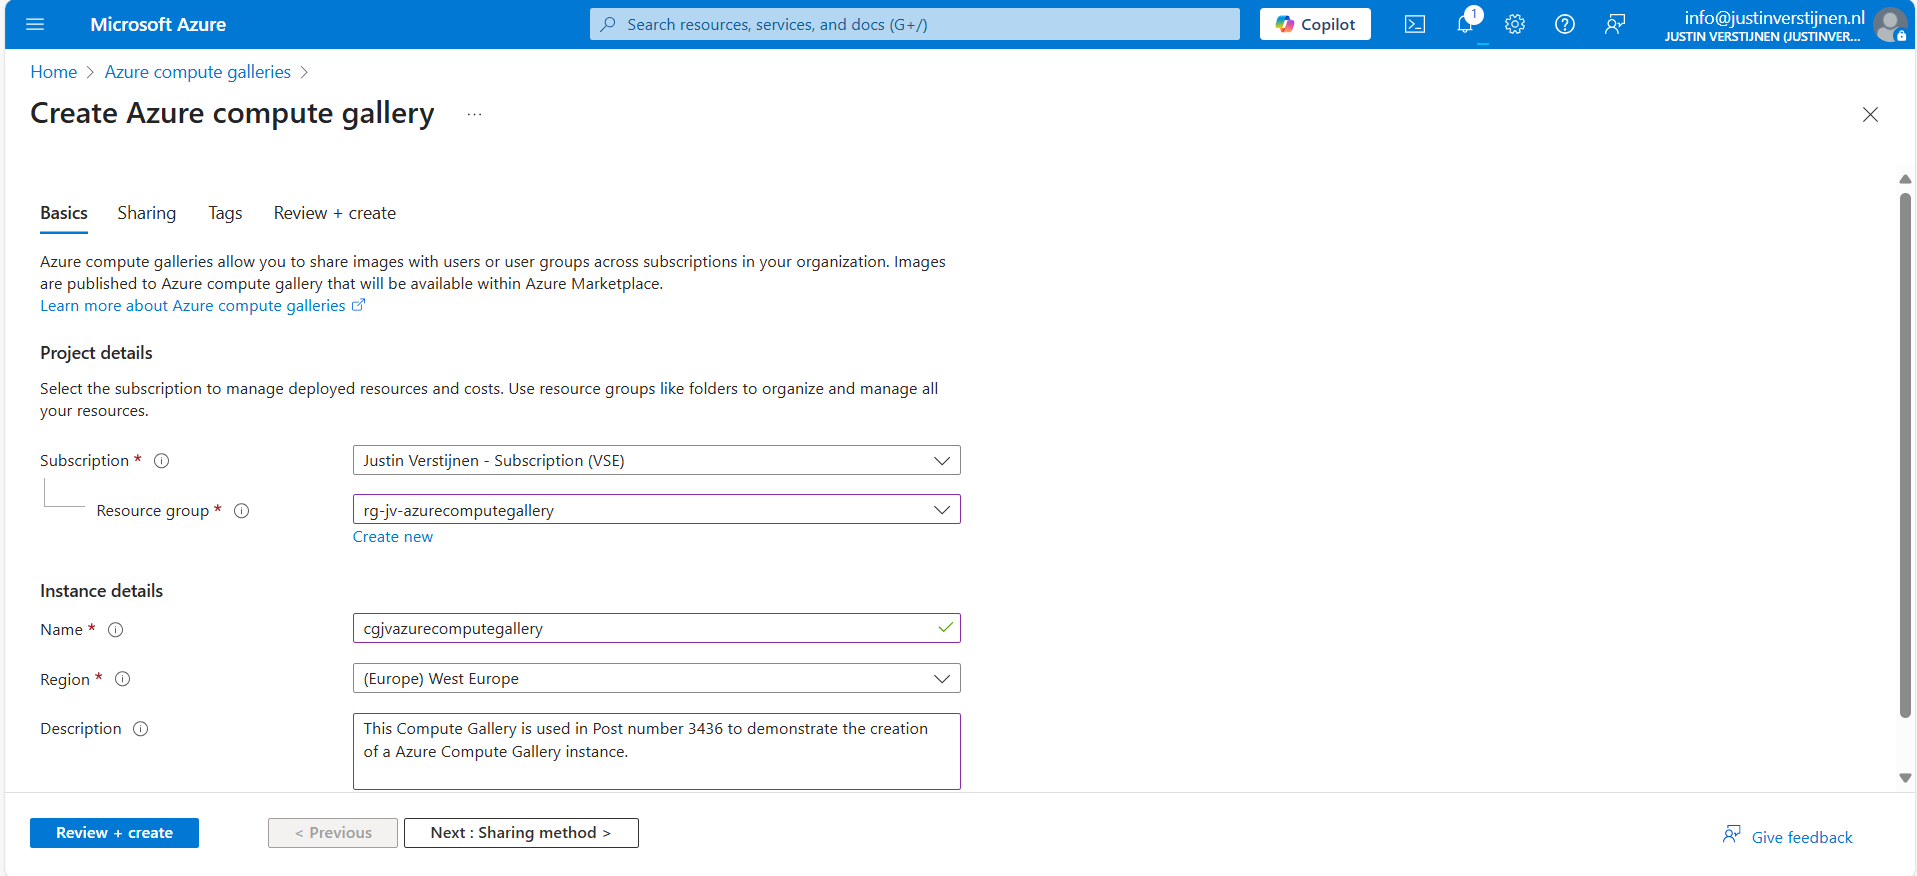
Give the gallery a name, place it in a resource group and give it a clear description. Then go to “Sharing method”.
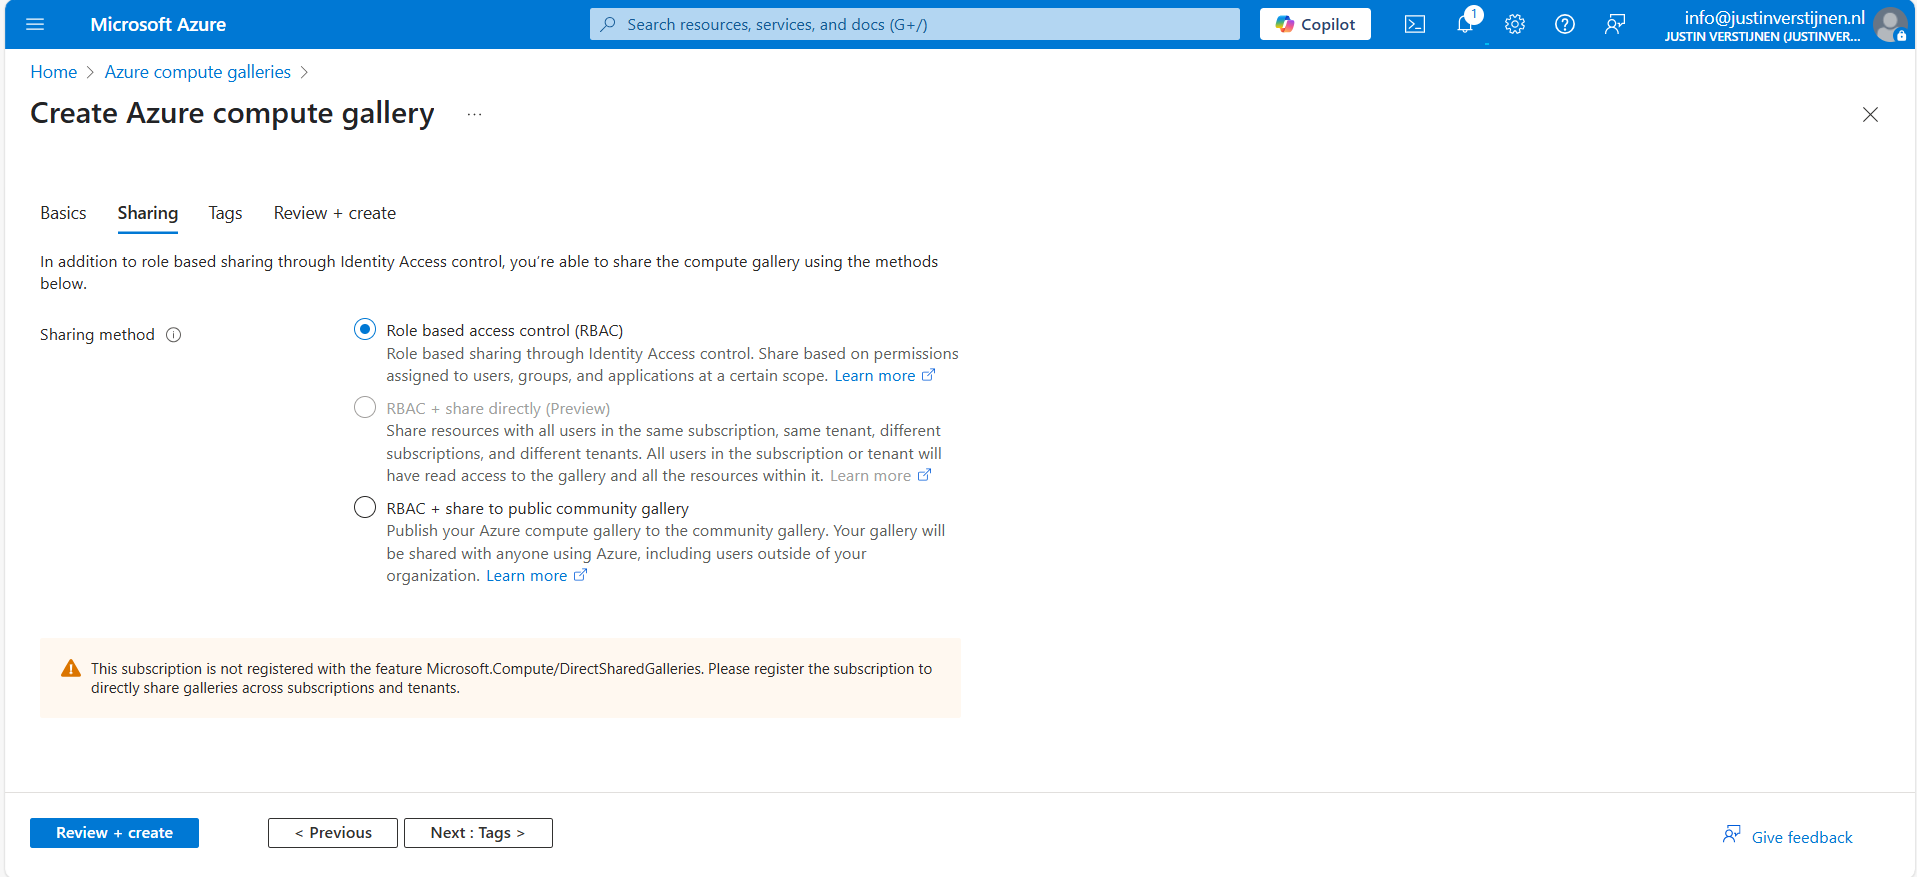
Here we have 3 options, where we will cover only 2:
- Role based access contol (RBAC): The gallery and images are only available to the people you give access to in the same tenant
- RBAC + share to public community gallery: The gallery and images can be published to the community gallery to be used by everyone using Azure, found here:
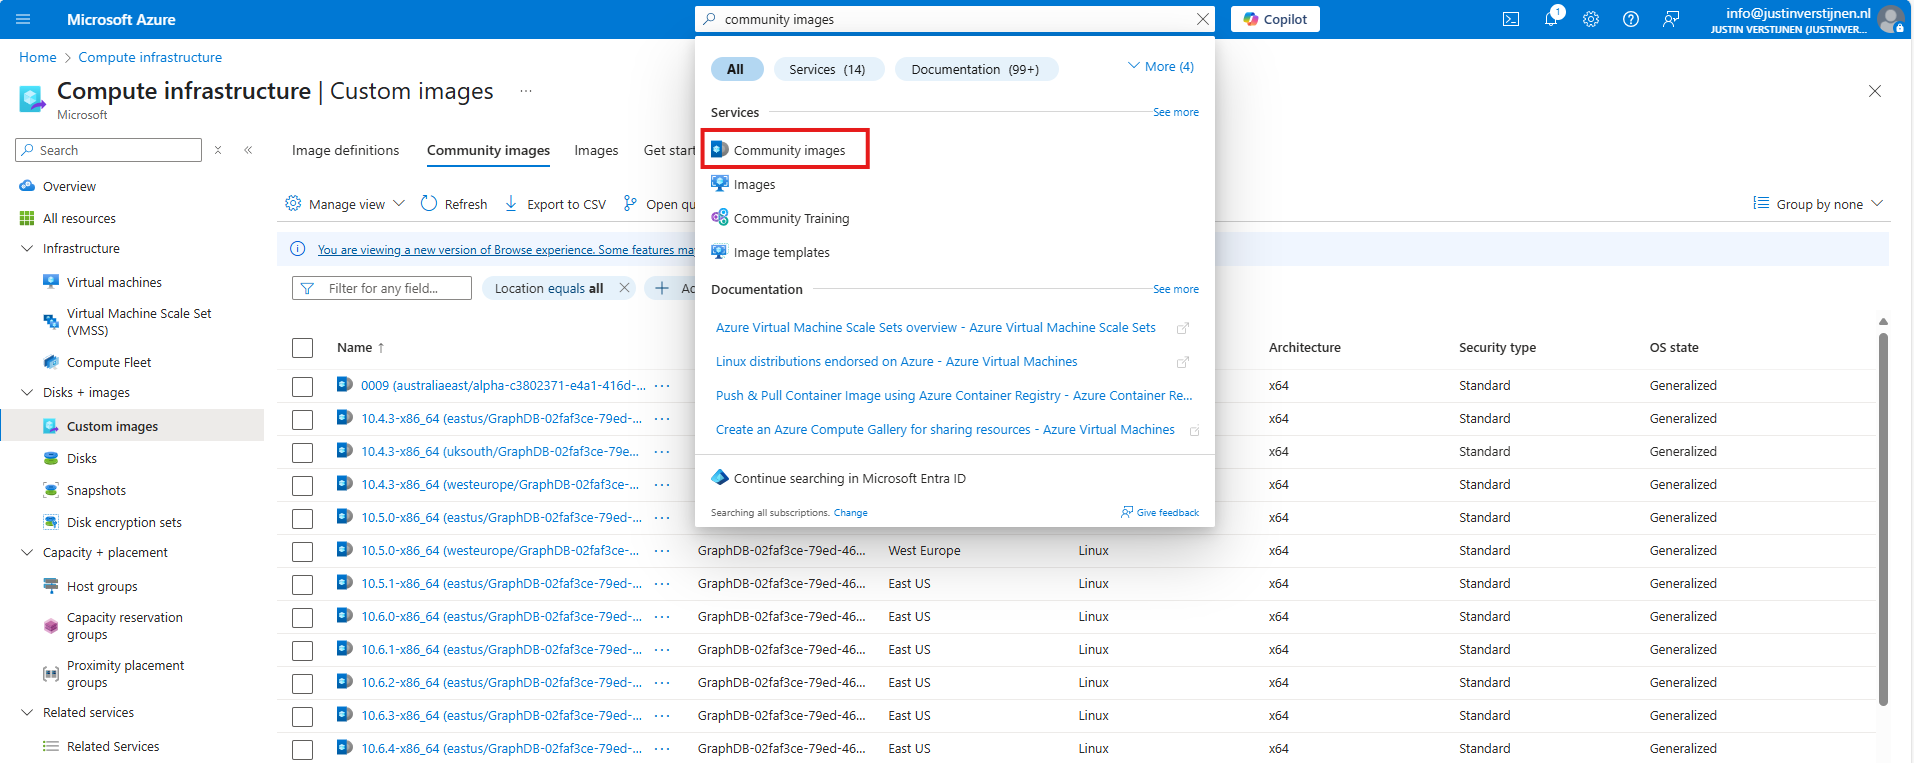
After you made your choice, proceed to the last page of the wizard and create the gallery.
Create a VM image definition
VM image definitions can be created manually like this step, but also through a image you capture. Most of the information will be filled in automatically when choosing the second option.
I will showcase both of the options.
After creating the gallery itself, the place to store the images, we can now manually create a VM image definition. The category of images that we can store.
Click on “+ Add” and then “VM image definition”:
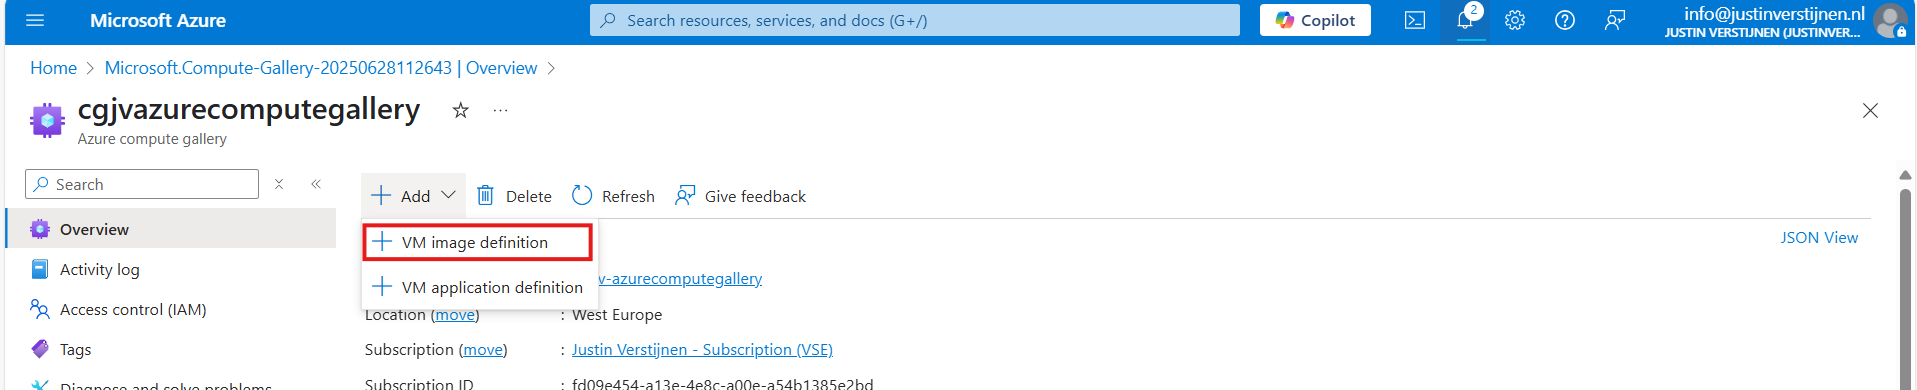
Here we need to define which type of VMs we will be storing into our gallery:
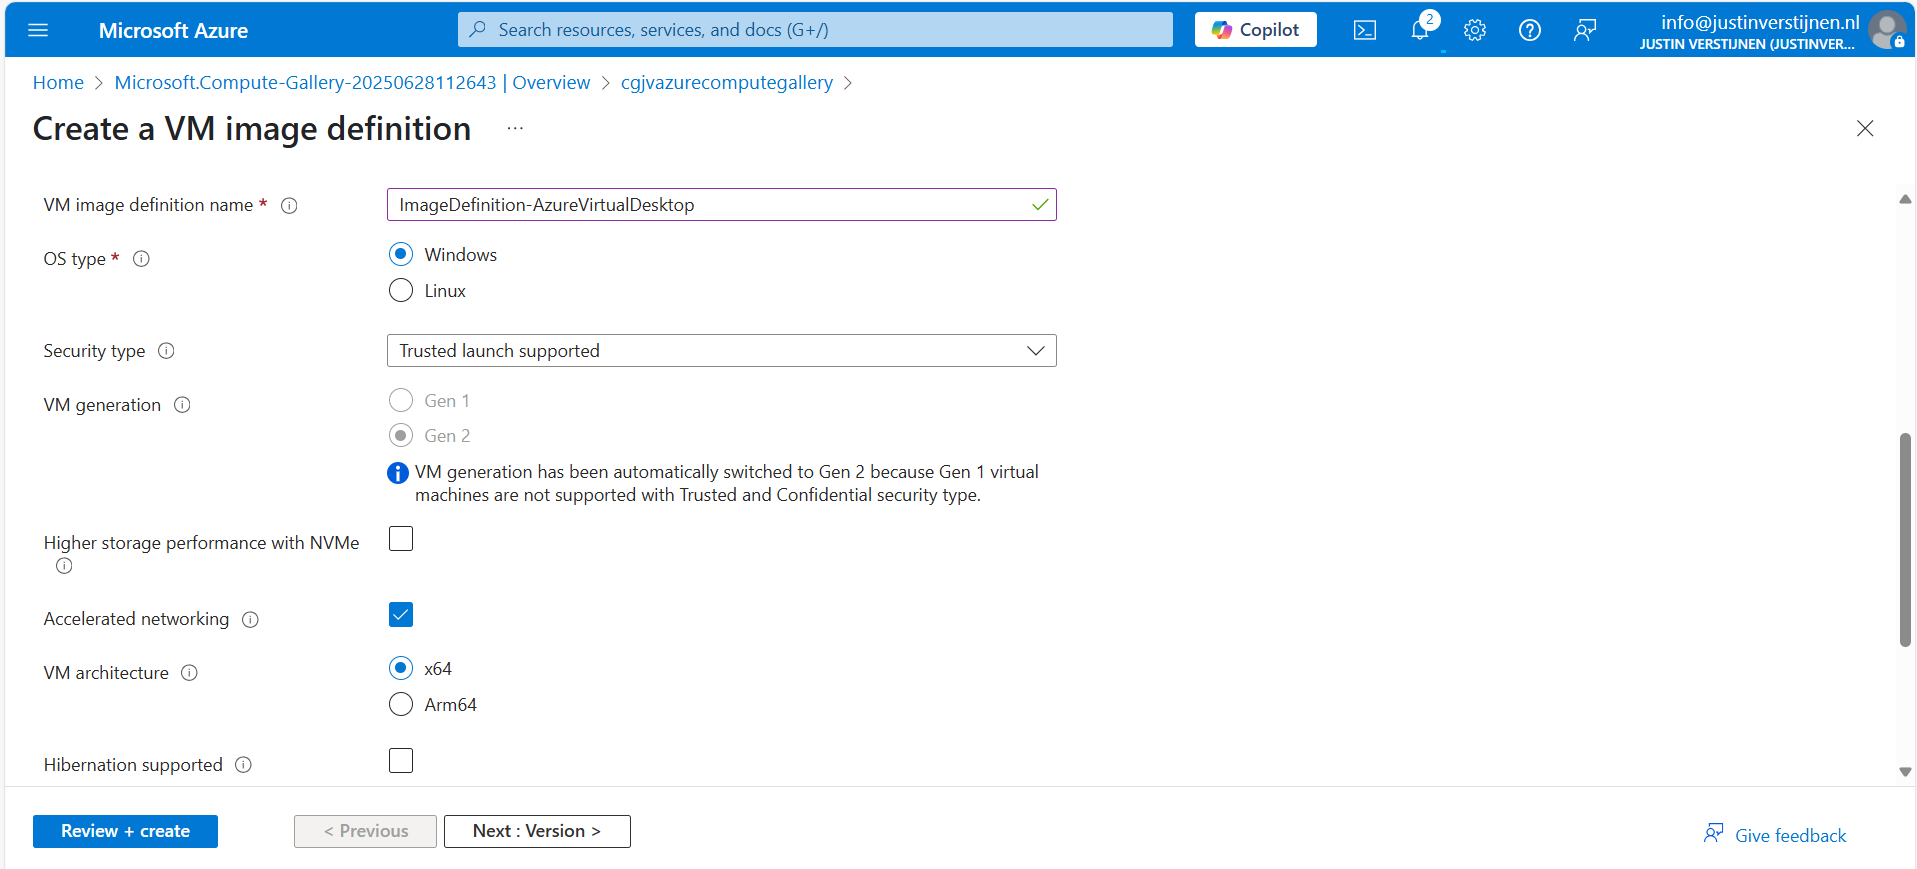
Here I named it “ImageDefinition-AzureVirtualDesktop”, the left side of the topology I showed earlier.
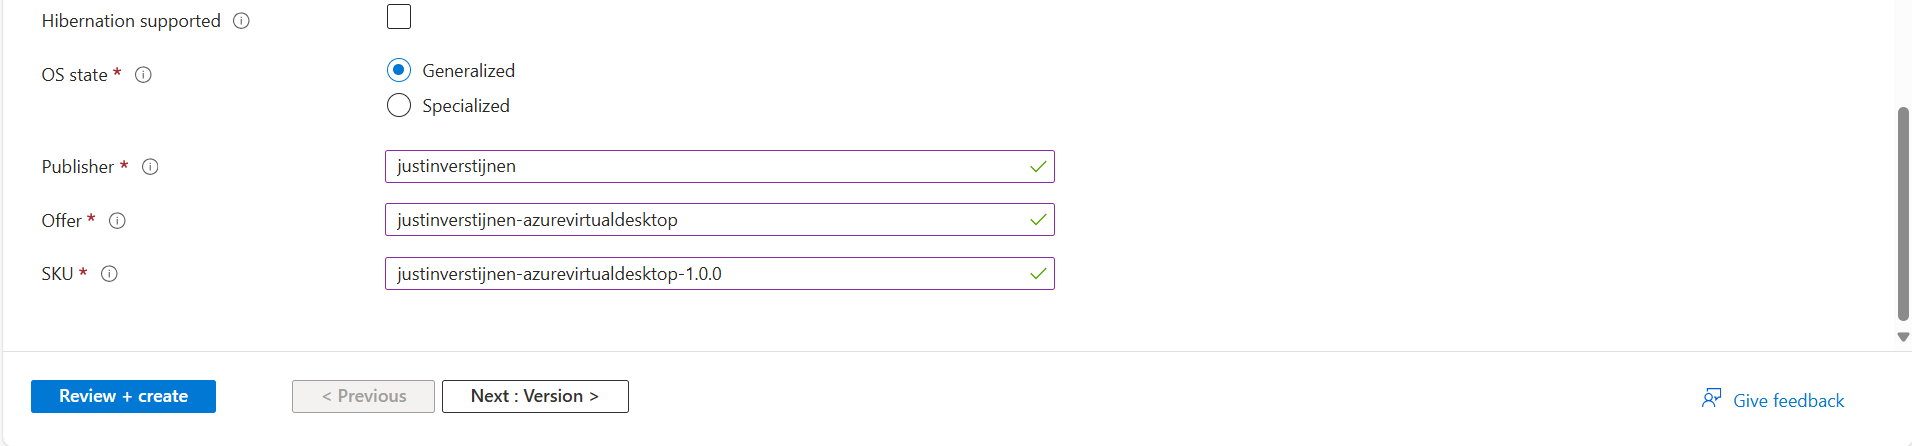
The last part can be named as you wish. This is meant for having more information for the image available for documentation purposes. Then go to the next page.
Here you can define the versioning, region and end date of using the image version. A EOL (End-of-Life) for your image.
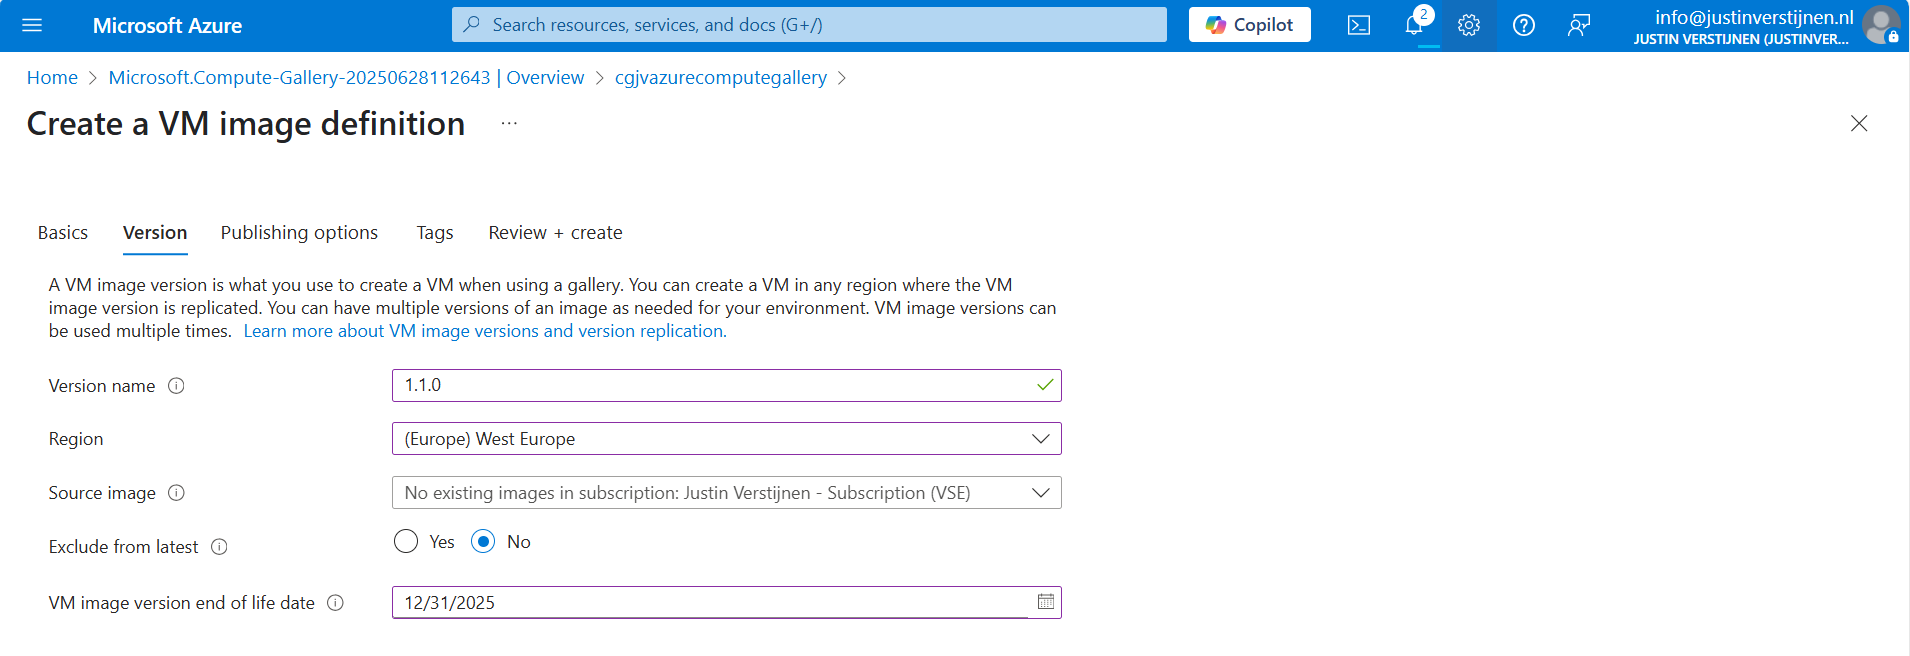
We can also select a managed image here, which makes migrating from Managed Images to Azure Compute Gallery really easy. After filling in the details go to the next page.
On the “Publishing options” page we can define more information for publishing and documentation including guidelines for VM sizes:
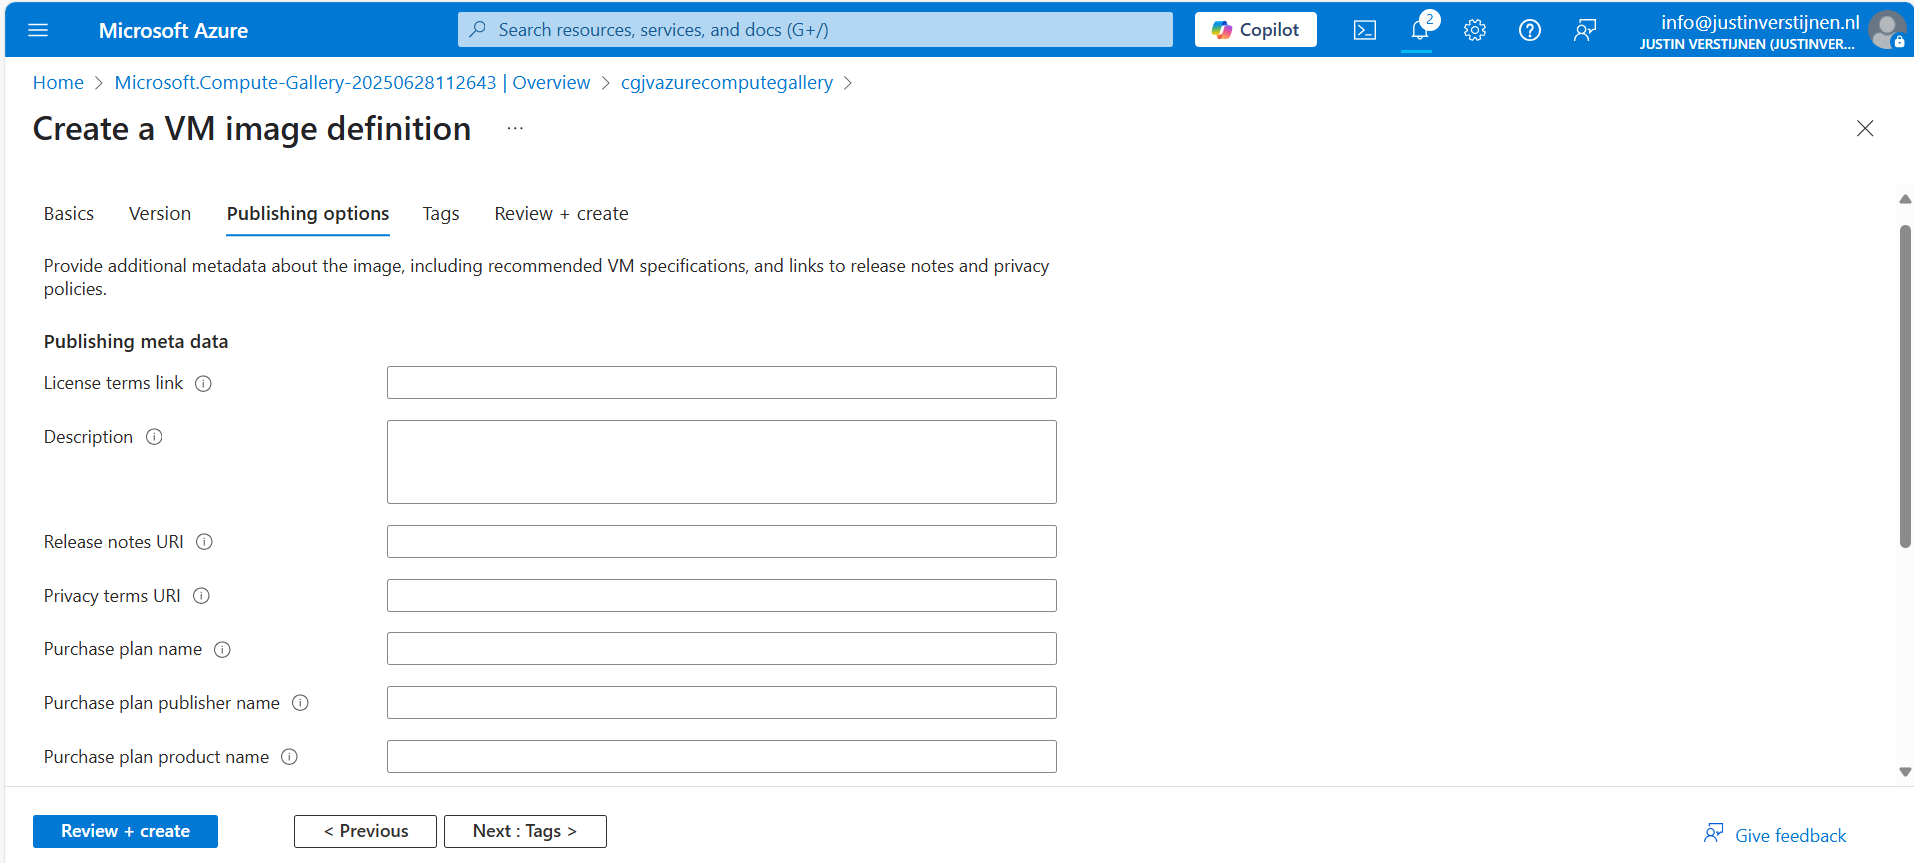
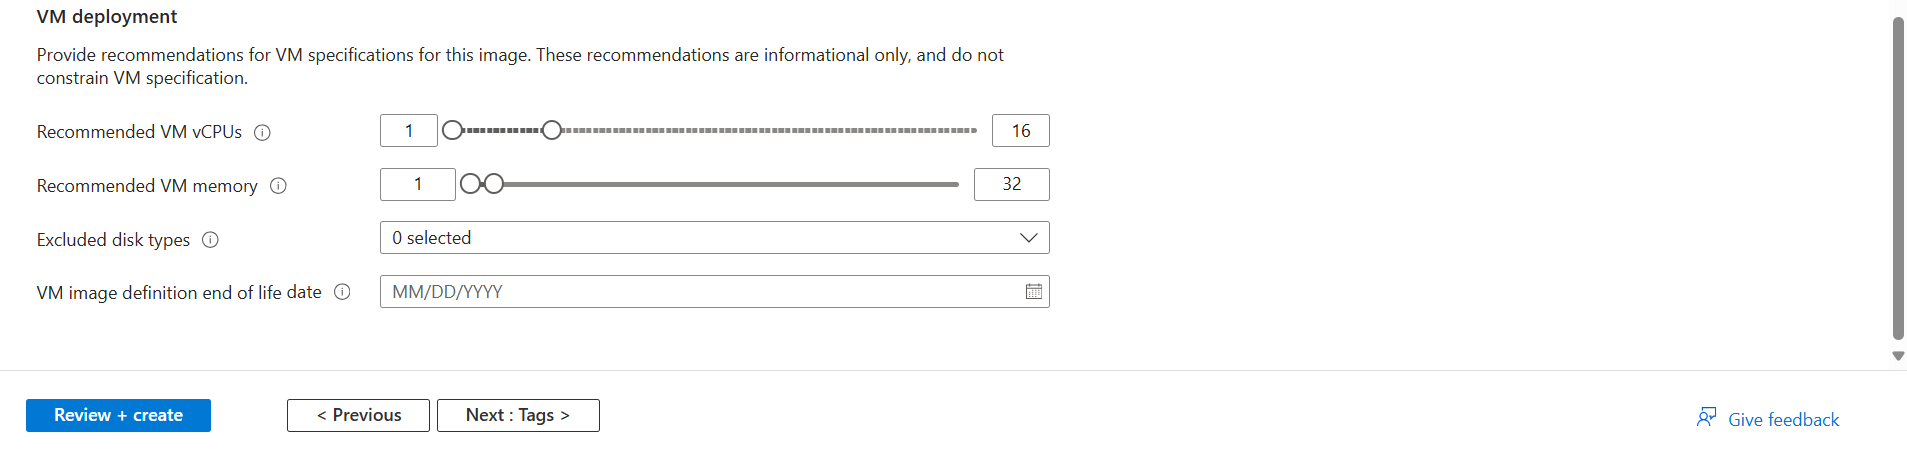
After defining everything, we can advance to the last page of the wizard and create the definition.
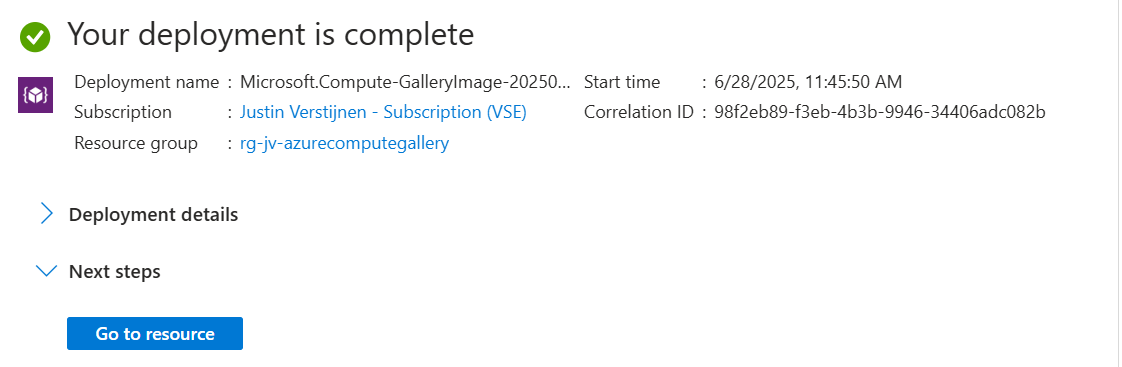
Capture a VM and store it in the gallery
For demonstrating how to capture a virtual machine into the gallery/definition, I already created a ready virtual machine with Windows Server 2025. Let’s perform some pre-capturing tasks in the VM:
- Disabling IE Enhanced Security Configuration
- Installing latest Windows updates
- Installing Google Chrome
Sysprep
Sysprep is a application which is shipped with Windows which cleanes a Windows installation from specific ID’s, drivers and such and makes the installation ready for mass deployment. You must only use this for temporary machines you want to images, as this is a semi-destructive action for Windows. A generalized VM in Azure cannot be booted, so caution is needed.
After finishing those pre-capturing tasks, clean up the VM by cleaning the installation files etc. Then run the application Sysprep which can be found here: C:\Windows\System32\Sysprep
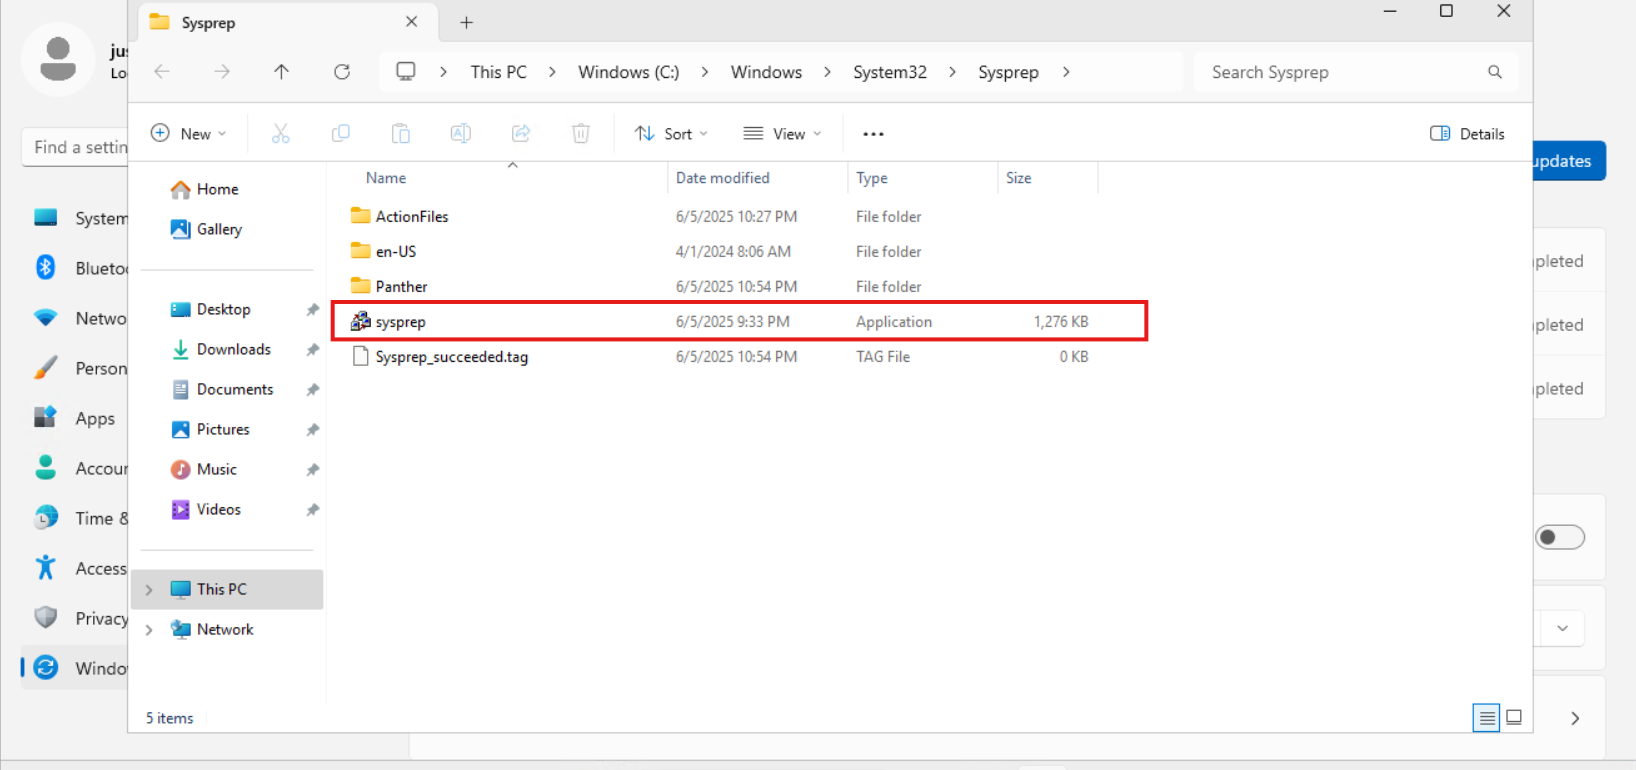
Open the application and select “Generalize” and the as Shutdown option: “Shutdown”.
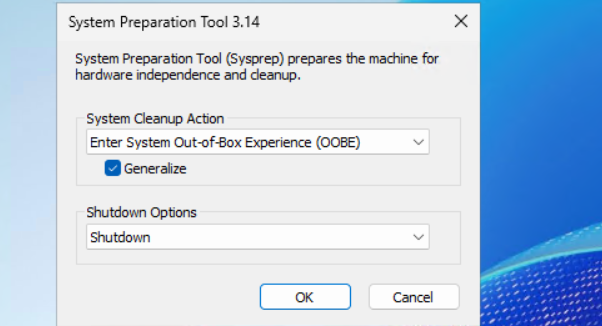
Click “OK” and wait till the virtual machine performs the shutdown action.

If you get an error during this stage that states Bitlocker is activated, you need to disable it temporarily. At deployment of the image, this will be re-activated.
PowerShell
Disable-BitLocker -MountPoint "C:"
Capturing the image in Azure
After the virtual machine is sysprepped/generalized succesfully, we can go to the virtual machine in the Azure Portal to capture it and store it in our newly created Compute gallery.
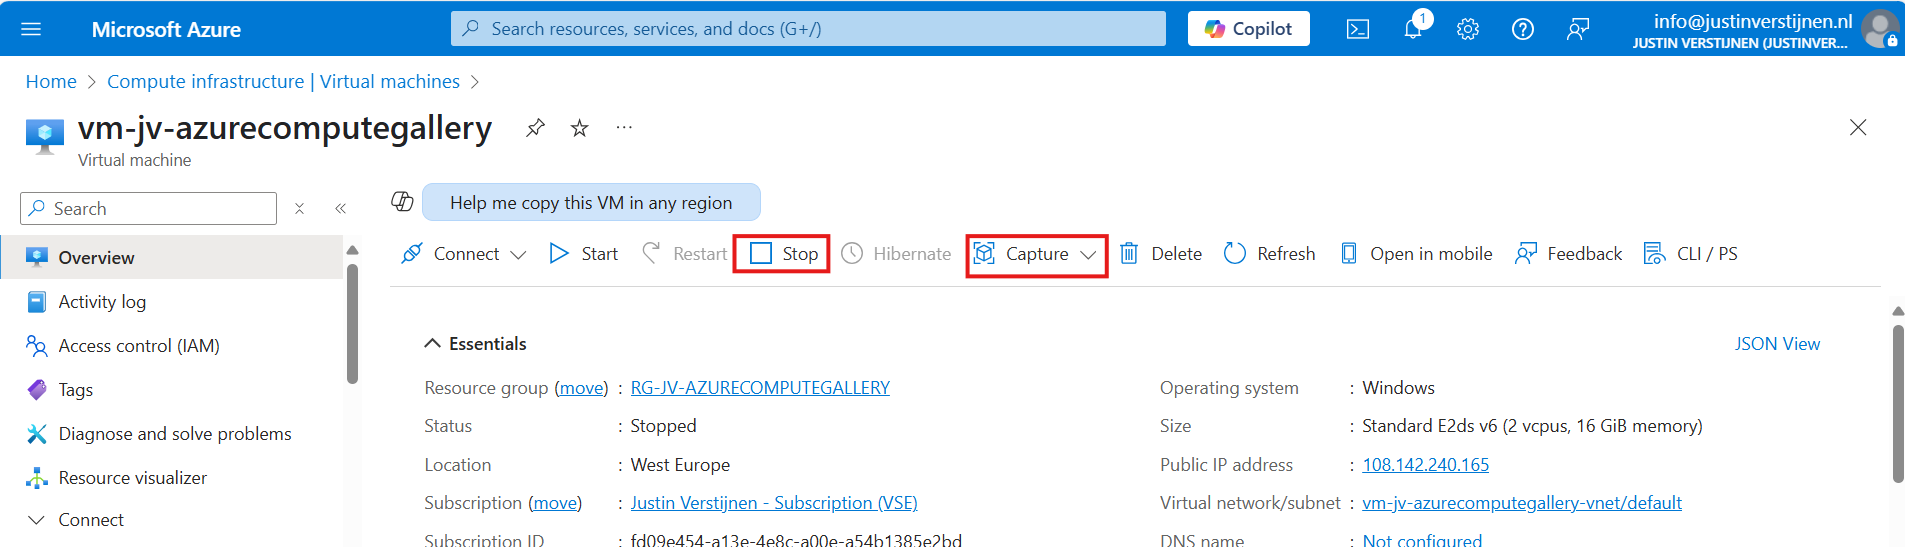
First clikc on “Stop” to actually deallocate the virtual machine. Then click on “Capture” and select “Image”.
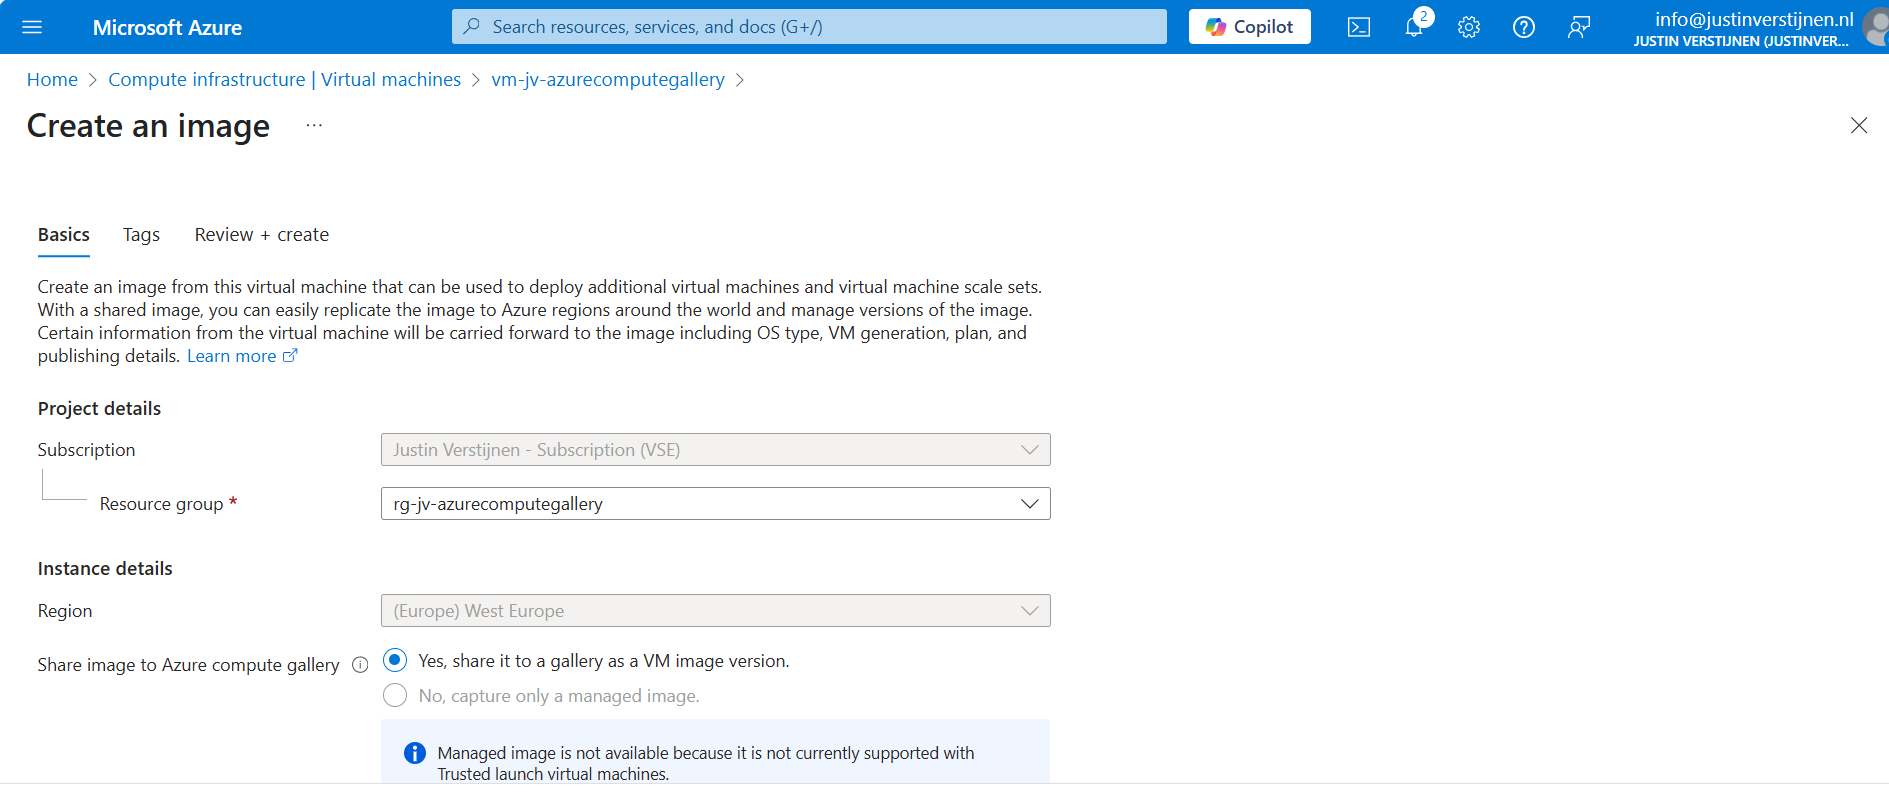
Select the option “Yes, share it to a gallery as a VM image version” if not already selected. Then scroll down and select your compute gallery as storage.
Creating the VM image definition automatically
Scroll down on the first page to “Target VM image definition”. We can create a VM image definition here based on the image we give Azure:
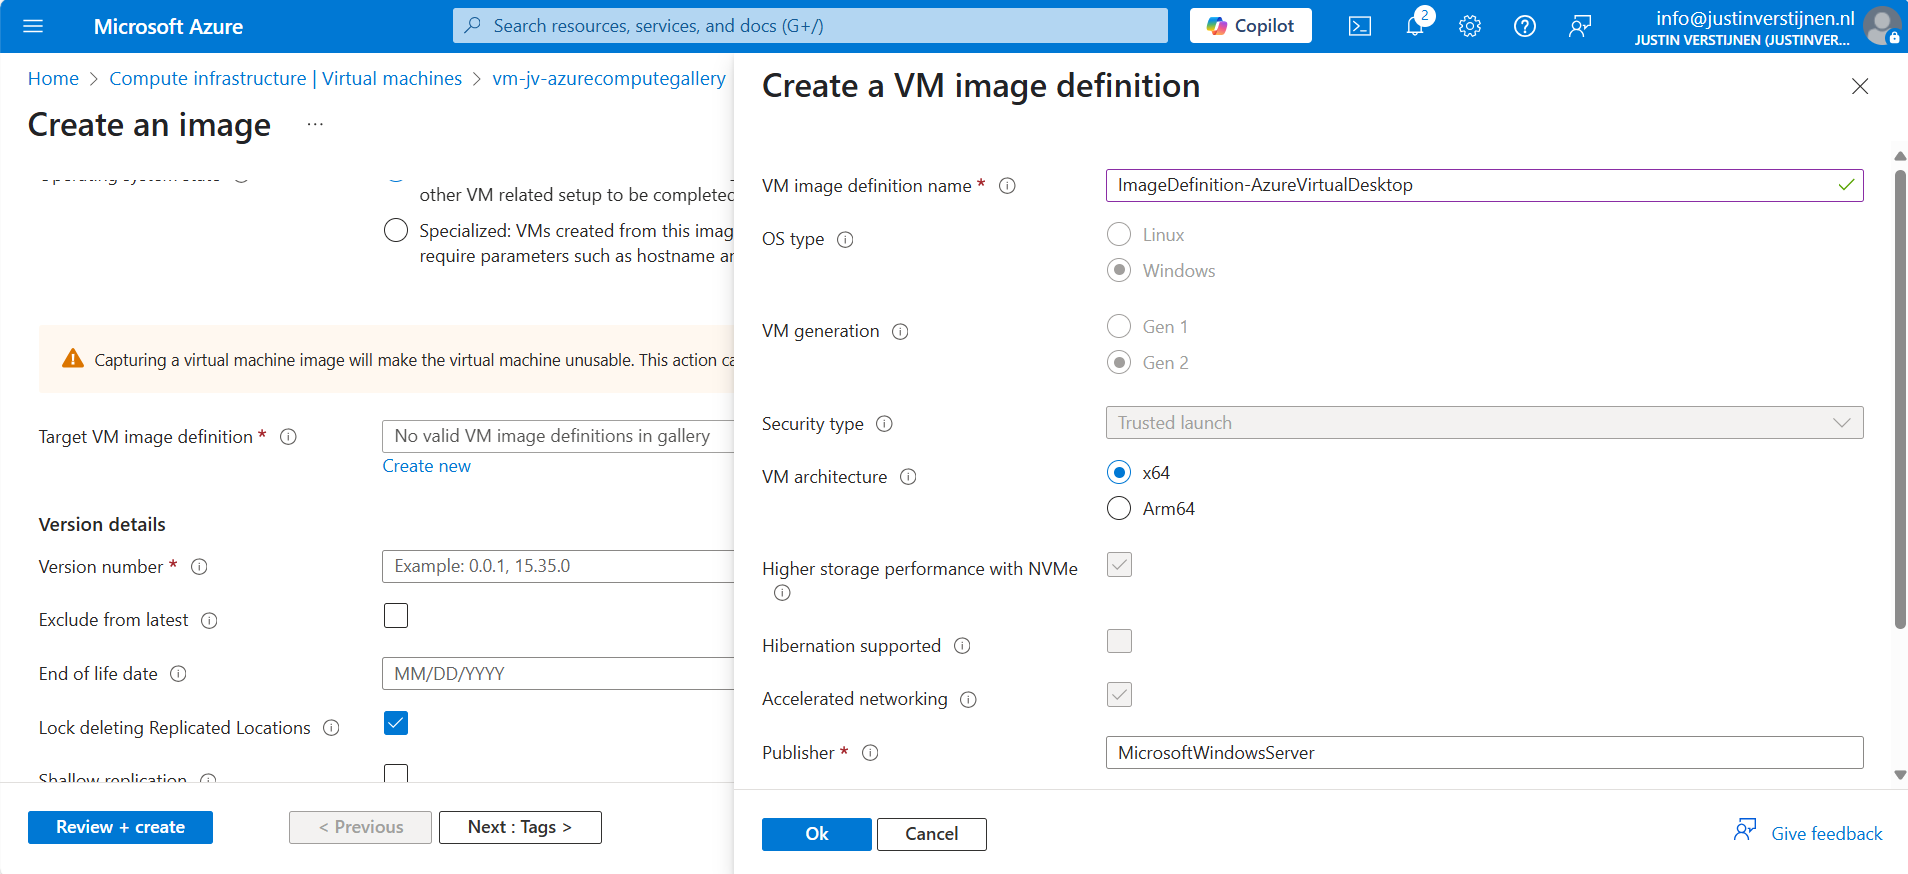
We don’t have to fill in that much. A name for the image is enough.
After that, click on “Add” and fill in the version numer and End of life date:
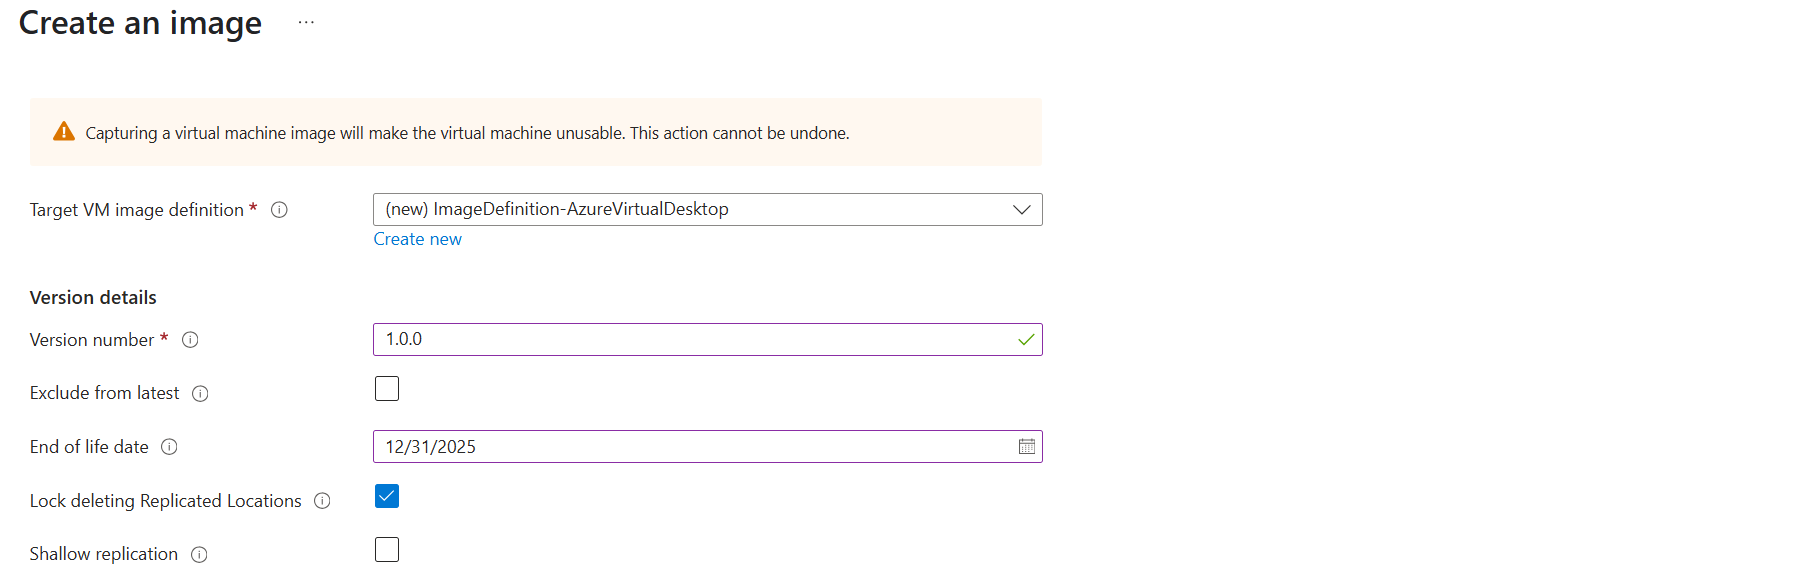
Then scroll down to the redundancy options. You can define here what type of replication you want and what type of storage:
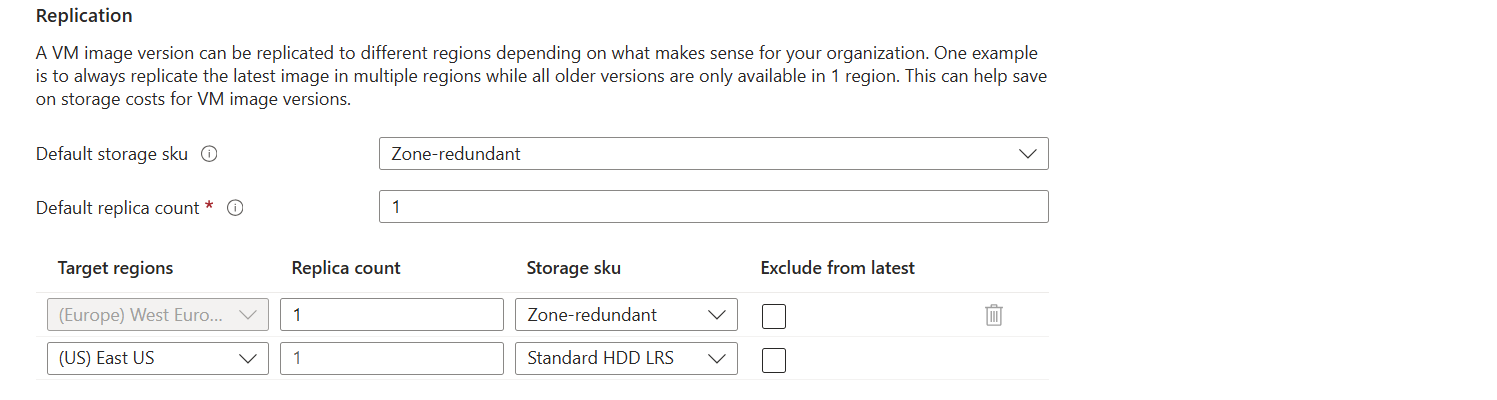
I changed the options to make it more available:
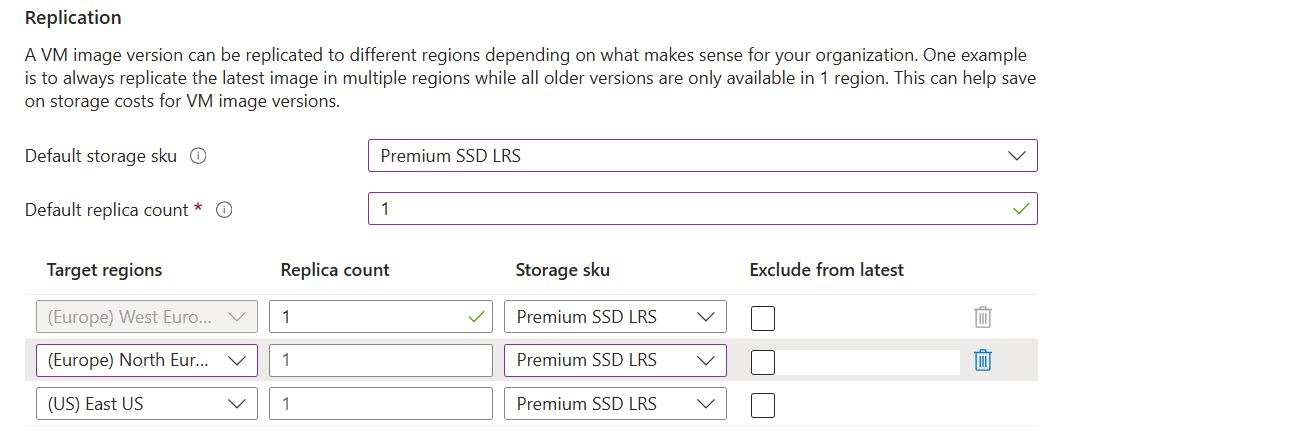
Only the latest versions will be available in the regions you choose here. Older versions are only available in the primary region (The region you can’t change).
After that finish the wizard, and the virtual machine will now be imaged and stored in Azure Compute Gallery.
Summary
Azure Compute Gallery is a great way to stora and maintain images in a fairly easy way. At first it can be overwhelming but after this post, I am sure you know the basics of it, how to use it and how it works.
If you already know the process with Managed Images, the only thing changed is the location of where you store the images. I think Azure Compute Gallery is the better option because of centralizing storage of images instead of random in your resource group and having support for trusted launch.
Sources
These sources helped me by writing and research for this post;
Thank you for reading and I hope it was helpful.
End of the page 🎉
You have reached the end of the page. You can navigate through other blog posts as well, share this post on X, LinkedIn and Reddit or return to the blog posts collection page. Thank you for visiting this post.
If you think something is wrong with this post or you want to know more, you can send me a message to one of my social profiles at: https://justinverstijnen.nl/about/
If you find this page and blog very useful and you want to leave a donation, you can use the button below to buy me a beer. Hosting and maintaining a website takes a lot of time and money. Thank you in advance and cheers :)
The terms and conditions apply to this post.
Customize Office apps installation for Azure Virtual Desktop
When deploying Microsoft Office apps to (pooled) Virtual Desktops, we mostly need to do some optimizations to the installation. We want to…
When deploying Microsoft Office apps to (pooled) Virtual Desktops, we mostly need to do some optimizations to the installation. We want to optimize performance on pooled and virtual machines, or maybe we want to enable shared computer activation because multiple users need the apps.
In this guide I will show you how to customize the installation of Office apps, primarily for Virtual Desktops, but can be used on any Windows machine.
Requirements
- Around 30 minutes of your time
- A Microsoft 365 tenant with Global Administrator, Security Administrator or Office Apps Admin permissions
- A Windows machine to test the installation
- Basic knowledge of Virtual Desktops and Office Apps
What is the Office Configuration Tool?
The Office Configuration Tool (config.office.com) is a customization tool for your Office installation. We can some custom settings and define which settings we want, how the programs must behave and include and exclude software we don’t need.
Some great options of using this tool are:
- Automatically accepting the EULA at first start (saves a click for every new user)
- Choosing x32 or x64 version
- x64 is always preferred, only use x32 if you need it because of some shitty add-in or 3rd party applications
- Automatically selecting Office XML or OpenDocument setting (saves a click for every new user)
- Enabling Shared Computer Activation for pooled machines
- Users need Microsoft 365 Business Premium or higher to use the apps
- Selecting monthly or semi annual update channel
- Include Visio or Project
- Include extra language packs
- Defining your company name to save with the documents
- Choosing the preview version (not preferred for production environments)
- Customizing the selection of apps
- Enabling or disabling Hardware Acceleration
To use the Office Configuration tool, use the following link:
Then start by creating a new configuration:
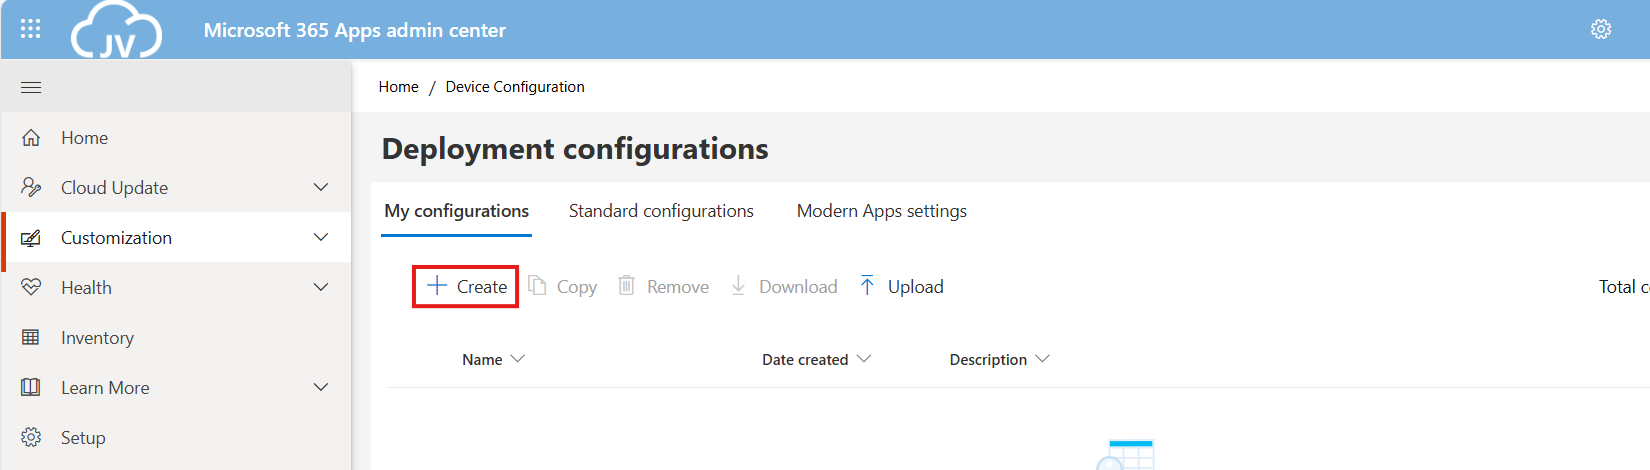
Choosing 32-bit or 64-bit version
The wizard starts with asking whether to use 32-bit (x86) or 64-bit (x64). Choose the version you’ll need, while keeping in ming x64 is always the preferred option:
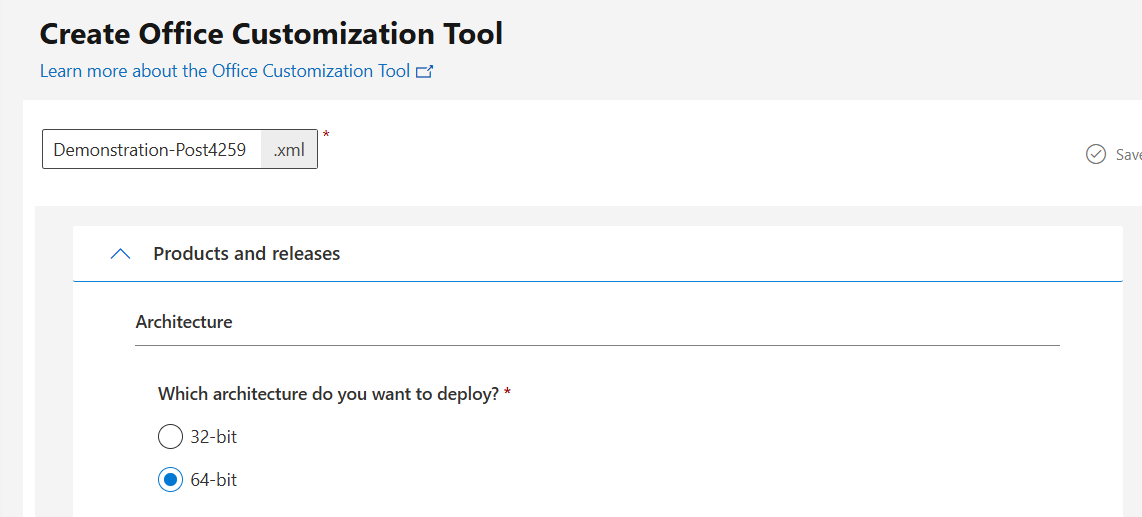
Then advance below.
Office version and additional products
If you need additional products or a different version like LTSC or Volume Licensing, you can select this now:
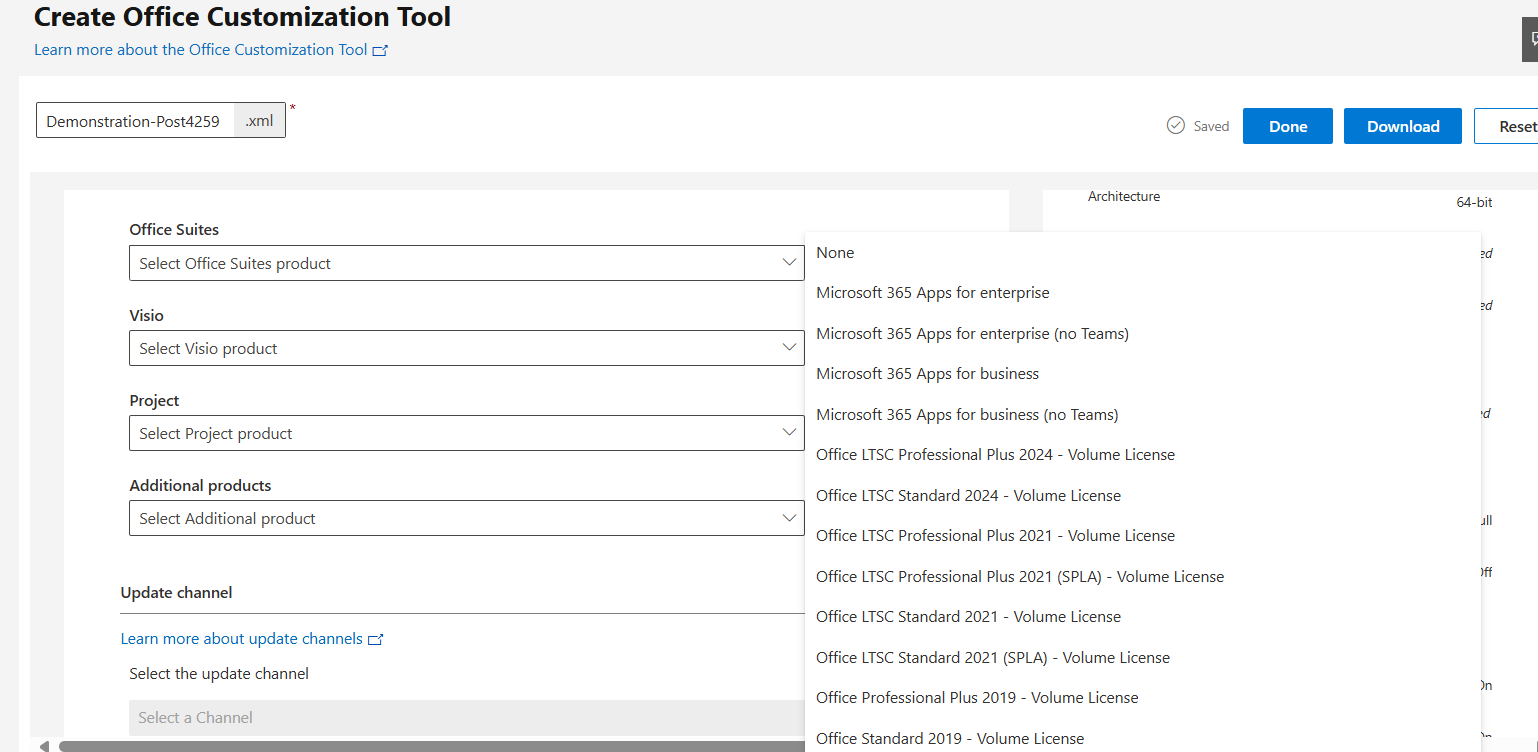
You can also select to include Visio, Project.
Update channel
You can now select what update channel to use:
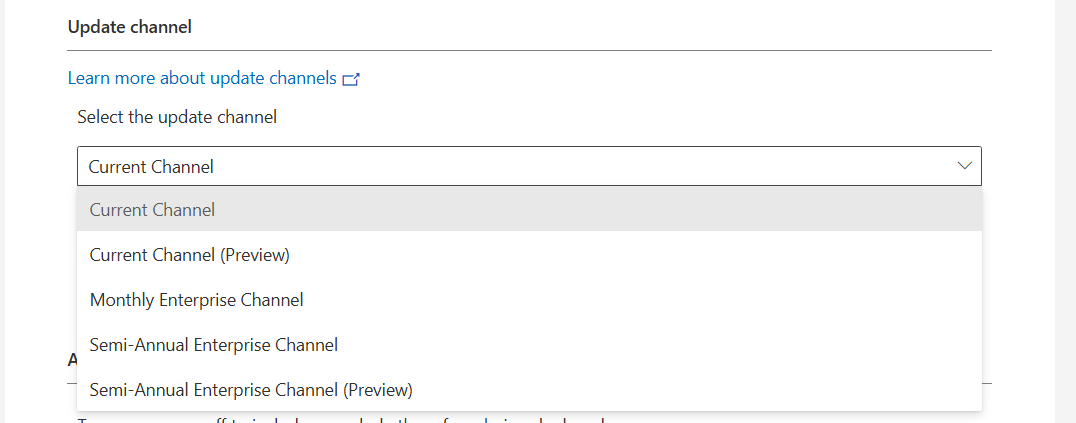
These channels define how much your apps are updated. I advice to use the monthly enterprise channel or the semi annual enterprise channel, so you’ll get updates once a month or twice a year. We don’t want to update too much and we also don’t want preview versions in our production environments.
In smaller organizations, I had more success with the monthly channel so new features like Copilot or such are not delayed for at least 6 months.
Selecting the apps to install
Now we can customize the set of applications that are being installed:
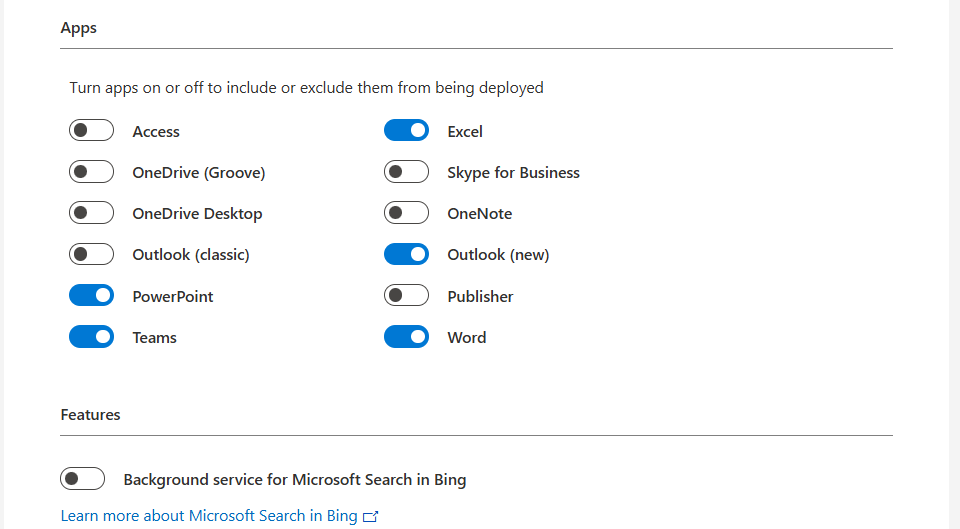
Here we can disable apps our users don’t need like the old Outlook or Access/Publisher. Not installing those applications saves some on storage and compute power. Also we can disable the Microsoft Bing Background service. No further clarification needed.
I prefer to install Onedrive manually myself to install it machine-wide. You do this by downloading Onedrive and then executing it with this command:
POWERSHELL
OneDriveSetup.exe /allusersDefault and additional languages
When you have users from multiple countries in your Virtual Desktops, we can install multiple language packs for users. These are used for display and language corrections.
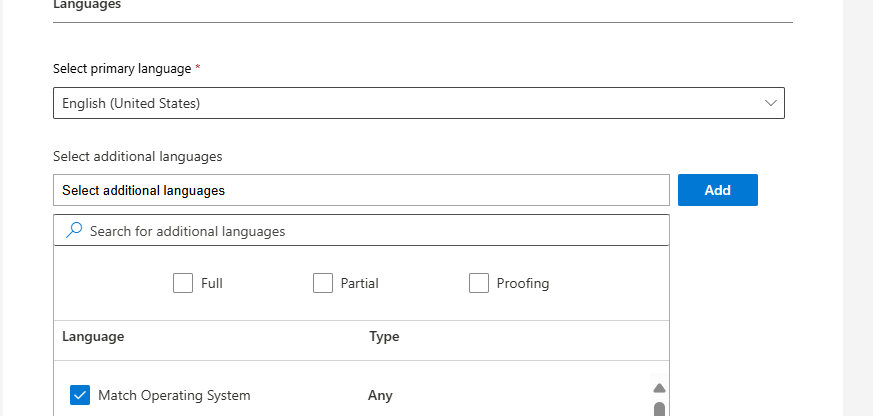
You can also choose to match the users’ Windows language.
Installation options
At this step you could host the Office installation files yourself on a local server, which can save on bandwidth if you install the applications 25 times a day. For installations happening once or twice a month, I recommend using the default options:
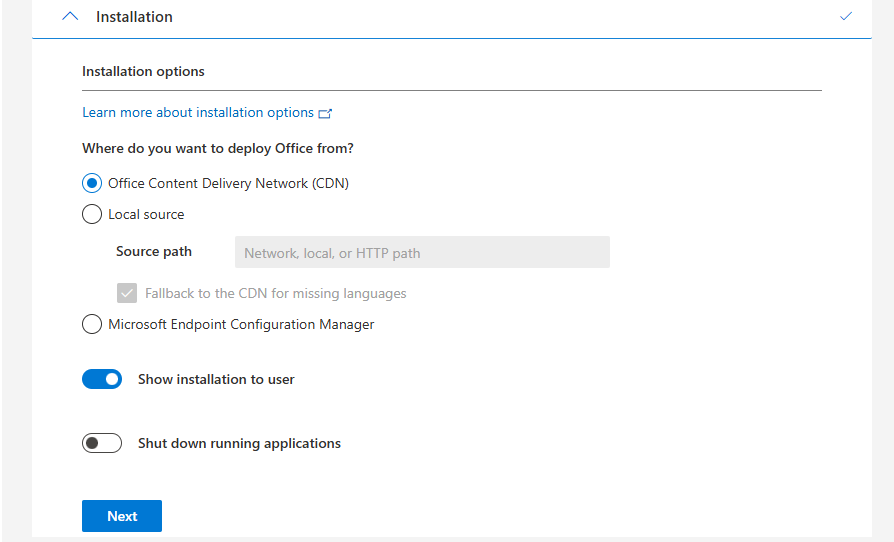
Automatically accepting EULA
Now we have the option to automatically accept the EULA for all users. This saves one click for every user who opens the Microsoft Office apps:
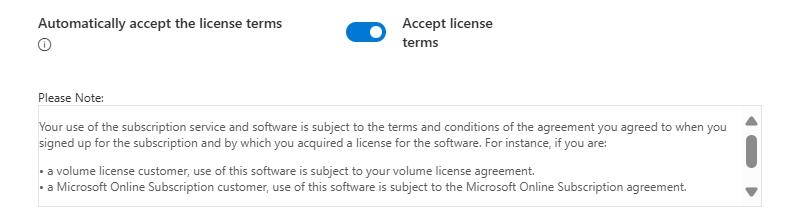
Shared Computer Activation
Now we have the option to enable Shared Computer Activation, which is required for using on machines where multiple users are working simultaneously.
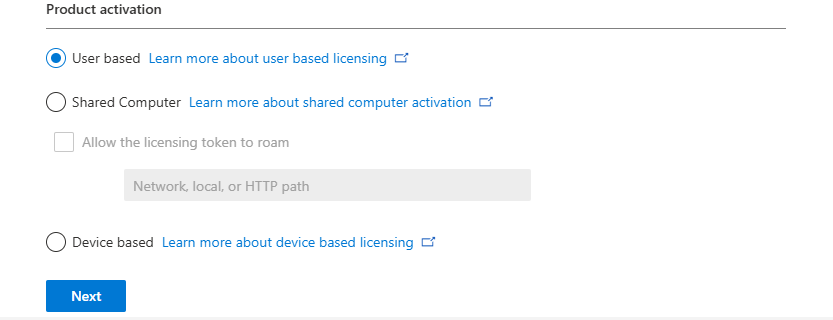
If using Azure Virtual Desktop or Remote Desktop Services as pooled, choose Shared Computer, otherwise use User based or Device based if having an Enterprise Agreement and the proper licenses.
Set your Company name
At this step we can set a company name to print in every Office document:
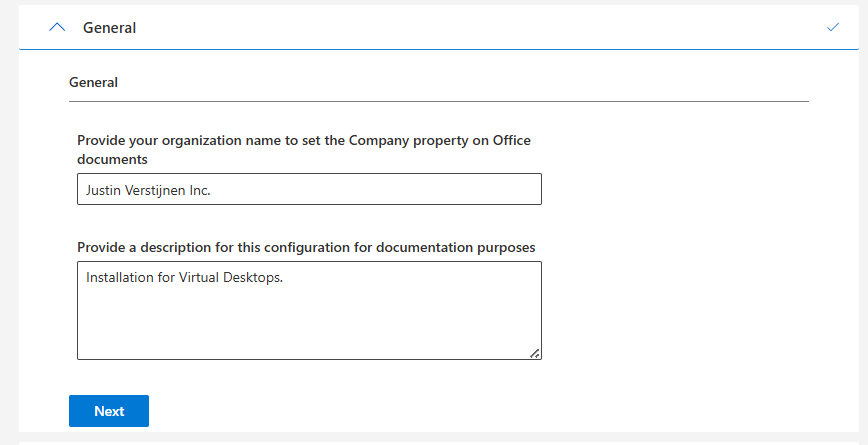
Enabling advanced options in Office
Now we have finished the normal wizard and we have the chance to set some advanced options/registry keys.
Disabling Hardware acceleration
We could disable hardware acceleration on Virtual Desktops, as we mostly don’t have a GPU on board. DirectX software rendering will then be used as default to make the software faster.
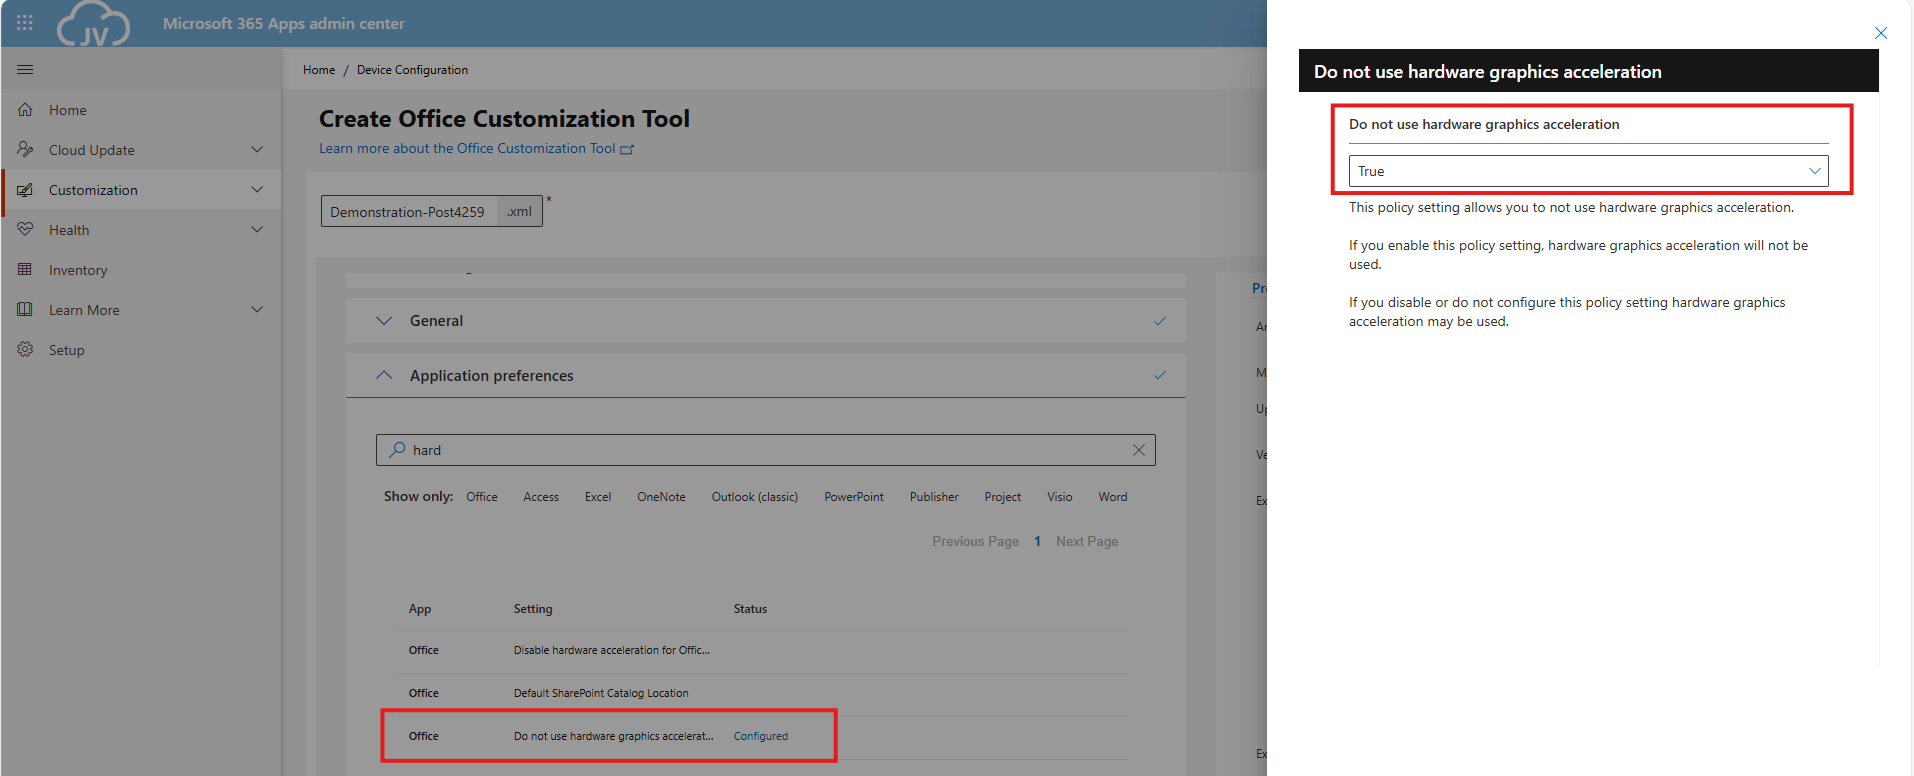
- Do not use hardware graphics acceleration
Disabling Animations
We could also disable the animations to save some on compute power:
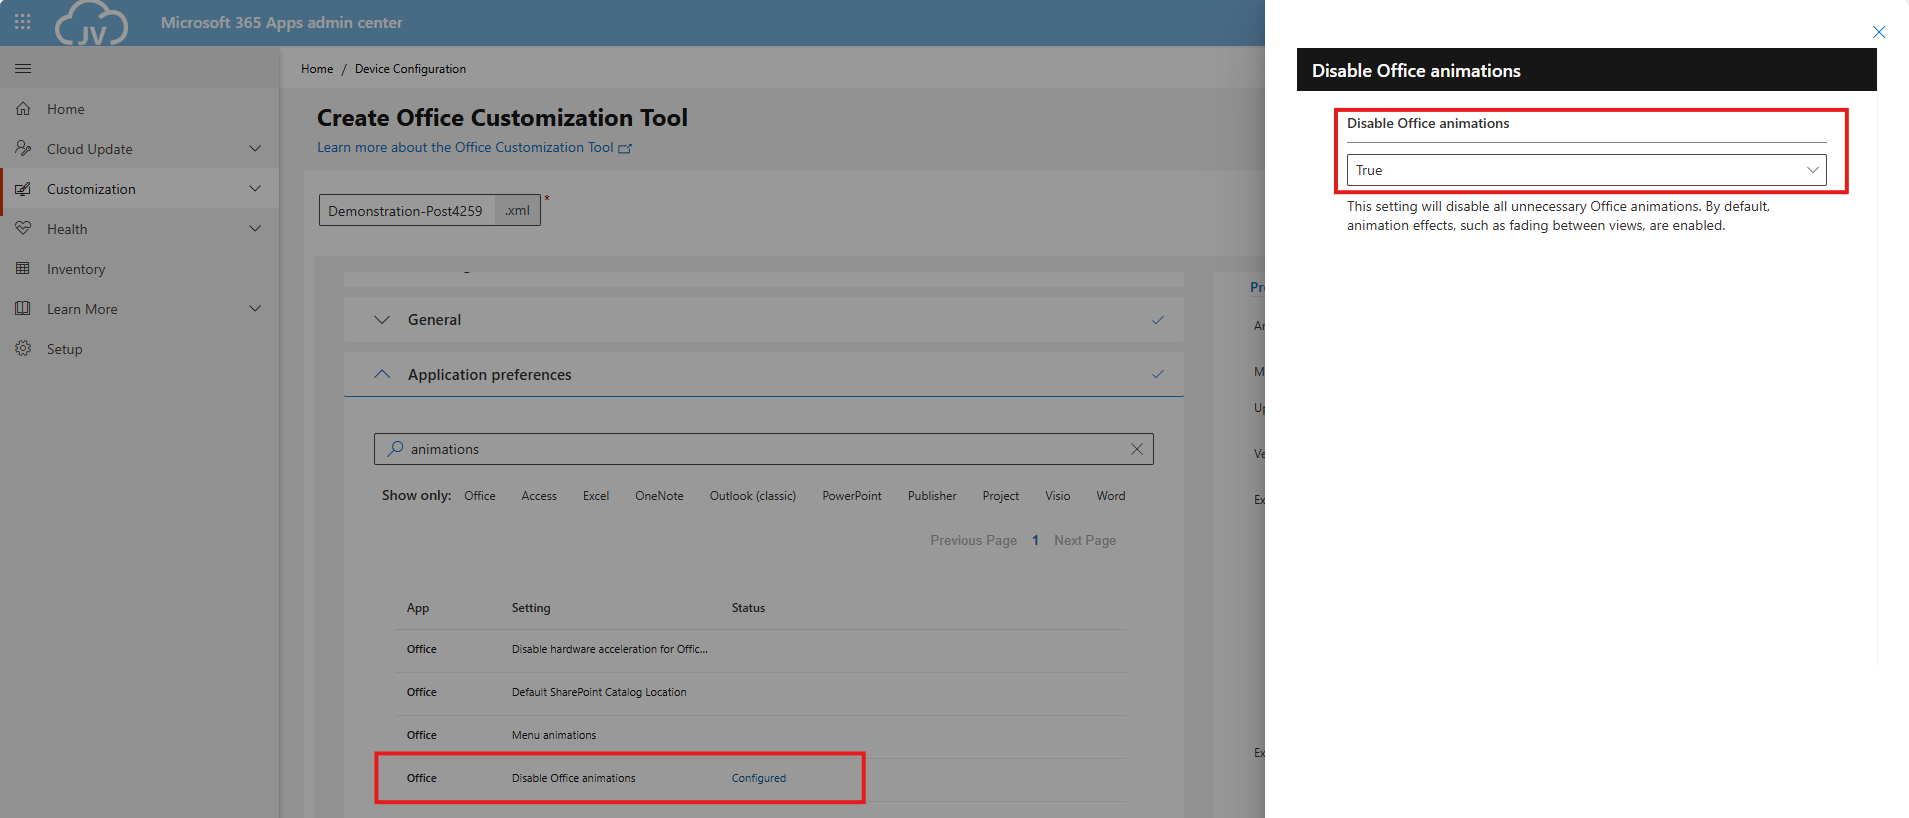
- Disable Office animations
- No need to change the “Menu animations” setting as we completely disabled animations
Disabling Macros from downloaded files
And we can also set some security options, like disable macros for files downloaded from the internet:
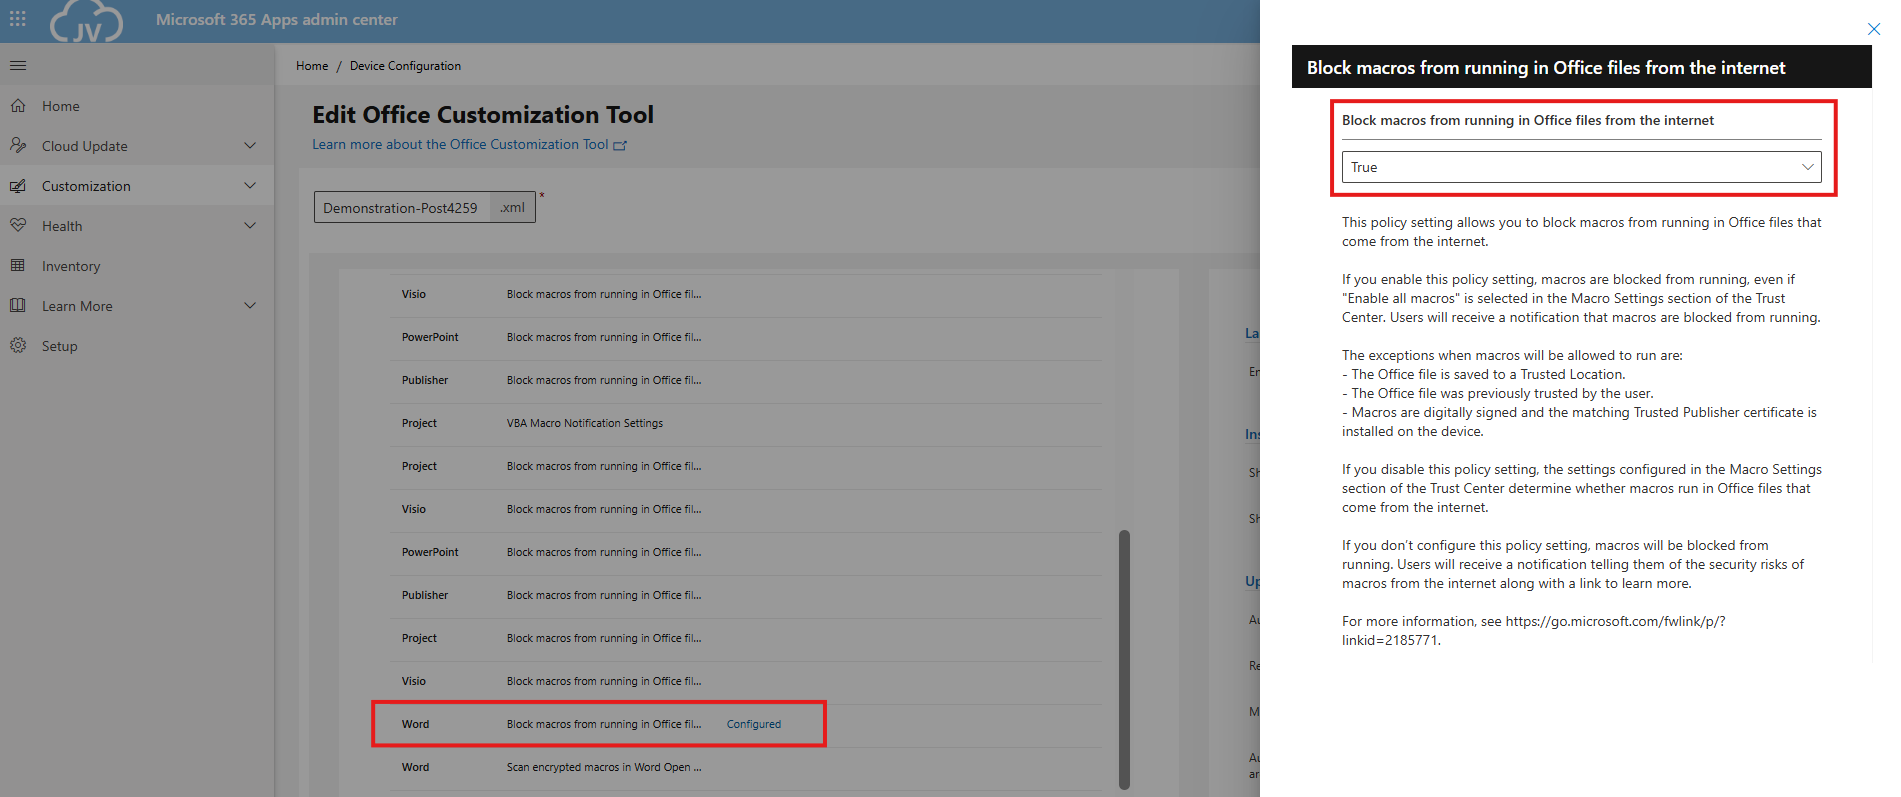
- Block macros from running in Office files from the internet
- Be aware, you must configure this for every Office application you install
Set Office XML/OpenDocument option and downloading configuration
We can set the Office XML or OpenDocument setting in this configuration, as this will be asked for every new user. I am talking about this window:
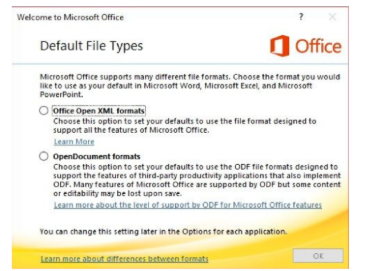
We can set this in our configured office by saving the configuration and then downloading it:

Click OK and your XML file with all customizations will be downloaded:
Installing Office on Windows
Now we can install Office with our customizations. We first need to download the Office Deployment Toolkit (ODT) from https://aka.ms/odt
After you downloaded the Office Deployment Toolkit, we end up having 2 files:
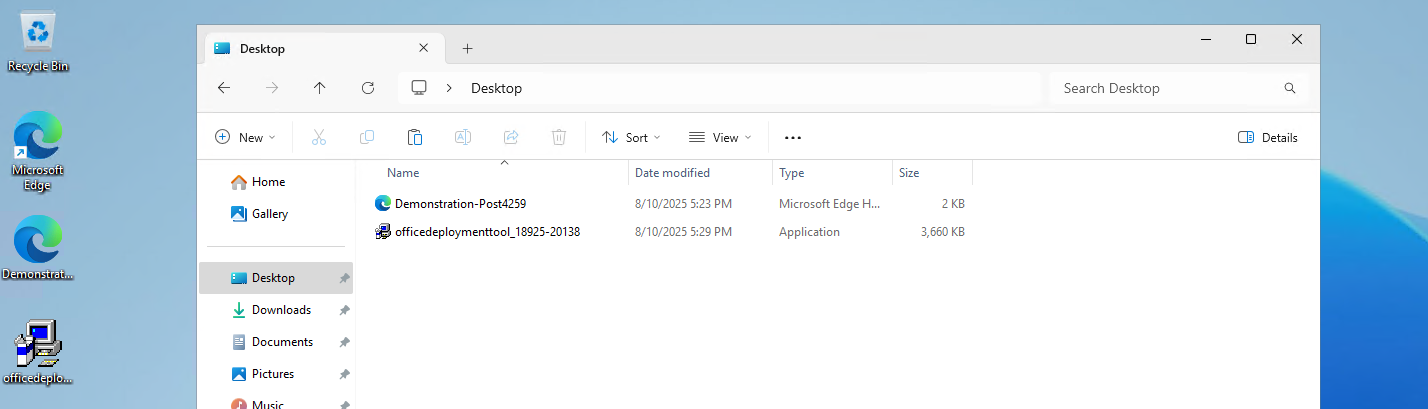
Now run the Office Deployment Toolkit and extract the files in the same folder:
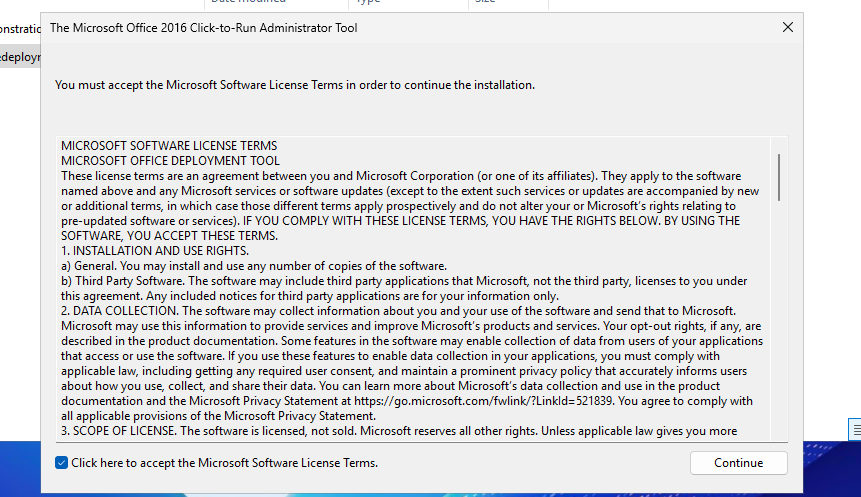
Select the folder containing your customized XML file:

Now we have around 4 files, with the official Office setup now extracted and comes with a default configuration:
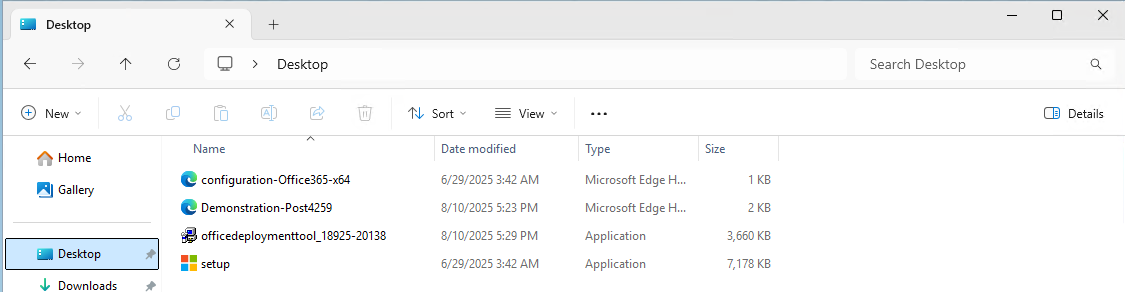
We will now execute the setup using our customized file. Don’t click on setup yet.
Click on the address bar of the File Explorer, type"cmd" and hit Enter.
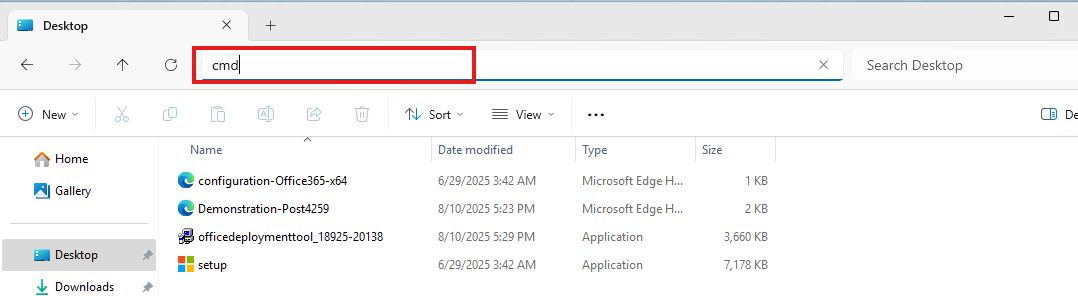
This opens CMD directly in this folder:
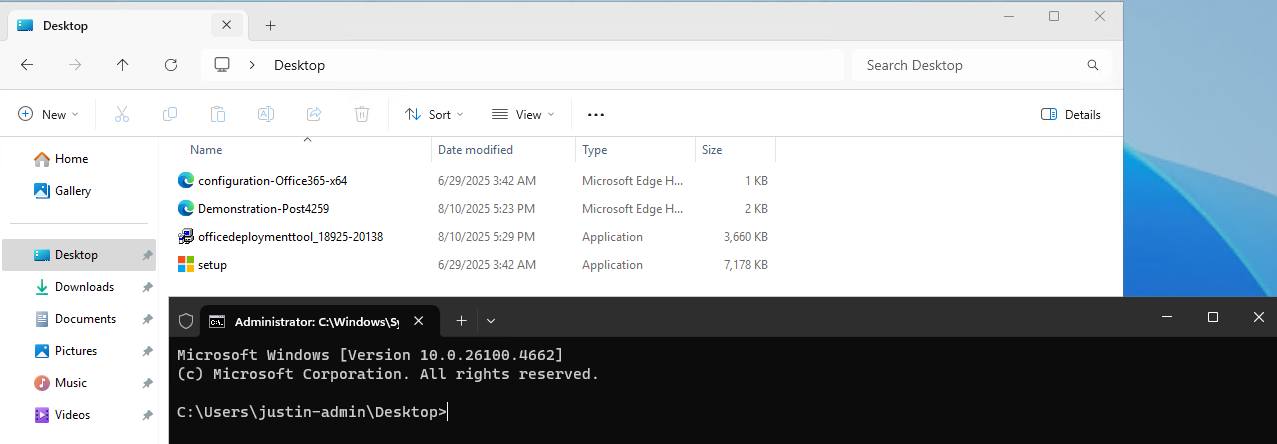
Now execute this command:
POWERSHELL
setup.exe /configure *yourcustomizedfile*.xmlAt the filename, you can use TAB to auto-complete the name. Makes it easier :)
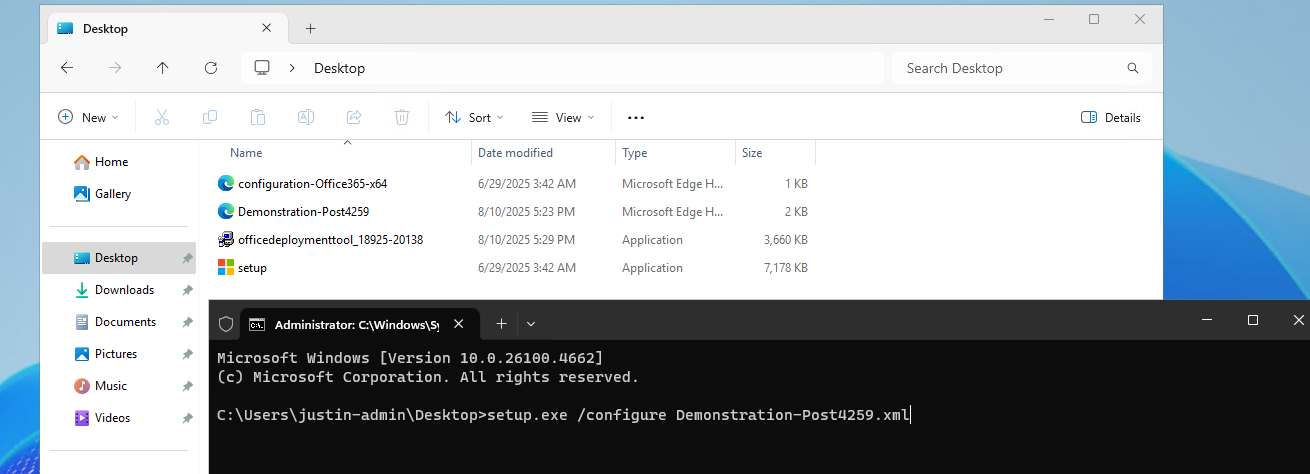
Now the setup will run and install Office applications according to your custom settings:
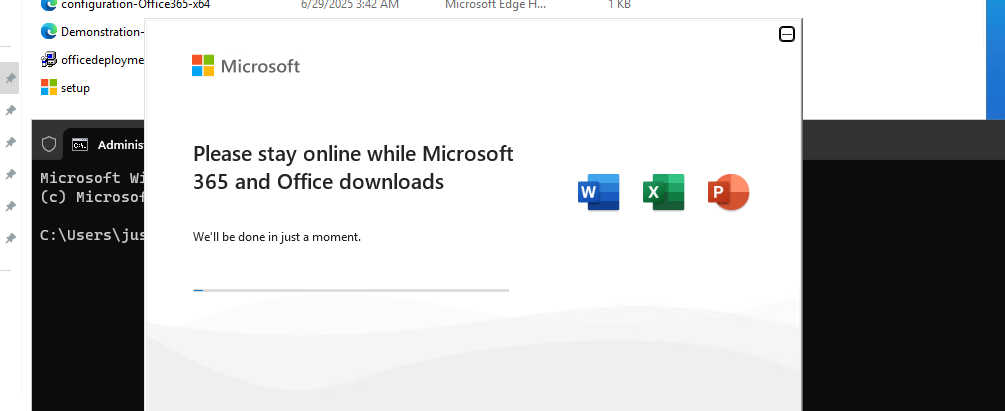
Let’s check the configured settings
Now the installation of Office is done and I will click through the applications to check the outcome of what we have configured:
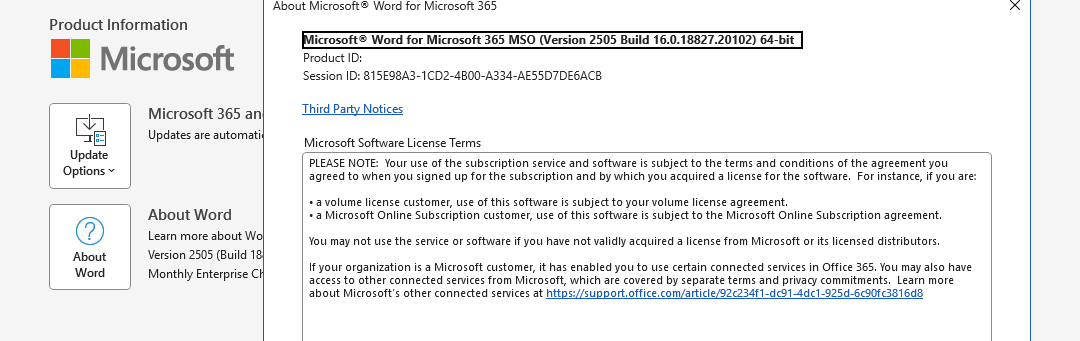

As we have Shared Computer Activation enabled, my user account needs a Microsoft 365 Business Premium or higher license to use the apps. I don’t have this at the moment so this is by design.
Learn more about the licensing requirements of Shared COmputer Activation here:
Summary
The Office Deployment Toolkit is your go-to customization toolkit for installing Office apps on Virtual Desktops. On Virtual Desktops, especially pooled/shared desktops it’s very critical that applications are as optimized as possible. Every optimization does save a few bits of compute power which will be profit for end users. And if one thing is true, nothing is as irritating as a slow computer.
Thank you for reading this guide and I hope it was helpful.
Sources
These sources helped me by writing and research for this post;
- https://learn.microsoft.com/en-us/microsoft-365-apps/admin-center/overview-office-customization-tool
- https://learn.microsoft.com/en-us/microsoft-365-apps/licensing-activation/device-based-licensing
- https://learn.microsoft.com/en-us/microsoft-365-apps/licensing-activation/overview-shared-computer-activation#how-to-enable-shared-computer-activation-for-microsoft-365-apps
End of the page 🎉
You have reached the end of the page. You can navigate through other blog posts as well, share this post on X, LinkedIn and Reddit or return to the blog posts collection page. Thank you for visiting this post.
If you think something is wrong with this post or you want to know more, you can send me a message to one of my social profiles at: https://justinverstijnen.nl/about/
If you find this page and blog very useful and you want to leave a donation, you can use the button below to buy me a beer. Hosting and maintaining a website takes a lot of time and money. Thank you in advance and cheers :)
The terms and conditions apply to this post.
Joining storage account to Active Directory (AD DS)
Joining a storage account to Active Directory can be a hard part of configuring Azure Virtual Desktop or other components to work. We must…
Joining a storage account to Active Directory can be a hard part of configuring Azure Virtual Desktop or other components to work. We must join the storage account so we can do our Kerberos authentication against the storage account.
In this guide I will write down the most easiest way with the least effort of performing this action.
Requirements
- Around 30 minutes of your time
- An Azure subscription with the storage account
- An Active Directory (AD DS) to join the storage account with (on-premises/Azure)
- Basic knowledge of Active Directory and PowerShell
Step 1: Prepare the Active Directory server
We must first prepare our server. This must be a domain-joined server, but preferably not a domain controller. Use a management server instead when possible. We must execute
The server must have the following software installed:
- .NET Framework 4.7.2 or higher(Included from Windows 10 and up)
- Azure Powershell module and Azure Storage module
- The Active Directory PowerShell module (Can be installed through Server Manager)
Installing the Azure PowerShell module
You can install the Azure PowerShell module by executing this command:
POWERSHELL
Install-Module -Name Az -Repository PSGallery -Scope CurrentUser -ForceInstalling the Azure Storage module
You can install the Azure Storage PowerShell module by executing this command:
POWERSHELL
Install-Module -Name Az.Storage -Repository PSGallery -Scope CurrentUser -ForceNow the server is prepared for installing the AZFilesHybrid Powershell module.
Step 2: Using the AZFilesHybrid Powershell module
We must now install the AzFilesHybrid PowerShell module. We can download the files from the Github repository of Microsoft: https://github.com/Azure-Samples/azure-files-samples/releases

Download the ZIP file and extract this on a location on your Active Directory management server.
Now open the PowerShell ISE application on your server as administrator.
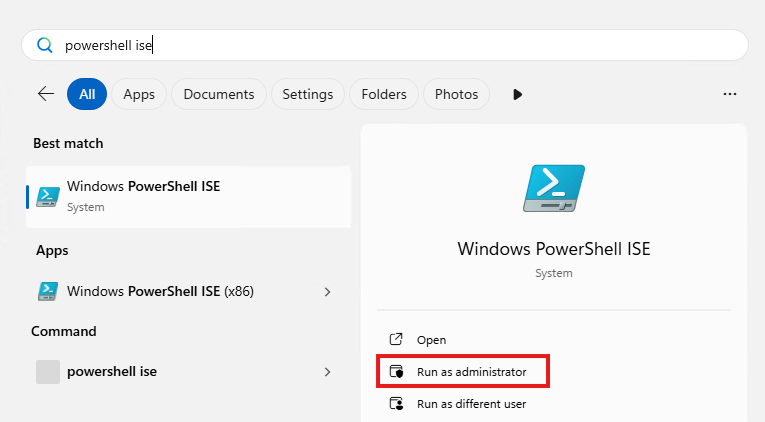
Then give consent to User Account Control to open the program.
Navigate to the folder where your files are stored, right-click the folder and click on “Copy as path”:
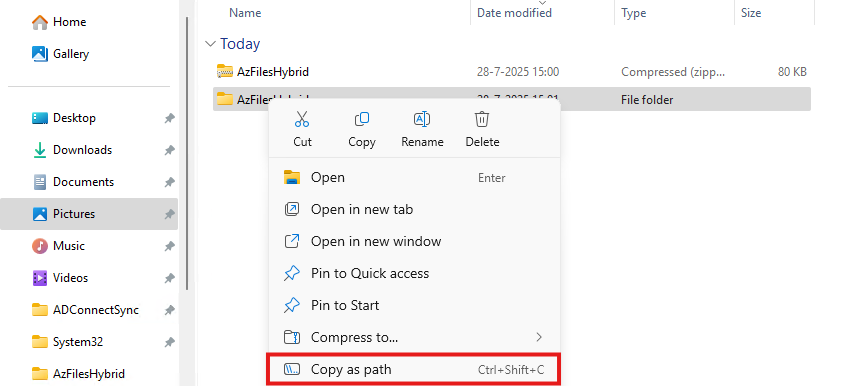
Now go back to PowerShell ISE and type “cd” followed by a space and paste your script path.
POWERSHELL
cd "C:\Users\justin-admin\Downloads\AzFilesHybrid"This will directly navigate PowerShell to the module folder itself so we can execute each command.
Step 3: Executing the script to join the Storage Account to Active Directory
Now copy the whole script block of the Microsoft Webpage or the altered and updated script block below and paste this into PowerShell ISE. We have to change the values before running this script. Change the values on line 9, 10, 11, 12 and 14.
POWERSHELL
Set-ExecutionPolicy -ExecutionPolicy Unrestricted -Scope Process

.\CopyToPSPath.ps1

Import-Module -Name AzFilesHybrid

Connect-AzAccount -DeviceCode

$SubscriptionId =     "<your-subscription-id-here>"
$ResourceGroupName =  "<resource-group-name-here>"
$StorageAccountName = "<storage-account-name-here>"
$SamAccountName =     "<sam-account-name-here>"
$DomainAccountType =  "ComputerAccount"
$OuDistinguishedName = "<ou-distinguishedname-here>"

Select-AzSubscription -SubscriptionId $SubscriptionId

Join-AzStorageAccount `
        -ResourceGroupName $ResourceGroupName `
        -StorageAccountName $StorageAccountName `
        -SamAccountName $SamAccountName `
        -DomainAccountType $DomainAccountType `
        -OrganizationalUnitDistinguishedName $OuDistinguishedName

Debug-AzStorageAccountAuth -StorageAccountName $StorageAccountName -ResourceGroupName $ResourceGroupName -Verbose- Subscription ID: This is the identifier of your Azure Subscription where your storage account is in. You can find this by going to “Subscriptions” in the Azure Portal.
- Resource Group Name: This is the name of the Resource Group, go to “Resource groups”
- Storage Account Name: This is the name of the joining storage account, go to “Storage Accounts”
- Sam Account Name: This will be the name in the Active Directory, must be less than 15 characters
- OU Distinguished Name: This is the OU name in LDAP format of Active Directory, you can find this by enabling Advanced Features in Active Directory and finding this name under the attributes.
After running this script with the right information, you will be prompted with a device login. Go to the link in a browser, login with a Entra ID Administrator account and fill in the code.

Now the storage account will be visible in your Active Directory.
Step 4: Checking status and Securing SMB access
After step 3, we will see the outcome of the script in the Azure Portal. The identity-based access is now configured.

Click on the Security button:

Set this to “Maximum security” and save the options.
Step 5: Testing access to the share
Ensure that the user(s) or groups you want to give access to the share have the role assignment “Storage File Data SMB Share Contributor”. This will give read/write NTFS access to the storage account. Now wait for around 10 minutes to let the permissions propagate.
Now test the access from File Explorer:
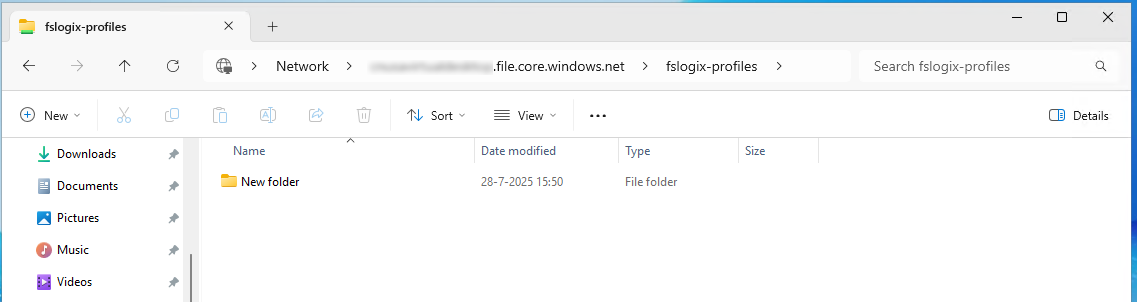
This works and we can create a folder, so have also write access.
Summary
This process we have to do sometimes when building an environment but most of the times, something doesn’t work, or we don’t have the modules ready, or the permissions were not right. Therefore I have decided to write this post to make this process as easy as possible while minimizing problems.
Thank you for reading this post and I hope it was helpful.
Sources
These sources helped me by writing and research for this post;
- https://learn.microsoft.com/en-us/azure/storage/files/storage-files-identity-ad-ds-enable#run-join-azstorageaccount
- https://github.com/Azure-Samples/azure-files-samples/releases
End of the page 🎉
You have reached the end of the page. You can navigate through other blog posts as well, share this post on X, LinkedIn and Reddit or return to the blog posts collection page. Thank you for visiting this post.
If you think something is wrong with this post or you want to know more, you can send me a message to one of my social profiles at: https://justinverstijnen.nl/about/
If you find this page and blog very useful and you want to leave a donation, you can use the button below to buy me a beer. Hosting and maintaining a website takes a lot of time and money. Thank you in advance and cheers :)
The terms and conditions apply to this post.
Clean up old FSLogix profiles with Logic Apps
Today I have a Logic App for you to clean up orphaned FSLogix profiles with Logic Apps. As you know, storage in Azure costs money and we…
Today I have a Logic App for you to clean up orphaned FSLogix profiles with Logic Apps. As you know, storage in Azure costs money and we want to store as minimum as possible. But in most companies, old and orphaned FSLogix profiles will be forgotten to clean up so we have automate this.
In this guide I will show you how you can clean up FSLogix profiles from Azure Files by looking up the last modified date, and deleting the files after they exceeded the number of days.
I will give you a step-by-step guide to build this Logic App yourself.
Make sure you have backups ofenabled on your storage account so when a file is deleted but you need it for some reason after some time, you can restore it from a monthly or yearly backup.
Also: Recover Services storage is much cheaper than live Storage Account storage, keep this in mind when implementing this sort of Logic Apps.
Requirements
- Around 30 minutes of your time
- An Azure Subscription
- An Azure Files share ready for the Logic App to check and delete files from
- Basic Knowledge of Azure, Logic Apps and Storage Accounts
Download the Logic App Template
For the fast pass, you can download the Logic App JSON code here:
Then you can use the code to configure it completely and only change the connections.
The Logic App described
The logic app looks like this:
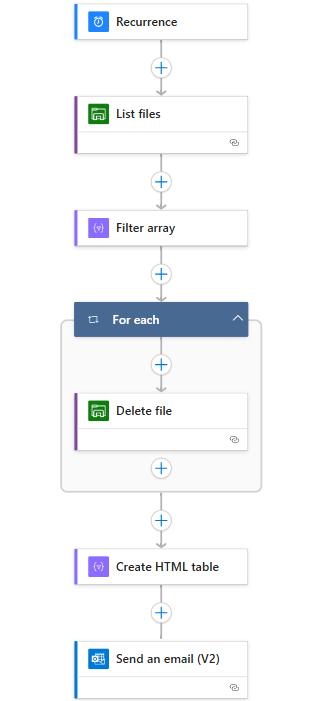
Recurrence: This is the trigger for the Logic App, and determines when it should run.
List Files: This connects to the storage account (using Storage Access Key) and folder and gets all file data.
Filter Array: Here the filtering on the last modified time/date takes place.
For Each -> Delete file: For each file that is longer than your stated last change date in the “Filter Array” step, deletes the file.
Create HTML template: Formats each file into a HTML template prior for sending via email.
Send an email: Sends an email of all the profiles which were deleted by the script for monitoring purposes.
This is a relatively simple 6-step logic app where the last 2 are optional. If you don’t want to receive email, it would be 4 steps and done after the for each -> Delete file step.
The Logic App monitors this date in the Azure Portal:
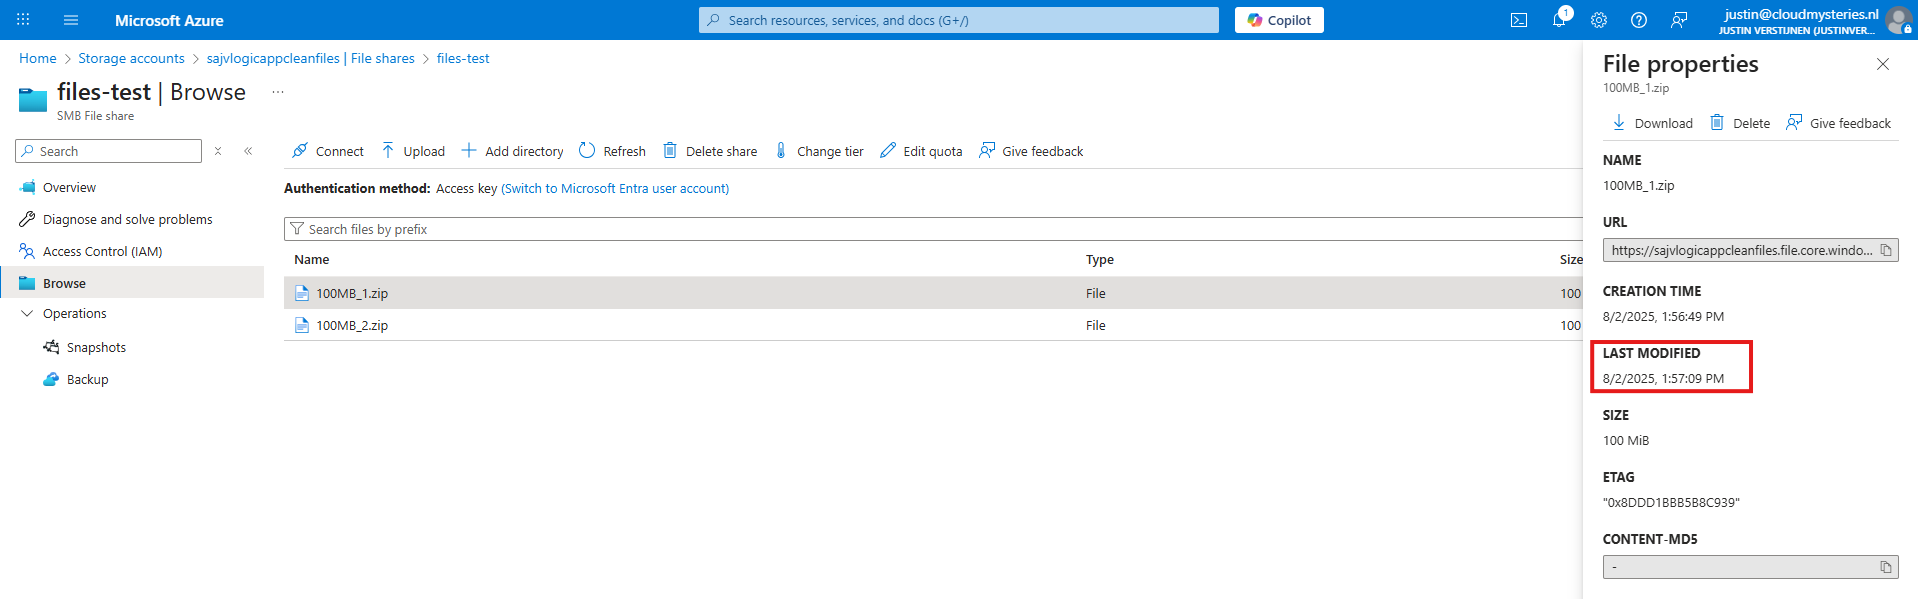
Not the NTFS last modified date which you will find in Windows:
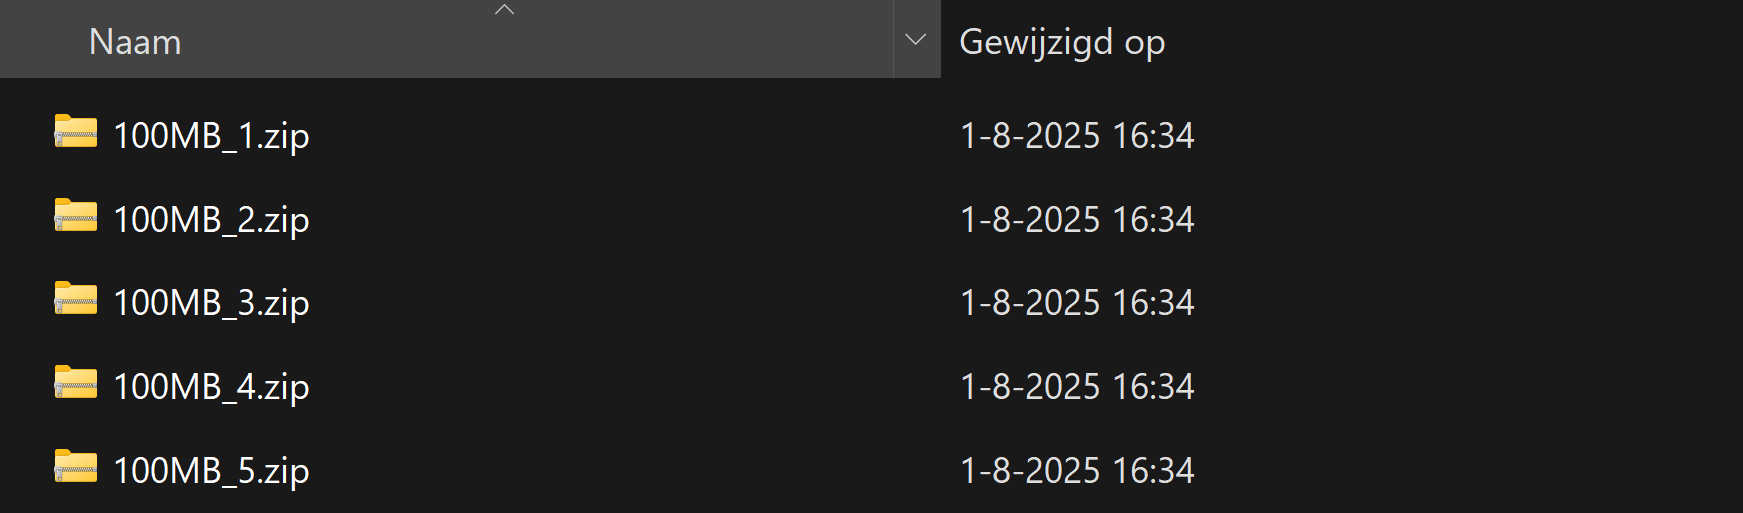
Step 1: Deploying the Logic App
Now we will configure this Logic App step-by step to configure it like I have done.
Start by creating a new Logic App in the Azure Portal. Choose the “Multi-tenant” option for the most cost-effective plan:
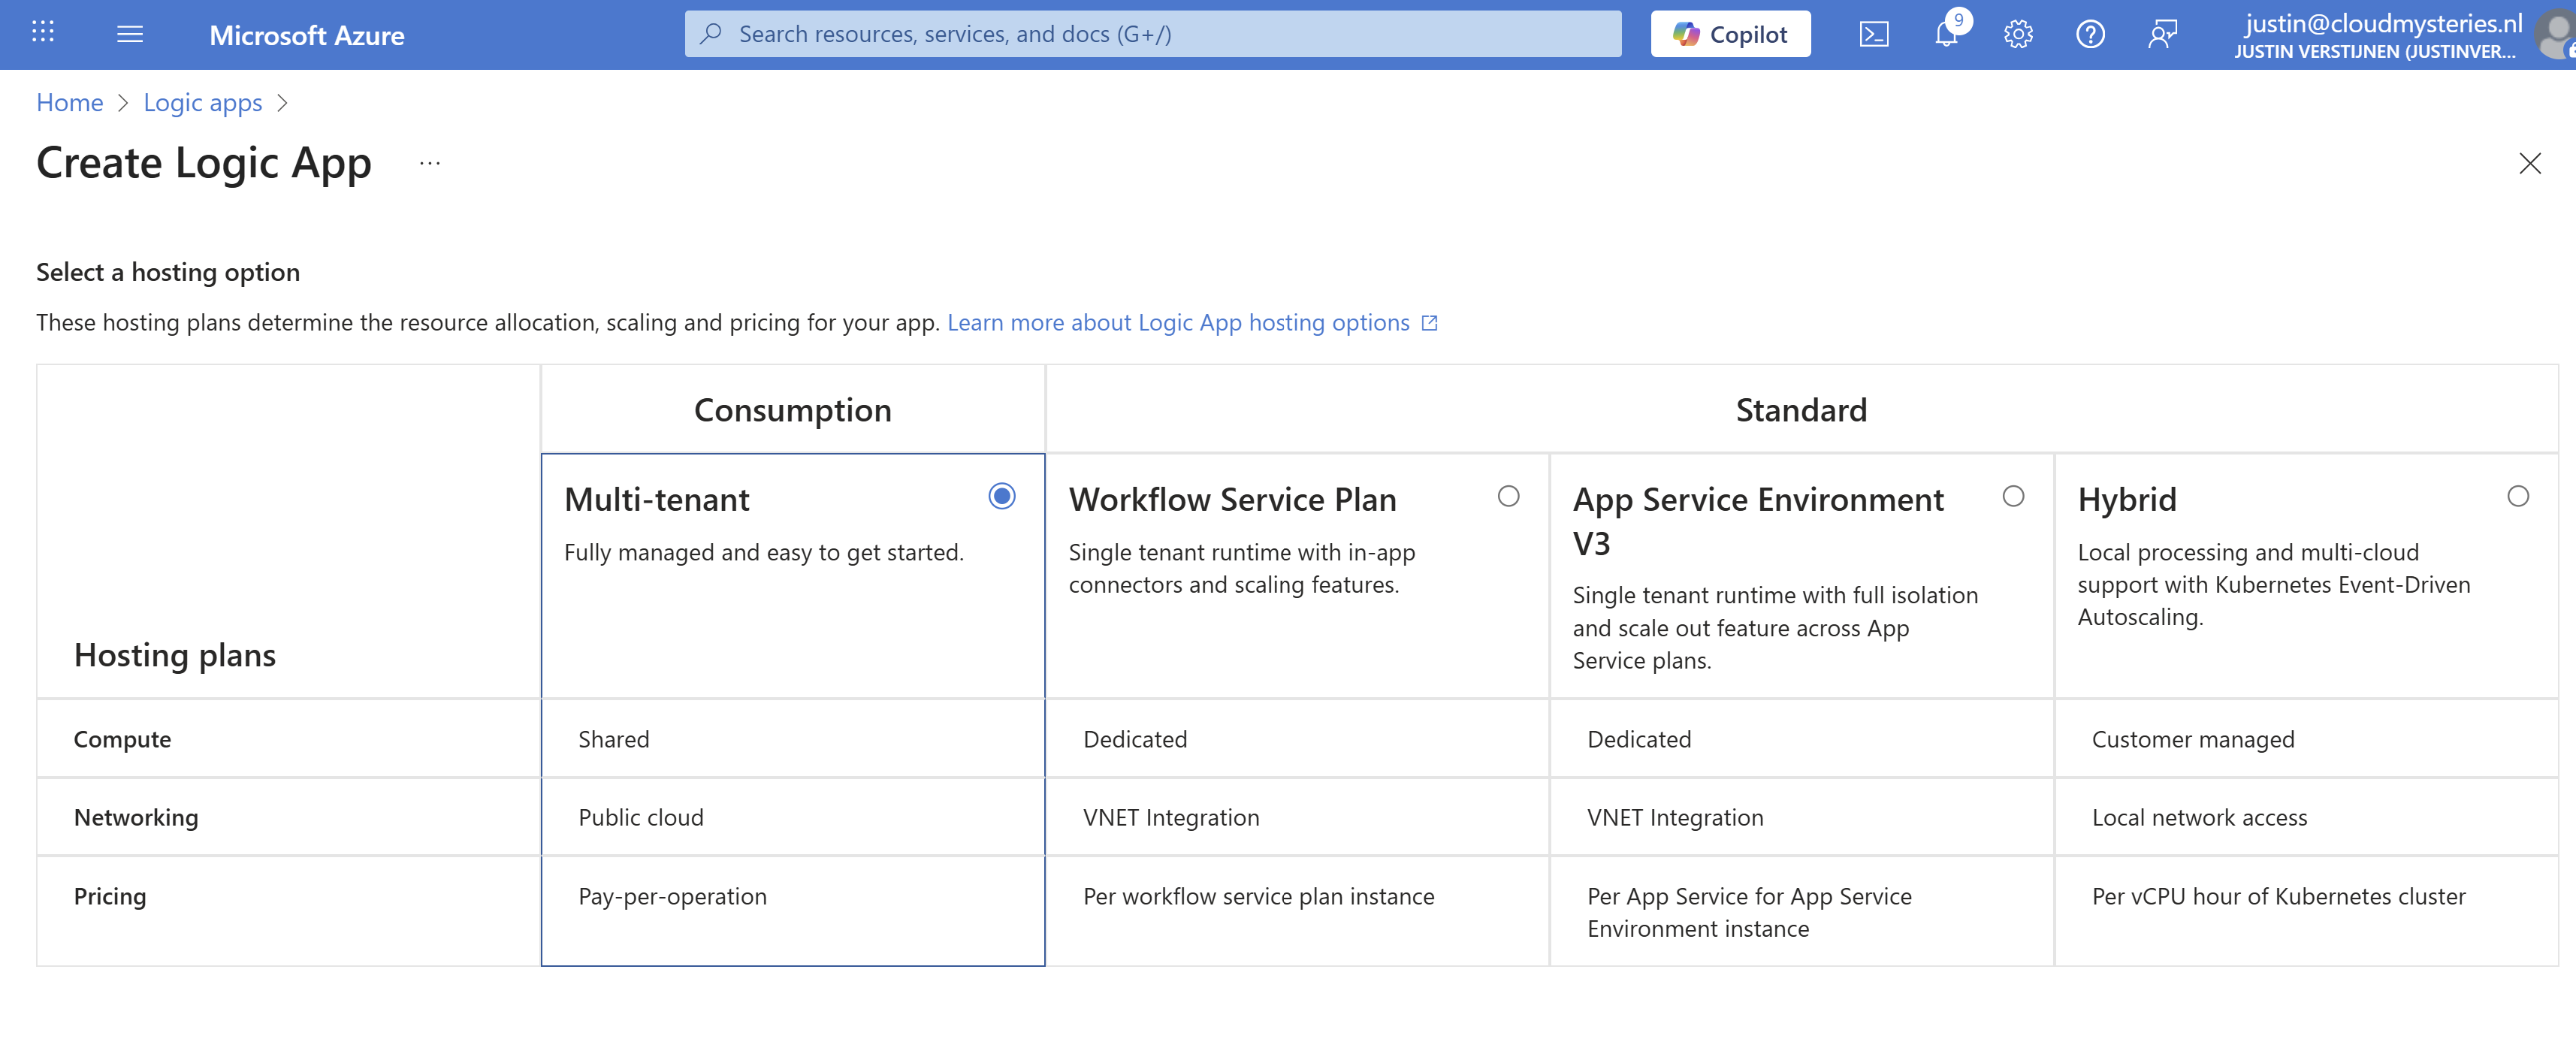
Advance.
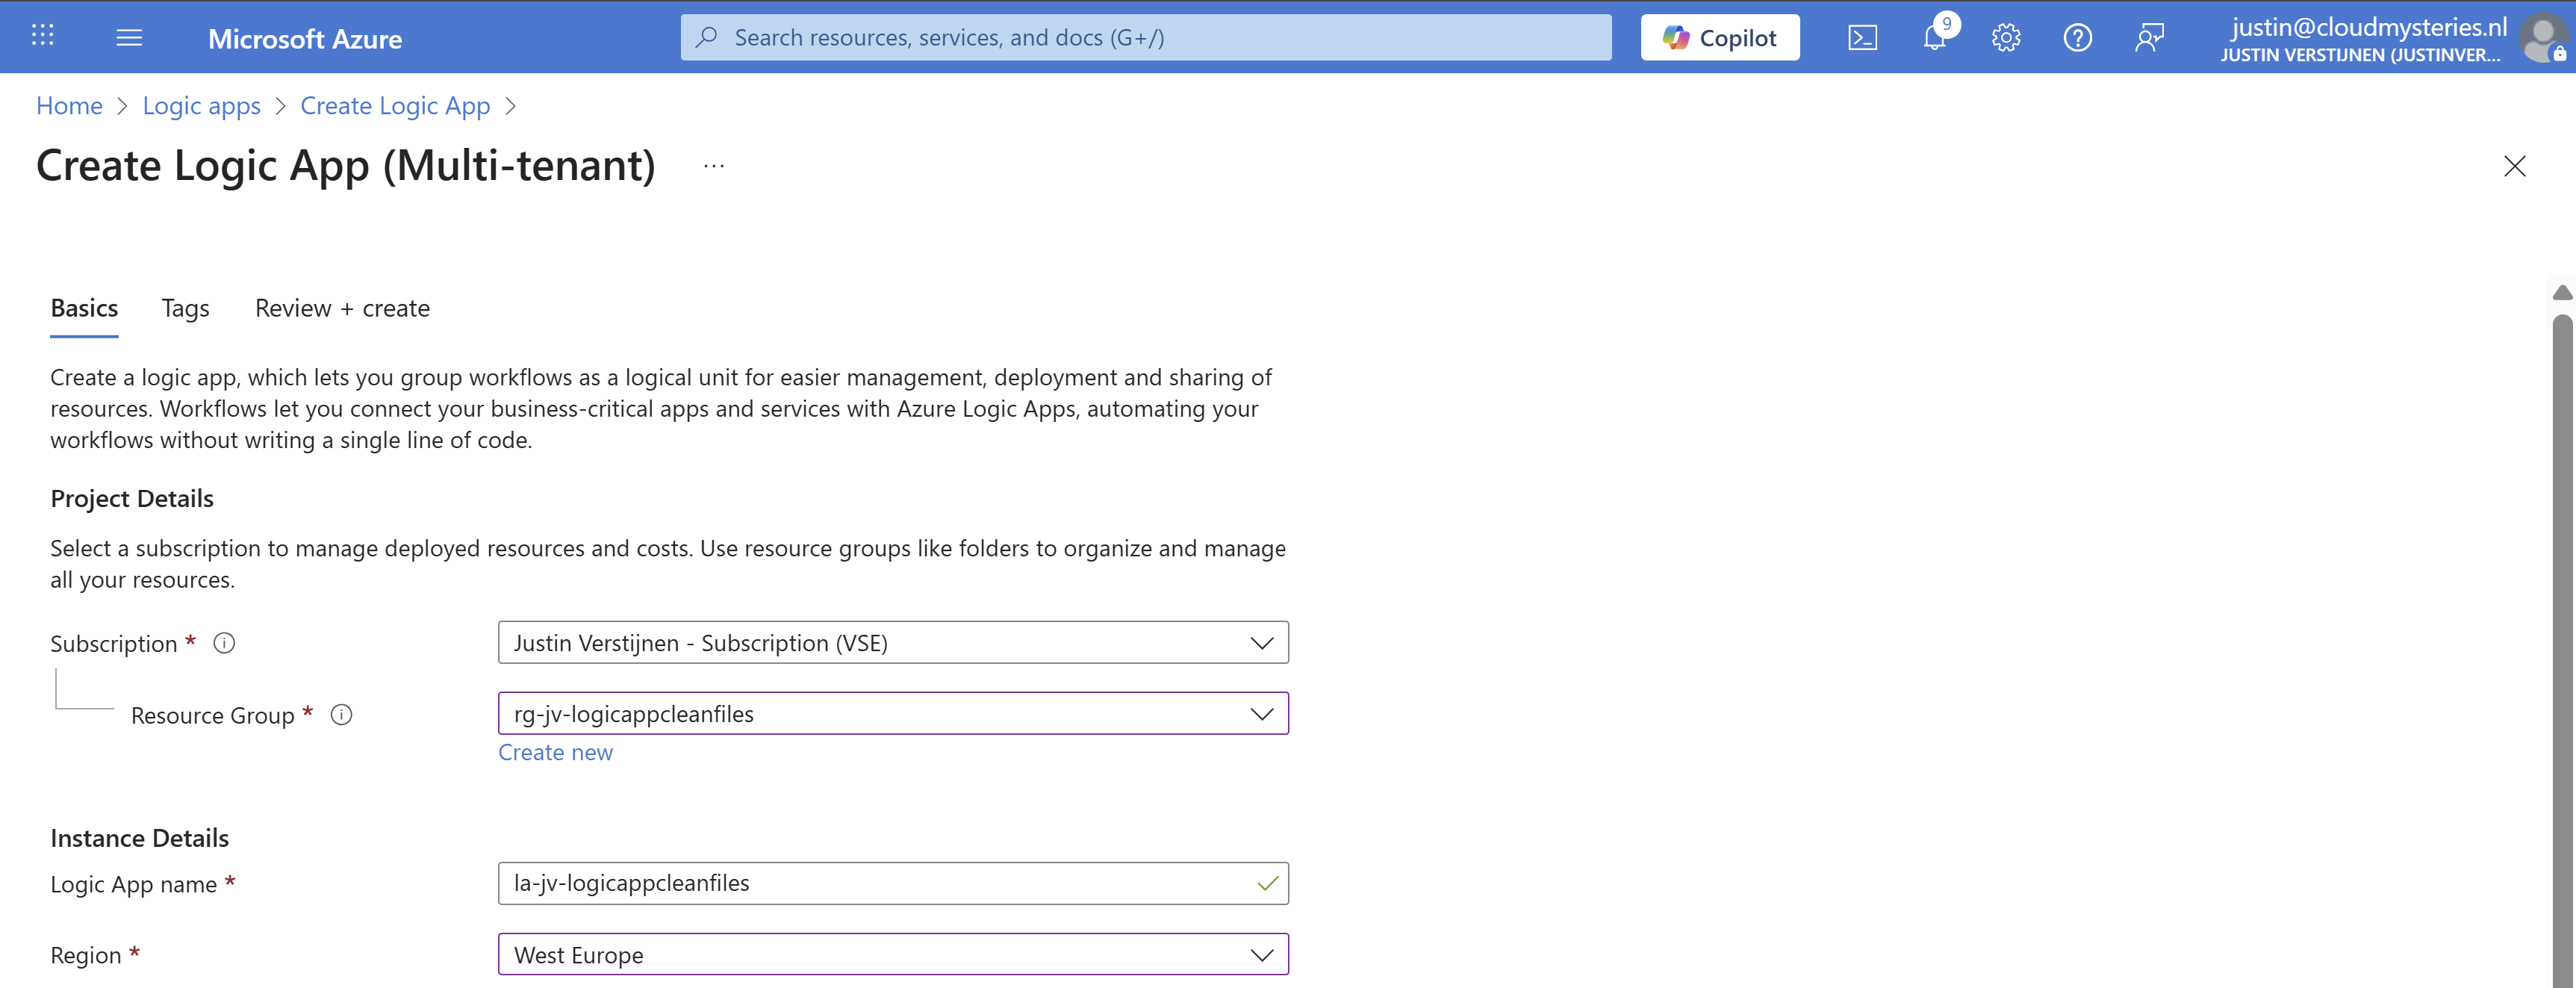
Select the right resource group, give it a name and select the right region. Then advance to the last page and create the Logic App.
Step 2: Create the trigger
Now that we have the Logic App, we must now configure the trigger. This states when the Logic App will run.
Open the Logic App designer, and click the “Add a trigger” button.
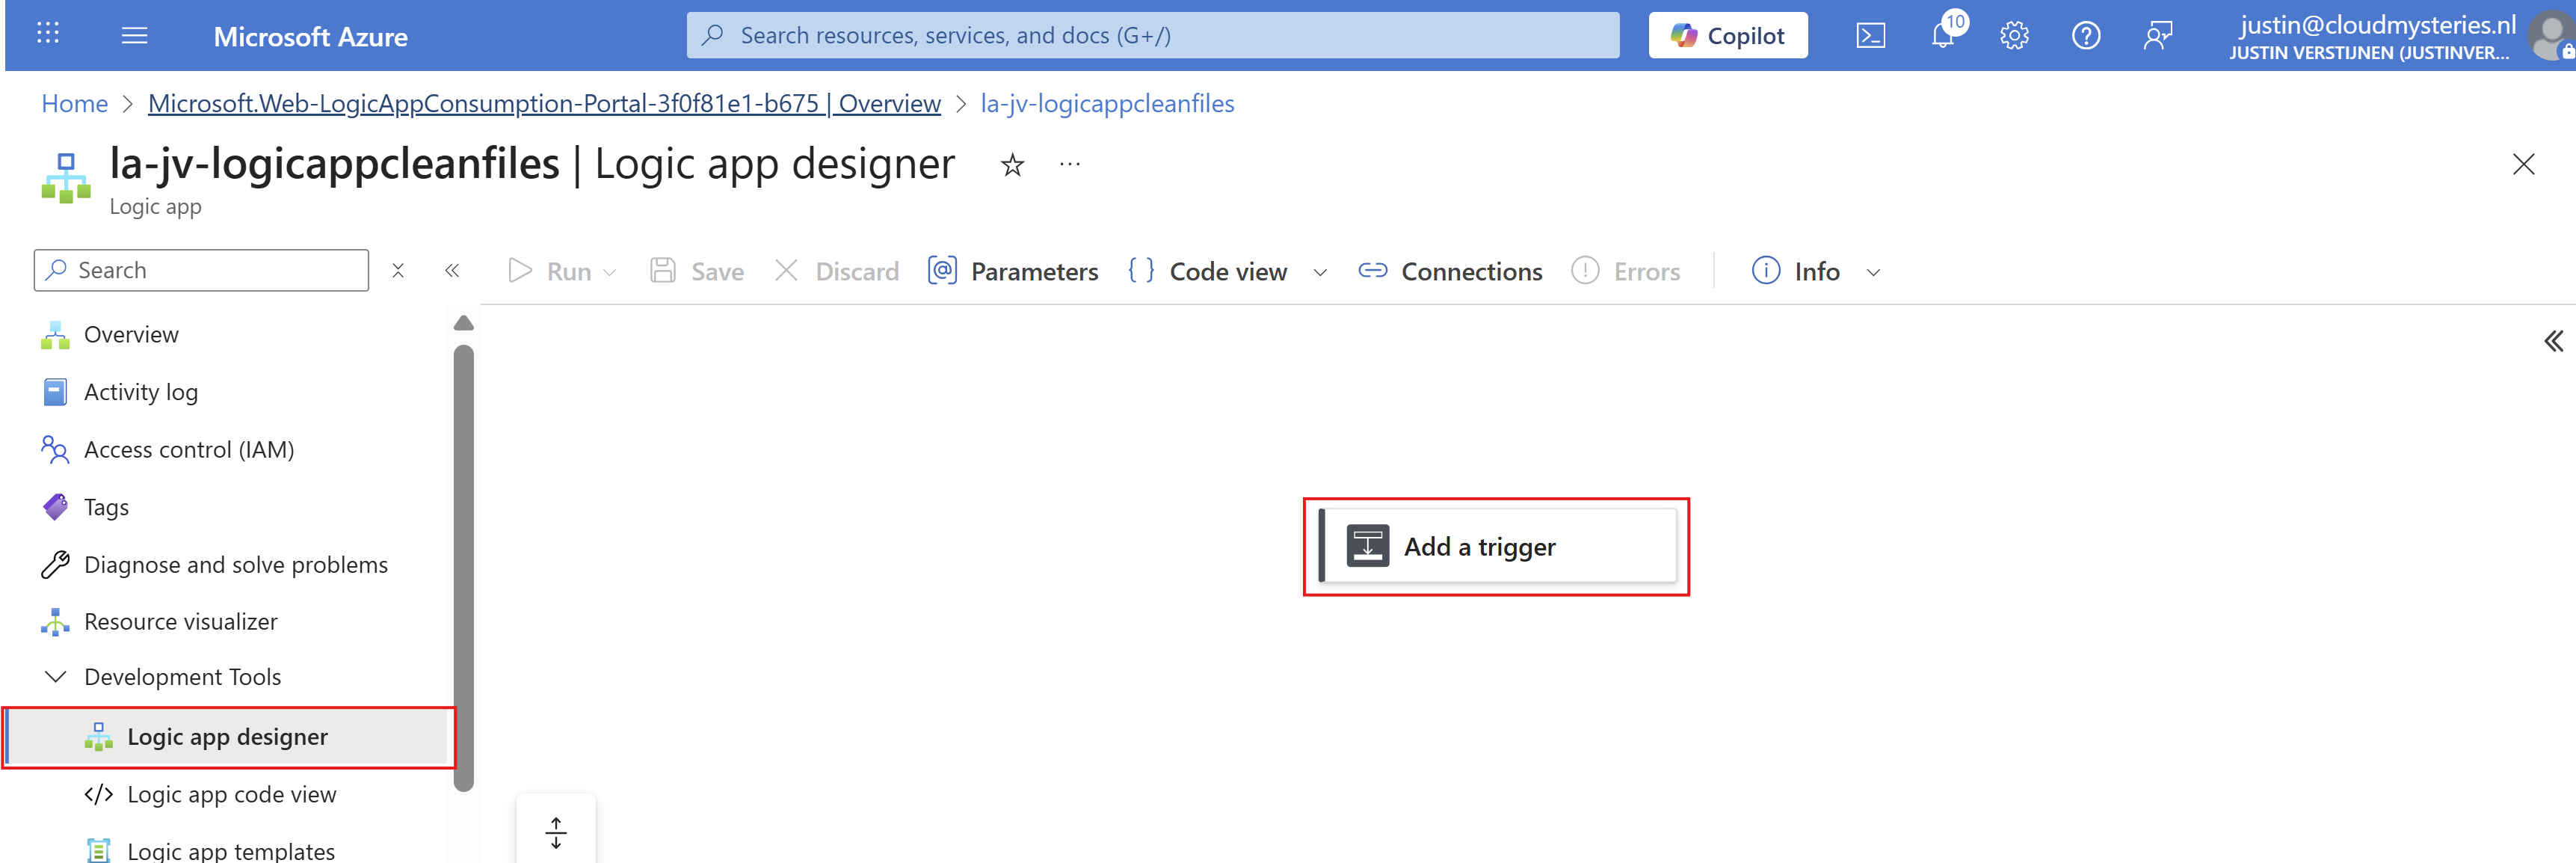
Search for “Recurrence” and select it.
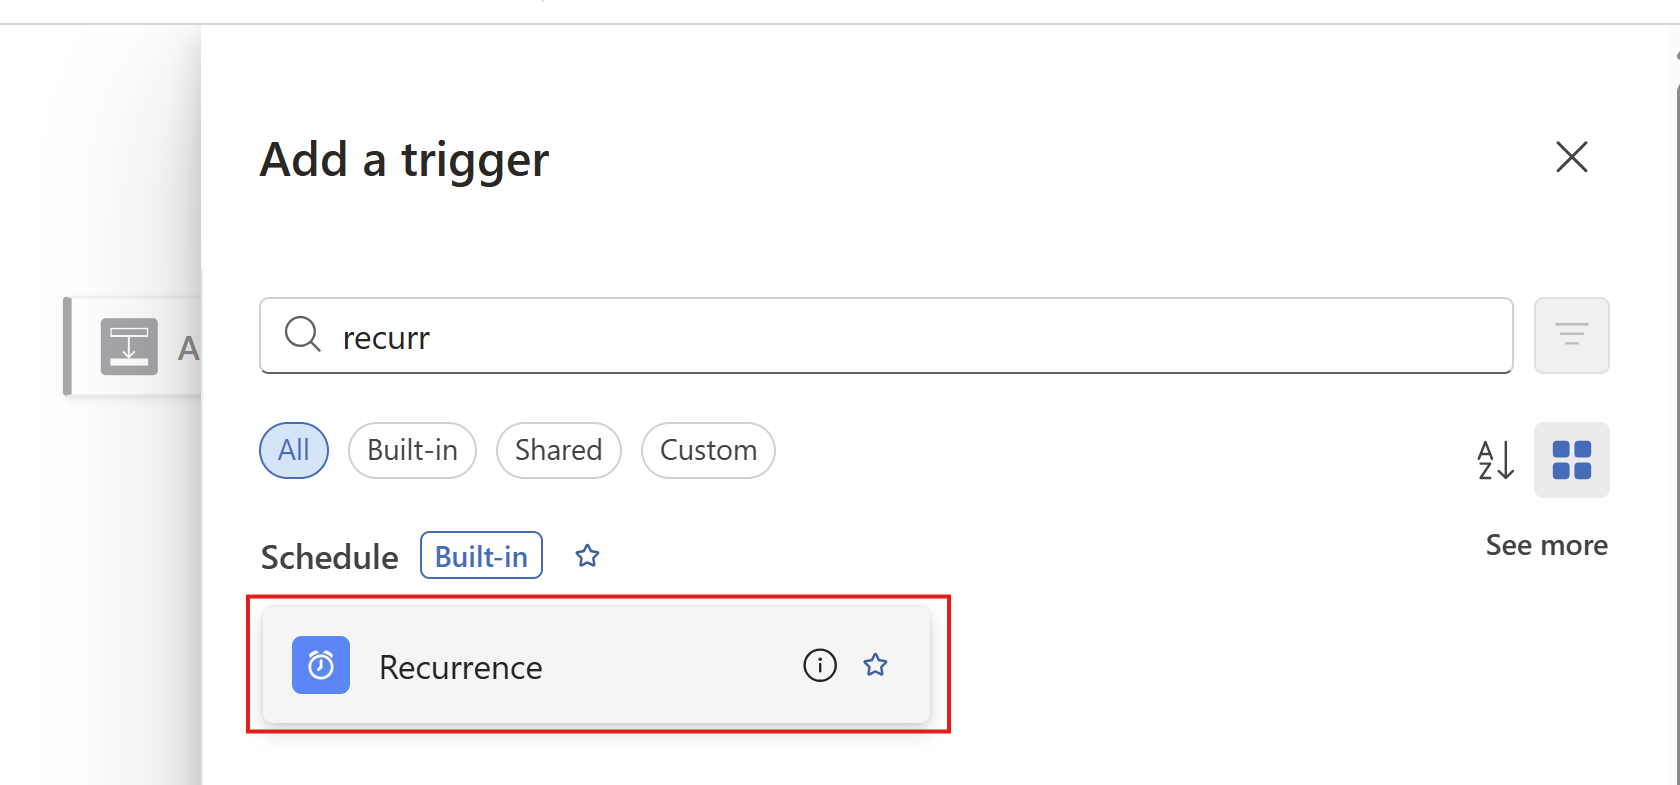
Then configure when the Logic App must run. In my example, I configured it to run every day on 00:00.
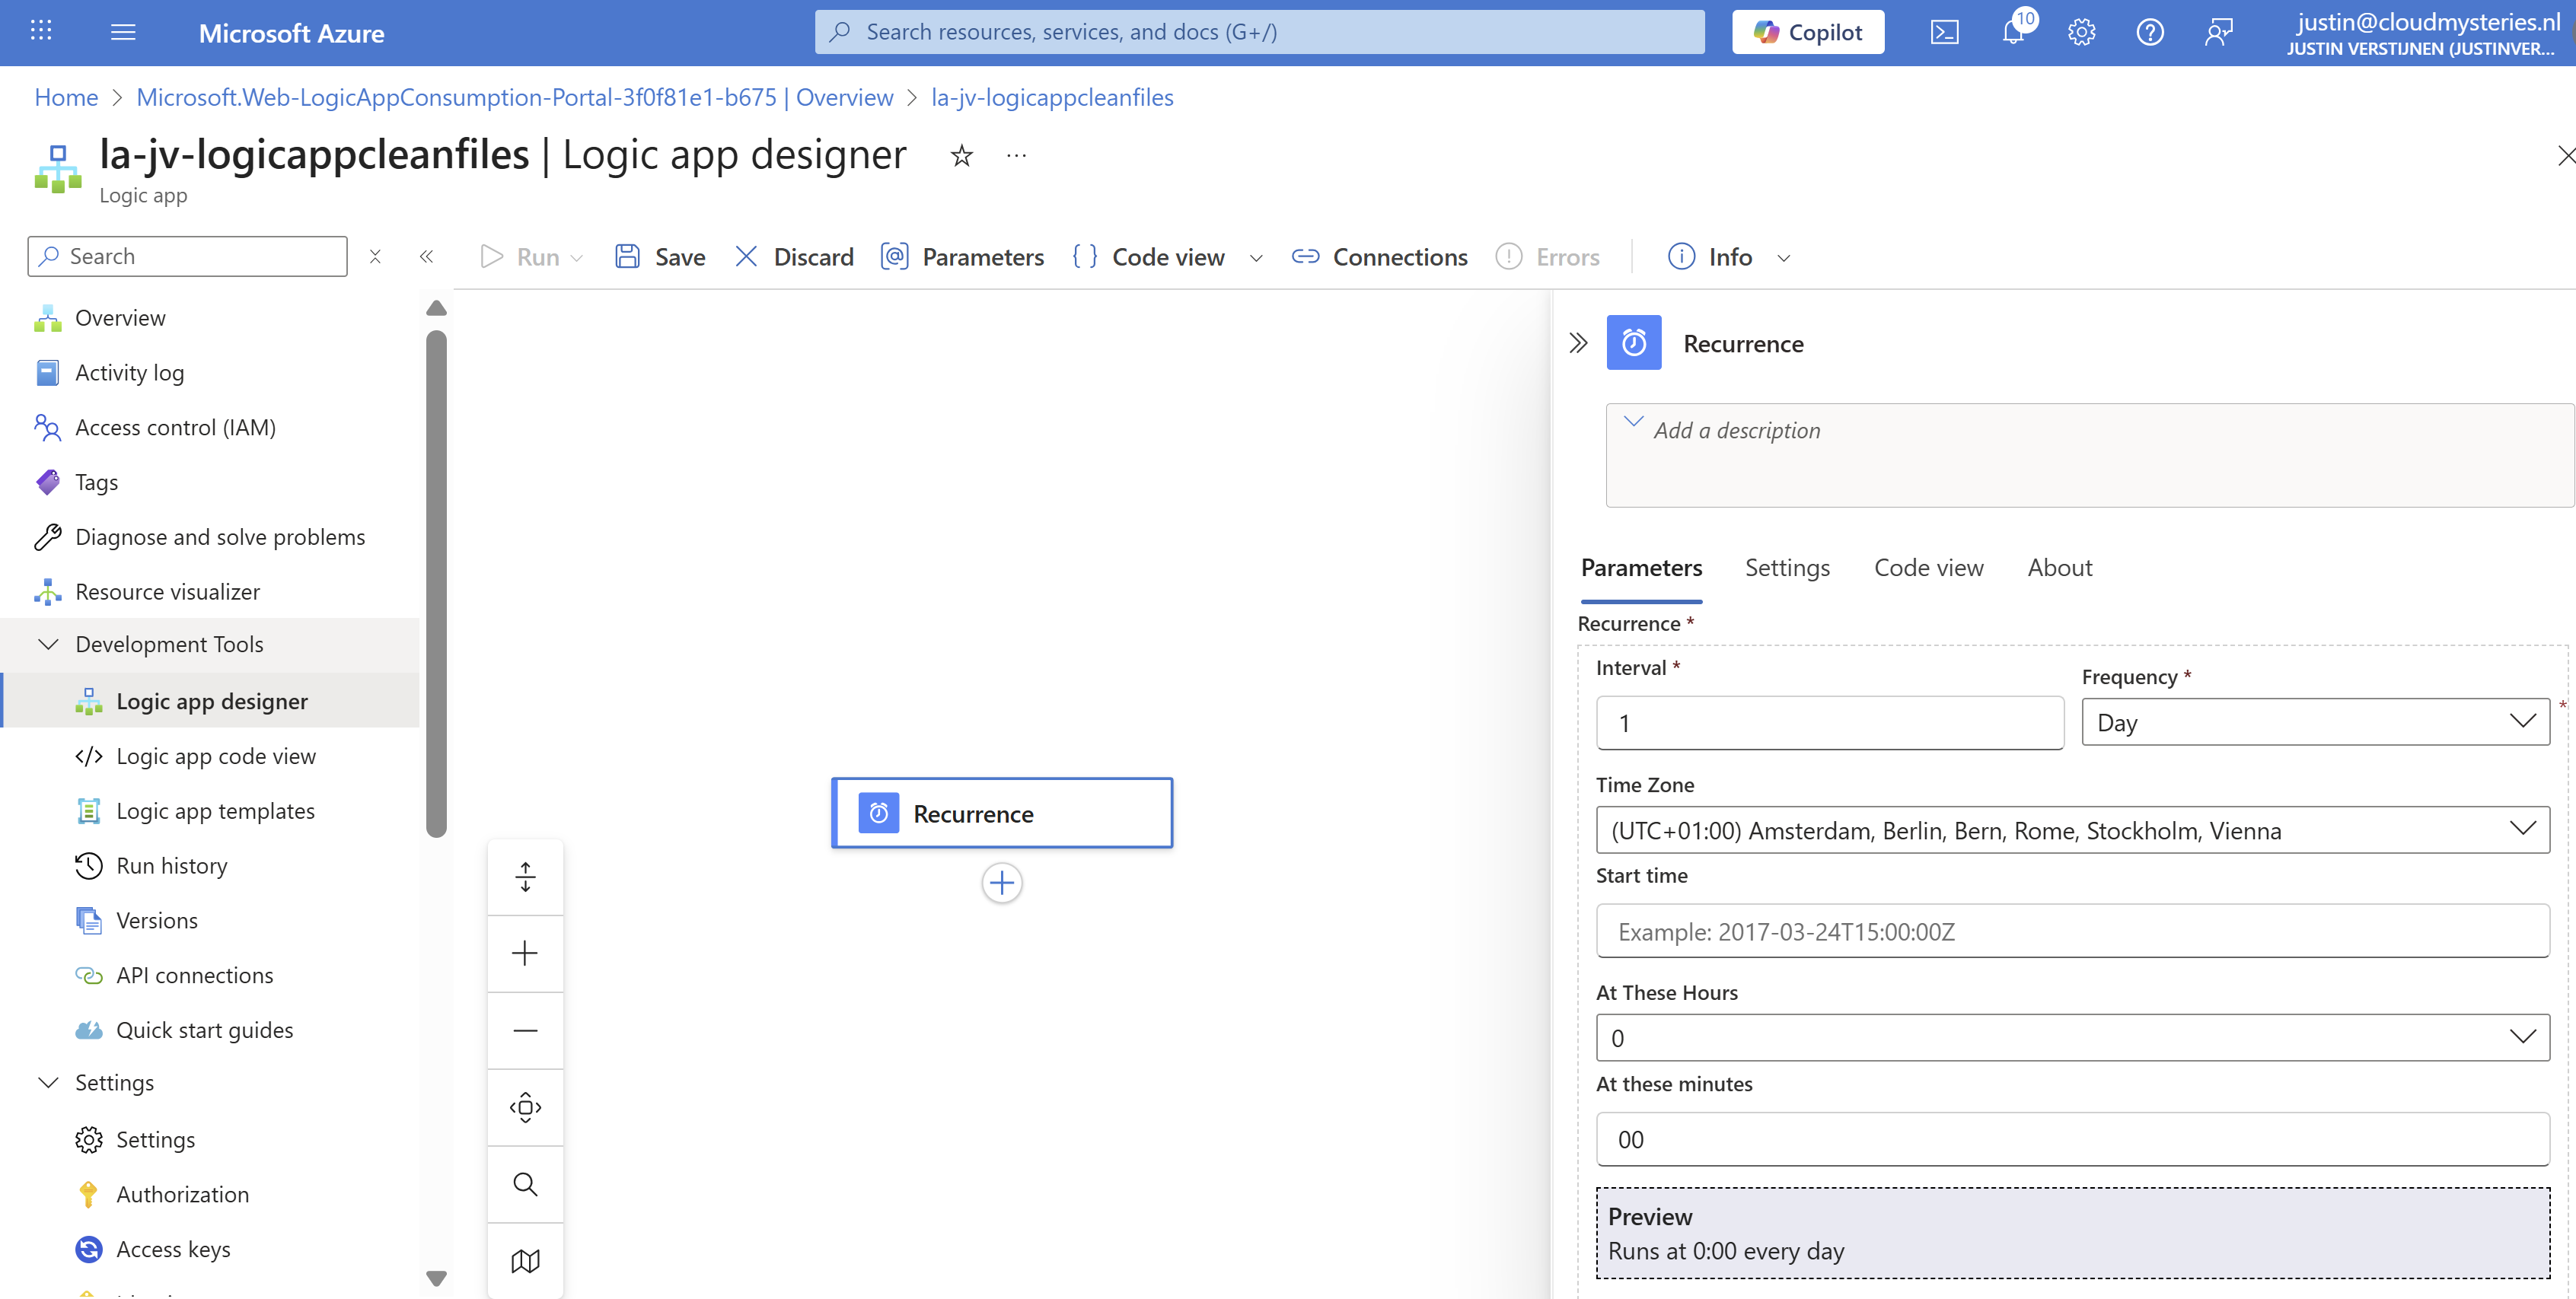
Then save the Logic App.
Step 3: Create the Azure Files connection and list step
Now we have to configure the step to connect the Logic App to the Azure Files share and configure the list action.
Add a step under “Recurrence” by clicking the “+” button:
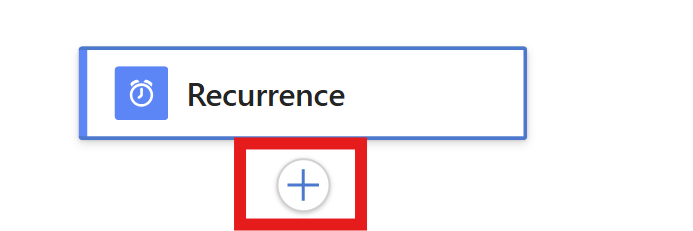
And then click “Add an action”. Then search for “List Files” of the Azure File Storage connector. Make sure to choose the right one:

Click the “List Files” button to add the connector and configure it. We now must configure 3 fields:
- Connection name: This is a free-of-coice name for the connection
- Azure Storage Account: Here we must paste the URL for the Azure Storage Account - File instance
- You can find this in the Storage account under “Endpoints” then copy the “File service” URL.
- Azure Storage Account Access Key: Here we must paste one of the 2 access keys
- You can find this in the Storage account under “Access Keys” and copy one of the 2 keys.
This must look like this:
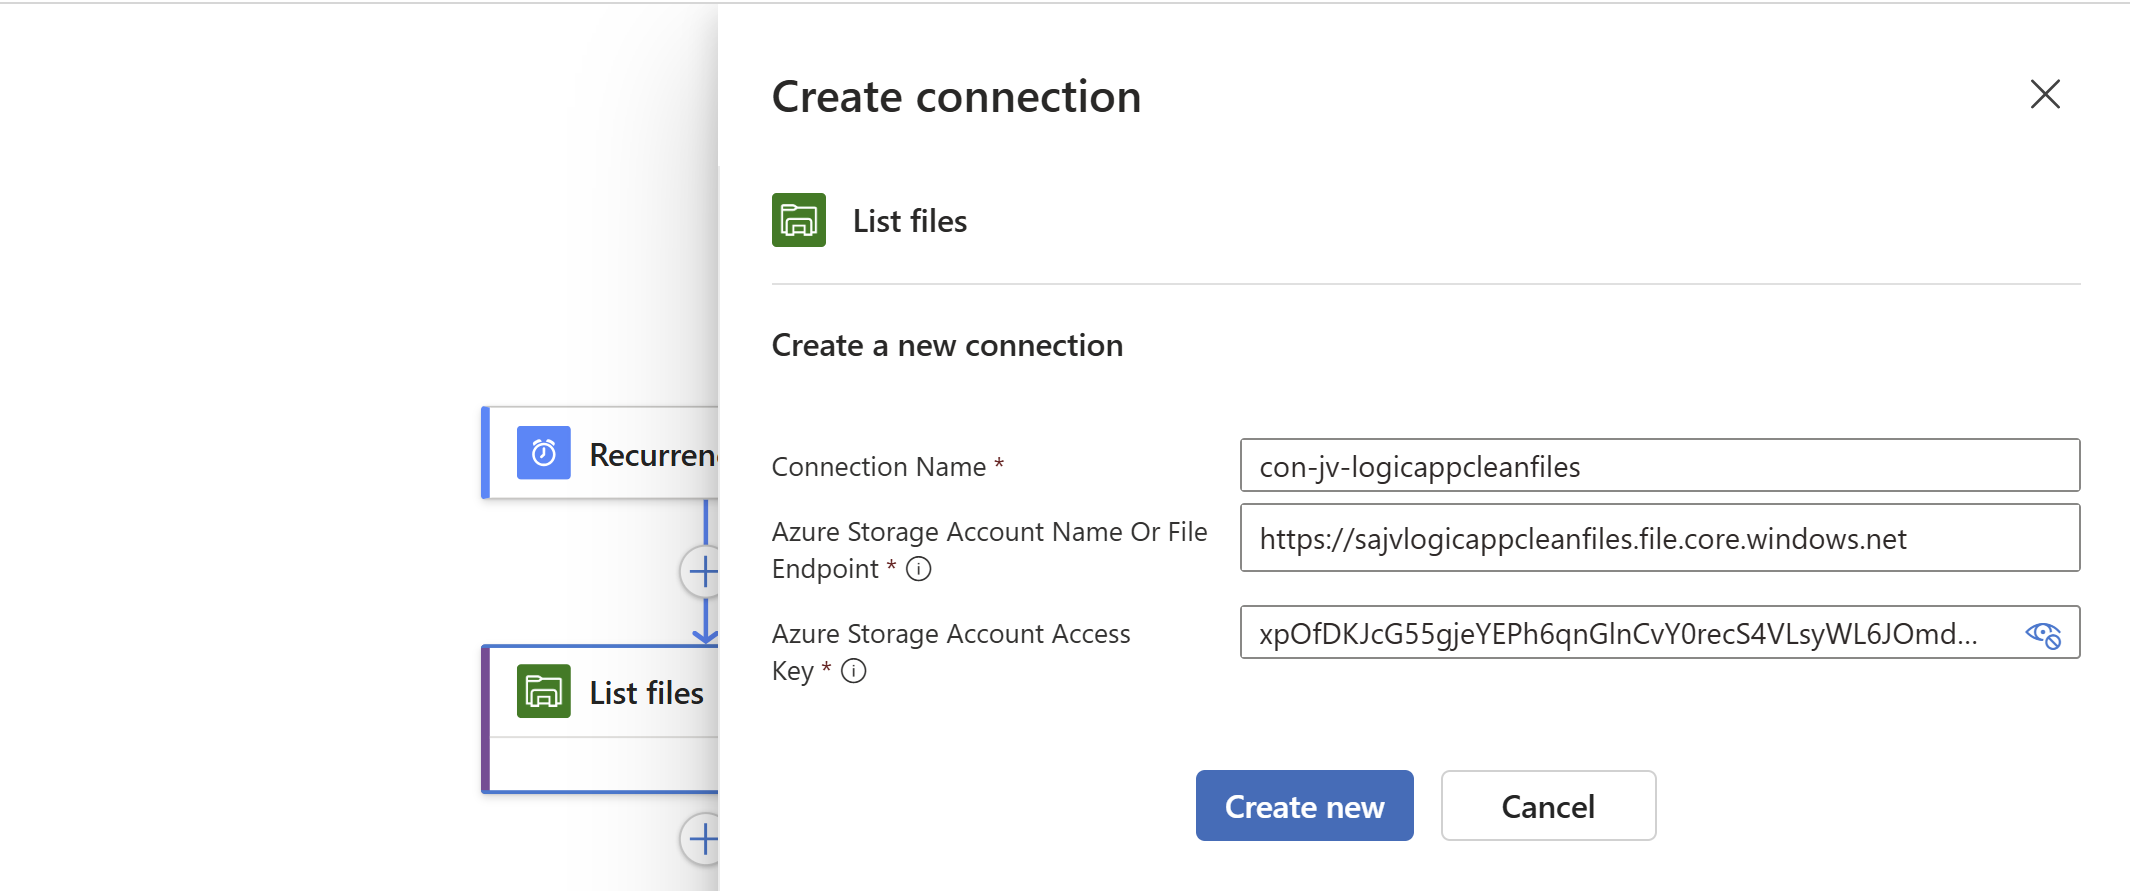
Click on “Create new” to create the connection. Because we now have access to the storage account we can select the right folder on the share:
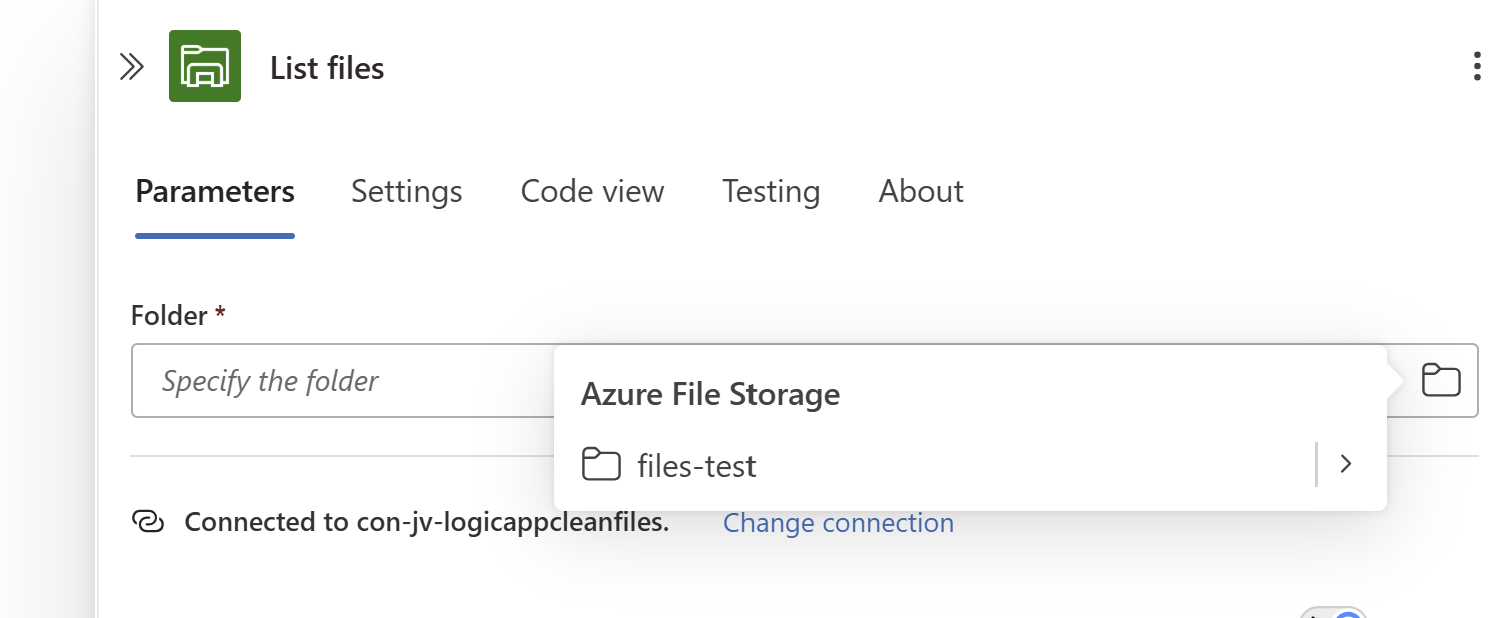
Save the Logic App.
Step 4: Create the Filter Array step and configure the retention
We have to add another step under the “List Files” step, called a “Filter Array”. This checks all files from the previous step and filters only the files that are older than your rule.
Add a “Filter Array” step from the “Data operations” connector:
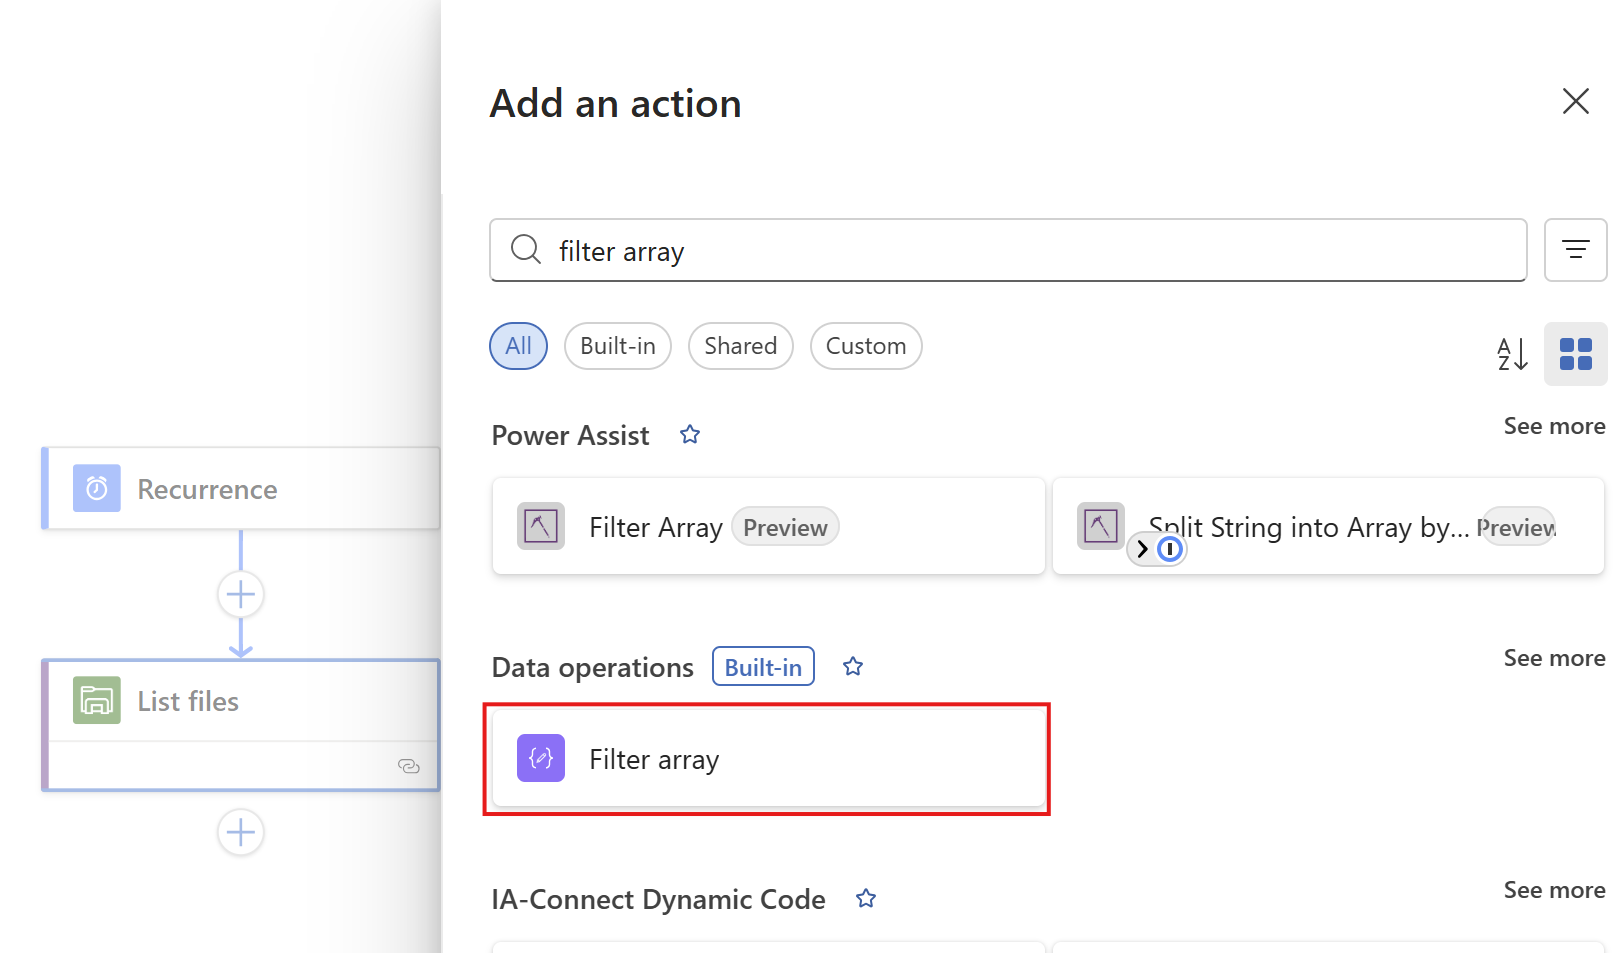
At the “From” field, click on the thunder button to add a dynamic content

And pick the “value” content of the “List Files” step.
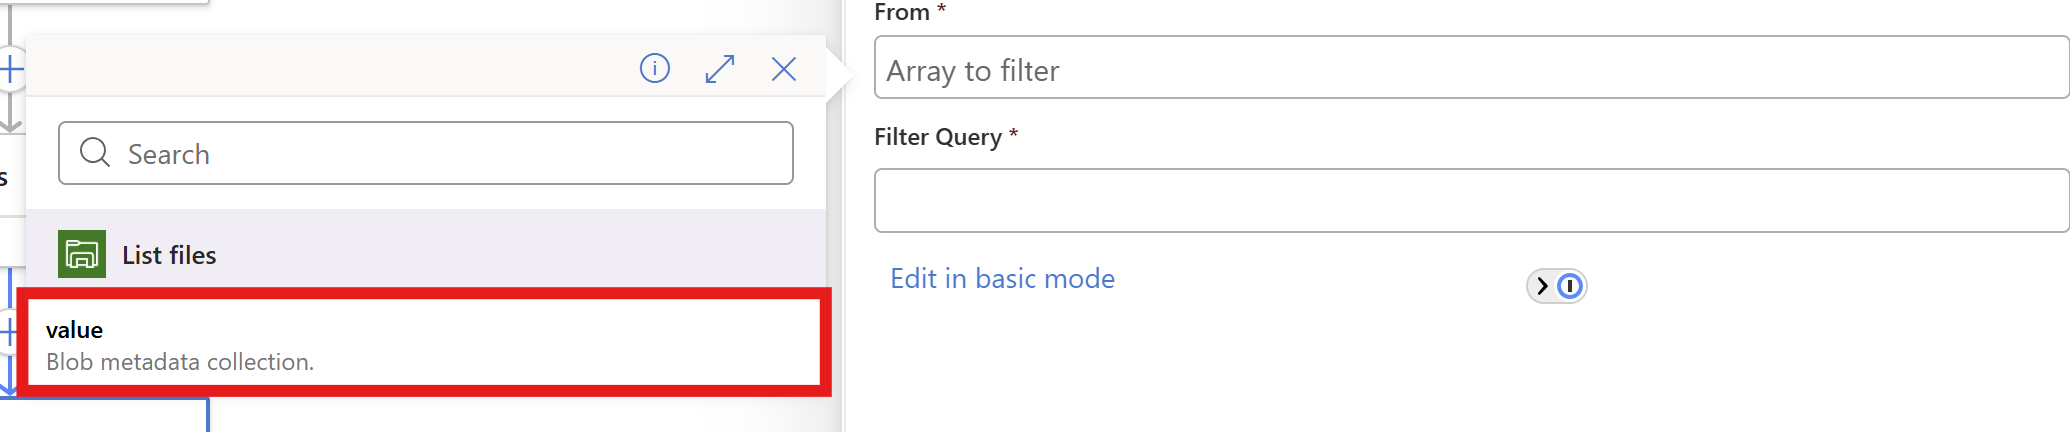
In the “Filter query” field, make sure you are in the advanced mode through the button below and paste this line:
JSON
@lessOrEquals(item()?['LastModified'], addDays(utcNow(), -180))You can change the retention by changing the 180 number. This is the amount of days.
You could also use minutes for testing purposes which I do in my demonstration:
JSON
@lessOrEquals(item()?['LastModified'], addMinutes(utcNow(), -30))This will only keep files mofidied within 30 minutes from execution. It’s up to you what you use. You can always change this and ensure you have good backups.
After pasting, it will automatically format the field:

Save the Logic App.
Step 5: Create the “Delete files” step
Now we have to add the step that deletes the files. Add the “Delete file” action from the Azure File Storage connector.
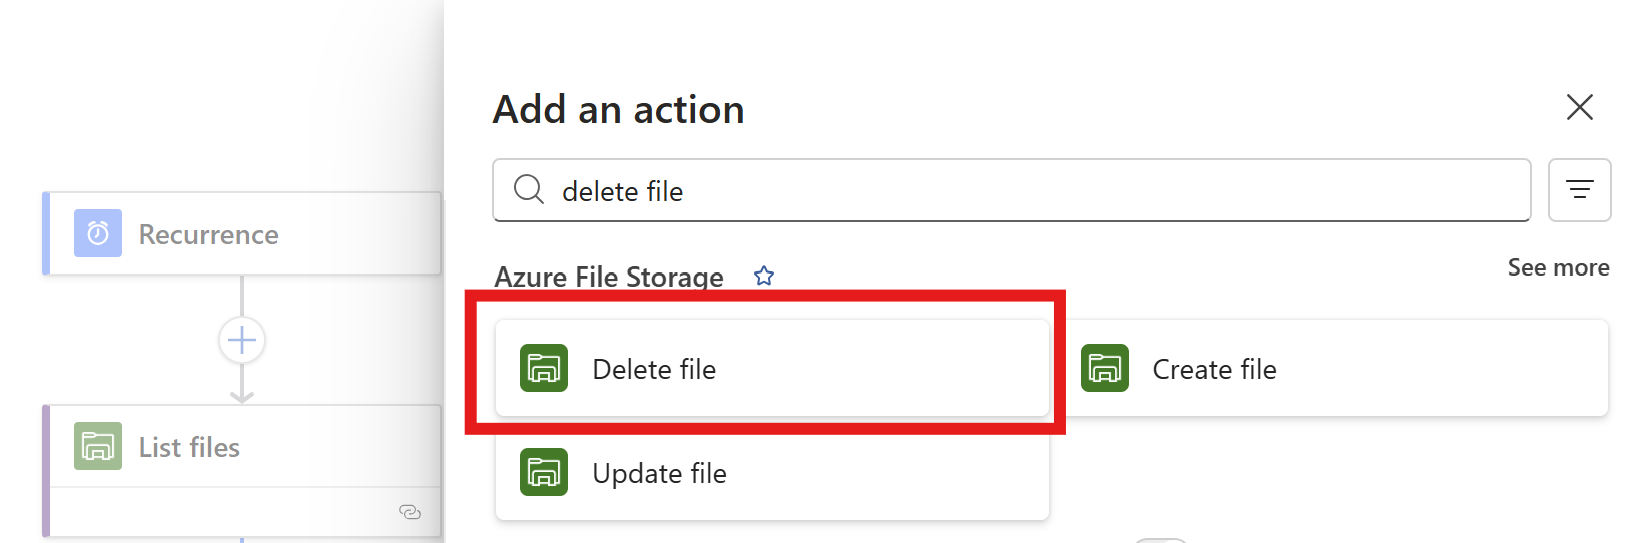
Click the “Delete files” option.
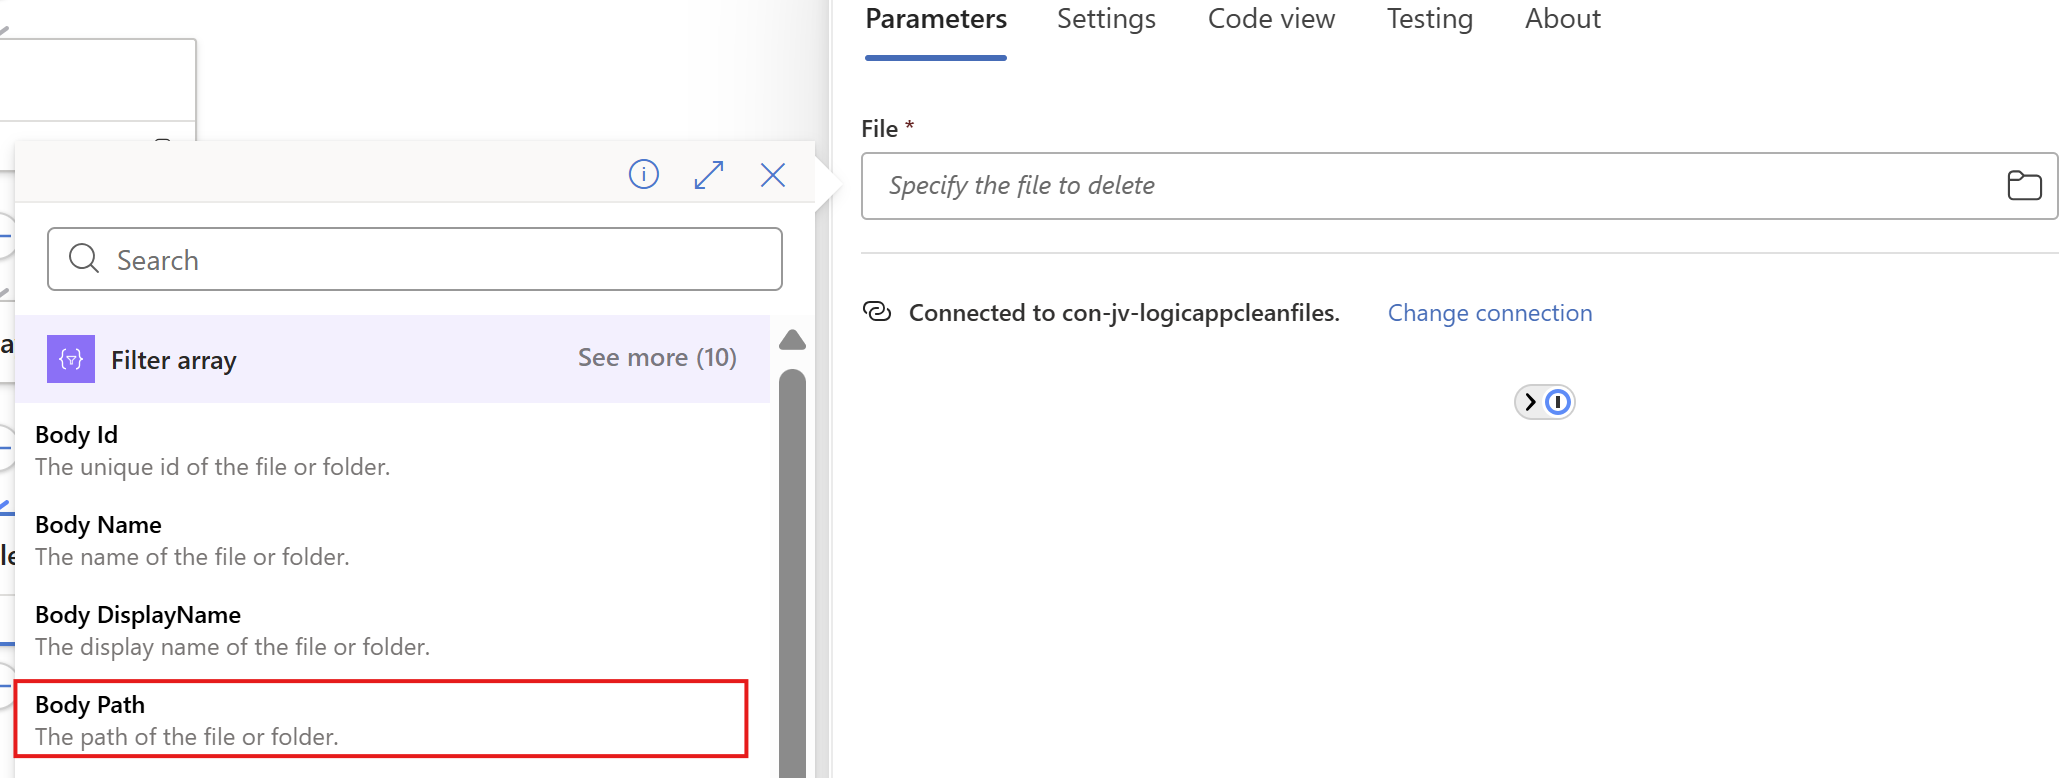
Now on the “File” field, again click on the thunder icon to add dynamic content and add the “Body Path” option of the “Filter Array” step.
Make sure you select the Filter Array step, as other steps might delete ALL files.
This automatically transforms the “Delete files” step into a loop where it performs the action for all filtered files in the “Filter Array” step.
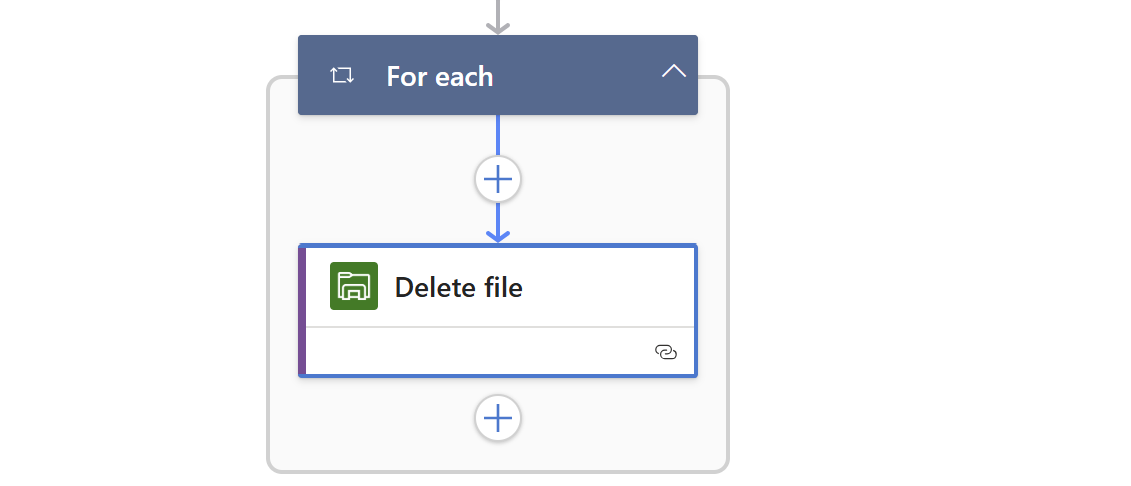
Save the Logic App.
Step 6: Create the “HTML table” step (optional)
We can now, if you want to receive reports of the files being deleted, add another step to transform the list of files deleted into a table. This is a preparation step for sending it through email.
Add a step called “Create HTML table” from the Data operations connector.
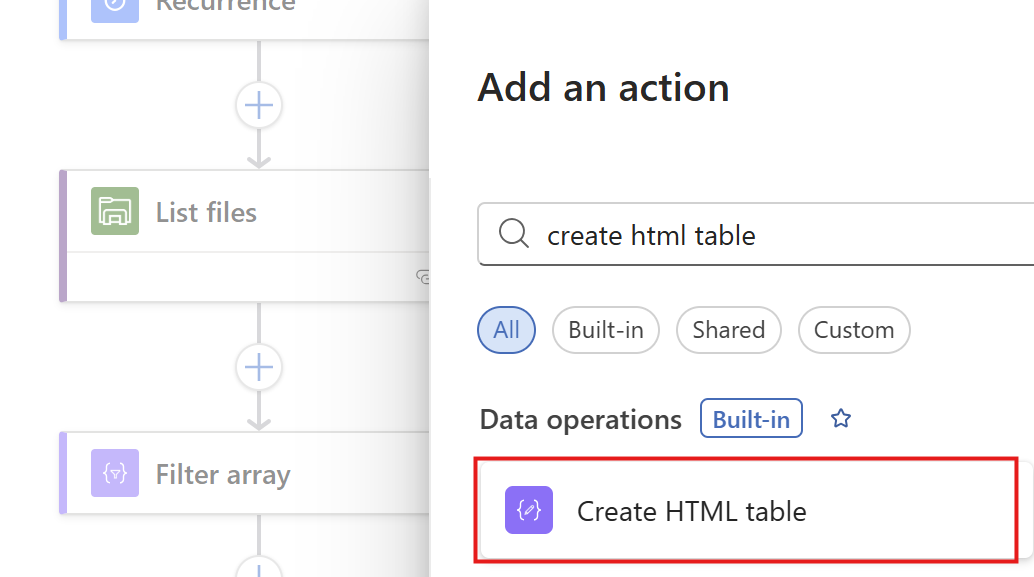
Then we have to format our table:
On the “From” field, again click the thunder icon to select dynamic content:
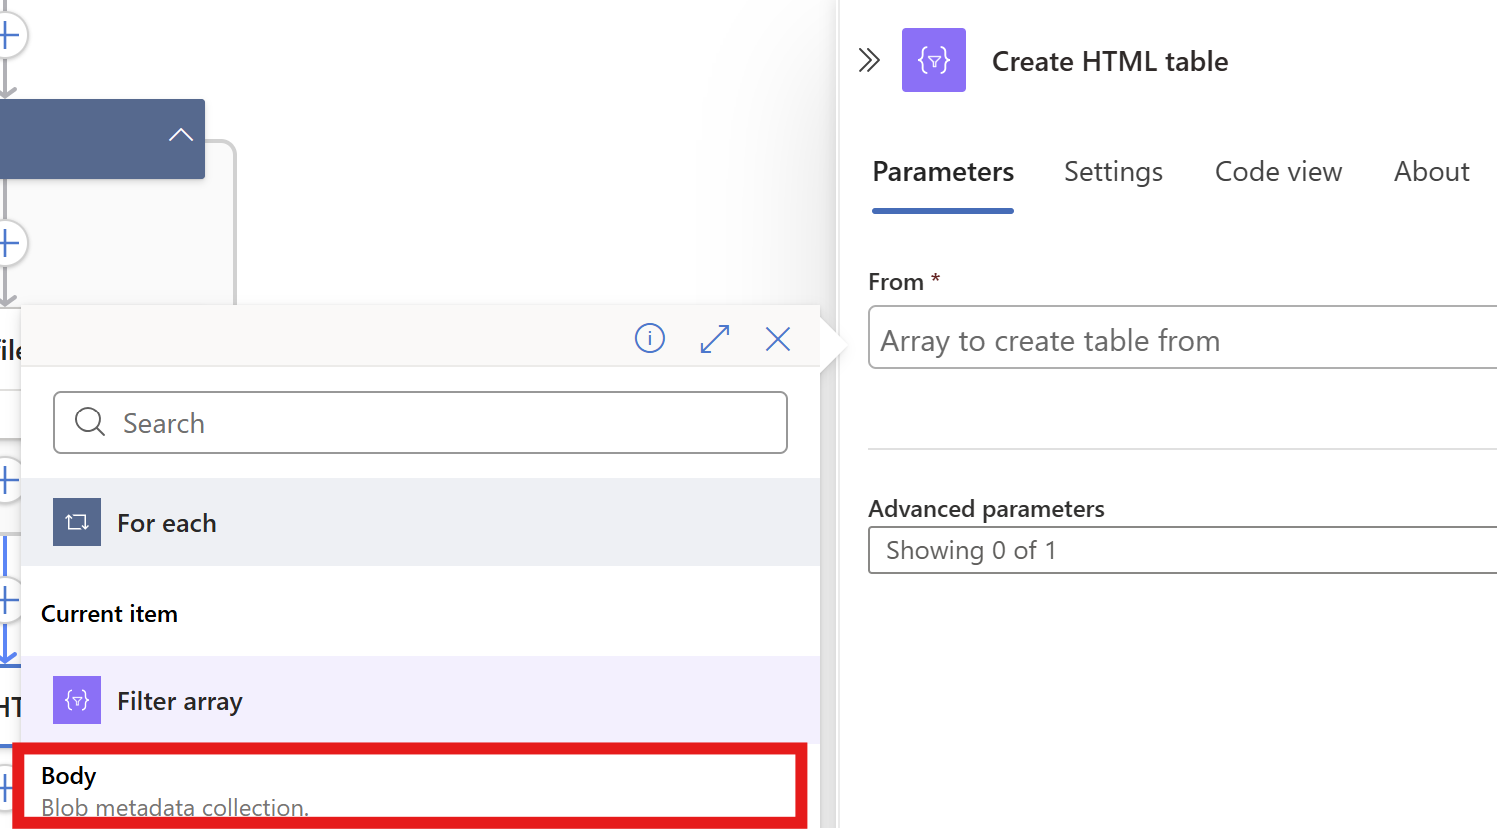
From the “Filter Array” step, select the Body content. Then on the “Advanced Parameters” drop down menu, select “Columns”. And after that on the “Columns” drop down menu, select “Custom”:
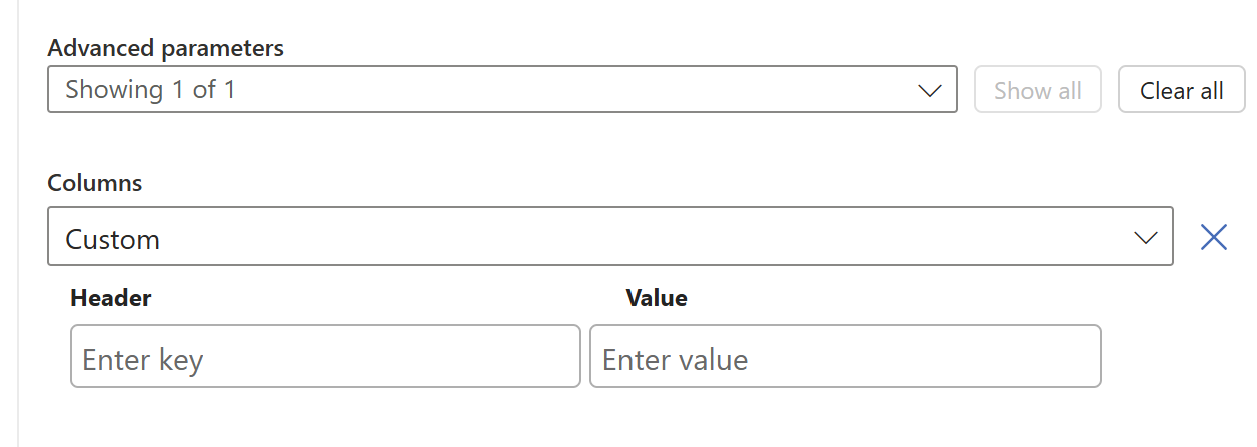
We now have to add 2 columns and configure in the information the Logic App needs to fill in.
Paste these 2 lines in the “Header” fiels:
- File name
- Last logon date
And in the “Value” field, click the thunder icon for dynamic content and select the “Body Name” and “Body Last Modified” information from the “Filter Array” step.
This must look like this in the end:
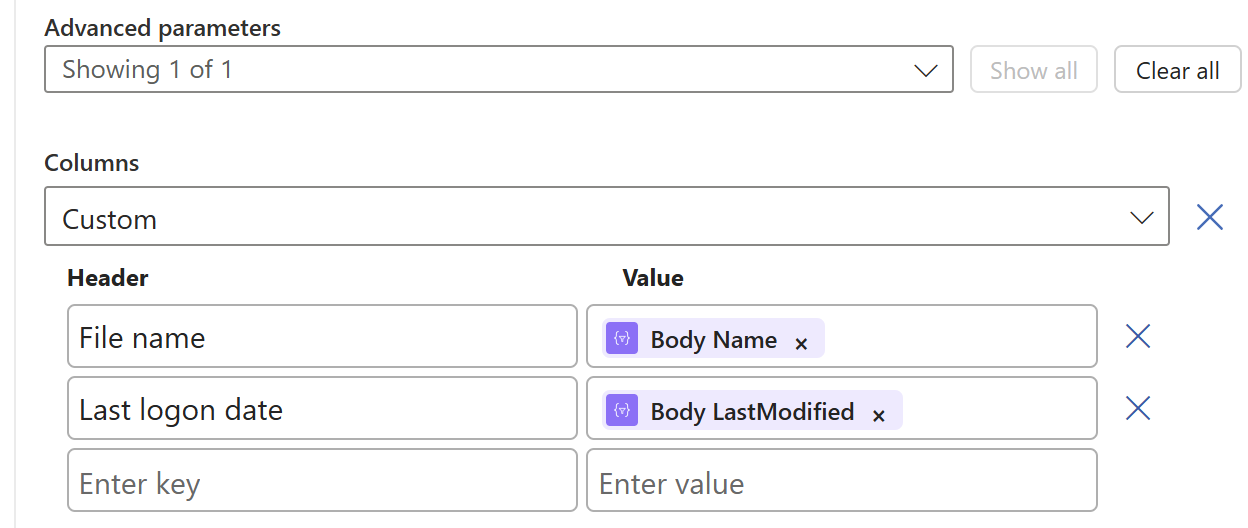
Now save the Logic app and we need to do one final step.
Step 7: Create the Send an Email action (optional)
Now we have to send all the information from previous steps by email. We have to add an action called ‘Send an Email":
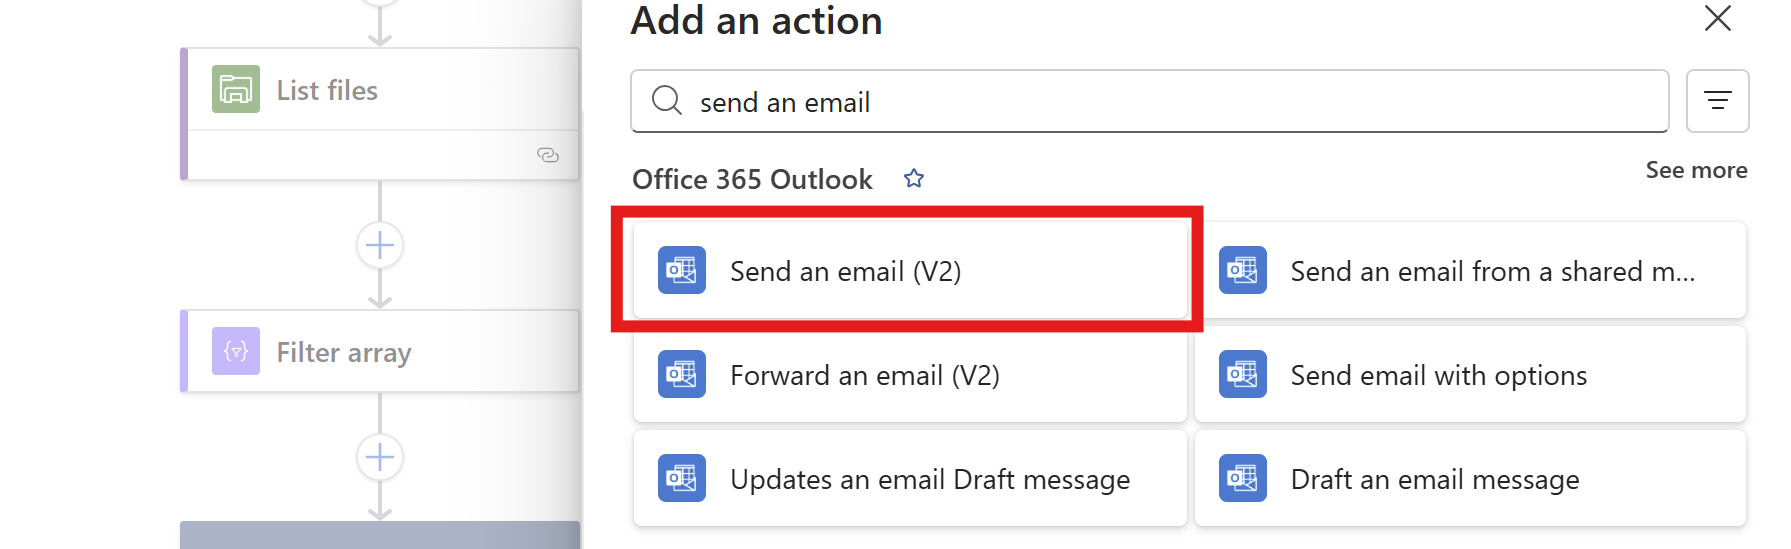
Make sure to use the “Office 365 Outlook” connector and not the Outlook.com connector. Also pick the newest version available in case of multiple versions.
Now create a connection to a mailbox, this means logging into it.
Then configure the address to send emails to, the subject and the text. I have did this:
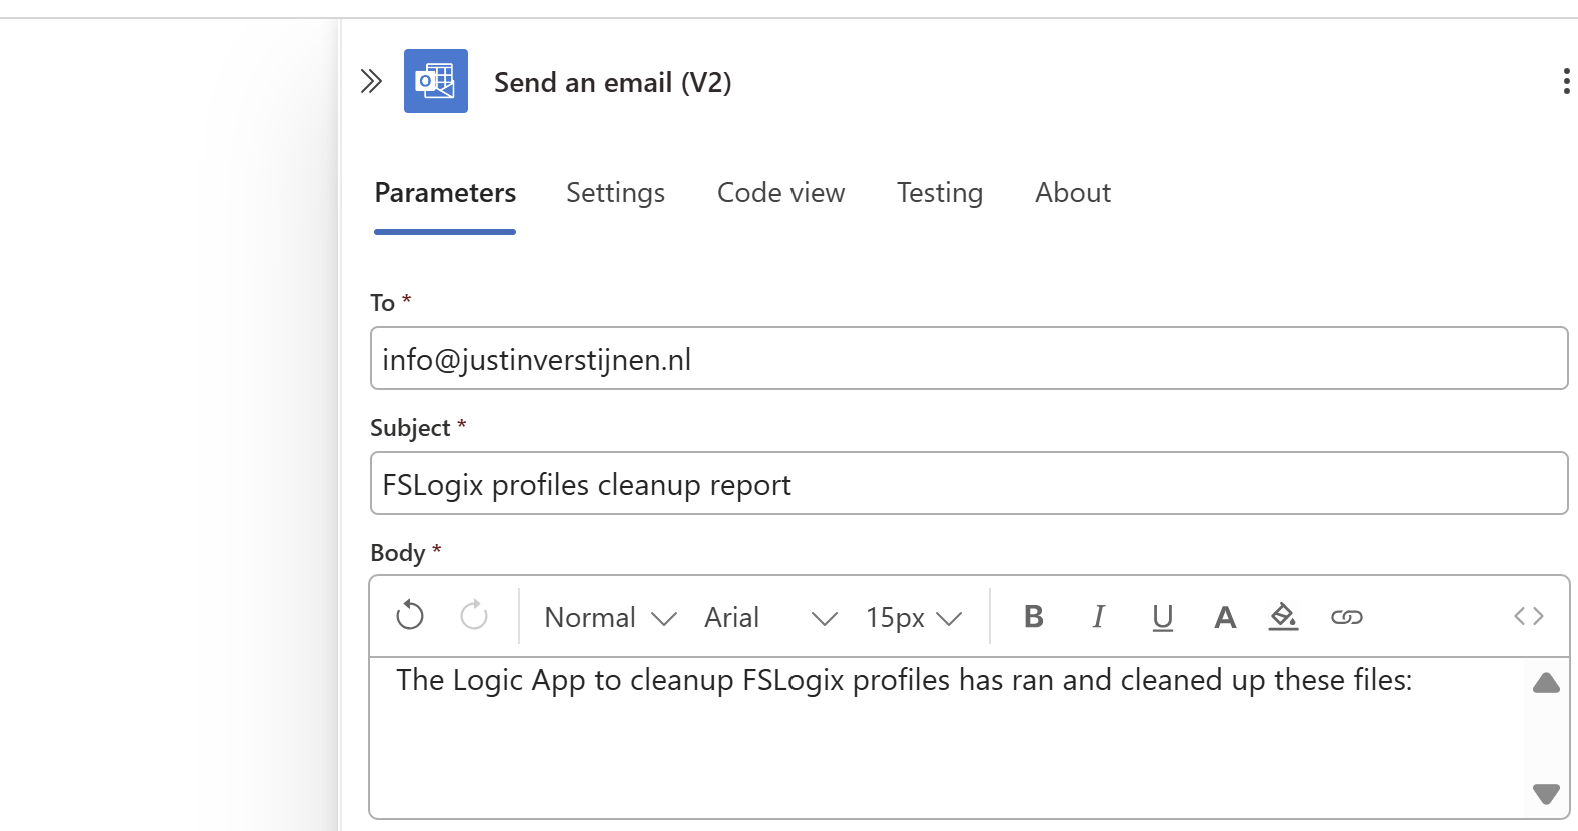
Then under the line in the “Body” field, paste a new dynamic content by clicking the thunder icon:

And select the “Output” option from the “Create HTML table” step which is basically the formatted table.

Now the Output dynamic content should be under your email text, and that will be where the table is pasted.
The Logic App live in in action
Now we have configured our Logic App and we want to test this. For the testing purpose, I have changed the rule in the “Filter Array” step to this:
JSON
@lessOrEquals(item()?['LastModified'], addMinutes(utcNow(), -30))This states that only files modified in the last 30 minutes will be kept, and longer than 30 minutes will be deleted. This is based on the Azure Files “Last Modified” time/date.

On the file share I have connected, there are 5 files present that acts as dummy files:
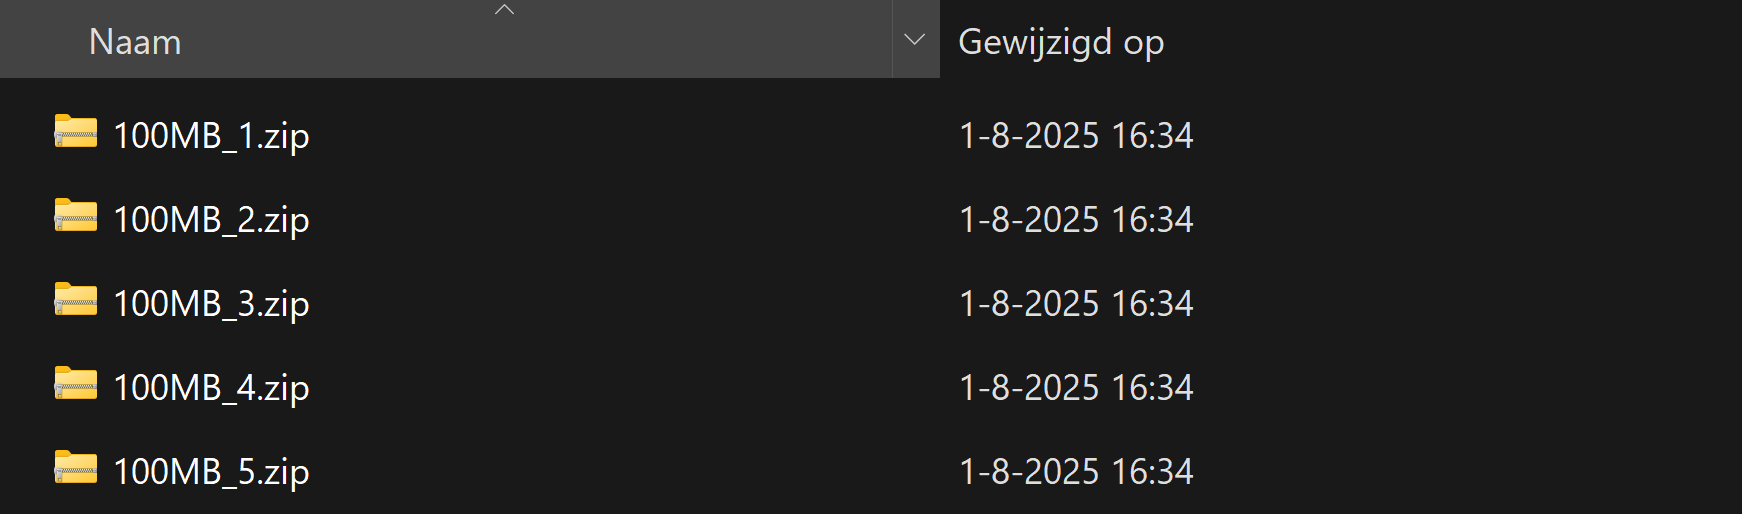
In the portal they have a different last modified date:
- 1: 8/2/2025, 1:57:09 PM
- 2: 8/2/2025, 1:57:19 PM
- 3: 8/2/2025, 2:11:39 PM
- 4: 8/2/2025, 2:11:49 PM
- 5: 8/2/2025, 2:17:45 PM
It’s now 2:39 PM on the same day, that will mean executing it now would:
- Delete files 1 and 2
- Retain files 3, 4 and 5
I ran the logic app using the manual “Run” button:

It ran successfully:

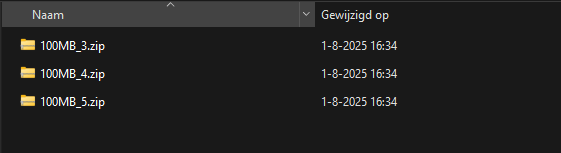
The files 1 and 2 are gone as they were not modified within 30 minutes of execution.
And I have a nice little report in my email inbox what files are exactly deleted:
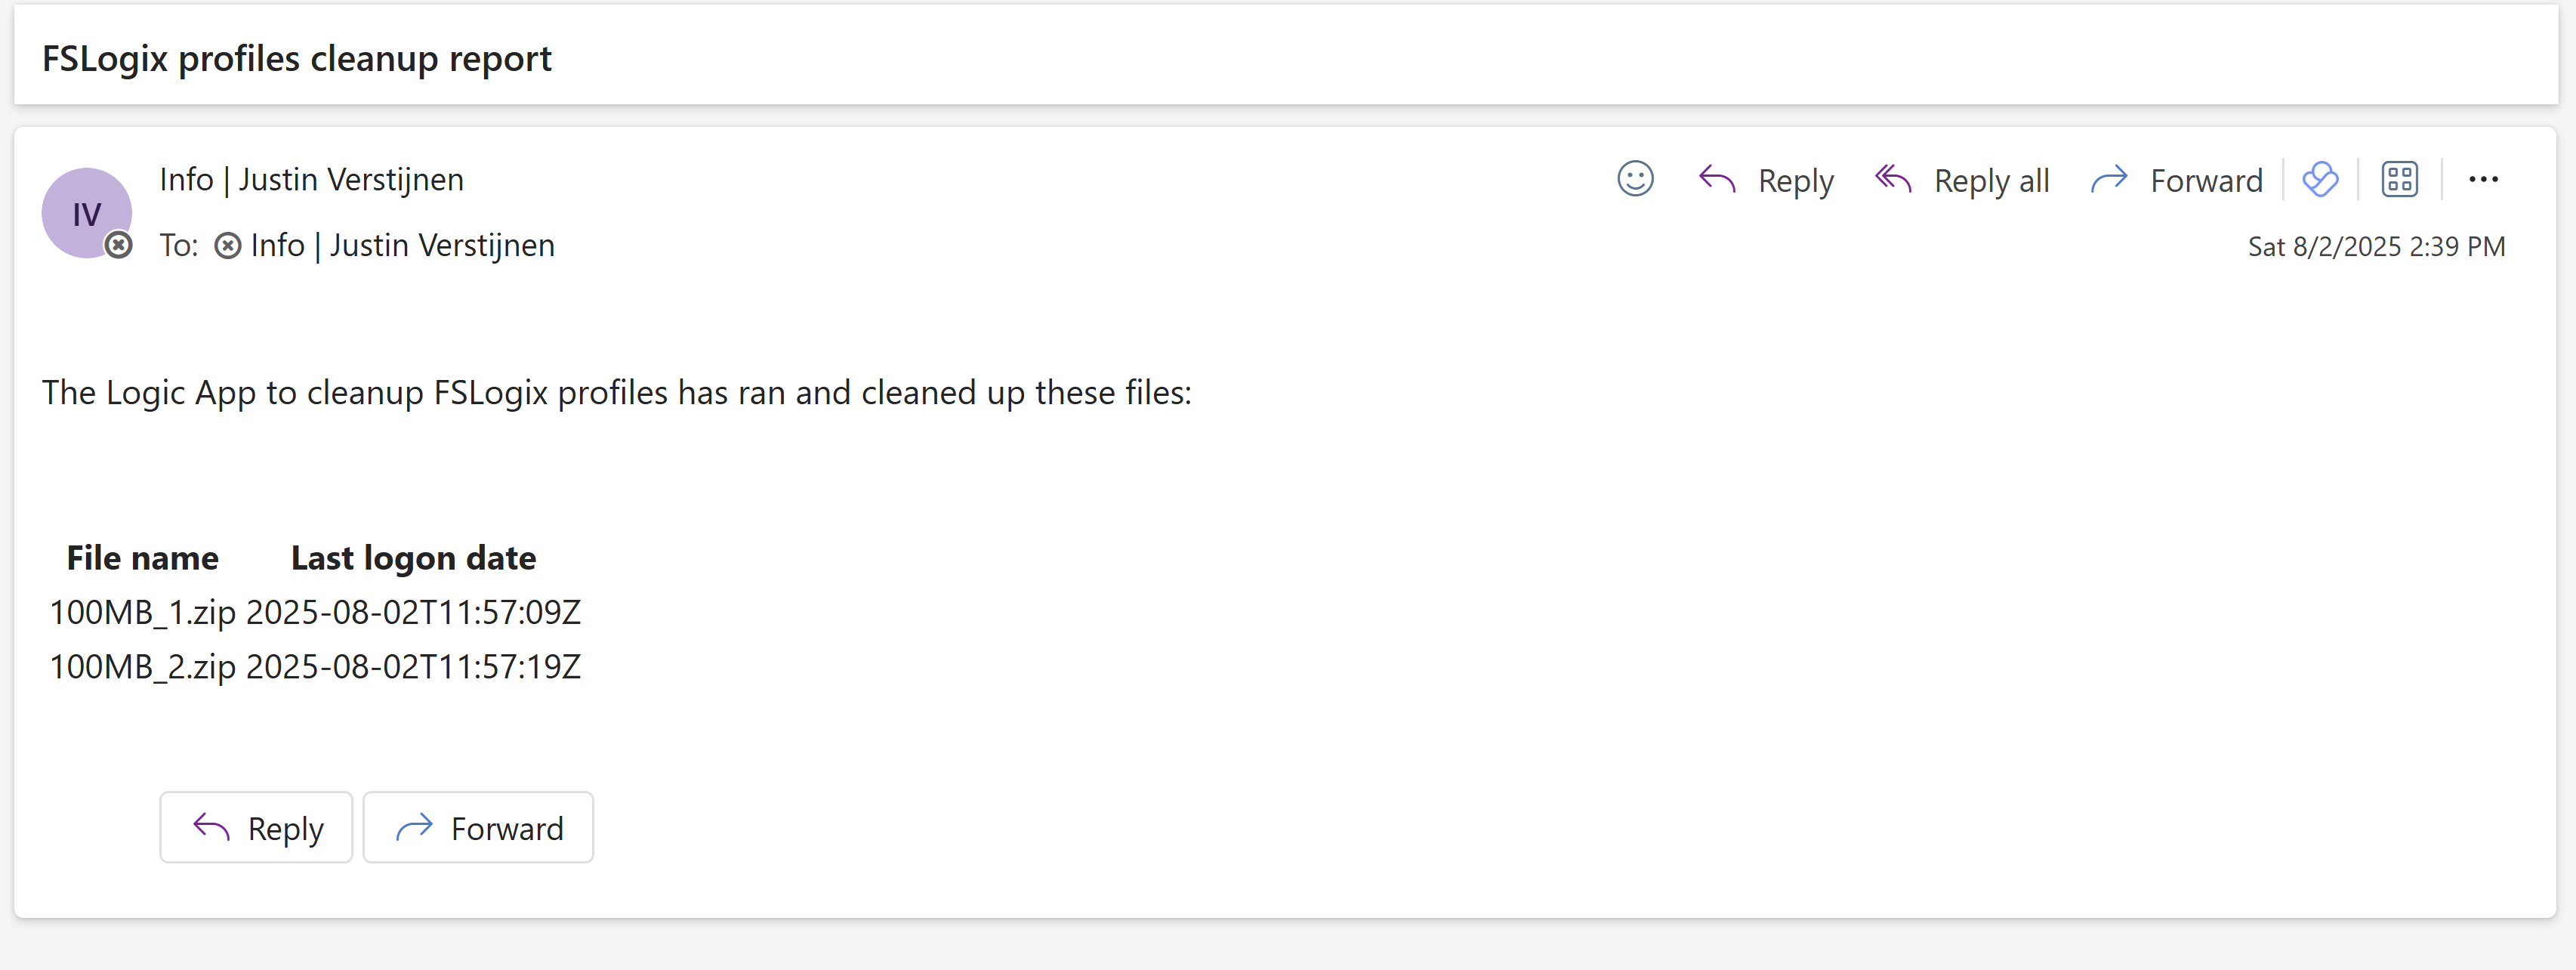
The last logon date is presented in UTC/Zulu timezone, but for my guide we have to add 2 hours.
Summary
This solution is really great for a Azure-native solution for cleaning Azure Virtual Desktop profiles. This is especially great when not having access to servers who can run this via SMB protocol.
The only downside in my opinion is that we cannot connect to the storage account using a Managed Identity or Storage Access Signature (SAS token), but that we must use the Storage Access key. We now connect with a method that has all rights and can’t be monitored. In most cased we would want to disable the Storage Access Key to have access.
Thank you for reading this guide and I hope it was helpful.
Sources
These sources helped me by writing and research for this post;
End of the page 🎉
You have reached the end of the page. You can navigate through other blog posts as well, share this post on X, LinkedIn and Reddit or return to the blog posts collection page. Thank you for visiting this post.
If you think something is wrong with this post or you want to know more, you can send me a message to one of my social profiles at: https://justinverstijnen.nl/about/
If you find this page and blog very useful and you want to leave a donation, you can use the button below to buy me a beer. Hosting and maintaining a website takes a lot of time and money. Thank you in advance and cheers :)
The terms and conditions apply to this post.
Using FSLogix App Masking to hide applications on Virtual Desktops
In this blog post I will explain and demonstrate the pro’s and features of using FSLogix App Masking for Azure Virtual Desktop. This is a…
In this blog post I will explain and demonstrate the pro’s and features of using FSLogix App Masking for Azure Virtual Desktop. This is a feature of FSLogix where we can hide certain applications and other components from our users while still having to maintain a single golden image.
In this guide I will give some extra explaination about this feature, how it works, how to implement it in a production environment and how to create those rules based on the logged on user. I hope to give a “one-post-fits-all” experience.
Requirements
- Around 45 minutes of your time
- An environment with Active Directory and separate client machine with FSLogix pre-installed
- Basic knowledge of Active Directory
- Basic knowledge of Windows and FSLogix
What is FSLogix App Masking?
FSLogix App Masking is an extra feature of the FSLogix solution. FSLogix itself is a profile container solution which is widely used in virtual desktop environments where users can login on any computer and the profile is fetched of a shared location. This eliminates local profiles and a universal experience on any host.
Using FSLogix App Masking enables you to hide applications from a system. This can come in very handy when using Azure Virtual Desktop for multiple departments in your company. We must install certain applications, but we don’t want to expose too much applications.
- Without FSLogix App Masking, we have to create a golden image for every department with their own set of applications.
- Using FSLogix App Masking, we can create a single golden image and hide every application users don’t need
Configuration example
To give a visual perspective of what we can do with FSLogix App Masking:
In this picture, we have a table that gives an example with 3 applications that we installed on our golden image:
- Google Chrome
- Firefox
- Adobe Reader
In my environment, I created 3 departments/user groups and we will use those groups to adjust the app masking rules.
We have a Front Office department that only needs basic web browsing, we have a department Sales that also need Firefox for some shitty application they use that does not work properly in Chrome and we have a finance department that we only want to use Firefox and Adobe Reader for some PDF reading.
Let’s find out how to create the rules.
How to configure the FSLogix App Masking hiding rules
Now we must configure rules to hide the applications. App Masking is designed as hiding applications, not particularly showing them. We must create rules to hide the applications if the requirements are not met. We do this based on a application.
Assuming you already have the FSLogix Rule Editor installed, Let’s follow these steps:
- Open up the “FSLogix Apps Rule Editor” on your testing machine.
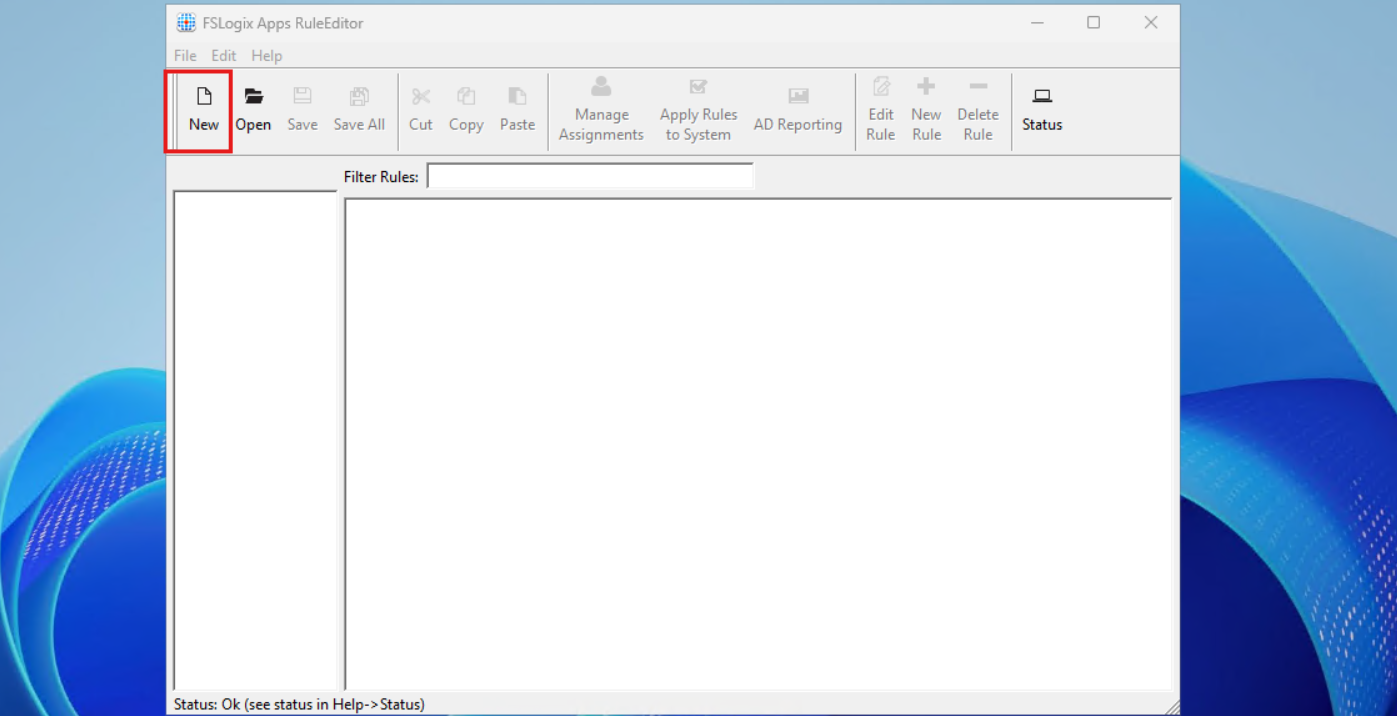
As this is a completely new instance, we must create a new rule by clicking the “New” button. Choose a place to save the rule and give it a name. I start with hiding Google Chrome according to the table.
After saving your rule, we get the following window:
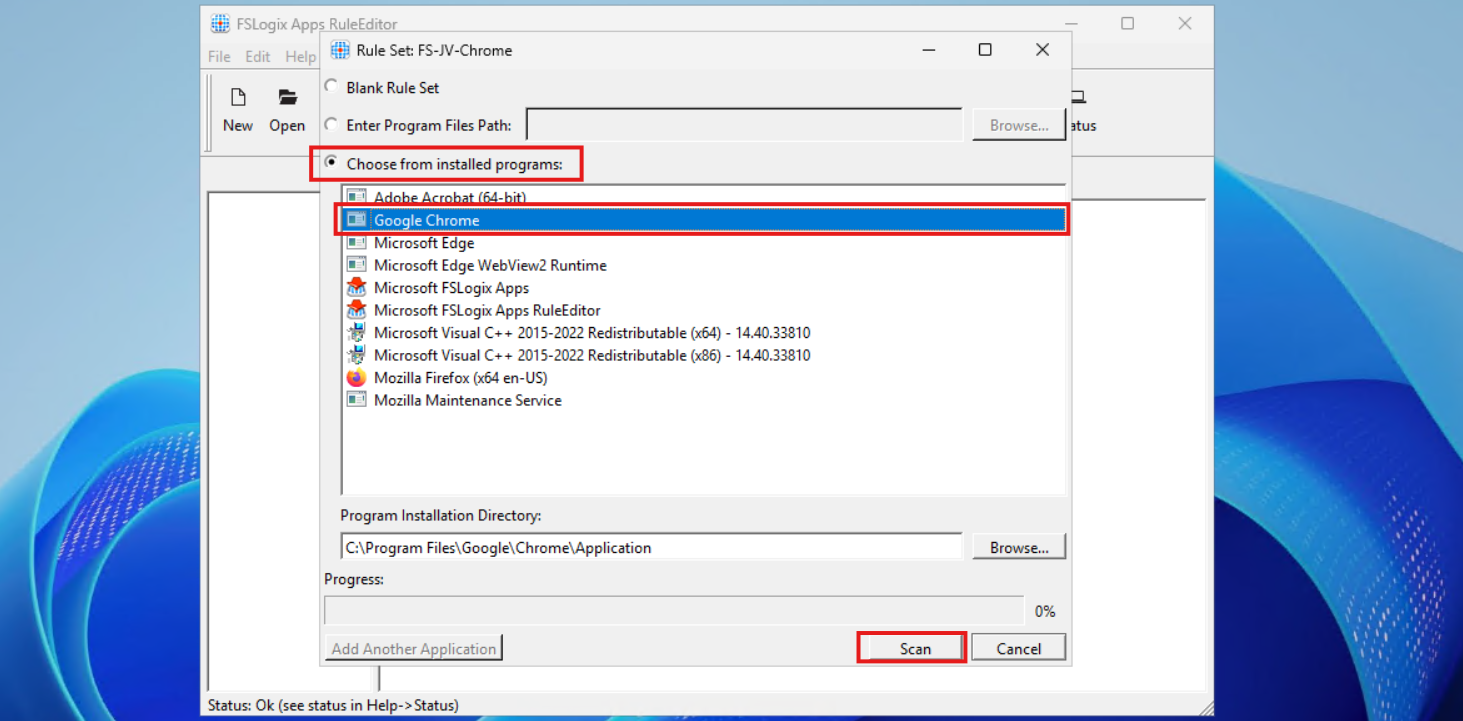
Select the option “Choose from installed programs”, then select Google Chrome and then click on Scan. Now something very interesting happens, the program scans for the whole application and comes up with all information, from installation directory to shortcuts and registry keys:
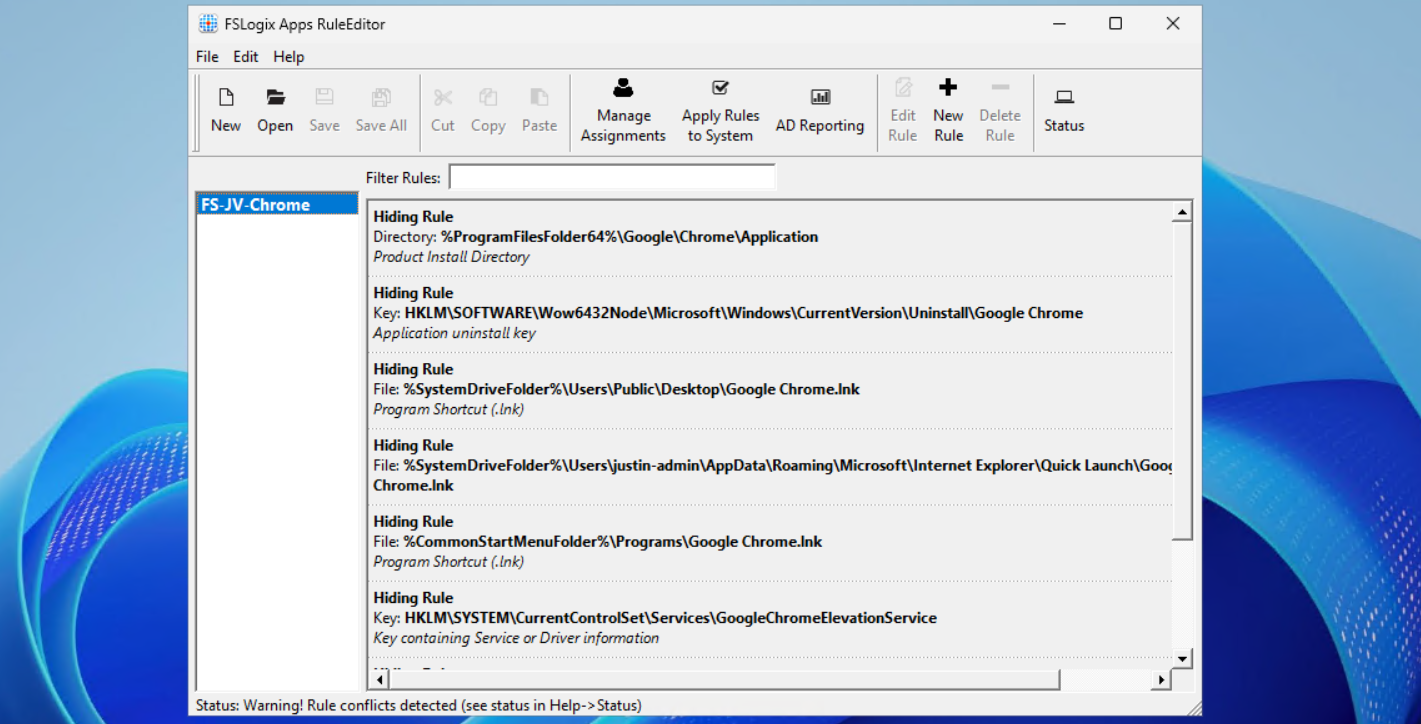
This means we use a very robust way of hiding everything for a user, even for non-authorized users like a hacker.
Now repeat those steps for the other applications, by creating a rule for every application like I did:
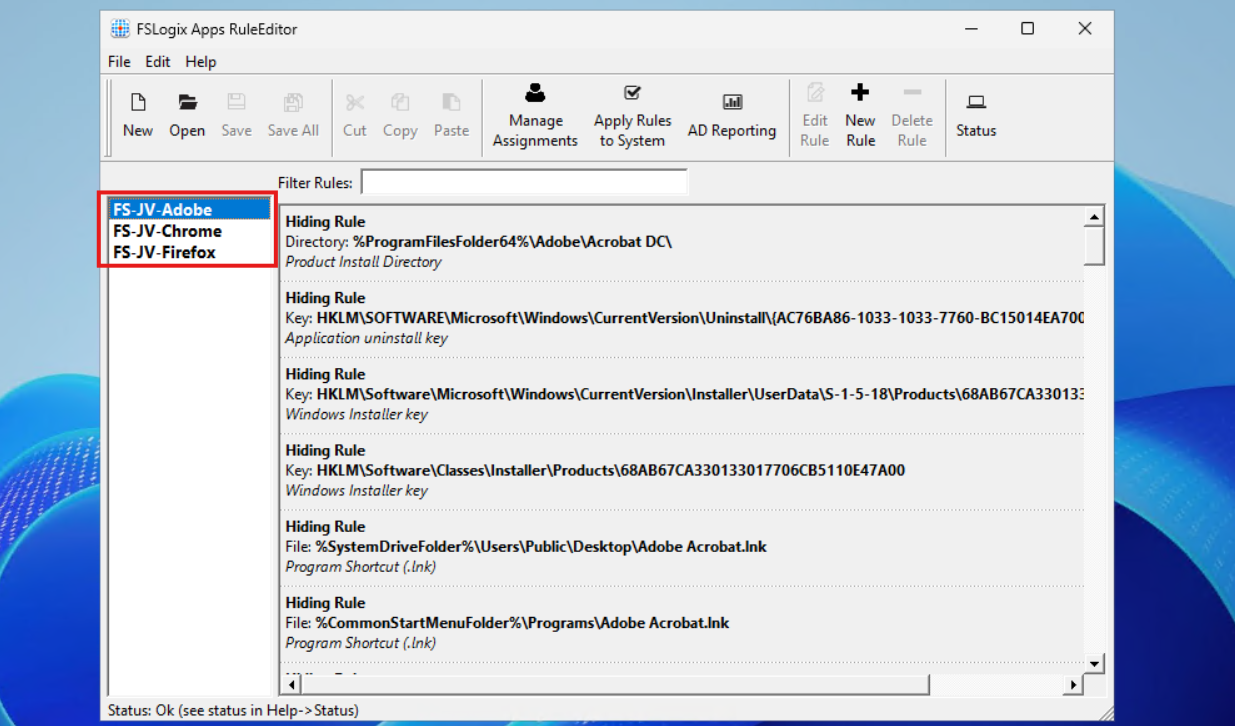
In the next step we will apply the security to those rules to make them effective.
Assign the security groups to the hiding rules
Now that we have the rules themselves in place, we now must decide when users are able to use the applications. We use a “hide by default” strategy here, so user not in the right group = hide application. This is the most straight forward way of using those rules.
When still in the FSLogix Rule Editor application, select the first rule (in my case Chrome) and click on “Manage Assignments”.
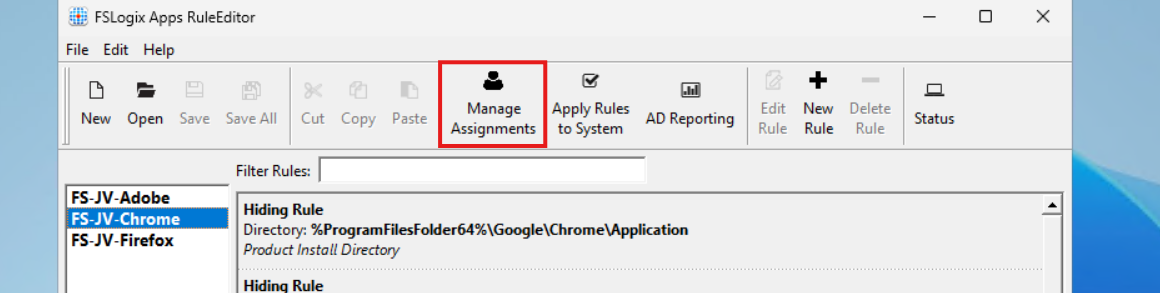
In this window we must do several steps:
- Delete the “Everyone” entry
- Click add and add the right security groups for this application
- Select Rule Set does not apply to user/group
Let’s do this step by step:
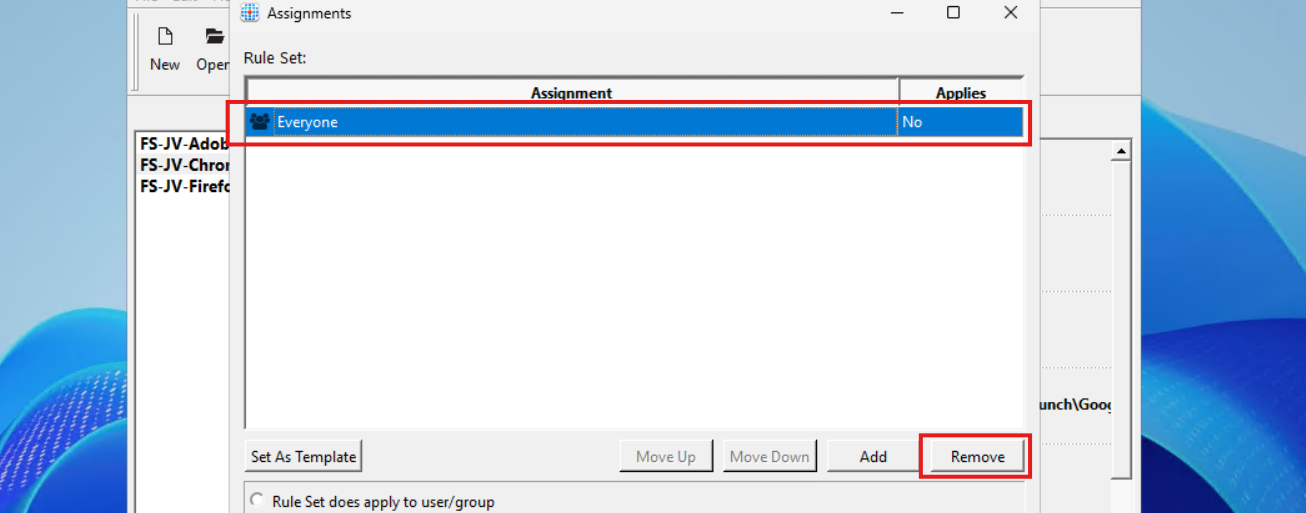
Select “Everyone” and click on remove.
Then click on “Add” and select “Group”.
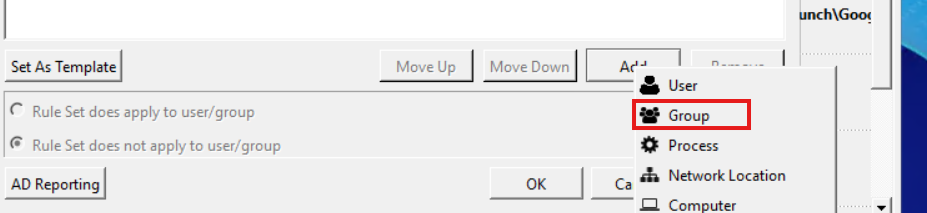
Then search for the group that must get access to the Google Chrome applicastion. In my example, these are the “Front Office” and “Sales” groups. Click the “User” icon to search the Active Directory.
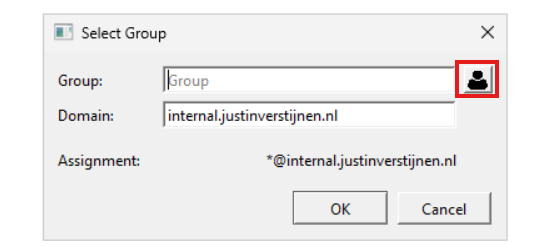
Then type in a part of your security group name and click on “OK”:
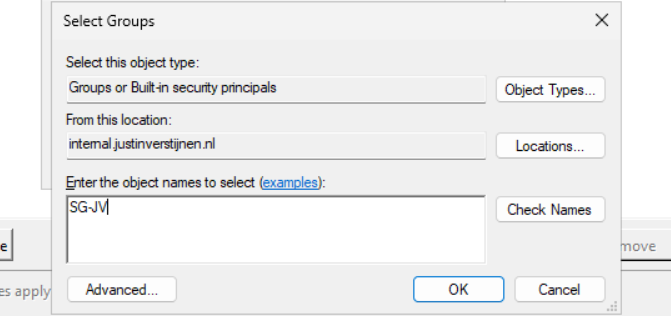
Add all your security groups in this way will they are all on the FSLogix Assignments page:
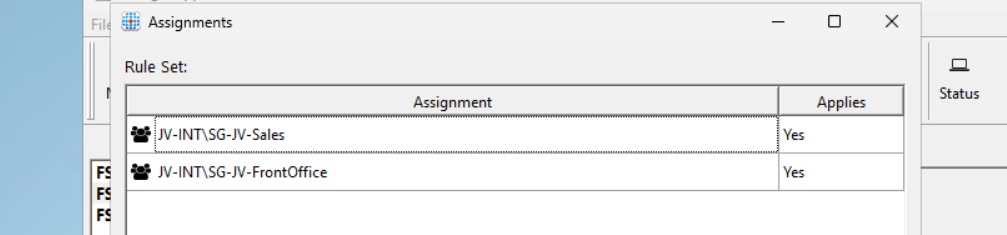
Now we must configure that the hiding rules does NOT apply to these groups. We do this by selecting both groups and then click “Rule Set does not apply to user/group”.
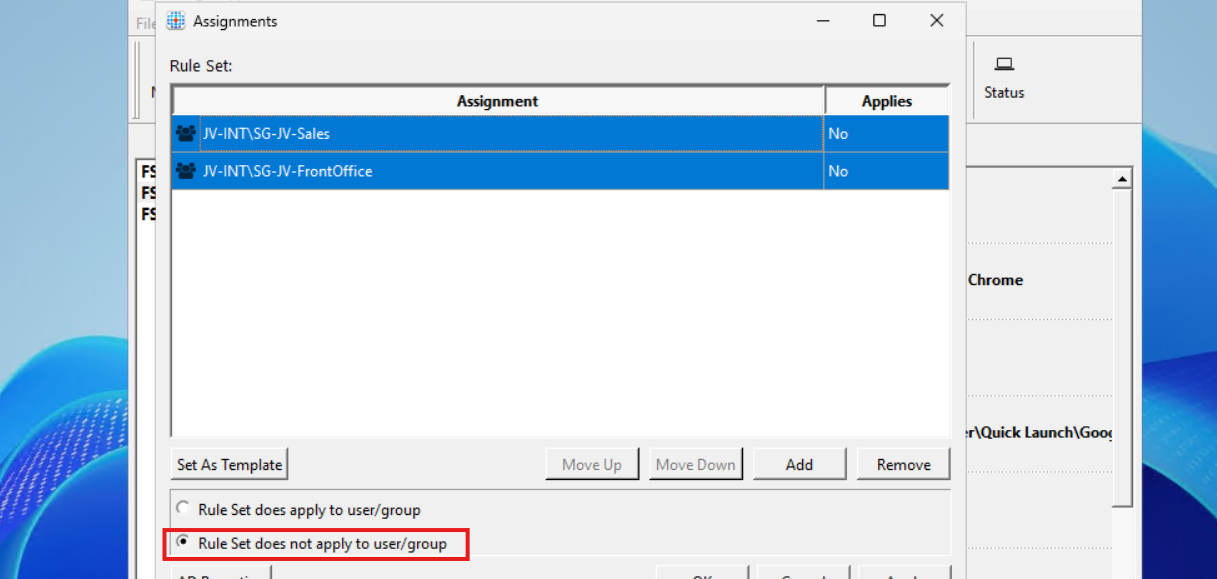
Then click “Apply” and then “OK”.
Repeat those steps for Firefox and Adobe Reader while keeping in mind to select the right security groups.
Testing the hiding rules live in action
We can test the hiding rules directly and easily on the configuration machine, which is really cool. In the FSLogix Apps Rule Editor, click on the “Apply Rules to system” button:
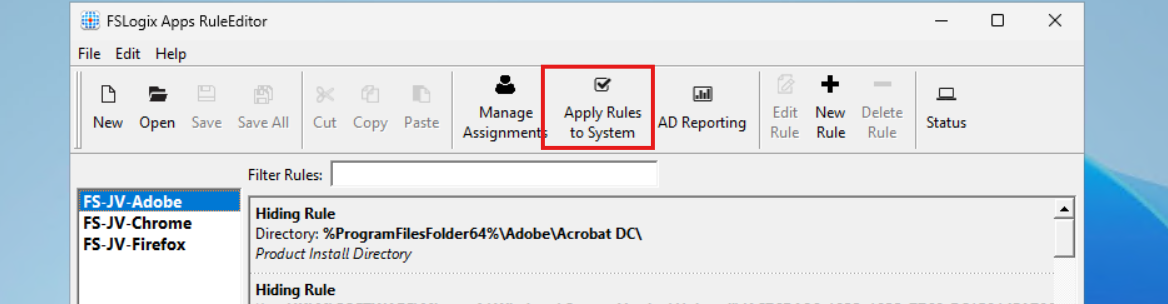
Testing - System
I will show you what happens if we activate all 3 rules on the testing machine. We don’t test the group assignments with this function. This function only tests if the hiding rules work.
You see that the applications disappear immediately. We are left with Microsoft Edge as only usable application on the machine. The button is a temporary testing button, clicking again gives the applications back.
Testing - Application folder and registry
Now an example where I show you what happens to the application folder and the registry key for uninstalling the application:
Deploying FSLogix App Masking rules to machines
We now must deploy the rules to the workstations where our end users work on. We have 2 files per hiding rule:
- .fxr file containing the hiding rules/actions
- .fxa file containing the group assignments (for who to or not to hide)
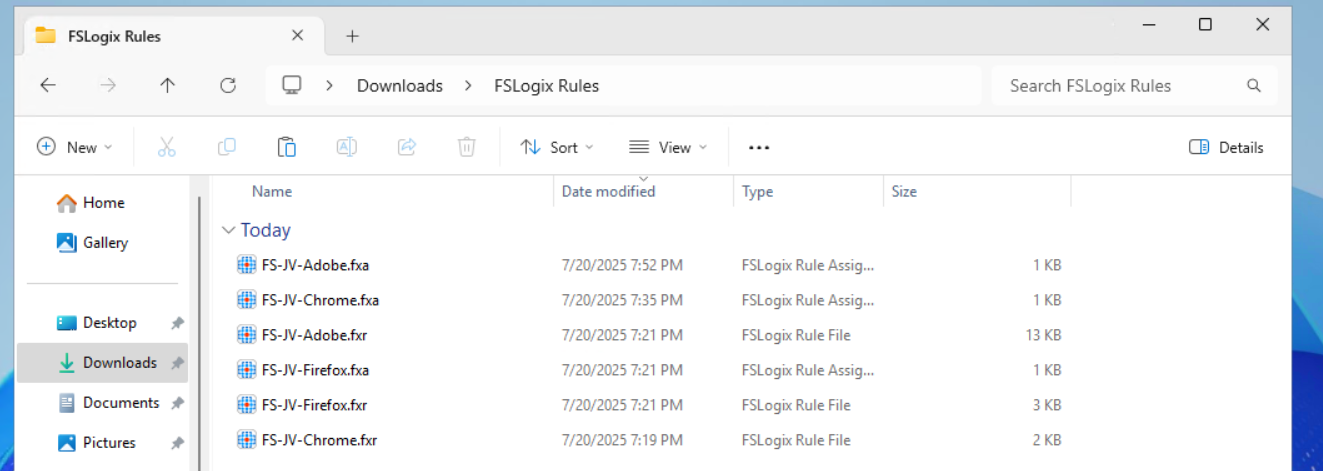
The best way is to host those files on a fileshare on or an Azure Storage account, and deploy them with Group Policy Files.
The files must go into this folder on the session hosts:
- C:\Program Files\FSLogix\Apps\Rules
If you place the rules there, they will become active immediately.
Creating a SMB share to host the rules in the network
We will now create a fileshare on our server and place the hiding rules there. We share this to the network so the session host in our Azure Virtual Desktop hostpool can pick the rules from there. Placing them centrally and deploying them from there to the session hosts is highly recommended as we might have to change stuff over time. We don’t want to manually edit those rules on every host.
I created a folder in C:\ named Shares, then created a folder “Systems Management” and then “FSLogix Rules”. The location doesn’t matter, it must be shared and authenticated users must have read access.
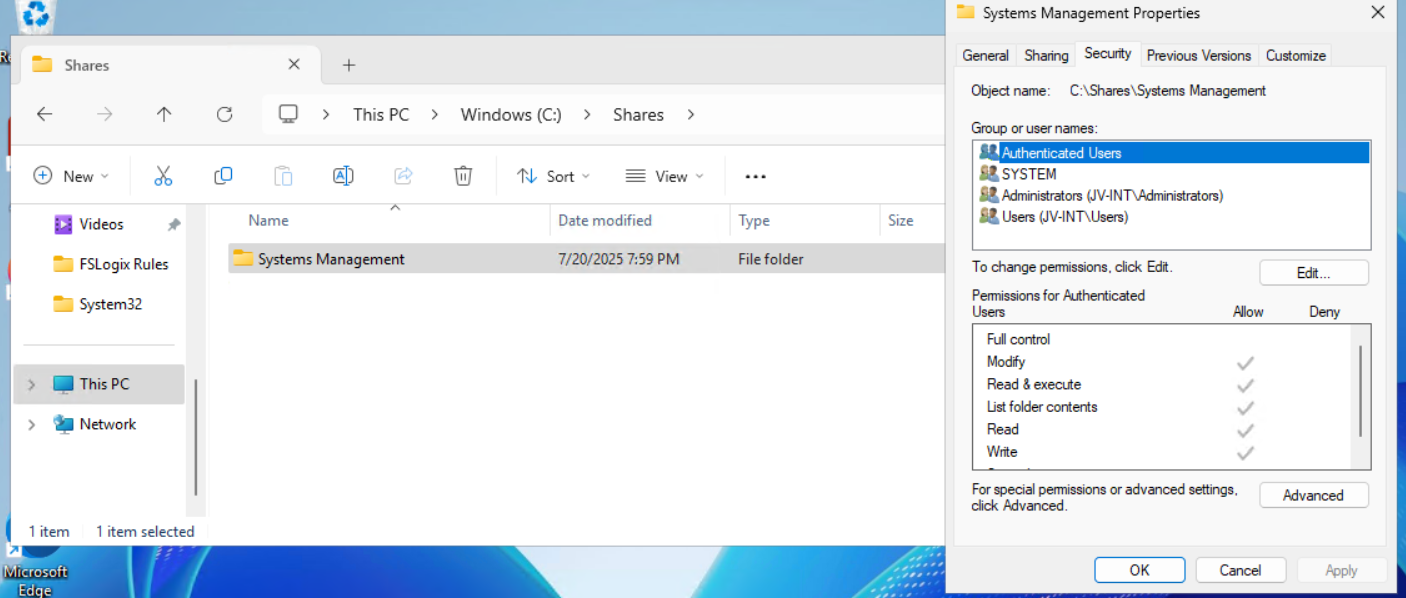
Then I shared the folder “Systems Management”, set Full Control to everyone on the SMB permissions and then gave “Authenticated Users” read access on the NTFS permissions.
Then I placed the files on the shared folder to make them accessible for the Azure Virtual Desktop hosts.
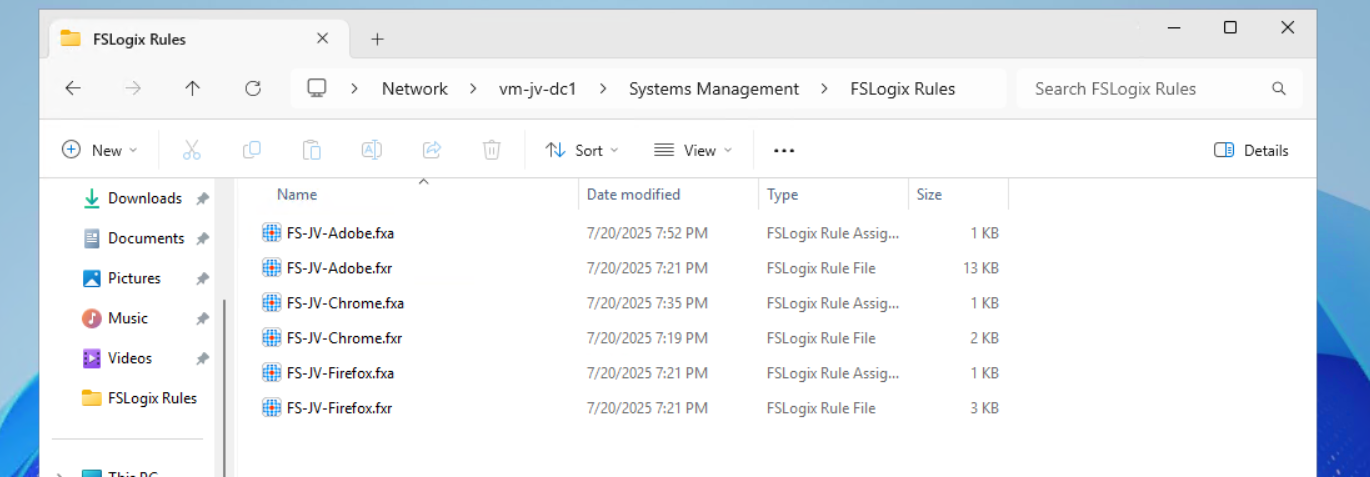
Let’s create the rule deployment Group Policy.
Creating the Group Policy to deploy the rules to session hosts
Now we can open the Group Policy Management console (gpmc.msc) on our management server. We can create a new GPO for this purpose. I do this on the OU Azure Virtual Desktop, thats where my hosts reside.

Give it a good and describing name:

Then edit the Group Policy by right clicking and then click “Edit”. Navigate to:
- Computer Configuration \ Preferences \ Windows Settings \ Files
Create a new file here:
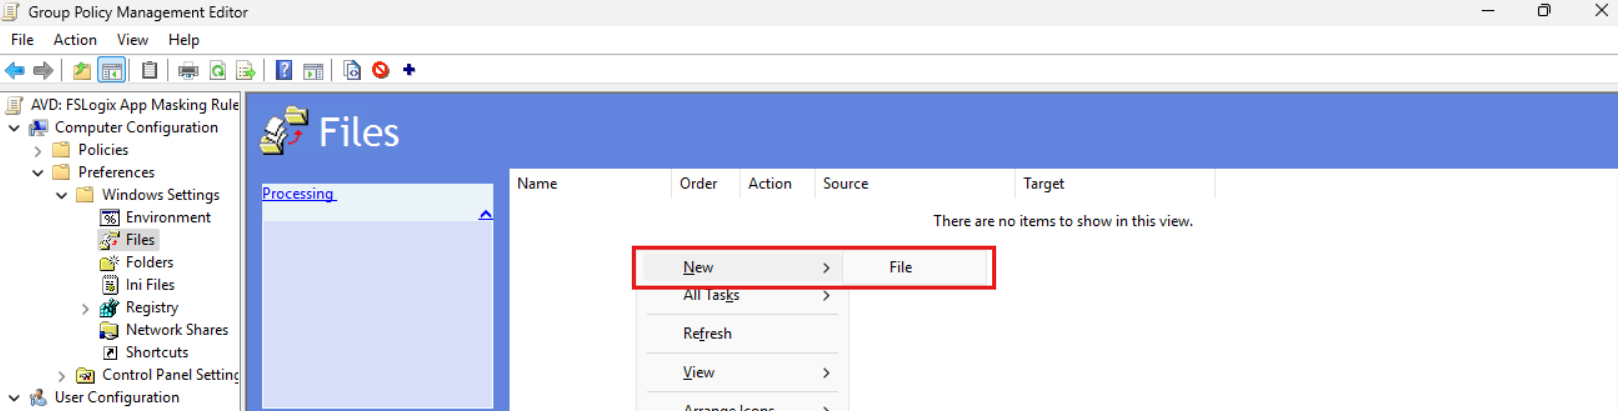
Now we must do this 6 times as we have 6 files. We have to tell Windows where to fetch the file and where the destination must be on the local machine/session host.
We now must configure the sources and destinations in this format:
| Source | Destination |
| \server\share\file.fxa | C:\Program Files\FSLogix\Apps\Rules\file.fxa |
So in my case this must be:
| Source | Destination |
| \vm-jv-dc1\Systems Management\FSLogix Rules\FS-JV-Adobe.fxa | C:\Program Files\FSLogix\Apps\Rules\FS-JV-Adobe.fxa |
| \vm-jv-dc1\Systems Management\FSLogix Rules\FS-JV-Adobe.fxr | C:\Program Files\FSLogix\Apps\Rules\FS-JV-Adobe.fxr |
| \vm-jv-dc1\Systems Management\FSLogix Rules\FS-JV-Chrome.fxa | C:\Program Files\FSLogix\Apps\Rules\FS-JV-Chrome.fxa |
| \vm-jv-dc1\Systems Management\FSLogix Rules\FS-JV-Chrome.fxr | C:\Program Files\FSLogix\Apps\Rules\FS-JV-Chrome.fxr |
| \vm-jv-dc1\Systems Management\FSLogix Rules\FS-JV-Firefox.fxa | C:\Program Files\FSLogix\Apps\Rules\FS-JV-Firefox.fxa |
| \vm-jv-dc1\Systems Management\FSLogix Rules\FS-JV-Firefox.fxr | C:\Program Files\FSLogix\Apps\Rules\FS-JV-Firefox.fxr |
Now paste in the source and destination paths both including the file name as I did for all 6 files. It should look like this:

We are done and the files will be deployed the first time Group Policy is updated.
Testing Rules deployment and the rules in action
Now I will do a manual Group Policy Update to force the files coming on my session host. Normally, this happens automatically every 90 to 120 minutes.
POWERSHELL
gpupdate /forceI made my account member of the Finance group that must be showing Adobe Reader and Firefox only. Let’s find out what happens:
After refreshing the Group Policies, everything we have prepared in this guide falls into place. The group policy ensures the files are placed in the correct location, the files contains the rules that we have configured earlier and FSLogix processes them live so we can see immediately what happens on the session hosts.
Google Chrome is hided, but Firefox and Adobe Reader are still available to me as temporary worker of the Finance department.
Appendix: Installing the FSLogix Rule Editor tool
In the official FSLogix package, the FSLogix rule editor tool is included as separate installation. You can find it here: https://aka.ms/fslogix-latest
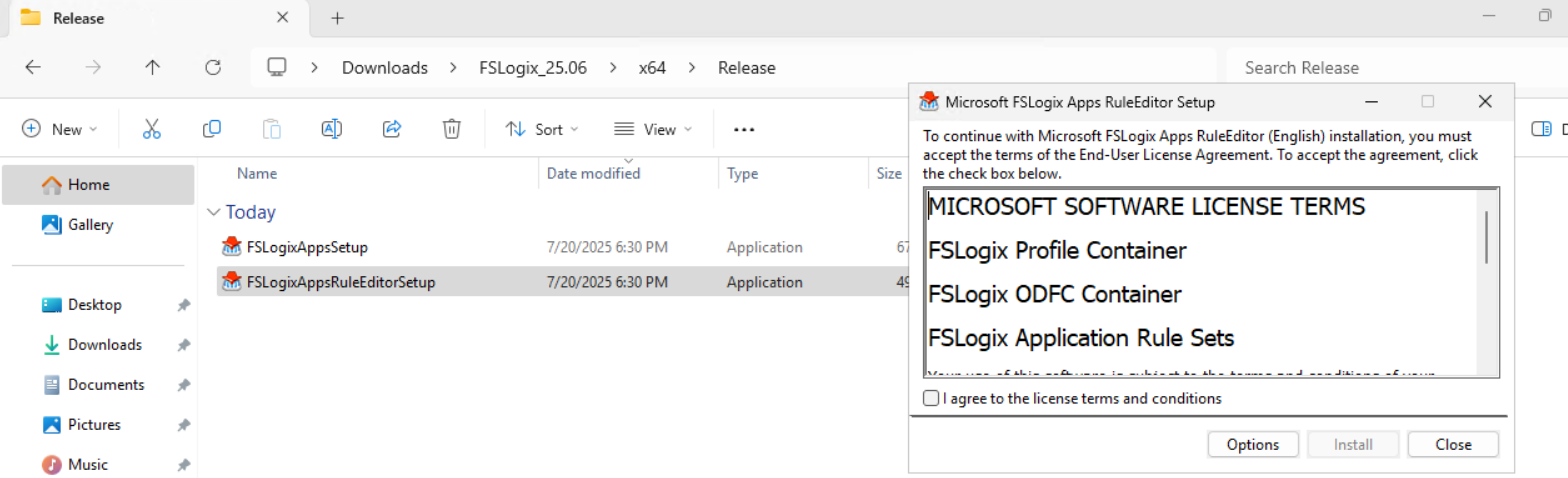
You need to install this on a testing machine which contains the same applications as your session host. In my work, we deploy session hosts first to a testing environment before deploying into production. I do the rule configuration there and installed the tool on the first testing session host.
After installing, the tool is available on your machine:
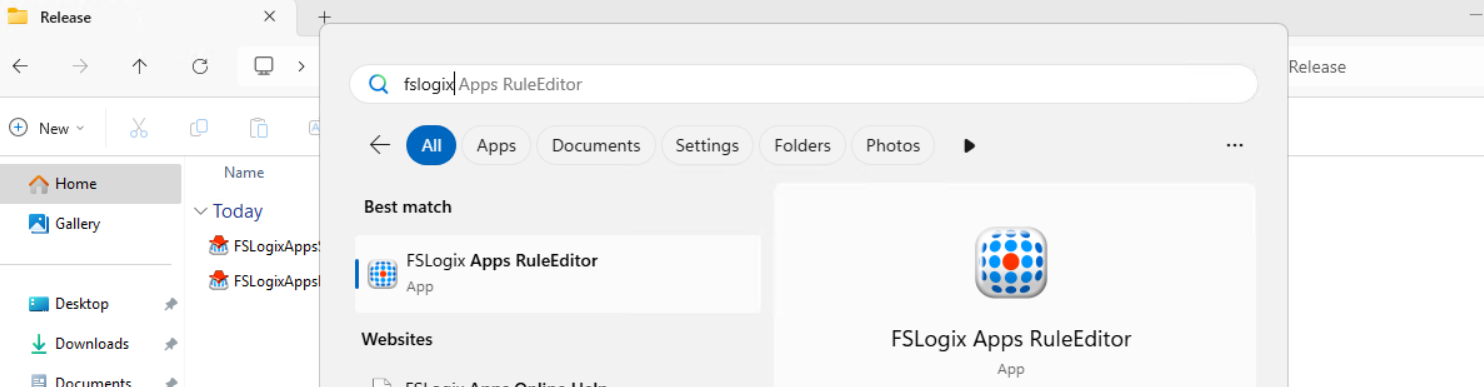
Summary
FSLogix App Masking is a great tool for an extra “cherry on the pie” (as we call this in Dutch haha) image and application management. It enables us creating one golden image and use this throughout the whole company. It also helps securing sensitive info, unpermitted application access and therefore possible better performance as users cannot open the applications.
I hope I give you a good understanding of how the FSLogix App Masking solution works and how we can design and configure the right rules without too much effort.
Thank you for reading this guide and I hope I helped you out.
Sources
These sources helped me by writing and research for this post;
- https://learn.microsoft.com/en-us/fslogix/overview-what-is-fslogix
- https://learn.microsoft.com/en-us/fslogix/tutorial-application-rule-sets
- https://learn.microsoft.com/en-us/windows-server/identity/ad-ds/manage/group-policy/group-policy-processing
End of the page 🎉
You have reached the end of the page. You can navigate through other blog posts as well, share this post on X, LinkedIn and Reddit or return to the blog posts collection page. Thank you for visiting this post.
If you think something is wrong with this post or you want to know more, you can send me a message to one of my social profiles at: https://justinverstijnen.nl/about/
If you find this page and blog very useful and you want to leave a donation, you can use the button below to buy me a beer. Hosting and maintaining a website takes a lot of time and money. Thank you in advance and cheers :)
The terms and conditions apply to this post.
Use Ephemeral OS Disks in Azure
In Azure, you have the option to create Ephemeral OS disks for your machine. This sounds really cool but what is it actually, what pro’s…
In Azure, you have the option to create Ephemeral OS disks for your machine. This sounds really cool but what is it actually, what pro’s and cons are coming with them, what is the pricing and how do we use them? I will do my best to explain everything in this guide.
Requirements
- Around 25 minutes of your time
- An Azure subscription (if wanting to deploy)
- Basic knowledge of Azure
- Basic knowledge of servers and infrastructure
What are Ephemeral OS Disks?
Ephemeral OS Disks are disks in Azure where the data is stored directly on the hypervisor itself, rather than having a managed disk which could be resided at the very other end of a datacenter. Every cable and step between the disk and the virtual machine creates latency which will result in your machine being slower.
Ephemeral OS Disk topology
Now this looks really how it normally should look.
Managed OS Disk topology
Now, let’s take a look at how normal, Managed disks work:
Topologies are simplified for more understanding.
As you can see, they could be stored anywhere in a datacenter or region. It could even be another datacenter. We can’t see this in the portal. We only see that a VM and disk are in a specific region and availability zone, but we don’t have further control.
Configuring Ephemeral OS Disks so mean much less latency and much more performance. Let’s dive into the pro’s and cons before being overjoyed.
Pro’s and Cons of Ephemeral OS Disks
Now let’s outline the pro’s and cons of Ephemeral OS Disks before jumping into the Azure Portal and configuring them:
| Pro | Con | Difference with managed disk |
| Very high disk performance and great user experience | Only support for VM sizes with local storage (includes non-capital “d” in size: D8dv4, E4ds_v6 | Managed disks support all VM sizes |
| No disk costs | Deallocation of VM not possible, VMs must be on 24/7 | Deallocation possible, saving money when VMs are shutdown and deallocated |
| Data storage is non-persistent, this means when a VM is redeployed or moved to another host, you data will be gone | Managed disks are persistent across a complete region | |
| No datacenter redundancy, VMs stay in the same datacenter for its lifetime | Datacenter redundancy and region redundancy possible with ZRS and GRS | |
| Resizing of disk not possible | Resizing possible (only increase) | |
| Backup, imaging or changing disk after deployment not possible | Backup, imaging and changing disks possible |
As you can see, this is exactly why I warned you for the cons, because these cons make it unusable for most workloads. However, there is at least one use-case where I can think of where the pros weigh up to the cons: Azure Virtual Desktop.
Theoretical performance difference
According to the Azure Portal, you have the following performance difference when using Ephemeral OS disks and Managed disks for the same VM size:
When using a E4ds_v6 VM size (and 128GB size disk);
| Disk type | IOPS | Throughput (Mbps) | |
| Ephemeral OS disk | 18000 | 238 | |
| Managed OS disk | 500 | 100 |
Let’s deploy a virtual machine with Ephemeral OS disk
To deploy a new virtual machine with a Ephemeral OS disk, follow these steps:
Login to the Azure Portal, and deploy a new virtual machine:
- Select a resource group
- Give it a name
- Disable availability zones (as this is not supported)
- Select your image (Windows 11 24H2 Multi-session in my case)
Now we have to select a size, which mus contain a non-capital “d”. This stands for having local NVME storage on the hypervisor which makes it bloody fast. In my case, I selected the vm size: “E4ds_v6”
Now the wizard looks like this:
Proceed by creating your local account and advance to the tab “Disks”.
Here we have to scroll down to the “Advanced” section, expand it and here we have the hided options for having Ephemeral OS disks:
Select the “NVME placement” option and let the option “Use managed disks” checked. This is for additional data disks you link to the virtual machine. The Ephemeral OS disk option requires you to enable it.
Finish the rest of the wizard by selecting your needed options.
Testing Ephemeral OS disk performance
Now that the virtual machine is deployed, we can log into it with Remote Desktop Protocol:

In my test period of about 15 minutes, the VM feels really snappy and fast.
Performance testing method
To further test the speed of the VM storage, I used a tool called Crystal Disk Mark. This is a generic tool which tests the disk speed of any Windows instance (physical or virtual).
Performance testing results
To have a great overview of the speeds, I have created a bar diagram to further display the test results of the different tests, each separated by read and write results:
Conclusion from test results
My conclusion from the test results is that Ephemeral OS disks does provide more speed when doing specific actions, like in the random 4KB tests, where it delivers 3 to 10 times te performance of managed disks. This is where you actually profit from the huge increase in Input Output operations Per Second (IOPS)
The sequential 1MB speeds are quite similar to the normal managed disks, in the read cases even slower. I think this has to do with traffic or bottlenecking. As my research goes, disk speed increases when the size of the VM increases, but I could not go for like D64 VMs due of quota limits.
Both of the test were conducted between 20 minutes of each other.
Raw data
Here is the raw data of the tests. Left is Ephemeral and right is Managed disk results.
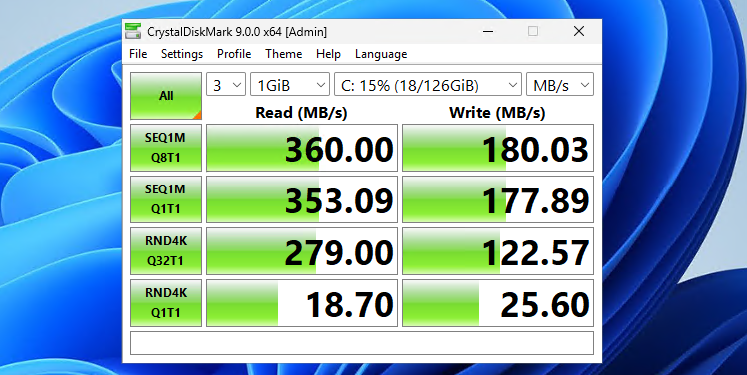
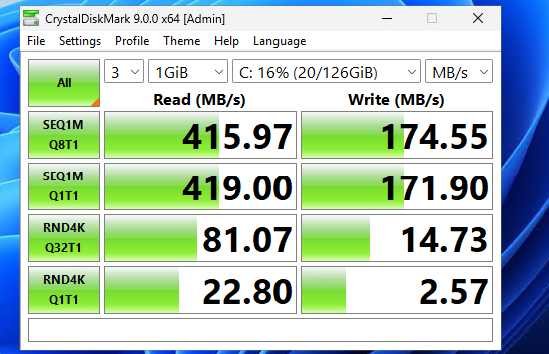
Summary
Ephemeral OS Disks ensure the VM is powered by great disk performance. Storage will not longer be a bottleneck when using the VM but it will be mostly CPU. However, it comes at the cost of not being able to perform some basic tasks like shutting down and deallocating the machine. Restarting is possible and these machines have an extra option, called “Reimage”, where they can be built again from a disk/image.

If using VMs with Ephemeral OS disks, use it for cases where data loss is no issue om the OS disk. All other data like data disks, data on storage account for FSLogix or outside of the VM is unharmed.
Sources
- https://learn.microsoft.com/en-us/azure/virtual-machines/ephemeral-os-disks
- https://justinverstijnen.nl/amc-module-7-virtual-machines-and-scale-sets/
Thank you for reading this guide and I hope it was helpful.
End of the page 🎉
You have reached the end of the page. You can navigate through other blog posts as well, share this post on X, LinkedIn and Reddit or return to the blog posts collection page. Thank you for visiting this post.
If you think something is wrong with this post or you want to know more, you can send me a message to one of my social profiles at: https://justinverstijnen.nl/about/
If you find this page and blog very useful and you want to leave a donation, you can use the button below to buy me a beer. Hosting and maintaining a website takes a lot of time and money. Thank you in advance and cheers :)
The terms and conditions apply to this post.
RDP Multipath - What is it and how to configure?
RDP Multipath is a new protocol for Azure Virtual Desktop and ensures the user always has a good and stable connection. It improves the…
RDP Multipath is a new protocol for Azure Virtual Desktop and ensures the user always has a good and stable connection. It improves the connection by connecting via the best path and reduces random disconnections between session hosts and users.
Let’s take a look what RDP Multipath adds to your connections:
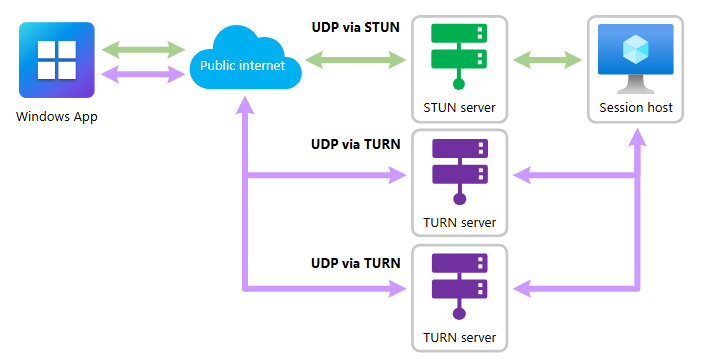
Green: The normal paths of connecting with RDP/Shortpath Purple: The paths added by RDP Multipath
This adds extra ways of connecting session hosts to the end device, selects the most reliable one and therefore adds stability and decreases latency.
RDP Multipath now has to be configured manually, but the expectation is that it will be added to new AVD/Multi Session images shortly, just ad RDP Shortpath did at the time.
The RDP Multipath function is exclusively for Azure Virtual Desktop and Windows 365 and requires you to use at least one of the supported clients and versions:
Option 1: Configure RDP Multipath using Group Policy
RDP Multipath can be configured by adding a registry key to your sessionhosts. This can be done through Group Policy by following these steps:
Open Group Policy Management (gpmc.msc) on your Active Directory Management server and create a new Group Policy that targets all AVD machines or use an existing GPO.
Go to: Computer Configuration \ Preferences \ Windows Settings \ Registry
Create a new registry item:
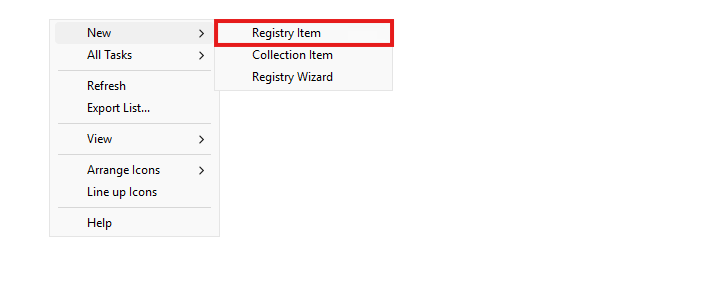
Choose the hive “HKEY_LOCAL_MACHINE” and in the Key Path, fill in:
- SYSTEM\CurrentControlSet\Control\Terminal Server\RdpCloudStackSettings
Then, fill in the following value in the Value field:
- SmilesV3ActivationThreshold
Then select “REG_DWORD” as value type and type in “100” in the value data field. Let the “Base” option be on “Decimal”.
The correct configuration must look like this:
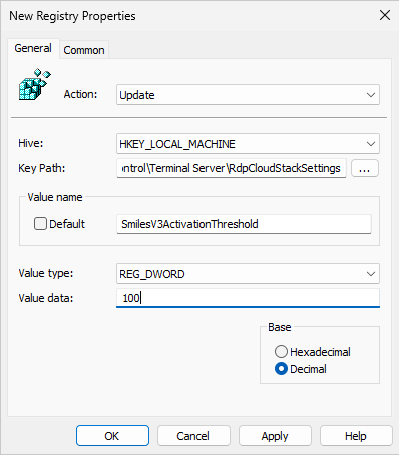
Now save this key, close the Group Policy Management console, reboot or GPupdate your session host and let’s test this configuration!
Option 2: Configure RDP Multipath manually through Registry Editor
You can configure RDP Multipath through registry editor on all session hosts.
Then go to:
- Computer\HKEY_LOCAL_MACHINE\SYSTEM\CurrentControlSet\Control\Terminal Server
Create a new key here, named “RdpCloudStackSettings”
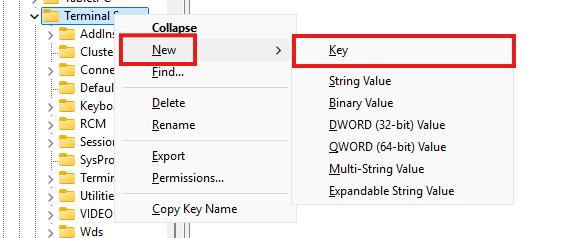
Then create a new DWORD value:
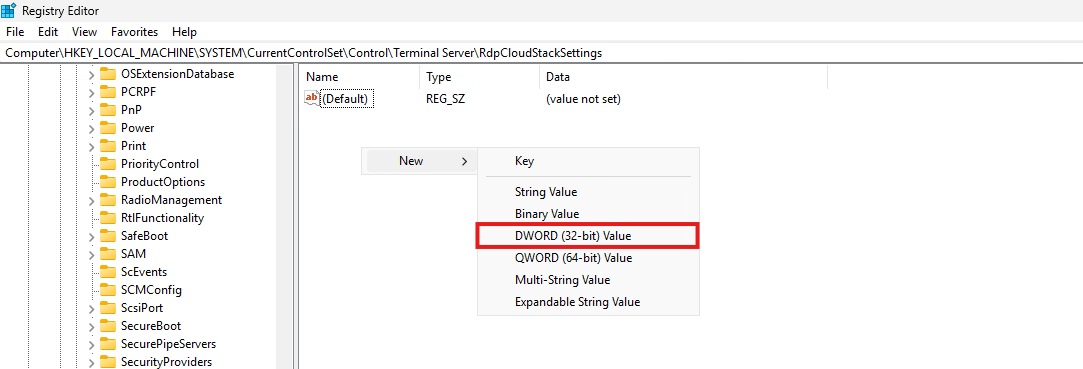
Name it “SmilesV3ActivationThreshold” and give it a value of 100 and set the Base to “Decimal”:
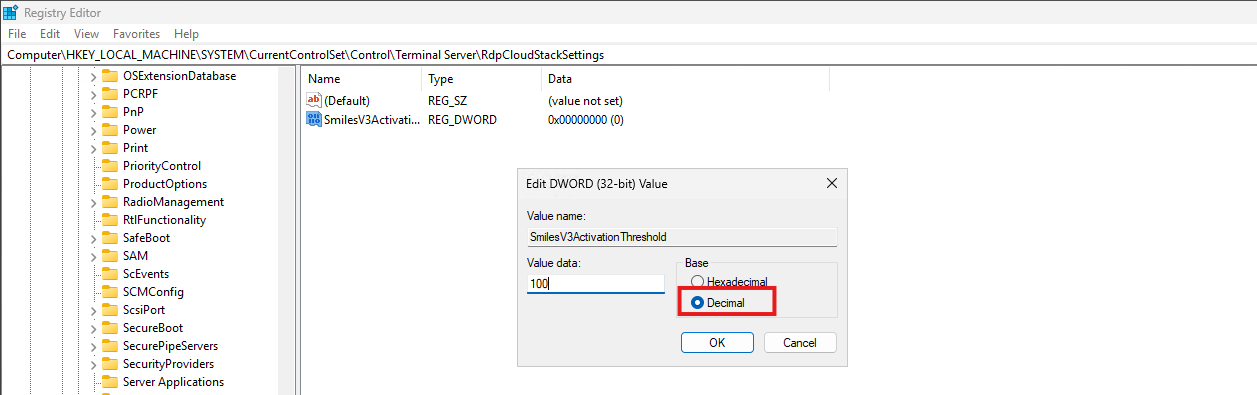
Save the key and close registry editor.
Now a new session to the machine must be made to make RDP Multipath active.
Option 3: Configure RDP Multipath using Microsoft Intune/Powershell Script
RDP Multipath can also be configured by running my PowerShell script. This can be run manually or by deploying via Intune. The script can be downloaded from my GitHub page:
Open Microsoft Intune, go to Windows, then go to “Scripts and Remediations” amd then “Platform Scripts”.
Click on “+ Add” to add a new script:
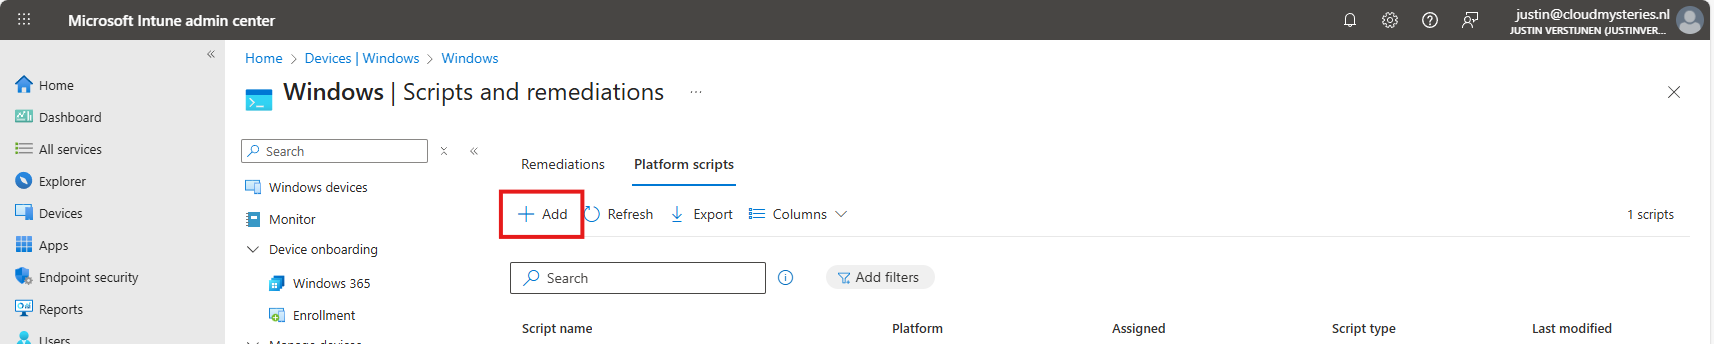
Give the script a name and description and click on “Next”.

Upload my script and then select the following options:
Select the script and change the options shown in the image and as follows:
- Run this script using the logged on credentials: No
- This runs the script as system account
- **Enforce script signature check:**No
- Run script in 64 bit PowerShell Host: Yes
Click next and assign the script to a group that contains your session hosts. Then save the script.
After this action, the script will be runned after synchronizing on your running sessionhosts, and then will be active. There is no reboot needed, only a new connection to the session host to make it work.
The results
After you configured RDP Multipath, you should see this in your connection window:
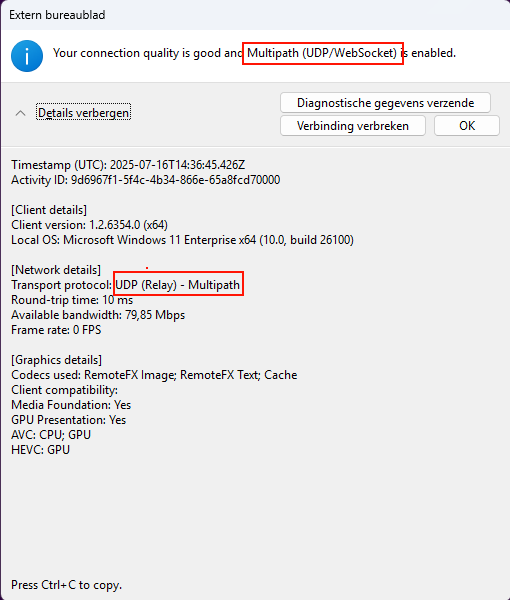
If Multipath is mentioned here, it means that the connection uses Multipath to connect to your session host. Please note that this may take up to 50 seconds prior to connectiong before this is visible. Your connection is first routed through the gateway and then switches to Shortpath or Multipath based on your settings.
Summary
Configuring RDP Multipath will enhance the user experience. With some minor network outages, the connection will be more stable. Also, it will help by always choosing the most efficient path to the end users’ computer.
Thank you for reading this guide and I hope it was helpful.
Sources
These sources helped me by writing and research for this post;
- https://learn.microsoft.com/en-us/azure/virtual-desktop/rdp-multipath
- https://www.youtube.com/watch?v=fkXZZixOMjc
End of the page 🎉
You have reached the end of the page. You can navigate through other blog posts as well, share this post on X, LinkedIn and Reddit or return to the blog posts collection page. Thank you for visiting this post.
If you think something is wrong with this post or you want to know more, you can send me a message to one of my social profiles at: https://justinverstijnen.nl/about/
If you find this page and blog very useful and you want to leave a donation, you can use the button below to buy me a beer. Hosting and maintaining a website takes a lot of time and money. Thank you in advance and cheers :)
The terms and conditions apply to this post.
Pooled Azure Virtual Desktop with Azure AD cloud users only
Since the beginning of Azure Virtual Desktop, it is mandatory to run it with an Active Directory. This because when using pooled sess…
This deployment option is superseded by the more easy and secure Entra Kerberos option, check out the updated deployment guide here: https://justinverstijnen.nl/azure-virtual-desktop-fslogix-and-native-kerberos-authentication/
Since the beginning of Azure Virtual Desktop, it is mandatory to run it with an Active Directory. This because when using pooled session hosts, there has to be some sort of NTFS permission for FSLogix to reach the users’ profile disks. This permission is done using NTFS with Kerberos authentication. Something Azure AD doesn’t support.
But what if I tell you this is technically possible to do now? We can use Azure Virtual Desktop in a complete cloud-only setup, where we use Azure for our session hosts, a storage account for the storage of the disks, Intune for our centralized configurations and Azure AD/Entra ID for our authentication! All of this without Active Directory, Entra Domain Services of any sort of Entra Connect Sync. Let’s follow this guide to find out.
Requirements
- Basic understanding of Azure
- Basic understanding of Entra ID
- Basic understanding of Azure Virtual Desktop and FSLogix
- Licenses for Intune and Azure Virtual Desktop (365 Business Premium and up)
- An Pay as you go (PAYG) Azure subscription to follow the step by step guide
- Around 60 minutes of your time
How does the traditional setup work?
In traditional environments we built or used an existing Active Directory and we joined the Azure storage account to it with Powershell. This makes Kerberos authentication possible to the fileshare of the storage account and for NTFS as well:
Topology
This means we have to host an Active Directory domain ourselves, and mean we have to patch and maintain those servers as well. Also, in bigger environments we are not done with only one server because of availability reasons.
A good point to remember is that this all works in one flow. The user is authenticated in Active Directory and then authorized with that credential/ticket for the NTFS permissions. Basically how Kerberos works.
How does the cloud only setup work?
In the cloud only setup there are 2 seperate authentication flows. The user will first be authenticated to Entra ID. When the user is authenticated there will be checked if it has the required Azure roles to login into a Entra joined machine.
After that is completed, there will be another authentication flow from the session host to the storage account to verify if the storage access key the session host knows is correct. The session host has the FSLogix setting enabled to access the network as computer account.
Topology
As you might think, there are indeed some security risks with this setup;
- The session host has full control over all user disks, not locked down to user1 only access to disk of user1 etc.
- The storage account access key is saved in the machine and does not rotate periodically
However, we want to learn something so we are still going to configure this cloud only setup. But take great care when bringing this into production.
Step 1: Resources and Hostpool
My environment looks like this before the guide. I already have created the needed resources to perform the tasks:
So I created the hostpool, a network, the workspace and a demo VM to test this configuration with.
The hostpool must be an Entra ID joined hostpool, which you can configure at the creation wizard of the hostpool:
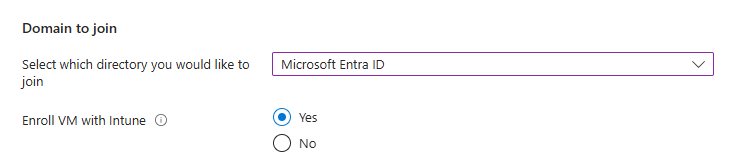
I also highly recommend using the “Enroll VM with Intune” option so we can manage the session hosts with Intune, as we don’t have Group Policies in this cloud only setup.
Step 2: Create a test user and assign roles
The cloud only setup need different role assignments and we will create a test user and assign him one of these roles:
- Virtual Machine User Login on all session hosts -> Resource group
- For default, non administrative users
- Virtual Machine Administrator Login on all session hosts -> Resource group
- For administrative users
In addition, our test user must have access to the Desktop application group in the Azure Virtual Desktop hostpool.
In this case, we are going to create our test user and assign him the default, non administrative role:
Now that the user is created, go to the Azure Portal, and then to the resource group where your session hosts lives:
Click on “+ Add” and then on “add role assignment”:
Then click on “Next” and under “User, group or service principal” select your user or user group:
Click on “Review + assign” to assign the role to your users.
This is an great example of why we place our resources in different resource groups. These users can login into every virtual machine in this resource group. By placing only the correct virtual machines in this resource group, the access is limited.
Now we navigate to our Hostpool to give our user access to the desktops.
Go to “Application Groups”, and then to our Hostpool DAG:
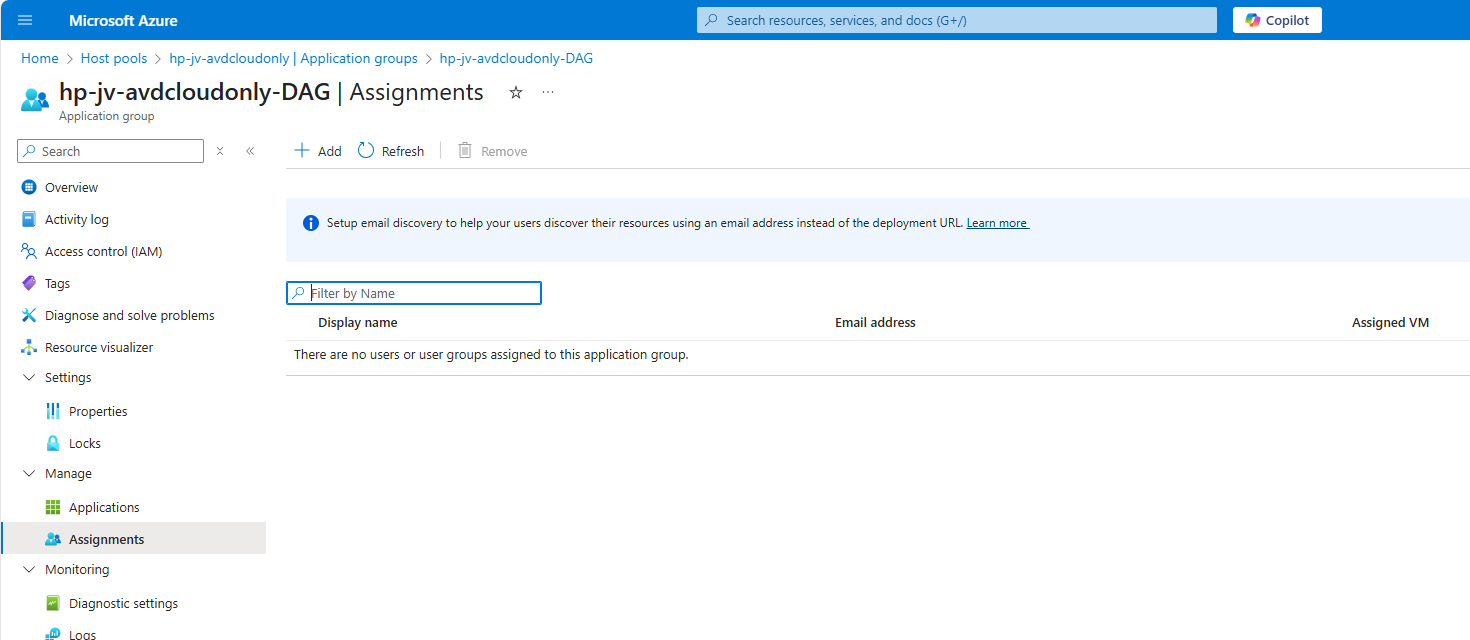
Click on “+ Add” to add our user or user group here:
Select your user or group here and save. The user/group is now allowed to logon to the hostpool and get the workspace in the Windows App.
Step 3: Create a dynamic group for session hosts (optional)
Using dynamic groups require a Microsoft Entra Premium P1 tenant. If you don’t have this license, you can use an assigned group instead.
Before we can configure the session hosts in Microsoft Intune, we need to have a group for all our session hosts. I really like the use of dynamic group for this sort of configurations, because the settings will be automatically done. Otherwise we configure a new session host in about 3 months later and forget about the group assignment.
Go to Microsoft Entra and then to groups:
Create a new “Dynamic Device” security group and add the following query:
V
(device.displayName -startsWith "jv-vm-avd") and (device.deviceModel -eq "Virtual Machine") and (device.managementType -eq "MDM")This ensures no other device comes into the group by accident or by a wrong name. Only Virtual Machines starting with this name and managed by Intune will join the group.
This looks like this:
Validate your rule by testing these rules on the “Validate Rules” tab:
Now we are 100% sure our session host will join the group automatically but a Windows 11 laptop for example not.
Step 4: Configure FSLogix
We can now configure FSLogix in Intune. I do this by using configuration profiles from settings catalogs. These are easy to configure and can be imported and exported. Therefore I added a download link for you:
Download FSLogix configuration template
If you choose to download the FSLogix configuration template, you need to change the VHD location to your own storage account and share name.
To configure this manually create a new configuration template from scratch for Windows 10 and higher and use the “Settings catalog”
Give the profile a name and description and advance.
Click on “Add settings” and navigate to the FSLogix policy settings.
Profile Container settings
Under FSLogix -> Profile Containers, select the following settings, enable them and configure them:
| Setting name | Value |
| Access Network as Computer Object | Enabled |
| Delete Local Profile When VHD Should Apply | Enabled |
| Enabled | Enabled |
| Is Dynamic (VHD) | Enabled |
| Keep Local Directory (after logoff) | Enabled |
| Prevent Login With Failure | Enabled |
| Roam Identity | Enabled |
| Roam Search | Disabled |
| VHD Locations | Your storage account and share in UNC. Mine is here: \sajvavdcloudonly.file.core.windows.net\fslogix-profiles |
Container naming settings
Under FSLogix -> Profile Containers -> Container and Directory Naming, select the following settings, enable them and configure them:
| Setting name | Value |
| No Profile Containing Folder | Enable |
| VHD Name Match | %username% |
| VHD Name Pattern | %username% |
| Volume Type (VHD or VHDX) | VHDX |
You can defer from this configuration to fit your needs, this is purely how I configured FSLogix.
After configuring the settings, advance to the “Assignments” tab:
Select your group here as “Included group” and save.
Step 5: Create Powershell script for connection to Storage account
We now have to create a Powershell script to connect the session hosts to our storage account and share. This is to automate this task and for each session host in the future you add that it works right out of the box.
In this script, there is an credential created to access the storage account, an registery key to enable the credential in the profile and an additional registery key if you use Windows 11 22H2 to make it work.
POWERSHELL
# PARAMETERS
# Change these 3 settings to your own settings

# Storage account FQDN
$fileServer = "yourstorageaccounthere.file.core.windows.net"

# Share name
$profilesharename = "yoursharehere"

# Storage access key 1 or 2
$storageaccesskey = "yourkeyhere"

# END PARAMETERS

# Don't change anything under this line ---------------------------------

# Formatting user input to script
$profileShare="\\$($fileServer)\$profilesharename"
$fileServerShort = $fileServer.Split('.')[0]
$user="localhost\$fileServerShort"

# Insert credentials in profile
New-Item -Path "HKLM:\Software\Policies\Microsoft" -Name "AzureADAccount" -ErrorAction Ignore
New-ItemProperty -Path "HKLM:\Software\Policies\Microsoft\AzureADAccount" -Name "LoadCredKeyFromProfile" -Value 1 -force

# Create the credentials for the storage account
cmdkey.exe /add:$fileServer /user:$($user) /pass:$($storageaccesskey)
New-ItemProperty -Path "HKLM:\SYSTEM\CurrentControlSet\Control\Lsa" -Name "LsaCfgFlags" -Value 0 -force
Change the information on line 5, 8 and 11 and save the script as .ps1 file or download it here:
Download Cloud Only Powershell script
You can find the information for line 5 and 11 in the Azure Portal by going to your Storage Account, and then “Access Keys”:
For line 8, you can go to Data Storage -> File Shares:

If you don’t have a fileshare yet, this is the time to create one.
Paste this information in the script and save the script. It should look like this:
Go to Intune and navigate to the “Scripts and Remediations” and then to the tab “Platform scripts”. Then add a new script:
Give the script a name and description and advance.
Select the script and change the options shown in the image and as follows:
- Run this script using the logged on credentials: No
- This runs the script as system account
- Enforce script signature check: No
- Run script in 64 bit PowerShell Host: Yes
Advance to the “Assignments” tab:
Select your session hosts dynamic group and save the script:
Step 6: Let’s test the result!
Now we are done with all of the setups and we can test our configuration. The session host must be restarted and fully synced before we can login. We can check the status in Intune under our Configuration Profile and Powershell Script.
Configuration Profile:
PowerShell script: (This took about 30 minutes to sync into the Intune portal)
Now that we know for sure everything is fully synchronized and performed, let’s download the new Windows App to connect to our hostpool.
After connecting we can see the session host indeed uses FSLogix to mount the profile to Windows:
Also we can find a new file in the FSLogix folder on the Azure Storage Account:
We have now successfully configured the Cloud only setup for Azure Virtual Desktop.
Testing the session host and security
We can test navigating to the Azure Storage account from the session host, we will get this error:
This is because we try it through the context of the user which doesn’t have access. So users cannot navigate to the fileshare of FSLogix because only our session host has access as system.
This means that you can only navigate to the fileshare on the PC when having local administrator permissions on the session host. This because a local administrator can traverse the SYSTEM account and navigate to the fileshare. However, local administrator permissions is something you don’t give to end users, so in this case it’s safe.
I tried several things to find the storage access key on the machine in registry and cmdkey commands but no success. It is secured enough but it is still a security concern.
Security recommendations for session hosts
I have some security recommendations for session hosts, not only for this cloud only setup but in general:
- Use Microsoft Defender for Endpoint
- Use the firewall on your Storage account so it can only be accessed from your session hosts’ subnet
- Block critical Windows tools like CMD/Powershell/Scripts/Control panel and access to power off/reboot in the VM
Summary
While this cloud only setup is very great, there are also some security risks that come with it. I really like to use as much serverless options as possible but for production environments, I still would recommend to use an Active Directory or take a look at personal desktop options. Also, Windows 365 might still be a great option if you want to eliminate Active Directory but still use modern desktops.
Please use the Powershell script very carefully, this contains the credentials to full controll access to the storage account. Upload to Intune and delete from your computer or save it and remove the key.
I hope this guide was very helpful and thank you for reading!
Sources
These sources helped me by writing and research for this post;
- https://learn.microsoft.com/en-us/azure/virtual-desktop/authentication
- https://learn.microsoft.com/en-us/azure/virtual-desktop/configure-single-sign-on
End of the page 🎉
You have reached the end of the page. You can navigate through other blog posts as well, share this post on X, LinkedIn and Reddit or return to the blog posts collection page. Thank you for visiting this post.
If you think something is wrong with this post or you want to know more, you can send me a message to one of my social profiles at: https://justinverstijnen.nl/about/
If you find this page and blog very useful and you want to leave a donation, you can use the button below to buy me a beer. Hosting and maintaining a website takes a lot of time and money. Thank you in advance and cheers :)
The terms and conditions apply to this post.
Test Azure Virtual Desktop connectivity and RTT
Sometimes, we need to check some basic connectivity from end user devices to a service like Azure Virtual Desktop.
Sometimes, we need to check some basic connectivity from end user devices to a service like Azure Virtual Desktop. Most networks have a custom firewall equipped where we must allow certain traffic to flow to the internet.
Previously there was a tool from Microsoft available, the Azure Virtual Desktop experience estimator, but they have discontinued that. This tested the Round Trip Time (RTT) to a specific Azure region and is a calculation of what the end user will get.
I created a script to test the connectivity, if it is allowed through Firewall and also test the RTT to the Azure Virtual Desktop service. The script then gives the following output:

The script to test Azure Virtual Desktop connectivity
I have the script on my Github page which can be downloaded here:
Download TestRTTAVDConnectivity script
What is Round Trip Time (RTT)?
The Round Trip Time is the time in milliseconds of an TCP packet from its source to it’s destination and from destination back to the source. It is like ping, but added with the time back like described in the image below:
This is an great mechanism to test connectivity in some critical applications where continious traffic to both the source and destination is critical. These applications can be Remote Desktop but also in VoIP.
RTT and Remote Desktop experience:
- Under 100ms RTT: Very good connection
- 100 to 200ms RTT: User can experience some lags in input. It feels different to a slow computer as the cursor and typing text might stutter and freeze
- Above 200ms RTT: This is very bad and some actions might be done.
The script described
The script tests the connection to the required endpoints of Azure Virtual Desktop on the required ports. Azure Virtual Desktop heavily relies on port 443, and is the only port needed to open.
- The script starts with the URLs which come from this Microsoft article: https://learn.microsoft.com/en-us/azure/virtual-desktop/required-fqdn-endpoint?tabs=azure#end-user-devices
- Then it creates a custom function/command to do a TCP test on port 443 on all those URLs and then uses ICMP to also get an RTT time. We also want to know if an connection was succeeded, how long it took.
- Then summarizes everything into a readable table. This is where the table marup is stated
- Test the connectivity and write the output, and waits for 50 seconds
The script takes around 10 seconds to perform all those actions and to print those. If one or all of them are “Failed”, then you know that something has to be changed in your Firewall configurations. If all of them succeeds then everything is alright, and the only factor can be a eventually low RTT.
Summary
This script is really useful to test connectivity to Azure Virtual Desktop. It can be used in multiple scenario’s, like initial setup, testing and troubleshooting.
Thank you for reading this guide and I hope it was useful.
Sources
These sources helped me by writing and research for this post;
- The old and discontinued “Azure Virtual Desktop Experience Estimator”
- https://learn.microsoft.com/en-us/azure/virtual-desktop/required-fqdn-endpoint?tabs=azure#end-user-devices
End of the page 🎉
You have reached the end of the page. You can navigate through other blog posts as well, share this post on X, LinkedIn and Reddit or return to the blog posts collection page. Thank you for visiting this post.
If you think something is wrong with this post or you want to know more, you can send me a message to one of my social profiles at: https://justinverstijnen.nl/about/
If you find this page and blog very useful and you want to leave a donation, you can use the button below to buy me a beer. Hosting and maintaining a website takes a lot of time and money. Thank you in advance and cheers :)
The terms and conditions apply to this post.
Windows Search optimization on Azure Virtual Desktop
When using Windows 11 Multi Session images on Azure for Azure Virtual Desktop, Microsoft has disabled some features and changed…
When using Windows 11 Multi Session images on Azure for Azure Virtual Desktop, Microsoft has disabled some features and changed the behaviour to optimize it for using with multiple users. One of the things that has been “lazy loading” is Windows Search. The first time after logging in it will be much slower than normal. The 2nd, 3rd and 4th time, it will be much faster.
In this video you will see that it takes around 5 seconds till I can begin searching for applications and Windows didnt respond to the first click. This is on a empty session host, so in practice this is much slower.
How to solve this minor issue?
We can solve this issue by running a simple script on startup that opens the start menu, types in some dummy text and then closes. In my experience, the end user actually likes this because waiting on Windows Search the first time on crowded session hosts can take up to 3 times longer than my “empty host” example. I call it “a stupid fix for a stupid problem”.
I have a simple script that does this here:
Download script from GitHub
Installing the script
Because it is a user-context script that runs on user sign in, I advice you to install this script using Group Policy or Microsoft Intune. I will show you how to do it with Group Policy. You can also store the script in your session host and run it with Task Scheduler.
Demonstration is done through the Local Group Policy editor, but it will work for both domain/non-domain group policy.
Place the script on a local or network location and open Group Policy Management, and then create a new GPO.
Go to User Configuration -> Windows Settings -> Scripts (Logon/Logoff)
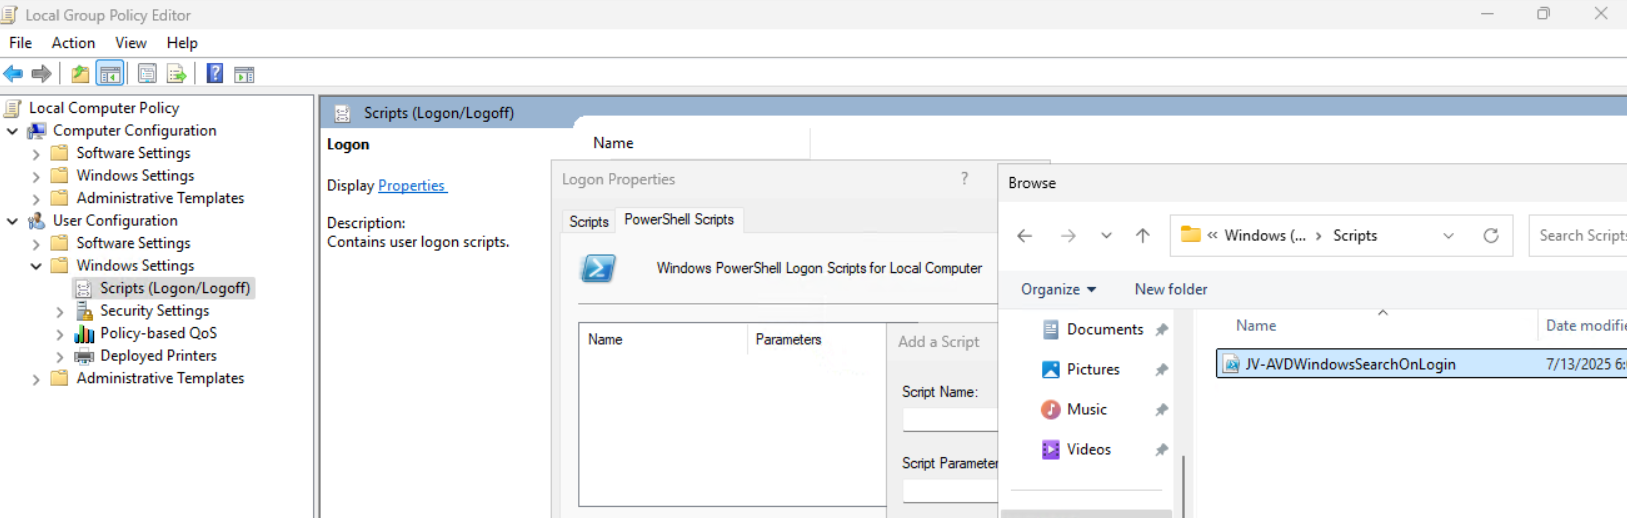
Then open the tab “Powershell Scripts” and select the downloaded script from my Github page.
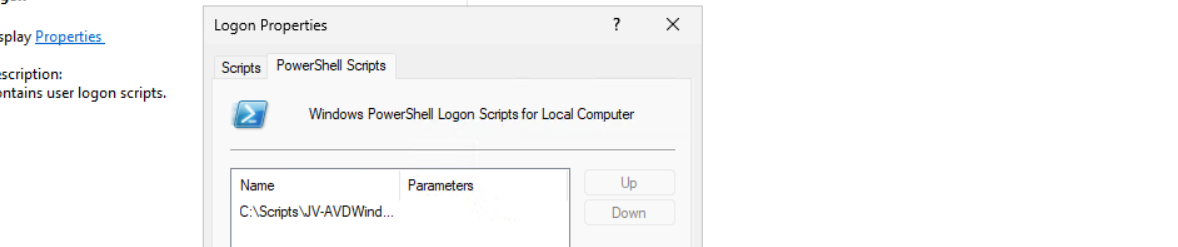
Save the GPO and the script will run on startup.
Optimal Windows Search settings for Azure Virtual Desktop
Assuming you use FSLogix for the roaming profiles on non-persistent session hosts, I have the following optimizations for Windows Search here:
- FSLogix settings: EnableSearchIndexRoaming -> Disable
We don’t neccesarily need to roam our search index and history to other machines. This just disables it and our compute power completely goes to serve the end user with a faster desktop experience.
And we have some GPO settings for Windows Search here. I advice you to add this to your system optimizations:
Computer Configuration > Administrative Templates > Windows Components > Search
Set the settings to this for the best performance:
- Allow Cortana -> Disabled
- Do not allow web search -> Enabled*
- Don’t search the web or display web results in Search -> Enabled*

* Negative policy setting, enabled means disabling the option
Save the group policy and test it out.
Summary
The script might seem stupid but it’s the only way it works. I did a lot of research because some end users were waiting around 10 seconds before searching was actually possible. This is very time wasting and annoying for the end user.
For better optimization, I included some Group Policy settings for Windows and FSLogix to increase the performance there and get the most out of Azure Virtual Desktop.
Thank you for reading this post and I hope this was helpful.
Sources
These sources helped me by writing and research for this post;
- None
End of the page 🎉
You have reached the end of the page. You can navigate through other blog posts as well, share this post on X, LinkedIn and Reddit or return to the blog posts collection page. Thank you for visiting this post.
If you think something is wrong with this post or you want to know more, you can send me a message to one of my social profiles at: https://justinverstijnen.nl/about/
If you find this page and blog very useful and you want to leave a donation, you can use the button below to buy me a beer. Hosting and maintaining a website takes a lot of time and money. Thank you in advance and cheers :)
The terms and conditions apply to this post.
Monitor Azure Virtual Deskop logon speed
Sometimes we want to know why a Azure Virtual Desktop logon took longer than expected. Several actions happen at Windows logon…
Sometimes we want to know why a Azure Virtual Desktop logon took longer than expected. Several actions happen at Windows logon, like FSLogix profile mounting, Group Policy processing and preparing the desktop. I found a script online that helps us monitor the sign-ins and logons and basically tells us why it took 2 minutes and what parts took a specific amount of seconds.
The script is not made by myself, the source of the script is: https://www.controlup.com/script-library-posts/analyze-logon-duration/
The script used in practice
I have a demo environment where we can test this script. There we will run the script.
The script must be run at the machine where a user has just finished the login process. The user must be still logged on at the time you run it because it needs information from the event log and the session id.
I have just logged in into my demo environment with my testuser. We must specify the user as: “DOMAIN\user”:
POWERSHELL
Get-LogonDurationAnalysis @params
cmdlet  at command pipeline position 1
Supply values for the following parameters:
DomainUser: JV\test.user
Then hit enter and the script will get all information from the event logs. It can generate some warnings about software not recognized, which is by design because they are actually not installed.
POWERSHELL
WARNING: Unable to find network providers start event
WARNING: Could not find Path-based Import events for source VMware DEM
WARNING: Could not find Async Actions events for source VMware DEM
WARNING: Could not find AppX File Associations events for source Shell
WARNING: Unable to find Pre-Shell (Userinit) start event
WARNING: Could not find ODFC Container events for source FSLogix
WARNING: No AppX Package load times were found. AppX Package load times are only present for a users first logon and may not show for subsequent logons.
The results
After about 15 seconds, we get the results from the script with readable information. I will give an explanation about each section of the output and the information it tells us.
Login information and phases
Here we have some basic information like the total time, the username, the FSLogix profile mounting, the possible Loopback processing mode and the total time of all login phases at the bottom.
This is a nice overview of the total sign in time and where this time is spent. In my case, I did not use FSLogix because of 1 session host.
Login tasks
At this section there are some tasks that happens in the background. In this case, the client refreshed some Group Policy scripts.
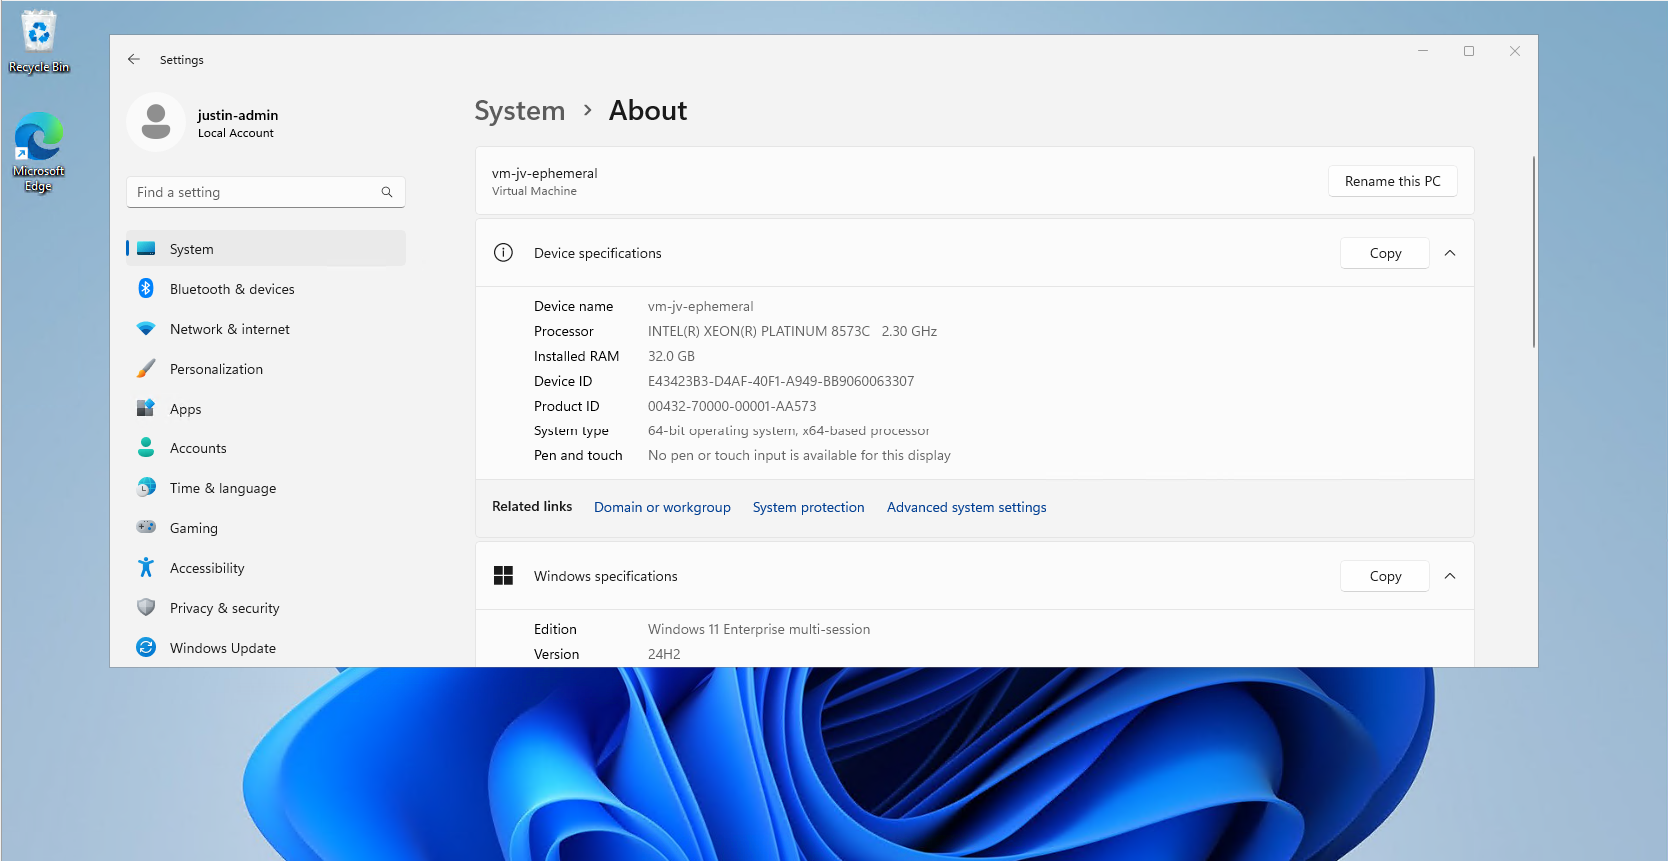
Login scheduled tasks
Here the script assessed the scheduled tasks on the machine that ran on the login of the user. Some tasks can take much time to perform, but in this case it was really fast.
Group Policies
At this section the group policies are assessed. This takes more time the more settings and different policies you have.
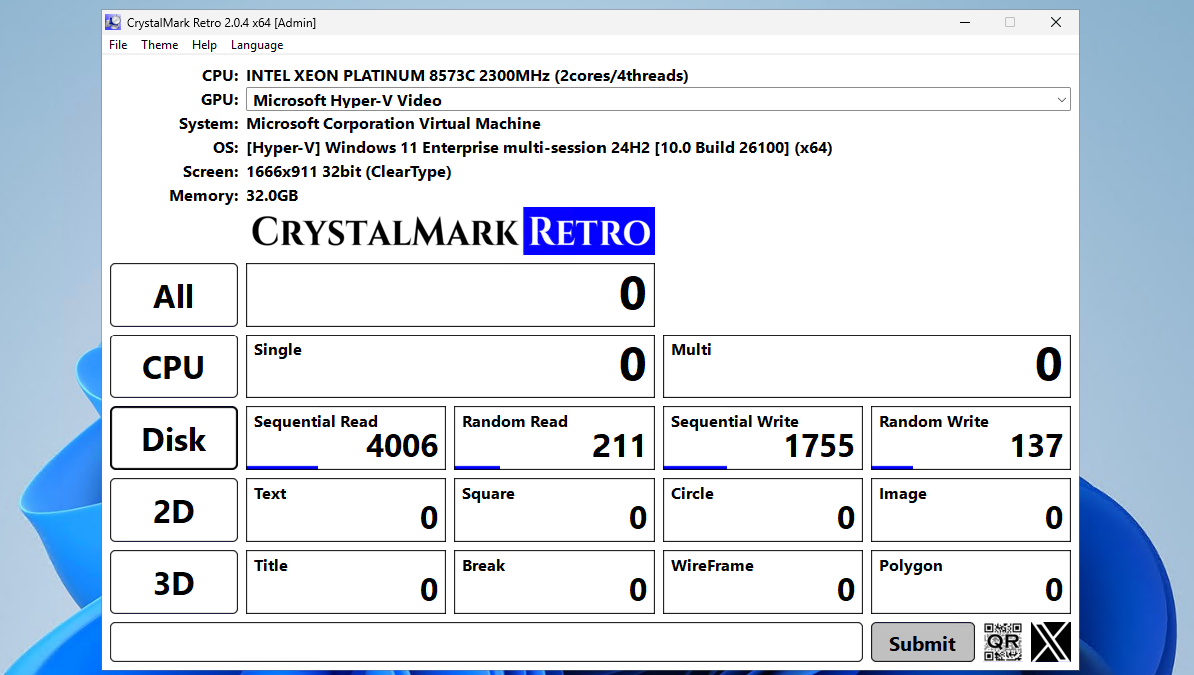
After that the script summarizes the processing time on the client for the Group Policy Client Side Extensions (CSE). This means, the machine get its settings and the CSE interprets this into machine actions.
Download the script
You can get the script from this site or by downloading it here:
Summary
This script can be very handy when testing, monitoring and troubleshooting logon performance of Azure Virtual Desktop. It shows exactly how much time it takes and what part took the most time. I can recommend everybody to use it when needed.
Thank you for reading this guide and I hope it was helpful.
End of the page 🎉
You have reached the end of the page. You can navigate through other blog posts as well, share this post on X, LinkedIn and Reddit or return to the blog posts collection page. Thank you for visiting this post.
If you think something is wrong with this post or you want to know more, you can send me a message to one of my social profiles at: https://justinverstijnen.nl/about/
If you find this page and blog very useful and you want to leave a donation, you can use the button below to buy me a beer. Hosting and maintaining a website takes a lot of time and money. Thank you in advance and cheers :)
The terms and conditions apply to this post.
Storage Account performance and pricing for Azure Virtual Desktop
Choosing the right performance tier of Azure Storage Accounts can be very complex. How much size and performance do we need? How many…
Choosing the right performance tier of Azure Storage Accounts can be very complex. How much size and performance do we need? How many users will login to Azure Virtual Desktop and how many profile size do we want to assign them?
In this blog post I will explain everything about hosting your FSLogix profiles on Azure Virtual Desktop and the storage account performance including pricing. AFter that we will do some real world performance testing and a conclusion.
Billing types for Storage Accounts
Before looking into the details, we first want to decide which billing type we want to use for our Storage Account. There are two billing types for storage accounts:
- Provisioned: Fixed storage size and fixed performance based on provisioning capacity
- Pay as you go: Pay only the storage what you need
You select this billing type at the storage account wizard. After creating the storage account, you can’t change the type. If you want to use premium storage account, then “provisioned” is required.
As you can see in this animation. For standard (HDD based) you can choose both, and for premium (SSD based) we have to provision storage.
Provisioned billing (V1 and V2)
When you want to be billed based on how many storage you provision/reserve, you can choose “provisioned”. This also means that we don’t pay for the transactions and egress costs as we pay a full package for the storage and can use it as much as we want.
We have two types of “provisioned” billing, V1 and V2:

The big difference between those two values is that in V1, you are stuck with Microsoft’s chosen performance based on how much you provision and with V2, you can change those values independently, as shown in the pictures below:
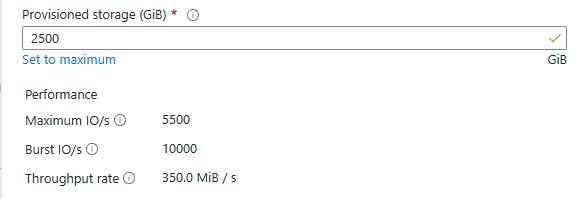
Provisioned v1
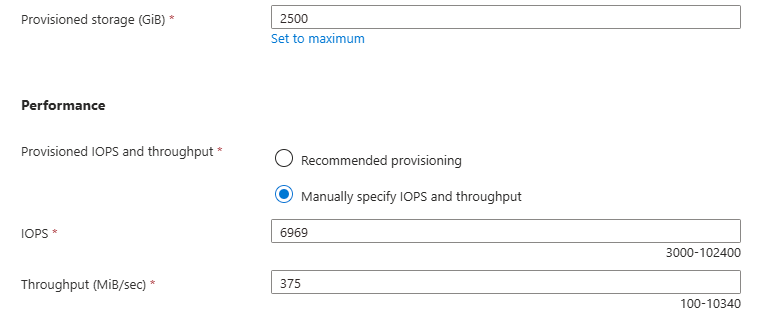
Provisioned v2
This way you can get more performance, with a little increase of credits instead of having to provision way more than you use.
Pay-as-you-go billing
Pay-as-you-go is the more linear manner of paying your storage account. Here you pay exactly what you use, and get a fixed performance but we have to pay additionally for transactions and egress of the data.
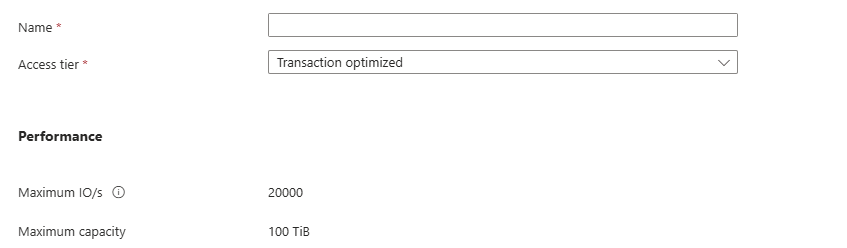
Because this billing option aligns tohow you use the storage, we can define for what purpose we use the storage account. This changes the prices of transactions, storage at rest and egress data. We have 3 categories/tiers:
- Transaction optimized
- Hot
- Cool
All three tiers use the same underlying hardware and give you the same performance.
For Azure Virtual Desktop operating in standard performance and pay-as-you-go billing, Transaction optimized or Hot tiers are recommended. Let’s find out why:
| Tier | Storage $/GB | IOPS Cost | Egress Cost | Use Cases |
|---|---|---|---|---|
| Transaction Optimized | Medium | Lowest | Normal | High metadata activity |
| Hot | Higher | Moderate | Lower | Frequent access |
| Cool | Lowest | Highest | Higher | Rare access, archival |
Per this table, we would pay the most if we place frequent accessed files on a “Cool” tier, as you pay the most for IOPS. Therefore, for FSLogix profiles it the best to use “Hot” tier as we pay the most for storage and we try to limit that as much as possible by deleting unneeded profiles and limiting the profile size with FSLogix settings.
Use the Azure Calculator for a real world calculation based on your needs.
Storage Account Performance Indicators
Now we have those terms to indicate the performance, but what do they mean exactly?
- Maximum IO/s (IOPS): Maximum read/write operations/actions per second under normal conditions
- Burst IO/s (IOPS): Maximum temporary higher read/write operations/actions per second, but only for a short time (boost)
- Throughput rate: The maximum data transfer rate in MB/s that the storage account allows
We can compare IOPS and throughput to a car, where the IOPS are the rotations per minute (RPM) of the engine and the throughput is the actual speed of the car.
Standard VS Premium performance and pricing example
Let’s say, we need a storage account. We want to know for 3 scenario’s which of the options would give us specific performance and also the costs of this configuration. We want the highest performance for the lowest price, or we want a upgrade for a little increase.
I want to go through all of the options to see the actual performance and pricing of 3 AVD profiles scenarios where we state we use 3 hypothetical sizes:
- 500GB (0,5TB) -> 20 users*
- 2500GB (2,5TB) -> 100 users*
- 5000GB (5TB) -> 200 users*
- *25GB per user profile
I first selected “Provisioned” with premium storage with default IOPS/throughput combination. For the three scenarios I get by default: (click image to enlarge)
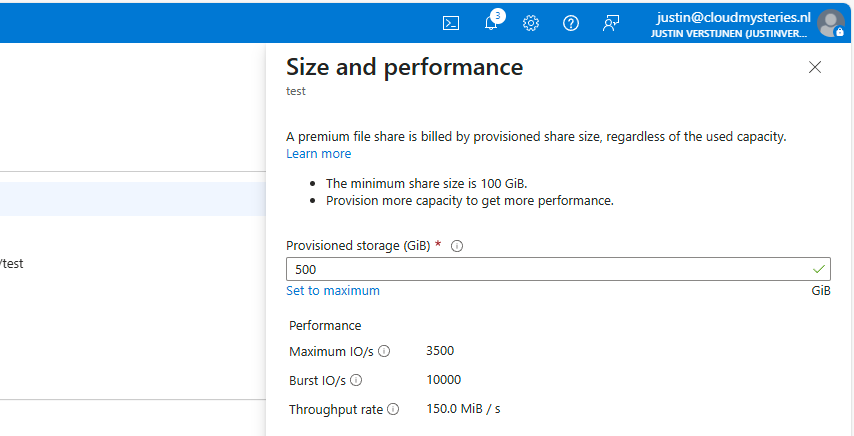
500GB
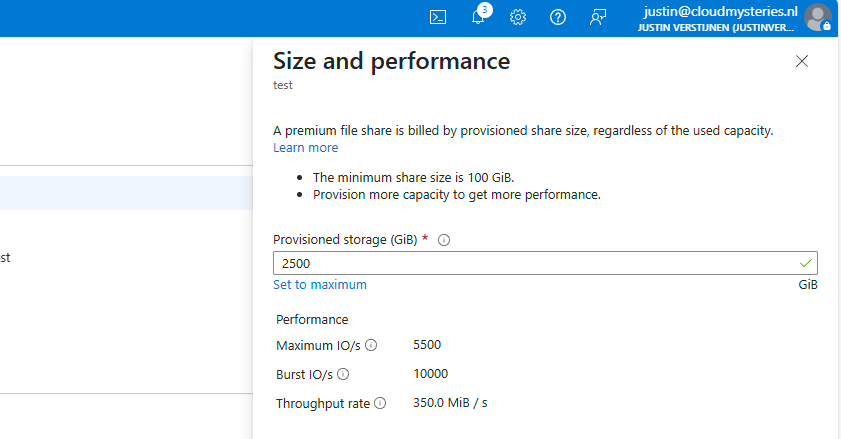
2500GB
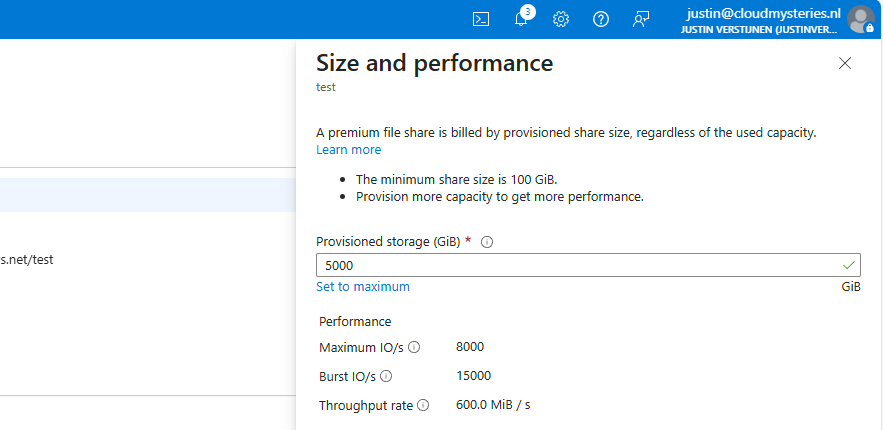
5000GB
I put those numbers in the calculator, and this will cost as stated below (without extra options):
| IOPS | Burst IOPS | Throughput (MB/s) | Costs per month | Latency (in ms) | |
| (Premium) 500GB | 3500 | 10000 | 150 | $ 96 | 1-5 |
| (Premium) 2500GB | 5500 | 10000 | 350 | $ 480 | 1-5 |
| (Premium) 5000GB | 8000 | 15000 | 600 | $ 960 | 1-5 |
You see, this is pretty much linear in terms of pricing. 96 dollars for every 500GB. Now let’s check the standard provisioned options:
| IOPS | Burst IOPS | Throughput (MB/s) | Costs per month | Latency (in ms) | |
| (Standard) 500GB | 1100 | Not available | 70 | $ 68 | 10-30 |
| (Standard) 2500GB | 1500 | Not available | 110 | $ 111 | 10-30 |
| (Standard) 5000GB | 2000 | Not available | 160 | $ 165 | 10-30 |
This shows pretty clear as the storage size increases, we could trade in performance for monthly costs. However, FSLogix profiles are heavily dependent on latency which increases by alot when using standard tier.
Because the difference of 1-5 and 10-30 ms latency, Premium would be a lot faster with loading and writing changes to the profile. And we have the possibility of bursting for temporary extra speed.
Testing performance in practice and conclusion
To further clarify what those numbers mean in terms of performance, I have a practice test;
In this test we will place a 10GB (10.240 MB) file from a workstation to the Azure Storage to count the time and the average throughput (speed in MB per second).

Now let’s take a look at the results:
Left: Premium Right: Standard
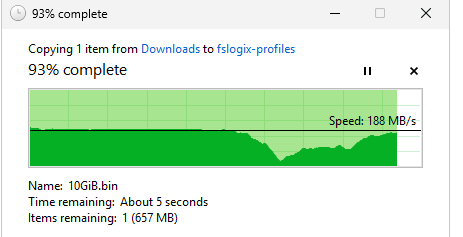
Time: 01:14:93 (75 seconds) Average speed: 136,5 MB/s Max speed: 203MB/s
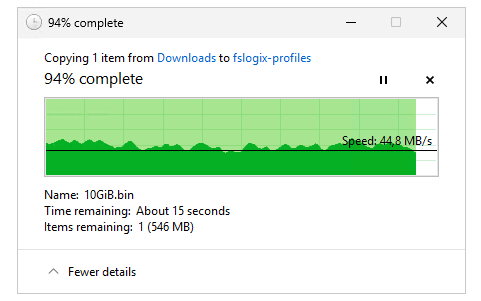
Time: 03:03:41 (183 seconds) Average speed: 55,9 MB/s Max Speed: 71,8 MB/s
The premium fileshare has finished this task 244% faster than the standard fileshare.
I also tested the profile mounting speed but they were around even. I have tested this with this script: https://justinverstijnen.nl/monitor-azure-virtual-deskop-logon-performance/
I couldn’t find a good way to test the performance when logged in and using the profile, but some tasks were clearly slower on the “standard” fileshare, like placing files on the desktop and documents folder.
Because FSLogix profiles heavily rely on low latency due to constant profile changes, we must have as low latency as possible which we also get with premium fileshares. I cannot state other than we must have Premium fileshares in production, at least for Azure Virtual Desktop and FSLogix disks.
Summary
This guide further clarifies the difference in costs and practice of Premium vs Standard Azure Storage Accounts for Azure Virtual Desktop. Due to the throughput and latency differences, for FSLogix profiles I would highly recommend using premium fileshares.
I hope this guide was very helpful and thank you for reading.
Sources
These sources helped me by writing and research for this post;
- https://azure.microsoft.com/en-us/pricing/calculator/
- https://azure.microsoft.com/en-us/pricing/details/storage/files/
- https://learn.microsoft.com/en-us/azure/storage/files/understanding-billing
- https://learn.microsoft.com/en-us/azure/storage/files/understand-performance?#glossary
- https://learn.microsoft.com/en-us/azure/storage/blobs/storage-performance-checklist
- https://justinverstijnen.nl/monitor-azure-virtual-deskop-logon-performance/
- https://testfiles.ah-apps.de/
End of the page 🎉
You have reached the end of the page. You can navigate through other blog posts as well, share this post on X, LinkedIn and Reddit or return to the blog posts collection page. Thank you for visiting this post.
If you think something is wrong with this post or you want to know more, you can send me a message to one of my social profiles at: https://justinverstijnen.nl/about/
If you find this page and blog very useful and you want to leave a donation, you can use the button below to buy me a beer. Hosting and maintaining a website takes a lot of time and money. Thank you in advance and cheers :)
The terms and conditions apply to this post.
Solved - FSLogix release 25.02 breaks Recycle Bin - Azure Virtual Desktop
I tested the new FSLogix 25.02 version and a very annoying bug appeared. “The Recycle Bin on C:\ is corrupted.”
This issue has been solved in the newest release of FSLogix 25.04: https://learn.microsoft.com/en-us/fslogix/overview-release-notes
Please use this newer version instead of version 25.02. This fixes the bug in this article without any change in policies and settings.
The problem/bug described
When testing the new FSLogix 25.02 version, I came across a very annoying problem/bug in this new version.
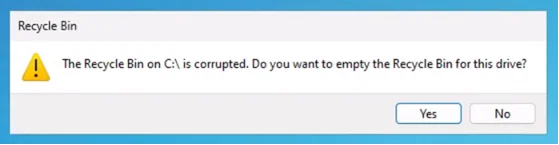
“The Recycle Bin on C:\ is corrupted. Do you want to empty the Recycle Bin for this drive?”
I tried everything to delete the folder of the Recycle bin on the C:\ drive but nothing worked. Only warnings about insufficient permissions and such, which is good but not in our case. This warning appears everytime you log in to the hostpool and every 2 minutes when working in the session. Something you definitely want to fix.
How to solve the problem with GPO (1)
To solve the bug, you have to disable the Recycle Bin roaming in the FSLogix configuration. You can do this by going to your FSLogix Group Policy and open it to edit the settings. Make sure you already updated the FSLogix policies to this new version to match the agent and policy version. I also addedd a fix for using the Windows registry.
Go to the following path:
Computer Configuration -> Policies -> Administrative Templates -> FSLogix
Here you can find the option “Roam Recycle Bin”, which is enabled by default -> even when in a “Not Configured” state. Disable this option and click on “OK”.
After this change, reboot your session host(s) to update the FSLogix configuration and after rebooting log in again and check if this solved your problem. Otherwise, advance to the second option.
How to solve the problem with a registry key (1)
When using Registery keys to administer your environment, you can create the following registery key that does the same as the Group Policy option:
REG
HKEY_LOCAL_MACHINE\SOFTWARE\FSLogix\Apps\RoamRecycleBinThis must be a default DWORD;
- 1: Enabled (which it is by default)
- 0: Disabled (Do this to fix the issue)
After this change, reboot your session host(s) to update the FSLogix configuration and after rebooting log in again and check if this solved your problem. Otherwise, advance to the second option.
How to solve the problem - Profile reset (2)
If disabling the recycle bin did not fix your problem, we have to do an extra step to fix it. In my case, the warning still appeared after disabling the recycle bin. FSLogix changed something in the profile which makes the recycle bin corrupt.
We have 2 options to “fix” the profile:
- Backup all of your data in the profile and delete it. Then let FSLogix regenerate a new profile
- Restore a backup of the profile, before the FSLogix update to 25.02
After logging in with a new or restored profile, the problem is solved.
Summary
This problem can be very annoying, especially when not wanting to disable the recycle bin. This version seems to change something in the profile which breaks usage of the the recycle bin. I did not manage to solve it with a profile that had this problem.
In existing and sensitive environments, my advice is to keep using the last FSLogix 2210 hotfix 4 version. As far as I know, this version is completely bug-free and does not have this problem.
After some more research, I came across a page of Microsoft about a lot of features deprecated in this version of FSLogix. Be aware of those changes before they might impact your environment: https://learn.microsoft.com/en-us/fslogix/troubleshooting-feature-deprecation
If I helped you with this guide to fix this bug, it was my pleasure and thank you for reading it.
End of the page 🎉
You have reached the end of the page. You can navigate through other blog posts as well, share this post on X, LinkedIn and Reddit or return to the blog posts collection page. Thank you for visiting this post.
If you think something is wrong with this post or you want to know more, you can send me a message to one of my social profiles at: https://justinverstijnen.nl/about/
If you find this page and blog very useful and you want to leave a donation, you can use the button below to buy me a beer. Hosting and maintaining a website takes a lot of time and money. Thank you in advance and cheers :)
The terms and conditions apply to this post.
Stop OneNote printer from being default printer in AVD
If you have the Office Apps installed with OneNote included, sometimes the OneNote printer will be installed as default…
If you have the Office Apps installed with OneNote included, sometimes the OneNote printer will be installed as default:

This can be very annoying for our end users and ourselves as we want real printers to be the default printer. Today I will show you how to delete this printer for current and new session hosts permanently.
The issue itself
The issue is that OneNote automatically creates a printer queue in Windows at installation for users to send information to OneNote. This will be something they use sometimes, but a physical printer will be used much more often. The most annoying part is that the software printer for OneNote will be marked as default printer every day which is annoying for the end users.
Advance through this page to see how I solved this problem many times, as our users don’t use the OneNote printer. Why keeping something as we don’t use it.
My solution
My solution to fix this problem is to create a delete-printer rule with Group Policy Printers. These are very great as they will remove the printer now, but also if we roll out new session hosts in a few months. This will be a permanent fix until we delete the GPO.
Create a new Group Policy Object at yourt Active Directory Management server:
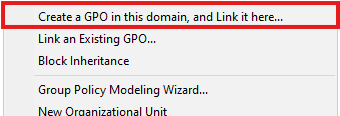
Choose “Create a GPO in this domain and Link it here…” or use your existing printers-GPO if applicable. The GPO must target users using the Azure Virtual Desktop environment.
Navigate to User Configuration -> Preferences -> Control Panel Settings -> Printers
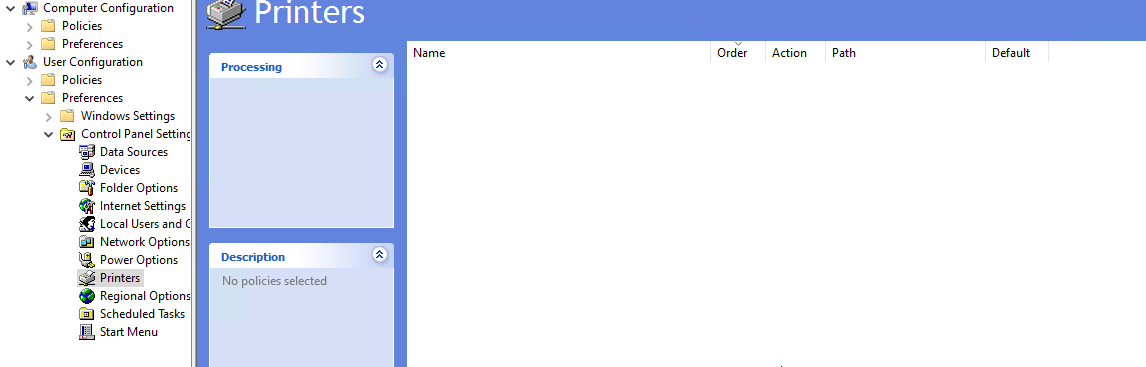
Right-click on the empty space and select New -> Local Printer
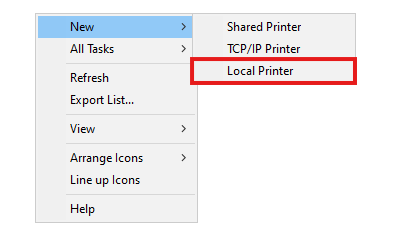
The select “Delete” as action and type in exactly the name of the printer to be deleted, in this case:
JSON
OneNote (Desktop)Just like below:
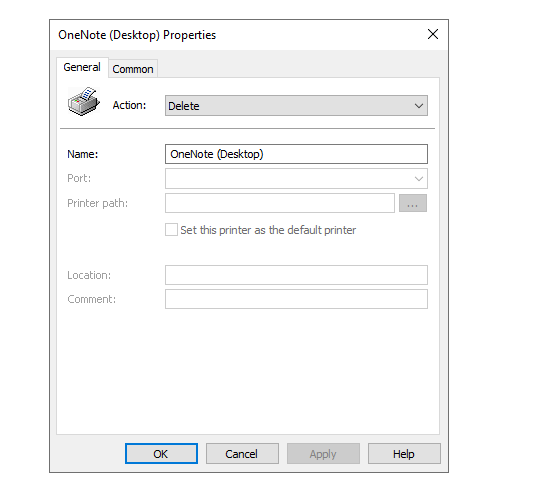
Click OK and check the settings for the last time:
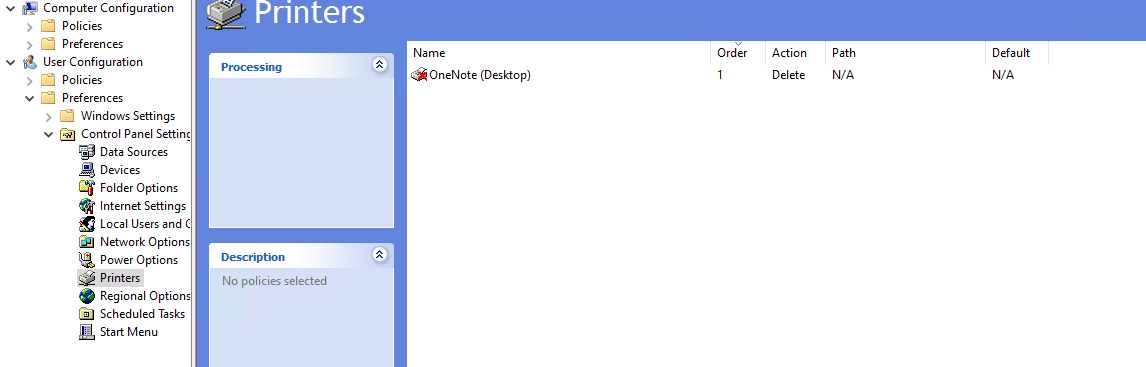
Now we are done and at the next login or Group Policy refresh interval, the OneNote printer will be completely deleted from the users’ printers list.
Summary
This is a very strange thing to happen but a relatively easy solution. I also tried deleting the printer through registery keys but this was very hard without success. Then I though of a better and easier solution as most deployments still need Active Directory.
Thank you for reading this guide and I hope it was helpful.
Sources
These sources helped me by writing and research for this post;
End of the page 🎉
You have reached the end of the page. You can navigate through other blog posts as well, share this post on X, LinkedIn and Reddit or return to the blog posts collection page. Thank you for visiting this post.
If you think something is wrong with this post or you want to know more, you can send me a message to one of my social profiles at: https://justinverstijnen.nl/about/
If you find this page and blog very useful and you want to leave a donation, you can use the button below to buy me a beer. Hosting and maintaining a website takes a lot of time and money. Thank you in advance and cheers :)
The terms and conditions apply to this post.
Automatic AVD/W365 Feed discovery for mobile apps
When using Azure Virtual Desktop (AVD) or Windows (W365), we sometimes use the mobile apps for Android, MacOS or iOS. But those apps rely…
When using Azure Virtual Desktop (AVD) or Windows (W365), we sometimes use the mobile apps for Android, MacOS or iOS. But those apps rely on filling in a Feed Discovery URL instead of simply a Email address and a password.
Did you know we can automate this process? I will explain how to do this!
Fast path for URL: https://rdweb.wvd.microsoft.com/api/arm/feeddiscovery
The problem explained
When downloading the apps for your mobile devices, we get this window after installing:
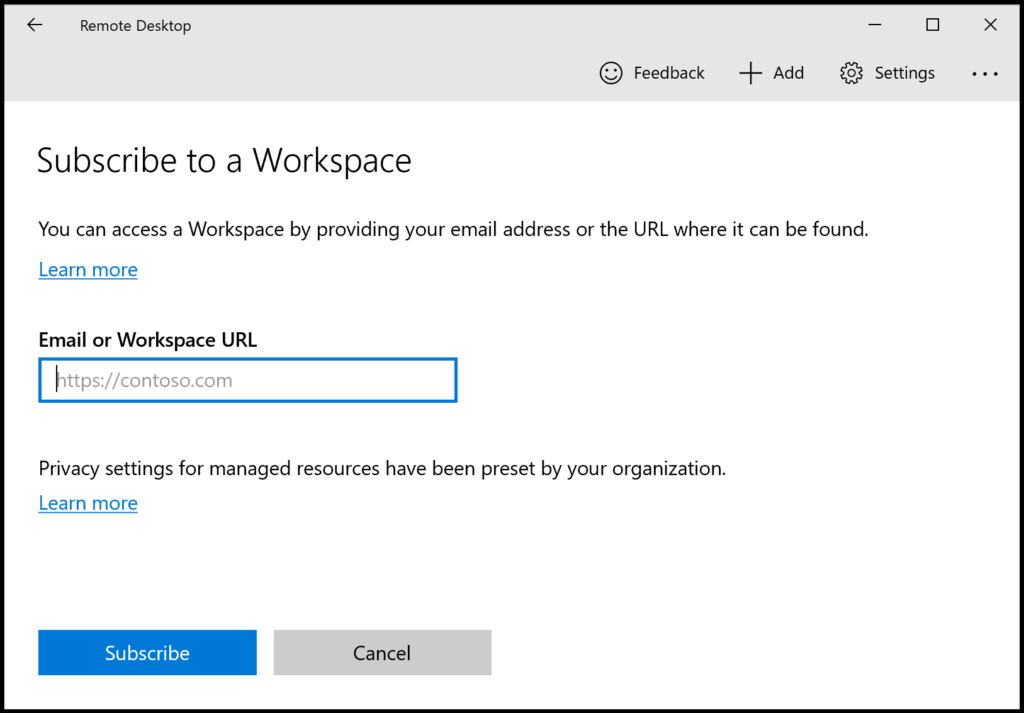
After filling in our emailadress that has access to a Azure Virtual Desktop hostpool or Windows 365 machine, we still get this error:
- We couldn’t find any Workspaces associated with this email address. Try providing a URL instead.
Now the client wants a URL, but we don’t want to fill in this URL for every device we configure. We can automate this through DNS.
How to configure the Feed Discovery DNS record
To configure your automatic Feed Discovery, we must create this DNS record:
| Record type | Host | Value |
| TXT | _msradc | https://rdweb.wvd.microsoft.com/api/arm/feeddiscovery |
Small note, we must configure this record for every domain which is used for one of the 2 remote desktop solutions. If your company uses e.g.:
- justinverstijnen.nl
- justinverstijnen.com
- justinverstijnen.tech
We must configure this 3 times.
Let’s login to our DNS hosting for the domain, and create the record:

Then save your configuration and wait for a few minutes.
Let’s test the configuration
Now that our DNS record is in place, we can test this by again, typing our email address into the application:
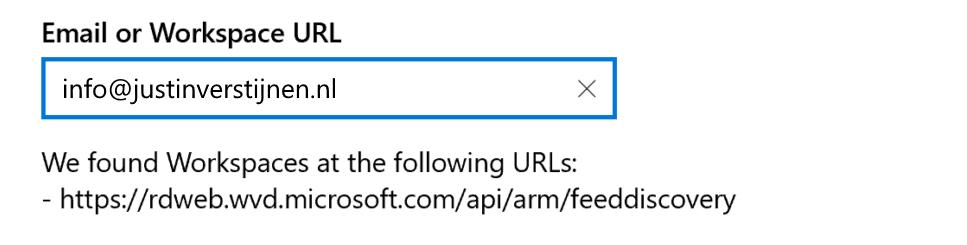
Now the application automatically finds the domain and imports the feed discovery URL into the application. This minor change solves a lot of headache.
Summary
Creating this DNS record saves a lot of problems and headache for users and administrators of Azure Virtual Desktop and/or Windows 365. I hope I explained clearly how to configure this record and described the problem.
Sources
These sources helped me by writing and research for this post;
Thank you for visiting this website!
End of the page 🎉
You have reached the end of the page. You can navigate through other blog posts as well, share this post on X, LinkedIn and Reddit or return to the blog posts collection page. Thank you for visiting this post.
If you think something is wrong with this post or you want to know more, you can send me a message to one of my social profiles at: https://justinverstijnen.nl/about/
If you find this page and blog very useful and you want to leave a donation, you can use the button below to buy me a beer. Hosting and maintaining a website takes a lot of time and money. Thank you in advance and cheers :)
The terms and conditions apply to this post.
Solved - Windows Store applications on FSLogix/Azure Virtual Desktop
By default, Microsoft Store applications are not supported when using FSLogix. The root cause is that Windows stores some metadata that…
By default, Microsoft Store applications are not supported when using FSLogix. The root cause is that Windows stores some metadata that is not roamed in the profile folder and cleared at every new logon. You will encounter this behaviour in every environment where you use FSLogix.
Now a long time I told our end users that there unfortunately is no solution possible to download apps and make them persistent across Azure Virtual Desktop sessions but someday I found a workaround to this problem. I will explain this at this page.
Requirements
- Around 15 minutes of your time
- An Azure Virtual Desktop or Remote Desktop Services environment with FSLogix
- Some basic knowledge about Windows, Azure and Active Directory
- Session host must have winget installed
Default behaviour and why applications disappear
So the problem with Microsoft Store applications on any FSLogix based system is that the application can be installed like expected and they will work. After signing out of the session and logging in again, the applications will be gone. Under water, the applications are still installed on the computer, only Windows doesn’t know to show them to the user.
The fun fact is, the application data is stored in the user profile. You can test this by for example download the application WhatsApp and login to your WhatsApp account. Log off the machine and sign in again. Download the application and you will be logged into WhatsApp automatically.
So, the application manifest of Windows which contains what applications are available to the user cleans up after logging out, but the data is persistent.
Solution to make Microsoft Store apps persistent
Now that we know more about the underlying problem, we can come to a solution to it. My solution is relatively simple; a log-on script that uses winget and installs all the needed packages at sign in of the user. This also has some advantages because we of IT are in control what people and install or not. We can completely disable the Microsoft Store and only use this “allowed” packages.
For installing this Microsoft Store applications, we use Winget. This is a built-in (from 24H2) package manager for Windows which can download and install these applications.
Step-by-step guide
We can for example install the WhatsApp Microsoft Store application with Winget with the following command:
POWERSHELL
winget install 9NKSQGP7F2NH --silent --accept-package-agreements --accept-source-agreementsFor installing applications, we have to define the Id of the package, which is 9NKSQGP7F2NH for WhatsApp. You can lookup these Id’s by using your own command prompt and run the following command:
POWERSHELL
winget search *string*Where *string* is of course the application you want to search for. Let’s say, we want to lookup WhatsApp:
POWERSHELL
winget search whatsapp

Agree: Y

Name                            Id                            Version         Match         Source
---------------------------------------------------------------------------------------------------
WhatsApp                        9NKSQGP7F2NH                  Unknown                       msstore
WhatsApp Beta                   9NBDXK71NK08                  Unknown                       msstore
Altus                           AmanHarwara.Altus             5.5.2           Tag: whatsapp winget
Beeper                          Beeper.Beeper                 3.110.1         Tag: whatsapp winget
Wondershare MobileTrans         Wondershare.MobileTrans       4.5.40          Tag: whatsapp winget
ttth                            yafp.ttth                     1.8.0           Tag: whatsapp winget
WhatsappTray                    D4koon.WhatsappTray           1.9.0.0                       winget
Here you can find the ID where we can install WhatsApp with. We need this in the next step.
Creating the login script
Now the solution itself consists of creating a logon script and running this on login.
First, put the script in .bat or .cmd format on a readable shared network location, like a server or on the SYSVOL folder of the domain.
Then create a Group Policy with an start-up script that targets this script and launches it on startup of the PC. You can do that here:
User Configuration -> Policies -> Windows Settings -> Scripts (Logon)
Add your network added script there. Then head over to your AVD application.
Testing the login script
After succesfully logging in to Azure Virtual Desktop (relogin required after changing policy), our applications will be available and installed in the background. After around 30 seconds you can find the applications in the start menu.
Fun fact is that the data is stored in the profile, so after installing the app it can be used directly and with the data from an earlier login.
Summary
Now this guide shows how I solved the problem of users not able to use apps on Azure Virtual Desktop without re-installing them every session.
In my opinion, I think its the best way to handle the applications. If the application has an option to install through a .exe or .msi file, that will work much better. I use this only for some applications that can be downloaded exclusively from the Windows Store.
Sources
These sources helped me by writing and research for this post;
End of the page 🎉
You have reached the end of the page. You can navigate through other blog posts as well, share this post on X, LinkedIn and Reddit or return to the blog posts collection page. Thank you for visiting this post.
If you think something is wrong with this post or you want to know more, you can send me a message to one of my social profiles at: https://justinverstijnen.nl/about/
If you find this page and blog very useful and you want to leave a donation, you can use the button below to buy me a beer. Hosting and maintaining a website takes a lot of time and money. Thank you in advance and cheers :)
The terms and conditions apply to this post.
Optimize Windows 11 for Azure Virtual Desktop (AVD)
When using Windows 11 on Azure Virtual Desktop (AVD) - without the right optimization - the experience can be a little lagg..
When using Windows 11 on Azure Virtual Desktop (AVD) - without the right optimization - the experience can be a little laggy, stuttery and slow. Especially when you came from Windows 10 with the same settings. You definitely want to optimize some settings.
After that we will look into the official Virtual Desktop Optimization Toolkit (VDOT).
Introduction to the Group Policy template
Assuming you run your Azure Virtual Desktop environment by using the good old Active Directory (AD DS), you can manage the hosts with Group Policy.
To help you optimizing the experience on Windows 11, I have a predefined group policy available with lots of settings to help optimizing your Windows 11 session hosts. This group policy follows the official Microsoft best practices, alongside with some of my own optimizations which has been proven good in production.
What this Group Policy does
This group policy does the following:
- Disables visual effects
- Disables transparency effects
- Disables shadows
- Disables other animations or CPU/GPU intensive parts not needed on RDP sessions
- Disables Cortana
- Disables redirected printers to be default
- Enables Timezone redirection from client to host (user sees time based on his client-side settings)
- Disables storage sensing
- Disables Taskview button in taskbar
- Places the start button on the left (most users prefer it on the left, not in the center)
- Enables RDP Shortpath when not already enabled (better performance and less latency)
- Verbose messages in Event Viewer
- Turn off Windows Autopilot
- Trust local UNC paths
- Google Chrome optimizations
How to install this Group Policy template
You can install this group policy by following the steps below;
- Download the zip file at the end of the page with contains a .ps1 scipt, GPO list and the GPO itself.
- Extract the zip file
- Run the .ps1 file in the zip
- In your current folder, do a shift+richt click and select “Open Powershell window”
If you have to change your Powershell Execution Policy, use Set-ExecutionPolicy Unrestricted -Scope Process and then run your script. This bypasses the execution policy for only the duration of that Powershell window.
After succesfully running the script, the GPO will be available in the Group Policy Management console;
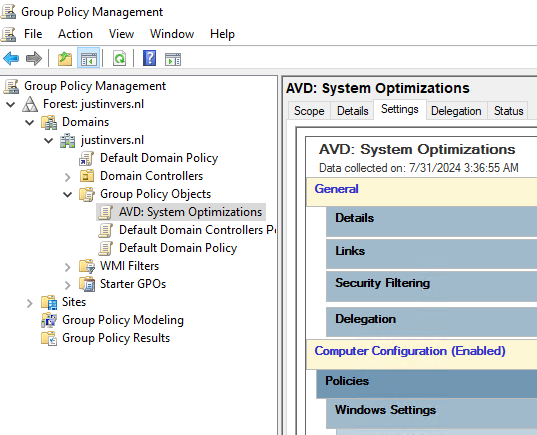
You are free to link the GPO to each OU you want but make sure it will not directly impact users or your service.
Tips when using this Group Policy
Managing AVD session hosts isn’t only enabling settings and hoping that it will reach its goal. It is building, maintaining and securing your system with every step. To help you building your AVD environment like a professional, i have some tips for you:
- Put your AVD session hosts in a seperate OU
- Better for security and maintainability, and you can link this group policy to your sessio hosts OU
- Use Group Policy Loopback Processing mode “Merge”
- Create a single GPO in your session hosts OU and set the group policy processing mode to “Merge”. This will ensure that your computer and user settings are merged.
- Carefully review all settings made by this GPO
- Test the change before putting into production
You can download the package from my Github (includes Import script).
Virtual Desktop Optimization Tool (VDOT)
Next to my template of performance GPO’s we can use the Virtual Desktop Optimization Tool (VDOT) to optimize our Windows images for multi-session hosts. When using Windows as multi session, we want to get the most performance without overshooting the resources which will result in high operational costs.
This tool does some deep optimizations for user accounts, processes and threads the background applications use. Let’s say that we have 12 users on one VM, some processes are running 12 times.
Download the tool and follow the instructions from this page:
Download Virtual Desktop Optimization Tool
When creating images, it is preferred to run the tool first, and then install the rest of your applications and changes.
Summary
This group policy is a great wat to optimize your Windows 11 session hosts in Azure Virtual Desktop (AVD) and Windows 365. This does disable some stuff that really uses some computing and graphical power which you don’t want in performance-bound situation like remote desktop. Those can feel laggy and slow really fast for an end user.
I hope I helped you optimizing your Windows 11 session hosts and thank you for reading and using my Group Policy template.
End of the page 🎉
You have reached the end of the page. You can navigate through other blog posts as well, share this post on X, LinkedIn and Reddit or return to the blog posts collection page. Thank you for visiting this post.
If you think something is wrong with this post or you want to know more, you can send me a message to one of my social profiles at: https://justinverstijnen.nl/about/
If you find this page and blog very useful and you want to leave a donation, you can use the button below to buy me a beer. Hosting and maintaining a website takes a lot of time and money. Thank you in advance and cheers :)
The terms and conditions apply to this post.