All pages referring or tutorials for Microsoft Secure Score.
Microsoft Secure Score - Devices
On this page, I will describe how I implemented my current Microsoft Secure Score on the Devices pillar. This means altering mostly the…
On this page, I will describe how I implemented my current Microsoft Secure Score on the Devices pillar. This means altering mostly the options of Microsoft Defender and Intune.
Before we begin
I collected all the options of the Microsoft Device Secure Score on this page, and we will address them all. I also added some industry-accepted options which are not in the secure score framework but are really helpful in avoiding or minimizing attacks in your environment.
You can use all options, or only use a subset of the options. This is up to you :)
Remember, having a secure score of 100% doesn’t mean 100% security. This only means you are using 100% of the security toolbox.
Starting this page, my Secure Score for Devices overview is already at 80% (due to strict policies I already created myself to play around):
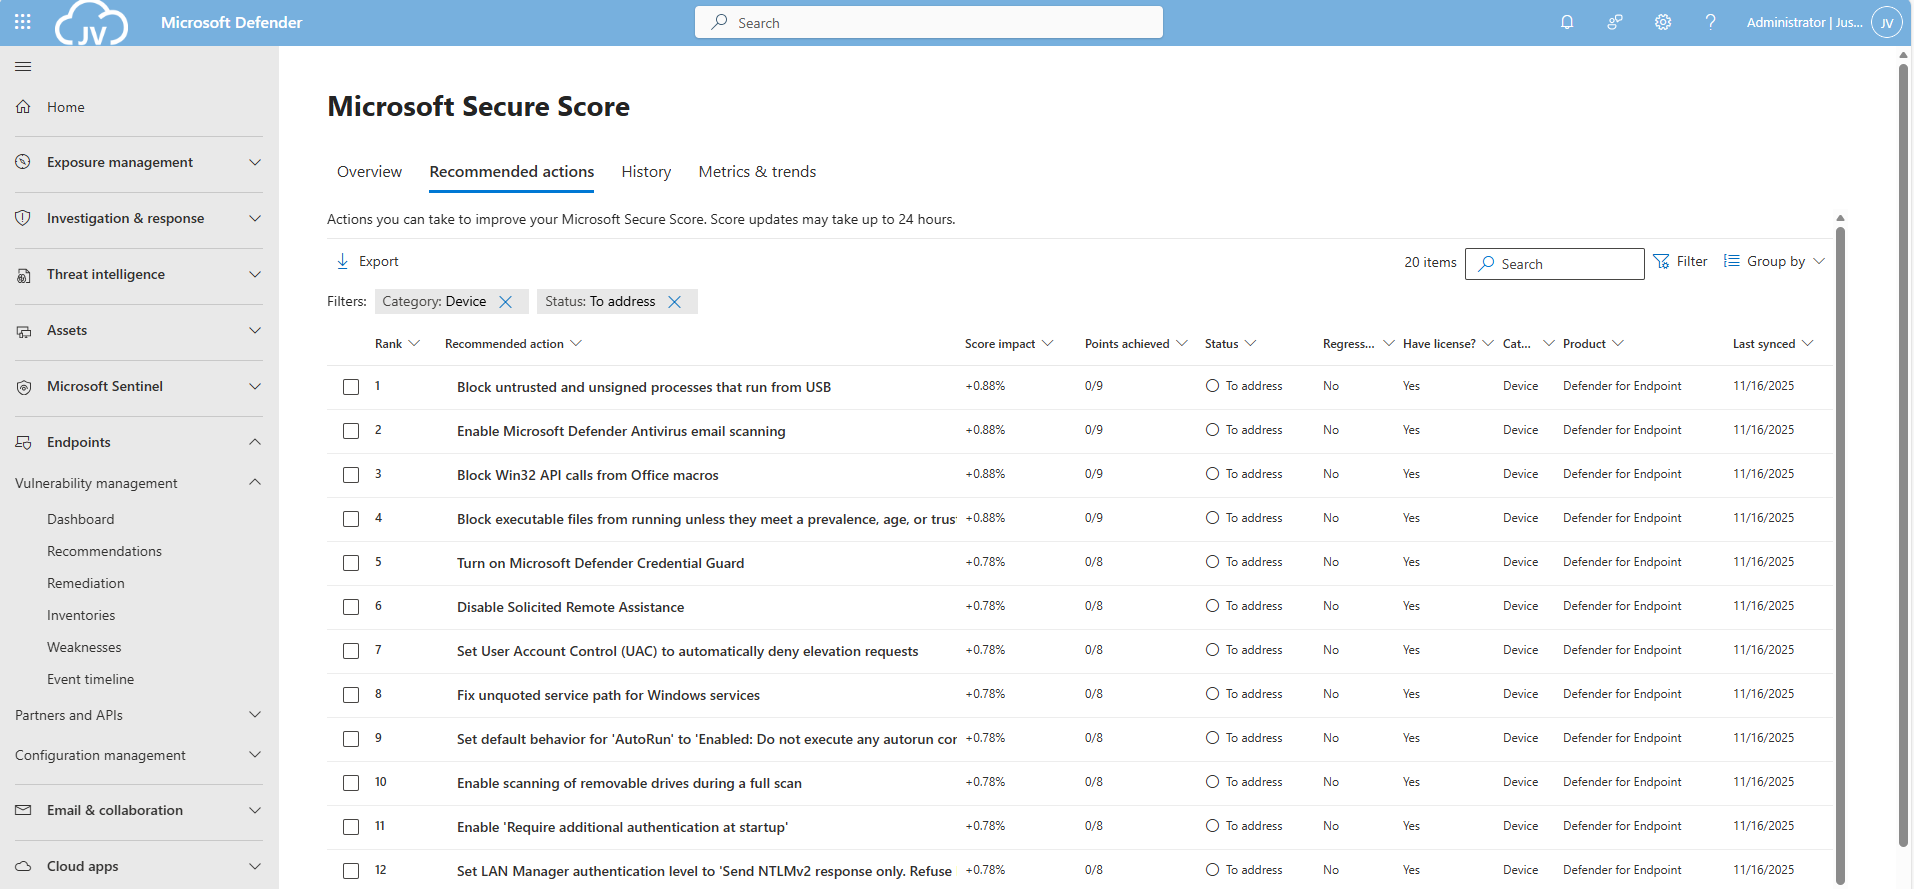
The recommendations to address:
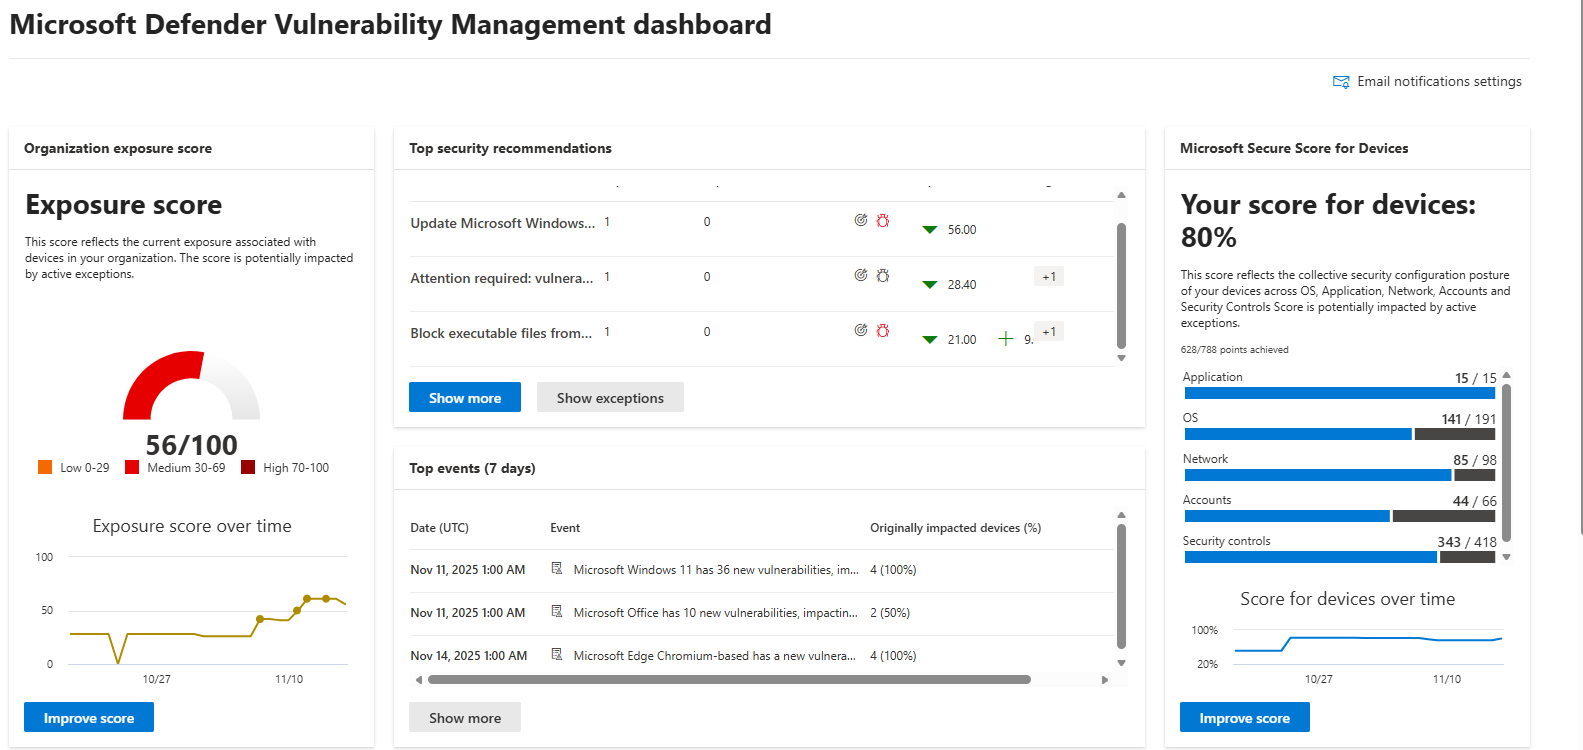
The current recommendations that I have to address are 20 of the 104 total items:
For the devices pillar, we have the Endpoints/Vulnerability Management overview which also gives us the action to take to resolve them: https://security.microsoft.com/security-recommendations
Addressing the recommendations
On this page, I will show how to address the recommendations of the Microsoft Device Secure Score. You can choose which items to implement, if you want to use one or multiple policies and such. I will put everything in a single policy and will export the policy for your use.
It may be very boring to do this by hand, but is actually very useful to learn. I am sorry for the bitwhat boring page this time, but my focus is on the reader to set all settings easily.
Task 1: Update Windows
The first recommendation was to update Windows. This was indeed the case for my device:
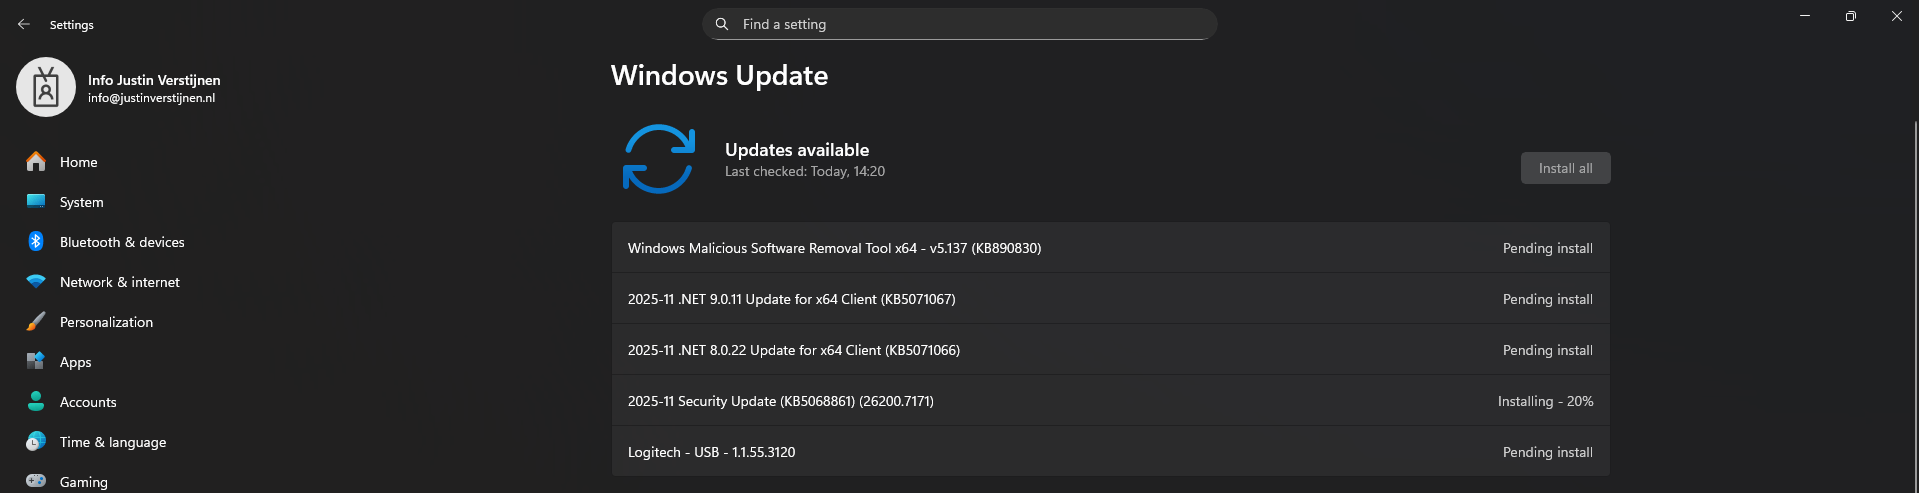
This is pretty straight forward and doesn’t need further explaination I think. You can automate this process using Windows Update Rings in Intune.
Task 2: Disable the local storage of passwords and credentials
This recommendation states we may not store credentials locally, actually disabling the Windows Credential Manager on your devices.
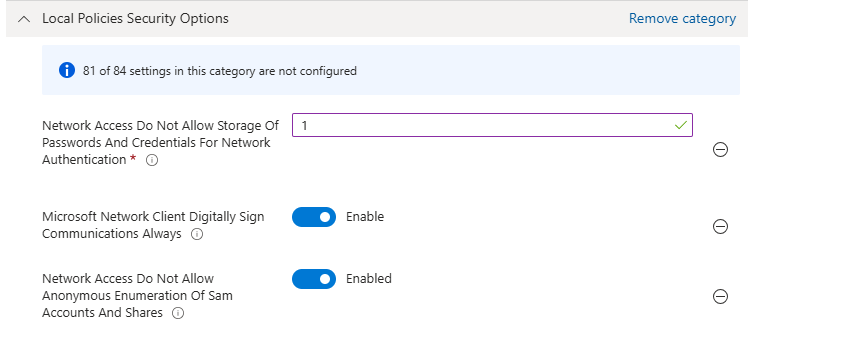
Open Microsoft Intune, create a new policy for Windows or use an existing one and find this option:

Select the setting, and then set it to “1” to enable forbidding to store credentials.
Save the policy and assign this to your devices.
Task 3: Set IPv6 source routing to highest protection
This recommendation wants us to set IPv6 source routing to the highest protection. This means IPv6 source routing is locked down to the highest level, blocking source-routed packets so attackers can’t influence how traffic moves through the network.
You can achieve this by searching for this option:
- DisableIPSourceRouting IPv6
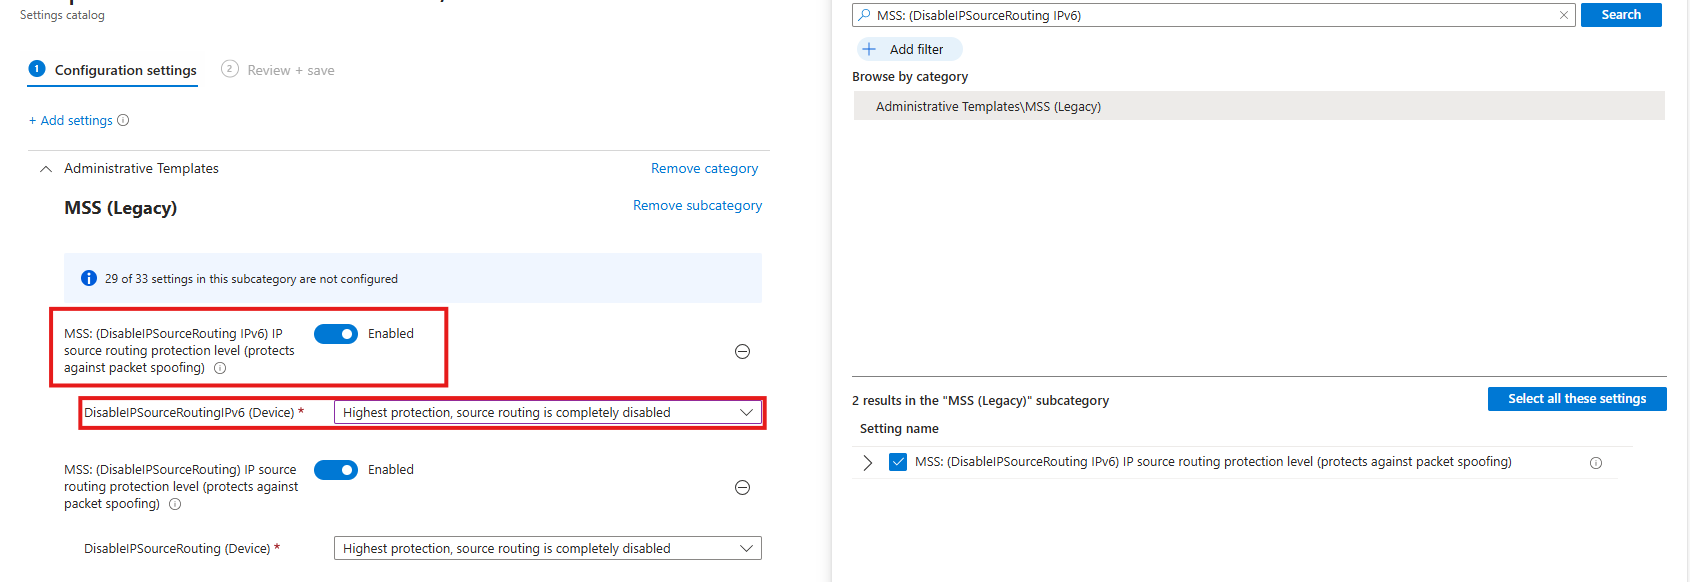
Then select the option and enable it, then set it to the highest protection as the recommendation states.
Task 4: Enable ‘Apply UAC restrictions to local accounts on network logons’
This recommendation wants us to apply restrictions on User Account Control to local accounts. Extra UAC checks are applied to local accounts when they log in over the network, limiting their permissions and reducing the risk of misuse or lateral movement.
You can find this setting by searching for:
- Apply UAC restrictions to
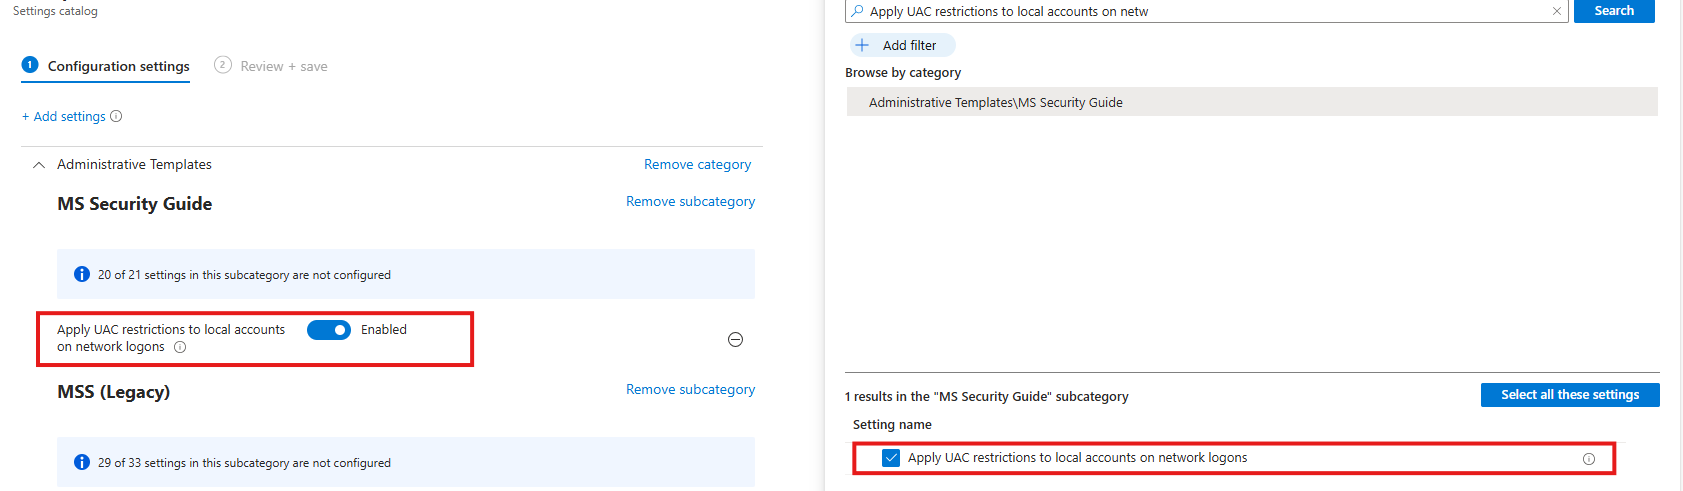
Select the option on the right and then enable it on the left.
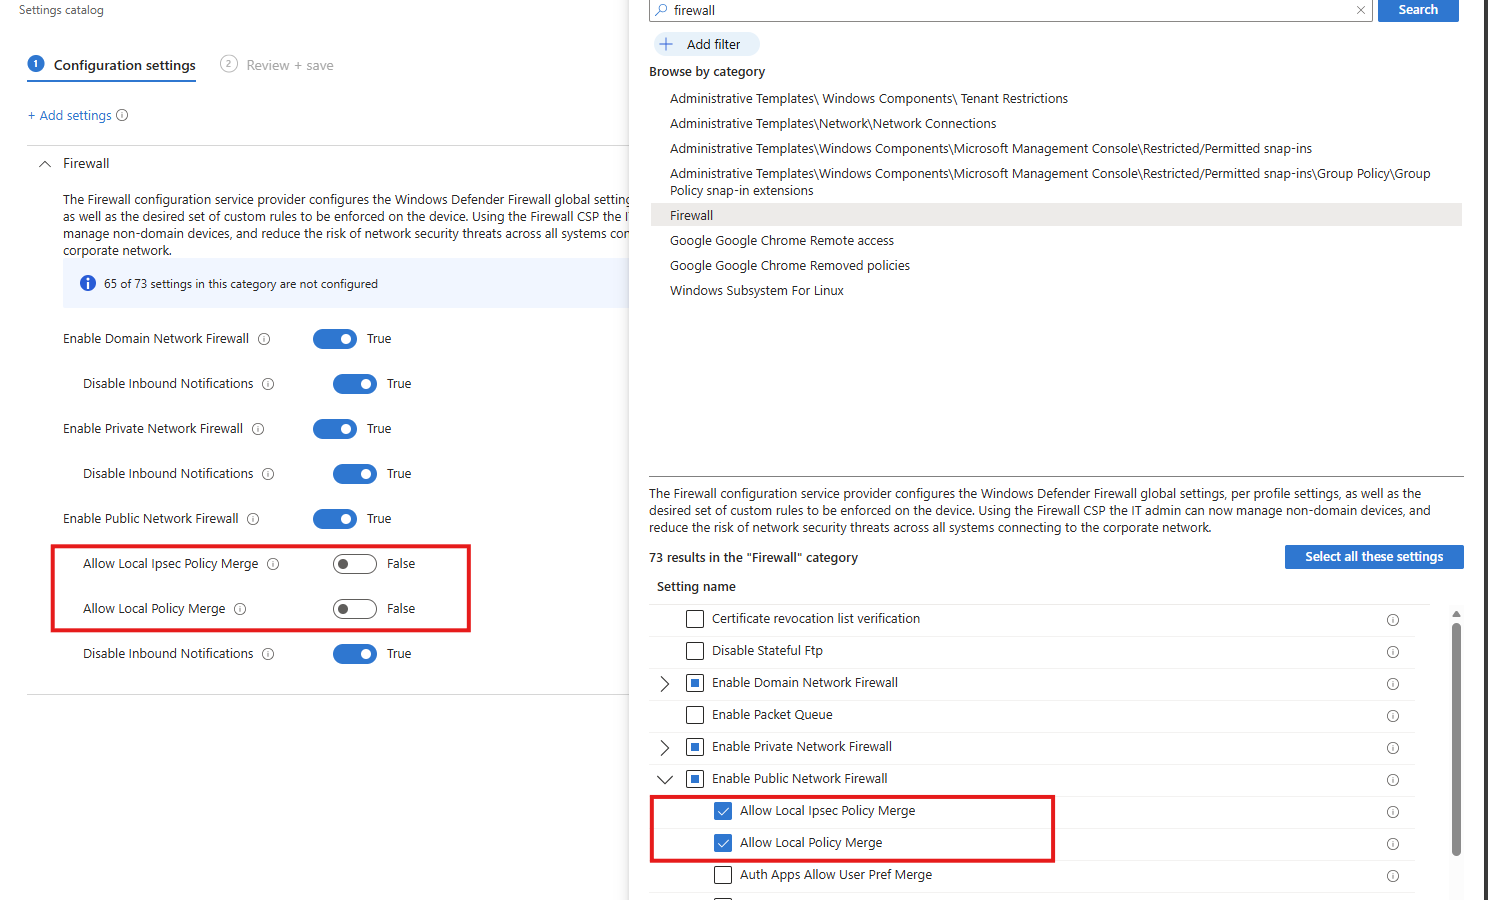
Task 5: Disable merging of local Microsoft Defender Firewall rules with group policy firewall rules for the Public profile
This recommendation wants us to disable merging of Windows Firewall rules. Local Microsoft Defender Firewall rules are ignored for the Public profile, so only centrally managed Group Policy rules apply, preventing users or apps from weakening firewall protection.
Search for the Windows Firewall settings, and select these two settings:
- Allow local Ipsec Policy Merge: Disable
- Allow local policy merge: Disable
Task 6: Enable scanning of removable drives during a full scan
This recommendation wants us to enable Windows Defender to scan removable devices after they are connected. They also can contain malicious files or software and we don’t want to be compromised that way.
Search for:
- Scan removable devices
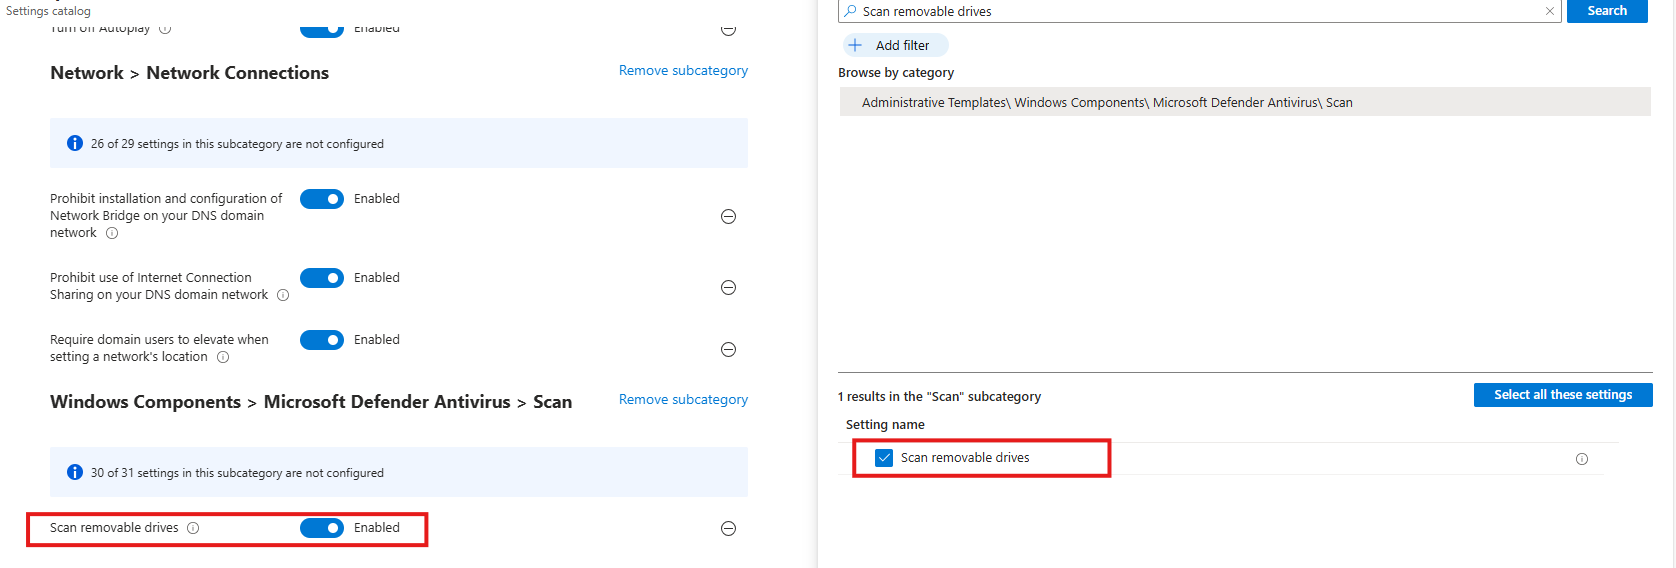
Select the option on the right and then enable it on the left.
Task 7: Disable Solicited Remote Assistance
This recommendation wants us to disable Remote Assistance without user intervention. Solicited Remote Assistance is disabled to prevent users from granting remote access to their system, reducing the attack surface and the risk of unauthorized control or social-engineering abuse.
Search for:
- Configure Solicited Remote Assistance
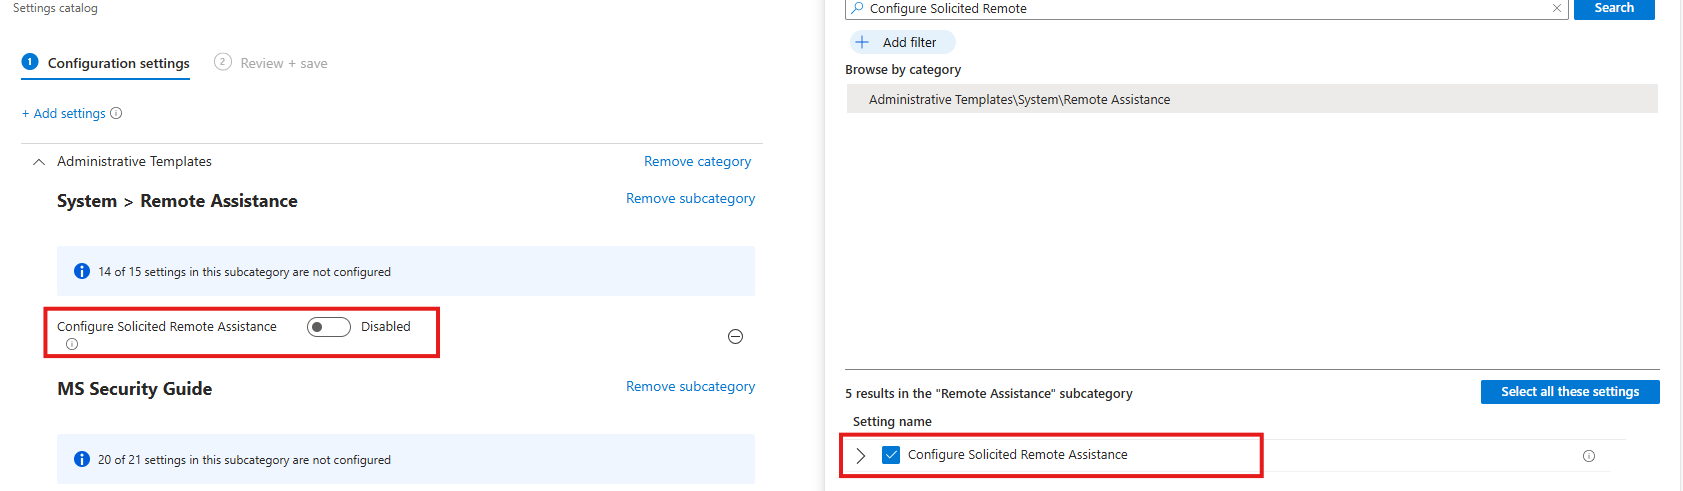
Select the option on the right and then disable it on the left.
Task 8: Network Security LAN Manager Authentication Level
This recommendation wants us to disable LM and NTLM authentication methods, forcing the use of stronger, modern authentication methods and reducing exposure to credential theft, relay, and downgrade attacks.
Search for:
- Network Security LAN Manager Authentication Level
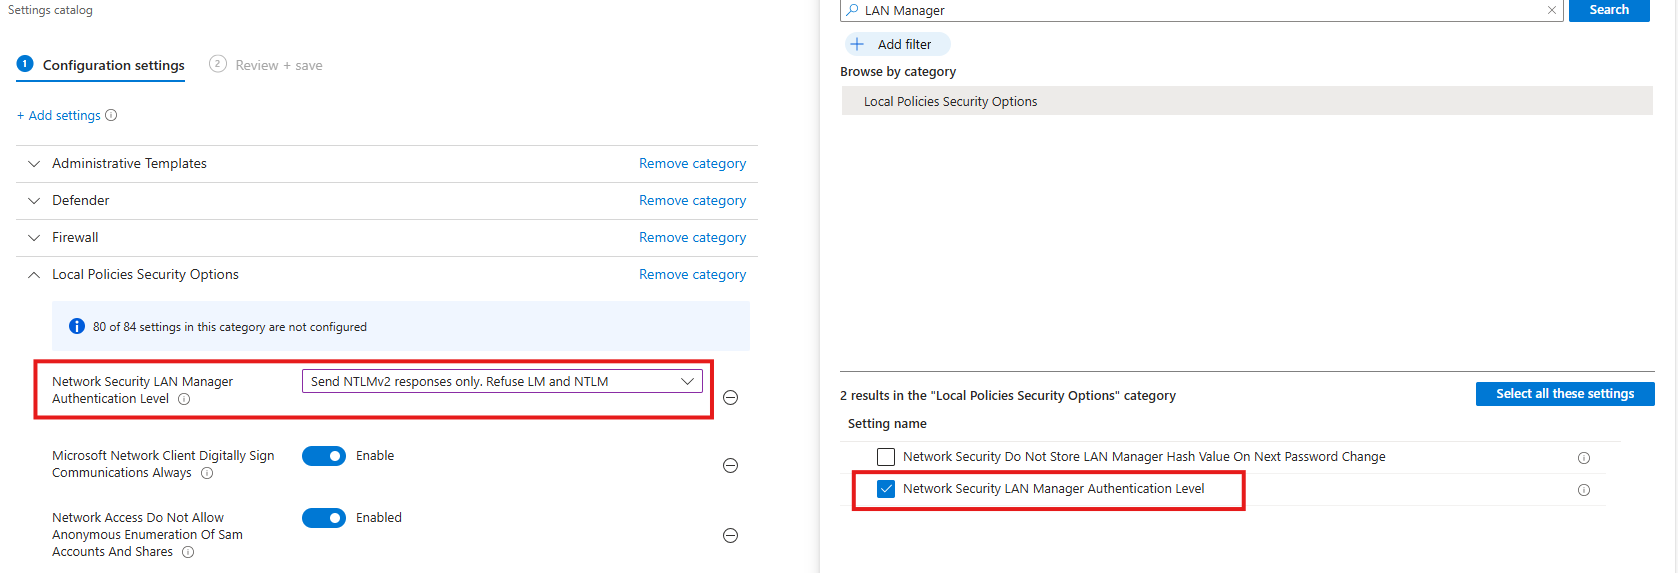
Select the option on the right and then select “Send NTLMv2 responses only. Refuse LM and NTLM”.
Task 9: Set default behavior for ‘AutoRun’ to ‘Enabled: Do not execute any autorun commands’
This recommendation wants us to set the AutoRun behaviour to “Disabled”. AutoRun is configured to block all automatic execution of commands from removable or external media, preventing malware from running automatically without user interaction.
- Search for Autoplay
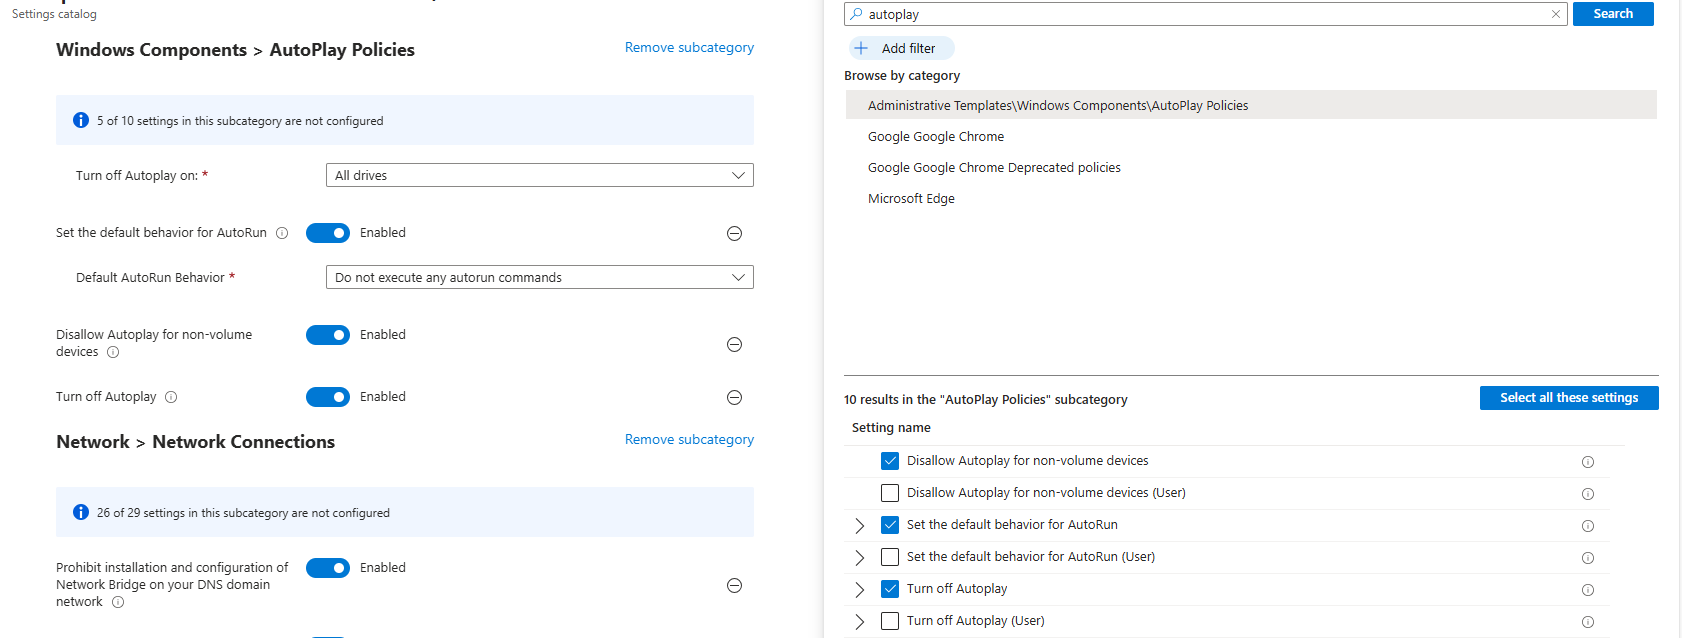
Then set the settings as follows:
- Turn off Autoplay on: All drives
- Set the default behaviour for AutoRun: Enabled
- Default AutoRun Behaviour: Do not execute any autorun commands
- Disallow Autoplay for non-volume devices: Enabled
- Turn off autoplay: Enabled
This might sound strange, but yea, we have to actually enable some settings to fully disable the feature.
Task 10: Block untrusted and unsigned processes that run from USB
This recommendation wants us to block untrusted and unsigned processes from running when launched from USB devices, reducing the risk of malware execution and unauthorized code running from removable media.
- Search for “Block untrusted and unsigned processes that run from USB”
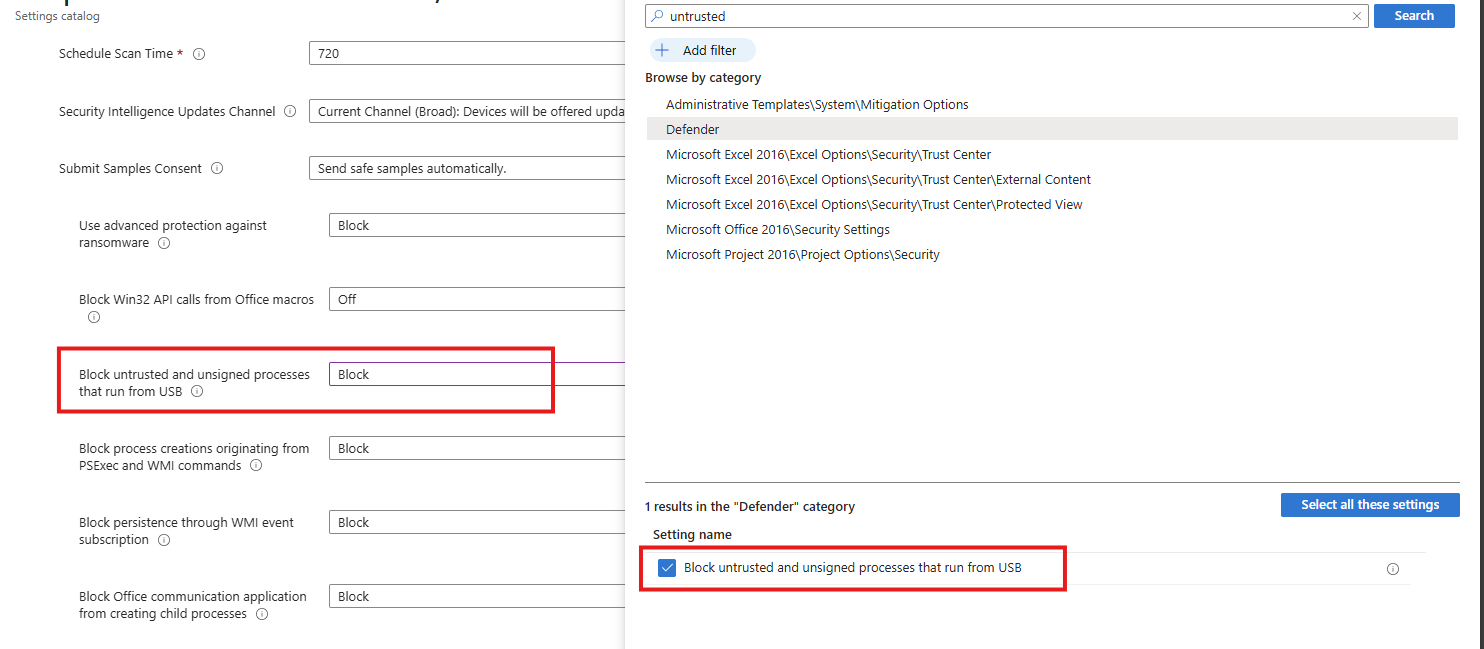
Select the option on the right and then Block it on the left.
Task 11: Enable Microsoft Defender Antivirus email scanning
This recommendation wants us to enable Microsoft Defender for scanning your email messages.
Search for the setting:
- Turn on e-mail scanning
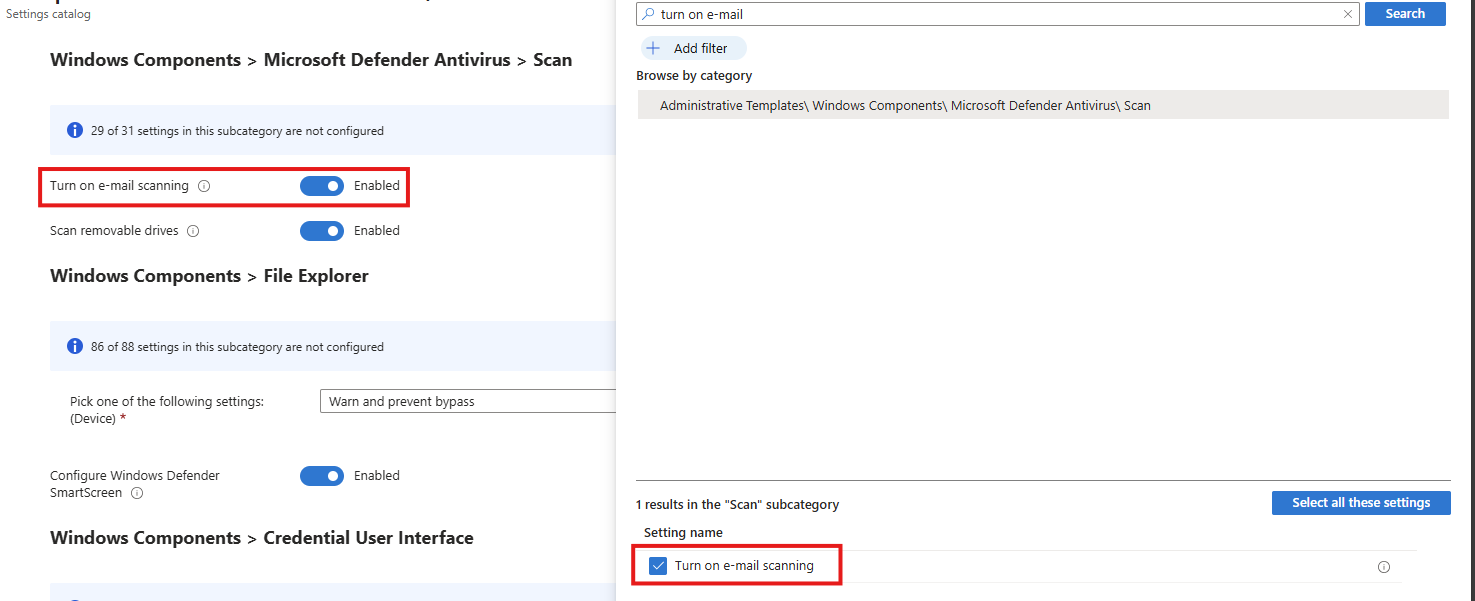
Select the option on the right and then enable it on the left.
Task 12: Block Win32 API calls from Office macros
This recommendation wants us to block Office macros from calling Win32 APIs, limiting their ability to execute system-level actions and significantly reducing the risk of macro-based malware and abuse.
Search for the setting:
- Block Win32 API calls from Office macros
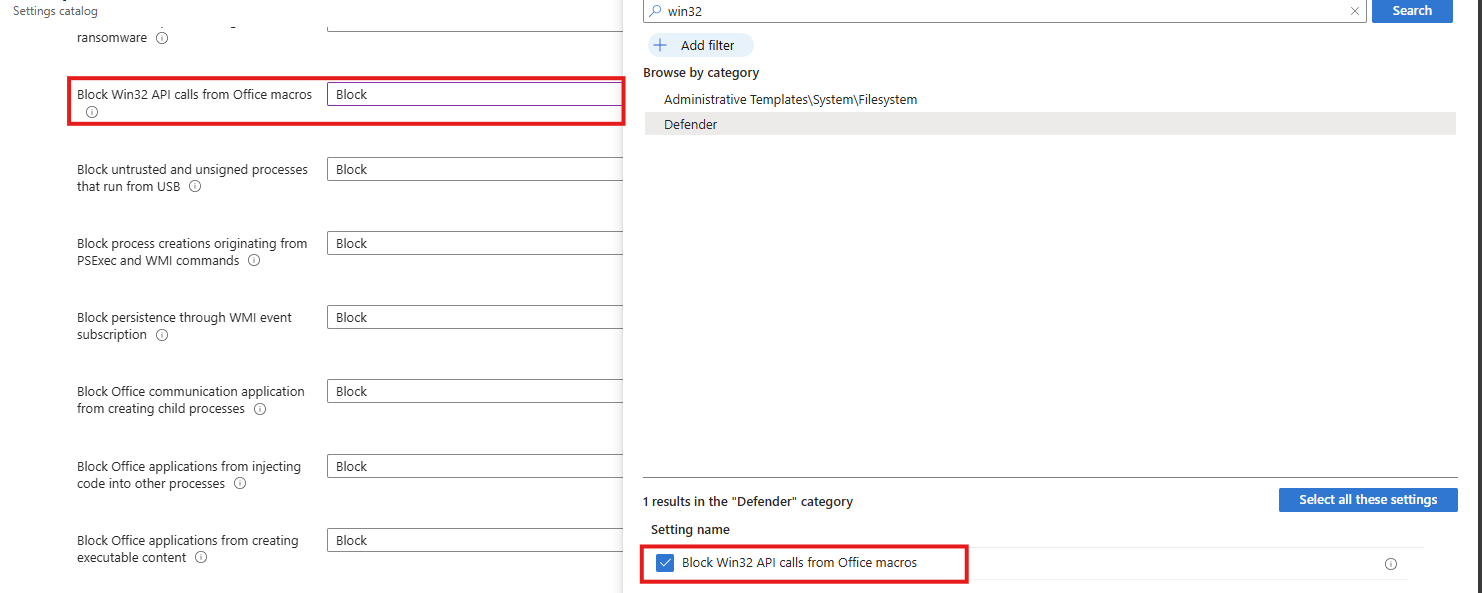
Select the option on the right and then Block it on the left.
Task 13: Block executable files from running
This recommendation wants us to block executable files from running, preventing unauthorized or malicious software from being launched and reducing the risk of malware execution.
Search for the setting:
- Block executable files from running unless they meet a prevalence, age or trusted list criterion
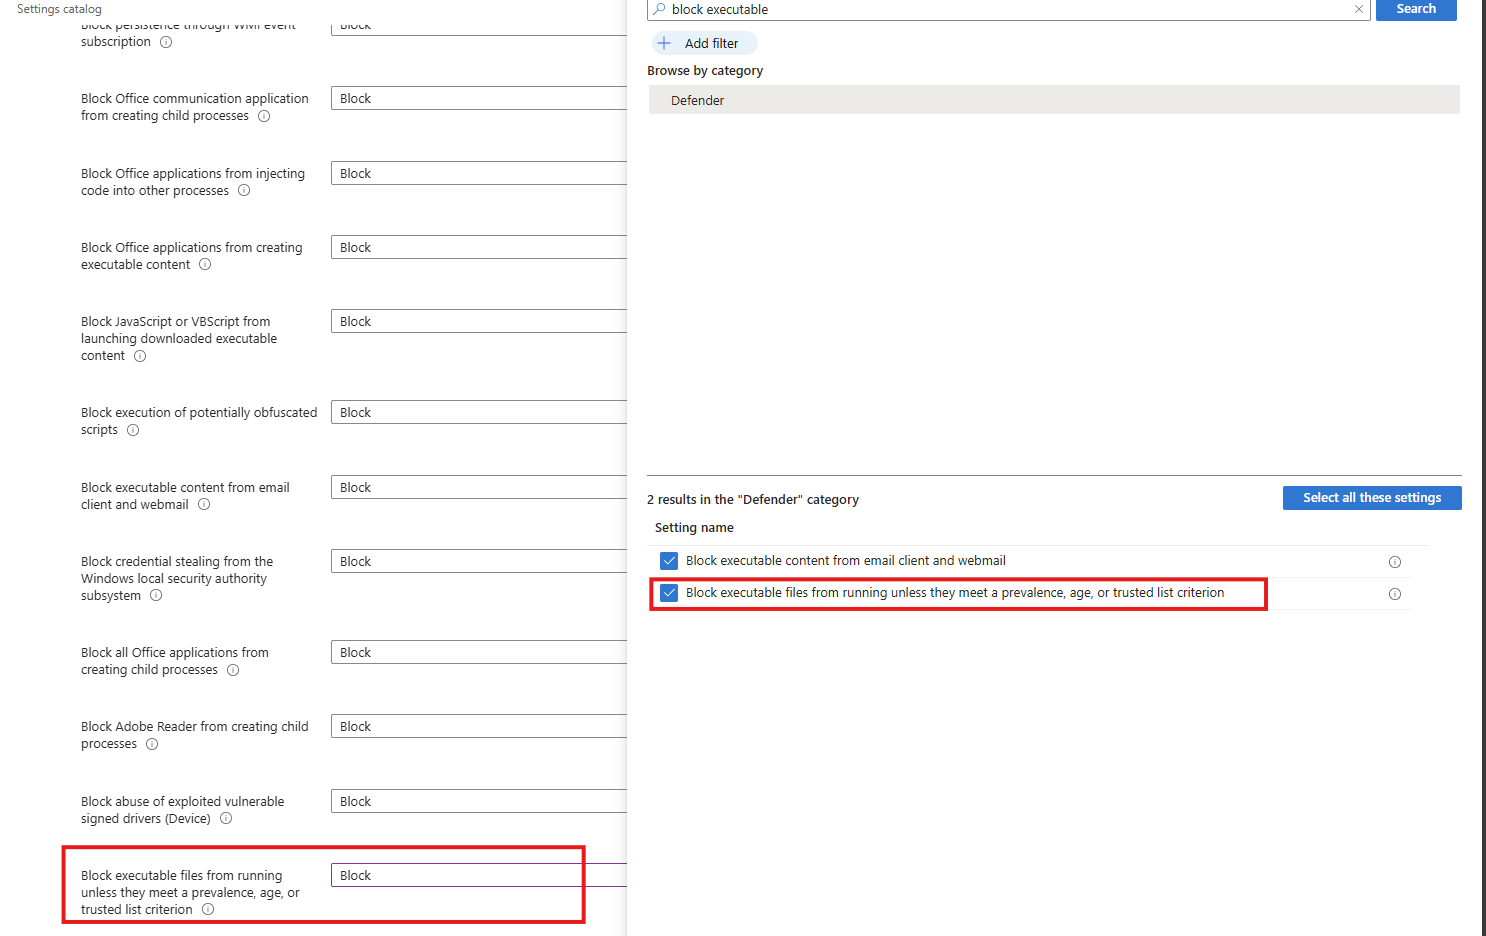
Select the option on the right and then block it on the left.
Task 14: Turn on Microsoft Defender Credential Guard
This recommendation wants us to enable the Microsoft Defender Credential Guard. Microsoft Defender Credential Guard is enabled, isolating credentials in a protected virtualization-based environment to reduce the risk of credential theft from memory by malicious software.
Search for the setting:
- Credential Guard

Select the option on the right and then enable it on the left (with or without UEFI lock)
Task 15: Set UAC to automatically deny elevation requests
This recommendation wants us to configure User Account Control to automatically deny elevation requests for non-admins, preventing users and malware from gaining administrative privileges and reducing the risk of privilege escalation. This blocks windows they don’t have permission to either.
Search for the setting
- User Account Control Behaviour Of The Elevation Prompt For Standard Users
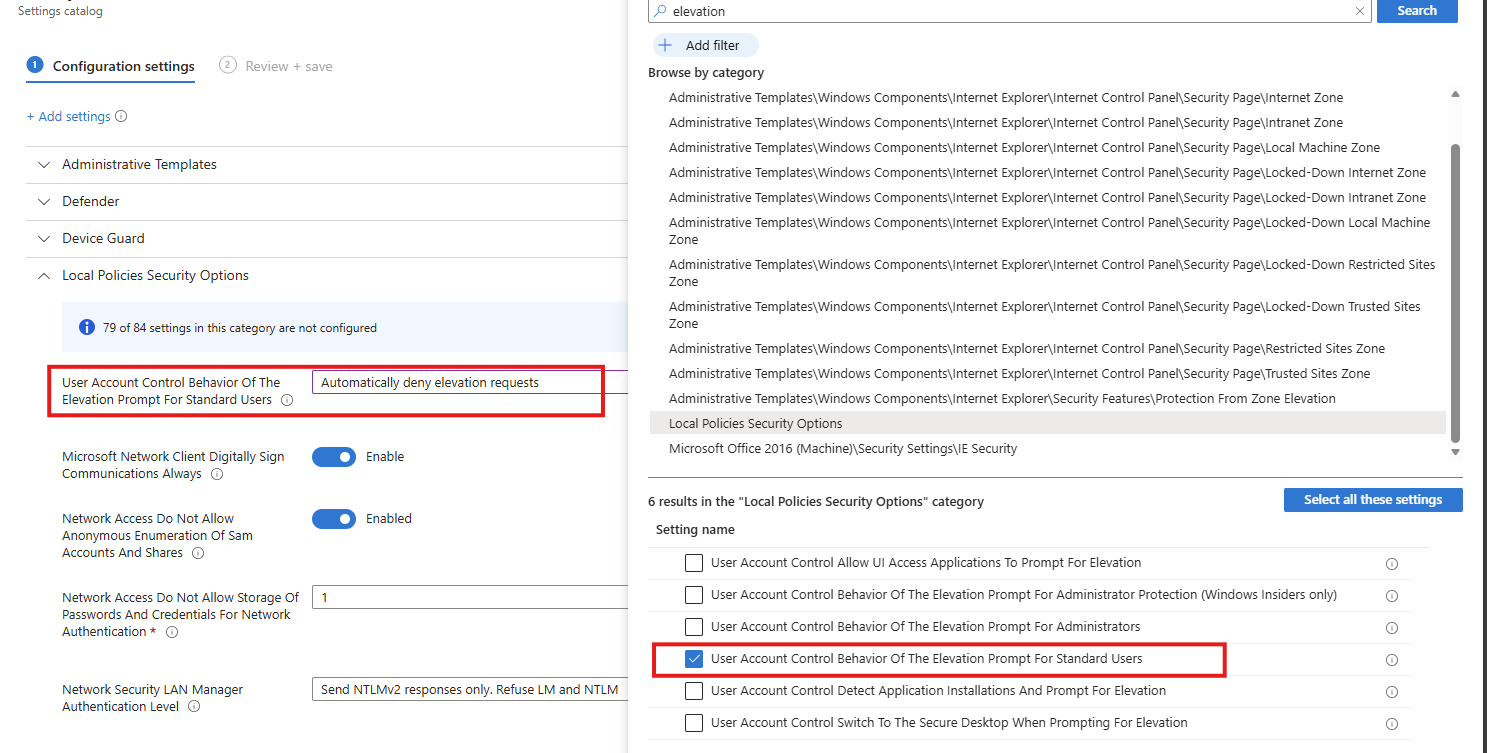
Select the option on the right and then enable it on the left.
Task 16: Enable scanning of removable drives during a full scan
This recommendation wants us to enable removable drives to be included in full antivirus scans, increasing the chance of detecting and blocking malware introduced via USB or other external media.
Search for the setting
- Allow Full Scan Removable Drive Scanning
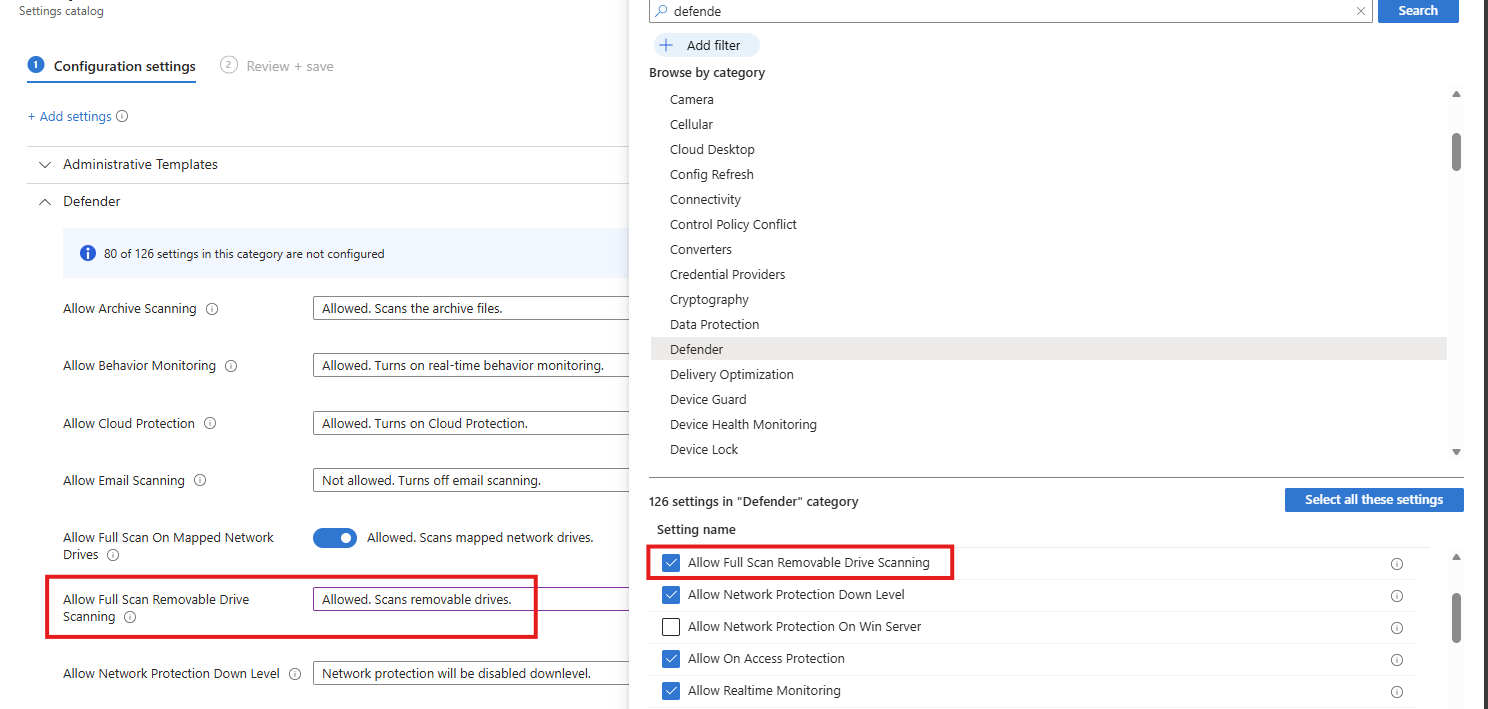
Select the option on the right and then enable it on the left.
Task 17: Enable ‘Require additional authentication at startup’
This recommendation wants us to enable additional authentication to be required at system startup, ensuring the device cannot boot without user verification and reducing the risk of unauthorized access if the device is lost or stolen.
Search for the setting
- Require additional authentication on startup

Select the option on the right and then enable it on the left.
Task 18: Set Minimum PIN length for startup to 6 or more characters
This recommendation wants us to enforce a minimum Windows PIN of 6 characters. A minimum startup PIN length of six characters is enforced, increasing resistance to brute-force and guess-based attacks during pre-boot authentication.
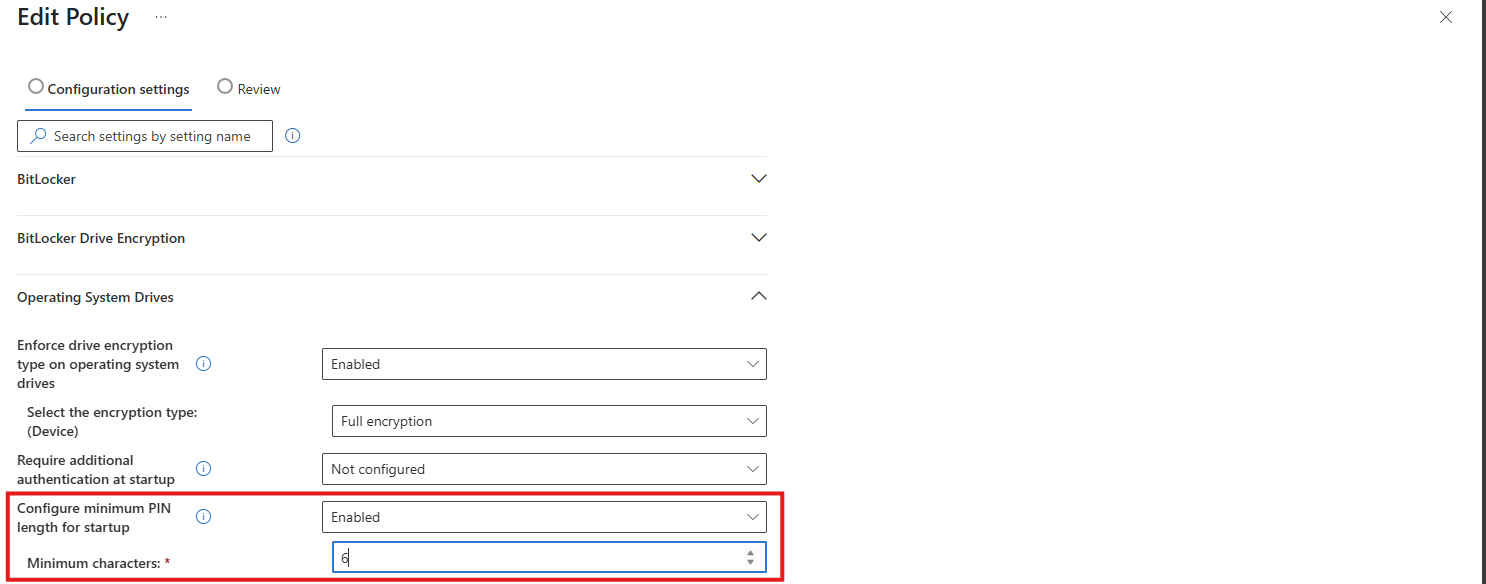
This can be found under the Drive Encryption settings:
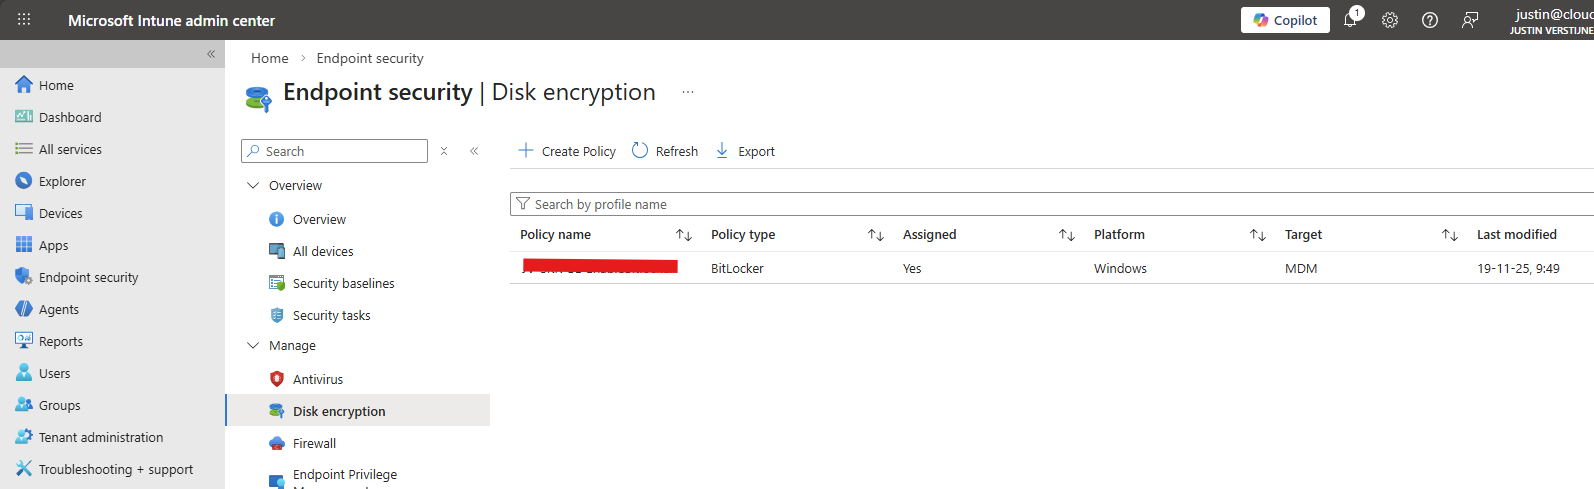
Download my Intune configuration policy
To be generous and if you don’t want to click through the Intune portal, I have my Intune configuration policy here to download:
Download Configuration policy from GitHub
End of the page 🎉
You have reached the end of the page. You can navigate through other blog posts as well, share this post on X, LinkedIn and Reddit or return to the blog posts collection page. Thank you for visiting this post.
If you think something is wrong with this post or you want to know more, you can send me a message to one of my social profiles at: https://justinverstijnen.nl/about/
If you find this page and blog very useful and you want to leave a donation, you can use the button below to buy me a beer. Hosting and maintaining a website takes a lot of time and money. Thank you in advance and cheers :)

The terms and conditions apply to this post.
Microsoft Secure Score - Identity
On this page, I will describe how I implemented my current Microsoft Secure Score on the Identity pillar. This means altering mostly the…
On this page, I will describe how I implemented my current Microsoft Secure Score on the Identity pillar. This means altering mostly the options of Microsoft Entra ID.
Before we begin
I collected all the options of the Microsoft Entra ID Identity Secure Score on this page, and we will address them all. I also added some industry-accepted options which are not in the secure score framework but are really helpful in avoiding or minimizing attacks in your environment.
You can use all options, or only use a subset of the options. This is up to you :)
Remember, having a secure score of 100% doesn’t mean 100% security. This only means you are using 100% of the security toolbox.
Starting this page, my Secure Score overview is this:
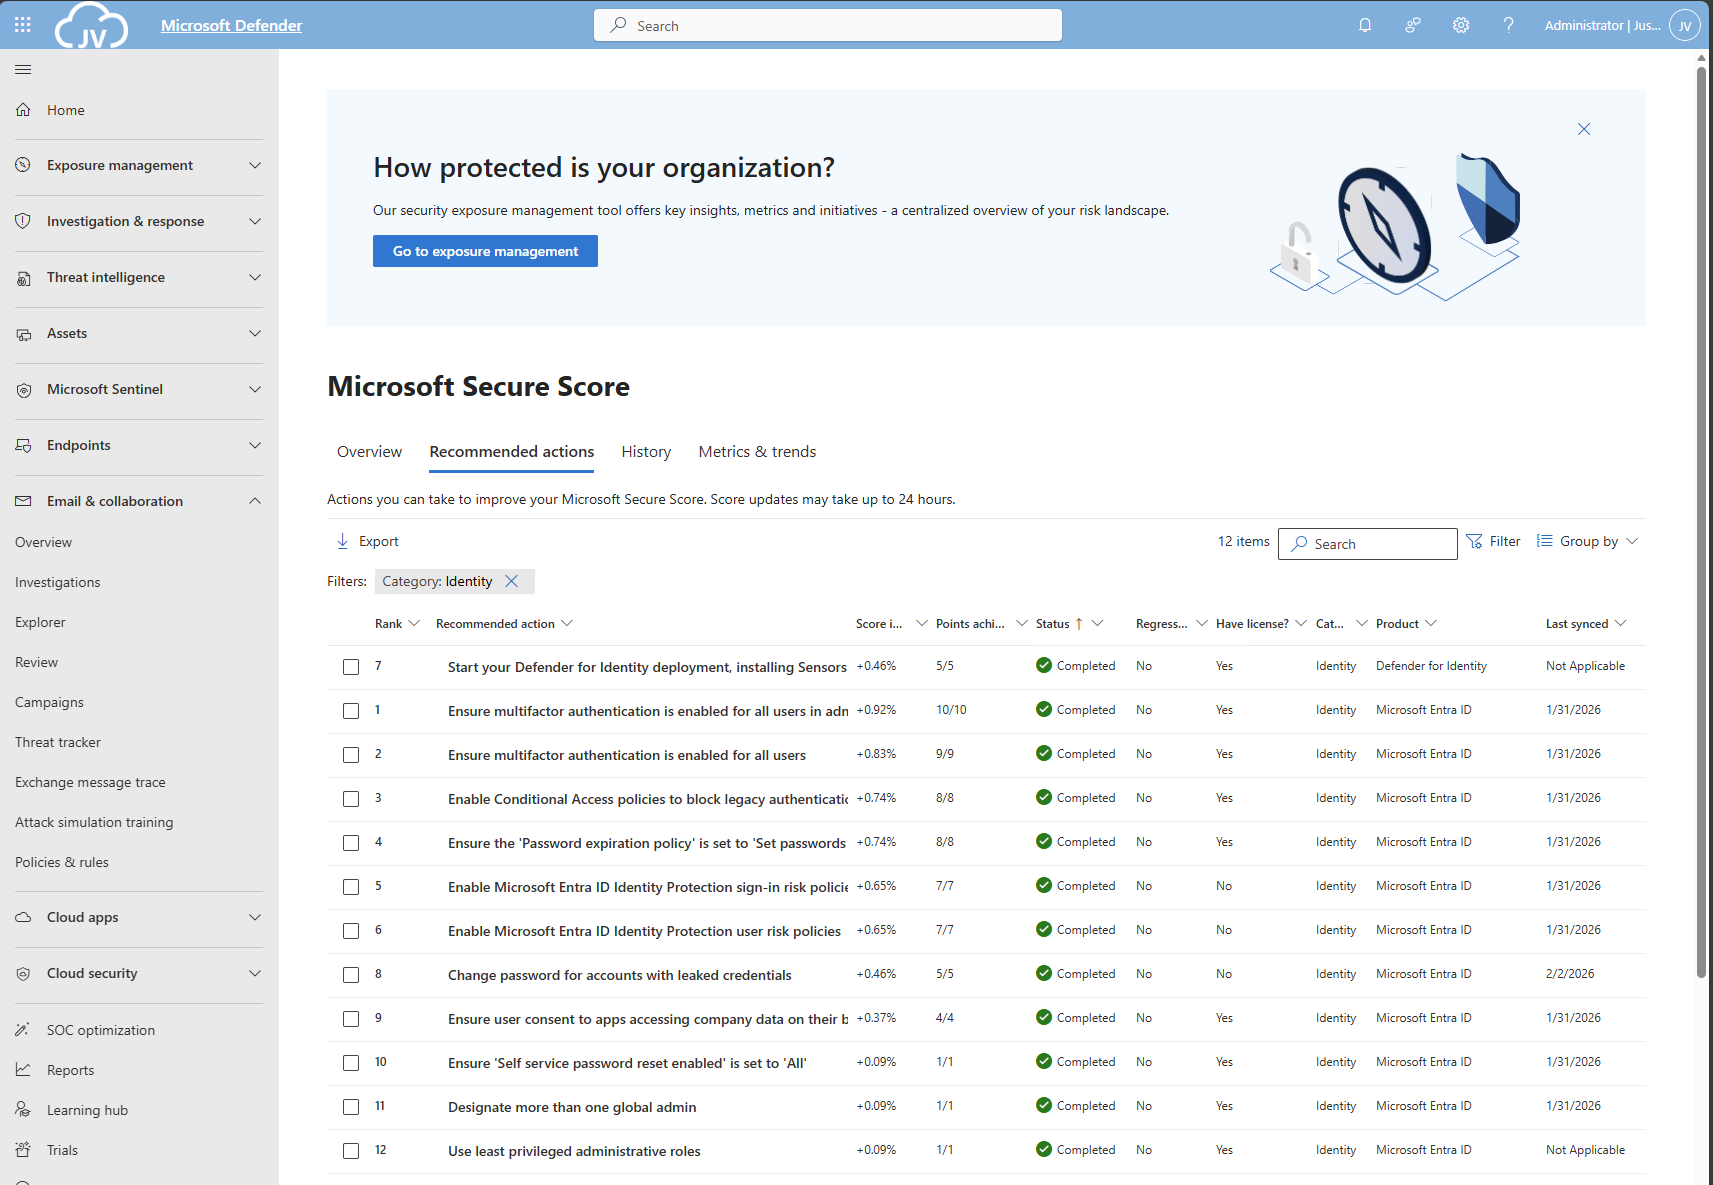
The Microsoft Entra ID recommendations
Let’s check first which requirements we have to address. Go to https://security.microsoft.com/securescore and select Microsoft Entra ID.
We then will get this list of items:
As you can see, the bottom 4 items are already done. The top 4 items must be addressed but I will explain how to address them all.
| Recommendation | Entra Information |
| 1. Enable Microsoft Entra ID Identity Protection sign-in risk policies | Ensure you block Medium and High sign-in risks with Conditional Access |
| 2. Enable Microsoft Entra ID Identity Protection user risk policies | Ensure you block High user risks with Conditional Access |
| 3. Ensure multifactor authentication is enabled for all users | Register MFA for all users and enforce it with Conditional Access. Registering is only making sure the user can use MFA. Enforcing it means we will actually use it. |
| 4. Ensure multifactor authentication is enabled for all users in administrative roles | Pretty straight forward |
| 5. Enable Conditional Access policies to block legacy authentication | Pretty straight forward |
| 6. Use least privileged administrative roles | Use less privileged roles for those who need it. Someone only managing billing options or resetting passwords doesn’t need Global Administrator access. |
| 7. Ensure ‘Self service password reset enabled’ is set to ‘All’ | Make sure everyone is able to reset their password themselves, so they can change it when needed, or enforce users to change them with Conditional Access. |
| 8. Ensure the ‘Password expiration policy’ is set to ‘Set passwords to never expire | Never expire passwords, as users will not select stronger passwords. They will mostly choose their birth month/place of birth and add a ascending number like 1, 2, 3 etc. Also those passwords will appear on post-its on their desk. |
| 9. Change password for accounts with leaked credentials | Entra ID will scan regularly with Identity Protection if users’ passwords are leaked. The users with a leaked password must change their password to be compliant with this recommendation. |
| 10. Ensure user consent to apps accessing company data on their behalf is not allowed | Disable users to have permissions to allow 3rd party apps accessing their data. |
| 11. Designate more than one global admin | Always ensure you have one or two back-up accounts. This is to avoid being locked out. Also always exclude on of the accounts from all policies with a very strong password and use this as “break-glass” account. |
1/2: Create a Risk-based Conditional Access policy
As 1 and 2 are mostly to achieve the same goal, I really like to create one policy to address them both. Go to Microsoft Entra, then to “Security” and then to “Conditional Access”. (or use this link).
First, check the list of users that might be blocked due to the results of this new policy: https://entra.microsoft.com/#view/Microsoft_AAD_IAM/SecurityMenuBlade/~/RiskyUsers/menuId/RiskyUsers/fromNav/
Then proceedd creating the policy.
In my environment, I use a very clear naming scheme for Conditional Access. I start with JV, then state if this policy allows or blocks users and then some more information. I call this new policy “JV-Block-RiskyUsersSignins”.
Create a new policy and name it to your desired naming scheme.
Then select “Users” and include all users.
After that, click on “Exclude”, select “Users and groups” and select your break-glass administrator account to have this account excluded from this policy. This ensures if you make any mistake, you have still access to the tenant with this account. Great recommendation, can save you weeks from support of Microsoft who wants to know in 5 different ways that its actually you.
For “Target Resources”, select “All resources”.
At “Conditions”, select the following options, according to Microsoft’s best practices (source)
- Users risk: High
- Sign-in risk: Medium and High
You can set this more tight, but expect false positives among users who are unable to sign in.
Then at “Grant”, set “Block access”. This ensures if users are at risk they are unable to sign in to their account and they need the skilled helpdesk to regain access to their account. It’s up to the helpdesk to confirm if the account is compromised, to collect sign-in actions, to take action and most of the time enforce a password change.
Now the policy can be created and ready to be enforced:
3/4: Enable Multi Factor Authentication for all users
Make sure you have a Conditional Access policy in place where you enforce Multi Factor Authentication for all users for this to work:
I have a policy in place that requires MFA or sign-in from a compliant device. This generally is a good approach. Make sure to exclude your break-glass administrator from the policy if making errors and/or not having a compliant device and/or having problems with your normal account.
Then proceed by logging into all of your user accounts, go to aka.ms/mfasetup and register at least 2 methods. You can enforce this using a registration policy. Users then must register for MFA otherwise they will be rejected to access any data.
5: Disable Legacy authentication for all users
Microsoft really recommends us to disable legacy authentication for all users, as they are protocols without MFA and any additional security. These are protocols like SMTP/IMAP/POP.
We can actually create one Conditional Access policy to do this. Let’s head back to Conditional Access to create a new policy.
Select “All Users” and exclude your break-glass administrator account.
Select all target resources.
Under “Conditions”, select “Client Apps” and select the options:
- Exchange ActiveSync clients
- Other clients
Then under “Grant”, select “Block access” to block any legacy authentication protocols from being used.
6: Use least privileged administrative roles
Make sure you use lower-privileged administrative roles for your users. This is not particularly a setting but more a process and teamwork to achieve.
Microsoft Entra ID has some lower-privileged roles which we must utilize. I will give some good examples of practice use of lower privileged roles, to minimize the Global Administrator role.
| Requirement | Correct role |
| User must be able to export users for billing purposes | User Administrator |
| User must be able to change licenses and add new products | Billing Administrator |
| User must be able to invite guest users | Guest Inviter |
| User must be able to manage applications and give consent | Cloud Application Administrator |
For a comprehensive list of Entra ID roles, check out this Microsoft page: https://learn.microsoft.com/en-us/entra/identity/role-based-access-control/permissions-reference
7: Ensure Self Service Password Reset (SSPR) is enabled and to all users
Microsoft recommends us that users have the Self Service Password Reset (SSPR) option enabled for all users. You can find this in Microsoft Entra -> Password reset (or use this link: https://entra.microsoft.com/#view/Microsoft_AAD_IAM/PasswordResetMenuBlade/~/Properties/fromNav/
Set this switch to “All” to enable this for all users. After a users logging in after this change, they will have to register for this new feature. Make sure you also set the methods needed to reset a password is “2” to enhance security.
8: Never expire passwords
A good recommendation is to let passwords of users never expire. This was a best practice in IT for around 15 years, but multiple researches pointed out that they will not work. Users will use a weak base password and will only add ascending numbers to that.
To disable this option (which is already disabled by default), go to Microsoft 365 Admin Center.
Then go to “Settings”, “Org settings”, then the tab “Security & privacy” and then search for “Password expiration policy”. Then check the box to disable this option.
9: Change password for accounts with leaked credentials
Microsoft Entra ID Protection will automatically scan for users with leaked credentials. If any user have leaked credentials, the user risk will be “High” and will be blocked by the policy we created in step 1. Changing the password of the user will be enough to give them access again.
You can check pro-actively in this dashboard for risky users or sign ins:
10: Ensure user consent to apps is not allowed
It is generally a good approach to disable users to give 3rd parties access to their profile and organization data. https://entra.microsoft.com/#view/Microsoft_AAD_IAM/ConsentPoliciesMenuBlade/~/UserSettings
- Do not allow user consent (recommended): This makes sure a user cannot give any 3rd party access and is the most restrictive option and also my recommendation.
- Allow user consent for apps from verified publishers, for selected permissions: Really broad setting and not something you want any user to do. Unfortunately, this is the default setting.
- Let Microsoft manage your consent settings: This option means Microsoft can dynamically change this option to new guidelines.
Setting this to “Do not allow user consent” will give your users a prompt where they can request access. Let’s configure that to make sure we have this flow correctly.
Go to “Admin consent settings” and configure the following options:
Select “Yes” to the “Users can request…” option and select users, groups or roles who are able to allow the consent. Then save the new configuration.
Now if users get any request from 3rd party applications, they can do a request to their admins to allow the application:
The request will then popup into this window: https://portal.azure.com/#view/Microsoft_AAD_IAM/StartboardApplicationsMenuBlade/~/AccessRequests/menuId~/null
11: Designate more than one global admin
It’s always recommended to have a break-glass administrator account. Secure this break-glass account in multiple ways, like:
- Have at least 2 accounts
- Have the accounts cloud only -> not synced from Active Directory
- Use the .onmicrosoft.com domain and no license
- Exclude from all Conditional Access policies
- Do not use licenses on Administrator accounts
- Passwords must be at least 64 and max 256 characters
- Avoid “break glass admin” or any tip to a high privileged account
- Register FIDO2 key for the account
- Setup Monitoring for login alerts
- Test the accounts twice per year
Give this administrator account Global Administrator account and only use it as last-resort from accessing your tenant.
Tip 1: Disable manual login of shared mailboxes
Something that is in no Secure Score check, but very important is to block manual sign in of your Shared Mailbox accounts. As we only want to delegate access to those using Manage/SendAs/Send on behalf permissions, we don’t need to expose those accounts.
Open up the Microsoft 365 Admin Center, search for the shared Mailbox and click on “Block Sign-in”.
Tip 2: Disable these user settings
Something that is also in no Secure Score check, is to disable some user settings. By default, simple users have some really high permissions to do certain actions.
In Microsoft Entra Admin Center, go to “Users” and the “User Settings”.
Set the following options:
- User can register applications: No
- Restrict non-admin users from creating tenants: Yes
- Users can create security groups: No
- Guest user restrictions: Most restrictive
- Restrict Access to Microsoft Entra Admin center: Yes
- Show keep user signed in: No
This must look like this for the highest level of security:
Tip 3: Restrict amount of outbound email messages
On this page we did everything to defend ourselves from certain identity attacks. However, being 100% secure is a fairy tale and attackers mostly will break into accounts to send phishing emails, as this must look very legit to other users.
This type of attack is described as such by the MITRE ATTACK framework:
| Category | Technique Name | Technique ID | Notes |
|---|---|---|---|
| Identity Attacks | Credential Harvesting | T1589 / T1557 / T1552 | Used to collect or intercept credentials. |
| Identity Attacks | Valid Accounts | T1078 | Using a compromised legitimate account. |
| Phishing from Compromised Accounts | Internal Spearphishing | T1534 | Sending phishing emails from a legitimate internal account to increase credibility. |
| Phishing from Compromised Accounts | Masquerading | T1036 | Impersonating a legitimate user. |
A good recommendation I can give is to limit the amount of outbound email messages a user can send per hour or day. We can do this in Microsoft Denfender with an Outbound anti-spam policy:
In this policy, I was very strict and set the maximum limit of every user to 100 messages. You can set this higher, but be aware that an attacker can send thousands of messages within minutes. The Exchange Online default limit is 10.000 messages which can cause devastating damage if being breached. Not only financial damage, but your good name is being abused too.
The result
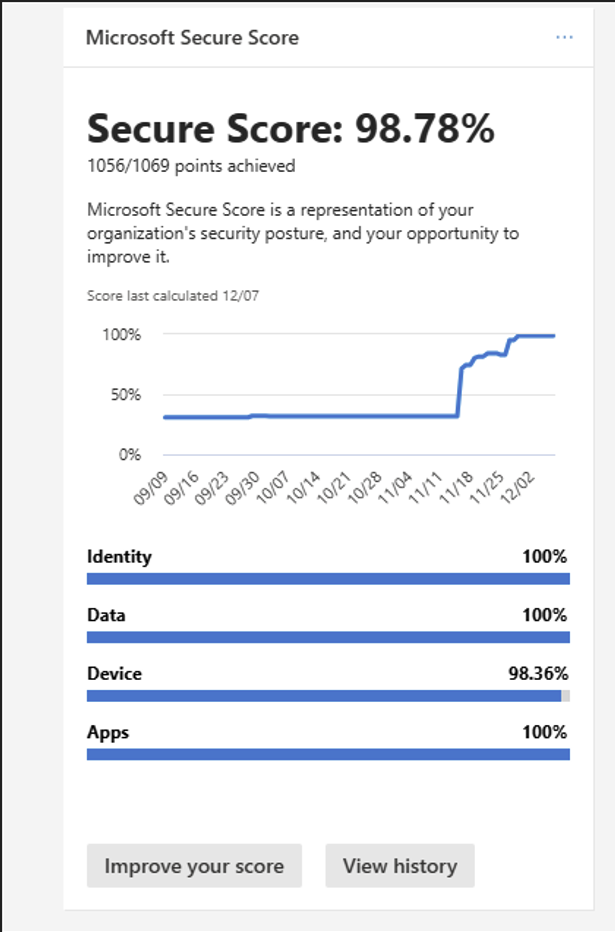
After I did all the configurations described on this page, my Identity secure score was at a whopping 98.48%.
And the result on the overview pages:

Summary
This page contains all the recommendations to enhance your Secure Score for the Identity pillar. This really helps defending your identities from several attacks and utilizing as much as 100% of the toolbox on this, somewhat fragile pillar.
Thank you for reading this post and I hope it was helpful.
Sources
These sources helped me by writing and research for this post;
End of the page 🎉
You have reached the end of the page. You can navigate through other blog posts as well, share this post on X, LinkedIn and Reddit or return to the blog posts collection page. Thank you for visiting this post.
If you think something is wrong with this post or you want to know more, you can send me a message to one of my social profiles at: https://justinverstijnen.nl/about/
If you find this page and blog very useful and you want to leave a donation, you can use the button below to buy me a beer. Hosting and maintaining a website takes a lot of time and money. Thank you in advance and cheers :)
The terms and conditions apply to this post.