Microsoft Secure Score - Identity
Categories:
On this page, I will describe how I implemented my current Microsoft Secure Score on the Identity pillar. This means altering mostly the options of Microsoft Entra ID.
Before we begin
I collected all the options of the Microsoft Entra ID Identity Secure Score on this page, and we will address them all. I also added some industry-accepted options which are not in the secure score framework but are really helpful in avoiding or minimizing attacks in your environment.
You can use all options, or only use a subset of the options. This is up to you :)
Remember, having a secure score of 100% doesn’t mean 100% security. This only means you are using 100% of the security toolbox.
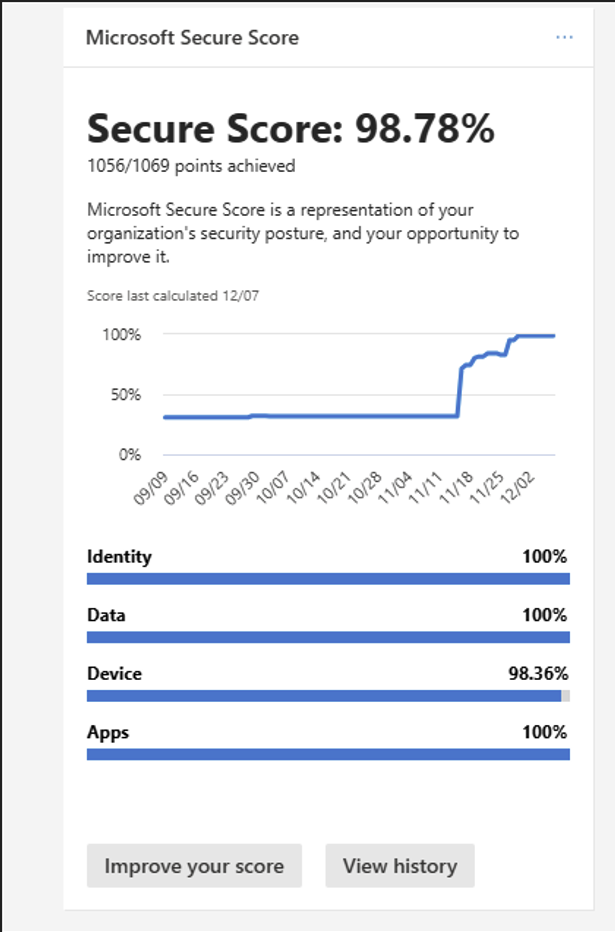
Starting this page, my Secure Score overview is this:
The Microsoft Entra ID recommendations
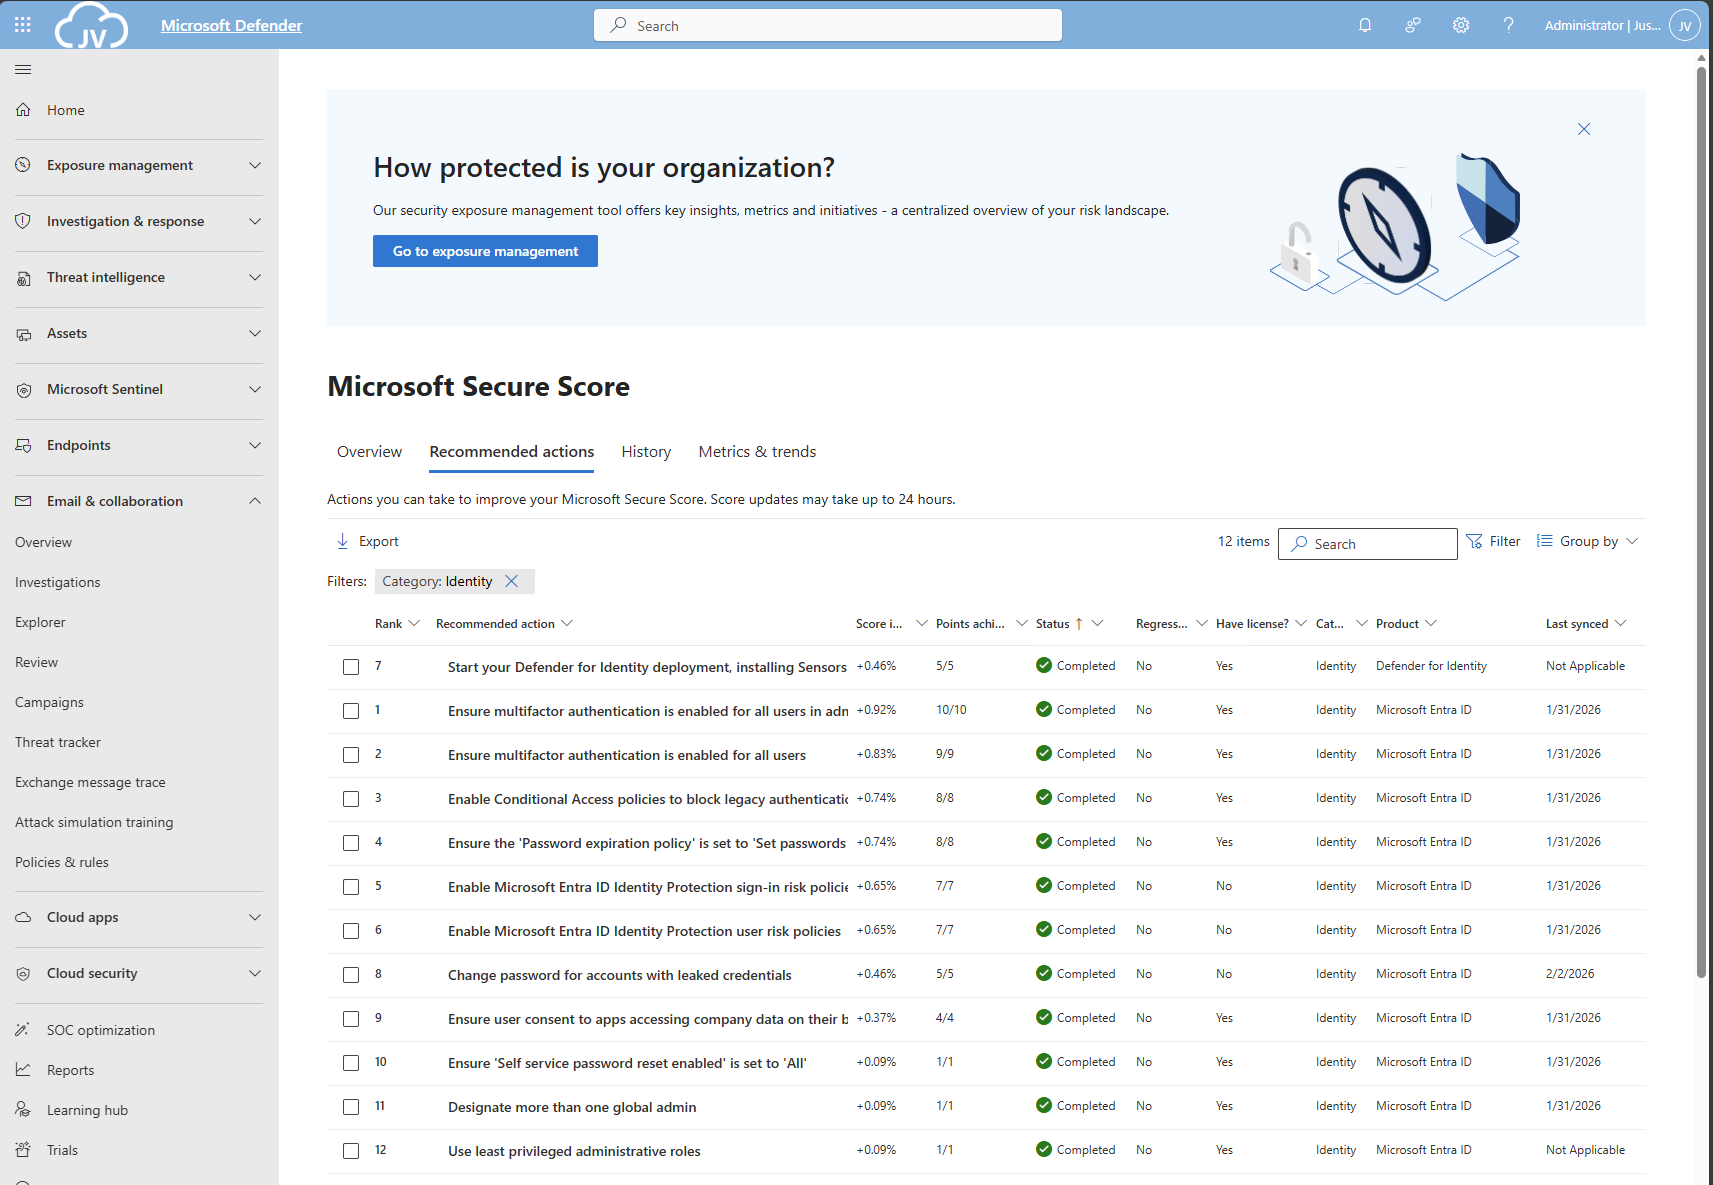
Let’s check first which requirements we have to address. Go to https://security.microsoft.com/securescore and select Microsoft Entra ID.
We then will get this list of items:
As you can see, the bottom 4 items are already done. The top 4 items must be addressed but I will explain how to address them all.
| Recommendation | Entra Information |
| 1. Enable Microsoft Entra ID Identity Protection sign-in risk policies | Ensure you block Medium and High sign-in risks with Conditional Access |
| 2. Enable Microsoft Entra ID Identity Protection user risk policies | Ensure you block High user risks with Conditional Access |
| 3. Ensure multifactor authentication is enabled for all users | Register MFA for all users and enforce it with Conditional Access. Registering is only making sure the user can use MFA. Enforcing it means we will actually use it. |
| 4. Ensure multifactor authentication is enabled for all users in administrative roles | Pretty straight forward |
| 5. Enable Conditional Access policies to block legacy authentication | Pretty straight forward |
| 6. Use least privileged administrative roles | Use less privileged roles for those who need it. Someone only managing billing options or resetting passwords doesn’t need Global Administrator access. |
| 7. Ensure ‘Self service password reset enabled’ is set to ‘All’ | Make sure everyone is able to reset their password themselves, so they can change it when needed, or enforce users to change them with Conditional Access. |
| 8. Ensure the ‘Password expiration policy’ is set to ‘Set passwords to never expire | Never expire passwords, as users will not select stronger passwords. They will mostly choose their birth month/place of birth and add a ascending number like 1, 2, 3 etc. Also those passwords will appear on post-its on their desk. |
| 9. Change password for accounts with leaked credentials | Entra ID will scan regularly with Identity Protection if users’ passwords are leaked. The users with a leaked password must change their password to be compliant with this recommendation. |
| 10. Ensure user consent to apps accessing company data on their behalf is not allowed | Disable users to have permissions to allow 3rd party apps accessing their data. |
| 11. Designate more than one global admin | Always ensure you have one or two back-up accounts. This is to avoid being locked out. Also always exclude on of the accounts from all policies with a very strong password and use this as “break-glass” account. |
1/2: Create a Risk-based Conditional Access policy
As 1 and 2 are mostly to achieve the same goal, I really like to create one policy to address them both. Go to Microsoft Entra, then to “Security” and then to “Conditional Access”. (or use this link).
First, check the list of users that might be blocked due to the results of this new policy: https://entra.microsoft.com/#view/Microsoft_AAD_IAM/SecurityMenuBlade/~/RiskyUsers/menuId/RiskyUsers/fromNav/
Then proceedd creating the policy.
In my environment, I use a very clear naming scheme for Conditional Access. I start with JV, then state if this policy allows or blocks users and then some more information. I call this new policy “JV-Block-RiskyUsersSignins”.
Create a new policy and name it to your desired naming scheme.
Then select “Users” and include all users.
After that, click on “Exclude”, select “Users and groups” and select your break-glass administrator account to have this account excluded from this policy. This ensures if you make any mistake, you have still access to the tenant with this account. Great recommendation, can save you weeks from support of Microsoft who wants to know in 5 different ways that its actually you.
For “Target Resources”, select “All resources”.
At “Conditions”, select the following options, according to Microsoft’s best practices (source)
- Users risk: High
- Sign-in risk: Medium and High
You can set this more tight, but expect false positives among users who are unable to sign in.
Then at “Grant”, set “Block access”. This ensures if users are at risk they are unable to sign in to their account and they need the skilled helpdesk to regain access to their account. It’s up to the helpdesk to confirm if the account is compromised, to collect sign-in actions, to take action and most of the time enforce a password change.
Now the policy can be created and ready to be enforced:
3/4: Enable Multi Factor Authentication for all users
Make sure you have a Conditional Access policy in place where you enforce Multi Factor Authentication for all users for this to work:
I have a policy in place that requires MFA or sign-in from a compliant device. This generally is a good approach. Make sure to exclude your break-glass administrator from the policy if making errors and/or not having a compliant device and/or having problems with your normal account.
Then proceed by logging into all of your user accounts, go to aka.ms/mfasetup and register at least 2 methods. You can enforce this using a registration policy. Users then must register for MFA otherwise they will be rejected to access any data.
5: Disable Legacy authentication for all users
Microsoft really recommends us to disable legacy authentication for all users, as they are protocols without MFA and any additional security. These are protocols like SMTP/IMAP/POP.
We can actually create one Conditional Access policy to do this. Let’s head back to Conditional Access to create a new policy.
Select “All Users” and exclude your break-glass administrator account.
Select all target resources.
Under “Conditions”, select “Client Apps” and select the options:
- Exchange ActiveSync clients
- Other clients
Then under “Grant”, select “Block access” to block any legacy authentication protocols from being used.
6: Use least privileged administrative roles
Make sure you use lower-privileged administrative roles for your users. This is not particularly a setting but more a process and teamwork to achieve.
Microsoft Entra ID has some lower-privileged roles which we must utilize. I will give some good examples of practice use of lower privileged roles, to minimize the Global Administrator role.
| Requirement | Correct role |
| User must be able to export users for billing purposes | User Administrator |
| User must be able to change licenses and add new products | Billing Administrator |
| User must be able to invite guest users | Guest Inviter |
| User must be able to manage applications and give consent | Cloud Application Administrator |
For a comprehensive list of Entra ID roles, check out this Microsoft page: https://learn.microsoft.com/en-us/entra/identity/role-based-access-control/permissions-reference
7: Ensure Self Service Password Reset (SSPR) is enabled and to all users
Microsoft recommends us that users have the Self Service Password Reset (SSPR) option enabled for all users. You can find this in Microsoft Entra -> Password reset (or use this link: https://entra.microsoft.com/#view/Microsoft_AAD_IAM/PasswordResetMenuBlade/~/Properties/fromNav/
Set this switch to “All” to enable this for all users. After a users logging in after this change, they will have to register for this new feature. Make sure you also set the methods needed to reset a password is “2” to enhance security.
8: Never expire passwords
A good recommendation is to let passwords of users never expire. This was a best practice in IT for around 15 years, but multiple researches pointed out that they will not work. Users will use a weak base password and will only add ascending numbers to that.
To disable this option (which is already disabled by default), go to Microsoft 365 Admin Center.
Then go to “Settings”, “Org settings”, then the tab “Security & privacy” and then search for “Password expiration policy”. Then check the box to disable this option.
9: Change password for accounts with leaked credentials
Microsoft Entra ID Protection will automatically scan for users with leaked credentials. If any user have leaked credentials, the user risk will be “High” and will be blocked by the policy we created in step 1. Changing the password of the user will be enough to give them access again.
You can check pro-actively in this dashboard for risky users or sign ins:
10: Ensure user consent to apps is not allowed
It is generally a good approach to disable users to give 3rd parties access to their profile and organization data. https://entra.microsoft.com/#view/Microsoft_AAD_IAM/ConsentPoliciesMenuBlade/~/UserSettings
- Do not allow user consent (recommended): This makes sure a user cannot give any 3rd party access and is the most restrictive option and also my recommendation.
- Allow user consent for apps from verified publishers, for selected permissions: Really broad setting and not something you want any user to do. Unfortunately, this is the default setting.
- Let Microsoft manage your consent settings: This option means Microsoft can dynamically change this option to new guidelines.
Setting this to “Do not allow user consent” will give your users a prompt where they can request access. Let’s configure that to make sure we have this flow correctly.
Go to “Admin consent settings” and configure the following options:
Select “Yes” to the “Users can request…” option and select users, groups or roles who are able to allow the consent. Then save the new configuration.
Now if users get any request from 3rd party applications, they can do a request to their admins to allow the application:
The request will then popup into this window: https://portal.azure.com/#view/Microsoft_AAD_IAM/StartboardApplicationsMenuBlade/~/AccessRequests/menuId~/null
11: Designate more than one global admin
It’s always recommended to have a break-glass administrator account. Secure this break-glass account in multiple ways, like:
- Have at least 2 accounts
- Have the accounts cloud only -> not synced from Active Directory
- Use the .onmicrosoft.com domain and no license
- Exclude from all Conditional Access policies
- Do not use licenses on Administrator accounts
- Passwords must be at least 64 and max 256 characters
- Avoid “break glass admin” or any tip to a high privileged account
- Register FIDO2 key for the account
- Setup Monitoring for login alerts
- Test the accounts twice per year
Give this administrator account Global Administrator account and only use it as last-resort from accessing your tenant.
Tip 1: Disable manual login of shared mailboxes
Something that is in no Secure Score check, but very important is to block manual sign in of your Shared Mailbox accounts. As we only want to delegate access to those using Manage/SendAs/Send on behalf permissions, we don’t need to expose those accounts.
Open up the Microsoft 365 Admin Center, search for the shared Mailbox and click on “Block Sign-in”.
Tip 2: Disable these user settings
Something that is also in no Secure Score check, is to disable some user settings. By default, simple users have some really high permissions to do certain actions.
In Microsoft Entra Admin Center, go to “Users” and the “User Settings”.
Set the following options:
- User can register applications: No
- Restrict non-admin users from creating tenants: Yes
- Users can create security groups: No
- Guest user restrictions: Most restrictive
- Restrict Access to Microsoft Entra Admin center: Yes
- Show keep user signed in: No
This must look like this for the highest level of security:
Tip 3: Restrict amount of outbound email messages
On this page we did everything to defend ourselves from certain identity attacks. However, being 100% secure is a fairy tale and attackers mostly will break into accounts to send phishing emails, as this must look very legit to other users.
This type of attack is described as such by the MITRE ATTACK framework:
| Category | Technique Name | Technique ID | Notes |
|---|---|---|---|
| Identity Attacks | Credential Harvesting | T1589 / T1557 / T1552 | Used to collect or intercept credentials. |
| Identity Attacks | Valid Accounts | T1078 | Using a compromised legitimate account. |
| Phishing from Compromised Accounts | Internal Spearphishing | T1534 | Sending phishing emails from a legitimate internal account to increase credibility. |
| Phishing from Compromised Accounts | Masquerading | T1036 | Impersonating a legitimate user. |
A good recommendation I can give is to limit the amount of outbound email messages a user can send per hour or day. We can do this in Microsoft Denfender with an Outbound anti-spam policy:
In this policy, I was very strict and set the maximum limit of every user to 100 messages. You can set this higher, but be aware that an attacker can send thousands of messages within minutes. The Exchange Online default limit is 10.000 messages which can cause devastating damage if being breached. Not only financial damage, but your good name is being abused too.
The result
After I did all the configurations described on this page, my Identity secure score was at a whopping 98.48%.
And the result on the overview pages:

Summary
This page contains all the recommendations to enhance your Secure Score for the Identity pillar. This really helps defending your identities from several attacks and utilizing as much as 100% of the toolbox on this, somewhat fragile pillar.
Thank you for reading this post and I hope it was helpful.
Sources
These sources helped me by writing and research for this post;
End of the page 🎉
You have reached the end of the page. You can navigate through other blog posts as well, share this post on X, LinkedIn and Reddit or return to the blog posts collection page. Thank you for visiting this post.
If you think something is wrong with this post or you want to know more, you can send me a message to one of my social profiles at: https://justinverstijnen.nl/about/
If you find this page and blog very useful and you want to leave a donation, you can use the button below to buy me a beer. Hosting and maintaining a website takes a lot of time and money. Thank you in advance and cheers :)

The terms and conditions apply to this post.